MariaDB Cookbook (2014)
Chapter 3. Optimizing and Tuning MariaDB
In this chapter, we will cover the following recipes:
· Using SHOW STATUS to check whether a feature is being used
· Controlling MariaDB optimizer strategies
· Using extended Keys with InnoDB and XtraDB
· Configuring the Aria two-step deadlock detection
· Configuring the MyISAM segmented key cache
· Configuring threadpool
· Configuring the Aria pagecache
· Optimizing queries with the subquery cache
· Optimizing semijoin subqueries
· Creating an index
· Creating a full-text index
· Removing an index
· Using JOINs
· Using microseconds in DATETIME columns
· Updating the DATETIME and TIMESTAMP columns automatically
Introduction
This chapter contains recipes for configuring and using various optimization and tuning-related features of MariaDB. This chapter is not meant as a complete or even a partial MariaDB optimization and tuning guide; it only contains recipes related to the topic.
Using SHOW STATUS to check if a feature is being used
The SHOW STATUS command shows information about the server. This includes things such as the number of bytes of data received and sent by the server, the number of connections served, the number of rows read, and so on. The command can also be used to check whether a feature has been enabled or is being used.
How to do it...
1. Launch the mysql command-line client and connect to our MariaDB database server.
2. Uninstall the Cassandra storage engine with:
3. UNINSTALL SONAME 'ha_cassandra.so';
4. MariaDB will either respond with a Query OK message (if the Cassandra storage engine was installed and has now been uninstalled) or it will give the SONAME ha_cassandra.so does not exist error (if the Cassandra storage engine was not installed). Either of the messages is ok.
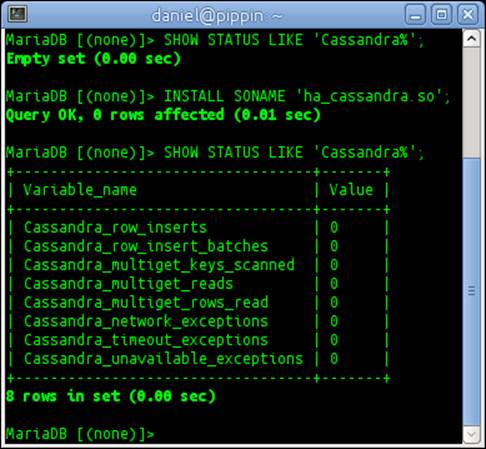
5. Issue the following SHOW STATUS command to see if the Cassandra storage engine is installed. The result will be an Empty set, which means that it is not installed:
6. SHOW STATUS LIKE 'Cassandra%';
7. Install the Cassandra storage engine with the following command, and the result will be Query OK:
8. INSTALL SONAME 'ha_cassandra.so';
9. Issue the SHOW STATUS command from step 3 again. This time, an output similar to the following screenshot will be displayed:
How it works...
The SHOW STATUS output gives us two different sets of information in this recipe. Firstly, the actual presence of the Cassandra% variables tells us that the Cassandra storage engine is installed. Secondly, it shows us some useful information about our usage of the Cassandra storage engine since it was installed (or the server was last restarted) and if there have been any exceptions. Since we just installed the plugin, all the values will likely be zeroes unless we have an active application that used the plugin between the time when we ran the INSTALL and SHOW STATUS commands.
There's more...
In the recipe, we modified the full SHOW STATUS output to restrict it just to the information on the Cassandra storage engine by adding LIKE 'Cassandra%' to the end of the command. We could also just add the following line of command to get the complete output:
SHOW STATUS;
There is a lot of output, so it is often better to use LIKE and some text with the wildcard character (%) to shorten the output to just what we want to know.
Many plugins and storage engines in MariaDB provide the STATUS variables that are useful when we want to know how the engine or plugin is operating. However, not all do; the preferred method to check whether a given plugin or storage engine is installed is to use the SHOW PLUGINS; command.
See also
· The full documentation of the SHOW STATUS command is available at https://mariadb.com/kb/en/show-status/
· The full documentation of the SHOW PLUGINS command is available at https://mariadb.com/kb/en/show-plugins/
Controlling MariaDB optimizer strategies
Starting with MariaDB 5.3 and continuing with all major releases since, various optimizations have been introduced that improve the core performance of MariaDB. To keep upgrades as compatible and as trouble-free as possible or because it is only useful in certain limited instances, many of these optimizations are turned off by default. This recipe is about enabling optimizations which are turned off by default.
In this recipe, we will enable the Multi-Range Read optimizations, but the basic concepts apply to control any of the optimizer_switch flags.
How to do it...
1. Launch the mysql command-line client application and connect to our MariaDB server as the root user or as a user with the SUPER privilege.
2. Show the current status of all optimizer_switch flags with the following command:
3. SELECT @@optimizer_switch\G
4. The output of the previous command will be similar to the following screenshot. There may be some differences depending on our local server settings.
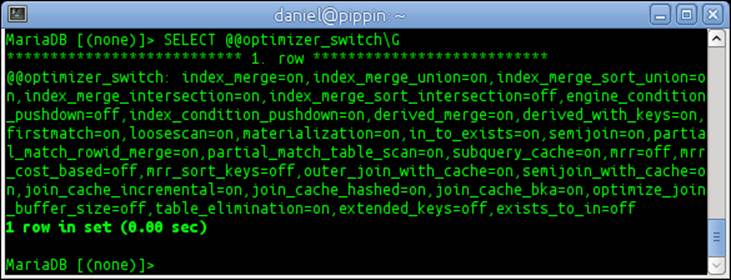
5. In the output, the mrr, mrr_cost_based, and mrr_sort_keys flags are all set to off. Enable them with the following command:
6. SET optimizer_switch="mrr=on";
7. SET optimizer_switch="mrr_cost_based=on";
8. SET optimizer_switch="mrr_sort_keys=on";
9. Run the SELECT command from step 2 and confirm that the three mrr flags are now set to on.
How it works...
The optimizer_switch variable is basically a list of flags, which shows the status of the various available optimization strategies. When we use the SET command, we can turn various individual flags off and on. Any flags that we do not name in the SET command remain as they are.
There's more...
By default, the SET command only sets the variables for our current session. If we quit the client or we are disconnected for some reason and then we reconnect, the flags will be set to what they were before the changes were made.
To make our changes until MariaDB is shut down or restarted, add GLOBAL to the command as follows:
SET GLOBAL optimizer_switch="mrr=on";
If we want to make the change permanent, so that an optimization is either on or off permanently, we need to add it to our my.cnf or my.ini file. For example, to turn on all the mrr optimizations, add the following lines of code to the end of the file (or to an existing[mysqld] section):
[mysqld]
optimizer_switch = "mrr=on, mrr_cost_based=on,mrr_sort_keys=on"
Restart MariaDB to activate the changes.
See also
· The full documentation of the optimizer_switch is found at https://mariadb.com/kb/en/optimizer-switch/ and https://mariadb.com/kb/en/server-system-variables/#optimizer_switch
· The documentation of the Multi-Range Read optimizations is available at https://mariadb.com/kb/en/multi-range-read-optimization/
Using extended keys with InnoDB and XtraDB
When creating an execution plan for a query, the MariaDB optimizer makes a cost-based decision about whether or not to use one or more indexes instead of reading through a table row-by-row. Indexes are often, but not always the faster choice. The extended key's optimization improves the index lookups for InnoDB and XtraDB tables.
How to do it...
1. Launch the mysql command-line client application and connect it to our MariaDB server as the root user or as a user with the SUPER privilege.
2. Enable the extended keys optimization with the following command:
3. SET GLOBAL optimizer_switch='extended_keys=on';
4. Add the following code to our my.cnf or my.ini file (or to an existing [mysqld] section):
[mysqld]
5. optimizer_switch = 'extended_keys=on' verifies that extended_keys is set to on with the following command:
6. SHOW VARIABLES LIKE 'optimizer_switch'\G
How it works...
In this recipe, we turn on the extended_keys optimization globally for the running server and we then make the change permanent by adding it to our my.cnf config file. In this way, we turn the feature on, and then ensure that it stays on, without having to restart MariaDB.
There's more...
Many InnoDB or XtraDB tables have more than one key, for example, a primary key on the id column and a secondary key on the username column. Using the extended_keys optimization, MariaDB is able to create execution plans for some queries, which only touchthe indexes of those keys. It does this by looking at the keys, and if all of the information that we are looking for is present, MariaDB uses that information instead of looking through tables row by row.
See also
· The full documentation of the extended keys optimization is available at https://mariadb.com/kb/en/extended-keys/
· A blog post about the development of this feature is available at http://igors-notes.blogspot.com/2011/12/3-way-join-that-touches-only-indexes.html
Configuring the Aria two-step deadlock detection
A deadlock is when there are two competing actions and both are waiting for the other to finish and so neither of them ever finish. The Aria storage engine is able to automatically detect and deal with deadlocks. To make effective use of this feature, we should configure it with the settings that work well for our needs.
How to do it...
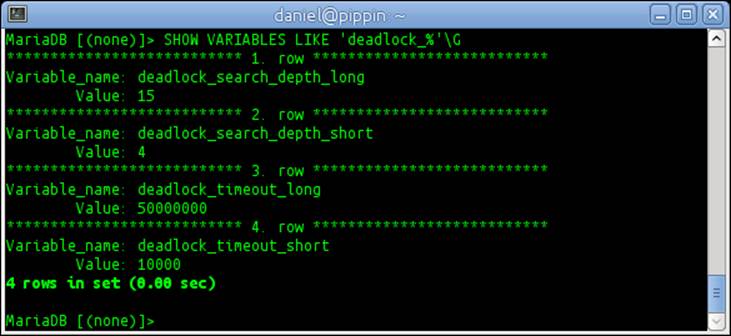
1. Run the following command to show the current settings for Aria's two-step deadlock detection:
2. SHOW VARIABLES LIKE 'deadlock_%'\G
3. If our settings are set to the default values, the output of the previous command will be as shown in the following screenshot:
4. Change the variables to our desired values, as follows:
5. SET GLOBAL deadlock_search_depth_short = 3;
6. SET GLOBAL deadlock_search_depth_long = 10;
7. SET GLOBAL deadlock_timeout_long = 10000000;
8. SET GLOBAL deadlock_timeout_short = 5000;
9. Make the changes permanent by adding the following lines of code to the bottom of our my.cnf or my.ini file (or to an existing [mysqld] section):
10.[mysqld]
11.deadlock_search_depth_short = 3
12.deadlock_search_depth_long = 10
13.deadlock_timeout_long = 10000000
deadlock_timeout_short = 5000
How it works...
If the Aria storage engine attempts to create a lock and is unable to do so, the possibility of having a deadlock exists. We only want to kill actual deadlocks and not a situation that will resolve itself in an amount of time for which we are comfortable waiting.
To detect deadlocks, whenever Aria cannot create a lock on a table, it first creates a wait-for graph of the possible deadlock with a search depth equal to deadlock_search_depth_short. If, after the search, the lock on the table still exists and Aria cannot determine if it is a deadlock, it will wait for the number of microseconds defined by the value of deadlock_timeout_short and then try again. If it is still unsuccessful, Aria will create a wait-for graph with a search depth equal to the value of deadlock_search_depth_long, and if a deadlock has still not been identified, Aria will wait for the number of microseconds defined by the value of deadlock_timeout_long and then time out with an error.
If a deadlock is detected at any point during the previous steps, Aria will determine the thread responsible for it and kill it, thereby releasing the deadlock and allowing a lock to be made and released as normal.
There's more...
It's important to remember that the deadlock_timeout_short and deadlock_timeout_long variables are defined in microseconds, not milliseconds or seconds. So a value of 10000000 is equal to ten seconds and a value of 5000 is equal to five-thousandths of a second.
For many users, the default timeout values of 50000000 (50 seconds) for the long timeout and 10000 (one-hundredth of a second) for the short timeout are perfectly adequate. The same is also true for the default values of the search depth variables. That said, it might be useful to experiment with different values if we're experiencing a lot of timeouts.
See also
· The full documentation of Aria two-step deadlock detection is available at https://mariadb.com/kb/en/aria-two-step-deadlock-detection/
· The syntax documentation of the various deadlock options is available at https://mariadb.com/kb/en/aria-server-system-variables/
· For more information on wait-for graphs and deadlocks, refer to http://en.wikipedia.org/wiki/Wait-for_graph and http://en.wikipedia.org/wiki/Deadlock
Configuring the MyISAM segmented key cache
We can dramatically improve the performance of our MyISAM tables by splitting the key cache into multiple segments. This is useful if we have high concurrency in our database usage (meaning there are lots of threads trying to access the key cache).
How to do it...
1. Launch the mysql command-line client application and connect to our MariaDB server as the root user or as a user with the SUPER privilege.
2. View the current number of segments with the following command:
3. SHOW VARIABLES LIKE 'key_cache_segments'\G
4. Set the number of segments to 64 with the following command:
5. SET GLOBAL key_cache_segments = 64;
6. Make the setting permanent by adding the following lines of code to the end of our my.cnf or my.ini file (or to an existing [mysqld] section):
7. [mysqld]
key_cache_segments = 64
How it works...
Whenever a MyISAM thread accesses the key cache, it needs to first acquire a lock. Lots of threads trying to get a lock on a single, monolithic key cache is a big choke point for large, busy MyISAM tables. Splitting the key cache into multiple segments reduces lock contention as a given thread only needs to lock the specific segment of the key cache that it needs, and not the entire key cache.
The key_cache_segments variable controls both the number of segments and checks whether or not the feature is turned on. A value of 0 (zero) turns off the feature and values of 1 or more turn on the feature and set the number of segments to use. To prevent upgrade issues with the old versions of MariaDB that don't have this feature, it is turned off by default.
There's more...
There are a few things we need to be aware of when configuring the segmented key cache.
Setting the number of segments to 1
It is possible to set the number of key cache segments to 1, which we might assume would be equal to turning the feature off, but it is not. Setting the number of segments to 1 tells MariaDB to activate and use the segmented key cache code, but with only one segment, which is actually more inefficient than the old, non-segmented code that is used when the number of segments is set to 0. So, while it is possible to set the key_cache_segments variable to 1, we never want to do so in practice.
Determining the optimal number of segments
The only way to determine the optimal number of segments is through testing and benchmarking with the key_cache_segments variable set to various values. Benchmarks run by the MariaDB developers suggest that 64 is a good number of segments to use, but this may not be true for our specific workload.
Other key cache variables
The other variables related to MyISAM key caches are key_buffer_size, key_cache_age_threshold, key_cache_block_size, and key_cache_division_limit that have all been updated to work equally well with both segmented and non-segmented key caches. There is no need to change or alter them when turning on or adjusting the segmented key cache.
See also
· The full documentation of the MyISAM segmented key cache is available at https://mariadb.com/kb/en/segmented-key-cache/
· The results from some segmented key cache benchmarks are available at https://mariadb.com/kb/en/segmented-key-cache-performance/
Configuring threadpool
Pool-of-threads, or threadpool, is a MariaDB feature that improves performance by pooling active threads together instead of the old one thread per client connection method, which does not scale well for typical web-based workloads with many short-running queries.
How to do it...
1. To enable threadpool on Linux, add the following line of code to our my.cnf file (or to an existing [mysqld] section) and then restart MariaDB:
2. [mysqld]
thread_handling = pool-of-threads
3. To enable threadpool on Windows, we don't have to do anything as it is set by default and uses the native Windows thread pooling.
4. To disable threadpool on Windows, add the following to our main my.ini file and then restart MariaDB:
5. [mysqld]
6. thread_handling = one-thread-per-connection
7. To disable threadpool on Linux, either change the thread_handling line to one-thread-per-connection, as on Windows, or remove the thread_handling line from our system's my.cnf file, and then restart MariaDB.
How it works...
When threadpool is enabled, MariaDB pools the threads together and automatically grows and shrinks the size of the pool as required. It also makes the best use of the underlying operating system's low-level thread pooling functionality. Threadpool is ideal if our workload includes many relatively short queries and the load is CPU-bound, as in Online Transaction Processing (OLTP) and other common website-style workloads. Threadpool is not ideal if our workload has long periods of quiet punctuated by short periods of high traffic. This can be mitigated somewhat through the use of the thread_pool_min_threads variable on Windows and the thread_pool_idle_timeout variable on Linux.
We may also run into issues with threadpool if we need our queries to always finish quickly no matter what because with threadpool, even short queries may be queued for later execution. Issues may also arise if we have many long, unyielding, and concurrent queries, such as in a data warehouse and we bump up against the limits defined by the thread_pool_stall_limit and thread_pool_max_threads variables.
There's more...
The goal for MariaDB's threadpool implementation is for it to have a good performance out of the box, with no need to tweak the settings in most cases. However, there are several settings that can be tweaked to get even better performance in some cases and with certain workloads. There are also some differences between the threadpool on Windows and Linux because of the functionality in which the underlying operating system's thread pooling works.
The thread_pool_stall_limit, thread_pool_max_threads, and extra_port variables
We can potentially run into an issue if our workload includes many long-running queries. The thread_pool_stall_limit variable defines, in milliseconds, how long until a running thread is considered to be stalled. The default is 500. If there is a stalled query, MariaDB will create a new running thread, up to the value of the thread_pool_max_threads variable. The default value for this variable is also 500.
If the maximum number of threads reach the thread_pool_max_threads limit, no new threads will be created, even if the threads are stalled. This could prevent an administrator from connecting to the server to resolve an issue with many stuck threads.
One solution to this is to set the extra_port variable. When this variable is defined, an additional port is opened and can be used by an administrator to connect to the server in situations where connecting using the default port is impossible. The extra_port variable must be set to a value different from the port variable.
The thread_pool_idle_timeout variable
The thread_pool_idle_timeout variable defines how long, in seconds, a thread should wait before it is retired. The default value is 60. If we find that we're regularly creating new threads soon after others have been retired, it might be a good idea to increase this variable.
Pool-of-threads differences on Windows and Linux
Pool-of-threads tries to be as efficient as possibly it can be. One way it does this is by using the native thread pooling of the underlying operating system. This leads to a couple of differences between the Linux and Windows versions.
MariaDB on Windows has a variable, threadpool_min_threads, which allows us to specify the minimum number of threadpool threads that should be always kept alive. The default value is one. Windows will retire unused threads down to the minimum number and if our database has a sudden burst of traffic, which requires several new pools to be created, it could take a few seconds for MariaDB to create them. If we expect such bursty traffic, we can specify a number of threads to always be kept alive. This variable is not available on Linux.
Linux versions of MariaDB have their own variable, thread_pool_size, which is not available on Windows. This variable controls the number of thread groups. By default, this is the number of processors on our server. Clients connecting to Linux-based systems are grouped together into a thread group. There is a reason to lower the default value if, for example, we are using the taskset utility to run MariaDB on a set of dedicated processors. There may also be causes to increase this value if, for example, our CPU-bound workload is not fully utilizing our CPUs.
See also
· The full documentation of pool-of-threads is found at https://mariadb.com/kb/en/thread-pool/
· The comparison of threadpool versus thread-per-connection performance can be found at http://blog.mariadb.org/mariadb-5-5-thread-pool-performance/
· Additional pool-of-threads benchmarks can be found at https://mariadb.com/kb/en/threadpool-benchmarks/
Configuring the Aria pagecache
One difference between the Aria and MyISAM storage engines is Aria's PAGE row format. This is the default row format for Aria tables and must be used to take advantage of the crash-safe features of this storage engine.
A primary advantage of this row format is that rows are efficiently cached, which gives better performance. They also do not fragment as easily as the alternative DYNAMIC row format, and updates to them are quicker. The Aria pagecache is controlled by three variables.
How to do it...
1. Launch the mysql command-line client application and connect to our MariaDB server as the root user or as a user with the SUPER privilege.
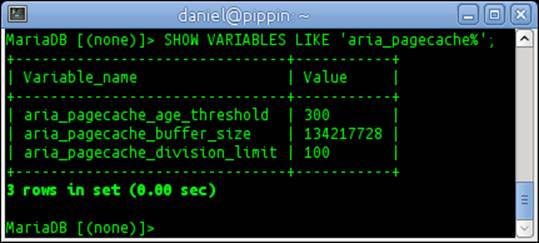
2. View the current Aria pagecache settings with the following command:
3. SHOW VARIABLES LIKE 'aria_pagecache%';
4. The output will look like the following screenshot:
5. Add the following lines of code to the end of our system's my.cnf or my.ini file (or to an existing [mysqld] section in the file), and then restart MariaDB:
6. [mysqld]
7. aria_pagecache_buffer_size = 536870912
8. aria_pagecache_age_threshold = 400
aria_pagecache_division_limit = 90
9. Check on the status of the Aria pagecache with the following command:
10.SHOW STATUS LIKE '%aria_pagecache%';
How it works...
The aria_pagecache_buffer_size variable should be set as large as we can afford. It is specified in bytes. In our recipe, we increased it from the default value of 128 MB to 512 MB. This variable may not be altered dynamically. It must be set in the server configuration file. Determining how much we can afford is tricky and will vary wildly from server to server. In general, if we make extensive use of Aria tables in our databases and we have RAM that is just sitting idle, we should increase aria_pagecache_buffer_size to use some of it.
The aria_pagecache_age_threshold variable controls how long a block in the pagecache will remain there without being accessed. The value is a ratio of the number of times the pagecache is accessed to the number of blocks in the pagecache. In our recipe, we increased this value from the default 300 to 400, which has the effect of keeping pagecache blocks last longer. This variable can also be altered dynamically using the mysql command-line client, for example, with the following command:
SET GLOBAL aria_pagecache_age_threshold = 400;
The aria_pagecache_division_limit variable specifies the minimum percentage of the pagecache that must be warm. In our recipe, we changed it from 100 percent to 90 percent. This variable can also be altered dynamically by using the mysql command-line client, with the following command:
SET GLOBAL aria_pagecache_division_limit = 90;
There's more...
It's worth experimenting with these variables to see how they affect performance on our server's workload. In the case of the aria_pagecache_buffer_size variable, larger value is almost always better, unless we specify a value too high for our available RAM.
See also
· The full documentation of the Aria storage engine is available at https://mariadb.com/kb/en/aria/
· Some Aria benchmark results are available at https://mariadb.com/kb/en/benchmarking-aria/
· More information on Aria's three storage formats (FIXED, DYNAMIC, and PAGE) is available at https://mariadb.com/kb/en/aria-storage-formats/
Optimizing queries with the subquery cache
The subquery cache is one of the several methods utilized by MariaDB to improve the performance of statements with subqueries. This is a feature unique to MariaDB and makes subqueries in MariaDB much faster than competing databases.
Getting ready
Import the ISFDB database as described in the Importing the data exported by mysqldump recipe in Chapter 2, Diving Deep into MariaDB.
How to do it...
1. Restart MariaDB to clear the subquery cache.
2. Launch the mysql command-line client application and connect to the isfdb database on our MariaDB server.
3. Run the following command to show our usage of the subquery cache:
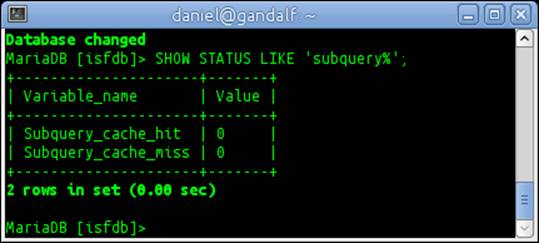
4. SHOW STATUS LIKE 'subquery%';
5. Because we just restarted MariaDB and cleared the subquery cache, the output will look like the following screenshot:
6. Run the following query:
7. SELECT titles.title_id AS ID,
8. titles.title_title AS Title,
9. authors.author_legalname AS Name,
10. (SELECT COUNT(DISTINCT title_relationships.review_id)
11. FROM title_relationships
12. WHERE title_relationships.title_id = titles.title_id)
13. AS reviews
14.FROM titles INNER JOIN authors INNER JOIN canonical_author
15.ON
16. (SELECT COUNT(DISTINCT title_relationships.review_id)
17. FROM title_relationships
18. WHERE title_relationships.title_id = titles.title_id)
19. >= 12
20. AND canonical_author.author_id = authors.author_id
21. AND canonical_author.title_id=titles.title_id
22. AND titles.title_parent=0;
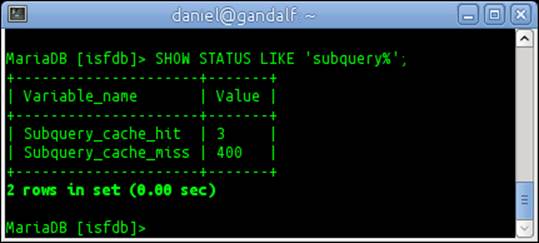
23. Run the SHOW STATUS command from step 2 again. This time the output will look similar to the following screenshot:
How it works...
The subquery cache is enabled by default in MariaDB. So there's nothing we have to do to start using it other than to run some queries with subqueries in them, which is what this recipe does. The two subquery-related STATUS variables show us how many times a subquery was able to make use of the cache (subquery_cache_hit) and how many times a subquery was not able to make use of the cache (subquery_cache_miss).
There's more...
To check if a query will be able to make use of the subquery cache before we actually run it, we can preface our query with EXPLAIN EXTENDED. The explanation will be accompanied by at least one warning. We will then run SHOW WARNINGS and the warning note containing our query will have the <expr_cache> text in it, if the subquery cache is used.
See also
· The full documentation of the subquery cache is available at https://mariadb.com/kb/en/subquery-cache/
· Some benchmarks demonstrating the benefit of the subquery cache are available at http://mysqlmaniac.com/2012/what-about-the-subqueries/
Optimizing semijoin subqueries
MariaDB includes several optimizations specifically targeted at semijoin subqueries. Semijoin subqueries are primarily the ones in which the subquery is an IN subquery located in the WHERE clause of our SQL statement. An example will be something like the following from the popular DBT3 benchmarking dataset:
SELECT * FROM part
WHERE p_partkey IN
(SELECT l_partkey FROM lineitem
WHERE l_shipdate between '1997-01-01' and '1997-02-01')
ORDER BY p_retailprice DESC LIMIT 10;
How to do it...
1. Launch the mysql command-line client application and connect to our MariaDB server as the root user or as a user with the SUPER privilege.
2. Run the following command to enable the exists_to_in optimization:
3. SET GLOBAL optimizer_switch='exists_to_in=on';
4. Make the change permanent by adding the following lines of code to the end of our my.cnf or my.ini file (or by adding it to an existing [mysqld] section):
5. [mysqld]
optimizer_switch = 'exists_to_in=on';
How it works...
MariaDB has several subquery optimization strategies. Most of these are enabled by default. MariaDB evaluates the enabled strategies and chooses the best one for the subquery we are running. There is one that is not enabled by default, and that is theexists_to_in strategy; in this recipe, we will enable it.
In older versions of MariaDB, the main optimization for the IN subqueries was to turn them into an EXISTS subquery. This optimization, in_to_exists, is still present in MariaDB and is used where and when it is the best available choice; however, other better optimizations are now available for most IN subqueries.
In fact, MariaDB is so good at optimizing the IN subqueries that it made sense to create an optimization that was the reverse of the in_to_exists optimization. Naturally, it is called exists_to_in. This optimization does exactly what the name implies. It turns an EXISTSsubquery into an IN subquery. MariaDB then takes the new query and uses its powerful set of optimizations to execute it in the optimal way.
There's more...
We can temporarily turn off MariaDB's subquery optimizations (only really recommended for benchmarking or other testing purposes) by running the following command:
SET optimizer_switch='semijoin=off';
To make the change permanent (again, this is not recommended), we can add the following code to the end of our my.cnf or my.ini file (or add it to an existing [mysqld] section):
[mysqld]
optimizer_switch = 'semijoin=off'
See also
· The Subquery Optimizations section of the MariaDB Knowledgebase contains several articles on the various optimizations available in MariaDB to improve the performance of subqueries. These articles can be found at https://mariadb.com/kb/en/subquery-optimizations/
· The full documentation of semijoin subquery optimizations in MariaDB is available at https://mariadb.com/kb/en/semi-join-subquery-optimizations/
· The full documentation of the exists_to_in subquery optimization strategy is found at https://mariadb.com/kb/en/exists-to-in-optimization/
Creating an index
An index helps MariaDB (or any database, really) to quickly locate often looked-for data that it will otherwise have to search for by reading through our tables row by row. Creating indexes of often-queried columns in large tables is a basic, but very useful optimization.
Getting ready
Import the ISFDB database as described in the Importing the data exported by mysqldump recipe in Chapter 2, Diving Deep into MariaDB.
How to do it...
1. Launch the mysql command-line client application and connect to the isfdb database on our MariaDB server.
2. Create an index on the email_address column of the emails table:
3. CREATE INDEX email ON emails(email_address(50));
4. Show the indexes on the emails table with the following command:
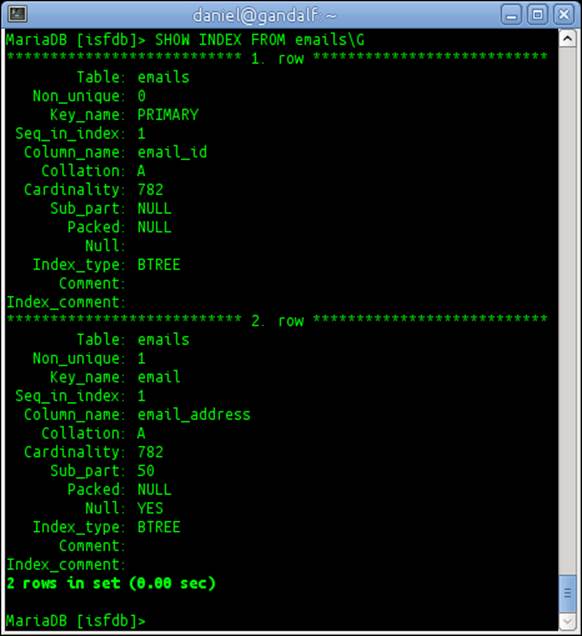
5. SHOW INDEX FROM emails\G
6. The output will look similar to the following screenshot:
How it works...
The emails table already has an index, the primary key. This is the most common type of index, but if we rarely search in a large table for a record matching a primary key, it does not do us much good. It is better to create indexes for the columns we are actually searching on.
An index on the email_address table contains a presorted list of the e-mail addresses, which makes looking them up much faster.
There's more...
If we are dealing with columns that are guaranteed to be unique, such as a primary key, we can create a unique index with the following command:
CREATE UNIQUE INDEX index_name ON table_name(column_name (length));
However, we can't do this for actual primary key columns; just columns that are unique. To create a primary key index, we must use an ALTER TABLE command. As an example, we'll create a new table that just contains author names copied from the authors table, and then add a primary key to it using the following commands:
CREATE TABLE authors2 (author mediumtext);
INSERT authors2 SELECT author_canonical FROM authors;
ALTER TABLE authors2 ADD author_id int NOT NULL PRIMARY KEY auto_increment FIRST;
The ALTER TABLE statement takes care of creating the missing primary key IDs. We can view a subsection of them with the following command:
SELECT * FROM authors2 WHERE author LIKE "%Bartholomew";
See also
· More information on indexes is available at https://mariadb.com/kb/en/optimization-and-indexes/
· The full documentation of the CREATE INDEX command is available at https://mariadb.com/kb/en/create-index/
· The full documentation of the SHOW INDEX command is available at https://mariadb.com/kb/en/show-index/
Creating a full-text index
A full-text index is a special type of index optimized to search through the text-based columns. They can only be created for columns of the type CHAR, VARCHAR, and TEXT.
Getting ready
Import the ISFDB database as described in the Importing the data exported by mysqldump recipe from Chapter 2, Diving Deep into MariaDB.
How to do it...
1. Launch the mysql command-line client application and connect to the isfdb database on our MariaDB server.
2. Create a FULLTEXT index on the note_note column of the notes table using the following command:
3. CREATE FULLTEXT INDEX note ON notes(note_note);
4. When MariaDB has finished creating the index, we will get an output similar to the following:
5. Query OK, 246719 rows affected (11.08 sec)
6. Records: 246719 Duplicates: 0 Warnings: 0
7. Show the indexes on the notes table with the following command:
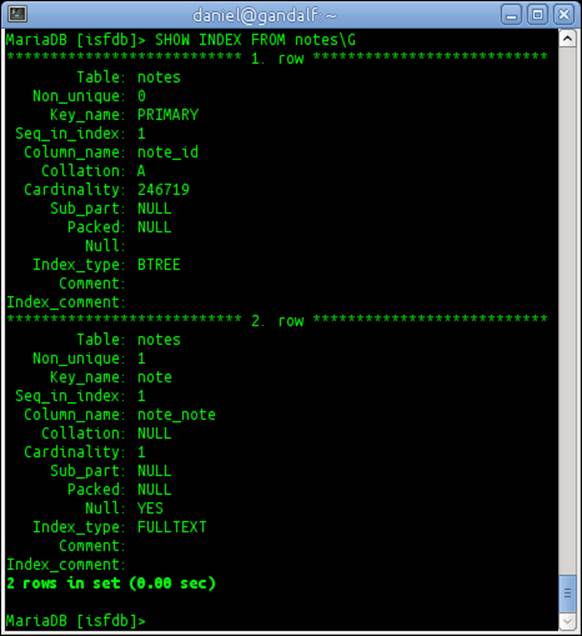
8. SHOW INDEX FROM notes\G
9. The output of the SHOW command will look like the following screenshot:
How it works...
A FULLTEXT index enables us to search data using the MATCH() ... AGAINST syntax. The MATCH part of the syntax contains a comma-separated list of the columns to be searched. The AGAINST part of the syntax contains the string to search for and may also contain anoptional modifier to indicate the type of search to be performed. The search types are IN NATURAL LANGUAGE MODE, IN BOOLEAN MODE, and WITH QUERY EXPANSION. The default type is IN NATURAL LANGUAGE MODE and doesn't need to be explicitly specified. An example using the index we just created is as follows:
SELECT * FROM notes
WHERE MATCH(note_note)
AGAINST('artificial','intelligence');
This query matches all the rows that either have the words artificial or intelligence in them, not necessarily both. To ensure that both words appear in the note, we can search for IN BOOLEAN MODE as follows:
SELECT * FROM notes
WHERE MATCH(note_note)
AGAINST('+artificial,+intelligence' IN BOOLEAN MODE);
There's more...
There are several limitations to the full-text indexes that we need to be aware of. Words that are three characters in length (or less) or words longer than 84 characters are excluded from the index. Partial words are also excluded. Lastly, if a word is a stopword, which is a list of common words such as there, done, then, and always, or if the word appears in more than half of the rows, it is excluded from the results unless we use IN BOOLEAN MODE.
See also
· The full documentation of full-text indexes is available at https://mariadb.com/kb/en/full-text-indexes/
· The full documentation of the CREATE INDEX command is available at https://mariadb.com/kb/en/create-index/
· The full documentation of the SHOW INDEX command is available at https://mariadb.com/kb/en/show-index/
· The full list of stopwords is available at https://mariadb.com/kb/en/stopwords/
Removing an index
If an index is not used, the only thing it is doing is wasting space and slowing down our INSERT and UPDATE statements. So if an index is not being used, we should remove it.
Getting ready
Import the ISFDB database as described in the Importing the data exported by mysqldump recipe from Chapter 2, Diving Deep into MariaDB.
How to do it...
1. Launch the mysql command-line client application and connect to the isfdb database on our MariaDB server.
2. Drop the full-text index on the note_note column of the notes table, which we created in the previous recipe using the following command:
3. DROP INDEX note ON notes;
4. After the command's execution is complete, verify that the full-text index is removed with the following command:
5. SHOW INDEX FROM notes;
How it works...
The DROP INDEX command actually creates and runs an ALTER TABLE statement to remove an index. So when removing an index on a large table, we'll see the standard ALTER TABLE progress messages.
There's more...
The last thing we want to do is to remove an index that we use regularly. To figure out what indexes we are actually using, we need to enable user statistics. To do so, we need to add the following code to the end of our main my.cnf or my.ini file (or add it to an existing [mysqld] section) and then restart MariaDB:
[mysqld]
userstat = 1
Once it is enabled, we will need to let the server run for a while to gather statistics. Once we feel that enough time has passed for the statistics to represent our typical usage, we can show the index statistics with the following command:
SHOW INDEX_STATISTICS;
See also
· More information on indexes can be found at https://mariadb.com/kb/en/optimization-and-indexes/
· The full documentation of the DROP INDEX command is available at https://mariadb.com/kb/en/drop-index/
· More information on user statistics can be found at https://mariadb.com/kb/en/user-statistics/
Using JOINs
Joining data from two or more tables is how we unlock the power of a relational database such as MariaDB. There are three basic JOIN types: INNER, CROSS, and LEFT (or OUTER).
Getting ready
Import the ISFDB database as described in the Importing the data exported by mysqldump recipe from Chapter 2, Diving Deep into MariaDB.
How to do it...
1. Launch the mysql command-line client application and connect to the isfdb database on our MariaDB server.
2. Perform an INNER JOIN of the authors and emails tables to show us a list of authors and their corresponding e-mail addresses using the following command:
3. SELECT author_canonical, email_address
4. FROM authors INNER JOIN emails
5. ON authors.author_id = emails.author_id;
6. Perform a LEFT JOIN of the emails and authors tables to show us a list of authors and their corresponding e-mail addresses using the following command:
7. SELECT author_canonical, email_address
8. FROM emails LEFT JOIN authors
9. ON authors.author_id = emails.author_id;
10. Perform a CROSS JOIN of awards and award types using the following command:
11.SELECT * FROM awards CROSS JOIN award_types LIMIT 10;
How it works...
The results of an INNER JOIN are the rows that match in both the tables for the specified join conditions. So, for example, all rows in the emails table that match the row in the authors table based on the join conditions will be shown. But any results in the authors table that don't exist will not be shown in the results.
The LEFT JOIN is similar to the INNER JOIN except that it produces results from all rows from the table on the left, even if they don't match anything in the table on the right. The emails table I'm using has 782 rows, so the result set of the LEFT JOIN example also has 782 rows. Columns from the emails table that do not match up with the columns from the authors table are set to NULL for that row of the results.
A CROSS JOIN is the product of the two tables. Every row in each table is joined to every other row in the other table. Think of it as multiplying the two tables together. For example, a cross join of a table with 15 rows and a table with 10 rows is a table of 150 rows. This makes this kind of JOIN potentially dangerous if we accidentally cross join two very large tables. In our example, we add a LIMIT clause to cut it off after 10 rows of output.
There's more...
The utility of INNER JOIN and LEFT JOIN is easy to see. They let us combine the data from multiple tables into a single result. The CROSS JOIN, on the other hand, may not seem to be quite as useful at first glance. However, they do have an important, if limited, set of use. For example, a CROSS JOIN can be used with a table of colors and a table of materials to give us all possible material and color combinations. That said, it's best to be careful with them to avoid unintended consequences.
See also
· Refer to https://mariadb.com/kb/en/joins/ for full documentation of JOIN in MariaDB
Using microseconds in the DATETIME columns
There was a time when measuring dates and times accurately to within a single second were as precise as we needed it to be. However, those days are gone. Users expect their apps to have response times of well under a second, and so our databases must be able to track those times as well.
How to do it...
1. Launch the mysql command-line client application and connect it to our MariaDB server.
2. Create a test database if it doesn't already exist and switch to it using the following command:
3. CREATE DATABASE IF NOT EXISTS test;
4. USE test;
5. Create a simple two-column table named times using the following command:
6. CREATE TABLE times (
7. id int NOT NULL AUTO_INCREMENT,
8. dt datetime(6),
9. PRIMARY KEY (id)
10.);
11. Run the following INSERT statements at least four times and add some sample data to our table using the following command:
12.INSERT INTO times (dt) VALUES (NOW()), (NOW(6));
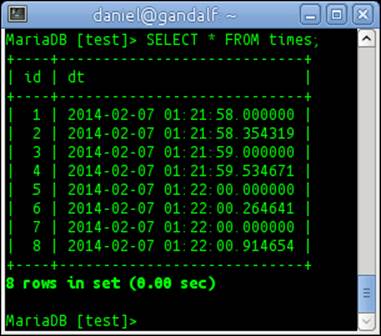
13. Select all of the data from our table with the following SELECT command:
14.SELECT * FROM times;
On running the SELECT command, we get an output similar to the following screenshot:
How it works...
When creating the times table, in order for our dt column to support datetime values with microseconds, we need to specify the precision. If we don't, it will default to a precision of one second. In this recipe, we set it to the highest precision, 6. If we try to use a higher value, we will get an error.
When inserting data into our tables, we put in two rows at a time. First, a row with the default precision of the NOW() function (1 second), and then with the highest precision (6). When we use the default precision of NOW() the microseconds part of the datetime gets entered as all zeroes. This is useful to keep in mind if we are migrating an application to use microseconds, both the table itself and the functions we use to enter our datetime data need to use microseconds.
There's more...
The CURRENT_TIMESTAMP function is a synonym for the NOW() function and the two can be used interchangeably.
See also
· Refer to https://mariadb.com/kb/en/microseconds-in-mariadb/ for more information on using microseconds
· The full documentation of the NOW() and CURRENT_TIMESTAMP() functions is at https://mariadb.com/kb/en/now/ and https://mariadb.com/kb/en/current_timestamp/
Updating DATETIME and TIMESTAMP columns automatically
If our database has a DATETIME or TIMESTAMP column that we want to be updated whenever the record is updated, there is no need for us to put that logic in our application. MariaDB can take care of it for us.
How to do it...
1. Launch the mysql command-line client application and connect to our MariaDB server.
2. Create a test database if it doesn't already exist and switch to it using the following command:
3. CREATE DATABASE IF NOT EXISTS test;
4. USE test;
5. Create a simple table named dtts using the following commands:
6. CREATE TABLE dtts (
7. id int(11) NOT NULL AUTO_INCREMENT,
8. name varchar(25),
9. dt datetime(6) NOT NULL DEFAULT CURRENT_TIMESTAMP(6),
10. ts timestamp(3) NOT NULL DEFAULT CURRENT_TIMESTAMP(3)
11. ON UPDATE CURRENT_TIMESTAMP(3),
12. PRIMARY KEY (id)
13.);
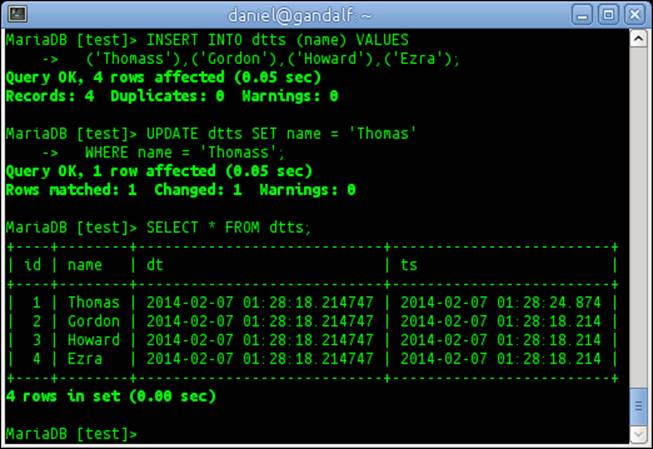
14. Insert some data into our new table using the INSERT command:
15.INSERT INTO dtts (name) VALUES
16. ('Thomass'),('Gordon'),('Howard'),('Ezra');
17. Fix the misspelling of Thomas:
18.UPDATE dtts SET name = 'Thomas'
19. WHERE name = 'Thomass';
20. View our table using the following command:
21.SELECT * FROM dtts;
22. The output will look similar to the following screenshot (but with today's date):
How it works...
In this recipe, we created a table with four columns. An id column, a name column, a dt column of the type datetime(6), and a ts column of the type timestamp(3).
The dt column has a type of datetime(6), which means it has full microsecond precision, and it has a default value of CURRENT_TIMESTAMP(6). The ts column has a type of timestamp(3), which gives it only millisecond precision, and it has the addition of ON UPDATE CURRENT_TIMESTAMP(3), which automatically updates the stored time value whenever the row is updated. With the update we made to the first row, we can see that the code is working as the dt and ts columns are different.
There's more...
Both datetime and timestamp columns can have their DEFAULT and ON UPDATE values set to the output of the CURRENT_TIMESTAMP function. We just need to take care to match the precision to avoid needless warnings about truncated data (if we specify a higher precision than the column is configured for) or avoid having data added with less precision than we wanted (if we input values with a lower precision than the column is configured for).
It is also worth noting that the CURRENT_TIMESTAMP() function is a synonym for the NOW() function.
See also
· For more on DATETIME columns, refer to https://mariadb.com/kb/en/datetime/
· For more on TIMESTAMP columns, refer to https://mariadb.com/kb/en/timestamp/
· The full documentation of the NOW() and CURRENT_TIMESTAMP() functions is available at https://mariadb.com/kb/en/now/ and https://mariadb.com/kb/en/current_timestamp/
· Notes related to the implementation of this feature in MariaDB are available at https://mariadb.atlassian.net/browse/MDEV-452
All materials on the site are licensed Creative Commons Attribution-Sharealike 3.0 Unported CC BY-SA 3.0 & GNU Free Documentation License (GFDL)
If you are the copyright holder of any material contained on our site and intend to remove it, please contact our site administrator for approval.
© 2016-2026 All site design rights belong to S.Y.A.