MariaDB Cookbook (2014)
Chapter 6. Replication in MariaDB
In this chapter, we will cover the following recipes:
· Setting up replication
· Using global transaction IDs
· Using multisource replication
· Enhancing the binlog with row event annotations
· Configuring binlog event checksums
· Selectively skipping the replication of binlog events
Introduction
Replication is what allows MariaDB to scale to thousands of servers, millions of users, and petabytes of data. But let's not get ahead of ourselves. Replication on a small scale is a great way to grow the number of users our application can support with minimal effort. As we gain users, we can grow the number of replication servers to match.
There are many different ways to set up how we do replication. In this chapter, we'll only touch on a couple of basic ones: a single master to multiple slaves, and multiple masters to a single slave.
Note
Historically, replication source servers have been called masters and replication target servers have been called slaves. To avoid confusion, we'll be using these names.
Setting up replication
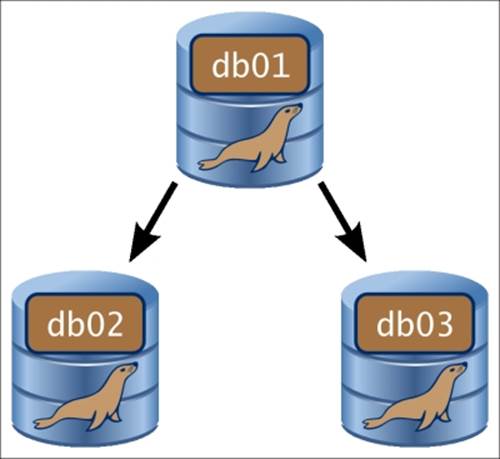
Setting up replication is not hard as long as all the various bits are in place. This recipe is all about the most basic concept of replication topologies; a single master server replicating to multiple slaves is shown in the following diagram:
Getting ready
This recipe assumes that we have three servers. The servers are named db01, db02, and db03, and they reside on the 192.168.4.0 network with IP addresses 192.168.4.101.to 192.168.4.103. One server, db01, will be our replication master, and the other two will be our replication slaves.
For the purposes of this recipe, the servers are assumed to contain fresh installs of MariaDB, with just the default databases set up.
How to do it...
1. On all three hosts, launch the mysql command-line client and connect to the local MariaDB server with the root user (or another user with the GRANT privilege) and run the following command:
2. GRANT REPLICATION SLAVE, REPLICATION CLIENT ON *.*
3. TO replicant@'192.168.4.%'
4. IDENTIFIED BY 'sup3rs3kr37p455w0rd';
5. Exit from the client and stop MariaDB.
6. Edit each system's my.cnf or my.ini file and add the following to the [mysqld] section (it may already exist, so look for it first, and feel free to adjust the path if desired):
7. log_bin = /var/log/mysql/mariadb-bin
8. While editing the config file, change the bind address to the IP address of the server.
9. While editing the config file, on each server, set a unique server_id and relay_log filename in the [mysqld] section for the db01 server as follows:
10.server_id = 101
11.relay_log = db01-relay-binlog
12. On both the replication slave servers, edit the system my.cnf or my.ini file and add the following to the [mysqld] section:
13.read_only
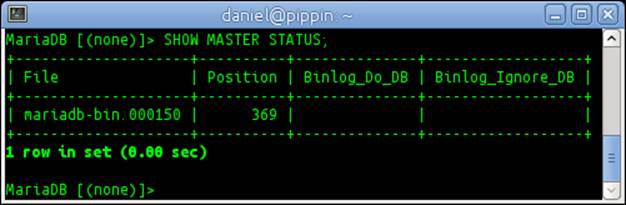
14. Launch the mysql command-line client on the replication master server and run the following command to discover the proper filename to use in the next step:
15.SHOW MASTER STATUS;
16. For this recipe, we'll get the following output:
17. Launch the mysql command-line client on each replication slave server and run the following commands:
18.CHANGE MASTER TO MASTER_HOST='192.168.4.101',
19.MASTER_USER = 'replicant',
20.MASTER_PASSWORD = 'sup3rs3kr37p455w0rd',
21.MASTER_LOG_FILE = 'mariadb-bin.000150',
22.MASTER_LOG_POS = 0;
23.START SLAVE;
24. Run the following command and confirm that Slave_IO_Running and Slave_SQL_Running are both Yes and that there are no errors:
25.SHOW SLAVE STATUS;
26. On the replication master server, launch the mysql command-line client and run the following commands to create a database and insert some data:
27.CREATE DATABASE IF NOT EXISTS temp;
28.USE temp;
29.
30.CREATE TABLE doctors (
31. id int NOT NULL AUTO_INCREMENT PRIMARY KEY,
32. given_names varchar(255),
33. surname varchar(255),
34. birthdate date);
35.
36.INSERT INTO doctors VALUES (
37. (1,'William','Hartnell','1908-01-08'),
38. (2,'Patrick','Troughton','1920-03-25'),
39. (3,'Jon','Pertwee','1919-07-07'),
40. (4,'Tom','Baker','1934-01-20'));
41. On the replication slave servers, launch the mysql command-line client and run the following commands to verify that the data entered on the replication master server has been replicated to the replication slave servers:
42.USE temp;
43.
44.SELECT * FROM doctors;
How it works...
The MariaDB binary log is at the heart of replicating from one machine to others. In basic terms, events are written to the log on the replication master server and then to the database. Replication slaves read the log on the replication master and apply them to their own copy of the database.
For simplicity, the replicant user we created for this recipe has the permissions needed on both the master and the slave servers. Strictly speaking, the REPLICATION SLAVE privilege is only needed on the user we created on the replication master server and theREPLICATION CLIENT privilege is only needed when we use the commands SHOW MASTER STATUS; and SHOW SLAVE STATUS;. By configuring our replication user with both of these privileges, we can use it for all of our replication tasks on any of our servers. And if we decide down the road to promote one of the slave servers to be the master server, the user is already set up and ready to go.
The CHANGE MASTER TO command with its various variables is what actually configures the replication. We could configure these variables in the my.cnf or my.ini config files, but this is not recommended because it hardcodes the settings, which can interfere with our other activities such as changing the master server on the fly.
The read_only variable is important because it prevents a rogue application or user from trying to INSERT on a replication slave. Doing so is a great way to corrupt our data when using a master-slave topology like we are using here.
For step 11, an alternative to typing out all of the commands to create the temp database, create the doctors table, and INSERT the data is to download the 4399OS_06_01.sql file from the book's website and to import it as follows:
mysql -u username -p < 4399OS_06_01.sql
Change username to a user that has rights to create a database and insert data. Also, because it's a file and we don't have to type it in, the file inserts more rows of data than are there in the recipe.
There's more...
There are many little things that are important to know about replication.
Common causes of replication failures
If the skip_networking variable is set in our my.cnf or my.ini file, MariaDB will limit connections to localhost only. This will break replication, as the whole point is for multiple servers to communicate with each other. This variable has been deprecated in favor of setting the bind_address variable to 127.0.0.1, which does the same thing.
If we see Can't connect or Connection refused errors when we run SHOW SLAVE STATUS;, then checking to see what both of these variables are set to is a good place to start. The bind_address variable must be set to the IP address we use to access the server remotely from other clients. If our server has one or more IP addresses assigned, such as a public and private IP address for example, we will almost always want to set it to the private IP address. Private IPv4 addresses are easy to recognize. They almost always take the form of either 192.168.x.x or 10.x.x.x. Private IPv6 addresses also exist but are rarely used. They begin with fd.
Another common failure is not setting the server_id variable. All servers in a replication group must have unique server IDs. The default value, if the server_id variable is not set, is 1. So, when setting it, choose a different number. Valid values are anything from 1 to4,294,967,295.
Binary logs versus relay logs
In this recipe, the replication slaves are not configured to store a log of their own. They simply read the binary log of the replication master server and apply it. The slaves can be configured to store a log of their own by adding the following to the [mysqld] section of the my.cnf or my.ini file:
log_slave_updates
Doing so adds some overhead to a slave server, but by setting this variable it can act as a replication master with its own downstream slaves. In this way, multilevel replication topologies can be created.
The log on the replication slaves is called the relay log instead of binary log. Both of these logs have the same format. On replication slave servers, they are called relay logs simply to specify that the log is from a replication master as opposed to being a log of activity on the local server itself.
Safer replication
One good way to increase safety and crash protection for MariaDB is to set the following two options in the [mysqld] section of our my.cnf or my.ini file:
innodb_flush_logs_at_trx_commit = 1
sync_binlog = 1
Both of these options force an explicit write-to-disk (fsync) operation whenever writing to these files. This helps ensure that our data is written to the disk as soon as possible. This adds safety in case of system failures or power outages to our databases and replication, but it has the potential to really impact performance as extra fsync operations are relatively expensive, resource wise. To combat this, the MariaDB developers have created a group commit operation that groups fsync operations together whenever possible. The optimization works best with highly parallel workloads and is enabled automatically. Enabling the variables still results in slightly lower performance, but combined with the fsync grouping it is not so bad that it isn't worth doing.
See also
· A lot more information can be found in the replication section of the MariaDB Knowledge Base at https://mariadb.com/kb/en/replication/
· The full documentation of the group commit optimization can be found at https://mariadb.com/kb/en/group-commit-for-the-binary-log/
Using global transaction IDs
Global Transaction ID (GTID) is a new feature in MariaDB 10.0 and above. It helps us achieve greater reliability and flexibility with our replication.
Getting ready
This recipe builds upon the previous one, so to get ready for this recipe, simply set up a basic replication as described in the Setting up replication recipe.
How to do it...
1. On both our replication slave servers, launch the mysql command-line client and run the following commands:
2. STOP SLAVE;
3. CHANGE MASTER TO MASTER_USE_GTID = SLAVE_POS;
4. START SLAVE;
5. Check on the status of our replication slave servers with the following command:
6. SHOW ALL SLAVES STATUS\G
7. Look at the bottom of the output for the following lines (the Gtid_Slave_Pos value will likely be different and the lines are separated by several other lines in the output):
8. Using_Gtid: Slave_Pos
9. Gtid_Slave_Pos: 0-101-2320
10. Insert more data into our temp.doctors table on the replication master server, and then run the following SELECT statement on our replication slave servers to confirm that replication is still happening:
11.SELECT * FROM temp.doctors;
How it works...
The GTID feature is enabled automatically, but when replication slaves connect to master servers, they can choose to use either the traditional filename and offset or GTID to determine where to start replicating from. To use GTID, we use the MASTER_USE_GTID variableinstead of the MASTER_LOG_FILE and MASTER_LOG_POS variables.
Because we started with a server that was already set up and using a traditional filename and position replication, the only thing we had to do was temporarily stop replication, set the MASTER_USE_GTID variable, and then start replication up again.
There's more...
There are three possible values we can use for the MASTER_USE_GTID variable. The one we used in the recipe is SLAVE_POS as this variable starts replication at the position of the last GTID replicated to our slave server. This is a safe default value to use.
The other two possible values are CURRENT_POS and the actual GTID number we want to use. Using CURRENT_POS is usually fine, unless we are changing a server from being the master to being a slave. The value of CURRENT_POS is whatever binlog entry that server has in its local binary log. If the most recent entry is something that doesn't exist on the current master server, then replication to the slave will fail. If our slave server does not have binary logging turned on, then the value of CURRENT_POS will be the same as SLAVE_POS.
The third option, using a specific GTID, is useful if we know exactly what number to start from, but it's more of an expert option used only when we know it's the right thing to do. It's much safer to stick to the other two.
See also
· More about Global Transaction ID is available at https://mariadb.com/kb/en/global-transaction-id/
· The full documentation of the CHANGE MASTER TO command can be found at https://mariadb.com/kb/en/change-master-to/
Using multisource replication
A familiar replication topology is one where we have a single master server and several slave servers. Another alternative topology is where we have a single slave server connected to multiple master servers. This is called multisource replication.
Getting ready
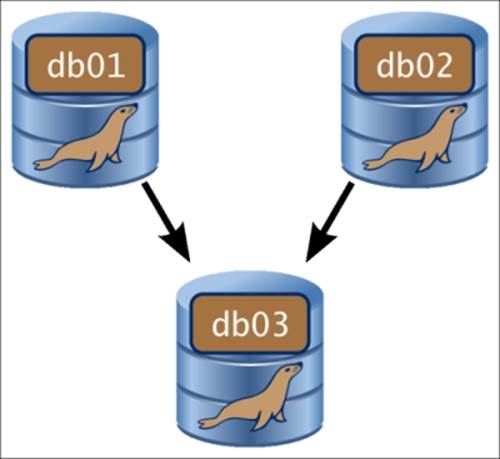
For this recipe, we'll be working on the assumption that we have three servers, db01, db02, and db03, which are each running a fresh install of MariaDB. The first two will be our replication masters, and the last one will be our replication slave as shown in the following diagram:
We'll further assume that all three servers are on the same subnet, 192.168.4.0, with the final part of their individual IP addresses being 101, 102, and 103, respectively.
How to do it...
1. On all three servers, launch the mysql command-line client and run the following command to add our replication user:
2. GRANT REPLICATION SLAVE, REPLICATION CLIENT ON *.*
3. TO replicant@'192.168.4.%' IDENTIFIED BY 'sup3rs3kr37p455w0rd';
4. Quit the mysql command-line client and then stop MariaDB.
5. Edit the system my.cnf or my.ini file on each server. Make sure the log_bin variable is set (it is by default).
6. On db01, add the following settings to the [mysqld] section:
7. bind_address = 192.168.4.101
8. relay_log = db01-relay-binlog
9. server_id = 101
10. On db02, add the following settings to the [mysqld] section:
11.bind_address = 192.168.4.102
12.relay_log = db02-relay-binlog
13.server_id = 102
14. On db03, add the following settings to the [mysqld] section:
15.read_only
16.replicate_ignore_db=mysql,information_schema,performance_schema
17.bind_address = 192.168.4.103
18.relay_log = db03-relay-binlog
19.server_id = 103
20. Start MariaDB on all three hosts.
21. On db03, launch the mysql command-line client and run the following commands:
22.CHANGE MASTER 'db01' TO MASTER_HOST='db01',
23. MASTER_USER = 'replicant',
24. MASTER_PASSWORD = 'sup3rs3kr37p455w0rd',
25. MASTER_USE_GTID = CURRENT_POS;
26.
27.CHANGE MASTER 'db02' TO MASTER_HOST='db02',
28. MASTER_USER = 'replicant',
29. MASTER_PASSWORD = 'sup3rs3kr37p455w0rd',
30. MASTER_USE_GTID = CURRENT_POS;
31.
32.START ALL SLAVES;
33. While on db03, in the mysql command-line client, run the following command to check the replication status:
34.SHOW ALL SLAVES STATUS;
35. On db01 and db02, create databases with uniquely named tables on each server and input data.
36. On db03, run queries to see that the data has been replicated.
How it works...
Multisource replication is a replication topology where there are many master servers replicating to a single slave. Setting it up is very similar to setting up traditional replication but with a few key differences.
One thing we need to do to prevent potential conflicts on the slave server is to list the tables we want to ignore. This is done with the replicate_ignore_db option. In our recipe, we set this option in the my.cnf or my.ini file, but it can also be set as a GLOBAL or SESSIONvariable using the mysql command-line client. The option takes a comma-separated list of the databases we want the slave server to not replicate. A good default is to set this to the system database, mysql, and the performance_schema and information_schema, but there may be other databases we don't want to replicate; if so, they should also be added to the list.
Because we are dealing with multiple master servers, we need to name them when running the CHANGE MASTER command. The name we choose is also used when running the SHOW ALL SLAVES STATUS; command so we can tell the master servers apart.
If we want to see the status of replication from an individual master server, we specify the name in the SHOW SLAVE STATUS; command as follows:
SHOW SLAVE 'db02' STATUS;
There's more...
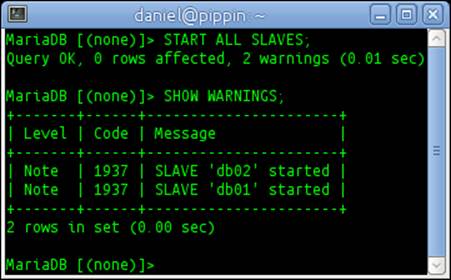
There will always be warnings when starting replication but they are just informational. The number of warnings corresponds directly to the number of configured replication masters. For example, refer to the following screenshot:
Other ignore options
We are not restricted to just ignoring whole databases; we can also ignore specific tables using the replicate_ignore_table variable.
Instead of specifying the tables or databases to ignore, we also have the option of specifying only the tables and databases we want to replicate. We use the replicate_do_table and replicate_do_db options for this.
Additional files
After setting up multisource replication, a few new files will appear in our slave server's data directory. These include a multi-master.info file and relay and .info files for each master server we have configured. These files are used by MariaDB to keep track of replication, so leave them alone.
See also
· The full documentation of Multi-source replication can be found at https://mariadb.com/kb/en/multi-source-replication/
Enhancing the binlog with row event annotations
When using replication, it's popular to set binlog_format to row. The only issue with this is that when we look at the binlog, it is harder to read because the statements aren't included. We can see the changes but not the SQL statement that made the changes.
Getting ready
For this recipe, we'll assume that we've set up replication as described in either the Setting up replication or Using multisource replication recipes earlier in this chapter. Pick a master server and a slave server to use. In this recipe, we'll call the master server db01and the slave server db03.
How to do it...
1. On db01, edit the system my.cnf or my.ini file and add the following to the [mysqld] section:
2. binlog_format = row
3. binlog_annotate_row_events
4. On db03, edit the system my.cnf or my.ini file and add the following to the [mysqld] section:
5. binlog_format = row
6. replicate_annotate_row_events
7. Restart MariaDB on both servers.
8. On db01, launch the mysql command-line client and run the following commands:
9. DROP DATABASE IF EXISTS test;
10.CREATE DATABASE test;
11.USE test;
12.CREATE TABLE t1(a char(1));
13.INSERT INTO t1 VALUES ('a'),('b'),('c'),('d');
14.CREATE TABLE t2(a char(1));
15.INSERT INTO t2 VALUES ('a'),('b'),('c'),('d');
16.CREATE TABLE t3(a char(1));
17.INSERT DELAYED INTO t3 VALUES ('a'),('b'),('c'),('d');
18.DELETE t1, t2 FROM t1 INNER JOIN t2 INNER JOIN t3
19. WHERE t1.a=t2.a and t2.a=t3.a;
20. On db01, run the following command in the mysql command-line client:
21.SHOW BINLOG EVENTS;
22. While still on db01, exit the mysql command-line client and look in the mysql directory under /var/log/ for the binlog file with the highest number. We'll assume it's 150. Run the following command to look at the events stored in the file:
23.mysqlbinlog /var/log/mysql/mariadb-bin.000150
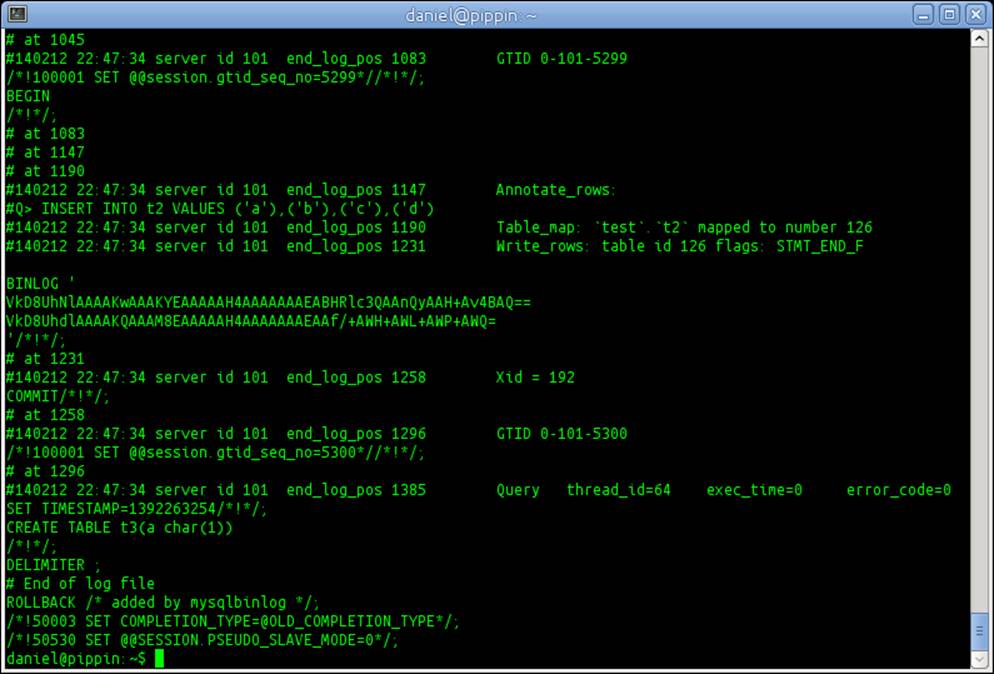
24. The result will have differences but will show annotations for binlog events similar to the following screenshot:
How it works...
When binary logging is enabled, we can look through the log and see when changes were made, but we don't see the statements that made those changes. Adding binlog_annotate_row_events to our configuration tells MariaDB to annotate our binary log with the statements that changed data. This makes it much easier to search through the binary log to find the statement or event we are looking for.
There's more...
There are situations where we may want to output data from our binary logs without the annotations. To do this, we simply add --skip-annotate-row-events to the mysqlbinlog command when we run it. By default, mysqlbinlog will print annotations if they are in the log.
See also
· The full documentation of the annotate row events feature can be found at https://mariadb.com/kb/en/annotate_rows_log_event/
· The full documentation of the mysqlbinlog command can be found at https://mariadb.com/kb/en/mysqlbinlog/
Configuring binlog event checksums
A rare, but still possible, problem can occur if the filesystem where we store our binary and relay logs gets corrupted. It can be especially damaging if we don't detect it early on. Event checksums are a way to detect this quickly.
Getting ready
For this recipe, we'll assume that we've set up replication as described in either the Setting up replication or the Using multisource replication recipes earlier in this chapter. Pick a master server and a slave server to use. In this recipe, we'll call db01 as the master server and db03 as the slave server.
How to do it...
1. On db01, launch the mysql command-line client and run the following commands:
2. SET GLOBAL BINLOG_CHECKSUM = 1;
3. SET GLOBAL MASTER_VERIFY_CHECKSUM = 1;
4. On db03, launch the mysql command-line client and run the following command:
5. SET GLOBAL SLAVE_SQL_VERIFY_CHECKSUM = 1;
How it works...
When checksums are enabled on our master and slave servers, it adds an extra layer of checking as events are copied over and applied. This helps us better to detect filesystem corruption of our binary and relay log files.
When first enabled, the binary log file is immediately rotated so that we don't have a situation where a part of a log file has checksums and the other part doesn't.
There's more...
In the recipe, we set the options dynamically so that we don't have to restart the server. To make the settings permanent, we need to add them to the [mysqld] section of the my.cnf or my.ini file.
The mysqlbinlog utility doesn't verify checksums by default. To have it do so, run it with the --verify-binlog-checksum option.
See also
· The full documentation of Binlog Event Checksums can be found at https://mariadb.com/kb/en/binlog-event-checksums/
· Also, refer to the Binlog Event Checksums interoperability page at https://mariadb.com/kb/en/binlog-event-checksum-interoperability/
Selectively skipping the replication of binlog events
Sometimes, we want to skip replicating certain events to our replication slave servers. MariaDB lets us do this dynamically.
Getting ready
For this recipe, we'll assume that we've set up replication as described in either the Setting up replication or Using multisource replication recipes earlier in this chapter. Pick a master server and a slave server to use. In this recipe, we'll call db01 as the master server and db03 as the slave server.
How to do it...
1. On db01, launch the mysql command-line client and run the following command to turn on replication skipping:
2. SET @@skip_replication=1;
3. On db01, create an empty database:
4. CREATE DATABASE w;
5. On db03, run the following commands to turn off replication of skipped events:
6. STOP SLAVE;
7. SET GLOBAL REPLICATE_EVENTS_MARKED_FOR_SKIP = FILTER_ON_MASTER;
8. START SLAVE;
9. On db01, create another empty database:
10.CREATE DATABASE wx;
11. On db03, switch to filtering on the slave:
12.STOP SLAVE;
13.SET GLOBAL REPLICATE_EVENTS_MARKED_FOR_SKIP = FILTER_ON_SLAVE;
14.START SLAVE;
15. On db01, create another empty database:
16.CREATE DATABASE wxy;
17. On db03, switch off filtering:
18.STOP SLAVE;
19.SET GLOBAL REPLICATE_EVENTS_MARKED_FOR_SKIP = REPLICATE;
20.START SLAVE;
21. On db01, create a fourth empty database:
22.CREATE DATABASE wxyz;
23. On db03, check to see whether only the first and last databases (w and wxyz) exist (filtering was turned on when we created the wx and wxy databases).
24.SHOW DATABASES;
25. On db01, turn off @@skip_replication by using the following command line:
26.SET @@skip_replication=0;
How it works...
The @@skip_replication session variable, when set to true (that is, 1), causes all events logged to the binary log on the master server to be flagged for skipping. Actual skipping only happens if the slave servers have the REPLICATE_EVENTS_MARKED_FOR_SKIP variable set to either FILTER_ON_MASTER or FILTER_ON_SLAVE. The default value for that variable is REPLICATE, which means that events are replicated even though there's a skip flag set.
One possible way this feature can be used is if we have a situation where we need to create a temporary database, give it some data, run some analytics or reports on it, and then drop it. If it's just a temporary thing, we might not want it replicated to the slave servers.
The actual filtering can take place either on the master server, by setting REPLICATE_EVENTS_MARKED_FOR_SKIP to FILTER_ON_MASTER, or on the slave server by setting the option to FILTER_ON_SLAVE. The end result is the same; the only difference is that with FILTER_ON_SLAVE, the events are transferred over the network before they are filtered.
MariaDB does not have to be stopped to change the REPLICATE_EVENTS_MARKED_FOR_SKIP variable, but replication does. So, in this recipe, we bracketed each change with STOP SLAVE; and START SLAVE; commands. Trying to change it without stopping replication first gives an error.
There's more...
While handy, this feature should be used with great caution. When events are not replicated, the data on the master server will be different from the data on the slave. Many problems could arise if this is handled badly. It is up to the application or user to properly handle this by either replicating the data some other way or by thoroughly cleaning up when finished.
Another way to stop replication is to set @@sql_log_bin=0, but this stops all replication to all slaves. By using the @@skip_replication variable instead, we can selectively stop replication to specific slaves while continuing to replicate to other slaves.
See also
· The full documentation of this is available at https://mariadb.com/kb/en/selectively-skipping-replication-of-binlog-events/
All materials on the site are licensed Creative Commons Attribution-Sharealike 3.0 Unported CC BY-SA 3.0 & GNU Free Documentation License (GFDL)
If you are the copyright holder of any material contained on our site and intend to remove it, please contact our site administrator for approval.
© 2016-2026 All site design rights belong to S.Y.A.