Neo4j Essentials (2015)
Chapter 1. Installation and the First Query
Neo4j comes with several flavors, thus embracing the diversity of its clients: from research projects to Fortune 500 companies through rapidly changing start-ups. Moreover, Neo4j is a multifaceted graph database, which can adapt to different technical constraints.
You now plan to start a project with it but you need some guidance. This chapter will help you understand the licensing options and the characteristics of each deployment model offered by Neo4j. Moreover, it will guide you through the installation process, starting from the download to the first actual query executed against your fully working instance.
At the end of this chapter, your work environment will be fully functional, and you will be able to write your first Cypher query to insert/fetch the data from the Neo4j database.
This chapter will cover the following topics:
· Licensing options and installing Neo4j
· Understanding all the deployment options
· Various tools and utilities
· Running your first Cypher query!
Licensing options
Neo4j is an open source graph database, which means all its sources are available to the public (on GitHub, at the time of writing). However, Neo Technology, the company behind Neo4j, distributes the latter in two different editions—Community Edition and Enterprise Edition.
Community Edition
Community Edition is a single node installation licensed under General Public License (GPL) Version 3—http://en.wikipedia.org/wiki/GNU_General_Public_License and is used for:
· Development and QA environments for fast-paced developments
· Small-to-medium-scale applications where it is preferred to embed the database within the existing application
Here are the main features of Neo4j Community Edition:
· Kernel API to intercept and customize Neo4j at a low level
· Core APIs to handle primitive operations on the graph
· APIs to query on the graph and retrieve data (Traversal API and Cypher Query Language)
· JMX monitoring primitives about the state of a Neo4j instance
· Index APIs to retrieve specific data using a fast and clean API
· Several REST APIs to expose the operations mentioned earlier
· Neo4j shell as a command line REST shell-like client
· Neo4j browser as a graphical Neo4j administration tool on your browser
You can benefit from the support of the whole Neo4j community on Stack Overflow, Google Groups, and Twitter.
Note
If you plan to ask a question on Stack Overflow, do not forget to tag your question with #Neo4j hashtag.
Enterprise Edition
Enterprise Edition comes with three different kinds of subscription options and provides the distributed deployment of the Neo4j databases, along with various other features such as backup, recovery, replication, and so on.
Visit http://neo4j.com/subscriptions/for more information on the available subscriptions with Enterprise Edition.
Each of the subscriptions are subject to their own license and pricing but let's first see the common feature set available with all types of subscriptions.
A common feature set
Community Edition features are obviously a part of every enterprise package. Moreover, all enterprise options include:
· Maintenance and scheduled fixes
· Advanced monitoring options
· Hot backups (without interruption of service)
· Deployment in cluster and high-performance cache
Personal license
The personal license plan is free of charge and may look very similar to the Community Edition. It targets students as well as small businesses and is only applicable under the following conditions:
· Your company is made up of up to three employees or contractors
· Your company is self-funded
· Your company's annual revenue amounts to not more than $100K
Depending on the company's location, the U.S. personal agreement at http://www.neotechnology.com/terms/personal_us/ or the world personal agreement at http://www.neotechnology.com/terms/personal_ne/ is to be accepted.
The start up program
Starting from this plan, you can benefit from enterprise support. The start up license allows workday support hours: 10 hours/5 business days.
The applicability conditions are similar to personal license, only the limits are raised:
· Your company is funded up to $10 million
· Your company's annual revenue amounts to up to $5 million
Depending on the company's location, the U.S. start up agreement at http://www.neotechnology.com/terms/startup_us/ or the World startup agreement at http://www.neotechnology.com/terms/startup_ne/ is to be accepted and the license fees amount to $12K US dollar / €12K per instance.
Note
The license defines an instance as the Java Virtual Machine hosting Neo4j server.
Enterprise subscriptions
With this plan, you can benefit from 24/7 support and emergency custom patches if needed. At this scale, your company will have to directly contact Neo Technology to assess the cost of your required setup.
Applicability
Neo4j is a database developed in Java and Scala—two programming languages that can only be executed within a Java Virtual Machine. As such, Neo4j can only be executed within a JVM, regardless of how you deploy it.
Therefore, embedding Neo4j is only available to JVM-based applications.
System hardware requirements
Neo4j does not restrict users to use certain hardware specifications but it does recommend minimum specifications for CPU, RAM, and disk that are required for deploying in development or production environments.
These specifications are explained as follows:
· CPU: Traversing in graphs and graph computations is CPU intensive and requires a good amount of CPU cycles. The following are the requirements for CPU:
· Must have an Intel Core I3 processor
· Good to have an Intel Core I7 processor
· RAM: The graphs in Neo4j are mapped to the OS memory so that the indexes and cached data can be traversed/searched from the memory itself and do not require any expensive I/O operation on disks. The following are the memory requirements:
· Must have at least 2 GB
· Good to have around 16 GB
· Disk: Anything that cannot be kept in memory will be flushed out to disks and will be required to read and load back into RAM on subsequent user's request. The higher the I/O, the better the response time will be for reading data from the disk. The following are some high-level specifications for the hard drive:
· Must have SATA drives with 15k RPM
· Good to have SSDs
· Operating system: The following are the various flavors of OSes recommended for deploying Neo4j:
· For production: Linux, HP-UX, and Windows 2008
· For development: Windows XP, Mac OS X, and Linux
Deployment options
Depending upon the license and operating system, Neo4j provides various deployment options. Although the nature of your project will probably rule out some licensing choices, the deployment plan remains open. Unfortunately, there cannot be universal recommendations about which one is going to be the best fit for you; it completely depends on the context of your project.
The following are the deployment options available with Neo4j:
· Neo4j Community Edition on Windows/Linux: Single node installation on Windows or Linux operating systems
· Neo4j Enterprise Edition on Windows/Linux: Single node or setting up cluster of nodes on Windows or Linux operating systems
Let's move forward now and discuss in detail each of the earlier mentioned deployment options.
Installing Neo4j Community Edition on Windows
This section will guide you through the end-to-end process of Neo4j installation on the Windows operating system. At the end of this section, you will have a fully functional Neo4j instance running on your Windows desktop / server.
Perform the following steps in order to install Neo4j on Windows:
1. Download and install Oracle Java 7 available at http://www.oracle.com/technetwork/java/javase/documentation/install-windows-152927.html or Open JDK 7 available at https://jdk7.java.net/download.html.
2. Open the environment variables and set the JAVA_HOME variable.
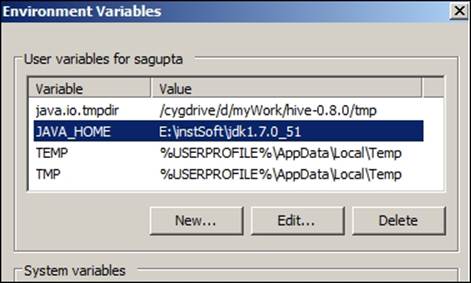
Neo4j can be installed and executed as a Windows service or it can also be downloaded as a .zip file, where after installation you need to execute a .bat script to run it as a standalone application.
Further in this section, we will talk about the steps involved in installing Neo4j as a service and standalone archive.
Installing as a Windows service
Installing Neo4j as a Windows service had always been a preferred procedure for administrators, especially in production environments, where you want your critical applications to be available for use at the server start-up itself and should also survive user logons/logoffs. Not only in the production environment but also in other development / QA environments, users have always preferred ease of installation, configuration, and upgradation, which can only happen when we install Neo4j as a service.
Note
You will require admin privileges on your system to install Neo4j as a Windows Service.
To install Neo4j as a Windows service, let's perform the following steps:
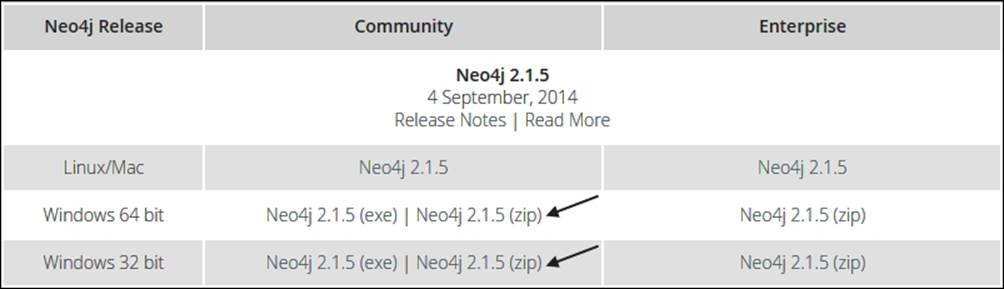
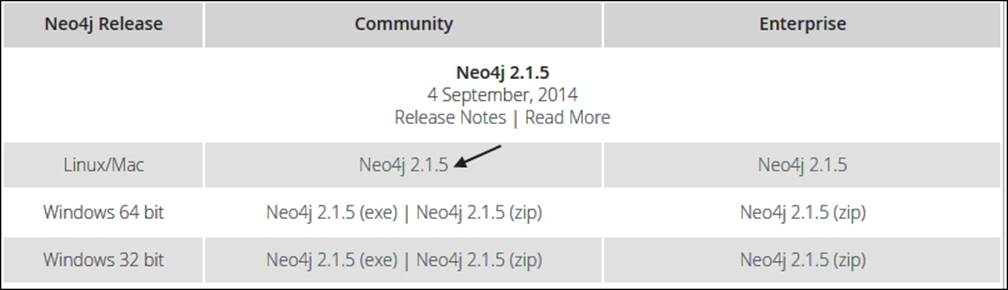
1. Depending upon your Windows platform (64 bit or 32 bit), download the latest stable release of Neo4j from http://neo4j.com/download/other-releases/.

2. Once downloaded, double-click on the .exe file and follow the instructions as they appear on your screen.
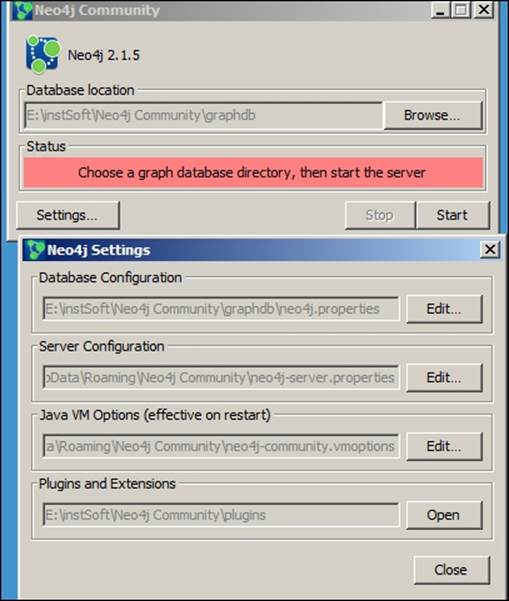
3. As soon as the installation process is finished, it will ask you to start the server and select the location where you want to create and store the graph database.
Note
Always provide an empty directory to store graph data for fresh installations.
By default it will choose to create data files at: %ROOT_DIR%:\Users\%USER%\Documents\Neo4j\default.graphdb.
4. On the same window, click on Settings and it will show you the location of various configuration files and their corresponding settings.
5. In case you are behind the firewall, it will ask for permissions to allow the server to communicate with certain ports.
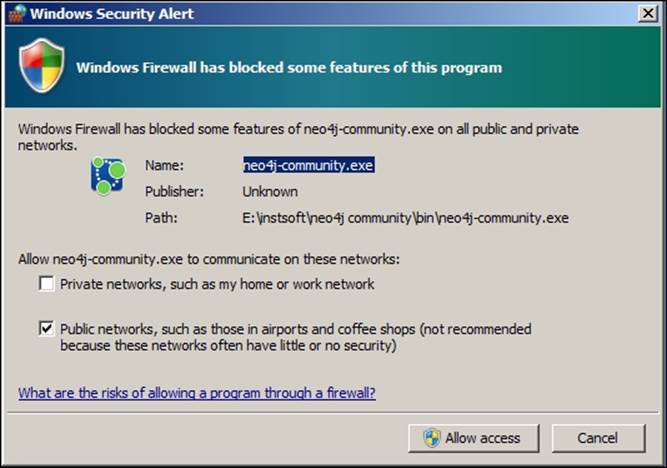
6. Click on Allow access and your Neo4j installation is complete and the server is ready for further development.
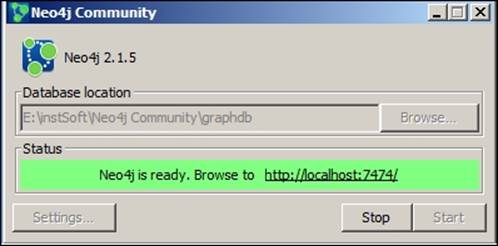
Browse http://localhost:7474/browser/ and you should see the Neo4j browser.
Note
The Neo4j Community link will also be available on your Windows Start menu for starting and stopping the server.
Installing as a Windows archive / standalone application
There is no doubt that administrators/users have always preferred installing critical software such as Neo4j as a Windows service; however, there are instances where users do not have sufficient privileges to install software as a service, and for this reason, there is another way that users can download Neo4j and can do manual configuration and start using it.
To install Neo4j as a Windows archive, let's perform the following steps:
1. Depending upon your Windows platform (64 bit or 32 bit), download the latest stable release of Neo4j from http://neo4j.com/download/other-releases/.
2. Once downloaded, extract the archive into any of the selected folders and refer to the top-level extracted directory as NEO4J_HOME.
3. Open the <$NEO4J_HOME >\bin directory and double-click on Neo4j.bat and you are done.
4. Stop the server by typing Ctrl + C.
5. Browse to http://localhost:7474/browser/ and you should see theNeo4j browser.
Installing Neo4j Community Edition on Linux/Unix
This section will guide you through the end-to-end process of Neo4j installation on the Linux/Unix operating system. By the end of this section, you will have a fully functional Neo4j instance running on your Linux/Unix desktop / server.
Perform the following steps to install Neo4j on Linux/Unix:
1. Download and install Oracle Java 7 available at http://www.oracle.com/technetwork/java/javase/install-linux-self-extracting-138783.html or Open JDK 7 available at https://jdk7.java.net/download.html.
2. Set JAVA_HOME as the environment variable export JAVA_HOME=<Path of Java install Dir>.
3. Download the stable release of Linux distribution neo4j-community-2.1.5-unix.tar.gz from http://neo4j.com/download/other-releases/.
Neo4j can be installed and executed as a Linux service, or it can be downloaded as a .tar file, where after installation it needs to be started manually by executing the shell scripts.
Further in this section, we will talk about the steps involved in installing Neo4j as a service and standalone archive.
Installing as a Linux tar / standalone application
There are no second thoughts that administrators/users have always preferred installing critical software such as Neo4j as Linux service; however, there are instances where users do not have sufficient privileges to install software as a service, there is another way that users can download Neo4j, perform some manual configuration, and start using it.
Let's perform the following steps to install Neo4j as a Linux tar / standalone application:
1. Once the Neo4j archive is downloaded, browse the directory where you want to extract the neo4j server and untar the Linux/Unix Archive—tar –xf <location of Archive file>. Let's refer to the top-level extracted directory as $NEO4J_HOME.
2. Open Linux shell or console and execute the following commands to start the server:
· $NEO4J_HOME/bin/neo4j - start – This command is used to run the server in a new process.
· $NEO4J_HOME/bin/neo4j - console – This command is used to run the server in the same window without forking a new process.
· $NEO4J_HOME/bin/neo4j - restart – This command is used to restart the server.
3. Browse http://localhost:7474/browser/ and you should see theNeo4j browser.
4. Stop the server by typing Ctrl + C or <$NEO4J_HOME>/bin/ neo4j - stop.
Installing Neo4j as a Linux service
Installing Neo4j as a Linux service has always been a preferred procedure for administrators, especially in production environments where you want your critical applications to be available for use at the server start-up itself and to also survive user logons/logoffs. Not only in the production environment but in other development / QA environments, users have always preferred ease of installation, configuration, and up-gradation, which can only happen when we install Neo4j as a service.
To install Neo4j as a Linux Service, let's perform the following steps:
1. Once the Neo4j archive is downloaded, browse the directory where you want to extract the Neo4j server, untar the Linux / Unix Archive—tar –xf <location of Archive file>, and refer to the top-level extracted directory as $NEO4J_HOME.
2. Change the directory to $NEO4J_HOME, execute the sudo bin/neo4j neo4j-installer install command, and follow the steps as they appear on screen.
Note
The installation procedure will provide an option to select the user that will be used to run the Neo4j server. You can supply any existing or new Linux user (it defaults to Neo4j). In case a user is not present, then it will be created as a system account and the ownership of $NEO4J_HOME/data will be moved to that user.
3. Once the installation is successfully completed, execute sudo service neo4j-service start on the Linux console to start the server and sudo service neo4j-service stop to gracefully stop the server.
4. Browse http://localhost:7474/browser/ and you should see the Neo4j browser.
Note
Accessing the Neo4j browser on a remote machine
To access the Neo4j browser on a remote machine, enable and modify org.neo4j.server.webserver.address in neo4j-server.properties and restart the server.
Installing the Neo4j Enterprise Edition
Enterprise Edition provides various features such as high availability (HA), fault tolerance, replication, backup, recovery, and many more. It also provides the features to set up a cluster of neo4j instances for achieving HA.
Setting up the Neo4j cluster will be quite similar to the single node setup except for a few properties that need to be modified for identification of the node in a cluster.
Configuring a Neo4j cluster on Windows
Let's perform the following steps to install the Neo4j Enterprise Edition on Windows:
1. Download and install Oracle Java 7, available at http://www.oracle.com/technetwork/java/javase/install-linux-self-extracting-138783.html or Open JDK 7, available at https://jdk7.java.net/download.html.
2. Open the environment variables and set the JAVA_HOME variable:
3. Depending upon your platform (64 or 32 bit), download the appropriate Windows archive from http://neo4j.com/download/other-releases/.
4. Once downloaded, extract the archive into any of the selected folders and let's refer to the top-level extracted directory as NEO4J_HOME.
5. Open <$NEO4J_HOME>\conf\neo4j-server.properties and enable/modify the following properties:
· #org.neo4j.server.database.mode=HA: This property allows us to keep this value as HA. You can run it as standalone too by providing the value as SINGLE.
· #org.neo4j.server.webserver.address=0.0.0.0: This property allows us to enable and provide the IP of the Node for enabling remote access.
6. Open <$NEO4J_HOME>\conf\neo4j.properties and enable/modify the following properties:
· "#ha.server_id=": This is the Unique ID of each node that will participate in the cluster. It should be an integer (1, 2, or 3).
· "#ha.cluster_server=192.168.0.1:5001"; this is the IP address and port for communicating cluster status information with other instances.
· "#ha.server=192.168.0.1:6001": This is the IP address and port of the node for communicating transactional data with other instances.
· "#ha.initial_hosts=192.168.0.1:5001,192.168.0.2:5001": This is a comma-separated list of the host port (ha.cluster_server), where all nodes will be listening. This would be the same for all nodes participating in the same cluster.
· "#remote_shell_enabled=true": Enable this property for connecting the server remotely through Shell.
· "#remote_shell_host=127.0.0.1": Enable this property and provide the IP address where the remote shell will be listening.
· "#remote_shell_port=1337": Enable this property and provide the port at which the shell will listen. You can keep it as default in case the default port is not being used by any other process.
7. Open the <$NEO4J_HOME>\bin directory and double-click on Neo4j.bat and you are done. Stop the server by typing Ctrl + C.
8. Browse http://<IP>:7474/browser/ for interactive shell or browse http://<IP>:7474/webadmin/ to perform administrative operations or to analyze server statistics.
Configuring a Neo4j cluster on Linux/Unix
Let's perform the following steps to install Neo4j Enterprise Edition on Linux:
1. Download and install Oracle Java 7, available at http://www.oracle.com/technetwork/java/javase/install-linux-self-extracting-138783.html or Open JDK 7, available at https://jdk7.java.net/download.html.
2. Set JAVA_HOME as the environment variable using the following command in your Terminal:
export JAVA_HOME=<Path of Java install Dir>
3. Download the stable release of the Linux distribution neo4j-enterprise-2.1.5-unix.tar.gz from http://neo4j.com/download/other-releases/.
4. Once downloaded, extract the archive into any of the selected folders and let's refer to the top-level extracted directory as NEO4J_HOME.
5. Open <$NEO4J_HOME>\conf\neo4j-server.properties and enable/modify the following properties:
· "#org.neo4j.server.database.mode=HA": This property allows us to keep this value as HA. You can run it as standalone too by providing the value as SINGLE.
· "#org.neo4j.server.webserver.address=0.0.0.0": This property allows us to enable and provide the IP of the node to enable remote access.
6. Open <$NEO4J_HOME>\conf\neo4j.properties and enable/modify the following properties:
· "#ha.server_id=": This is the unique ID of each node that will participate in the cluster. It should be an integer (1, 2, or 3).
· "#ha.cluster_server=192.168.0.1:5001": This is the IP address and port for communicating cluster status information with other instances.
· "#ha.server=192.168.0.1:6001": This is the IP address and port of the node for communicating transactional data with other instances.
· "#ha.initial_hosts=192.168.0.1:5001,192.168.0.2:5001": This is a comma-separated list of the host port (ha.cluster_server), where all the nodes will be listening. This would be the same for all the nodes participating in the same cluster.
· "#remote_shell_enabled=true": This property enables us to connect to the server remotely through shell.
· "#remote_shell_host=127.0.0.1": This property enables and provides the IP address where remote shell will be listening.
· "#remote_shell_port=1337": This property enables and provides the port at which Shell will listen. You can keep it as default in case the default port is not being used by any other process.
7. Open <$NEO4J_HOME>/bin and execute ./neo4j start and you are done. Stop the server by typing Ctrl + C.
8. Browse http://<IP>:7474/browser/ for interactive shell or browse to http://<IP>:7474/webadmin/ to perform administrative operations or to analyze server statistics.
Tools and utilities for administrators/developers
Neo4j comes with various tools and utilities which ease the life of a developer. Let's talk about each of them and see how they are helpful to developers:
· <$NEO4J_HOME>/bin/neo4j: This utility is used to start, stop, restart, or get the current status of the Neo4j server, which is not installed as a service and is executed as a standalone application. Here are the different options available with this utility:
· neo4j console: This option starts the Neo4j server as a foreground process.
· neo4j start: This option starts the Neo4j server in a different process.
· neo4j stop: This option shuts down the Neo4j server gracefully.
· neo4j status: This option shows the current status of the Neo4j server.
· <$NEO4J_HOME>/bin/neo4j-installer: This utility is used to install/uninstall the Neo4j server (as a service) on/from the local system. Here are the different options available with this utility:
· neo4j-installer install: This option is used to install the Neo4j server as a service on the local system.
· neo4j-installer remove: This option is used to uninstall/remove the server from the local system.
· neo4j-installer status: This option provides the status of the Neo4j server.
· neo4j-installer usage: This option prints the various parameters available for use.
· neo4j-installer start: This option starts the service of the Neo4j server.
· neo4j-installer stop: This option gracefully stops the service of the Neo4j server.
· <$NEO4J_HOME>/bin/neo4j-shell: Here, neo4j-shell is a powerful interactive shell used to interact with the Neo4j database. It is used to perform CRUD operations on graphs.
Neo4jshell can be executed locally on the same machine where we have installed the Neo4j server or by remotely connecting Neo4j shell to a remote sever.
Here are the various options available with this utility for connecting to the local Neo4j server:
· neo4j-shell -path <PATH>: This option is the path to the database directory on a local filesystem. A new database will be created in case the given path does not contain any valid neo4j database.
· neo4j-shell -pid <PID>: This option is used to connect to a specific process ID.
· neo4j-shell -readonly: This option is used to connect to the local database in READONLY mode.
· neo4j-shell -c <COMMAND>: This option is used to execute a single statement and then shell exits.
· neo4j-shell -file <FILE >: This option is used to read the contents of the file (multiple CRUD operations) and then execute it.
· neo4j-shell –config - <CONFIG>: This option is used to read the given configuration file (neo4j-server.propoerties) from the specified location and then start the shell.
Here are the various options available with this utility for connecting to the remote Neo4j server:
· neo4j-shell -port <PORT>: This option is used to connect to the server running on a different port other than the default port (1337).
· neo4j-shell -host <HOST>: This is the IP address or domain name of the remote host on which the neo4j server is installed and is currently running.
· neo4j-shell -name <NAME>: This option is used to connect to the remote host by getting the reference of the object binded within the RMI registry.
The following configuration changes are required to enable your shell to connect remotely. Open <$NEO4J_HOME>/conf/neo4j.properties and enable the following properties, providing an appropriate value against each of them:
· #remote_shell_enabled = true
· #remote_shell_host = 127.0.0.1
· #remote_shell_port = 1337
Note
All the utilities can be found under <$NEO4J_HOME>/bin.
There are two more utilities that are only available with the Enterprise Edition:
· <$NEO4J_HOME>/bin/neo4jArbiter: The Arbiter instances are used to take part in master elections with the single purpose of breaking ties in the election process. It will be difficult to understand at this point, but as of now, let's just remember the definition and we will talk about Arbiters a little later in Chapter 7, Neo4j Deployment.
· <$NEO4J_HOME>/bin/backups: This utility helps administrators/developers in scheduling backups or performing manual backups of Neo4j database.
Note
Online backups can also be performed by enabling the online_backup_enabled and online_backup_server properties.
Neo4j also provides a rich UI for interacting with the database and performing various CRUD operations visually such as querying data, managing indexes, and so on. It is similar to the Neo4j shell, which is a command-line utility but does not provide a UI.
Neo4j provides two kinds of web interfaces:
· Neo4j browser: It is available at http://<IP or Domain_name>:7474/browser/ and is the primary User Interface (UI) of Neo4j that provides a rich UI for visualizing the data in the form of graphs. It also facilitates in running your Cypher queries in an interactive UI-based console and showing the results in pretty graphs and tables.
· Neo4j WebAdmin: It is available at http://<IP or Domain_Name>:7474/webadmin/ and is similar to the Neo4j browser but comes with a classic UI and does not provide rich UI.
Running your first Cypher query
After Neo4j installation, we are ready to get our hands dirty with the system.
To begin with and to make it simple, first we will insert the data and then try to fetch the same data in four different ways:
· Interactive console (Neo4j shell)
· REST APIs
· Custom Java code with embedded database
· Neo4j browser
Interactive console – Neo4j shell
Neo4j shell is a command-line utility for performing CRUD operations on the Neo4j database. In this section, we will talk about the step-by-step process involved in executing Cypher queries using neo4j-shell.
Perform the following steps to run your Cypher queries in neo4j-shell:
1. Assuming that your server is already started, open a new Command Prompt, browse <$NEO4J_HOME>/bin/, and execute neo4j-shell. This will show you the shell prompt where you can execute your Cypher queries.
2. Next, execute the following set of statements on the console:
3. CREATE (movies:Movies {Name:"Rocky", ReleaseYear:"1976"});
MATCH (n) return n;
4. You will see something like the following screenshot on your console:
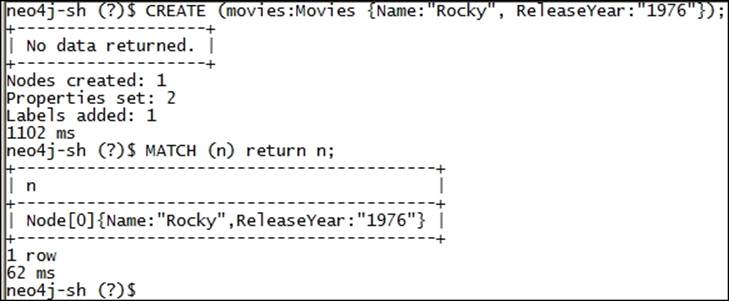
WOW!!! We are done! Simple, isn't it?
In the preceding example, we created a node called Movies with two attributes—Name and ReleaseYear. After creation, we fetched the same data using the Match query.
Working with REST APIs
Neo4j also exposes several REST APIs for performing CRUD operations on the Neo4j database. In this section, we will talk about the step-by-step process involved in fetching data from the Neo4j database using REST APIs.
Perform the following steps to invoke the Neo4j REST APIs:
1. Download any tool such as SoapUI, which provides creation and execution of REST calls.
2. Open your tool and execute the following request and parameters:
· Request method type: POST
· Request URL: http://localhost:7474/db/data/transaction
· Request headers: Accept: application/json; charset=UTF-8 and Content-Type: application/json
· JSONRequest: {"statements": [{"statement" : "MATCH (n) return n;"}]
The result would be a JSON response containing data inserted in the previous example.
Java code API and embedding the Neo4j database
Neo4j provides a rich set of Java APIs that help in embedding the Neo4j database within the Java/J2EE application as a headless application. Let's see how it works:
1. Shut down the Neo4j server by executing $NEO4J_HOME/bin/neo4j stop. Now using any IDE, create a new Java project and define the following dependencies to your project:
· JDK 1.7
· All JAR files in $NEO4J_HOME/lib/
2. Create a new Java file and add the following code:
3. import org.neo4j.graphdb.GraphDatabaseService;
4. import org.neo4j.graphdb.Label;
5. import org.neo4j.graphdb.Node;
6. import org.neo4j.graphdb.Transaction;
7. import org.neo4j.graphdb.factory.GraphDatabaseBuilder;
8. import org.neo4j.graphdb.factory.GraphDatabaseFactory;
9. import org.neo4j.tooling.GlobalGraphOperations;
10.
11.public class FetchAllData {
12. public static void main(String[] args) {
13. //Complete path of the database files on local System
14. //Use the same path "$NEO4J_HOME/data/graph.db"
15. String location = "$NEO4J_HOME/data/graph.db";
16.
17. //Create instance of Graph Database.
18. GraphDatabaseFactory fac = new GraphDatabaseFactory();
19. GraphDatabaseBuilder build = fac.newEmbeddedDatabaseBuilder(location);
20. GraphDatabaseService dbService = build.newGraphDatabase();
21.
22. //Starting a Transaction...All CRUD operations should be in Transaction
23. try (Transaction tx = dbService.beginTx()) {
24. GlobalGraphOperations operations = GlobalGraphOperations
25. .at(dbService);
26.
27. //Getting All Nodes
28. for (Node node : operations.getAllNodes()) {
29. System.out.println("Node Labels.....");
30.
31. //Get All Labels associated with that Node
32. for (Label label : node.getLabels()) {
33. System.out.println(label.name());
34. }
35. System.out.println("Node Properties = ");
36.
37. //Get All Keys/ Value associated with that Node
38. for (String key : node.getPropertyKeys()) {
39. System.out.println(key + " = " + node.getProperty(key));
40. }
41.
42. }
43. }
44. }
}
Tip
Downloading the example code
You can download the example code files from your account at http://www.packtpub.com for all the Packt Publishing books you have purchased. If you purchased this book elsewhere, you can visit http://www.packtpub.com/support and register to have the files e-mailed directly to you.
Compile the preceding code and execute it from the IDE itself. The preceding code will dump the complete data on the console.
In order to understand the preceding code, follow the comments provided before every line of the code.
The Neo4j browser
Neo4j provides a UI-based interactive console for performing CRUD operations on the Neo4j database. The Neo4j browser not only provides the console for executing Cypher queries but also a REST client to invoke the REST endpoints exposed by the Neo4j server.
In this section, we will talk about the step-by-step process involved in executing Cypher queries using the Neo4j browser.
Perform the following steps for running your Cypher queries in the Neo4j browser:
1. Assuming that your server has already started, open a new browser window and type http://localhost:7474 in the navigation bar of the browser. This will show you the Neo4j browser where you can execute your Cypher queries.
2. Next, click on the Get some data button from the left navigation pane and then execute the query by clicking on the right arrow sign that will appear on the extreme right corner, just below the browser navigation bar, which will look something like this:
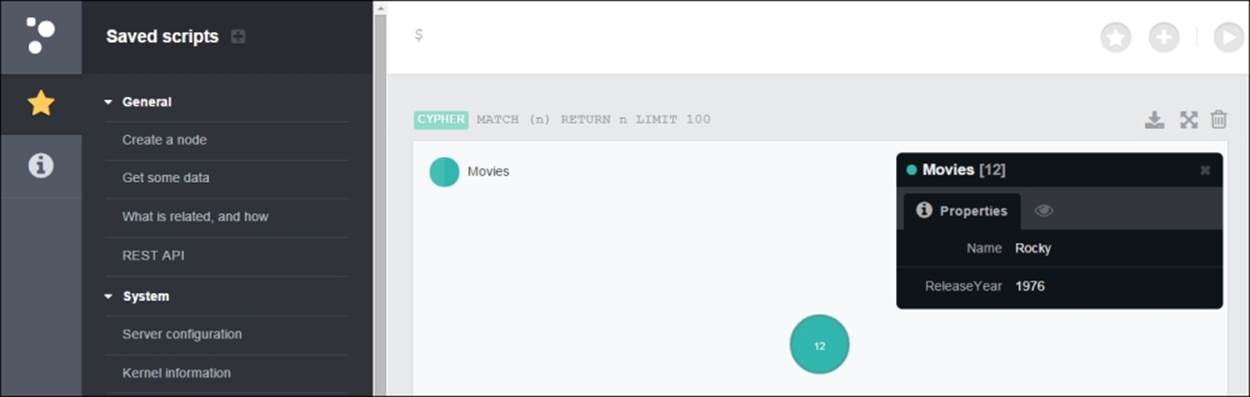
You can also click on the specific node to see its properties and type/execute other Cypher queries in the space given next to $ (below the browser navigation bar) as shown in the preceding screenshot. You can also invoke REST endpoints by clicking on REST API from the left navigation pane.
In this section, we walked you through the different ways to perform CRUD operation using various APIs exposed by Neo4j. You have not only executed your "first Cypher query" through the neo4j-shell, but you have also learned the other ways of accessing data through REST and Java APIs.
Summary
Throughout this chapter, we have gone through various licensing, installation, and step–by-step deployment options of the Neo4j database/server. We have also touched upon various ways to perform CRUD operations.
In the next chapter, we will talk about various bulk data import options and integration with third-party ETL tools.
All materials on the site are licensed Creative Commons Attribution-Sharealike 3.0 Unported CC BY-SA 3.0 & GNU Free Documentation License (GFDL)
If you are the copyright holder of any material contained on our site and intend to remove it, please contact our site administrator for approval.
© 2016-2026 All site design rights belong to S.Y.A.