Neo4j Essentials (2015)
Chapter 2. Ready for Take Off
We never work in isolation and this applies even to enterprises where they always look for systems that can be efficiently and seamlessly integrated with many other tools and technologies, so that they can use the best fit technology for their use cases, also known as best of all possible worlds.
Apart from being a robust and massively scalable graph database, storing billions of nodes and their associations/relationships, Neo4j also provides several ways to integrate with Business Intelligence (BI) / Visualization tools. As perhttp://businessintelligence.com/dictionary/business-intelligence-2/ BI is defined as:
"A term that refers to ideas, practices, and technologies for turning raw data into information that businesses can use to make better organizational decisions. Businesses that employ BI effectively can transform information into growth by gaining a clear understanding of their strengths and weaknesses, cutting costs and losses, streamlining internal processes, and increasing revenue."
BI helps in visualizing data in the form of intuitive dashboards for connected data, which helps businesses to take informed decisions for their organization's growth and future.
Neo4j also provides features to import/export data to/from other databases working for the same purpose or different purposes, in a performance-efficient manner.
At the end of this chapter, you will be able to insert data within your Neo4j database from other data sources and integrate with BI / Visualization and ETL tools.
This chapter will cover the following topics:
· Integration with BI / visualization and ETL tools
· Batch import
· Performance tuning / optimizations
Integration of the BI tool – QlikView
In this section, we will talk about the integration of the BI tool—QlikView with Neo4j. QlikView is available only on the Windows platform, so this section is only applicable for Windows users.
Neo4j as an open source database exposes its core APIs for developers to write plugins and extends its intrinsic capabilities.
Neo4j JDBC is one such plugin that enables the integration of Neo4j with various BI / visualization and ETL tools such as QlikView, Jaspersoft, Talend, Hive, Hbase, and many more.
Let's perform the following steps for integrating Neo4j with QlikView on Windows:
1. Download, install, and configure the following required software:
1. Download the Neo4j JDBC driver directly from https://github.com/neo4j-contrib/neo4j-jdbc as the source code. You need to compile and create a JAR file or you can also directly download the compiled sources from http://dist.neo4j.org/neo4j-jdbc/neo4j-jdbc-2.0.1-SNAPSHOT-jar-with-dependencies.jar.
2. Depending upon your Windows platform (32 bit or 64 bit), download the QlikView Desktop Personal Edition. In this chapter, we will be using QlikView Desktop Personal Edition 11.20.12577.0 SR8.
3. Install QlikView and follow the instructions as they appear on your screen. After installation, you will see the QlikView icon in your Windows start menu.
2. QlikView leverages QlikView JDBC Connector for integration with JDBC data sources, so our next step would be to install QlikView JDBC Connector. Let's perform the following steps to install and configure the QlikView JDBC Connector:
1. Download QlikView JDBC Connector either from http://www.tiq-solutions.de/display/enghome/ENJDBC or from https://s3-eu-west-1.amazonaws.com/tiq-solutions/JDBCConnector/JDBCConnector_Setup.zip.
2. Open the downloaded JDBCConnector_Setup.zip file and install the provided connector.
3. Once the installation is complete, open JDBC Connector from your Windows Start menu and click on Active for a 30-day trial (if you haven't already done so during installation).
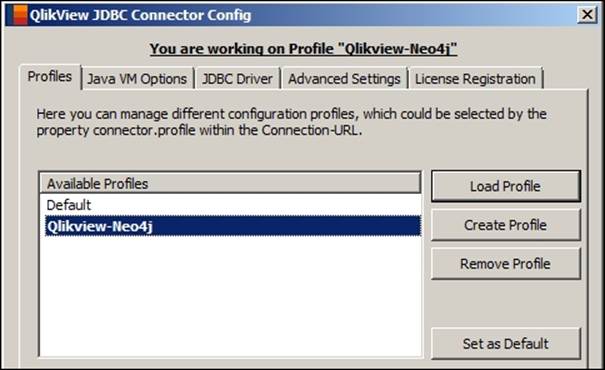
4. Create a new profile of the name Qlikview-Neo4j and make it your default profile.
5. Open the JVM VM Options tab and provide the location of jvm.dll, which can be located at <$JAVA_HOME>/jre/bin/client/jvm.dll.
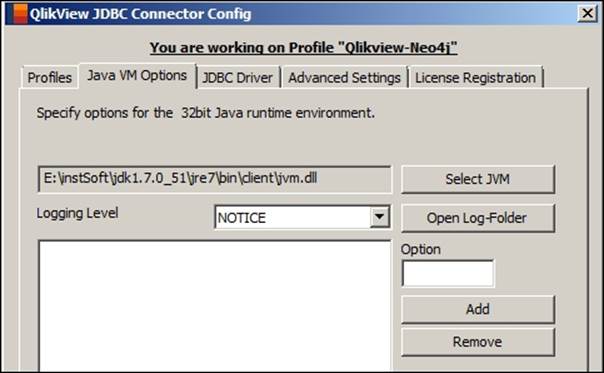
6. Click on Open Log-Folder to check the logs related to the Database connections.
Note
You can configure the Logging Level and also define the JVM runtime options such as -Xmx and -Xms in the textbox provided for Option in the preceding screenshot.
7. Browse through the JDBC Driver tab, click on Add Library, and provide the location of your <$NEO4J-JDBC driver>.jar, and add the dependent JAR files.
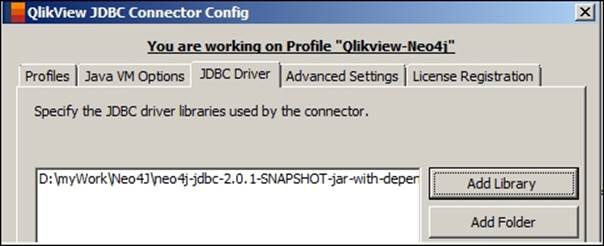
Instead of adding individual libraries, we can also add a folder containing the same list of libraries by clicking on the Add Folder option.
Note
We can also use non JDBC-4 compliant drivers by mentioning the name of the driver class in the Advanced Settings tab. There is no need to do that, however, if you are setting up a configuration profile that uses a JDBC-4 compliant driver.
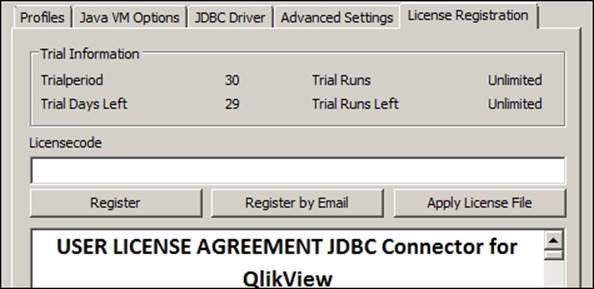
8. Open the License Registration tab and request Online Trial license, which will be valid for 30 days. Assuming that you are connected to the Internet, the trial license will be applied immediately.
9. Save your settings and close QlikView JDBC Connector configuration.
3. Open <$NEO4J_HOME>\bin\neo4jshell and execute the following set of Cypher statements one by one to create sample data in your Neo4j database; then, in further steps, we will visualize this data in QlikView:
4. CREATE (movies1:Movies {Title : 'Rocky', Year : '1976'});
5. CREATE (movies2:Movies {Title : 'Rocky II', Year : '1979'});
6. CREATE (movies3:Movies {Title : 'Rocky III', Year : '1982'});
7. CREATE (movies4:Movies {Title : 'Rocky IV', Year : '1985'});
8. CREATE (movies5:Movies {Title : 'Rocky V', Year : '1990'});
9. CREATE (movies6:Movies {Title : 'The Expendables', Year : '2010'});
10.CREATE (movies7:Movies {Title : 'The Expendables II', Year : '2012'});
11.CREATE (movies8:Movies {Title : 'The Karate Kid', Year : '1984'});
CREATE (movies9:Movies {Title : 'The Karate Kid II', Year : '1986'});
12. Open the QlikView Desktop Personal Edition and create a new view by navigating to File | New. The Getting Started wizard may appear as we are creating a new view. Close this wizard.
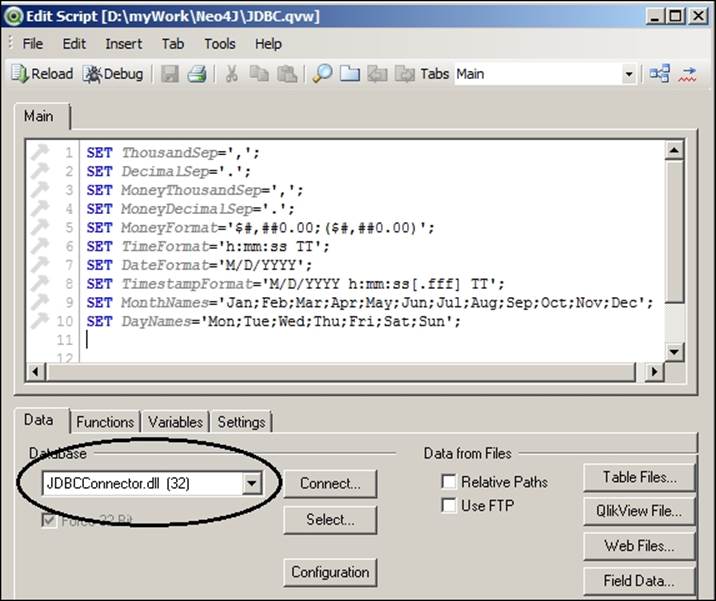
13. Navigate to File | EditScript and change your database to JDBCConnector.dll (32).
14. In the same window, click on Connect and enter "jdbc:neo4j://localhost:7474/" in the "url" box.
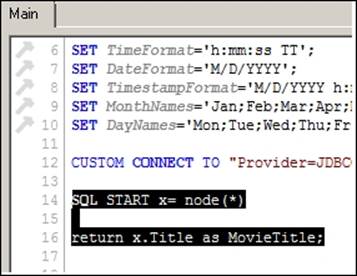
15. Leave the username and password as empty and click on OK. You will see that a CUSTOM CONNECT TO statement is added in the box provided.
16. Next insert the highlighted Cypher statements in the provided window just below the CUSTOM CONNECT TO statement.
17. Save the script and close the EditScript window.
18. Now, on your Qlikviewsheet, execute the script by pressing Ctrl + R on our keyboard.
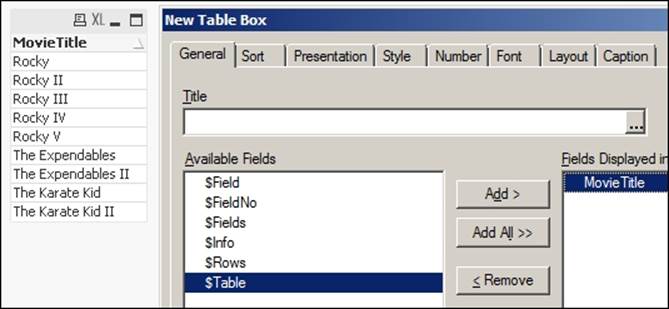
19. Next, add a new TableObject on your Qlikviewsheet, select "MovieTitle" from the provided fields and click on OK.
And we are done!!!!
You will see the data appearing in the listbox in the newly created Table Object. The data is fetched from the Neo4j database and QlikView is used to render this data.
The same process is used for connecting to other JDBC-compliant BI / visualization / ETL tools such as Jasper, Talend, Hive, Hbase, and so on. We just need to define appropriate JDBC Type-4 drivers in JDBC Connector.
Note
We can also use ODBC-JDBC Bridge provided by EasySoft at http://www.easysoft.com/products/data_access/odbc_jdbc_gateway/index.html. EasySoft provides the ODBC-JDBC Gateway, which facilitates ODBC access from applications such as MS Access, MS Excel, Delphi, and C++ to Java databases. It is a fully functional ODBC 3.5 driver that allows you to access any JDBC data source from any ODBC-compatible application.
Creating a ready-to-use database – batch imports
Batch data import is one of the most widely used and integral processes in enterprise systems. It not only helps to create our ready-to-use database in a few minutes, but is also helpful in situations such as system failures / crashes where we want to recover our systems and reload the data as soon as possible.
Neo4j provides the following processes for importing data in batches:
· CSV importer
· The spreadsheet way—Excel
· HTTP batch imports—REST API
· Java API
Let's discuss in detail each of the batch import processes.
The CSV importer
Neo4j exposes the LOAD CSV command for importing data from the CSV files (with or without headers). LOAD CSV can either use the CREATE or MERGE commands for importing the data into the database.
Let's understand each of the available options.
LOAD CSV with CREATE
The following steps will guide you through the process of using the LOAD CSV command:
1. Let's create a file by the name neo4j-import.csv in the root of your <$NEO4J_HOME> folder with the following content:
2. Name, WorkedAs
3. "Sylvester Stallone","Actor,Director"
4. "John G. Avildsen","Director"
5. "Ralph Macchio","Actor"
"Simon West","Director"
6. Once the CSV file is created, ensure that it has the following characteristics:
· The character encoding of a CSV file should be UTF-8
· End line termination is system dependent, for example, it is \n on Unix and \r\n on Windows
· The default field terminator is ",", though you can change it by using the FIELDTERMINATOR option
· Quoted strings are allowed in the CSV file and the quotes are removed while reading the data
· The character for string quotation is double quotes "
· The escape character is \
7. In Unix, open <$NEO4J_HOME>/bin/neo4j-shell and enter the following command; you will see that four nodes, four properties, and four labels are added:
8. LOAD CSV WITH HEADERS FROM "file://<$NEO4J_HOME>/neo4j-import.csv" as csv
9. CREATE (cinestars:Cinestars {Name : csv.Name, WorkedAs : split (csv.WorkedAs,",")});
Make sure that you replace <$NEO4J_HOME> with the actual path or location of the directory.
10. In Windows, open <$NEO4J_HOME>\bin\neo4j-shell and enter the following command; you will see that four nodes, four properties, and four labels are added:
11.LOAD CSV WITH HEADERS FROM "file:\\<$NEO4J_HOME>\\neo4j-import.csv" as csv
CREATE (cinestars:Cinestar {Name : csv.Name, WorkedAs : split (csv.WorkedAs,",")});
Make sure that you replace <$NEO4J_HOME> with the actual path or location of the Neo4j installation directory..
And you are done!!! Easy isn't it?
Note
LOAD CSV can import CSV files, which do not contain any headers. Replace the name of the header with their position in the file within []. For example, the first column of neo4j-import.csv will be referred to as csv[1] and the second column would be csv[2] in the Cypher statement.
In subsequent sections and chapters, all examples will list down the steps for the Unix operating system, unless specified otherwise.
LOAD CSV with MERGE
In the previous example, we have used CREATE in LOAD CSV, which creates the new records in the database, but what happens when you have duplicate records in your CSV file?
That would create duplicate records in your database too, which will be a real problem.
In order to solve the issue with duplicate records, Neo4j provides the MERGE command, which if used will either match the existing nodes and bind them, or create new data and bind them. It is like a combination of MATCH and CREATE statements that additionally allow you to specify the action that needs to be performed in scenarios where data is matched or created.
The behavior of MERGE is that it either matches the whole pattern, or it creates the whole pattern. It will not partially use existing patterns—it's all or nothing.
MERGE is accompanied and followed with ON CREATE and ON MATCH. These allow us to perform additional changes to the nodes, properties, and relationship depending upon the result of the MERGE command.
For example, the preceding LOAD CSV command can be re-written as:
LOAD CSV WITH HEADERS FROM "$NEO4J_HOME/neo4j-import.csv" as csv
MERGE (cinestars:Cinestar {Name : csv.Name})
ON CREATE SET cinestars.WorkedAs = split (csv.WorkedAs,",");
The preceding command will load the data and set the properties of the node only if it is created. No changes will be performed in case the node already exists.
Note
LOAD CSV only works with Cypher 2.1 and above. Check the version of kernel by executing dbinfo -g Kernel KernelVersion on neo4j-shell (in Unix) or neo4jshell (in Windows) and if required upgrade or try appending Cypher 2.1 before your LOAD CSV statement.
The spreadsheet way – Excel
Neo4j does not provide direct support for importing Excel documents; however, by leveraging the capabilities of Excel, we can create dynamic cypher queries and then execute all those queries in a batch mode.
Let's consider an example and see how it works.
Assume that your data is organized in an Excel sheet, as per the following screenshot where columns A, B, and C contain the data and column D contains the dynamic Cypher:

Columns A, B, and C are straightforward to understand as they contain plain data. The tricky part is column D where we have entered the following Excel formula:
= "CREATE (n:"&C2&" {id:"&A2&", name: '"&B2&"'});"
Copy the same formula for all other rows and we get similar Cypher queries based on the data provided in Columns A, B, and C.
Next, perform the following steps to create the batch import file:
1. Create a new empty file and save it as import.txt in your <$NEO4J_HOME> folder.
2. Edit import.txt and add BEGIN at the top of the file.
3. Copy the values of column D into import.txt, below the BEGIN line.
4. Add COMMIT to the end of the file.
5. Save import.txt.
6. Stop your Neo4j server.
The Neo4j server needs to be stopped because in the next step we will be using Neo4j shell to start the Neo4j server in embedded mode and perform direct imports (also called low level imports). Now, for starting the Neo4j server in embedded mode, Neo4j shell needs to take a look at the database files, which otherwise would be with the Neo4j server.
7. Open your console, browse <$NEO4J_HOME>, and execute the following command:
8. cat import.txt | $NEO4J_HOME/bin/neo4j-shell –config conf/neo4j.properties -path $NEO4J_HOME/data/graph.db
Now all you need to do is start your Neo4j server again and you will be able to query the data.
HTTP batch imports – REST API
Neo4j REST architecture is one of the most well-crafted and well-designed architectures. Designed on principles of service discoverability, it exposes the service root, and from there users can discover other URIs to perform various CRUD and search operations.
All endpoints are relative to http://<HOST>:<PORT>/db/data/ which is also known as a service root for other REST end points. You can simply fire the service root, using GET operations, and it will show its other REST endpoints.
The default representation for all types of request (POST/PUT) and response is JSON.
In order to interact with the JSON interface, users need to explicitly set the request header as Accept:application/json and Content-Type:application/json.
One of the end points exposed by Neo4j REST architectures is /batch/. This is used to perform batch operations on the Neo4j database. It provides an interface for multiple API calls through a single HTTP request, which significantly improves performance for a large number of insert and update operations.
The API expects an array of job descriptions as input and each job description describes an action to be performed via the normal server API.
This service is executed in a transaction, and in case any operation fails, all modifications are rolled back.
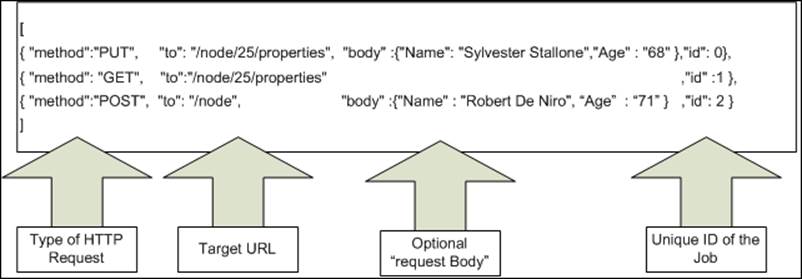
Let's first understand the structure of a sample batch request, which defines multiple jobs within a single request and then we will also execute the same request against our local Neo4j database:
[ {
"method":"PUT",
"to": "/node/25/properties",
"body" :{
"Name": "Sylvester Stallone",
"Age" : "68"
},"id": 0
},
{
"method": "GET",
"to":"/node/25/properties",
"id" :1
},
{
"method":"POST",
"to": "/node",
"body" :{
"Name" : "Robert De Niro",
"Age" : "71"
},
"id": 2
}]
Let's discuss the role of each of the different sections of the preceding JSON request:
· method: This defines the type of operation (GET, PUT, POST, DELETE, and so on).
· to: This is the target URL where we submit our request. The URL can request any type of operation on nodes, attributes, or relationships. For example, in Job-0 ("id:"0") we request the PUT operation on node with node ID = 25, for Job-1 GET operation on node with node ID = 25 and for Job-2 we use the POST operation for adding a new node. Node ID is unique and has internal IDs used by Neo4j; they are not guaranteed to be the same for two different setups. So, before executing the preceding example, find the node ID of the node, which contains the Name property as Sylvester Stallone and then replace it in the preceding request. Node ID can be queried by executing the following Cypher query on Neo4j shell:
· match (n) where n.Name = "Sylvester Stallone" return n;
· body: This is the optional attribute for sending the parameters.
· Id: This defines the unique ID of each job. Results, when returned, are identified by the ID. The order of the results is the same as the order of the jobs when submitted.
Use any tool such as SoapUI, which supports testing of REST-based services / representation, execute the preceding JSON request using the following configuration, and see the results:
· Request method type: POST
· Request URL: http://<HOST>:<PORT>/db/data/batch
· Headers: Accept: application/json; charset=UTF-8 and Content-Type: application/json
Java API – batch insertion
Neo4j exposes a low-level Java API for bulk insertion of data, namely BatchInserter and for bulk indexing of data, namely BatchInserterIndex. These APIs are packaged with the Neo4j kernel available athttps://github.com/neo4j/neo4j/tree/2.1.5/community/kernel/src/main/java/org/neo4j/unsafe/batchinsert. So it is available with both flavors (Enterprise and Community Edition) of Neo4j.
Let's take a closer look at each of these APIs.
BatchInserter
The intention behind the batch insertion API is to provide a low-level interface for directly interacting with or inserting data into Neo4j and avoiding all overheads such as transactions and other checks.
This API is useful when we have to load huge datasets (TBs), and the priority is only performance and nothing else.
At the same time, this API is limited in functionality and needs to be used with caution due to the following reasons:
· Request method type is POST
· It is not thread safe
· It does not support a transaction, so it is non-transactional
· It repopulates all existing indexes and new indexes on shutdown
· It is imperative to invoke shutdown successfully, otherwise database files will be corrupted
The batch insertion API should be used in a single thread or synchronization needs to be used so that concurrent access to BatchInserter object is restricted.
The following code creates two nodes in Neo4j database, using the batch insertion API:
Import java.util.HashMap;
Import java.util.Map;
import org.neo4j.graphdb.DynamicLabel;
import org.neo4j.graphdb.DynamicRelationshipType;
import org.neo4j.graphdb.Label;
import org.neo4j.graphdb.RelationshipType;
import org.neo4j.unsafe.batchinsert.BatchInserter;
import org.neo4j.unsafe.batchinsert.BatchInserters;
public class Neo4jBatchInserter {
public void batchInsert() throws Exception {
//Getting Object of BatchInserter.
//Should be called only once for Batch of statements
// "/graph.db" should be replaced with the path of your Neo4j Database.
//Neo4j Database should be located at following path <$NEO4J_HOME>/data/graph.db
BatchInserter inserter = BatchInserters.inserter("/graph.db");
try{
//Create a Label for a Node
Label personLabel = DynamicLabel.label( "Cinestars" );
//Enabling Index for a Label and Property
inserter.createDeferredSchemaIndex(personLabel ).on( "name" ).create();
//Creating Properties and the Node
//"<>" or generics are available with Java>=1.5
// But it is recommended to use Java>=1.7 with Neo4j API's
Map<String, Object> properties = new HashMap<>();
properties.put( "Name", "Cate Blanchett" );
long cateNode = inserter.createNode( properties, personLabel );
//Creating Properties and the Node
properties.put( "Name", "Russell Crowe " );
long russellNode = inserter.createNode( properties, personLabel );
//Creating Relationship
RelationshipType knows = DynamicRelationshipType.withName( "KNOWS" );
// To set properties on the relationship, use a properties map
// instead of null as the last parameter.
inserter.createRelationship(cateNode, russellNode, knows, null );
} catch (Exception e) {
//Print Exception on Console and shutdown the Inserter
e.printStackTrace();
//Shutdown the Inserter, so that your database is not corrupted.
inserter.shutdown();
}
//Should be called only once for Batch of statements
inserter.shutdown();
}
public static void main(String[] args) {
try {
new Neo4jBatchInserter().batchInsert();
} catch (Exception e) {
//Print all and any kind of Exception on Console.
e.printStackTrace();
}
}
}
Stop your Neo4j server (if it is running); compile the preceding code and execute it from the IDE itself. You should now see two nodes inserted by the batch insertion API.
Note
In order to understand the preceding code, follow the comments provided before each line of the code. This technique is adopted for every code example.
GraphDatabaseService is also supported by the batch insertion API for reusability of insertion code, which must have been written using the normal Neo4j Java API and not BatchInserter.
Simply replace build.newGraphDatabase();in your older code base with BatchInserters.batchDatabase( "/graph.db"); and now you can use the APIs of GraphDatabaseService. Do not forget to add dbService.shutdown() at the end of the code and you are done; however, this ease and simplicity comes with a cost and the cost is that there are few operations that are not supported by this service.
The following is the list of such operations:
· Transaction.finish() / Transaction.close() or Transaction.success()
· Node.delete() and Node.traverse()
· Transaction.failure() will generate a NotInTransaction exception
· Relationship.delete()
· Event handlers and indexes are not supported
· getRelationshipTypes(), getAllNodes(), and getAllRelationships() of GraphDatabaseService are also not supported
Batch indexing
As we have BatchInserter for inserting the data in batches, in the same manner Neo4j provides BatchInserterIndex for indexing the dataset during the insertion process. The following sample code demonstrates the use of BatchInserterIndex:
Import java.util.Map;
import org.neo4j.helpers.collection.MapUtil;
import org.neo4j.index.lucene.unsafe.batchinsert.LuceneBatchInserterIndexProvider;
import org.neo4j.unsafe.batchinsert.BatchInserter;
import org.neo4j.unsafe.batchinsert.BatchInserterIndex;
import org.neo4j.unsafe.batchinsert.BatchInserterIndexProvider;
import org.neo4j.unsafe.batchinsert.BatchInserters;
public class Neo4jBatchIndexer {
public void batchIndexer() throws Exception {
// "/graph.db" should be replaced with the path of your Neo4j Database.
//Neo4j Database should be located at following path <$NEO4J_HOME>/data/graph.db
BatchInserter inserter = BatchInserters.inserter( "graph.db" );
//Creating Object of Index Providers
BatchInserterIndexProviderindexProvider=new LuceneBatchInserterIndexProvider( inserter );
Try{
//Getting reference of Index
BatchInserterIndex actors = indexProvider.nodeIndex( "cinestars", MapUtil.stringMap( "type", "exact" ) );
//Enabling Caching on Nodes
actors.setCacheCapacity( "name", 100000 );
//Creating Node and setting Properties
//"<>" or generics are available with Java>=1.5
// But it is recommended to use Java>=1.7 with Neo4j API's
Map<String, Object> properties = MapUtil.map( "name", "Keanu Reeves" );
long node = inserter.createNode( properties );
//Adding Node to Index
actors.add( node, properties );
//make the changes visible for reading, use Carefully, requires IO!
actors.flush();
// Shut down the index provider and inserter
} catch (Exception e) {
//Print Exception on Console and shutdown the Inserter and Indexer
e.printStackTrace();
//Shutdown the Index and Inserter, so that your database is not corrupted.
indexProvider.shutdown();
inserter.shutdown();
}
indexProvider.shutdown();
inserter.shutdown();
}
public static void main(String[] args) {
try {
new Neo4jBatchIndexer().batchIndexer();
} catch (Exception e) {
//Print all and any kind of Exception on Console
e.printStackTrace();
}
}
Stop your Neo4j server (if it is running); compile the preceding code and execute it from IDE itself. The preceding code will create a Node that can then be indexed using BatchInserterIndex.
Understanding performance tuning and optimizations
Neo4j provides various optimizations and tuning parameters, which, if used thoughtfully, can provide significant differences in the behavior and throughput of the database and server. There is no standard or universally accepted configuration and developers need to consider the various non-functional requirements (NFRs) of the use case such as SLA, efficiency, effectiveness, failure management, performance / response time, and the environment in which they need to operate, before they start tuning the system.
Neo4j provides the capability of using the OS mapped memory, instead of the JVM heap for reading/writing. It is always recommended to provide enough OS mapped memory so that the best performance can be achieved, but in case memory is not enough, then Neo4j will do its best to keep frequently accessed data in memory and the rest on disk.
It is also recommended to configure OS with large disk caches, which will help in cases where we get cache misses in the node and relationship caches.
The following table shows the configuration for tuning the memory of the Neo4j database, which needs to be modified in <$NEO4J_HOME>/conf/neo4j.properties irrespective of the process, function, or operation being used or considered (such as reading/writing or bulk insertion).
|
Parameter |
Default value |
Description |
|
use_memory_mapped_buffers |
True (except windows) |
Enables the mapping of operating system memory for storing the file buffer cache windows. |
|
neostore.nodestore.db.mapped_memory |
25M |
This is the memory required to store the nodes. |
|
neostore.relationshipstore.db.mapped_memory |
50M |
This is the memory required to store the relationships. |
|
neostore.propertystore.db.mapped_memory |
90M |
This is the memory required to store the properties of the nodes and relationships. |
|
neostore.propertystore.db.strings.mapped_memory |
130M |
This is the memory allocated for storing strings. |
|
neostore.propertystore.db.arrays.mapped_memory |
130M |
This is the memory allocated for storing arrays. |
|
mapped_memory_page_size |
1048576 |
Total size for pages of mapped memory. |
|
label_block_size |
60 bytes |
This is the block size for storing labels exceeding in-lined space in node record. This parameter is only considered at the time of store creation, otherwise it is ignored. |
|
array_block_size |
120 bytes |
This is the block size for storing arrays. This parameter is only considered at the time of store creation, otherwise it is ignored. |
|
string_block_size |
120 bytes |
This is the block size for storing strings. This parameter is only considered at the time of store creation, otherwise it is ignored. |
|
node_auto_indexing |
False |
This controls the autoindexing feature for nodes. We should turn it ON. |
Tuning JVM
Neo4j is written in Java and as with other Java-based applications, we need to configure JVM for optimal performance.
First and foremost, here are a few considerations for tuning the memory of any Java-based systems, in our case Neo4j:
· Monitoring GC activity and ensuring that it is not spending too much time in garbage collection.
· For most of the use cases, CMS garbage collector (-XX+UseConcMarkSweepGC), which collects objects concurrently and has low pause time, works well but don't stop yourself from considering Parallel GC (-XX:+UseParallelGC). Parallel GC performs minor collections in parallel, which can significantly reduce garbage collection overhead.
· Start your Java process with -server flag and based on your hardware capacity and use case requirements, configure max memory (-Xmx) and min memory (-Xms).
· Providing too much memory for JVM can result in performance degradation due to the pauses caused by long GC cycles; this can happen with too less memory as well. Monitor the memory of your system and then decide upon the appropriate values for –Xms and –Xmx. Think twice in case you are considering anything above 16 GB for your JVM. There can be long GC cycles resulting in performance degradation. There are a bunch of other parameters that can be referred fromhttp://www.oracle.com/technetwork/java/javase/tech/vmoptions-jsp-140102.html.
LOAD CSV
LOAD CSV is a memory-intensive operation, which if optimized, can provide significant improvements in the overall data-loading process. For one of our use cases, we were able to reduce the overall data insertion time by 40 percent by using appropriate configuration and tuning parameters.
Apart from the common memory parameters, the following are a few considerations for the LOAD CSV process:
· Having simple LOAD CSV statements and multiple passes across them or multiple .csv files, consumes less memory than complex LOAD CSV statements
· The MERGE command should not be used for nodes and relationships in a single LOAD CSV command
· In a single LOAD CSV statement, either use CREATE nodes or MERGE nodes, but not both
· Neo4j shell provides optimum performance for batch imports
· Make sure that auto indexing is ON (set node_auto_indexing=true) and also define the columns that need to be indexed (node_keys_indexable=id,name,type) in <$NEO4J_HOME>/conf/neo4j.properties
Batch inserter / indexer
Similar to LOAD CSV, batch inserter / indexer is also a memory-intensive operation. So it is imperative for inserter/indexer to tune the memory and JVM parameters. The following are few considerations for tuning the memory and JVM of batch inserter / indexer:
· BatchInserter#shutdown should be called only at the end of each phase of the batch writing operation, as it will commit all changes and make it visible to the querying APIs.
· Avoid executing BatchInserterIndex.flush() too often during batch indexing as flushing will commit all changes and make it available for the querying APIs, which could result in performance degradation.
· Depending upon your memory sizes, have big phases for the write operations.
· Enable indexing and caching (BatchInserterIndex.html#setCacheCapacity) for common and widely used keys so that it can increase performance during lookups. Though it will slightly degrade the performance, there will be no major impact unless you care for each millisecond.
· Avoid or keep to a minimum read/lookup operations during batch insertion or indexing.
Summary
In this chapter, we have walked through the process of BI integration with Neo4j, bulk data loading strategies and processes. In the end, we have also touched upon the various aspects of performance tuning and optimization of our Neo4j database.
In the next chapter, we will discuss the strategy for modeling data in Neo4j, read-only Cypher queries for fetching data from the database, and using legacy indexing queries.
All materials on the site are licensed Creative Commons Attribution-Sharealike 3.0 Unported CC BY-SA 3.0 & GNU Free Documentation License (GFDL)
If you are the copyright holder of any material contained on our site and intend to remove it, please contact our site administrator for approval.
© 2016-2026 All site design rights belong to S.Y.A.