Neo4j Essentials (2015)
Chapter 7. Neo4j Deployment
Designing a scalable and distributed software deployment architecture is another challenge for developers/architects. Development teams are constantly striving to deploy software in such a way that various enterprise concerns such as maintenance, backups, restores, and disaster recovery are easier to perform and flexible enough to scale and accommodate future needs.
However, application software does provide various deployment options, but which one to use and how they are used, will largely depend upon the end users. For example, you may have more reads being performed as compared to writes or vice versa. So your deployment architecture would need to support and be optimized either for a high volume of reads or high volume of writes, or both.
Scalability is another aspect that is closely linked to the deployments. In simple terms, it defines a feature of a software where it can support x number of user requests by adding more nodes in a cluster (horizontal scalability or scale out) or by upgrading the existing hardware by adding more processing power CPUs or memory—RAM (vertical scalability). Now, which one to use, without impacting the SLAs, is again a challenging question that will require pushing the software to its limits, so that you can understand its behavior in extreme / rare circumstances and then define an appropriate strategy / plan for your production deployment. We should also remember that the production deployments are evolving and will change over time due to many reasons such as new versions of software, innovation in hardware, changes in user behavior, and so on.
In this chapter, we will discuss the Neo4j deployment scenarios and also talk about recommended setup and monitoring. This chapter will cover the following topics:
· Neo4j architecture and advanced settings
· Cluster mode – principles and recommended setup
· Monitoring
Neo4j architecture and advanced settings
Neo4j architecture, which is also known as Neo4j HA architecture, provides a robust and scalable architecture that fits best towards the needs of enterprises. It mainly provides the following features:
· High Availability (HA) and linear scalability
· Fault tolerance
· Data replication and data locality
· Backup and recovery
Let's discuss the preceding features provided by Neo4j HA architecture.
High Availability and linear scalability
Neo4j HA architecture provides clustering of Neo4j servers and implements a master-slave architecture.
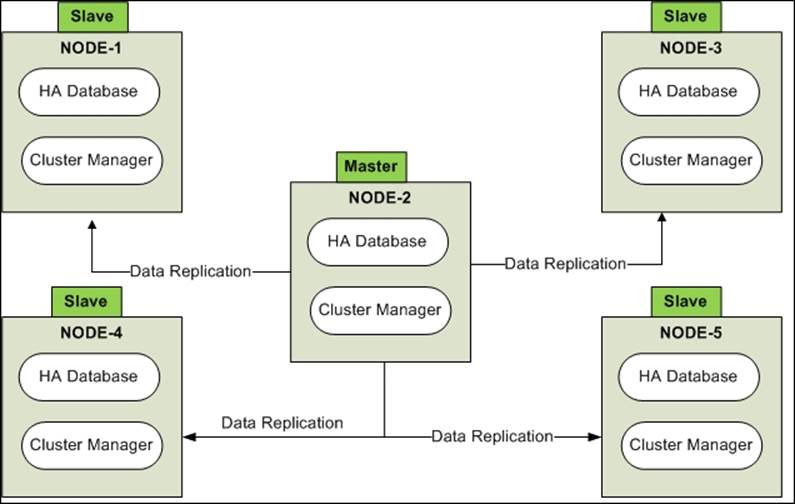
As shown in the preceding diagram, each Neo4j server instance has two parts: one is the Neo4j HA database and the other is the cluster manager. Neo4j HA database is responsible for storing and retrieving the data, and cluster manager is responsible for ensuring a HA and fault-tolerant cluster.
Neo4j HA database directly communicates with the other instances for data replication with the help of cluster manager.
The following are the features provided by cluster manager:
· Maintaining and tracking of live and dead nodes
· Enabling data replication from the master node by polling at regular intervals
· Electing the master node
· Exposing system health / monitoring via JMX beans
Neo4j architecture is a self-driven and independent architecture and requires minimum human intervention or management.
All the nodes in a cluster are self-sufficient and any node, either slave or master, can be used to read data from the database. Writing is an exception where all writes have to be persisted or relayed through the master node. Although you can still connect to the slave nodes and relay your write requests, before returning success, the slave nodes will direct all requests to the master node, and once the master node confirms the success, only then will the client receive a success response. So, it is always advisable to relay all writes to the master node, and reads can be performed from any node.
Neo4j also provides linear scalability where we can add nodes to the existing cluster and data is asynchronously replicated to the new nodes.
Note
To enable HA / cluster mode, modify the value of org.neo4j.server.database.mode as HA in <$NEO4J_HOME>/conf/neo4j-server.properties.
Fault tolerance
Neo4j provides the custom implementation of multi-paxos paradigm at http://en.wikipedia.org/wiki/Paxos_%28computer_science%29#Multi-Paxos, which provides the following features:
· Cluster management keeps a track of the leaving or joining nodes. It checks the heartbeat of the other participating nodes in a cluster and keeps a track of the last sync and its availability.
· Message broadcasting and replication.
· Electing and choosing master nodes.
· Assisting Neo4j HA database in transaction propagation and data replication.
Note
You can also read more about Paxos from http://research.microsoft.com/en-us/um/people/lamport/pubs/paxos-simple.pdf.
Although reads can be served even with a single node, when it comes to writes, it is essential to have a Quorum of nodes available in a cluster.
Whenever a Neo4j database instance becomes unavailable, due to any reason such as hardware or network failure, the other database instances in the cluster will detect that and mark it as temporarily failed.
Once the temporarily failed instance is available and ready to serve user requests, it is automatically synced with the other nodes in the cluster.
If the master goes down, then another (best-suited) member will be elected and have its role switched from slave to master after a quorum has been reached within the cluster. Writes are blocked during the election process of the master node.
For all those cases where Quorum is not available and we still want to elect the master, Neo4j provides arbiter nodes that can be deployed to achieve the Quorum. Arbiter nodes do not contain the data and neither serve the read or write requests. They are used only in the election of the master node with the single purpose of breaking ties.
Arbiter instances are configured in the same way as Neo4j HA members are configured in the neo4j.properties file under conf/ and the following command is used to start an arbiter instance:
<$NEO4J_HOME>/bin/neo4j-arbiter start
In cases where the new master performs some changes to the data, before the old master recovers, there will be two branches of the database after the point where the old master became unavailable. The old master will move away from its database (its branch), will download a full copy from the new master, would be marked as available, and will also be added as a slave node in the cluster.
Data replication and data locality
Neo4j HA architecture asynchronously replicates the data to other nodes in a cluster. All write operations are first performed by the master node and then the slave nodes are synchronized or they poll the new data from the last checkpoint from the master node. The behavior of data replication is driven by the following properties defined at <$NEO4J_HOME>/conf/neo4j.properties:
· ha.pull_interval: This is the interval at which slaves will pull updates from the master. The unit is in seconds.
· ha.tx_push_factor: This is the amount of slaves node the master will try to push a transaction before returning success to the client. We can also set this to 0, which will switch off the synchronous data writes to slave node and would eventually increase the write performance, but would also increase the risk of data loss, as the master would be the only node containing the transaction.
· ha.tx_push_strategy: It should be either fixed or round robin. This means the priority of nodes that will be selected to push the events. In case of fixed, the priority is decided based on the value of ha.server_id, which is further based on the principle of highest first.
All write transactions on a slave will be first synchronized with the master. When the transaction commits, it will be first committed on the master, and if successful, then it will be committed on the slave. To ensure consistency, the slave has to be updated and synchronized with the master before performing a write operation. This is built into the communication protocol between the slave and the master so that updates are applied automatically to a slave node communicating with its master node.
Neo4j provides full data replication on each node so that each node is self-sufficient to serve read/write requests. It also helps in achieving low latency. In order to serve the global audience, additional Neo4j servers can be configured as read-only slave servers and these servers can be placed near the customer (maybe geographically). These slave read-only servers are synced up with the master in real time and all the local read requests are directed and served by these read-only slave servers, which provide data locality for our client applications.
Backup and recovery
Backup and recovery is another challenge for distributed systems and Neo4j HA architecture provides various tools and utilities for performing online backup and recovery, which is in sync with the enterprise's operational needs.
Neo4j provides <$NEO4J_HOME>/bin/neo4j-backup as a command-line utility for performing the Full and Incremental / hot backups.
The following steps need to be performed to enable backups:
1. Enabling online backup: online_backup_enabled should be enabled in <$NEO4J_HOME>/conf/neo4j.properties.
2. Full backup: Create a blank directory on the machine where you want to take the full backup and run the backup tool <$NEO4J_HOME>/bin/neo4j-backup -host <IP-ADDRESS> -port <PORT#> -to <DIR location on remote server>.
3. Incremental backup: Run the same command that we used to take full backup and neo4j-backup will only copy the updates from the last backup. Incremental backups can fail in case the provided directory does not have valid backup or previous backup is from the older version of the Neo4j database.
4. Recovering database from backup: Modify the org.neo4j.server.database.location property in <$NEO4J_HOME>/conf/neo4j-server.properties and provide the location of directory where backup is stored and restart your Neo4j server.
Note
Online backup can also be performed programmatically using Java by using org.neo4j.backup.OnlineBackup.java.
Advanced settings
Let's discuss the advanced settings exposed by Neo4j, which should be considered for any production deployment:
|
<$NEO4J_HOME>/conf/neo4j-server.properties – Neo4j server configuration file |
||
|
Parameter |
Default value |
Description |
|
org.neo4j.server.webserver.address |
0.0.0.0 |
Client accept pattern for the web server. By default it accepts connection only from local boxes. Define the IP address of the box for accepting remote connections. |
|
org.neo4j.server.webserver.maxthreads |
200 |
This controls the concurrent request handled by the web server. |
|
org.neo4j.server.transaction.timeout |
60 |
Timeouts for orphaned transactions. |
|
<$ NEO4J_HOME>/conf/neo4j.propoerties – low-level configurations for Neo4j database |
||
|
Read_only |
False |
This is the Boolean value for enabling READ mode or WRITE mode. By default it is in WRITE mode. |
|
Cache_type |
soft |
This defines the type of cache used to store the nodes and relationships. The following are the types of cache: · none: Do not use any cache. · soft: LRU cache using soft references. Used when the application load isn't very high. · weak: LRU cache using weak references. Used when the application is under heavy load with lots of reads and traversals. · strong: Will hold on to all data that gets loaded and never release it. Use it when your graph is small enough to fit in memory. · hpc: High Performance Cache, is only available with the Enterprise version of Neo4j. |
|
dump_configuration |
False |
This logs all configuration parameters at the time of server start up. |
|
query_cache_size |
100 |
This is the number of Cypher query execution plans to be cached. |
|
keep_logical_logs |
7 Days |
This is the logical transaction logs to back up the database. It is used to specify the threshold to prune logical logs. |
|
logical_log_rotation_threshold |
25M |
This is the size of the file that will be used to autorotate the logical logfile after a certain threshold. Value of 0 means there is no rotation based on the size of the file. |
Apart from the properties mentioned in the preceding table, we can also configure and tune the JVM by defining the configurations such as type of GC, GC Logs, Max and Min memory, and so on in <$NEO4J_HOME>/conf/neo4j-wrapper.conf.
To summarize, Neo4j HA architecture meets the enterprise needs in a true sense where it provides the highest degree of fault tolerance, can operate even with a single machine, and can expose various configurations, which help in tuning our database to produce maximum throughput.
Neo4j cluster – principles and recommended setup
Neo4j HA cluster can be setup/tuned and optimized for accommodating various kinds of requirements such as fault tolerance, load (read versus write) availability, and so on.
The bad news is that there is no single setup that can meet all these needs, but the good news is that we do have a solution to meet the requirements individually.
Let's discuss different aspects/principles of the Neo4j cluster and its recommended setup for various scenarios.
Scaling write throughputs
As we discussed earlier, Neo4j provides a master-slave architecture, where all writes are served by the master and then eventually they are replicated to the slave nodes in an asynchronous mode. Although we can perform writes on slave nodes too, slave nodes eventually will contact the master node before returning the success response to the master node.
It is always advisable that all writes are directly written to the master nodes for better performance, though it also means that write throughput is limited to a single machine. Despite this limitation of a single machine, write throughput can still be very high by introducing the upcoming strategies.
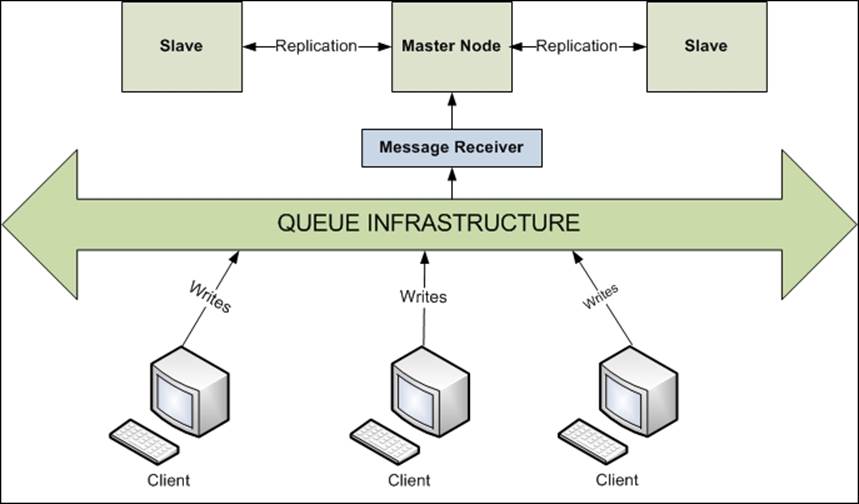
Introducing queues for write operations
We need to realize that the master node plays a very important role in the cluster setup, and at any point of time, we may not expose our master node directly to our clients for any kind of operations, be it read or write.
Especially in cases where we need high throughput from our write operations, it is recommended to introduce a queuing solution so that the cluster can service a steady and manageable stream of write operations. It will also rescue us from losing any write transactions, which may occur in extreme situations where our master node abruptly goes down.
Batch writes
We talked about batch writes and the optimization techniques in Chapter 2, Ready for Take Off.
We should remember that Neo4j provides ACID properties and every request to Neo4j is wrapped around a transaction, which also induces some overhead. Planning your writes and submitting it to the server in batches using a low-level API like BatchInserter would help in directly interacting or inserting data into Neo4j and avoiding all overhead-like transactions. It would definitely help in achieving higher throughput.
Vertical scaling
Vertical scaling or upgrading the hardware of the master node is another option where we can scale our write operations. Neo4j cluster does support SSD drives such as Fusion-io, which does provide exceptional high write performance.
Tuning Neo4j caches
Neo4j provides two kinds of caches: File Buffer Cache and Object Cache.
File Buffer Cache is specifically introduced to improve write performance. It enables and persists all write operations on cache, deferring durable writes until the logical log is rotated. It is advised to tune and optimize both caches as per your available hardware and memory.
Scaling read throughputs
Unlike the write operation where only the master node is eligible for writing, reads can be performed locally and can be served by any node in the cluster. Read operations in HA Neo4j cluster increase linearly where any node in a cluster can serve the read request and new nodes can be added at any point of time.
Let's discuss strategies, which if implemented, can provide desirable throughputs for read operations.
Load balancer
Neo4j HA cluster does not provide any load balancing that can distribute the load over the nodes in a cluster, but we can introduce a software or hardware load balancer for distributing the load equally over the various nodes in the cluster.
For example, we can introduce a software load balancer such as HA proxy—http://www.haproxy.org/ or Apache Proxy—http://httpd.apache.org/docs/2.2/mod/mod_proxy.html, which would intercept REST calls, and based on routing rules, can delegate the request to the appropriate node in a cluster.
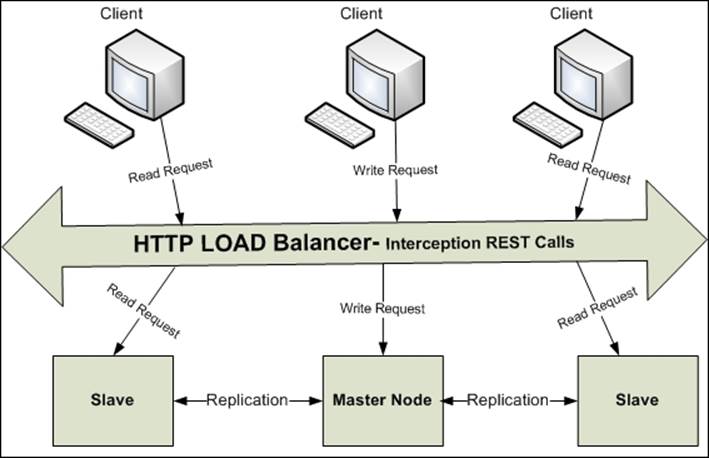
Apart from distributing the load across the cluster, the following are the other benefits of introducing a load balancer to our Neo4j cluster:
· The client does not have to be aware of the location and address of the physical nodes of the cluster
· The nodes can be removed or added at any point of time, while the customer can still perform the reads
· There is flexibility of re-routing the request based on the type of request, customer, or URL
· It can implement cache-based sharding where specific nodes can be determined to serve specific needs of the customer
Cache-based sharding
Caching and sharding are two important strategies for any production system. Neo4j provides a high-performance cache with the Enterprise Edition, which can be leveraged for fast lookups. It enables the flexibility to provide specific memory sizes for nodes.
Note
Enable high-performance cache by modifying cache_type=hpc in <$NEO4J_HOME>/conf/neo4j.properties.
In the Neo4j world, we consider large data, large enough that it cannot fit into the provided memory (RAM), so the next option would be to introduce shards and distribute these shards to individual nodes.
Sharding data and then caching it on individual nodes is a reasonable and scalable solution, but it is difficult to shard the graphs with a traditional sharding approach and it may not scale for real-time transactions too. That's the reason there is no utility/API provided in Neo4j to shard the data.
So what's next???
The answer is cache-based sharding.
In cache-based sharding, all nodes in a cluster contain the full data, but we partition the type of requests served by each database instance to increase the likelihood of hitting a warm cache for a given request. Warm caches in Neo4j are ridiculously high in performance, especially the HPC—high-performance cache.
In short, we would recommend a routing strategy that routes the user read requests in such a manner that they are always served by a specific set of nodes in a cluster.
The strategy could be based on the domain or may be based on the specific type of query or characteristics of data. We could also use sticky sessions where the first and subsequent request is served by the same node.
In any case, we need to ensure that majority of READ requests are served by warm cache and not by the disk.
Monitoring
We discussed the Neo4j browser in Chapter1, Installation and the First Query. Neo4j browser exposes the basic configuration of our server and database, but that is not enough for the enterprise class systems, where we need detail monitoring, statistics, and options to modify certain configurations at runtime without restarting the server.
Neo4j exposes JMX beans for advanced level of monitoring and management, which not only exposes the overall health of our Neo4j server and database, but also provides certain operations that can be invoked over live Neo4j instances and that too without restarting the server. Most of the monitoring options exposed through JMX beans are only available with the Enterprise version of Neo4j.
Note
For more information on JMX, refer to http://www.oracle.com/technetwork/java/javase/tech/javamanagement-140525.html.
Java provides JConsole—http://docs.oracle.com/javase/7/docs/technotes/guides/management/jconsole.html—which is packaged with standard JDK 7 distribution for viewing/modifying/invoking the attributes or operations exposed by JMX beans. JConsole is also leveraged for viewing the overall health of our system where it exposes the various memory statistics such as heap/non-heap, threads JVM configurations, classes loaded in VM, and active threads along with their current state.
Let's move forward and discuss the configurations required for enabling JMX beans via JConsole for viewing the various monitoring attributes exposed by Neo4j in local and remote mode.
JConsole in local mode
JMX provides the option of directly connecting to the process ID of Neo4j instance running on the local machine and viewing the various JMX beans exposed by Neo4j. Perform the following steps to view JMX beans and JConsole in local mode in Linux OS. For Windows, change the forward slash / to a backward slash \, and the rest of the steps remain the same:
1. Start your Neo4j server by executing <$NEO4J_HOME>/bin/neo4j start.
2. Open your console and execute <$JAVA_HOME>/bin/jconsole on the same machine that is hosting your Neo4j server.
3. Select the Local Process option and then select org.neo4j.server.Bootstrapper and click on Connect.
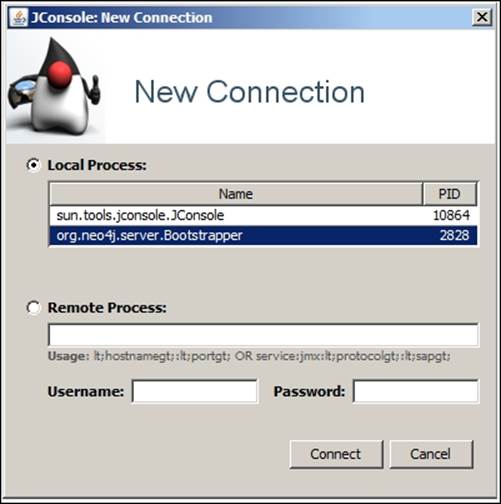
And we are done!!! You will be able to see the JConsole UI that displays the health of your system, such as memory utilization, details about JVM, and so on.
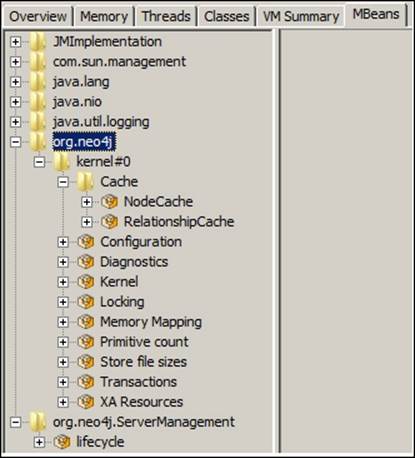
4. Click on the last tab MBeans and you will see two JMX Beans: org.neo4j and org.neo4j.ServerManagement.
JConsole in remote mode
JMX also provides the option of connecting to the remote Java process or Neo4j instance and viewing the various JMX beans. Perform the following steps to view JMX beans and JConsole in remote mode in Linux OS. For windows, change the forward slash / to a backward slash \, and rest of the steps remain the same:
1. Open <$NEO4J_HOME>/conf/neo4j-wrapper.conf and enable the following properties:
2. wrapper.java.additional=-|Dcom.sun.management.jmxremote.port=3637
3. wrapper.java.additional=-Dcom.sun.management.jmxremote.authenticate=true
4. wrapper.java.additional=-Dcom.sun.management.jmxremote.ssl=false
5. wrapper.java.additional=-Dcom.sun.management.jmxremote.password.file=conf/jmx.password
wrapper.java.additional=-Dcom.sun.management.jmxremote.access.file=conf/jmx.access
All the preceding properties define the configuration of JMX beans such as communication port, username and password files, and so on.
6. Next we need to modify the username/password for connecting the JMX server remotely. Open <$NEO4J_HOME>/conf/jmx.access and uncomment the line control readwrite. Uncommenting this line will enable the admin role for the JMX beans and you can modify and invoke the operations exposed by Neo4j JMX beans.
7. Now we will add the username and password in jmx.password. Open <$NEO4J_HOME>/conf/jmx.password and at the end of file enter control <space><password> like control Sumit, where the first word is the username and the second word is the password. The username should match with the entry made in the jmx.access file.
8. We also need to make sure that the permissions for conf/jmx.password are 0600 in Linux. Open the console and execute sudo chmod 0600 conf/jmx.password in Linux, and For windows, follow instructions given athttp://docs.oracle.com/javase/7/docs/technotes/guides/management/security-windows.html.
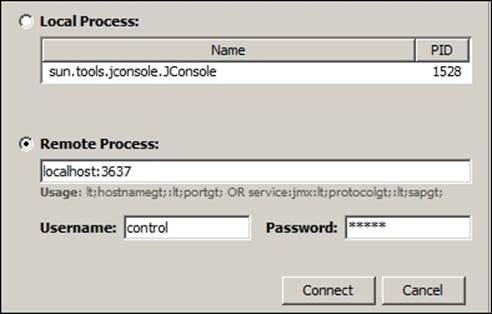
9. In your Linux console, execute <$JAVA_HOME>/bin/jconsole and select Remote Process, and in the textbox enter localhost:3637, username as control, and password as Sumit.
10. And we are done!!! Click on Connect and you will be able to see the UI of JConsole exposing the health statistics of your system along with the MBeans exposed by Neo4j.
Summary
In this chapter, we discussed the Neo4j architecture and its various components which converged and provided a scalable and HA architecture. We also talked about various principles of the Neo4j cluster and also provided recommendations for various production scenarios. Lastly, we also discussed about the monitoring options available to the Neo4j users.
In the next chapter, we will discuss the Neo4j security and extensions.
All materials on the site are licensed Creative Commons Attribution-Sharealike 3.0 Unported CC BY-SA 3.0 & GNU Free Documentation License (GFDL)
If you are the copyright holder of any material contained on our site and intend to remove it, please contact our site administrator for approval.
© 2016-2026 All site design rights belong to S.Y.A.