Learning OpenShift (2014)
Chapter 9. Using the OpenShift Web Console
In this chapter, we are going to focus on and learn how to interact with the OpenShift platform by using the web console that is available to all users of the system. We are going to start by learning how to create applications. After we learn how to create applications, we are going to explore how to embed add-on cartridges, and then learn how to manage applications deployed to the platform. Finally, we are going to learn how to create and apply a custom domain name for an application.
Creating applications
Previously in this book, we created several applications using the command-line tools that are provided by the platform. There will often be times when you want to quickly spin up an application, such as the Drupal CMS system, without having to use the command line. A popular use of the web console is to browse available community cartridges and application stacks, as all of these are integrated into the web console. This can save you a lot of time by being able to view a list of approved projects that you can get started with versus having to search Google to find what you are looking for.
To get started with creating an application with the web console, the first thing you need to do is log in to the platform by opening up your favorite browser and visiting http://www.openshift.com.
Once the site is loaded, click on the LOG IN button on the right-hand side of the page and provide your authentication details.
Tip
Your authentication details are the username and password that you created in Chapter 1, Creating Your First OpenShift Application.
After you are successfully authenticated to the platform, you will be presented with the application dashboard. In order to create a new application on the platform, click on the Add Application… button as shown in the following screenshot:

After clicking on this button, the system will display the first step of the create application wizard where you can choose the runtime or application stack that you want to use for your gear. This page is broken up into several areas:
· Featured applications area: This section of the page will display any currently highlighted application stacks that are available for you to use. This is normally populated with new and exciting cartridges that may have been contributed by the community.
· Instant applications area: These applications are preconfigured code repositories that normally consist of a full application stack for popular applications and frameworks. A good example is the WordPress instant application that includes the PHP runtime, a MySQL database, and the WordPress source code—all ready to use. Instant applications are also commonly referred to as quickstarts.
· Language-specific areas: These areas are dedicated to specific runtimes and applications that are tagged for a specific language. The sections are broken down into areas such as Java, Python, and PHP.
· Code anything area: This area is set aside for developers who want to create an application based on an existing custom cartridge that they have a URL for. Developers also have the ability to create a DIY application, which will be covered in Chapter 13, Using the Do-It-Yourself Cartridge.
Each of these areas will display a list of choices that the user can choose from when creating a new application. An example of one of these sections is shown in the following screenshot, which displays the area focused on PHP-based applications:

Each item listed in the preceding screenshot contains a logo for the specific application type on the left-hand side of the item and then the title for the choice. On the right-hand side of the selection is a list of images that will help you understand information on the cartridge you will be installing. The shield, as shown in the PHP 5.3 selection in the preceding screenshot, lets the user know that this cartridge will receive automatic security updates from the OpenShift team. The icon to the right of the shield in the PHP 5.3 example is a symbol that represents a cartridge. Furthermore, the icon displayed to the right of the CakePHP choice informs the user that this is a quickstart.
Note
When choosing a cartridge, it is important to understand the difference between those that receive automatic security updates and those that don't. For cartridges that receive automatic updates, the OpenShift team will routinely patch cartridges that power your application to ensure that any security errata is applied. This allows the developer to have one less thing to worry about. On the other hand, if automatic security updates are not provided for the chosen cartridge, the developer is responsible for updating and applying any security errata to the gear.
If you want to search for a particular application type, you can use the search box at the top of the screen or browse all of the selections based on the tag associated with the item, as indicated in the following screenshot:

Using instant applications
To learn how to create OpenShift gears based on an instant application, we are going to utilize the search box at the top of this page. Scroll to the top and enter codeigniter, and then press the Enter key on your keyboard or click on the magnifying glass on the right-hand side of the search box. Once the search is complete, the CodeIgniter quickstart will be displayed on the screen.

If you want to dig a little bit deeper to understand all of the components that will be installed on your gear as well as where the source code will initially be cloned from, you can click on the Learn more link:

As we can see from the preceding screenshot, this instant application will install the PHP runtime, a MySQL database, and then clone the source for the CodeIgniter framework from the listed GitHub repository.
Note
CodeIgniter is a popular Model-View-Controller framework that is written for the PHP language. It has a small footprint and was designed for developers who want a simple toolkit to create robust and full-featured PHP applications. For more information on this framework, visit the official project page at http://ellislab.com/codeigniter.
Now, click on the Deploy Now button at the top of the screen to be presented with the second step of the application creation wizard.
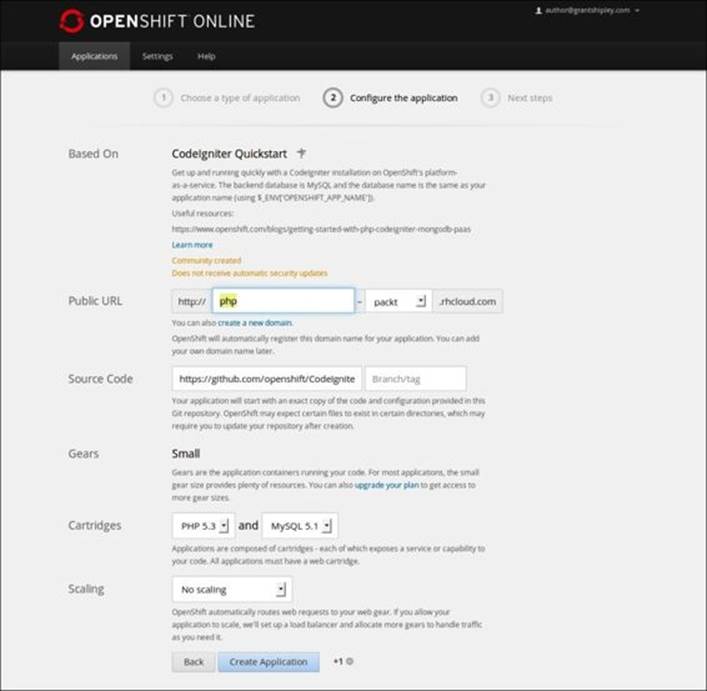
This step of the application's creation process has the following sections:
· Based On: This will display information on the quickstart or instant application template that will be used to create your gear. This area also contains information to let you know whether the cartridge will be automatically updated with security errata.
· Public URL: This allows you to specify the name of the application that will be appended to your OpenShift domain in order to create the full URL of the application. If you have multiple domains associated with your account, a drop-down list will be provided in order to allow you to select the domain under which you want the application to be created.
· Source Code: This area contains the optional GitHub repository that your application will clone upon creation. For a quickstart or instant application, this field will be automatically filled in with the correct repository. If you are creating an application from scratch, you can leave this field blank.
· Gears: This allows you to specify the size of the gear that the application will reside in. If you are on the free plan, the only option available will be a small gear. However, paid users have the option to select additional gear sizes with more available memory and disk space.
· Cartridges: This specifies the runtime cartridge that will be used for your application. If you are creating an application based on a quickstart or instant application, this area will also contain any add-on cartridges that are required for the application to be deployed.
· Scaling: This allows you to specify whether you want your application to automatically scale up to additional gears based on the amount of HTTP traffic that the gear is handling. This will be explained in more detail in Chapter 12, Scaling Applications.
For this example, change the name of the application from php to codeigniter, and then click on the Create Application button at the bottom of the screen.
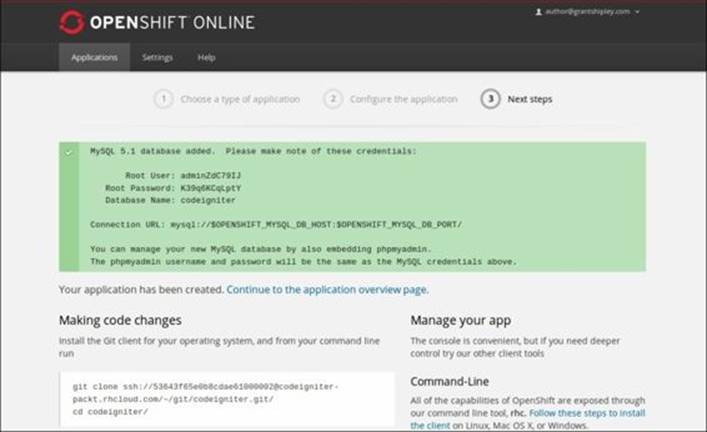
After the gear has been created, you will see a confirmation screen that displays some vital information. This information will include the connection information for the MySQL database and the command that clones your newly created application's remote Git repository.
Tip
While the authentication and connection information is provided for databases added to your application, it is important to remember that the recommended way of connecting is through the use of environment variables.
Verify that your application has been created by visiting the site with your web browser. If everything is working correctly, you should see the following screenshot:

Modifying the source code
Now that we have our application gear created, let's examine how to make modifications to the source code. If you recall from Chapter 2, Creating and Managing Applications, when an application is created using the command-line tools, part of the process is to clone the remote Git repository to your local machine. When creating applications using the web console, this step is not performed. In order to push new code changes to your OpenShift gear, you will need to clone the repository for your application. This can be performed in one of two ways. You can either use the RHC command-line tools or use the Git command to clone the repository.
First, let's learn how to clone the repository using the Git command that is installed on your operating system. Open a command line and navigate to the directory where you want the source code to be located. Once you are in this directory, issue the following command:
$ git clone <git_remote_url>
Tip
Ensure that you replace <git_remote_url> with the correct URL that was provided to you on the confirmation screen when you created the application. The URL for your Git repository is also available via the rhc app show command.
This will create a directory on your local filesystem named codeigniter. Switch to this newly created directory and edit the welcome_message.php file that is located under the php/application/view directory. Change <h1>Welcome to CodeIgniter!</h1> to <h1>Welcome to CodeIgniter on OpenShift!</h1>.
Once you have modified and saved this file, you can push the changes up to the OpenShift gear using the same process that you are already familiar with, namely the commit and push commands:
$ git commit -am "Change welcome message"
$ git push
After the modified code has been deployed, verify that the change was successful by opening your application in a web browser. If everything went as expected, you should see the updated text as shown in the following screenshot:

As you can see, once you have cloned the application's repository to your local machine, the workflow for changing the source code is the same, regardless of what tool you used to create the application.
Now that we know how to clone an application using the Git command, let's explore how to perform the same function with the RHC client tools. You might be wondering why you would want to use the RHC command-line tools to clone an OpenShift repository instead of using the Git command proper. Using the RHC tools provides a lot of convenience to the developer in that the developer does not need to know the URL of the Git repository. The developer only needs to know the name of the application that he/she wants to clone locally. Furthermore, for the RHC context-aware commands to work properly, you will need to use the RHC tools to clone the repository, as this adds additional metadata to the .git/config file. To clone the codeigniter application that we created using the RHC command-line tools, enter the following command:
$ rhc git-clone codeigniter
Note
The metadata that is added to the .git/config file as part of the clone using the RHC command-line tools contains the app-id, app-name, and domain-name of the application.
Managing applications
The OpenShift web console allows you to perform many, but not all, administration tasks for your application that the command-line tools allow. This includes adding cartridges, restarting your application, adding custom domain names, managing SSH keys, and deleting an entire application.
Adding cartridges
Most applications that are created on the OpenShift platform will rely on add-on cartridges to extend the functionality of the application. The most common use case of an add-on cartridge is the addition of a database cartridge to an application. During this section, we are going to learn how to embed add-on cartridges using the web console.
Now that you are familiar with how to create applications using the web console, create a new gear named cartadd and then navigate to the application's overview page, as shown in the following screenshot:
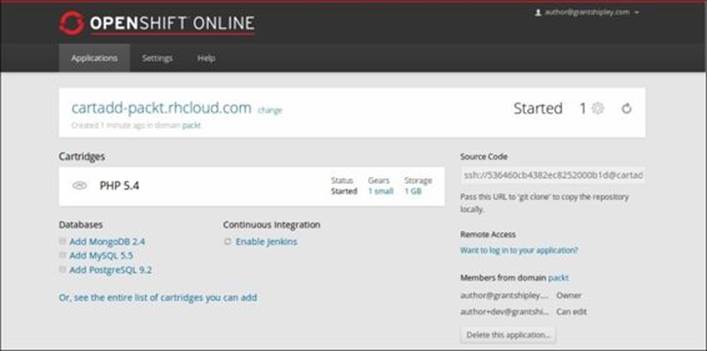
On this page, you can see all of the current cartridges associated with the application as well as have the ability to add additional ones. To view a list of all of the available cartridges for the runtime that you have chosen for your gear, click on the Or, see theentire list of cartridges you can add link. This will take you to a page that details all of the available cartridges.
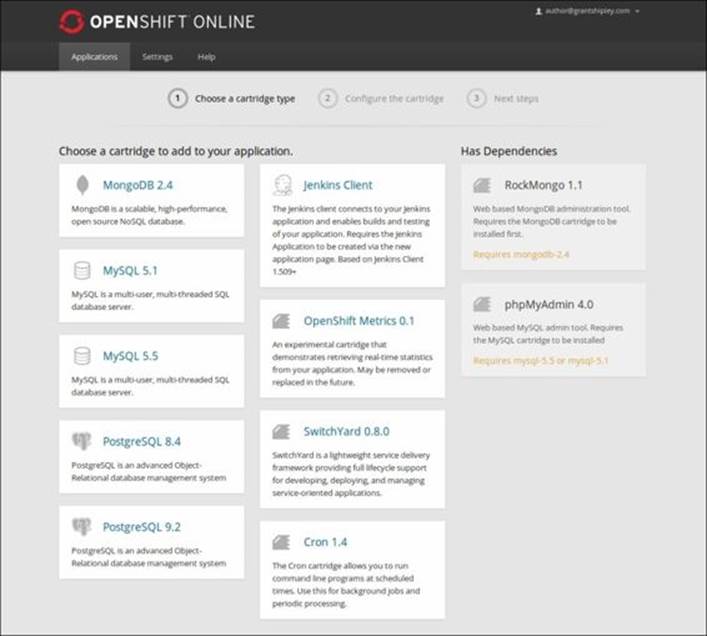
Let's install the MongoDB 2.4 cartridge by clicking on the box for that selection. Once you click on the add-on cartridge that you want to embed in your gear, you will be shown a confirmation page that displays information about the cartridge. To confirm that you want to embed this cartridge, click on the Add Cartridge button at the bottom of the screen.

Once the cartridge has been added to your gear, you will see a confirmation screen that will provide you with the details that you will need in order to authenticate to the database.
Note
If a particular add-on cartridge that you want to use is not listed on the Add Cartridge page, you can search GitHub for community-based cartridges, such as Redis, that you can install and use on the platform.
Restarting an application
In order to restart an application from the web console, browse to the application's overview page of the gear you want to restart by clicking on the application name from the OpenShift dashboard. Once you are on the application's page, restarting the gear is as simple as clicking on theRestart button in the top-right corner of the page. For example, if you wanted to restart the cartadd application that we created in the previous section of this chapter, you can click on the button highlighted in the following screenshot:

Once the application has been restarted, you will receive a confirmation message on the application's overview page.
Note
There is currently no way to stop or restart a specific cartridge, such as MongoDB, via the web console. If you only want to restart a specific cartridge instead of the entire gear, you will need to use the RHC command-line tools.
Adding a custom domain name and SSL certificate
OpenShift Online supports the use of custom domain names for an application so that a user does not have to use the automatically generated one that is based on the application name and domain for the users' account. For example, suppose that we want to use http://www.example.comdomain name for the cartadd application that we created in a previous section of this chapter. The first thing you need to do before you set up a custom domain name is buy the domain name from a domain registration provider.
Once the domain name has been purchased, you have to add a CNAME record for the custom domain name with the DNS provider for your domain. Once you have created the CNAME record, you can let OpenShift Online know about the CNAME using the web console.
Note
For more information on what a CNAME record is, it is suggested that you visit http://en.wikipedia.org/wiki/CNAME_record.
To add a custom alias to the cartadd application, browse the application's overview page and click on the change link next to your application's name.
![]()
In the following page, you can specify the custom domain name for your application. Go ahead and add a custom domain name of www.example.com, as shown in the following screenshot:

When adding a custom domain name for your application, you also have the option to add a custom SSL certificate for the domain name that you are adding. For this, you will need to first purchase an SSL certificate from a provider, and then upload the certificate, certificate chain, private key, and pass key.
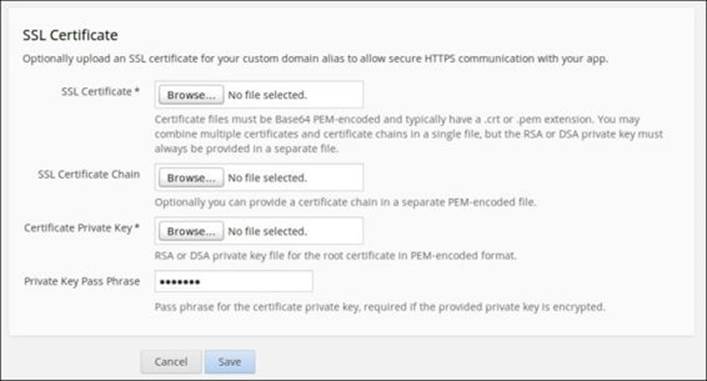
Tip
Adding a custom SSL certificate is only available on one of the many pay-as-you-go plans offered by the OpenShift platform.
Once you have added the custom domain and optionally added a custom SSL certificate, you should see the new domain name listed on the application's overview page.
Note
If you point your web browser to http://www.example.com, you will notice that your application is not displayed. This is because the domain name has not been set up with a DNS registry. In order to verify that this vhost was added to your application gear, you can add an entry in your/etc/hosts or equivalent file for your operating system.
Creating a URL for application cloning
A great feature of OpenShift that is not widely known is its ability to create a URL that will populate the application creation fields on the web console in order to allow someone to clone your application with a single click. This is a very powerful feature if you want to share the application code among a group of developers, as it eliminates the headache of a new developer having to set up an environment. As an example, we are going to create a single click URL for the mlbparks application that we wrote as part of Chapter 5, Creating and Deploying Java EE Applications. The URL is broken down into the following parts:
· The main domain name for the OpenShift Online service that creates custom applications (https://openshift.redhat.com/app/console/application_types/custom).
· The cartridges that will be used for the application passed in as an array since more than one cartridge might be needed for the application. For instance, the mlbparks application requires the JBoss EAP cartridge as well as the MongoDB cartridge:
cartridges[]=jbosseap-6&cartridges[]=mongodb-2.4
· The initial Git repository for the application. For the mlbparks application, we are going to use the GitHub repository that contains the source code from Chapter 5, Creating and Deploying Java EE Applications (initial_git_url=https%3A%2F%2Fgithub.com/gshipley/mlbparks.git).
· The last argument, which is name=mlbparks, is the default name that will be populated when the user clicks on the URL.
The complete URL that incorporates all of the preceding arguments to perform this magic is https://openshift.redhat.com/app/console/application_types/custom?cartridges[]=jbosseap-6&cartridges[]=mongodb-2.4&initial_git_url=https%3A%2F%2Fgithub.com/gshipley/mlbparks.git&name=mlbparks.
Tip
For an even better experience when sharing these custom URLs, you might consider using a URL shortening service that makes it even easier for a new user to get started deploying your application.
Deleting an application
The OpenShift web console makes it extremely easy to delete an application that you no longer need. This is important if you want to free up a gear for use by another application. To learn how to perform this task, let's delete the cartadd application that we created earlier in this chapter.
Navigate to the application's overview page for the cartadd application and click on the Delete this application… button that is in the bottom right-hand corner of the page.

Once you click on the Delete this application… button, you will be presented with a confirmation screen that ensures that you really want the system to perform this action. If you are sure you want to remove the application, click on the Delete button.

Once the delete operation is complete, you will be returned to the application dashboard, and a confirmation message will be displayed letting you know that the action was a success.
Summary
In this chapter, we learned how to use the OpenShift web console to create applications, and how to embed add-on cartridges to extend the functionality of the newly created gear. After this, we explored how to manage an existing application by adding a custom domain and SSL certificate. We also learned how to create a reusable URL that enables you to share your application with others by allowing them to create a clone of the gear with a single URL. Lastly, we learned how to delete applications with the web console when they are no longer in use.
In the next chapter, we are going to learn how to debug applications that are running on a remote OpenShift gear. We will learn how to enable remote debugging inside of the Eclipse IDE, and then, how to set break points to step through the application code.
All materials on the site are licensed Creative Commons Attribution-Sharealike 3.0 Unported CC BY-SA 3.0 & GNU Free Documentation License (GFDL)
If you are the copyright holder of any material contained on our site and intend to remove it, please contact our site administrator for approval.
© 2016-2026 All site design rights belong to S.Y.A.