Learning OpenShift (2014)
Chapter 1. Creating Your First OpenShift Application
OpenShift Online was released to the general public in June 2012, and has rapidly grown in popularity with developers because of the speed with which they can quickly spin up a new development stack and do what they love: develop software. In this chapter, we will learn how to sign up for the OpenShift Online service and then create our first application, which will be available on the public cloud. To become familiar with the platform, we will initially create a basic PHP application and then later create a WordPress-based blog that is deployed on the cloud. Don't worry if you are not a PHP developer as OpenShift supports other languages, such as Java, Python, Ruby, Perl, and Node.js. So sit back, grab your cup of coffee, and prepare to get your first application deployed to the cloud.
Creating your OpenShift Online account
To get started with using the OpenShift Online platform, the first thing a developer needs is an account that will provide access to create and deploy applications. Fortunately, the OpenShift Online service is free to use for both development and production applications. However, in order to create an account, you will need a few basic pieces of information that OpenShift Online requires in order to begin using the service:
· A valid e-mail address
· A password
Wait, what? You are probably asking yourself at this point whether these really are the only two pieces of information that the OpenShift Online service requires in order to create an account that will enable you to start deploying applications. The answer to this question is: yes. You will not be asked for your first name, last name, dog's name, or any other information about yourself or the types of applications that you want to deploy to the public cloud.
In order to begin the signup process, open up your favorite browser and type in the following URL:
http://www.openshift.com
Once the page has loaded, you will see a SIGN UP button in the top-right corner of the page. After clicking on this button, you will be presented with a web form to create your OpenShift Online account:
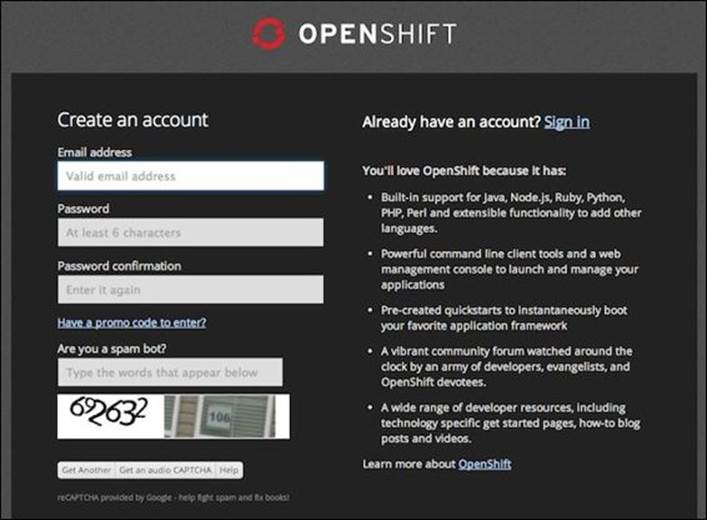
Enter in your e-mail address, select a password, provide the CAPTCHA answer, and then click on the SIGN UP button at the bottom of the screen.
When selecting a password, it is suggested that you choose to create one that is considered a strong password. Using strong passwords lowers the risk of your account getting compromised by a brute-force attack.
Note
A Completely Automated Public Turing Test to tell Computers and Humans Apart (CAPTCHA) is a system that OpenShift Online uses to determine whether the entity that is signing up for an account is a physical human or a programmatic bot. The OpenShift Online implementation uses the popular reCAPTCHA system provided by Google and helps to digitize books, newspapers, and old-time radio shows.
After you have clicked on the SIGN UP button, the OpenShift Online platform will send a verification e-mail to the address that you provided. You cannot access the OpenShift Online system until you have verified your account by clicking on the link in the e-mail.
Tip
If you don't see the verification e-mail right away, check your Spam folders and/or filters. If you still don't find it, try searching your e-mail with the subject Confirm your OpenShift account and get in the cloud now.
Once you have clicked on the link provided in the verification e-mail, you will be redirected to a page that lists the legal terms associated with your account. If you agree to the legal terms, click on the I Accept button at the bottom of the screen.
Congratulations! You now have an OpenShift Online account with all the permissions required to create and deploy applications.
Installing and configuring the Red Hat Cloud command-line tools
In order to create, manage, and deploy applications from the command line, it is required that you install the Red Hat Cloud command-line tools and the Git revision control system. The RHC command-line tools are written in the popular programming language, Ruby. In this section, we will cover how to install the tools on the three most popular operating systems today: Windows, Mac OS X, and Linux. Once you have installed the command-line tools and Git for your operating system, you can skip to the next section in this chapter.
Installing the RHC command-line tools for Microsoft Windows
Unfortunately, Windows does not include the Ruby language runtime by default, so the first thing you need to do is install the latest version of the runtime.
Note
For this book, I will be using version 1.9.3 of the Ruby language and version 8.1 of Microsoft Windows.
In order to install the Ruby language runtime on your operating system, open up your favorite browser and go to the following URL:
http://rubyinstaller.org
At the top of the web page, you will see a Download button, which will allow you to download the installation program for the language:

The next page will list the various versions of the programming language that you can install. Select to download the latest version of Ruby and save the installation program to your local computer.
After the installation program has downloaded, start the program by double-clicking on the executable in the folder where you saved the file. Once the installation program has started, accept the license agreement and click on the Next button.
Note
During the installation, you can accept all of the defaults, but it is mandatory that you select the Add Ruby executables to your PATH checkbox in order to run Ruby from the command line.
The first screen of the installation wizard will allow you to specify the installation directory where you want the runtime installed. On this screen, it is critical that you select the checkbox to add the Ruby executable to your PATH variable, as shown in the following screenshot:
Note
Adding an executable to your PATH variable will allow you to run the command while at a terminal prompt, regardless of the location of the executable or directory that you are currently in. You can think of adding this command as a global variable that is available anywhere on the filesystem.
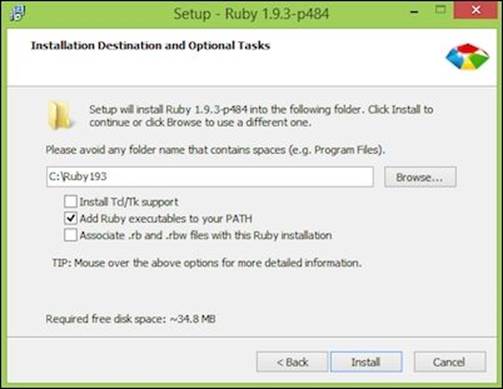
Ruby installation wizard
After the installation is complete, you can verify whether the installation was successful by opening a command prompt on your machine and typing the following command to display the version information:
C:\> ruby –v
Once you have executed the previous command, you will see the version number displayed as shown in the following example:
ruby 1.9.3p484 (2013-11-22) [i386-mingw32]
Note
You may have a slightly different Ruby version than the one listed in the preceding example. This is fine as long as the version number is greater than 1.9.
The next step is to install the Git revision control system on your operating system to ensure that you are able to clone your application repository to your local machine. You can download the latest version of Git for Windows from http://msysgit.github.io/. Once you have entered the URL into your web browser, click on the Download link to list all of the versions available for your operating system. Click on the link for the latest version, and save the installation file on your computer.
Just as you did when installing Ruby, ensure that the Git executable is added to your PATH variable by selecting the Run Git from the Windows Command Prompt checkbox from the installation wizard:

Git installation wizard
Now that you have both Ruby and Git installed, you can use the ruby gem command to install the RHC tools.
Note
Ruby gem is a package manager for the programming language, which allows users to easily install Ruby programs and libraries.
Open up a new command prompt and issue the following command to install the Ruby gem that contains the RHC command-line tools:
C:\> gem install rhc
Depending on the speed of your Internet connection, the installation may take a few minutes while it downloads and installs all of the dependencies for the tools. During the installation process, you will see an update with the current progress of the command.
Installing the RHC command-line tools for OS X
Modern versions of the OS X operating system include Ruby by default, so all you need to install is the Git revision control system. You can install Git by either installing the full Xcode Suite or using Git for the OS X installation program. For this book, we will be using Git for the OS X installation program. Open up your web browser and go to the following URL:
https://code.google.com/p/git-osx-installer/
Click on the Download the installers here link in order to view a list of all of the available installation disk images for your operating system. Download and mount the disk image, and follow the onscreen instructions to install the program.
Tip
If you get an error message stating that the package can't be opened because it is from an unidentified developer, you will need to modify your security and privacy settings. To do this, open up system preferences, click on Security and Privacy, and under the General tab, select to allow the installation of apps that have been downloaded from anywhere. Remember to change this back after the installation is complete.
Now that you have both Ruby and Git installed, you can use the gem command to download and install the RHC command-line tools. Open up a new terminal window and type the following command:
$ sudo gem install rhc
Depending on the speed of your Internet connection, the installation may take a few minutes while it downloads and installs all of the dependencies for the tools. During the installation process, you will see an update with the current progress of the command.
Installing the RHC command-line tools for Linux
There are many different distributions of the Linux operating system, and covering the installation procedure for each variant is beyond the scope of this book. Given that Ubuntu is considered to be one of the most popular desktop distributions available, we will be using version 13.10 of this distribution for the instructions in this section. If you are using Fedora or any other distribution, you will need to modify the commands as appropriate for your distribution.
The first thing you need to do is install the Ruby runtime, since Ubuntu 13.10 does not include this by default for a new installation of the operating system. In order to install Ruby, open up a terminal prompt and use the apt-get command by typing the following command:
$ sudo apt-get install ruby
Note
The Advanced Packaging Tool (APT) is the default package management tool for Debian-based Linux distributions. The apt command will resolve all dependencies and then perform the installation or removal of software packages on the operating system. If you are using an RPM-based distribution such as Fedora or Red Hat, the equivalent command is yum (Yellowdog Updater, Modified).
After the installation is complete, type ruby -v on the command line to verify that the installation was successful. If all went well, you should see the version number printed on your terminal screen.
Now that you have Ruby installed, you also need to install the Git revision control system. In order to install the Git package, use the apt-get command like you did to install Ruby:
$ sudo apt-get install git
Lastly, you can install the RHC command-line tools using the gem command that was installed as part of the Ruby package:
$ gem install rhc
Depending on the speed of your Internet connection, the installation may take a few minutes while it downloads and installs all of the dependencies for the tools. During the installation process, you will see an update with the current progress of the command.
Configuring the RHC command-line tools
If you have followed the information presented so far in this chapter, you should have an OpenShift Online account created as well as the RHC command-line tools installed on your operating system. We will now configure the RHC tools to communicate with the OpenShift Online platform. This setup procedure will allow us to create our OpenShift namespace domain as well as create and upload the necessary SSH keys to authenticate us to the service.
Open up a new terminal prompt and begin the setup procedure by typing the following command in the prompt:
$ rhc setup
Upon executing the preceding command, the first thing you will be asked for is the username that you created earlier in this chapter. Enter in the username and password that you used to authenticate the OpenShift Online platform and press the Enter key.
After you enter in your credentials to authenticate the service, the setup program will ask if you want to generate an authentication token. Generating a token will allow you to run RHC tools without having to authenticate with a password each time you issue a command. It is recommended that you generate a token to speed up the time it takes to perform management commands for your application. If you want to generate a token, type in yes and hit the Enter key.
The next step of the configuration process is to generate and upload an SSH key-pair for your account. The SSH key is used by the platform for authentication when cloning the source code repository for your applications that you create. The SSH key is also used if you want to secure shell into your remote application. In order to upload your SSH key, type in yes and press the Enter key.
Note
We will discuss SSH in more detail in Chapter 3, Application Maintenance, of this book.
Next, you will be prompted to create a namespace for your account on the OpenShift platform. A namespace is a unique identifier for your account, which will be used as the basis for all URLs for the applications that you create. Keep this in mind when selecting your namespace as it will be included in the URL for any application that you create on the platform.
Tip
A common practice is to use your username as your namespace.
Once you create a namespace for your account, it means that the RHC command-line tools have been configured and you are now ready to begin creating applications.
Note
All of the information related to your OpenShift Online account is stored in a configuration file named express.conf located in the .openshift directory that resides within your user's home directory.
Creating your first OpenShift Online application
The time we have been waiting for is finally here! We get to create our first application that is deployed on the OpenShift Online cloud. I hope that when you see how simple and fast it is to create and deploy applications, you will be amazed at the possibilities this new technology (PaaS) can provide for your software projects. Let's dip our toes in the water by creating a simple PHP application and then modify the source code to practice the development workflow.
Let's start by creating a directory where we will organize all of our OpenShift projects. I prefer to use a directory named code that is located in my home directory, but feel free to use the standard directory convention that you have been using throughout your software development history. Create the code directory if you don't already have one, and change to that directory from your command prompt. For example, if you are using Linux or OS X, the command will be the following:
$ mkdir -p ~/code
$ cd ~/code
Once you are inside of the directory where you want to organize your source files, you can create a new OpenShift Online application by leveraging the RHC command-line tools that you installed previously in this chapter. The RHC command is actually an umbrella command that will allow you to perform many different operations on the OpenShift platform. To create an application, use the app create subcommand. The syntax to create a new application is as follows:
$ rhc app create application_name application_type
For instance, create a new PHP application and name it myphpapp, and specify that you want to use the PHP-5.4 language. In order to create this application, enter in the following command on your terminal, ensuring that you are in the directory where you want to organize your source files:
$ rhc app create myphpapp php-5.4
After you enter in the previous command, you will see the following output that indicates the progress of the application creation:
Application Options
-------------------
Domain: packt
Cartridges: php-5.4
Gear Size: default
Scaling: no
Creating application 'myphpapp' ... done
Waiting for your DNS name to be available ... done
Cloning into 'myphpapp'...
The authenticity of host 'myphpapp-packt.rhcloud.com (184.73.118.31)' can't be established.
RSA key fingerprint is cf:ee:77:cb:0e:fc:02:d7:72:7e:ae:80:c0:90:88:a7.
Are you sure you want to continue connecting (yes/no)? yes
Warning: Permanently added 'myphpapp-packt.rhcloud.com,184.73.118.31' (RSA) to the list of known hosts.
Checking connectivity... done
Your application 'myphpapp' is now available.
URL: http://myphpapp-packt.rhcloud.com/
SSH to: 52bf4758e0b8cd189d0000d9@myphpapp-packt.rhcloud.com
Git remote: ssh://52bf4758e0b8cd189d0000d9@myphpapp-packt.rhcloud.com/~/git/myphpapp.git/
Cloned to: /home/gshipley/myphpapp
Run 'rhc show-app myphpapp' for more details about your app.
Note
Once you enter in the rhc app create command, you may be prompted to accept the authenticity of the application hosts. Type yes and hit the Enter key.
Congratulations! You have just created your first application that is running in the cloud. Don't believe me? Take a quick look at your application to verify that it was deployed correctly. Open up a web browser and enter in the URL for your application that was provided by the rhc app create command. The application URL always looks like applicationName-namespace.rhcloud.com
For example, I used the unique namespace of packt for my account, and I named my application myphpapp. Given these two bits of information, the URL for my application would be http://myphpapp-packt.rhcloud.com
If everything went smoothly, you should see the following screen in your web browser:

I know you are anxious to dig in and start modifying the source code, but stick with me just a little bit longer. To truly appreciate the benefits of using a PaaS, such as OpenShift Online, we need to understand all of the glue that just happened at the backend.
What just happened?
Once you understand what just happened behind the scenes, you might start to think of the rhc app create command as some type of magic. Let's take a closer look at everything that happened to enable your application.
Placement of your gear
When issuing the previous command, the first thing the OpenShift Online platform did, after authentication of course, is determine which server to place your application gear on. The algorithm used to determine the best location for your gear takes many factors into account, including (but not limited to) the current load on each server, the application runtime, and the amount of memory the application is configured to consume.
Note
OpenShift uses the term "gear" to define a set of resources allocated to provide your application with the environment that it needs to run effectively. A gear contains resources such as memory, CPU, and disk space. You can think of a gear as an application container on the operating system that segments your resources from other users on the system.
Creating your application account
After the platform has determined the optimal server for your gear to reside on, the system creates a Linux user ID for your account. This is an actual Linux user on the system that your gear will run under. Having this account created will allow you to SSH to the gear in a later chapter.
After the account is created, OpenShift then applies the Security Enhanced Linux (SELinux) contexts and Control Groups (cgroups) for your gear. In a nutshell, cgroups allows the kernel to allocate resources such as memory, CPU time, and network bandwidth to processes on the system. SELinux allows the system to set contexts to determine access control for files and processes. Both of these technologies are implemented by OpenShift Online to secure your application gear as well as provide multitenancy of the platform.
Don't worry if you don't understand these technologies in depth, as this is where one of the true benefits of deploying applications to OpenShift Online comes into play. You get all of the benefits of using these kernel features to provide a secure environment for your application without having to know the ins and outs of configuring and maintaining complex security policies.
Given that this is a book for using the OpenShift Online platform for development, we will end the discussion of these technologies here. However, if you have an interest in security and system administration, reading up on these two Linux technologies will prove to be a fun exercise. A great resource to learn more information about these technologies is Wikipedia. You can find in-depth information on SELinux and cgroups at the following URLs:
· http://en.wikipedia.org/wiki/Selinux
· http://en.wikipedia.org/wiki/Cgroups
Configuring your application
Once the gear has been placed on a server, and the access controls for your gear have been enabled, OpenShift Online then begins the process of configuring all of the necessary components to run your application code. In this example, we decided to create and deploy a PHP application, so OpenShift Online enabled the Apache and mod_php module for our gear.
After the web server process was configured, the platform then created a private Git repository for us on our application gear and added a PHP application template to the repository. The application source code was then deployed to the web server, and DNS for our application was propagated worldwide. This means our application will immediately be available on the public Internet once the rhc app create command is complete.
Cloning the remote Git repository
The last step of the application creation process is when the RHC command-line tool clones your Git repository from your OpenShift Online gear to your local machine. This part of the process will create a directory with the same name as your application in the filesystem location from which you issued the rhc app create command.
Tip
A common error that users encounter when creating an application is the failure of the system to clone the Git repository. This normally means that your local machine could not authenticate to the OpenShift platform using the SSH key for your account. If you see this error message, ensure that you upload the generated SSH key while running the rhc setup command.
Adding the source code to your application
The application creation process created a new directory on your filesystem that is named after your application. This directory is created in the location that you issued the rhc app create command in. If you have followed the conventions laid out in this chapter, you should be able to change to your application directory with the following command:
$ cd ~/code/myphpapp
Once inside of the myphpapp directory, if you issue the ls -al command, you should see the following items:

Note
The ls command is a command for the Linux and OS X operating systems that will display all of the files and directories at the current location. If you are using the Microsoft Windows operating system, the equivalent command is dir.
We will discuss all of these items in more detail in a later chapter, but for right now, the only directory you want to concentrate on is the root directory. This is the location where all of your source code files will need to be placed if you want them available to the web server.
After listing the files inside of the root directory, you will notice that only one entry exists:
· index.php
This is the main HTML page that you saw when you verified that your application was created and deployed correctly, earlier in this chapter. This file is standard HTML and provides instructions on how to get started with the OpenShift Online platform.
To understand the application deployment workflow, create a new PHP source file and name it hello.php. Open up your favorite text editor and add the following code to the hello.php file:
<?php
echo "Hello, Cloud!";
The next step after saving the new file is to add it to your Git repository on your local machine. Since you created a new source file that your revision control system doesn't know about, you need to first add the file:
$ git add hello.php
Once the file has been added, you need to commit the changes that you made and provide a comment message that describes the change:
$ git commit -am "Added hello.php"
1 file changed, 3 insertions(+)
create mode 100644 php/hello.php
If you are not familiar with Git, you may have expected that once you have committed your source code change to your local repository that the OpenShift Online repository would have also been updated. It is important to understand that when you commit changes to your local Git repository, they have not been pushed to the remote repository that resides on your OpenShift Online gear. In order to take all of the changes that you committed to your local repository to your upstream OpenShift Online repository, you need to push these changes using the git pushcommand:
$ git push
Counting objects: 6, done.
Compressing objects: 100% (3/3), done.
Writing objects: 100% (4/4), 401 bytes | 0 bytes/s, done.
Total 4 (delta 1), reused 0 (delta 0)
remote: Stopping PHP cartridge
remote: Waiting for stop to finish
remote: Building git ref 'master', commit 9dfe837
remote: Building PHP cartridge
remote: Preparing build for deployment
remote: Deployment id is 9fb0c7ee
remote: Activating deployment
remote: Starting PHP cartridge
remote: Result: success
remote: Activation status: success
remote: Deployment completed with status: success
To ssh://52bf4758e0b8cd189d0000d9@myphpapp-packt.rhcloud.com/~/git/myphpapp.git/
e368126..9dfe837 master -> master
Once you have pushed the changes to the remote repository, OpenShift Online will be notified about the new file(s) and will then redeploy your application. View your new source file by opening the page in a web browser at the following URL, ensuring that you use the correct namespace for your account:
http://myphpapp-YourNamespace.rhcloud.com/hello.php
Note
You may have noticed that OpenShift Online stops Apache during the deployment process. If you are familiar with PHP, you know that this step is not necessary. To ensure that your application does not experience downtime during a new deployment, learn how to take advantage of the hot deploy feature by referring to Chapter 11, Using the Marker and Action Hook System.
You now know the basic building blocks and workflow to create and deploy applications to OpenShift. You need to follow these basic steps:
1. Create an application using rhc app create.
2. Add new source files with git add.
3. Commit changes using git commit.
4. Push and deploy changes using git push.
Note
If you are not familiar with the Git revision control system, a good reference on the system is located at http://gitref.org/index.html.
Using the web console
Up to this point, we have focused exclusively on interacting with the OpenShift Online service purely from the command line. During this section, we are going to use the feature-rich web console that is provided for users to create and manage all applications from inside of their favorite web browser. We will now use the web console to deploy a WordPress application to the platform.
To get started, open up your web browser and go to http://www.openshift.com. Once the page is loaded, click on the MY APPS button at the top-right corner of the page and authenticate to the OpenShift Online platform using the username and password you created earlier in this chapter.
After you have authenticated, you will be placed on the application dashboard where you should see the myphpapp application that we created previously in this chapter. Click on the Add Application… button that is located under your application list.

On the next screen, look for the Instant App section and choose WordPress 3.x.

After you select to create a WordPress instant application, you will be presented with a screen where you will need to specify the name of the application you are creating. For the name, enter in myblog and click on the Create Application button at the bottom of the screen.

After the application creation process is complete, you will be presented with a confirmation page that includes important information about the WordPress deployment, which includes information on the database connection authentication.
You now have a fully functioning WordPress installation that you created in about two minutes. Don't believe me? Open up your web browser and enter in the URL for the application that you just created. Once you load the site for the first time, you will be prompted to enter some basic information about the blog site as well as to create the username and password that will be the administrator of the site. Pretty neat stuff!
Note
In Chapter 9, Using the OpenShift Web Console, we will learn how to create our own instant application, such as the one we just deployed, which will enable you to quickly spin up preconfigured applications in a matter of minutes.
The web console comes in handy when you want to create an application very quickly without having to use the command line. However, you will often find that once you create an application using the web console, you need to modify the source code of the application that you deployed. Let's go back to the command line to show you that we can clone the source code repository of the myblog application that we just created. Open up a new terminal window and change to your code directory that we created previously in this chapter:
$ cd ~/code
Once you are in this directory, we can use the rhc app show command to list the information about the WordPress deployment:
$ rhc app show myblog
myblog @ http://myblog-packt.rhcloud.com/ (uuid: 52bf71fc5973ca055f0003b7)
--------------------------------------------------------------------------
Domain: packt
Created: 5:51 PM
Gears: 1 (defaults to small)
Git URL: ssh://52bf71fc5973ca055f0003b7@myblog-packt.rhcloud.com/~/git/myblog.git/
Initial Git URL: git://github.com/openshift/wordpress-example.git
SSH: 52bf71fc5973ca055f0003b7@myblog-packt.rhcloud.com
Deployment: auto (on git push)
php-5.3 (PHP 5.3)
-----------------
Gears: Located with mysql-5.1
mysql-5.1 (MySQL 5.1)
---------------------
Gears: Located with php-5.3
Connection URL: mysql://$OPENSHIFT_MYSQL_DB_HOST:$OPENSHIFT_MYSQL_DB_PORT/
Database Name: myblog
Password: mG3SasTv-mRL
Username: adminNyyHHvA
If you examine the output, you will notice that part of the information provided is the Git URL for your application. In the preceding example, the Git URL for the application is as follows:
ssh://52bf71fc5973ca055f0003b7@myblog-packt.rhcloud.com/~/git/myblog.git/
Tip
You can use a combination of rhc app show and grep to list only the URL of your Git repository with the following command:
$ rhc app show myblog|grep 'Git URL:'
Now that we know the URL of our remote Git repository, we can clone the repository by using the git clone command:
$ git clone ssh://52bf71fc5973ca055f0003b7@myblog-packt.rhcloud.com/~/git/myblog.git/
Tip
The Git URL shown previously is an example that is based on the application that I created. The Git URL for your WordPress application will be different. Make sure that you use the correct URL when cloning the repository.
However, the suggested way to clone a Git repository from the OpenShift Online platform is to use the rhc git-clone command, as shown in the following command:
$ rhc git-clone myblog
This will create a directory under your ~/code directory, named myblog. If you are curious, switch to that directory and take a look around the source code for your newly created blog.
The same application workflow that we learned about previously in this chapter holds true for applications that you create with the web console. For instance, if you wanted to manually install plugins and themes for your blog, you would deploy them using the following:
· Adding new templates or themes with git add
· Committing changes using git commit
· Pushing and deploying changes using git push
Summary
In this chapter, we built the foundation for interacting with OpenShift Online, and we will continue to expand on this throughout the remainder of this book. Laying this groundwork is essential to ensure that your local system is configured properly in order to communicate with the platform.
We created a user account, installed the client tools, and created two applications. We also learned the basic application creation and deployment workflow that will be the cornerstone for every application that we create in the future.
In the next chapter, we will learn about the essential commands for the RHC client tools. We will also explore the embedded cartridge system that will enable us to add additional functionalities to our applications, such as databases, metrics, and task scheduling.
All materials on the site are licensed Creative Commons Attribution-Sharealike 3.0 Unported CC BY-SA 3.0 & GNU Free Documentation License (GFDL)
If you are the copyright holder of any material contained on our site and intend to remove it, please contact our site administrator for approval.
© 2016-2026 All site design rights belong to S.Y.A.