Learning OpenShift (2014)
Chapter 4. Using an Integrated Development Environment
In this chapter, we are going to look at the software development aspects of the OpenShift platform by exploring how to use integrated development environments (IDEs) to interact with the OpenShift service. Developers are often passionate about their software development environment of choice and I can't possibly cover each environment in the scope of this chapter. However, we will be examining the most popular IDE in use by developers today, Eclipse. We will learn how to download, install, and configure the Eclipse IDE as well and how to install and configure the OpenShift Eclipse plugin that is provided as part of the JBoss Tools project. After we have our development environment configured, we will explore how to interact with the OpenShift platform from within the IDE in order to create, delete, and manage applications.
To use an IDE or not to use an IDE is the question
There are often two types of software developers today: those that benefit from using a full IDE and those that prefer a lightweight approach such at VI, EMACS, or Sublime Text. If you are expecting me to preach the merits of using a simple text editor for software development, you will be disappointed with the content of this chapter.
While I am a huge fan of using VI or Sublime Text for small single-page applications or to make a quick change to a file, I am convinced that using an IDE is the most productive way to work on large software projects. I equate using an IDE for development to using a hammer to drive nails. Sure, you could use a brick or some other blunt object with a nail, but a hammer was designed for the specific purpose of driving nails.
Likewise, IDEs are designed for one purpose: to make the life of a software developer more productive. This is accomplished by providing a tight integration with the language runtime, providing code insight, looking for compile errors as you write software, and even integrating with source code revision systems.
Another benefit of using an IDE, when working on software projects that you intend to deploy to the OpenShift platform, is the ability to have full control over all aspects of your application from the same environment that you use to write the code. The OpenShift IDE plugin allows you to create applications, view logfiles of your application, debug your application code, use port forwarding to connect to your remote databases, deploy code to the remote server, and many other features. By the end of this chapter, you will understand the convenience of having this tightly coupled integration with the Eclipse IDE.
Installing and configuring Eclipse
The Eclipse IDE is one of the most popular development environments in existence and is often the primary editor for Java developers. Over the years, the Eclipse platform has grown to support most programming languages including C++, PHP, and others. In fact, a lot of newer IDEs are based on the Eclipse source code because it has the reputation of being stable and performant as well as the ability to run on most operating systems including Windows, Linux, and Mac OSX.
Downloading and installing Eclipse
To get started with the Eclipse platform, we first need to download the software package. One of the great things about the Eclipse platform is that it is open source software and is therefore free to both download and use. For this chapter, we will be downloading the Kepler version of Eclipse from http://www.eclipse.org/downloads/.
Note
Even though I am showing the usage of the Kepler version of Eclipse, the newest version named Luna will also work with the same instructions.
Once the page has loaded in your browser, download the Eclipse IDE for Java EE Developers by selecting the correct version for your operating system, as shown in the following screenshot:

This will download a compressed archive of the Eclipse platform to your local filesystem. Once the download has completed, extract the contents of the archive using the correct command for your operating system. As an example, I am using the Linux operating system; the archive for that platform is a .tar.gz file. To extract the contents of the archive, I would open up a terminal prompt and change to the location of the downloaded file. Once I am in that directory, I would issue the following command:
$ tar zxvf eclipse-jee-kepler-SR1-linux-gtk-x86_64.tar.gz
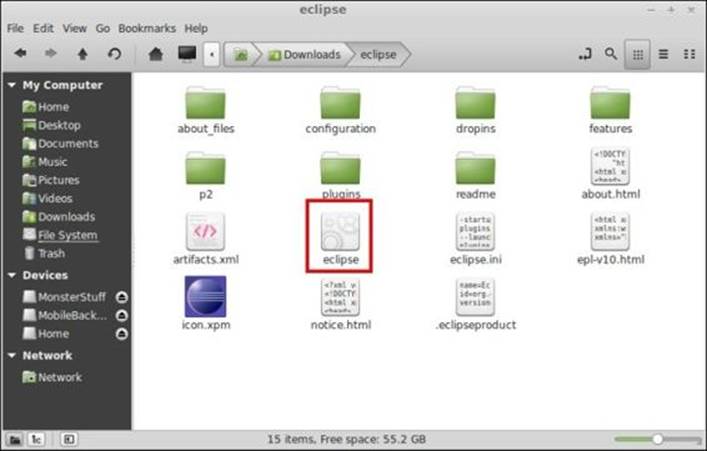
Once the contents have been extracted, the binary used to run the IDE is located inside the eclipse directory. For example, if you extracted the contents to the Downloads directory, you would see what is shown in the following screenshot:

Open the eclipse directory and launch the environment by double-clicking on the Eclipse executable file, as follows:
The first thing the IDE will ask you is what workspace you would like to use. If you are not familiar with the concept of a workspace, don't worry as it's not that complicated. A workspace is simply a directory on your filesystem where Eclipse stores the settings and configurations that you are working with for the given workspace. If this is the first time you are using Eclipse, my advice is to use the default workspace that is provided by clicking on the OK button, as shown in the following screenshot:

If the download and installation were successful, you should see the following welcome screen after selecting the default workspace:

Downloading and installing the OpenShift plugin
Now that our Eclipse IDE is installed and running, the next thing we want to do is download and install the OpenShift plugin for the IDE. The OpenShift plugin is packaged as part of the JBoss Tools project that is provided by the JBoss team at Red Hat. In order to download, install, and use this plugin, open up your browser and go to https://tools.jboss.org/downloads.
Tip
Alternatively, if you are familiar with the Eclipse Marketplace, you can simply search for JBoss Tools and install the plugin directly from within the IDE. This is probably the simplest way to get the plugin installed.
On this page, you will be able to download the correct package for the version of Eclipse that you have installed. Select the version of JBoss Tools that you would like to install and click on the Download button.
The team that works on JBoss Tools has made it extremely easy to install the plugin by simply dragging the install icon to your running Eclipse application. Move your mouse over the icon to view the instructions and then drag it to your Eclipse environment, as shown in the following screenshot:

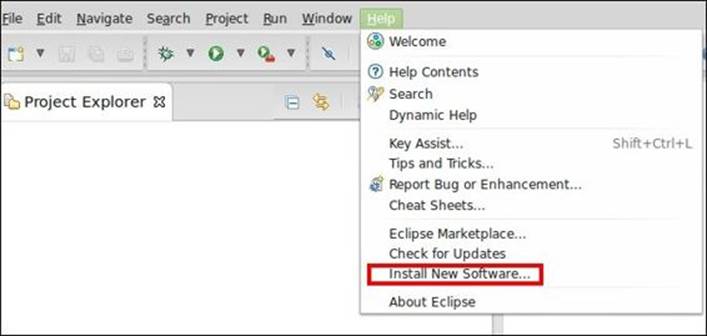
The installation by dragging the Install icon may not work on some systems. If this is the case with your particular installation, you can manually install the package by clicking on Help and then on Install New Software… from within the Eclipse IDE, as shown in the following screenshot:
This will open up a dialog window that will allow you to add a new repository to install packages from. Click on the Add button and then name the repository JBoss Tools and provide http://download.jboss.org/jbosstools/updates/stable/kepler/ for the location, as shown in the following screenshot:

Once the new repository has been added, select all of the packages and then click on the Next button.
Note
Depending on the speed of your Internet connection, the installation may take a few minutes.
Once the installation of the plugin has completed, you will be prompted to restart the IDE.
Importing an existing OpenShift application
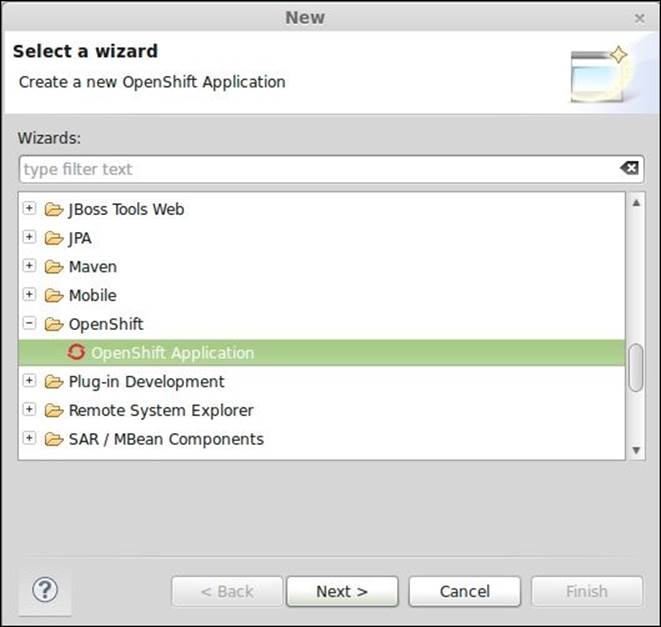
After the installation of the plugin has completed and you have restarted the IDE, the next step is to create a new project using the Eclipse IDE. In order to do this, navigate to File | New | Other and then expand the OpenShift selection, as shown in the following screenshot:
This will open up a new window where you can define a connection to the OpenShift Online service. This screen is fairly straightforward and only requires that you enter in the username and password combination that you used when creating your OpenShift account in Chapter 1, Creating Your First OpenShift Application.
Once you have authenticated to the OpenShift service and a new Eclipse connection has been defined, you will be presented with a dialog window that will allow you to either create a new application or to create an Eclipse-based project from an existing application. To showcase some of the capabilities of the Eclipse integration, let's choose to create a project from an existing application that we have already deployed to the OpenShift platform. In order to do this, select the checkbox next to Use existing application and then click on the Browse button. This will open up a dialog window that displays all the currently running applications that you have deployed on the OpenShift Cloud, as shown in the following screenshot:

Select the lampstack project that we created in Chapter 2, Creating and Managing Applications, as highlighted in the preceding screenshot, and click on the OK button. Once you click on this button, the dialog window will close and the previous window will be shown again. After clicking on the Next button, the plugin will allow you to define your project creation settings. Select the option of creating a new project and click on Next. Finally, you will be presented with a window where you need to define the location on disk where you want to create your Eclipse project files. Uncheck the box next to Use default clone destination and then click on the Browse button to specify the directory where you want your project source files to live, as shown in the following screenshot:

After clicking on the Finish button, the OpenShift plugin will create a new project using the existing source for the lampstack application. This is accomplished by cloning the remote Git repository that resides on your OpenShift gear and integrating the source code revision processes directly into the IDE. This will allow you to make changes and deploy your software code without having to leave the environment. This can be seen by expanding the lampstack folder under the Project Explorer view on the left-hand side of the screen. Note that the IDE displays the project's Git information next to the project's name to indicate which branch of the repository you are currently working with, as shown in the following screenshot:

Tip
To fully realize the power of the Eclipse IDE while working with PHP-based applications, you will need to download the Eclipse PDT plugin that offers native support for developing applications with the PHP language.
Creating and managing a new OpenShift application
Creating a new application is similar to the process that we have already explored; that is, using an existing OpenShift application. In order to see the full power of the OpenShift integration with Eclipse, we need to also explore how to create a new application. For this example, we are going to create a Java-based project while using the Tomcat server.
To create a new Java-based project, navigate to File | New | Project, and then select OpenShift Application. After authenticating to the OpenShift service, we will see the same dialog window that we saw previously, but this time we will want to select to create a new project calledJavaSample. On the project creation dialog window, clicking on the runtime type field will display a list of all the available runtimes on the OpenShift platform. For this sample application, we will want to select Tomcat 7 (JBoss EWS 2.0) (jbossews-2.0) as shown in the following screenshot:

The final two pieces of information that we want to define for our new application are the gear profile and any add-on cartridges that we want to add to our application. Select the small gear profile and the MySQL 5.5 (mysql 5.5) database for our application. After completing these steps, the dialog window should look similar to what's shown in the following screenshot:

After defining your project options, follow the onscreen instructions to complete the project creation step. Once the project has been created, you will see two projects under the Project Explorer view on the left-hand side of the Eclipse IDE, as shown in the following screenshot:

Note
The project creation process can take several minutes as it uses the Maven build system to compile the JavaSample application. This build process includes downloading several dependencies including the appropriate JAR files used to connect to and work with databases.
Deploying changes
One of the useful features of the JBoss Tools plugin, which provides OpenShift integration to the Eclipse IDE, is the ability to work on source code and then deploy those changes to the cloud without having to leave the familiar landscape of the IDE. To illustrate how this works, we are going to create a new JSP file that displays a message to the user. However, before we begin adding new software code, let's verify that our JavaSample application was compiled and deployed to the OpenShift platform during the project creation step.
To verify that everything works correctly, we can use the internal web browser that is part of the Eclipse IDE by viewing our application inside of the OpenShift Explorer. To open this view, navigate to Window | Show View | Other and then select OpenShift Explorer under JBoss Tools, as shown in the following screenshot:

Note
You can also use the keyboard shortcut of Cmd + 3 (OS X) or Ctrl + 3 (Windows/Linux) and type openshift.
This will open up a new tab at the bottom of the screen that will display all of the applications that you have deployed to the OpenShift platform. Expand all of the applications and right-click on JavaSample and then select Show in Web Browser. This will open up the embedded web browser inside of Eclipse and point to the URL of your application.
If the application was compiled and deployed successfully, you should see something similar to what's shown in the following screenshot inside the IDE:

Now that we have verified that our application has been deployed correctly, let's create a new JSP file that will display a message to the user. Navigate to the src | main | webapp directory under the Project Explorer view and then right-click on the webapp directory. Once you right-click on this directory, you will be given the options to create a new JSP file, as shown in the following screenshot:

Name the new file hello.jsp and click on Finish. Once the file has been created, replace the contents with the following source code, which will greet the user and display the current system's date and time:
<%
out.println("Hello from Eclipse!");
out.println("The current date/time is " + new java.util.Date());
%>
Once the file has been saved, we need to perform three steps in order to deploy our changes to the OpenShift server:
1. Add our new file to the revision control system.
2. Commit our changes to the repository.
3. Push our changes to the remote upstream repository.
Luckily, the Git integration inside of Eclipse can tackle the first two steps at the same time. To add and commit our new file to the local repository, right-click on the javasample project under the Project Explorer view and then select Team and then finally choose Commit.
Tip
You can also use the keyboard shortcut to commit changes to the Git repository using the Ctrl + # key combination.
This will open up a dialog window where we can input a message that will explain the changes that we are committing to the Git repository. Enter a commit message and then select the checkbox next to the src/main/webapp/hello.jsp file, as shown in the following screenshot, to indicate that this is the file we want to add and commit to the repository:

The last step is to push the changes we have made and committed to our local Git repository to the upstream OpenShift gear. You can do this by right-clicking on the javasample project and then selecting Team and finally Push to Upstream.
An alternative approach that is viewed by many as an easier way to commit and push changes to Git repositories is using the built-in Git Staging view that is part of the Eclipse IDE with OpenShift integration. To open this view, navigate to Window | Show View | Other and expand the Gitfolder to select the Git Staging view. This will open up a view at the bottom of the IDE that will allow you to drag unstaged changes to the staged area and then allow you to commit and push in one step. To try this out, make a small modification to the hello.jsp file and save the changes. For example:
out.println("Hello from Eclipse!");
The preceding line of code should be modified to read as follows:
out.println("Hello from OpenShift and Eclipse!");
Open up the Git Staging view and then drag the hello.jsp file to the Staged Changed box and enter a commit message. Lastly click on Commit and Push as shown in the following screenshot:

Viewing your application's logfiles
As we discussed previously, viewing the logfiles of your running application is an important tool in determining the current state of the application as well as a crucial tool in the debugging process when something is not working as expected. The OpenShift plugin for Eclipse provides the ability to view your application and server logfiles from right inside of the IDE. To view the logfiles for an application deployed on the OpenShift service, open up the OpenShift Explorer view and navigate to the application whose logfiles you want to view. Once you have located the application, you can simply right-click on it and then select to tail the files associated with it, as shown in the following screenshot:

This will open up a dialog window that will allow you to specify any arguments that you want to pass to the remote tail command as well as allow you to specify what gears of the application you want to view. For most cases, using the defaults will provide the information that you are looking for when viewing the logfiles.
Note
Viewing logfiles for specific gears will be explained in Chapter 12, Scaling Applications, where we introduce the concept of automatic scaling of your application based upon the amount of web traffic your application receives. In short, the ability to view specific logs for a particular gear will allow you to isolate problems to a specific server while debugging application code.
Once you specify any arguments that you want to include, click on the Finish button to begin viewing the files. The contents of all the logfiles will be displayed in the Console tab at the bottom of the IDE, as shown in the following screenshot:

Embedding add-on cartridges
As we discussed in Chapter 2, Creating and Managing Applications, embedding and using cartridges is an integral part of the application development and deployment process. Previously, we learned how to embed cartridges using the RHC command-line tools. Embedding add-on cartridges is also available from within the Eclipse IDE. If you recall, when we created the JavaSample application earlier in this chapter, we specified that the MySQL database cartridge should be included as part of the application creation process. We will now use the Eclipse IDE to add both theCron and phpMyAdmin cartridges to our application.
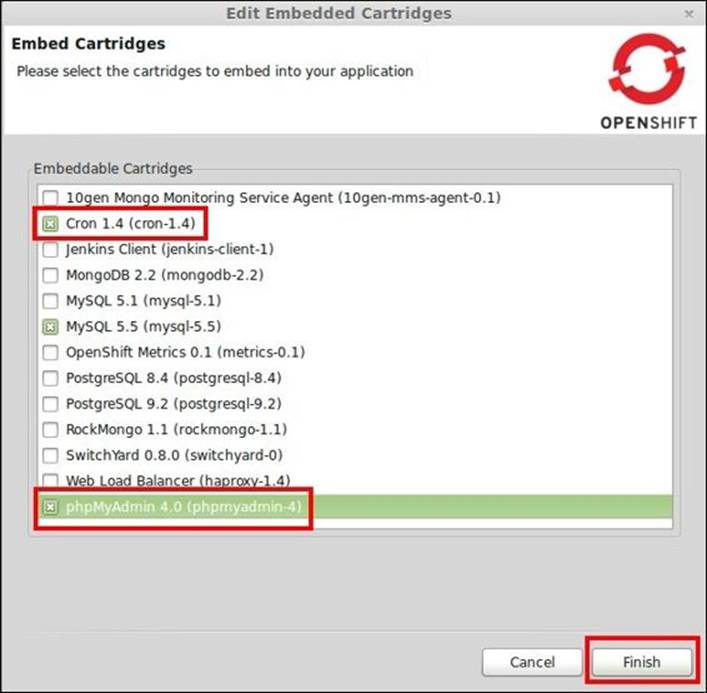
To accomplish this task, right-click on your application from within the OpenShift Explorer view and select Edit Embedded Cartridges… as shown in the following screenshot:

This will open up a dialog window that will display all of the available add-on cartridges that are applicable to your application. Select the Cron 1.4 (cron-1.4) and phpMyAdmin 4.0 (phpmyadmin-4) cartridges and click on Finish, as shown in the following screenshot:
Once the Cron and phpMyAdmin cartridges have been added to your application, any authentication information needed for the newly added cartridges will be displayed on a dialog window that opens.
You can verify that the cartridges were successfully added by expanding your application in the OpenShift Explorer view where all of the cartridges that your application is consuming are displayed.
Viewing your application's environment variables
In Chapter 3, Application Maintenance, we discussed using environment variables as well as how to create your own environment variable. As part of that chapter, we created a new environment variable for our lampstack application called OPENSHIFT_LAMPSTACK_LOGLEVEL. We then used the value of that variable to determine the type of log output that we write to a custom logfile. The OpenShift plugin for Eclipse allows us to view and edit custom environment variables as well as the ability to view all system-level environment variables for our application. To demonstrate this, let's view the custom environment variable that we created in Chapter 3, Application Maintenance, using the Eclipse IDE instead of the RHC command-line tools. To do this, right-click on the lampstack application in the OpenShift Explorer view and then select Edit Environment Variables. This will open up a dialog window that will display any custom variables we have defined as well as the current value that is set for the variable. The following screenshot shows this in action:

Using this dialog window, change the value of the OPENSHIFT_LAMPSTACK_LOGLEVEL variable by highlighting the variable and changing the value to DEBUG. Once you've changed the value, click on Finish to save your changes. Verify that the changes were deployed to your remote running application by either viewing the hellodb.php file from Chapter 3, Application Maintenance, or by viewing the environment variables again from inside of Eclipse.
Viewing the details of an application
In Chapter 2, Creating and Managing Applications, we explored how to use the rhc app show command to display all of the details for an application. For example, to view the details of the lampstack application using the RHC command-line tools, we would issue the following command at a terminal prompt:
$ rhc app show lampstack
As with most of the RHC command-line tools, there is an equivalent included as part of the OpenShift Eclipse plugin. To view the details of an application, right-click on the application name under the OpenShift Explorer view and select Details. This will open up a new window that displays the following information:
· The name of the application
· The public URL of the application that can be used to view the application inside of a web browser
· The type of runtime that is associated with the application, for example, PHP, JBoss EAP, and so on
· The date the application was first created and deployed to the OpenShift platform
· The user ID of the gear that your application code is deployed on
· The Git URL for the remote repository that resides on the OpenShift gear
· The connection information that allows you to connect to the remote OpenShift gear using the SSH protocol
· All add-on cartridges that are embedded in your application
Deleting an application
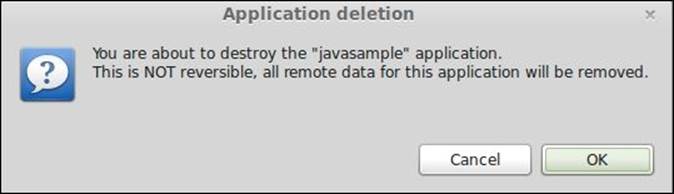
Previously in this chapter, we created an application called JavaSample. Since we will not be using this application in the future, we can safely remove it from the OpenShift service in order to free up resources in our account. To delete this application from inside of Eclipse, right-click on the application's name from within the OpenShift Explorer view and select Delete Application. The OpenShift plugin will display a dialog box asking you to confirm the operation since a delete operation cannot be reversed, as shown in the following screenshot:
To verify that your application has been deleted, refresh the OpenShift Explorer view to ensure that the JavaSample application is no longer listed.
Tip
To refresh the view, right-click on your account name and select Refresh.
You are probably wondering why the source code for the application we just deleted is still showing in the Project Explorer view. This is because when deleting an application, it only deletes the remote gear that your application has been deployed to, while leaving the local copy of your application's source code and repository intact. To fully delete the application and any source code on your local filesystem, you will need to also delete the Eclipse project associated with the application. To do this, right-click on your project and select the option of deleting it.
Integrating OpenShift with other IDEs
What happens if your preferred IDE is not Eclipse? I am happy to report that because of the popularity of the OpenShift platform, integration is also available for the majority of the popular IDEs in use by developers today. While the actual implementation of the OpenShift service may differ slightly in each IDE, the concepts are the same. Some of the popular integrations that I have used in the past are available for the following environments:
· JetBrains IntelliJ IDEA
· Zend Studio
· Appcelerator Titanium Studio
· Code Envy
· Cloud 9
Summary
In this chapter, we learned how to install and configure the popular Eclipse IDE in order to work with the OpenShift platform. Once we had our development environment installed and properly configured, we learned how to import existing applications as well as how to create new applications from within the Eclipse IDE. Next, we learned the essential workflow steps for creating, managing, and deploying applications with OpenShift while using Eclipse. This included how to add, commit, and deploy code changes to the OpenShift server. Lastly, we learned how to embed cartridges, view logfiles, and how to use environment variables with our application.
In the next chapter, we will learn how to use the OpenShift Online service to create and deploy Java EE applications using the JBoss Enterprise Application Platform application server.
All materials on the site are licensed Creative Commons Attribution-Sharealike 3.0 Unported CC BY-SA 3.0 & GNU Free Documentation License (GFDL)
If you are the copyright holder of any material contained on our site and intend to remove it, please contact our site administrator for approval.
© 2016-2026 All site design rights belong to S.Y.A.