Learning OpenShift (2014)
Chapter 5. Creating and Deploying Java EE Applications
In this chapter, we are going to learn how to use OpenShift in order to create and deploy Java-EE-based applications using the JBoss Enterprise Application Platform (EAP) application server. To illustrate and learn the concepts of Java EE, we are going to create an application that displays an interactive map that contains all of the major league baseball parks in the United States. We will start by covering some background information on the Java EE framework and then introduce each part of the sample application. The process for learning how to create the sample application, named mlbparks, will be started by creating the JBoss EAP container, then adding a database, creating the web services, and lastly, creating the responsive map UI.
The evolution of Java EE
I can't think of a single programming language other than Java that has so many fans while at the same time has a large community of developers that profess their hatred towards it. The bad reputation that Java has can largely be attributed to early promises made by the community when the language was first released and then not being able to fulfill these promises. Developers were told that we would be able to write once and run anywhere, but we quickly found out that this meant that we could write once and then debug on every platform. Java was also perceived to consume more memory than required and was accused of being overly verbose by relying heavily on XML configuration files.
Another problem the language had was not being able to focus on and excel at one particular task. We used Java to create thick client applications, applets that could be downloaded via a web browser, embedded applications, web applications, and so on. Having Java available as a tool that completes most projects was a great thing, but the implementation for each project was often confusing. For example, let's examine the history of GUI development using the Java programming language. When the language was first introduced, it included an API called the Abstract Window Toolkit (AWT) that was essentially a Java wrapper around native UI components supplied by the operating system. When Java 1.2 was released, the AWT implementation was deprecated in favor of the Swing API that contained GUI elements written in 100 percent Java. By this time, a lot of developers were quickly growing frustrated with the available APIs and to further complicate the frustration, yet another new toolkit called the Standard Widget Toolkit (SWT) was developed.
Note
SWT was developed by IBM and is the Windowing toolkit in use by the Eclipse IDE. It is considered by most to be the superior toolkit when creating applications with a graphical user interface.
Another reason why developers began switching from Java to more attractive programming languages was the implementation of Enterprise JavaBeans (EJB). The first Java EE release occurred in December, 1999, and the Java community is just now beginning to recover from the complexity introduced by the language in order to create applications. If you were able to escape creating applications using early EJBs, consider yourself lucky, as many of your fellow developers were consumed by implementing large-scale systems using this new technology. It wasn't fun; trust me. I was there and experienced it firsthand.
When developers began abandoning Java EE, they seemed to go in one of two directions. Developers who understood that the Java language itself was quite beautiful adopted the Spring Framework methodology of having enterprise grade features while sticking with a Plain Old Java Object (POJO) implementation. Other developers were wooed away by languages that were considered more modern, such as Ruby and the popular Rails framework. While the rise in popularity of both Ruby and Spring was happening, the team behind Java EE continued to improve and innovate, which resulted in the creation of a new implementation that is both easy to use and a pleasure to develop with.
I am happy to report that if you haven't taken a look at Java EE in the last few years, now is the time to do so. Working with the language after a long hiatus has been a rewarding and pleasurable experience. By the end of this chapter, you will have the skills and knowledge to see past the legacy of Java and realize that it is an exciting and refreshing language to use to create both simple and enterprise class applications.
Introducing the sample application
For the remainder of this chapter, we are going to develop an application called mlbparks that displays a map of the United States with a pin on the map representing the location of each major league baseball stadium. The requirements for the application are as follows:
· A single map that a user can zoom in and out of
· As the user moves the map around, the map must be updated with all baseball stadiums that are located in the shown area
· The location of the stadiums must be searchable based on map coordinates that are passed to the REST-based API
· The data should be transferred in the JSON format
· The web application must be responsive so that it is displayed correctly regardless of the resolution of the browser
· When a stadium is listed on the map, the user should be able to click on the stadium to view details about the associated team
The end state application will look like the following screenshot:

The user will also be able to zoom in on a specific location by double-clicking on the map or by clicking on the + zoom button in the top-left corner of the application. For example, if a user zooms the map in to the Phoenix, Arizona area of the United States, they will be able to see theinformation for the Arizona Diamondbacks stadium as shown in the following screenshot:
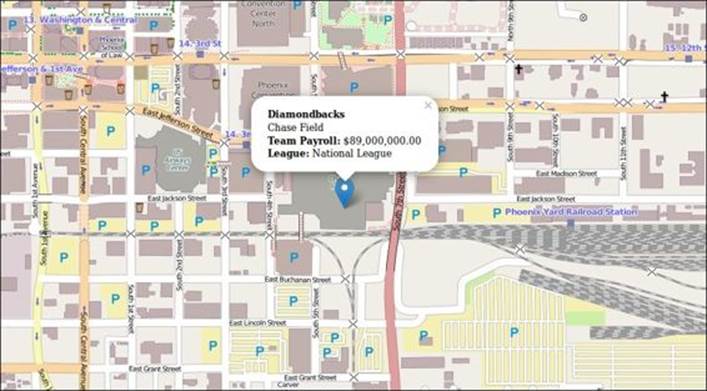
To view this sample application running live, open your browser and type http://mlbparks-packt.rhcloud.com.
Now that we have our requirements and know what the end result should look like, let's start creating our application.
Creating a JBoss EAP application
For the sample application that we are going to develop as part of this chapter, we are going to take advantage of the JBoss EAP application server that is available on the OpenShift platform.
Note
The JBoss EAP application server is a fully tested, stable, and supported platform for deploying mission-critical applications. Some developers prefer to use the open source community application server from JBoss called WildFly. Keep in mind when choosing WildFly over EAP that it only comes with community-based support and is a bleeding edge application server.
To get started with building the mlbparks application, the first thing we need to do is create a gear that contains the cartridge for our JBoss EAP runtime. For this, we are going to use the RHC tools, which we learned about in Chapter 2, Creating and Managing Applications. Open up your terminal application and enter in the following command:
$ rhc app create mlbparks jbosseap-6
Once the previous command is executed, you should see the following output:
Application Options
-------------------
Domain: yourDomainName
Cartridges: jbosseap-6 (addtl. costs may apply)
Gear Size: default
Scaling: no
Creating application 'mlbparks' ... done
Waiting for your DNS name to be available ... done
Cloning into 'mlbparks'...
Your application 'mlbparks' is now available.
URL: http://mlbparks-yourDomainName.rhcloud.com/
SSH to: 5311180f500446f54a0003bb@mlbparks-yourDomainName.rhcloud.com
Git remote: ssh://5311180f500446f54a0003bb@mlbparks-yourDomainName.rhcloud.com/~/git/mlbparks.git/
Cloned to: /home/gshipley/code/mlbparks
Run 'rhc show-app mlbparks' for more details about your app.
Tip
If you have a paid subscription to OpenShift Online, you might want to consider using a medium- or large-size gear to host your Java-EE-based applications. To create this application using a medium-size gear, use the following command:
$ rhc app create mlbparks jbosseap-6 -g medium
Adding database support to the application
Now that our application gear has been created, the next thing we want to do is embed a database cartridge that will hold the information about the baseball stadiums we want to map. Given that we are going to develop an application that doesn't require referential integrity but provides a REST-based API that will return JSON, it makes sense to use MongoDB as our database.
Note
MongoDB is arguably the most popular NoSQL database available today. The company behind the database, MongoDB, offers paid subscriptions and support plans for production deployments. For more information on this popular NoSQL database, visit www.mongodb.com.
As we learned in Chapter 2, Creating and Managing Applications, run the following command to embed a database into our existing mlbparks OpenShift gear:
$ rhc cartridge add mongodb-2.4 -a mlbparks
Once the preceding command is executed and the database has been added to your application, you will see the following information on the screen that contains the username and password for the database:
Adding mongodb-2.4 to application 'mlbparks' ... done
mongodb-2.4 (MongoDB 2.4)
-------------------------
Gears: Located with jbosseap-6
Connection URL: mongodb://$OPENSHIFT_MONGODB_DB_HOST:$OPENSHIFT_MONGODB_DB_PORT/
Database Name: mlbparks
Password: q_6eZ22-fraN
Username: admin
MongoDB 2.4 database added. Please make note of these credentials:
Root User: admin
Root Password: yourPassword
Database Name: mlbparks
Connection URL: mongodb://$OPENSHIFT_MONGODB_DB_HOST:$OPENSHIFT_MONGODB_DB_PORT/
Importing the MLB stadiums into the database
Now that we have our application gear created and our database added, we need to populate the database with the information about the stadiums that we are going to place on the map. The data is provided as a JSON document and contains the following information:
· The name of the baseball team
· The total payroll for the team
· The location of the stadium represented with the longitude and latitude
· The name of the stadium
· The name of the city where the stadium is located
· The league the baseball club belongs to (National or American)
· The year the data is relevant for
· All of the players on the roster including their position and salary
A sample for the Arizona Diamondbacks looks like the following line of code:
{ "name":"Diamondbacks", "payroll":89000000, "coordinates":[ -112.066662, 33.444799 ], "ballpark":"Chase Field", "city":"Phoenix", "league":"National League", "year":"2013", "players":[ { "name":"Miguel Montero", "position":"Catcher", "salary":10000000 }, ………… ]}
In order to import the preceding data, we are going to use the SSH command, which we learned in Chapter 3, Application Maintenance. To get started with the import, SSH into your OpenShift gear for the mlbparks application by issuing the following command in your terminal prompt:
$ rhc app ssh mlbparks
Once we are connected to the remote gear, we need to download the JSON file and store it in the /tmp directory of our gear. To complete these steps, use the following commands on your remote gear:
$ cd /tmp
$ wget https://raw.github.com/gshipley/mlbparks/master/mlbparks.json
Note
Wget is a software package that is available on most Linux-based operating systems in order to retrieve files using HTTP, HTTPS, or FTP.
Once the file has completed downloading, take a quick look at the contents using your favorite text editor in order to get familiar with the structure of the document. When you are comfortable with the data that we are going to import into the database, execute the following command on the remote gear to populate MongoDB with the JSON documents:
$ mongoimport --jsonArray -d $OPENSHIFT_APP_NAME -c teams --type json --file /tmp/mlbparks.json -h $OPENSHIFT_MONGODB_DB_HOST --port $OPENSHIFT_MONGODB_DB_PORT -u $OPENSHIFT_MONGODB_DB_USERNAME -p $OPENSHIFT_MONGODB_DB_PASSWORD
If the command was executed successfully, you should see the following output on the screen:
connected to: 127.7.150.130:27017
Fri Feb 28 20:57:24.125 check 9 30
Fri Feb 28 20:57:24.126 imported 30 objects
What just happened? To understand this, we need to break the command we issued into smaller chunks, as detailed in the following table:
|
Command / argument |
Description |
|
mongoimport |
This command is provided by MongoDB to allow users to import data into a database. |
|
--jsonArray |
This specifies that we are going to import an array of JSON documents. |
|
-d $OPENSHIFT_APP_NAME |
Specifies the database that we are going to import the data into. If you recall from Chapter 3, Application Maintenance, we are using a system environment variable to use the database that was created by default when we embedded the database cartridge in our application. |
|
-c teams |
This defines the collection to which we want to import the data. If the collection does not exist, it will be created. |
|
--type json |
This specifies the type of file we are going to import. |
|
--file /tmp/mlbparks.json |
This specifies the full path and name of the file that we are going to import into the database. |
|
-h $OPENSHIFT_MONGODB_DB_HOST |
This specifies the host of the MongoDB server. |
|
--port $OPENSHIFT_MONGODB_DB_PORT |
This specifies the port of the MongoDB server. |
|
-u $OPENSHIFT_MONGODB_DB_USERNAME |
This specifies the username to be used for authenticating to the database. |
|
-p $OPENSHIFT_MONGODB_DB_PASSWORD |
This specifies the password to be used for authenticating to the database. |
To verify the data was loaded properly, you can use the following command that will print out the number of documents in the teams collection of the mlbparks database:
$ mongo -quiet $OPENSHIFT_MONGODB_DB_HOST:$OPENSHIFT_MONGODB_DB_PORT/$OPENSHIFT_APP_NAME -u $OPENSHIFT_MONGODB_DB_USERNAME -p $OPENSHIFT_MONGODB_DB_PASSWORD --eval "db.teams.count()"
The result should be 30.
Lastly, we need to create a 2d index on the teams collection to ensure that we can perform spatial queries on the data.
Note
Geospatial queries are what allow us to search for specific documents that fall within a given location as provided by the latitude and longitude parameters.
To add the 2d index to the teams collection, enter the following command on the remote gear:
$ mongo
$OPENSHIFT_MONGODB_DB_HOST:$OPENSHIFT_MONGODB_DB_PORT/$OPENSHIFT_APP_NAME --eval 'db.teams.ensureIndex( { coordinates : "2d" } );'
Adding database support to our Java application
The next step in creating the mlbparks application is adding the MongoDB driver dependency to our application. OpenShift Online supports the popular Apache Maven build system as the default way of compiling the Java source code and resolving dependencies.
Note
Maven was originally created to simplify the build process by allowing developers to specify specific JARs that their application depends on. This alleviates the bad practice of checking JAR files into the source code repository and allows a way to share JARs across several projects. This is accomplished via a pom.xml file that contains configuration items and dependency information for the project.
In order to add the dependency for the MongoDB client to our mlbparks applications, we need to modify the pom.xml file that is in the root directory of the Git repository. The Git repository was cloned to our local machine during the application's creation step that we performed earlier in this chapter. Open up your favorite text editor and modify the pom.xml file to include the following lines of code in the <dependencies> block:
<dependency>
<groupId>org.mongodb</groupId>
<artifactId>mongo-java-driver</artifactId>
<version>2.9.1</version>
</dependency>
Once you have added the dependency, commit the changes to your local repository by using the following command:
$ git commit -am "added MongoDB dependency"
Finally, let's push the change to our Java application to include the MongoDB database drivers using the git push command:
$ git push
Note
The first time the Maven build system builds the application, it downloads all the dependencies for the application and then caches them. Because of this, the first build will always take a bit longer than any subsequent build.
Creating the database access class
At this point, we have our application created, the MongoDB database embedded, all the information for the baseball stadiums imported, and the dependency for our database driver added to our application. The next step is to do some actual coding by creating a Java class that will act as the interface for connecting to and communicating with the MongoDB database. Create a Java file named DBConnection.java in the mlbparks/src/main/java/org/openshift/mlbparks/mongo directory and add the following source code:
package org.openshift.mlbparks.mongo;
import java.net.UnknownHostException;
import javax.annotation.PostConstruct;
import javax.enterprise.context.ApplicationScoped;
import javax.inject.Named;
import com.mongodb.DB;
import com.mongodb.Mongo;
@Named
@ApplicationScoped
public class DBConnection {
private DB mongoDB;
public DBConnection() {
super();
}
@PostConstruct
public void afterCreate() {
String mongoHost = System.getenv("OPENSHIFT_MONGODB_DB_HOST");
String mongoPort = System.getenv("OPENSHIFT_MONGODB_DB_PORT");
String mongoUser = System.getenv("OPENSHIFT_MONGODB_DB_USERNAME");
String mongoPassword = System.getenv("OPENSHIFT_MONGODB_DB_PASSWORD");
String mongoDBName = System.getenv("OPENSHIFT_APP_NAME");
int port = Integer.decode(mongoPort);
Mongo mongo = null;
try {
mongo = new Mongo(mongoHost, port);
} catch (UnknownHostException e) {
System.out.println("Couldn't connect to MongoDB: " + e.getMessage() + " :: " + e.getClass());
}
mongoDB = mongo.getDB(mongoDBName);
if (mongoDB.authenticate(mongoUser, mongoPassword.toCharArray()) == false) {
System.out.println("Failed to authenticate DB ");
}
}
public DB getDB() {
return mongoDB;
}
}
Note
The preceding source code as well as all source code for this chapter is available on GitHub at https://github.com/gshipley/mlbparks.
The preceding code snippet simply creates an application-scoped bean that is available until the application is shut down.
Note
The @ApplicationScoped annotation is used when creating application-wide data or constants that should be available to all the users of the application. We chose this scope because we want to maintain a single connection class for the database that is shared among all requests.
The next bit of interesting code is the afterCreate method that authenticates to the database using the system environment variables that we discussed in Chapter 3, Application Maintenance.
Once you have created the DBConnection.java file and added the preceding source code, add the file to your local repository and commit the changes as follows:
$ git add .
$ git commit -am "Adding database connection class"
Creating the beans.xml file
The DBConnection class we just created makes use of CDI for dependency injection.
Note
CDI stands for Context Dependency Injection and is part of the official Java EE specification.
According to the official specification for CDI, an application that uses CDI must have a file called beans.xml. The file must be present and located under the WEB-INF directory. Given this requirement, create a file named beans.xml under the mlbparks/src/main/webapp/WEB-INF directory and add the following lines of code:
<?xml version="1.0"?>
<beans xmlns="http://java.sun.com/xml/ns/javaee" xmlns:xsi="http://www.w3.org/2001/XMLSchema-instance" xsi:schemaLocation="http://java.sun.com/xml/ns/javaee http://jboss.org/schema/cdi/beans_1_0.xsd"/>
After you have added the beans.xml file, add and commit it to your local Git repository:
$ git add .
$ git commit -am "Adding beans.xml for CDI"
Creating the domain model
The next step is to create our model class that will hold information on a specific baseball park. This model object is a POJO that is defined to contain the team name, position (the longitude and latitude), ballpark name, team payroll, and the league the team belongs to. Create a Java file named MLBPark.java under the mlbparks/src/main/java/org/openshift/mlbparks/domain directory and add the following source code:
package org.openshift.mlbparks.domain;
public class MLBPark {
private Object name;
private Object position;
private Object id;
private Object ballpark;
private Object payroll;
private Object league;
public Object getName() {
return name;
}
public void setName(Object name) {
this.name = name;
}
public Object getPosition() {
return position;
}
public void setPosition(Object position) {
this.position = position;
}
}
Note
In the preceding code snippet, I have omitted the getters and setters for most of the variables. When creating your source file, make sure that you include a getter and setter for each variable in order to ensure that your application works correctly. Again, the complete source code for this application can viewed at https://github.com/gshipley/mlbparks.
Once you have created the MLBPark.java file and added the preceding listed source code, add the file to your local repository and commit the changes:
$ git add .
$ git commit -am "Adding MLBParks model object"
Creating the REST services
The application that we are developing will provide data to the user interface by providing a set of web services that will allow the code to make a request for all available baseball parks as well as the ability to query for stadiums within a given set of longitude and latitude parameters. We will be using the popular Java API for RESTful Web Services (JAX-RS) to provide this functionality. To get started with defining our available service, create a file named JaxrsConfig.java under the mlbparks/src/main/java/org/openshift/mlbparks/rest directory and add the following code snippet:
package org.openshift.mlbparks.rest;
import javax.ws.rs.ApplicationPath;
import javax.ws.rs.core.Application;
@ApplicationPath("/ws")
public class JaxrsConfig extends Application{
}
The preceding code snippet defines the URL path that clients will use to communicate with our REST web services. The definition occurs on the @ApplicationPath("/ws") line.
Considering the preceding line of explanation, the entry point for our REST services will be http://mlbparks-yourNameSpace.rhcloud.com/ws.
Now that we have our application path defined, we can begin to build the web services for our application. Create a file named MLBParkResource.java under the mlbparks/src/main/java/org/openshift/mlbparks/rest directory and add the following code snippet:
package org.openshift.mlbparks.rest;
import java.util.ArrayList;
import java.util.List;
import javax.enterprise.context.RequestScoped;
import javax.inject.Inject;
import javax.ws.rs.GET;
import javax.ws.rs.Path;
import javax.ws.rs.Produces;
import javax.ws.rs.QueryParam;
import org.openshift.mlbparks.domain.MLBPark;
import org.openshift.mlbparks.mongo.DBConnection;
import com.mongodb.BasicDBObject;
import com.mongodb.DB;
import com.mongodb.DBCollection;
import com.mongodb.DBCursor;
import com.mongodb.DBObject;
The preceding code snippet defines the package of the Java class as well as lists all the imports that are required for the class to function properly.
After you have added the package and import statements, we can begin building our class by defining the actual class as well as defining the database connection. Add the following code snippet directly after the last import statement in your source file:
@RequestScoped
@Path("/parks")
public class MLBParkResource {
@Inject
private DBConnection dbConnection;
The preceding code snippet creates a request-scoped bean with a default URL path of parks. It then defines a DBConnection variable that will be injected with an instance using CDI by leveraging the DBConnection class that we created previously in this chapter.
Next, we want to add two helper methods to our MLBParkResource class. We will use these to get our database collection as well as a method for populating the MLBPark model object. Add the following source code to the class directly after the definition of the DBConnection variable:
private DBCollection getMLBParksCollection() {
DB db = dbConnection.getDB();
DBCollection parkListCollection = db.getCollection("teams");
return parkListCollection;
}
private MLBPark populateParkInformation(DBObject dataValue) {
MLBPark thePark = new MLBPark();
thePark.setName(dataValue.get("name"));
thePark.setPosition(dataValue.get("coordinates"));
thePark.setId(dataValue.get("_id").toString());
thePark.setBallpark(dataValue.get("ballpark"));
thePark.setLeague(dataValue.get("league"));
thePark.setPayroll(dataValue.get("payroll"));
return thePark;
}
Finally, we get to create our first actual web service using JAX-RS. The first service we are going to create will return all of the available baseball stadiums in the database. To add this method, modify your source code to include a getMLBParksCollection() method, as shown in the following source code:
@GET()
@Produces("application/json")
public List<MLBPark> getAllParks() {
ArrayList<MLBPark> allParksList = new ArrayList<MLBPark>();
DBCollection mlbParks = this.getMLBParksCollection();
DBCursor cursor = mlbParks.find();
try {
while (cursor.hasNext()) {
allParksList.add(this.populateParkInformation(cursor.next()));
}
}
finally {
cursor.close();
}
return allParksList;
}
The preceding method states that it will accept GET requests (the @GET annotation) and will return data in the JSON format (the @Produces annotation). The body of the method gets the database collection where the park information is stored, and then performs a find() query to retrieve all of the stadiums. The code then iterates over each result and populates an MLBPark model object with the data provided by the query. Once all of the results have been parsed, the results are returned by the method in the JSON format.
The last method we need to add to our class is the findParksWithin() method that will allow the requester to pass in coordinates that we need to search for baseball stadiums that fall within the provided locations:
@GET
@Produces("application/json")
@Path("within")
public List<MLBPark> findParksWithin(@QueryParam("lat1") float lat1,
@QueryParam("lon1") float lon1, @QueryParam("lat2") float lat2,
@QueryParam("lon2") float lon2) {
ArrayList<MLBPark> allParksList = new ArrayList<MLBPark>();
DBCollection mlbParks = this.getMLBParksCollection();
// make the query object
BasicDBObject spatialQuery = new BasicDBObject();
ArrayList<double[]> boxList = new ArrayList<double[]>();
boxList.add(new double[] { new Float(lon2), new Float(lat2) });
boxList.add(new double[] { new Float(lon1), new Float(lat1) });
BasicDBObject boxQuery = new BasicDBObject();
boxQuery.put("$box", boxList);
spatialQuery.put("coordinates", new BasicDBObject("$within", boxQuery));
System.out.println("Using spatial query: " + spatialQuery.toString());
DBCursor cursor = mlbParks.find(spatialQuery);
try {
while (cursor.hasNext()) {
allParksList.add(this.populateParkInformation(cursor.next()));
}
}
finally {
cursor.close();
}
return allParksList;
}
Lastly, we need to add a closing curly brace to end our class:
}
Once you have performed these code changes, add the source file and commit your changes to your local repository:
$ git add .
$ git commit -am "Adding REST web services"
Verifying the REST web services
At this point, we should have everything created and committed to our local repository and should be ready to deploy the REST services to our running OpenShift gear. To ensure that you have all of the changes committed to your local repository, change the root directory of the application and issue the following command:
$ git status
Tip
Make sure that you do not have any untracked changes on your local filesystem. If you do have untracked changes, add the files and commit the changes.
Guess what? We are finally ready to deploy the application and test the web services that we created. To deploy your mlbparks application to your OpenShift gear, enter the following command:
$ git push
Note
The git push command might take a few minutes to complete as Maven needs to download all the dependencies that are specified in the pom.xml file. This only happens the first time a build is performed or if new dependencies are added that are not available in the cache.
Once the application has been deployed, open your favorite web browser and point to http://mlbparks-yourDomainName.rhcloud.com/ws/parks.
If the application is successfully deployed, you should see a listing of all baseball stadiums and teams as depicted in the following screenshot:

Creating the user interface
The final piece of our application involves creating a user interface that interacts with the web services that we have developed previously in this chapter, and then presents the information to the user in a cohesive and usable manner. Developing the user-facing parts of an application is where the real joy of programming is for me. I love being able to take all of the backend services and data and then present the results in a new and fascinating way. For this example, we are going to create a web-based frontend, but given that the application services we developed previously in this chapter are accessible via HTTP requests, the possibilities are limitless as to how you can present the information to the user. If you have experience developing mobile or thick client applications, I suggest that you develop a frontend using these mediums as well.
As you can recall, the requirements for the application state that the application should display a map of the United States with a pin on the map representing the location of each major league baseball stadium. The user should be able to zoom in and out on the map, and the map should automatically update the baseball stadiums based on the visible area on the users' screen. When the user clicks on a stadium, the information about the team should be displayed to the user. To fully understand how to develop the frontend portion of the application, we are going to satisfy each requirement in small increments and slowly build upon each step to fully develop the frontend application.
Creating the map using Leaflet and OpenStreetMap
In order to create the map for our application, we are going to use two projects: Leaflet and OpenStreetMap.
The description provided on the official project page for Leaflet superbly describes the features and benefits of the project. The official page (http://leafletjs.com/) states that Leaflet is a modern open source JavaScript library for mobile-friendly, interactive maps. Vladimir Agafonkin and a team of dedicated contributors developed it. Weighing in at just about 33 KB of JavaScript, it has all the features most developers will ever need for online maps.
Leaflet is designed with simplicity, performance, and usability in mind. It works efficiently across all major desktop and mobile platforms out of the box, taking advantage of HTML5 and CSS3 on modern browsers while still being accessible on older ones. It can be extended with a huge amount of plugins, has a beautiful, easy-to-use, well-documented API, and a simple code base that is readable and easy to understand.
OpenStreetMap is a collaborative project that provides free and open map data that can be integrated with applications. We will be using the data provided by OpenStreetMap in conjunction with Leaflet in order to produce a map that is visible to users.
Note
For more information on OpenStreetMap and to learn how you can contribute to the project, visit the official page of the project at http://www.openstreetmap.org/.
The first thing we want to do is remove the existing index.html file that is created by the OpenShift Online template for JBoss EAP applications. The existing index file presents a "getting started" page that looks like the following screenshot:

To remove this file, switch to the mlbparks/src/main/webapp directory and issue the following commands:
$ git rm index.html
$ git commit -am "Remove existing index file"
Now that we have removed the existing index file, it's time to create a new one. Open your favorite text editor and create a file named index.html under the mlbparks/src/main/webapp directory. The first bit of information we want to add to the source file is some basic CSS that specifies the look and feel of the UI components as well as adding dependencies to pull in remote JavaScript resources for both Leaflet and jQuery. Add the following lines of code to the top of the index.html file:
<!doctype html>
<html lang="en">
<head>
<!-- Set the title of the application that will be displayed on the browser window -->
<title>Map of MLB Parks</title>
<!-- Specifiy to load the correct remote stylesheet for Leaflet depending on the browser -->
<link rel="stylesheet"
href="http://cdn.leafletjs.com/leaflet-0.5.1/leaflet.css" />
<!--[if lte IE 8]>
<link rel="stylesheet" href="http://cdn.leafletjs.com/leaflet-0.5.1/leaflet.ie.css" />
<![endif]-->
<!-- Load in the remote JS for JQuery -->
<script src="http://code.jquery.com/jquery-2.0.0.min.js"></script>
<!-- Load in the remote JS for Leaflet -->
<script src="http://cdn.leafletjs.com/leaflet-0.5.1/leaflet.js"></script>
<!-- Specify that we will be using the OSWALD font provided by Google -->
<link href='http://fonts.googleapis.com/css?family=oswald'
rel='stylesheet' type='text/css'>
<!-- Set the initial parameters for the viewport-->
<meta name="viewport" content="width=device-width, initial-scale=1.0, maximum-scale=1.0, user-scalable=no" />
<!-- Create custom CSS styles for our display-->
<style type="text/css">
body {
padding: 0;
margin: 0;
}
html,body,#map {
height: 100%;
font-family: 'oswald';
}
.leaflet-container .leaflet-control-zoom {
margin-left: 13px;
margin-top: 70px;
}
#map {
z-index: 1;
}
#title {
z-index: 2;
position: absolute;
left: 10px;
}
</style>
</head>
With the preceding code snippet, as described in the HTML comments, we have created our HTML head section that included the dependencies for external JavaScript libraries as well as created a few custom styles for our interface. The next thing we need to do is start creating our map by implementing the <body> section of the HTML code. Add the following directly underneath the closing </head> tag from the previous section:
<body>
<h1 id="title">MLB Stadiums</h1>
The preceding code will create the body section of the HTML file and create a label that will be displayed according to the #title CSS style that we created in the <head> portion of the HTML document.
The next thing we want to do is create an attribution on the map that lets our users know that we are using the Leaflet project for the mapping API and OpenStreetMap for the data that powers the map that will be displayed to the user. Add the following lines of code to your index.html file directly under the h1 title tag:
<div id="map"></div>
<script>
Number.prototype.toCurrencyString = function() { return "$" + Math.floor(this).toLocaleString() + (this % 1).toFixed(2).toLocaleString().replace(/^0/,''); }
center = new L.LatLng(39.82, -98.57);
zoom = 5;
var map = L.map('map').setView(center, zoom);
var markerLayerGroup = L.layerGroup().addTo(map);
L.tileLayer('http://{s}.tile.openstreetmap.org/{z}/{x}/{y}.png', {
maxZoom: 18,
attribution: 'Map data © <a href="http://openstreetmap.org">OpenStreetMap</a> contributors, <a href="http://creativecommons.org/licenses/by-sa/2.0/">CC-BY-SA</a>'
}).addTo(map);
What did we just do? We started by creating a <div> element that will contain the actual map that is displayed to the user. After creating the <div> element, we created a function called toCurrencyString() that will format numbers to a currency representation, which will be displayed when a user views details about a stadium. We then set the starting center point of the map to the latitude and longitude of 39.82 and -98.57, respectively. If you are not familiar with these coordinates, don't worry; this is simply the location of the middle of the United States. To not introduce bias in which stadium is displayed first, I couldn't think of a better way to start the application than by being stadium-agnostic. If you do have a favorite MLB team, you can certainly change these coordinates to the city of your favorite team.
After we set the center point of the map, we defined the default zoom level the user will experience when loading the web page. We then added the attribution tile and set the maximum level we want the users to be able to zoom in to.
The last thing we need to do before we can test that our map is displayed correctly is close the open <script>, <body>, and <html> tags. Add the following code to the very bottom of the index.html file:
</script>
</body>
</html>
Once you have added the closing tags, save your changes to the file, and then deploy the application using the following commands:
$ git add .
$ git commit -am "Adding map to the application"
$ git push
If there are no code errors, the deployment should be completed successfully, as indicated by the following output displayed on your screen:
remote: Preparing build for deployment
remote: Deployment id is 02e426b5
remote: Activating deployment
remote: Starting MongoDB cartridge
remote: Deploying jbosseap cartridge
remote: Starting jbosseap cartridge
remote: Found 127.7.150.129:8080 listening port
remote: Found 127.7.150.129:9999 listening port
remote: /var/lib/openshift/5311180f500446f54a0003bb/jbosseap/standalone/deployments /var/lib/openshift/5311180f500446f54a0003bb/jbosseap
remote: /var/lib/openshift/5311180f500446f54a0003bb/jbosseap
remote: Artifacts deployed: ./ROOT.war
remote: -------------------------
remote: Git Post-Receive Result: success
remote: Activation status: success
remote: Deployment completed with status: success
Verifying that the map was deployed and is responsive
In the previous section, we created and deployed the basics of a mapping application using the Leaflet and OpenStreetMap projects. To verify that the map was created correctly and is getting displayed to the user via the web application, open your favorite browser and point to the URL of your application. If everything works as it should, you will see the following map including the title in the top-left corner of the map as well as the attributions of the projects we have used. Your browser should look like the following screenshot:

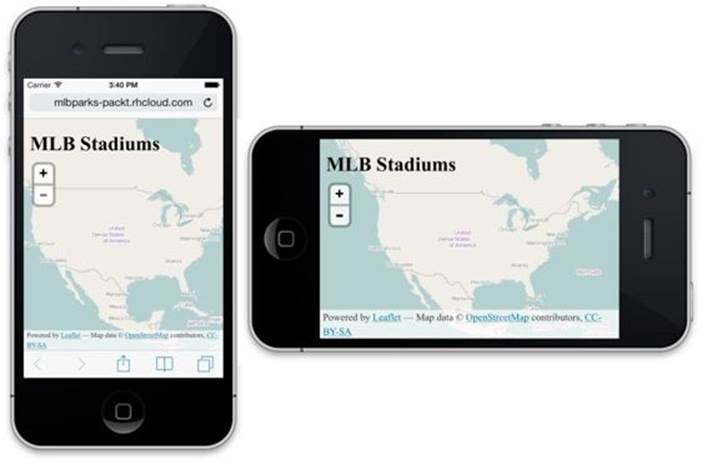
If you recall from the requirements, the application should also be responsive in nature so that it can be viewed just as easily on a mobile device.
Note
A responsive web design means that your application's user interface should be able to adapt to different devices and resolutions without hindering the user experience.
To verify that our application is indeed responsive, pull out your smartphone and load the URL of your application in the browser of your mobile device. As you can see in the following images, the Leaflet library we are using for our mapping capabilities implements responsive web design, gets displayed correctly on these mobile devices, and gets updated based on the orientation of the device (portrait or landscape):
Getting the stadiums from our REST services
Now that we have verified that our map is deployed and is functioning correctly, we are ready to add the stadium information as pins on the map. The first step in order to accomplish this is to create a function that will perform the REST call to our backend services that we created previously in this chapter. Open up the index.html file and add the following code snippet before the closing </script> tag at the bottom of the file:
function getPins(e){
bounds = map.getBounds();
url = "ws/parks/within?lat1=" + bounds.getNorthEast().lat + "&lon1=" + bounds.getNorthEast().lng + "&lat2=" + bounds.getSouthWest().lat + "&lon2=" + bounds.getSouthWest().lng;
$.get(url, pinTheMap, "json")
}
The preceding code snippet might look complicated but it is really quite simple. The first thing we do is define a function called getPins() that will contain the logic for making the call to our REST service that we have already deployed as part of our application.
After our function is defined, we get the area of the map that is currently visible on the screen and assign it to the bounds variable. We then create a URL for the endpoint we are calling and pass in the correct latitude and longitude for the viewable area.
Finally, we create the REST call, passing in the URL of the endpoint as well as the callback function (pinTheMap) that we will get processed once we receive a response from the service.
Adding the stadiums to the map
In the previous section, we stated that we wanted to call a function named pinTheMap when a response is received from the web service. In this section, we are going to add this function to our index.html file directly after the getPins() function. Open the index.html file again and add the following code snippet directly after the getPins() function but before the closing </script> tag at the bottom of the file:
function pinTheMap(data){
//clear the current pins
map.removeLayer(markerLayerGroup);
//add the new pins
var markerArray = new Array(data.length)
for (var i = 0; i < data.length; i++){
park = data[i];
var popupInformation = "<b>" + park.name + "</b></br>" + park.ballpark + "</br>";
popupInformation += "<b>Team Payroll: </b>" + park.payroll.toCurrencyString() + "</br>";
popupInformation += "<b>League: </b>" + park.league + "</br>";
markerArray[i] = L.marker([park.position[1], park.position[0]]).bindPopup(popupInformation);
}
markerLayerGroup = L.layerGroup(markerArray).addTo(map);
}
The preceding function takes a data parameter that contains all of the baseball stadiums' information for the viewable map area that is displayed on the screen. The first thing the function does is clear any other pins (markers) on the map, as we are going to replace them with the information passed in via the data variable. After the existing pins are removed, the function iterates over each element in the array of stadiums and creates a string that contains all of the information we want to display about the stadium and the associated baseball team. We then add this string to an array called makerArray and finally, we add this information to the map.
Automatically updating the map
The final bit of code that we need to add will provide the functionality that updates the map if the user changes the zoom level or drags the map around to display a new section of the United States. Open the index.html file again and add the following code directly after the pinTheMap()function but before the closing </script> tag and the bottom of the file:
map.on('dragend', getPins);
map.on('zoomend', getPins);
map.whenReady(getPins);
Testing the application
Congratulations! You have just completed an application that includes a dynamic map of the world that will also display all of the baseball stadiums in use by MLB. To verify that everything is working correctly, deploy your changes using the following commands:
$ git commit -am "Adding stadiums to map"
$ git push
Once your application has been deployed, open your web browser and play around with the application. The application you have just developed and deployed should match the images at the beginning of this chapter.
Taking the easy way out
Don't hate me for telling you this at the very end of the chapter, but there is an easy way out if you couldn't get all the source code typed in or copied over just right. OpenShift allows you to create applications from existing Git repositories with a single command. To try this out, delete your existing mlbparks application and enter in the following command to create an application, add MongoDB, download the mlbparks application source code, import the dataset, and deploy the code:
$ rhc app create mlbparks jbosseap-6 mongodb-2.4 --from-code https://github.com/gshipley/mlbparks.git --timeout 3600
Tip
It is important to remember that when you delete an application gear on OpenShift, the local copy of the source code remains intact. For this reason, you will need to delete the mlbparks directory on your local machine or the preceding command will fail if you executed it where an mlbparksdirectory already exists.
Summary
In this chapter, we learned how to create a Java-EE-based application using the JBoss EAP application server. As part of the development process, we learned how to use the MongoDB NoSQL database as well as how to import data into the database. After importing the data, we created a spatial index that allowed us to perform geospatial queries to find all stadiums within a given latitude and longitude. Lastly, we learned how to create a frontend for the application by taking advantage of two popular open projects, which are Leaflet and OpenStreetMap. Using these two projects allowed us to quickly create a responsive application that behaves in the same way regardless of the device the user accesses the application from.
In the next chapter, we are going to continue to learn how to build and deploy a Java applications to the OpenShift platform by converting this application to the Spring Framework.
All materials on the site are licensed Creative Commons Attribution-Sharealike 3.0 Unported CC BY-SA 3.0 & GNU Free Documentation License (GFDL)
If you are the copyright holder of any material contained on our site and intend to remove it, please contact our site administrator for approval.
© 2016-2026 All site design rights belong to S.Y.A.