Learning OpenShift (2014)
Chapter 7. Adding a Continuous Integration Environment to Applications
In this chapter, we are going to learn how to add a continuous integration environment to the mlbparks application that we wrote as part of Chapter 5, Creating and Deploying Java EE Applications. For this chapter, we are going to use the popular Jenkins build system, which is a fully supported cartridge on the OpenShift Online platform. We will start by creating a Jenkins server and then add the Jenkins client to our existing application. At the end of this chapter, any code changes we make to the mlbparks application will be compiled by our Jenkins server instead of being built on the OpenShift application gear where the mlbparks application resides.
What is continuous integration?
Continuous integration (CI) is not a new concept in the software development industry, but it might be new to you. For this reason, I am going to cover the high-level basics of what it is and why you would want to use it while developing applications that you deploy to the OpenShift platform.
The implementation of a CI server gained popularity with the rush of development teams practicing the Agile/Scrum methodology of development. In this type of environment, developers work in iterations or sprints and the team should have a shippable software project at the end of each cycle. Granted, not all features will be implemented, but the idea is that after a sprint, the code that has been written should be tested, should be able to be demoed, and should be able to be released if the team chooses. Because of the amount of work that each team member puts in while working on a specific feature independently of the rest of the team, many saw a challenge in merging all of the code together at the end of a sprint without breaking other code or having extensive merge conflicts.
The CI movement was used to alleviate and ease the pain of massive merges at the end of a sprint cycle by encouraging developers to write unit tests and commit their code to the integration environment frequently. Once the code has been committed to the CI environment, the unit tests will run and a full build will be performed. If any compilation issues or test failures surfaced during the build, the team will be notified and the developer will be able to resolve the errors quickly—after being publicly shamed for breaking the build, of course!
In the OpenShift world, another use case for a CI server is to allow for greater uptime of your application. As you have learned throughout this book, when you push code changes to your OpenShift gear, the build occurs on the remote gear. Once the build is finished, the code is deployed to the application server. The OpenShift deployment process performs the following steps:
· The developer makes code modifications
· The developer adds and commits all changes to the local Git repository
· The developer pushes the changes up to the remote OpenShift gear
· The prebuild action hooks are executed, if they exist
· The application server on the remote OpenShift gear is stopped
· The new code is built on the remote OpenShift gear
· The deployment of new application code is performed on the OpenShift gear
· The application server is restarted on the remote OpenShift gear
This might look good on the surface and will suffice for the majority of applications, but there are a couple of gotchas that developers might not be aware of. First of all, the application server is stopped and does not serve requests while the application code is being compiled. Depending on the size of your application code base, this could mean a significant amount of downtime while your application is being built. Second, and most importantly, if the application fails to get built due to compilation failures, the application server will not be restarted and your application will be in outage until you resolve the build errors. Once the build errors have been corrected, the developer then needs to start the build process all over again.
Implementing the Jenkins CI environment as an OpenShift cartridge can help alleviate these two problem areas. Once the Jenkins server has been added to your application, all builds will be performed on a separate builder gear and then deployed once the compilation is successful. The new workflow while using the Jenkins CI cartridge is as follows:
· The developer makes code modifications
· The developer adds and commits all changes to the local Git repository
· The developer pushes code to the remote repository with a git push command
· OpenShift is aware that you have Jenkins CI enabled and triggers a build on the CI server
· Jenkins runs all tests and performs a build by creating a separate builder gear that only lives for the life of the build process
· The application server is stopped
· The code is deployed
· The application server is started
Using a CI environment, such as Jenkins, with your OpenShift application ensures that your OpenShift gear is only stopped while performing a deployment of code that has been successfully compiled and has passed all tests. Furthermore, you can enable hot deployment so that your application server is not stopped during a deployment.
Summarizing this, a few of the benefits of leveraging the Jenkins CI environment for your application include the ability to have archived build information, no application downtime while the code is being built, failed builds not getting deployed to your OpenShift gear, and more resources being available in order to build your application as each build spins up a new gear for a short-lived period of time.
Adding support for a Jenkins server
Now that we understand a few of the advantages of using a CI environment for your OpenShift applications, let's get started by adding the Jenkins server to our mlbparks application that we created in Chapter 5, Creating and Deploying Java EE Applications.
To get started with adding CI support to the application, the first thing we need to do is create an application gear that contains the Jenkins software. The Jenkins cartridge is a top-level web cartridge on the OpenShift platform and is available just like any other runtime. In order to create our server, issue the following command:
$ rhc app create ciserver jenkins
After entering the preceding command, the OpenShift platform will spin up a new gear and deploy the Jenkins server software. You should see the following output once the process is complete:
Using jenkins-1 (Jenkins Server) for 'jenkins'
Application Options
-------------------
Domain: packt
Cartridges: jenkins-1
Gear Size: default
Scaling: no
Creating application 'ciserver' ... done
Jenkins created successfully. Please make note of these credentials:
User: admin
Password: eXUWlFGnIsiq
Note: You can change your password at: https://ciserver-packt.rhcloud.com/me/configure
Waiting for your DNS name to be available ... done
Cloning into 'ciserver'...
Your application 'ciserver' is now available.
URL: http://ciserver-packt.rhcloud.com/
SSH to: 535ed9225004467d8d000852@ciserver-packt.rhcloud.com
Git remote: ssh://535ed9225004467d8d000852@ciserver-packt.rhcloud.com/~/git/ciserver.git/
Cloned to: /home/gshipley/code/ciserver
Run 'rhc show-app ciserver' for more details about your app.
Tip
Make a note of the username and password, as this information will be required in order to log in to the server.
Verifying that the Jenkins server is up and running
At this point, we should have a Jenkins server deployed and running on the OpenShift service. To test this out, go to http://ciserver-yourDomainName.rhcloud.com.
Tip
Ensure that you replace yourDomainName in the preceding URL with the domain name of your account that you created previously in this book.
Upon entering the preceding URL, you will be presented with the Jenkins authentication page. Provide the username and password that were displayed on the screen when you created the server and click on the log in button, as depicted in the following screenshot:

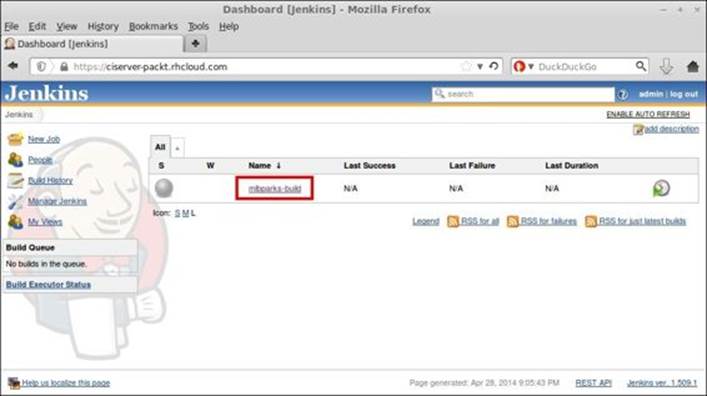
If the authentication was successful, you should see the main Jenkins dashboard, as shown in the following screenshot:

Congratulations; you now have a Jenkins server running on your OpenShift account!
Embedding Jenkins into an existing application
Now that we have a Jenkins server set up and running, we can add support to our mlbparks application, which will allow all future builds to get compiled on builder gears created by the Jenkins server. To embed the Jenkins support cartridge in your application, use the following command:
$ rhc cartridge add jenkins-client -a mlbparks
Once you enter the preceding command, you should see the following output, which provides the status of the operation:
Using jenkins-client-1 (Jenkins Client) for 'jenkins-client'
Adding jenkins-client-1 to application 'mlbparks' ... done
jenkins-client-1 (Jenkins Client)
---------------------------------
Gears: Located with jbosseap-6, mongodb-2.4
Job URL: https://ciserver-packt.rhcloud.com/job/mlbparks-build/
Associated with job 'mlbparks-build' in Jenkins server.
Verify that the Jenkins client was added to your application by running the following command:
$ rhc app show mlbparks
You should see the following information indicating that Jenkins has been enabled for the mlbparks application:
mlbparks @ http://mlbparks-packt.rhcloud.com/ (uuid: 5311180f500446f54a0003bb)
------------------------------------------------------------------------------
Domain: packt
Created: Feb 28 4:13 PM
Gears: 1 (defaults to small)
Git URL: ssh://5311180f500446f54a0003bb@mlbparks-packt.rhcloud.com/~/git/mlbparks.git/
SSH: 5311180f500446f54a0003bb@mlbparks-packt.rhcloud.com
Deployment: auto (on git push)
jbosseap-6 (JBoss Enterprise Application Platform 6)
----------------------------------------------------
Gears: Located with mongodb-2.4, jenkins-client-1
mongodb-2.4 (MongoDB 2.4)
-------------------------
Gears: Located with jbosseap-6, jenkins-client-1
Connection URL: mongodb://$OPENSHIFT_MONGODB_DB_HOST:$OPENSHIFT_MONGODB_DB_PORT/
Database Name: mlbparks
Password: q_6eZ22-fraN
Username: admin
jenkins-client-1 (Jenkins Client)
---------------------------------
Gears: Located with jbosseap-6, mongodb-2.4
Job URL: https://ciserver-packt.rhcloud.com/job/mlbparks-build/
The Jenkins client has now been embedded into the mlbparks application. This will ensure that all future builds will be performed on builder gears created by the continuous integration server instead of the OpenShift gear that contains the JBoss application server.
Using the Jenkins web console
Now that we have our Jenkins CI server up and running as well as the client added to the application, it's time to take a look at the Jenkins web console in order to understand the workflow that is followed when a developer pushes new source code to the remote Git repository.
Open your web browser and go to the main Jenkins dashboard where you will see a new item labeled mlbparks-build, as shown in the following screenshot:
In order to view details about the build configuration, click on the mlbparks-build item and then select Configure on the next page. This will display configuration items for the build that will happen when the new code is pushed to the remote mlbparks Git repository. This should look similar to the following screenshot:
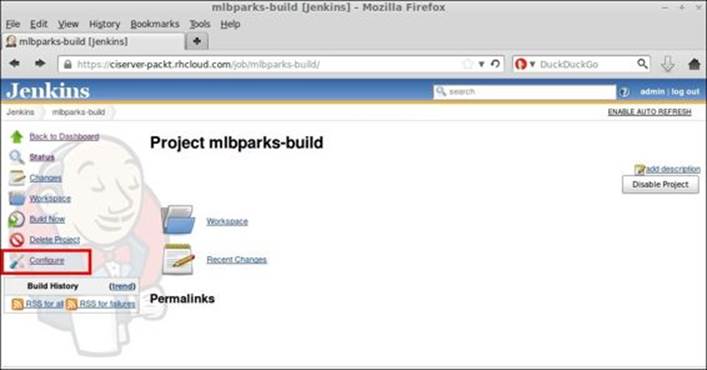
A few interesting configuration items are displayed on this page, which will allow you to fine-tune how your builds for the specified application are performed. Let's look at each section that might be of interest.
The first interesting configuration is concerned with the builder. The following configuration states that Jenkins should create a builder with a small size gear using the JBoss EAP cartridge and that the Jenkins master will wait for 5 minutes for the slave to come online, as shown in the following screenshot:

If you have a large application that takes a considerable amount of time to compile, you might consider moving the builder size to a medium or large size gear.
Tip
Gear sizes for OpenShift Online come in three flavors: small, medium, and large. Small gears consist of 512 MB of memory, medium gears contain 1 GB of memory, and large gears can consume up to 2 GB of memory. To get access to larger gear sizes, you must upgrade your account to a paid offering on the platform.
The next configuration item of interest is the Source Code Management section. It specifies the URL of the Git repository to be used, the branch to be used, and so on. This section is important if you want to use Jenkins to build a project that exists outside of OpenShift Online. This will be useful for developers who have an existing repository that they would like to build from.
A couple of common use cases for this are a repository that is hosted internally behind the company's firewall or a private repository that is hosted on GitHub. As you can see in the following screenshot, the default location is the Git repository that is hosted on your application's gear:

The last configuration item that is interesting is under the Build section. In this section, you can specify a shell script for building the project. If you want a glimpse under the hood of how OpenShift deploys a new build to an existing server, this section of code should have your mouthwatering.
By default, the shell script that is executed is as shown in the following screenshot:

Building code with Jenkins
Now that you have the Jenkins client embedded into your mlbparks application gear, any future git push commands will send the code to the Jenkins server for compilation. To test this out, let's make a small code change to our mlbparks application by editing the index.html file found under the /src/main/webapp directory. Open the file and find the following line of code:
<h1 id="title">MLB Stadiums</h1>
Once you have found the preceding line of code, change the line of code as follows:
<h1 id="title">MLB Stadiums with CI</h1>
In order to see our new build server in action, we need to commit the change to our local repository and then push the change to our remote Git repository. For this, enter the following commands:
$ git commit -am "Changing index message"
$ git push
You should notice a slightly different workflow than what you are used to seeing when performing a build on the application server gear. If everything went smoothly, you will see the following output:
Counting objects: 11, done.
Compressing objects: 100% (5/5), done.
Writing objects: 100% (6/6), 463 bytes | 0 bytes/s, done.
Total 6 (delta 4), reused 0 (delta 0)
remote: Executing Jenkins build.
remote:
remote: You can track your build at https://ciserver-packt.rhcloud.com/job/mlbparks-build
remote:
remote: Waiting for build to schedule.........................................................................Done
remote: Waiting for job to complete........................................................................................................................................................Done
remote: SUCCESS
remote: New build has been deployed.
remote: -------------------------
remote: Git Post-Receive Result: success
remote: Deployment completed with status: success
To ssh://5311180f500446f54a0003bb@mlbparks-packt.rhcloud.com/~/git/mlbparks.git/
d4b77ea..d6d9ae9 master -> master
Awesome! We just performed a build using the Jenkins CI server, and then automatically deployed the binary artifact to our JBoss EAP server. Don't believe me? Load the mlbparks application in your browser and notice that the title for the map has changed, as shown in the following screenshot:

You might have noticed that the build using the Jenkins server took a bit longer than building the code on the application server gear. This is because there is some overhead involved with dynamically creating a new builder gear on the OpenShift platform and then having to perform a full Maven build without an available cache of .jar files. Even though the build might have taken a bit longer, the benefits of using a CI environment far outweigh the additional time required for building. While the build is being performed, you can authenticate to the Jenkins web console and view the status of the build as well as view the console output from the builder gear.
Troubleshooting the build
What happens if the build didn't get completed? This is a common problem that I see when talking to users who are using OpenShift Online and integrating with the Jenkins CI server. 99 times out of 100, it is because they have run out of free resources on the service. This is an important concept to understand if your build failed as it is most likely due to this problem. At the current time, the free tier for OpenShift Online generously allows users to create up to three gears before requiring the user to upgrade their account with more access.
If you remember from earlier in this chapter, the Jenkins CI server creates a dynamic gear on the fly for all builds with a profile that is specified in the build configuration items. Even though this builder gear is short lived, it still counts against your gear ratio on the platform. What this means is that in order for you to utilize the Jenkins build server, you can only have two running gears when performing a build. As an example, the mlbparks application will consume the following gears:
· One gear for the core JBoss EAP server that serves application requests. This is the http://mlbparks-yourUsername.rhcloud.com gear.
· One gear for the Jenkins server. This is the http://ciserver-yourUsername.rhcloud.com gear.
· One gear that will be created dynamically in order to perform builds, and then will be destroyed after the build is complete.
Manually triggering a build
One of the great things about integrating your application with the Jenkins CI environment is the ability to start a new build without having to modify or push your source code. To initiate a new build, log in to the Jenkins dashboard and select the mlbparks builder. Once you are on this page, simply click on the Build Now button that is located on the left-hand side of the screen, as shown in the following screenshot:
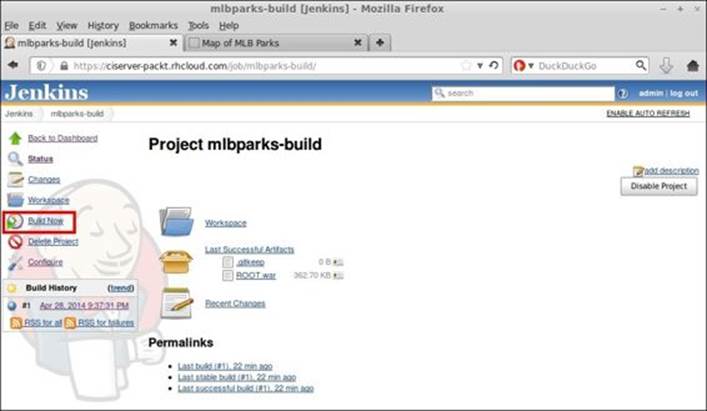
Once you click on the Build Now button, a new build will be scheduled on the server and will be reflected under the Build History section of the dashboard:

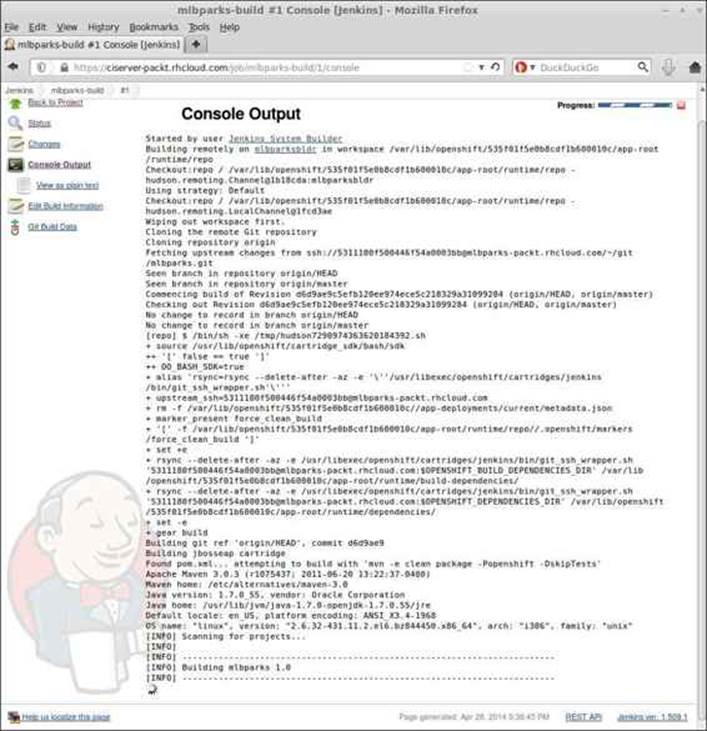
For more information about the current build, you can click on build under the Build History section in order to view the details, including the console output, as shown in the following screenshot:
Summary
In this chapter, we learned how to implement the popular Jenkins continuous integration environment with our applications that have been deployed on the OpenShift Online platform. We started by creating a Jenkins server, and then moved to embedding the Jenkins client to an existing application, mlbparks, that we created in Chapter 5, Creating and Deploying Java EE Applications. After we embedded the client, we explored some configuration items that can be modified in order to gain more performance from our builds. Lastly, we performed builds using the new CI environment using the git push command as well as manually starting a build while using the web console of the Jenkins server.
In the next chapter, we are going to take team development a bit further by exploring how to create multiple domains for an OpenShift account and how to add additional developers with restricted access rights to an application in that domain.
All materials on the site are licensed Creative Commons Attribution-Sharealike 3.0 Unported CC BY-SA 3.0 & GNU Free Documentation License (GFDL)
If you are the copyright holder of any material contained on our site and intend to remove it, please contact our site administrator for approval.
© 2016-2026 All site design rights belong to S.Y.A.