Learning OpenShift (2014)
Chapter 8. Using OpenShift for Team Development
In this chapter, we are going to explore how to use the OpenShift Online platform to manage a team of developers that might be working on the same application or deploying applications under the same account. Learning how to utilize the access controls and permission system that are built into OpenShift will provide the account owner, who might be paying the bills, the authority to grant specific rights to an individual developer. The current access permissions that can be assigned by the account owner are view, edit, and administer.
The view permission level only allows the user to view the details of an application for the domain, such as the name, the add-on cartridges, the number of gears, the amount of storage, and so on. A user with the view access role will not be able to clone the Git repository, SSH to the gear, stop or start the application, or embed add-on cartridges. This role is simply for viewing information about the running applications under the domain.
The edit permission level will allow the user to perform all functions on the domain, such as adding cartridges, creating new applications, deleting applications, viewing and changing the source code, and triggering new deployments. However, this role does not grant you the permission to modify, add, or delete users from the domain access list.
The administer permission level allows you to give full control of the domain to another user. Caution should be observed when granting this permission level, as the added user will be able to modify any setting for the specified domain.
Setting up multiple domains
OpenShift Online allows a user to create multiple domains that are associated with their account. Keep in mind that domain in this context does not refer to the domain name of the application, but a unique identifier for grouping your applications. You can think of an OpenShift domain as a filing cabinet into which you can organize your applications by placing them in the correct cabinet. To understand the impact the domain has on your application, let's examine the URL for an application that is hosted on OpenShift. The standard naming convention for an application URL ishttp://appname-domainname.rhcloud.com.
As you can see in the preceding example, the domain that you choose will become a part of the URL for the application. Given this, it is important to choose a domain that accurately reflects what you are trying to accomplish with the domain.
A common use case for team development is to have a domain for different environments that your application will go through before reaching production. These domains can be named dev, qa, stage, and production. You can create additional domains for your account by using the command line or the web console.
Note
Adding multiple domains to an OpenShift account is only available if you are on a paid plan to use the service. For more information on the available pay-as-you-go offerings, visit http://www.openshift.com/pricing.
Adding a new domain with the command line
To add a new domain to your application using the command line, you can use the RHC client tools that we have been using throughout this book. For example, to create a new domain under your account called packtdev, issue the following command:
$ rhc domain create packtdev
If the domain was created as requested, you should see the following output on the screen:
Creating domain 'packtdev' ... done
You may now create an application using the rhc create-app command.
You might have seen an error message while executing the preceding command. The most common error message is as follows:
Creating domain 'packtdev' ... You may not have more than 1 domain.
If you received the preceding message, remember that in order to create additional domains, you need to be on one of the paid offerings for OpenShift.com.
The other common error message that users might see is the following:
Creating domain 'packtdev' ... Namespace 'packtdev' is already in use. Please choose another.
This error message indicates that another user has already created a domain with the name that you are trying to use. Each domain that is created on the OpenShift platform must be unique across all users of the system.
Once your domain has been created, you can view a list of all domains associated with your account using the following command:
$ rhc domain list
Adding a new domain with the web console
The OpenShift web console provides a user interface to interact with and manage the domains associated with your account. In order to create a new domain using the web console, log in to the platform by opening up a web browser and going to http://www.openshift.com. Once you have authenticated to the web console, you will see the main dashboard as depicted in the following screenshot:

Click on the See all domains link on the right-hand side of the screen, as shown in the preceding screenshot. This will take you to the area of the console where you can manage the domains associated with your account. In order to create a new domain, click on the Add Domain… button that is underneath your existing domains.

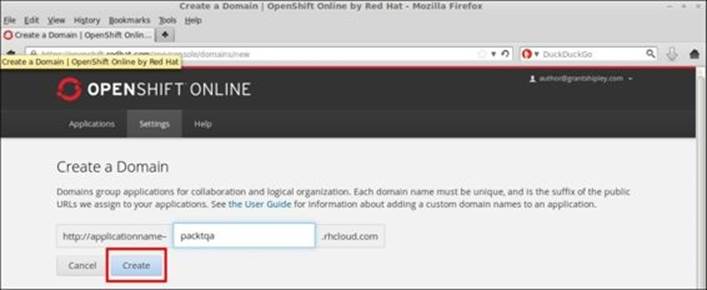
After clicking on the Add Domain… button, you will be presented with a screen where you can provide the name of the domain that you want to add to your account. Enter the name and then click on the Create button, as shown in the following screenshot:
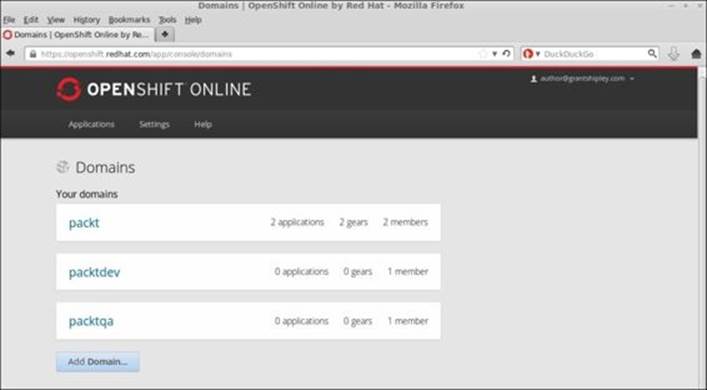
Once the domain has been added, you will be presented with the settings page that will allow you to modify the configuration for your account. We will cover this settings page in more detail in Chapter 9, Using the OpenShift Web Console. For the time being, go back to the domain list for your account to verify that the new item was successfully added. If everything went smoothly, you should see the new domain listed as shown in the following screenshot:
Adding members to a domain
Now that we understand the different roles that can be assigned to a user for a specific domain, it's time to learn how to add new members that will contribute to the projects. The OpenShift platform allows you to add additional members to your domain as long as the user you are adding has an existing account on the platform. If you don't know any other users of the OpenShift platform and just want to try some of these examples out, feel free to use the user account that I have created for the examples in this book, which is author@grantshipley.com.
You can add members to your domain using either the web console or the command-line utilities. We will start by learning how to manage members by leveraging the command line and then learn how to perform the same functions via the web console.
Managing members with the command line
In order to add members to a domain using the command line, we will take advantage of the RHC command-line tools that we have used throughout the examples in this book. The first thing we want to do is list the existing members of our domain. To accomplish this task, open up your terminal window and type in the following command, making sure to replace yourDomainName with the correct name of the domain that you want to list the membership for:
$ rhc member list -n yourDomainName
Tip
When performing actions that involve managing members, you must specify the domain you want to perform the action on by using the -n argument.
Since we haven't added any members to our domain yet, the only user with membership should be you. For example, my username is author@grantshipley.com, so the output when I run the command is as follows:
Login Role
----------------------- -------------
author@grantshipley.com admin (owner)
In order to add a new member to the domain, you simply use the member add arguments as follows:
$ rhc member add authordev@grantshipley.com -n yourDomainName
Upon the execution of the preceding command, you should see the following message, which indicates that the operation was successful:
Adding 1 editor to domain ... done
To verify that the new member was added, execute the following command:
$ rhc member list -n yourDomainName
You should see the following output, which confirms that the new member was added:
Login Role
--------------------------- -------------
author@grantshipley.com admin (owner)
authordev@grantshipley.com edit
Modifying a member's role in a domain
An interesting thing that you might have noticed is that we did not specify the role that we wanted to be applied to the member. In the case where a role is not specified, the OpenShift platform will default the membership to the edit role. Let's imagine that we made a mistake and actually wanted to add the new member under the view-only role. In order to change a role for a member, you can simply execute the rhc member add command again while also specifying the role to be applied to the member. For example, to update the role for the author+dev@grantshipley.commember, we can simply issue the following command:
$ rhc member add author+dev@grantshipley.com -n yourDomainName --role view
You should see the following output, thus confirming the operation was successful:
Adding 1 viewer to domain ... done
Tip
To view the available roles and the associated access rights for each one, you can use the rhc member help command.
To verify that the new member was added, execute the following command:
$ rhc member list -n yourDomainName
You should see the following output, thus confirming that the new member was added:
Login Role
--------------------------- -------------
author@grantshipley.com admin (owner)
authordev@grantshipley.com view
Deleting a member from a domain
The time will come when someone you have granted a membership role decides to stop working on the application, moves to a new development team, or perhaps leaves the company. When this happens, it is important that you are able to remove their access to the domain and all associated applications. Performing this management task is an easy and straightforward process by utilizing the rhc member remove command, as shown in the following example:
$ rhc member remove authordev@grantshipley.com –n yourDomainName
Once the command has been executed, you should see the following confirmation:
Removing 1 member from domain ... done
Managing members with the web console
The OpenShift Online web console provides the membership management functionality directly in your browser. In order to access this functionality, log in to your OpenShift account and then navigate to the domain management screen as shown in the following screenshot:

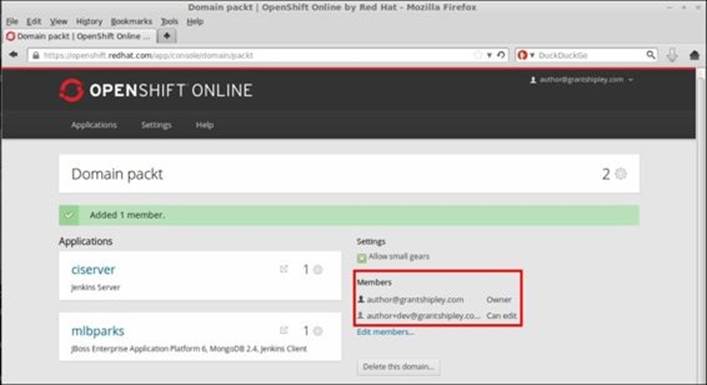
On this page, you can see the number of applications that belong to the domain, the total number of gears consumed by all of the applications, as well as the number of members who have access to the domain. In order to manage the membership for a particular domain, simply click on the domain that you want to manage, and you will be presented with the following screenshot:

On this screen, you can see all the applications that you have deployed as well as the number of gears that each application is consuming. On the right-hand side of the screen, you will see the Members section that will list all the current members with permissions for the domain. In order to add a new member to the domain, simply click on the Add members… link. After clicking on this link, a dialog will be presented where you can enter the username of the member you want to add as well as the corresponding role that should be assigned to the member, as shown in the following screenshot:

Once you have added the username and role for the new member, click on the Save button. After the operation is complete, you will see a message indicating that the addition of the member was successful.
Modifying a member's role and deleting a member
In order to modify the permissions or role that a member has for a domain, you can simply click on the Edit members… link, and a dropdown that allows you to select the new role list will be presented. Highlight the new role and click on the Save button, as shown in the following screenshot:

In order to delete a member from a domain, you can click on the x button that is displayed next to the users role, and then click on the Save button.
Promoting code between environments
One of the most common questions that I get asked about the OpenShift Online platform by larger organizations and development teams is how to perform code promotion between different environments.
Organizations want to allow developers to have full control over the development environment where they can create gears on demand in order to take advantage of the speed with which they can develop the software.
The QA team wants full access to the QA environment as well as to be the only ones who can provision servers and deploy stable builds from the development environment. Once the QA team has deployed the application to their environment, they don't want pesky developers to be able to log in to the gears and modify configuration settings or code that might invalidate their test cases.
In the production environment, the system administrators and release engineers need full control over the environment while locking out both the development and quality assurance teams.
Fortunately, using the information you have learned in this chapter, you should have the tools and knowledge required to accomplish this common scenario by creating additional domains and assigning proper membership and roles to each domain.
For this scenario to work properly, you will need to create three domains: dev, qa, and production. Once the domains have been created, you can then begin assigning access permissions to each member in the corresponding team that needs access to that environment. The following diagram shows how you can configure your account for this scenario:

To fully understand this concept, let's look at each team in a bit more detail:
· Development staff: This has full admin access to the dev domain. It will allow the member of the operations team to add additional team members, provision gears, create applications, embed cartridges, clone repositories, and push code to the continuous integration environment. This team has no access to the qa or production domains.
· QA staff: This has full admin access to the qa domain. It will allow the member of the operations team to add additional team members, provision gears, create applications, embed cartridges, clone repositories, and deploy code. This has edit access to the dev domain. Having this edit access is essential in order to be able to create a copy of the final build that is deployed to the development environment.
· Production staff: This has full admin access to the production domain. It will allow the member of the operations team to add additional team members, provision gears, create applications, embed cartridges, clone repositories, and deploy code. This has edit access to the qa domain. Having this edit access is essential in order to be able to create a copy of the final build that has passed all tests in the QA environment.
Promoting the code
The developers have been hard at work and have deployed the final version of the application to their development environment. It is now time to hand this build over to the QA team so that they can run their test suite and validate the release. Since the QA team has edit permissions on the development domain and admin permissions on the QA domain, they will be able to simply clone the existing deployment, including all the runtimes, databases, data in the database, and any additional add-on cartridges. Luckily, this can be accomplished with a single command that is provided as part of the RHC tool suite. For example, if the application was named mlbparks, the QA team can simply enter the following command:
$ rhc app create devmlb -n qaDomainName --from-app devDomainName/mlbparks
Tip
Keep in mind that if the application you are cloning from the development domain has a dependency on a Jenkins server, the QA domain must also have a Jenkins server available for use.
Once the preceding command has been executed, you will see the following output:
Application Options
-------------------
Domain: qaDomainName
Cartridges: jbosseap-6 (addtl. costs may apply), mongodb-2.4, jenkins-client-1
From app: mlbparks
Gear Size: Copied from 'mlbparks'
Scaling: no (copied from 'mlbparks')
Creating application 'devmlb' ... done
MongoDB 2.4 database added. Please make note of these credentials:
Root User: admin
Root Password: B8spTFvYFAK6
Database Name: devmlb
Connection URL: mongodb://$OPENSHIFT_MONGODB_DB_HOST:$OPENSHIFT_MONGODB_DB_PORT/
Associated with job 'devmlb-build' in Jenkins server.
Waiting for your DNS name to be available ... done
Setting deployment configuration ... done
Pulling down a snapshot of application 'mlbparks' to
/var/folders/jd/bdhxtn214mgfpmy72dyyy4140000gn/T/mlbparks_temp_clone.tar.gz ...
done
Restoring from snapshot /var/folders/jd/bdhxtn214mgfpmy72dyyy4140000gn/T/mlbparks_temp_clone.tar.gz to
application 'devmlb' ...
Cloning into 'devmlb'...
Wait, what? Did that really just happen? Indeed, it did. We just cloned an existing application that was created by a team member in another domain to our own environment. Not only did we clone the application code, but we also cloned all of the add-on cartridges and any data that was populated in the database. Pretty powerful stuff!
Adding access using SSH keys
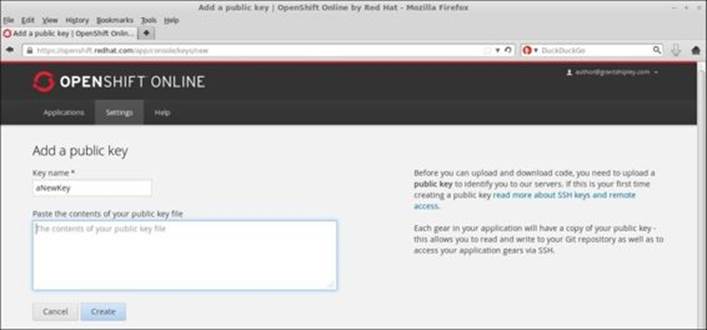
So far in this chapter, we have discussed the concept of using the built-in membership management system in order to allow additional users access to your domain. Another option, although not recommended, is that you simply add the user's SSH key to which you want to grant access to your OpenShift account. The easiest way to accomplish this is to make the user send you their public SSH key and upload it via the web console. For this, log in to the OpenShift console and click on the Settings tab at the top of the screen.

Once you are on the Settings page, you will see all of the SSH keys that are associated with your account. To add a new key, click on the button labeled Add a new key... and paste the contents of the user's public key into the text area.
Once you have added the user's key, they will be able to clone the Git repository that resides on the remote OpenShift gear as well as push code changes to the server.
Note
The user will not be able to perform operations on the application—such as adding cartridges or restarting the server—as these operations require the RHC command-line tools as well as an authorization token that can only be obtained by knowing the username and password for the account.
You can also add an SSH key to your account using the following command:
$ rhc sshkey add <name> <path to SSH key file>
To remove a key, issue the following command:
$ rhc sshkey remove <name>
Summary
In this chapter, we learned how to create and manage additional domains for your OpenShift account. We also learned how to add new members to a domain and specify the access role that is associated with each member. The available access roles are view, edit, and administer. We also learned how to utilize the membership system in order to promote code from one environment to another by cloning the existing deployed application. Finally, we learned how to add SSH keys to your account that will provide access to other developers in order to clone your Git repository as well as push new code to your OpenShift gear.
In the next chapter, we are going to focus on the OpenShift web console and learn how to manage your account and application from the browser. We will also learn how to add a custom domain name to your application so that you can use any URL that you own to access your application.
All materials on the site are licensed Creative Commons Attribution-Sharealike 3.0 Unported CC BY-SA 3.0 & GNU Free Documentation License (GFDL)
If you are the copyright holder of any material contained on our site and intend to remove it, please contact our site administrator for approval.
© 2016-2026 All site design rights belong to S.Y.A.