Oracle Database 12c DBA Handbook (2015)
PART
II
Database Management
CHAPTER
10
Database Security and Auditing
To protect one of the most vital assets to a company—its data—you as a DBA must be keenly aware of how Oracle can protect corporate data and the different tools you have at your disposal. The Oracle-provided tools and mechanisms fall into three broad categories: authentication, authorization, and auditing.
Authentication includes methods used to identify who is accessing the database, ensuring that you are who you say you are, regardless of what resources you are requesting of the database. Even if you are merely trying to access the daily lunch menu at the cafeteria, it is important that you identify yourself correctly to the database. If, for example, the web-based database application presents customized content based on the user account, you want to make sure you get the lunch menu for your branch office in Houston, Texas, and not the one for the home office in Buffalo, New York!
Authorization provides access to various objects in the database once you are authenticated by the database. Some users may be authorized to run a report against the daily sales table, some users may be developers and therefore need to create tables and reports, whereas others may only be allowed to see the daily lunch menu. Some users may never log in at all, but their schema may own a number of tables for a particular application, such as payroll or accounts receivable. Additional authorization methods are provided for database administrators, due to the extreme power that a database administrator has. Because a DBA can shut down and start up a database, an additional level of authorization is provided.
Authorization goes well beyond simple access to a table or a report; it also includes the rights to use system resources in the database as well as privileges to perform certain actions in the database. A given database user might be allowed to use only 15 seconds of CPU time per session, for example, or to be idle only for five minutes before being disconnected from the database. Another database user might be granted the privilege to create or drop tables in any other user’s schema, but not be able to create synonyms or view data dictionary tables. Fine-grained access control gives the DBA more control over how database objects are accessed. For example, standard object privileges will either give a user access to an entire row of a table or give the user no access at all; using fine-grained access control, a DBA can create a policy implemented by a stored procedure that restricts access based on time of day, where the request originates, which column of the table is being accessed, or all three.
At the end of the section on database authorization, I will present a short example of a Virtual Private Database (VPD) to provide methods for defining, setting, and accessing application attributes along with the predicates (usually WHERE clauses) to control which data is accessible or returned to the user of the application.
Auditing in an Oracle database encompasses a number of different levels of monitoring in the database. At a high level, auditing can record both successful and unsuccessful attempts to log in, access an object, or perform an action. Fine-grained auditing (FGA) can record not only what objects are accessed, but what columns of a table are accessed when an insert, update, or delete is being performed on the data in the column. Fine-grained auditing is to auditing what fine-grained access control is to standard authorization: more precise control and information about the objects being accessed or actions being performed.
DBAs must use auditing judiciously so as not to be overwhelmed by audit records or create too much overhead by implementing continuous auditing. On the flip side, auditing can help to protect company assets by monitoring who is using what resource, at what time, and how often, as well as whether the access was successful or not. Therefore, auditing is another tool that the DBA should be using on a continuous basis to monitor the security health of the database.
Non-database Security
All the methodologies presented later in the chapter are useless if access to the operating system is not secure or the physical hardware is not in a secure location. In this section, I’ll discuss a few of the elements outside of the database itself that need to be secure before the database can be considered secure.
The following are a few things that need to be considered outside of the database:
![]() Operating system security Unless the Oracle database is running on its own dedicated hardware with only the root and oracle user accounts enabled, operating system security must be reviewed and implemented. Ensure that the software is installed with the oracle account and not the root account. You may also consider using another account instead of oracle as the owner of the software and the database files, to eliminate an easy target for a hacker. Ensure that the software and the database files are readable only by the oracle account and the group that oracle belongs to. Other than the Oracle executables that require it, turn off the SUID (set UID, or running with root privileges) bit on files that don’t require it. Don’t send passwords (operating system or Oracle) to users via e-mail in plain text. Finally, remove any system services that are not required on the server to support the database, such as telnet and ftp.
Operating system security Unless the Oracle database is running on its own dedicated hardware with only the root and oracle user accounts enabled, operating system security must be reviewed and implemented. Ensure that the software is installed with the oracle account and not the root account. You may also consider using another account instead of oracle as the owner of the software and the database files, to eliminate an easy target for a hacker. Ensure that the software and the database files are readable only by the oracle account and the group that oracle belongs to. Other than the Oracle executables that require it, turn off the SUID (set UID, or running with root privileges) bit on files that don’t require it. Don’t send passwords (operating system or Oracle) to users via e-mail in plain text. Finally, remove any system services that are not required on the server to support the database, such as telnet and ftp.
![]() Securing backup media Ensure that the database backup media—whether tape, disk, or CD/DVD-ROM—is accessible by a limited number of people. A secure operating system and robust, encrypted passwords on the database are of little value if a hacker can obtain backup copies of the database and load them onto another server. The same applies to any server that contains data replicated from your database.
Securing backup media Ensure that the database backup media—whether tape, disk, or CD/DVD-ROM—is accessible by a limited number of people. A secure operating system and robust, encrypted passwords on the database are of little value if a hacker can obtain backup copies of the database and load them onto another server. The same applies to any server that contains data replicated from your database.
![]() Background security checks Screening of employees that deal with sensitive database data—whether it be a DBA, auditor, or operating system administrator—is a must.
Background security checks Screening of employees that deal with sensitive database data—whether it be a DBA, auditor, or operating system administrator—is a must.
![]() Security education Ensure that all database users understand the security and usage policies of the IT infrastructure. Requiring that users understand and follow the security policies emphasizes the critical nature and value of the data to the company, including the information in the database. A well-educated user will be more likely to resist attempts at system access from a hacker’s social-engineering skills.
Security education Ensure that all database users understand the security and usage policies of the IT infrastructure. Requiring that users understand and follow the security policies emphasizes the critical nature and value of the data to the company, including the information in the database. A well-educated user will be more likely to resist attempts at system access from a hacker’s social-engineering skills.
![]() Controlled access to hardware All computer hardware that houses the database should be located in a secure environment that is accessible only with badges or security access codes.
Controlled access to hardware All computer hardware that houses the database should be located in a secure environment that is accessible only with badges or security access codes.
Database Authentication Methods
Before the database can allow a person or application access to objects or privileges in the database, the person or application must be authenticated; in other words, the identity of who is attempting access to the database needs to be validated.
In this section, I’ll give an overview of the most basic method used to allow access to the database—the user account, otherwise known as database authentication. In addition, I’ll show how to reduce the number of passwords a user needs to remember by allowing the operating system to authenticate the user and, as a result, automatically connect the user to the database. Using 3-tier authentication via an application server, network authentication, or Oracle’s Identity Management can reduce the number of passwords even further. Finally, I’ll talk about using a password file to authenticate DBAs when the database is down and cannot provide authentication services.
Database Authentication
In an environment where the network is protected from the outside environment with firewalls and the network traffic between the client and the database server uses some method of encryption, authentication by the database is the most common and easiest method to authenticate the user with the database. All information needed to authenticate the user is stored in a table within the SYSTEM tablespace.
Very special database operations, such as starting up or shutting down the database, require a different and more secure form of authentication, either by using operating system authentication or by using password files.
Network authentication relies on third-party authentication services such as the Distributed Computing Environment (DCE), Kerberos, Public Key Infrastructure (PKI), and Remote Authentication Dial-In User Service (RADIUS). Although at first glance 3-tier authentication appears to be a network authentication method, it is different in that a middle tier, such as Oracle Application Server, authenticates the user while maintaining the client’s identity on the server. In addition, the middle tier provides connection pooling services and implements business logic for the client.
Later in this chapter, in the section titled “User Accounts,” we’ll go through all the options available to the DBA for setting up accounts in the database for authentication.
Database Administrator Authentication
The database is not always available to authenticate a DBA, such as when it is down because of an unplanned outage or for an offline database backup. To address this situation, Oracle uses a password file to maintain a list of database users who are allowed to perform functions such as starting up and shutting down the database, initiating backups, and so forth.
Alternatively, a DBA can use operating system authentication, which we discuss in the next section. The flowchart shown in Figure 10-1 identifies the options for a DBA when deciding what method will work the best in their environment.
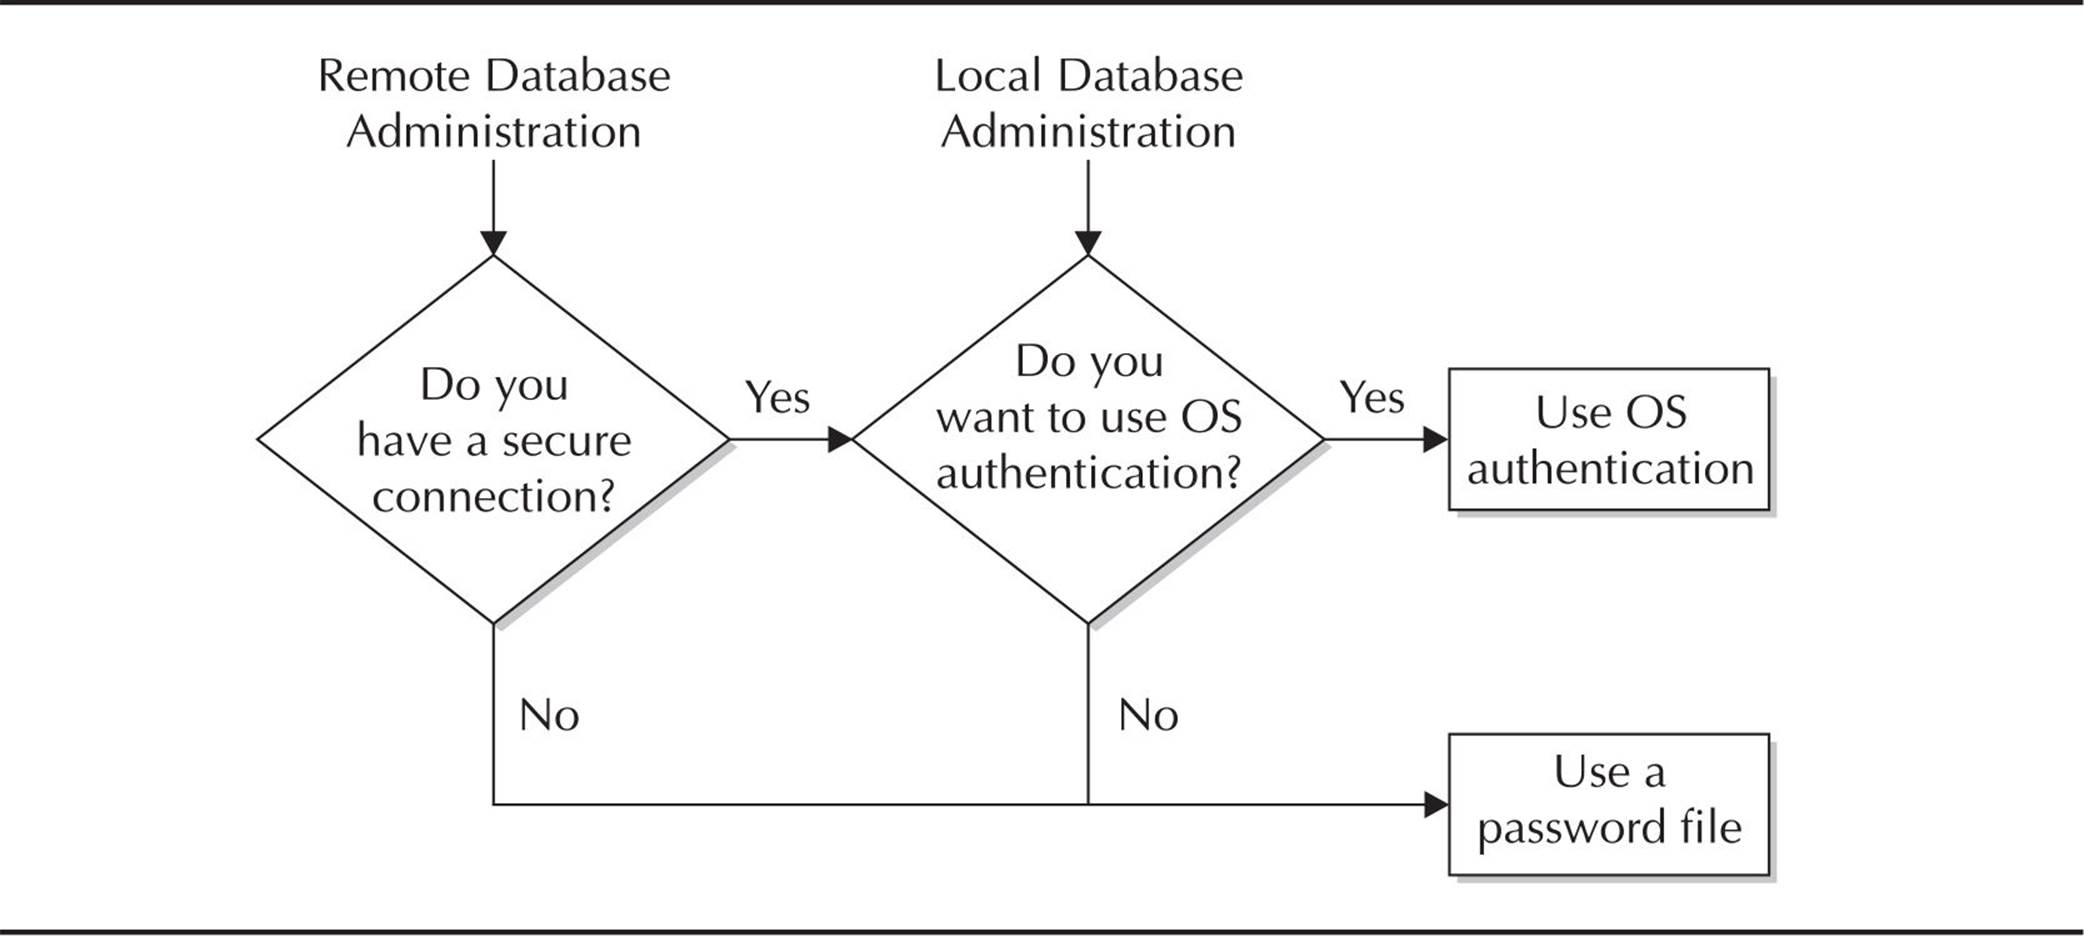
FIGURE 10-1. Authentication method flowchart
For connecting locally to the server, the main consideration is the convenience of using the same account for both the operating system and the Oracle server versus maintaining a password file. For a remote administrator, the security of the connection is the driving factor when choosing an authentication method. Without a secure connection, a hacker could easily impersonate a user with the same account as that of an administrator on the server itself and gain full access to the database with OS authentication.

NOTE
When using a password file for authentication, ensure that the password file itself is in a directory location that is only accessible by the operating system administrators and the user or group that owns the Oracle software installation.
We will discuss system privileges in greater detail later in this chapter. For now, though, you need to know that three particular system privileges give administrators special authentication in the database:
![]() SYSOPER An administrator with the SYSOPER privilege can start up and shut down the database, perform online or offline backups, archive the current redo log files, and connect to the database when it is in RESTRICTED SESSION mode.
SYSOPER An administrator with the SYSOPER privilege can start up and shut down the database, perform online or offline backups, archive the current redo log files, and connect to the database when it is in RESTRICTED SESSION mode.
![]() SYSDBA The SYSDBA privilege contains all the rights of SYSOPER, with the addition of being able to create a database and grant the SYSDBA or SYSOPER privilege to other database users.
SYSDBA The SYSDBA privilege contains all the rights of SYSOPER, with the addition of being able to create a database and grant the SYSDBA or SYSOPER privilege to other database users.
![]() SYSASM As of Oracle Database 11g, the SYSASM privilege is specific to an ASM instance to manage database storage.
SYSASM As of Oracle Database 11g, the SYSASM privilege is specific to an ASM instance to manage database storage.
Oracle Database 12c has three additional privileges to further enhance Oracle’s support for separation of duties: SYSBACKUP, SYSDG, and SYSKM.
To connect to the database from a SQL*Plus session, you append AS SYSDBA or AS SYSOPER to your CONNECT command. Here’s an example:

Other than the additional privileges available to the users who connect as SYSDBA or SYSOPER, the default schema is also different for these users when they connect to the database. Users who connect with the SYSDBA or SYSASM privilege connect as the SYS user; the SYSOPER privilege sets the user to PUBLIC. Each of the privileges SYSKM, SYSBACKUP, and SYSDG connects to a database user with the same name.
As with any database connection request, you have the option to specify the username and password on the same line as the sqlplus command, along with the SYSDBA or SYSOPER keyword:
![]()
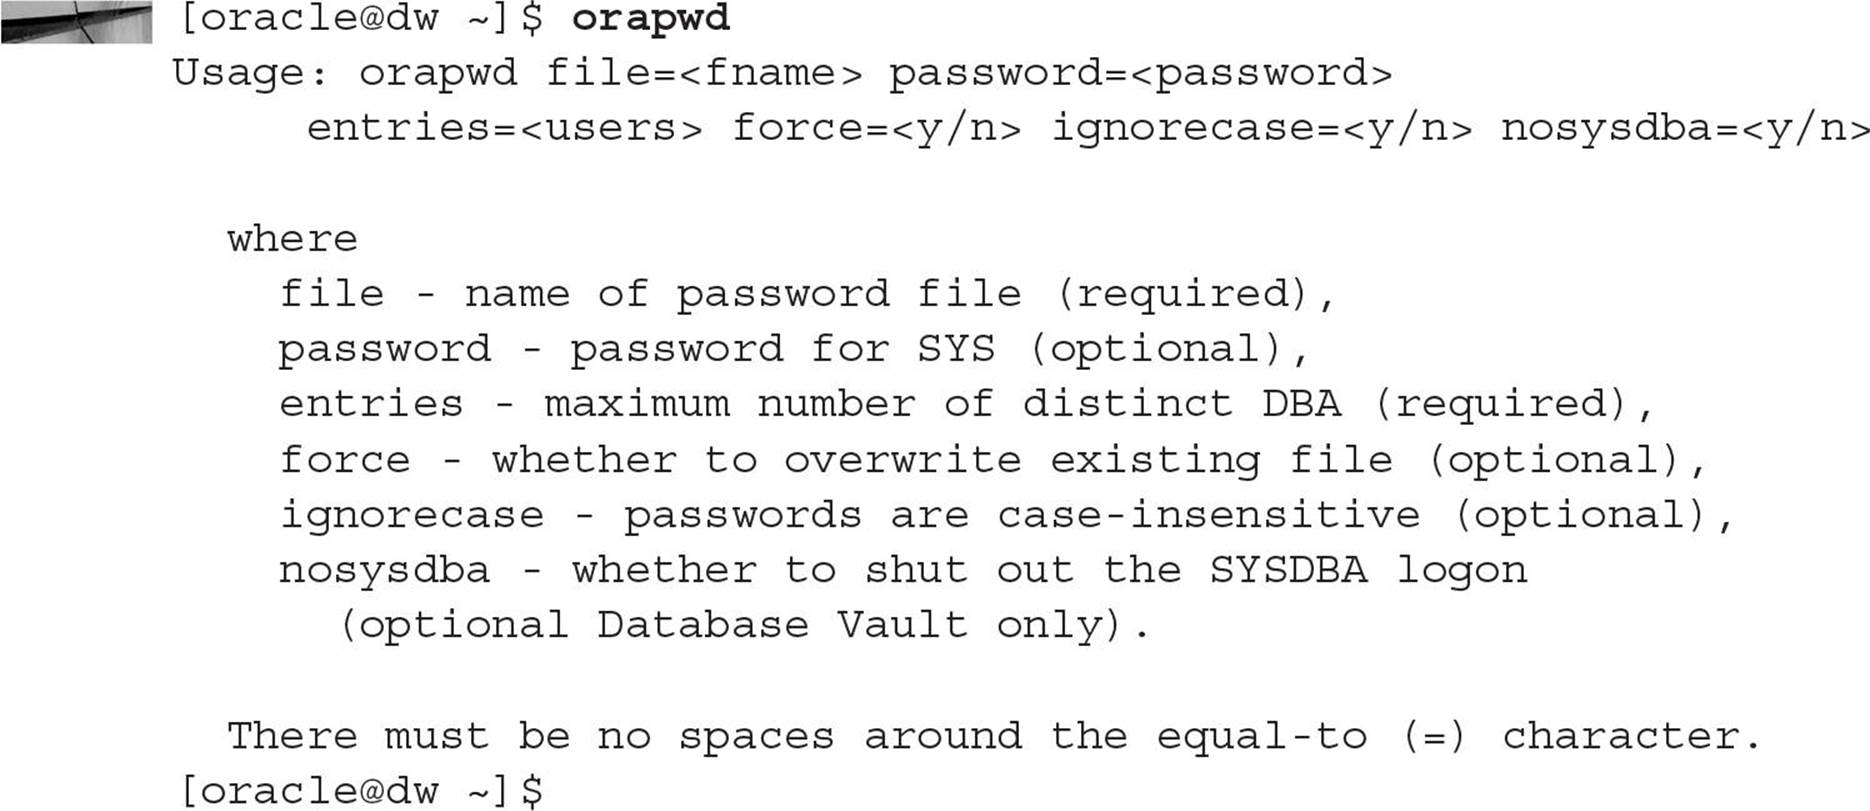
Although a default installation of Oracle Database using the Oracle Universal Installer with a seed database or using the Database Creation Assistant will automatically create a password file, there are occasions when you may need to re-create one if it is accidentally deleted or damaged. The orapwd command will create a password file with a single entry for the SYS user and other options, as noted, when you run the orapwd command without any options:
Once you re-create the password file, you will have to grant the SYSDBA and SYSOPER privileges to those database users who previously had those privileges. In addition, if the password you provided in the orapwdcommand is not the same password that the SYS account has in the database, this is not a problem: when you connect using CONNECT / AS SYSDBA, you’re using operating system authentication. And just to reiterate, if the database is down or in MOUNT mode, you must use operating system authentication or the password file. Also worth noting is that operating system authentication takes precedence over password file authentication, so as long as you fulfill the requirements for operating system authentication, the password file will not be used for authentication if it exists.
CAUTION
As of Oracle Database 11g, database passwords are case sensitive. To disable case sensitivity, set the SEC_CASE_SENSITIVE_LOGON initialization parameter to FALSE.
The system initialization parameter REMOTE_LOGIN_PASSWORDFILE controls how the password file is used for the database instance. It has three possible values: NONE, SHARED, and EXCLUSIVE.
If the value is NONE, then Oracle ignores any password file that exists. Any privileged users must be authenticated by other means, such as by operating system authentication, which is discussed in the next section.
With a value of SHARED, multiple databases can share the same password file, but only the SYS user is authenticated with the password file, and the password for SYS cannot be changed. As a result, this method is not the most secure, but it does allow a DBA to maintain more than one database with a single SYS account.
TIP
If a shared password file must be used, ensure that the password for SYS is at least 12 characters long and includes a combination of upper- and lowercase alphabetic, numeric, and special characters to fend off a brute-force attack.
A value of EXCLUSIVE binds the password file to only one database, and other database user accounts can exist in the password file. As soon as the password file is created, use this value to maximize the security of SYSDBA or SYSOPER connections.
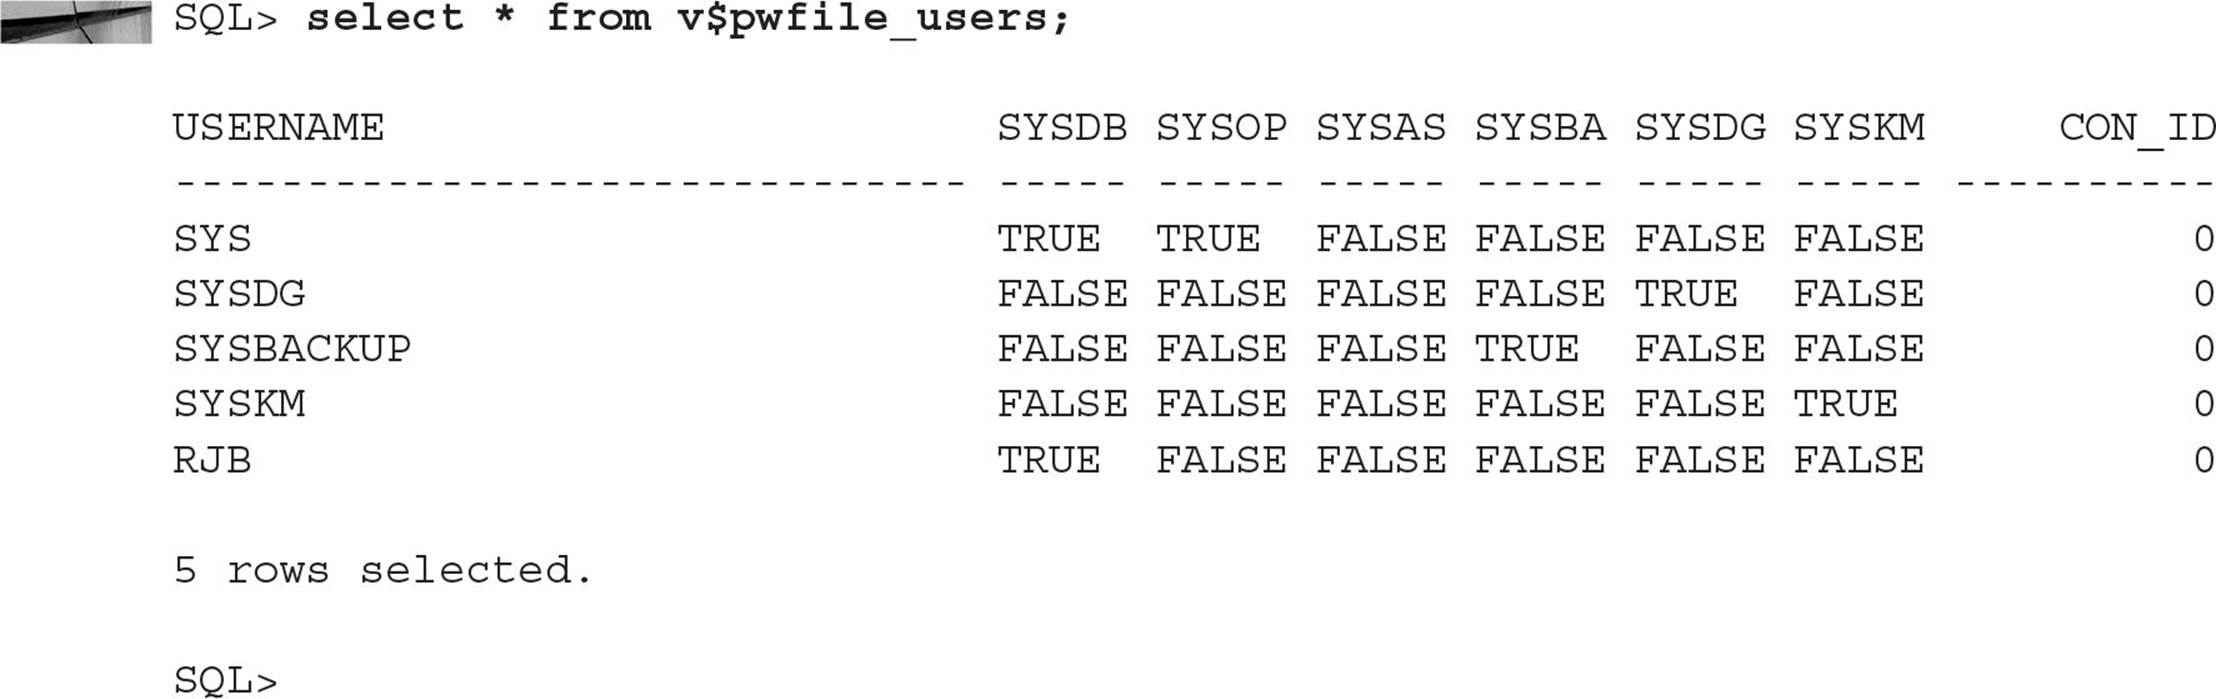
The dynamic performance view V$PWFILE_USERS lists all the database users who have one of the six available privileges, as shown here:
Operating System Authentication
If a DBA chooses to implement operating system authentication, a database user is automatically connected to the database when they use the following SQL*Plus syntax:
![]()
This method is similar to how an administrator connects to the database, without the AS SYSDBA or AS SYSOPER clause. The main difference is that the operating system account authorization methods are used instead of an Oracle-generated and -maintained password file.
In fact, administrators can also use operating system authentication to connect using AS SYSDBA or AS SYSOPER. If the administrator’s operating system login account is in the Unix group dba (or the Windows group ORA_DBA), the administrator can connect to the database using AS SYSDBA. Similarly, if the operating system login account is in the Unix group oper (or the Windows group ORA_OPER), the administrator can connect to the database using AS SYSOPER without the need for an Oracle password file.
The Oracle server makes the assumption that if the user is authenticated by an operating system account, then the user is also authenticated for the database. With operating system authentication, Oracle does not need to maintain passwords in the database, but it still maintains the usernames. The usernames are still needed to set the default schema and tablespaces in addition to providing information for auditing.
In a default Oracle 12c installation, as well as in previous releases of Oracle, operating system authentication is enabled for user accounts if you create database users with the identified externally clause. The prefix for the database username must match the value of the initialization parameter OS_AUTHENT_PREFIX; the default value is OPS$. Here’s an example:
![]()
When the user logs into the operating system with the account CORIE, she is automatically authenticated in the Oracle database as if the account OPS$CORIE was created with database authentication.
Setting the value of OS_AUTHENT_PREFIX to a null string allows the database administrator and the operating system account administrator to use identical usernames when using external authentication.
Using IDENTIFIED GLOBALLY is similar to using IDENTIFIED EXTERNALLY in that the authentication is done outside of the database. However, with a globally identified user, authentication is performed by an enterprise directory service such as Oracle Internet Directory (OID). OID facilitates ease of account maintenance for DBAs and the convenience of single sign-on for database users who need to access more than just a single database or service.
Network Authentication
Authentication by a network service is another option available to the DBA to authenticate users in the database. Although a complete treatment is beyond the scope of this book, I will give a brief summary of each method and its components. These components include Secure Sockets Layer (SSL), Distributed Computing Environment (DCE), Kerberos, PKI, RADIUS, and directory-based services.
Secure Sockets Layer Protocol
Secure Sockets Layer (SSL) is a protocol originally developed by Netscape Development Corporation for use in web browsers. Because it is a public standard and open source, it faces continuous scrutiny by the programming community to ensure that there are no holes or “back doors” that can compromise its robustness.
At a minimum, a server-side certificate is required for authentication. Client authentication is also doable with SSL to validate the client, but setting up certificates may become a large administrative effort.
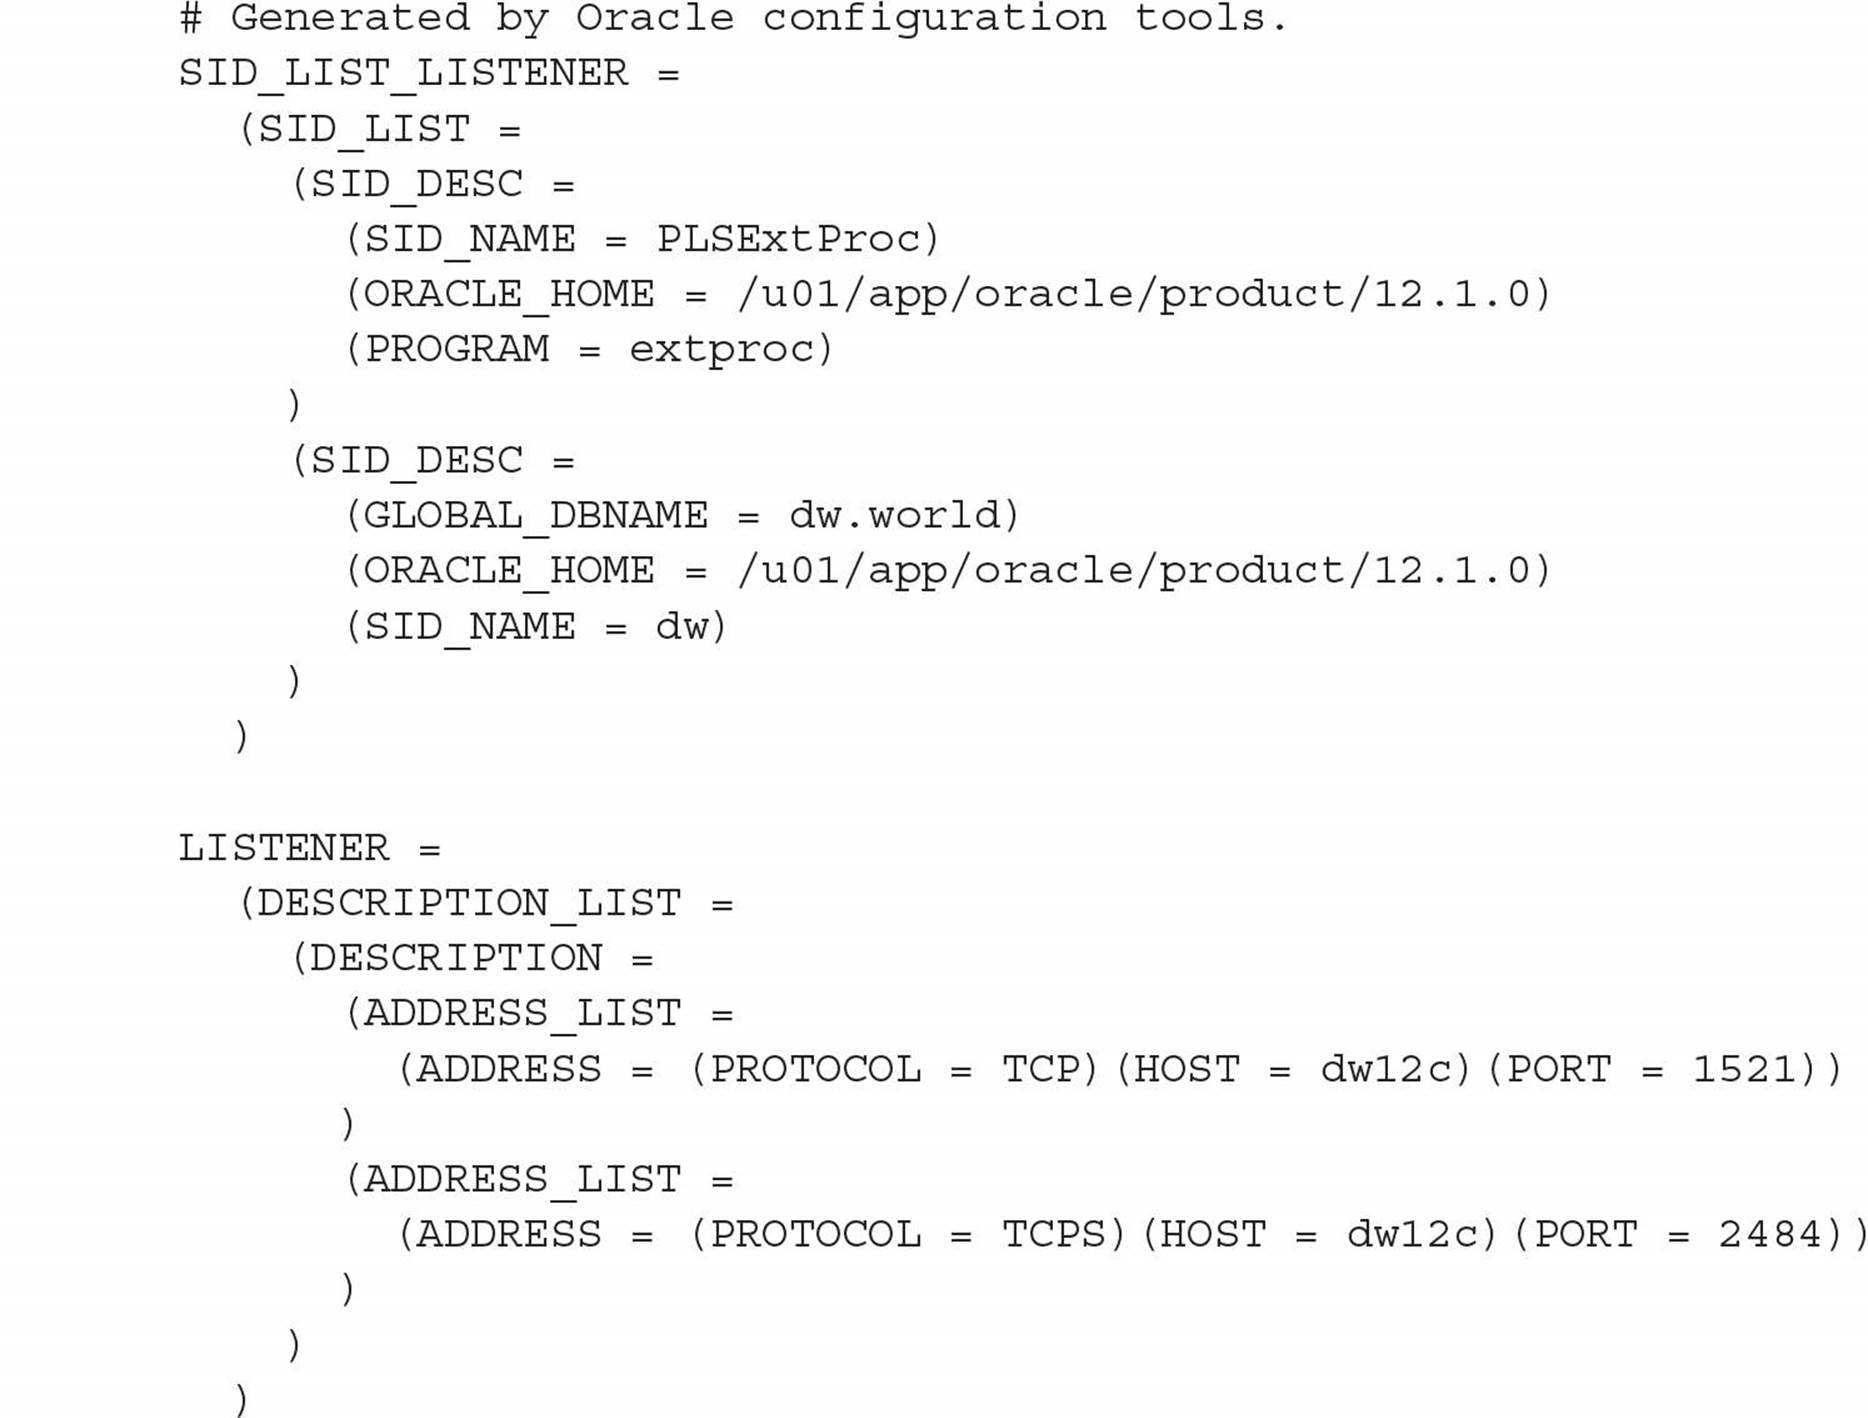
Using SSL over TCP/IP requires only slight changes to the listener configuration by adding another protocol (TCPS) at a different port number in the listener.ora file. In the following excerpt, configured with Oracle Net Configuration Assistant (netca), the listener named LISTENER on the server dw10g will accept traffic via TCP on port 1521 and SSL TCP traffic on port 2484:

Distributed Computing Environment
The Distributed Computing Environment (DCE) provides a number of services, such as remote procedure calls, distributed file services, and distributed time service, in addition to a security service. DCE supports distributed applications in a heterogeneous environment on all major software and hardware platforms.
DCE is one of the protocols that support single sign-on (SSO); once a user authenticates with DCE, they can securely access any Oracle database configured with DCE without specifying a username or password.
Kerberos
Kerberos is another trusted third-party authentication system that, like DCE, provides SSO capabilities. Oracle fully supports Kerberos version 5 with Oracle Advanced Security under the Enterprise Edition of Oracle Database 12c.
As with other middleware authentication solutions, the basic premise is that passwords should never be sent across the network; all authentication is brokered by the Kerberos server. In Kerberos terminology, a password is a “shared secret.”
Public Key Infrastructure
Public Key Infrastructure (PKI) comprises a number of components. It is implemented using the SSL protocol and is based on the concept of secret private keys and related public keys to facilitate secure communications between the client and server.
To provide identification and authentication services, PKI uses certificates and certificate authorities (CAs). In a nutshell, a certificate is an entity’s public key validated by a trusted third party (a certificate authority), and it contains information such as the certificate user’s name, an expiration date, the public key, and so forth.
RADIUS
Remote Authentication Dial-In User Service (RADIUS) is a lightweight protocol used for authentication as well as authorization and accounting services. In an Oracle environment, the Oracle server acts as the client to a RADIUS server when an authorization request is sent from an Oracle client.
Any authentication method that supports the RADIUS standard—whether it be token cards, smart cards, or SecurID ACE—can easily be added to the RADIUS server as a new authentication method without any changes being made on the client or server configuration files, such as sqlnet.ora.
3-Tier Authentication
In a 3-tier or multitier environment, an application server can provide authentication services for a client and provide a common interface to the database server, even if the clients use a variety of different browsers or “thick” client applications. The application server, in turn, is authenticated with the database and demonstrates that the client is allowed to connect to the database, thus preserving the identity of the client in all tiers.
In multitier environments, both users and middle tiers are given the fewest possible privileges necessary to do their jobs. The middle tier is granted permission to perform actions on behalf of a user with a command such as the following:

In this example, the application server service OES_AS is granted permission to perform actions on behalf of the database user KMOURGOS. The user KMOURGOS has been assigned a number of roles, and they can all be enabled through the application server, except for the ORDMGMT role. As a result, when KMOURGOS connects through the application server, he is permitted to access, via the Web, all tables and privileges granted to him via roles, except for the order management functions. Because of the business rules in place at his company, all access to the order management applications must be done via a direct connection to the database. Roles are discussed in detail in the section titled “Creating, Assigning, and Maintaining Roles” later in this chapter.
Client-Side Authentication
Client-side authentication is one way to authenticate users in a multitier environment, but Oracle strongly discourages this method unless all clients are on a secure network, inside a firewall, with no connections allowed to the database from outside the firewall. In addition, users should not have any administrative rights on any workstation that can connect to the database.
If an Oracle user is created with the IDENTIFIED EXTERNALLY attribute, and the initialization parameter REMOTE_OS_AUTHENT is set to TRUE, then an attacker can easily authenticate himself on the workstation with a local user account that matches the oracle user account, and as a result gain access to the database.
As a result, it is strongly recommended that the REMOTE_OS_AUTHENT parameter be set to FALSE. The database will have to be stopped and restarted for this change to take effect.
NOTE
As of Oracle Database 11g, the parameter REMOTE_OS_AUTHENT is deprecated. There are several other, more secure ways to allow remote access to the database.
User Accounts
In order to gain access to the database, a user must provide a username to access the resources associated with that account. Each username must have a password and is associated with one and only one schema in the database; some accounts may have no objects in the schema, but instead would have the privileges granted to that account to access objects in other schemas.
In this section, I’ll explain the syntax and give examples for creating, altering, and dropping users. In addition, I’ll show you how to become another user without explicitly knowing the password for the user.
Creating Users
The CREATE USER command is fairly straightforward. It has a number of parameters, the most important of which are listed in Table 10-1 along with a brief description of each one.
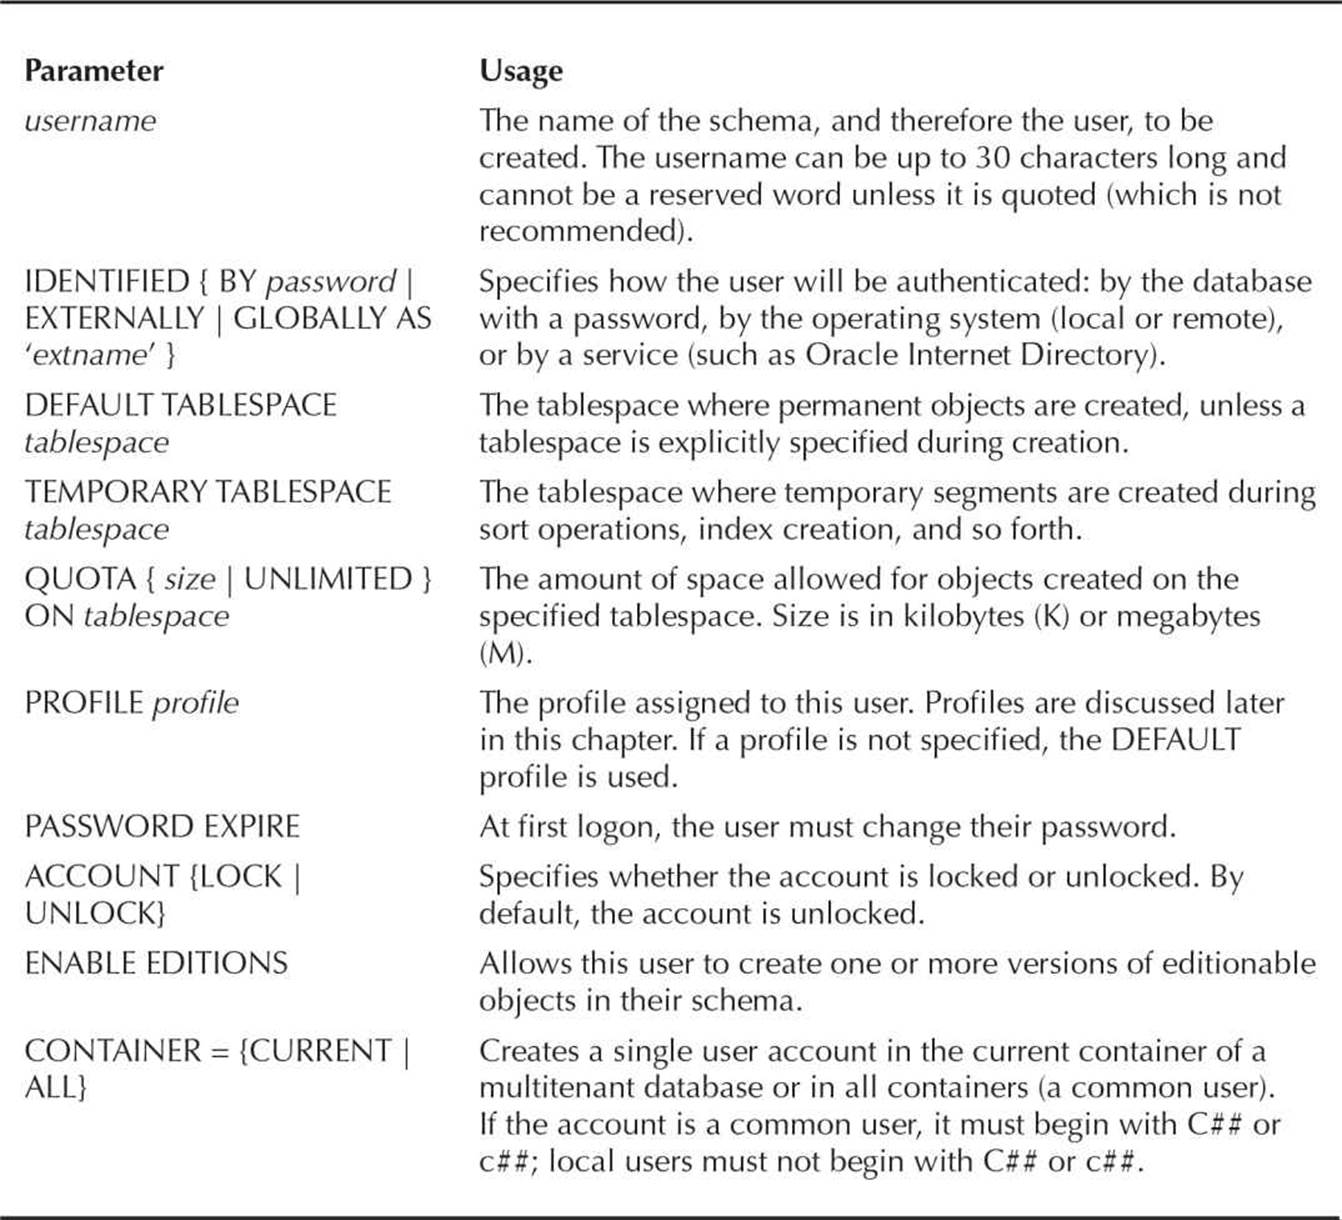
TABLE 10-1. Options for the CREATE USER Command
In the following example, we are creating a user (KLYNNE) to correspond with the user Jeff K. Lynne, employee number 100 in the HR.EMPLOYEES table from the sample schemas installed with the database:

The user KLYNNE is authenticated by the database with an initial password of KLYNNE901. The second line is not required; all accounts are created unlocked by default. Both the default permanent tablespace and default temporary tablespace are defined at the database level, so the last two lines of the command aren’t required unless you want a different default permanent tablespace or a different temporary tablespace for the user.
Even though the user KLYNNE has been either explicitly or implicitly assigned a default permanent tablespace, he cannot create any objects in the database until we provide both a quota and the rights to create objects in their own schema.
A quota is simply a space limit, by tablespace, for a given user. Unless a quota is explicitly assigned or the user is granted the UNLIMITED TABLESPACE privilege (privileges are discussed later in this chapter), the user cannot create objects in their own schema. In the following example, we’re giving the KLYNNE account a quota of 250MB in the USERS tablespace:

Note that we could have granted this quota at the time the account was created, along with almost every other option in the CREATE USER command. A default role, however, can only be assigned after the account is created. (Role management is discussed later in this chapter.)
Unless we grant some basic privileges to a new account, the account cannot even log in; therefore, we need to grant at least the CREATE SESSION privilege or the CONNECT role (roles are discussed in detail later in this chapter). For Oracle Database 10g Release 1 and earlier, the CONNECT role contains the CREATE SESSION privilege, along with other basic privileges, such as CREATE TABLE and ALTER SESSION; as of Oracle Database 10gRelease 2, the CONNECT role only has the CREATE SESSION privilege and therefore is deprecated. In the following example, we grant KLYNNE the CREATE SESSION and CREATE TABLE privileges:

Now the user KLYNNE has a quota on the USERS tablespace as well as the privileges to create objects in that tablespace.
All these options for CREATE USER are available in the web-based Oracle Cloud Control 12c interface, as demonstrated in Figure 10-2.
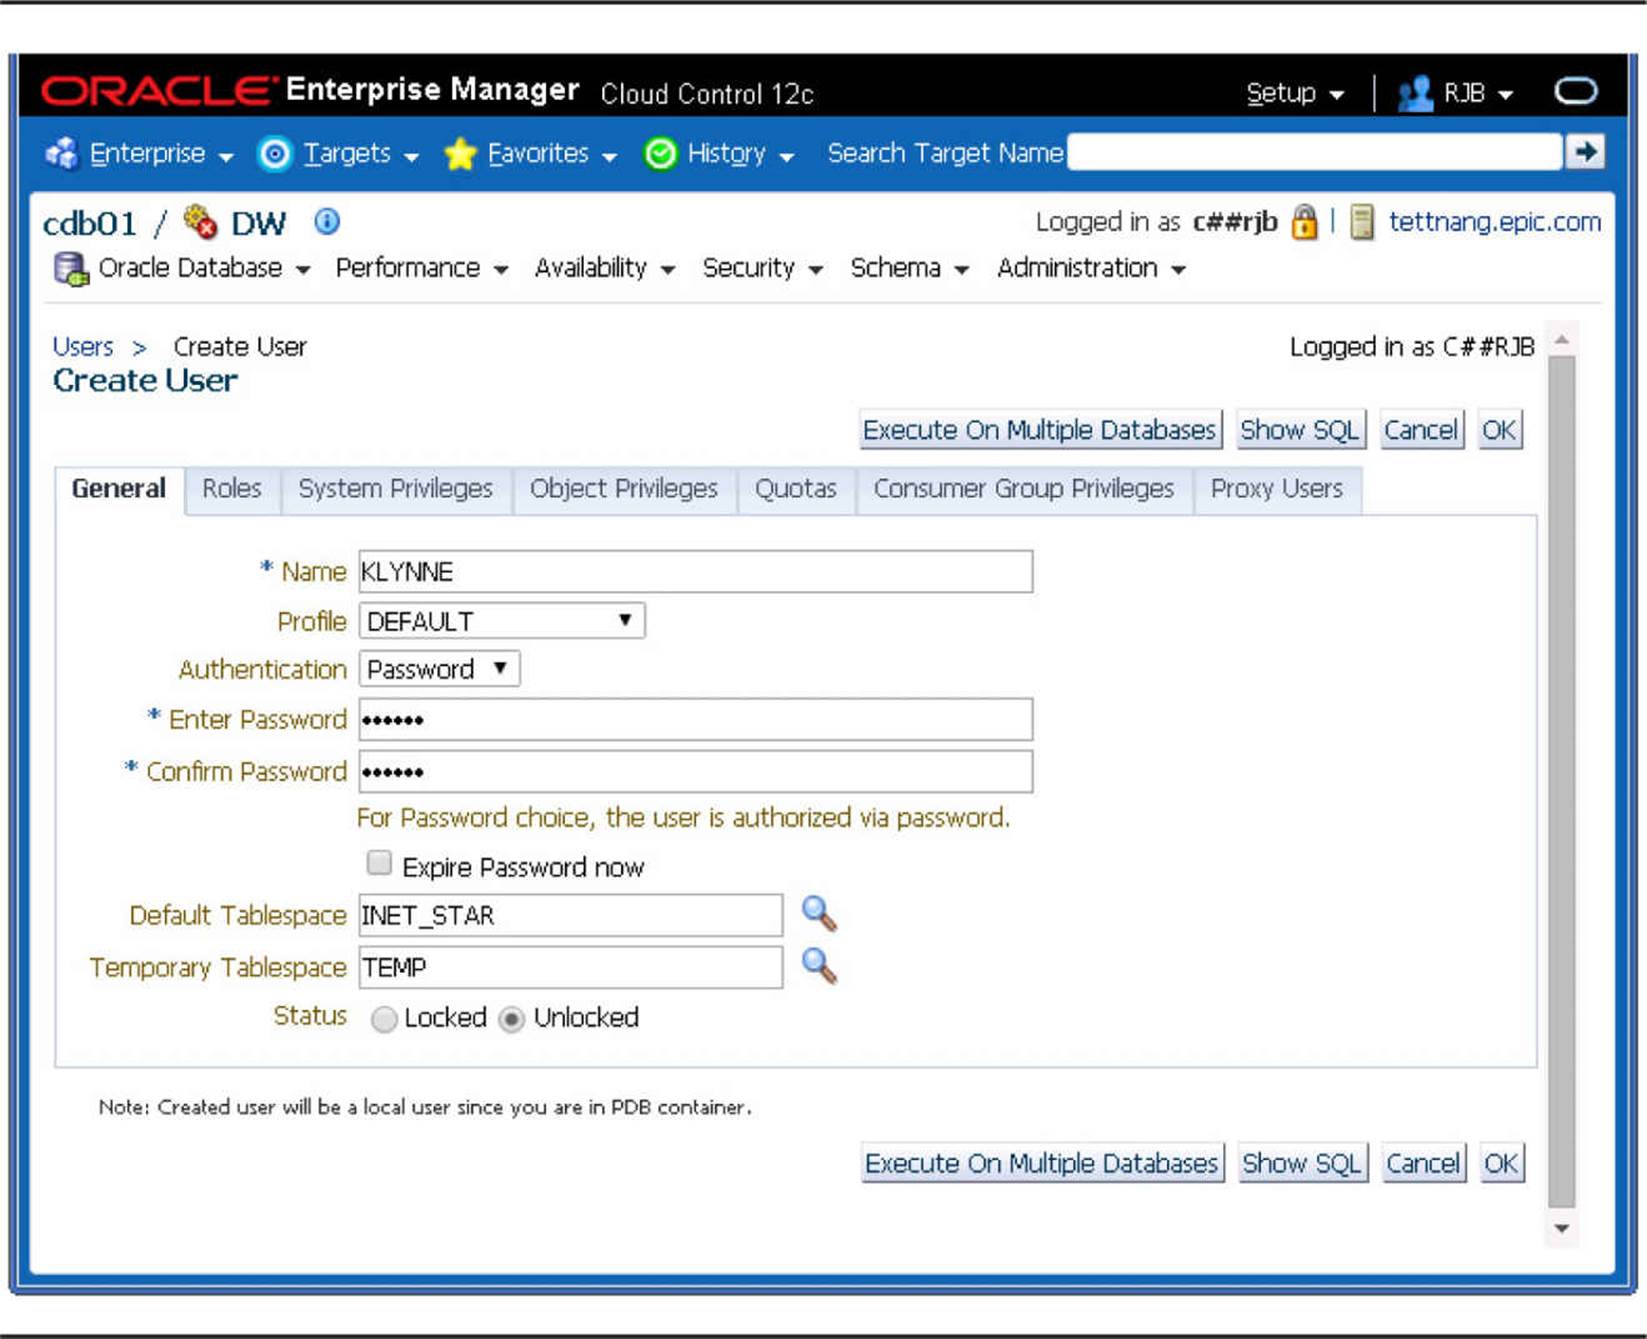
FIGURE 10-2. Creating users with Cloud Control
As with any Cloud Control operation, the Show SQL button shows the actual SQL commands, such as CREATE and GRANT, that will be run when the user is created. This is a great way to take advantage of the web interface’s ease of use, while at the same time brushing up on your SQL command syntax!
In Figure 10-3, you can see that it’s also very easy to pick an existing user and create a new user with the same characteristics except for the password.
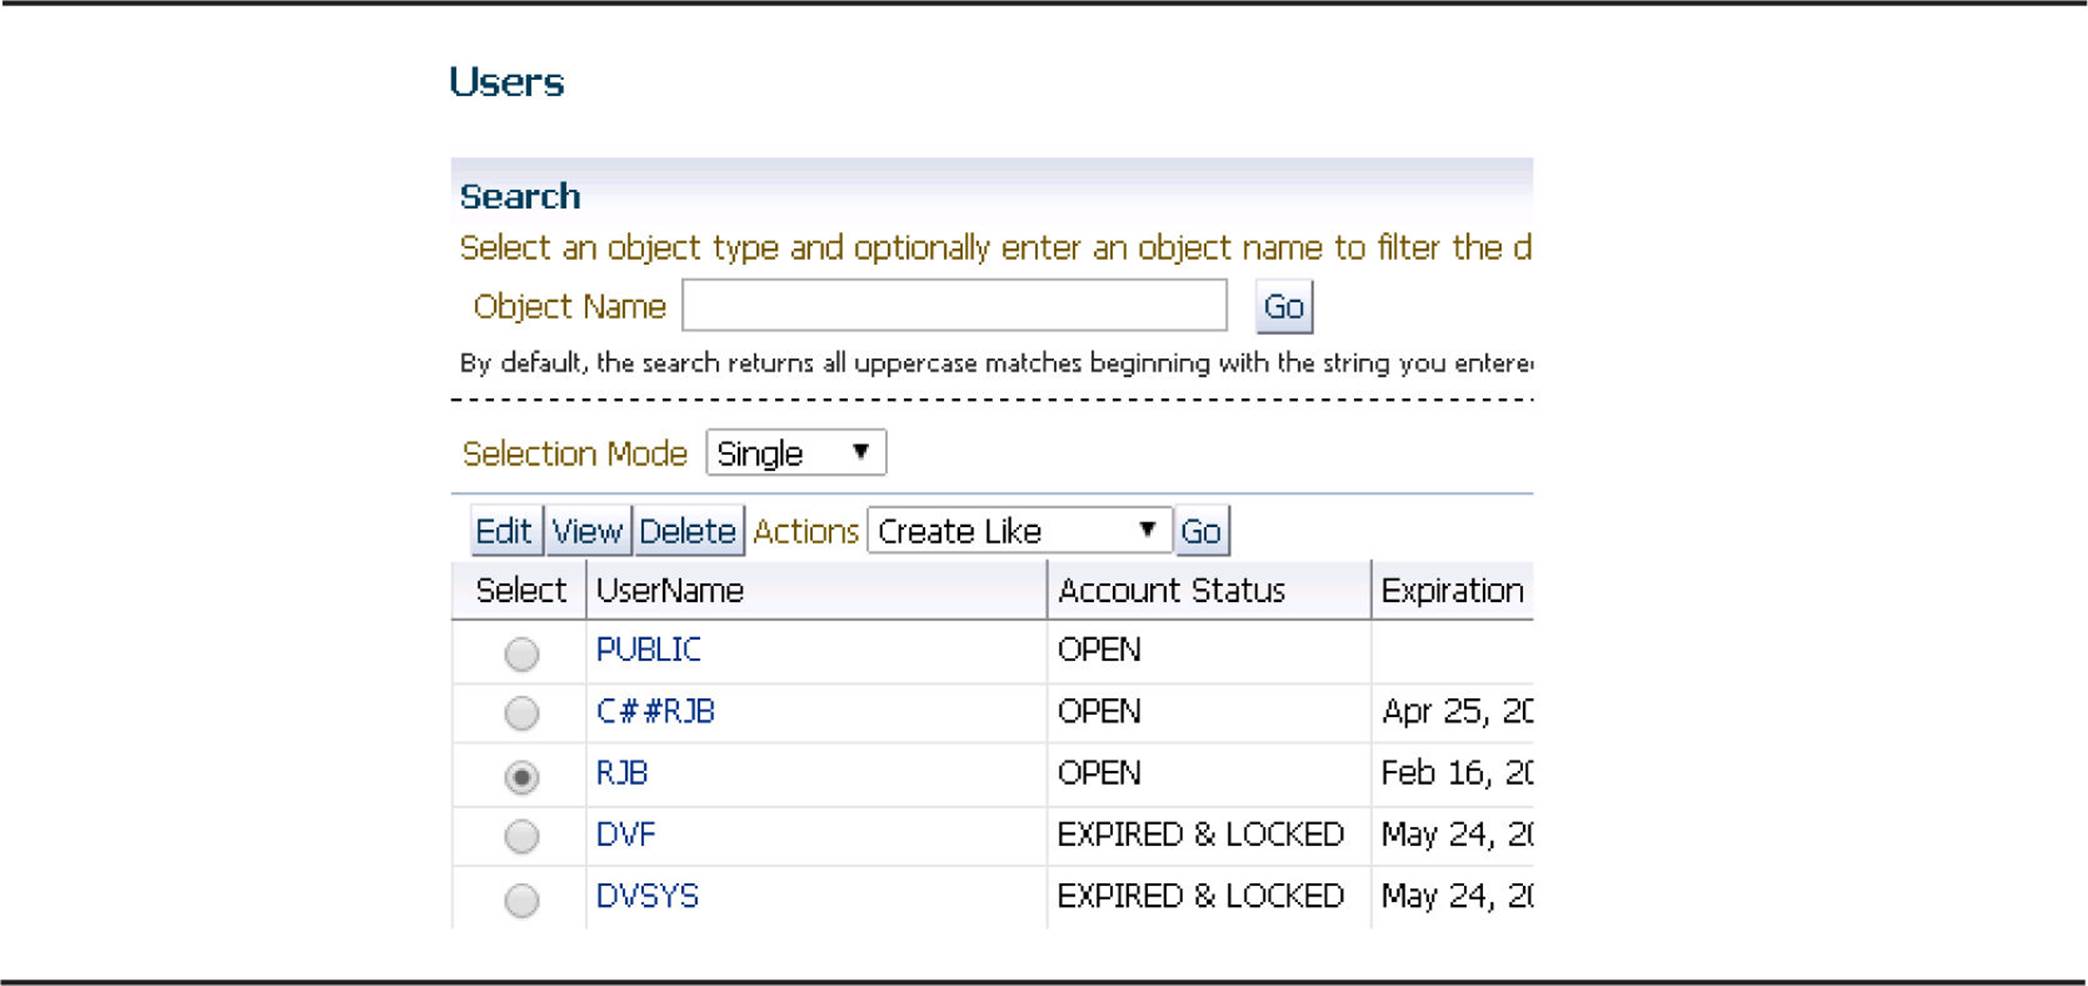
FIGURE 10-3. Copying users with Cloud Control
Other options available in the Cloud Control interface include expiring a user account, generating the DDL used to create the account, and locking or unlocking the account.
Altering Users
Changing the characteristics of a user is accomplished by using the ALTER USER command. The syntax for ALTER USER is nearly identical to that of CREATE USER, except that ALTER USER allows you to assign roles as well as grant rights to a middle-tier application to perform functions on behalf of the user.
In this example, we’ll change user KLYNNE to use a different default permanent tablespace:

Note that the user KLYNNE still can create objects in the USERS tablespace, but he must explicitly specify USERS in any CREATE TABLE and CREATE INDEX commands.
Dropping Users
Dropping users is very straightforward and is accomplished with the DROP USER command. The only parameters are the username to be dropped and the CASCADE option; any objects owned by the user must be explicitly dropped or moved to another schema if the CASCADE option is not used. In the following example, the user QUEENB is dropped, and if there are any objects owned by QUEENB, they are automatically dropped as well:

If any other schema objects, such as views or packages, rely on objects dropped when the user is dropped, the other schema objects are marked INVALID and must be recoded to use other objects and then recompiled. In addition, any object privileges that were granted by the first user to a second user via the WITH GRANT OPTION clause are automatically revoked from the second user if the first user is dropped.
Becoming Another User
To debug an application, a DBA sometimes needs to connect as another user to simulate the problem. Without knowing the actual plain-text password of the user, the DBA can retrieve the encrypted password from the database, change the password for the user, connect with the changed password, and then change back the password using an undocumented clause of the ALTER USER command. It is assumed that the DBA has access to the DBA_USERS table, along with the ALTER USER privilege. If the DBA has the DBA role, then these two conditions are satisfied.
The first step is to retrieve the encrypted password for the user, which is stored in the table DBA_USERS:
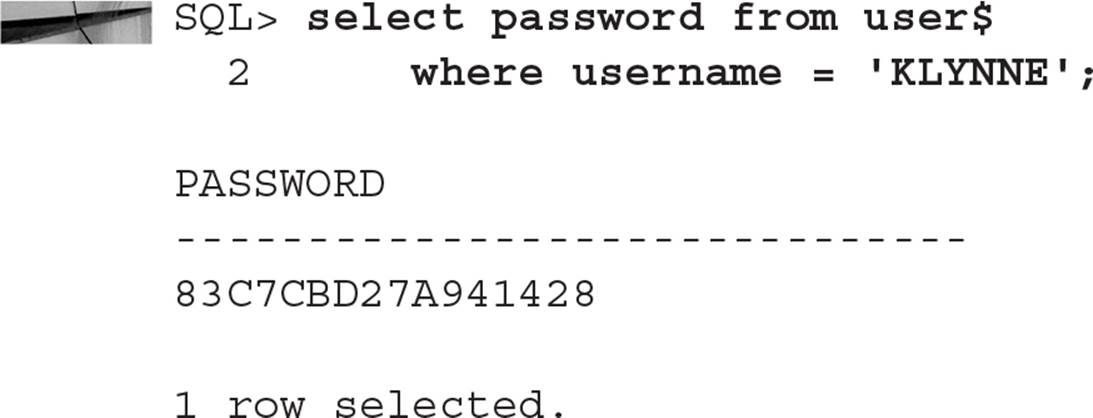
Save this password using cut and paste in a GUI environment, or save it in a text file to retrieve later. The next step is to temporarily change the user’s password and then log in using the temporary password:

At this point, you can debug the application from KLYNNE’s point of view. Once you are done debugging, change the password back using the undocumented BY VALUES clause of ALTER USER:

Connecting with the KLYNNE user guarantees that you will see exactly what KLYNNE will see when running the application. In some scenarios, however, you can avoid having to change passwords by using the ALTER SESSION command with the CURRENT_SCHEMA option.
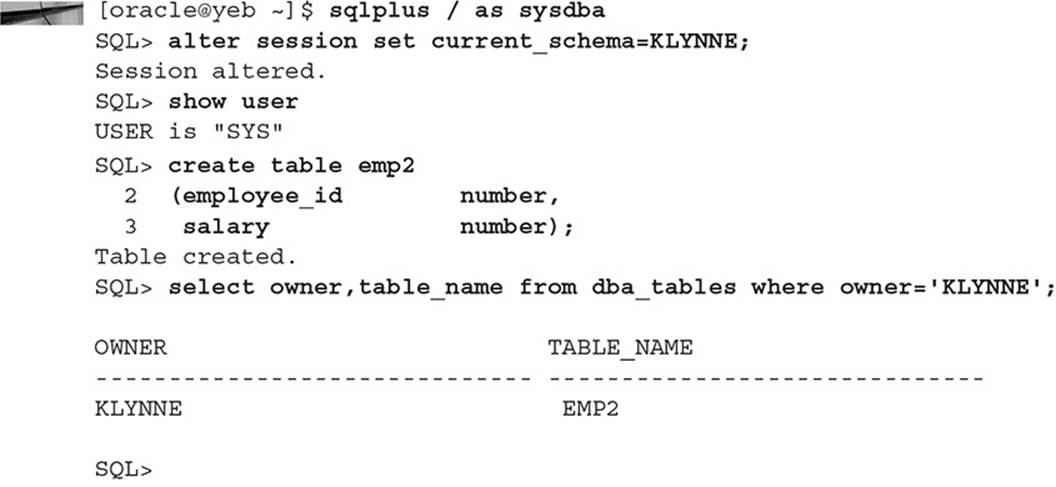
All DML and SELECT commands will run in the context of the user specified by CURRENT_SCHEMA parameter.
User-Related Data Dictionary Views
A number of data dictionary views contain information related to users and characteristics of users. Table 10-2 lists the most common views and tables. The equivalent views in a multitenant environment begin with CDB_ instead of DBA_.
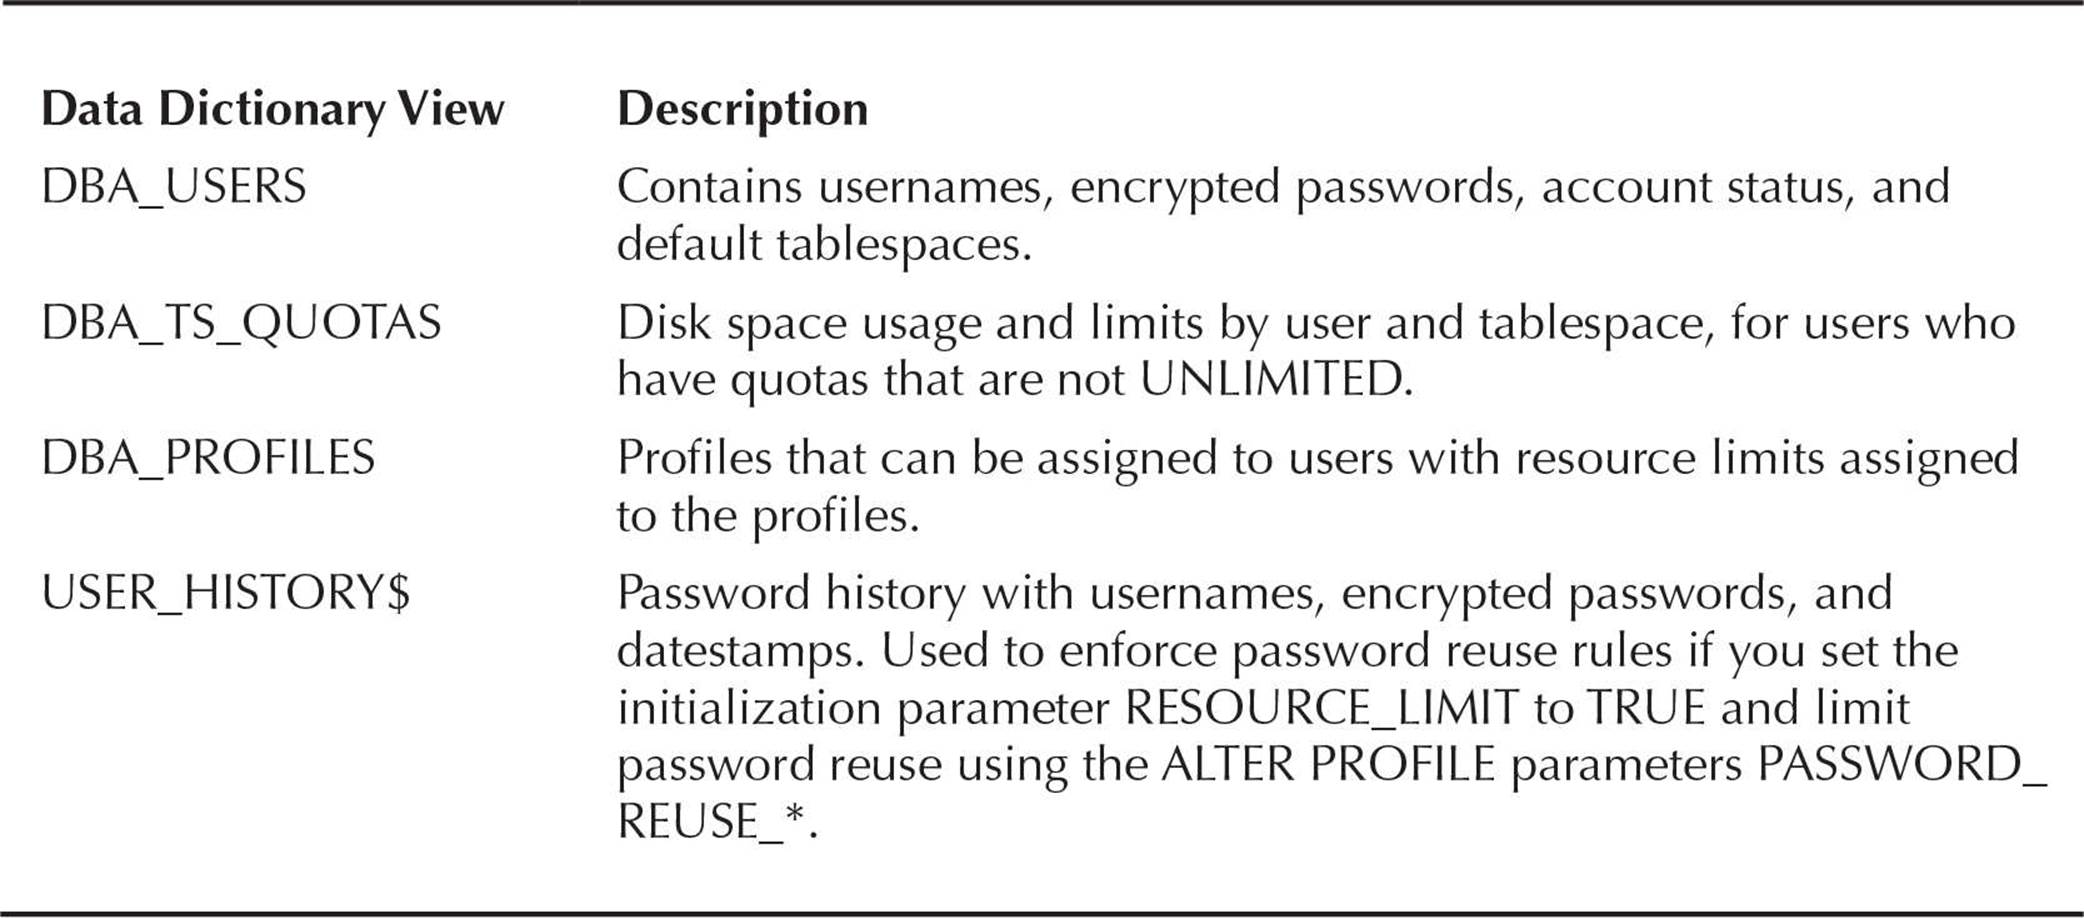
TABLE 10-2. User-Related Data Dictionary Views and Tables
Database Authorization Methods
Once a user is authenticated with the database, the next step is to determine what types of objects, privileges, and resources the user is permitted to access or use. In this section, we’ll review how profiles can control not only how passwords are managed but also how profiles can put limits on various types of system resources.
In addition, we’ll review the two types of privileges in an Oracle database: system privileges and object privileges. Both of these privileges can be assigned directly to users, or indirectly through roles, another mechanism that can make a DBA’s job easier when assigning privileges to users.
Managing profiles and privileges in a multitenant environment is similar to managing those in a non-CDB environment with a few exceptions; see Chapter 11 for more details.
At the end of this section, we’ll cover the Virtual Private Database (VPD) features of Oracle and how it can be used to provide more precise control over what parts of a table can be seen by a user based on a set of DBA-defined credentials assigned to the user. To help make the concepts clearer, we’ll step through an implementation of a VPD from beginning to end.
Profile Management
There never seems to be enough CPU power or disk space or I/O bandwidth to run a user’s query. Because all these resources are inherently limited, Oracle provides a mechanism to control how much of these resources a user can use. An Oracle profile is a named set of resource limits providing this mechanism.
In addition, profiles can be used as an authorization mechanism to control how user passwords are created, reused, and validated. For example, we may wish to enforce a minimum password length, along with a requirement that at least one upper- and lowercase letter appear in the password. In this section, we’ll look at how profiles manage passwords and resources.
The CREATE PROFILE Command
The CREATE PROFILE command does double duty; we can create a profile to limit the connect time for a user to 120 minutes:

Similarly, we can limit the number of consecutive times a login can fail before the account is locked:

Or, we can combine both types of limits in a single profile:

How Oracle responds to one of the resource limits being exceeded depends on the type of limit. When one of the connect time or idle time limits is reached (such as CPU_PER_SESSION), the transaction in progress is rolled back, and the session is disconnected. For most other resource limits (such as PRIVATE_SGA), the current transaction is rolled back, an error is returned to the user, and the user has the option to commit or roll back the transaction. If an operation exceeds a limit for a single call (such as LOGICAL_READS_PER_CALL), the operation is aborted, the current statement is rolled back, and an error is returned to the user. The rest of the transaction remains intact; the user can then roll back, commit, or attempt to complete the transaction without exceeding statement limits.
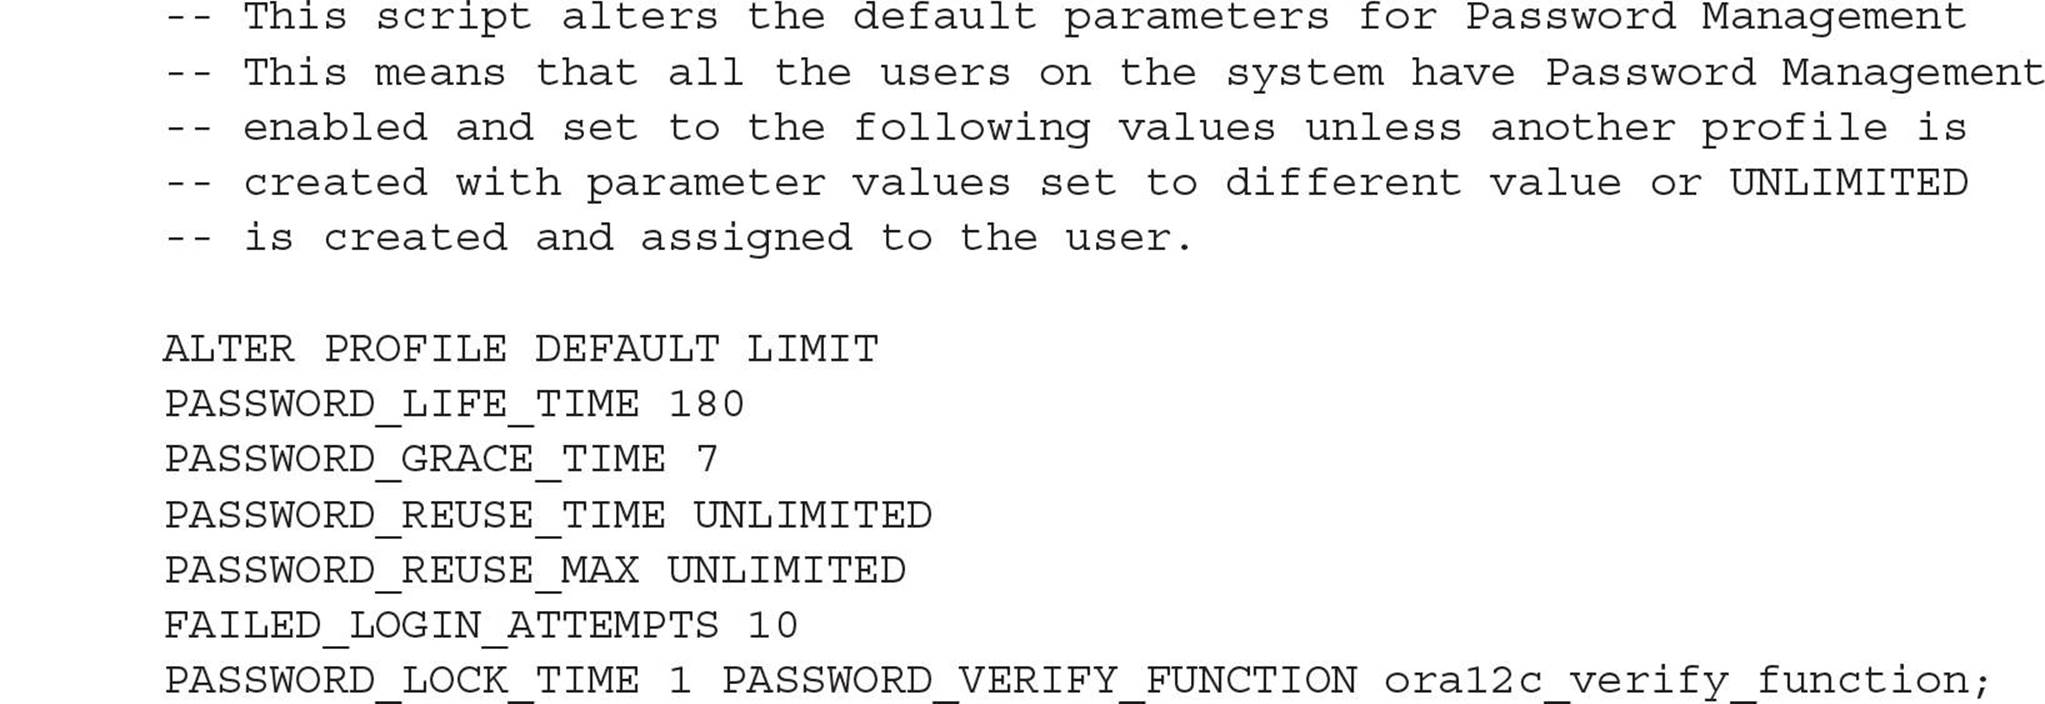
Oracle provides the DEFAULT profile, which is applied to any new user if no other profile is specified. The following query against the data dictionary view DBA_PROFILES reveals the limits for the DEFAULT profile.
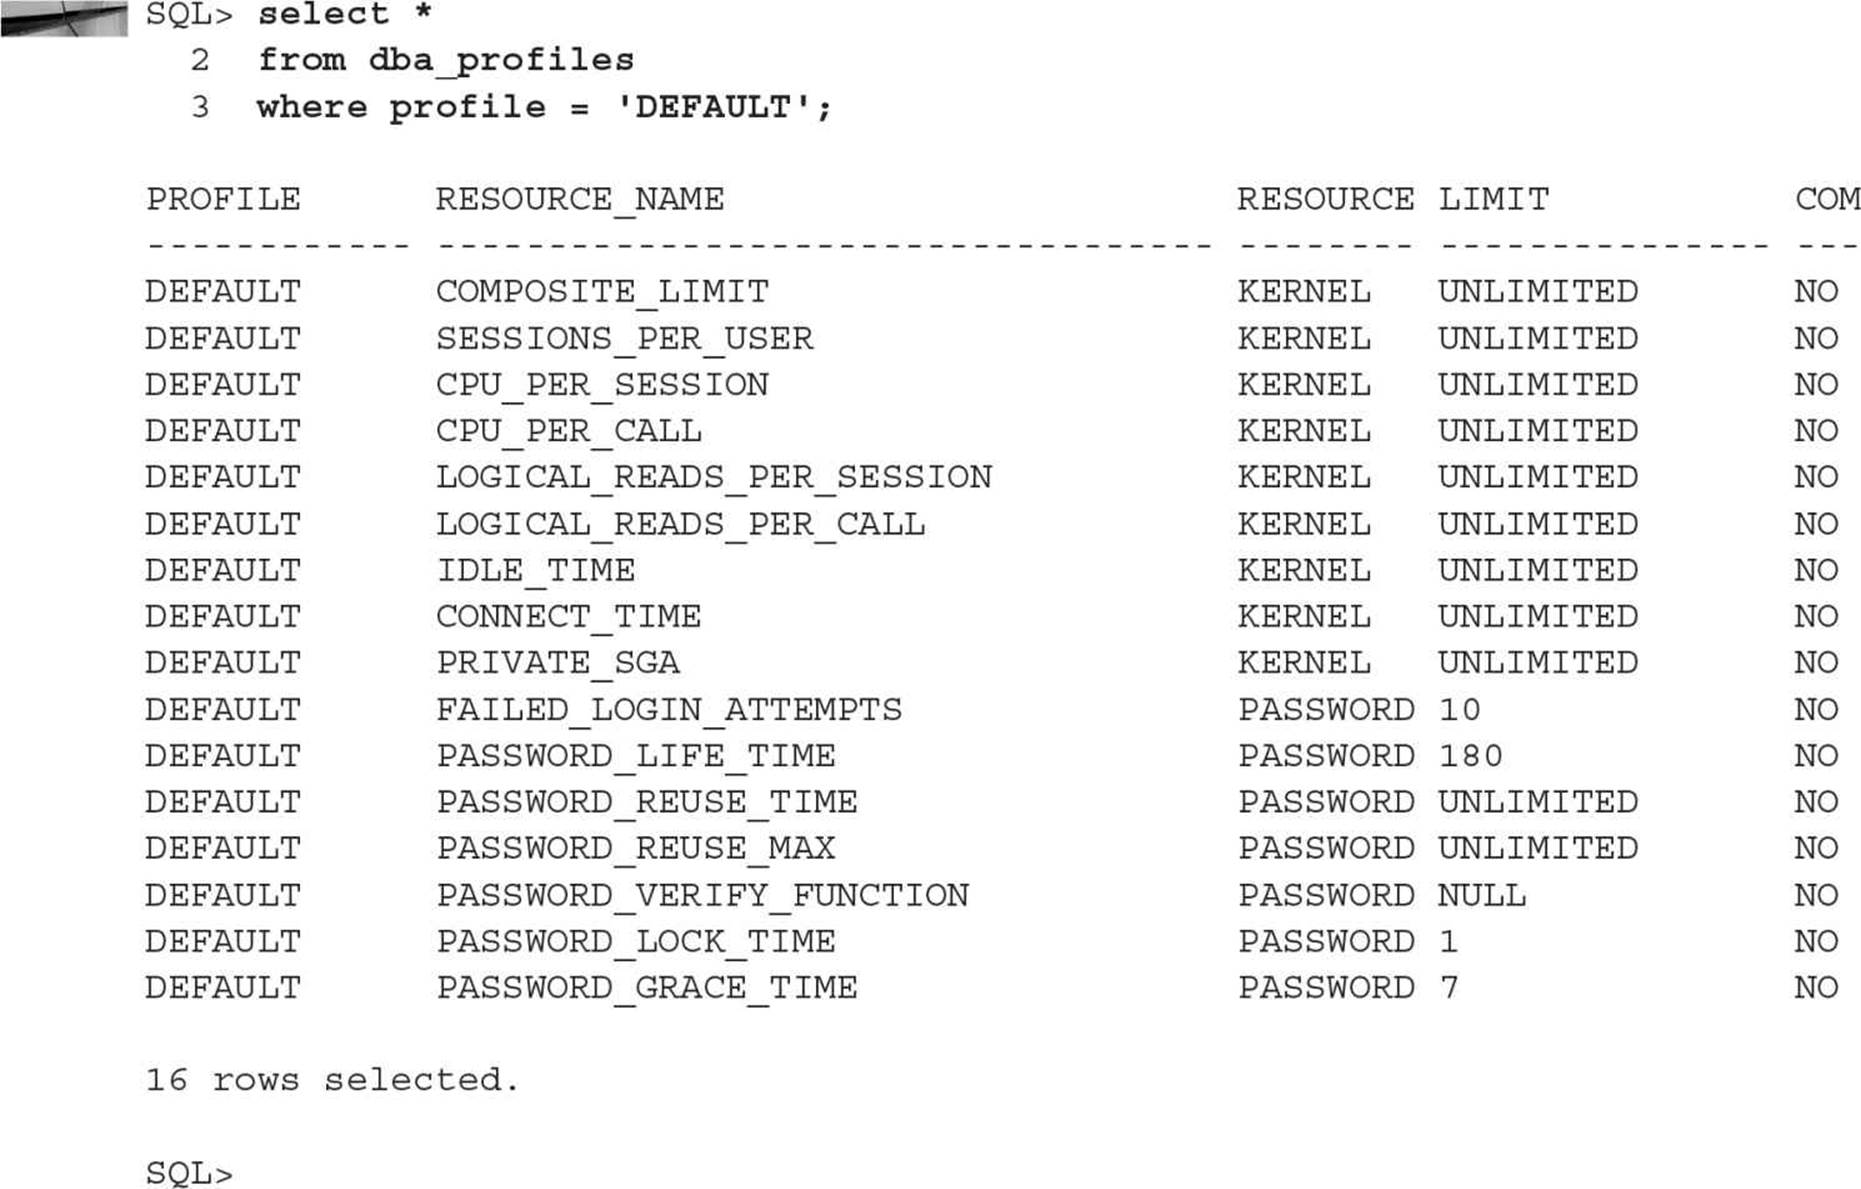
The only real restrictions in the DEFAULT profile limit the number of consecutive unsuccessful login attempts (FAILED_LOGIN_ATTEMPTS) to ten before the account is locked and the number of days before a password must be changed (PASSWORD_LIFE_TIME) to 180. In addition, no password verification function is enabled.
Profiles and Password Control
Table 10-3 lists and describes the password-related profile parameters. All units of time are specified in days (to specify any of these parameters in minutes, for example, divide by 1440):
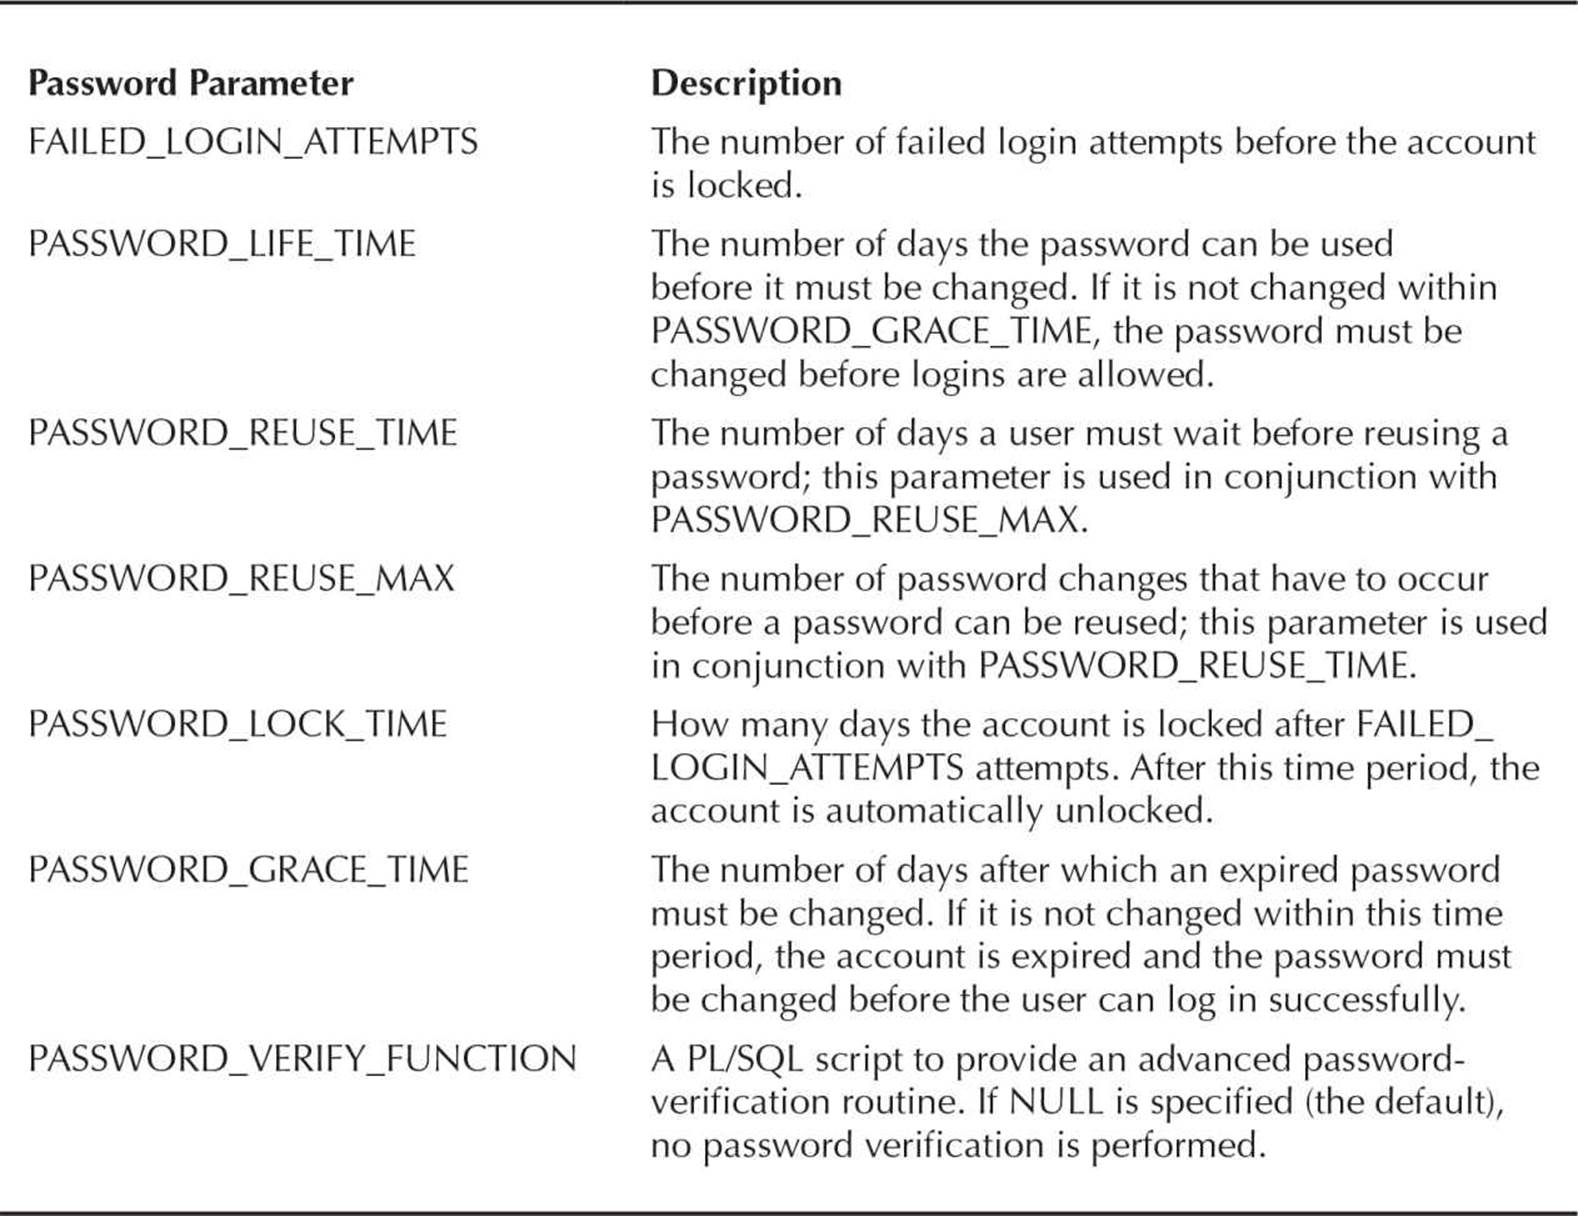
TABLE 10-3. Password-Related Profile Parameters

In this example, an account will only be locked for five minutes after the specified number of login failures.
A parameter value of UNLIMITED means that there is no bound on how much of the given resource can be used. DEFAULT means that this parameter takes its values from the DEFAULT profile.
The parameters PASSWORD_REUSE_TIME and PASSWORD_REUSE_MAX must be used together; setting one without the other has no useful effect. In the following example, we create a profile that sets PASSWORD_REUSE_TIME to 20 days and PASSWORD_REUSE_MAX to 5:

For users with this profile, their password can be reused after 20 days if the password has been changed at least five times. If you specify a value for either of these, and UNLIMITED for the other, a user can never reuse a password.
As with most other operations, profiles can easily be managed with Oracle Cloud Control. Figure 10-4 shows an example of changing the DEFAULT profile to disconnect the user after only 15 minutes of inactivity.
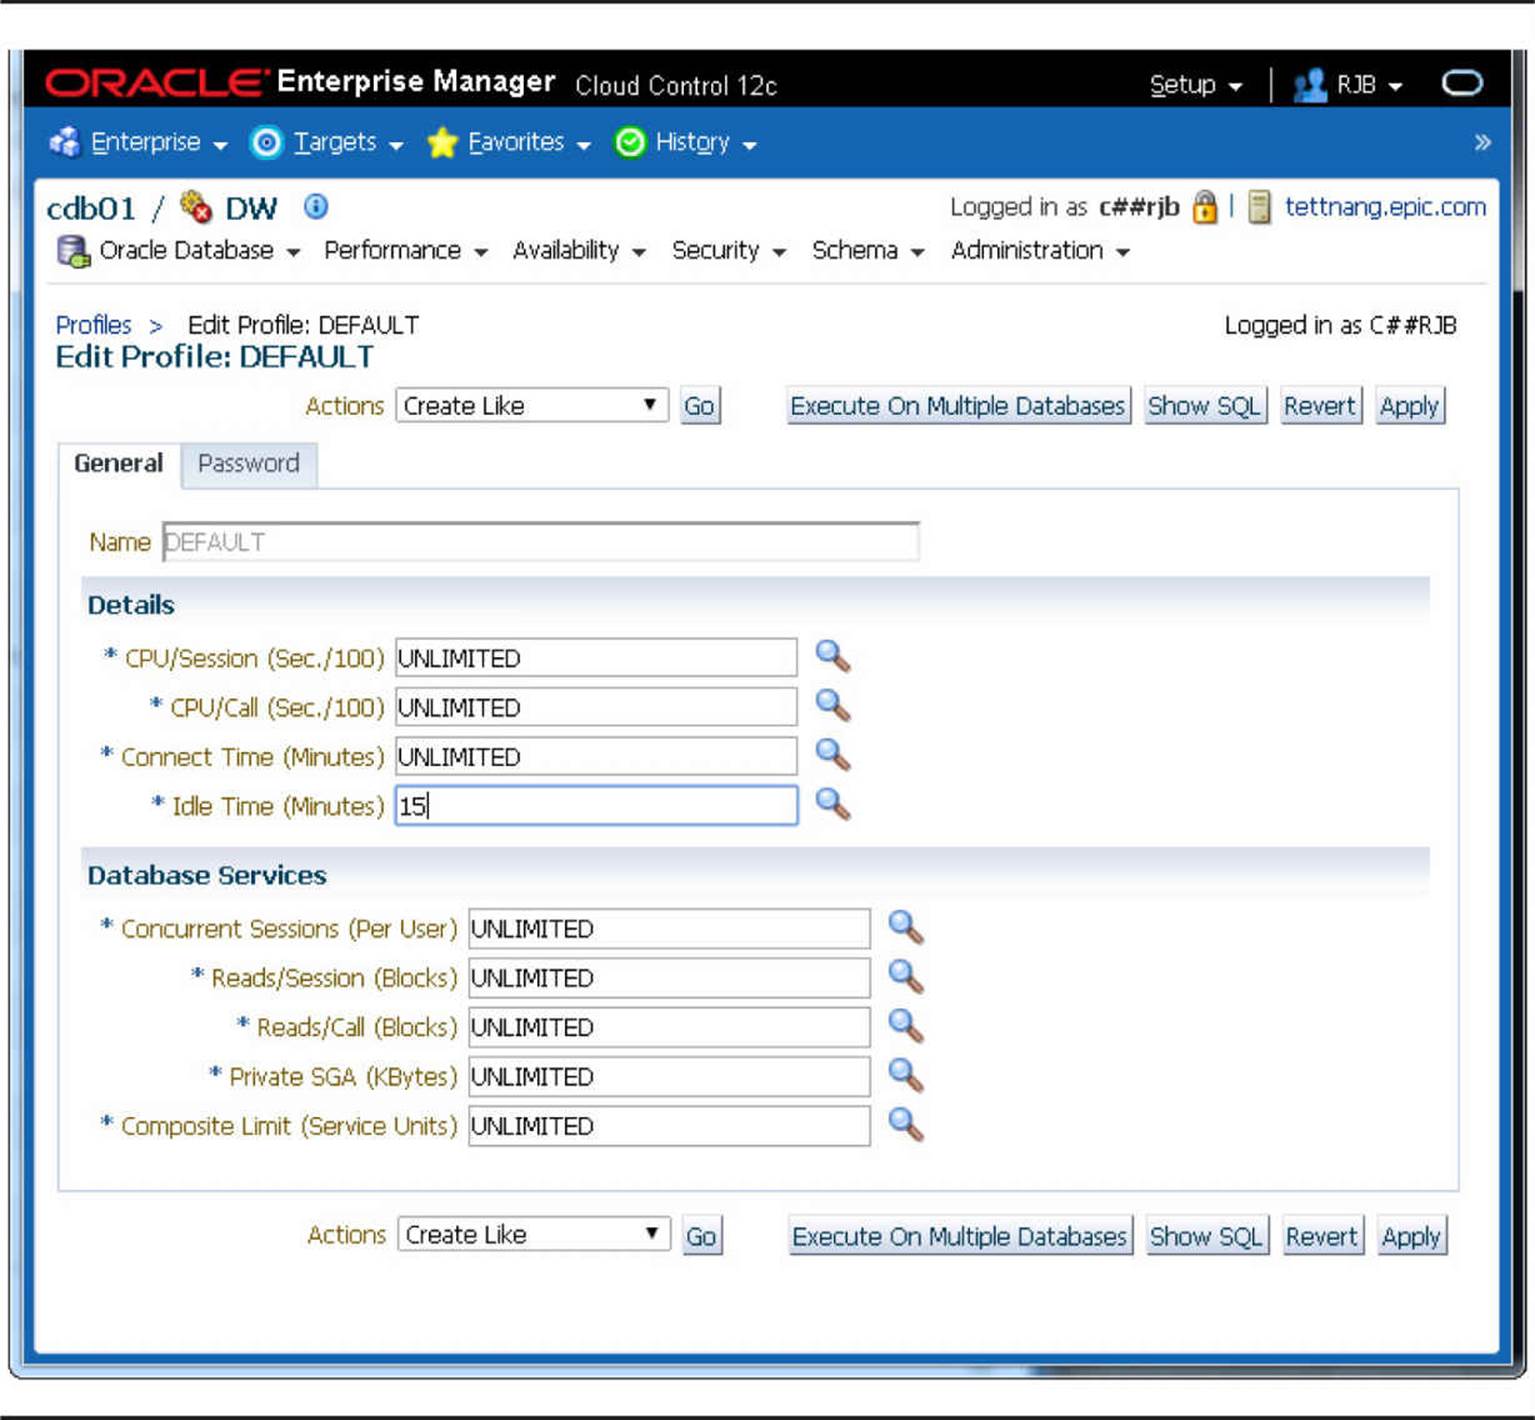
FIGURE 10-4. Changing password limits with Oracle Cloud Control
If we wanted to provide tighter control over how passwords are created and reused, such as a mixture of upper- and lowercase characters in every password, we need to enable the PASSWORD_VERIFY_FUNCTION limit in each applicable profile. Oracle provides a template for enforcing an organization’s password policy. It’s located in $ORACLE_HOME/rdbms/admin/utlpwdmg.sql. Some key sections of this script follow:

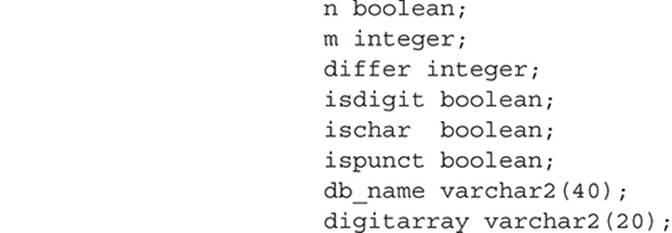
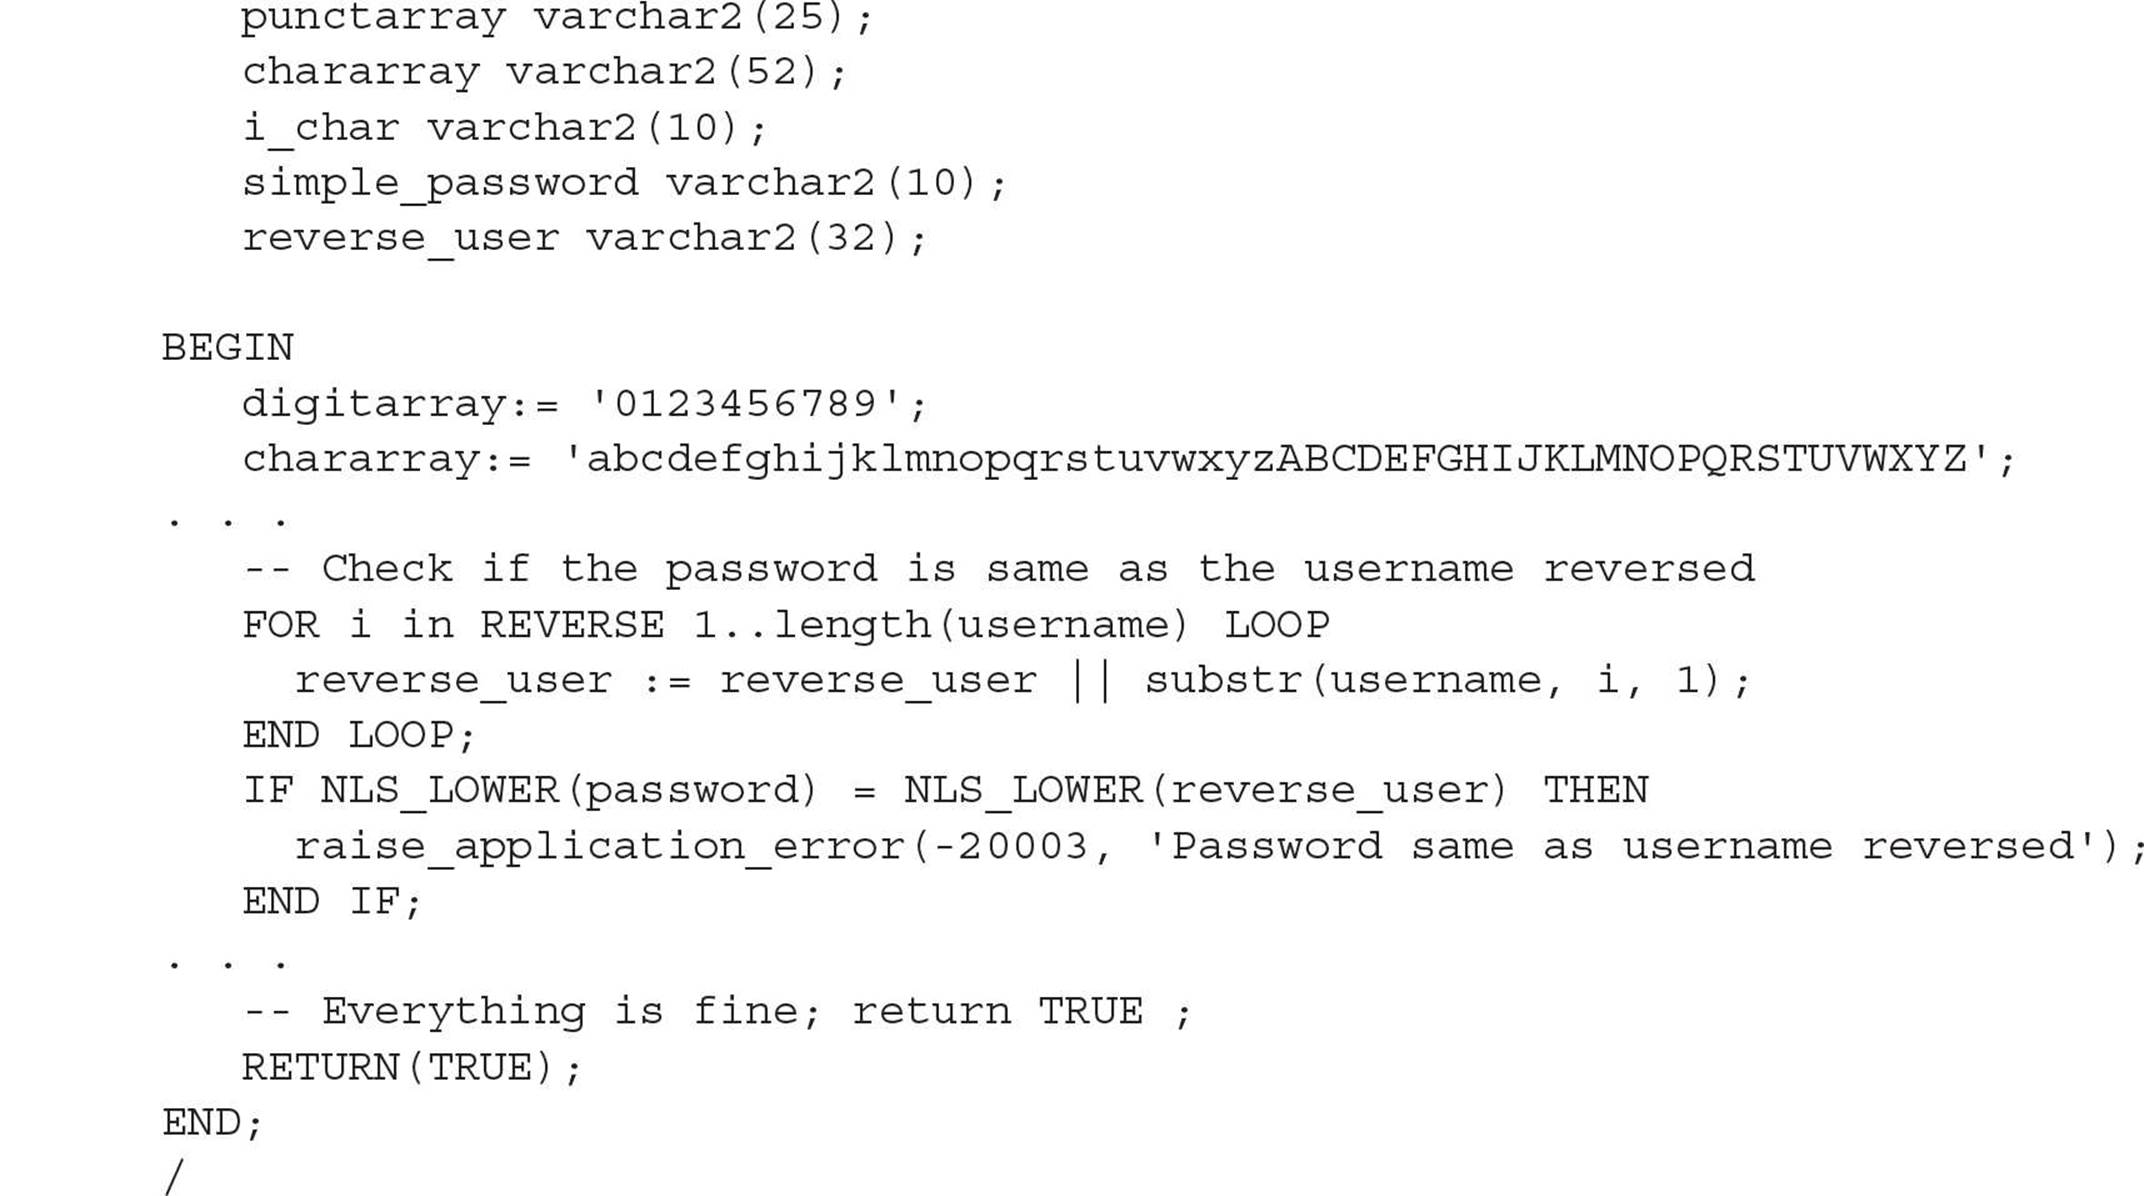
The script provides the following functionality for password complexity:
![]() Ensures that the password is not the same as the username
Ensures that the password is not the same as the username
![]() Ensures that the password is at least four characters long
Ensures that the password is at least four characters long
![]() Checks to make sure the password is not a simple, obvious word, such as ORACLE or DATABASE
Checks to make sure the password is not a simple, obvious word, such as ORACLE or DATABASE
![]() Requires that the password contains one letter, one digit, and one punctuation mark
Requires that the password contains one letter, one digit, and one punctuation mark
![]() Ensures that the password is different from the previous password by at least three characters
Ensures that the password is different from the previous password by at least three characters
To use this policy, the first step is to make your own custom changes to this script. For example, you may wish to have several different verify functions, one for each country or business unit, to match the database password complexity requirements to that of the operating systems in use in a particular country or business unit. Therefore, you can rename this function as VERIFY_FUNCTION_US_MIDWEST, for example. In addition, you might want to change the list of simple words to include names of departments or buildings at your company.
Once the function is successfully compiled, you can either alter an existing profile to use this function with the ALTER PROFILE command, or create a new profile that uses this function. In the following example, we’re changing the DEFAULT profile to use the function VERIFY_FUNCTION_US_MIDWEST:

For all existing users who are using the DEFAULT profile, or for any new users who use the DEFAULT profile, their password will be checked by the function VERIFY_FUNCTION_US_MIDWEST. If the function returns a value other than TRUE, the password is not allowed, and the user must specify a different password. If a user has a current password that does not conform to the rules in this function, it is still valid until the password is changed, at which time the new password must be validated by the function.
Profiles and Resource Control
The list of resource-control profile options that can appear after CREATE PROFILE profilename LIMIT are explained in Table 10-4. Each of these parameters can either be an integer, UNLIMITED, or DEFAULT.
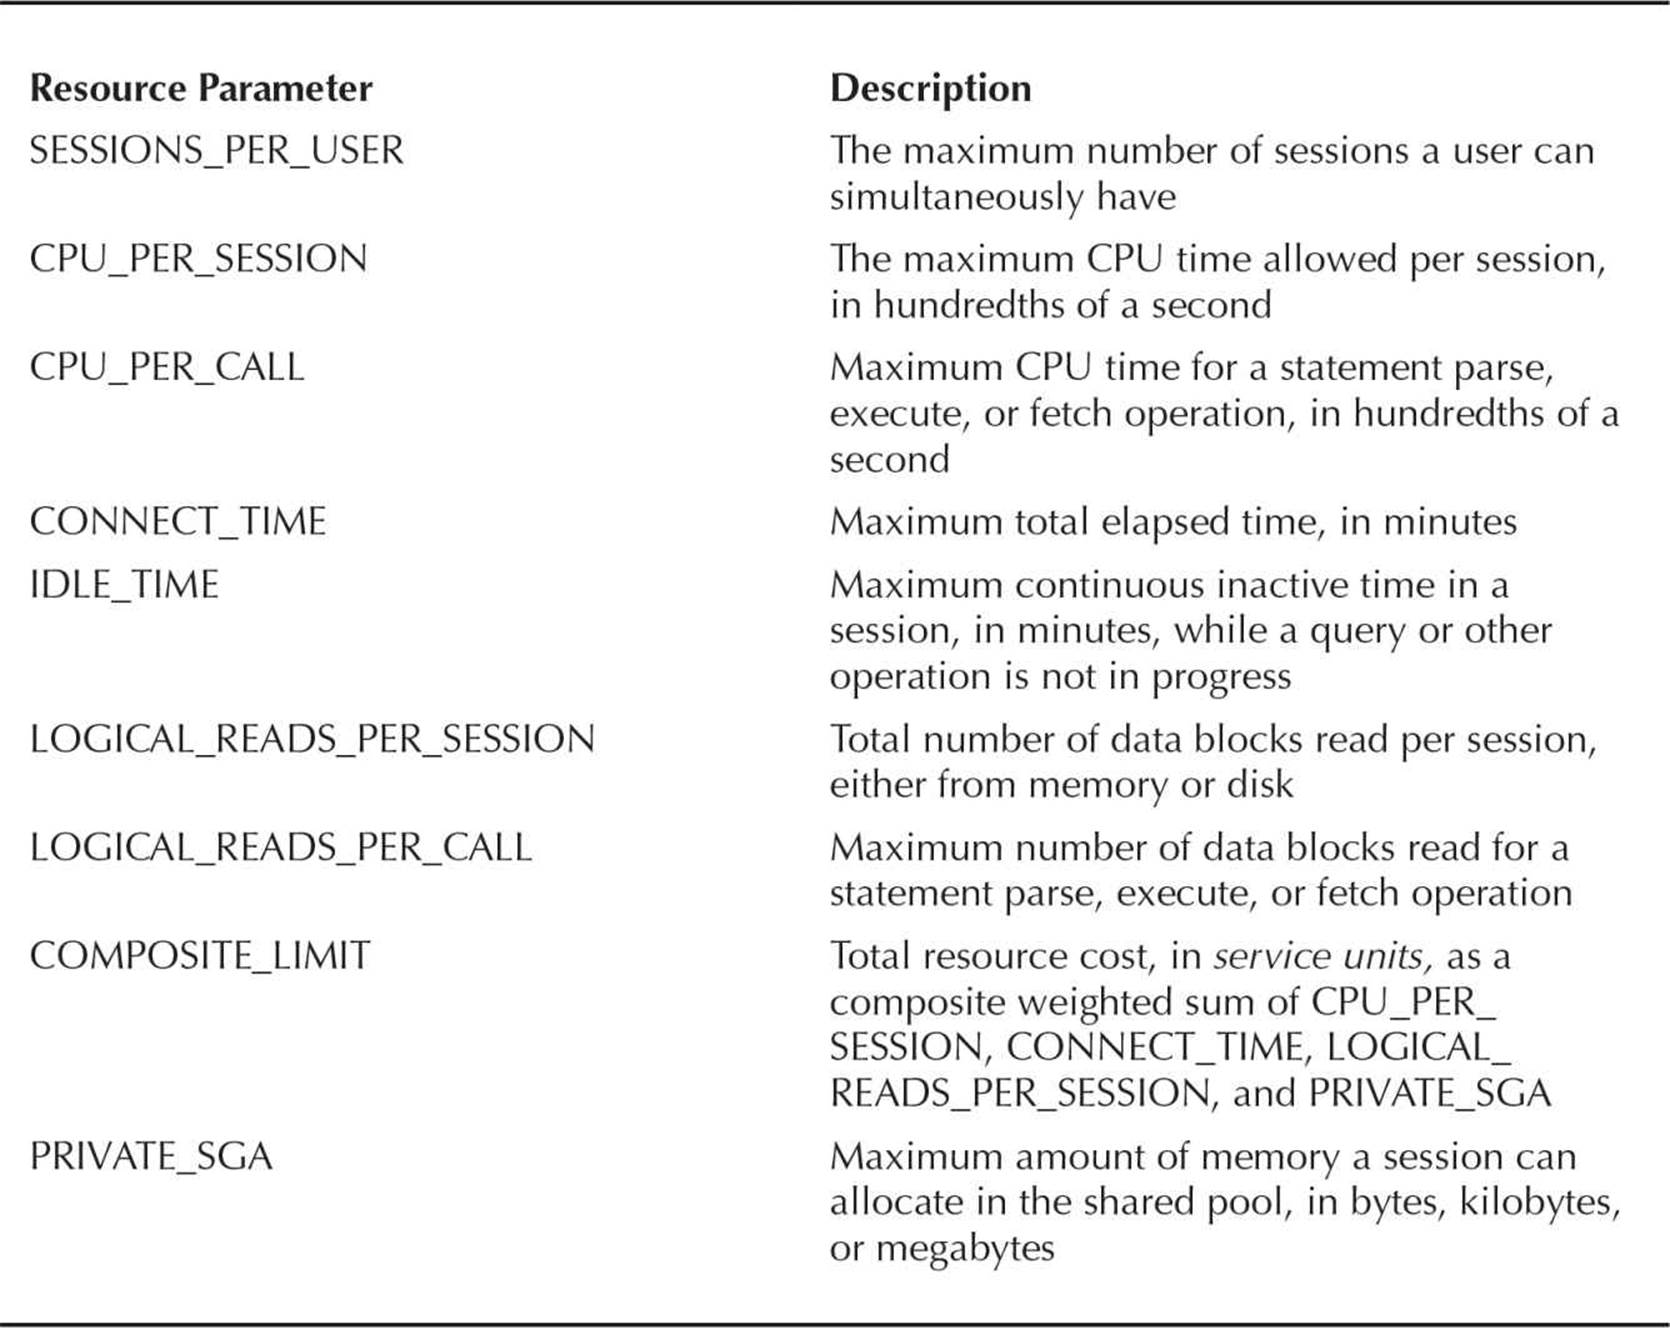
TABLE 10-4. Resource-Related Profile Parameters
As with the password-related parameters, UNLIMITED means that there is no bound on how much of the given resource can be used. DEFAULT means that this parameter takes its values from the DEFAULT profile.
The COMPOSITE_LIMIT parameter allows you to control a group of resource limits when the types of resources typically used varies widely by type; it allows a user to use a lot of CPU time but not much disk I/O during one session, and vice versa during another session, without being disconnected by the policy.
By default, all resource costs are zero:
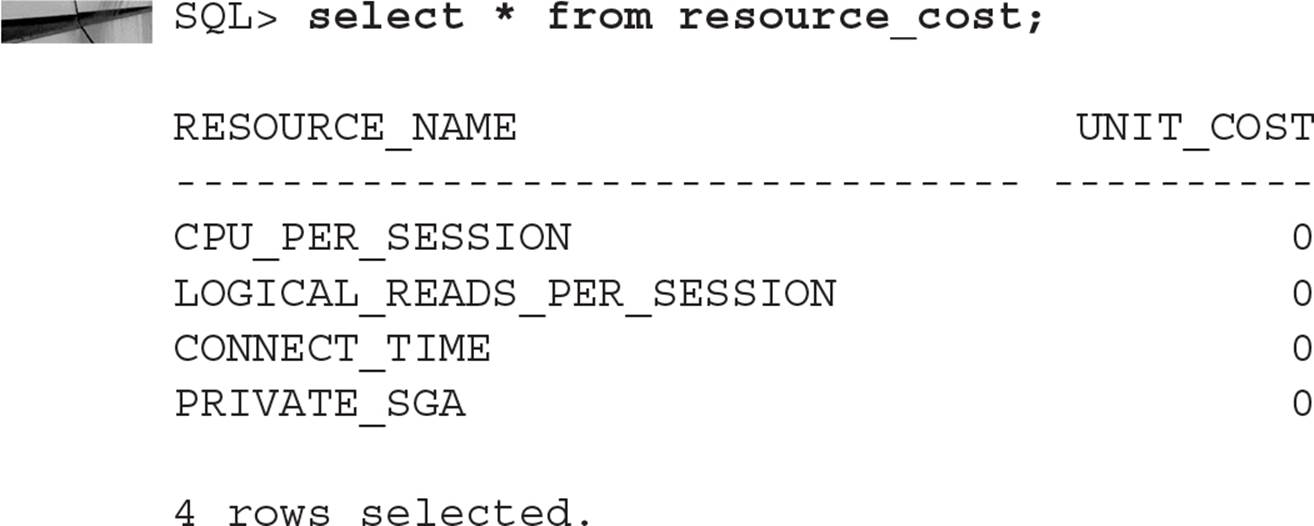
To adjust the resource cost weights, use the ALTER RESOURCE COST command. In this example, we change the weightings so that CPU_PER_SESSION favors CPU usage over connect time by a factor of 25 to 1; in other words, a user is more likely to be disconnected because of CPU usage than connect time:
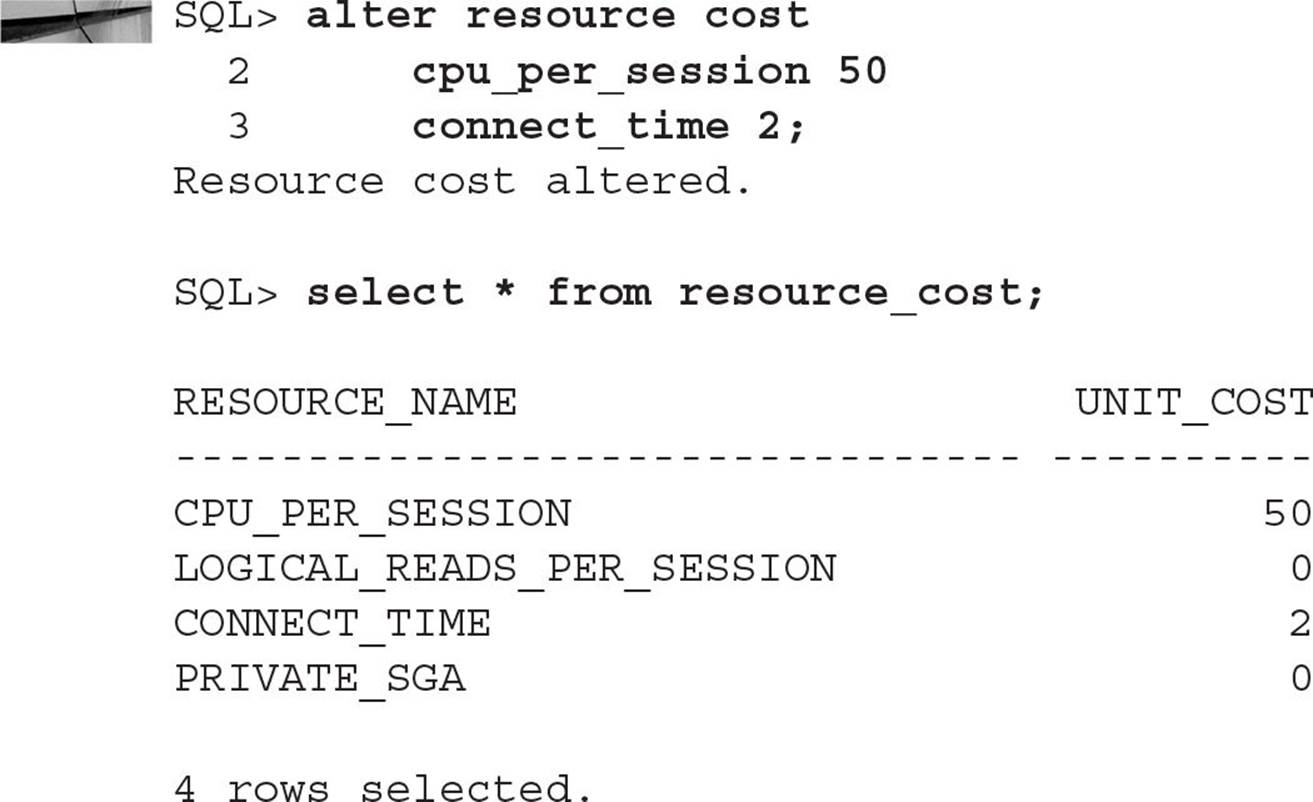
The next step is to create a new profile or modify an existing profile to use a composite limit:

As a result, users assigned to the profile LIM_COMP_CPU_CONN will have their session resources limited using the following formula to calculate cost:
![]()
Table 10-5 provides some examples of resource usage to see if the composite limit of 250 is exceeded.
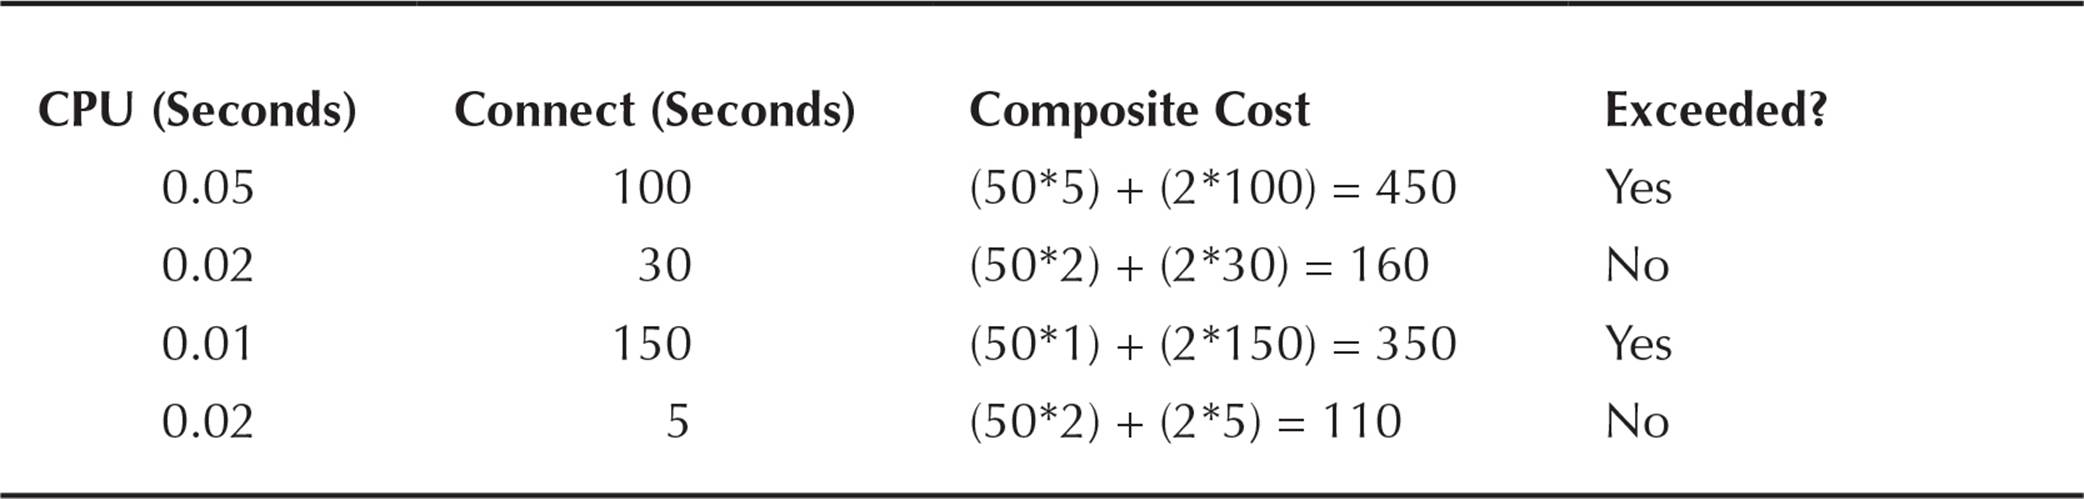
TABLE 10-5. Resource Usage Scenarios
The parameters PRIVATE_SGA and LOGICAL_READS_PER_SESSION are not used in this particular example, so unless they are specified otherwise in the profile definition, they default to whatever their value is in the DEFAULT profile. The goal of using composite limits is to give users some leeway in the types of queries or DML they run. On some days, they may run a lot of queries that perform numerous calculations but don’t access a lot of table rows; on other days, they may do a lot of full table scans but not stay connected very long. In these situations, we don’t want to limit a user by a single parameter, but instead by total resource usage weighted by the availability of each resource on the server.
System Privileges
A system privilege is a right to perform an action on any object in the database, as well as other privileges that do not involve objects at all, but rather things like running batch jobs, altering system parameters, creating roles, and even connecting to the database itself. There are 237 system privileges in Release 1 of Oracle 12c (12.1.0.2). All of them can be found in the data dictionary table SYSTEM_PRIVILEGE_MAP:
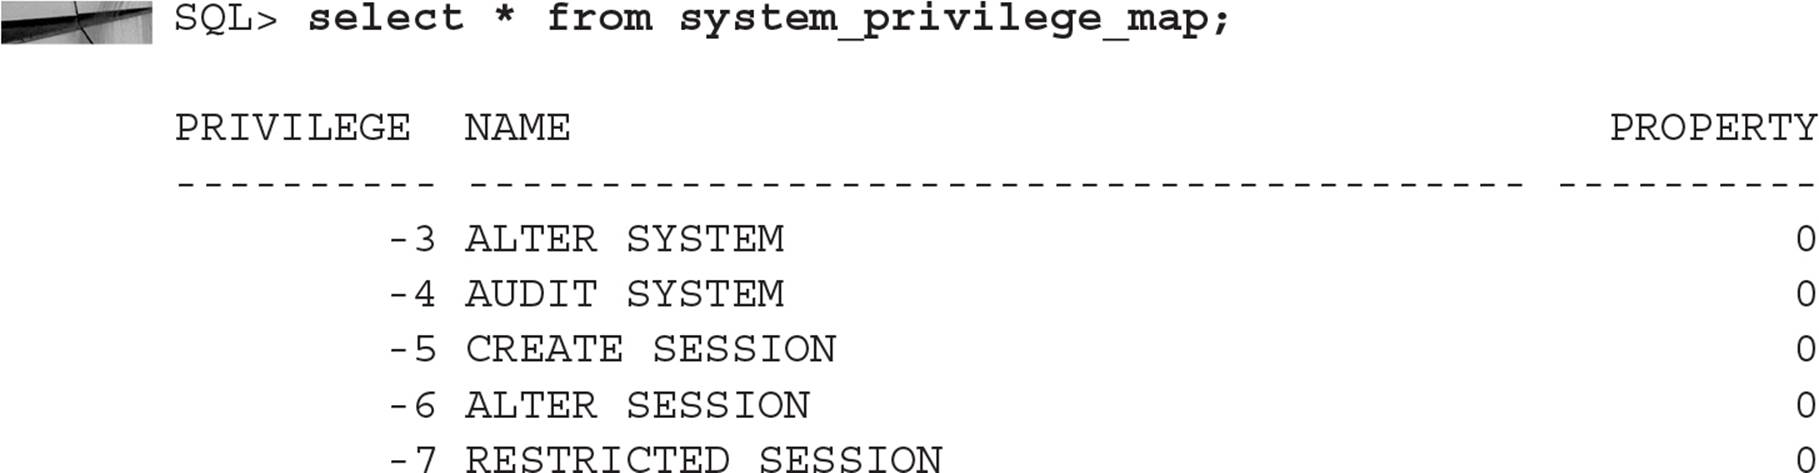
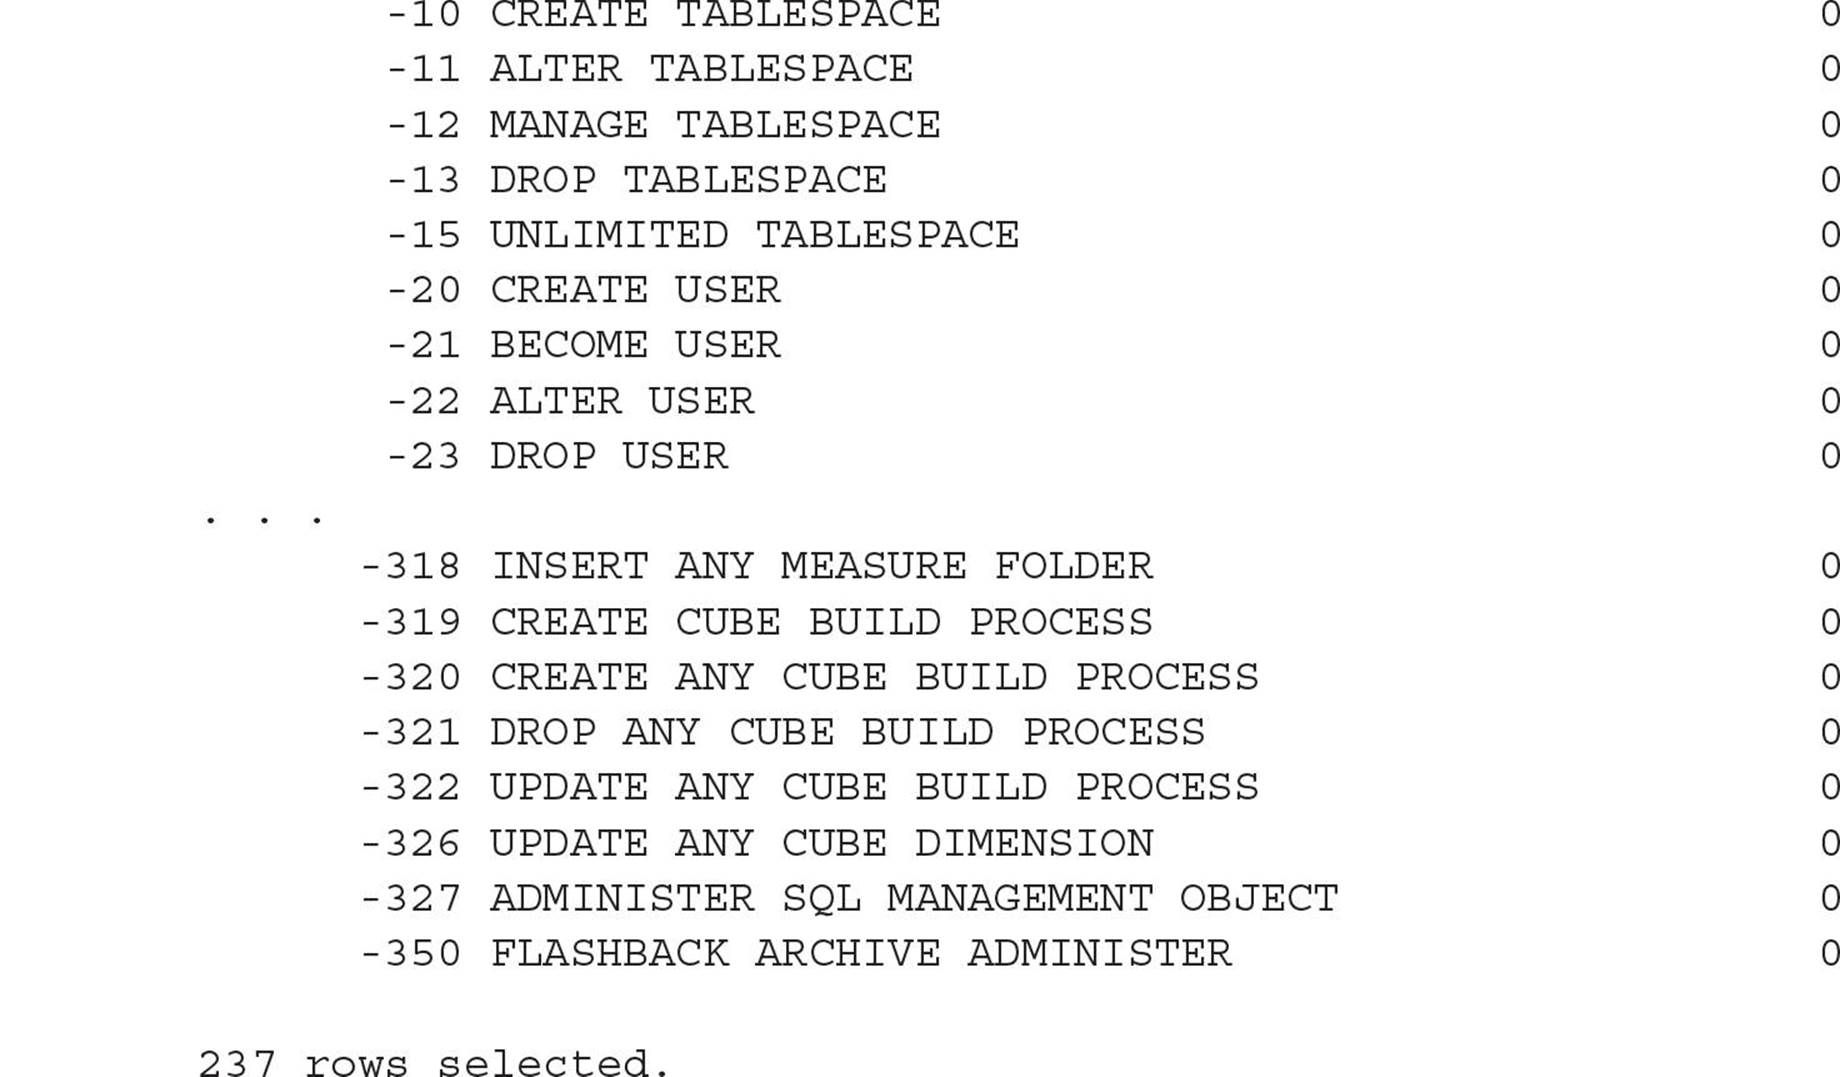
Table 10-6 lists some of the more common system privileges, along with a brief description of each.
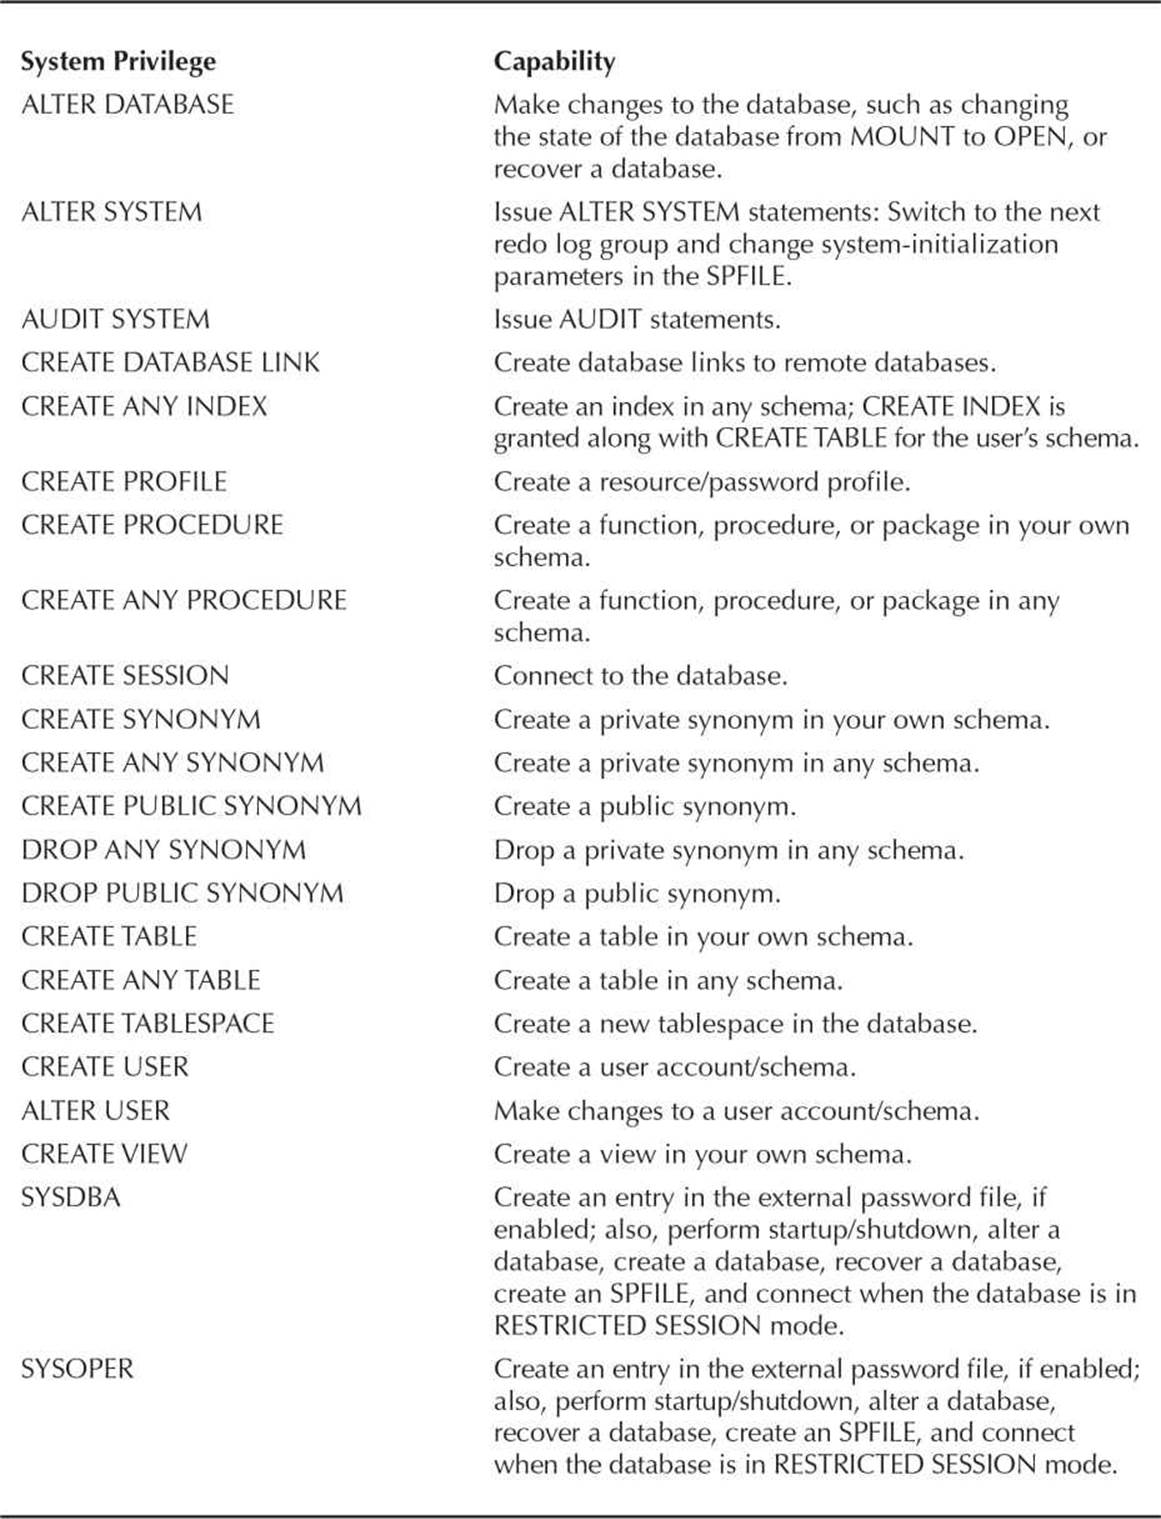
TABLE 10-6. Common System Privileges
Granting System Privileges
Privileges are granted to a user, role, or PUBLIC using the GRANT command; privileges are revoked using the REVOKE command. PUBLIC is a special group that includes all database users, and it’s convenient shorthand for granting privileges to everyone in the database.
To grant the user SCOTT the ability to create stored procedures and synonyms, you can use a command like the following:

Revoking privileges is just as easy:

If you wish to allow grantees the right to grant the same privilege to someone else, you include WITH ADMIN OPTION when you grant the privilege. In the preceding example, we want the user SCOTT to be able to grant the CREATE PROCEDURE privilege to other users. To accomplish this, we need to re-grant the CREATE PROCEDURE privilege:

Now the user SCOTT may issue the GRANT CREATE PROCEDURE command. Note that if SCOTT’s permission to grant his privileges to others is revoked, the users he granted the privileges to retain the privileges.
System Privilege Data Dictionary Views
Table 10-7 contains the data dictionary views related to system privileges (see Chapter 11 for the equivalent views in a multitenant environment).
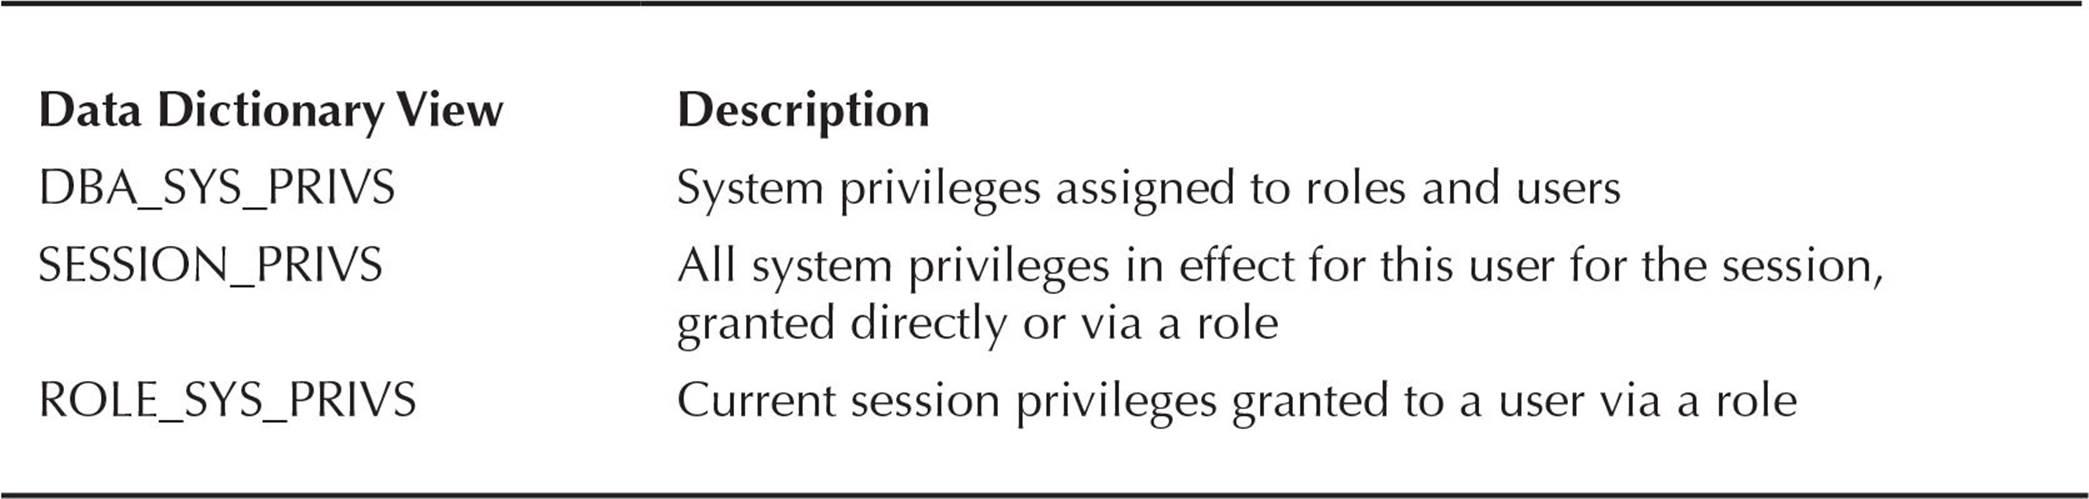
TABLE 10-7. System Privilege Data Dictionary Views
Object Privileges
In contrast to a system privilege, an object privilege is a right to perform a particular type of action on a specific object, such as a table or a sequence, that is not in the user’s own schema. As with system privileges, you use the grant and revoke commands to grant and revoke privileges on objects.
As with system privileges, you can grant object privileges to PUBLIC or a specific user; a user with the object privilege may pass it on to others by granting the object privilege with the WITH GRANT OPTION clause.
CAUTION
Only grant object or system privileges to PUBLIC when the privilege is truly required by all current and future users of the database.
Some schema objects, such as clusters and indexes, rely on system privileges to control access. In these cases, the user can change these objects if they own the objects or have the ALTER ANY CLUSTER or ALTER ANY INDEX system privilege.
A user with objects in their own schema automatically has all object privileges on those objects and can grant any object privilege on these objects to any user or another role, with or without the GRANT OPTION clause.
In Table 10-8 are the object privileges available for different types of objects; some privileges are only applicable to certain types of objects. For example, the INSERT privilege only makes sense with tables, views, and materialized views; the EXECUTE privilege, on the other hand, is applicable to functions, procedures, and packages, but not tables.
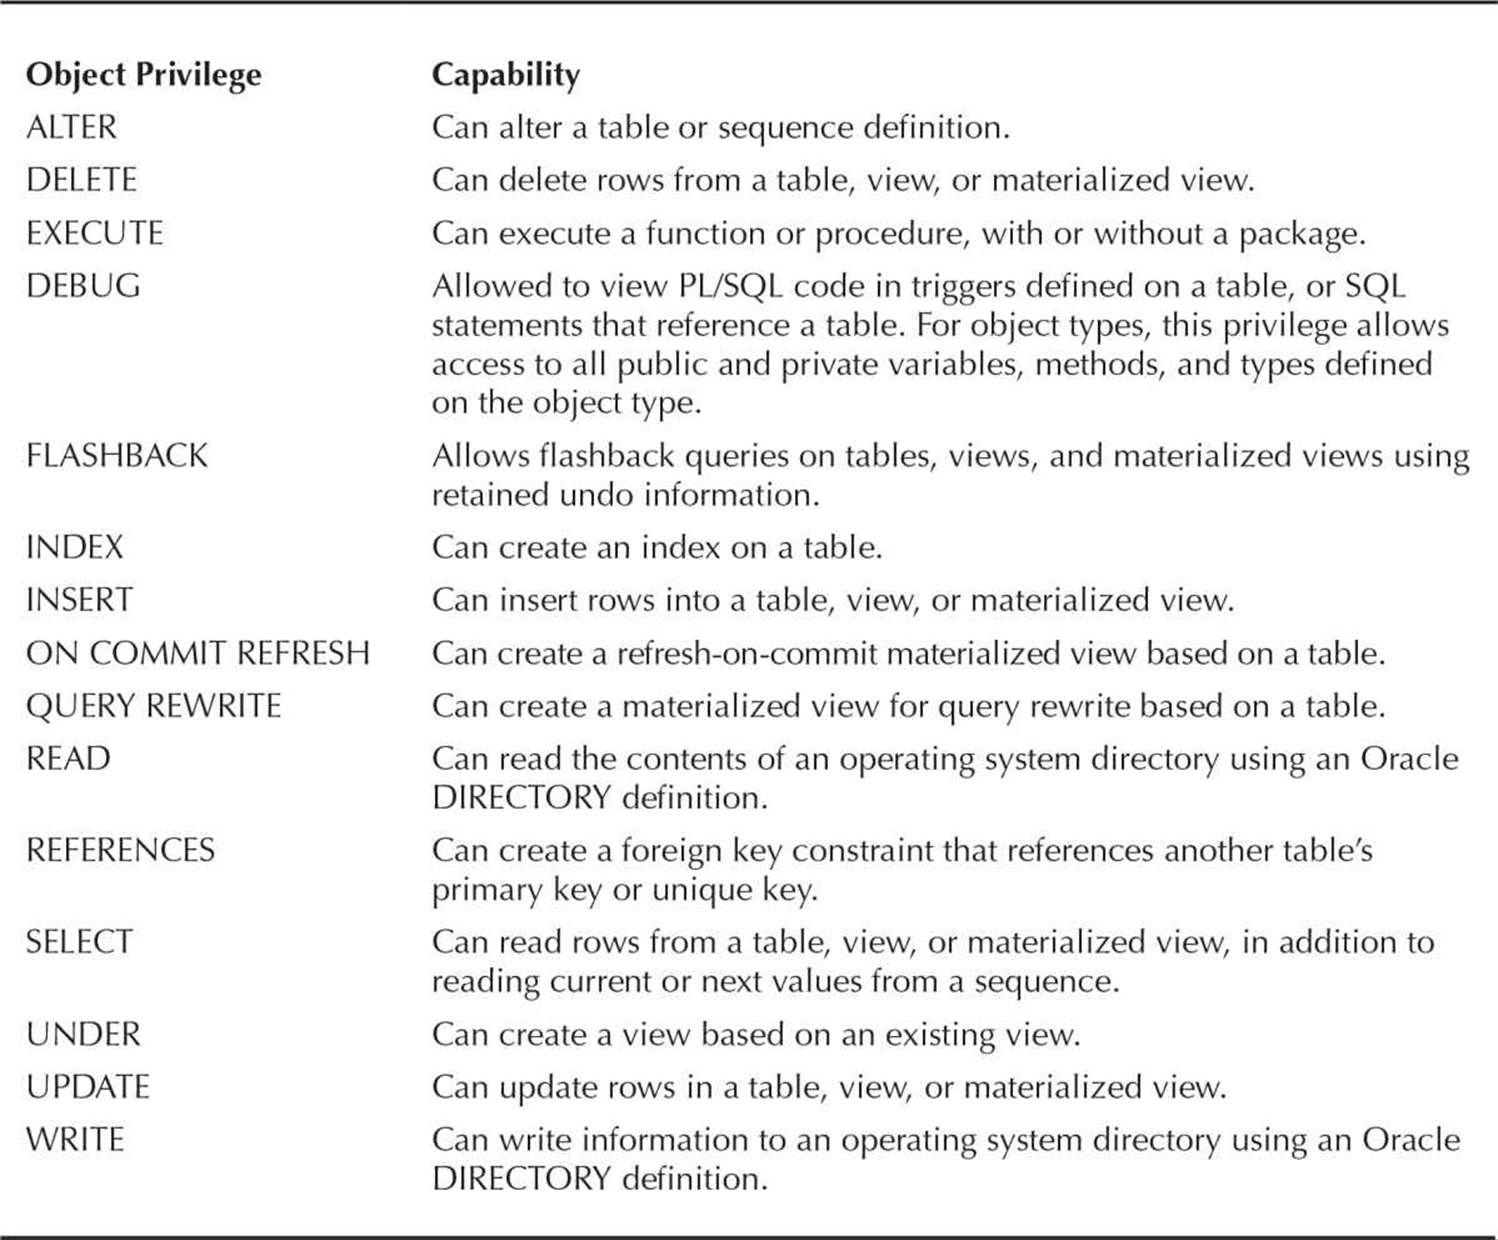
TABLE 10-8. Object Privileges
It’s worth noting that DELETE, UPDATE, and INSERT privileges cannot be granted to materialized views unless they are updatable. Some of these object privileges overlap with system privileges; for example, if you don’t have the FLASHBACK object privilege on a table, you can still perform flashback queries if you have the FLASHBACK ANY TABLE system privilege.
In the following example, the DBA grants SCOTT full access to the table HR.EMPLOYEES, but only allows SCOTT to pass on the SELECT object privilege to other users:

Note that if the SELECT privilege on the table HR.EMPLOYEES is revoked from SCOTT, the SELECT privilege is also revoked from anyone he granted the privilege.
Table Privileges
The types of privileges that can be granted on a table fall into two broad categories: DML operations and DDL operations. DML operations include DELETE, INSERT, SELECT, and UPDATE, whereas DDL operations include adding, dropping, and changing columns in the table as well as creating indexes on the table.
When granting DML operations on a table, it is possible to restrict those operations only to certain columns. For example, we may want to allow SCOTT to see and update all the rows and columns in the HR.EMPLOYEES table except for the SALARY column. To do this, we first need to revoke the existing SELECT privilege on the table:

Next, we will let SCOTT update all the columns except for the SALARY column:

SCOTT will be able to update all columns in the HR.EMPLOYEES table except for the SALARY column:

This operation is also easy to perform with the web-based Cloud Control, as demonstrated in Figure 10-5.
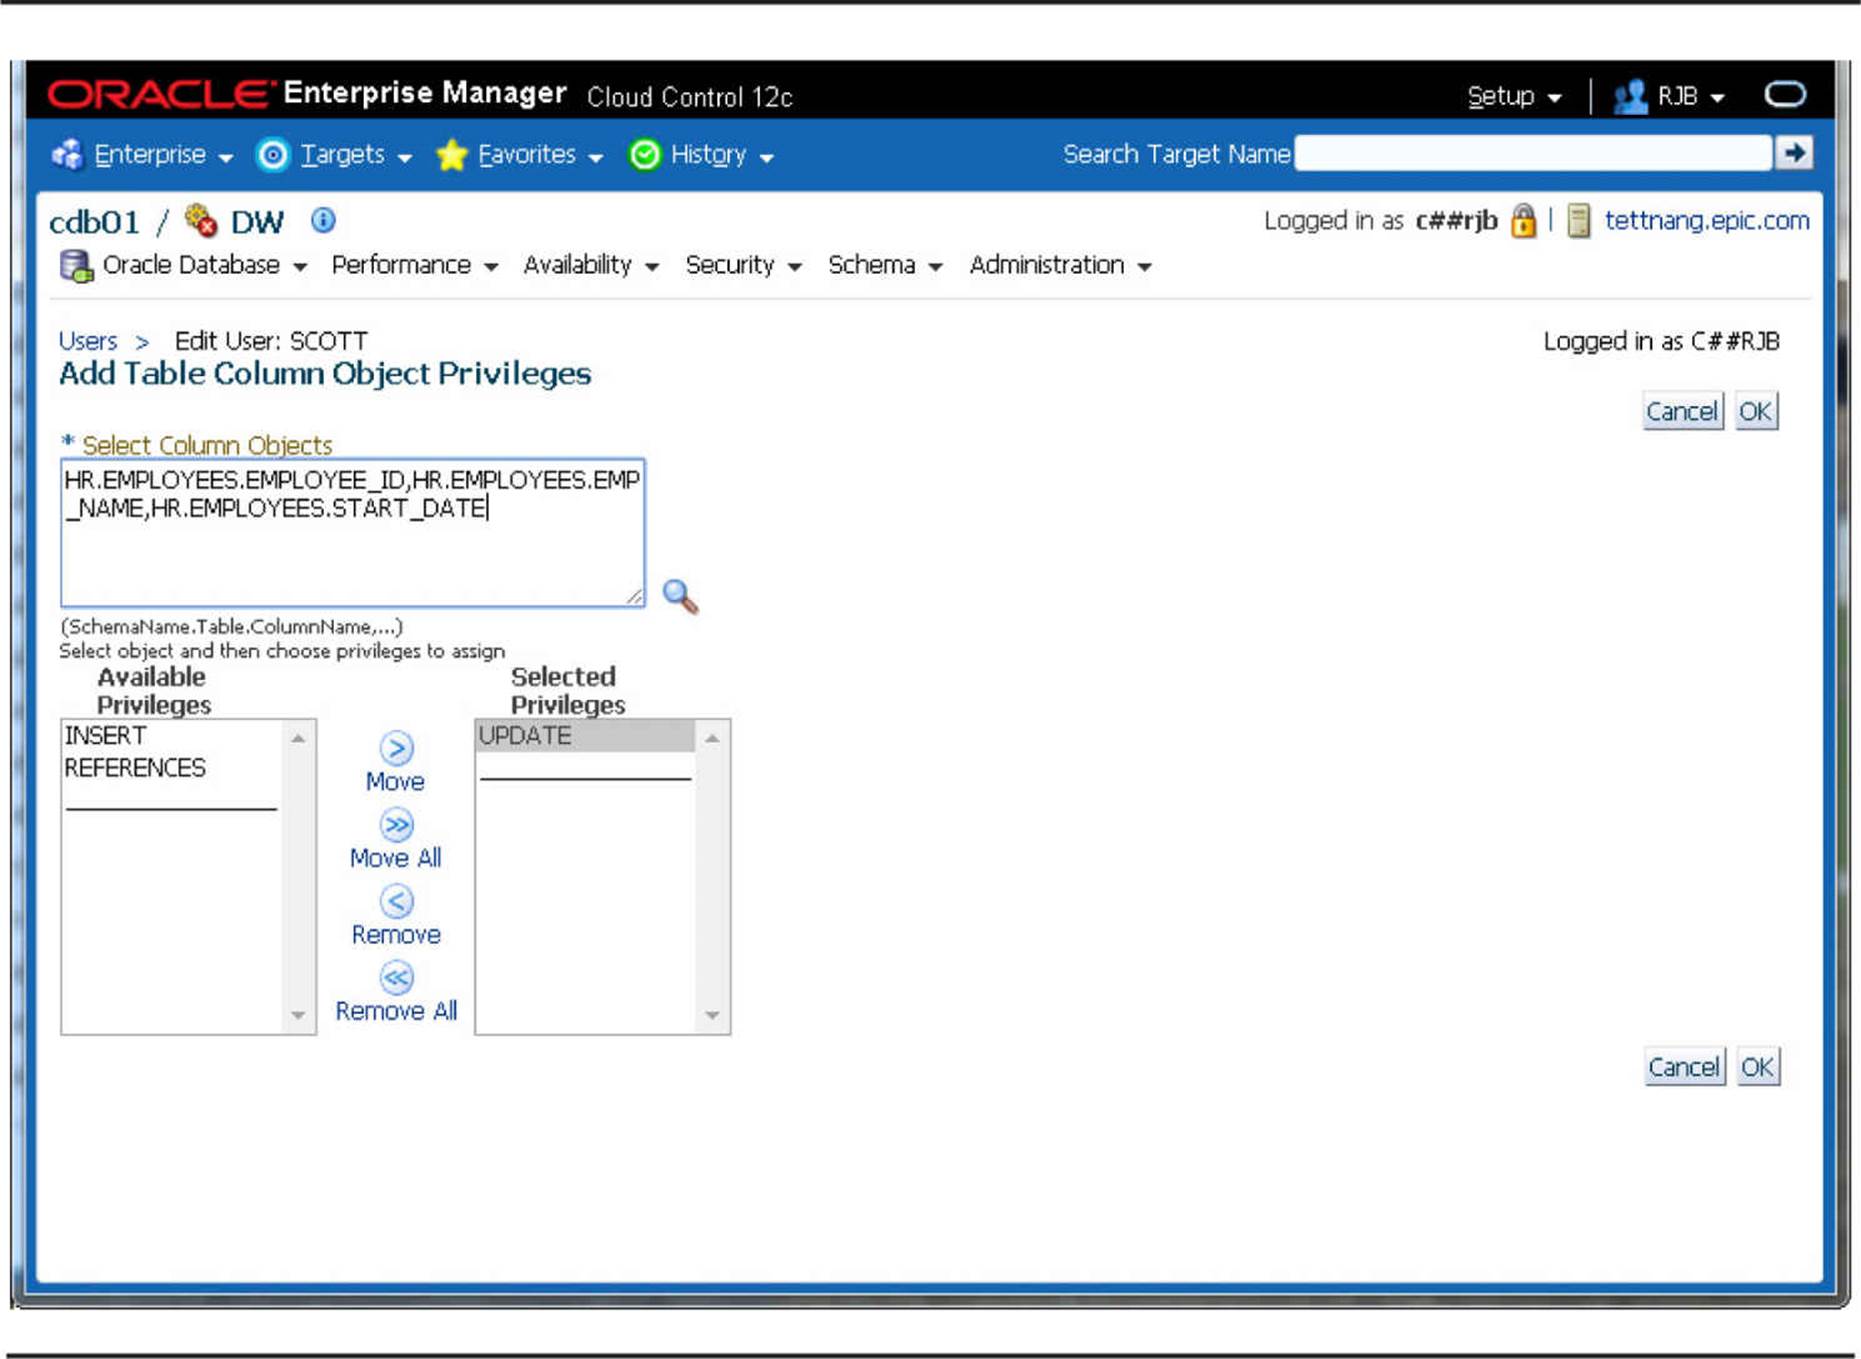
FIGURE 10-5. Granting column privileges in Oracle Cloud Control
View Privileges
Privileges on views are similar to those granted on tables. Rows in a view can be selected, updated, deleted, or inserted, assuming that the view is updatable. To create a view, first you need either the CREATE VIEW system privilege (to create a view in your own schema) or the CREATE ANY VIEW system privilege (to create a view in any schema). Even to create the view, you must also have at least SELECT object privileges on the underlying tables of the view, along with INSERT, UPDATE, and DELETE, if you wish to perform those operations on the view and the view is updatable. Alternatively, you can have the SELECT ANY TABLE, INSERT ANY TABLE, UPDATE ANY TABLE, or DELETE ANY TABLE privileges if the underlying objects are not in your schema.
To allow others to use your view, you must also have permissions on the view’s base tables with the GRANT OPTION, or you must have the system privileges with the ADMIN OPTION. For example, if you are creating a view against the HR.EMPLOYEES table, you must have been granted the SELECT object privilege WITH GRANT OPTION on HR.EMPLOYEES, or you must have the SELECT ANY TABLE system privilege WITH ADMIN OPTION.
Procedure Privileges
For procedures, functions, and the packages that contain procedures and functions, the EXECUTE privilege is the only object privilege that can be applied. Since Oracle8i, procedures and functions can be run either from the perspective of the definer, the creator of the procedure or function, or from the invoker, the user who is running the procedure or function.
A procedure with definer’s rights is run as if the definer was running the procedure, with all privileges of the definer in effect against objects referenced in the procedure. This is a good way to enforce restrictions on private database objects: Other users are granted EXECUTE permissions on the procedure and no permissions on the referenced objects. As a result, the definer can control how other users access the objects.
Conversely, an invoker’s rights procedure requires that the invoker have direct rights, such as SELECT and UPDATE, to any objects referenced in the procedure. The procedure could reference an unqualified table named ORDERS, and if all users of the database have an ORDERS table, the same procedure could be used by any user who has their own ORDERS table. Another advantage to using invoker’s rights procedures is that roles are enabled within them. Roles are discussed in depth later in this chapter.
By default, a procedure is created with definer’s rights. To specify that a procedure uses invoker’s rights, you must include the keywords AUTHID CURRENT_USER in the procedure definition, as in the following example:


To create a procedure, a user must have either the CREATE PROCEDURE or CREATE ANY PROCEDURE system privilege. For the procedure to compile correctly, the user must have direct privileges against all objects referenced in the procedure, even though roles are enabled at runtime in an invoker’s rights procedure to obtain these same privileges. To allow other users to access a procedure, you grant EXECUTE privileges on the procedure or package.
Object Privilege Data Dictionary Views
A number of data dictionary views contain information about object privileges assigned to users. Table 10-9 lists the most important views containing object privilege information.
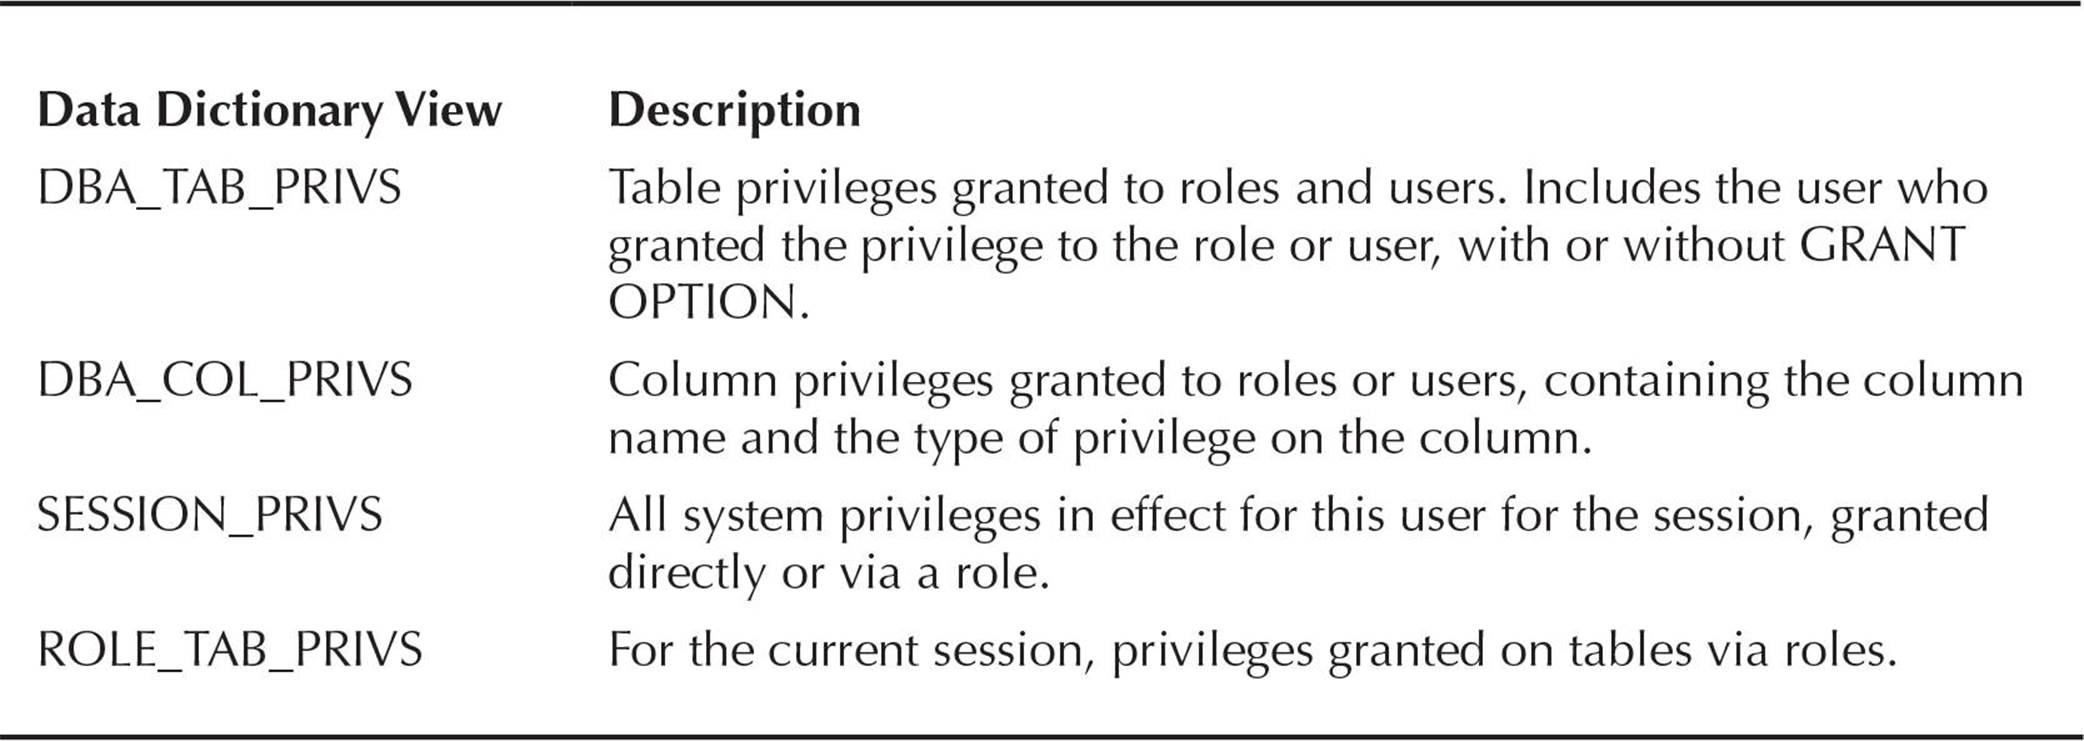
TABLE 10-9. Object Privilege Data Dictionary Views
Creating, Assigning, and Maintaining Roles
A role is a named group of privileges, either system privileges or object privileges or a combination of the two, that helps to ease the administration of privileges. Rather than granting system or object privileges individually to each user, you can grant the group of system or object privileges to a role, and in turn the role can be granted to the user instead. This reduces tremendously the amount of administrative overhead involved in maintaining privileges for users. Figure 10-6 shows how a role can reduce the number of grant commands (and ultimately revoke commands) that need to be executed when roles are used to group privileges.
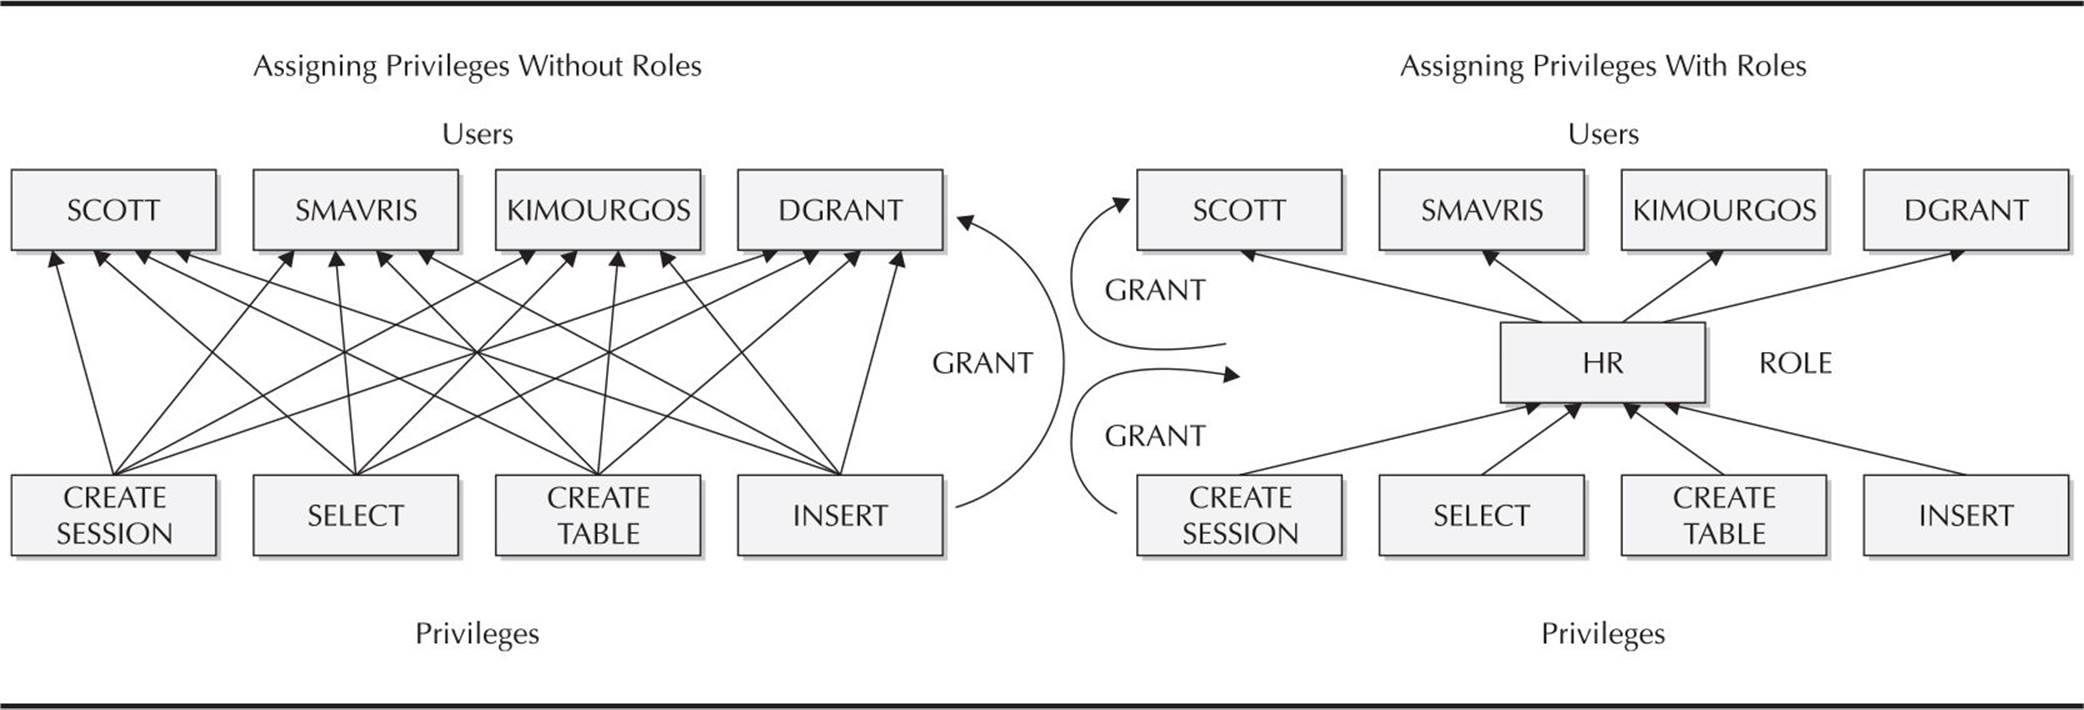
FIGURE 10-6. Using roles to manage privileges
If the privileges for a group of people authorized by a role need to change, only the privileges of the role need to be changed, and the capabilities of the users with that role automatically use the new or changed privileges. Roles may selectively be enabled by a user; some roles may automatically be enabled at login. In addition, passwords can be used to protect a role, adding another level of authentication to the capabilities in the database.
In Table 10-10 are the most common roles that are automatically provided with the database, along with a brief description of what privileges come with each role.
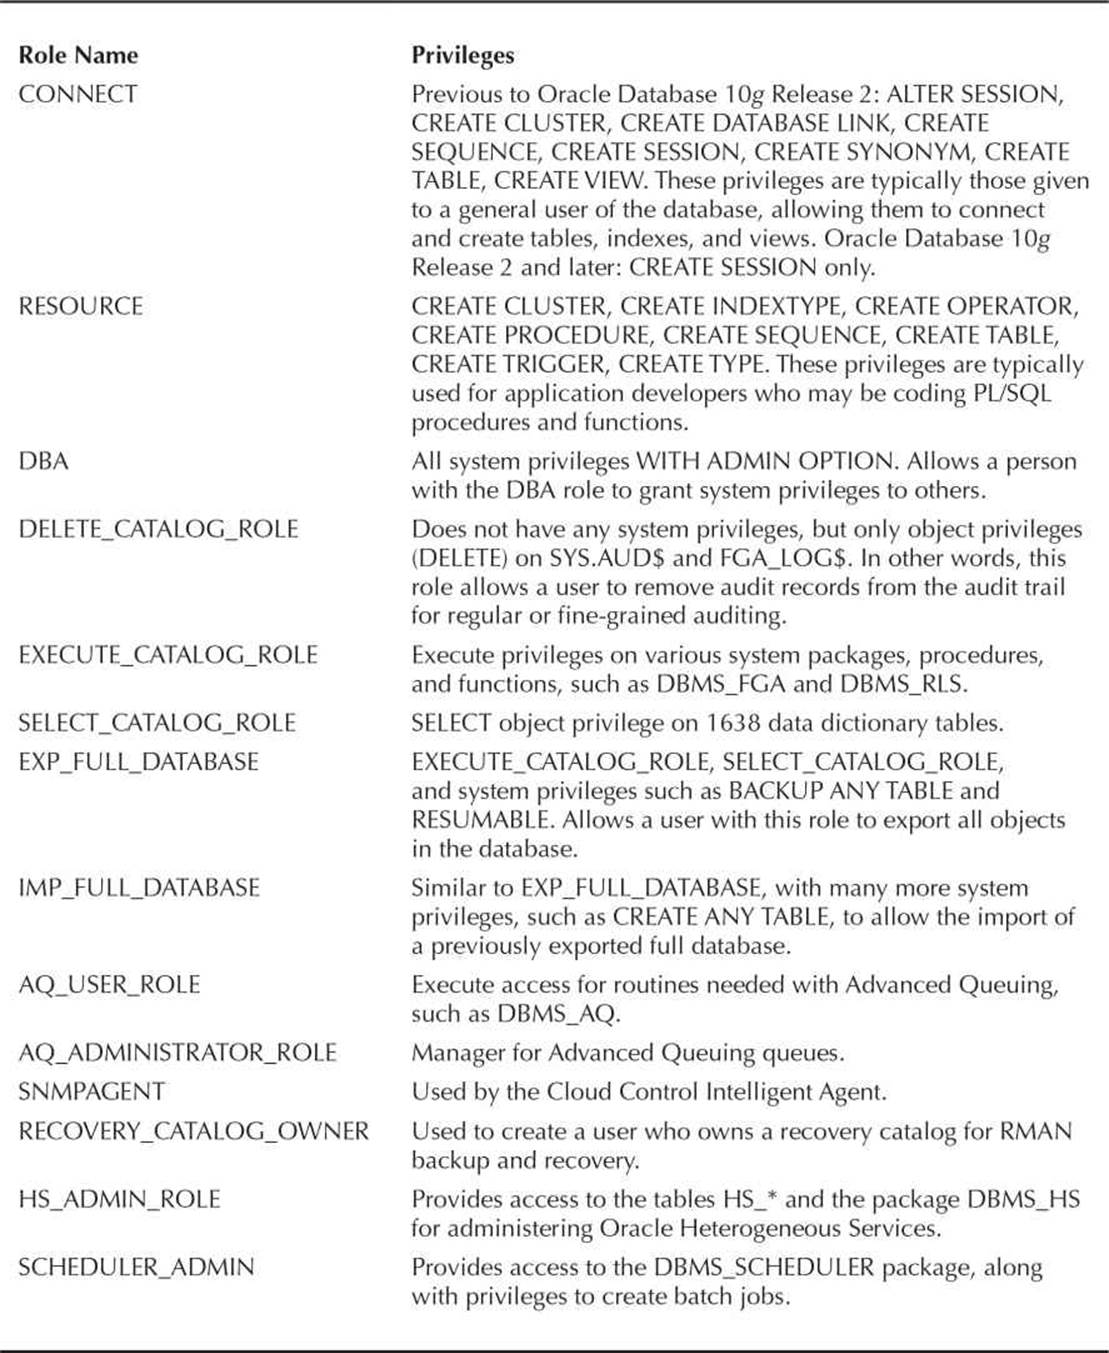
TABLE 10-10. Predefined Oracle Roles
The roles CONNECT, RESOURCE, and DBA are provided mainly for compatibility with previous versions of Oracle; they may not exist in future versions of Oracle. The DBA should create custom roles using the privileges granted to these roles as a starting point.
Creating or Dropping a Role
To create a role, you use the CREATE ROLE command, and you must have the CREATE ROLE system privilege. Typically, this is granted only to database administrators or application administrators. Here’s an example:

By default, no password or authentication is required to enable or use an assigned role; therefore, the NOT IDENTIFIED clause is optional.
As with creating users, you can authorize use of a role by a password (database authorization with IDENTIFIED BY password), by the operating system (IDENTIFIED EXTERNALLY), or by the network or directory service (IDENTIFIED GLOBALLY).
In addition to these familiar methods, a role can be authorized by the use of a package: This is known as using a secure application role. This type of role uses a procedure within the package to enable the role. Typically, the role is enabled only under certain conditions: The user is connecting via a web interface or from a certain IP address, or it’s a certain time of day. Here is a role that is enabled using a procedure:

The procedure HR.CLERK_VERIF need not exist when the role is created; however, it must be compiled and valid when a user who is granted this role needs to enable it. Typically, with secure application roles, the role is not enabled by default for the user. To specify that all roles are enabled by default, except for the secure application role, use the following command:

In this way, when the HR application starts, it can enable the role by performing a SET ROLE HR_CLERK command, thus calling the procedure HR.CLERK_VERIF. The user need not know about the role or the procedure that enables the role; therefore, no access to the objects and privileges provided by the role are available to the user outside of the application.
Dropping a role is just as easy as creating a role:

Any users assigned to this role will lose the privileges assigned to this role the next time they connect to the database. If they are currently logged in, they will retain the privileges until they disconnect from the database.
Granting Privileges to a Role
Assigning a privilege to a role is very straightforward; you use the GRANT command to assign the privilege to a role, just as you would assign a privilege to a user:

In this example, we’ve assigned an object privilege and a system privilege to the HR_CLERK role. In Figure 10-7, we can use Cloud Control to add more object or system privileges to the role.
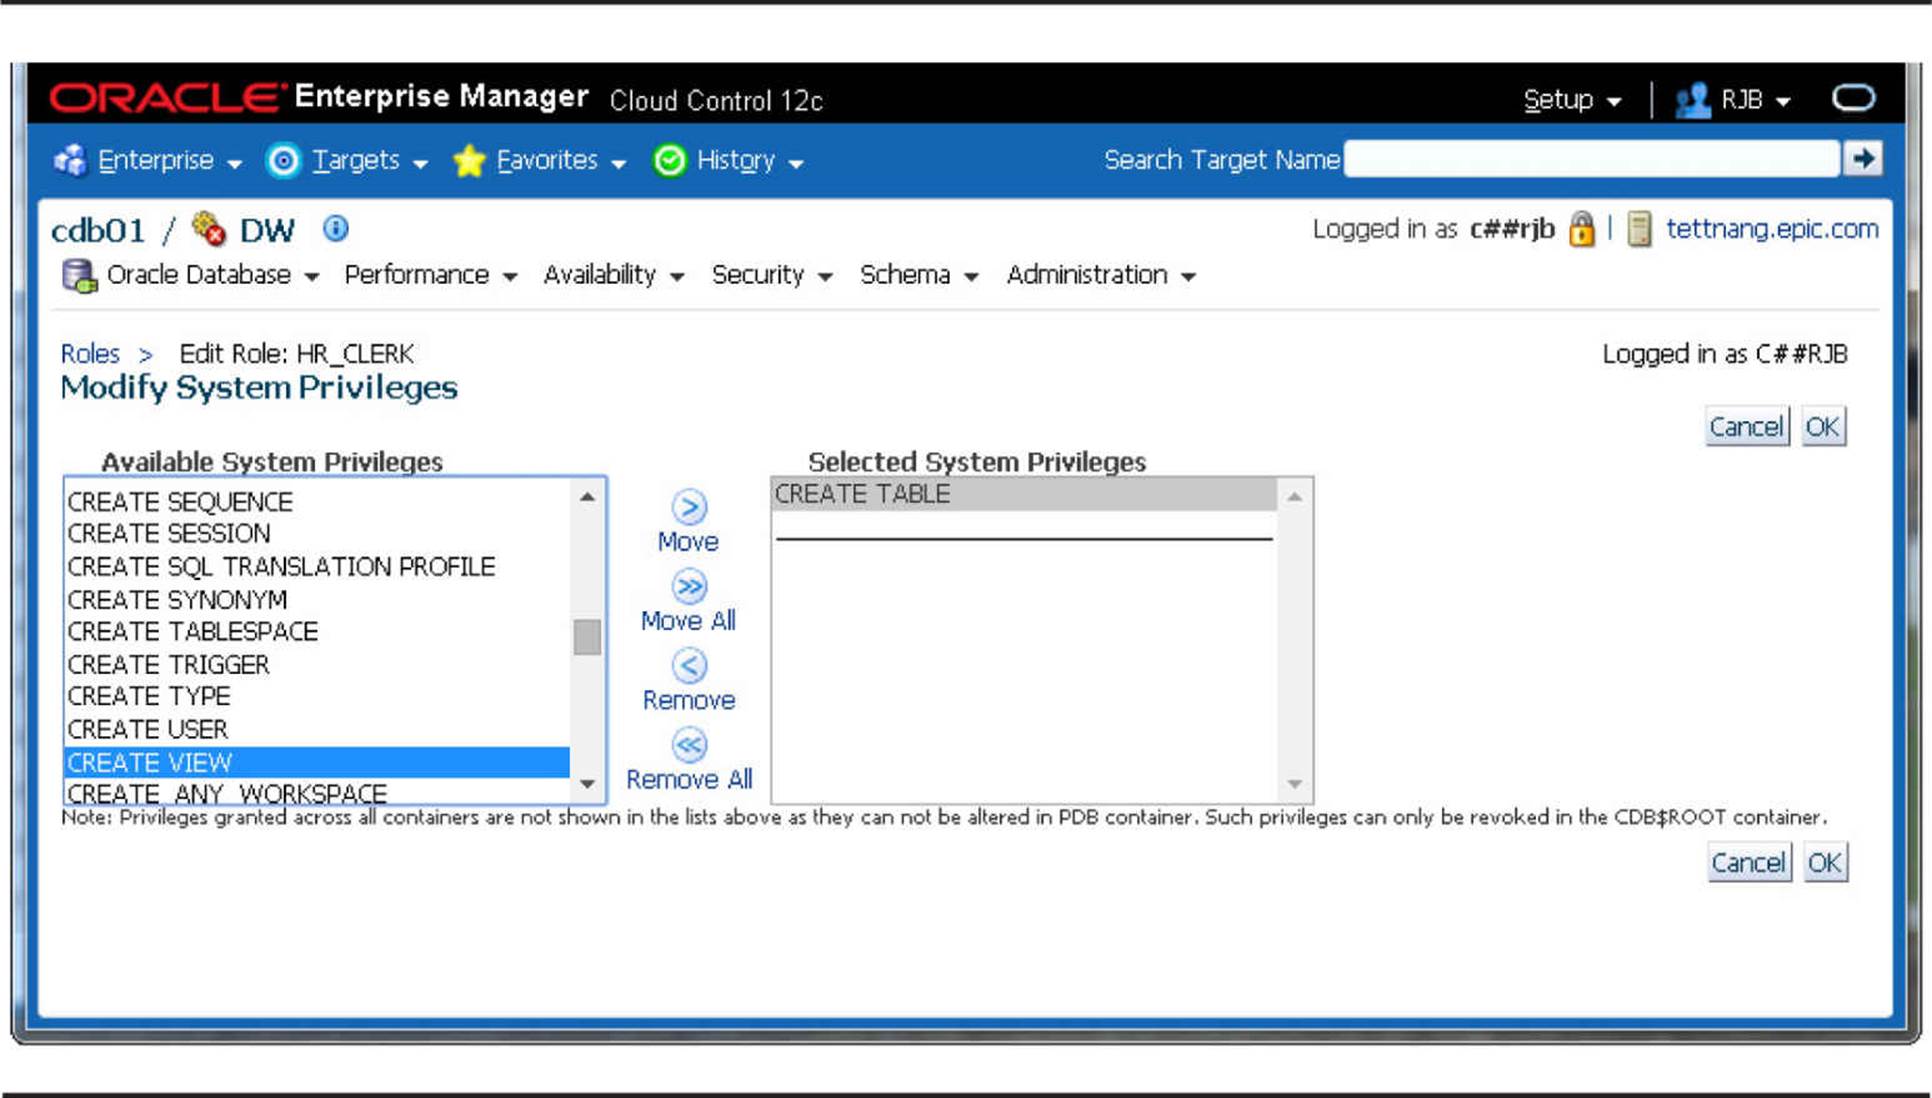
FIGURE 10-7. Granting privileges to roles with Cloud Control
Assigning or Revoking Roles
Once we have the desired system and object privileges assigned to the role, we can assign the role to a user, using familiar syntax:

Any other privileges granted to the HR_CLERK role in the future will automatically be usable by SMAVRIS because SMAVRIS has been granted the role.
Roles may be granted to other roles; this allows a DBA to have a hierarchy of roles, making role administration easier. For example, we may have roles named DEPT30, DEPT50, and DEPT100, each having object privileges to tables owned by each of those departments. An employee in department 30 would be assigned the DEPT30 role, and so forth. The president of the company would like to see tables in all departments; but rather than assigning individual object privileges to the role ALL_DEPTS, we can assign the individual department roles to ALL_DEPTS:
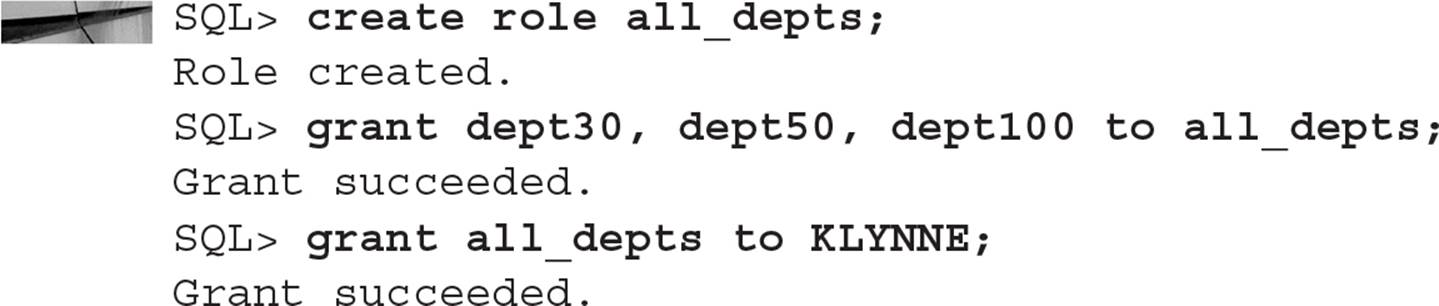
The role ALL_DEPTS may also contain individual object and system privileges that do not apply to individual departments, such as object privileges on order entry tables or accounts receivable tables.
Revoking a role from a user is very similar to revoking privileges from a user:

The privileges revoked will no longer be available to the user the next time they connect to the database. However, it is worth noting that if another role contains privileges on the same objects as the dropped role, or privileges on the objects are granted directly, the user retains these privileges on the objects until these and all other grants are explicitly revoked.
Default Roles
By default, all roles granted to a user are enabled when the user connects. If a role is going to be used only within the context of an application, the role can start out disabled when the user is logged in; then it can be enabled and disabled within the application. If the user SCOTT has CONNECT, RESOURCE, HR_CLERK, and DEPT30 roles, and we want to specify that HR_CLERK and DEPT30 are not enabled by default, we can use something like the following:

When SCOTT connects to the database, he automatically has all privileges granted with all roles except for HR_CLERK and DEPT30. SCOTT may explicitly enable a role in his session by using SET ROLE:

When he’s done accessing the tables for department 30, he can disable the role in his session:

NOTE
The initialization parameter MAX_ENABLED_ROLES is deprecated as of Oracle 10g. It is retained for compatibility with previous versions only.
Password-Enabled Roles
To enhance security in the database, the DBA can assign a password to a role. The password is assigned to the role when it’s created:

When the user SCOTT is connected to the database, either the application he is using will provide or prompt for a password, or he can enter the password when he enables the role:

Role Data Dictionary Views
Table 10-11 lists and describes the data dictionary views related to roles.
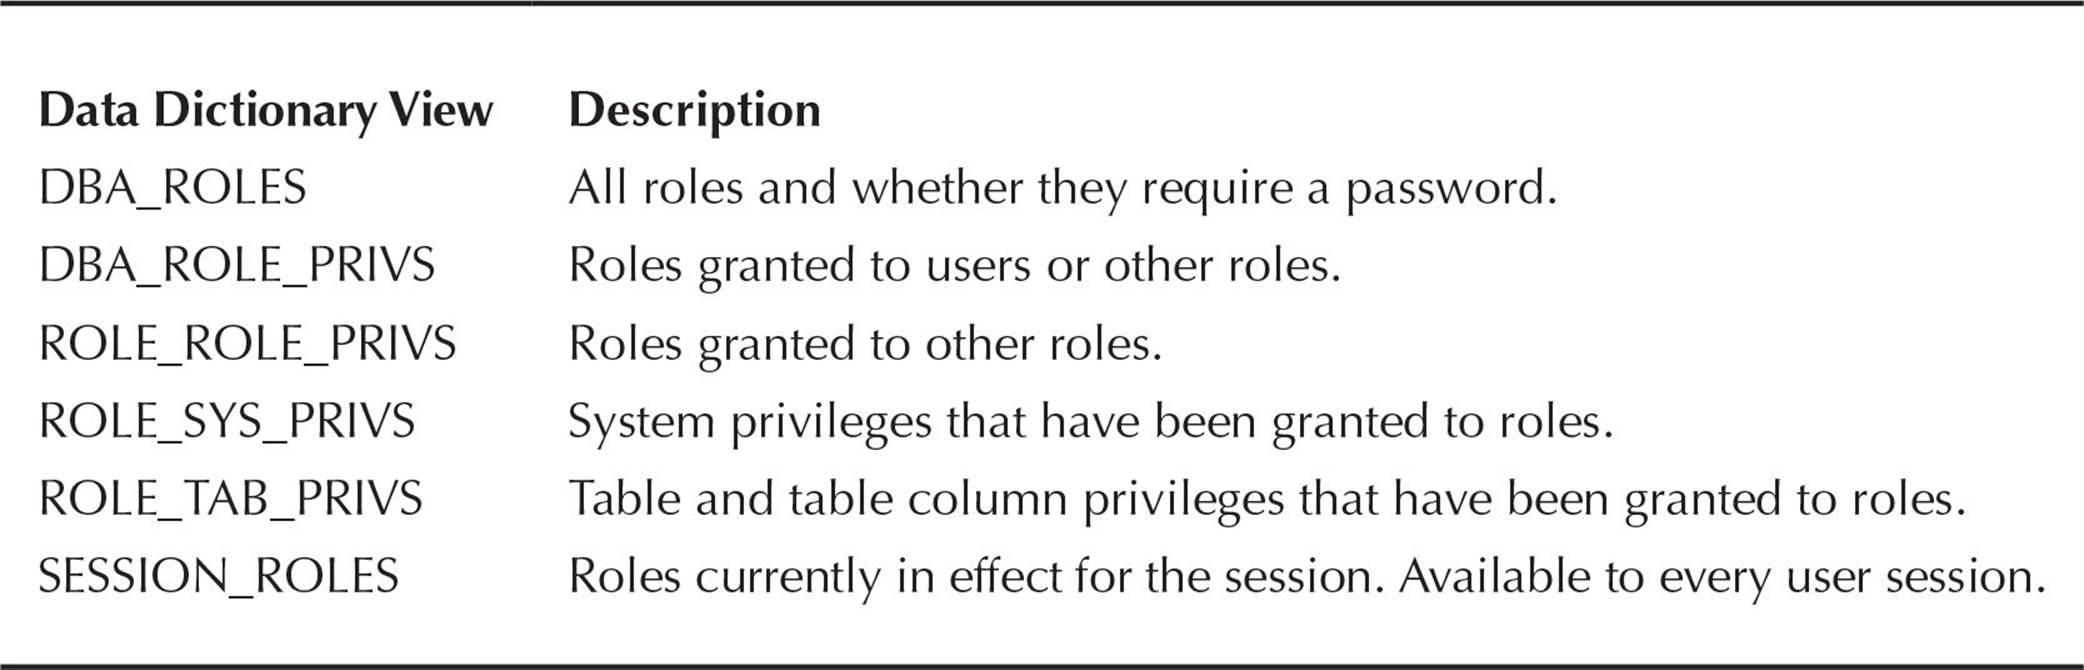
TABLE 10-11. Role-Related Data Dictionary Views
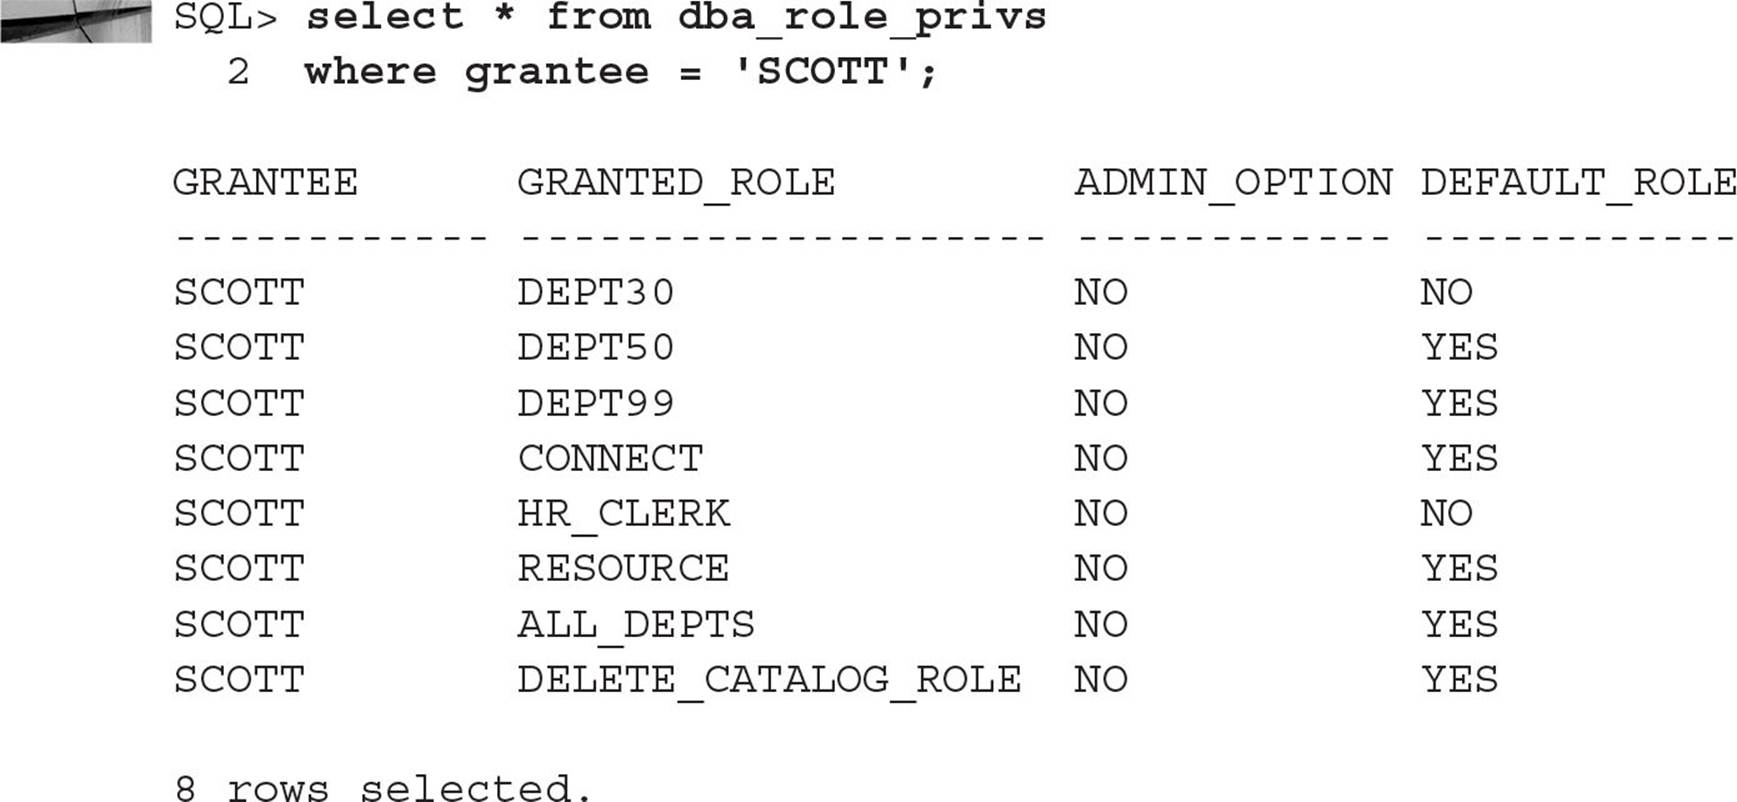
The view DBA_ROLE_PRIVS is a good way to find out what roles are granted to a user as well as whether they can pass this role to another user (ADMIN_OPTION) and whether this role is enabled by default (DEFAULT_ROLE):
Similarly, we can find out which roles we assigned to the ALL_DEPTS role:
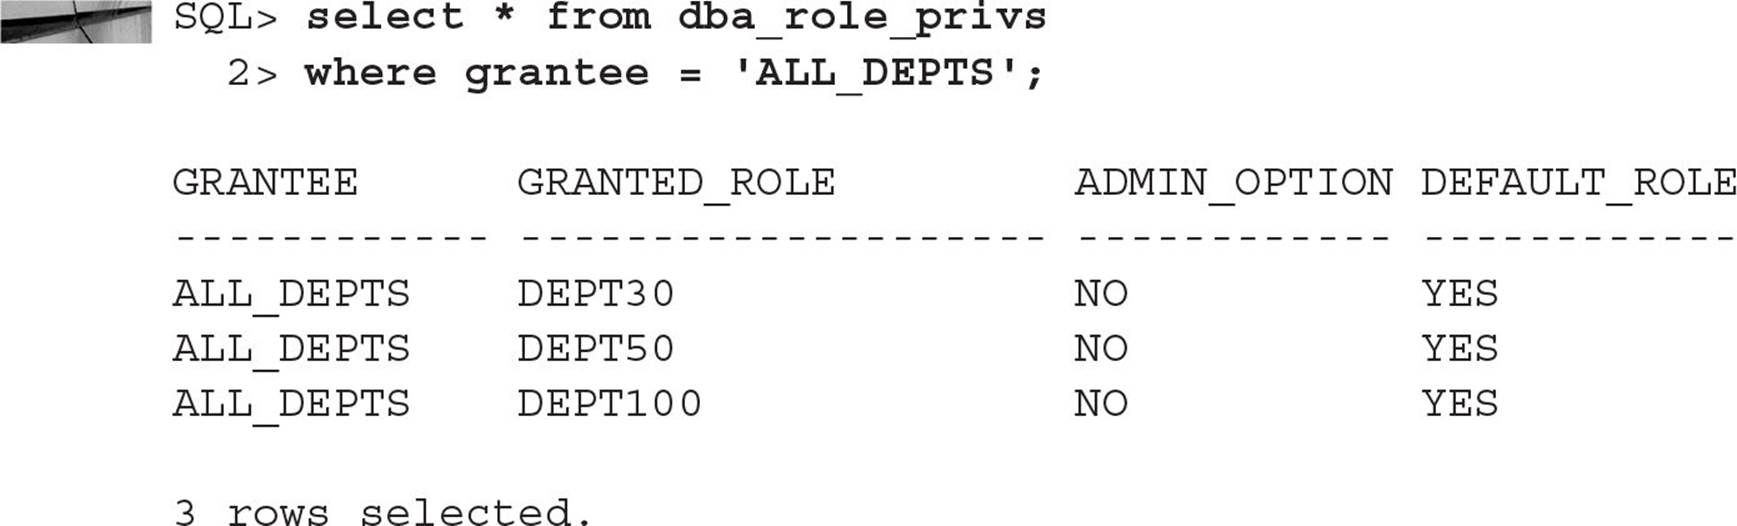
The data dictionary view ROLE_ROLE_PRIVS can also be used to get this information; it only contains information about roles assigned to roles, and it does not have the DEFAULT_ROLE information.
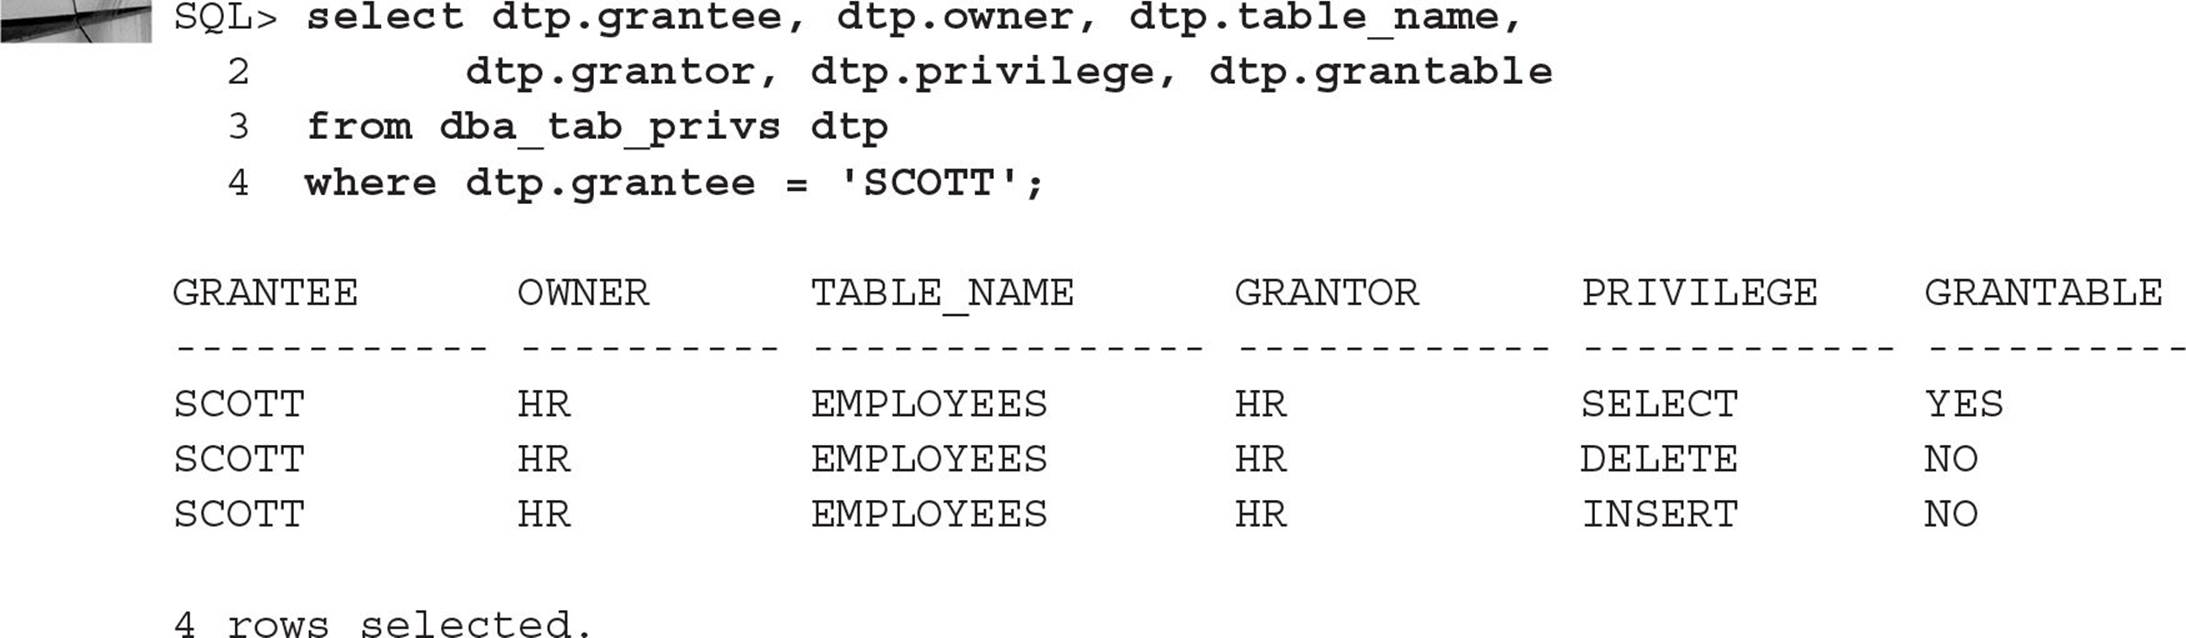
To find out privileges granted to users on a table or table columns, we can write two queries: one to retrieve privileges granted directly, and another to retrieve privileges granted indirectly via a role. Retrieving privileges granted directly is straightforward:
To retrieve table privileges granted via roles, we need to join DBA_ROLE_PRIVS and ROLE_TAB_PRIVS. DBA_ROLE_PRIVS has the roles assigned to the user, and ROLE_TAB_PRIVS has the privileges assigned to the roles:
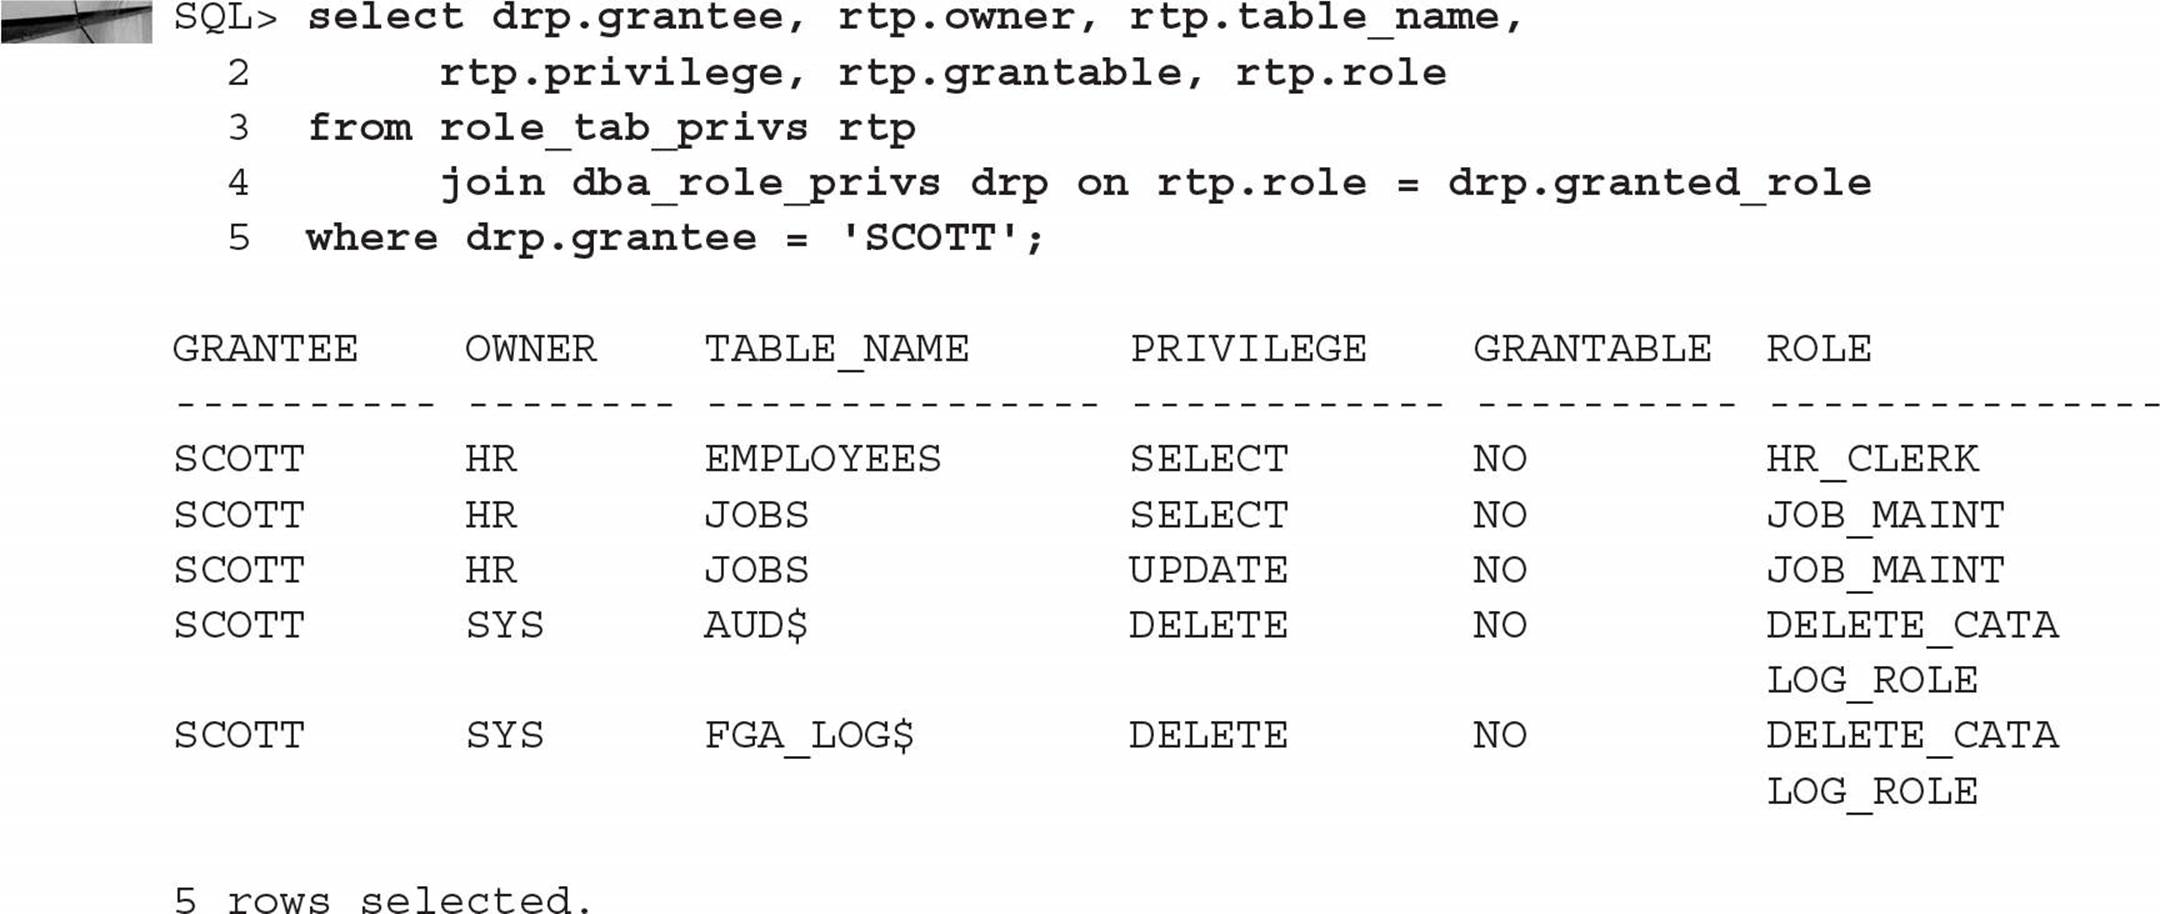
In the case of SCOTT’s privileges, notice that he has the SELECT privilege on the HR.EMPLOYEES table both via a direct GRANT and via a role. Revoking either one of the privileges will still leave him with access to the HR.EMPLOYEES table until both privileges have been removed.
Using a VPD to Implement Application Security Policies
A Virtual Private Database (VPD) combines server-enforced fine-grained access control with a secure application context. The context-aware functions return a predicate—a WHERE clause—that is automatically appended to all SELECT statements or other DML statements. In other words, a SELECT statement on a table, view, or synonym controlled by a VPD will return a subset of rows based on a WHERE clause generated automatically by the security policy function in effect by the application context. The major component of a VPD is row-level security (RLS), also known as fine-grained access control (FGAC).
Because a VPD generates the predicates transparently during statement parse, the security policy is enforced consistently regardless of whether the user is running ad hoc queries, retrieving the data from an application, or viewing the data from Oracle Forms. Because the Oracle server applies the predicate to the statement at parse time, the application need not use special tables, views, and so forth to implement the policy. As a result, Oracle can optimize the query using indexes, materialized views, and parallel operations where it otherwise might not be able. Therefore, using a VPD may incur less overhead than a query whose results are filtered using applications or other means.
From a maintenance point of view, security policies can be defined within a policy function that would be difficult to create using roles and privileges. Similarly, an Application Server Provider (ASP) may only need to set up one database to service multiple customers for the same application, with a VPD policy to ensure that employees of one customer can see only their data. The DBA can maintain one larger database with a small number of VPD policies instead of an individual database for each customer.
Using column-level VPD, a DBA can restrict access to a particular column or columns in a table. The query returns the same number of rows, but if the user’s context does not allow access to the column or columns, NULL values are returned in the restricted column or columns.
VPD policies can be static, context sensitive, or dynamic. Static and context-sensitive policies can improve performance dramatically because they do not need to call the policy function every time a query is run, because it is cached for use later in the session. Before Oracle Database 10g, all policies were dynamic; in other words, the policy function was run every time a SQL statement containing the target VPD table was parsed. Static policies are evaluated once during login and remain cached throughout the session, regardless of application context. With context-sensitive policies, the policy function is called at statement parse time if the application context changes—for example, a policy that enforces the business rule that “employees only see their own salary history, but managers can see all the salaries of their employees.” If the employee executing the statement has not changed, the policy function need not be called again, thus reducing the amount of overhead due to VPD policy enforcement.
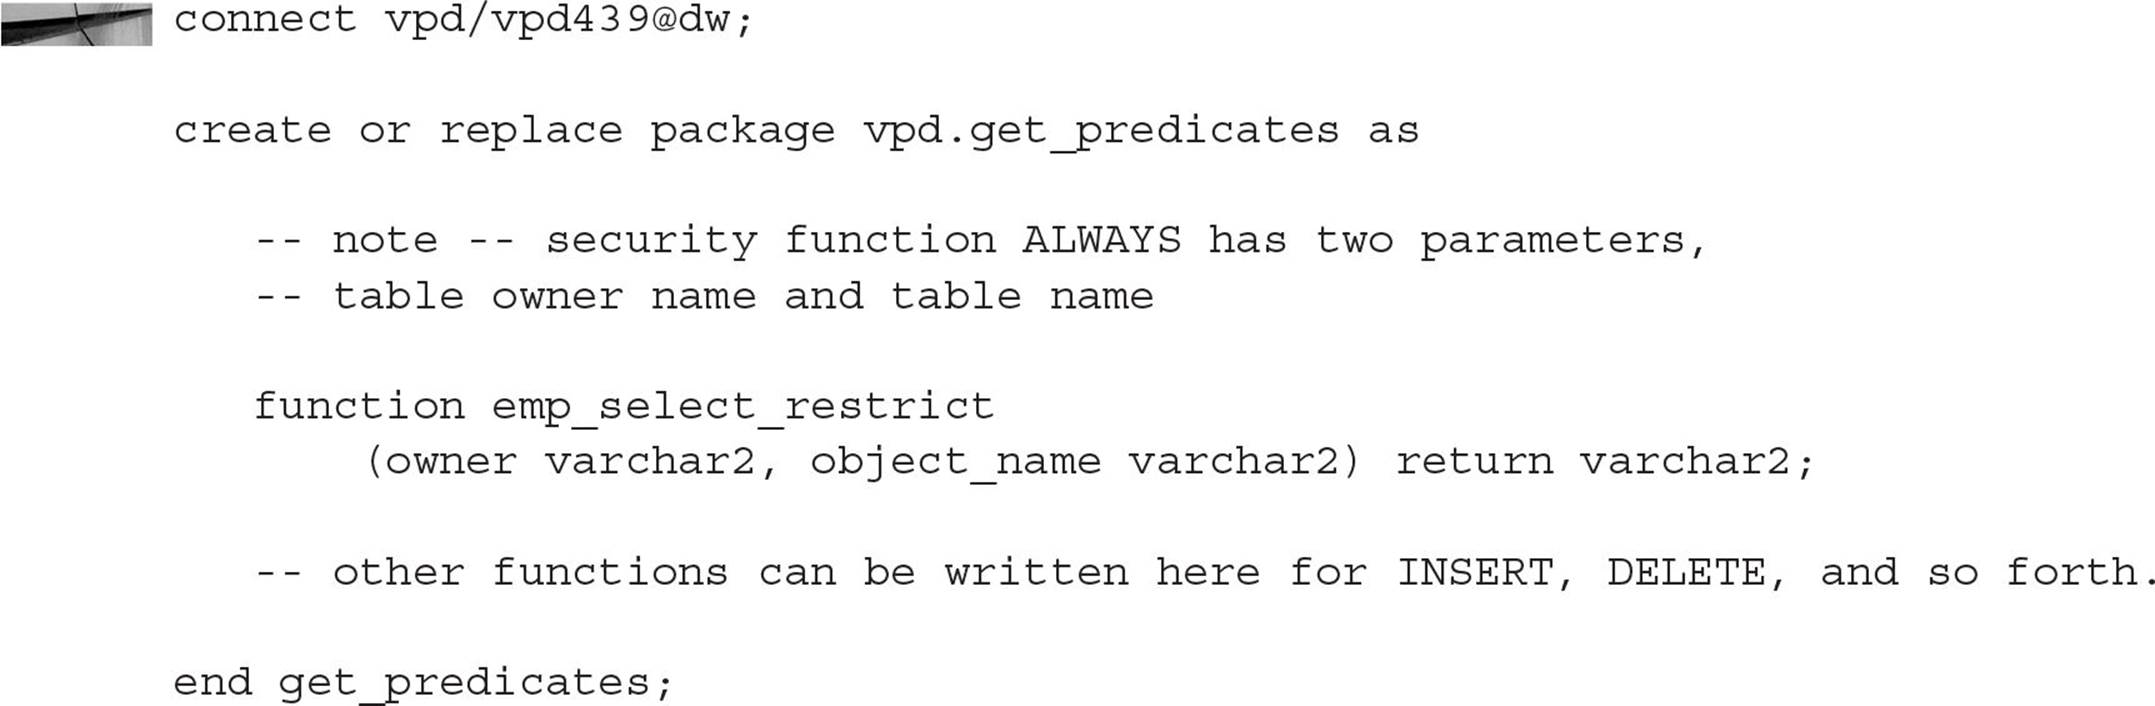
You create application contexts using the CREATE CONTEXT command, and the package DBMS_RLS manages VPD policies. The function used to return the predicates to enforce the policy is created like any other function, except that the function has two required parameters and returns a VARCHAR2. Later in this chapter, I’ll go into more detail on these functions and we’ll step through a VPD example using the sample schemas provided during the installation of the Oracle database.
Application Context
Using the CREATE CONTEXT command, you can create the name of application-defined attributes that will be used to enforce your security policy, along with the package name for the functions and procedures used to set the security context for the user session. Here’s an example:

In this example, the context name is HR_SECURITY, and the package used to set up the characteristics or attributes for the user during the session is called EMP_ACCESS. The procedure SET_SECURITY_PARAMETERS will be called in the logon trigger. Because the context HR_SECURITY is bound only to EMP_ACCESS, no other procedures can change the session attributes. This ensures a secure application context that can’t be changed by the user or any other process after connecting to the database.
In a typical package used to implement application context, you use the built-in context USERENV to retrieve information about the user session itself. In Table 10-12 are a few of the more common parameters in the USERENV context.
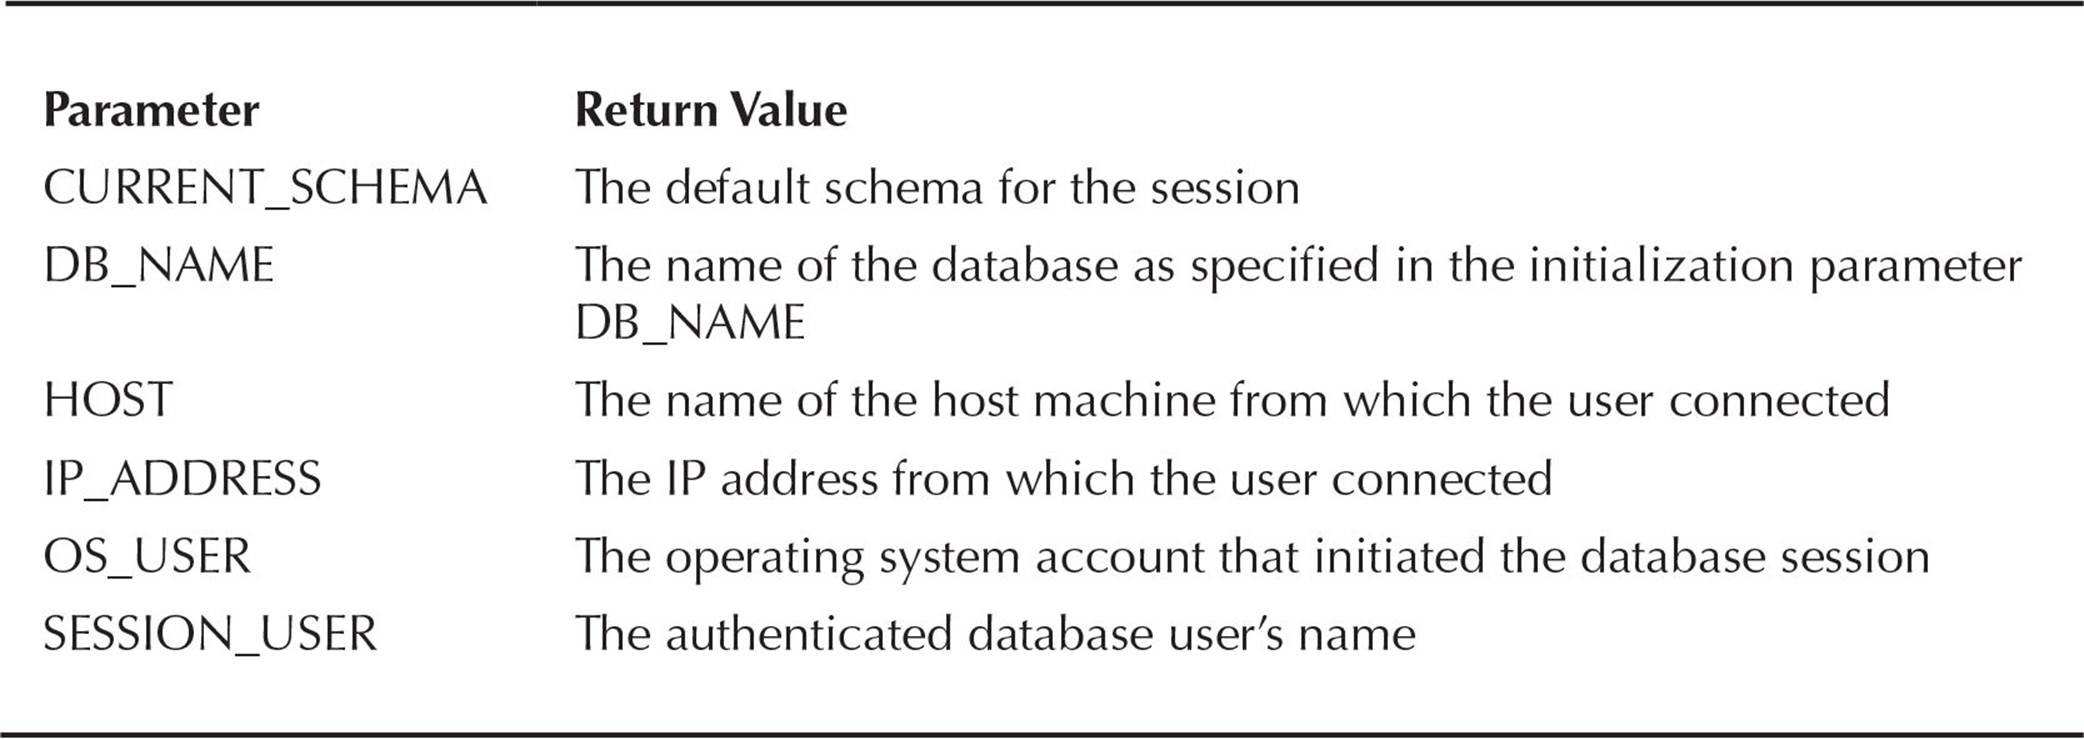
TABLE 10-12. Common USERENV Context Parameters
For example, the following calls to SYS_CONTEXT will retrieve the username and IP_ADDRESS of the database session:


Similarly, the SYS_CONTEXT function can be used within a SQL SELECT statement:

Using some combination of the USERENV context and authorization information in the database, we use DBMS_SESSION.SET_CONTEXT to assign values to parameters in the application context that we create:
![]()
In this example, the application context variable SEC_LEVEL is set to HIGH in the HR_SECURITY context. The value can be assigned based on a number of conditions, including a mapping table that assigns security levels based on user ID.
To ensure that the context variables are set for each session, we can use a logon trigger to call the procedure associated with the context. As mentioned earlier, the variables in the context can only be set or changed within the assigned package. Here is a sample logon trigger that calls the procedure to set up the context:

In this example, the procedure SET_SECURITY_PARAMETERS would make the necessary calls to DBMS_SESSION.SET_CONTEXT.
Within Oracle Cloud Control, you can navigate to Application Contexts under the Security dropdown to set up contexts and policy groups, as demonstrated in Figure 10-8.
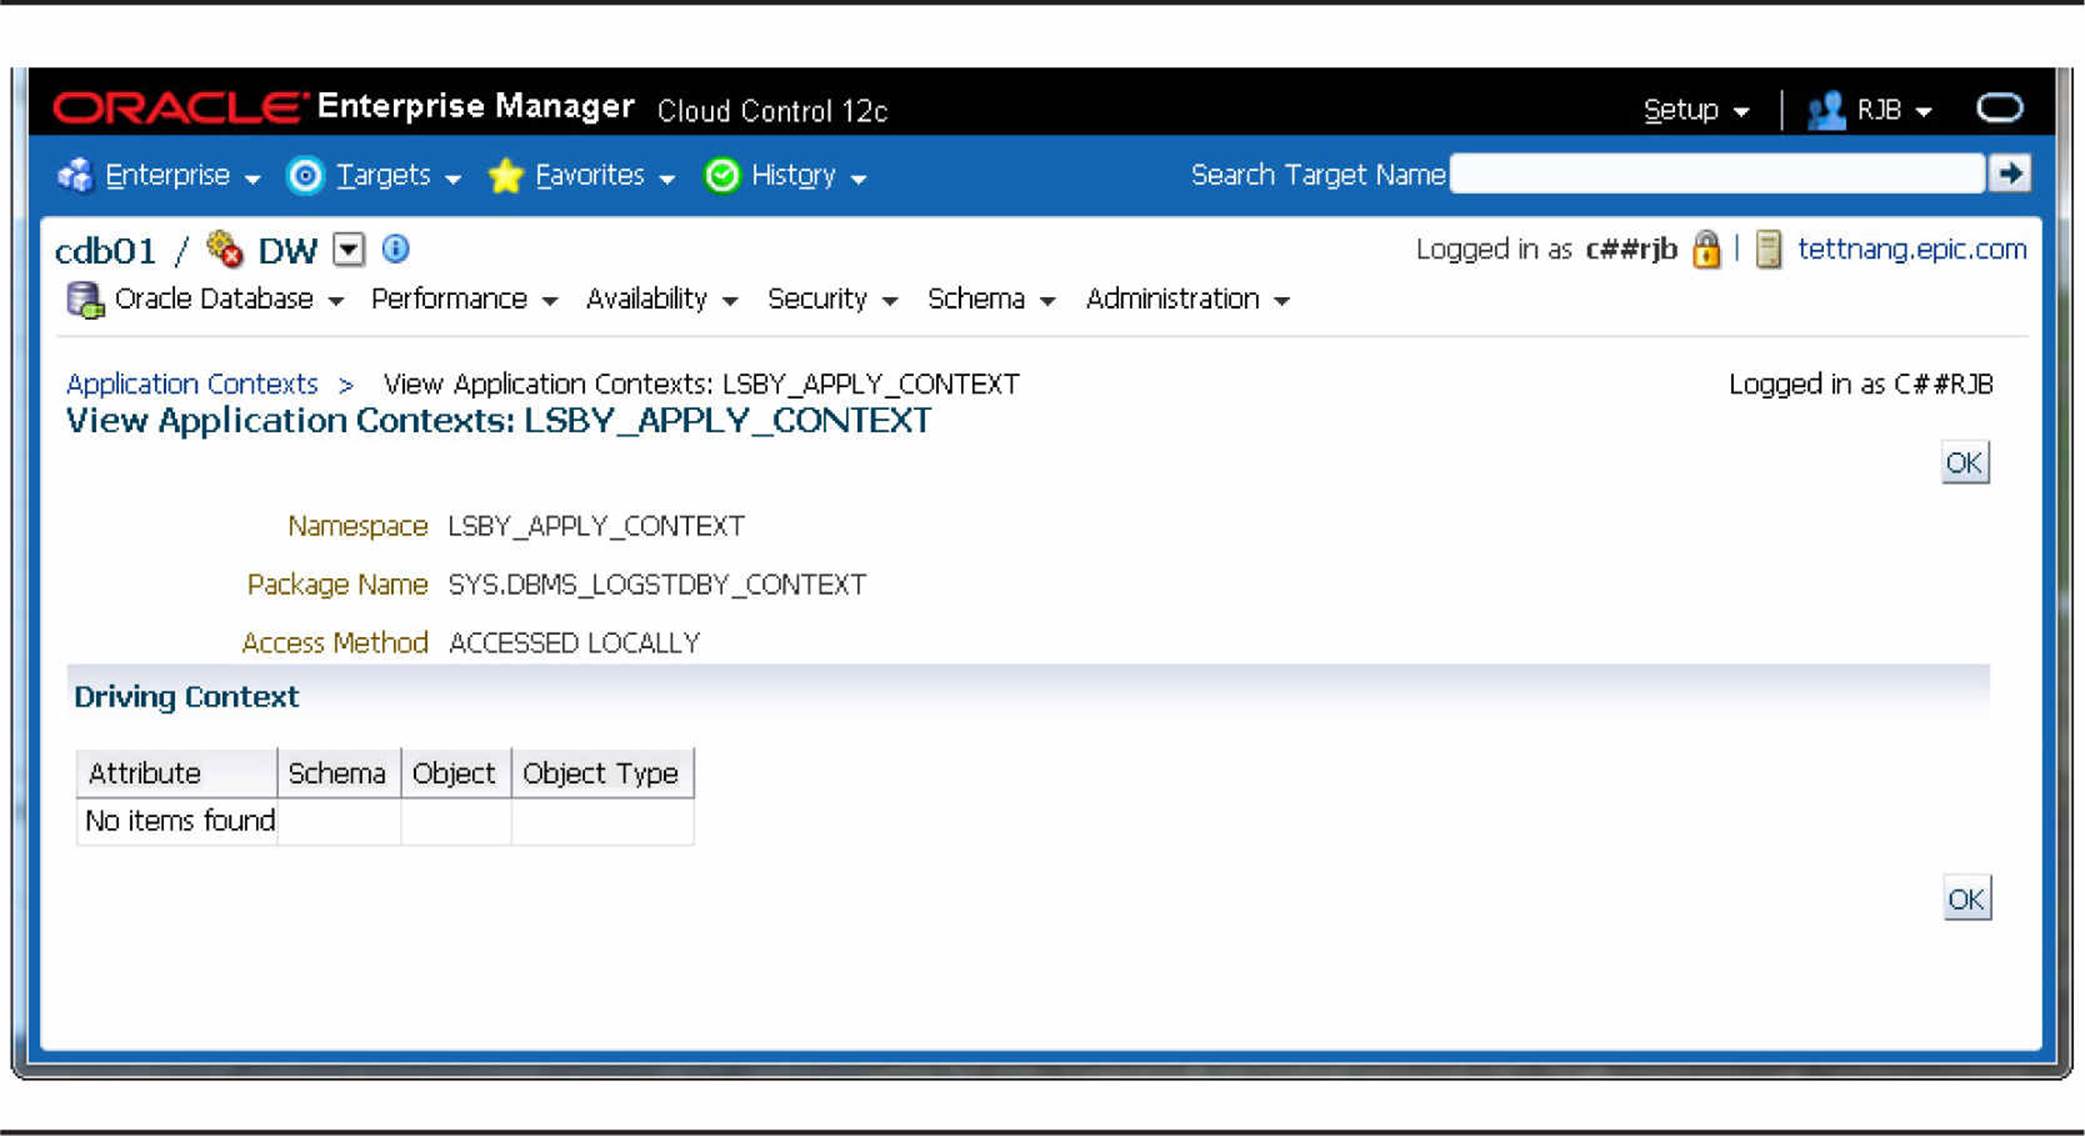
FIGURE 10-8. Oracle Policy Manager
Security Policy Implementation
Once the infrastructure is in place to set up the security environment, the next step is to define the function or functions used to generate the predicate that will be attached to every SELECT statement or DML command against the protected tables. The function used to implement the predicate generation has two arguments: the owner of the object being protected, and the name of the object within the owner’s schema. One function may handle predicate generation for just one type of operation, such as SELECT, or may be applicable to all DML commands, depending on how this function is associated with the protected table. The following example shows a package body containing two functions—one that will be used to control access from SELECT statements, and the other for any other DML statements:
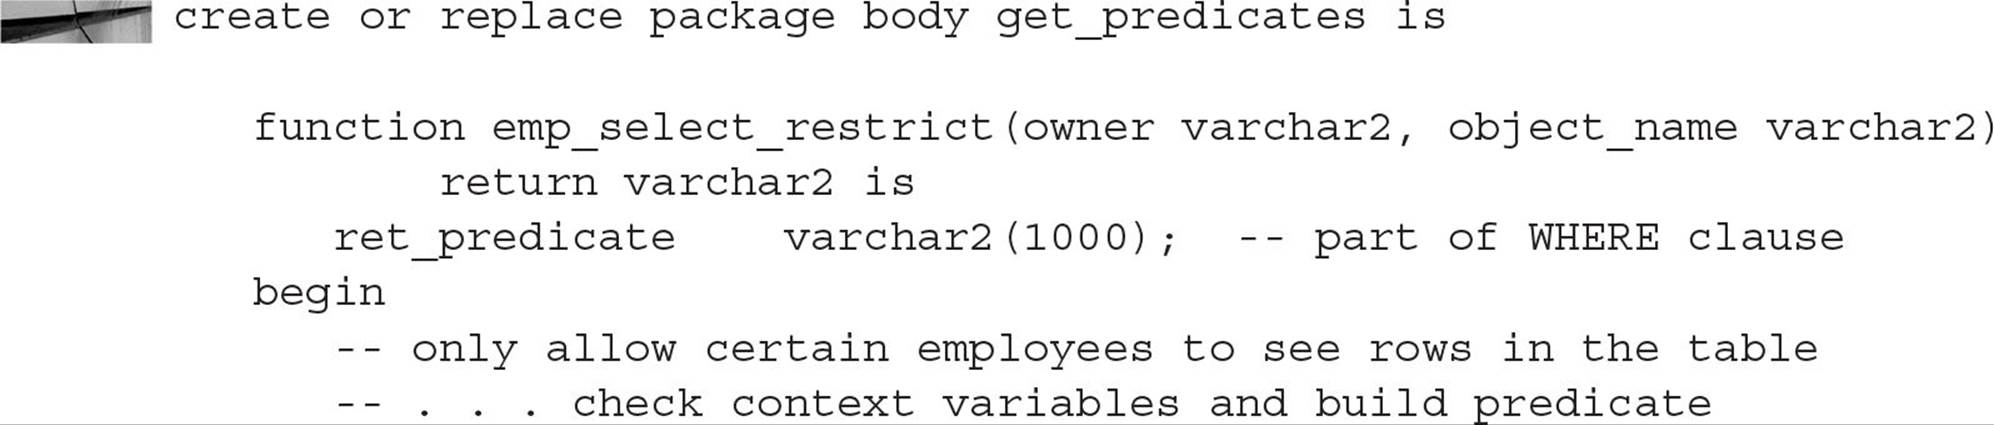
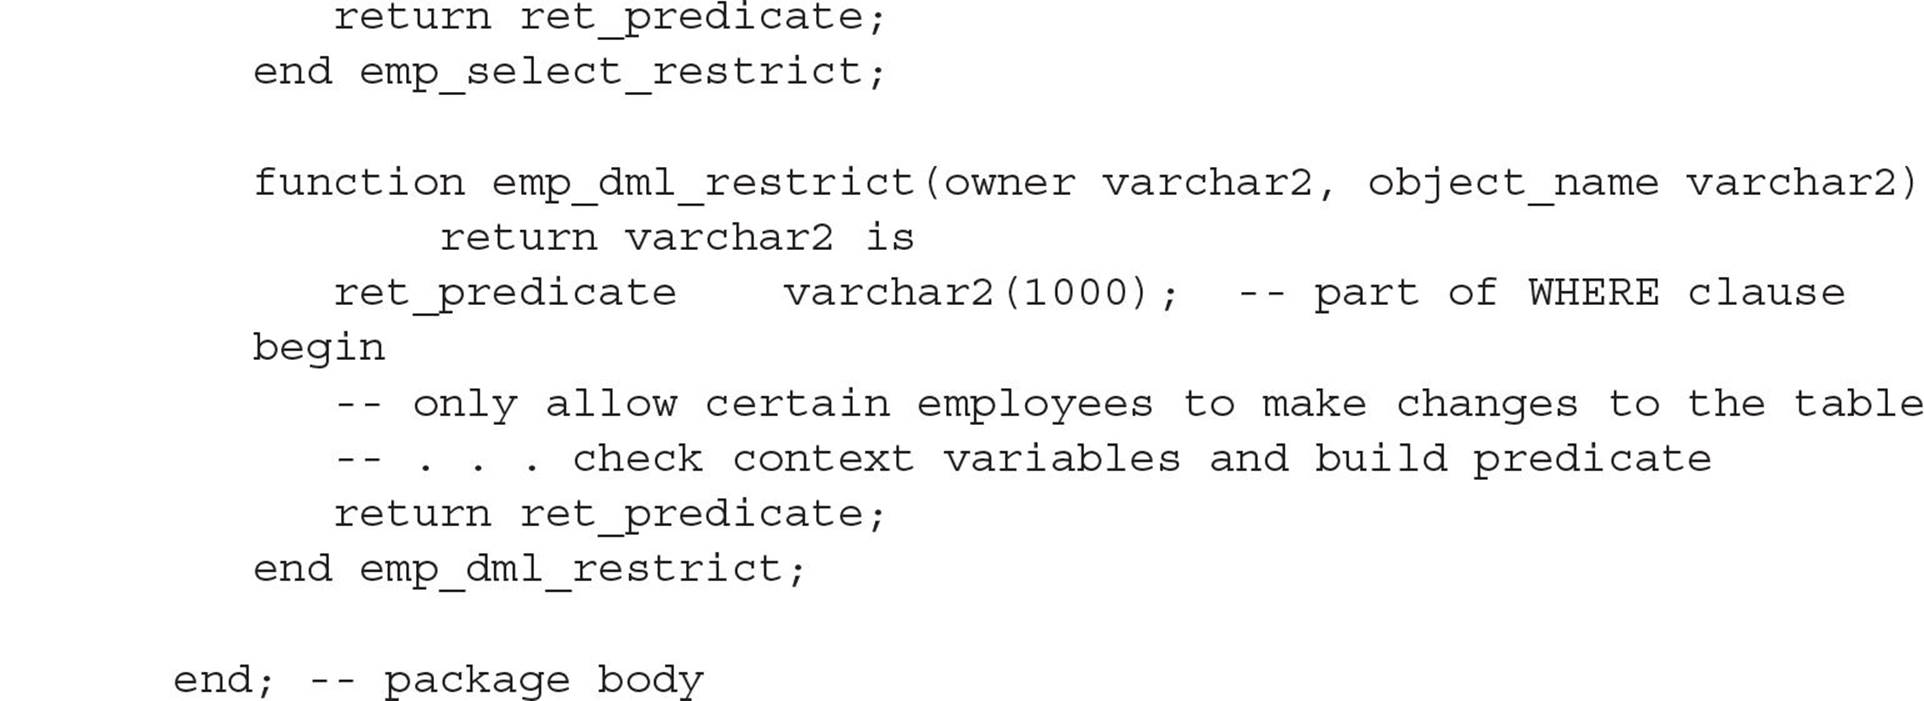
Each function returns a string containing an expression that is added to a WHERE clause for a SELECT statement or a DML command. The user or application never sees the value of this WHERE clause; it is automatically added to the command at parse time.
The developer must ensure that the functions always return a valid expression. Otherwise, any access to a protected table will always fail, as in the following example:
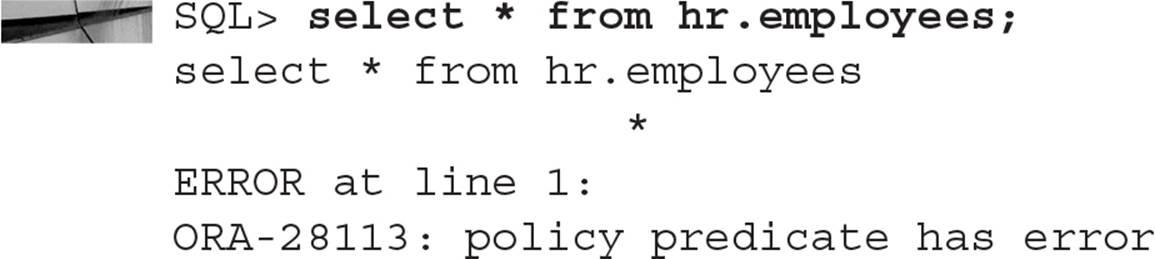
The error message does not say what the predicate is, and all users are locked out of the table until the predicate function is fixed. Tips on how to debug a predicate function are presented later in this chapter.
Using DBMS_RLS
The built-in package DBMS_RLS contains a number of subprograms that a DBA uses to maintain the security policies associated with tables, views, and synonyms. In Table 10-13 are the subprograms available in the DBMS_RLS package. Any user who needs to create or administer policies must have EXECUTE privileges granted on the package SYS.DBMS_RLS.
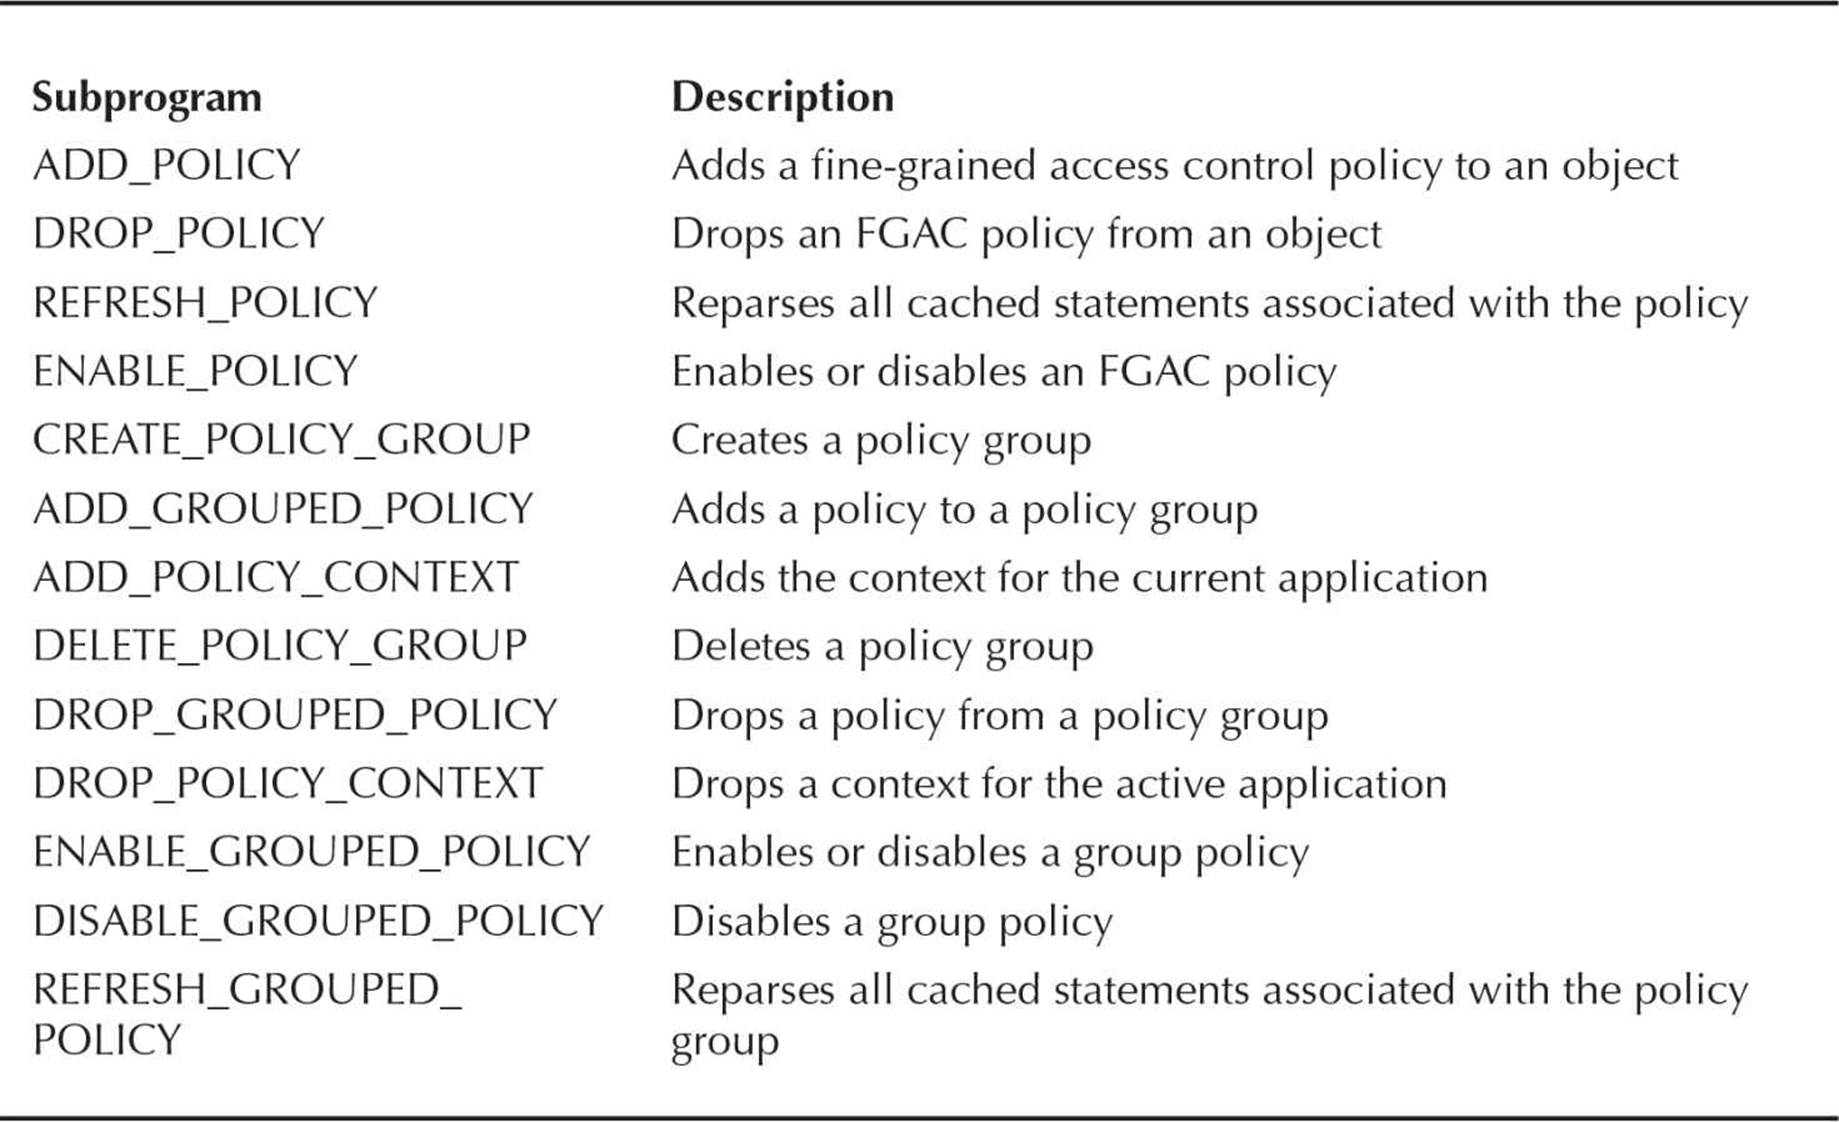
TABLE 10-13. DBMS_RLS Package Subprograms
In this chapter, we’ll cover the most commonly used subprograms, ADD_POLICY and DROP_POLICY. The syntax of ADD_POLICY follows:
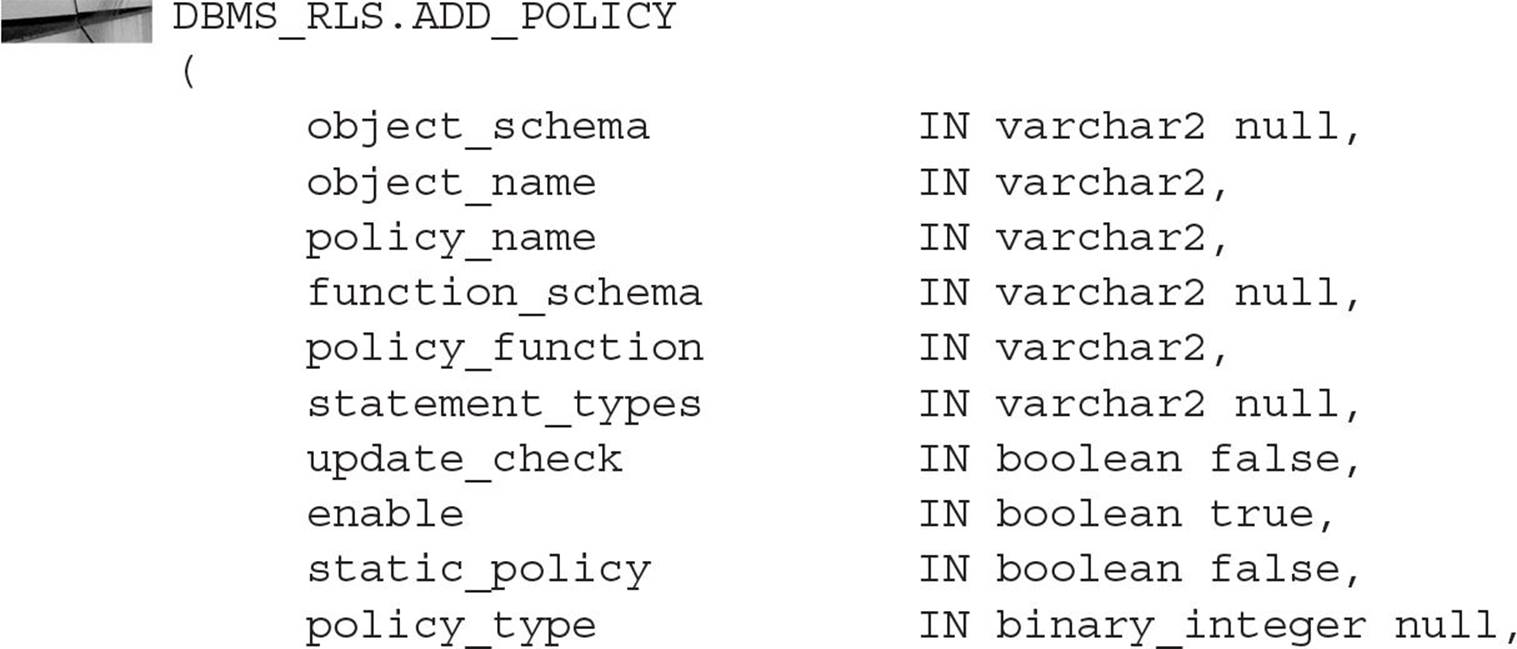

Note that some of the parameters have BOOLEAN default values and that the less commonly used parameters are near the end of the argument list. This makes the syntax for any particular call to DBMS_RLS.ADD_POLICY easier to write and understand for the vast majority of cases. The description and usage for each parameter are provided in Table 10-14.
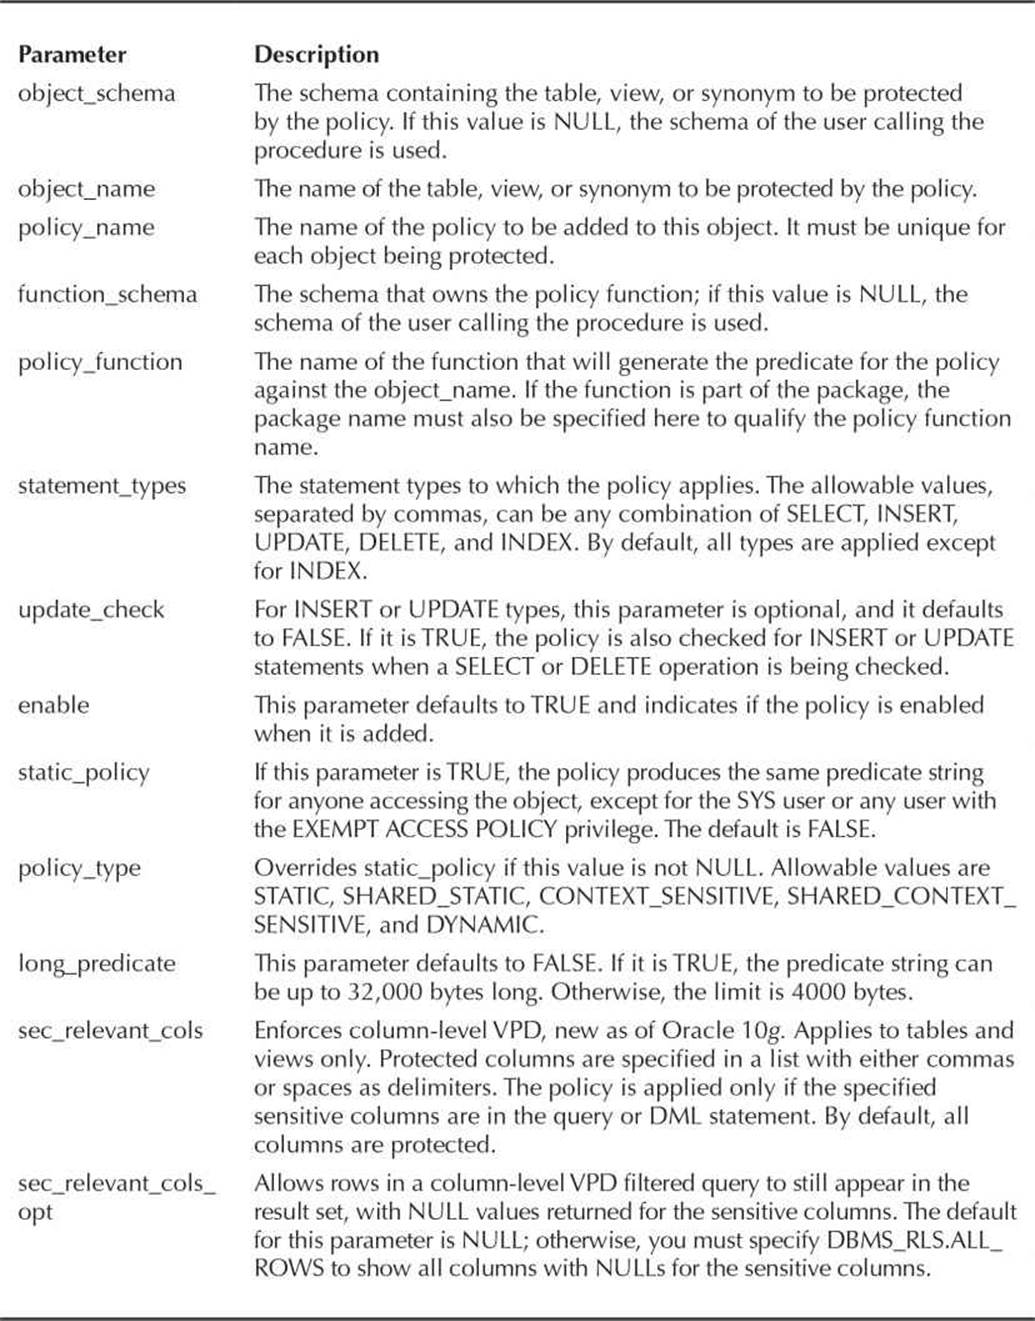
TABLE 10-14. DBMS_RLS.ADD_POLICY Parameters
Using the parameter sec_relevant_cols is handy when you don’t mind if users see part of a row, just not the columns that might contain confidential information, such as a Social Security Number or a salary. In our example later in this chapter, we’ll build on the first security policy we define to filter out sensitive data for most employees of the company.
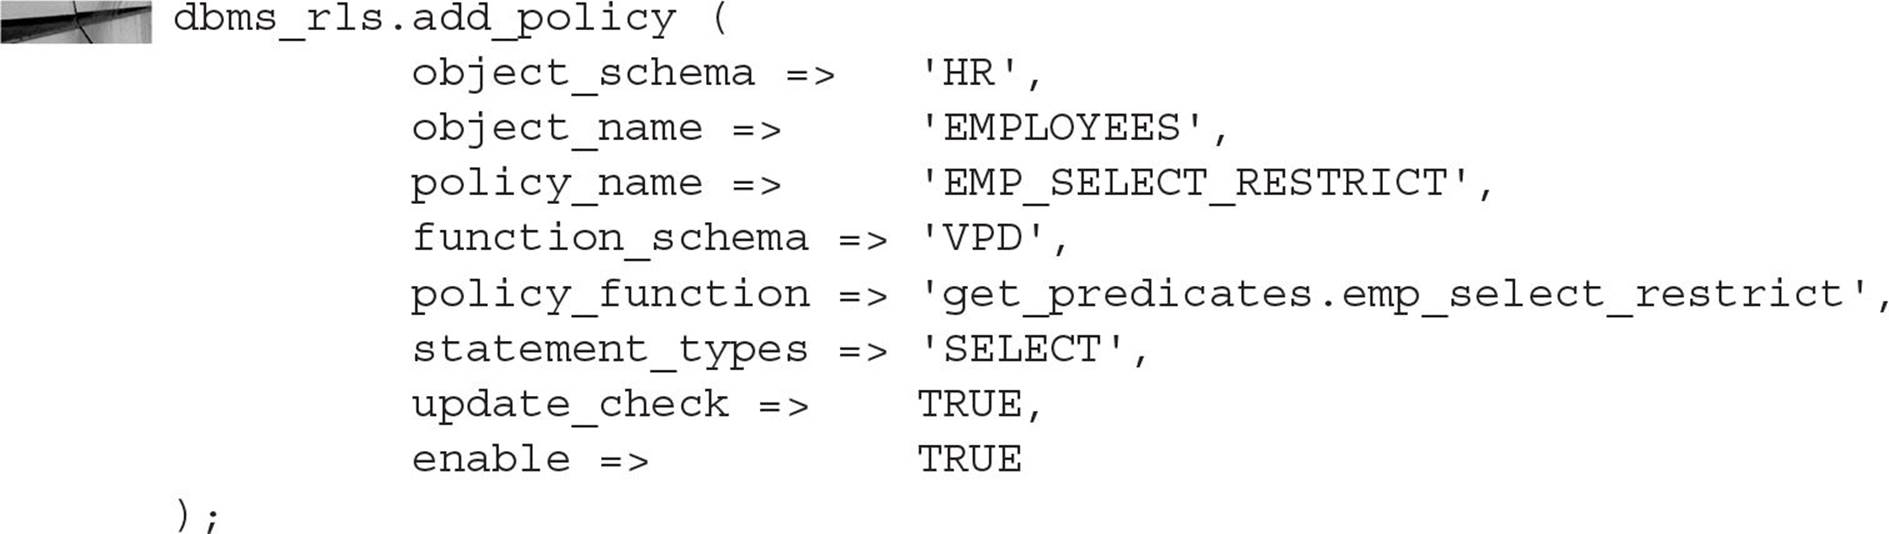
In the following example, we’re applying a policy named EMP_SELECT_RESTRICT to the table HR.EMPLOYEES. The schema VPD owns the policy function GET_PREDICATES.EMP_SELECT_RESTRICT. The policy explicitly applies to SELECT statements on the table; however, with UPDATE_CHECK set to TRUE, UPDATE, or DELETE commands will also be checked when rows are updated or inserted into the table.


Because we did not set static_policy, it defaults to FALSE, meaning that the policy is dynamic and is checked every time a SELECT statement is parsed. This is the only behavior available before Oracle Database 10g.
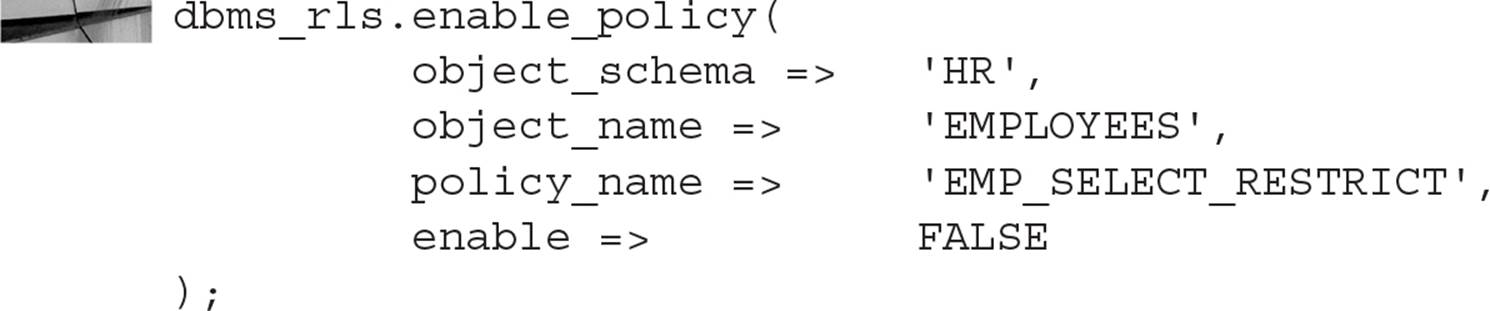
Using the subprogram ENABLE_POLICY is an easy way to disable the policy temporarily without having to rebind the policy to the table later:
If multiple policies are specified for the same object, an AND condition is added between each predicate. If you need to have an OR condition between predicates for multiple policies instead, the policy most likely needs to be revised. The logic for each policy needs to be combined within a single policy with an OR condition between each part of the predicate.
Creating a VPD
In this section, we’ll step through a complete implementation of a VPD from beginning to end. This example relies on the sample schemas installed with Oracle Database 12c. To be specific, we are going to implement an FGAC policy on the HR.EMPLOYEES table to restrict access based on manager status and the employee’s department number. If you are an employee, you can see your own row in HR.EMPLOYEES; if you are a manager, you can see the rows for all the employees who report directly to you.
TIP
If you do not have the sample schemas installed in your database, you can create them using the scripts found in $ORACLE_HOME/demo/schema.
Once the sample schemas are in place, we need to create some users in the database who want to see rows from the table HR.EMPLOYEES.
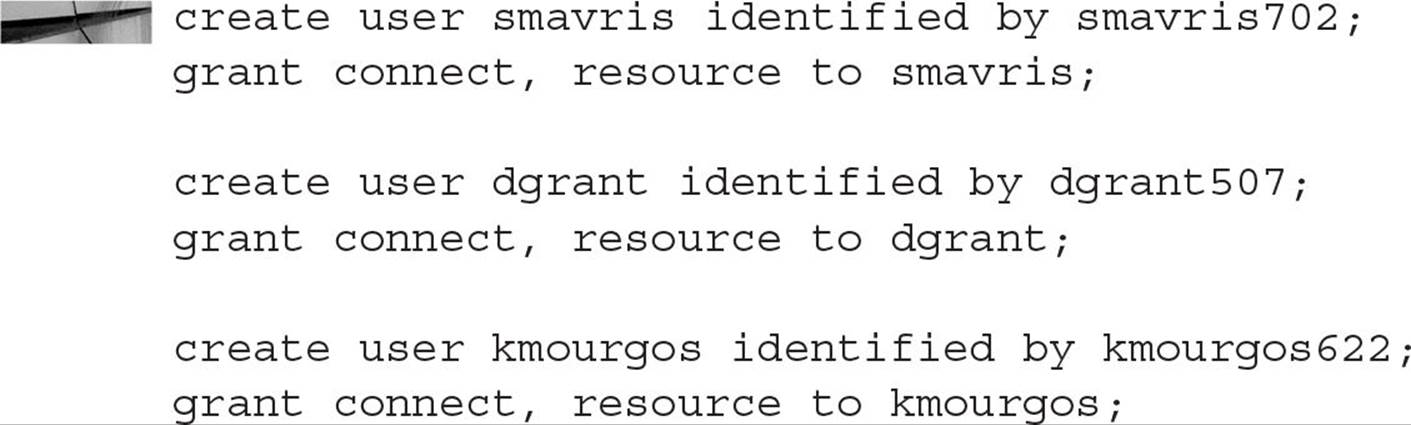
The user KMOURGOS is the manager for all the stocking clerks, and DGRANT is one of KMOURGOS’s employees. The user SMAVRIS is the HR representative for the company.
In the following three steps, we will grant SELECT privileges on the HR.EMPLOYEES table to everyone in the database, and we will create a lookup table that maps employee ID numbers to their database account. The procedure that sets the context variables for the user session will use this table to assign the employee ID number to the context variable that will be used in the policy function to generate the predicate.

Next, we will create a user account called VPD that has the privileges to create contexts and maintain the policy functions:

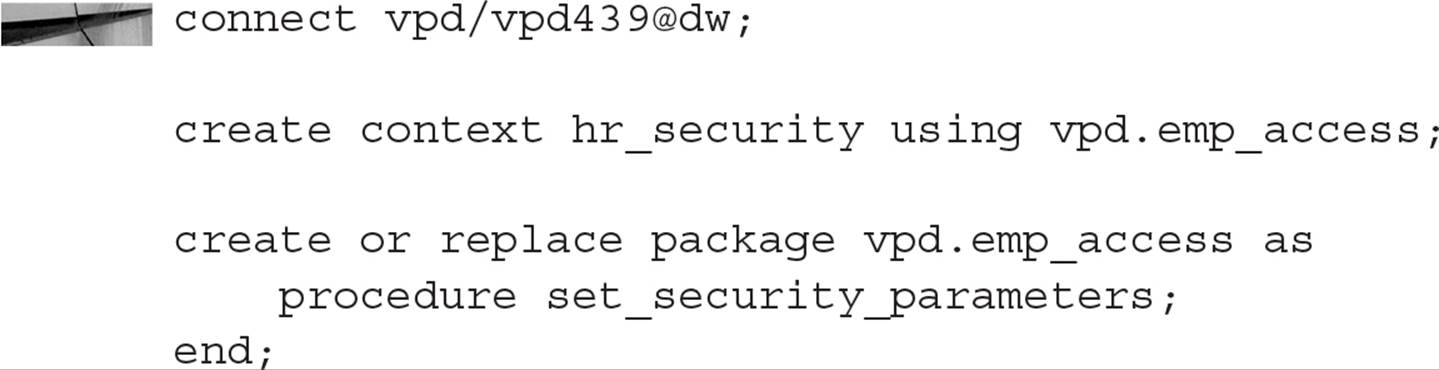
Connecting to the VPD schema, we will create a context called HR_SECURITY and define the package and procedure used to set the context for the application:
Remember that the procedures in the package VPD.EMP_ACCESS are the only procedures that can set the context variables. The package body for VPD.EMP_ACCESS follows:
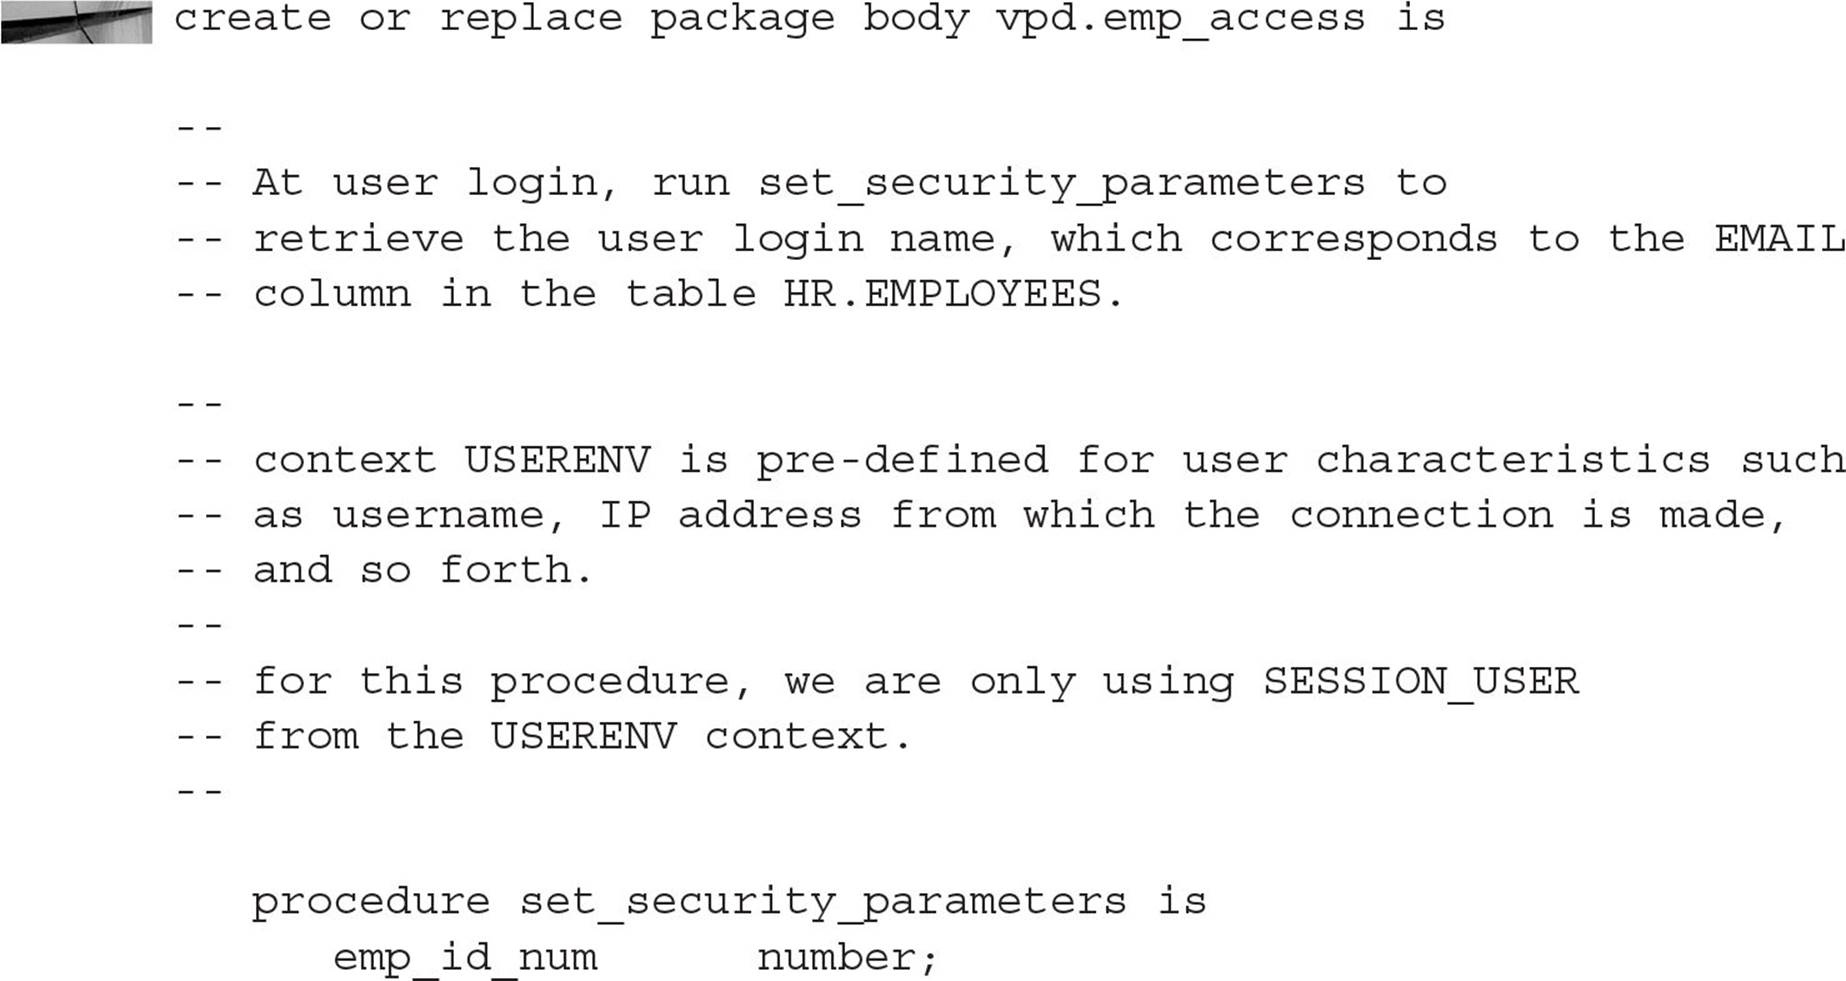
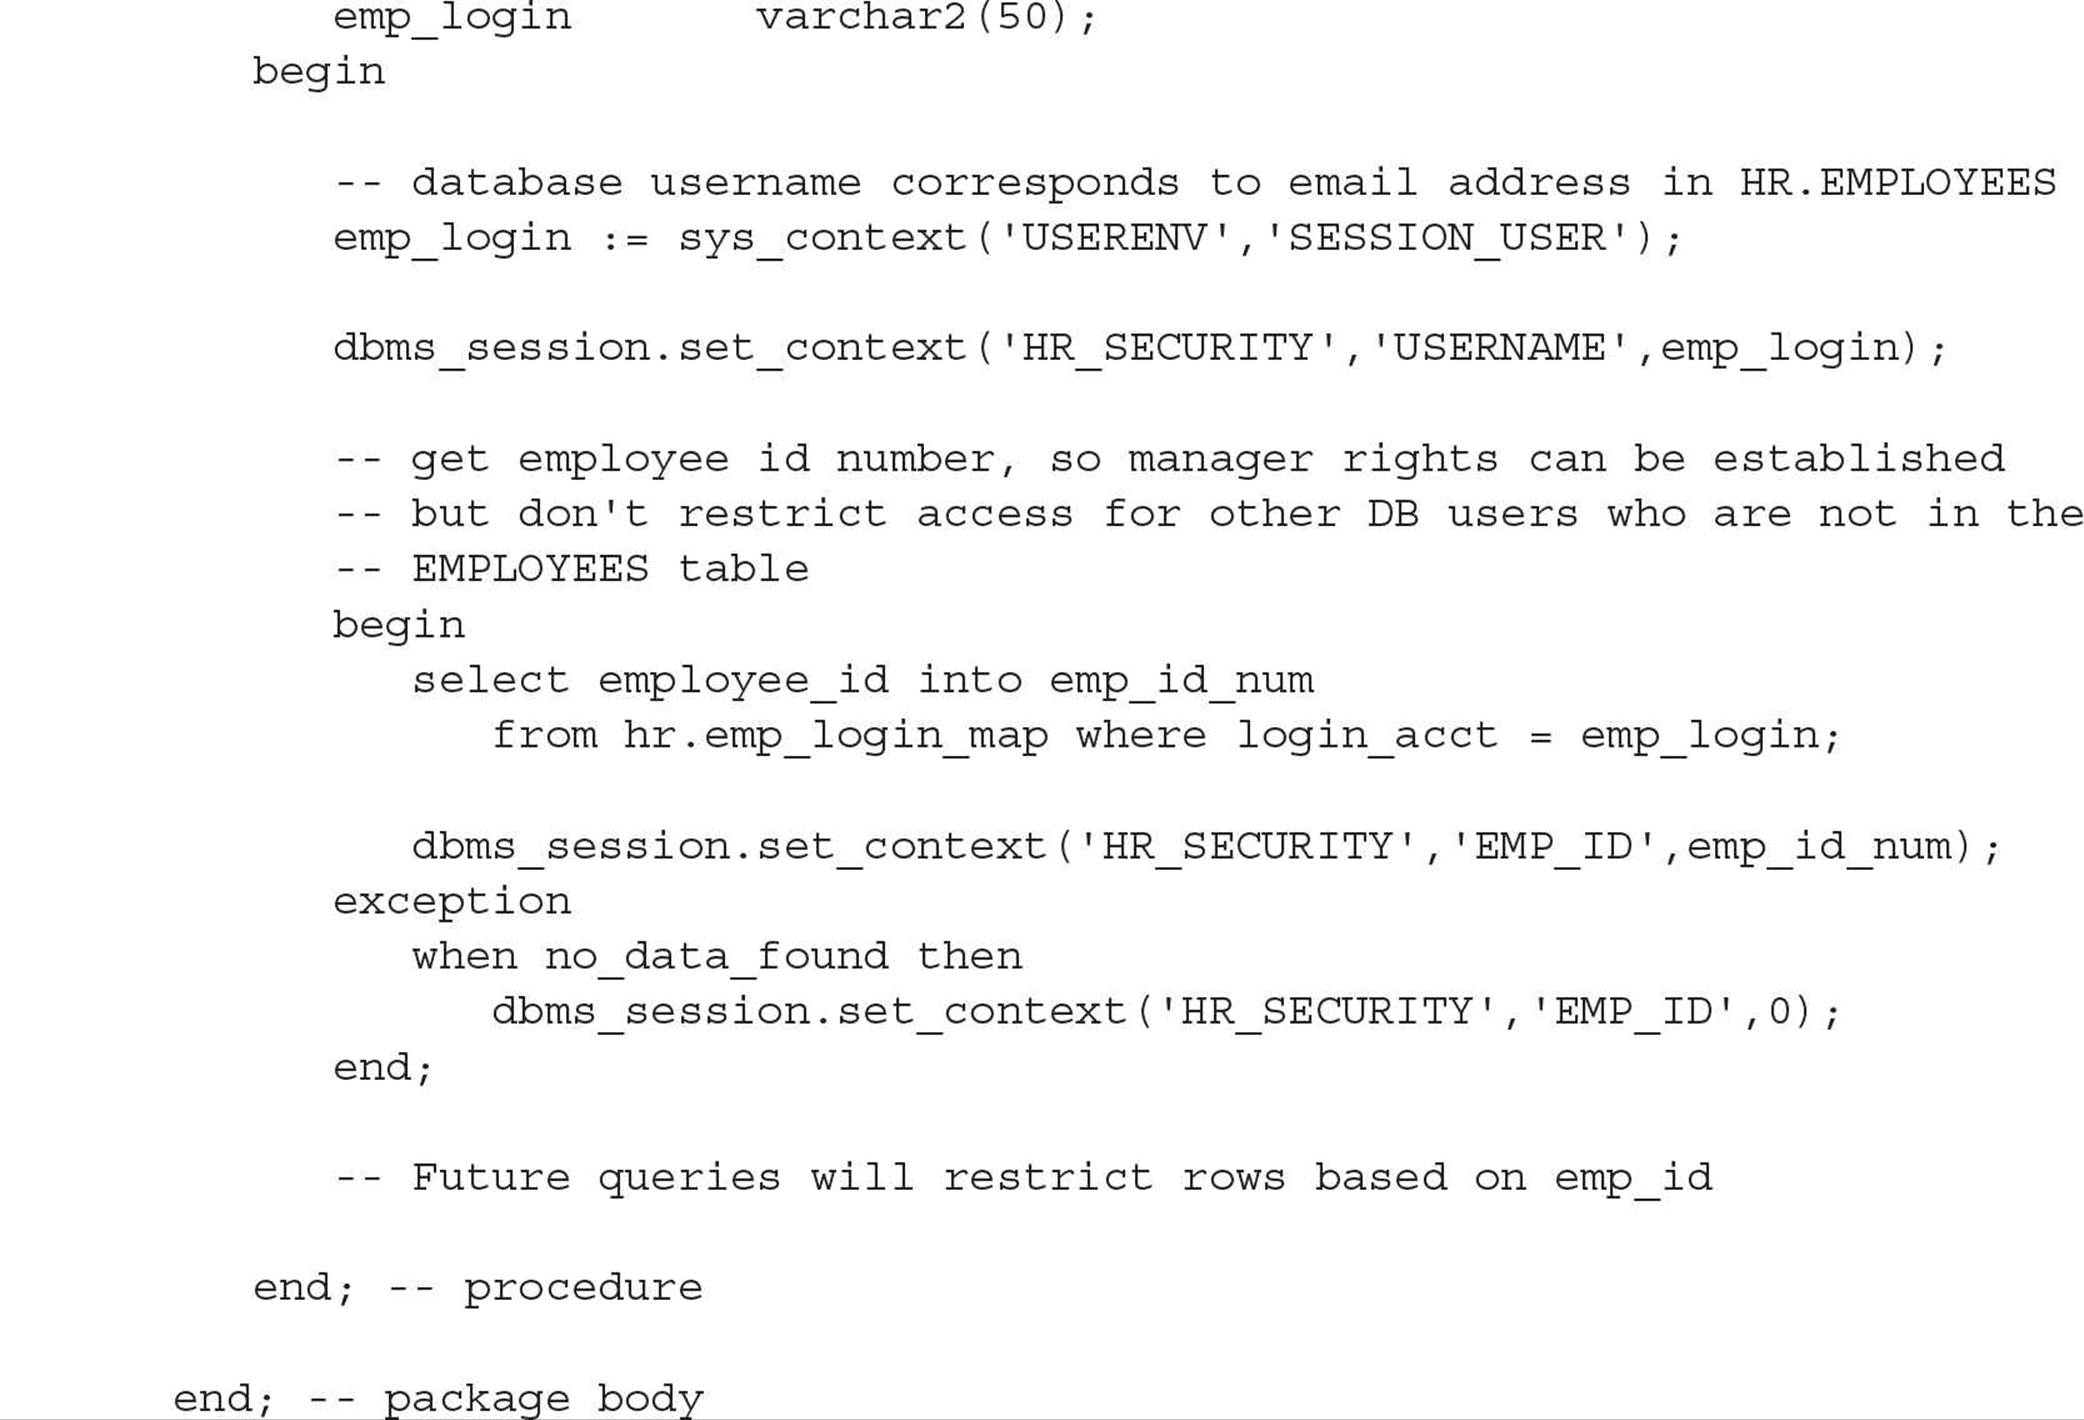
A few things are worth noting about this procedure. We retrieve the user’s schema by looking in the USERENV context, which is enabled by default for all users, and assigning it to the variable USERNAME in the newly created context HR_SECURITY. The other HR_SECURITY context variable EMP_ID is determined by doing a lookup in the mapping table HR.EMP_LOGIN_MAP. We don’t want the procedure to terminate with an error if the logged-in user is not in the mapping table; instead, we assign an EMP_ID of 0, which will result in no access to the table HR.EMPLOYEES when the predicate is generated in the policy function.
In the next steps, we grant everyone in the database EXECUTE privileges on the package, and we create a synonym for it to save a few keystrokes any time we need to call it:

To ensure that the context is defined for each user when they log on, we will connect as SYSTEM and create a logon trigger to set up the variables in the context:
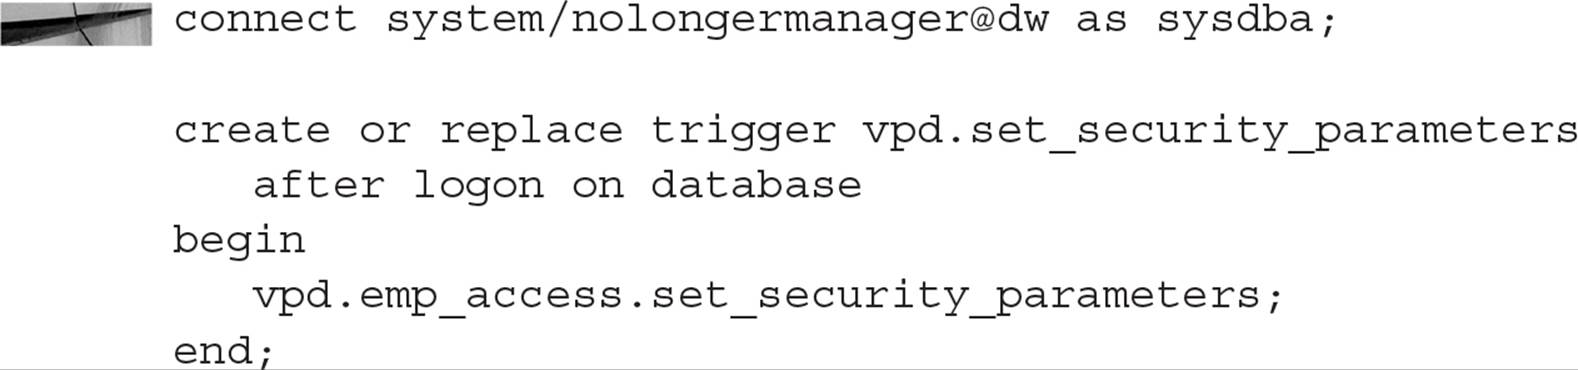
Because this trigger is fired for every user who connects to the database, it is vitally important that the code be tested for every class of user, if not every user in the database! If the trigger fails with an error, regular users cannot log in.
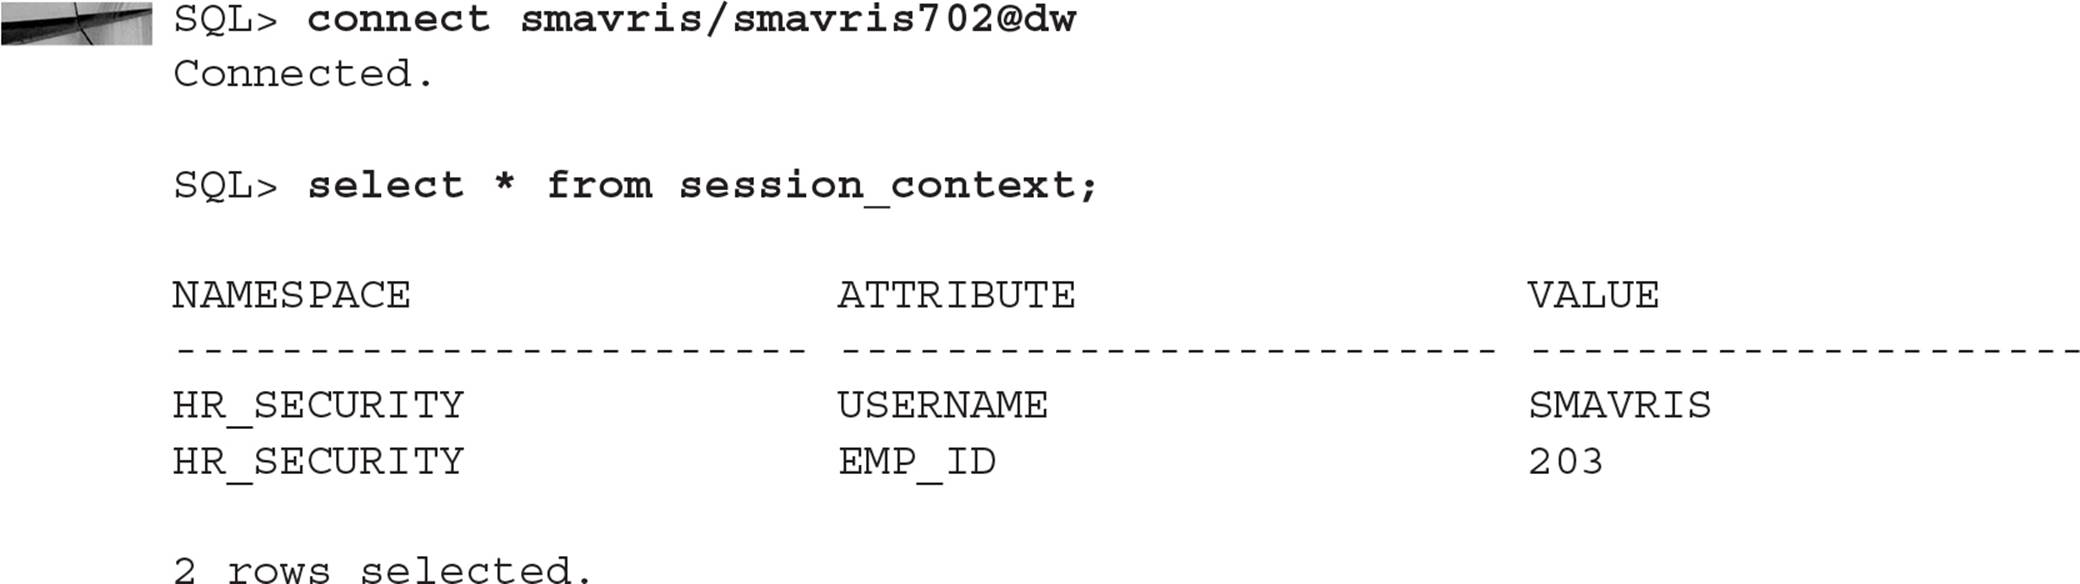
So far, we have our context defined, the procedure used to set up the context variables, and a trigger that automatically calls the procedure. Logging in as one of our three users defined previously, we can query the contents of the context:
Notice what happens when SMAVRIS tries to impersonate another employee:
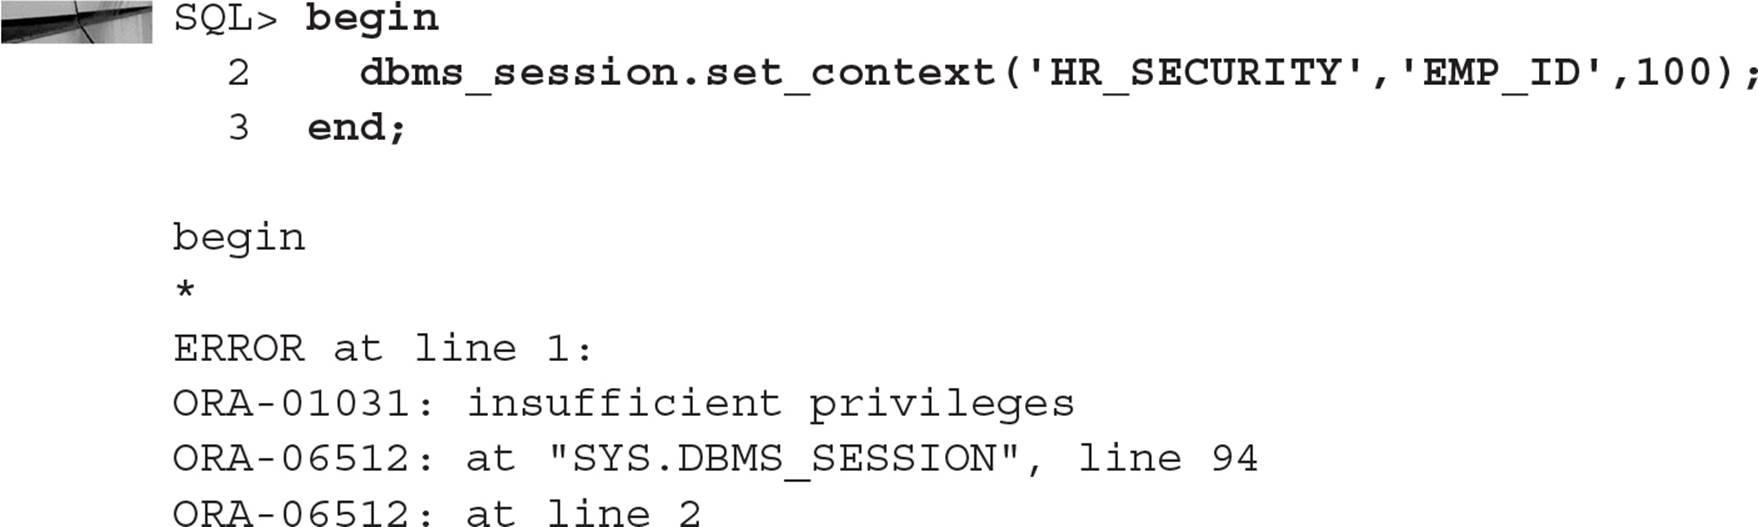
Only the package VPD.EMP_ACCESS is allowed to set or change variables in the context.
The final steps include defining the procedures that will generate the predicate and assigning one or more of these procedures to the HR.EMPLOYEES table. As the user VPD, which already owns the context procedures, we’ll set up the package that determines the predicates:
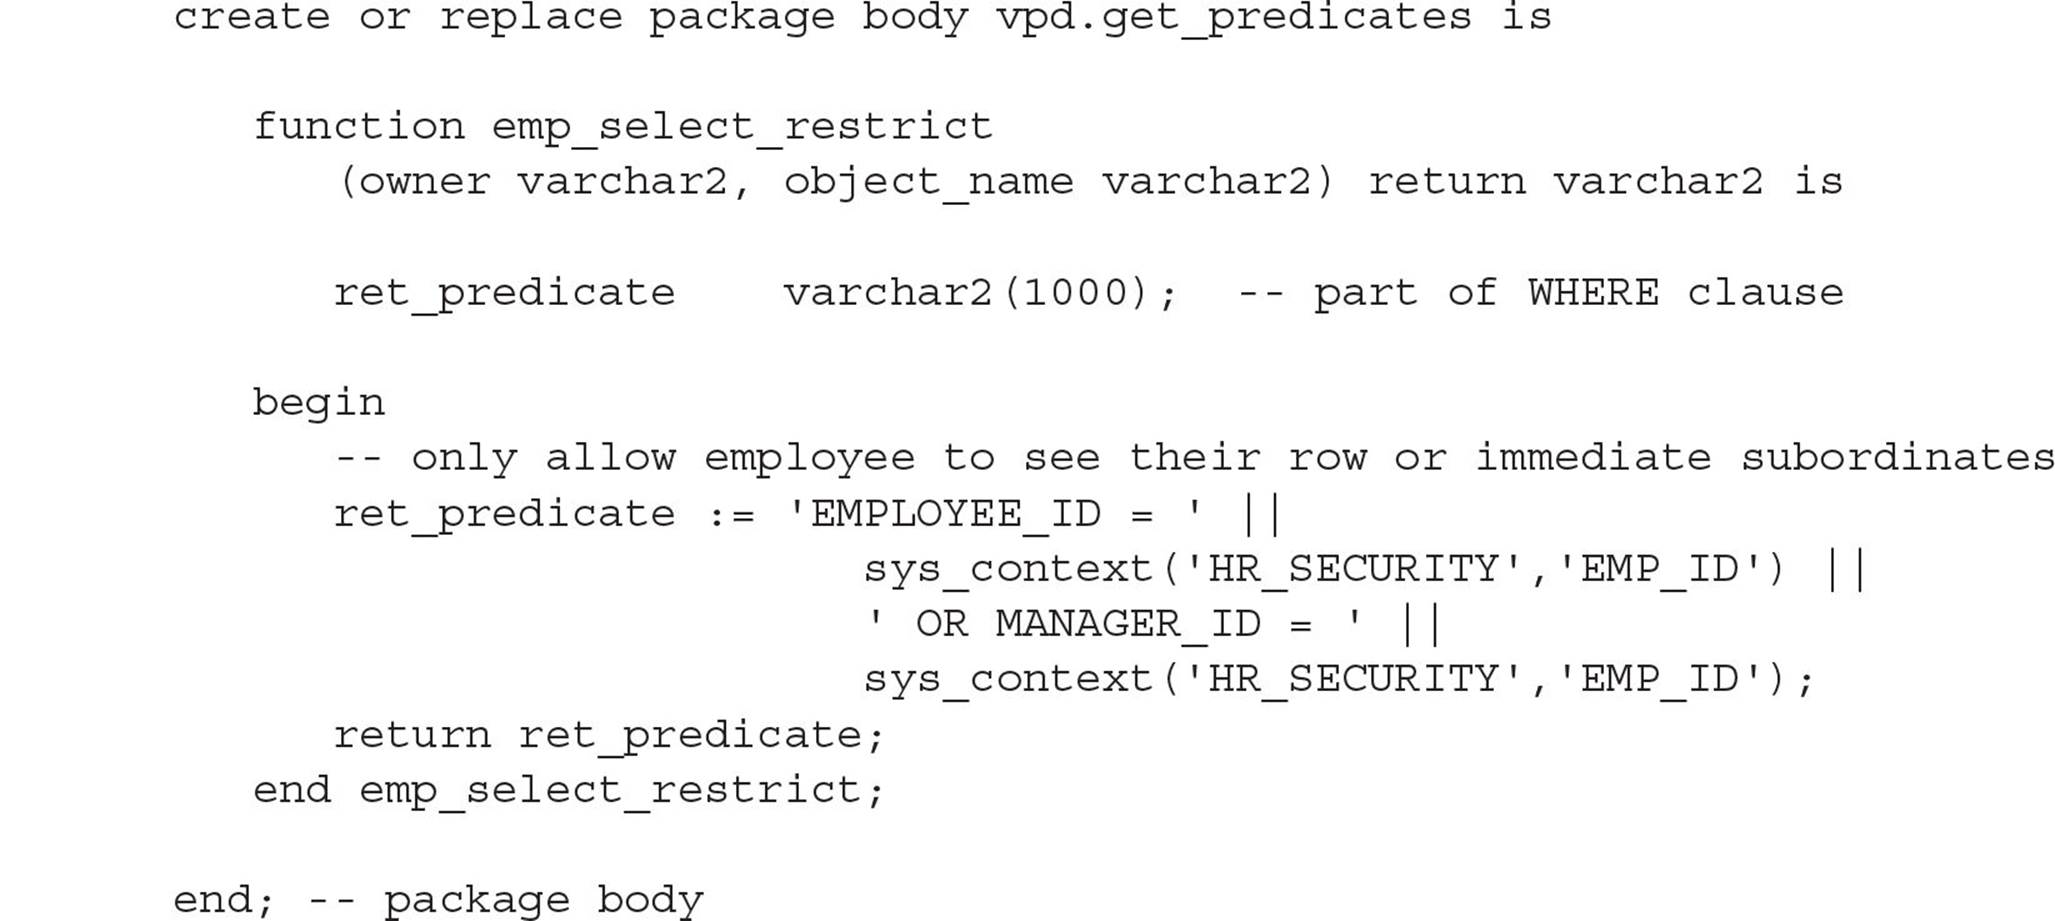
Once we attach the function to a table with DBMS_RLS, it will generate a text string that can be used in a WHERE clause every time the table is accessed. The string will always look something like this:
![]()
As with the packages that set up the context environment, we need to allow users access to this package:

Last, but certainly not least, we will attach the policy function to the table using the DBMS_RLS.ADD_POLICY procedure (run by the SYS user):
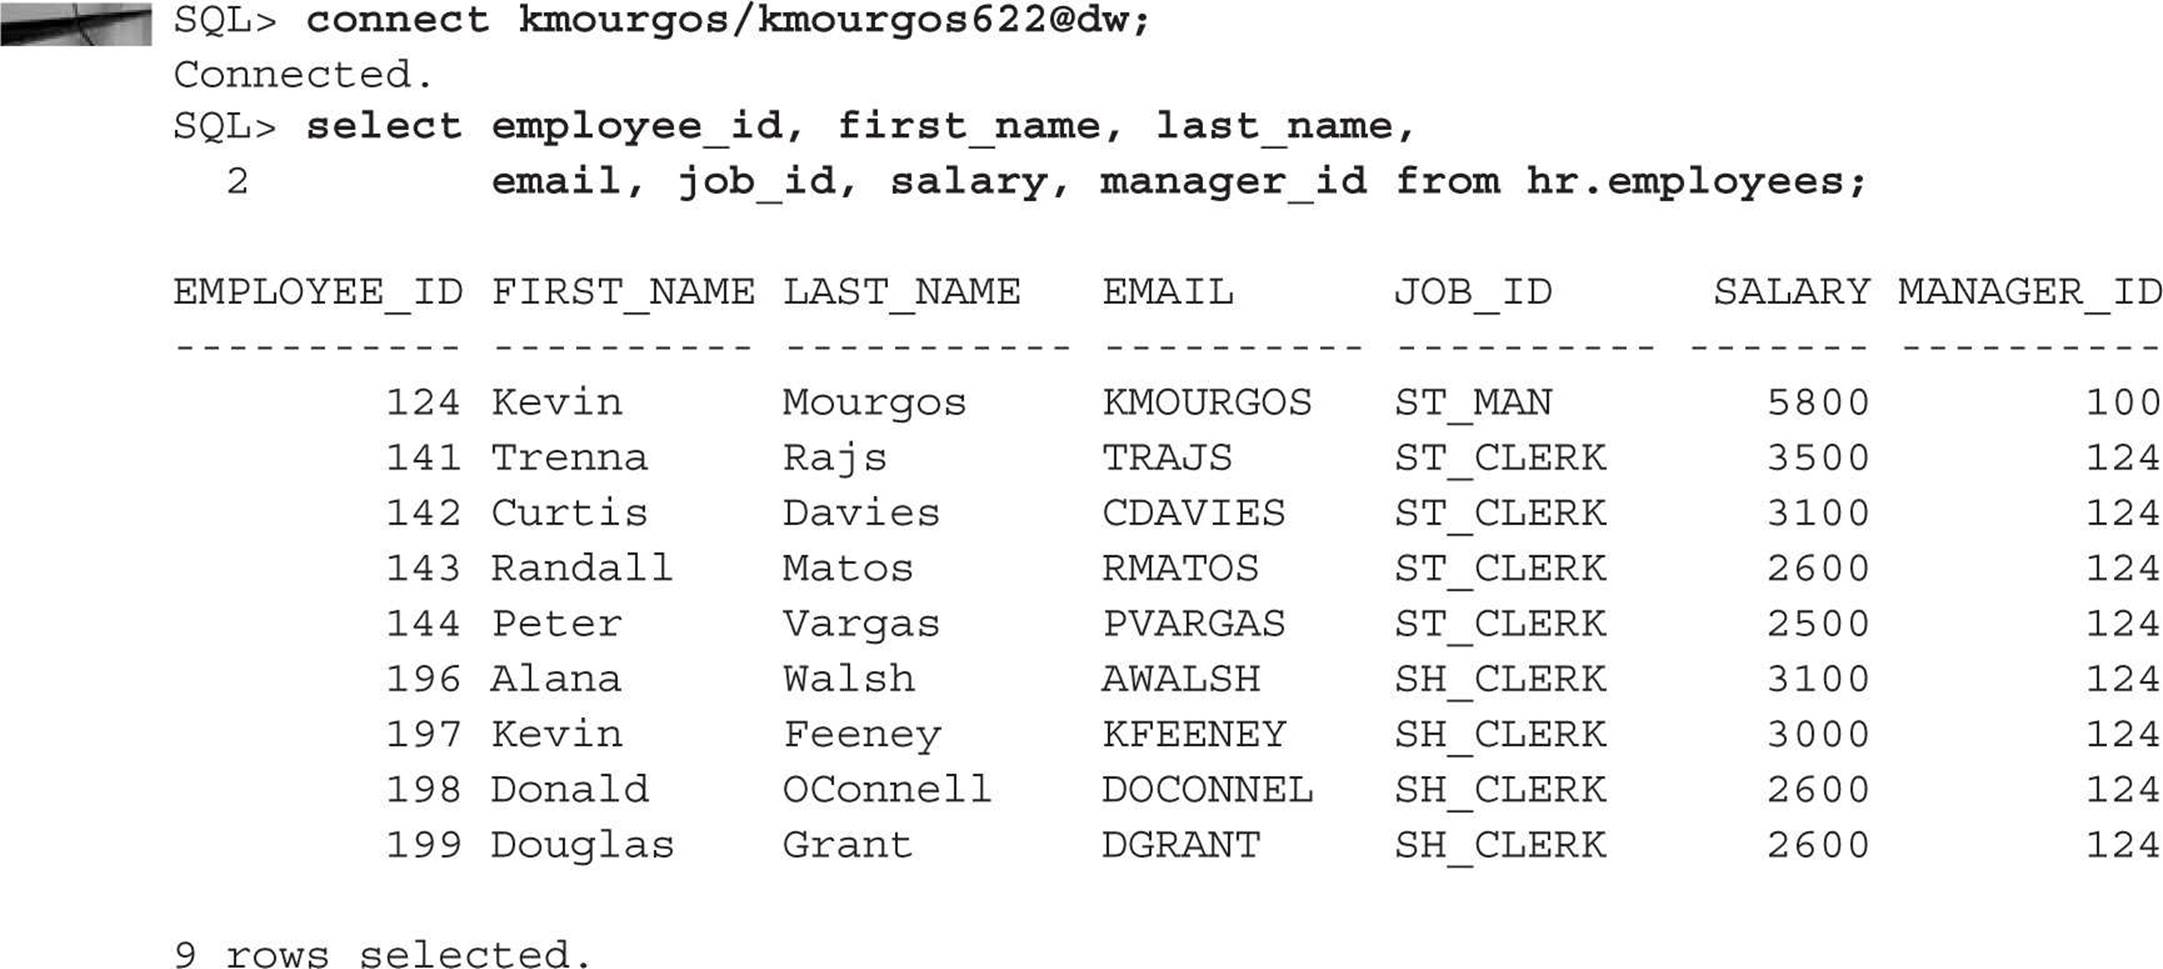
An employee can access the HR.EMPLOYEES table as before, but they will only see their row and the rows of the employees who work for them, if any. Logging in as KMOURGOS, we try to retrieve all the rows of the HR.EMPLOYEES table, but we only see KMOURGOS and the employees who report directly to him:
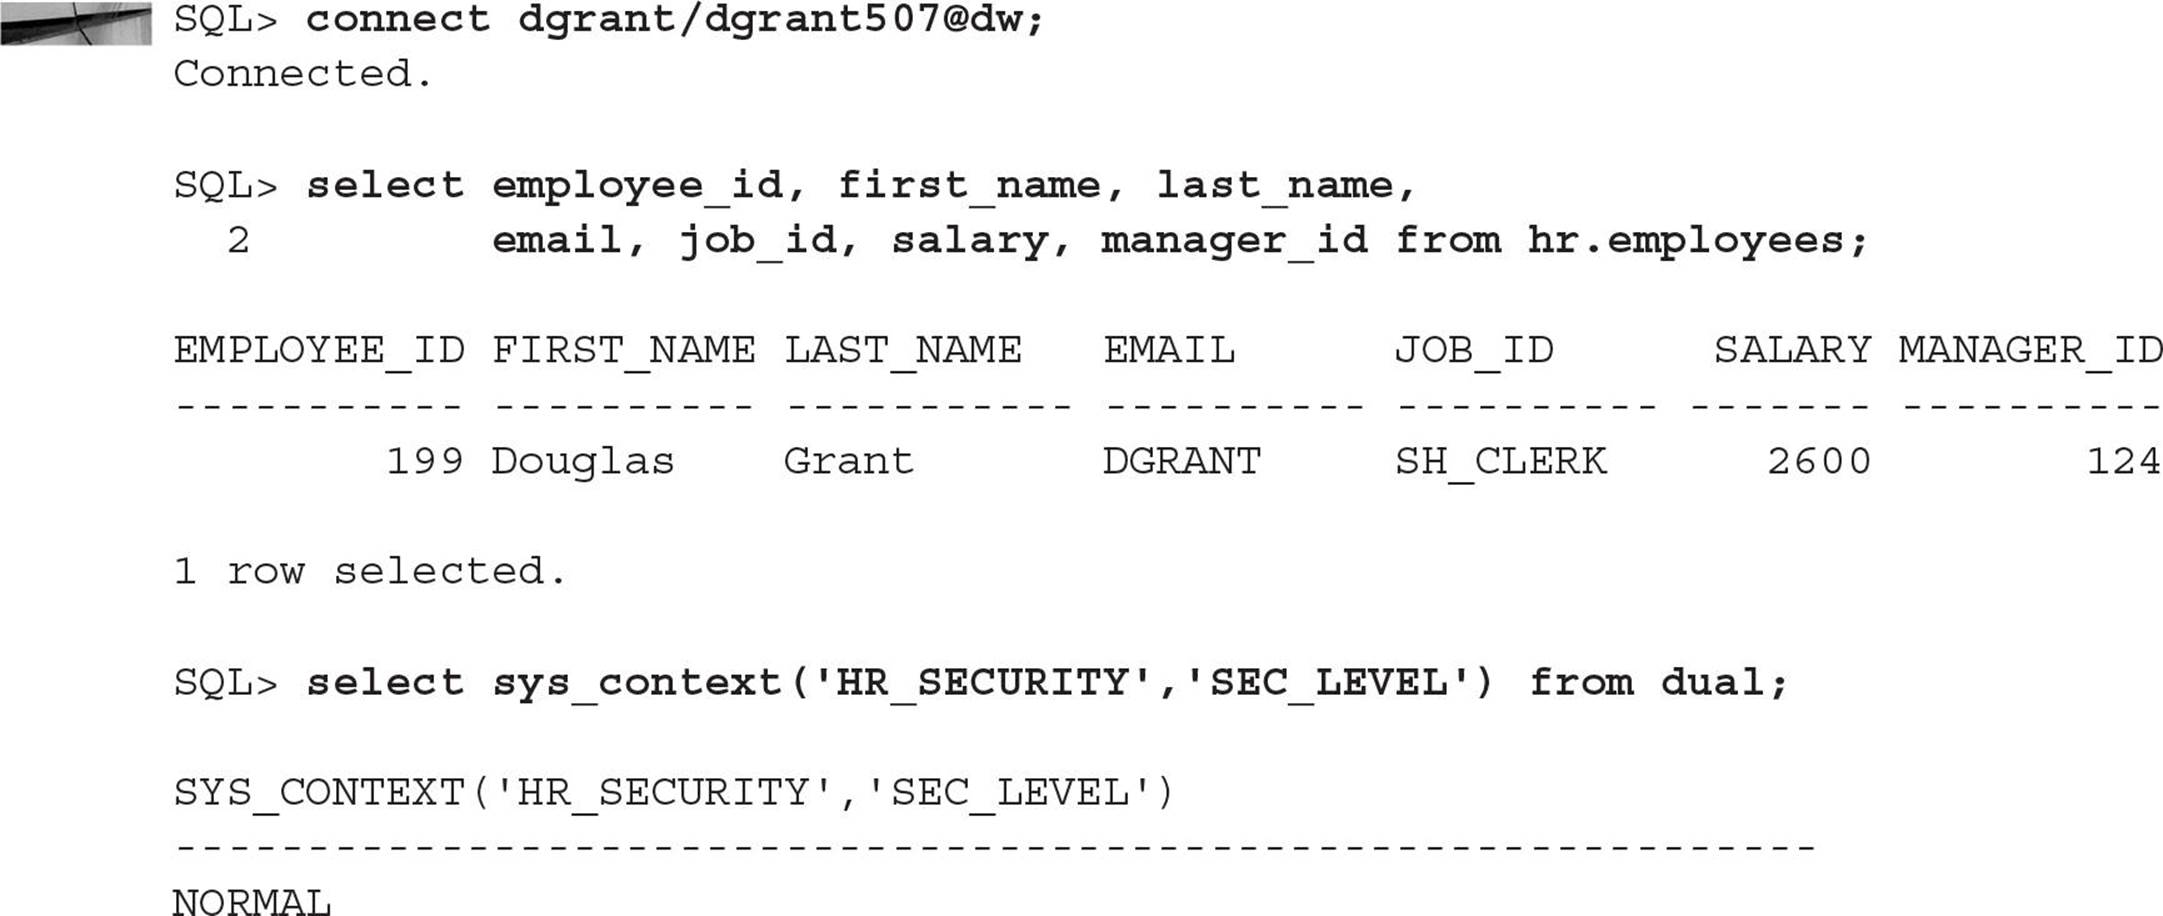
For the user DGRANT, it’s a different story:
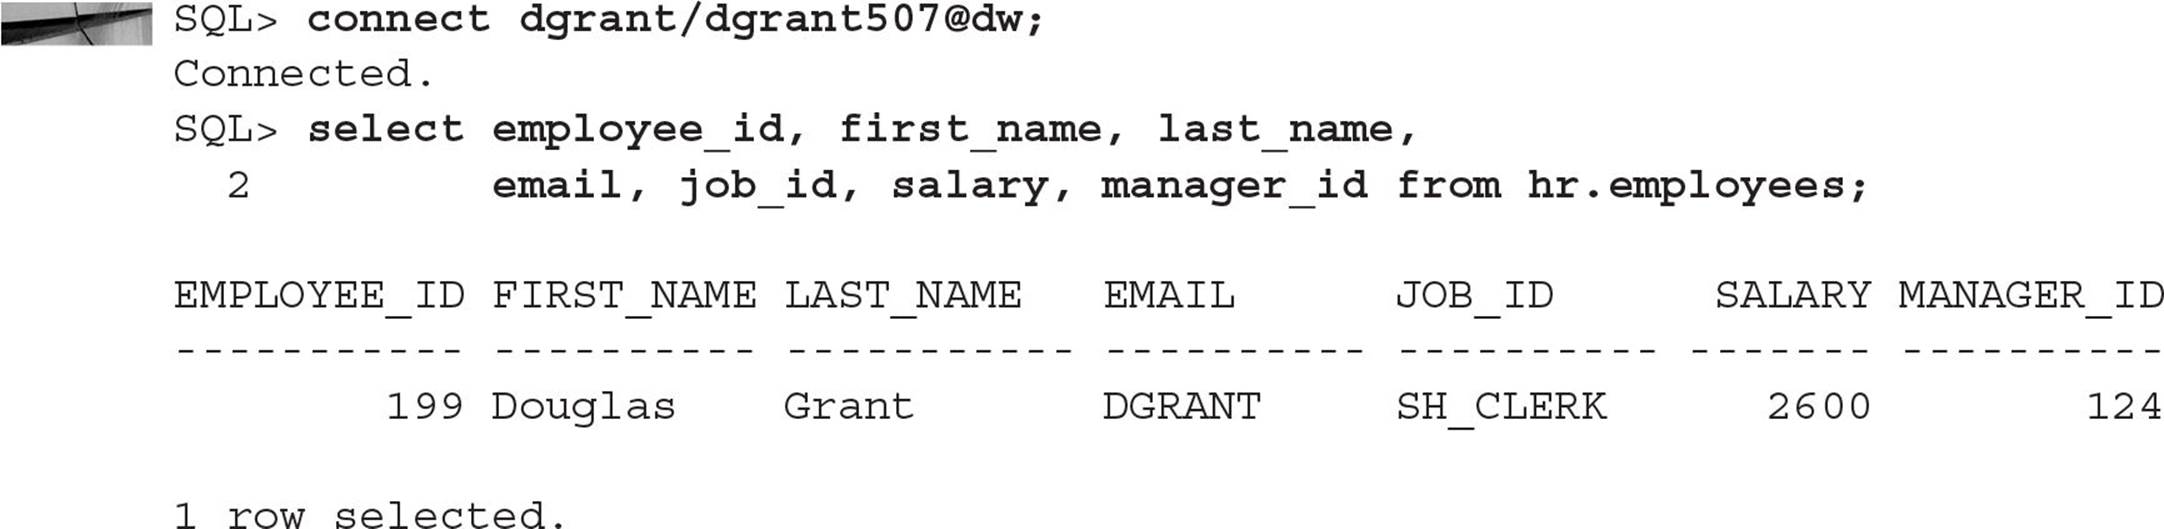
DGRANT gets to see only his own row, because he does not manage anyone else in the company.
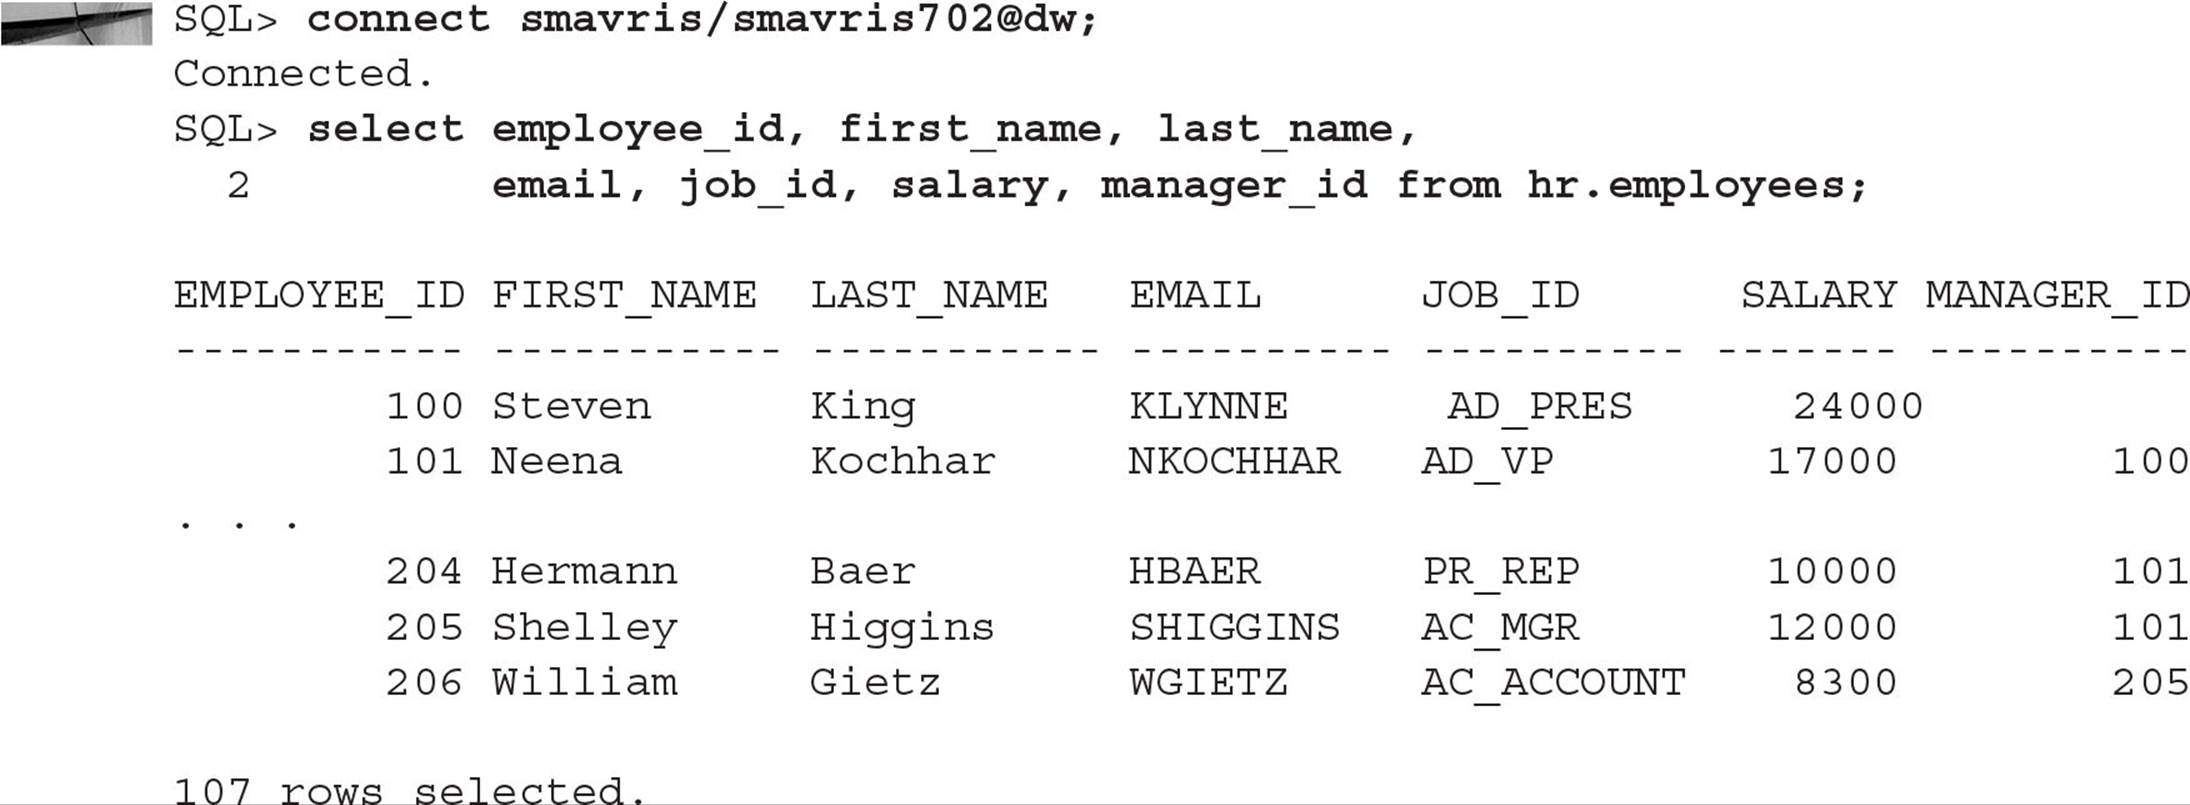
In the case of SMAVRIS, we see similar results from the query:
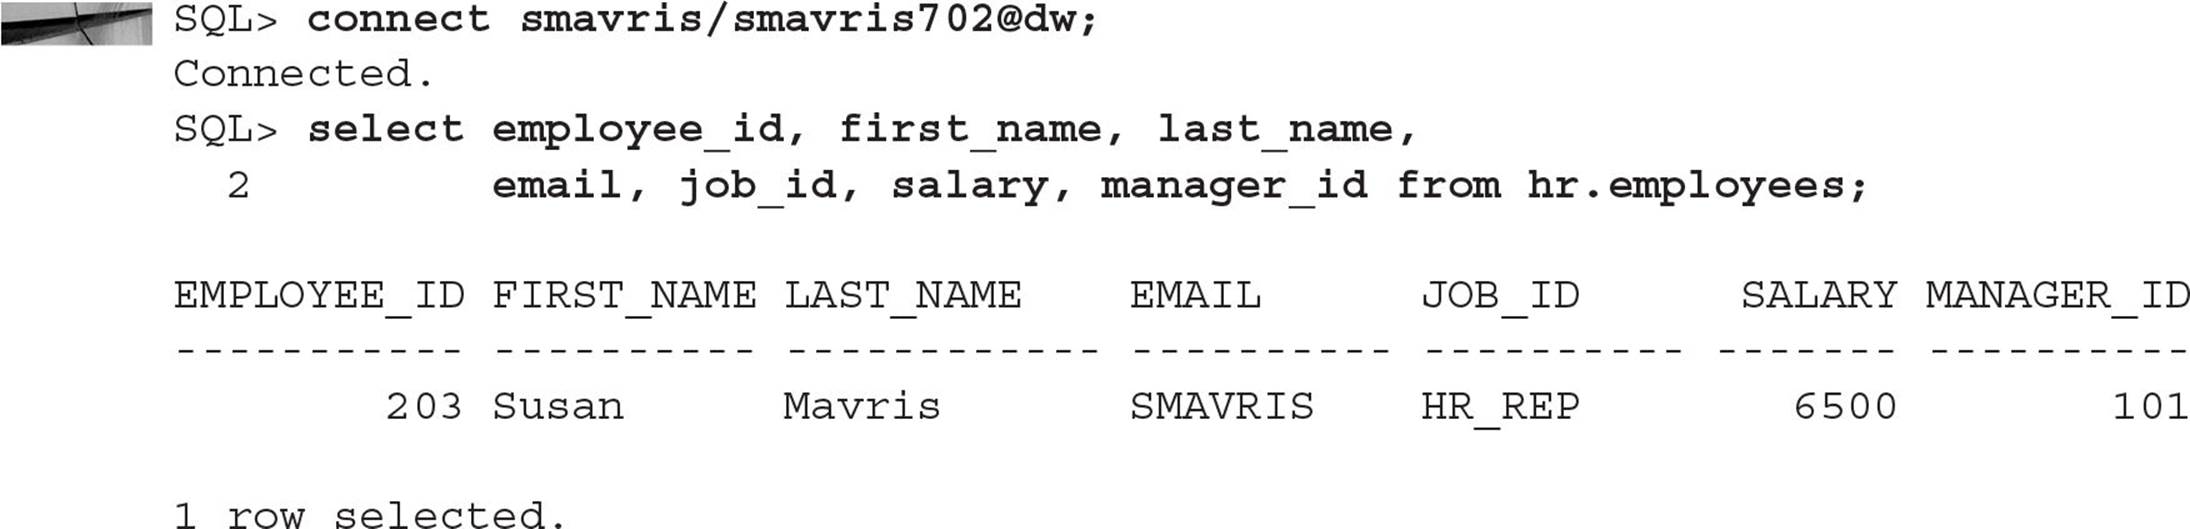
But wait, SMAVRIS is in the HR department and should be able to see all rows from the table. In addition, SMAVRIS should be the only person to see the salary information for all employees. As a result, we need to change our policy function to give SMAVRIS and other employees in the HR department full access to the HR.EMPLOYEES table; in addition, we can use column-level restrictions in the policy assignment to return the same number of rows, but with the sensitive data returned as NULL values.
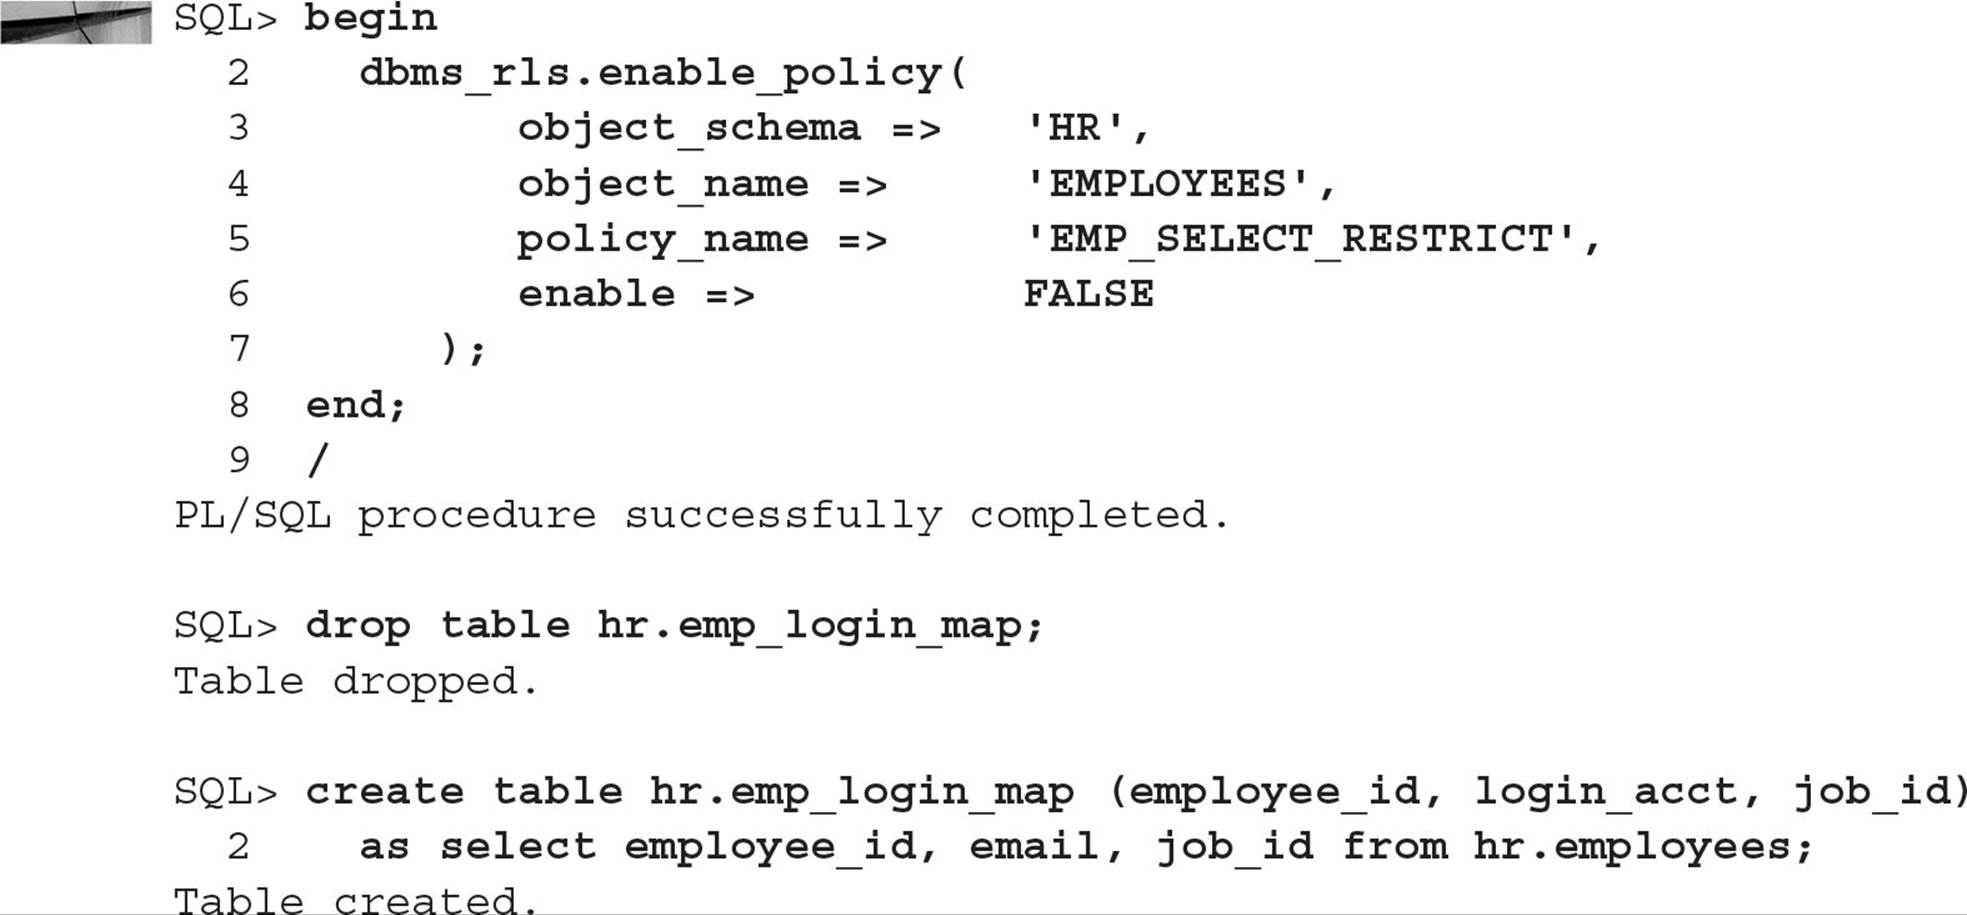
To facilitate access to the HR.EMPLOYEES table by HR department employees, we first need to change our mapping table to include the JOB_ID column. If the JOB_ID column has a value of HR_REP, the employee is in the HR department. We will first disable the policy in effect and create the new mapping table:

The procedure we’re using to set up the context variables, VPD.EMP_ACCESS, needs another context variable added that indicates the security level of the user accessing the table. We will change the SELECT statement and make another call to DBMS_SESSION.SET_CONTEXT, as follows:
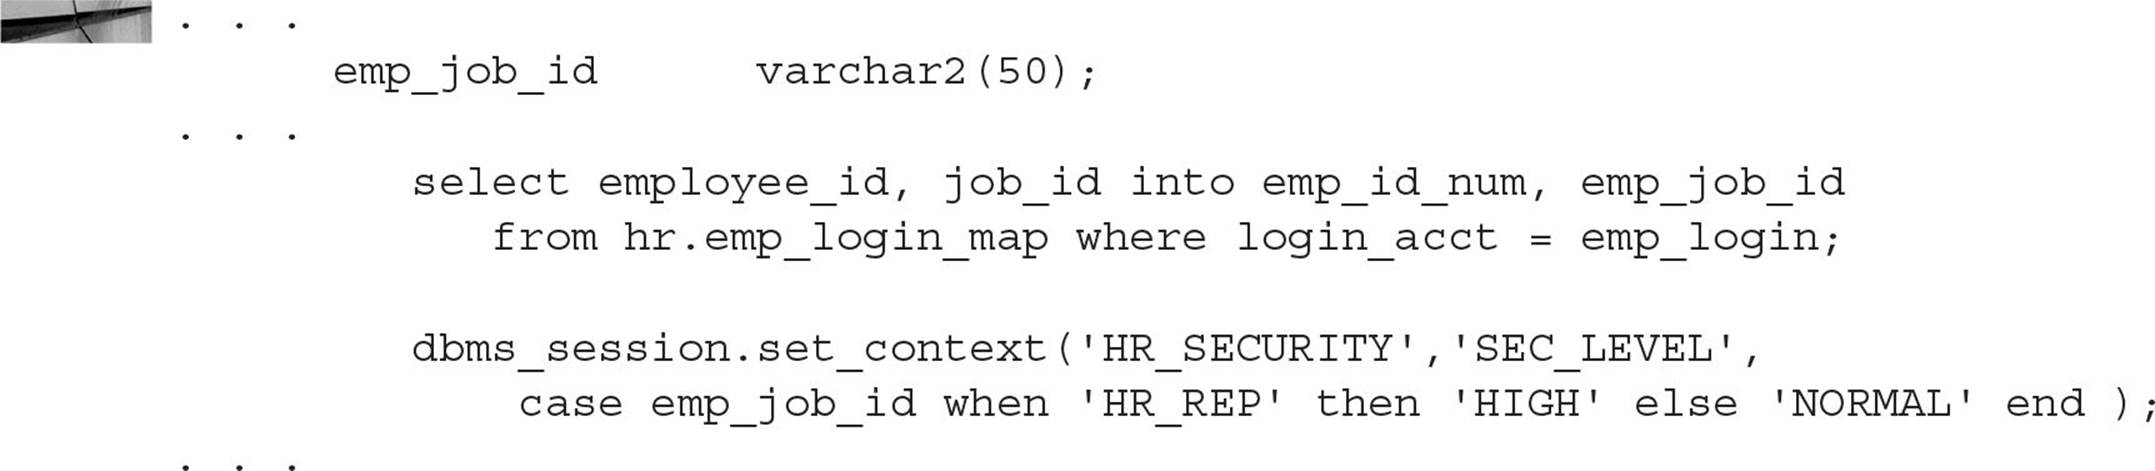
Whenever the employee has a job title of HR_REP, the context variable SEC_LEVEL is set to HIGH instead of NORMAL. In our policy function, we need to check for this new condition as follows:

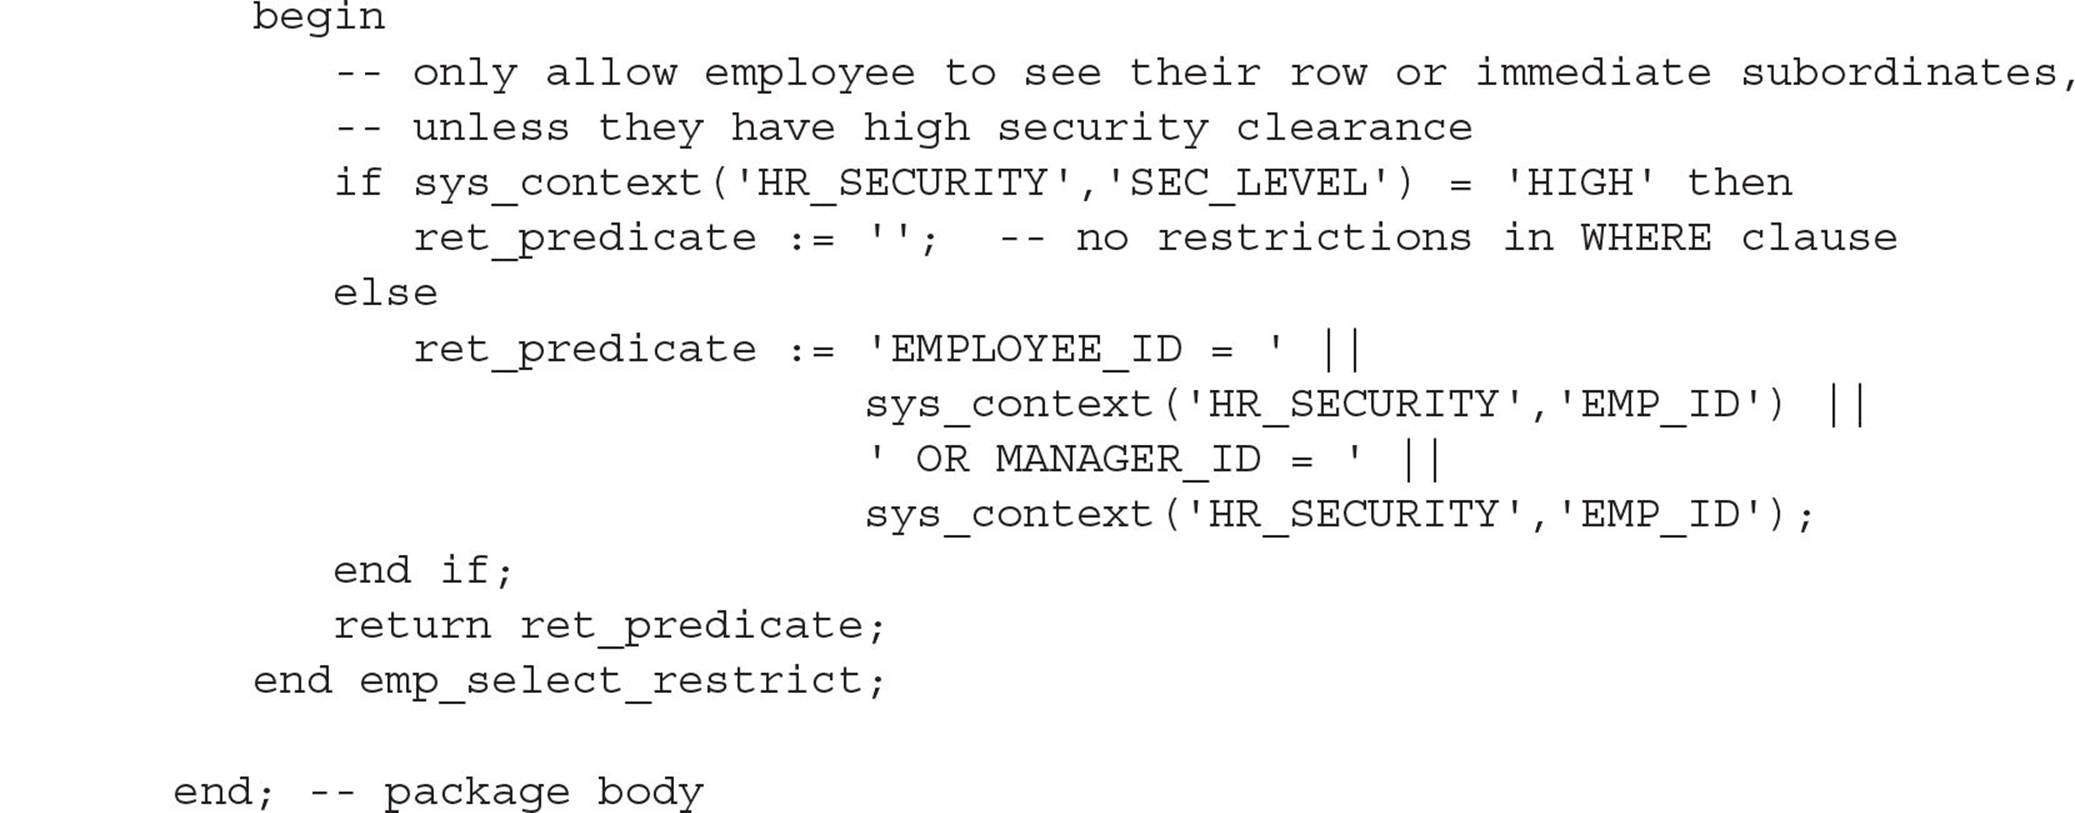
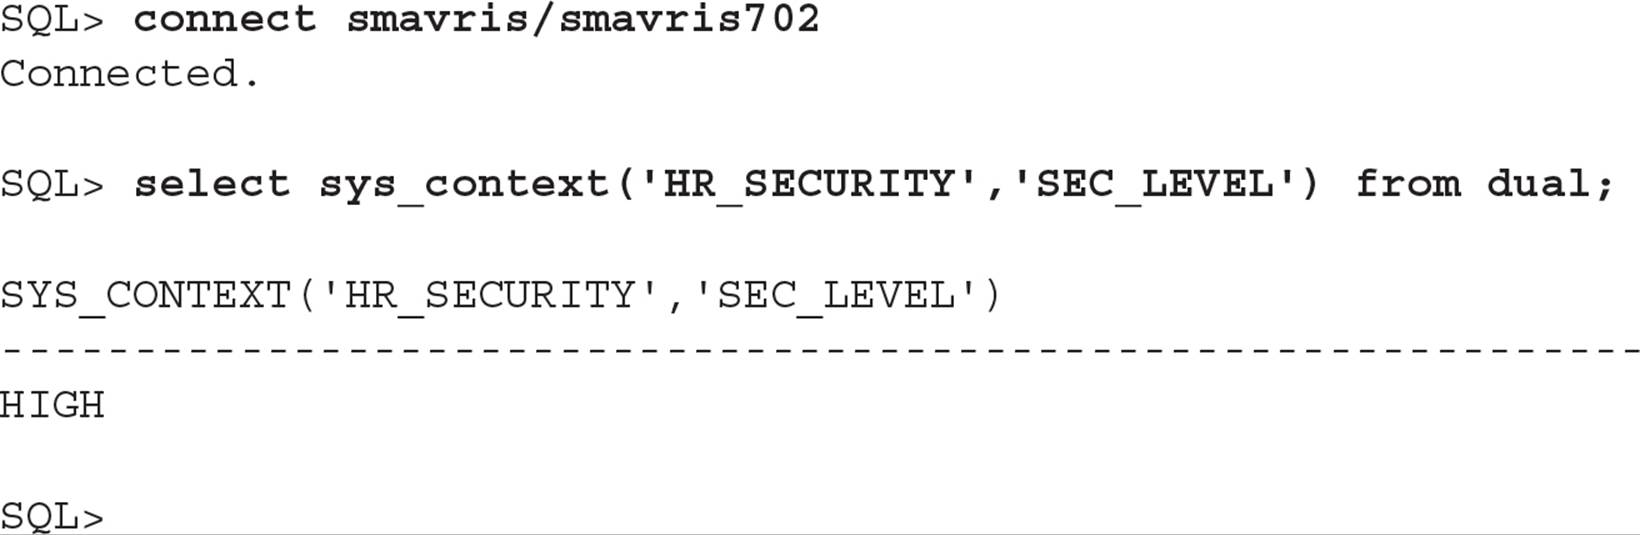
Because the policy is dynamic, the predicate is generated each time a SELECT statement is executed, so we don’t have to do a policy refresh. When the user SMAVRIS, the HR representative, runs the query now, she sees all rows in the HR.EMPLOYEES table:
As you might expect, SMAVRIS’s security level within the HR_SECURITY context is HIGH:
However, DGRANT can still only see his row in the table because his security level within the HR_SECURITY context is NORMAL:
To enforce the requirement that only HR employees can see salary information, we would need to make a slight change to the policy function and enable the policy with column-level restrictions. First, drop the current policy before creating the new one:
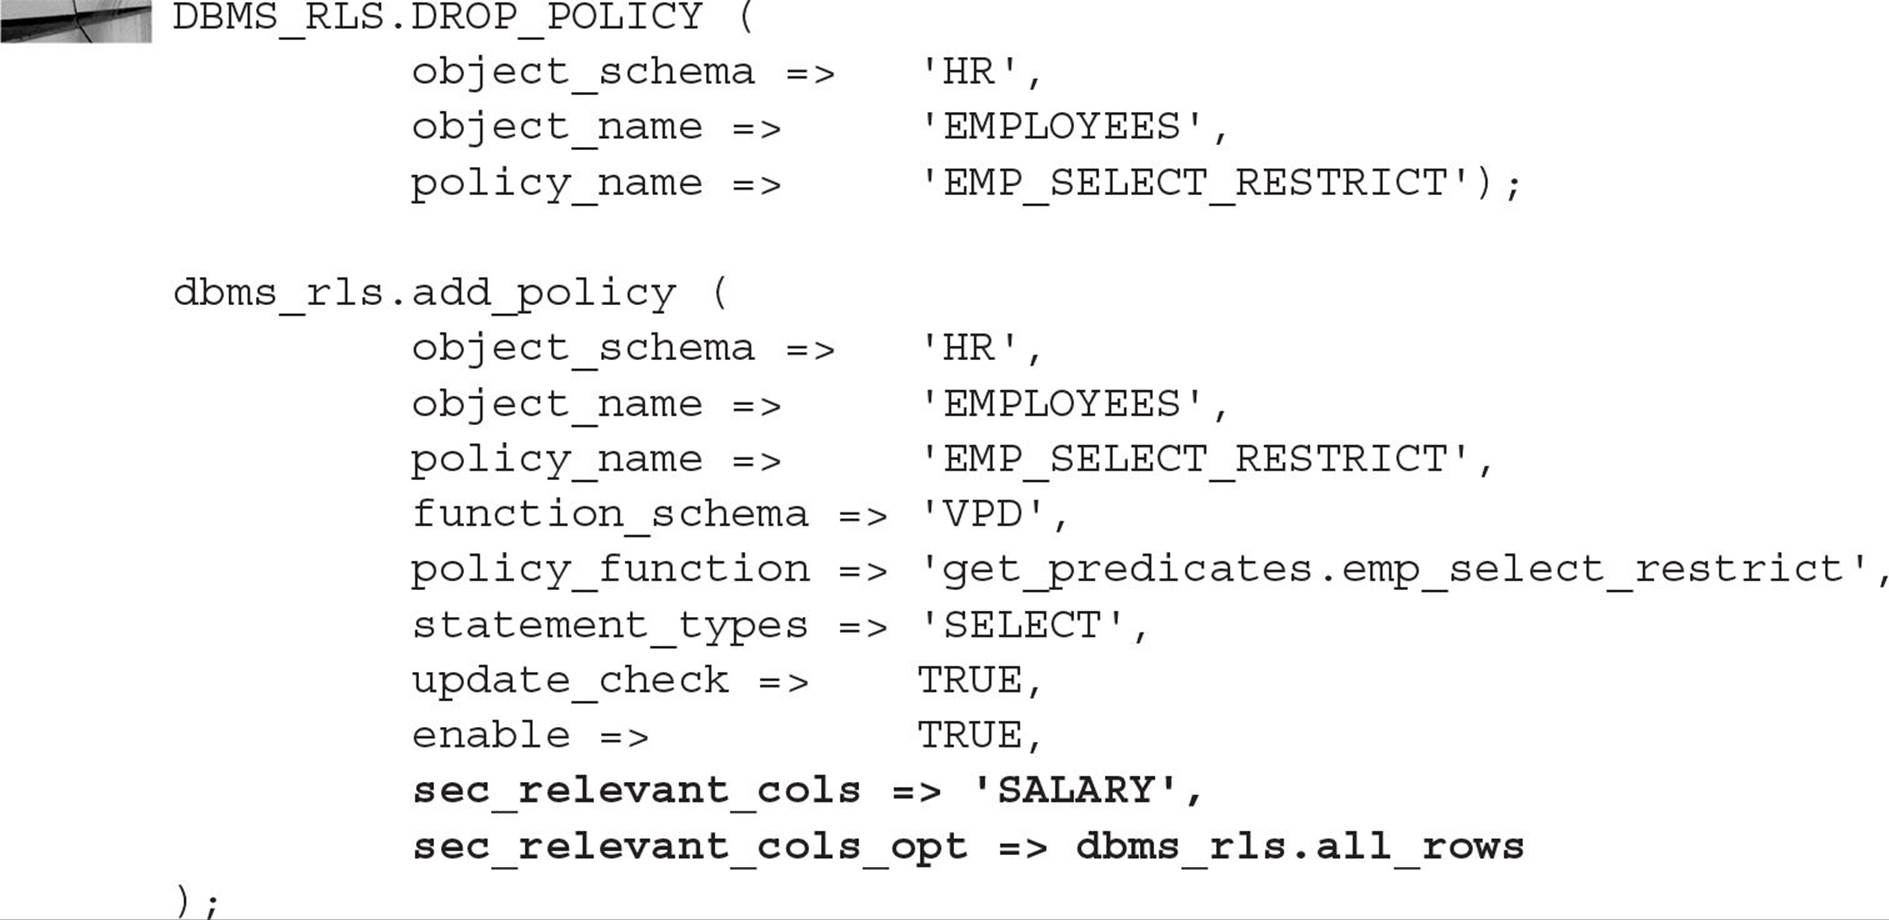
The last parameter, SEC_RELEVANT_COLS_OPT, specifies the package constant DBMS_RLS.ALL_ROWS to indicate that we still want to see all rows in our query results, but with the relevant columns (in this case SALARY) returning NULL values. Otherwise, we would not see any rows from queries that contain the SALARY column.
Debugging a VPD Policy
Even if you’re not getting an “ORA-28113: policy predicate has error” or an “ORA-00936: missing expression,” it can be very useful to see the actual predicate being generated at statement parse time. There are a couple of ways to debug your predicates, and both have their advantages and disadvantages.
The first method uses the dynamic performance views V$SQLAREA and V$VPD_POLICY. As the names imply, V$SQLAREA contains the SQL statements currently in the shared pool, along with current execution statistics. The view V$VPD_POLICY lists all the policies currently being enforced in the database, along with the predicate. Joining the two tables, as in the following example, gives us the information we need to help debug any problems we’re having with the query results:
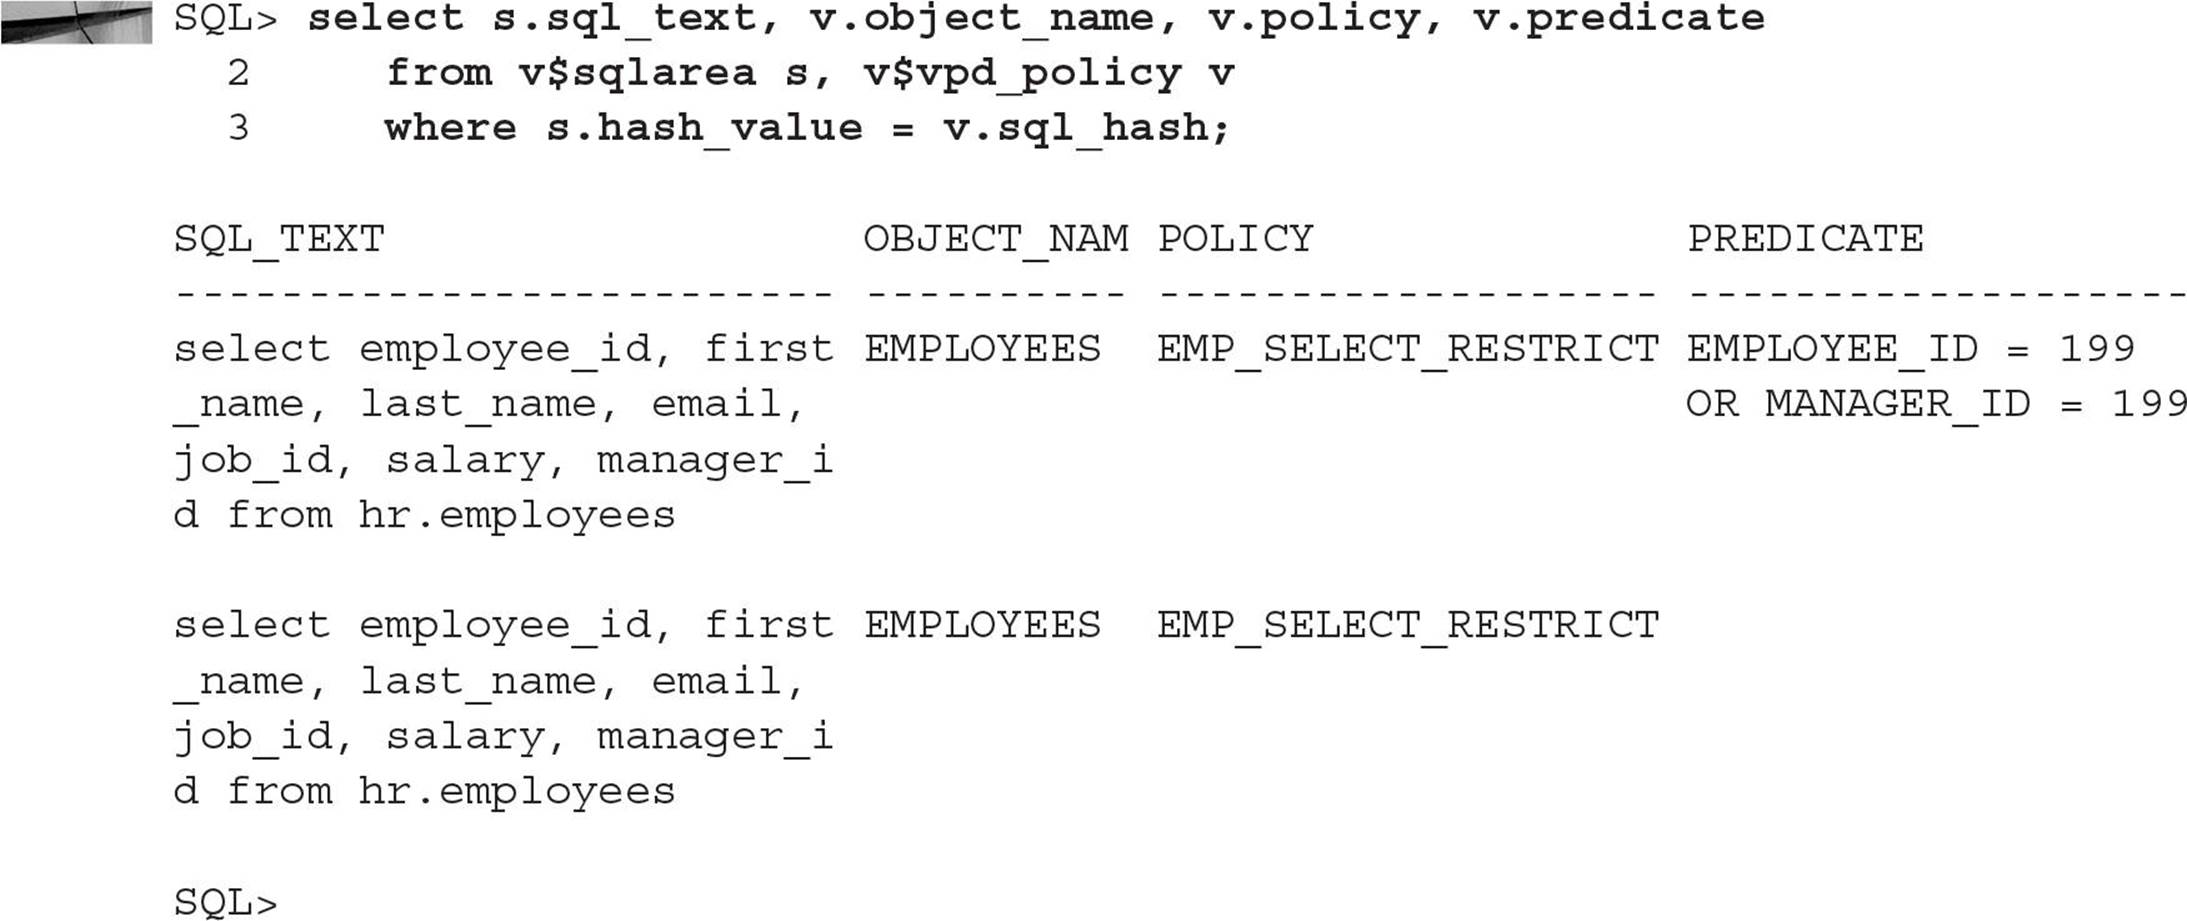
If we add a join to V$SESSION in this query, we can identify which user was running the SQL. This is especially important in the second SQL statement: there is no predicate applied to the SQL statement; therefore, all we can infer is that one of the HR employees ran the query. There is a downside to this method: If the database is extremely busy, the SQL commands may be flushed from the shared pool for other SQL commands before you get a chance to run this query.
The other method uses the ALTER SESSION command to generate a plain-text trace file containing much of the information from the previous query. Here are the commands to set up tracing:

Event 10730 is defined for tracing RLS policy predicates. Other common events that can be traced are 10029 and 10030 for session logon/logoff, 10710 to trace bitmap index access, and 10253 for simulating write errors to the redo log, among others. Once the session is altered, the user DGRANT runs his query:

Here’s a look at the bottom part of the trace file located in the directory specified by the initialization parameter DIAGNOSTIC_DEST in Oracle Database 11g and 12c, USER_DUMP_DEST in Oracle Database 10g and earlier.
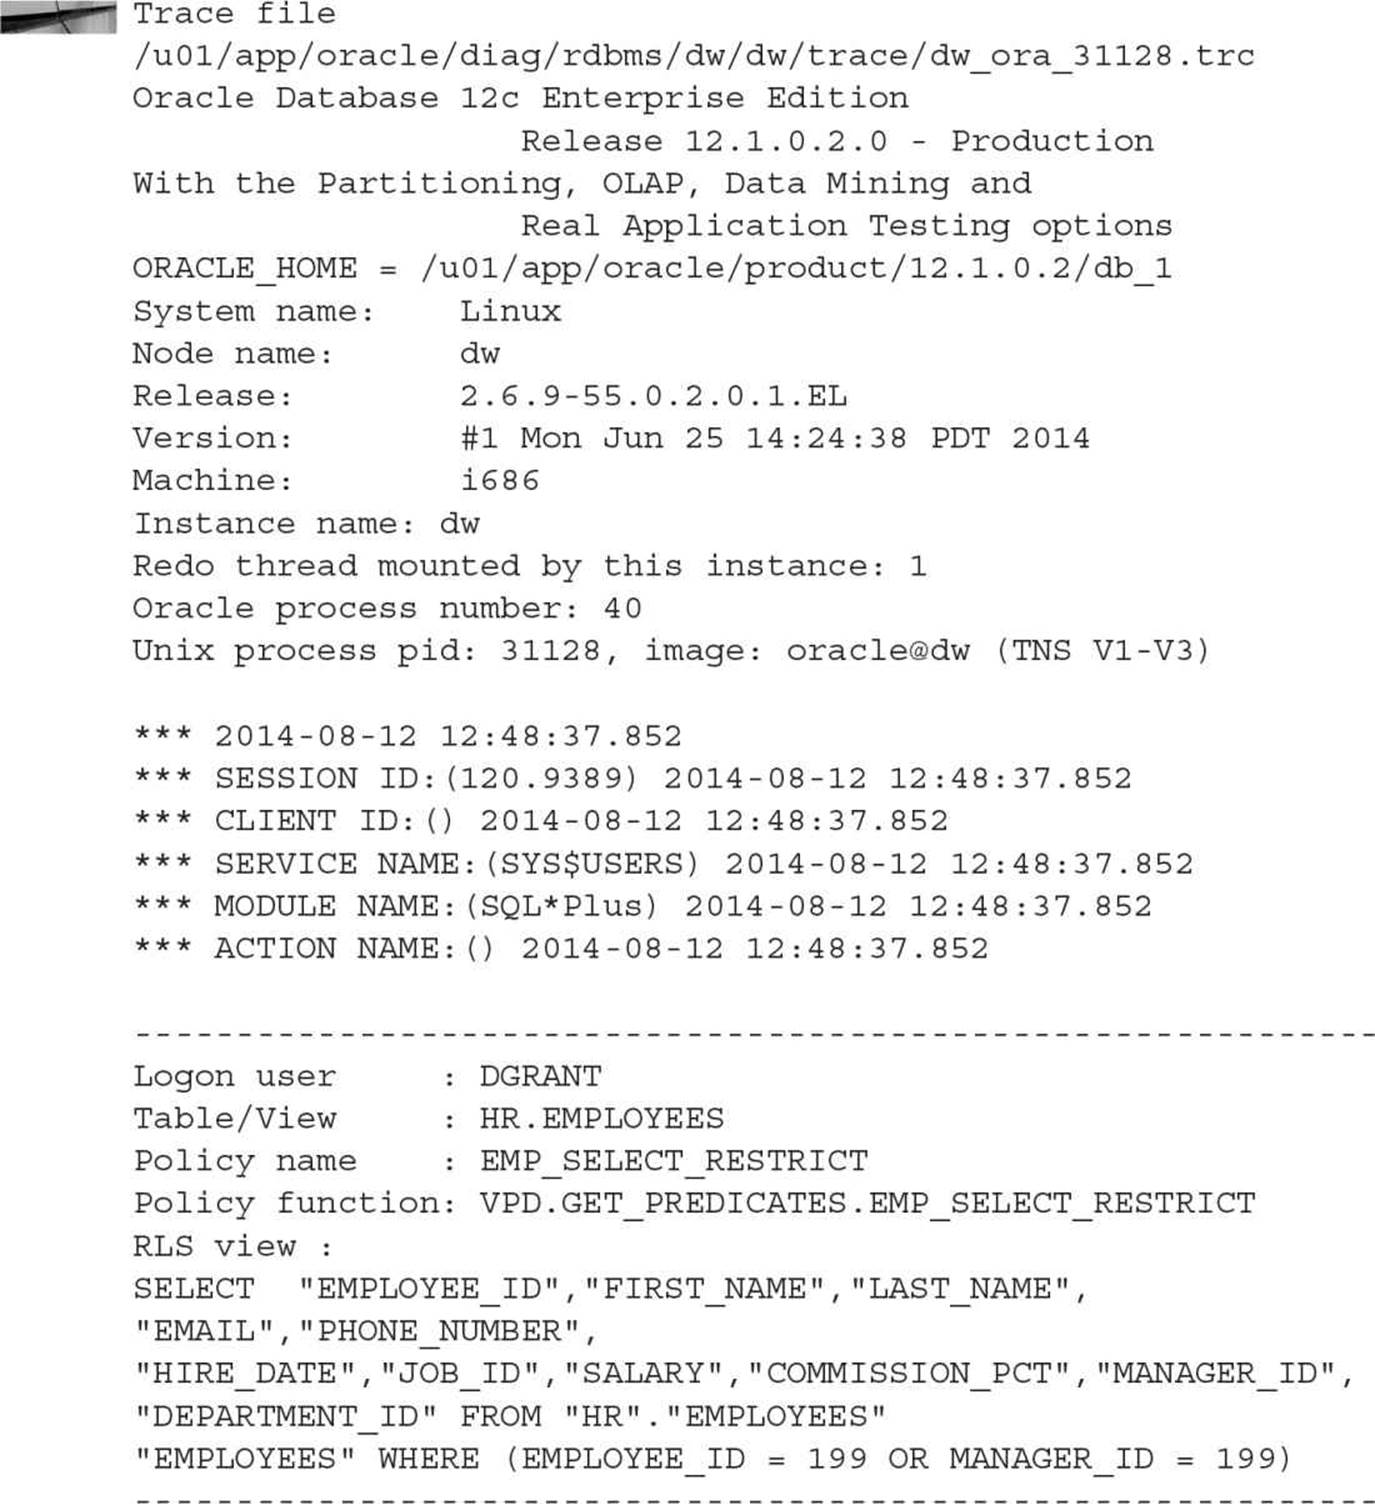
The user’s original SQL statement plus the appended predicate are clearly shown in the trace file. The downside to using this method is that while a user may be able to access dynamic performance views, a developer might not normally have access to the user dump directory on the server itself. As a result, the DBA may need to be involved when trying to debug predicate problems.
Be sure to turn off tracing when you’re done debugging to reduce the overhead and disk space associated with tracing operations (or just log off!):

Auditing
Oracle uses a number of different auditing methods to monitor what kinds of privileges are being used as well as what objects are being accessed. Auditing does not prevent the use of these privileges, but it can provide useful information to uncover abuse or misuse of privileges.
Table 10-15 summarizes the different types of auditing in an Oracle database.
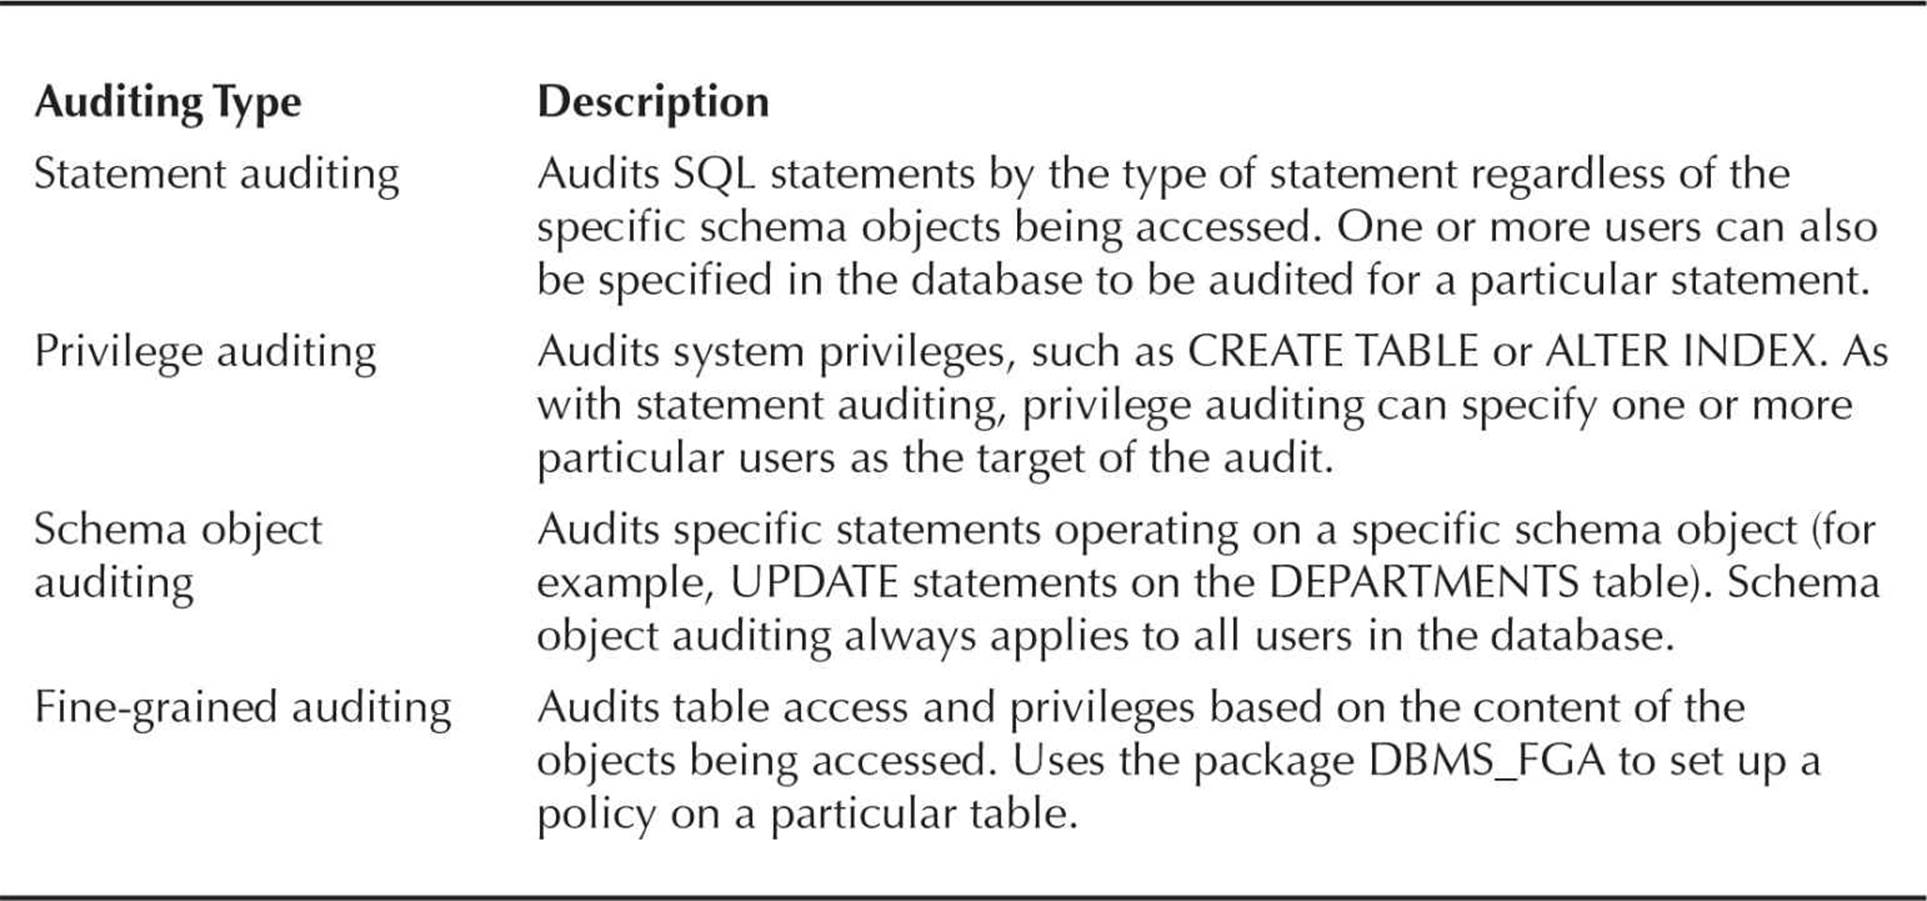
TABLE 10-15. Auditing Types
In the next few sections, we’ll review how a DBA can manage audits of both system and object privilege use. When the granularity is required, a DBA can use fine-grained auditing to monitor access to certain rows or columns of a table, not just whether the table was accessed.
Auditing Locations
Audit records can be sent to either the SYS.AUD$ database table or an operating system file. To enable auditing and specify the location where audit records are recorded, the initialization parameter AUDIT_TRAIL is set to one of the following values:
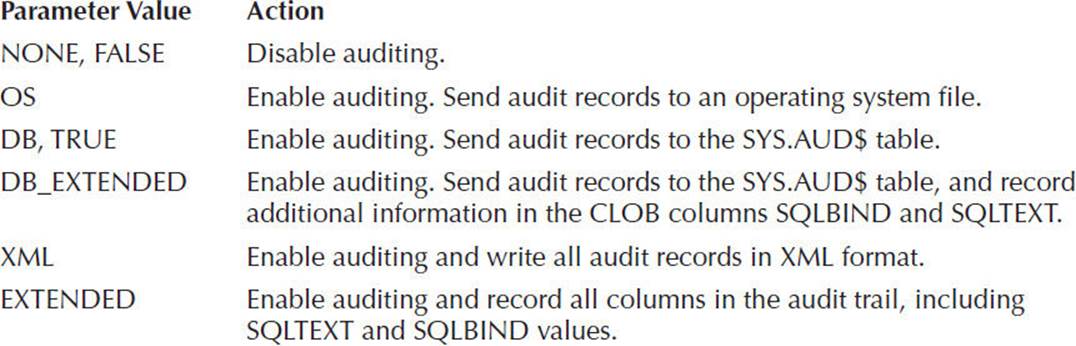
The parameter AUDIT_TRAIL is not dynamic; the database must be shut down and restarted for a change in the AUDIT_TRAIL parameter to take effect. When auditing to the SYS.AUD$ table, the size of the table should be carefully monitored so as not to impact the space requirements for other objects in the SYS tablespace. It is recommended that the rows in SYS.AUD$ be periodically archived and the table truncated. Oracle provides the role DELETE_CATALOG_ROLE to use with a special account in a batch job to archive and truncate the audit table.
As of Oracle Database 12c, system security administration is simplified by a unified audit data trail. In previous releases, you would have to go to each of the following tables to get audit information:
![]() SYS.AUD$ Database audit trail
SYS.AUD$ Database audit trail
![]() SYS.FGA_LOG$ Fine-grained auditing
SYS.FGA_LOG$ Fine-grained auditing
![]() DVSYS.AUDIT_TRAIL$ Database Vault audit trail
DVSYS.AUDIT_TRAIL$ Database Vault audit trail
The new unified audit trail is named, not surprisingly, UNIFIED_AUDIT_TRAIL. This new audit trail has its own schema as well: the AUDSYS schema is used exclusively for the unified audit trail. In addition, two new roles, AUDIT_ADMIN and AUDIT_VIEWER, further refine separation of duties.
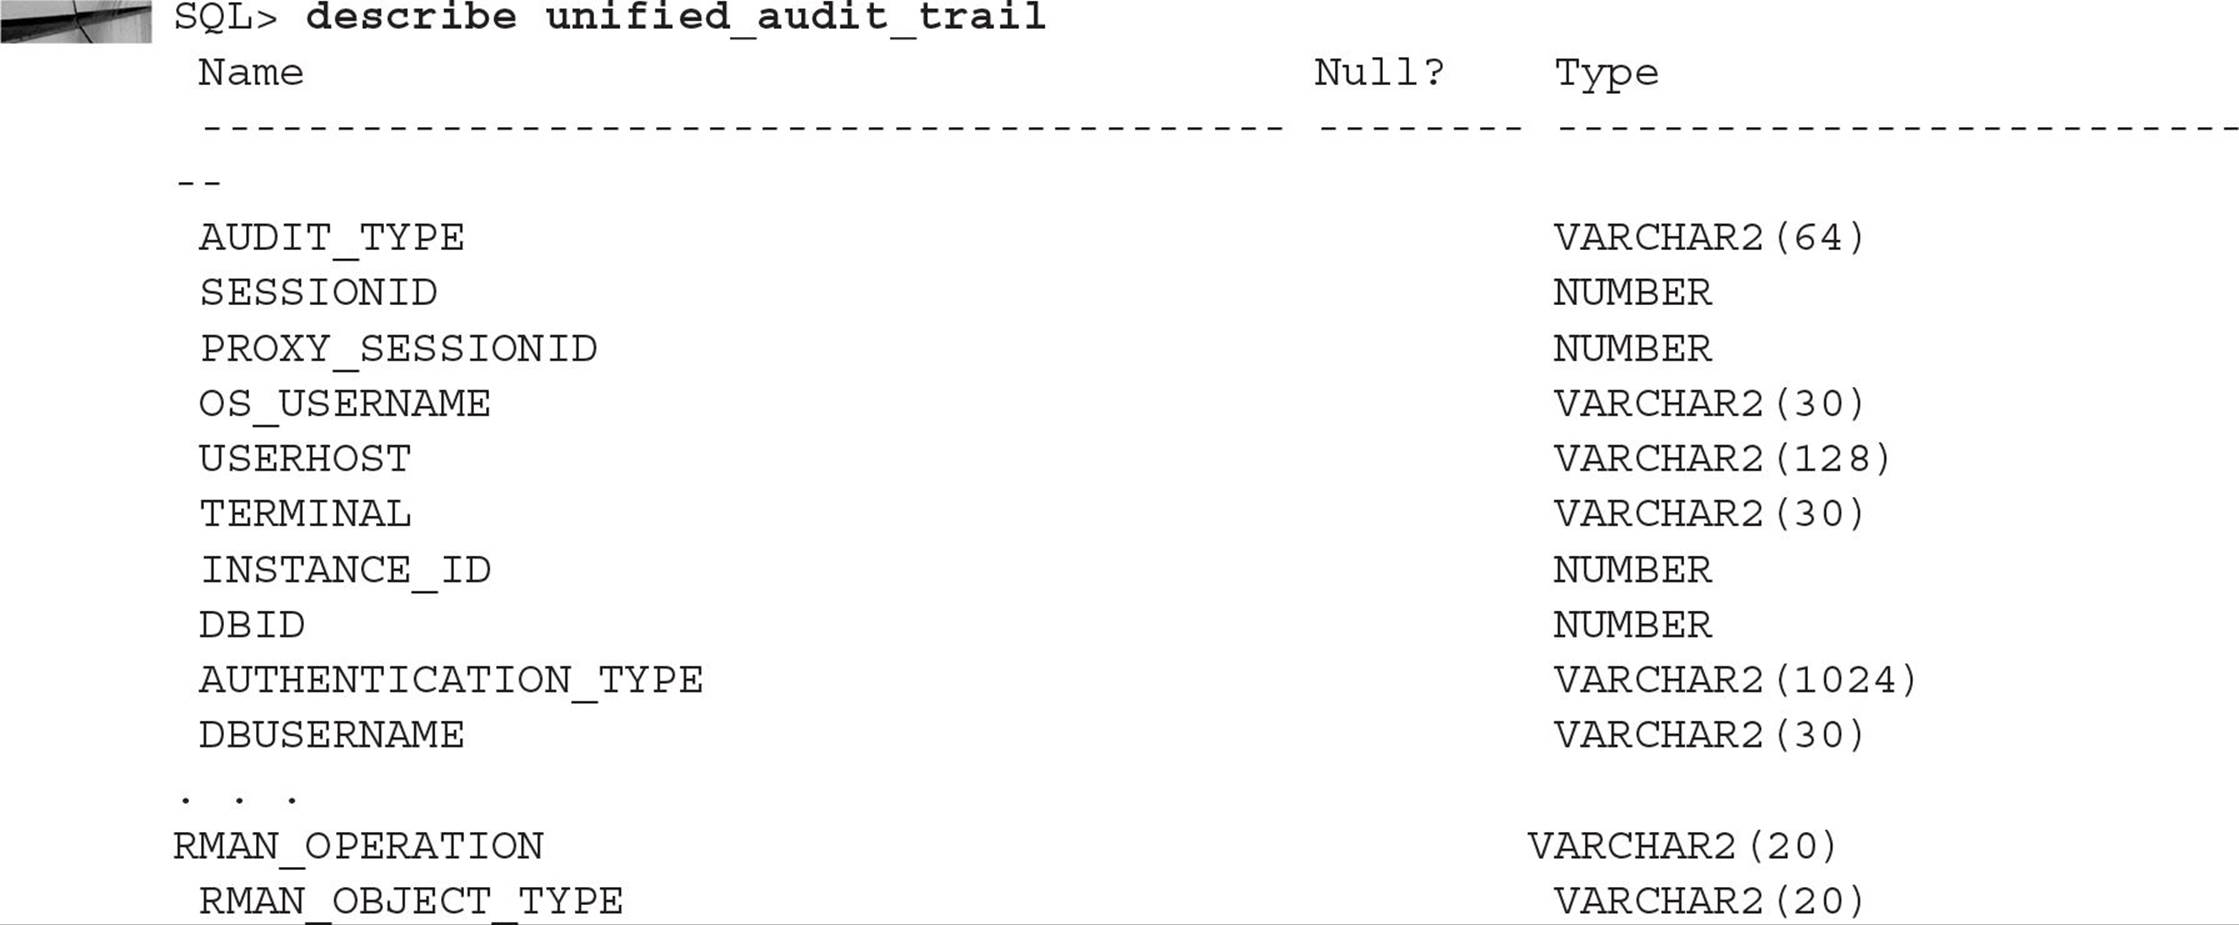

The columns in UNIFIED_AUDIT_TRAIL are much what you’d expect as an amalgam of the existing individual audit tables. There is no CON_ID column as you might see for a data dictionary view in a multitenant environment; however, auditing-related procedures such as DBMS_AUDIT_MGMT.CLEAN_AUDIT_TRAIL and FLUSH_UNIFIED_AUDIT_TRAIL let you specify a single container or all containers when operating on the audit trail rows.
Statement Auditing
All types of auditing use the AUDIT command to turn on auditing and NOAUDIT to turn off auditing. For statement auditing, the format of the AUDIT command looks something like the following:

The sql_statement_clause contains a number of different pieces of information, such as the type of SQL statement we want to audit and who we are auditing.
In addition, we want to either audit the action every time it happens (BY ACCESS) or only once (BY SESSION). The default is BY SESSION.
Sometimes we want to audit successful actions—statements that did not generate an error message. For these statements, we add WHENEVER SUCCESSFUL. Other times we only care if the commands using the audited statements fail, either due to privilege violations, running out of space in the tablespace, or syntax errors. For these we use WHENEVER NOT SUCCESSFUL.
For most categories of auditing methods, we can specify ALL instead of individual statement types or objects if we truly want all types of access to a table or any privileges by a certain user to be audited.
The types of statements we can audit, with a brief description of what statements are covered in each category, are listed in Table 10-16. If ALL is specified, any statement in this list is audited. However, the types of statements in Table 10-17 do not fall into the ALL category when enabling auditing; they must be explicitly specified in any AUDIT commands.
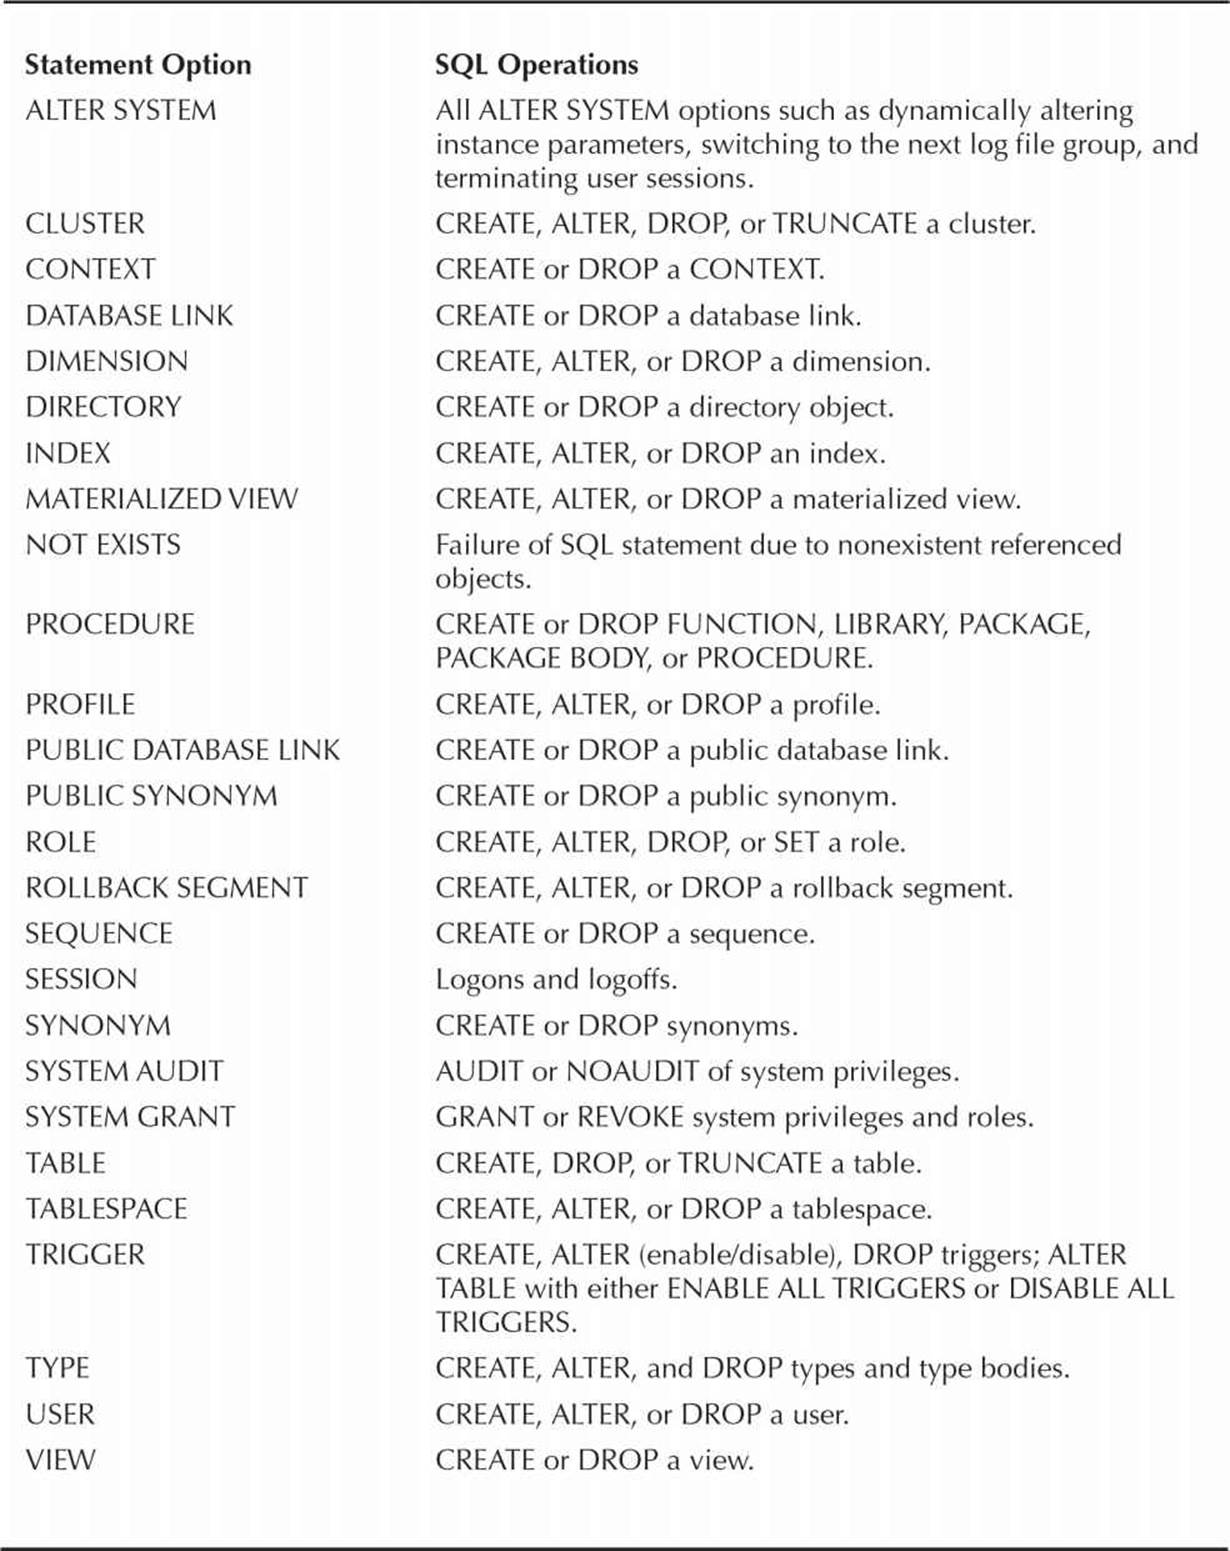
TABLE 10-16. Auditable Statements Included in the ALL Category
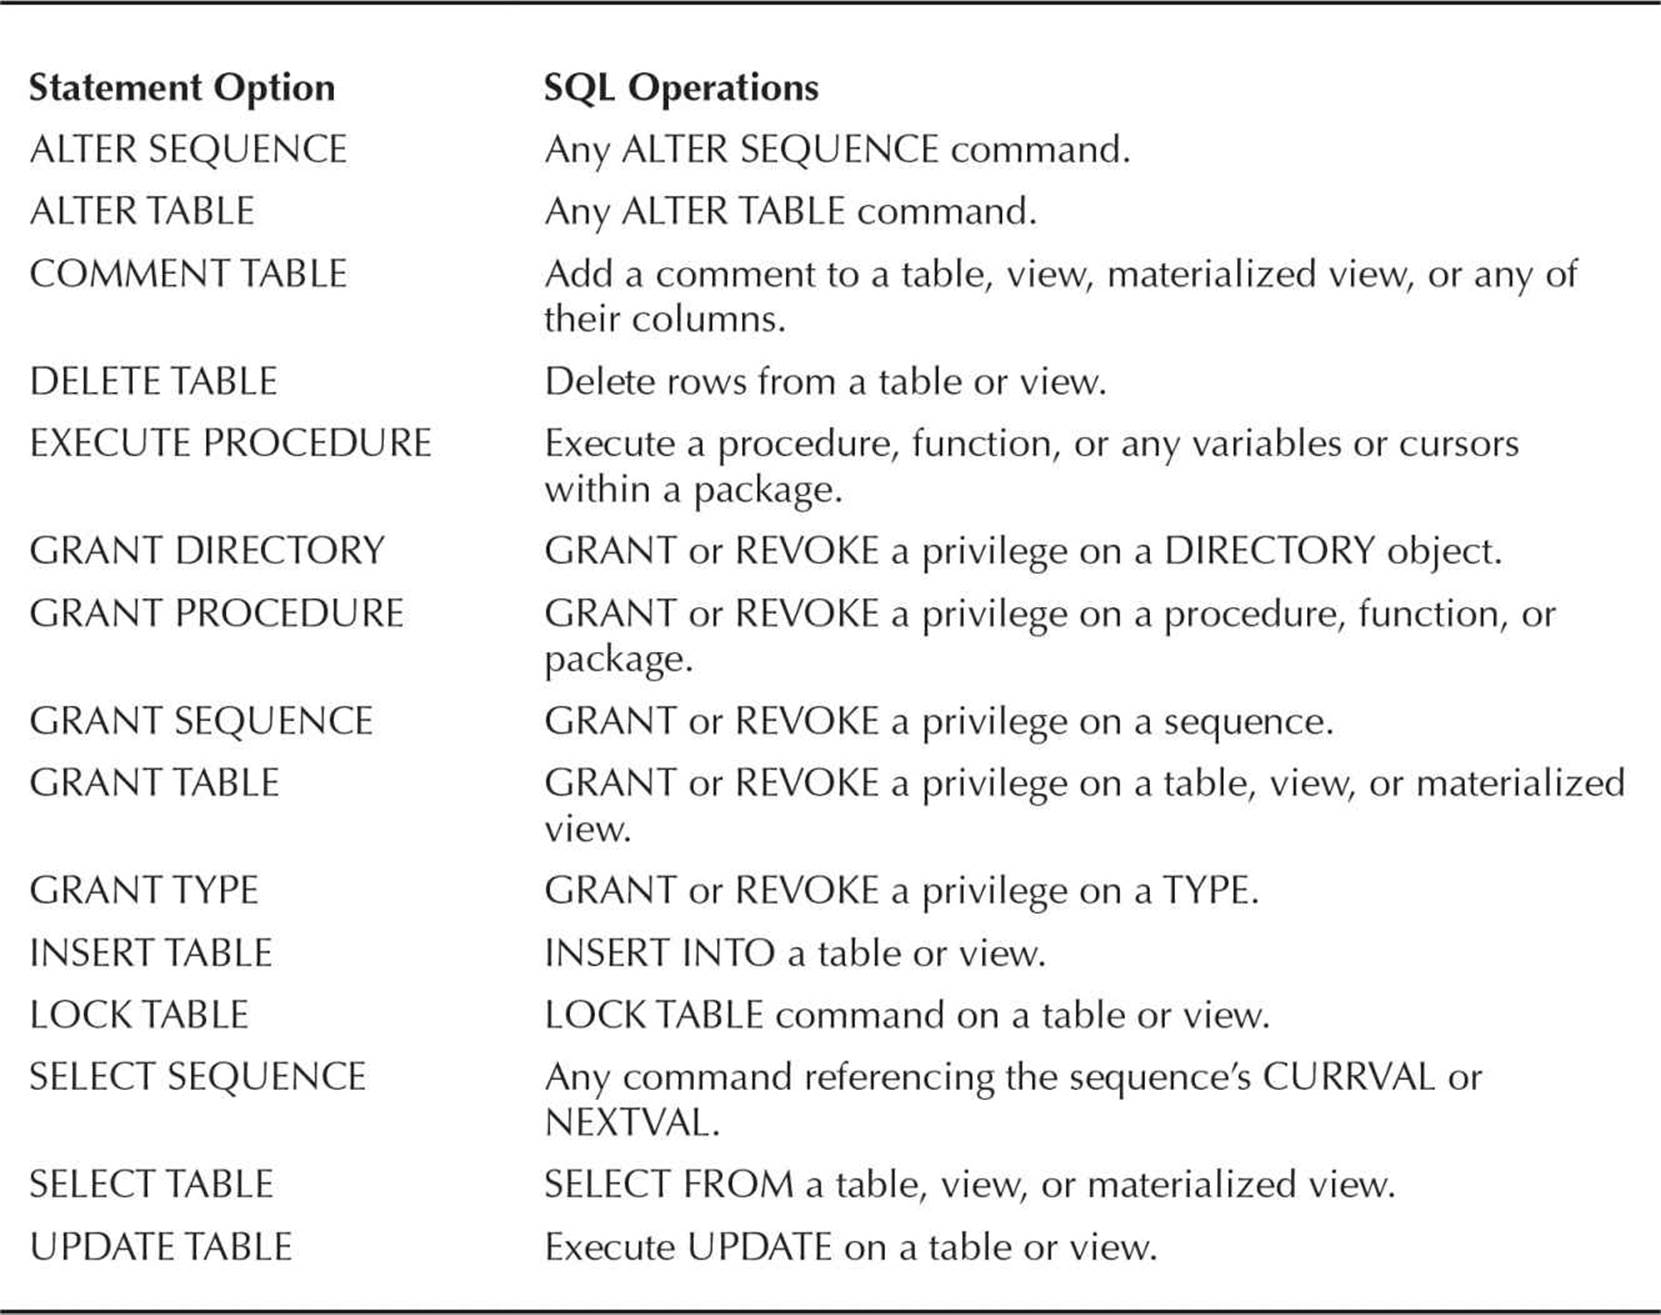
TABLE 10-17. Explicitly Specified Statement Types
Some examples will help make all these options a lot clearer. In our sample database, the user KLYNNE has privileges on all of the tables in the HR schema and other schemas. KLYNNE is allowed to create indexes on some of these tables, but we want to know when the indexes are created in case we have some performance issues related to execution plans changing. We can audit index creation by KSHELTON with the following command:

Later that day, KLYNNE creates an index on the HR.JOBS table:

Checking the audit trail in the data dictionary view DBA_AUDIT_TRAIL, we see that KSHELTON did indeed create an index at 5:15 P.M. on August 12th:
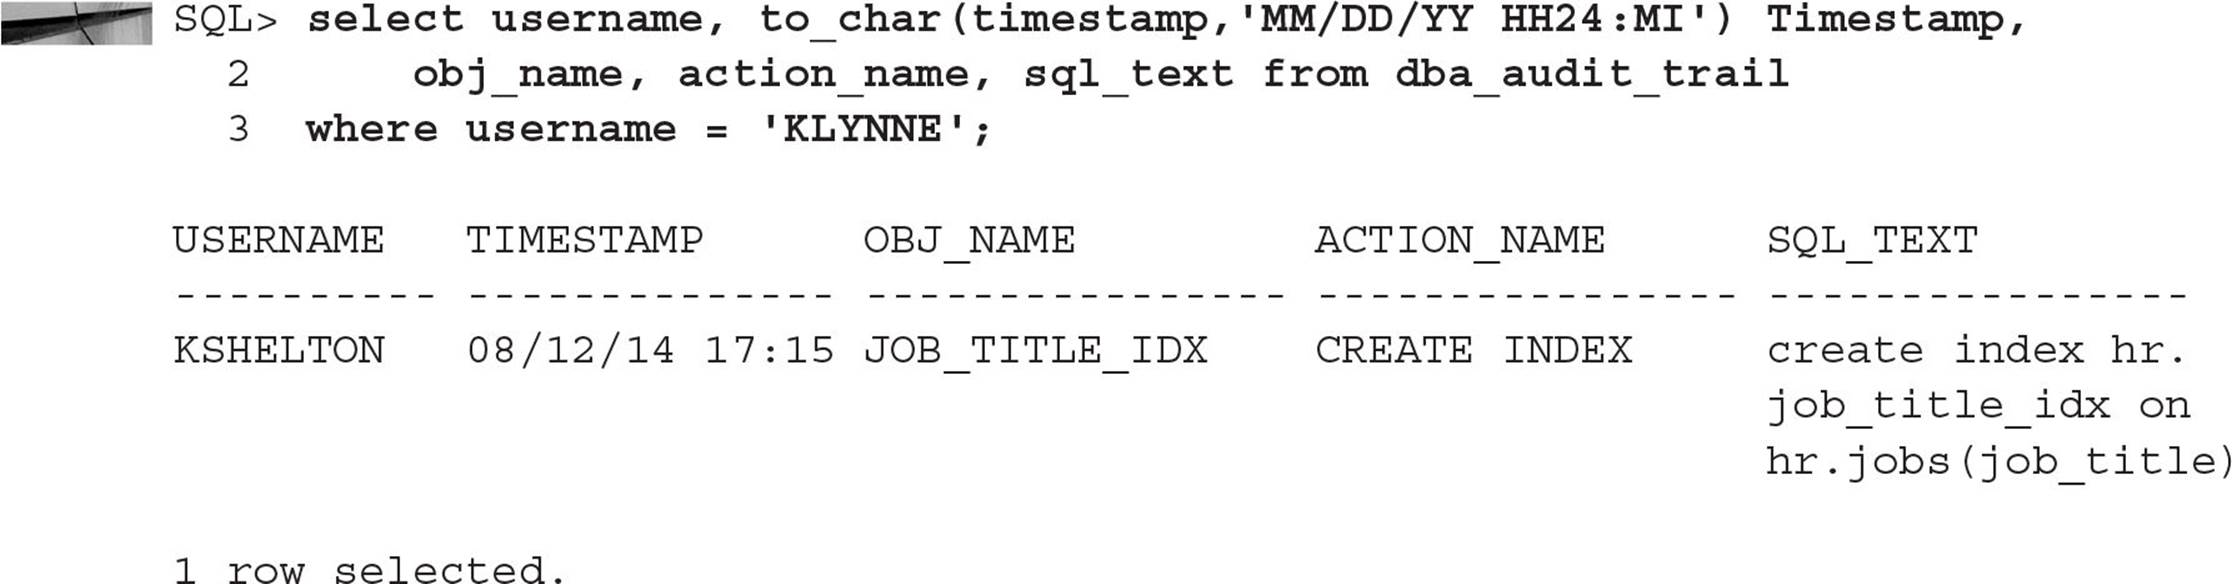
NOTE
Starting with Oracle Database 11g, the columns SQL_TEXT and SQL_BIND in DBA_AUDIT_TRAIL are populated only if the initialization parameter AUDIT_TRAIL is set to DB_EXTENDED. By default, the value of AUDIT_TRAIL is DB.
To turn off auditing for KLYNNE on the HR.JOBS table, we use the NOAUDIT command, as follows:

We also may wish to routinely audit both successful and unsuccessful logins. This requires two AUDIT commands:

Reviewing the audit trail reveals one failed login attempt by the user RJB on August 10th:
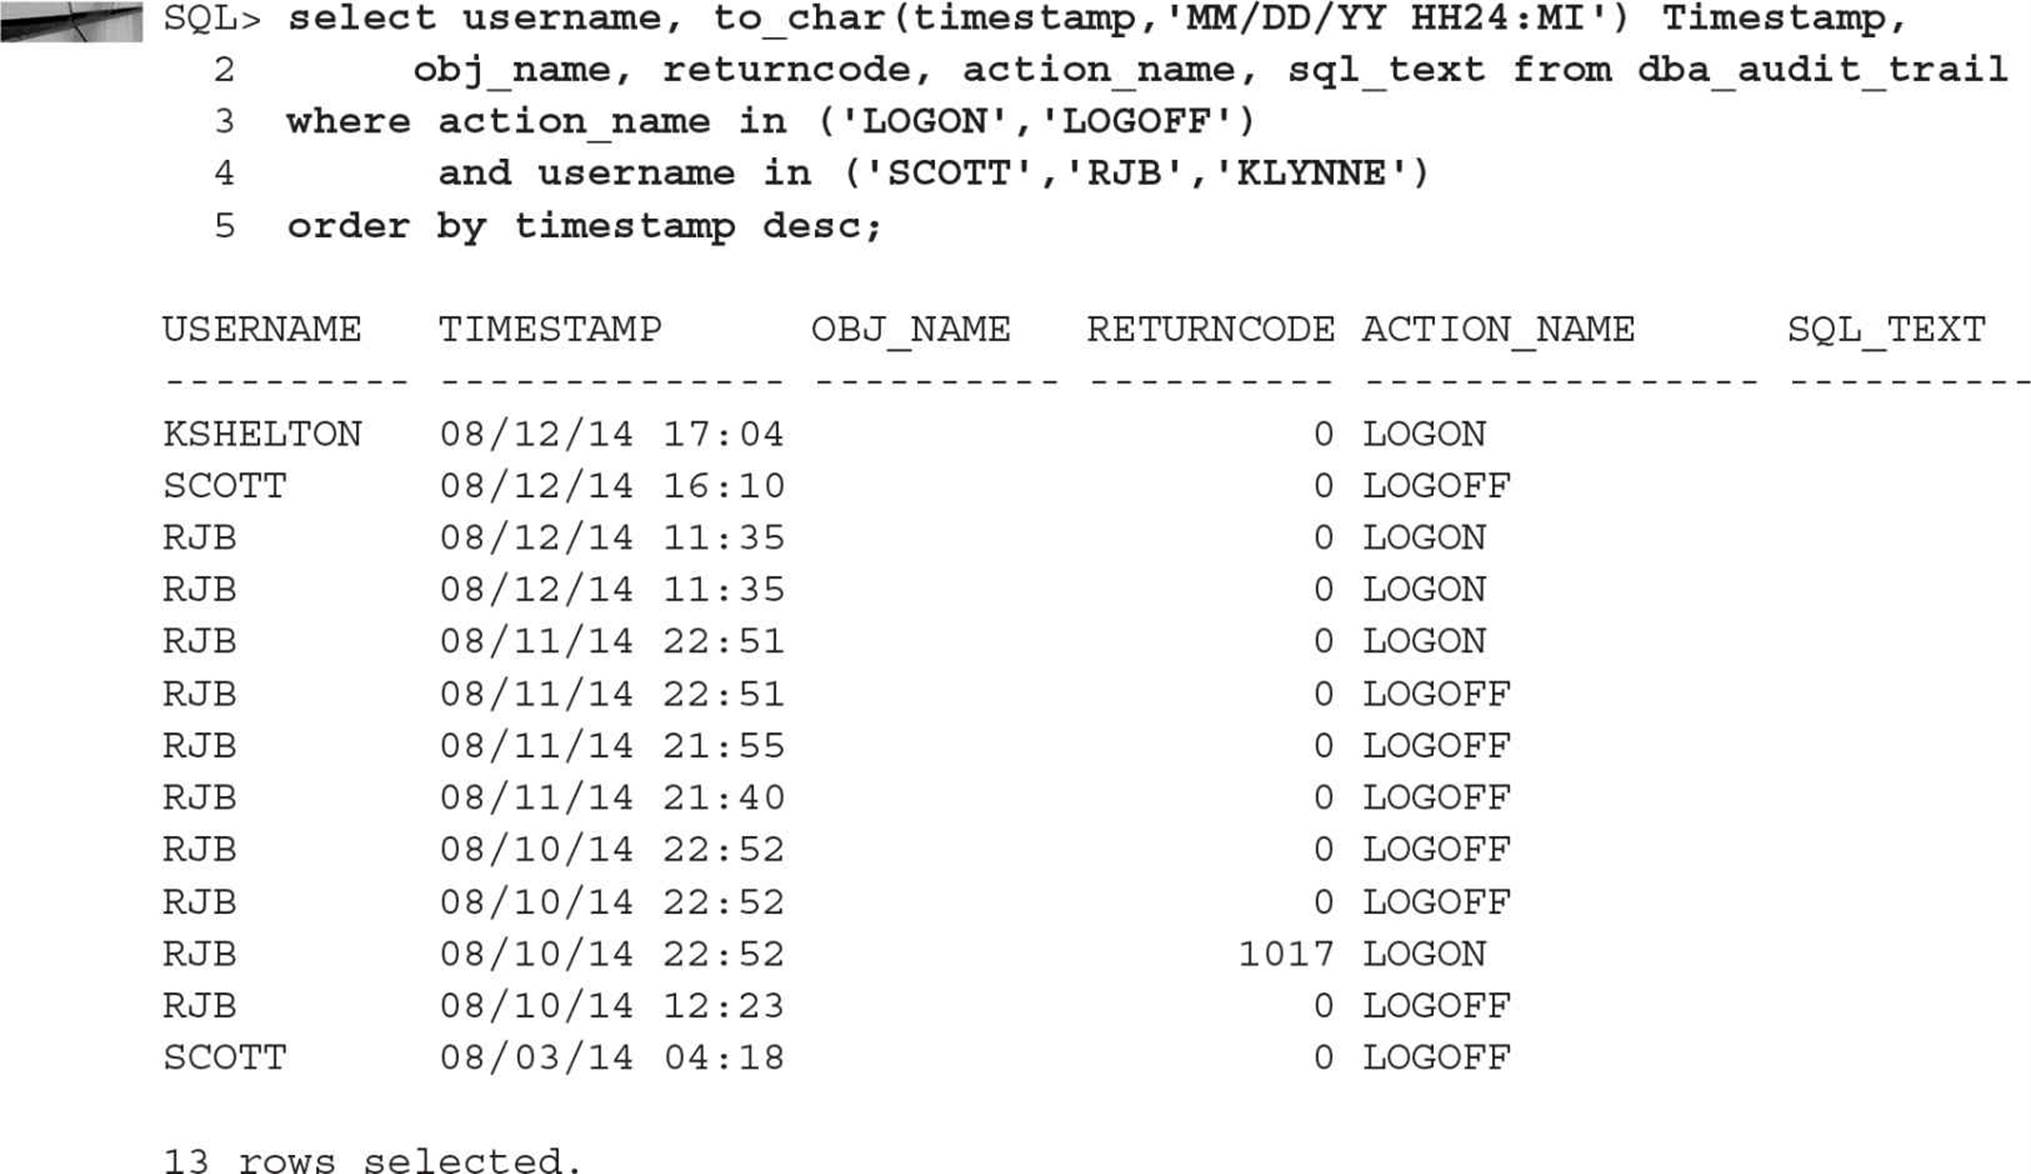
The RETURNCODE represents the ORA error message. An ORA-1017 message indicates that an incorrect password was entered. Note that if we are just interested in logons and logoffs, we could use the DBA_AUDIT_SESSION view instead.
Statement auditing also includes startup and shutdown operations. Although we can audit the command SHUTDOWN IMMEDIATE in the SYS.AUD$ table, it is not possible to audit the startup command in SYS.AUD$ because the database has to be started before rows can be added to this table. For these cases, we can look in the directory specified in the initialization parameter AUDIT_FILE_DEST to see a record of a startup operation performed by a system administrator (by default this parameter contains $ORACLE_HOME/admin/dw/adump). Here is a text file created when the database was started with the startup command:
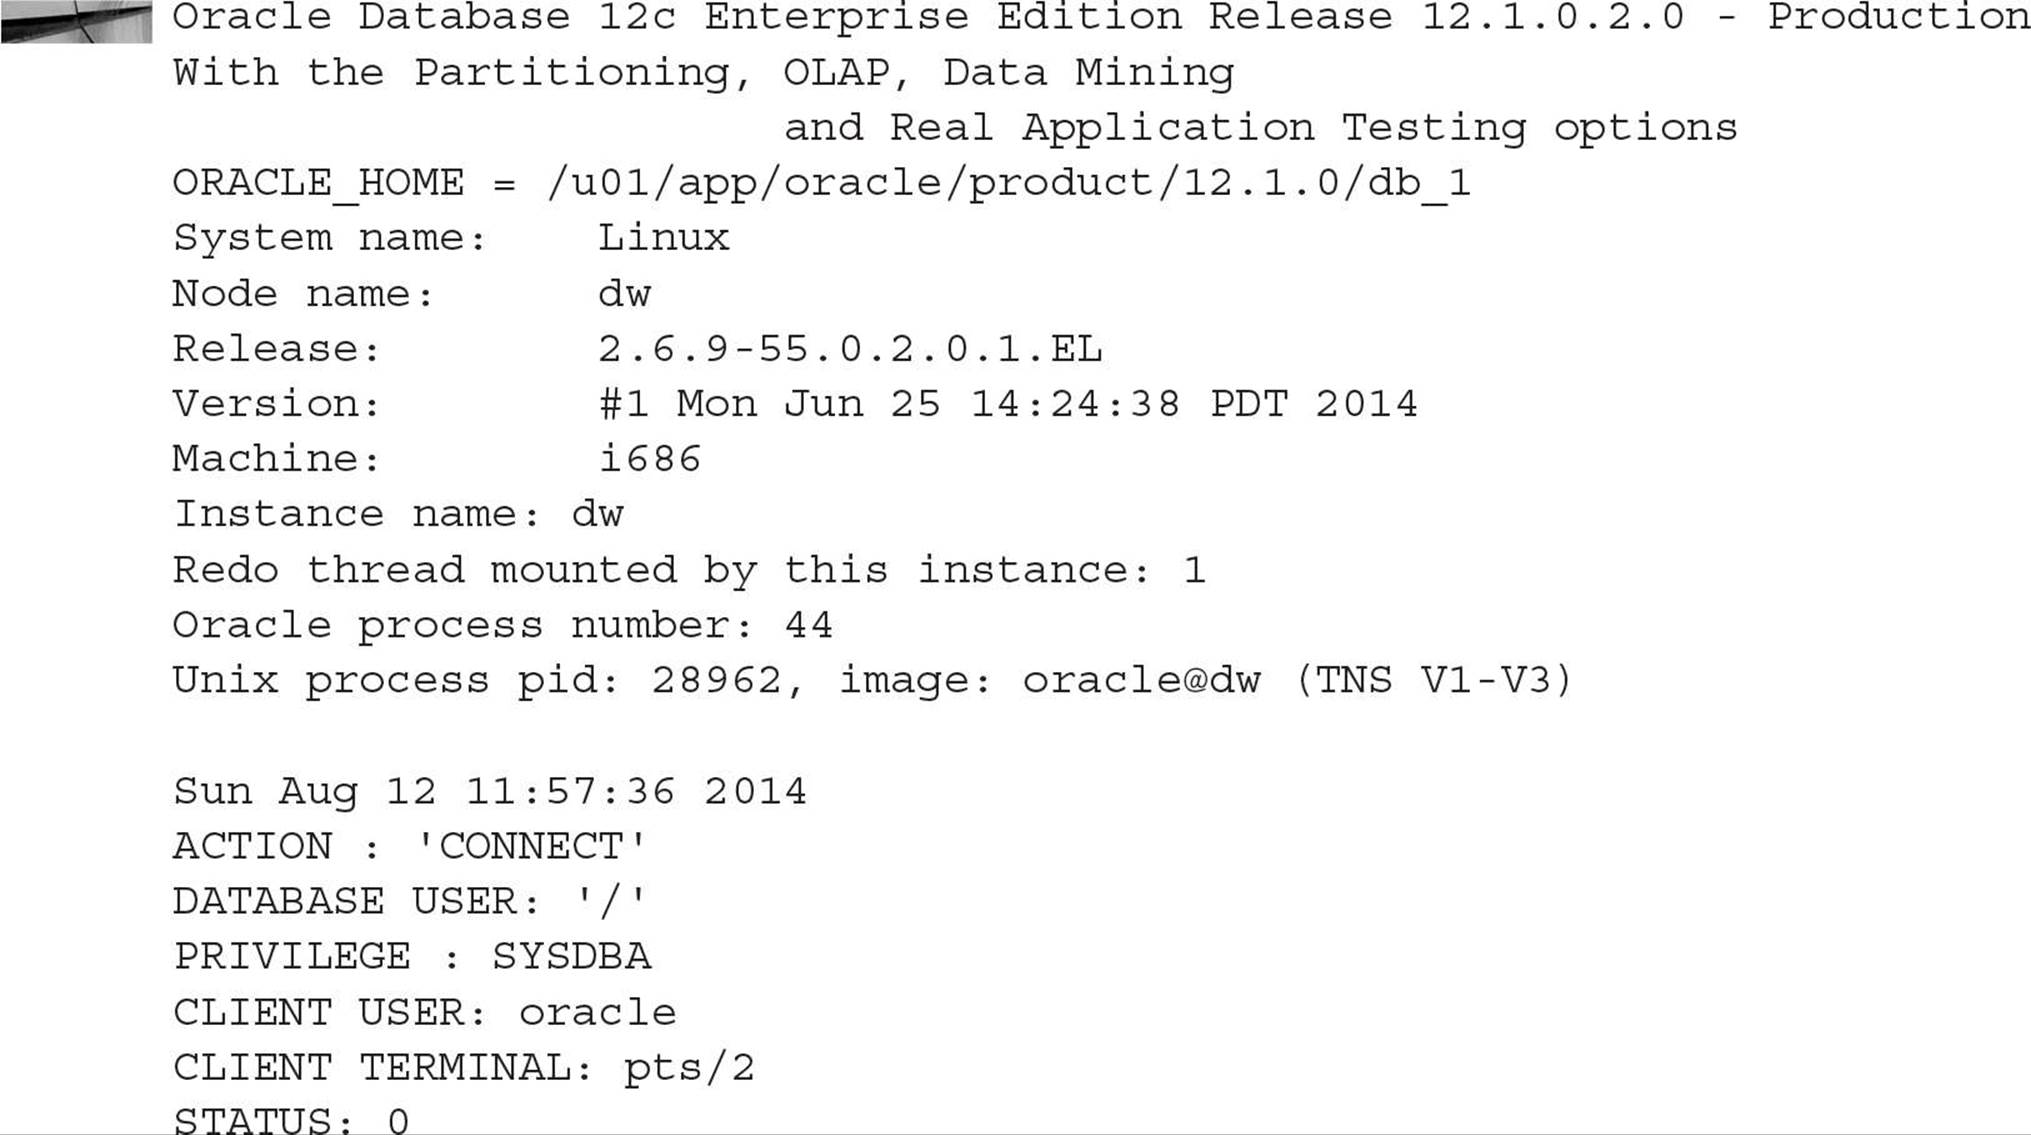
In this example, the database was started by a user connected as oracle on the host system and connected to the instance with operating system authentication. We will cover additional system administrator auditing issues in the next section.
Privilege Auditing
Auditing system privileges has the same basic syntax as statement auditing, except that system privileges are specified in the sql_statement_clause instead of statements.
For example, we may wish to grant the ALTER TABLESPACE privilege to all our DBAs, but we want to generate an audit record when this happens. The command to enable auditing on this privilege looks similar to statement auditing:

Every time the ALTER TABLESPACE privilege is successfully used, a row is added to SYS.AUD$.
Special auditing is available for system administrators who use the SYSDBA and SYSOPER privileges or connect with the SYS user. To enable this extra level of auditing, set the initialization parameter AUDIT_SYS_OPERATIONS to TRUE. The audit records are sent to the same location as the operating system audit records; therefore, this location is operating system dependent. All SQL statements executed while using one of these privileges, as well as any SQL statements executed as the user SYS, are sent to the operating system audit location.
Schema Object Auditing
Auditing access to various schema objects looks similar to statement and privilege auditing:

The schema_object_clause specifies a type of object access and the object being accessed. Fourteen different types of operations on specific objects can be audited; they are listed in Table 10-18.
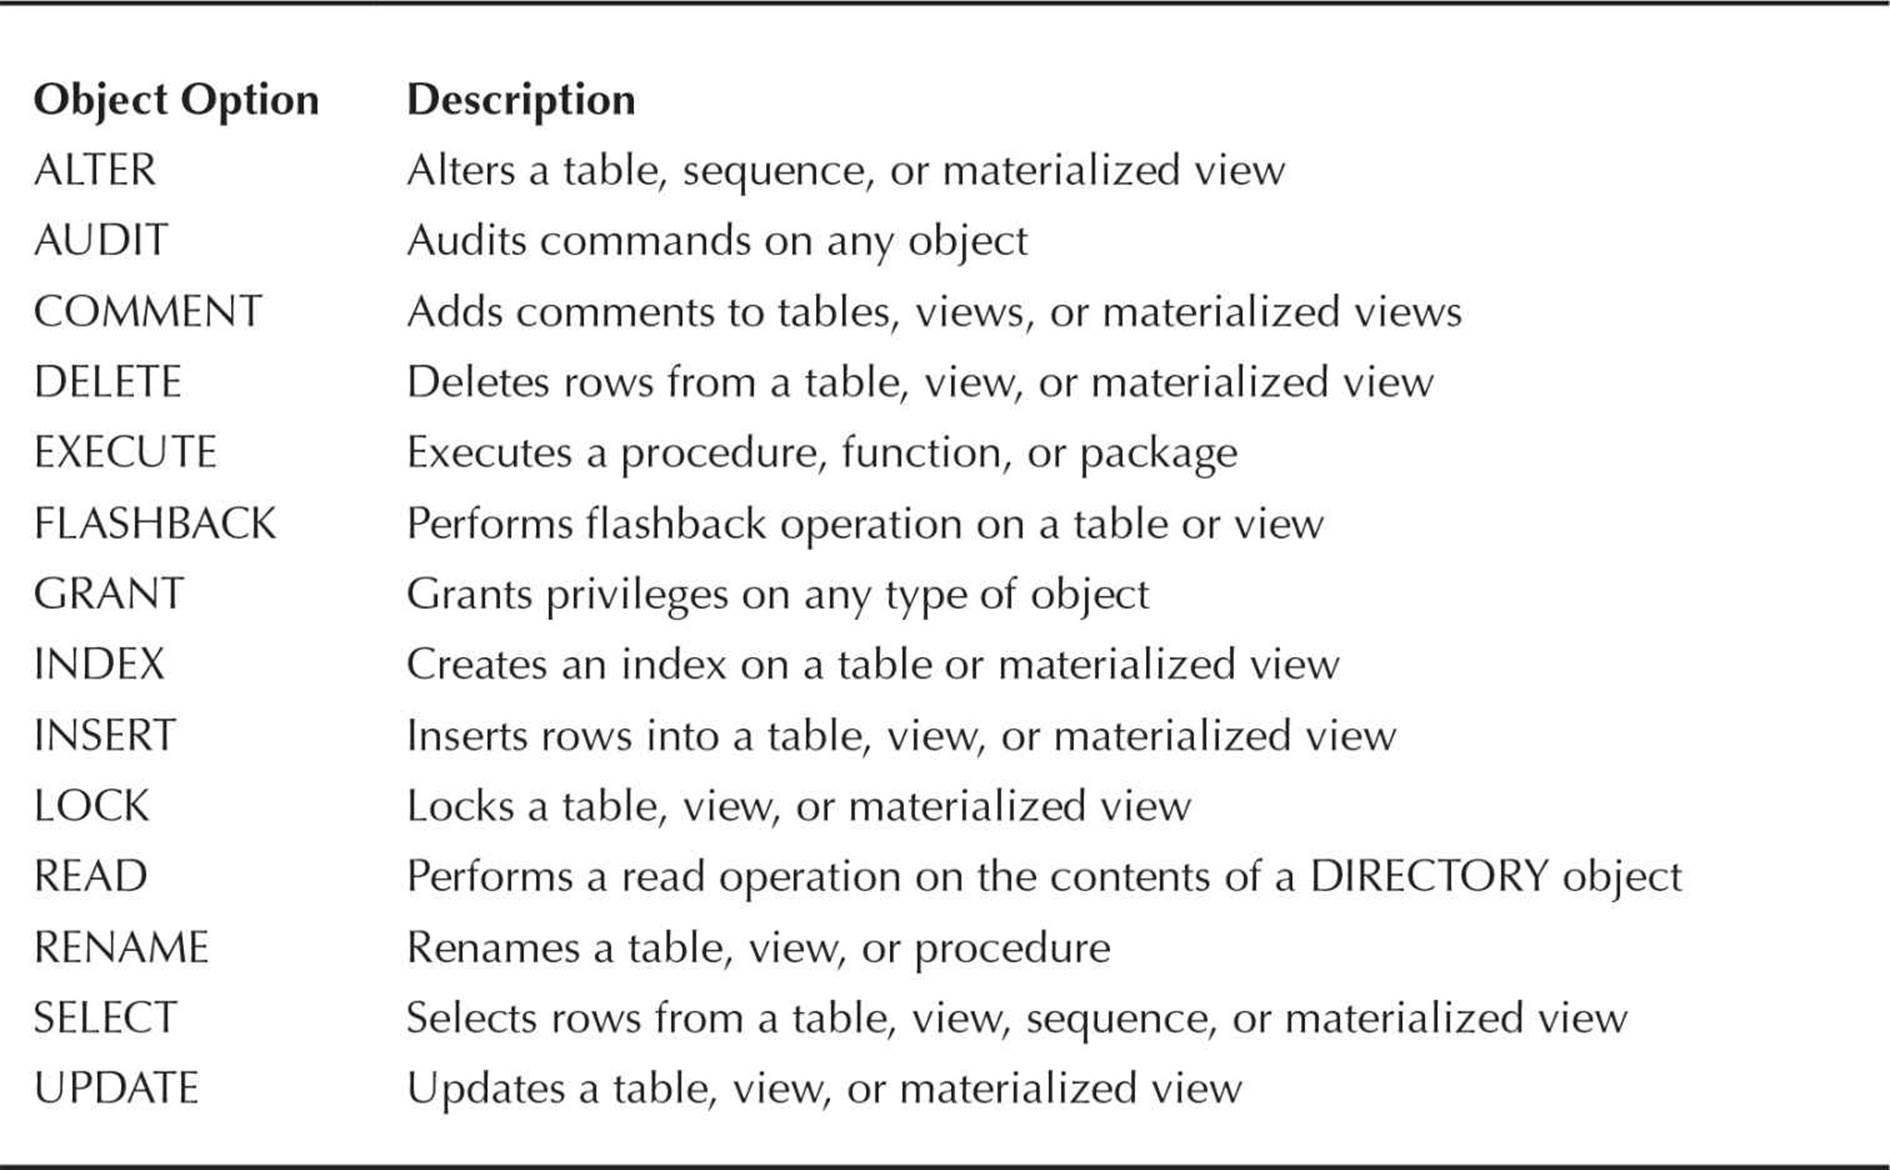
TABLE 10-18. Object Auditing Options
If we wish to audit all INSERT and UPDATE commands on the HR.JOBS table, regardless of who is doing the update, and every time the action occurs, we can use the AUDIT command as follows:

The user KLYNNE decides to add two new rows to the HR.JOBS table:


Looking in the DBA_AUDIT_TRAIL view, we see the two INSERT commands in KLYNNE’s session:
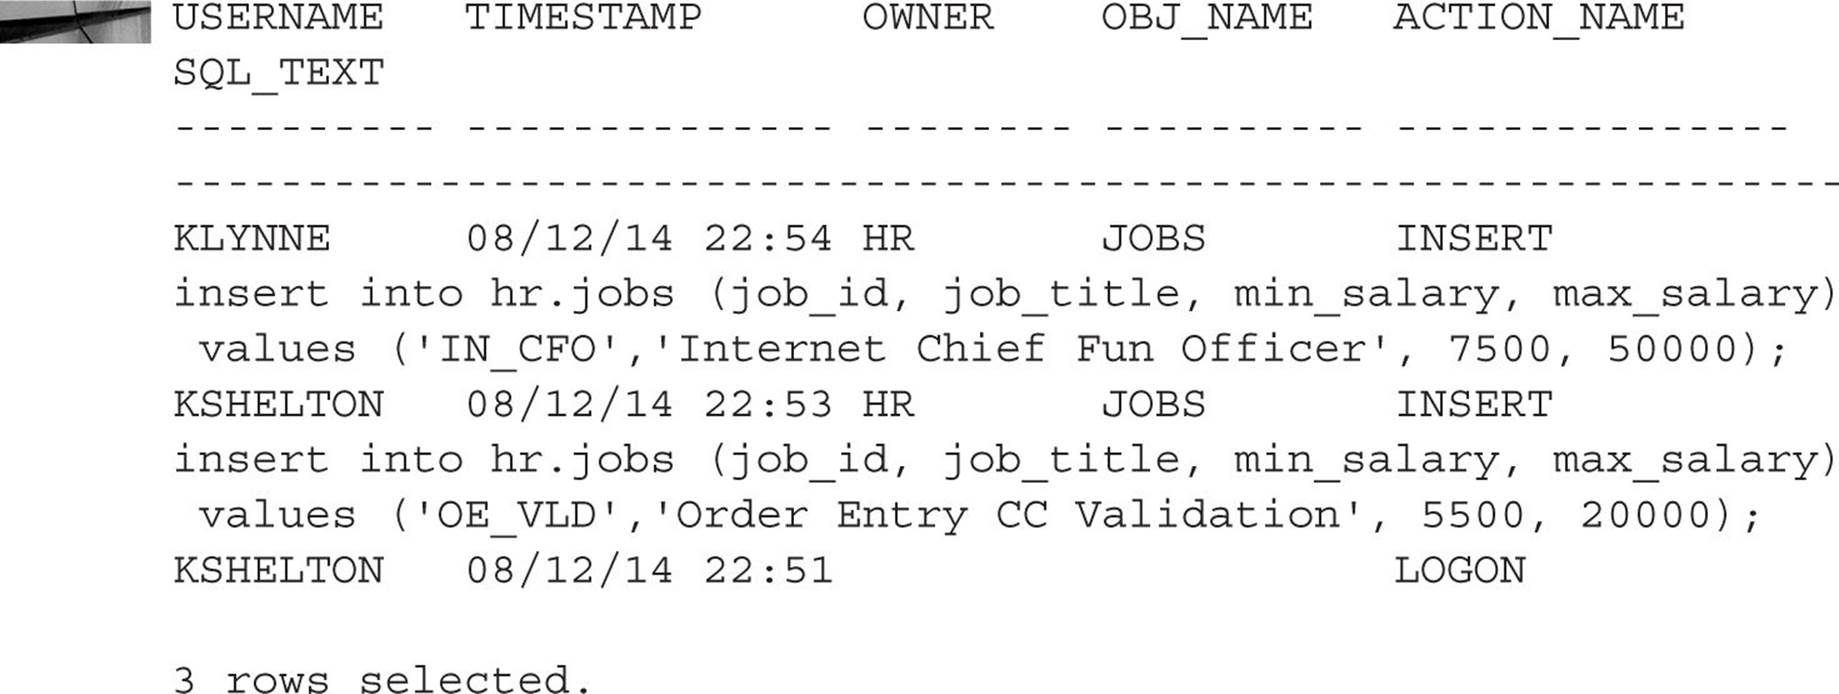
Fine-Grained Auditing
Introduced in Oracle9i, auditing became much more focused and precise with the introduction of fine-grained object auditing, or FGA. FGA is implemented by a PL/SQL package called DBMS_FGA.
With standard auditing, you can easily find out what objects were accessed and by whom, but you don’t know which columns or rows were accessed. Fine-grained auditing addresses this problem by not only specifying a predicate, or WHERE clause, for which rows need to be accessed, but also by specifying a column or columns in the table being accessed. This can dramatically reduce the number of audit table entries by only auditing access to the table if it accesses certain rows and columns.
The package DBMS_FGA has four procedures:
![]() ADD_POLICY Adds an audit policy using a predicate and audit column
ADD_POLICY Adds an audit policy using a predicate and audit column
![]() DROP_POLICY Drops the audit policy
DROP_POLICY Drops the audit policy
![]() DISABLE_POLICY Disables the audit policy but keeps the policy associated with the table or view
DISABLE_POLICY Disables the audit policy but keeps the policy associated with the table or view
![]() ENABLE_POLICY Enables a policy
ENABLE_POLICY Enables a policy
The user TAMARA usually accesses the HR.EMPLOYEES table on a daily basis to look up employee e-mail addresses. The system administrators suspect that TAMARA is viewing salary information for managers, so they set up an FGA policy to audit any access to the SALARY column for anyone who is a manager:


Audit records for fine-grained auditing can be accessed with the data dictionary view DBA_FGA_AUDIT_TRAIL. If you typically need to see both standard audit rows and FGA rows, the data dictionary view DBA_COMMON_AUDIT_TRAIL combines rows from both types of audits.
To continue our example, the user TAMARA runs two SQL queries as follows:
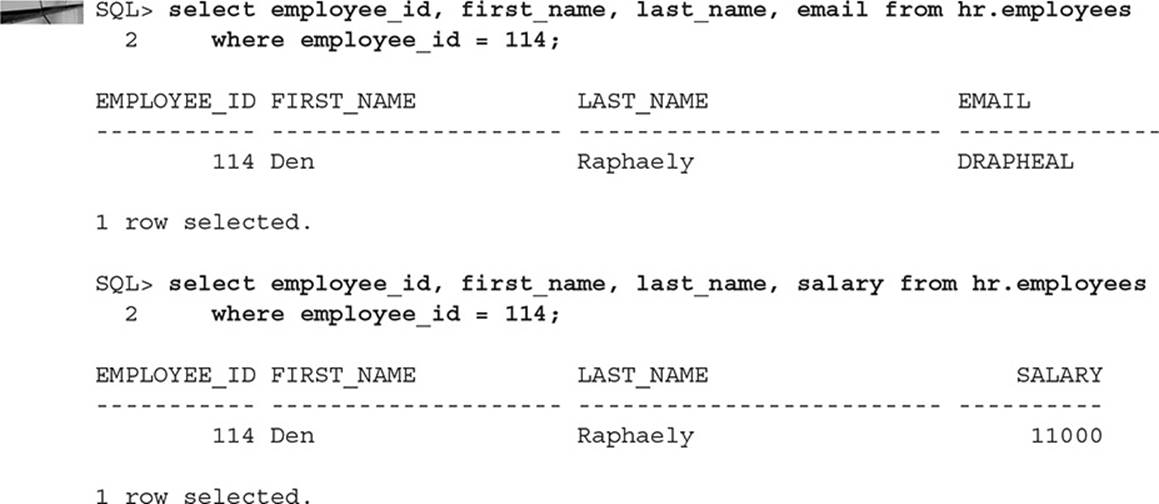
The first query accesses a manager, but not the SALARY column. The second query is the same as the first, but does access the SALARY column and therefore triggers the FGA policy, thus generating one, and only one, row in the audit trail:
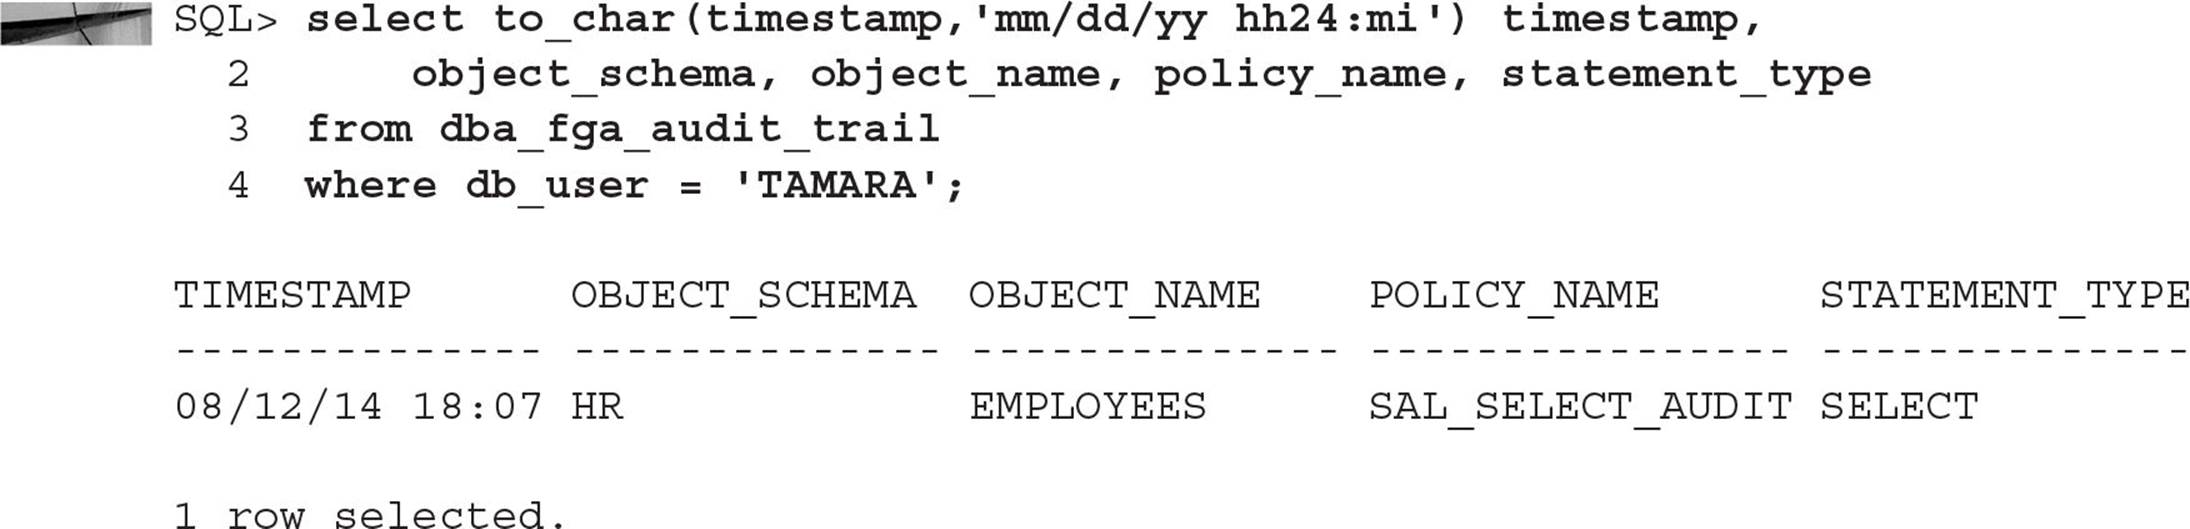
Because we set up fine-grained access control in our VPD example earlier in this chapter to prevent unauthorized use of the SALARY column, we need to double-check our policy functions to make sure that SALARY information is still being restricted correctly. Fine-grained auditing, along with standard auditing, is a good way to ensure that our authorization policies are set up correctly in the first place.
Auditing-Related Data Dictionary Views
Table 10-19 contains the data dictionary views related to auditing.
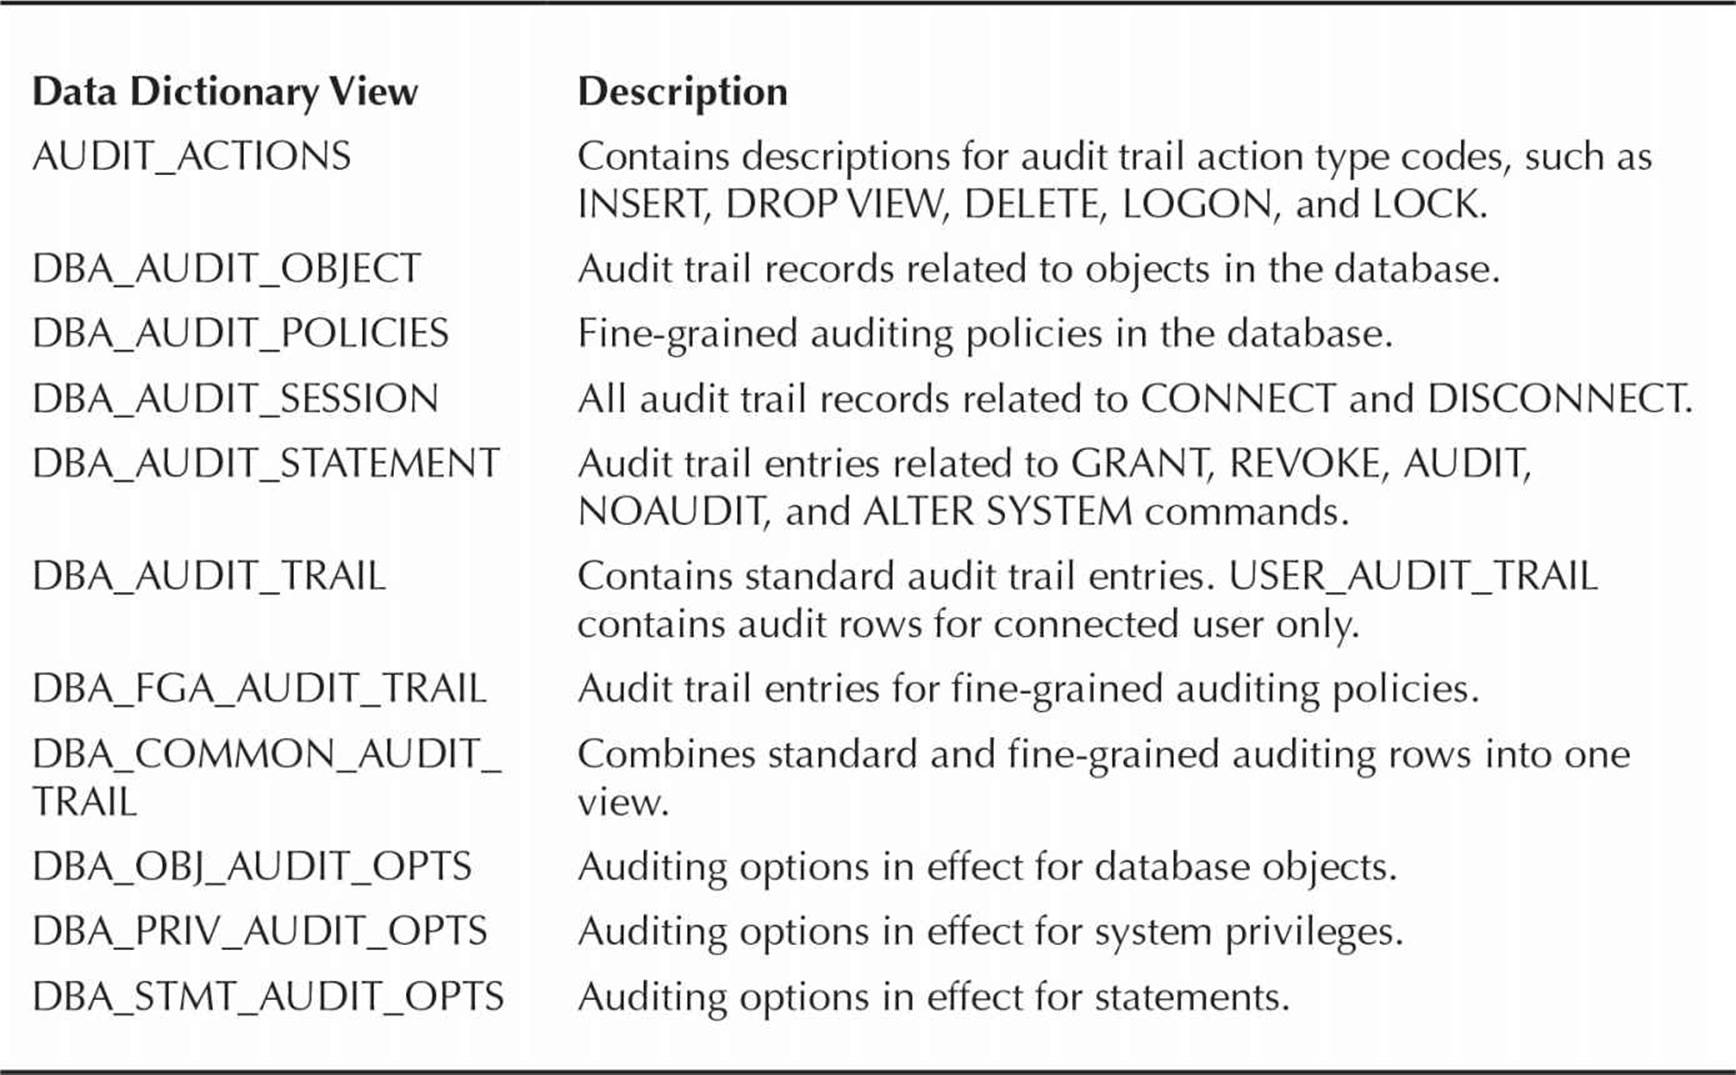
TABLE 10-19. Auditing-Related Data Dictionary Views
Protecting the Audit Trail
The audit trail itself needs to be protected, especially if non-system users must access the table SYS.AUD$. The built-in role DELETE_ANY_CATALOG is one of the ways that non-SYS users can have access to the audit trail (for example, to archive and truncate the audit trail to ensure that it does not impact the space requirements for other objects in the SYS tablespace).
To set up auditing on the audit trail itself, connect as SYSDBA and run the following command:

Now, all actions against the table SYS.AUD$, including SELECT, INSERT, UPDATE, and DELETE, will be recorded in SYS.AUD$ itself. But, you may ask, what if someone deletes the audit records identifying access to the table SYS.AUD$? The rows in the table are deleted, but then another row is inserted, recording the deletion of the rows. Therefore, there will always be some evidence of activity, intentional or accidental, against the SYS.AUD$ table. In addition, if AUDIT_SYS_OPERATIONS is set to TRUE, any sessions using AS SYSDBA, AS SYSOPER, or connecting as SYS itself will be logged in the operating system audit location, which presumably even the Oracle DBAs would not have access to. As a result, we have many safeguards in place to ensure that we record all privileged activity in the database, along with any attempts to hide this activity!
Data Encryption Techniques
Data encryption can enhance security both inside and outside the database. A user may have a legitimate need for access to most columns of a table, but if one of the columns is encrypted and the user does not know the encryption key, the information is not usable. The same concern is true for information that needs to be sent securely over a network. The techniques I presented so far in this chapter, including authentication, authorization, and auditing, ensure legitimate access to data from a database user but do not prevent access to an operating system user that may have access to the operating system files that compose the database itself.
Users can leverage one of two methods for data encryption: using the package DBMS_CRYPTO, an Oracle Database 10g replacement for the package DBMS_OBFUSCATION_TOOLKIT found in Oracle9i, and transparent data encryption, which stores encryption keys globally and includes methods for encrypting entire tablespaces.
DBMS_CRYPTO Package
Introduced in Oracle 10g, the package DBMS_CRYPTO replaces DBMS_OBFUSCATION_TOOLKIT and includes the Advanced Encryption Standard (AES) encryption algorithm, which replaces the Data Encryption Standard (DES).
Procedures within DBMS_CRYPTO can generate private keys for you, or you can specify and store the key yourself. In contrast to DBMS_OBFUSCATION_TOOLKIT, which could only encrypt RAW or VARCHAR2 datatypes, DBMS_CRYPTO can encrypt BLOB and CLOB types.
Transparent Data Encryption
Transparent data encryption is a key-based access control system that relies on an external module for enforcing authorization. Each table with encrypted columns has its own encryption key, which in turn is encrypted by a master key created for the database and stored encrypted within the database; the master key is not stored in the database itself. The emphasis is on the word transparent—authorized users do not have to specify passwords or keys when accessing encrypted columns in a table or in an encrypted tablespace.
Although transparent data encryption has been significantly enhanced in Oracle Database 11g, there are still a few restrictions on its use; for example, you cannot encrypt columns using foreign key constraints, since every table has a unique column encryption key. This should typically not be an issue, since keys used in foreign key constraints should be system-generated, unique, and unintelligent. Business keys and other business attributes of a table are more likely candidates for encryption and usually do not participate in foreign key relationships with other tables. Other database features and types are also not eligible for transparent data encryption:
![]() Index types other than B-tree
Index types other than B-tree
![]() Range-scan searching of indexes
Range-scan searching of indexes
![]() BFILEs (external objects)
BFILEs (external objects)
![]() Materialized view logs
Materialized view logs
![]() Synchronous Change Data Capture
Synchronous Change Data Capture
![]() Transportable tablespaces
Transportable tablespaces
![]() Original import/export utilities (Oracle9i and earlier)
Original import/export utilities (Oracle9i and earlier)
Alternatively, you can use DBMS_CRYPTO to manually encrypt these types and features.
NOTE
As of Oracle Database 11g, internal large objects such as BLOB and CLOB types can now be encrypted.
Summary
Auditing database access effectively and efficiently is key to a secure and accountable database environment. The database administrator (or security administrator in an enterprise with fine-grained separation of duties) needs to know who accessed the database, when they accessed it, and what they did. More importantly, the DBA must ensure that the wrong people can’t get into the database in the first place.
If the database user has already authenticated with the operating system, the network, and the firewall, then the database settings will determine if they are authorized to connect to the database and access a particular schema, table, or column.
Permissions on the database can be as coarse as granting some users blanket permissions to view or modify any table; however, you’ll more likely want those permissions to be much more granular. Therefore, you can control access to database objects in an application schema with literally hundreds of privileges and control over which columns a database user can see in a table. To further refine (and audit) access to rows of a table, you can leverage Oracle’s Virtual Private Database (VPD) and transparently limit and control access to sensitive data regardless of how the table is accessed.
Once a user is authenticated and authorized to access a database object, you still might want to know what they accessed and when. With each new feature of Oracle Database comes a new auditing method and its associated audit trail location. Oracle Database 12c simplifies the navigation of the plethora of audit trails by introducing a unified audit trail—one-stop shopping for all your security auditing needs.

All materials on the site are licensed Creative Commons Attribution-Sharealike 3.0 Unported CC BY-SA 3.0 & GNU Free Documentation License (GFDL)
If you are the copyright holder of any material contained on our site and intend to remove it, please contact our site administrator for approval.
© 2016-2026 All site design rights belong to S.Y.A.