Oracle Database 12c DBA Handbook (2015)
PART
III
High Availability
CHAPTER
13
Backup and Recovery Options
Oracle provides a variety of backup procedures and options that help protect an Oracle database. If they are properly implemented, these options will allow you to effectively back up your databases and recover them easily and efficiently.
Oracle’s backup capabilities include logical and physical backups, both of which have a number of options available. This chapter will not detail every possible option and recovery scenario; rather, I will focus on using the best options in the most effective manner possible. You will see how to best integrate the available backup procedures with each other and with the operating system backups. You will also see details on the options for Data Pump Export and Import, which were introduced in Oracle Database 10g.
Backup Capabilities
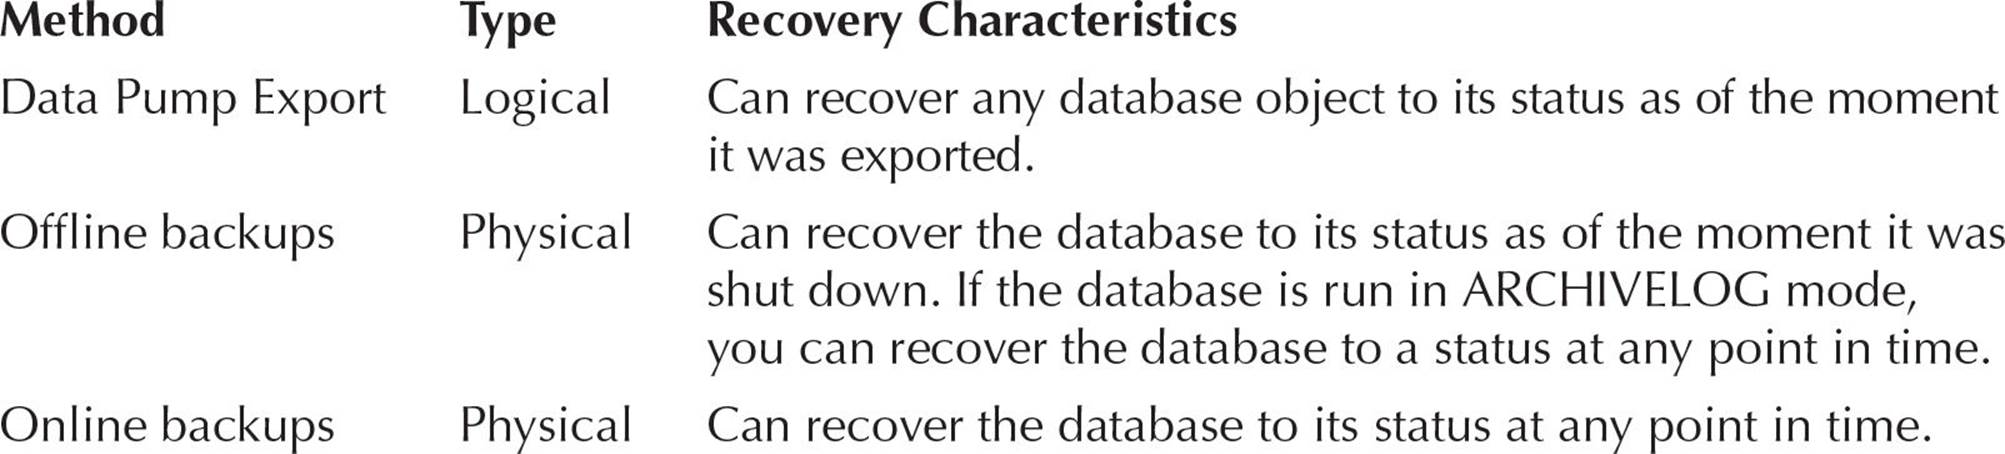
There are three standard methods of backing up an Oracle database: exports, offline backups, and online backups. An export is a logical backup of the database; the other two backup methods are physical file backups. In the following sections, you will see each of these options described. The standard (and preferred) tool for physical backups is Oracle’s Recovery Manager (RMAN) utility; see Chapter 14 for details on the implementation and usage of RMAN.
A robust backup strategy includes both physical and logical backups. In general, production databases rely on physical backups as their primary backup method, and logical backups serve as the secondary method. For development databases and for some small data movement processing, logical backups offer a viable solution. You should understand the implications and uses of both physical and logical backups in order to develop the most appropriate solution for your applications.
Logical Backups
A logical backup of a database involves reading a set of database records and writing them to a file. These records are read independently of their physical location. In Oracle, the Data Pump Export utility performs this type of database backup. To recover using the file generated from a Data Pump Export, you use Data Pump Import.

NOTE
The Import utility (imp) of Oracle’s original Import and Export utilities, available prior to Oracle Database 10g, is still provided as part of the Oracle 12c installation to read dump files created in previous versions. Users of the old Export and Import utilities are encouraged to replace their usage with Data Pump Export and Data Pump Import.
Oracle’s Data Pump Export utility queries the database, including the data dictionary, and writes the output to an XML file called an export dump file. You can export the full database, specific users, tablespaces, or specific tables. During exports, you may choose whether or not to export the data dictionary information associated with tables, such as grants, indexes, and constraints. The file written by Data Pump Export will contain the commands necessary to completely re-create all the chosen objects and data.
Once data has been exported via Data Pump Export, it may be imported via the Data Pump Import utility. Data Pump Import reads the dump file created by Data Pump Export and executes the commands found there. For example, these commands may include a CREATE TABLE command, followed by an INSERT command to load data into the table.
NOTE
Data Pump Export and Import can use a network connection for a simultaneous export and import operation, avoiding the use of intermediate operating system files and reducing total export and import time. You can also leverage parallelism if your network bandwidth is high enough.
The data that has been exported does not have to be imported into the same database, or the same schema, as was used to generate the export dump file. You may use the export dump file to create a duplicate set of the exported objects under a different schema or in a separate database.
You can import either all or part of the exported data. If you import the entire export dump file from a full export, then the entire set of database objects, including tablespaces, datafiles, and users, will be created during the import. However, it is often useful to pre-create tablespaces and users in order to specify the physical distribution of objects in the database or provide different attributes for those tablespaces. This advice is also applicable even in an ASM storage environment.
If you are only going to import part of the data from the export dump file, the tablespaces, datafiles, and users that will own and store that data should be set up prior to the import.
Physical Backups
Physical backups involve copying the files that constitute the database. These backups are also referred to as file system backups because they involve using operating system file backup commands. Oracle supports two different types of physical file backups: offline backups and online backups (also known as cold and hot backups, respectively). You can use the RMAN utility (see Chapter 14) to perform all physical backups. You may optionally choose to write your own scripts to perform physical backups, but doing so will prevent you from obtaining many of the benefits of the RMAN approach.
Offline Backups
Consistent offline backups occur when the database has been shut down normally (that is, not due to instance failure) using the NORMAL, IMMEDIATE, or TRANSACTIONAL option of the SHUTDOWN command. While the database is “offline,” the following files should be backed up:
![]() All datafiles
All datafiles
![]() All control files
All control files
![]() All archived redo log files
All archived redo log files
![]() The init.ora file or server parameter file (SPFILE)
The init.ora file or server parameter file (SPFILE)
CAUTION
You should never, ever, want or need to back up online redo log files. Although there is a slight time-savings for restoring from a cold backup after a clean shutdown, the risk of losing committed transactions outweighs the convenience. Your online redo logs should be mirrored and multiplexed so that you should never lose the current online log file.
Having all these files backed up while the database is closed provides a complete image of the database as it existed at the time it was closed. The full set of these files could be retrieved from the backups at a later date, and the database would be able to function. It is not valid to perform a file system backup of the database while it is open unless an online backup is being performed. Offline backups that occur following database aborts will also be considered inconsistent and may require more effort to use during recoveries if they are usable.
Online Backups
You can use online backups for any database that is running in ARCHIVELOG mode. In this mode, the online redo logs are archived, creating a log of all transactions within the database.
Oracle writes to the online redo log files in a cyclical fashion: After filling the first log file, it begins writing to the second, until that one fills, and then it begins writing to the third. Once the last online redo log file is filled, the LGWR (Log Writer) background process begins to overwrite the contents of the first redo log file.
When Oracle is run in ARCHIVELOG mode, the archiver background processes (ARC0-ARC9 and ARCa-ARCt) make a copy of each redo log file before overwriting it. These archived redo log files are usually written to a disk device. The archived redo log files may also be written directly to a tape device, but disk space is getting cheap enough that the additional cost of archiving to disk is offset by the time and labor savings when a disaster recovery operation must occur.
NOTE
Most production databases, particularly those that support transaction-processing applications, should be run in ARCHIVELOG mode to ensure recoverability in case of media failure.
You can perform file system backups of a database while that database is open, provided the database is running in ARCHIVELOG mode. An online backup involves setting each tablespace into a backup state, backing up its datafiles, and then restoring the tablespace to its normal state.
NOTE
When using the Oracle-supplied RMAN utility, you do not have to manually place each tablespace into a backup state. RMAN reads the data blocks in the same manner Oracle uses for queries.
The database can be fully recovered from an online backup, and it can, via the archived redo logs, be rolled forward to any point in time before the failure. When the database is then opened, any committed transactions that were in the database at the time of the failure will have been restored, and any uncommitted transactions will have been rolled back.
While the database is open, the following files can be backed up:
![]() All datafiles
All datafiles
![]() All archived redo log files
All archived redo log files
![]() One control file, via the ALTER DATABASE BACKUP CONTROLFILE command
One control file, via the ALTER DATABASE BACKUP CONTROLFILE command
![]() The server parameter file (SPFILE)
The server parameter file (SPFILE)
NOTE
RMAN automatically backs up the control file and SPFILE whenever the entire database or the SYSTEM tablespace are backed up and when you have CONTROLFILE AUTOBACKUP set as the default in RMAN.
Online backup procedures are very powerful for two reasons. First, they provide full point-in-time recovery. Second, they allow the database to remain open during the file system backup. Even databases that cannot be shut down due to user requirements can still have file-system backups. Keeping the database open also keeps the System Global Area (SGA) of the database instance from being cleared when the database is shut down and restarted. Keeping the SGA memory from being cleared will improve the database’s performance because it will reduce the number of physical I/Os required by the database.
NOTE
You can use the Flashback Database option, introduced in Oracle Database 10g, to roll the database backward in time without relying on physical backups. To use the FLASHBACK DATABASE command, you must have a fast recovery area defined, be running in ARCHIVELOG mode, and must have issued the ALTER DATABASE FLASHBACK ON command while the database was mounted but not open. Logs written to the fast recovery area are used by Oracle during the Flashback Database operation.
Using Data Pump Export and Import
Introduced with Oracle Database 10g, Data Pump provides a server-based data-extraction and data-import utility. Its features include significant architectural and functional enhancements over the original Import and Export utilities. Data Pump allows you to stop and restart jobs, see the status of running jobs, and restrict the data that is exported and imported.
NOTE
Data Pump files are incompatible with those generated from the original Export utility.
Data Pump runs as a server process, benefiting users in many ways. The client process that starts the job can disconnect and later reattach to the job. Performance is enhanced (as compared to the original Export/Import) because the data no longer has to be processed by a client program. Data Pump extractions and loads can be parallelized, further enhancing performance.
In this section, you will see how to use Data Pump, along with descriptions and examples of its major options. This includes how Data Pump uses directory objects, specifying options on the command line, and how to stop and restart jobs within the Data Pump command-line interface.
Creating a Directory
Data Pump requires you to create directories for the datafiles and log files it will create and read. Use the CREATE DIRECTORY command to create the directory pointer within Oracle to the external directory you will use. Users who will access the Data Pump files must have the READ and WRITE privileges on the directory.
Before you start, verify that the external directory exists and that the user who will be issuing the CREATE DIRECTORY command has the CREATE ANY DIRECTORY system privilege.
NOTE
In a default installation of Oracle Database 12c, a directory object called DATA_PUMP_DIR is created and points to the directory $ORACLE_BASE/admin/database_name/dpdump in a non-multitenant environment.
The following example creates a directory object called DPXFER in the Oracle instance dw referencing the file system directory /u01/app/oracle/DataPumpXfer and grants READ and WRITE access to the user RJB:
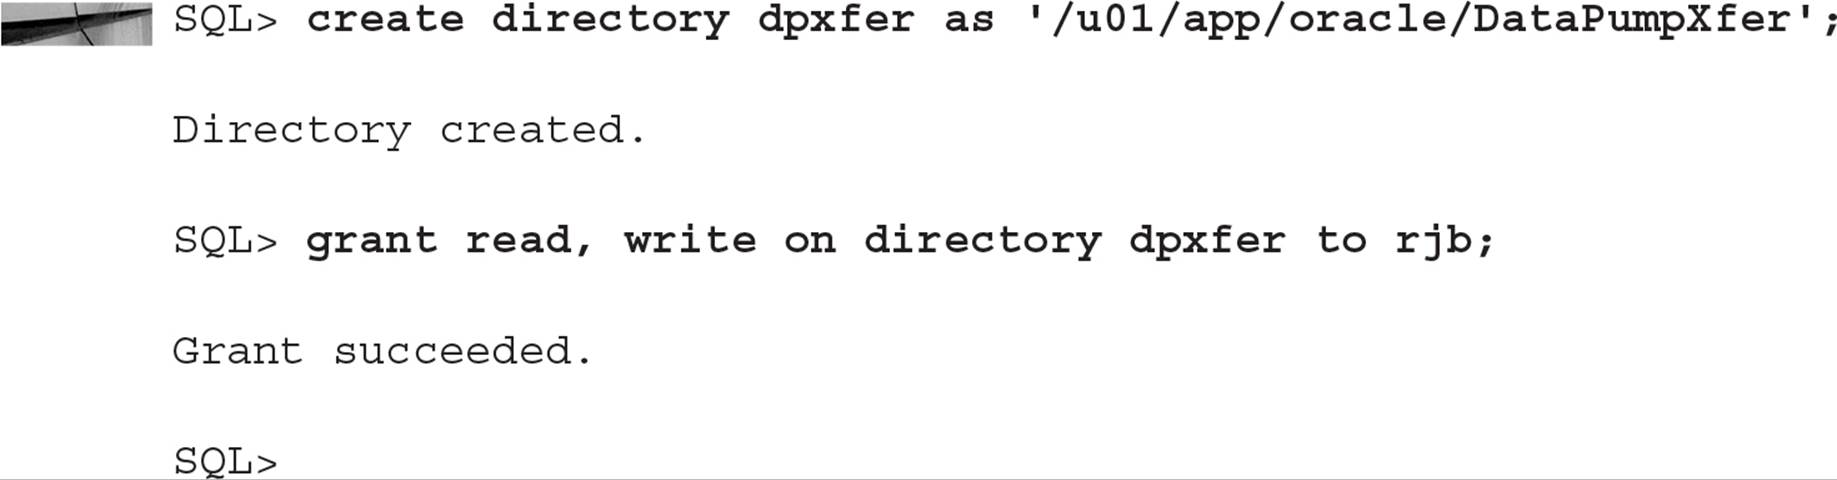
The RJB user can now use the DPXFER directory for Data Pump jobs. The file system directory /u01/app/oracle/DataPumpXfer can exist on the source server, the target server, or any server on the network, as long as each server can access the directory and the permissions on the directory allow read/write access by the oracle user (the user that owns the Oracle executable files).
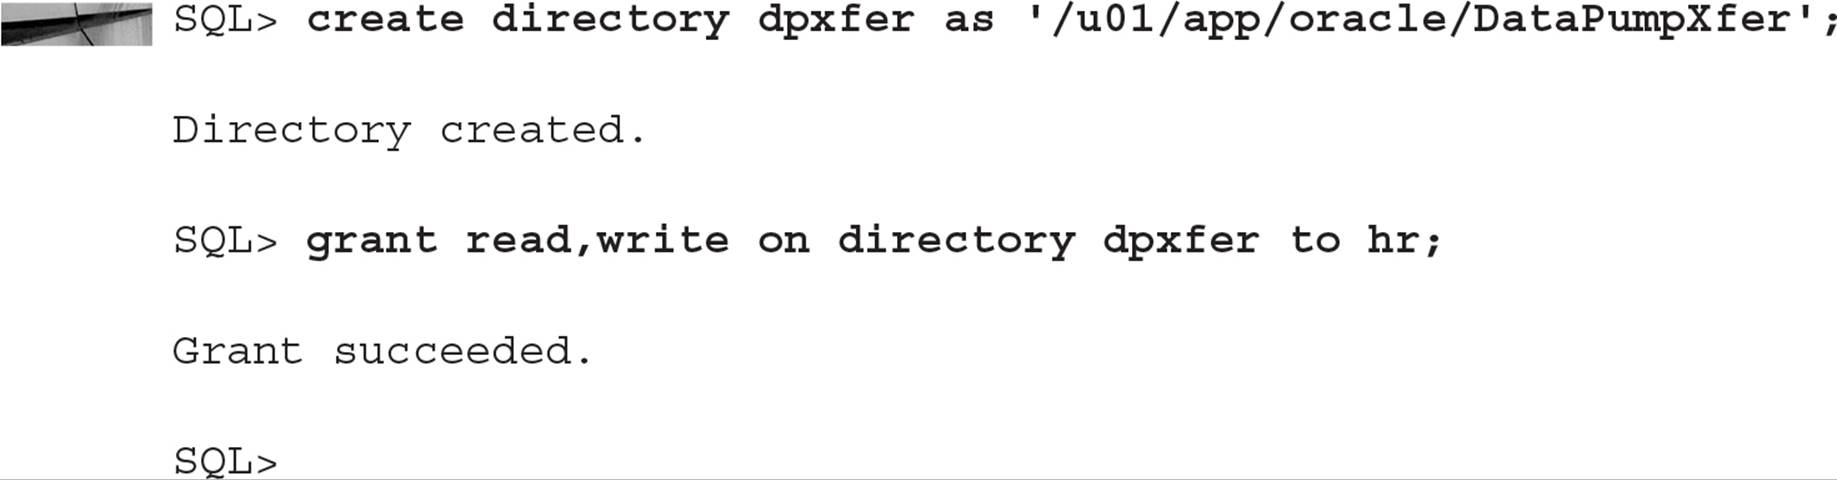
On the server oc1, the administrator creates a directory with the same name that references the same network file system, except that privileges on the directory are granted to the HR user instead:
Data Pump Export Options
Oracle provides the OS utility expdp that serves as the interface to Data Pump. If you have previous experience with the Export utility, some of the options will be familiar. However, some significant features are available only via Data Pump. Table 13-1 shows the command-line input parameters for expdp when a job is created. These parameters can be specified in a parameter file unless otherwise noted.
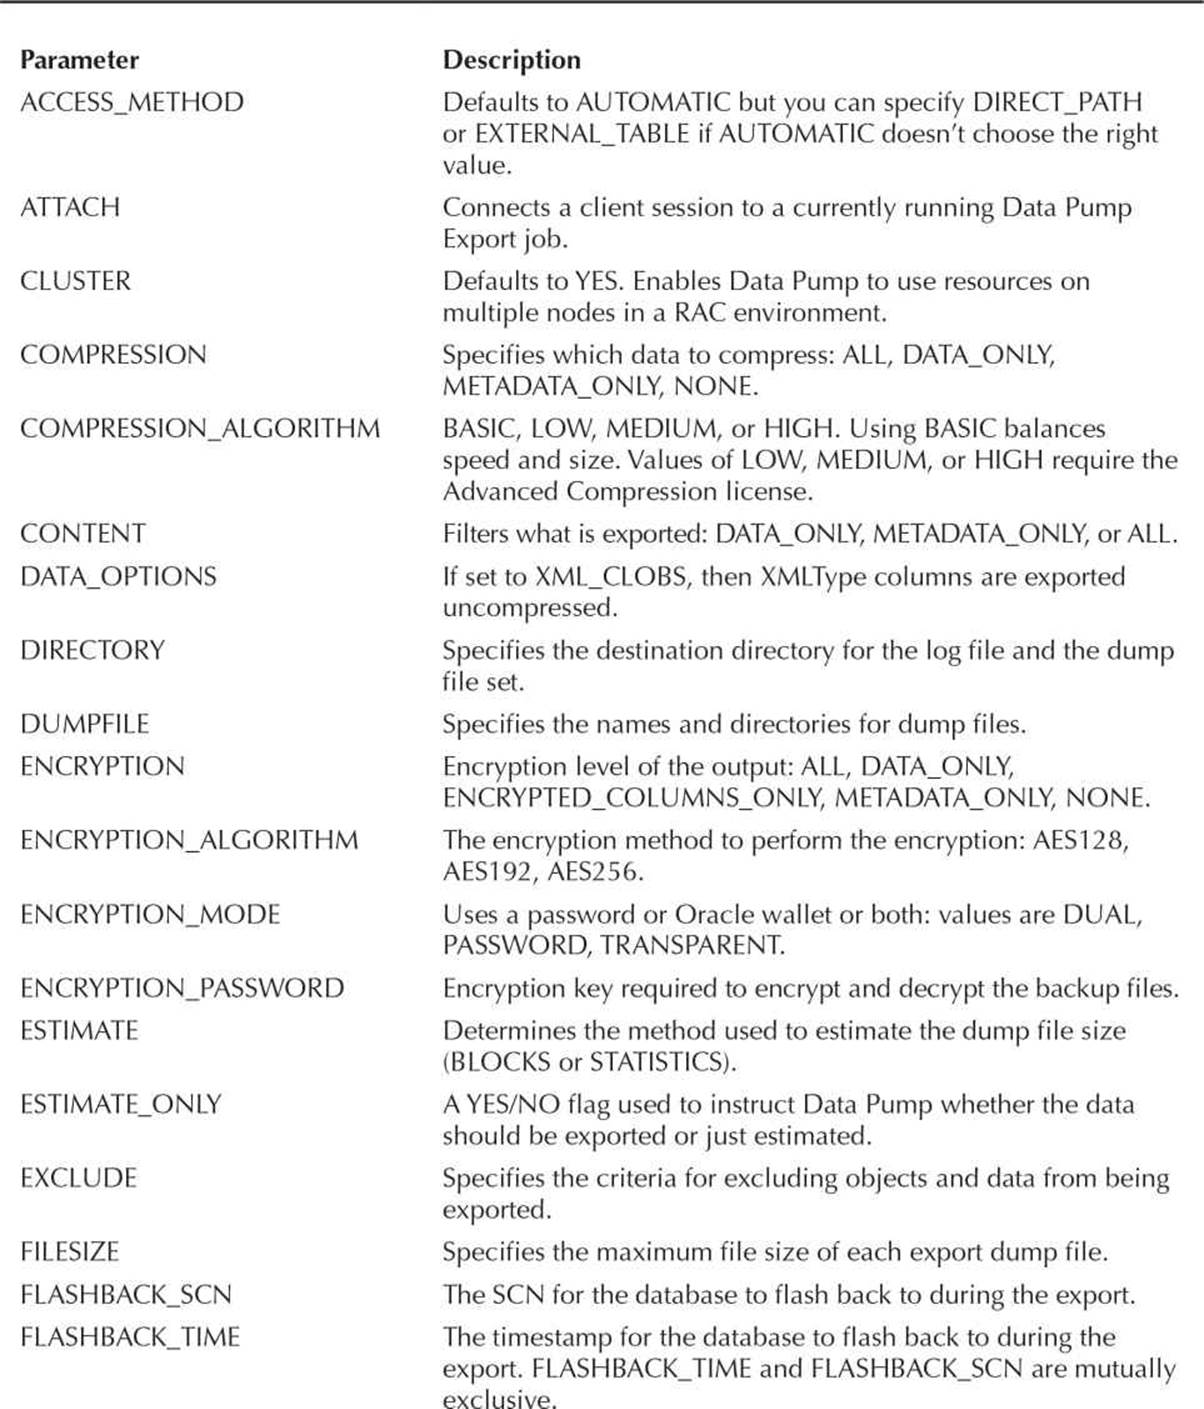
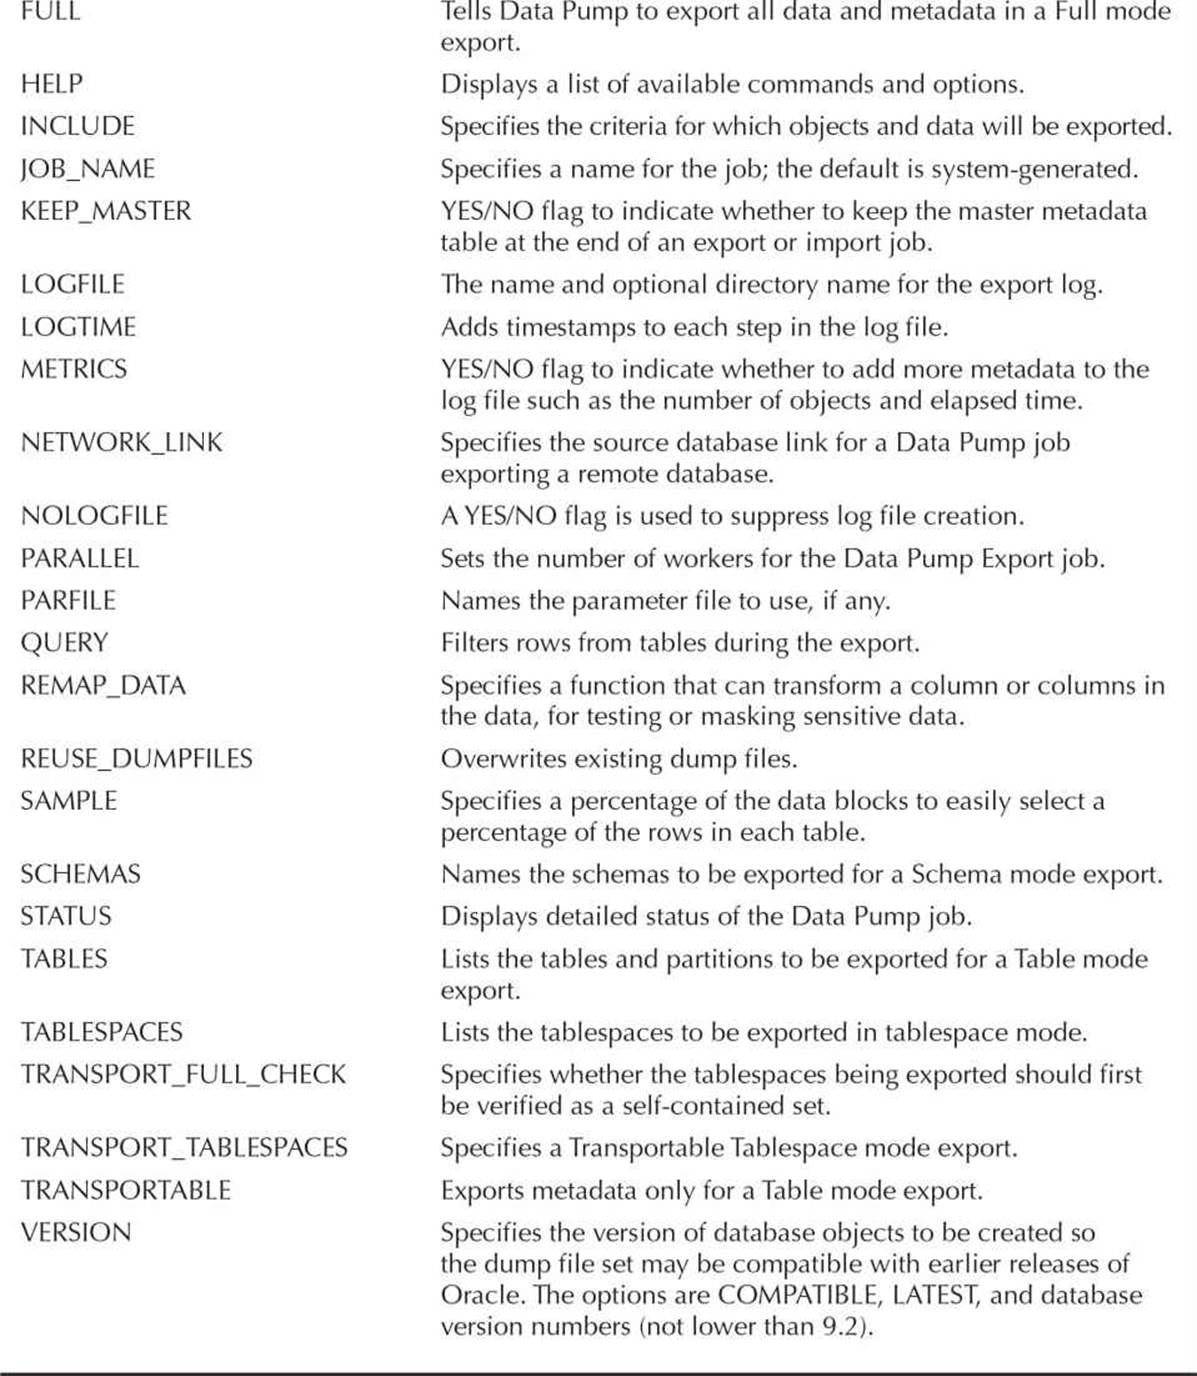
TABLE 13-1. Command-Line Input Parameters for expdp
As detailed in Table 13-1, five modes of Data Pump exports are supported:
![]() Full Export all database data and metadata
Full Export all database data and metadata
![]() Schema Export data and metadata for specific user schemas
Schema Export data and metadata for specific user schemas
![]() Tablespace Export data and metadata for tablespaces
Tablespace Export data and metadata for tablespaces
![]() Table Export data and metadata for tables and table partitions
Table Export data and metadata for tables and table partitions
![]() Transportable Tablespace Export metadata for specific tablespaces in preparation for transporting a tablespace from one database to another
Transportable Tablespace Export metadata for specific tablespaces in preparation for transporting a tablespace from one database to another
NOTE
You must have the EXP_FULL_DATABASE system privilege in order to perform a Full export or a Transportable Tablespace export.
When you submit a job, Oracle will give the job a system-generated name. If you specify a name for the job via the JOB_NAME parameter, you must be certain that the job name will not conflict with the name of any table or view in your schema. During Data Pump jobs, Oracle will create and maintain a master table for the duration of the job. The master table will have the same name as the Data Pump job, so its name cannot conflict with existing objects.
While a job is running, you can execute the commands listed in Table 13-2 via Data Pump’s interface.

TABLE 13-2. Parameters for Interactive Mode Data Pump Export
Starting a Data Pump Export Job
You can store your job parameters in a parameter file, referenced via the PARFILE parameter of expdp. For example, you can create a file named dp_rjb.par with the following entries:

The logical Data Pump directory is DPXFER, the one created earlier in the chapter. The Data Pump Export will only have metadata; the name of the dump file, metadata_only.dmp, reflects the contents of the dump file. Here’s how you initiate a Data Pump job using this parameter file:
![]()
Oracle will then pass the dp_rjb.par entries to the Data Pump Export job. A schema-type Data Pump Export (which is the default) will be executed, and the output (metadata only, no table rows) will be written to a file in the DPXFER directory. Here is the output from the expdp command:
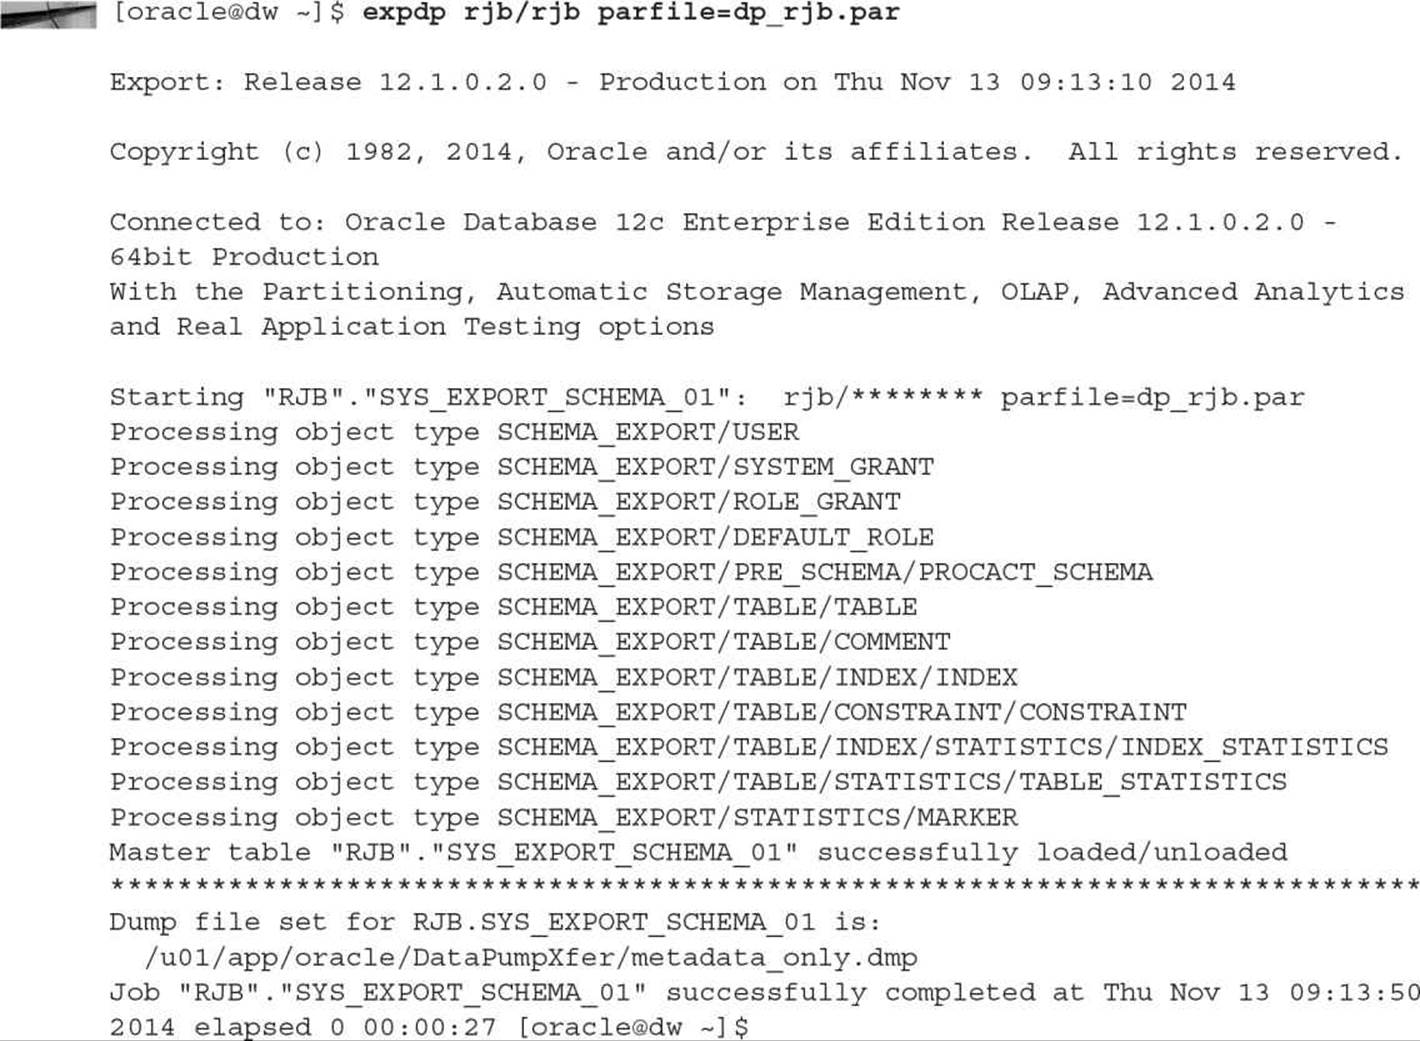
The output file, as shown in the listing, is named metadata_only.dmp. The output dump file contains a binary header and XML entries for re-creating the structures for the RJB schema. During the export, Data Pump created and used an external table called SYS_EXPORT_SCHEMA_01.
NOTE
Dump files will not overwrite previously existing dump files in the same directory unless you use the REUSE_DUMPFILES parameter.
You can use multiple directories and dump files for a single Data Pump Export. Within the DUMPFILE parameter setting, list the directory along with the filename, in this format:

Using multiple directories in the DUMPFILE parameter has two benefits: the Data Pump job can use parallel processes (using the PARALLEL parameter), in addition to spreading out the dump file to wherever disk space is available. You can also use the substitution variable %U in the filename specification to automatically create multiple dump files that can be written to by multiple processes automatically. Even if only one process is writing the dump file, using the %U substitution variable in combination with the FILESIZE parameter will limit the size of each dump file.
Stopping and Restarting Running Jobs
After you have started a Data Pump Export job, you can close the client window you used to start the job. Because it is server based, the export will continue to run. You can then attach to the job, check its status, and alter it. For example, you can start the job via expdp:
![]()
Press CTRL-C to leave the log display, and Data Pump will return you to the expdb prompt:
![]()
Exit to the client using the exit_client command:
![]()
Later, you can restart the client and attach to the currently running job under your schema:
![]()
If you gave a name to your Data Pump Export job (or you identified the job name in the log file when the job started), specify the name as part of the attach parameter. For example, if you had named the job RJB_JOB, attach to the job by name:
![]()
When you attach to a running job, Data Pump will display the status of the job: its basic configuration parameters and its current status. You can then issue the continue_client command to see the log entries as they are generated, or you can alter the running job:
![]()
In addition, you can stop a job using the stop_job command:
![]()
The job is not canceled, only suspended. With the job stopped, you can then add additional dump files in new directories via the ADD_FILE option. You can then restart the job using start_job:
![]()
You can specify a log file location for the export log file via the LOGFILE parameter. If you do not specify a value for LOGFILE, the log file will be written to the same directory as the dump file.
Exporting from Another Database
You can use the NETWORK_LINK parameter to export data from a different database. If you are logged into the HQ database and you have a database link to the DW database, Data Pump can use that link to connect to the DW database and extract its data.
NOTE
If the source database is read-only, the user on the source database must have a locally managed tablespace assigned as the temporary tablespace; otherwise, the job will fail.
In your parameter file or on the expdp command line, set the NETWORK_LINK parameter to the name of the database link. The Data Pump Export job will write the data from the remote database to the directory defined in your local database.
Using EXCLUDE, INCLUDE, and QUERY
You can exclude or include sets of tables from the Data Pump Export via the EXCLUDE and INCLUDE options. You can exclude objects by type and by name. If an object is excluded, all its dependent objects are also excluded. The format for the EXCLUDE option is
![]()
NOTE
You cannot specify EXCLUDE if you specify CONTENT=DATA_ONLY.
For example, to exclude the ANGUSP schema from a full export, the format of the EXCLUDE option is as follows:
![]()
NOTE
You can specify more than one EXCLUDE option within the same Data Pump Export job.
The EXCLUDE option in the preceding example contains a limiting condition within a set of double quotes. The object_type variable can be any Oracle object type, including a grant, index, or table. The name_clause variable restricts the value returned. For example, to exclude from the export all tables whose names begin with TEMP, use the following EXCLUDE clause:
![]()
When you enter this at the command line on Linux, you may need to use escape characters so the quotation marks and other special characters are properly passed to Oracle. Your expdp command will look similar to this:
![]()
NOTE
This example shows part of the syntax, not the full syntax for the command.
If you do not provide a name_clause value, all objects of the specified type are excluded. For example, to exclude all indexes, you would use an EXCLUDE clause similar to the following:
![]()
For a listing of the objects you can filter, query the DATABASE_EXPORT_OBJECTS, SCHEMA_EXPORT_OBJECTS, and TABLE_EXPORT_OBJECTS data dictionary views. If the object_type value is CONSTRAINT, all constraints will be excluded except for NOT NULL. Additionally, constraints needed for a table to be created successfully, such as a primary key constraint for an index-organized table, cannot be excluded. If the object_type value is USER, the user definitions are excluded, but the objects within the user schemas will still be exported. Use the SCHEMA object_type, as shown in an earlier example, to exclude a user and all of the user’s objects. If the object_typevalue is GRANT, all object grants and system privilege grants are excluded.
A second option, INCLUDE, is also available. When you use INCLUDE, only those objects that pass the criteria are exported; all others are excluded. INCLUDE and EXCLUDE are mutually exclusive. The format for INCLUDE is
![]()
NOTE
You cannot specify INCLUDE if you specify CONTENT=DATA_ONLY.
For example, to export two specific tables and all procedures, your parameter file will include two lines similar to the following:

What rows will be exported for the objects that meet the EXCLUDE or INCLUDE criteria? By default, all rows are exported for each table. You can use the QUERY option to limit the rows returned. Here is the format for the QUERY parameter:
![]()
If you do not specify values for the schema and table_name variables, the query_clause will be applied to all the exported tables. Because query_clause will usually include specific column names, you should be very careful when selecting the tables to include in the export. You can specify a QUERY value for a single table, as shown in the following example:
![]()
As a result, the dump file will only contain rows from the BOOKSHELF table that meet the QUERY criterion as well as any INCLUDE or EXCLUDE criteria. You can also apply these filters during a subsequent Data Pump Import job, as described in the next section.
Data Pump Import Options
To import a dump file exported via Data Pump Export, use Data Pump Import. As with the export process, the import process runs as a server-based job you can manage as it executes. You can interact with Data Pump Import via the command-line interface, a parameter file, and an interactive interface. Table 13-3 lists the parameters for the command-line interface.
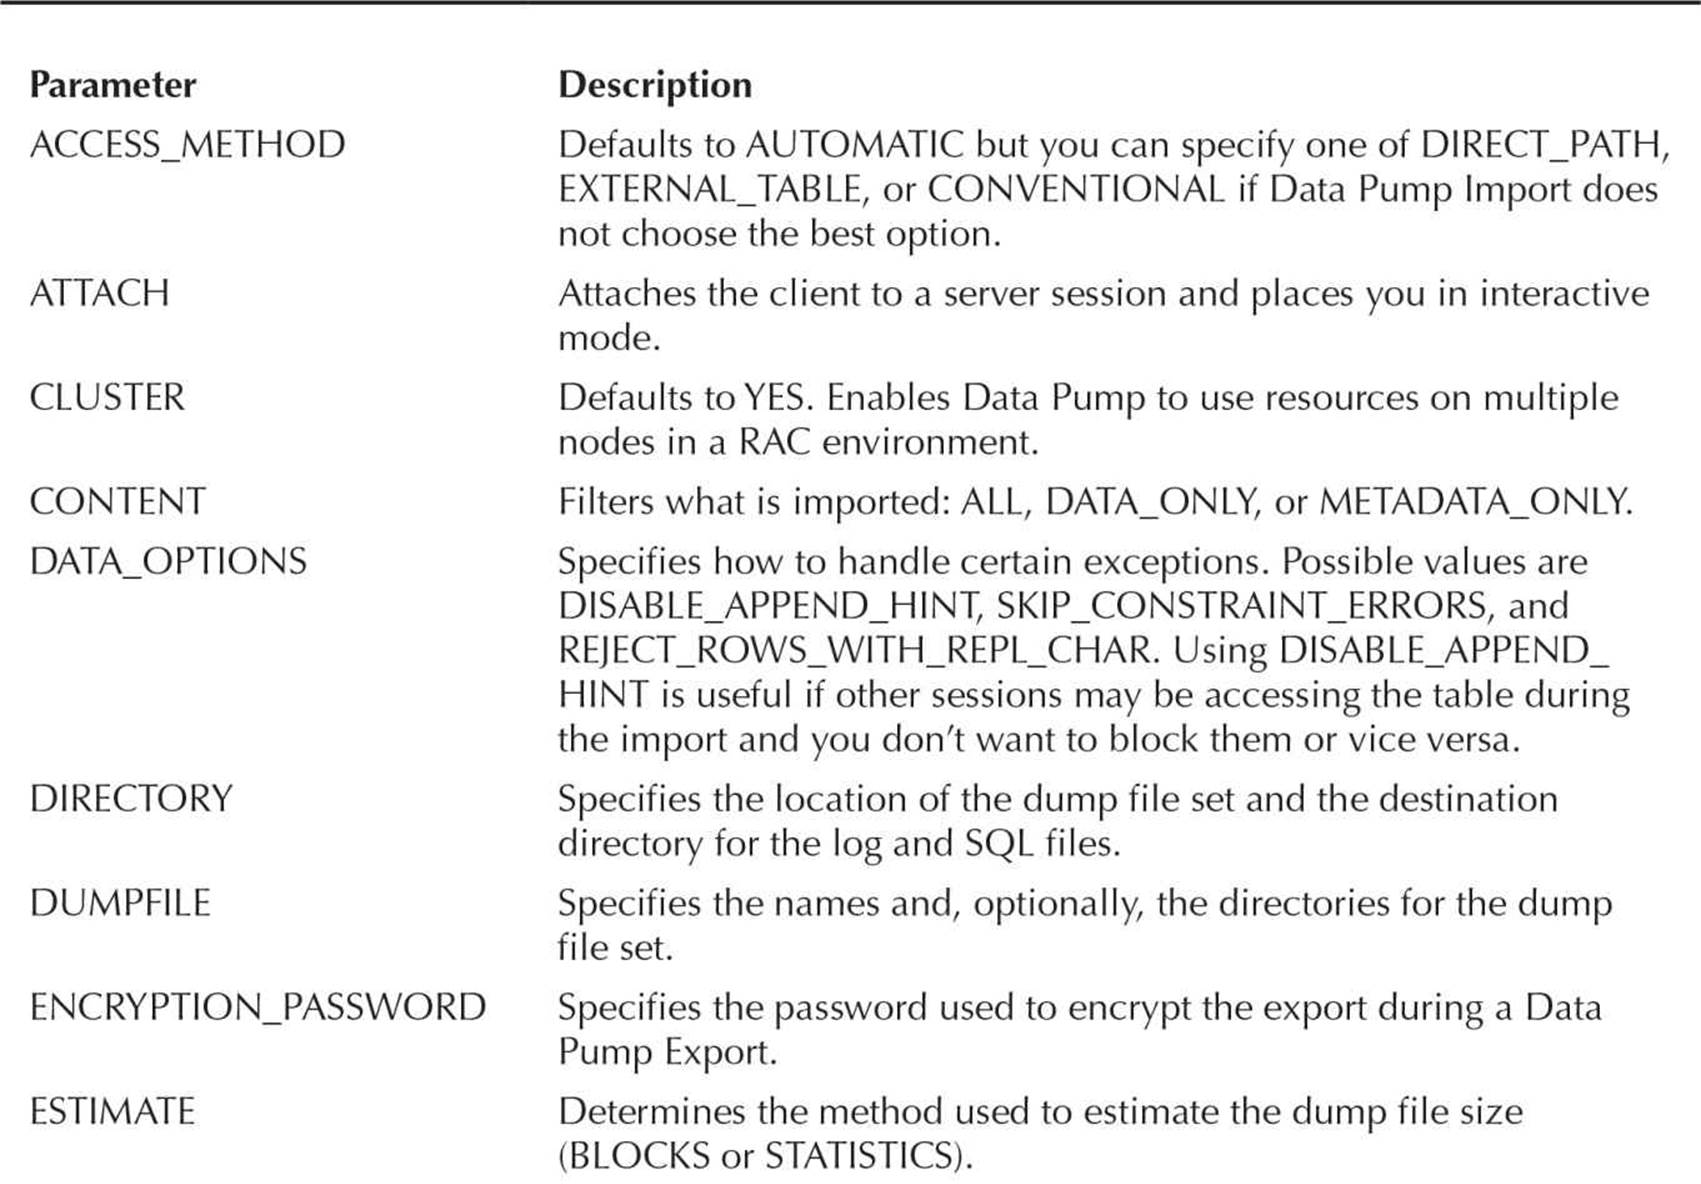
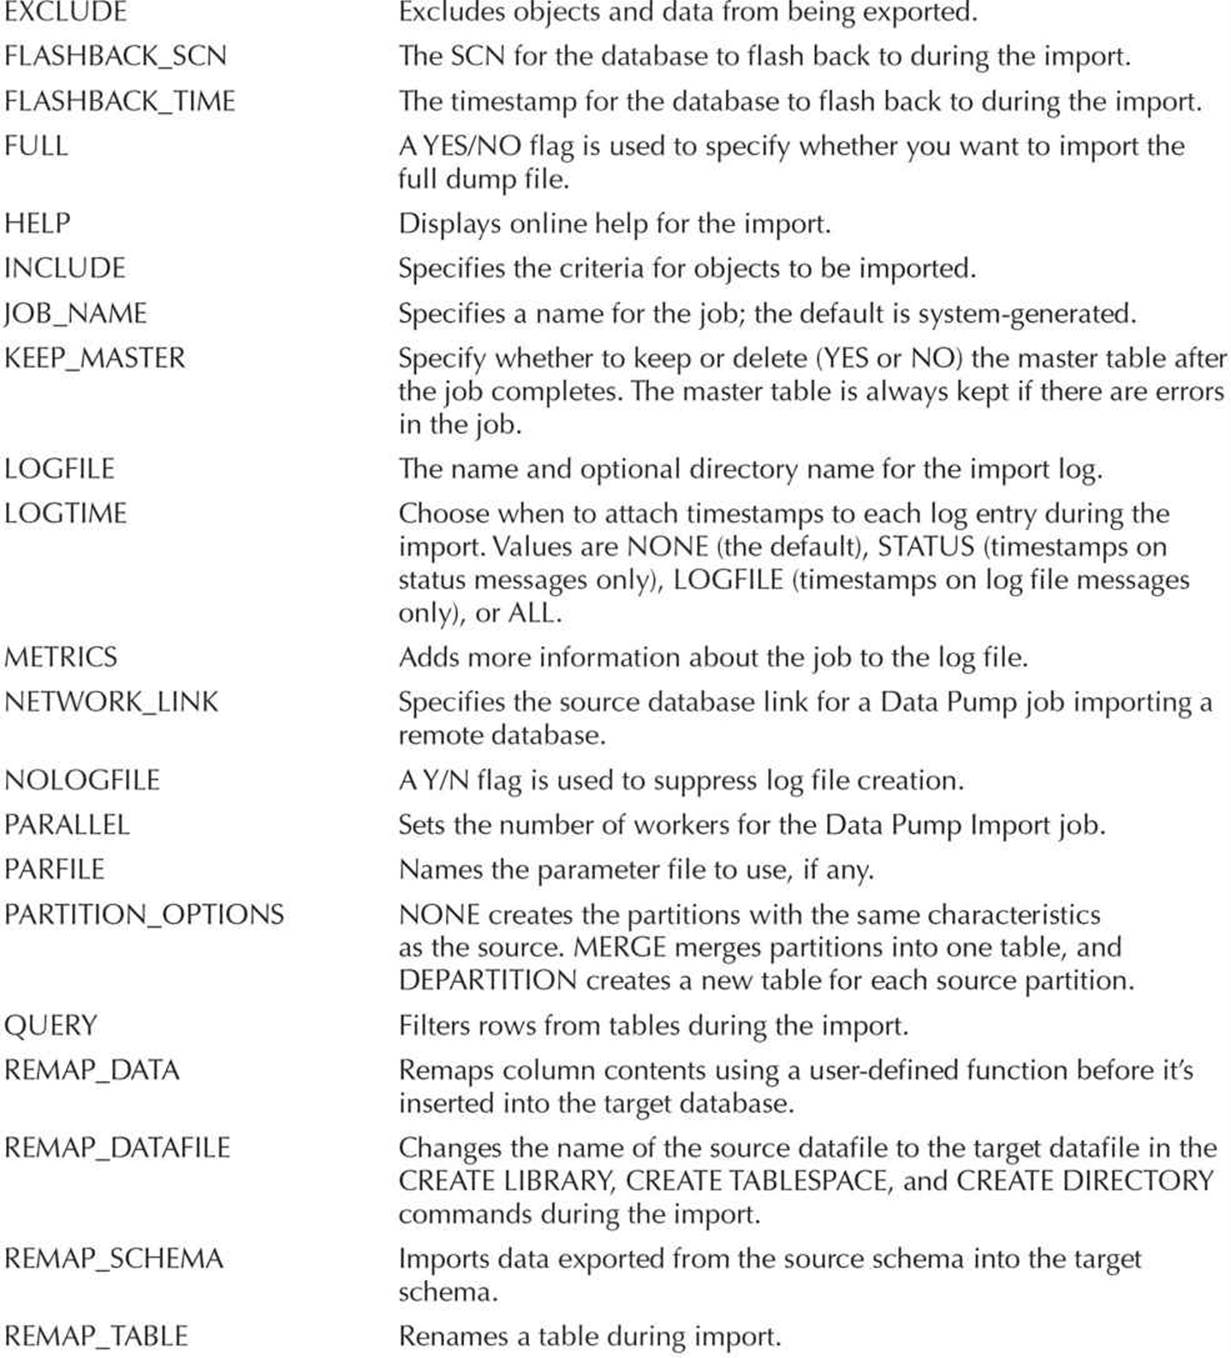
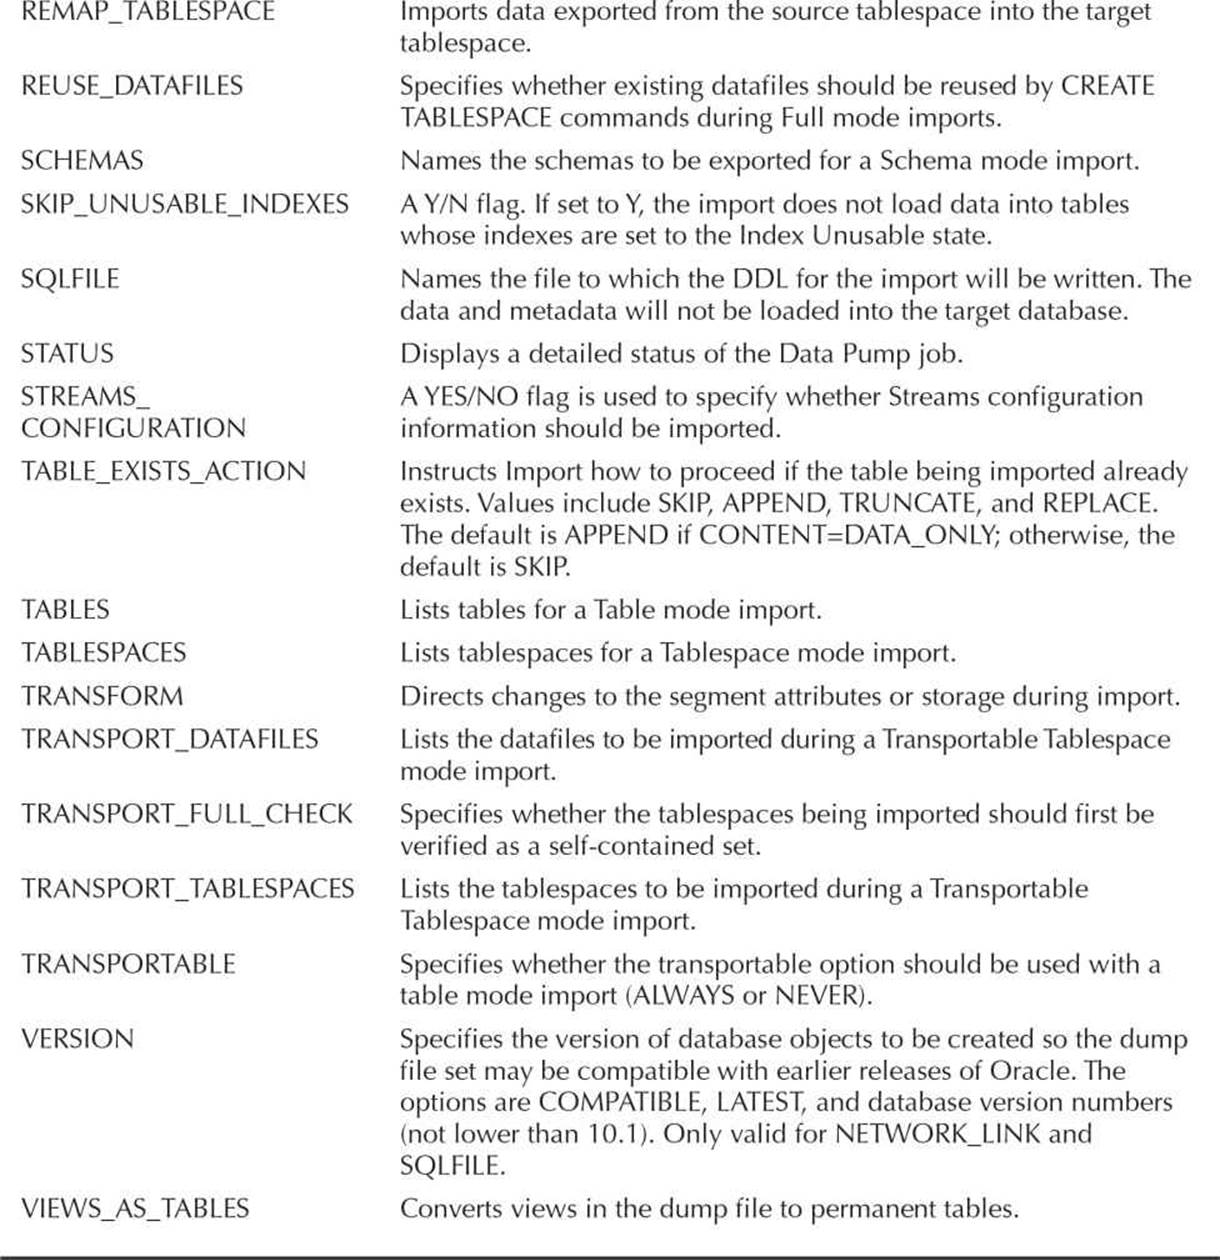
TABLE 13-3. Data Pump Import Command-Line Parameters
As with Data Pump Export, five modes are supported in Data Pump Import:
![]() Full Import all database data and metadata
Full Import all database data and metadata
![]() Schema Import data and metadata for specific user schemas
Schema Import data and metadata for specific user schemas
![]() Tablespace Import data and metadata for tablespaces
Tablespace Import data and metadata for tablespaces
![]() Table Import data and metadata for tables and table partitions
Table Import data and metadata for tables and table partitions
![]() Transportable Tablespace Import metadata for specific tablespaces in preparation for transporting a tablespace from the source database
Transportable Tablespace Import metadata for specific tablespaces in preparation for transporting a tablespace from the source database
If no mode is specified, Data Pump Import attempts to load the entire dump file.
NOTE
The directory for the dump file and log file must already exist; see the prior section on the CREATE DIRECTORY command, “Creating a Directory.”
Table 13-4 lists the parameters that are valid in the interactive mode of Data Pump Import. Many of the Data Pump Import parameters are the same as those available for the Data Pump Export. In the following sections, you’ll see how to start an import job, along with descriptions of the major options unique to Data Pump Import.
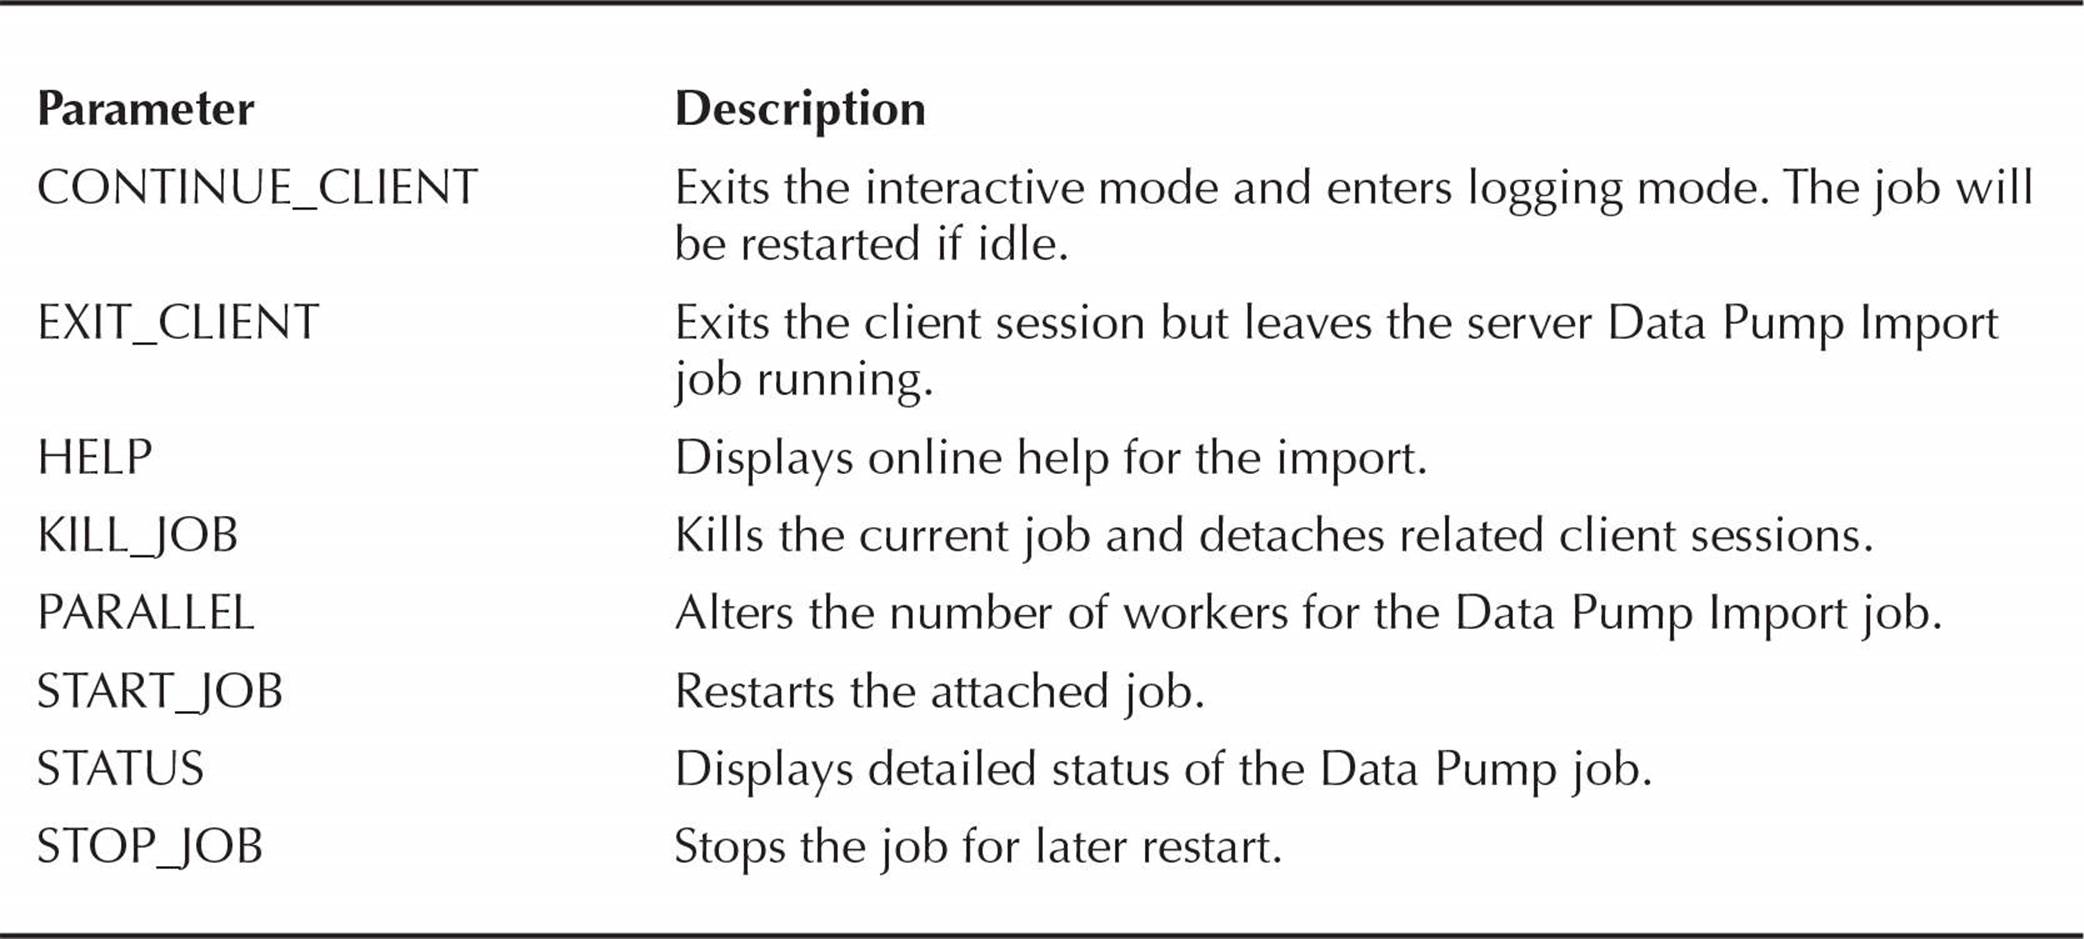
TABLE 13-4. Interactive Parameters for Data Pump Import
Starting a Data Pump Import Job
You can start a Data Pump Import job via the impdp OS executable provided with Oracle Database 12c. Use the command-line parameters to specify the import mode and the locations for all the files. You can store the parameter values in a parameter file and then reference the file via the PARFILE option.
In the first export example of this chapter, using the RJB schema, the parameter file named dp_rjb.par has been copied to the destination and renamed to rjb_dp_imp.par. It contains the following entries:

If the Oracle directory object has the same name on the target database, you can reuse the same parameter file. To create the RJB schema’s objects in a different schema on the target database, use the REMAP_SCHEMA parameter as follows:
![]()
You can change the destination tablespace as well using the REMAP_TABLESPACE option. Before starting the import, create a new user KFC as follows:

Next, add the REMAP_SCHEMA parameter to the end of the parameter file you copied from the source database:

NOTE
All dump files must be specified at the time the job is started.
You are now ready to start the import job. Because you are changing the original owner of the schema, you must have the IMP_FULL_DATABASE system privilege. Data Pump Import jobs are started using the impdp utility; here is the command, including the revised parameter file:
![]()
Data Pump Import will now perform the import and display its progress. Because the NOLOGFILE option was not specified, the log file for the import will be placed in the same directory as the dump file and will be given the name import.log. You can verify the success of the import by logging into the KFC schema and reviewing the objects. Here is the log file from the impdp command:

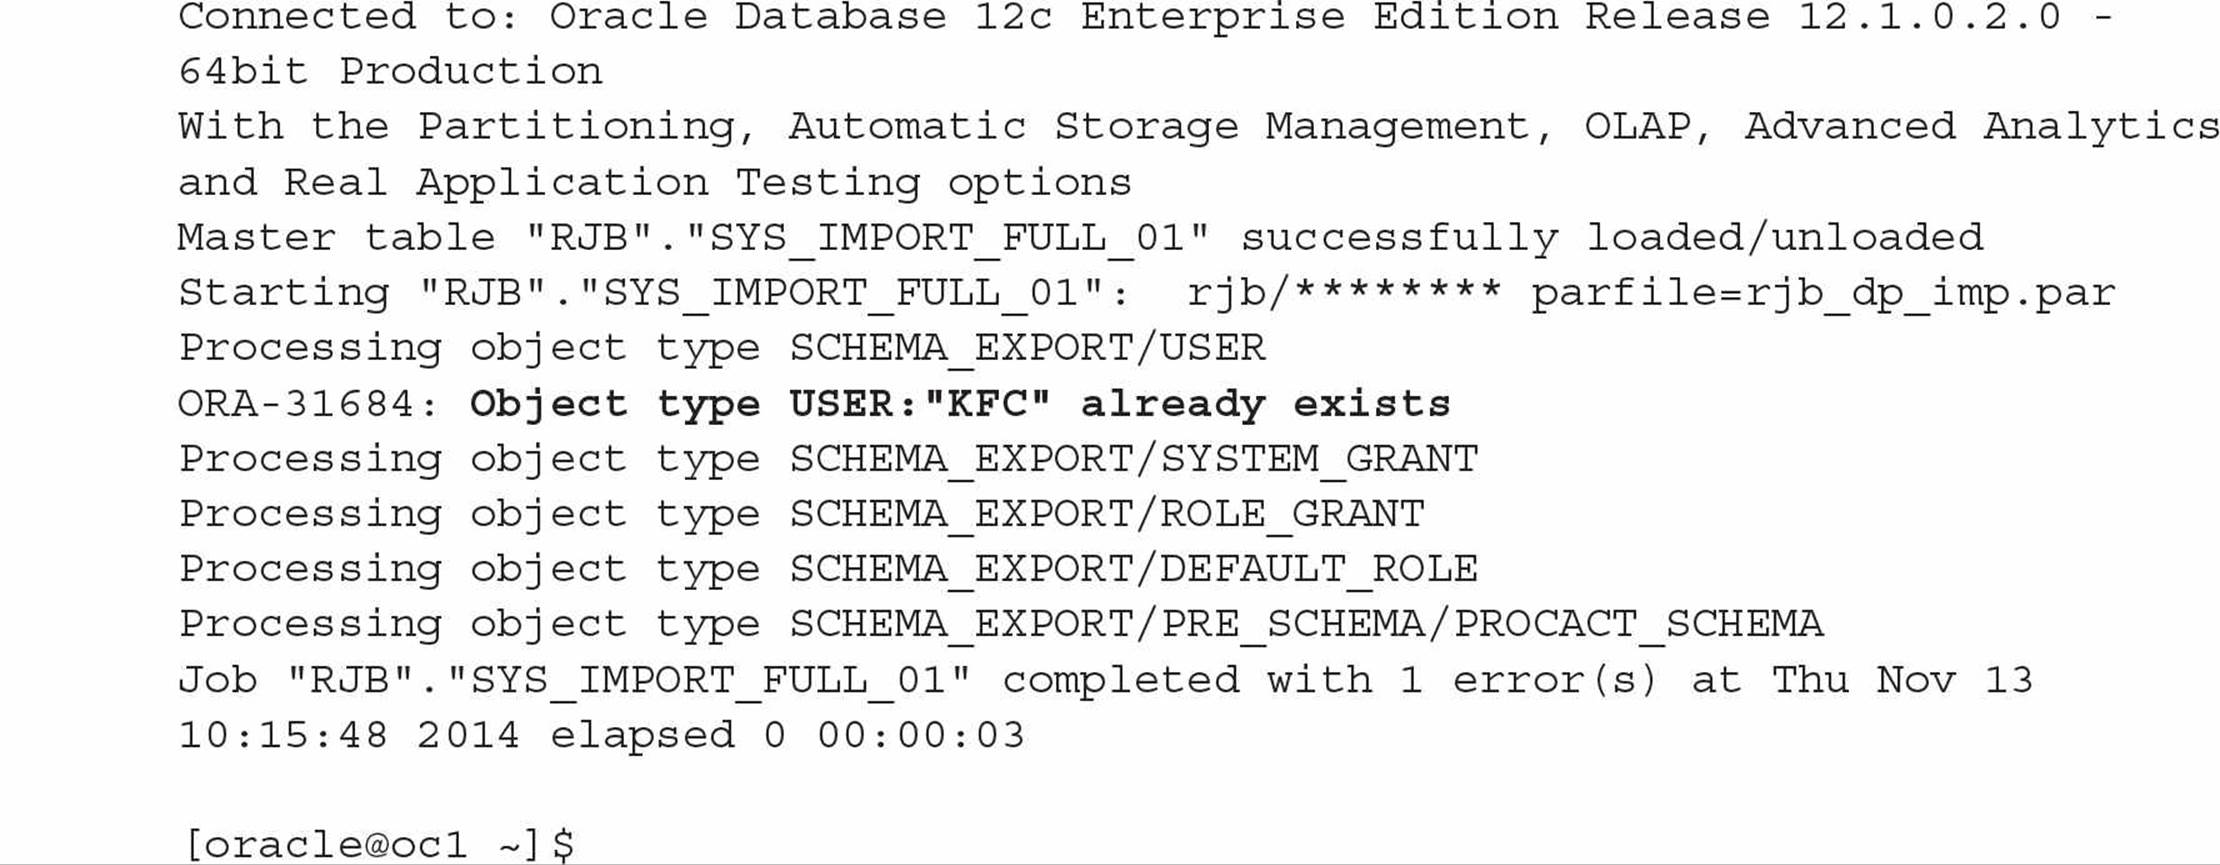
The only error during the impdp command was that the KFC user already exists; I created it explicitly earlier, and this error message can safely be ignored.
What if a table being imported already exists? In this example, with the CONTENT option set to METADATA_ONLY, the table would be skipped by default. If the CONTENT option was set to DATA_ONLY, the new data would be appended to the existing table data. To alter this behavior, use the TABLE_EXISTS_ACTION option. Valid values for TABLE_EXISTS_OPTION are SKIP, APPEND, TRUNCATE, and REPLACE.
Stopping and Restarting Running Jobs After you have started a Data Pump Import job, you can close the client window you used to start the job. Because it is server based, the import will continue to run. You can then attach to the job, check its status, and alter it:
![]()
Press CTRL-C to leave the log display, and Data Pump Import will return you to the impdp prompt:
![]()
Exit to the operating system using the exit_client command:
![]()
Later, you can restart the client and attach to the currently running job under your schema:
![]()
If you gave a name to your Data Pump Import job, specify the name as part of the attach parameter. When you attach to a running job, Data Pump Import will display the status of the job—its basic configuration parameters and its current status. You can then issue the continue_client command to see the log entries as they are generated, or you can alter the running job:
![]()
Not surprisingly, you can temporarily stop a job using the stop_job command:
![]()
While the job is stopped, you can increase its parallelism via the parallel option, and then restart the job:
![]()
EXCLUDE, INCLUDE, and QUERY Data Pump Import, like Data Pump Export, allows you to restrict the data processed via the use of the EXCLUDE, INCLUDE, and QUERY options, as described earlier in this chapter. Because you can use these options on both the export and the import, you can be very flexible in your imports. For example, you may choose to export an entire table but only import the rows that match your QUERY criteria. You could choose to export an entire schema but, when recovering the database via import, include only the most necessary tables so that the application downtime can be minimized. EXCLUDE, INCLUDE, and QUERY provide powerful capabilities to developers and database administrators during both export and import jobs.
Transforming Imported Objects In addition to changing or selecting schemas, tablespaces, datafiles, and rows during the import, you can change the segment attributes and storage requirements during import via the TRANSFORM option. The format for TRANSFORM is as follows:
![]()
The transform_name variable can have a value of SEGMENT_ATTRIBUTES or STORAGE. You can use the value variable to include or exclude segment attributes (physical attributes such as storage attributes, tablespaces, and logging). The object_type variable is optional, but if specified, it must be one of these values:
![]() CLUSTER
CLUSTER
![]() CONSTRAINT
CONSTRAINT
![]() INC_TYPE
INC_TYPE
![]() INDEX
INDEX
![]() ROLLBACK_SEGMENT
ROLLBACK_SEGMENT
![]() TABLE
TABLE
![]() TABLESPACE
TABLESPACE
![]() TYPE
TYPE
For example, object storage requirements may change during an export/import; you may be using the QUERY option to limit the rows imported, or you may be importing only the metadata, without the table data. To eliminate the exported storage clauses from the imported tables, add the following to the parameter file:
![]()
To eliminate the exported tablespace and storage clauses from all tables and indexes, use the following:
![]()
When the objects are imported, they will be assigned to the user’s default tablespace and will use the default tablespace’s storage parameters.
Generating SQL Instead of importing the data and objects, you can generate the SQL for the objects (without the data) and store it in a file on your operating system. The file will be written to the directory and filename specified via the SQLFILE option. The SQLFILE option format is as follows:
![]()
NOTE
If you do not specify a value for the directory_object variable, the file will be created in the dump file directory.
Here is the same parameter file used for the import earlier in this chapter, modified to create the SQL only:

Notice that we do not need the content=metadata_only or the remap_schema parameters, since all we want to do is to create SQL statements:
![]()
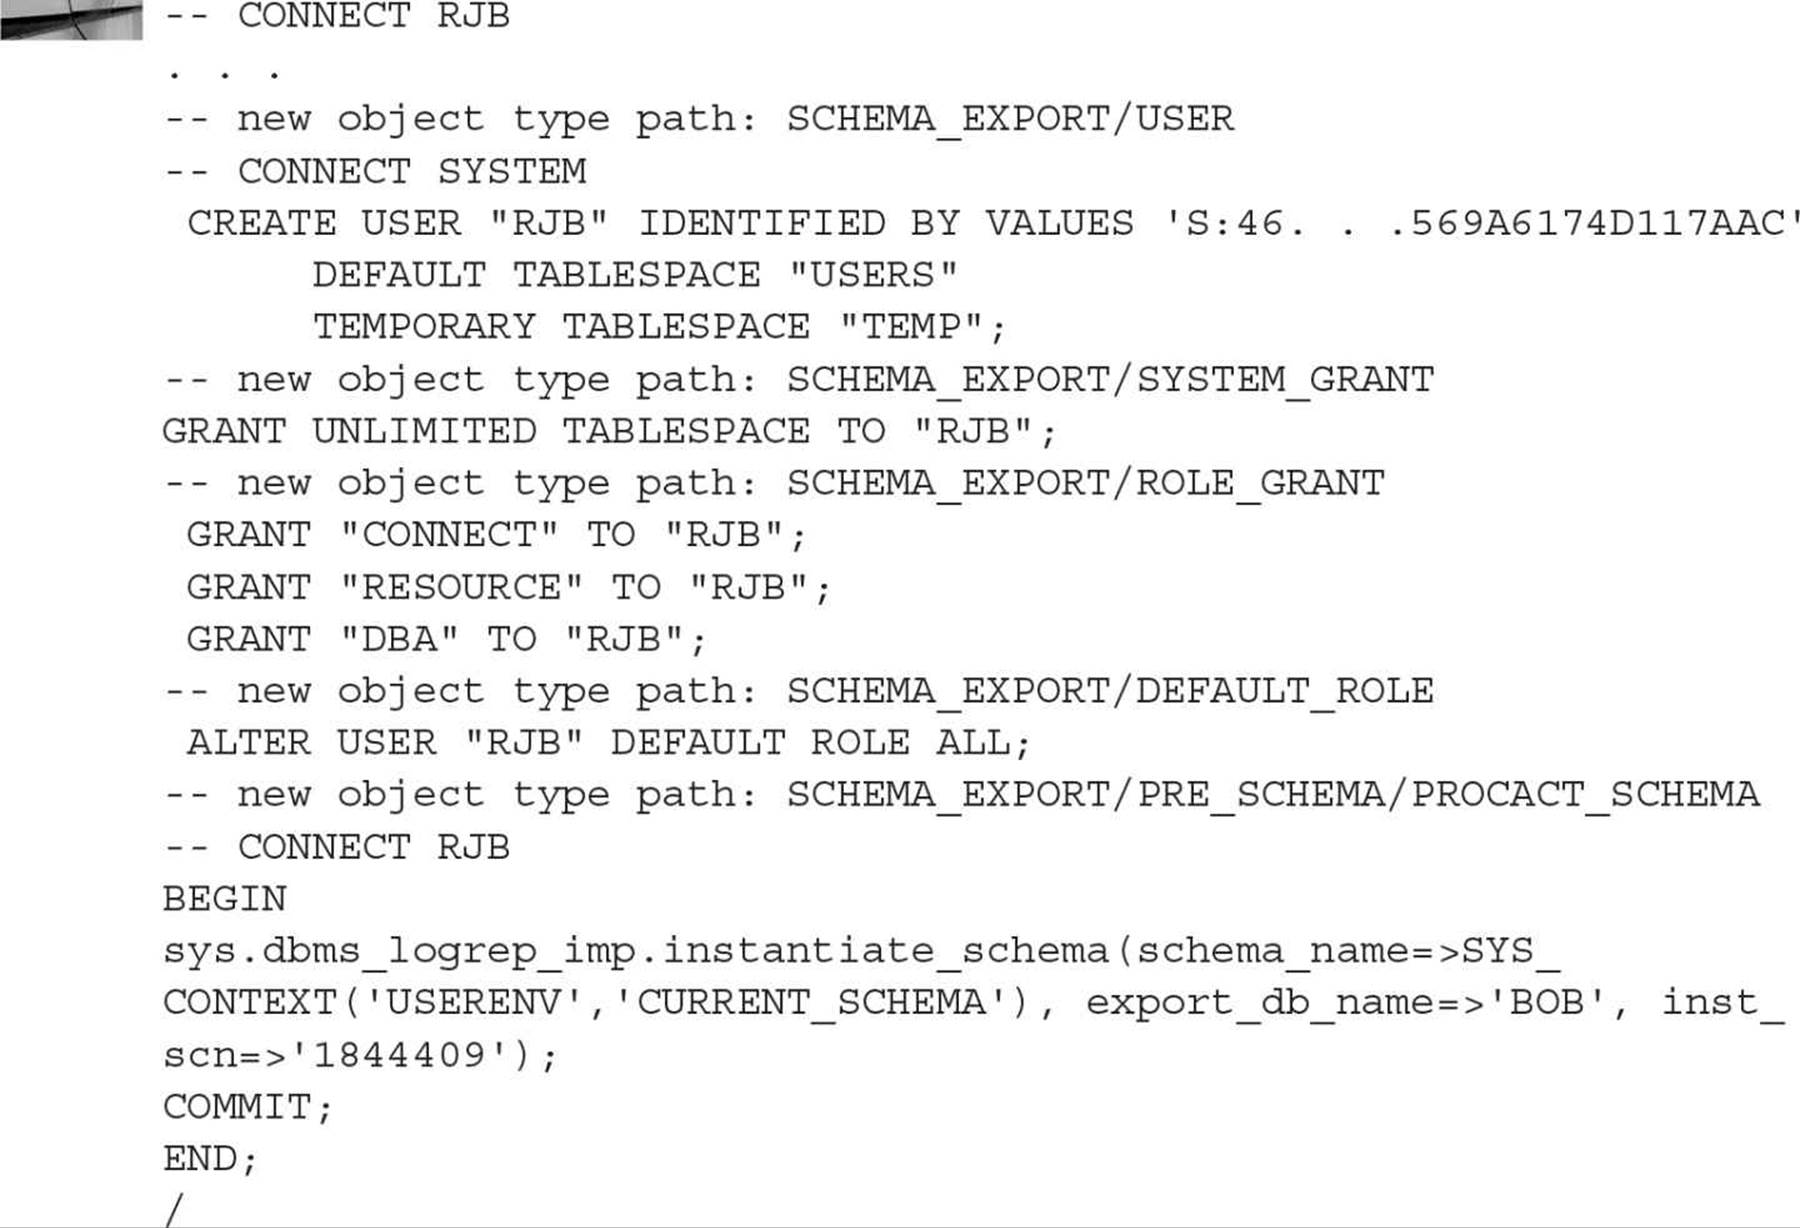
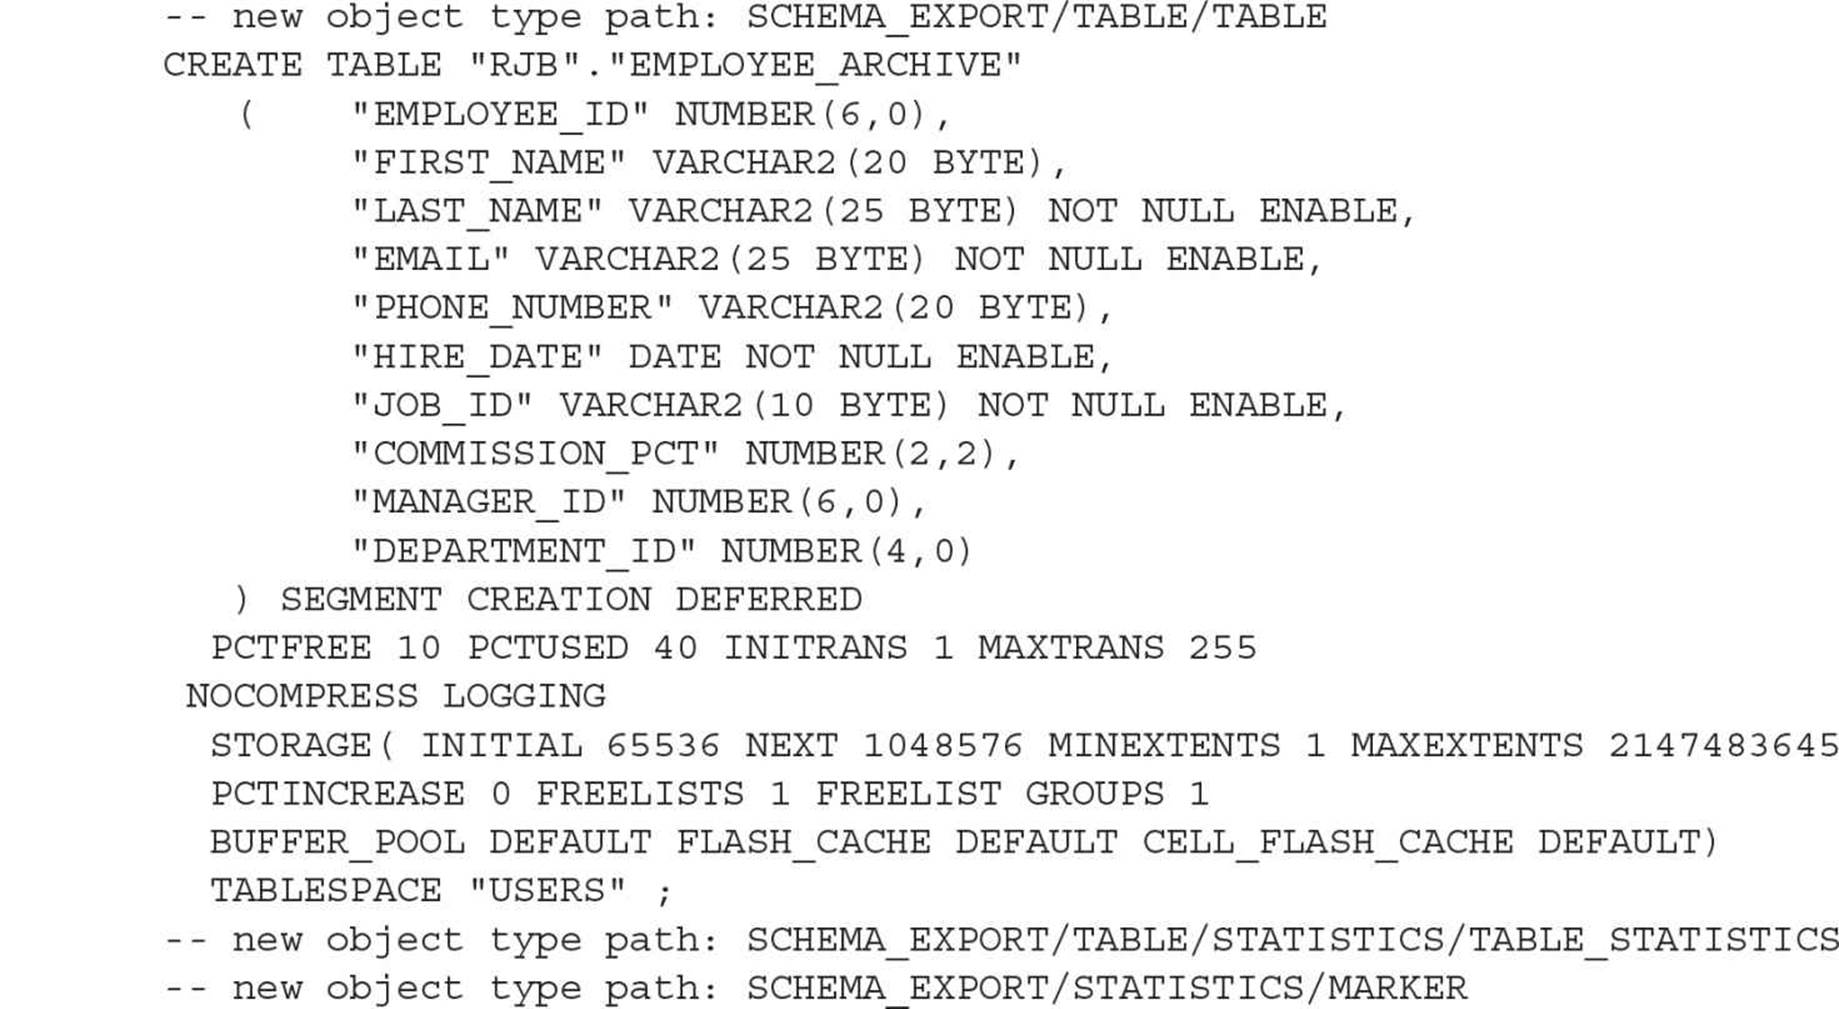
In the sql.txt file that the import process creates, you will see entries for each of the object types within the schema. Here is an excerpt from the file:
The SQLFILE output is a plain-text file, so you can edit the file, use it with SQL*Plus or SQL Developer, or keep it as documentation of your application’s database structures.
Implementing Offline Backups
An offline backup is a physical backup of the database files made after the database has been shut down cleanly via a SHUTDOWN NORMAL, a SHUTDOWN IMMEDIATE, or a SHUTDOWN TRANSACTIONAL command. While the database is shut down, each of the files actively used by the database is backed up. These files provide a complete image of the database as it existed at the moment it was shut down.
NOTE
You should not rely on an offline backup performed following a SHUTDOWN ABORT, because it may be inconsistent. If you must perform a SHUTDOWN ABORT, you should restart the database and perform a normal SHUTDOWN or a SHUTDOWN IMMEDIATE or a SHUTDOWN TRANSACTIONAL prior to beginning your offline backup.
The following files should be backed up during a cold backup:
![]() All datafiles
All datafiles
![]() All control files
All control files
![]() All archived redo log files
All archived redo log files
![]() Initialization parameter file or server parameter file (SPFILE)
Initialization parameter file or server parameter file (SPFILE)
![]() Password file
Password file
If you are using raw devices for database storage, with or without ASM, you’ll have to back up these devices as well using operating system commands such as dd in combination with a compression utility, as in this example:
![]()
During a recovery, an offline backup can restore the database to the point in time at which the database was shut down. Offline backups commonly play a part in disaster recovery planning, because they are self-contained and may be simpler to restore on a disaster recovery server than other types of backups. If the database is running in ARCHIVELOG mode, you can apply more recent archived redo logs to the restored offline backup to bring the database back to the point in time of a media failure or a complete loss of the database. As I’ve emphasized throughout this book, the need for cold backups is minimized or eliminated if you use RMAN; your database may never need to be shut down for a cold backup (unless disaster strikes—in which case, be sure to create a RAC database as well!).
Implementing Online Backups
Consistent offline backups can only be performed while the database is shut down. However, you can perform physical file backups of a database while the database is open, provided the database is running in ARCHIVELOG mode and the backup is performed correctly. These backups are referred to as online backups.
Oracle writes to the online redo log files in a cyclical fashion: After filling the first log file, it begins writing to the second, until that one fills, and it then begins writing to the third. Once the last online redo log file is filled, the LGWR (Log Writer) background process begins to overwrite the contents of the first redo log file.
When Oracle is run in ARCHIVELOG mode, the archiver background processes (ARC0-ARC9 and ARCa-ARCt) make a copy of each redo log file after the LGWR process finishes writing to it. These archived redo log files are usually written to a disk device. They may instead be written directly to a tape device, but this tends to be very operator intensive.
Getting Started
To make use of the ARCHIVELOG capability, you must first place the database in ARCHIVELOG mode. Before starting the database in ARCHIVELOG mode, make sure you are using one of the following configurations, listed from most to least recommended:
![]() Enable archiving to the fast recovery area only; use disk mirroring on the disks containing the fast recovery area. The DB_RECOVERY_FILE_DEST parameter specifies the file system location or ASM disk group containing the fast recovery area. As an Oracle best practice, you should create the fast recovery area on a mirrored ASM disk group separate from the primary disk group.
Enable archiving to the fast recovery area only; use disk mirroring on the disks containing the fast recovery area. The DB_RECOVERY_FILE_DEST parameter specifies the file system location or ASM disk group containing the fast recovery area. As an Oracle best practice, you should create the fast recovery area on a mirrored ASM disk group separate from the primary disk group.
![]() Enable archiving to the fast recovery area and set at least one LOG_ARCHIVE_DEST_n parameter to another location outside of the fast recovery area.
Enable archiving to the fast recovery area and set at least one LOG_ARCHIVE_DEST_n parameter to another location outside of the fast recovery area.
![]() Set at least two LOG_ARCHIVE_DEST_n parameters to archive to non-fast recovery area destinations.
Set at least two LOG_ARCHIVE_DEST_n parameters to archive to non-fast recovery area destinations.
NOTE
If the initialization parameter DB_RECOVERY_FILE DEST is specified and no LOG_ARCHIVE_DEST_n parameter is specified, then LOG_ARCHIVE_DEST_10 is implicitly set to the fast recovery area.
In the following examples, I assume that the best configuration, a single mirrored fast recovery area, has been selected. The following listing shows the steps needed to place a database in ARCHIVELOG mode; first, shut down the database, and then issue these commands:

NOTE
To see the currently active online redo log and its sequence number, query the V$LOG dynamic view.
If you enable archiving but do not specify any archiving locations, the archived log files reside in a default, platform-dependent location; on Unix and Linux platforms the default location is $ORACLE_HOME/dbs.
Each of the archived redo log files contains the data from a single online redo log. They are numbered sequentially, in the order in which they were created. The size of the archived redo log files varies, but it does not exceed the size of the online redo log files.
If the destination directory of the archived redo log files runs out of space, the ARCn processes will stop processing the online redo log data and the database will stop itself. This situation can be resolved by adding more space to the archived redo log file destination disk or by backing up the archived redo log files and then removing them from this directory. If you are using the fast recovery area for your archived redo log files, the database issues a warning alert if the available space in the fast recovery area is less than 15 percent, and a critical alert when the available space is less than 3 percent. Taking action at the 15 percent level, such as increasing the size or changing the location of the fast recovery area, can most likely avoid any service interruptions, assuming that there are no runaway processes consuming space in the fast recovery area.
The initialization parameter DB_RECOVERY_FILE_DEST_SIZE can also assist in managing the size of the fast recovery area. While its primary purpose is to limit the amount of disk space used by the fast recovery area on the specified disk group or file system directory, it can be temporarily increased once an alert is received to give the DBA additional time to allocate more disk space to the disk group or relocate the fast recovery area.
DB_RECOVERY_FILE_DEST_SIZE helps manage space not only within a database but also across all databases that use the same ASM disk groups. Each database can have its own setting for DB_RECOVERY_FILE_DEST_SIZE.
Short of receiving a warning or critical alert, you can be a bit more proactive in monitoring the size of the fast recovery area using the dynamic performance view V$RECOVERY_FILE_DEST to see the total used and reclaimable space on the destination file system. In addition, you can use the dynamic performance view V$FLASH_RECOVERY_AREA_USAGE to see a usage breakdown by file type:
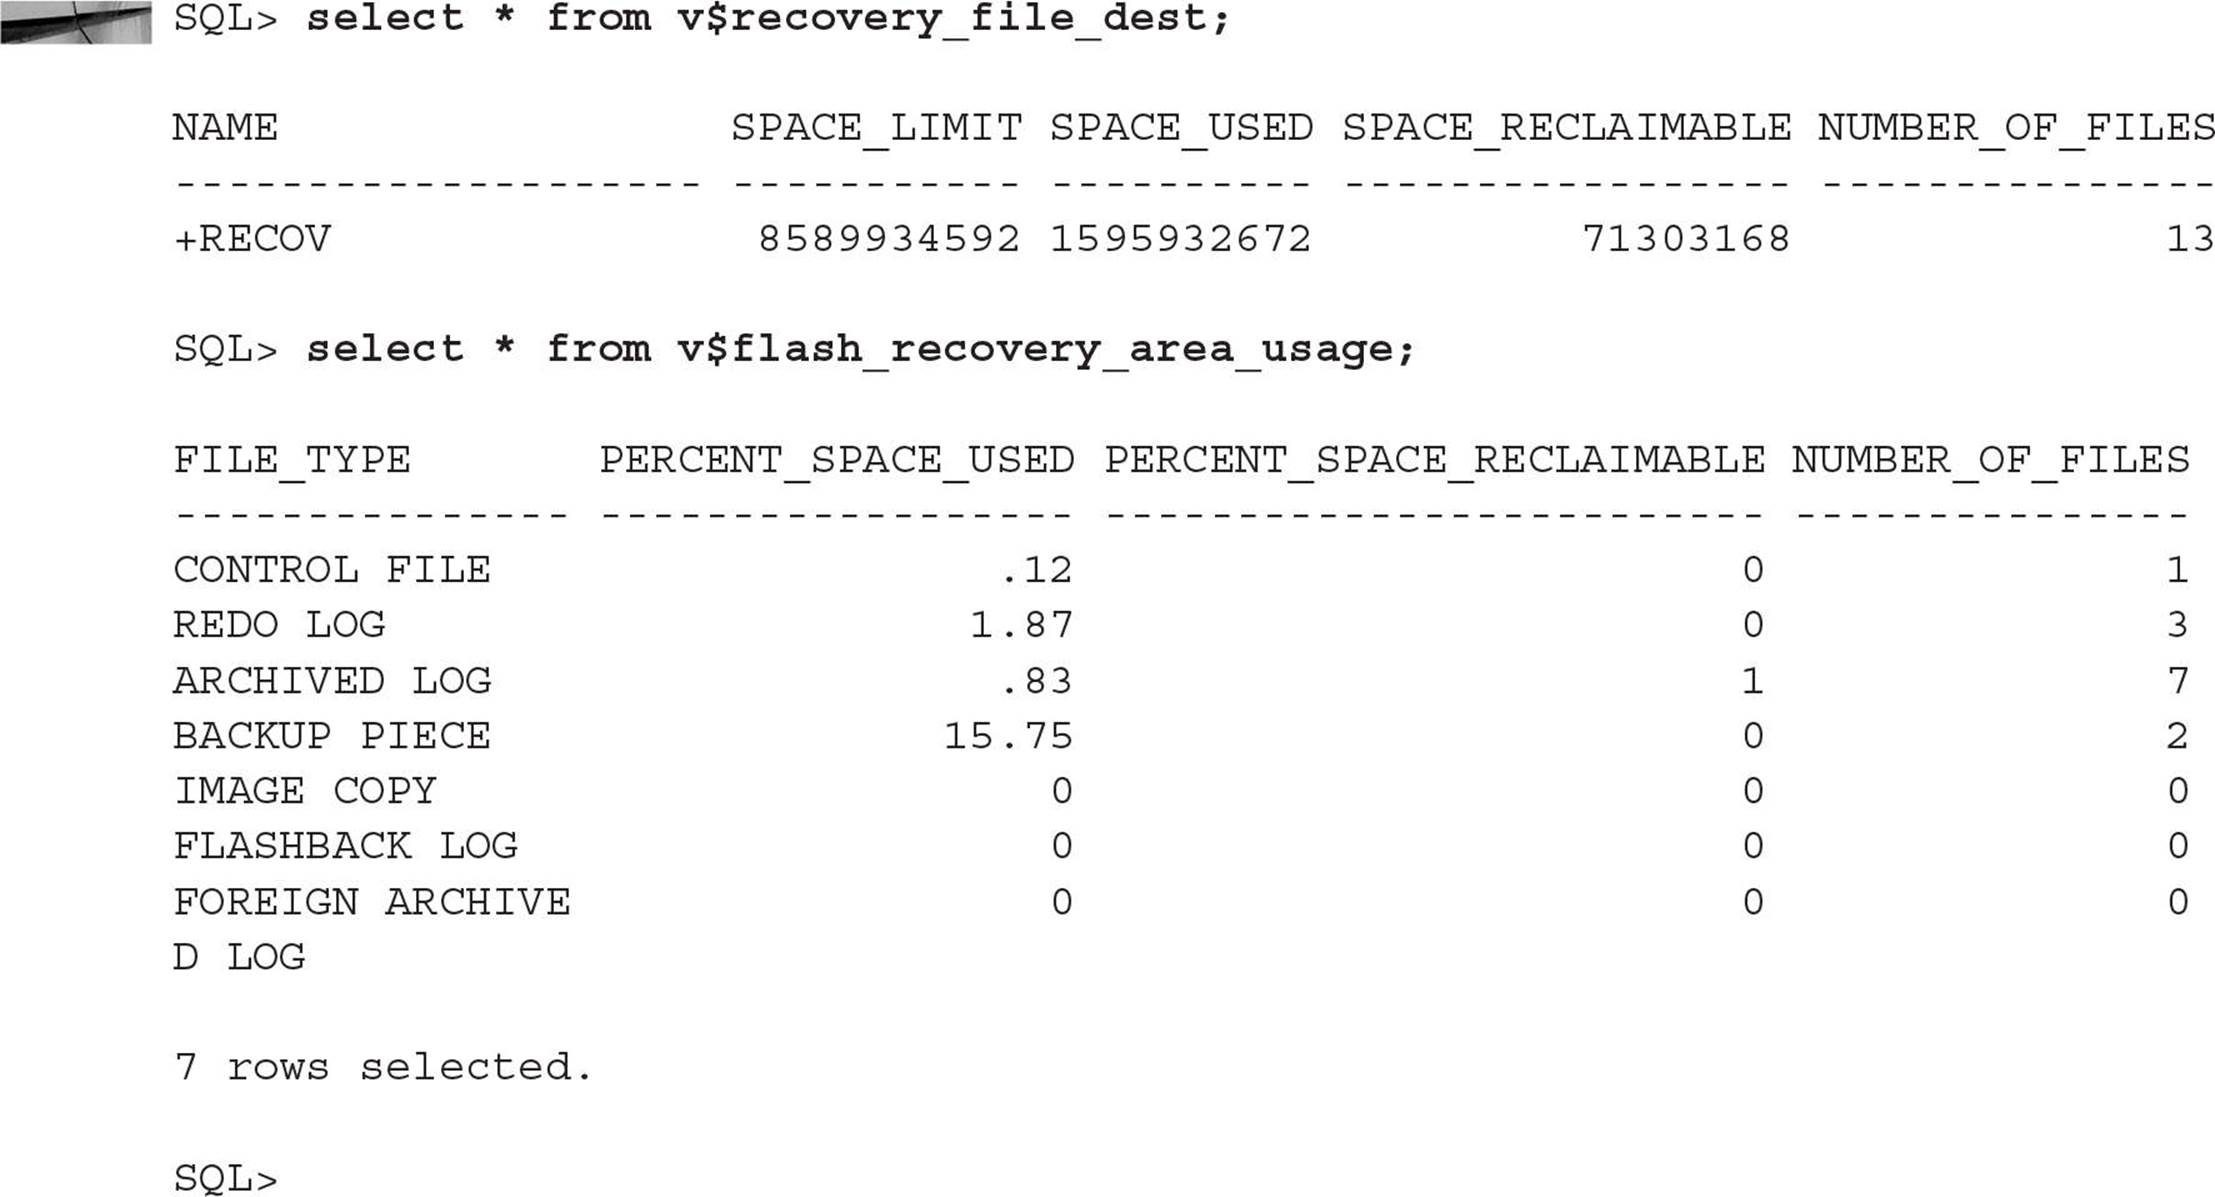
In this example, the fast recovery area is less than 20 percent used, with the largest percentage due to RMAN backups.
Performing Online Database Backups
Once a database is running in ARCHIVELOG mode, you can back it up while it is open and available to users. This capability allows round-the-clock database availability to be achieved while still guaranteeing the recoverability of the database.
Although online backups can be performed during normal working hours, they should be scheduled for the times of the least user activity for several reasons. First, the online backups will use operating system commands to back up the physical files, and these commands will use the available I/O resources in the system (impacting the system performance for interactive users). Second, while the tablespaces are being backed up, the manner in which transactions are written to the archived redo log files changes. When you put a tablespace in “online backup” mode, the DBWR process writes all the blocks in the buffer cache that belong to any file that is part of the tablespace back to disk. When the blocks are read back into memory and then changed, they will be copied to the log buffer the first time that a change is made to them. As long as they stay in the buffer cache, they will not be recopied to the online redo log file. This will use a great deal more space in the archived redo log file destination directory.
NOTE
You can create a command file to perform your online backups, but using RMAN is preferred for several reasons: RMAN maintains a catalog of your backups, allows you to manage your backup repository, and allows you to perform incremental backups of the database.
Follow these steps to perform an online database backup or individual tablespace backups:
1. Set the database into backup state (prior to Oracle 10g, the only option was to enable backup on a tablespace-by-tablespace basis) by using the ALTER TABLESPACE … BEGIN BACKUP command for each tablespace or ALTER DATABASE BEGIN BACKUP to put all tablespaces into online backup mode.
2. Back up the datafiles using operating system commands.
3. Set the database back to its normal state by issuing ALTER TABLESPACE … END BACKUP for each tablespace or ALTER DATABASE END BACKUP for all tablespaces in the database.
4. Archive the unarchived redo logs so that the redo required to recover the tablespace backup is used by issuing the command ALTER SYSTEM ARCHIVE LOG CURRENT.
5. Back up the archived redo log files. If necessary, compress or delete the backed-up archived redo log files to free space on disk.
6. Back up the control file.
See Chapter 14 for details on RMAN’s automation of this process.
Integration of Backup Procedures
Because there are multiple methods for backing up the Oracle database, there is no need to have a single point of failure in your backup strategy. Depending on your database’s characteristics, you should choose one method, and use at least one of the remaining methods as a backup to your primary backup method.
NOTE
When considering physical backups, you should also evaluate the use of RMAN to perform incremental physical backups.
In the following sections, you will see how to choose the primary backup method for your database, how to integrate logical and physical backups, and how to integrate database backups with file system backups. For details on RMAN, see Chapter 14.
Integration of Logical and Physical Backups
Which backup method is appropriate to use as the primary backup method for your database? When deciding, you should take into account the characteristics of each method:
Offline backups are the least flexible method of backing up the database if the database is running in NOARCHIVELOG mode. Offline backups are a point-in-time snapshot of the database. Also, because they are a physical backup, DBAs cannot selectively recover logical objects (such as tables) from them. Although there are times when they are appropriate (such as for disaster recovery), offline backups should normally be used as a fallback in case your primary method fails. If you are running the database in ARCHIVELOG mode (strongly recommended!), you can use the offline backups as the basis for a media recovery, but an online backup would typically be easier to use for recovery in that situation.
Of the two remaining methods, which one is more appropriate? For production environments, the answer is almost always online backups. Online backups, with the database running in ARCHIVELOG mode, allow you to recover the database to the point in time immediately preceding a system fault or a user error. Using a Data Pump Export-based strategy would limit you to only being able to go back to the data as it existed the last time the data was exported.
Consider the size of the database and what objects you will likely be recovering. Given a standard recovery scenario, such as the loss of a disk, how long will it take for the data to be recovered? If a file is lost, the quickest way to recover it is usually via a physical backup, which again favors online backups over exports.
If the database is small, transaction volume is very low, and availability is not a concern, then offline backups may serve your needs. If you are only concerned about one or two tables, you could use Data Pump Export to selectively back them up. However, if the database is large, the recovery time needed for Data Pump Export/Import may be prohibitive. For large, low-transaction environments, offline backups may be appropriate.
Regardless of your choice for primary backup method, the final implementation should include a physical backup and some sort of logical backup, either via Data Pump Export or via replication. This redundancy is necessary because these methods validate different aspects of the database: Data Pump Export validates that the data is logically sound, and physical backups validate that the data is physically sound. A good database backup strategy integrates logical and physical backups. The frequency and type of backup performed will vary based on the database’s usage characteristics.
Other database activities may call for ad hoc backups. Ad hoc backups may include offline backups before performing database upgrades and exports during application migration between databases.
Integration of Database and Operating System Backups
As described in this chapter, the DBA’s backup activities involve a number of tasks normally assigned to a systems management group: monitoring disk usage, maintaining tapes, and so on. Rather than duplicate these efforts, it is best to integrate them; focus on a process-based alignment of your organization. The database backup strategy should be modified so that the systems management personnel’s file system backups will take care of all tape handling, allowing you to centralize the production control processes in your environment.
Centralization of production control processes is usually accomplished by dedicating disk drives as destination locations for physical file backups. Instead of files being backed up to tape drives, the backups will instead be written to other disks on the same server. Those disks should be targeted for backups by the systems management personnel’s regular file system backups. The DBA does not have to run a separate tape backup job. However, the DBA does need to verify that the systems management team’s backup procedures executed correctly and completed successfully.
If your database environment includes files outside the database, such as datafiles for external tables or files accessed by BFILE datatypes, then you must determine how you are going to back those files up in a way that will provide consistent data in the event of a recovery. The backups of these flat files should be coordinated with your database backups and should also be integrated into any disaster recovery planning.
Summary
As with most Oracle features and tools, you have more than one if not several ways to accomplish a specific task. Performing backup and recovery is no exception. You can perform logical backups of your database using Data Pump Export and Import; physical backups of the database using RMAN in ARCHIVELOG mode; physical backups with the database shut down; or manual physical database backups of datafiles, control files, the SPFILE, and other miscellaneous files such as the password file and wallet while the database is in ARCHIVELOG mode.
Which method you should use depends on how available your database needs to be, how much storage space you can allocate for backups, and how quickly you must restore and recover the database in case of media failure. Using at least two of the methods described in this chapter ensures that your backup infrastructure doesn’t become the single point of failure in your environment.

All materials on the site are licensed Creative Commons Attribution-Sharealike 3.0 Unported CC BY-SA 3.0 & GNU Free Documentation License (GFDL)
If you are the copyright holder of any material contained on our site and intend to remove it, please contact our site administrator for approval.
© 2016-2026 All site design rights belong to S.Y.A.