Oracle Database 12c DBA Handbook (2015)
PART
III
High Availability
CHAPTER
14
Using Recovery Manager (RMAN)
In Chapters 11 and 13, we discussed a number of different ways in which we can back up our data and protect the database from accidental, inadvertent, or deliberate corruption. Physical backups of the database ensure that no committed transaction is lost and that we can restore the database from any previous backup to the current point in time or any point in between; logical backups allow the DBA or a user to capture the contents of individual database objects at a particular point in time, providing an alternative recovery option when a complete database-restoration operation would have too big an impact on the rest of the database.
Oracle’s Recovery Manager (RMAN) takes backup and recovery to a new level of protection and ease of use. Since RMAN’s appearance in Oracle version 8, there have been a number of major improvements and enhancements that can make RMAN a “one-stop shopping” solution for nearly every database environment, including those that are leveraging Oracle’s multitenant architecture features first available in Oracle Database 12c. In addition to the RMAN command-line interface improvements in Oracle 12c, all the RMAN functionality has been included in the web-based Enterprise Manager Cloud Control 12c (EM Cloud Control) interface as well, allowing a DBA to monitor and perform backup operations when only a web browser connection is available.
In this chapter, we’ll use a number of examples of RMAN operations, both using command-line syntax and the EM Cloud Control web interface. The examples will run the gamut from RMAN environment setup to backup, and the recovery and validation of the backup itself. We’ll go into some detail about how RMAN manages the metadata associated with the database and its backups. Finally, we’ll cover a number of miscellaneous topics, such as using RMAN to catalog backups made outside of the RMAN environment.
Oracle Database 12c brings even more functionality to an RMAN environment. To make database management more easily accessible from the command line, virtually all commands you would run at the SQL> prompt in SQL*Plus are now available at the RMAN> prompt without using the RMAN sql command. You can also now perform a restore and recovery operation at the table level—you would typically use Data Pump for logical export and import of table objects, but this gives you another option to retrieve a single table or a small number of tables using the latest RMAN backups. Finally, the DUPLICATE command can back up much faster over a network connection by leveraging a higher degree of parallelism on the auxiliary instance as well as better compression algorithms; these dramatically reduce the amount of time needed to create a copy of a database.
Due to the wide variety of tape backup management systems available, discussing any particular hardware configuration would be beyond the scope of this book. Instead, the focus in this chapter will be on using the fast recovery area, a dedicated area allocated on disk to store disk-based copies of all types of objects that RMAN can back up. The fast recovery area (formerly known as the flash recovery area) has been available since Oracle Database 10g.
For all the examples in this chapter, we will use a recovery catalog with RMAN. Although most of the functionality of RMAN is available by only using the control file of the target database, benefits such as being able to store RMAN scripts and additional recovery capabilities far outweigh the relatively low cost of maintaining an RMAN user account in a different database.
RMAN Features and Components
RMAN is more than just a client-side executable that can be used with a web interface. It comprises a number of other components, including the database to be backed up (the target database), an optional recovery catalog, an optional fast recovery area, and media management software to support tape backup systems. We will review each of these briefly in this section.
Many features of RMAN do not have equivalents in the backup methods presented in Chapter 13. We’ll contrast the advantages and disadvantages of using RMAN versus the more traditional methods of backups.
RMAN Components
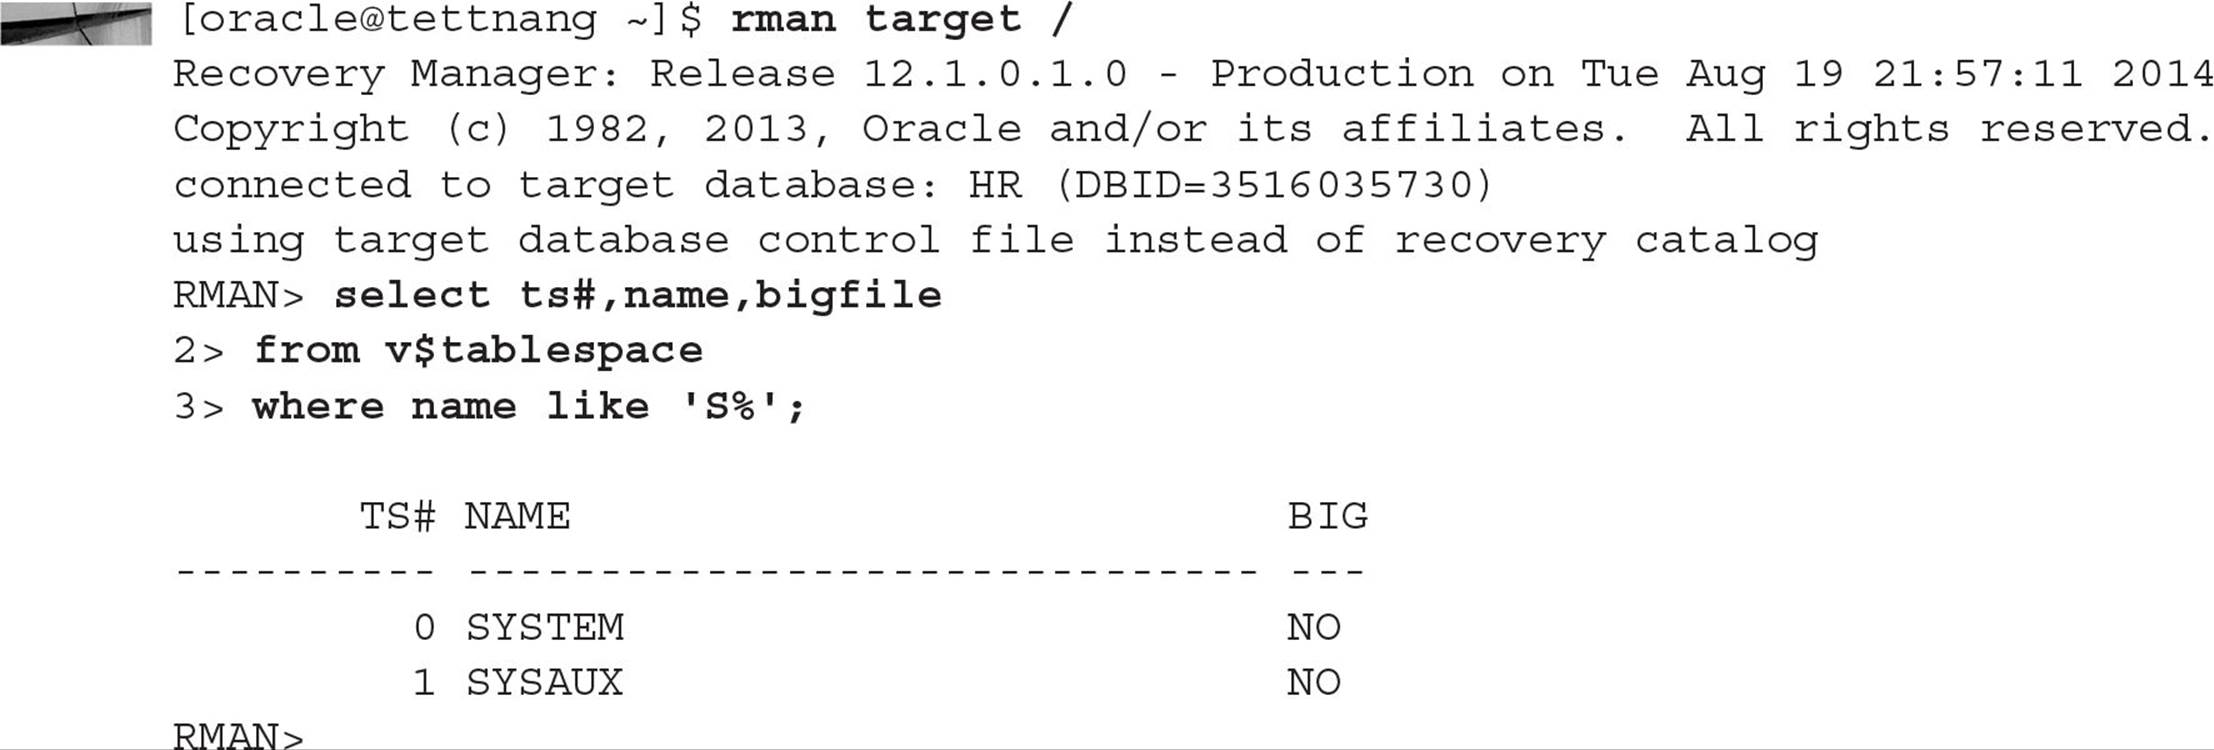
The first, and minimal, component in the RMAN environment is the RMAN executable. It is available along with the other Oracle utilities in the directory $ORACLE_HOME/bin, and it’s installed by default with both the Standard and Enterprise Editions of Oracle Database 12c. From a command-line prompt, you can invoke RMAN with or without command-line arguments; in the following example, we’re starting up RMAN using operating system authentication without connecting to a recovery catalog:

The command-line arguments are optional; we can specify our target database and a recovery catalog from the RMAN> prompt also. In Figure 14-1, you can see how to access RMAN features from EM Cloud Control.
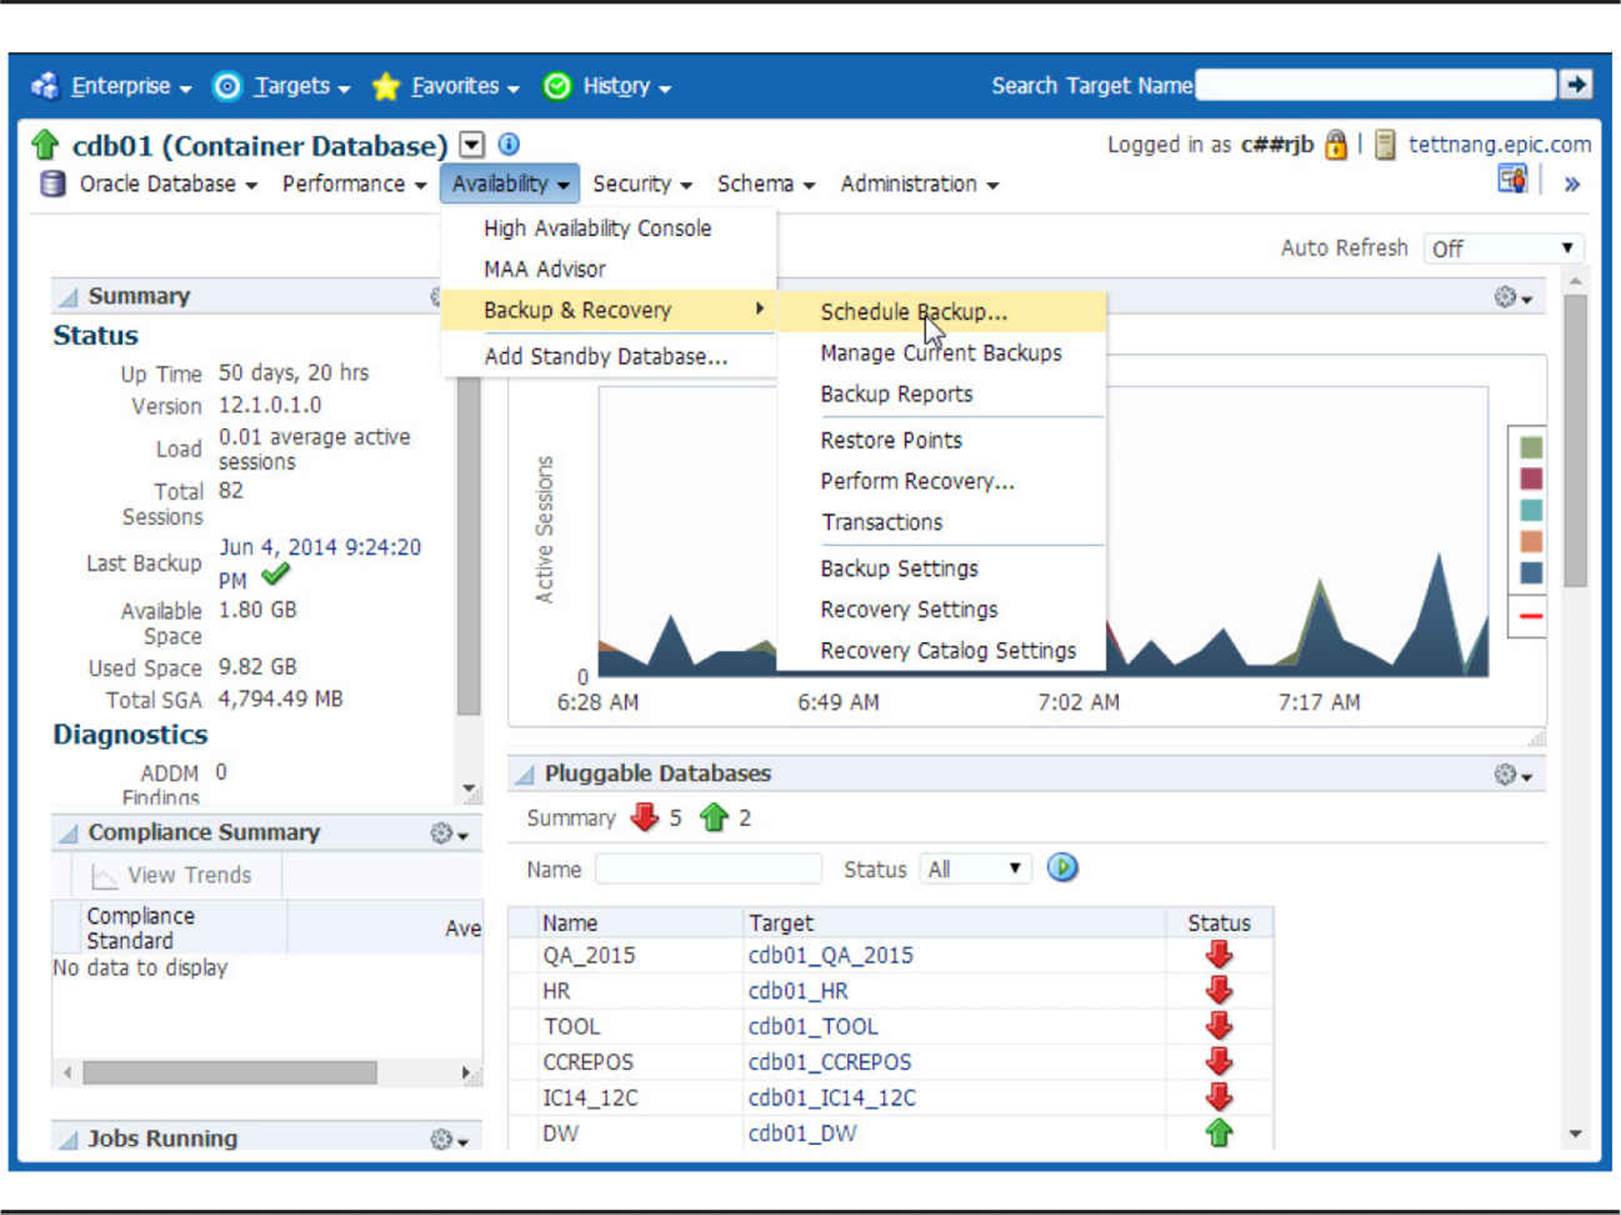
FIGURE 14-1. Accessing RMAN functionality from EM Cloud Control
RMAN is not of much use unless we have a database to back up. One or more target databases can be cataloged in the recovery catalog; in addition, the control file of the database being backed up contains information about backups performed by RMAN. From within the RMAN client, you can also issue SQL commands for those operations you cannot perform with native RMAN commands.
The RMAN recovery catalog, whether using the target database control file or a dedicated repository in a separate database, contains the location of recovery data, its own configuration settings, and the target database schema. At a minimum, the target database control file contains this data; to be able to store scripts and to maintain a copy of the target database control file, a recovery catalog is highly recommended. In this chapter, all examples will use a recovery catalog.
Since the release of Oracle 10g, the fast recovery area simplifies disk-based backup and recovery by defining a location on disk to hold all RMAN backups. Along with the location, the DBA can also specify an upper limit to the amount of disk space used in the fast recovery area. Once a retention policy is defined within RMAN, RMAN will automatically manage the backup files by deleting obsolete backups from both disk and tape. The initialization parameters related to the fast recovery area are covered in the next section.
To access all non-disk-based media, such as tape and BD-ROM, RMAN utilizes third-party media management software to move backup files to and from these offline and near-line devices, automatically requesting the mount and dismount of the appropriate media to support backup and restore operations. Most major media management software and hardware vendors have device drivers that directly support RMAN.
RMAN vs. Traditional Backup Methods
There are very few reasons not to use RMAN as your main tool for managing backups. Here are some of the major features of RMAN that either are not available with traditional backup methods or have significant restrictions using traditional backup methods:
![]() Skip unused blocks Blocks that have never been written to, such as blocks above the high-water mark (HWM) in a table, are not backed up by RMAN when the backup is an RMAN backupset. Traditional backup methods have no way to know which blocks have been used.
Skip unused blocks Blocks that have never been written to, such as blocks above the high-water mark (HWM) in a table, are not backed up by RMAN when the backup is an RMAN backupset. Traditional backup methods have no way to know which blocks have been used.
![]() Backup compression In addition to skipping blocks that have never been used, RMAN can also use one of several Oracle-specific binary compression modes to save space on the backup device. Although operating system-specific compression techniques are available with traditional backup methods, the compression algorithm used by RMAN is customized to maximize the compression for the typical kinds of data found in Oracle data blocks. Although there is a slight increase in CPU time during an RMAN compressed backup or recovery operation, the amount of media used for backup may be significantly reduced, as well as network bandwidth if the backup is performed over the network. Multiple CPUs can be configured for an RMAN backup to help alleviate the compression overhead.
Backup compression In addition to skipping blocks that have never been used, RMAN can also use one of several Oracle-specific binary compression modes to save space on the backup device. Although operating system-specific compression techniques are available with traditional backup methods, the compression algorithm used by RMAN is customized to maximize the compression for the typical kinds of data found in Oracle data blocks. Although there is a slight increase in CPU time during an RMAN compressed backup or recovery operation, the amount of media used for backup may be significantly reduced, as well as network bandwidth if the backup is performed over the network. Multiple CPUs can be configured for an RMAN backup to help alleviate the compression overhead.
![]() Open database backups Tablespace backups can be performed in RMAN without using the BEGIN/END BACKUP clause with ALTER TABLESPACE. Whether using RMAN or a traditional backup method, however, the database must be in ARCHIVELOG mode.
Open database backups Tablespace backups can be performed in RMAN without using the BEGIN/END BACKUP clause with ALTER TABLESPACE. Whether using RMAN or a traditional backup method, however, the database must be in ARCHIVELOG mode.
![]() True incremental backups For any RMAN incremental backup, unchanged blocks since the last backup will not be written to the backup file. This saves a significant amount of disk space, I/O time, and CPU time. For restore and recovery operations, RMAN supports incrementally updated backups. Data blocks from an incremental backup are applied to a previous backup to potentially reduce the amount of time and number of files that need to be accessed to perform a recovery operation. We will cover an example of an incrementally updated backup later in this chapter.
True incremental backups For any RMAN incremental backup, unchanged blocks since the last backup will not be written to the backup file. This saves a significant amount of disk space, I/O time, and CPU time. For restore and recovery operations, RMAN supports incrementally updated backups. Data blocks from an incremental backup are applied to a previous backup to potentially reduce the amount of time and number of files that need to be accessed to perform a recovery operation. We will cover an example of an incrementally updated backup later in this chapter.
![]() Block-level recovery To potentially avoid downtime during a recovery operation, RMAN supports block-level recovery for recovery operations that only need to restore or repair a small number of blocks identified as being corrupt during the backup operation. The rest of the tablespace and the objects within the tablespace can remain online while RMAN repairs the damaged blocks. The rows of a table not being repaired by RMAN are even available to applications and users.
Block-level recovery To potentially avoid downtime during a recovery operation, RMAN supports block-level recovery for recovery operations that only need to restore or repair a small number of blocks identified as being corrupt during the backup operation. The rest of the tablespace and the objects within the tablespace can remain online while RMAN repairs the damaged blocks. The rows of a table not being repaired by RMAN are even available to applications and users.
![]() Table-level recovery When logical backups of a table aren’t available or when FLASHBACK TABLE cannot bring back a table to a previous state, you can use RMAN to restore a table or tables from an RMAN backup as of any SCN since the last full RMAN backup with the database in ARCHIVELOG mode. This makes table-level recovery much easier than having to restore and recover an entire tablespace, much less the entire database, for just one table.
Table-level recovery When logical backups of a table aren’t available or when FLASHBACK TABLE cannot bring back a table to a previous state, you can use RMAN to restore a table or tables from an RMAN backup as of any SCN since the last full RMAN backup with the database in ARCHIVELOG mode. This makes table-level recovery much easier than having to restore and recover an entire tablespace, much less the entire database, for just one table.
![]() Multiple I/O channels During a backup or recovery operation, RMAN can utilize many I/O channels, via separate operating system processes, to perform concurrent I/O. Traditional backup methods, such as a Unix cpcommand, are typically single-threaded operations.
Multiple I/O channels During a backup or recovery operation, RMAN can utilize many I/O channels, via separate operating system processes, to perform concurrent I/O. Traditional backup methods, such as a Unix cpcommand, are typically single-threaded operations.
![]() Platform independence Backups written with RMAN commands will be syntactically identical regardless of the hardware or software platform used, with the only difference being the media management channel configuration. On the other hand, a Unix script with lots of cp commands will not run very well if the backup script is migrated to a Windows platform!
Platform independence Backups written with RMAN commands will be syntactically identical regardless of the hardware or software platform used, with the only difference being the media management channel configuration. On the other hand, a Unix script with lots of cp commands will not run very well if the backup script is migrated to a Windows platform!
![]() Tape manager support All major enterprise backup systems are supported within RMAN by a third-party media management driver provided by a tape backup vendor.
Tape manager support All major enterprise backup systems are supported within RMAN by a third-party media management driver provided by a tape backup vendor.
![]() Cataloging A record of all RMAN backups is recorded in the target database control file, and optionally in a recovery catalog stored in a different database. This makes restore and recovery operations relatively simple compared to manually tracking operating system-level backups using “copy” commands.
Cataloging A record of all RMAN backups is recorded in the target database control file, and optionally in a recovery catalog stored in a different database. This makes restore and recovery operations relatively simple compared to manually tracking operating system-level backups using “copy” commands.
![]() Scripting capabilities RMAN scripts can be saved in a recovery catalog for retrieval during a backup session. The tight integration of the scripting language, the ease of maintaining scripts in RMAN, and the Oracle scheduling facility make it a better choice than storing traditional operating system scripts in an operating system directory with the operating system’s native scheduling mechanisms.
Scripting capabilities RMAN scripts can be saved in a recovery catalog for retrieval during a backup session. The tight integration of the scripting language, the ease of maintaining scripts in RMAN, and the Oracle scheduling facility make it a better choice than storing traditional operating system scripts in an operating system directory with the operating system’s native scheduling mechanisms.
![]() Encrypted backups RMAN uses backup encryption integrated into Oracle Database 12c (including advanced compression) to store encrypted backups. Storing encrypted backups on tape requires the Advanced Security Option.
Encrypted backups RMAN uses backup encryption integrated into Oracle Database 12c (including advanced compression) to store encrypted backups. Storing encrypted backups on tape requires the Advanced Security Option.
In a few limited cases, a traditional backup method may have an advantage over RMAN; but now that RMAN supports the backup of password files and other non-database files such as tnsnames.ora, listener.ora, and sqlnet.ora (using Oracle Secure Backup), the case for RMAN as your single backup and recovery solution is compelling.
Backup Types
RMAN supports a number of different backup methods, depending on your availability needs, the desired size of your recovery window, and the amount of downtime you can endure while the database or a part of the database is involved in a recovery operation.
Consistent and Inconsistent Backups
A physical backup can be classified by being a consistent or an inconsistent backup. In a consistent backup, all datafiles have the same SCN; in other words, all changes in the redo logs have been applied to the datafiles. Because an open database with no uncommitted transactions may have some dirty blocks in the buffer cache, it is rare that an open database backup can be considered consistent. As a result, consistent backups are taken when the database is shut down normally or in a MOUNT state.
In contrast, an inconsistent backup is performed while the database is open and users are accessing the database. Because the SCNs of the datafiles typically do not match when an inconsistent backup is taking place, a recovery operation performed using an inconsistent backup must rely on both archived and online redo log files to bring the database into a consistent state before it is opened. As a result, a database must be in ARCHIVELOG mode to use an inconsistent backup method.
Full and Incremental Backups
Full backups include all blocks of every datafile within a tablespace or a database; it is essentially a bit-for-bit copy of one or more datafiles in the database. Either RMAN or an operating system command can be used to perform a full backup, although backups performed outside of RMAN must be cataloged with RMAN before they can be used in an RMAN recovery operation.
In Oracle 11g and later, incremental backups can be level 0 or level 1. A level 0 backup is a full backup of all blocks in the database that can be used in conjunction with differential, incremental, or cumulative incremental level 1 backups in a database recovery operation. A distinct advantage to using an incremental backup in a recovery strategy is that archived and online redo log files may not be necessary to restore a database or tablespace to a consistent state; the incremental backups may have some or all of the blocks needed. An example of using level 0 and level 1 incremental backups is presented later in this chapter. Incremental backups can only be performed within RMAN.
Image Copies
Image copies are full backups created by operating system commands or RMAN BACKUP AS COPY commands. Although a full backup created with a Unix cp command can be later registered in the RMAN catalog as a database backup, doing the same image copy backup in RMAN has the advantage of checking for corrupt blocks as they are being read by RMAN and recording the information about the bad blocks in the data dictionary. Image copies are the default backup file format in RMAN.
This is a great feature of Oracle 12c’s RMAN for the following reason: If you add another datafile to a tablespace, you need to also remember to add the new datafile to your Unix script cp command. By creating image copies using RMAN, all datafiles will automatically be included in the backup. Forgetting to add the new datafile to a Unix script will make a recovery situation extremely inconvenient at best and a disaster at worst.
Backupsets and Backup Pieces
In contrast to image copies, which can be created in most any backup environment, backupsets can be created and restored only with RMAN. A backupset is an RMAN backup of part or all of a database, consisting of one or more backup pieces. Each backup piece belongs to only one backupset, and can contain backups of one or many datafiles in the database. All backupsets and pieces are recorded in the RMAN repository, the same as any other RMAN-initiated backup.
Compressed Backups
For any Oracle 12c RMAN backup creating a backupset, compression is available to reduce the amount of disk space or tape needed to store the backup. Compressed backups are only usable by RMAN, and they need no special processing when used in a recovery operation; RMAN automatically decompresses the backup. Creating compressed backups is as easy as specifying AS COMPRESSED BACKUPSET and COMPRESSION ALGORITHM in the RMAN BACKUP command or as part of the default settings.
Overview of RMAN Commands and Options
In the next few sections, we’ll review the basic set of commands you’ll use on a regular basis. We’ll look at how to make your job even easier by persisting some of the settings in an RMAN session; in addition, we’ll set up the retention policy and the repository we’ll use to store RMAN metadata.
At the end of this section, we’ll review the initialization parameters related to RMAN backups and the fast recovery area.
Running SQL Commands in RMAN
Running SQL commands within an RMAN session becomes much easier in Oracle Database 12c. Unless there is an RMAN command that has the same name as a SQL or SQL*Plus command, you can just type it at the RMAN command line as if you were using SQL*Plus, as in this example:
The existing method to run SQL statements in RMAN, SQL “command”, is still available if you want to avoid any ambiguity or don’t want to change any existing RMAN scripts.
Frequently Used Commands
Table 14-1 provides a list of the most common RMAN commands you’ll use on a regular basis, along with some common options and caveats for each command. For the complete list of all RMAN commands and their syntax, see the Oracle Database Backup and Recovery Reference, 12c Release 1.
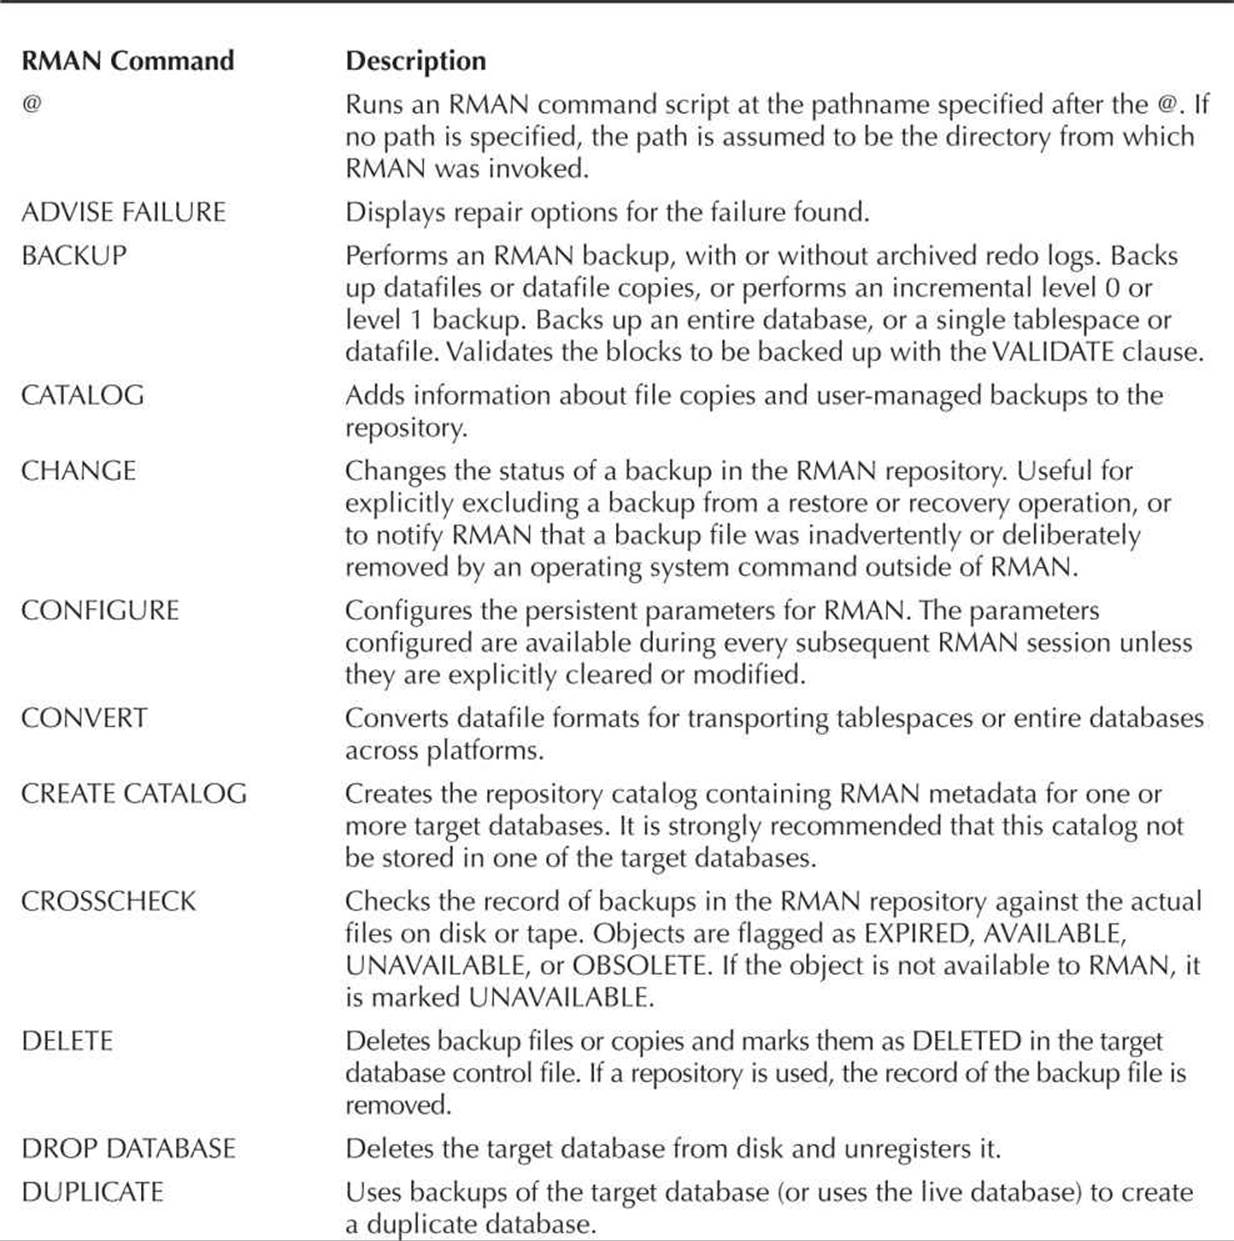
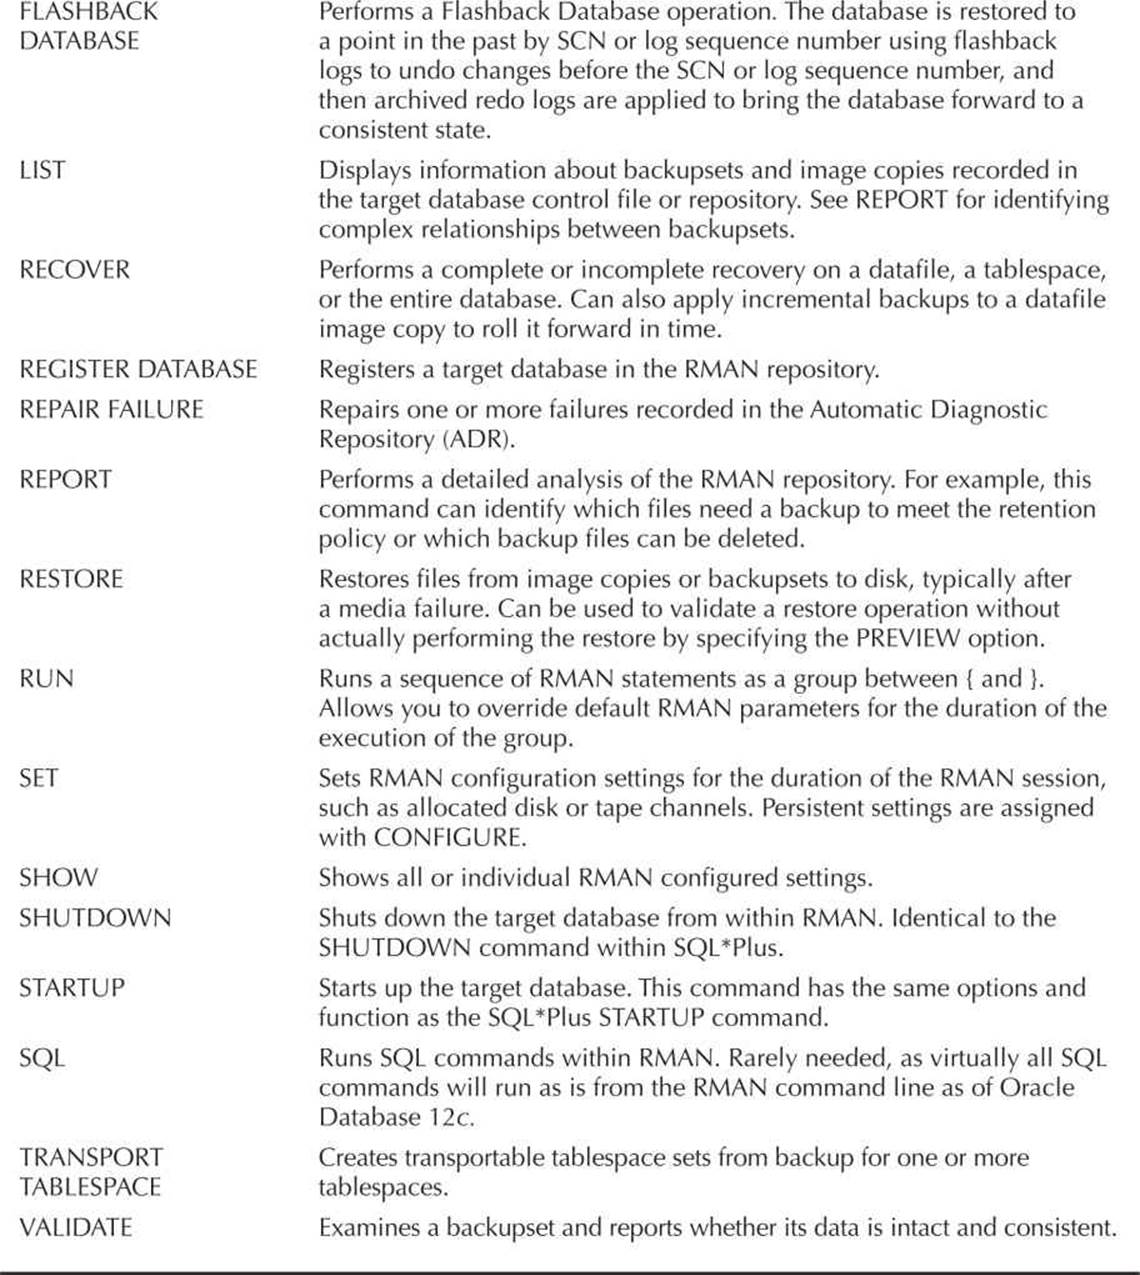
TABLE 14-1. Common RMAN Commands
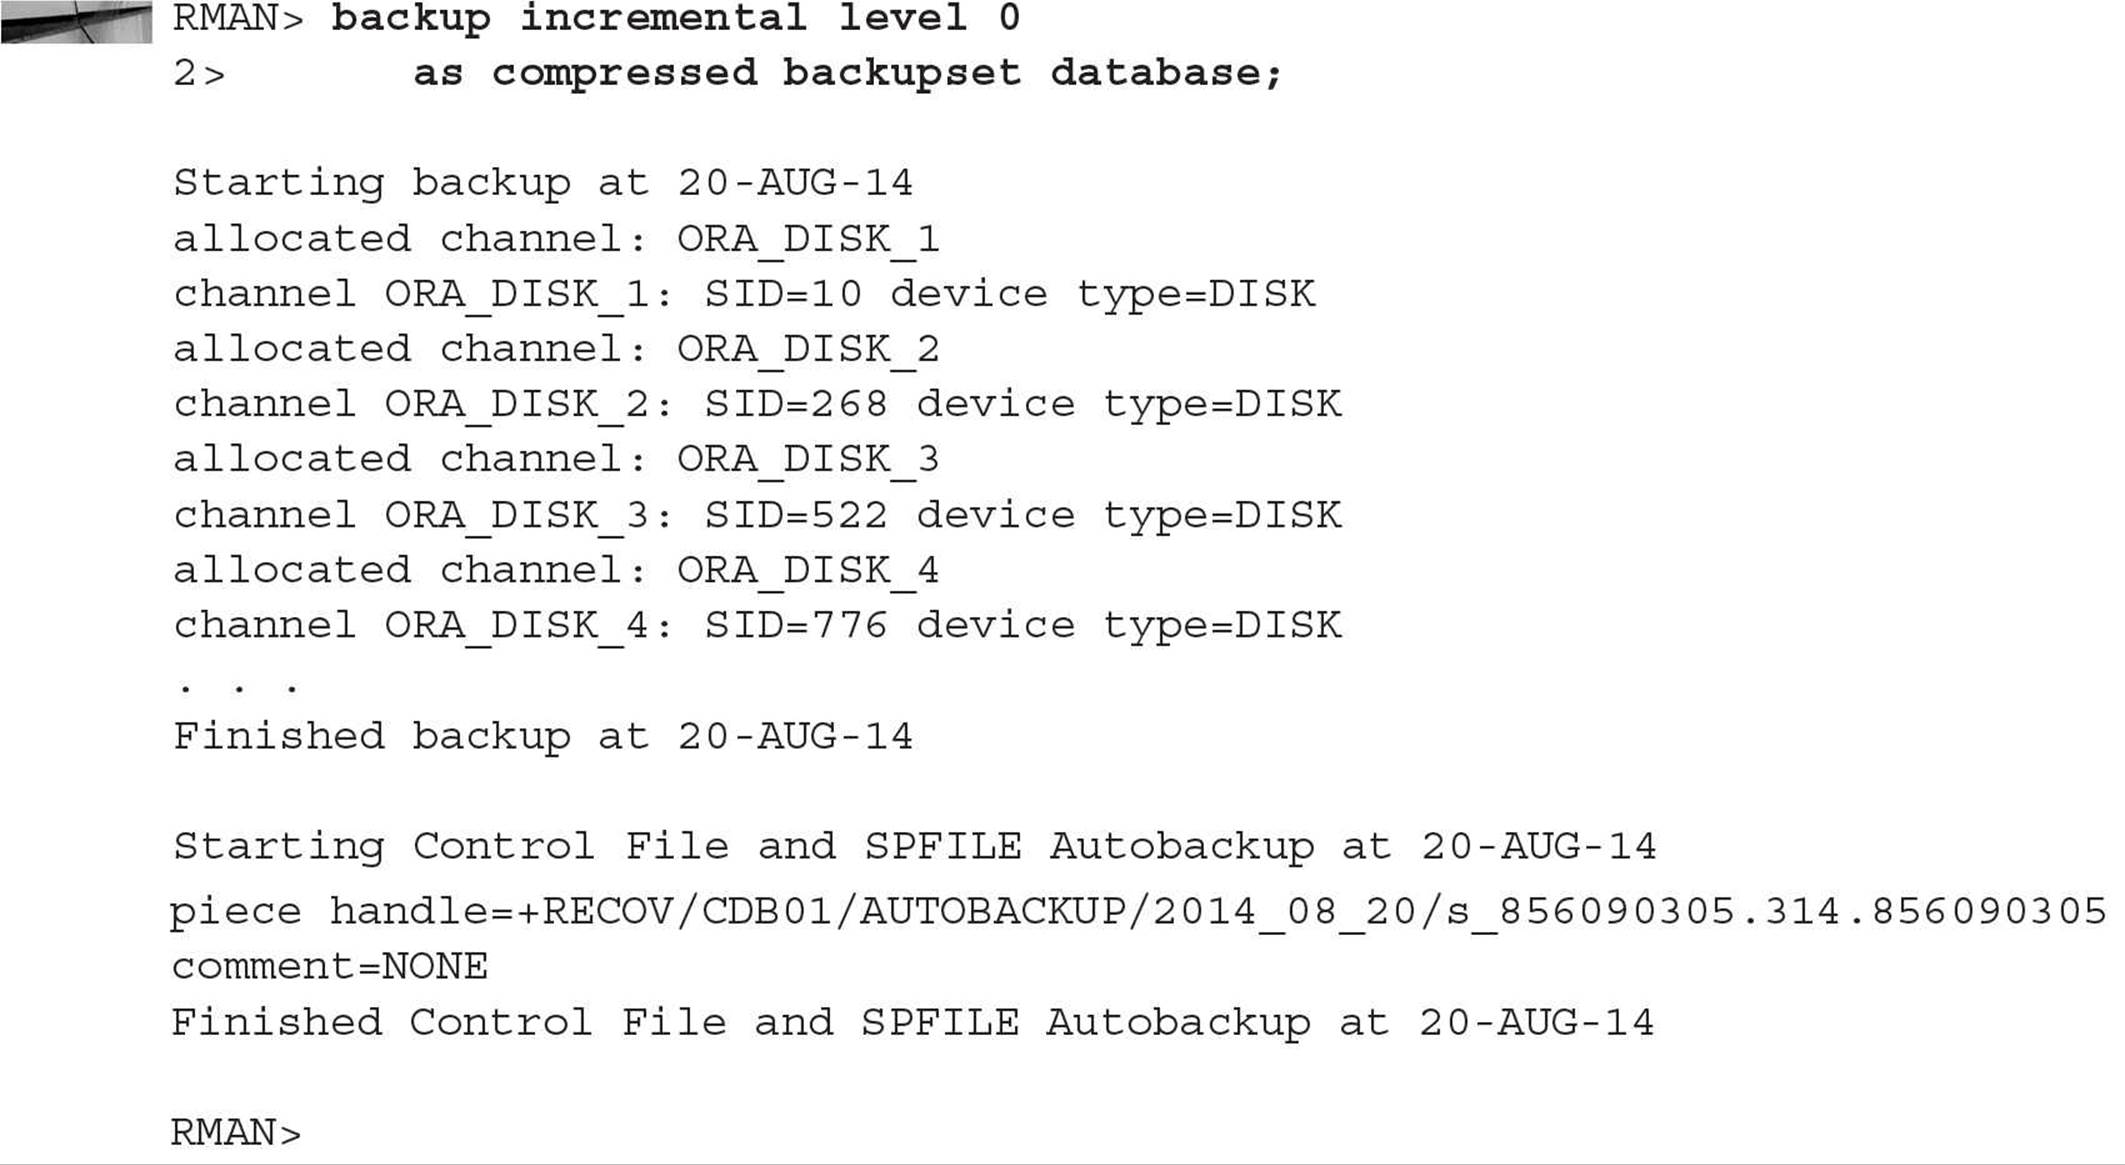
If backups use a fast recovery area (presented in Chapter 13), you can back up the database without any other explicit RMAN configuration by running the following command:
![]()
Note that this is a full backup and can be used with archived redo log files to recover a database. However, this is not a level 0 backup and cannot be used as part of an incremental backup strategy. See the “Backup Operations” section later in this chapter.
Setting Up a Repository
Whether you use a repository for the metadata from one database or a hundred, the repository setup is very straightforward and needs to be done only once. The examples that follow assume that we have a default installation of an Oracle 12c database; the repository database itself can be used for other applications if there is no significant performance degradation when RMAN needs to update metadata in the repository.

CAUTION
Using an RMAN target database for the repository is strongly discouraged. Loss of the target database prevents any chance of a successful recovery of the database using RMAN because the repository metadata is lost along with the target database.
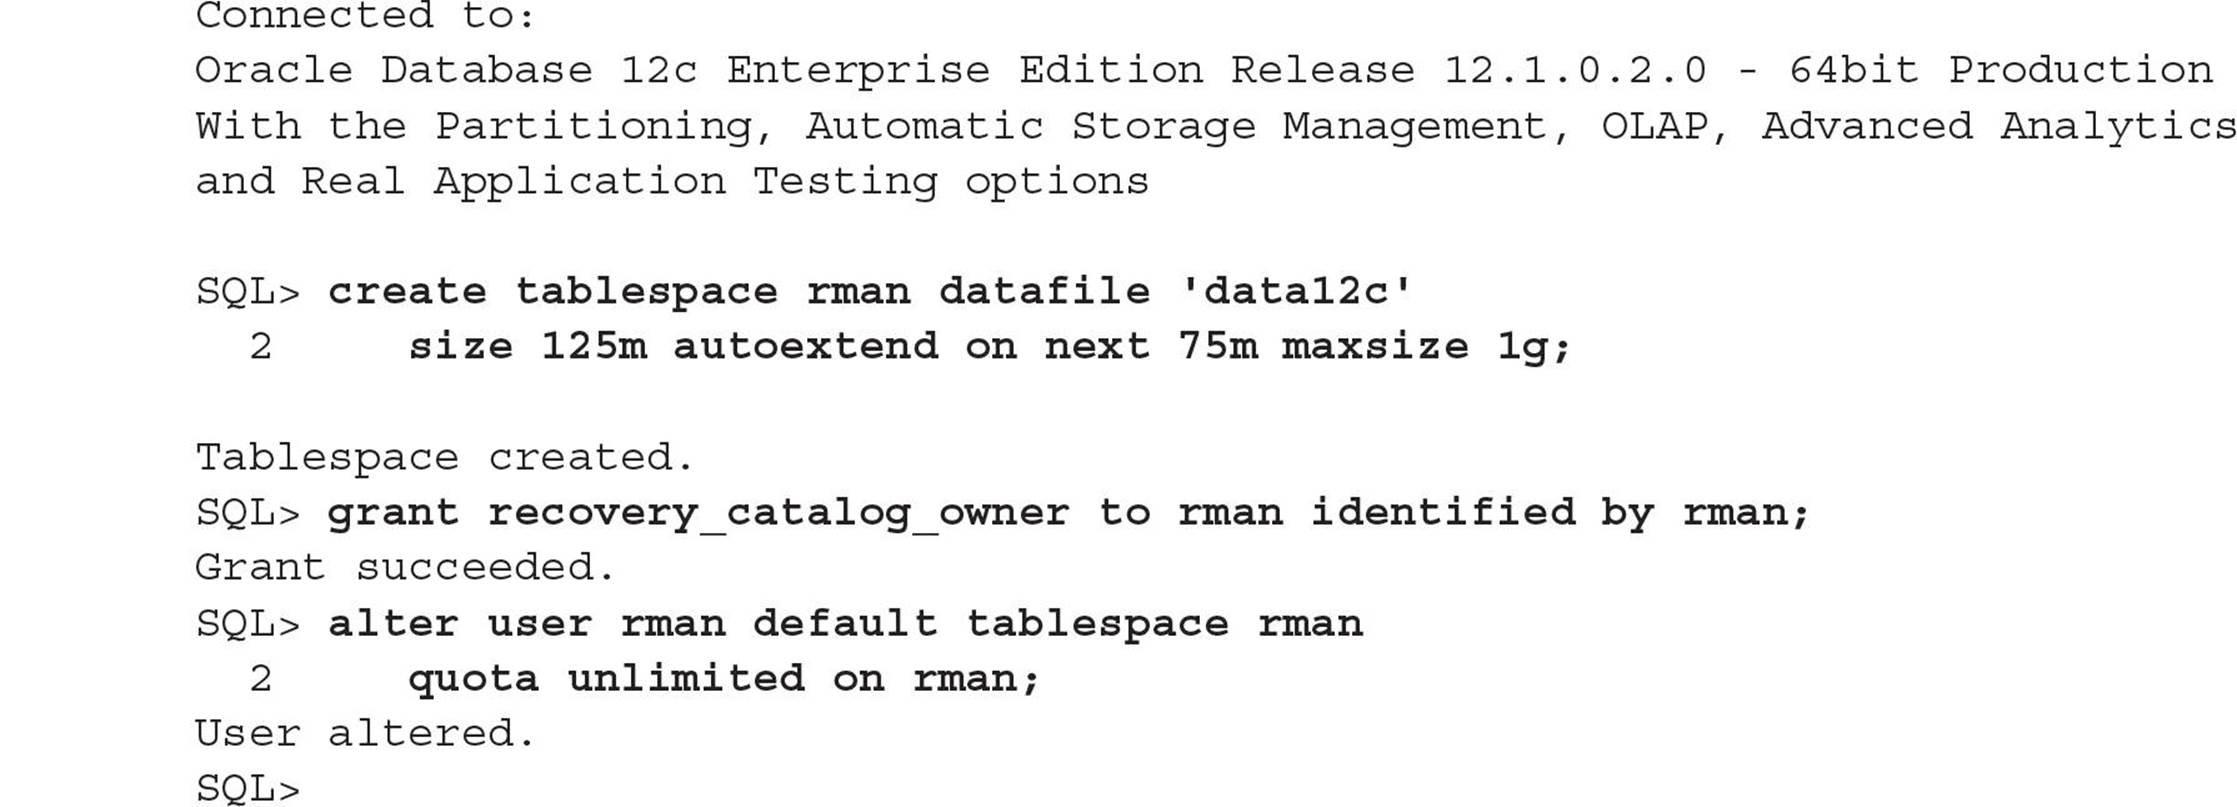
The following sequence of commands creates a tablespace and a user to maintain the metadata in the repository database. In this and all subsequent examples, a database with a SID of rman_rep is used for all repository operations.
The tablespace that holds the repository database requires at least 125MB to hold recovery catalog entries; here is a space requirements breakdown by tablespace:
![]() 90MB in the SYSTEM tablespace
90MB in the SYSTEM tablespace
![]() 5MB in the TEMP tablespace
5MB in the TEMP tablespace
![]() 5MB in the UNDO tablespace
5MB in the UNDO tablespace
![]() 15MB in RMAN’s default tablespace for each database registered in the recovery catalog
15MB in RMAN’s default tablespace for each database registered in the recovery catalog
![]() 1MB for each online redo log file
1MB for each online redo log file
Starting out with available free space of 125MB will in most cases be sufficient for the first year, and enabling additional extents of 75MB each will be sufficient in the long term depending on how many databases you manage in the recovery catalog. Overall, it’s a very small amount of disk space compared to your terabyte data warehouse!
Connect to the repository database with SYSDBA privileges and create the RMAN account and the recovery catalog in the RMAN tablespace as follows:

TIP
You can create a user, grant privileges, and assign a password using the GRANT command alone instead of using a separate CREATE USER command.
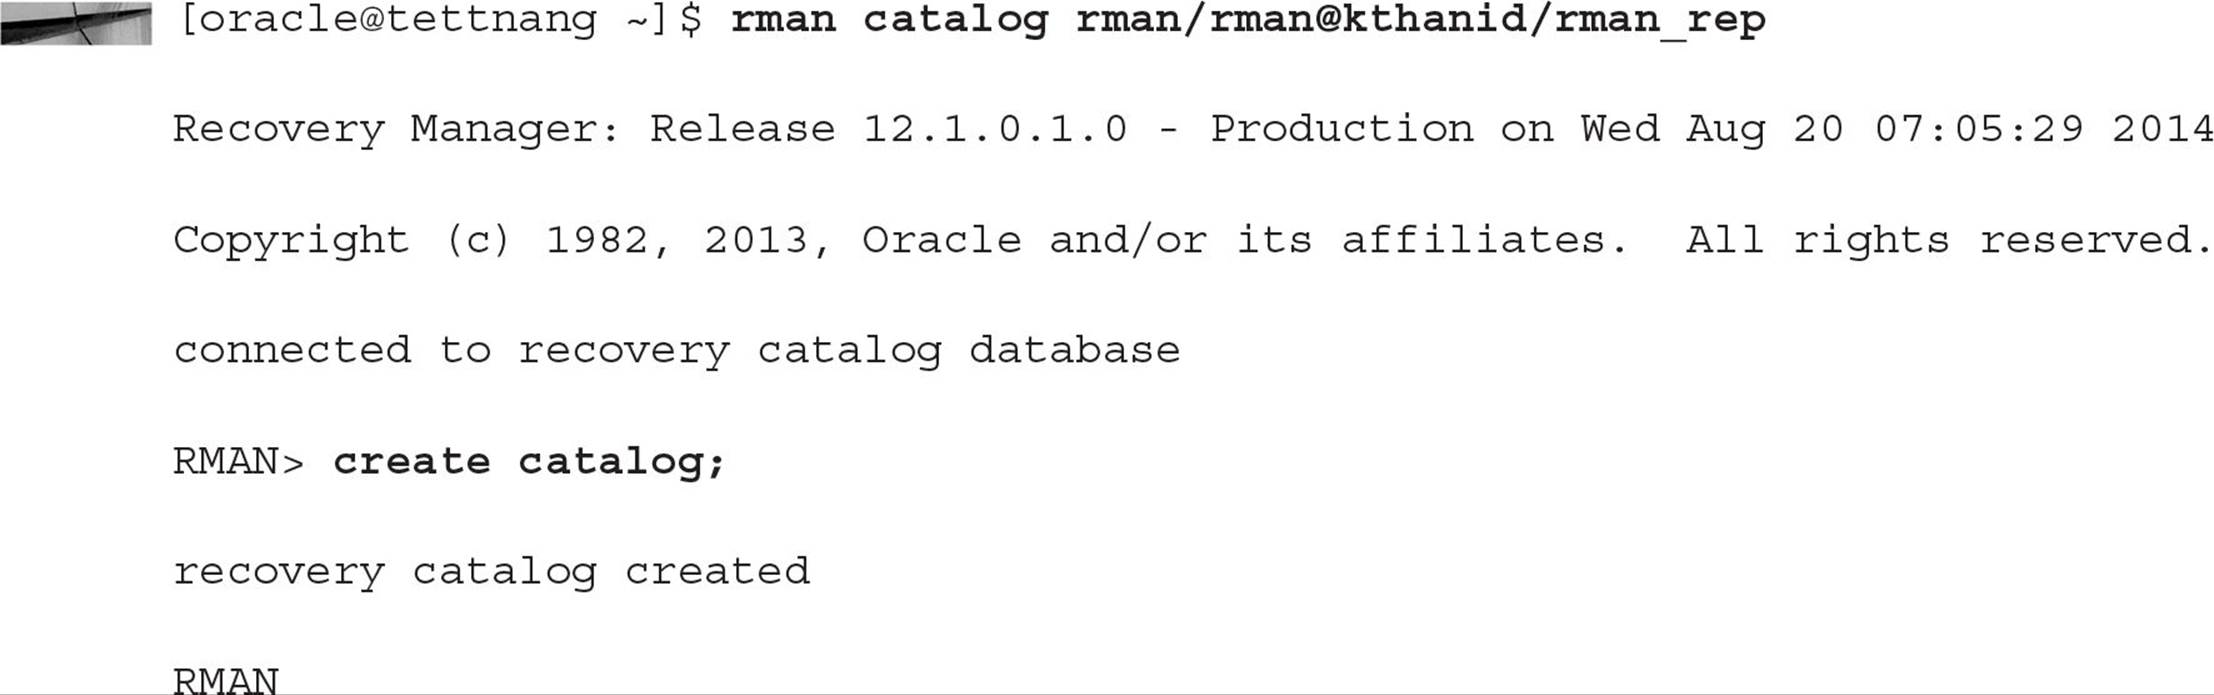
Now that the RMAN user account exists in the repository database, we can start RMAN, connect to the catalog, and initialize the repository with the CREATE CATALOG command from the server with the target database:
From this point on, using a repository is as easy as specifying the repository username and password on the RMAN command line with the CATALOG parameter or using the CONNECT CATALOG command in an RMAN session. Within EM Cloud Control, you can persist the repository credentials as demonstrated in Figure 14-2.
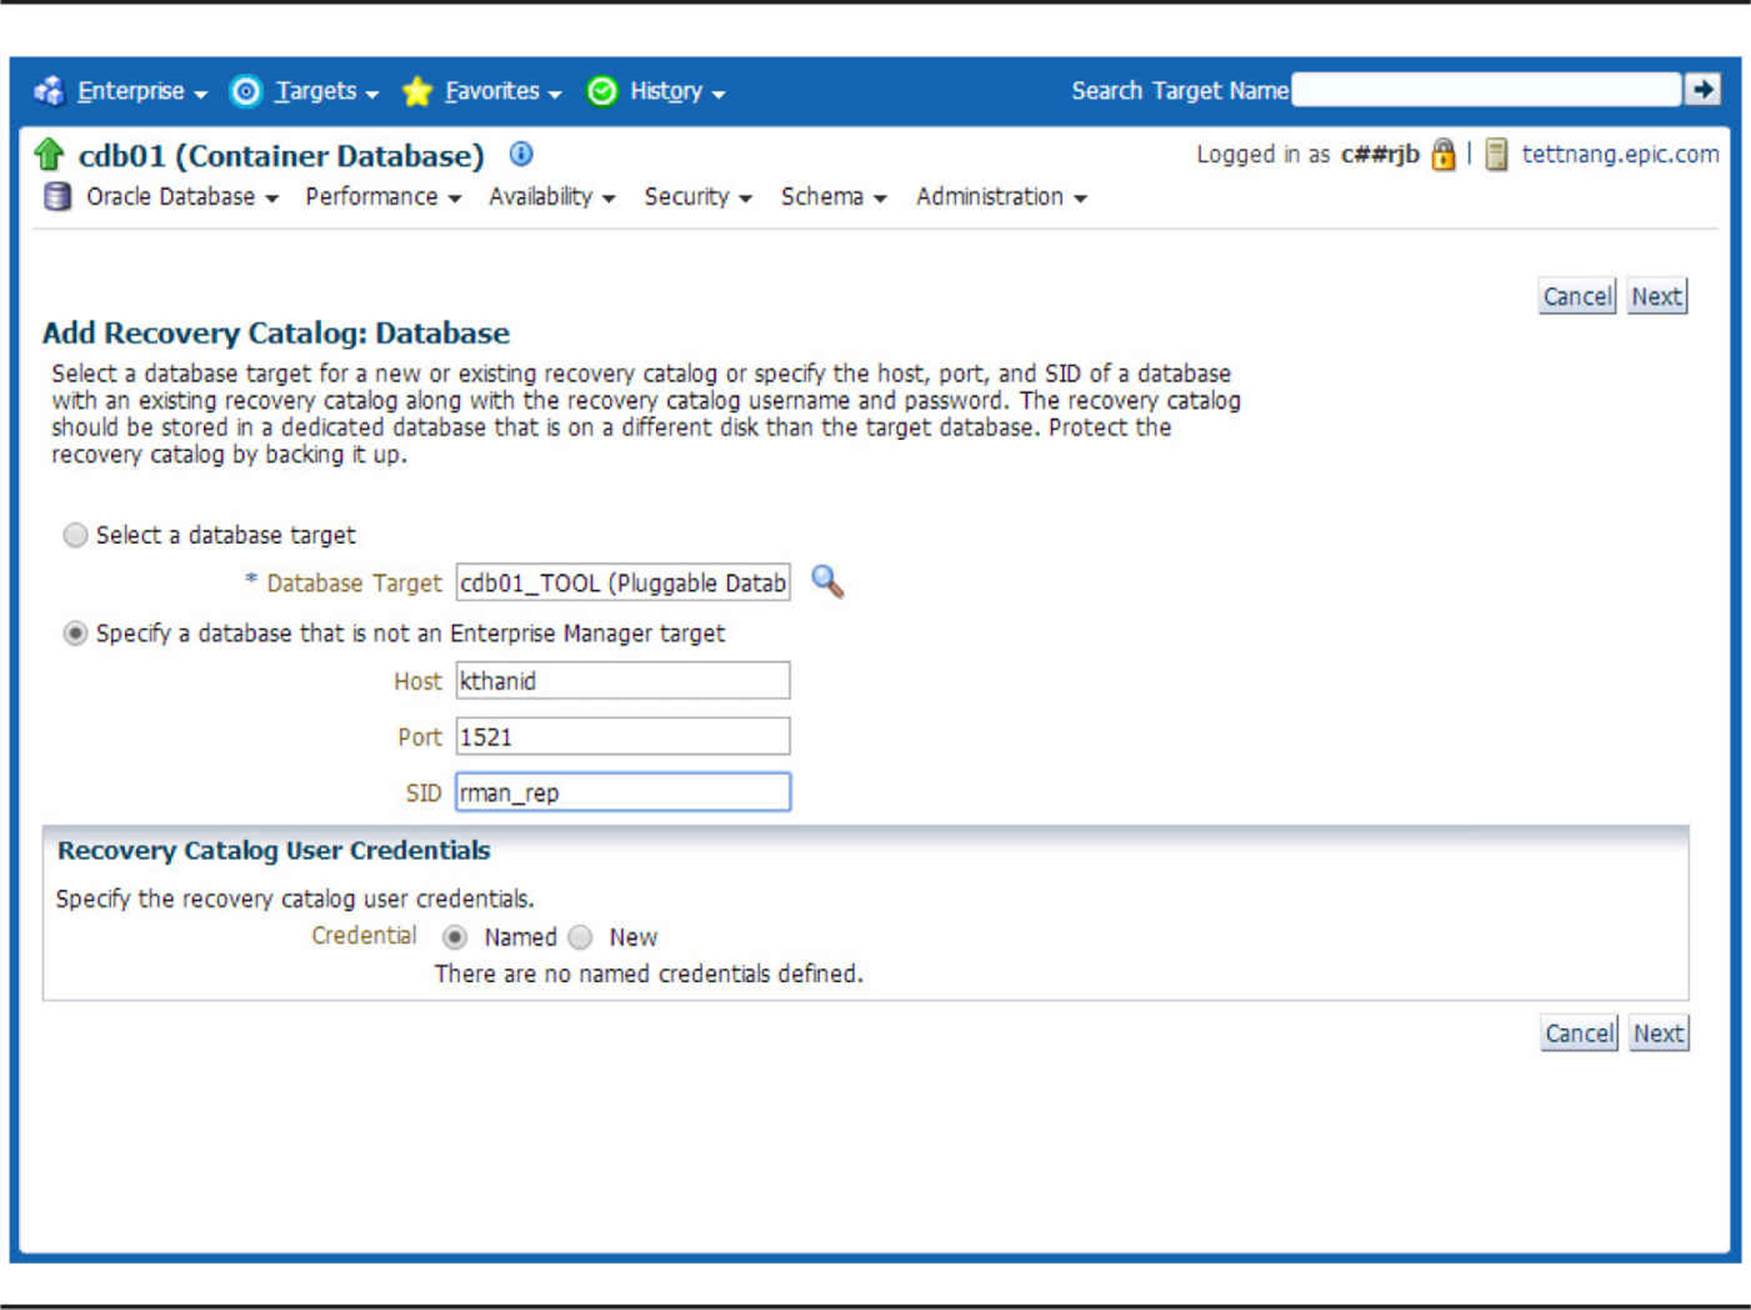
FIGURE 14-2. Persisting RMAN repository credentials
In future EM Cloud Control sessions, any RMAN backup or recovery operations will automatically use the recovery catalog.
Registering a Database
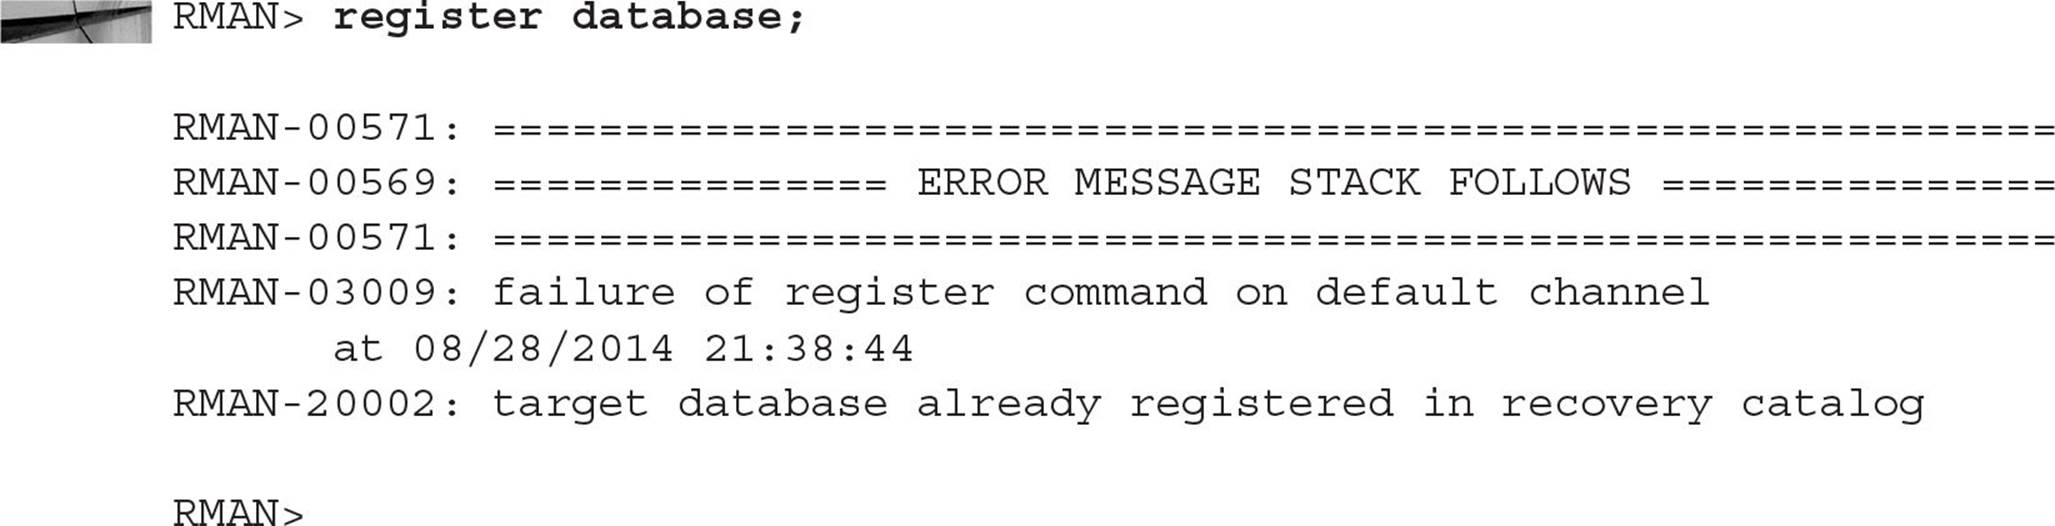
For each database for which RMAN will perform a backup or recovery, we must register the database in the RMAN repository; this operation records information such as the target database schema and the unique database ID (DBID) of the target database. The target database need only be registered once; subsequent RMAN sessions that connect to the target database will automatically reference the correct metadata in the repository.
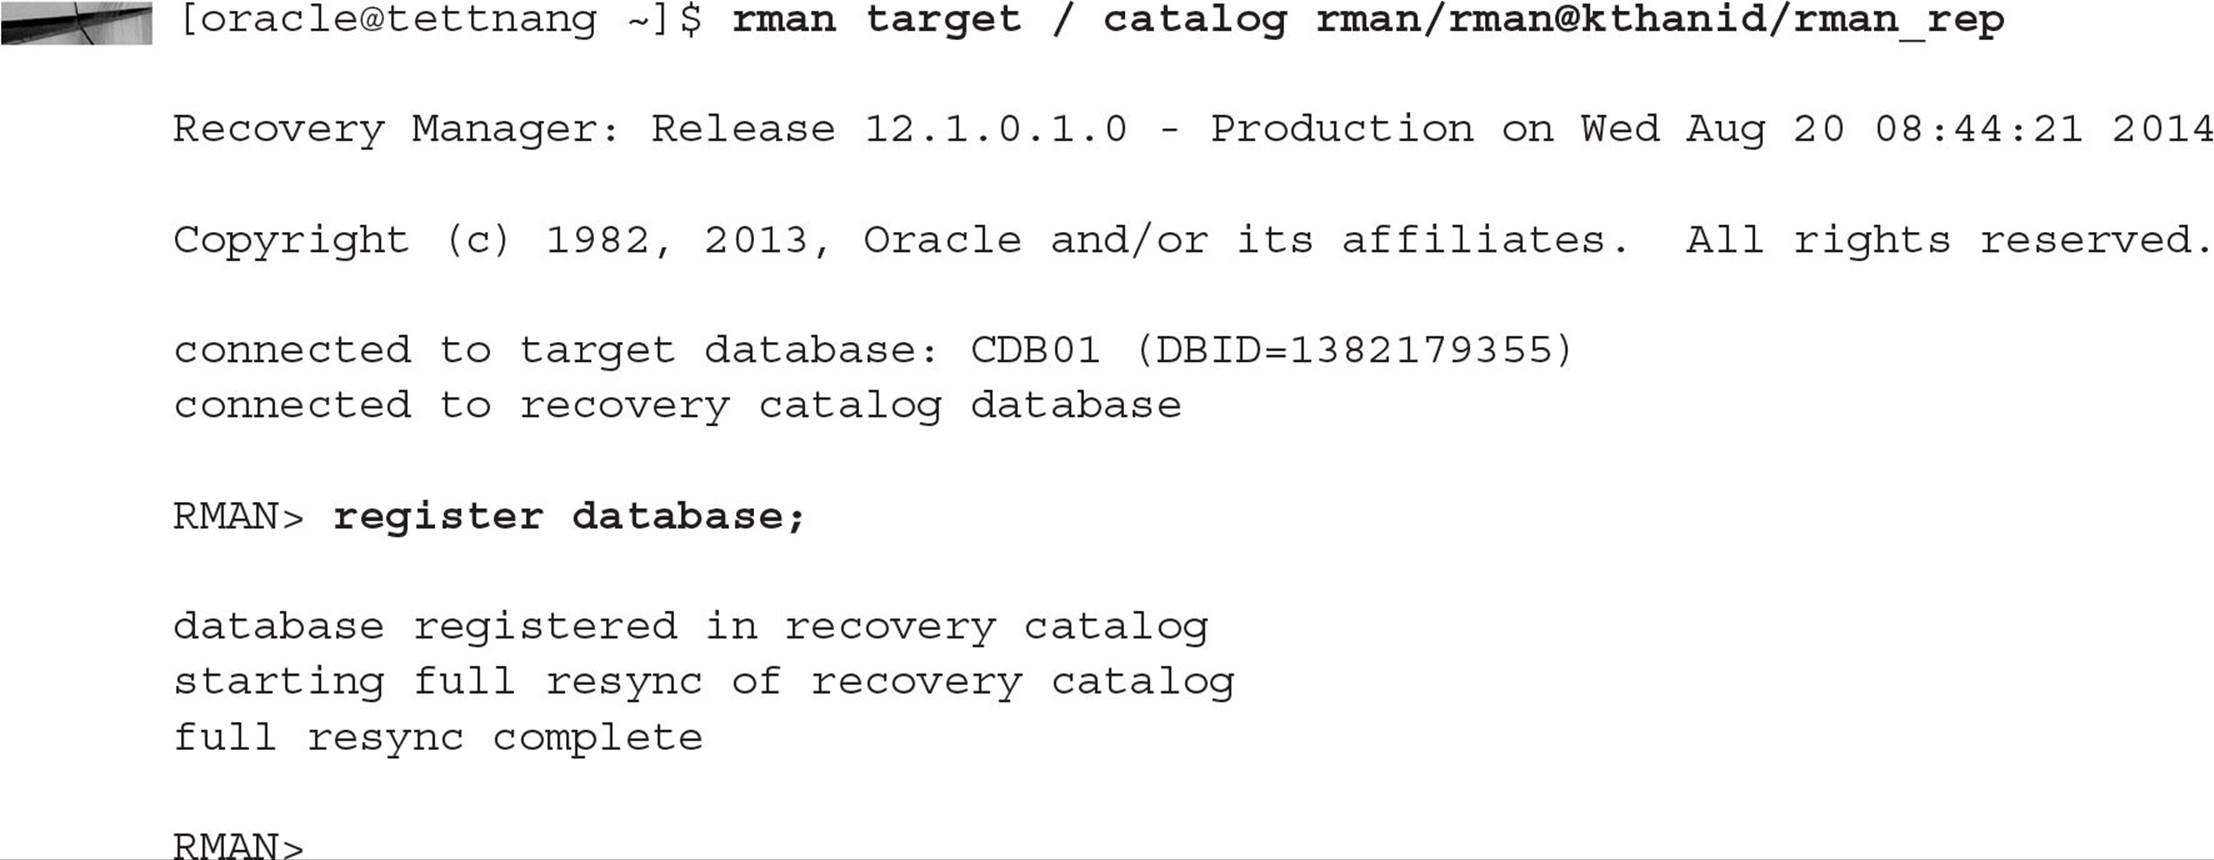
In the preceding example, we connect to the target database using operating system authentication and to the repository with password authentication. Note that in this example the database CDB01 may or may not be a container database (CDB), but it doesn’t matter since RMAN must connect to a CDB in the root container to perform backup and recovery operations for the entire CDB or any individual PDB.
All databases registered with the repository must have unique DBIDs; trying to register the database again yields the following error message:
Persisting RMAN Settings
To make the DBA’s job easier, a number of RMAN settings can be persisted. In other words, these settings will stay in effect between RMAN sessions. In the example that follows, we use the SHOW command to display the default RMAN settings:
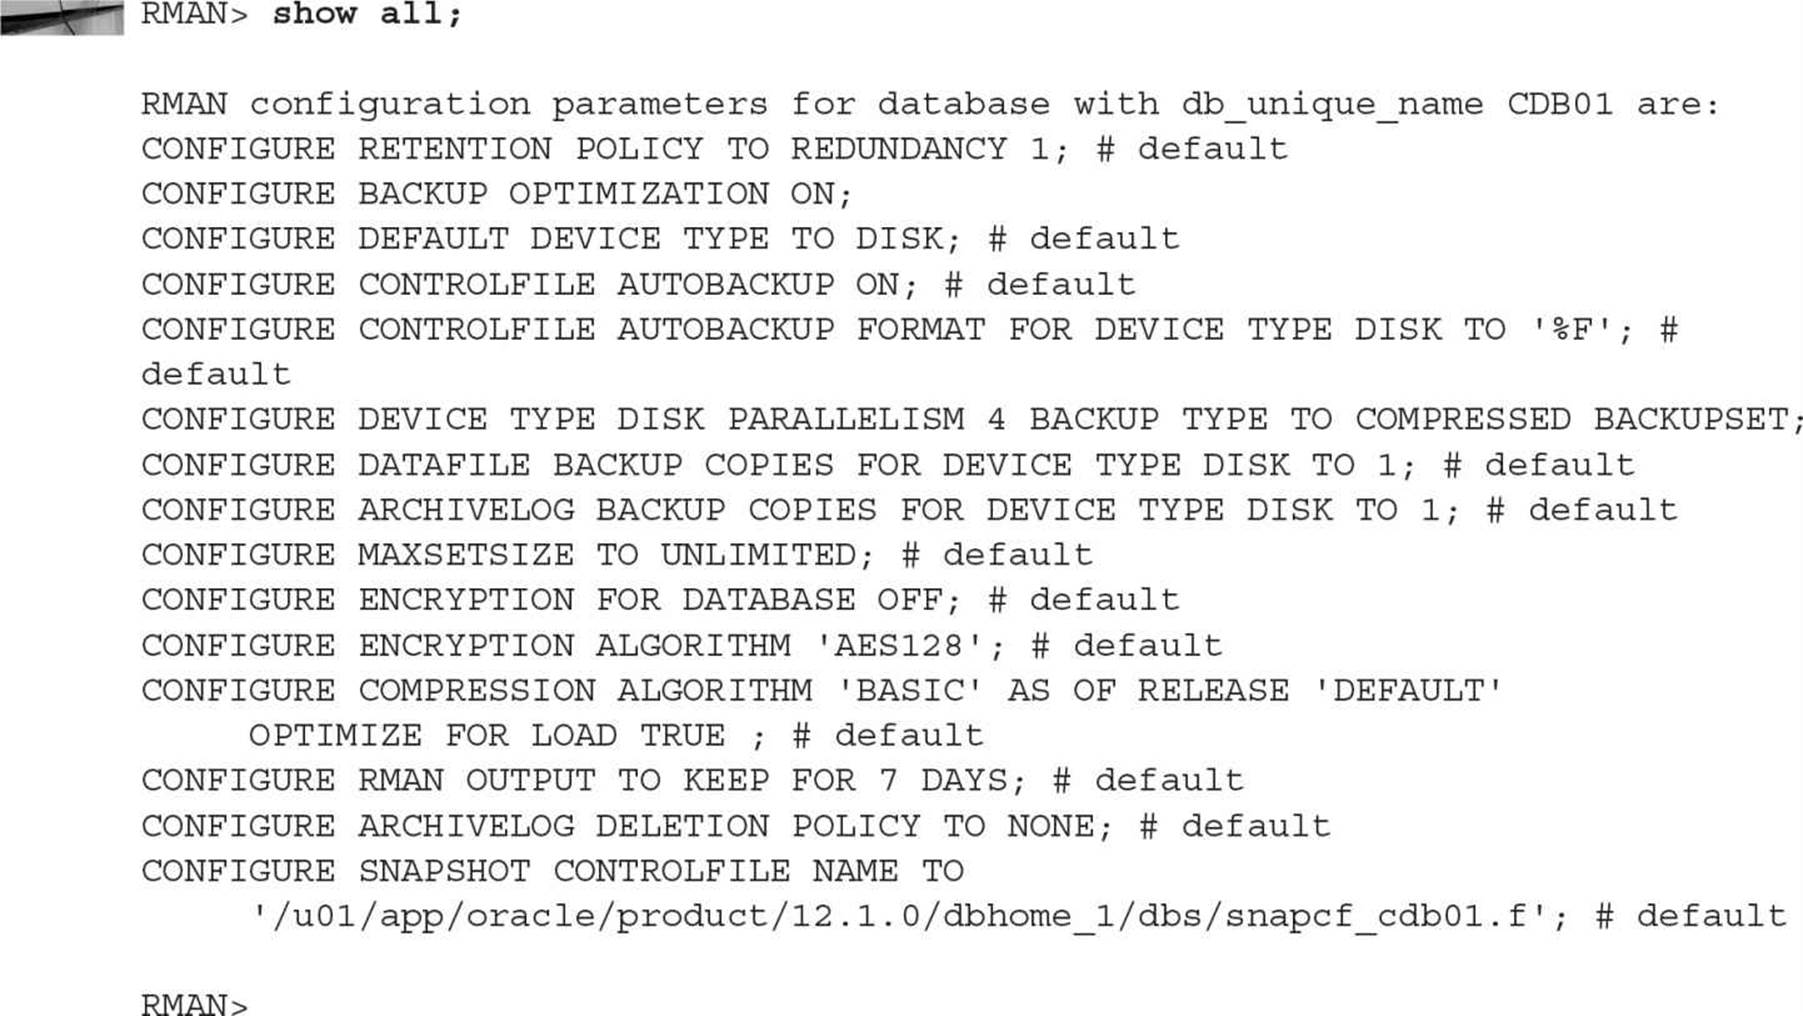
Any parameters that are set to their default values have # default at the end of the configuration setting. These parameters are easy to review and change using EM Cloud Control, as demonstrated in Figure 14-3.
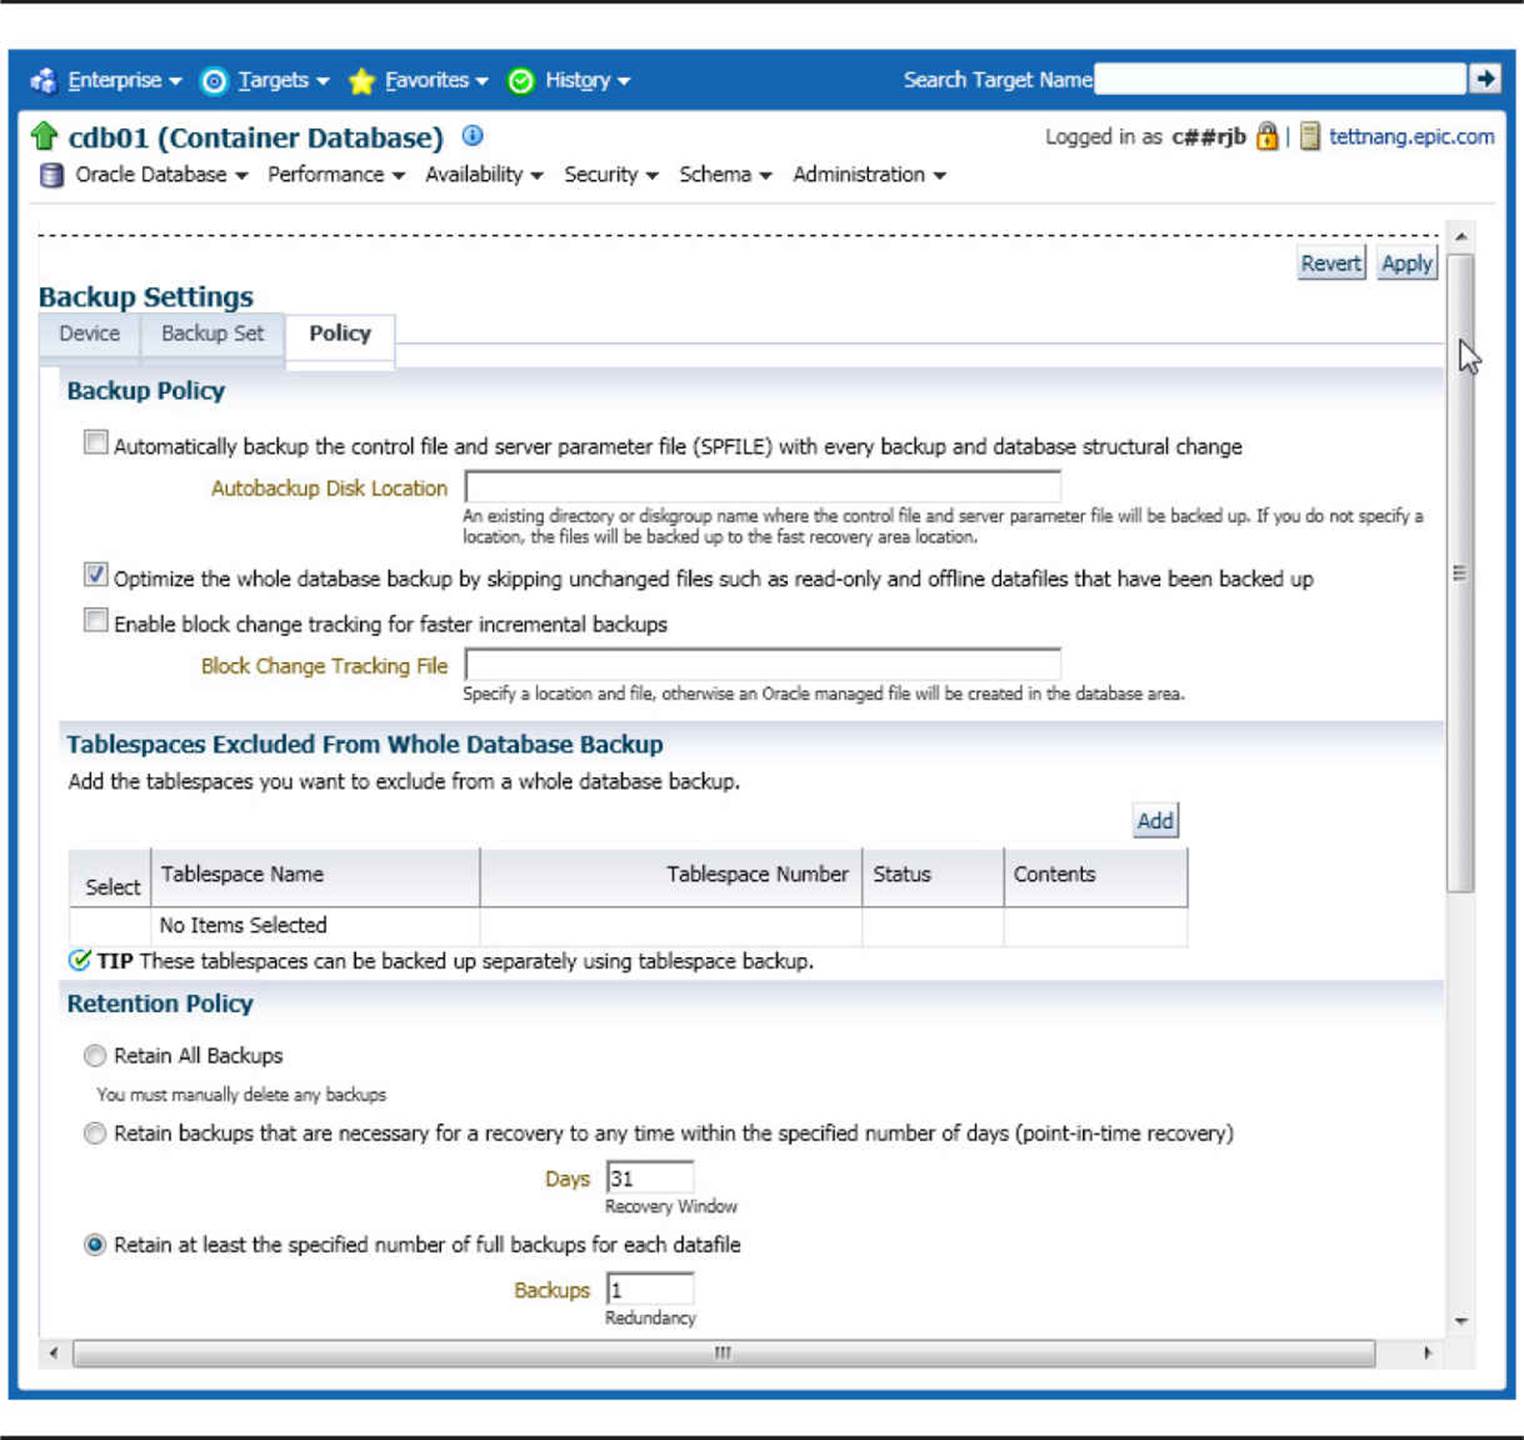
FIGURE 14-3. Reviewing RMAN settings in EM Cloud Control
In the next few sections, we’ll review a few of the more common RMAN persistent settings.
Retention Policy
Backups can be automatically retained and managed using one of two methods: by a recovery window or by redundancy. Using a recovery window, RMAN will retain as many backups as necessary to bring the database to any point in time within the recovery window. For example, with a recovery window of seven days, RMAN will maintain enough image copies, incremental backups, and archived redo logs to ensure that the database can be restored and recovered to any point in time within the last seven days. Any backups that are not needed to support this recovery window are marked as OBSOLETE and are automatically removed by RMAN if a fast recovery area is used and disk space is needed for new backups.
In contrast, a redundancy retention policy directs RMAN to retain the specified number of backups or copies of each datafile and control file. Any extra copies or backups beyond the number specified in the redundancy policy are marked as OBSOLETE. As with a recovery window, obsolete backups are automatically removed if disk space is needed and a fast recovery area is used. Otherwise, you can use the DELETE OBSOLETE command to remove the backup files and update the catalog.
If the retention policy is set to NONE, no backups or copies are ever considered obsolete, and the DBA must manually remove unneeded backups from the catalog and from disk.
In the following example, we will set the retention policy to a recovery window of four days (from a default redundancy policy of one copy):

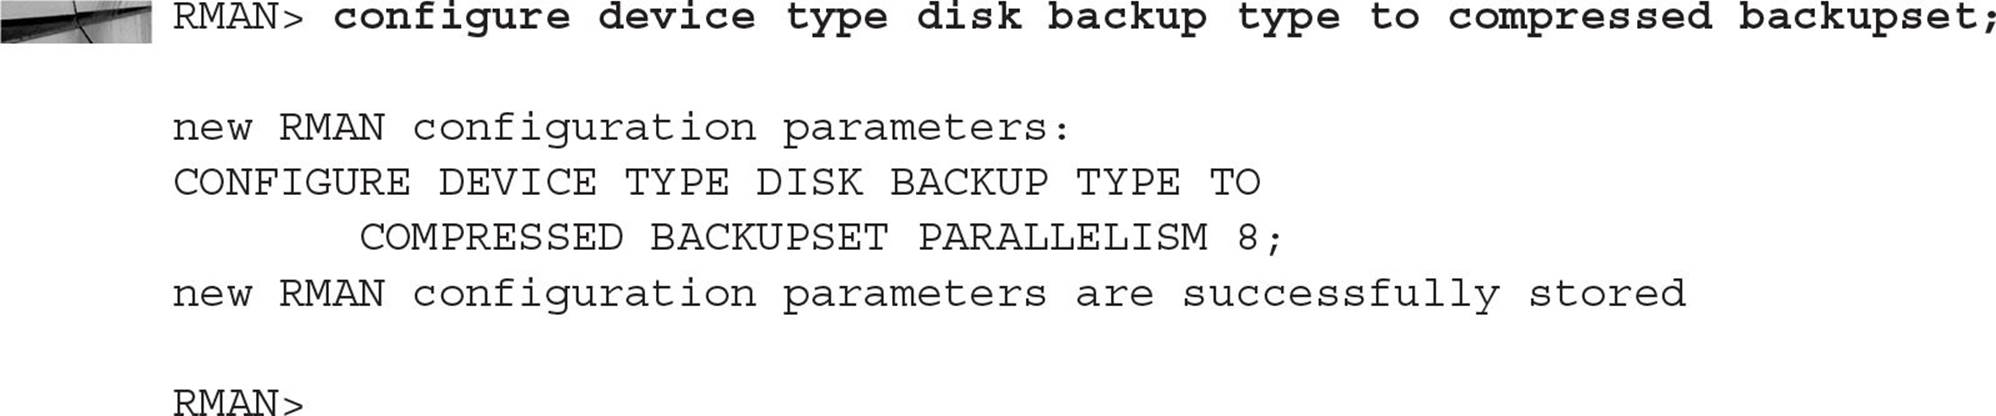
Device Type
If the default device type is set to DISK and no pathname parameter is specified, RMAN uses the fast recovery area for all backups (in this case the disk group +RECOV); you can easily override the disk backup location in EM Cloud Control, as you can see in Figure 14-4. As with many of the simplified administration tasks from Oracle 12c, there is no need to allocate or deallocate a specific channel for backups unless you’re using a tape device.
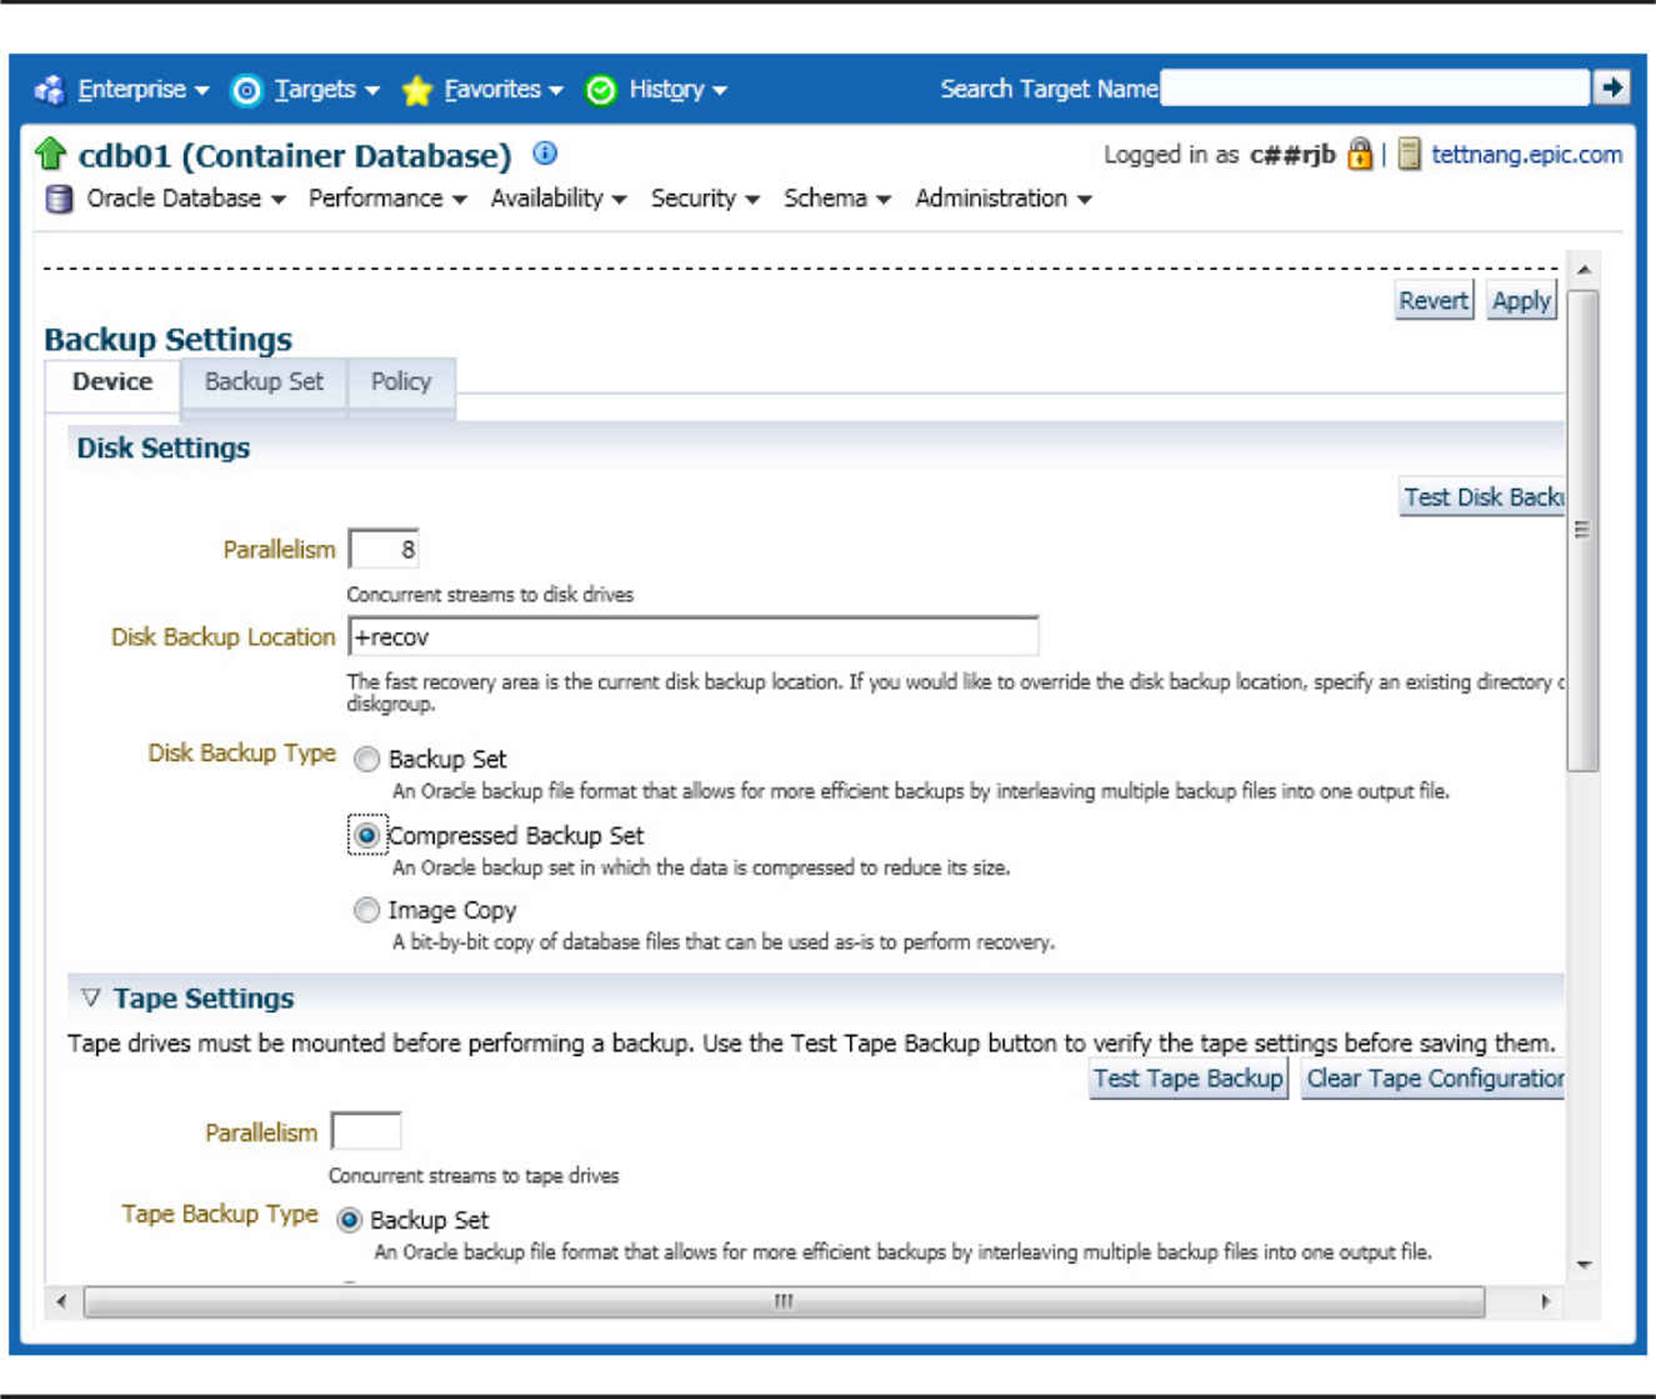
FIGURE 14-4. Configuring backup destination using EM Cloud Control
Although configuring a tape device is specific to your installation, in general terms we configure a tape device as follows:

NOTE
sbt is the device type used for any tape backup subsystem, regardless of vendor.
Although we can use the fast recovery area to restore and recover our database entirely from disk, at some point it becomes inefficient to keep all our backups on disk, especially if we have a large recovery window. As a result, we can make copies of our backup files to tape, and RMAN will dutifully keep track of where the backups are in case we need to restore or recover the database from tape, or restore archived redo logs to roll forward an image copy in the fast recovery area.
Control File Autobackup
Because of the importance of the control file, we want to back it up at least as often as it changes due to modifications in the structure of the database. By default, the backup of the control file does not occur automatically. This is a strange default, considering the importance of the control file and how little disk space it takes to back it up. Fortunately, RMAN can easily be configured to back up the control file automatically, either any time a successful backup must be recorded in the repository or when a structural change affects the contents of the control file (in other words, cases when a control file backup must occur to ensure a successful recovery if and when a recovery operation is required):
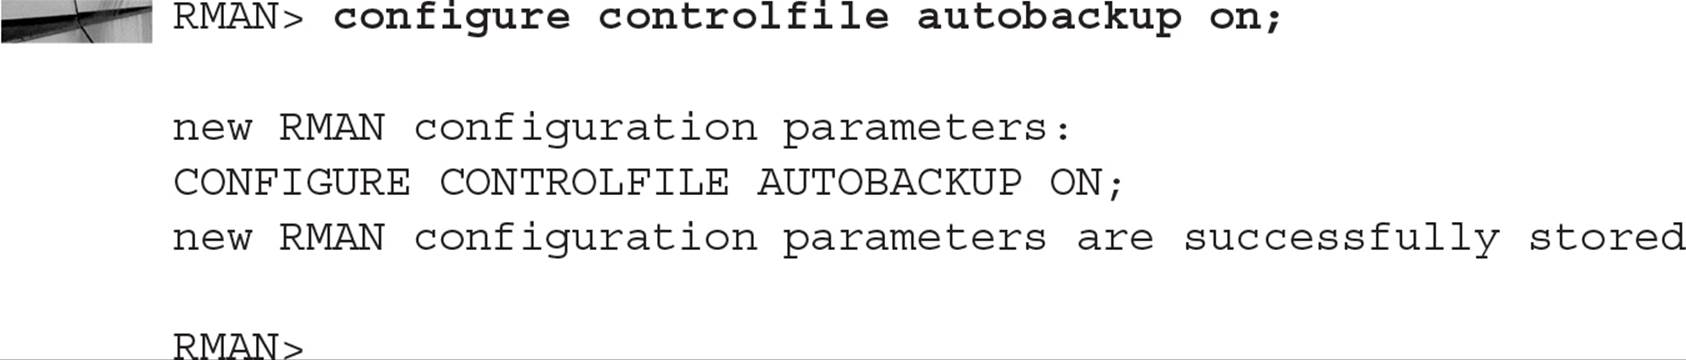
Every RMAN backup from this point on will automatically include a copy of the control file; the control file is also backed up whenever a new tablespace is created or another datafile is added to an existing tablespace.
Backup Compression
If disk space is at a premium, you have a very large database, and you have some extra CPU capacity, it makes sense to compress the backups to save space. The files are decompressed automatically during a restore or recovery operation.
Compressing backupsets may not be necessary if the operating system’s file system has compression enabled or if the tape device hardware automatically compresses backups; however, RMAN’s compression algorithm is tuned to efficiently back up Oracle data blocks, and as a result it may do a better job of compressing the backupsets.
Initialization Parameters
A number of initialization parameters are used to control RMAN backups. We’ll cover some of the more important parameters in this section.
CONTROL_FILE_RECORD_KEEP_TIME
A record of all RMAN backups is kept in the target control file. This parameter specifies the number of days that RMAN will attempt to keep a record of backups in the target control file. After this time, RMAN will begin to reuse records older than this retention period. If RMAN needs to write a new backup record, and the retention period has not been reached, RMAN will attempt to expand the size of the control file. Usually, this is successful because the size of the control file is relatively small compared to other database objects. However, if space is not available for the expansion of the control file, RMAN will reuse the oldest record in the control file and write a message to the alert log.
As a rule of thumb, you should set CONTROL_FILE_RECORD_KEEP_TIME to several days beyond your actual recovery window to ensure that backup records are retained in the control file. The default is seven days.
DB_RECOVERY_FILE_DEST
This parameter specifies the location of the fast recovery area. It should be located on a file system different from any database datafiles, control files, or redo log files, online or archived. If you lose the disk with the datafiles, the fast recovery area is gone too, mitigating the advantages of using a fast recovery area.
DB_RECOVERY_FILE_DEST_SIZE
The parameter DB_RECOVERY_FILE_DEST_SIZE specifies an upper limit to the amount of space used for the fast recovery area. The underlying file system may have less or more than this amount of space; the DBA should ensure that at least this amount of space is available for backups. Note that this is the amount of recovery space for this database only; if multiple databases share the same ASM disk group for their fast recovery area, the sum of all values for DB_RECOVERY_FILE_DEST_ SIZE must not exceed the available space in the disk group.
In our data warehouse database, dw, a fast recovery area is defined in the disk group +RECOV with a maximum size of 8GB. As this limit is reached, RMAN will automatically remove obsolete backups and generate an alert in the alert log when the amount of space occupied by nonobsolete backups is within 10 percent of the value specified in DB_RECOVERY_FILE_DEST_SIZE.
The parameters DB_RECOVERY_FILE_DEST and DB_RECOVERY_FILE_DEST_SIZE are both dynamic; they can be changed on the fly while the instance is running to respond to changes in disk space availability.
Data Dictionary and Dynamic Performance Views
A number of Oracle data dictionary and dynamic performance views contain information specific to RMAN operations, on both the target database and the catalog database. In Table 14-2 are the key views related to RMAN. Each of these views will be covered in more detail later in this chapter.
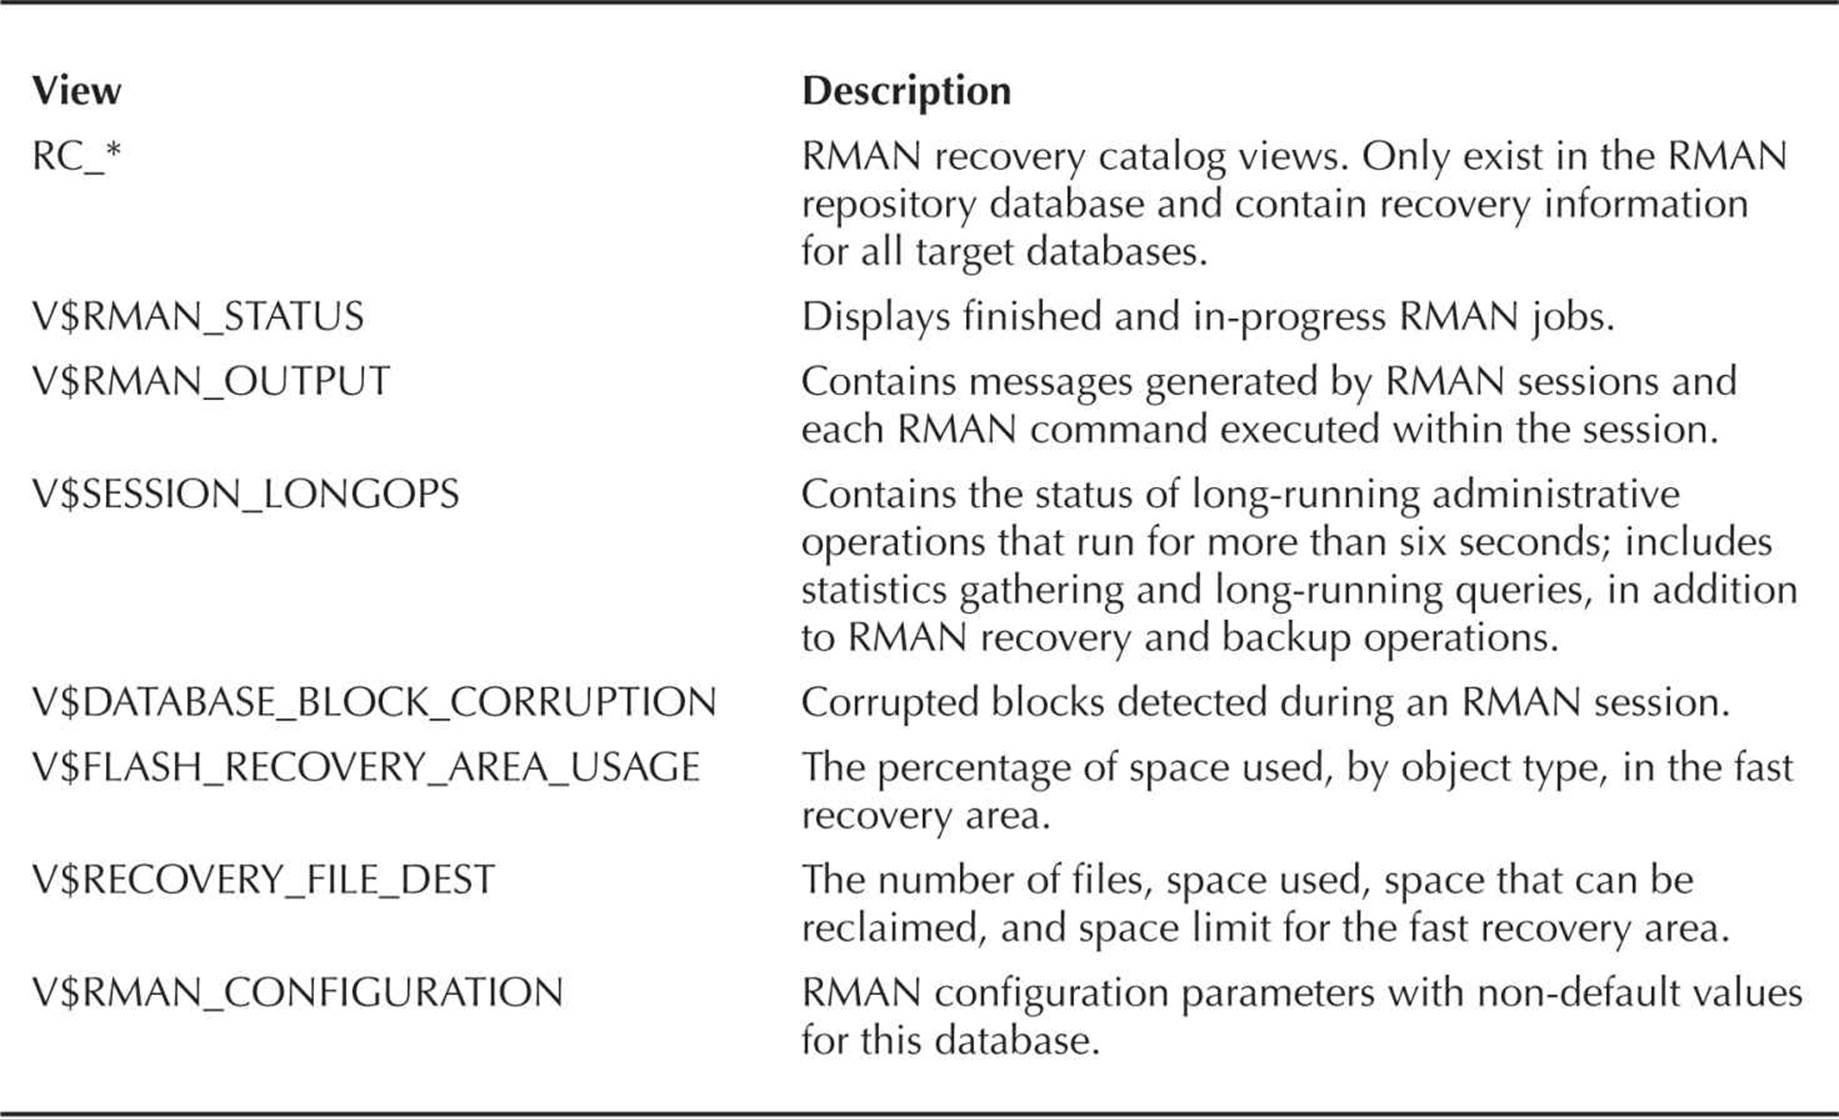
TABLE 14-2. RMAN Data Dictionary and Dynamic Performance Views
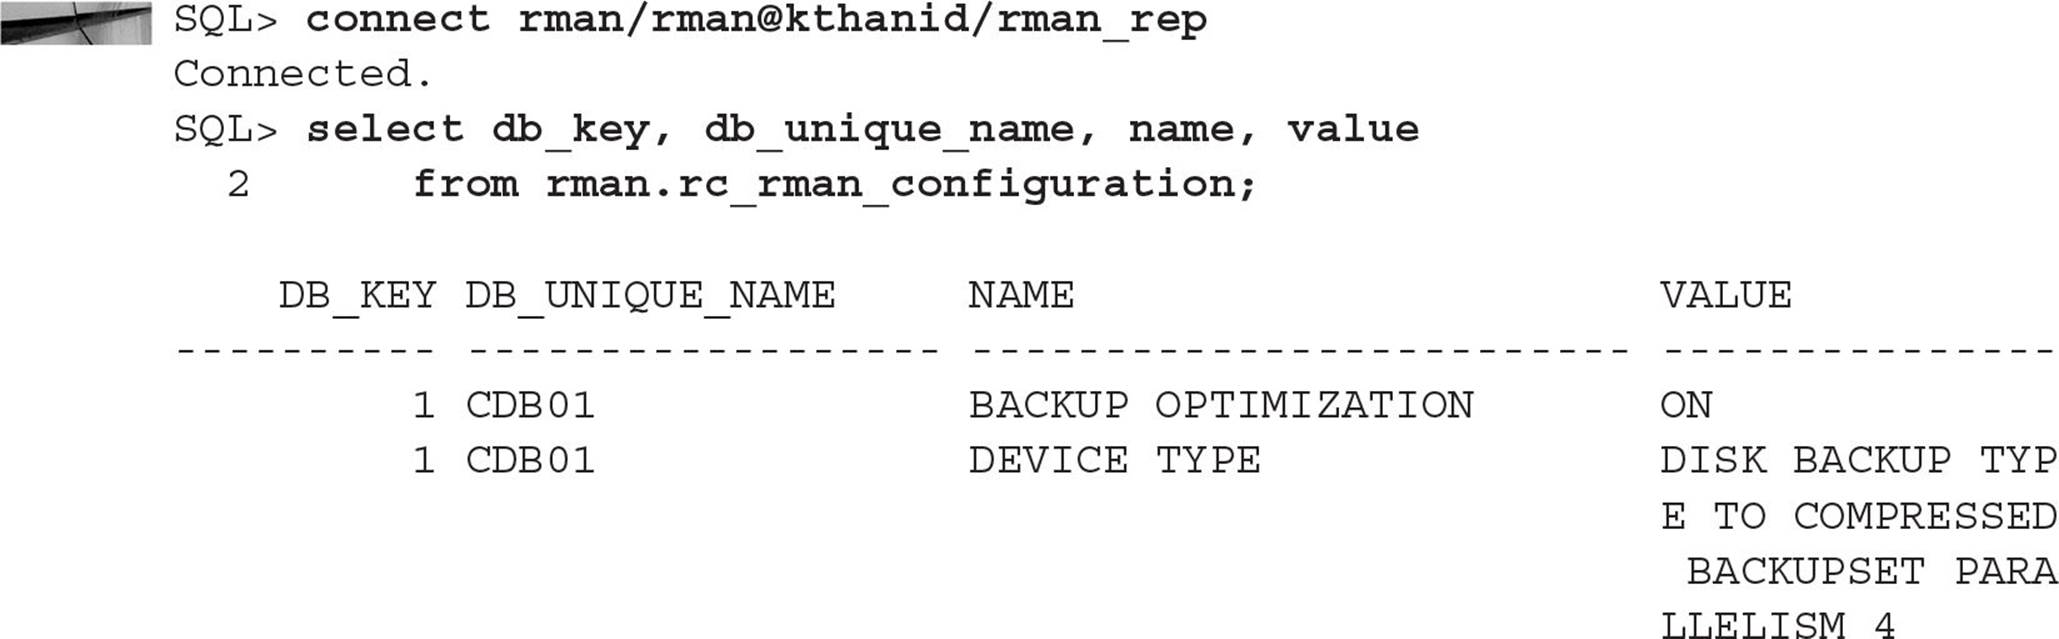
The RC_* views only exist in a database that is used as an RMAN repository; the V$ views exist and have rows in any database that is backed up using RMAN. To highlight this difference, we’ll look at the view V$RMAN_CONFIGURATION in the target database:
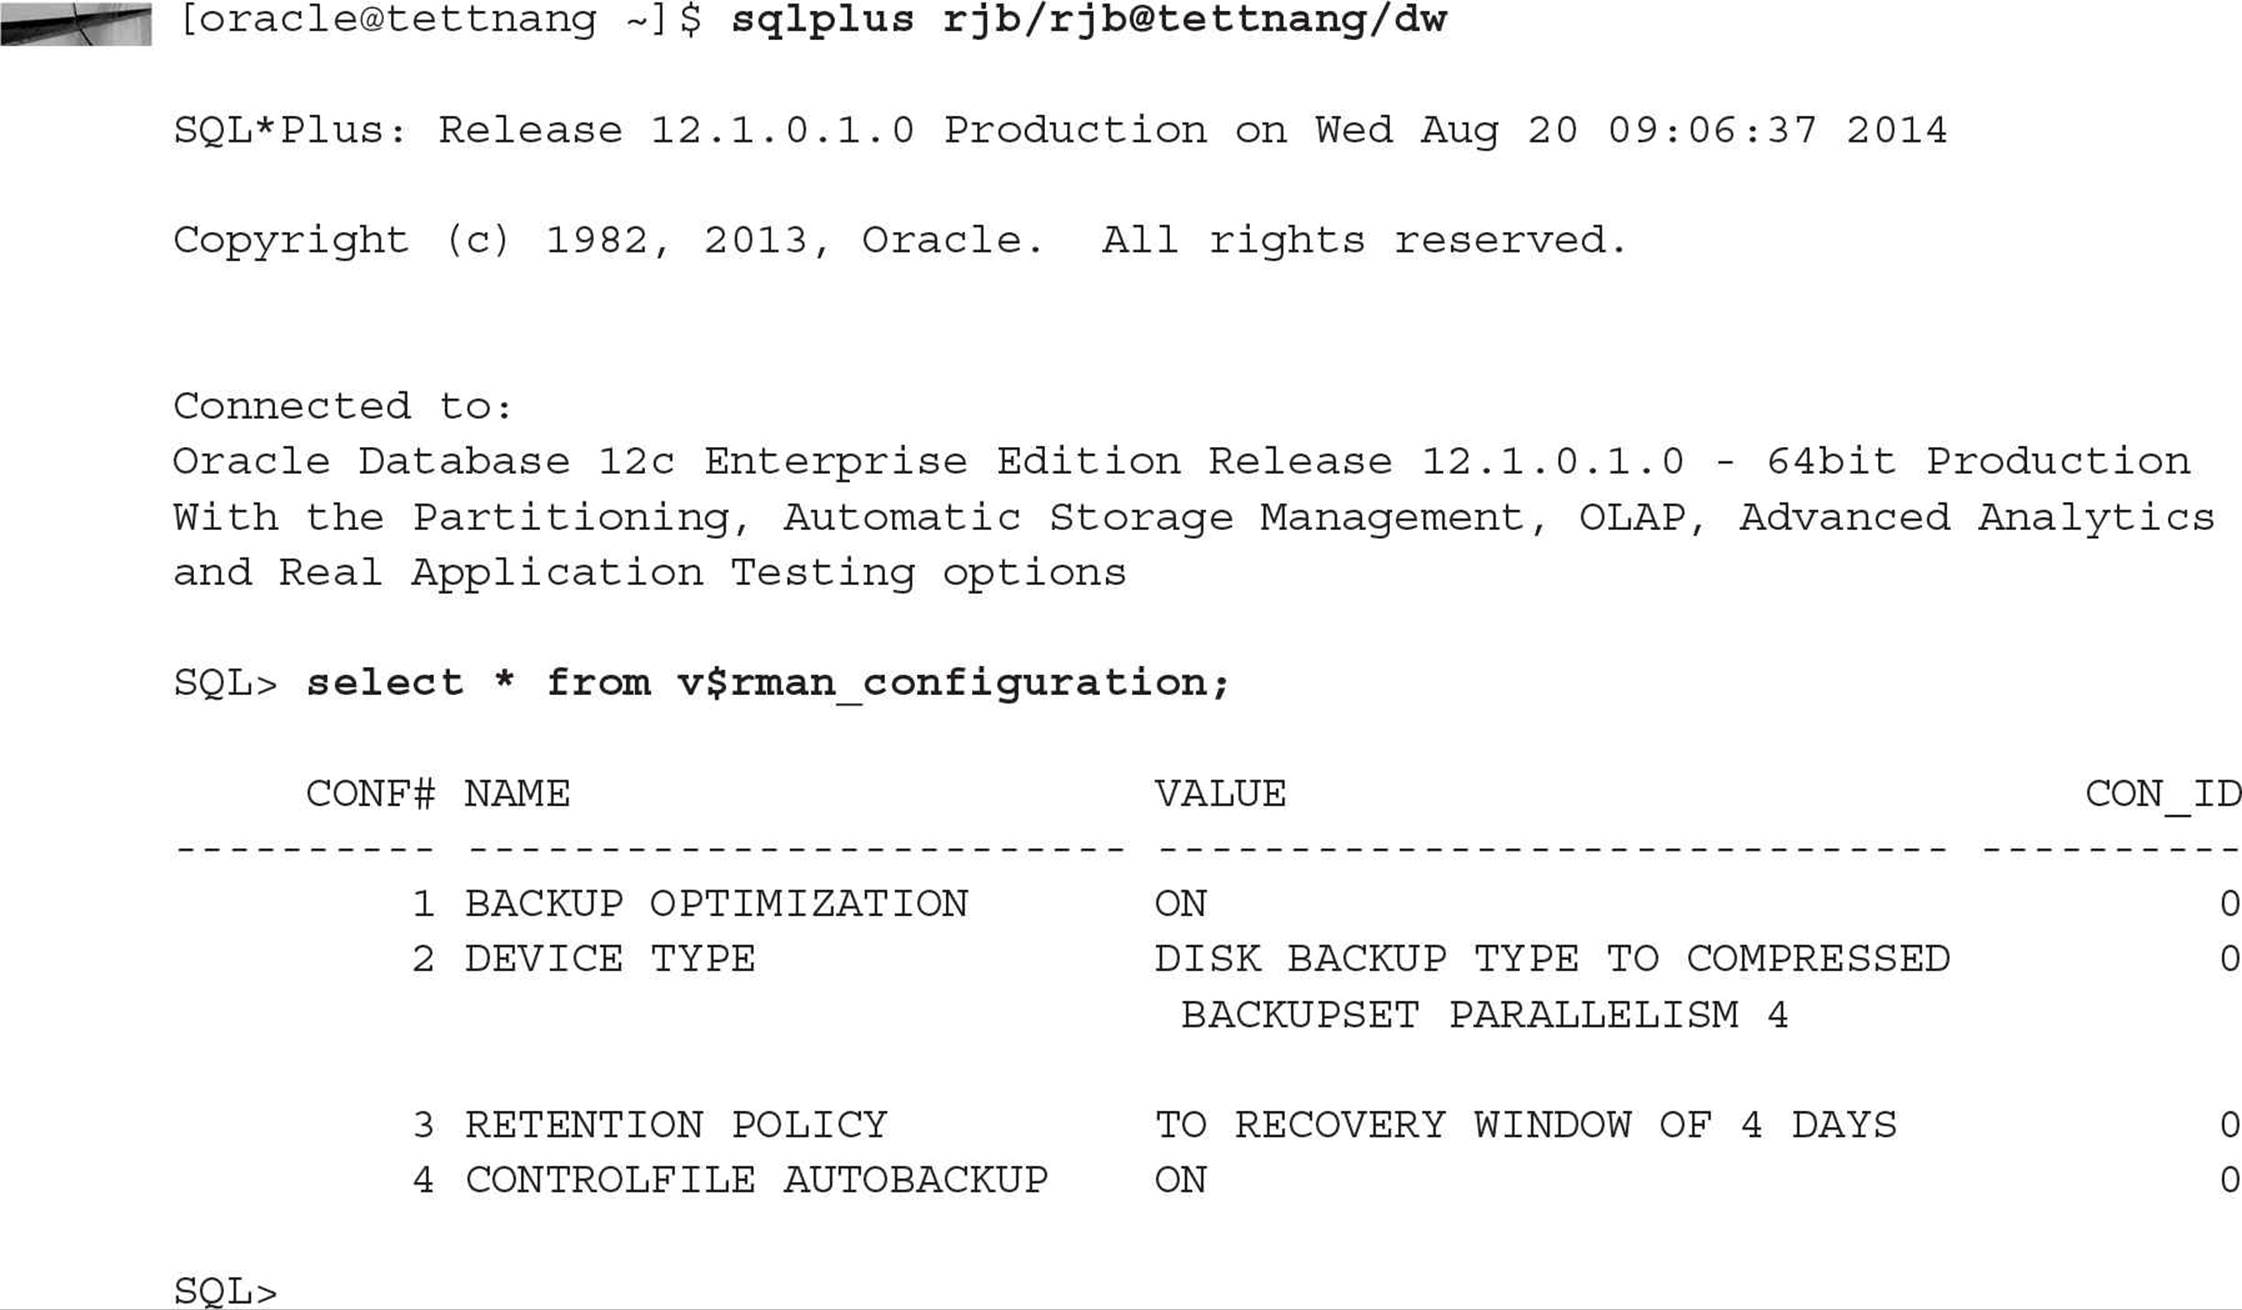
Note that these are the RMAN persistent parameters that were changed from the default. The recovery catalog database keeps these non-default values in the view RC_RMAN_CONFIGURATION for all databases registered with RMAN. Note also the CON_ID column for databases in a multitenant environment. A PDB will have CON_ID=0 (no visibility to other PDBs in the CDB), whereas CON_ID will have a unique identifier for each PDB when connected to the root container.

If we were using RMAN to back up another database, this view would contain other values for DB_KEY and DB_UNIQUE_NAME for other target databases with non-default RMAN parameters.
Because we are not using RMAN to back up the rman_rep database, the views V$RMAN_* are empty.
Backup Operations
In this section, we’ll run through some examples to back up the target database in a variety of ways: We’ll perform two kinds of full backups, create image copies of selected database files, investigate how incremental backups work, and discuss both incremental backup optimization and the fast recovery area.
We’ll continue to use our data warehouse database, dw, as the target database, with the database rman_rep as the RMAN repository.
Full Database Backups
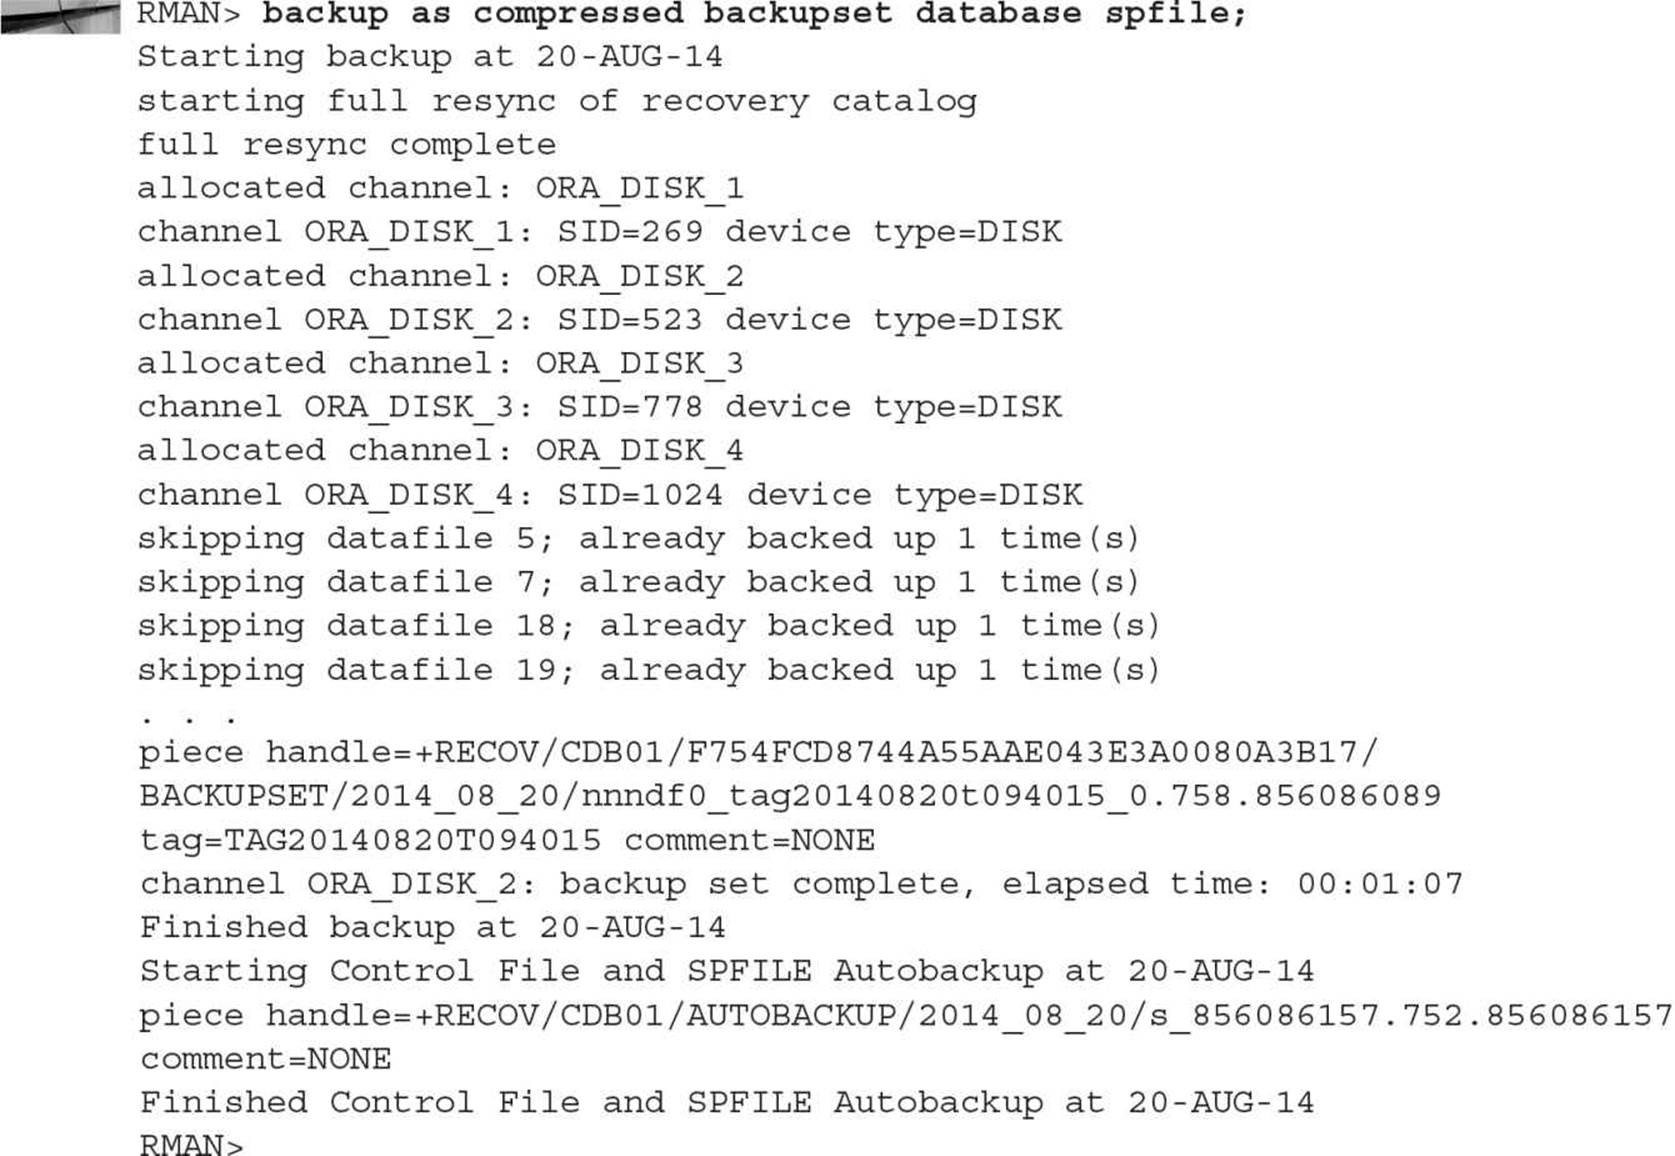
In our first example of a full database backup, we’ll use backupsets to copy all database files, including the SPFILE, to the fast recovery area:
NOTE
When using a recovery catalog, RMAN can only connect to the root container (CDB) to perform backup and recovery operations.
Files 5, 7, 18, and 19 did not need to be backed up because of the BACKUP OPTIMIZATION setting configured to ON. Note also that the SPFILE is backed up twice, the second time along with the control file. Because we set CONFIGURE CONTROLFILE AUTOBACKUP to ON, we automatically back up the control file and SPFILE whenever we do any other kind of backup or the structure of the database changes. As a result, we don’t need to specify SPFILE in the BACKUP command.
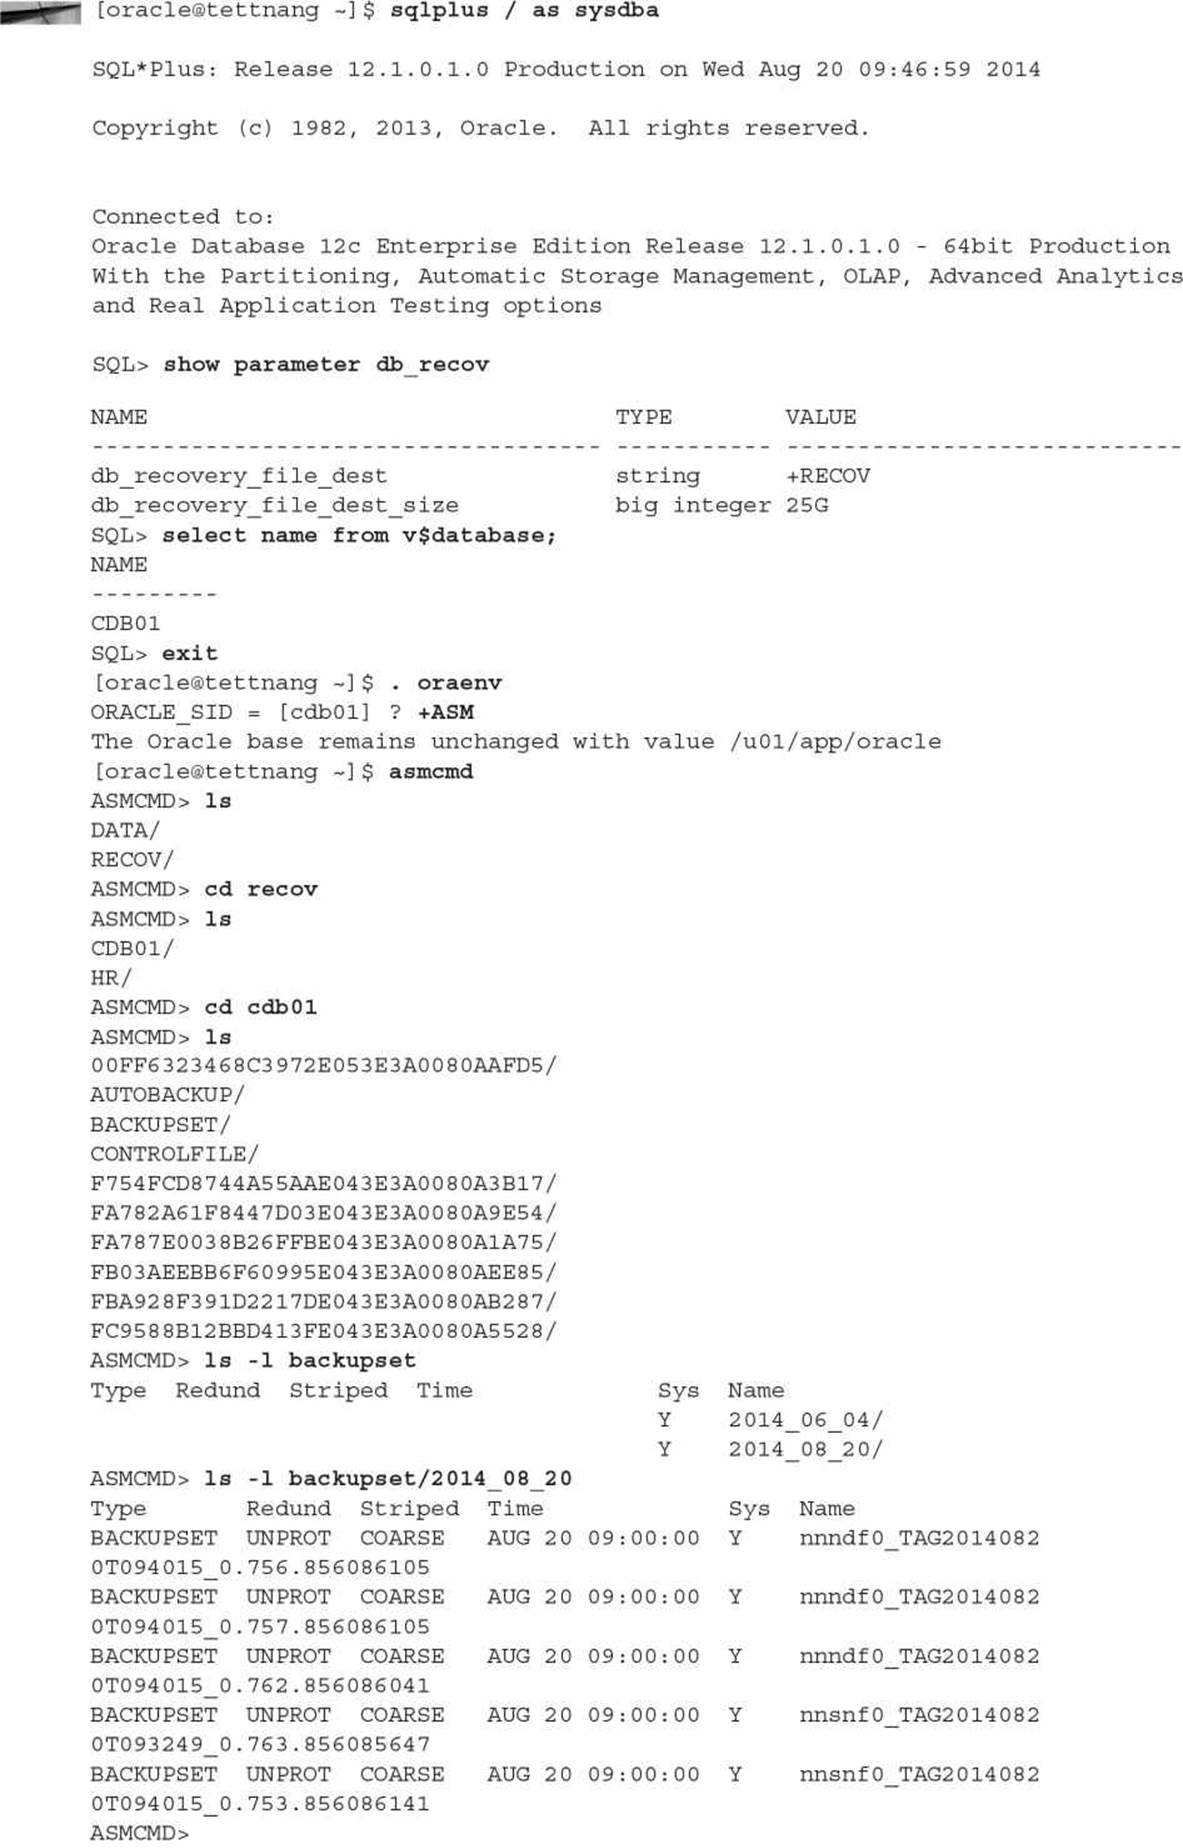
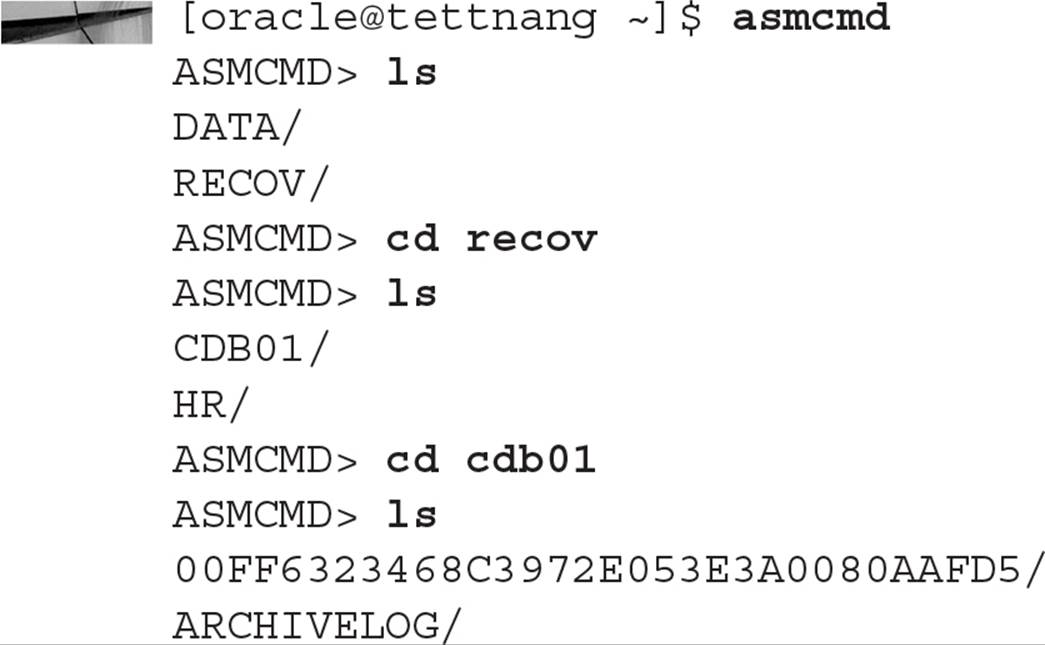
Taking a peek into the fast recovery area using the asmcmd tool, we see a lot of cryptic filenames for the recent archived redo logs and the full database backup we just performed:
As an alternative, you can use RMAN’s LIST command to see these backups as they are cataloged in the target database control file and the RMAN repository. There are four backupsets, one for a previous full database backup, and three others: a more recent full backup containing the datafiles themselves, one for the explicit SPFILE backup, and one for the implicit SPFILE and control file backup.
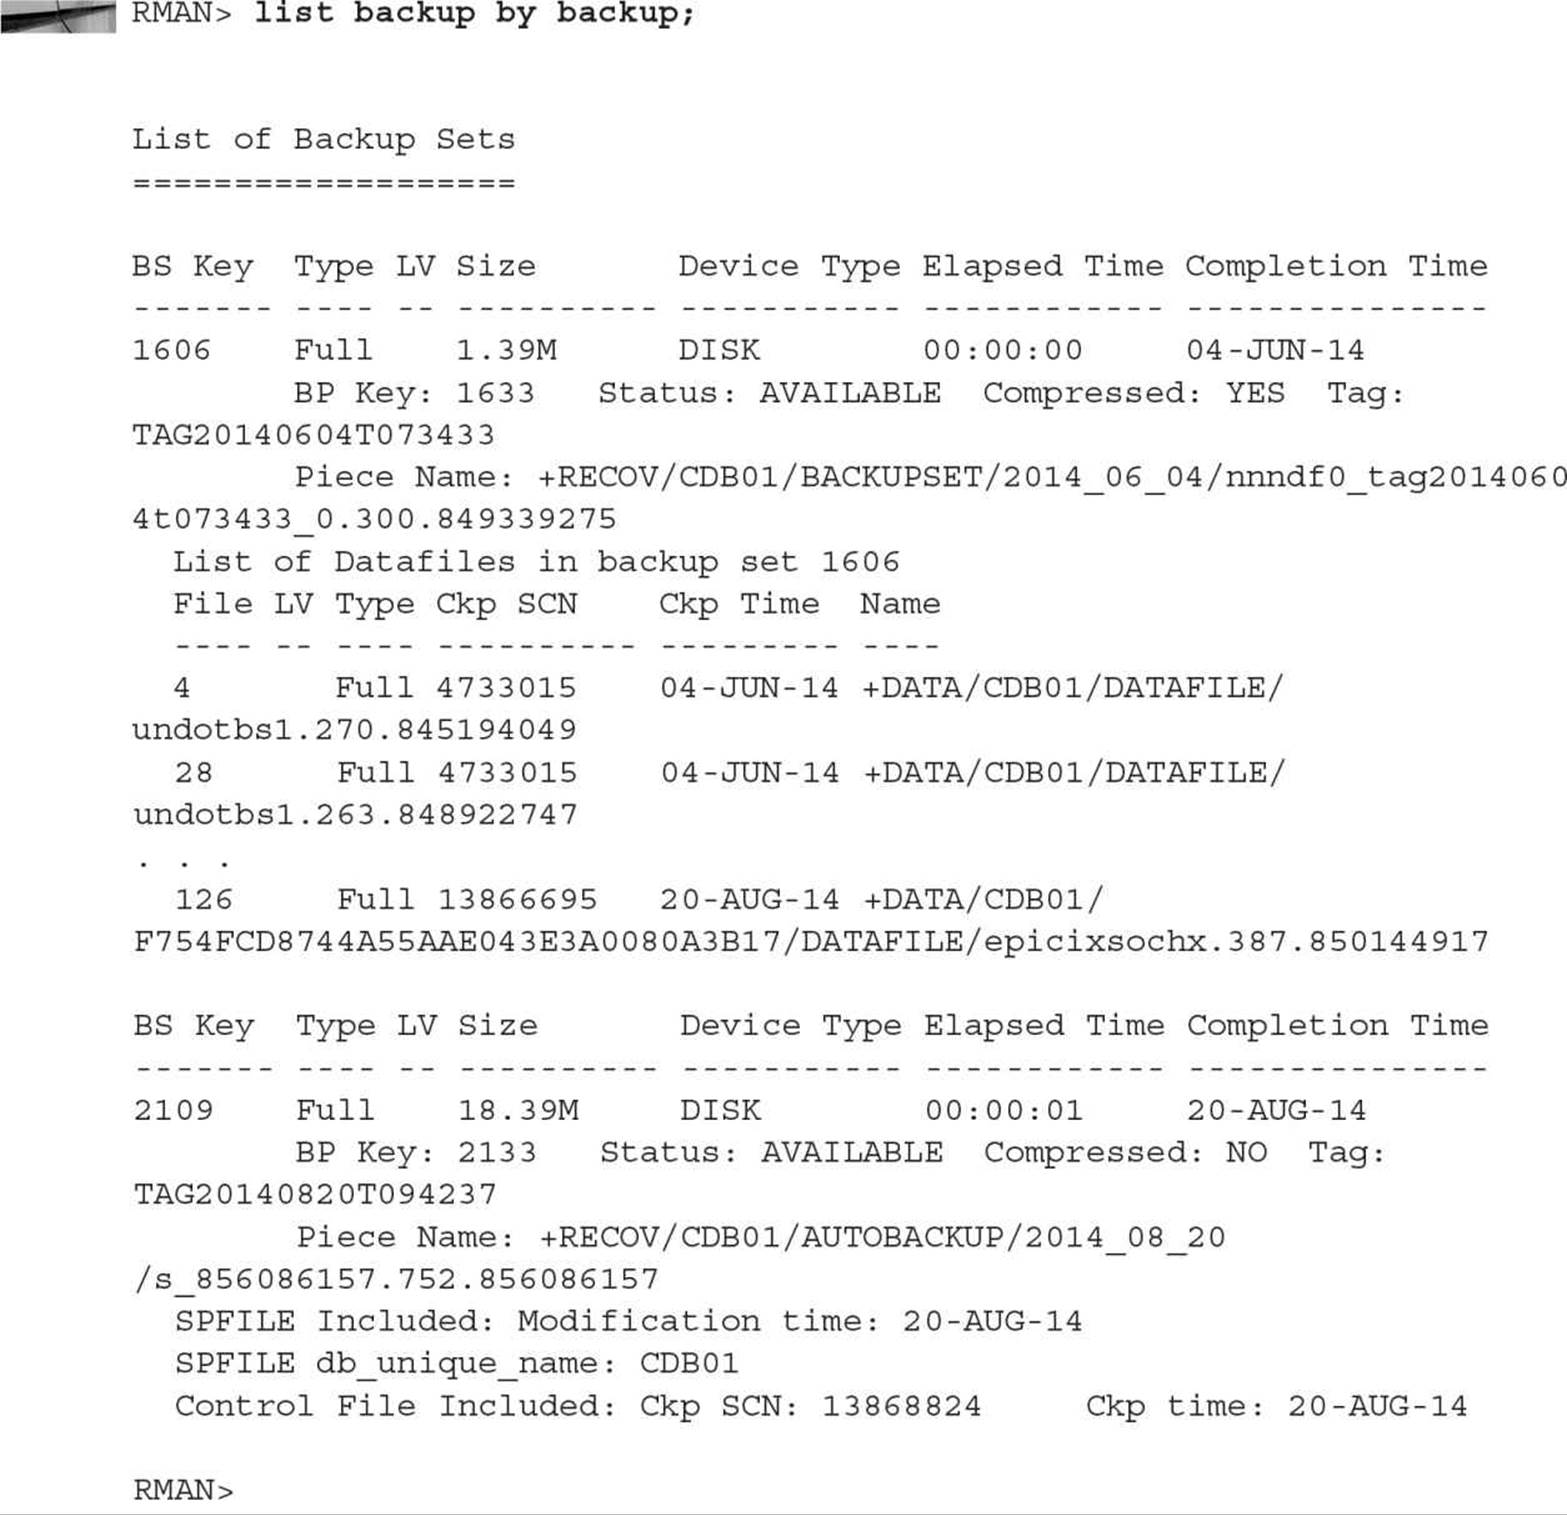
One of the full backups can be used in conjunction with the archived redo logs (stored by default in the fast recovery area residing in the ASM disk group +RECOV) to recover the database to any point in time up to the last committed transaction.
Figure 14-5 shows a whole database backup configured to run using EM Cloud Control. Notice that you can view, copy, or edit the RMAN script that EM Cloud Control generates.
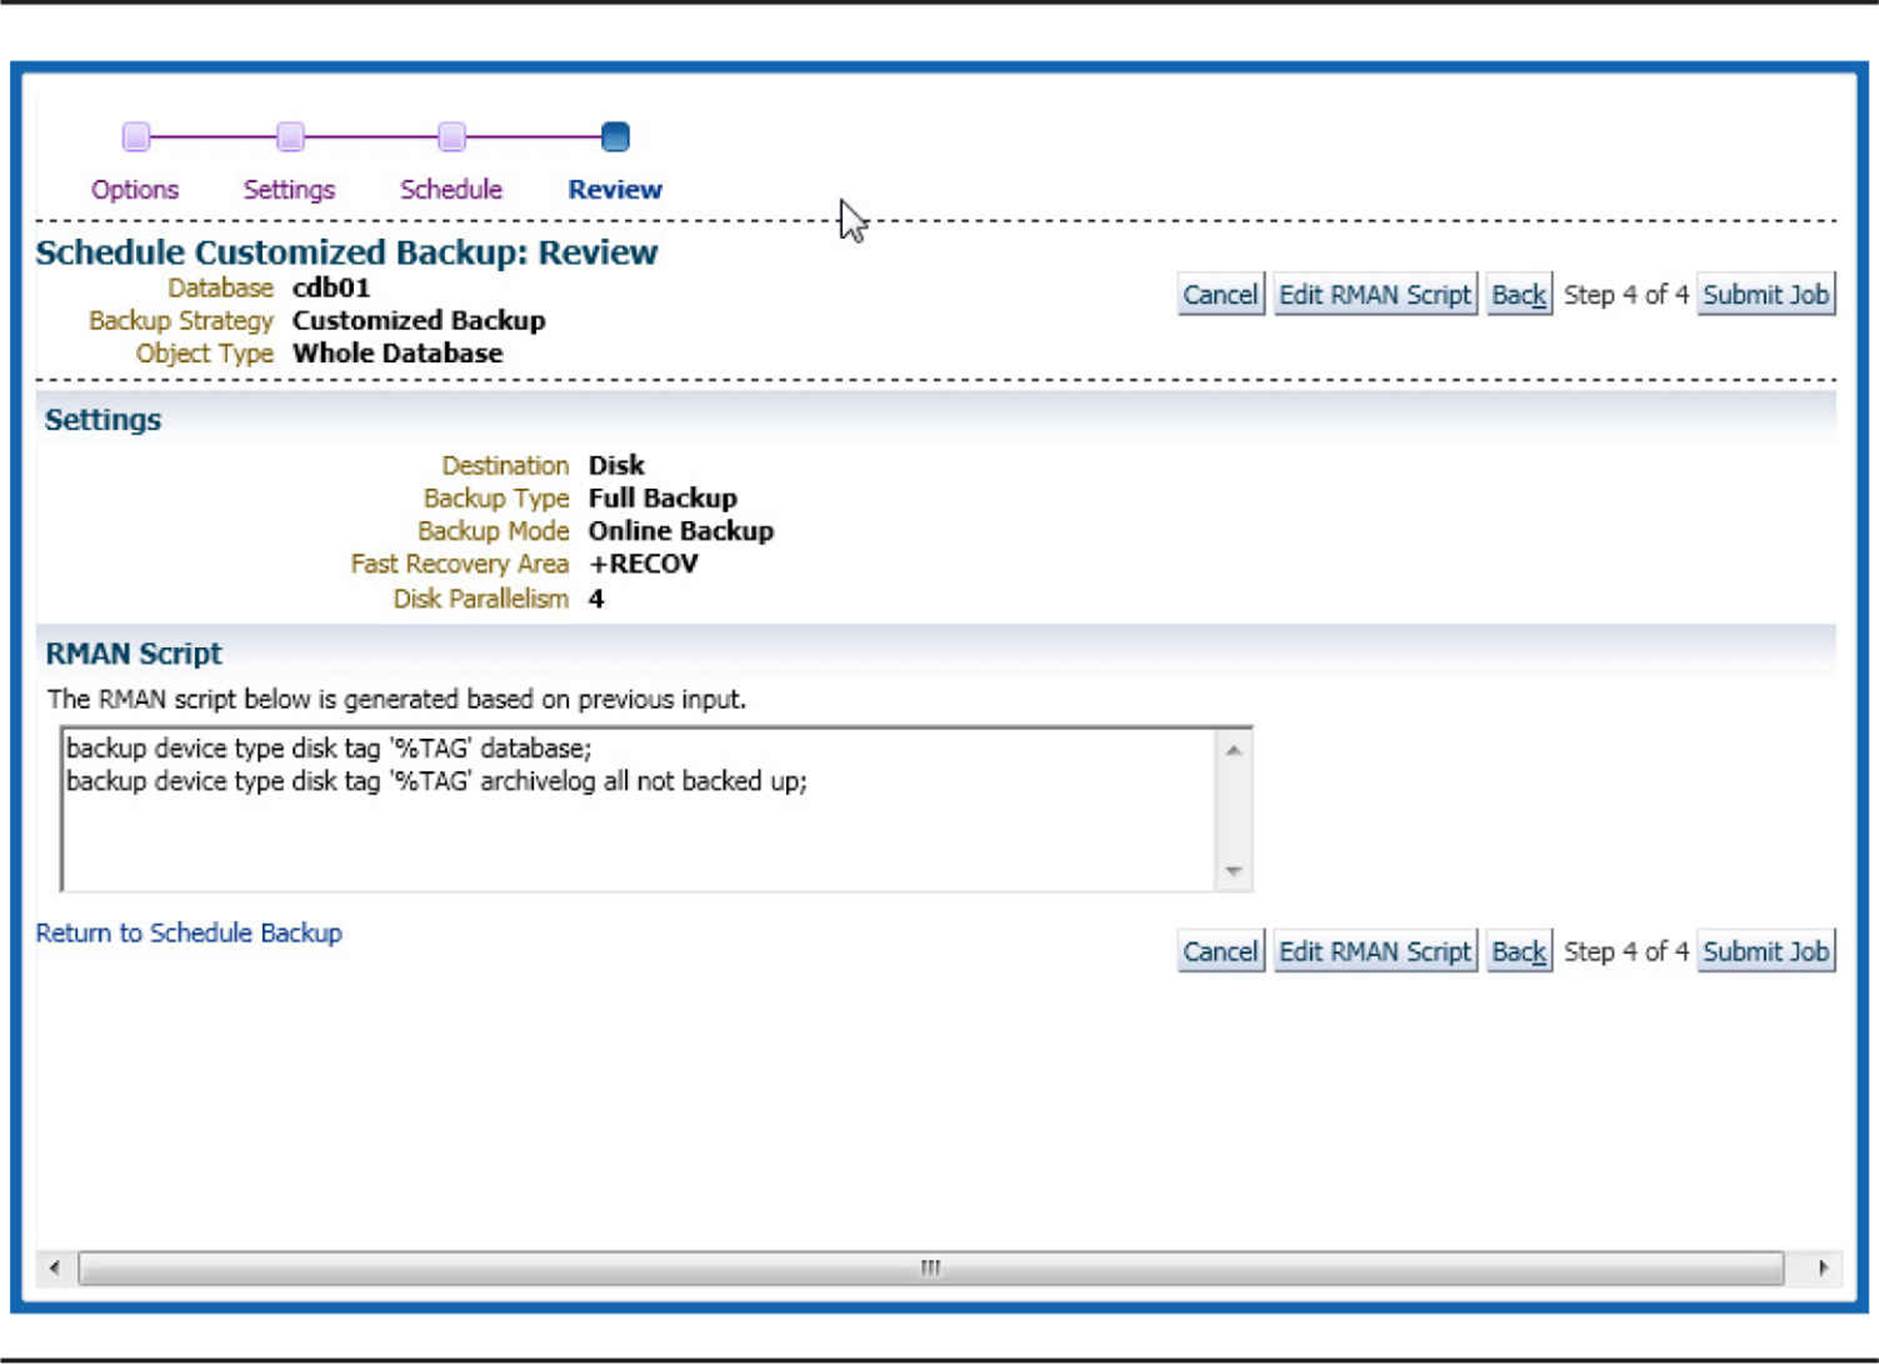
FIGURE 14-5. Configure backup job with EM Cloud Control
Displaying the contents of the catalog is just as easy in EM Cloud Control. Figure 14-6 shows results equivalent to the LIST BACKUP BY BACKUP command.
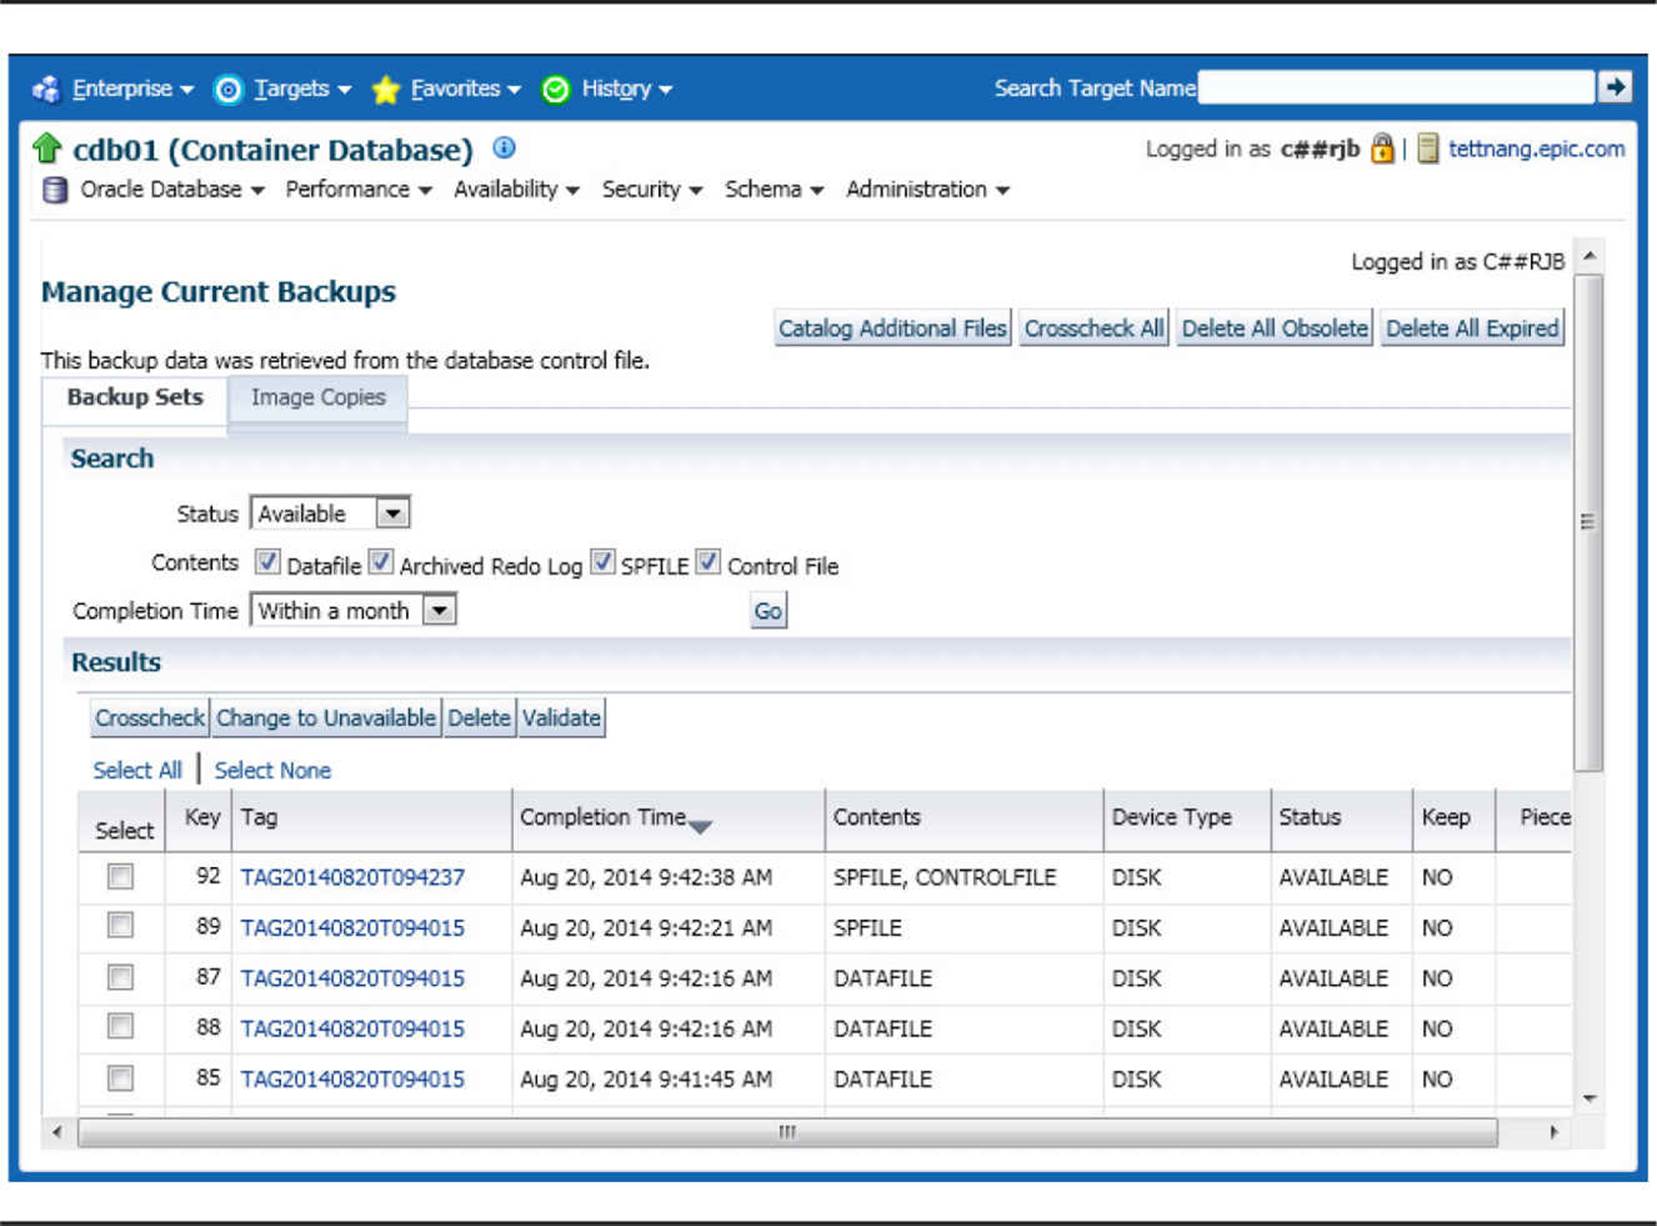
FIGURE 14-6. Display backupset information with EM Cloud Control
The LIST and REPORT commands are covered in more detail later in this chapter.
Tablespace Backups
After adding a tablespace to the database, performing an immediate backup of the tablespace will shorten the time it will take to restore the tablespace later in the event of media failure. In addition, you might back up an individual tablespace in a database that is too large to back up all at once; again, creating a backupset or image copy of a tablespace at frequent intervals will reduce the amount of redo that would need to be applied to an older backup of the tablespace in the event of media failure. For example, in an environment with three large tablespaces—USERS, USERS2, and USERS3—along with the default tablespaces SYSTEM and SYSAUX, you might back up the SYSTEM and SYSAUX tablespaces on Sunday, USERS on Monday, USERS2 on Wednesday, and USERS3 on Friday. Failures of any media containing datafiles from one of these tablespaces will use a tablespace backup that is no more than a week old plus the intervening archived and online redo log files for recovery.
In our next example, we’re adding a tablespace to the dw database (a PDB within the CDB01 container) to support a new set of star schemas:

From an RMAN session, we will back up the tablespace along with the control file. In this case, it’s critical that we back up the control file because it contains the definition for the new tablespace.
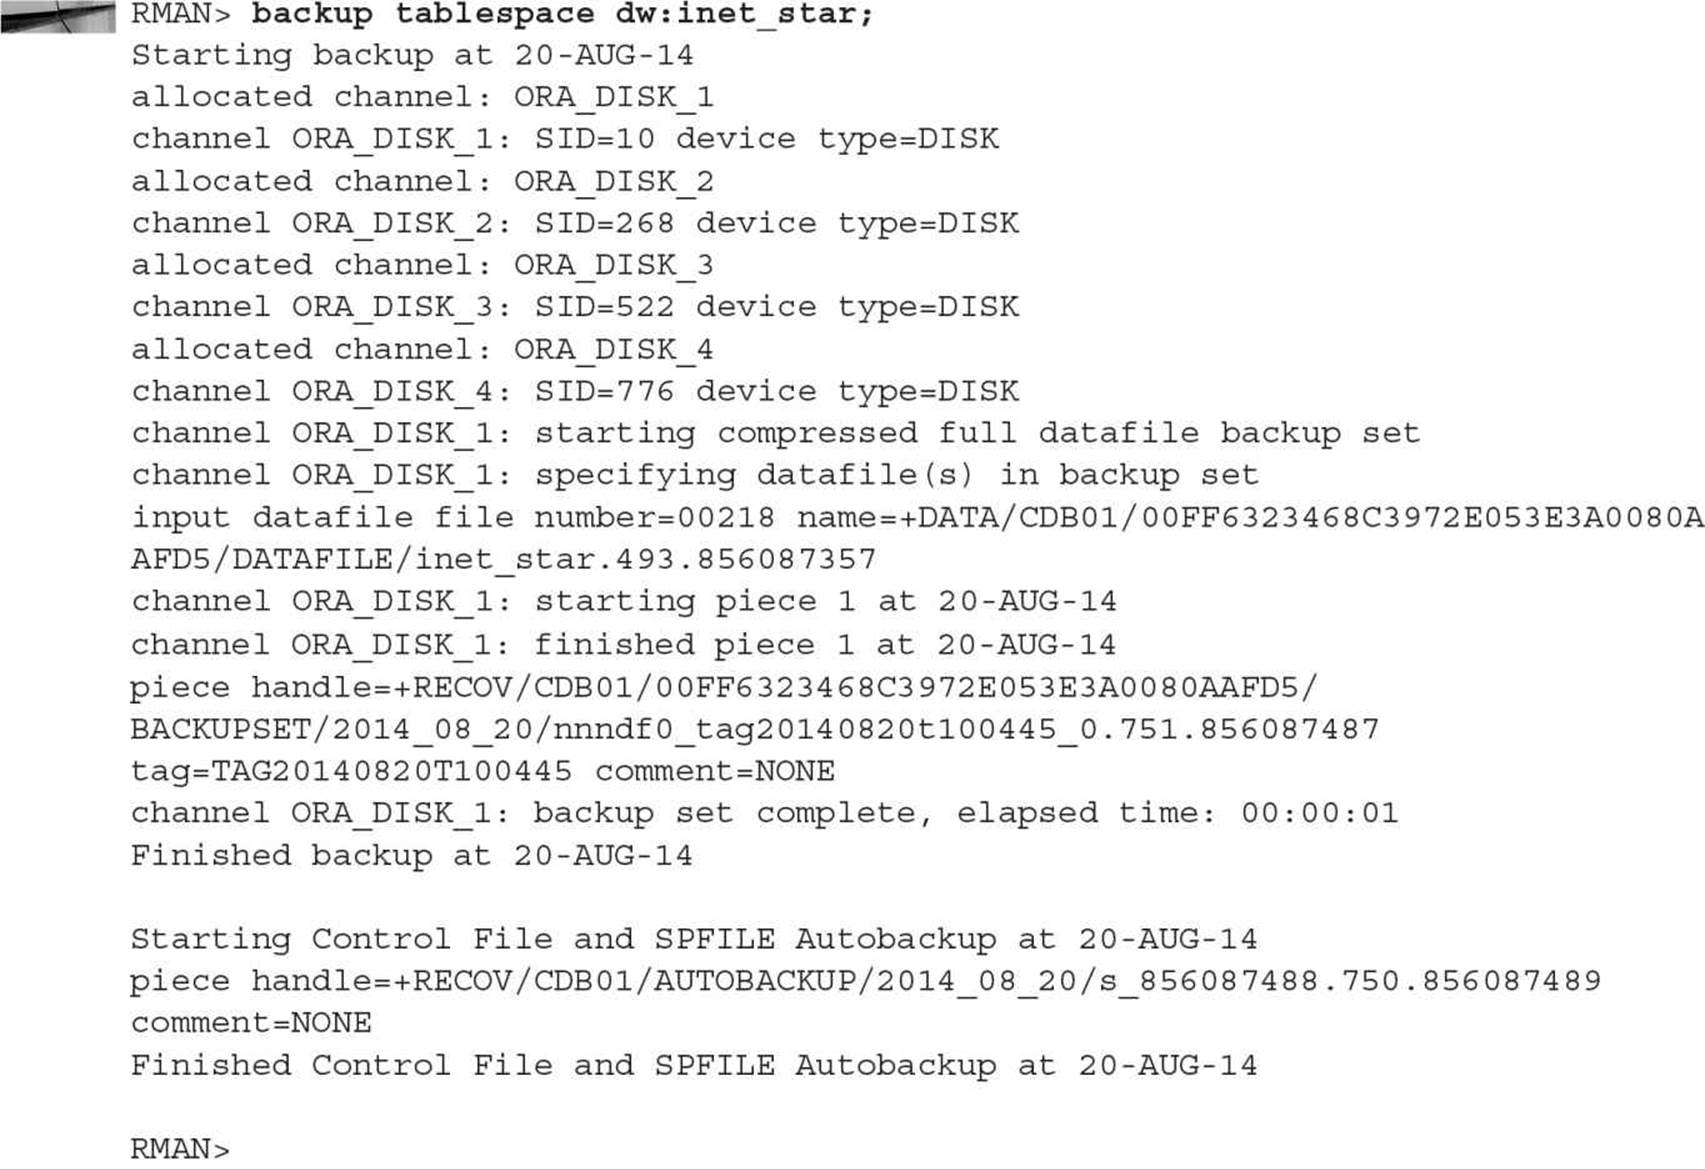
Since the dw database is a PDB within the CDB01 container (a feature new to Oracle Database 12c; see Chapter 11), you must qualify the tablespace name with the PDB name, even if there is only one PDB with a tablespace with that name.
In Figure 14-7, you can see the new RMAN backup record in the repository (TAG20140820T100448)—a combined backupset for the tablespace and the control file/SPFILE autobackup.
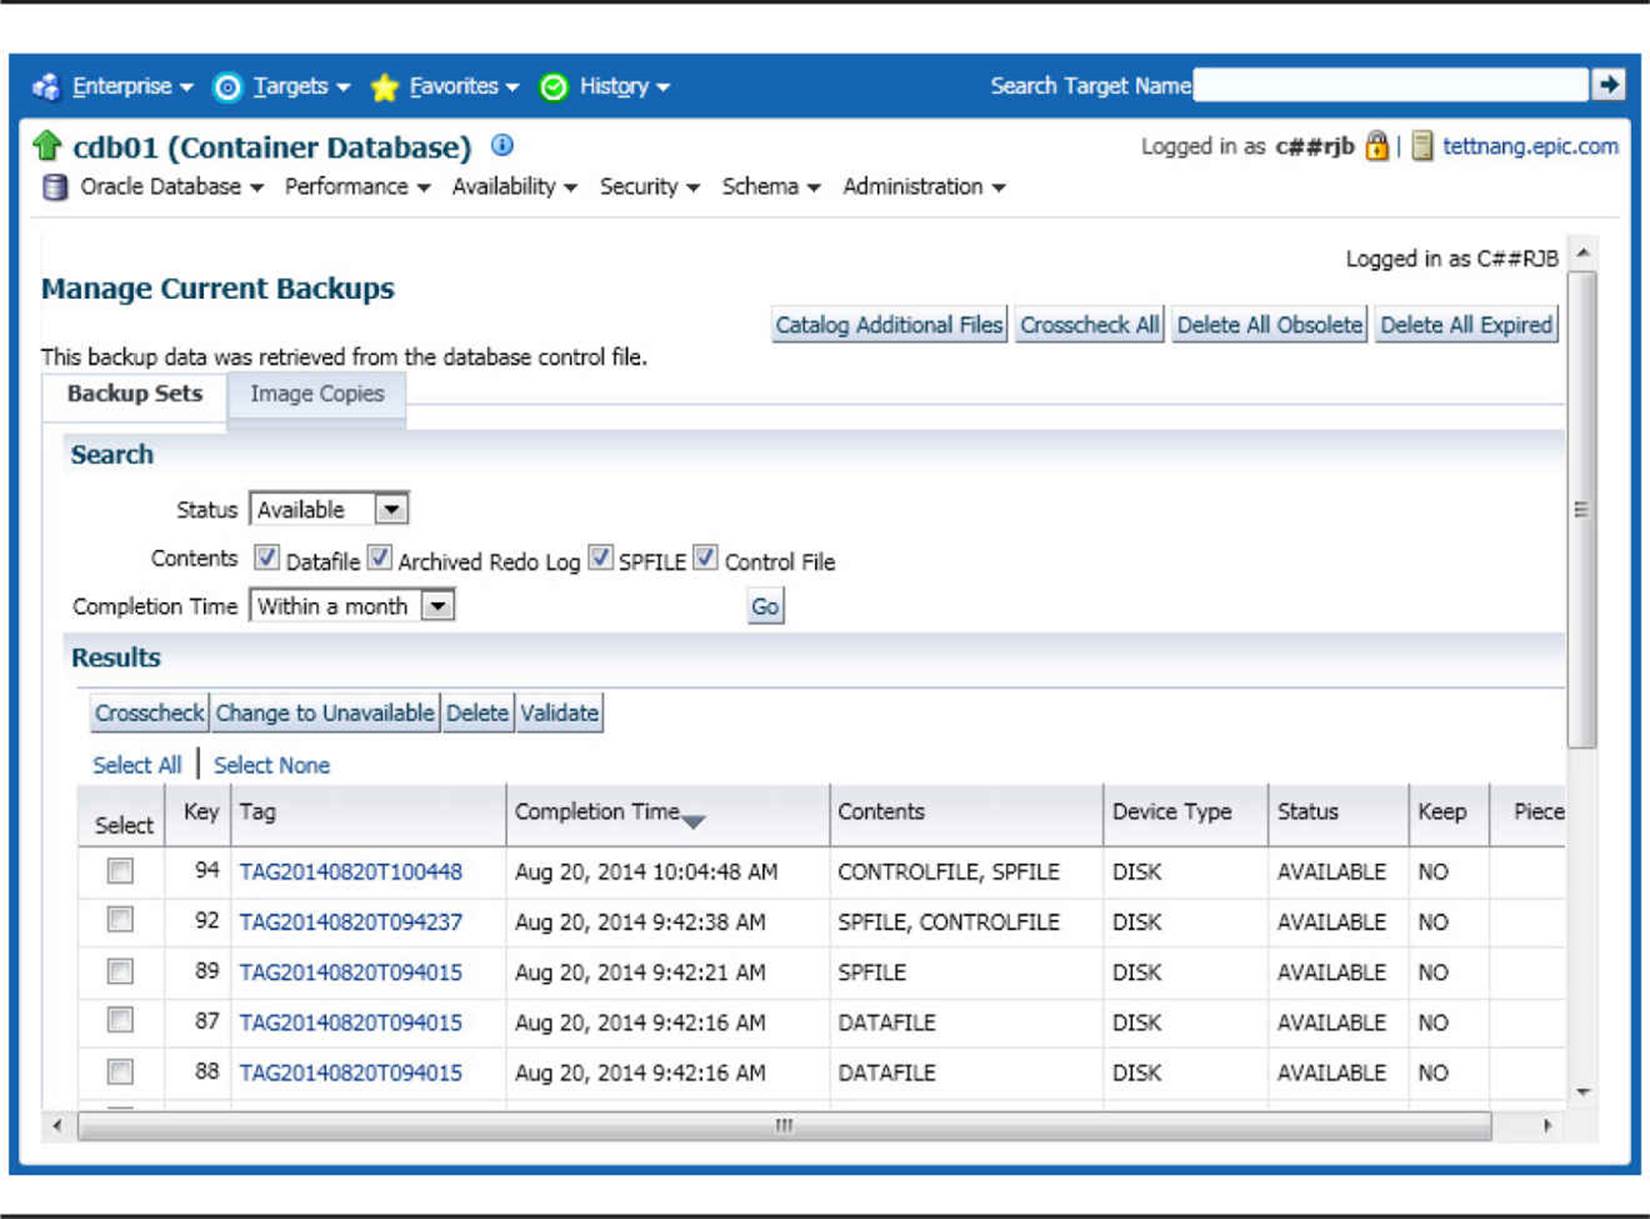
FIGURE 14-7. Tablespace backup files in EM Cloud Control
Datafile Backups
Backing up individual datafiles is as easy as backing up a tablespace. If it’s impractical to back up an entire tablespace within an RMAN session, you can back up individual datafiles within a tablespace over a period of days, and the archived redo log files will take care of the rest during a recovery operation. Here is an example of a datafile backup of a single datafile within a non-ASM tablespace:

Image Copy Backups
Up until this point, we have been using backupset backups; in contrast, image copies make bit-for-bit copies of the specified tablespace or entire database. There are a couple of distinct advantages for using RMAN to perform image copy backups: First, the backup is automatically recorded in the RMAN repository. Second, all blocks are checked for corruption as they are read and copied to the backup destination. Another side benefit to making image copies is that the copies can be used “as is” outside of RMAN if, for some reason, a recovery operation must occur outside of RMAN.
In the example that follows, we make another backup of the INET_STAR tablespace, this time as an image copy:
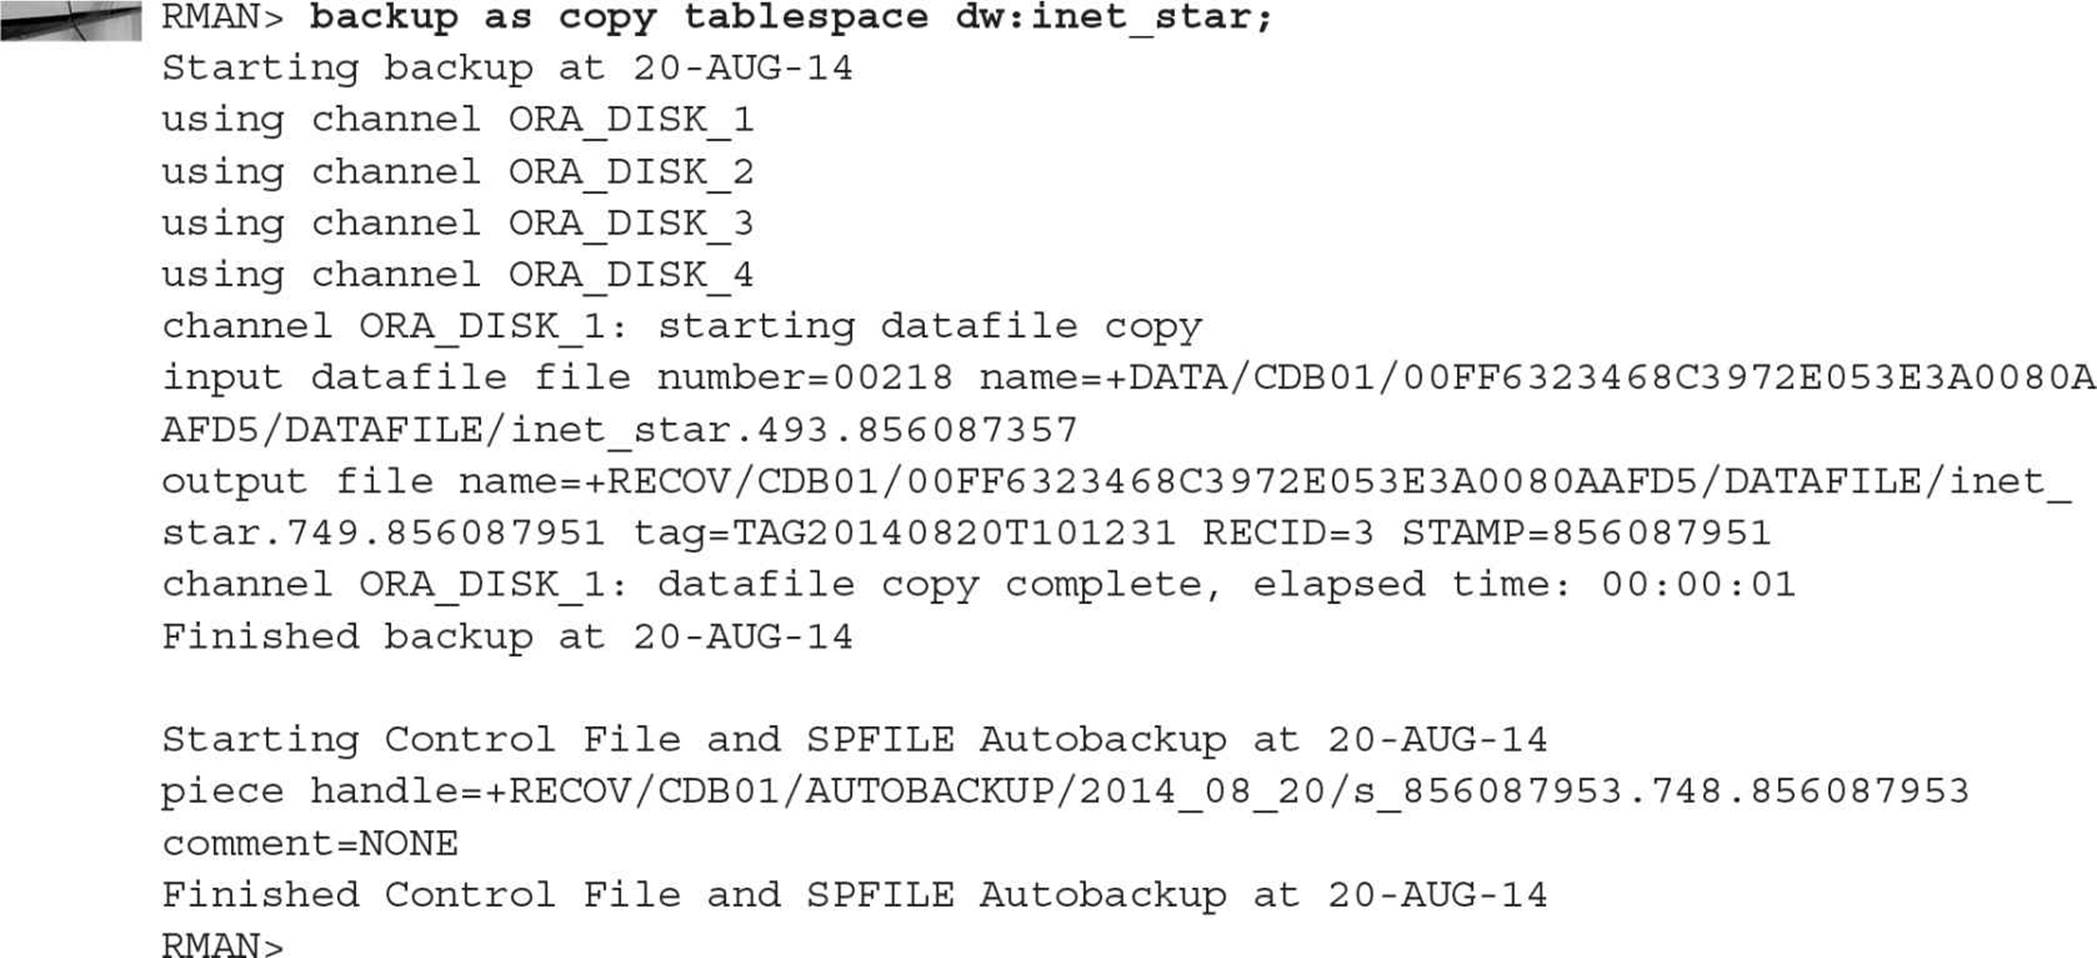
Image copies can only be created on DISK device types. In Figure 14-8, we perform an image copy of the root container’s USERS tablespace with EM Cloud Control.
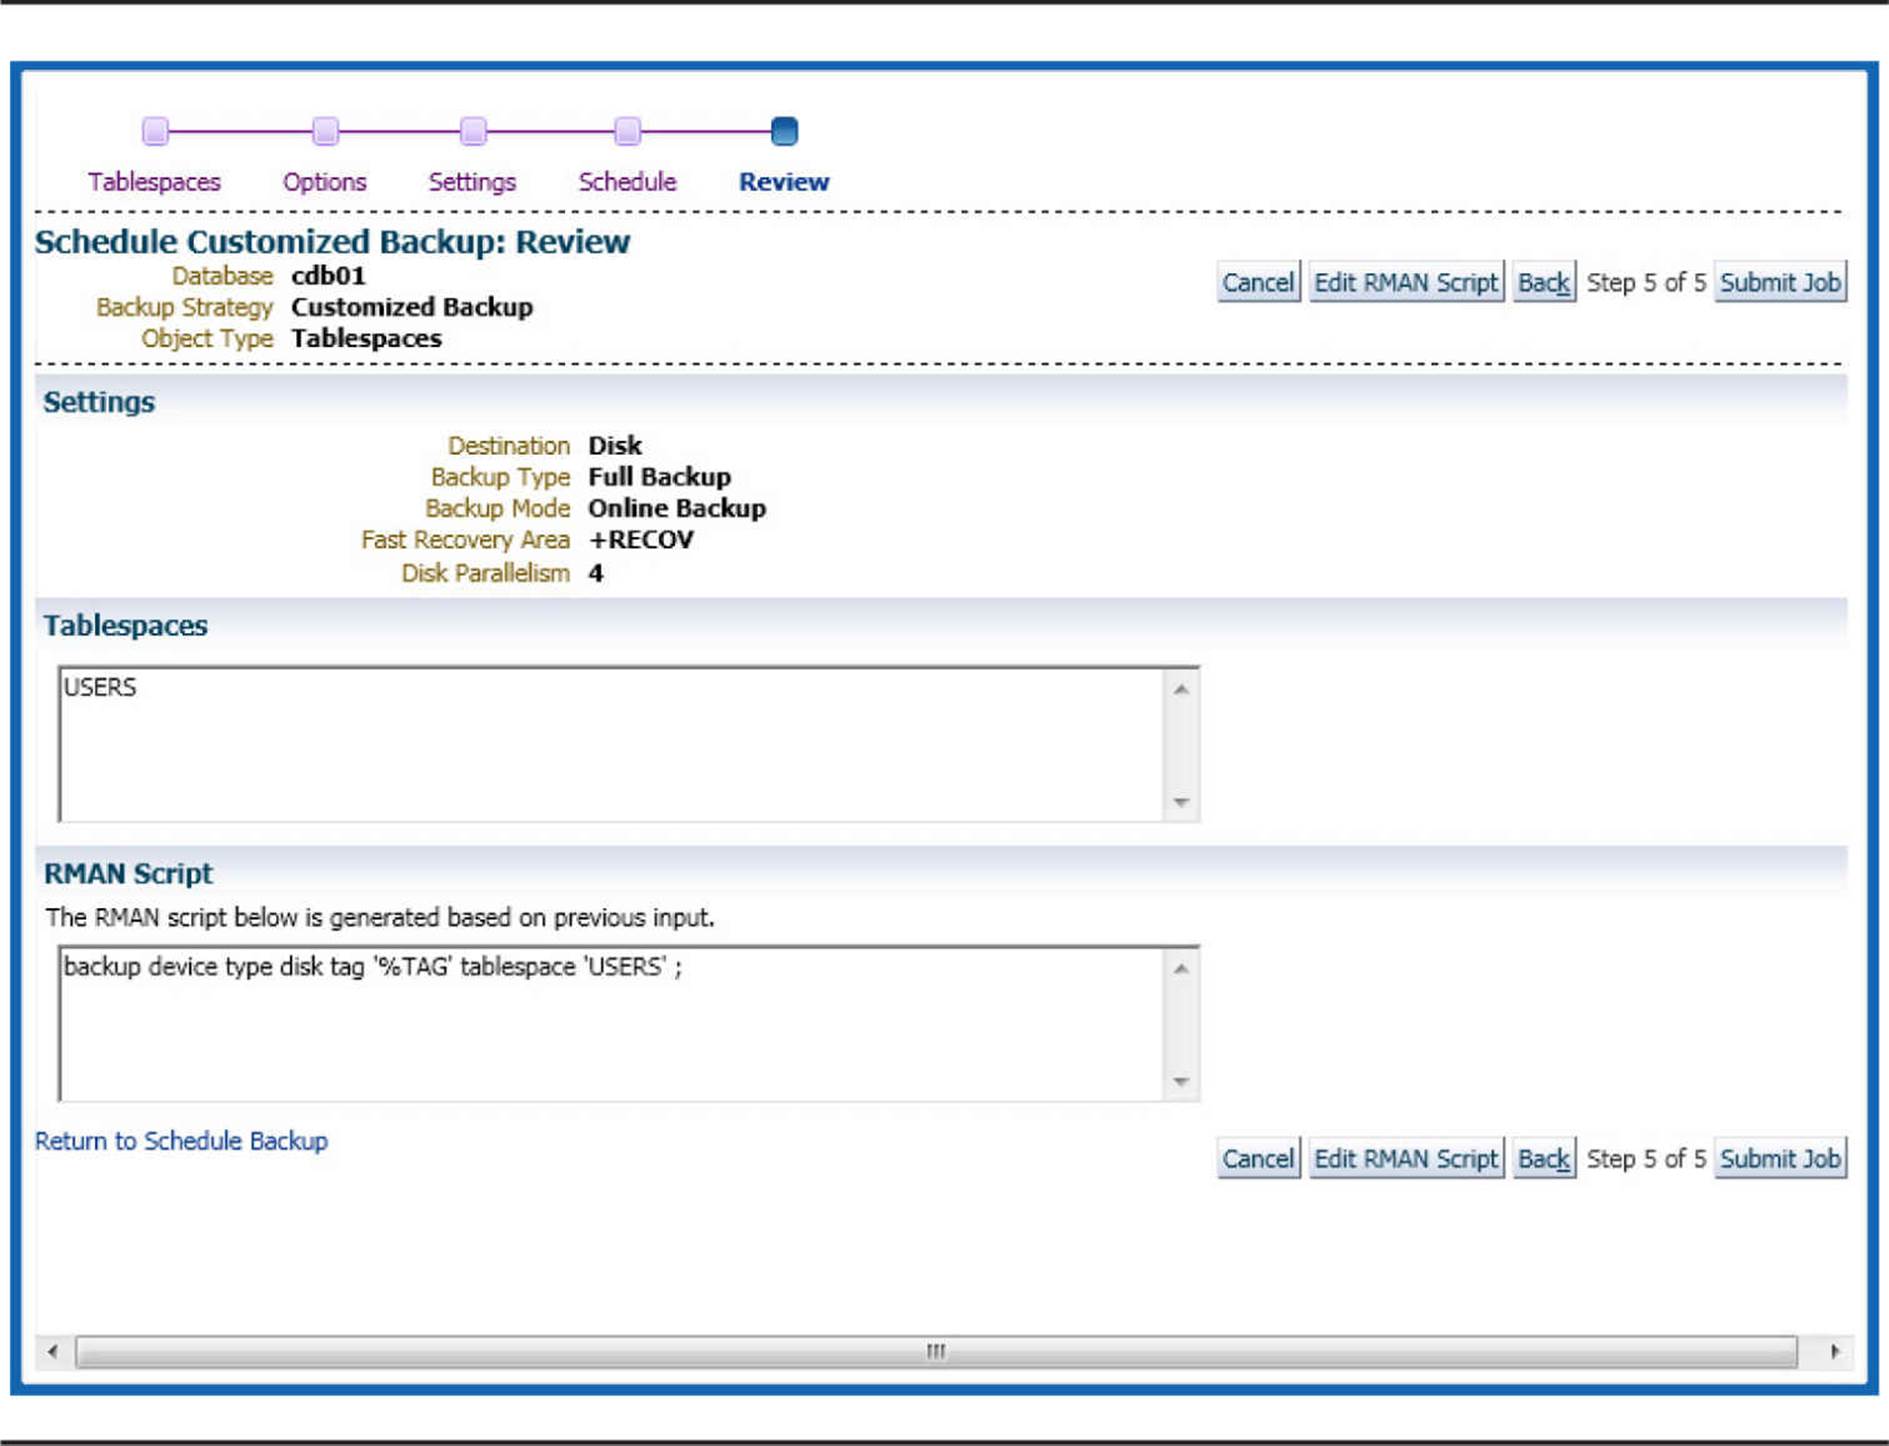
FIGURE 14-8. Image copy backup of a tablespace using EM Cloud Control
Because we had earlier configured the default backup type to COMPRESSED BACKUPSET, we overrode the default value in an earlier setup screen for this backup.
Control File, SPFILE Backup
To back up the control file and SPFILE manually, use the following RMAN command:
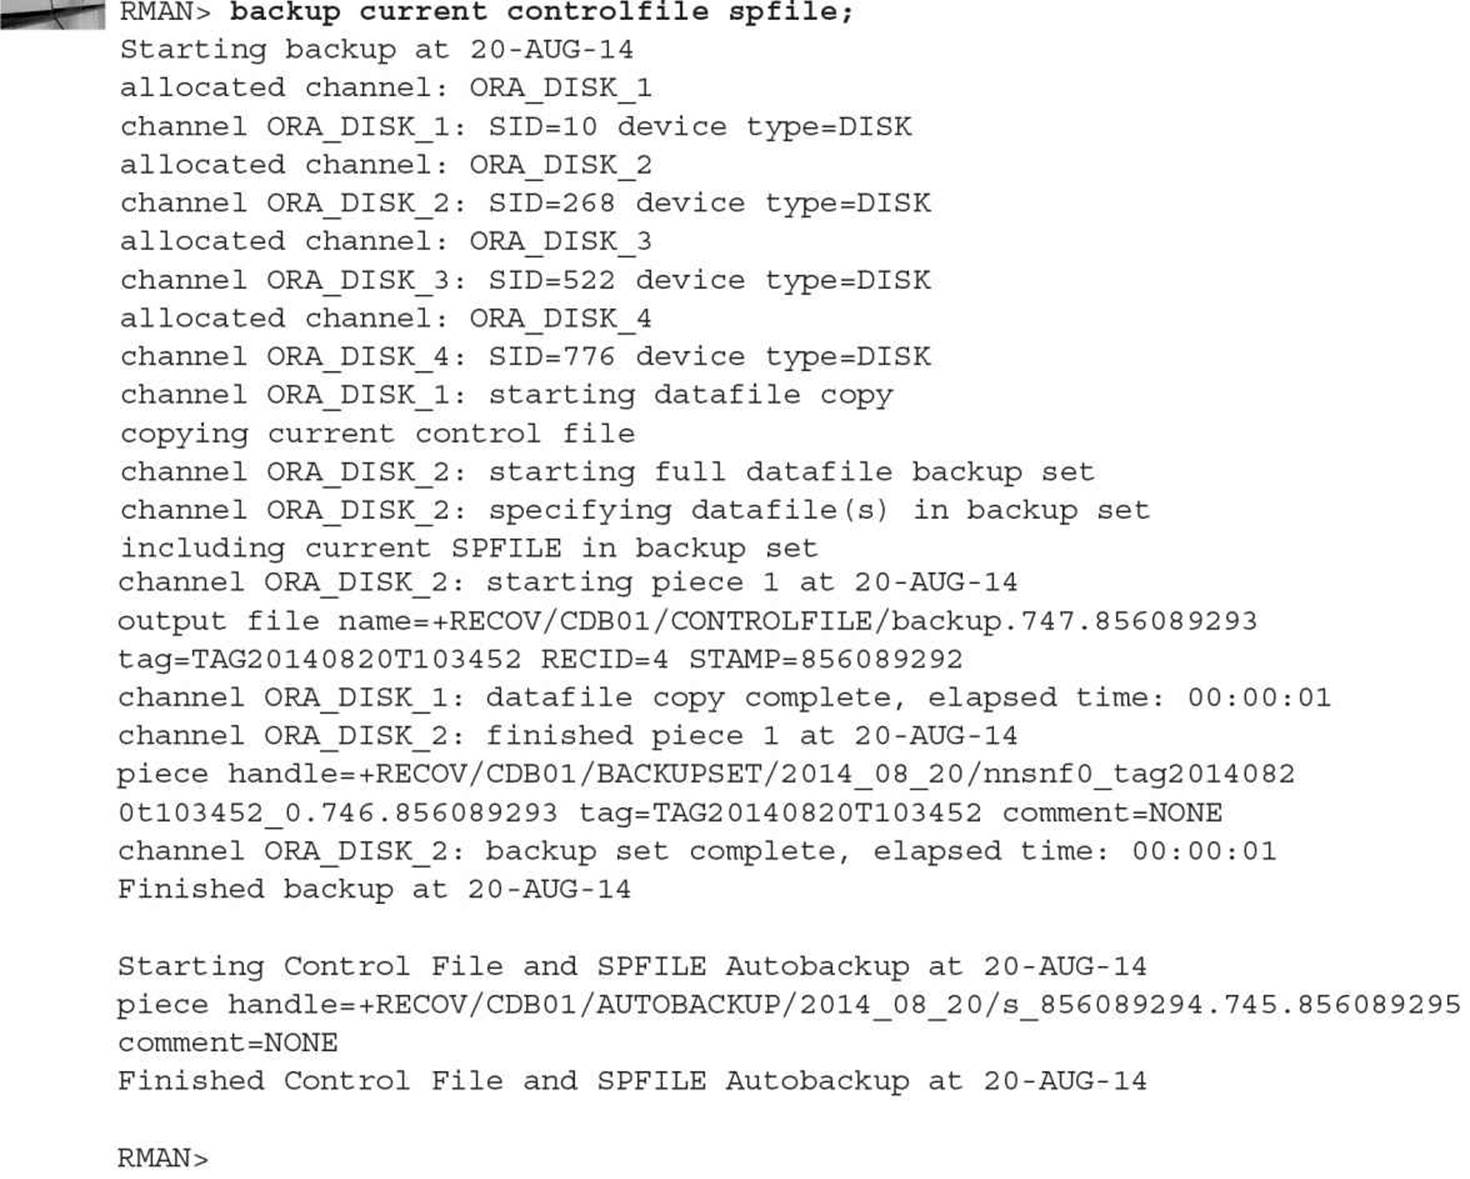
Note that because we already had AUTOBACKUP set to ON, we actually performed two backups of the control file and the SPFILE. The second backup of the control file, however, has a record of the first control file and SPFILE backup.
Archived Redo Log Backup
Even when archived redo logs are sent to multiple destinations, including the fast recovery area, due to the critical nature of the archived redo logs, we want to back up copies of the logs to tape or another disk destination. Once the backup is completed, we have the option to leave the logs in place, to delete only the logs that RMAN used for the backup, or to delete all copies of the archived logs that were backed up to tape.
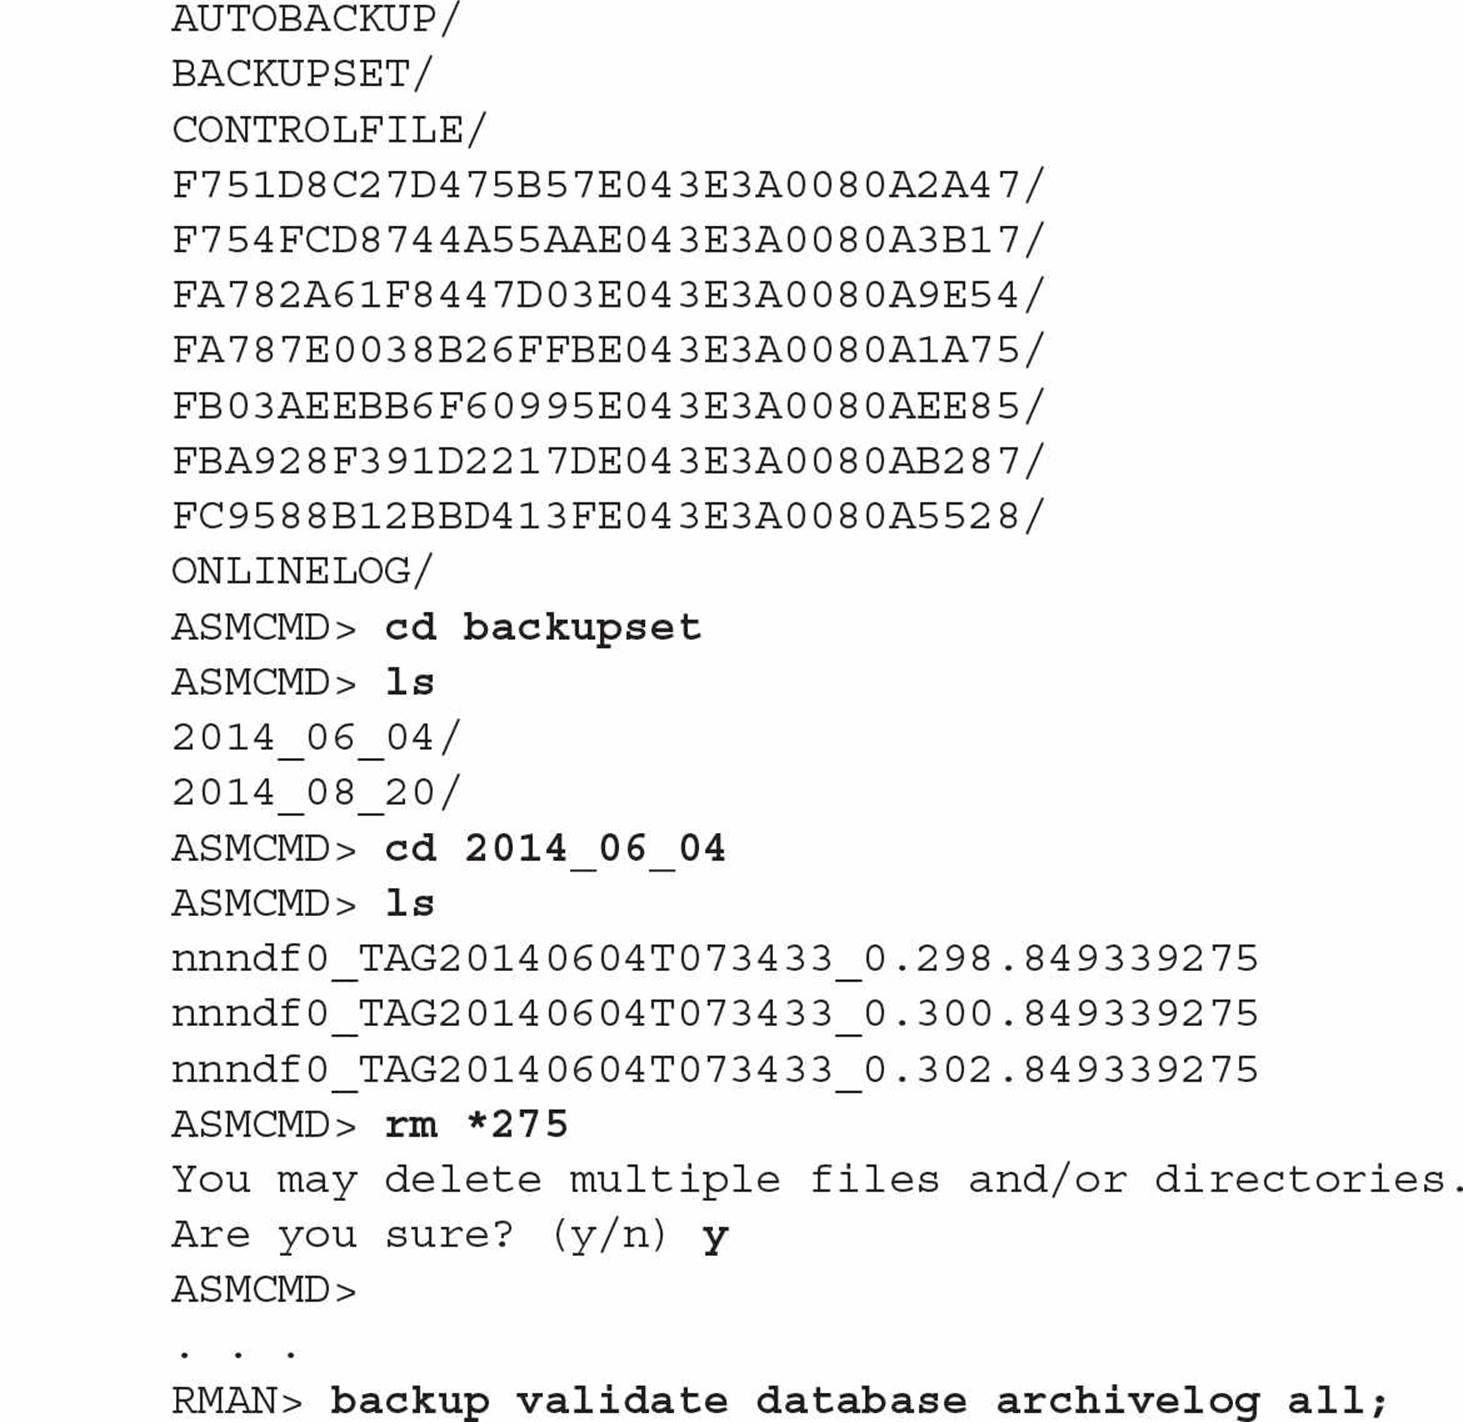
In the following example, we back up all the archived log files in the fast recovery area and then remove them from disk:
![]()
If archived log files are being sent to multiple locations, then only one set of the archived redo log files is deleted. If we want all copies to be deleted, we use DELETE ALL INPUT instead of DELETE INPUT. As of Oracle Database 11g, corrupt or missing archived log files do not prevent a successful RMAN backup of the archived logs as in previous releases; as long as one of the archive log file destinations has a valid log file for a given log sequence number, the backup is successful.
Backing up and deleting only older archived redo log files can be accomplished by specifying a date range in the BACKUP ARCHIVELOG command:

In the preceding example, all archived redo logs older than one week, going back for three weeks, are copied to tape and deleted from disk. In addition, you can specify a range using SCNs or log sequence numbers.
Incremental Backups
An alternative strategy to relying on full backups with archived redo logs is to use incremental backups along with archived redo logs for recovery. The initial incremental backup is known as a level 0 incremental backup. Each incremental backup after the initial incremental backup (also known as a level 1 incremental backup) contains only changed blocks and as a result takes less time and space. Incremental level 1 backups can either be cumulative or differential. A cumulative backup records all changed blocks since the initial incremental backup; a differential backup records all changed blocks since the last incremental backup, whether it was a level 0 or a level 1 incremental backup.
When a number of different types of backups exist in the catalog, such as image copies, tablespace backupsets, and incremental backups, RMAN will choose the best combination of backups to most efficiently recover and restore the database. The DBA still has the option to prevent RMAN from using a particular backup (for example, if the DBA thinks that a particular backup is corrupt and will be rejected by RMAN during the recovery operation).
The decision whether to use cumulative or differential backups is based partly on where you want to spend the CPU cycles, and how much disk space you have available. Using cumulative backups means that each incremental backup will become progressively larger and take longer until another level 0 incremental backup is performed, but during a restore and recovery operation, only two backupsets will be required. On the other hand, differential backups only record the changes since the last backup, so each backupset might be smaller or larger than the previous one, with no overlap in data blocks backed up. However, a restore and recovery operation may take longer if you have to restore from several backupsets instead of just two.
Following our example with the dw database, we have changed the retention policy to a window of eight days. Therefore, we will likely need to perform a backup to satisfy that policy:
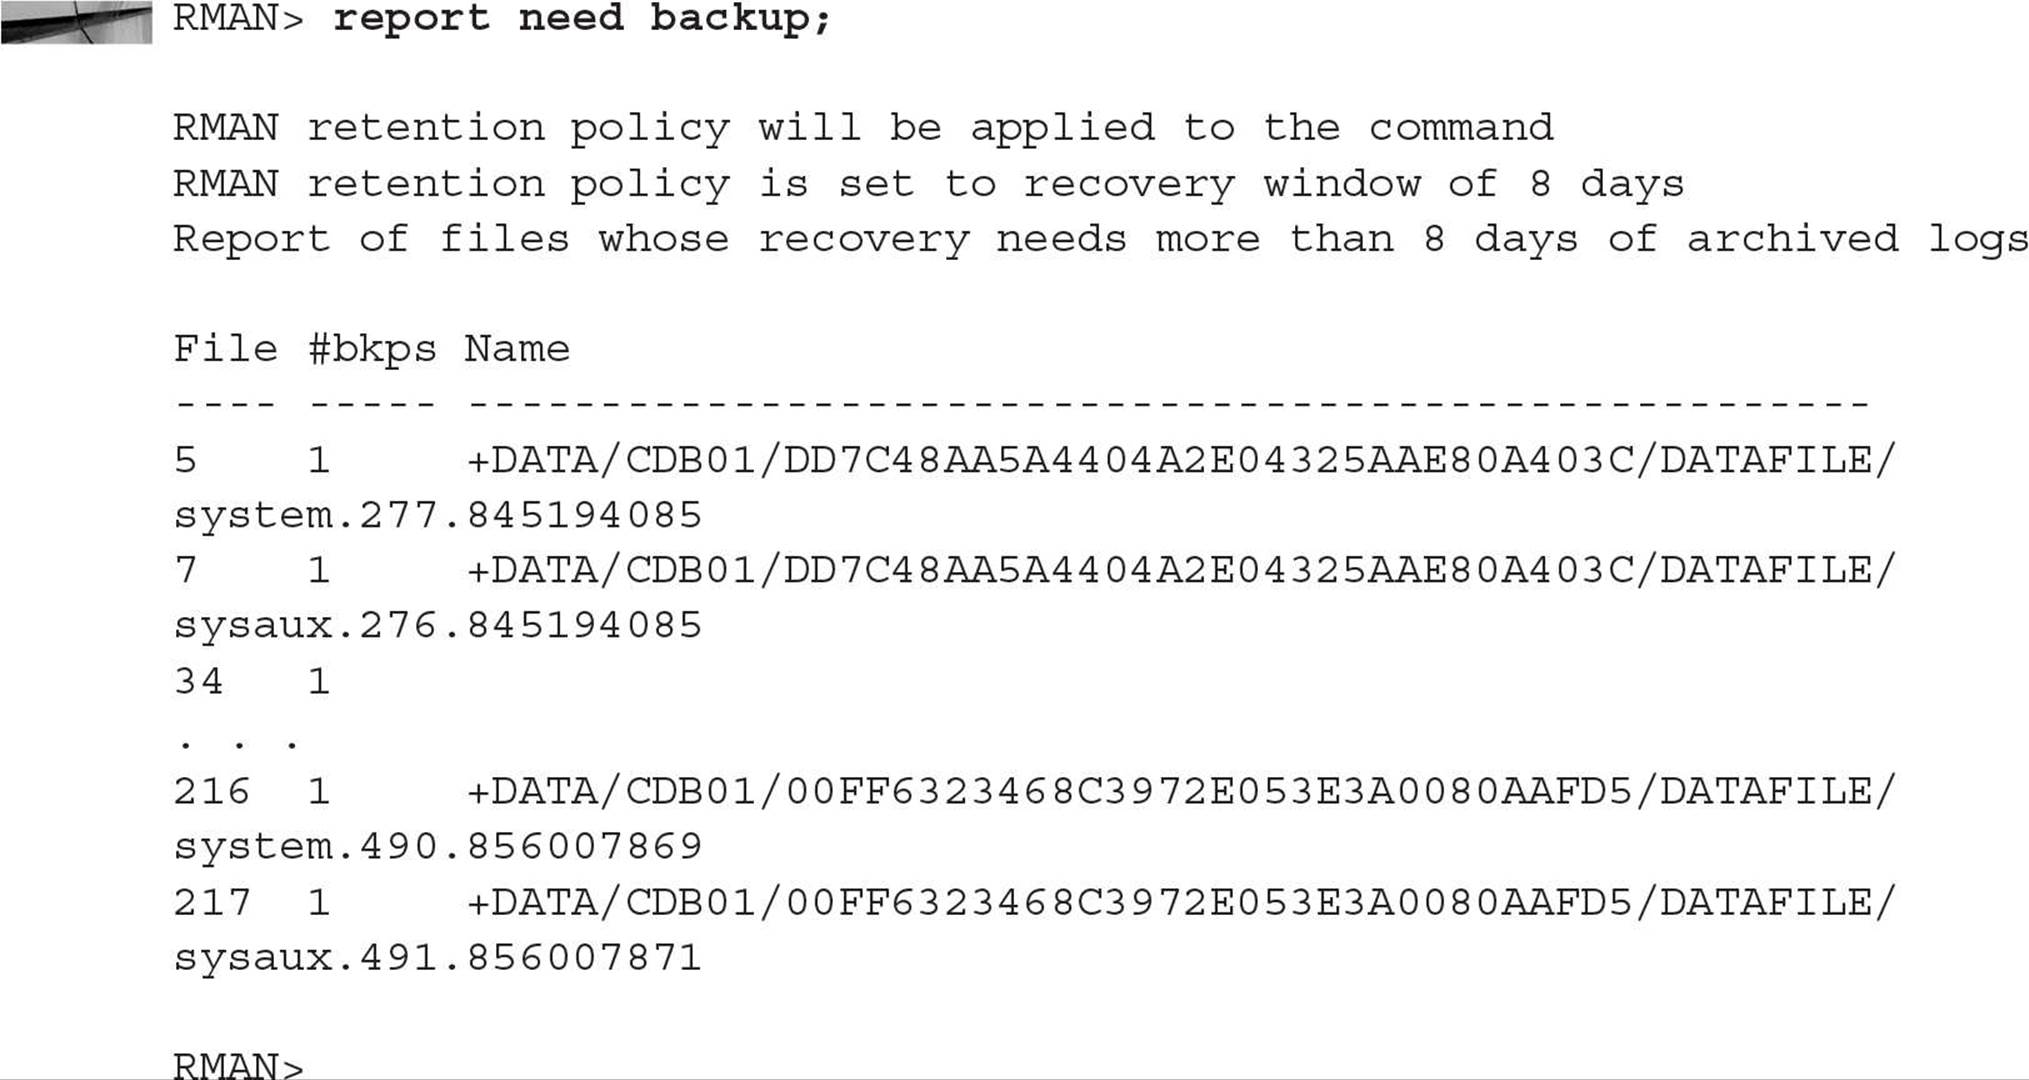
To remedy this situation, we can do another full backup, or we can pursue an incremental backup policy, which might be easier to implement and maintain. To set up our incremental policy, we need to perform a level 0 incremental backup first:
At any point in the future after this level 0 backup, we can perform an incremental level 1 differential backup:

The default incremental backup type is differential; the keyword DIFFERENTIAL is neither needed nor allowed. However, to perform a cumulative backup, we add the CUMULATIVE keyword:

How much database activity is performed may also dictate whether you use cumulative or differential backups. In an OLTP environment with heavy insert and update activity, incremental backups may be more manageable in terms of disk space usage. For a data warehouse environment with infrequent changes, a differential backup policy may be more suitable. Compared to using redo log files, both types of incremental backups are far superior in terms of the time to recover a database. In any case, we have addressed RMAN’s retention policy:

Incrementally Updated Backups
An incrementally updated backup can potentially make a restore and recovery operation even more efficient by rolling the changes from a level 1 incremental backup to a level 0 incremental image backup. If the incrementally updated backup is run on a daily basis, then any recovery operation would require at most the updated image copy, one incremental level 1 backup, and the most recent archived and online redo logs. The following example uses an RMAN script that can be scheduled to run at the same time every day to support an incrementally updated backup strategy:

The key part of both commands within the RUN script is the RECOVER COPY clause. Rather than doing a recovery of the actual database datafiles, we are recovering a copy of a database datafile by applying incremental backups. Using a tag with an RMAN backup allows us to apply the incremental backup to the correct image copy. Tags allow DBAs to easily refer to a specific backup for recovery or catalog cleanup operations; if the BACKUP command does not provide a tag, one is automatically generated for the backupset and is unique within the backupsets for the target database.
The basics of standard recovery operations and RMAN scripting capabilities are covered later in this chapter.
The EM Cloud Control backup wizards make it easy to automate an incrementally updated backup strategy. In the figures that follow, we’ll cover the steps needed to configure this strategy within EM Cloud Control.
In Figure 14-9, we’re specifying the strategy for backing up our database.
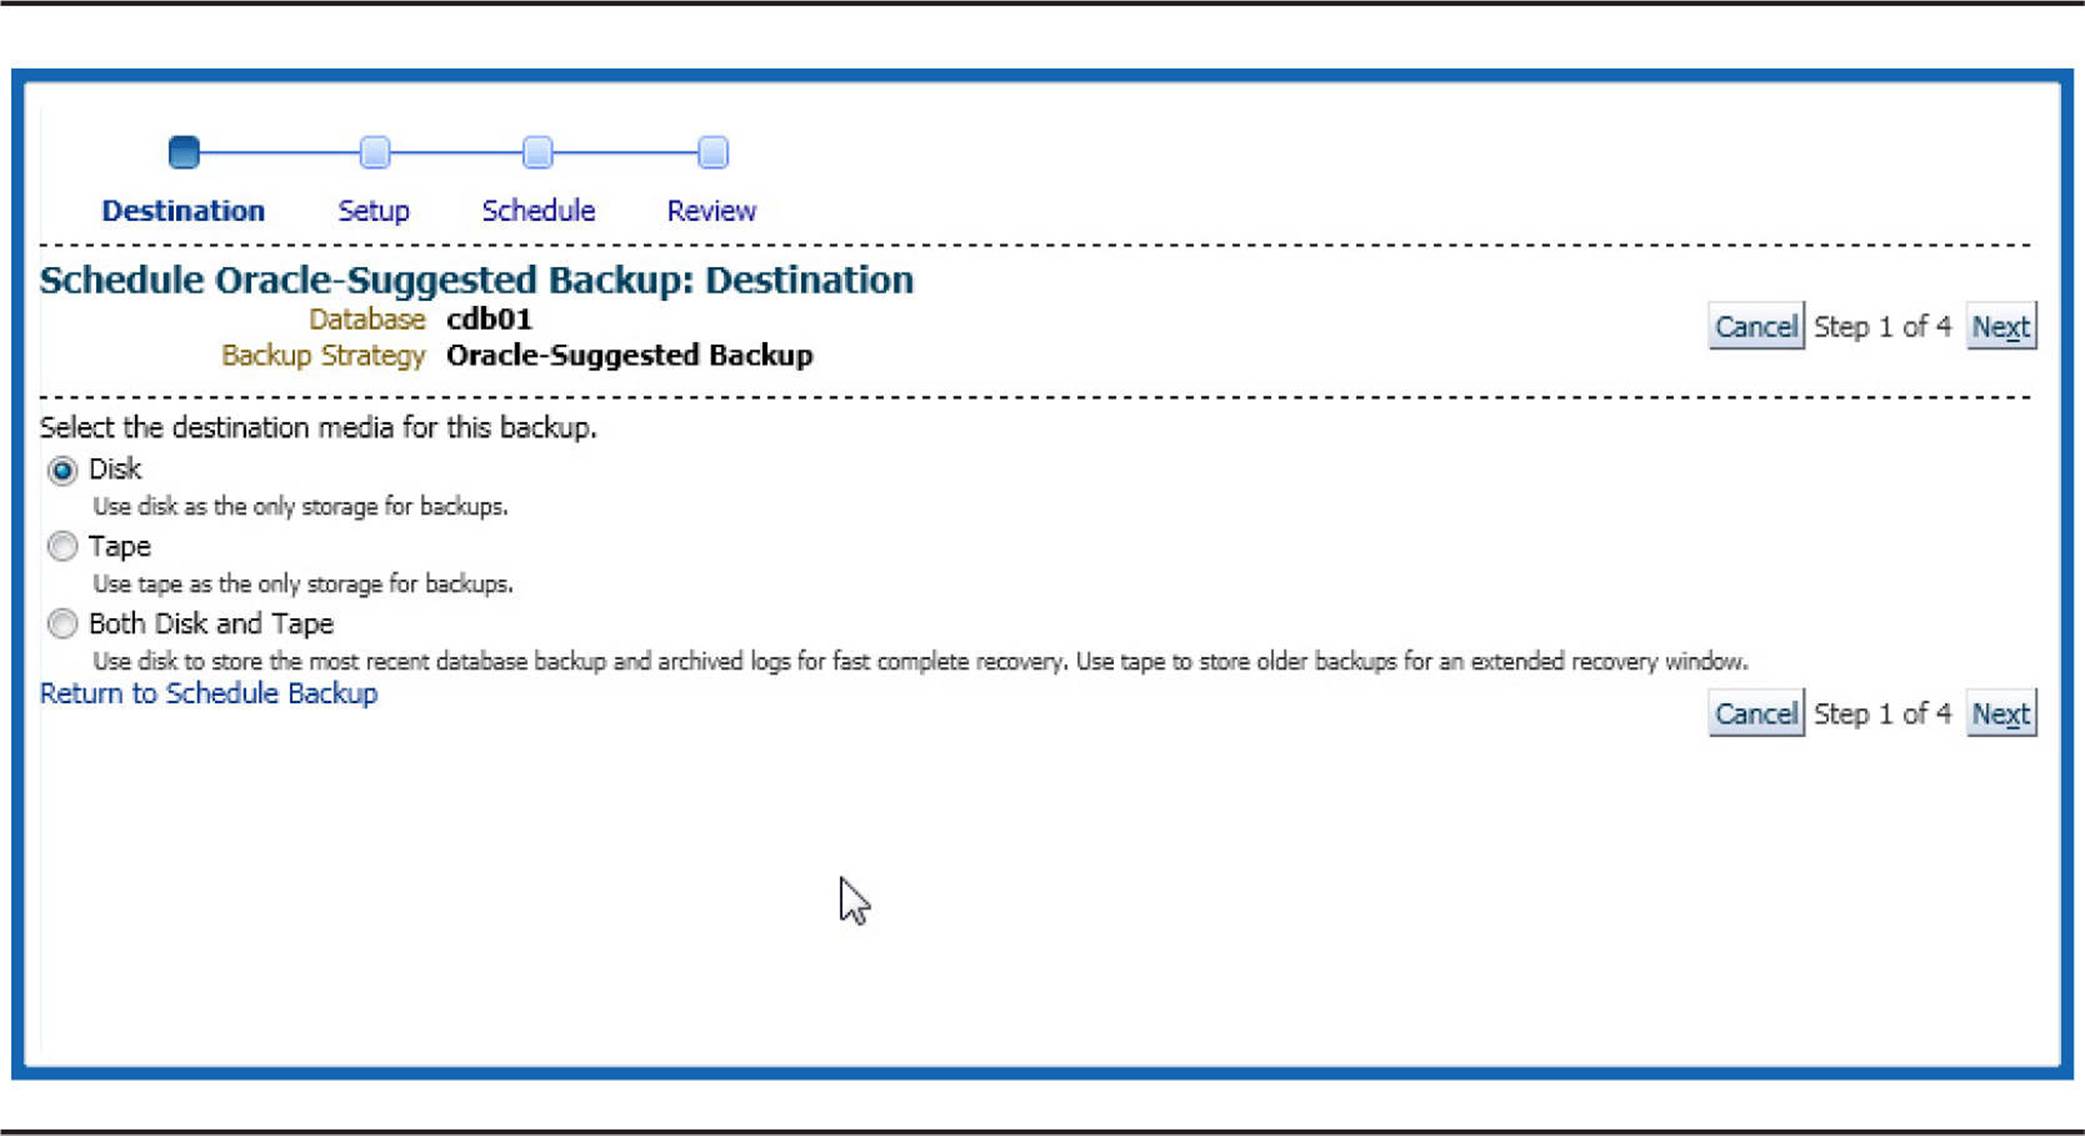
FIGURE 14-9. EM Cloud Control backup strategy selection
The database is open, ARCHIVELOG mode is enabled, and backups will follow the Oracle-suggested guidelines for a backup strategy. Figure 14-10 shows the next step in the backup configuration process: a summary of the database name, the selected strategy, where the backups will be sent, the recovery catalog in use, and a brief explanation as to how the backup will be performed.
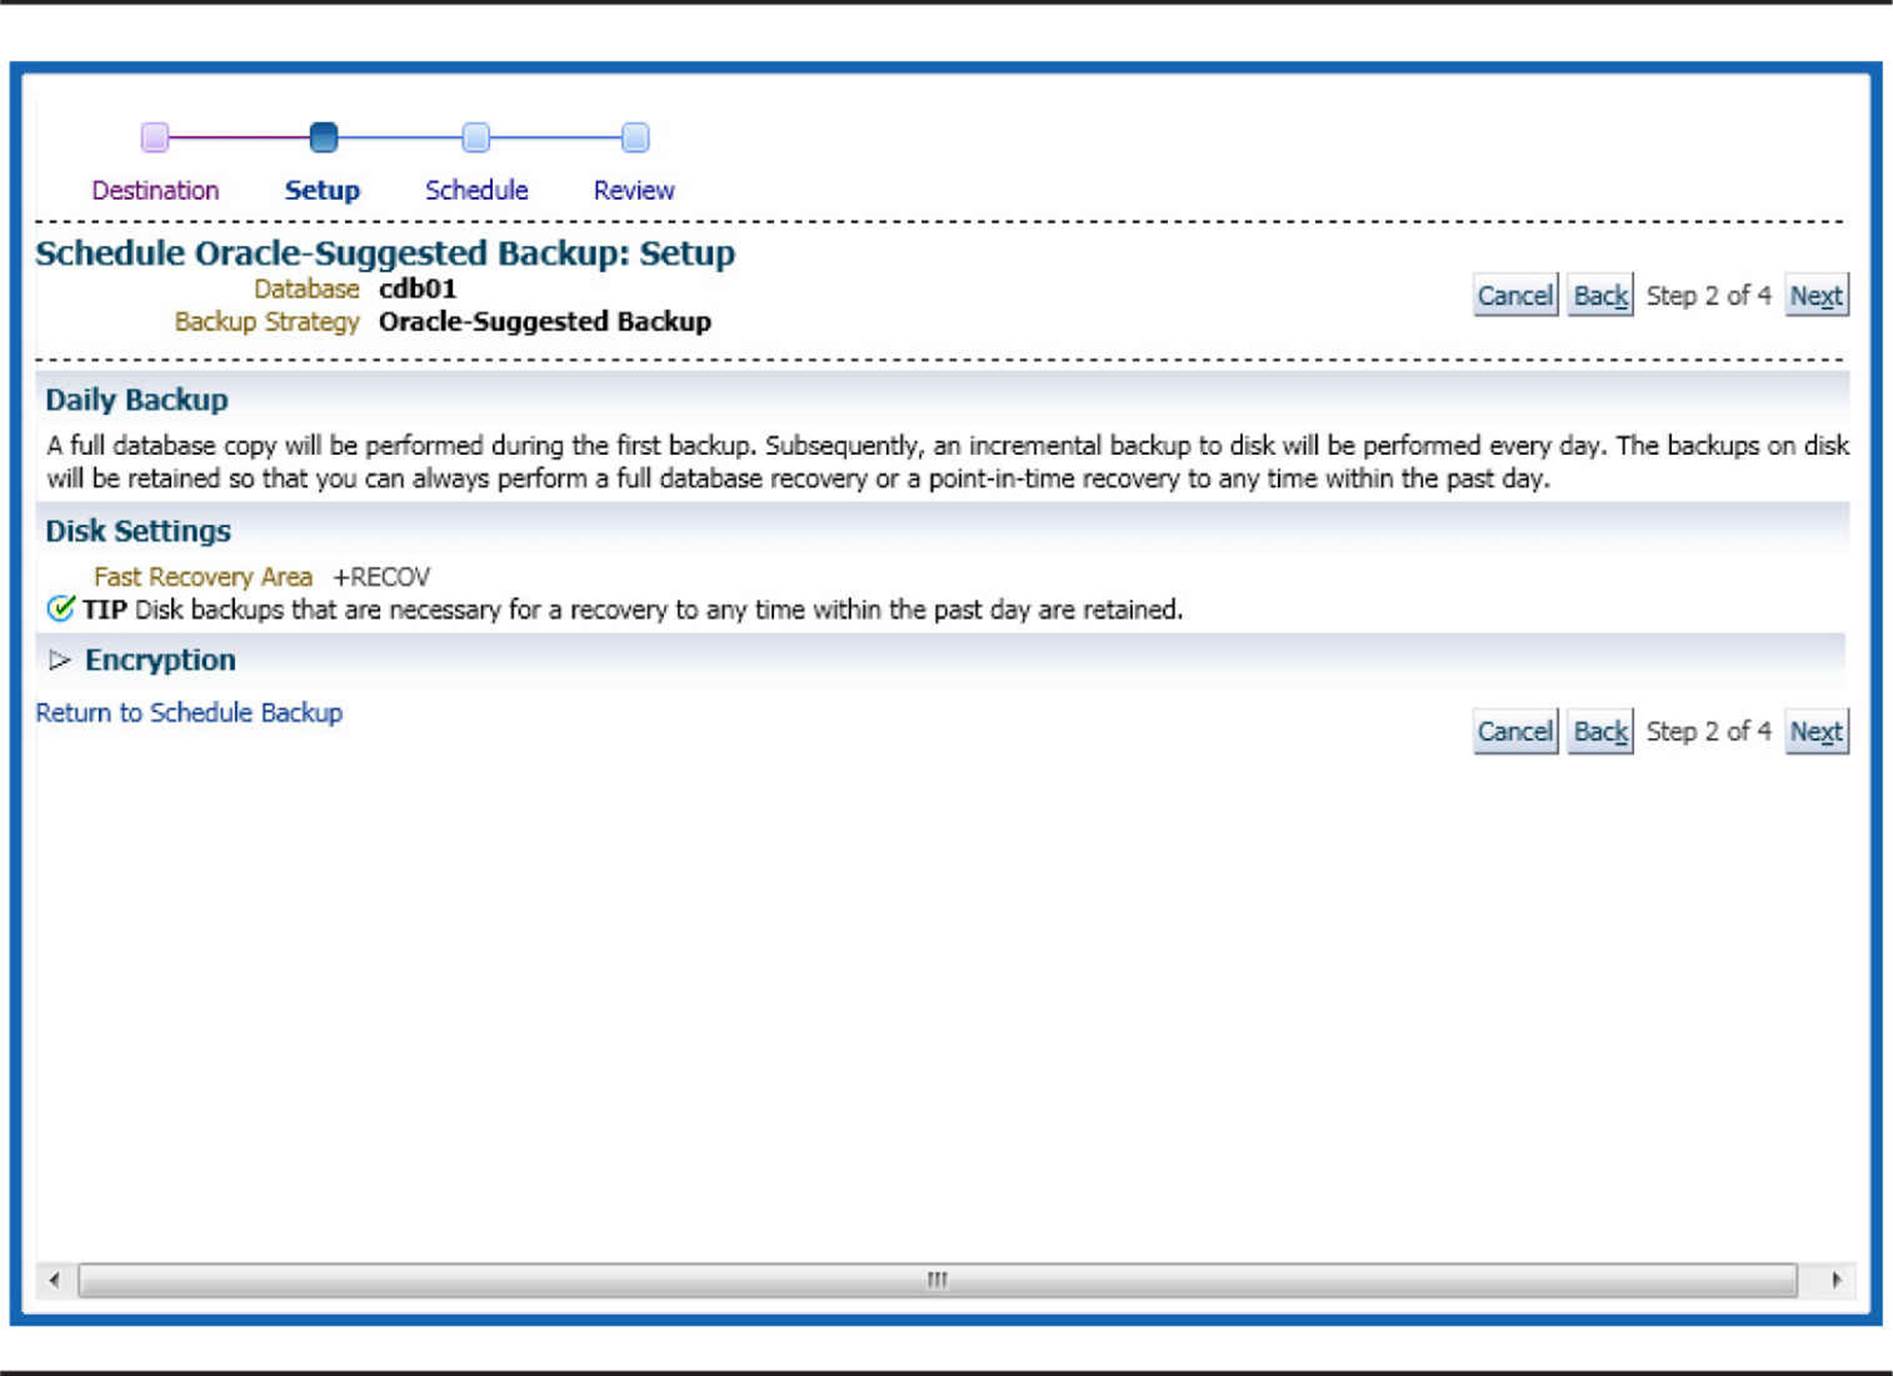
FIGURE 14-10. EM Cloud Control backup setup summary
In Figure 14-11, we specify when the backups will start, and what time of day they will run. Although the backup job can run any time during the day, because we are performing a hot backup (the database is open and users can process transactions), we want to minimize the possible impact on query and DML response time by scheduling the job during a time period with low activity.
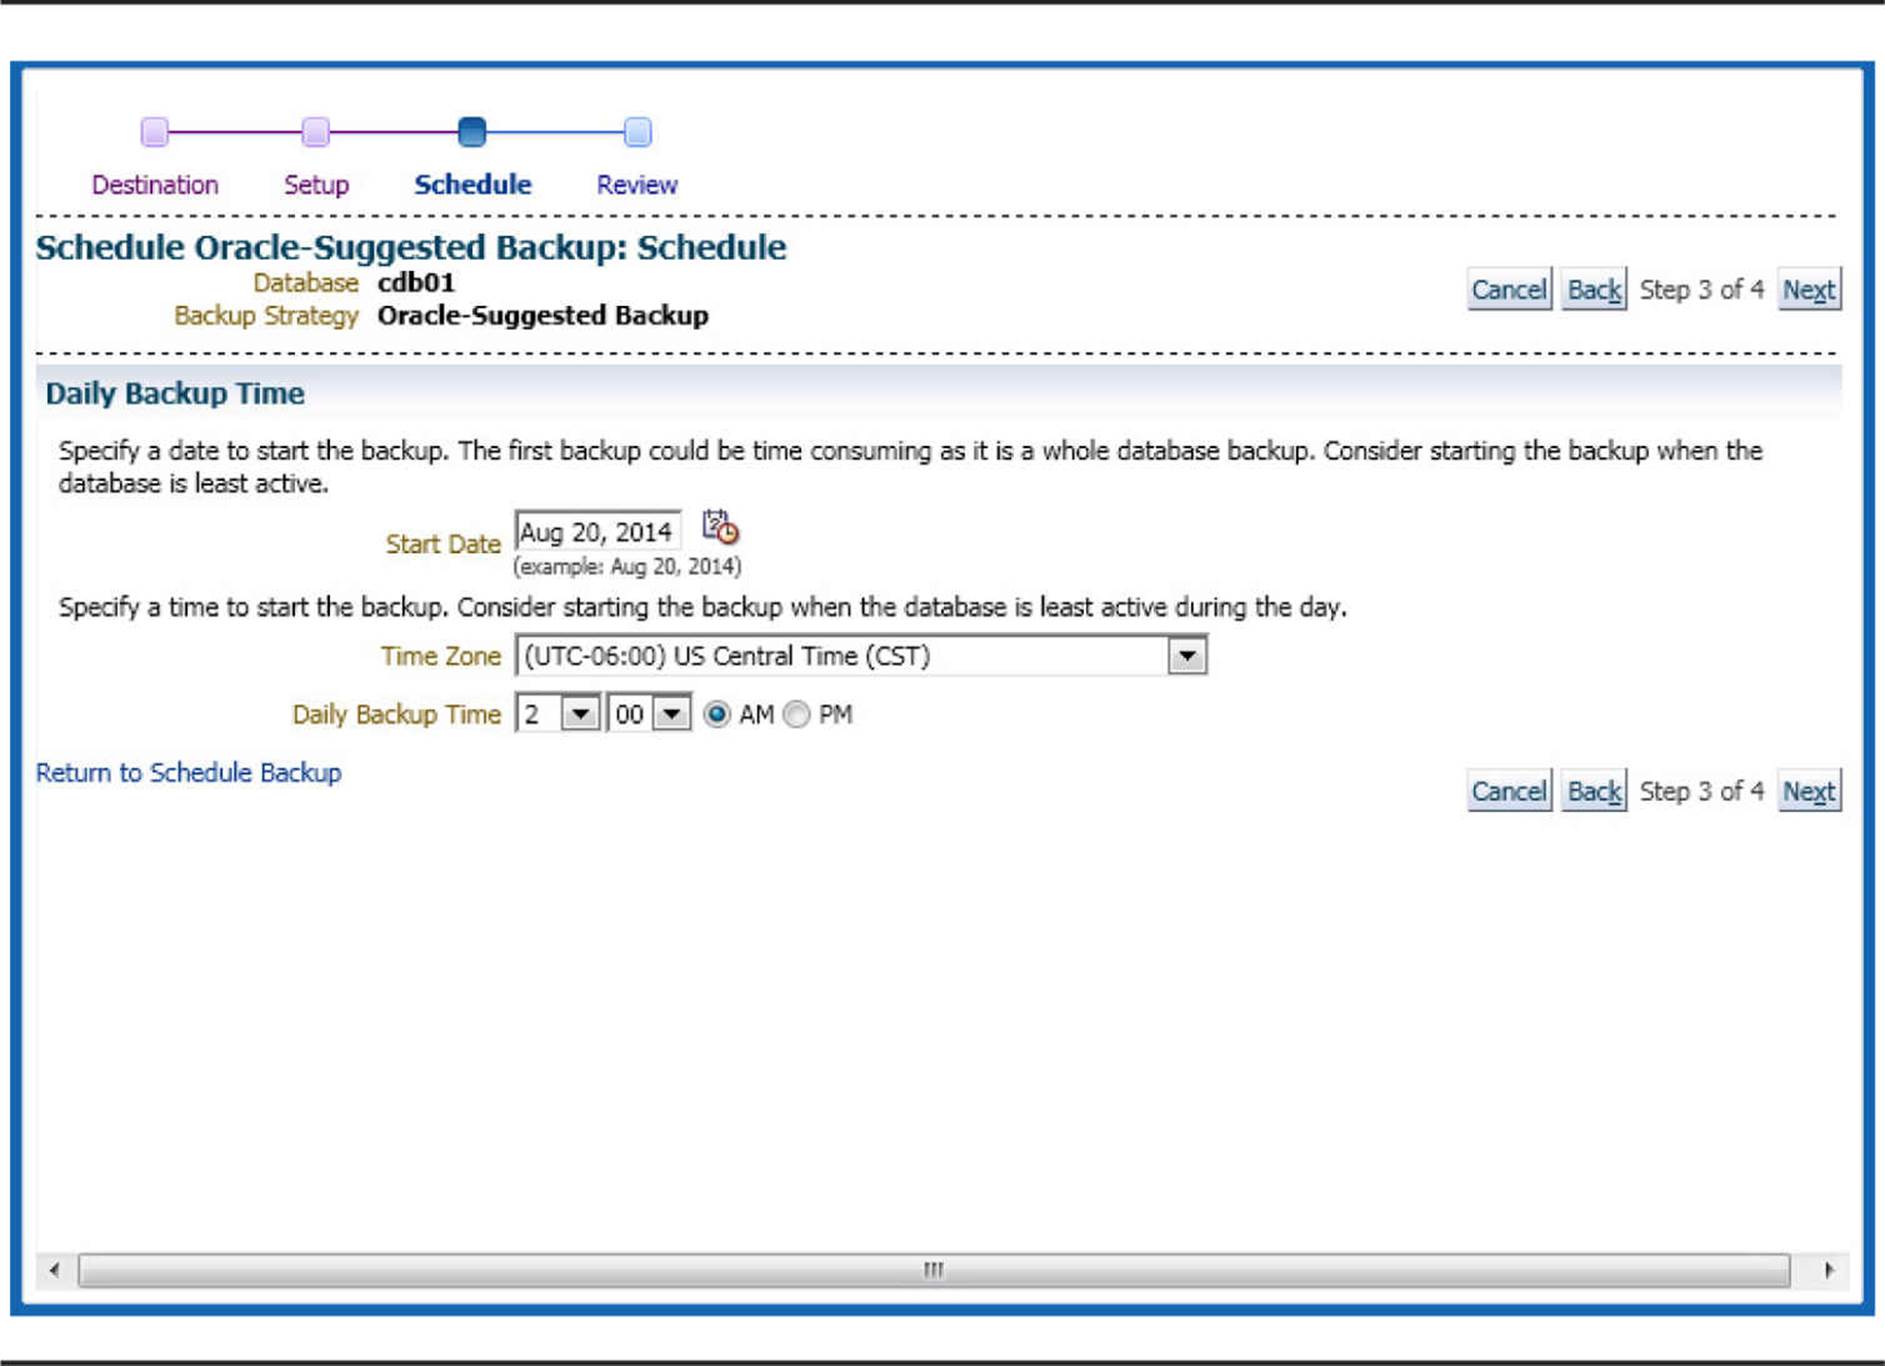
FIGURE 14-11. EM Cloud Control backup schedule
Figure 14-12 gives us one more chance to review how the backup will be performed and where it will reside.
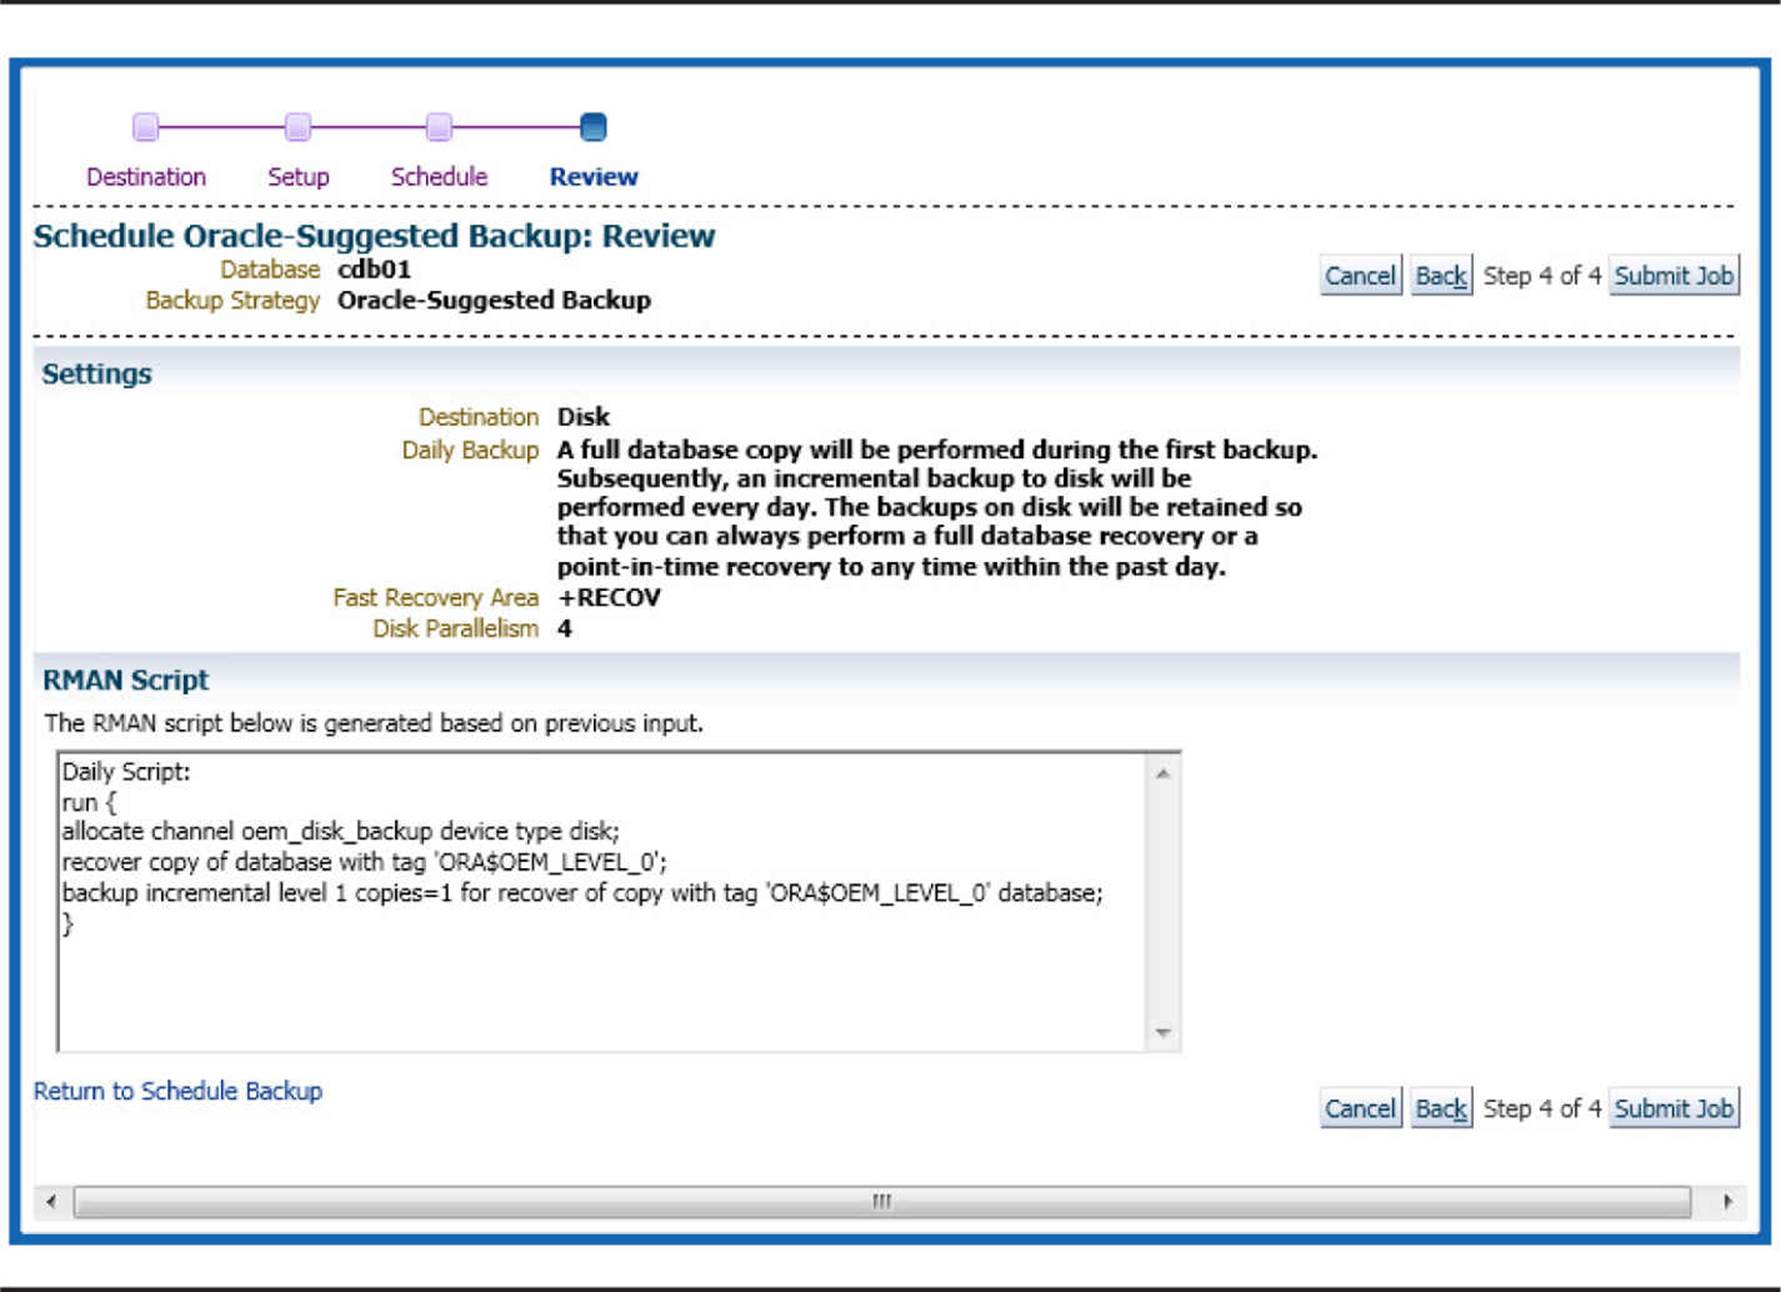
FIGURE 14-12. EM Cloud Control backup summary
At the bottom of the browser window is the actual RMAN script that will be scheduled to run on a daily basis (see Figure 14-12). Coincidentally, it strongly resembles the RMAN script we presented earlier in this section.
Incremental Backup Block Change Tracking
Another way to improve the performance of incremental backups is to enable block change tracking. For a traditional incremental backup, RMAN must inspect every block of the tablespace or datafile to be backed up to see if the block has changed since the last backup. For a very large database, the time it takes to scan the blocks in the database can easily exceed the time it takes to perform the actual backup.
By enabling block change tracking, RMAN knows which blocks have changed by using a change tracking file. Although there is some slight overhead in space usage and maintenance of the tracking file every time a block is changed, the tradeoff is well worth it if frequent incremental backups are performed on the database. In the following example, we create a block change tracking file in the DATA disk group and enable block change tracking:

The next time a backup is performed, RMAN will only have to use the contents of an OMF-named file in the DW/CHANGETRACKING directory of the DATA disk group to determine which blocks need to be backed up. The space needed for the block change tracking file is approximately 1/250,000 the size of the database.
The dynamic performance view V$BLOCK_CHANGE_TRACKING contains the name and size of the block change tracking file as well as whether change tracking is enabled:

Using a Fast Recovery Area
Earlier in this chapter, we covered the initialization parameters required to set up the fast recovery area: DB_RECOVERY_FILE_DEST and DB_RECOVERY_FILE_DEST_SIZE. Both of these parameters are dynamic, allowing the DBA to change either the RMAN destination for backups or the amount of space allowed for backups in the fast recovery area without restarting the instance.
To facilitate a completely disk-based recovery scenario, the fast recovery area should be big enough for a copy of all datafiles, incremental backup files, online redo logs, archived redo logs not on tape, control file autobackups, and SPFILE backups. Using a larger or smaller recovery window or adjusting the redundancy policy will require an adjustment in the size of the fast recovery area. If the fast recovery area is limited in size due to disk space constraints, at a minimum there should be enough room to hold the archived log files that have not yet been copied to tape. The dynamic performance view V$RECOVERY_FILE_DEST displays information about the number of files in the fast recovery area, how much space is currently being used, and the total amount of space available in the fast recovery area.
The fast recovery area automatically uses OMF. As part of the simplified management structure introduced in Oracle Database 11g, you do not need to explicitly set any of the LOG_ARCHIVE_DEST_n initialization parameters if you only need one location for archived redo log files; if the database is in ARCHIVELOG mode, and a fast recovery area is defined, then the initialization parameter LOG_ARCHIVE_DEST_10 is implicitly defined as the fast recovery area.
As you have seen in many previous examples, RMAN uses the fast recovery area in a very organized fashion with separate directories for archived logs, backupsets, image copies, block change tracking files, and automatic backups of the control file and SPFILE. In addition, each subdirectory is further subdivided by a datestamp, making it easy to find a backupset or image copy when the need arises.
Multiple databases can share the same fast recovery area, even a primary and a standby database. Even with the same DB_NAME, as long as the DB_UNIQUE_NAME parameter is different, there will not be any conflicts. RMAN uses the DB_UNIQUE_NAME to distinguish backups between databases that use the same fast recovery area.
Validating Backups
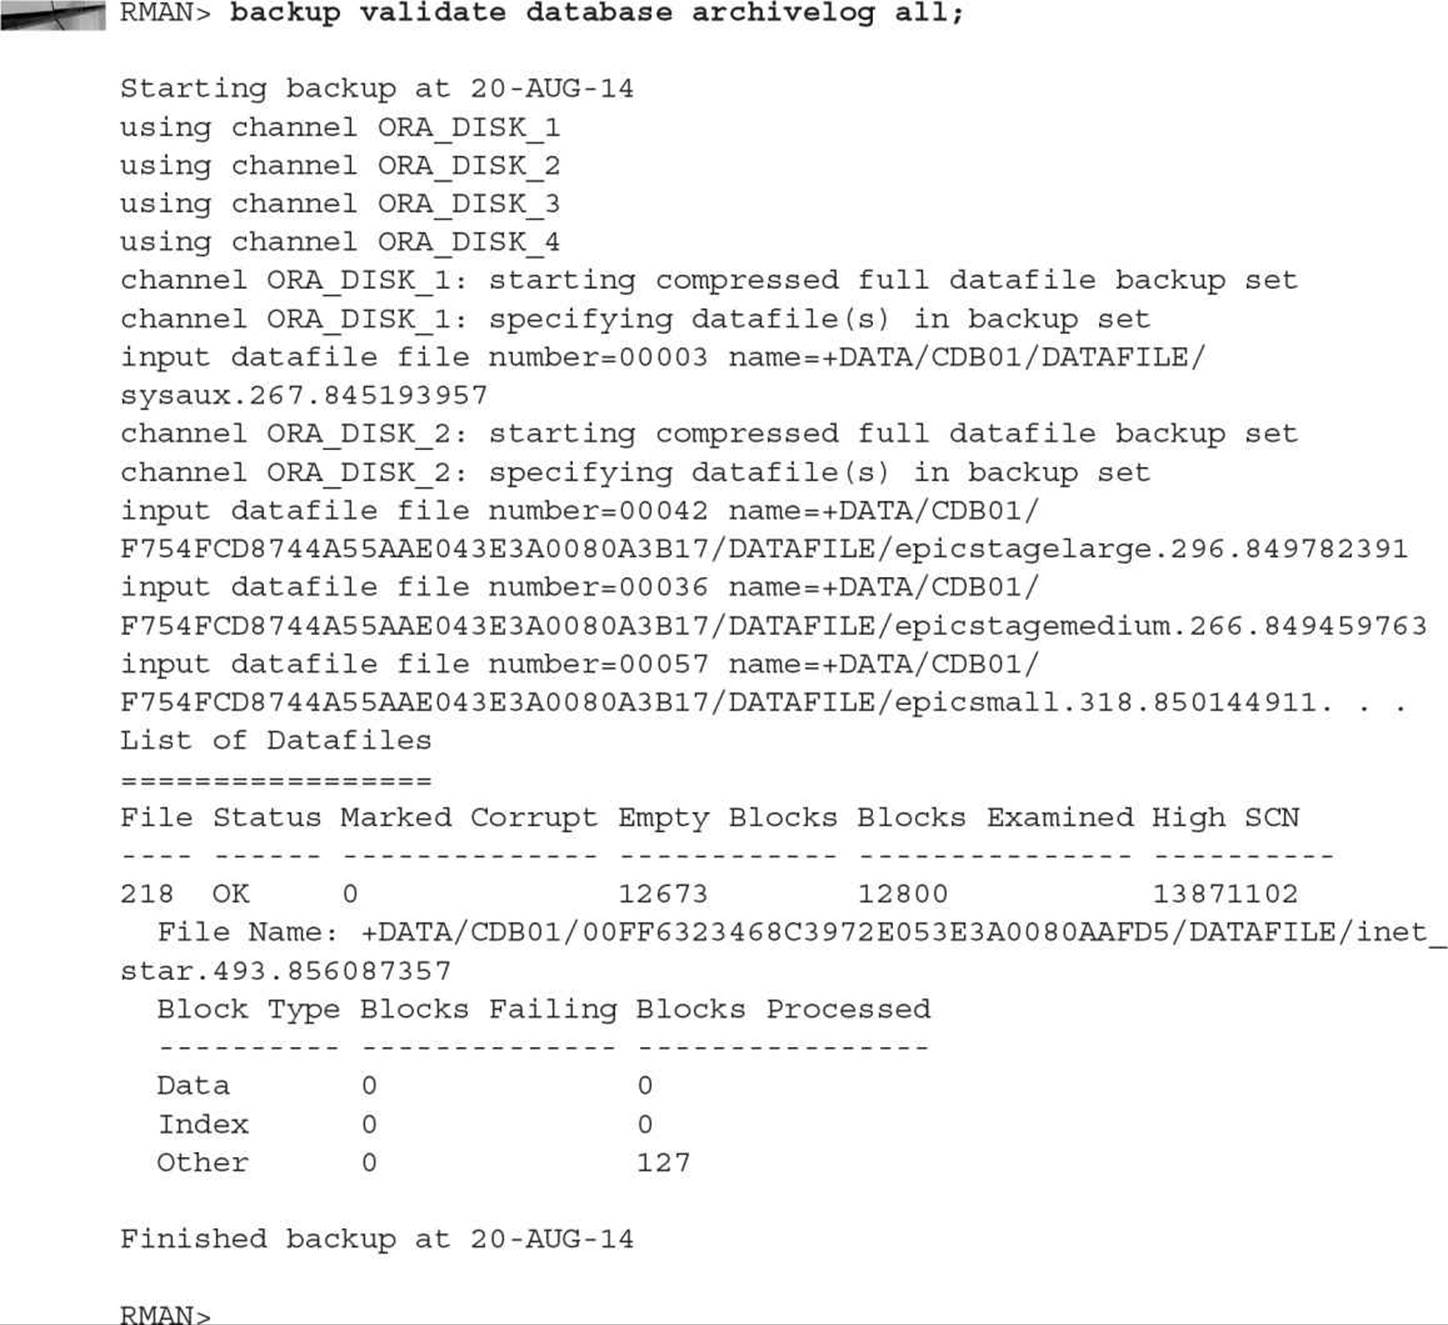
Having multiple image backups or enough archived redo log files to support a recovery window is of less value if there are problems with the live database files or control files. The RMAN command BACKUP VALIDATE DATABASE will simulate a backup, checking for the existence of the specified files, ensuring that they are not corrupted. No backup files are created. This command would be useful in a scenario where you can check for problems with the database or archived redo logs proactively, giving you an opportunity to fix problems before the actual backup operation or for scheduling additional time overnight to repair problems found during the day.
In the following example, we will validate the entire database along with the archived redo logs after some logs are accidentally deleted:
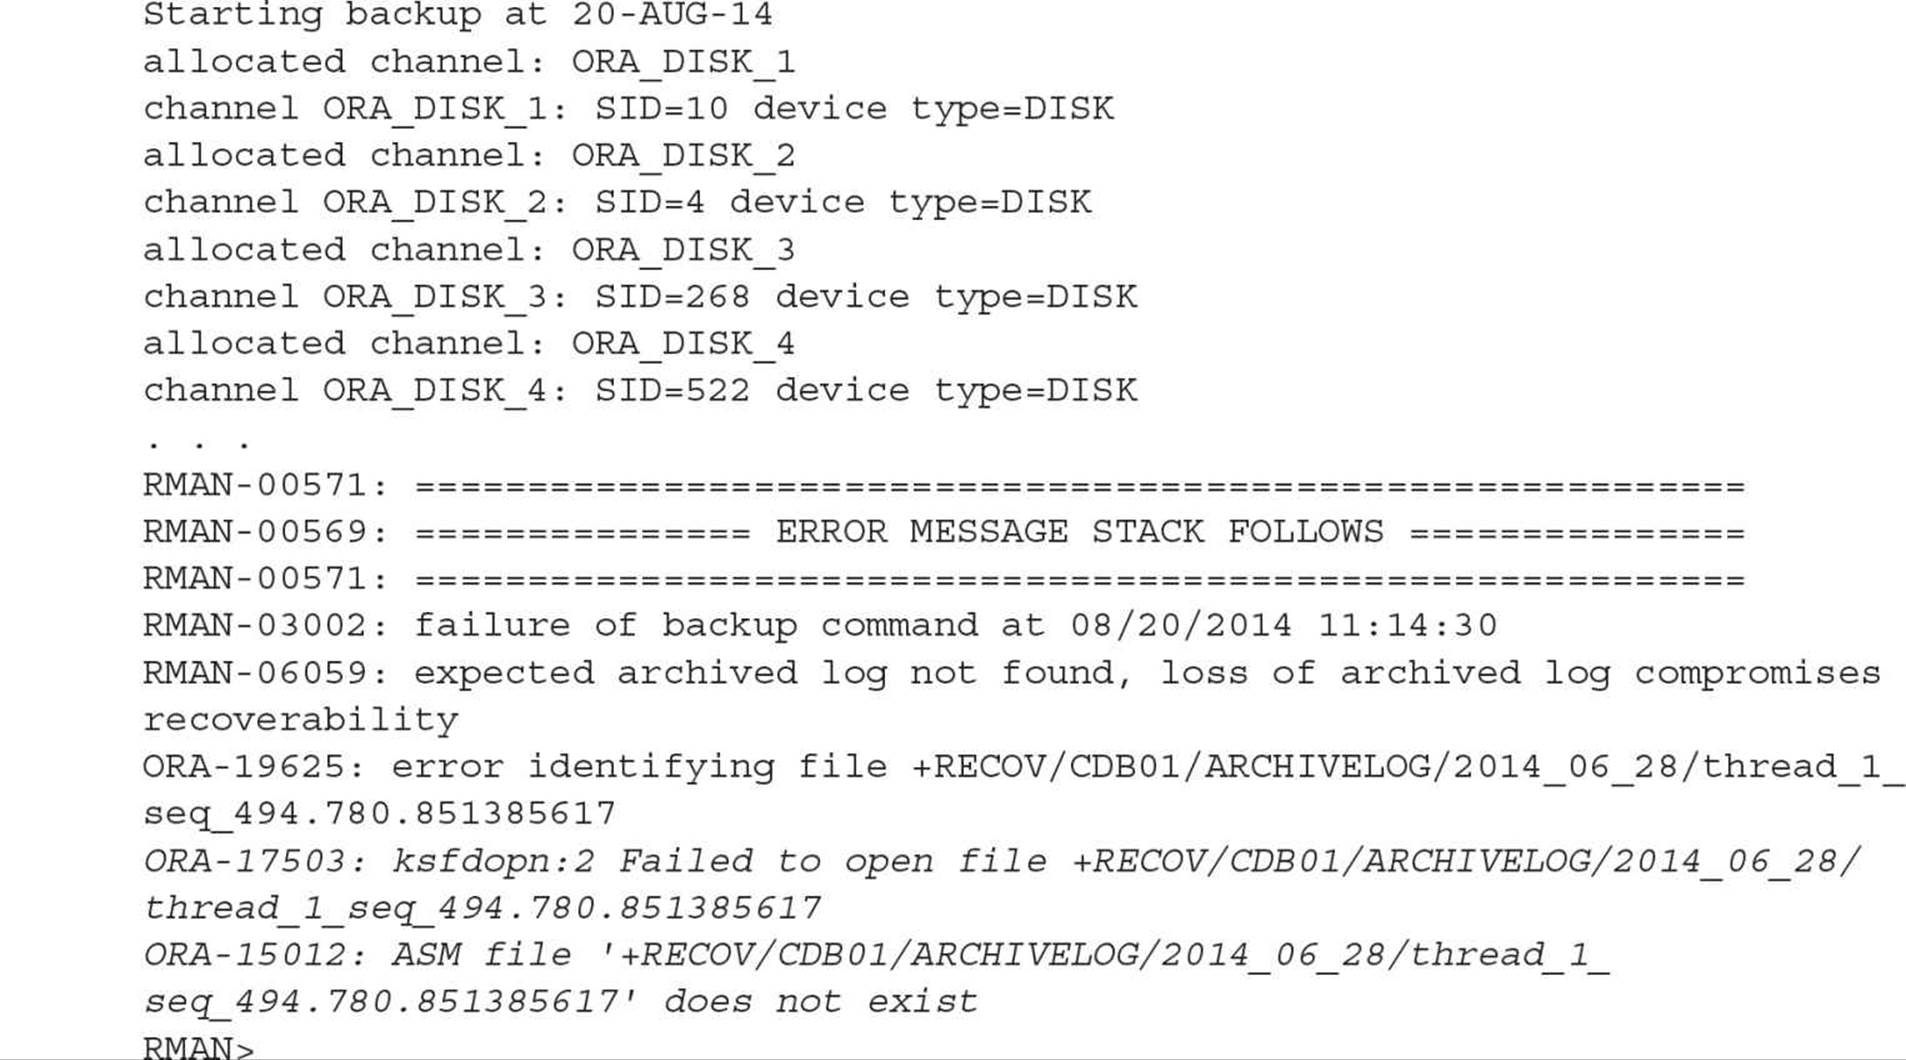
The BACKUP VALIDATE command has identified an archived redo log file that is no longer in the fast recovery area. It may have been archived to tape outside of RMAN, or it may have been inadvertently deleted (in this case, it appears that the log file was intentionally deleted). Looking at the datestamp of the log file, we see that it is outside of our recovery window of four days, so it is not a critical file in terms of recoverability.
Synchronizing the fast recovery area and the catalog with the CROSSCHECK command is covered later in this chapter; once we have fixed the cross-reference problem we have just discovered, we can perform the rest of the validation:
No errors were found during the validation; RMAN read every block of every archived redo log file and datafile to ensure that they were readable and had no corrupted blocks. However, no backups were actually written to a disk or tape channel.
Recovery Operations
Every good backup plan includes a disaster recovery plan so that we can retrieve the datafiles and logs from the backups and recover the database files. In this section, we’ll review several different aspects of RMAN recovery operations.
RMAN can perform restore and recovery operations at various levels of granularity, and most of these operations can be performed while the database is open and available to users. We can recover individual blocks, tablespaces, datafiles, or even an entire database. In addition, RMAN has various methods of validating a restore operation without performing an actual recovery on the database datafiles.
Block Media Recovery
When there are only a small handful of blocks to recover in a database, RMAN can perform block media recovery rather than a full datafile recovery. Block media recovery minimizes redo log application time, and it drastically reduces the amount of I/O required to recover only the block or blocks in question. While block media recovery is in progress, the affected datafiles can remain online and available to users.
NOTE
Block media recovery is only available from within the RMAN application.
There are a number of ways in which block corruption is detected. During a read or write operation from an INSERT or SELECT statement, Oracle may detect a block is corrupt, write an error in a user trace file, and abort the transaction. An RMAN BACKUP or BACKUP VALIDATE command can record corrupted blocks in the dynamic performance view V$DATABASE_BLOCK_CORRUPTION. In addition, the SQL commands ANALYZE TABLE and ANALYZE INDEX could uncover corrupted blocks.
To recover one or more data blocks, RMAN must know the datafile number and block number within the datafile. This information is available in a user trace file, as in the following example:

Alternatively, the block may appear in the view V$DATABASE_BLOCK_CORRUPTION after an RMAN BACKUP command; the columns FILE# and BLOCK# provide the information needed to execute the RECOVER command. The column CORRUPTION_TYPE identifies the type of corruption in the block, such as FRACTURED, CHECKSUM, or CORRUPT. Fixing the block is easily accomplished in RMAN:
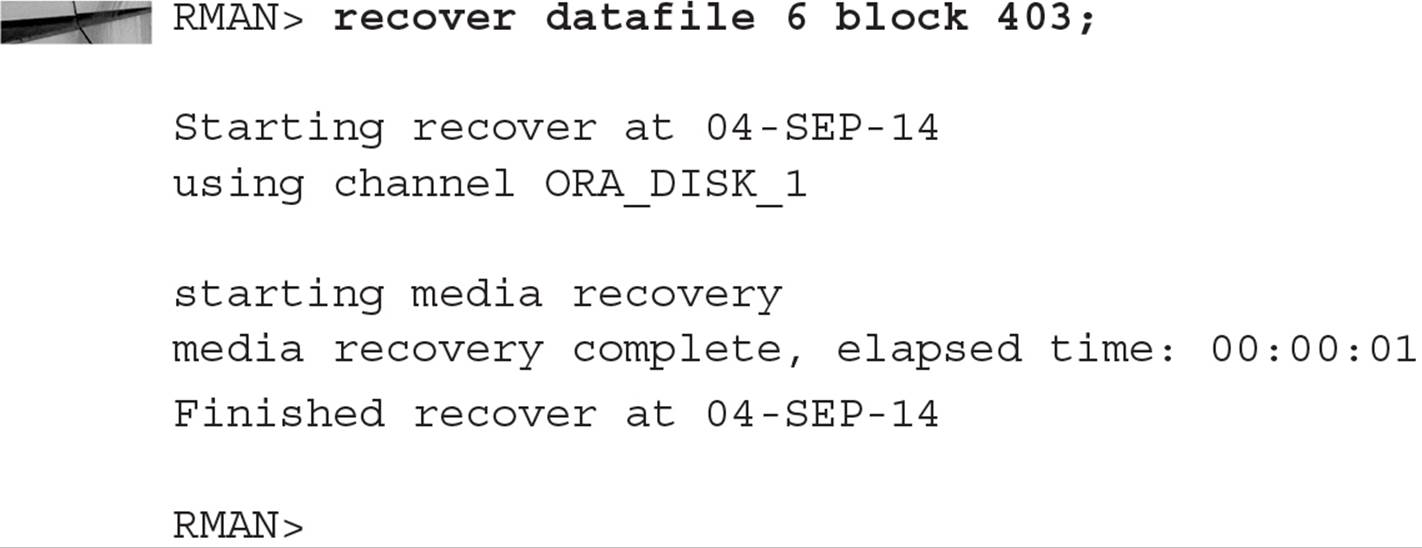
A corrupted block must be restored completely; in other words, all redo operations up to the latest SCN against the data block must be applied before the block can be considered usable again.
NOTE
The BLOCKRECOVER command, available in previous releases of RMAN, has been deprecated as of Oracle Database 11g in favor of the RECOVER command; the syntax of the command is otherwise the same.
Restoring a Control File
In the rare event that you lose all copies of your control file, it is easy to restore the control file when a recovery catalog is used; start the instance with NOMOUNT (since we don’t have a control file to read with MOUNT) and issue the following RMAN command:
![]()
If you are not using a recovery catalog, you can add the FROM ‘<FILENAME>’ clause to the command to specify where the latest control file exists:
![]()
After restoring the control files, you must perform complete media recovery of your database and open the database with the RESETLOGS option. Complete media recovery can be performed using RMAN or the methods described in Chapter 13.
Restoring a Tablespace
If the disk containing the datafiles for a tablespace fails or becomes corrupted, recovery of the tablespace is possible while the database remains open and available. The exception to this is the SYSTEM tablespace. In our dwdatabase, suppose the disk containing the datafiles for the root container’s USERS2 tablespace has crashed. After the first phone call from the users (which happened even before EM Cloud Control notified us of the error), we can check the dynamic performance view V$DATAFILE_HEADER to see which datafiles need recovery:
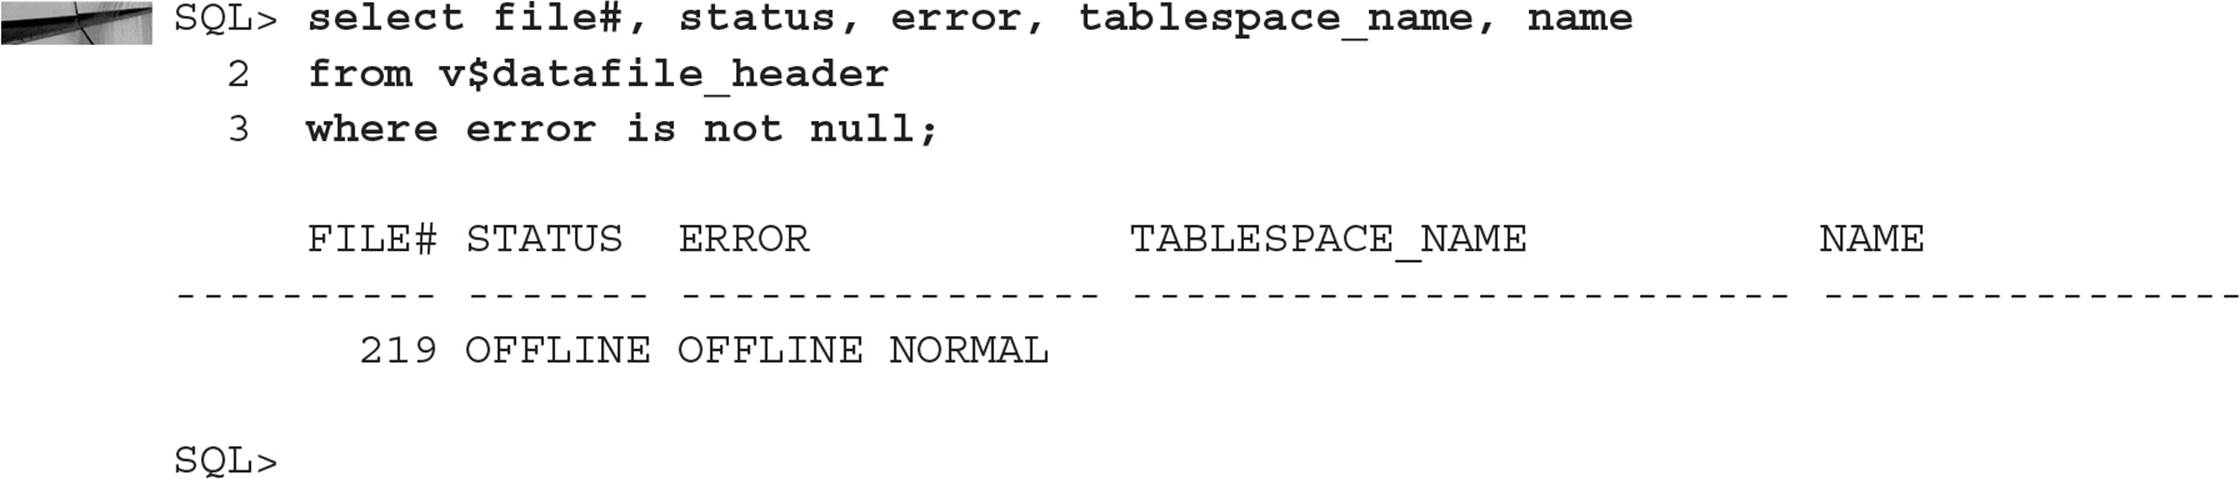
Incidentally, you would have also seen this error when trying to bring the USERS2 tablespace back online:

After replacing the disk drive, you can use also the REPORT SCHEMA command to find the tablespace associated with file number 219. To restore and recover the tablespace, we force the tablespace offline, restore and recover the tablespace, and bring it back online. If the USERS2 tablespace was not already offline, you can do that within RMAN before recovering it:
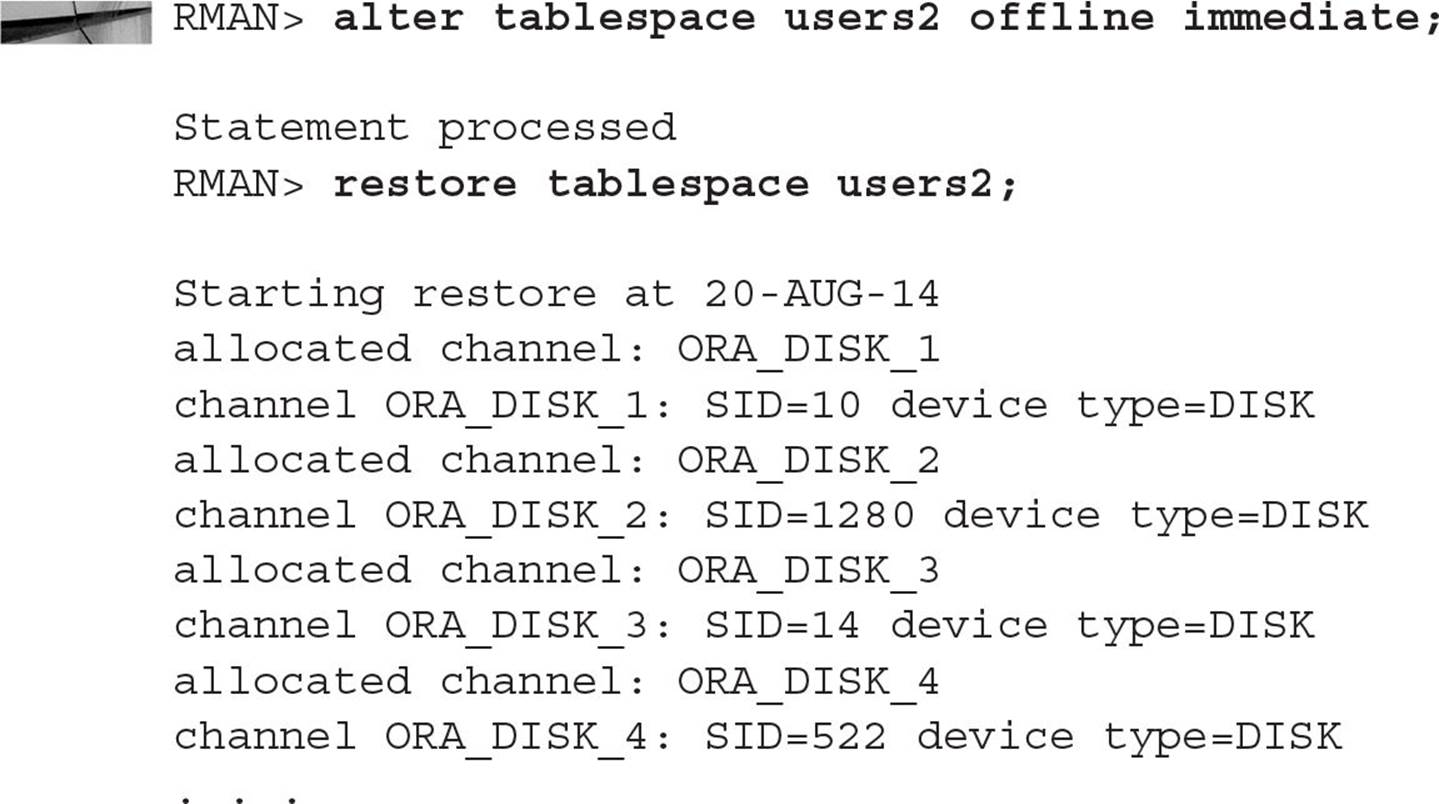

The RESTORE command copied the latest image or backupset copy of the datafiles in the USERS tablespace to their original locations; the RECOVER command applied redo from either redo log files or incremental backups to bring the objects in the tablespace back up to the latest SCN. Once the tablespace is back online, it is available for use again, without the loss of any committed transactions to tables in the tablespace.
Restoring a Table
As of Oracle Database 12c, you can use an RMAN backup to recover a single table. This method fills the gap between the tablespace point in time recovery (TSPITR) method (which is time consuming and must involve the DBA) and methods that are available to a database user such as Flashback Table using the UNDO tablespace and possibly a Flashback Data Archive. Because the logical corruption of a table may have been discovered long after the UNDO data has expired and been purged from the UNDO tablespace, recovering a single table from an RMAN backup fills the gap between a full TSPITR and a Flashback Table or Flashback Drop operation.
Scenarios for Table Recovery from Backups
In addition to the time it takes to recover an entire tablespace versus a single table from a tablespace backup, there are several other reasons why you would use table recovery from backups (TRFB) instead of other Flashback methods.
Using TSPITR may be a reasonable option if you have many tables in a tablespace that you need to recover, but what if the tablespace is not self-contained? In that scenario, you will have to recover more than one tablespace, which makes TSPITR less attractive.
You may often rely on Flashback Drop to get back a table that might have been dropped even weeks ago, but space pressure may have already purged it or the table may have been dropped while the recycle bin was turned off.
Finally, even if your UNDO tablespace and retention period is long, there may have been a recent structural change to the table, which will prevent any Flashback operation using the UNDO tablespace.
Prerequisites and Limitations for Table Recovery from Backups
In addition to the limitations mentioned in the previous section, there are several other conditions that must be met to perform TRFB:
![]() The database must be in read-write mode.
The database must be in read-write mode.
![]() The database must be in ARCHIVELOG mode.
The database must be in ARCHIVELOG mode.
![]() COMPATIBLE must be set to 12.0 or higher.
COMPATIBLE must be set to 12.0 or higher.
![]() You cannot recover tables or table partitions from the SYS schema.
You cannot recover tables or table partitions from the SYS schema.
![]() You cannot recover objects from the SYSTEM or SYSAUX tablespace.
You cannot recover objects from the SYSTEM or SYSAUX tablespace.
![]() Objects cannot be recovered to standby databases.
Objects cannot be recovered to standby databases.
Using Table Recovery from Backups
Using TRFB is quite similar to TSPITR in many ways. In fact, you could argue that TRFB is more of an RMAN recovery method than a tool in your Flashback toolkit. The key is the scope of the objects that you are recovering or rewinding to a previous point in time or SCN.
Figure 14-13 shows the general steps and flow of the recovery operation.
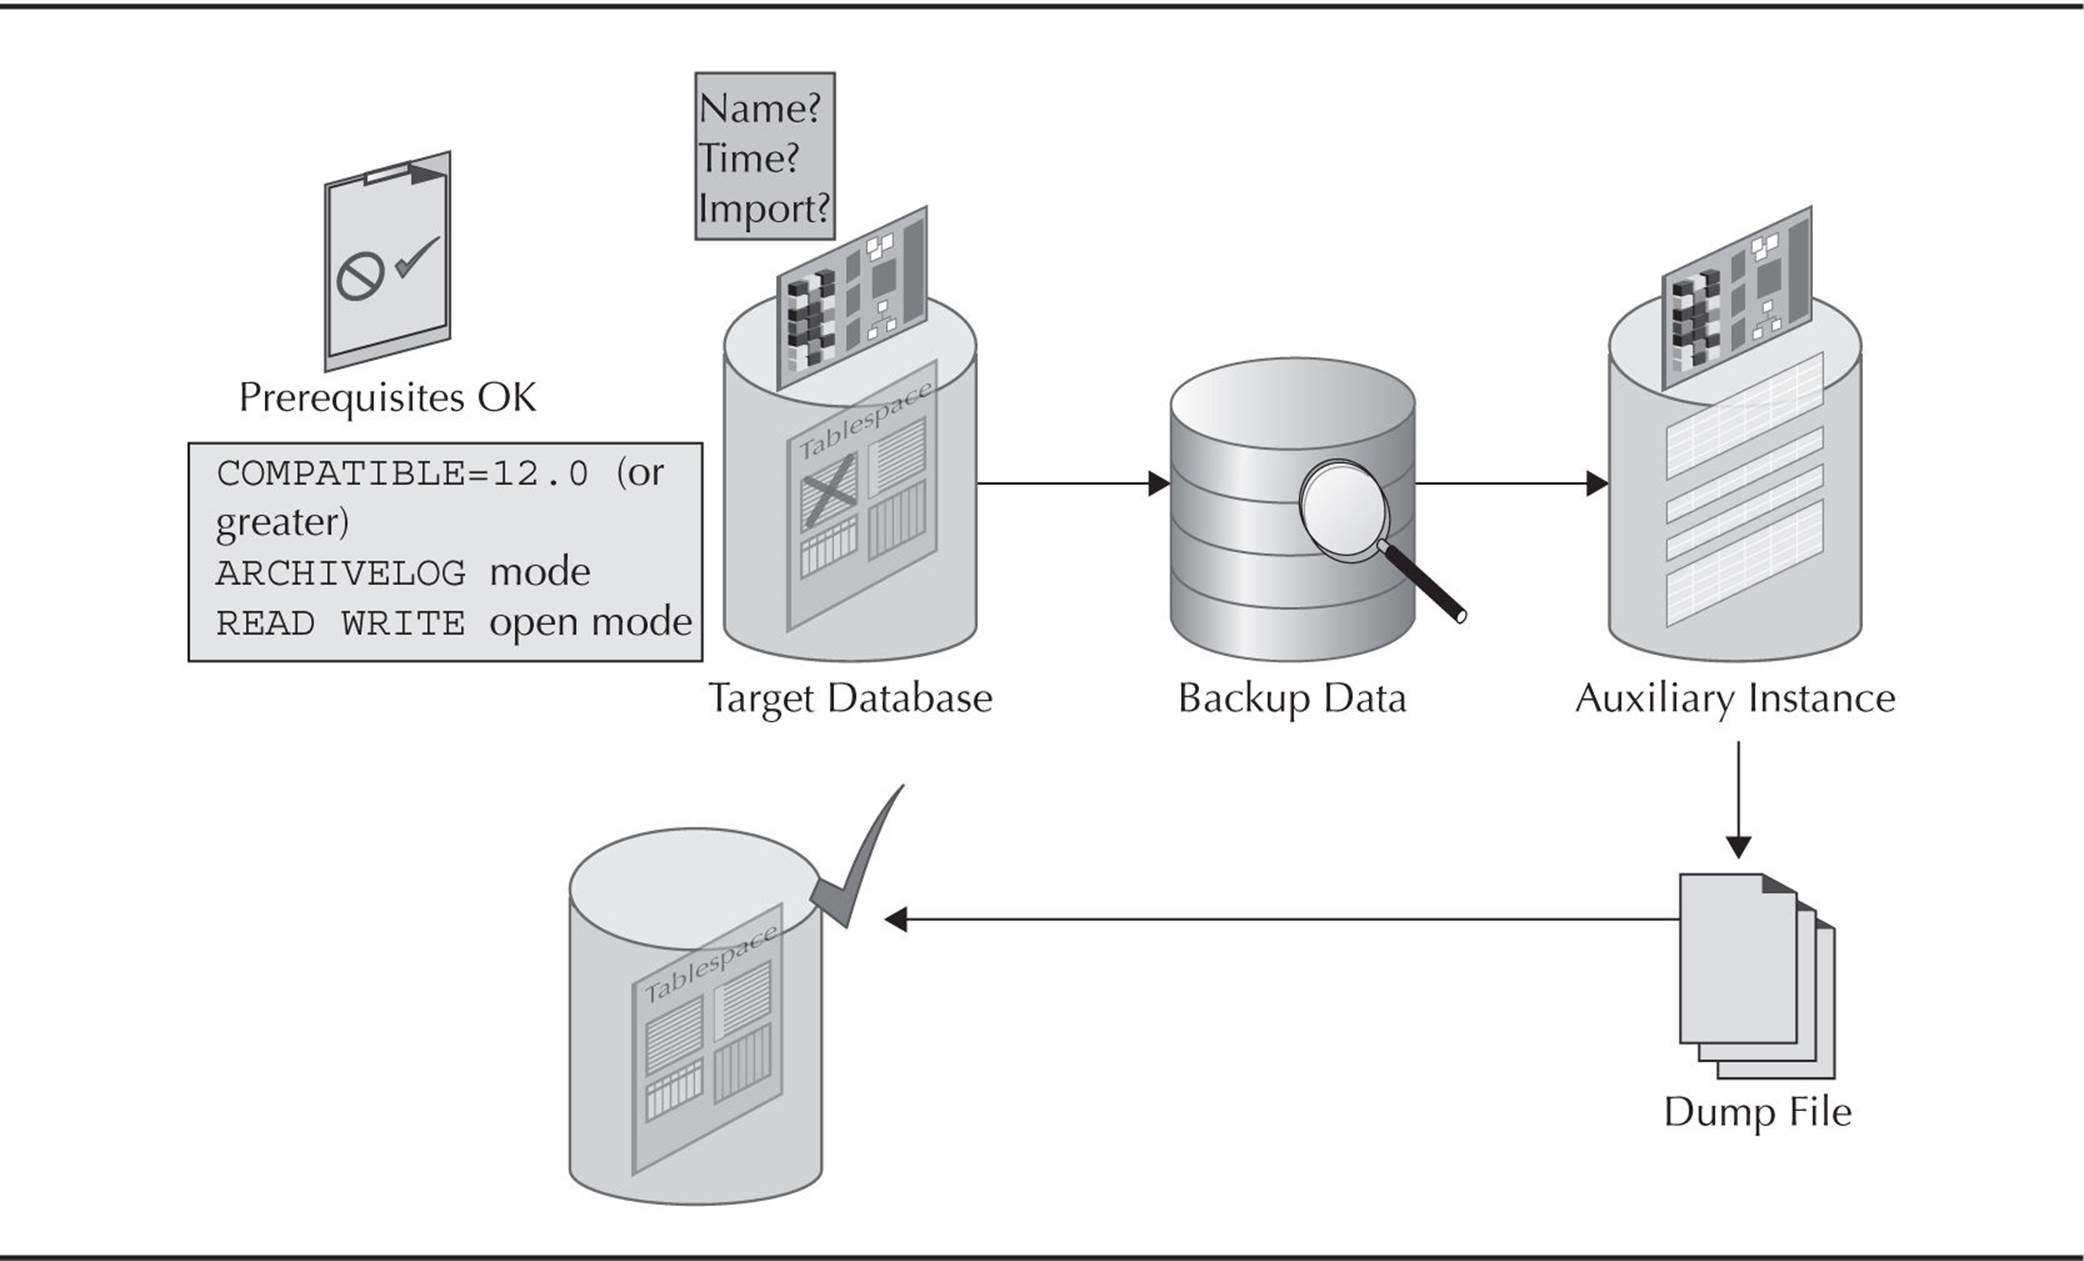
FIGURE 14-13. Process flow for table recovery from backups
Here are the steps you use in RMAN to recover a single table using TRFB:
1. Specify the RMAN parameters for the TRFB operation:
a. Names of tables or table partitions to recover
b. Point in time at which the objects need to be recovered to (timestamp or SCN)
c. Whether the recovered objects must be imported into the target database
2. RMAN determines which backups will be used for the operation.
3. RMAN creates a temporary auxiliary instance.
4. RMAN recovers the table or tables into a tablespace available to this auxiliary instance.
5. RMAN creates a Data Pump Export dump file with the recovered objects.
6. If specified, RMAN will use Data Pump Import to copy the objects into the target database.
As you may have noticed, this operation is somewhat automated compared to TSPITR, especially in versions of Oracle Database before 12c. This operation still must be performed by a DBA, however.
Restoring a Datafile
Restoring a datafile is a very similar operation to restoring a tablespace. Once the missing or corrupted datafile is identified using the V$DATAFILE_HEADER view, the RMAN commands are very similar to the previous example in the “Restoring a Tablespace” section; the tablespace is taken offline, the datafile(s) are restored and recovered, and the tablespace is brought back online. If only file number 7 was lost, the RECOVER and RESTORE commands are as simple as this:

Restoring an Entire Database
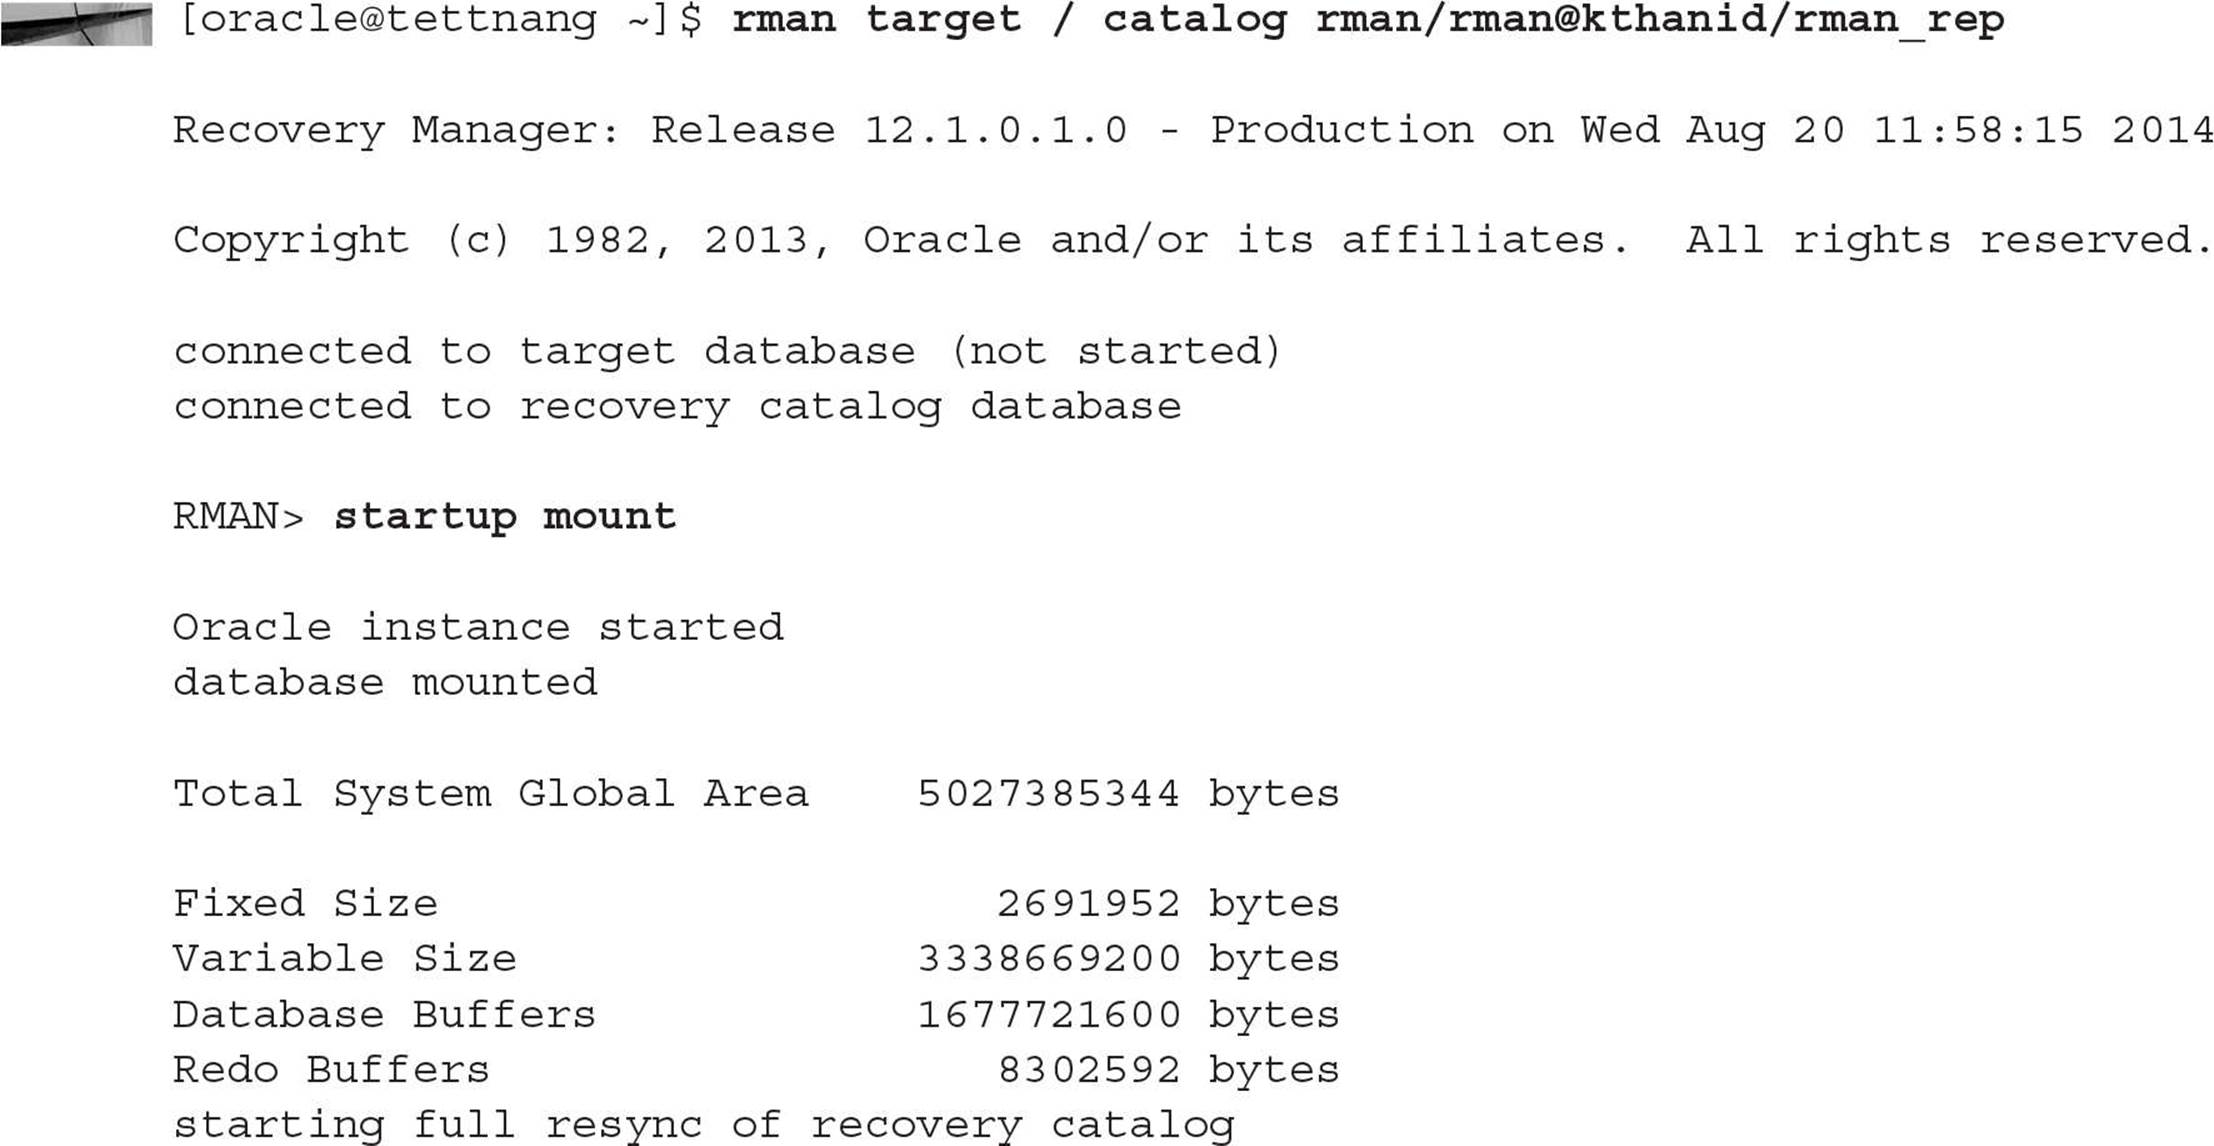
Although the loss of an entire database is a serious and disastrous event, having a solid backup and recovery policy, as described previously in this chapter, can bring the database back up to the most recent committed transaction with a minimum of effort. In the following scenario, we have lost all datafiles. However, because we have multiplexed the control file and online redo log files on many different disks, we will have them available during the RMAN restore and recovery operation. Alternatively, you can restore the control files or copy the online redo log files to the other destinations before mounting the database. If this is not feasible because the alternate disk locations are not available, you can alter your parameter file or SPFILE to indicate which files are still available.
The entire restore and recovery operation can be performed within RMAN; first, we start up RMAN and open the database in MOUNT mode, just as if we used the STARTUP MOUNT command at a SQL*Plus prompt:
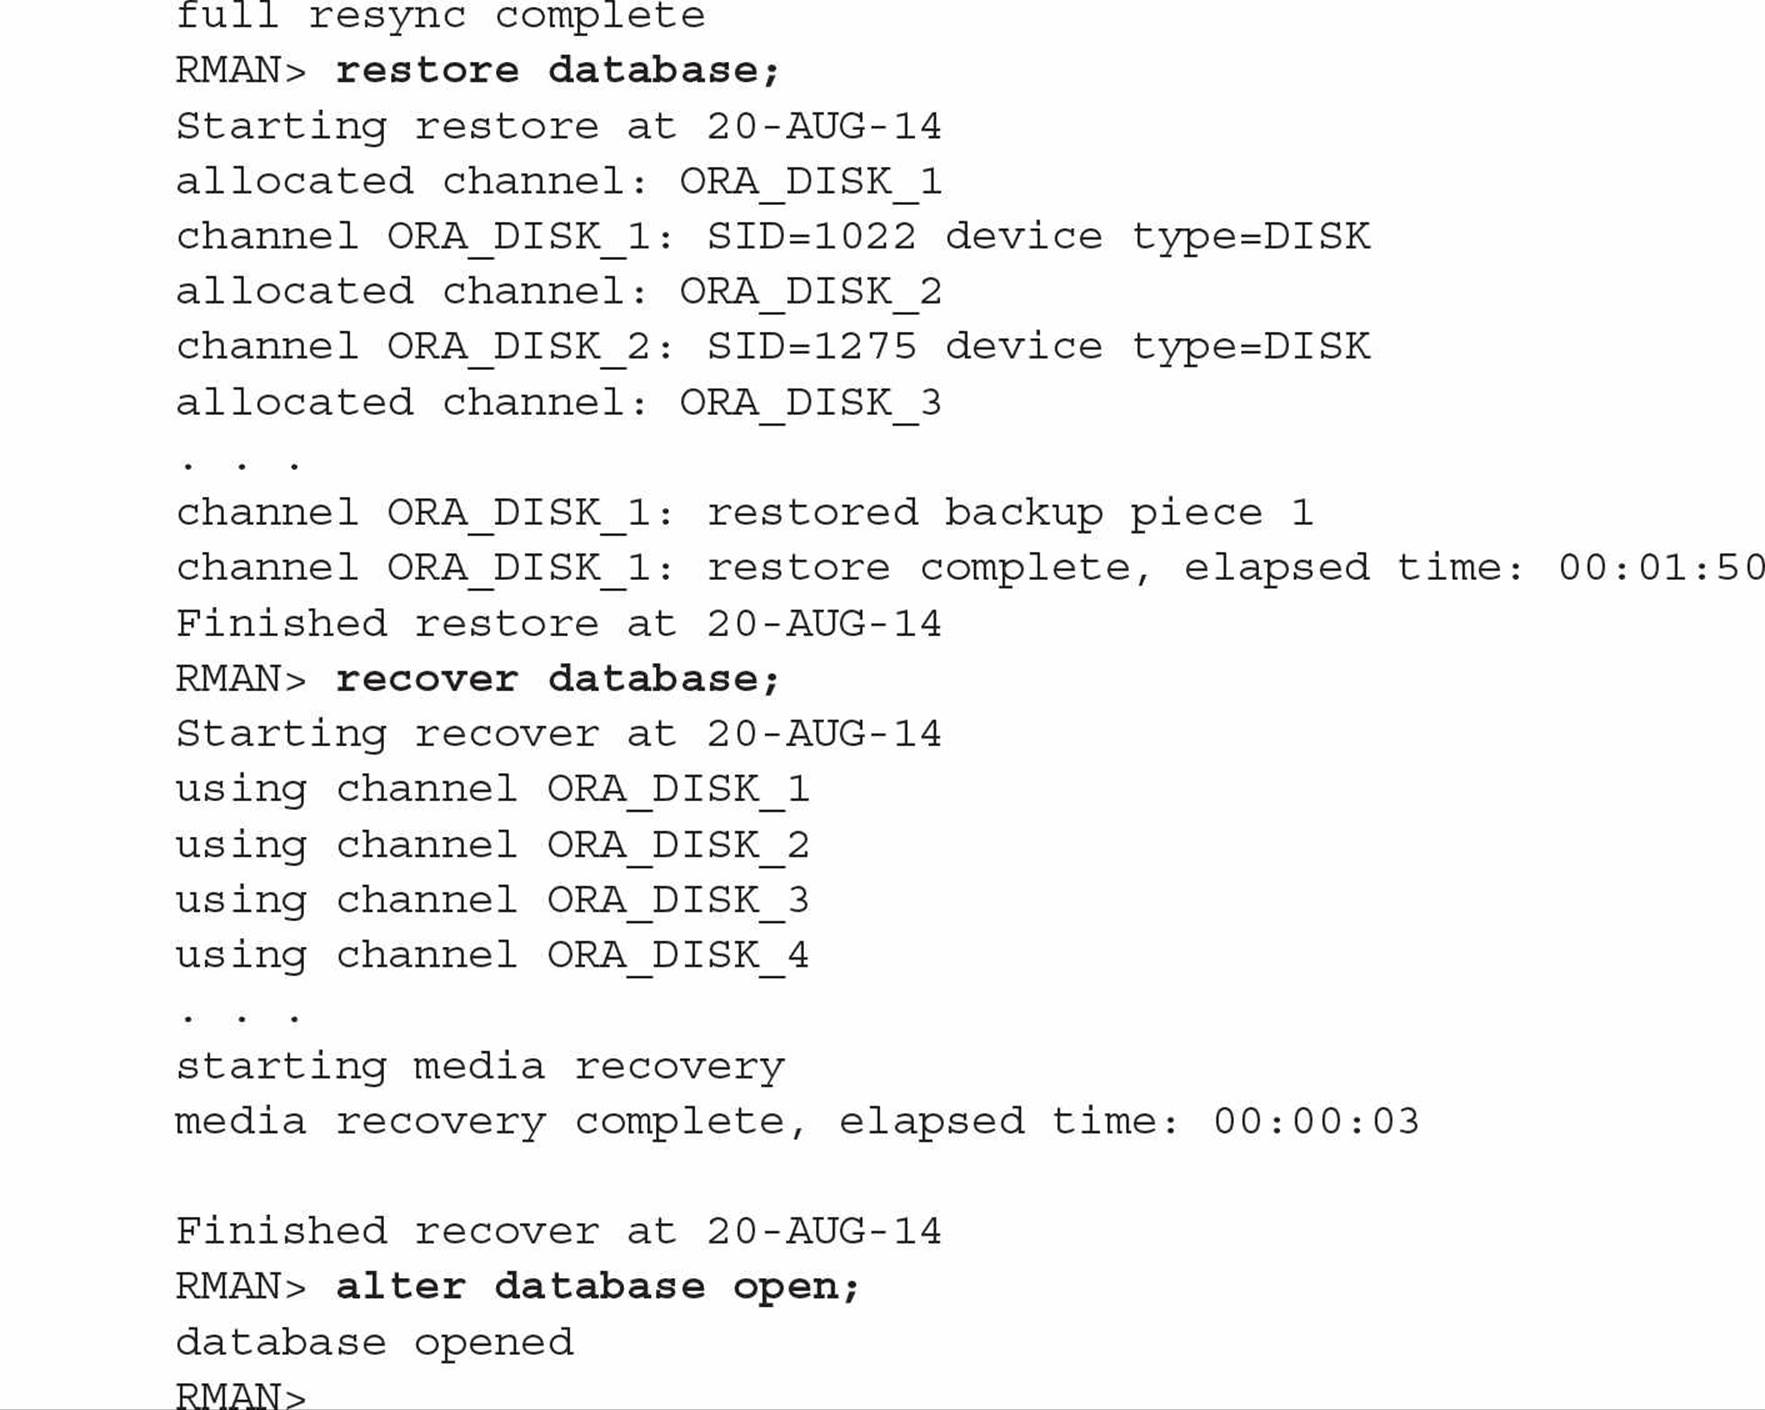
The database is now open and available for use. RMAN will pick the most efficient way to perform the requested operation, minimizing the number of files accessed or the number of disk I/Os to bring the database back to a consistent state in as short a time as possible. In the previous example, RMAN used a full database backupset and archived redo log files to recover the database.
During a recovery operation, RMAN may need to restore archived redo logs from tape; to limit the amount of disk space used during a recovery operation, the RECOVER command used in the previous example could use the following options instead:
![]()
The parameter DELETE ARCHIVELOG directs RMAN to remove archived log files from disk that were restored from tape for this recovery option; the MAXSIZE 2GB parameter restricts the amount of space that can be occupied by restored archived log files at any point in time to 2GB. In our dw database, these two parameters are not needed; all archived log files needed to recover the database are kept in the fast recovery area on disk to support the defined retention policy.
Validating Restore Operations
Earlier in this chapter, we validated the data blocks in the datafiles that we want to back up. In this section, we’ll take the opposite approach and instead validate the backups that we have already made. We’ll also find out from RMAN which backupsets, image copies, and archived redo logs would be used in a recovery operation without actually performing the recovery.
RESTORE PREVIEW
The command RESTORE PREVIEW will provide a list of the files that RMAN will use to perform the requested operation; the preview will also indicate if a tape volume will be requested, for example. No files are actually restored; only the recovery catalog is queried to determine which files are needed. In the following example, we want to find out what RMAN will need if we need to recover the USERS tablespace:
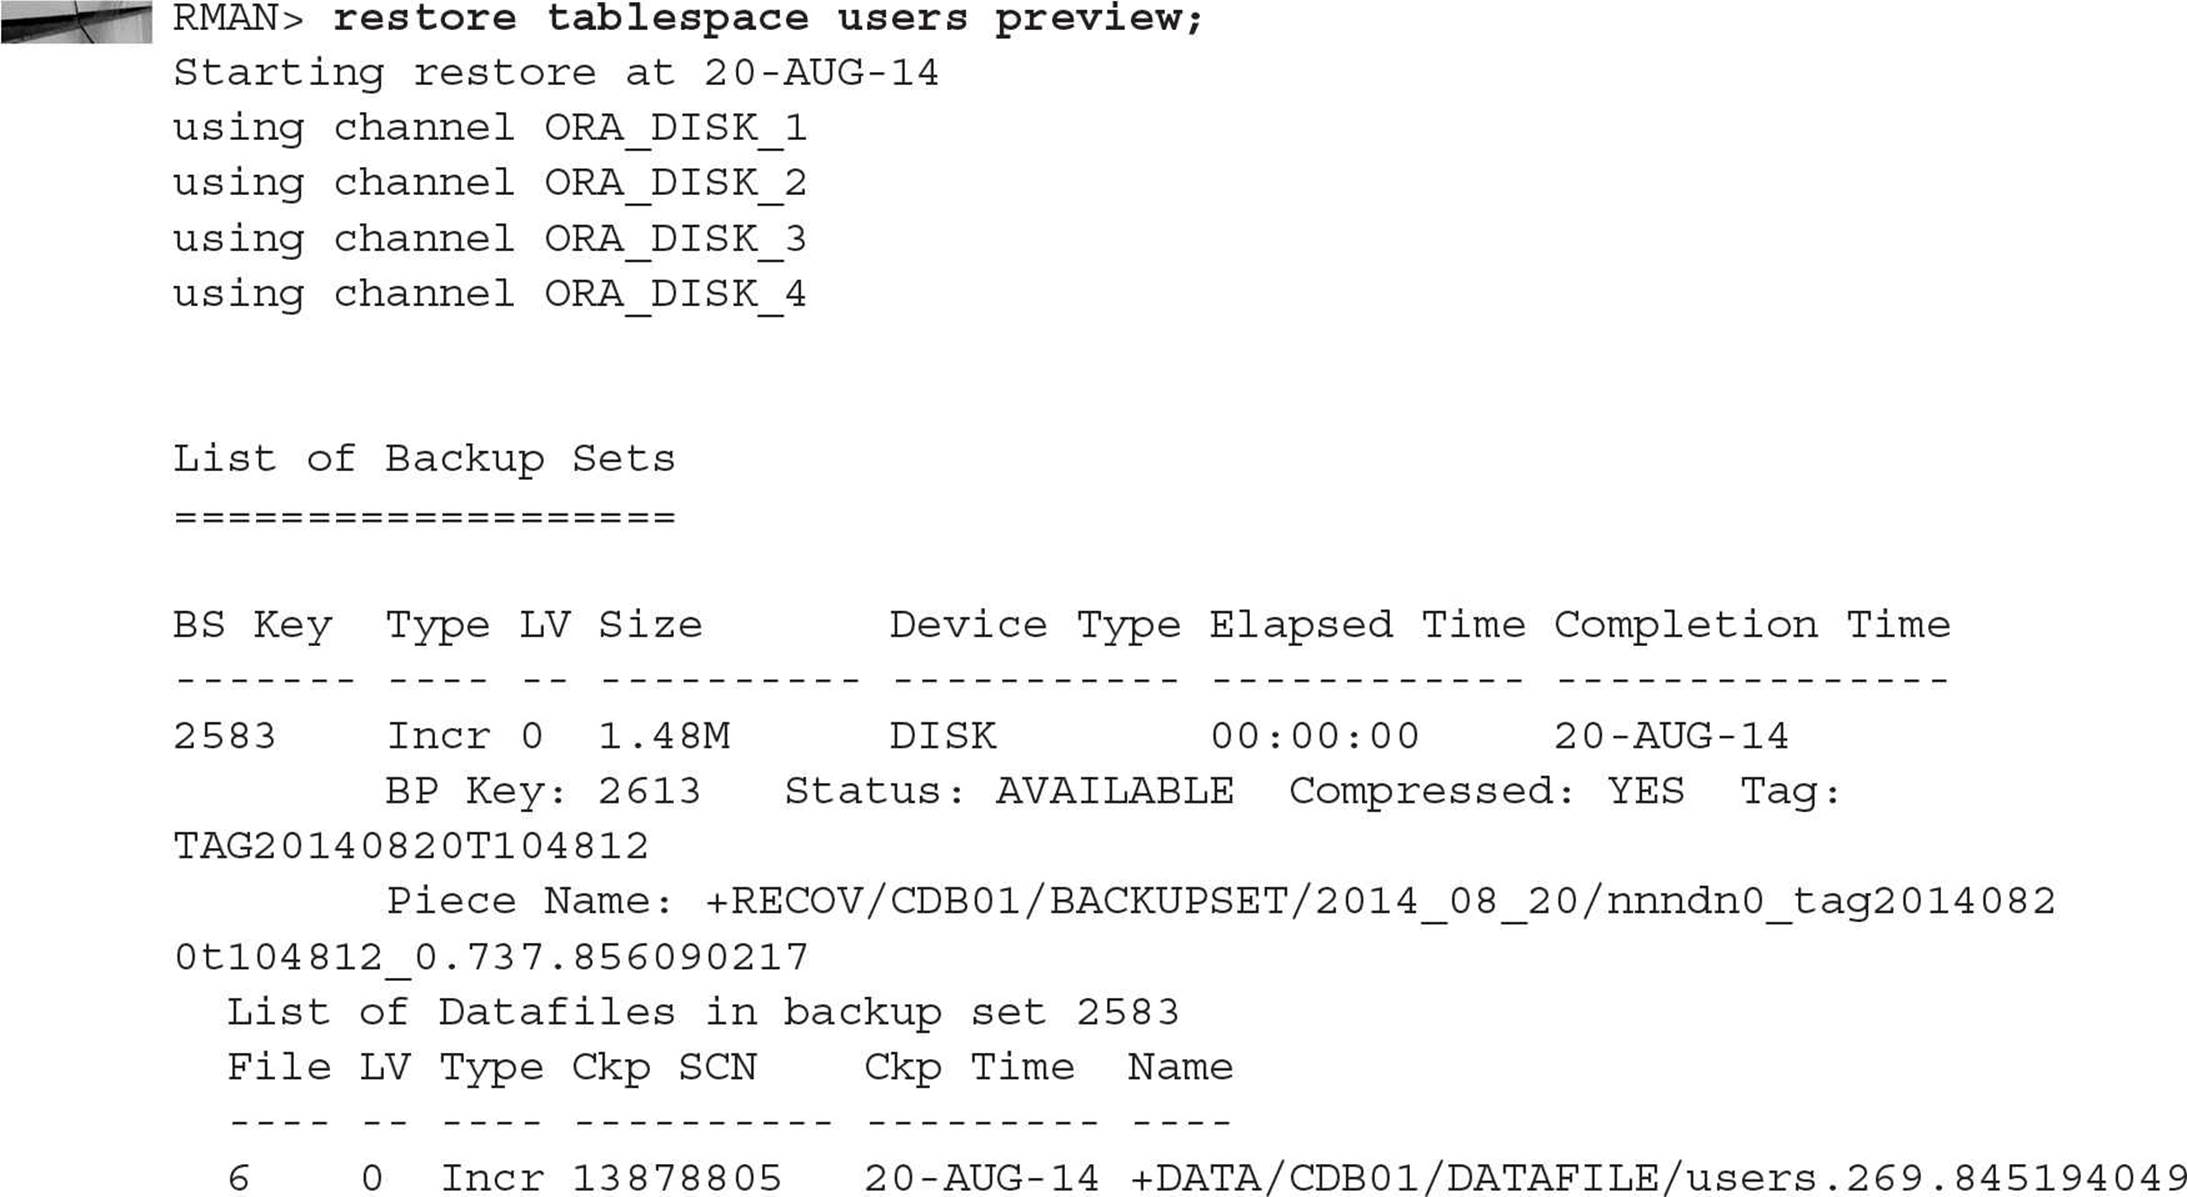
For the restore operation, RMAN will need to use one backupset for the single datafile in the tablespace; archived redo log files will be used to bring the tablespace up to the current SCN.
If a restore operation needs to be performed immediately, and one of the files that RMAN will request to perform the operation is offsite, you can use the CHANGE … UNAVAILABLE command to mark a backupset as unavailable and then run the RESTORE TABLESPACE … PREVIEW command again to see if RMAN can use disk-based backupsets to fulfill the request.
RESTORE VALIDATE
The RESTORE … PREVIEW command does not read the actual backupsets, only the catalog information; if we want to validate whether the backupsets themselves are readable and not corrupted, we use the RESTORE … VALIDATE command. As with most other RMAN commands, we can perform the validation for a datafile, a tablespace, or the entire database. In the following example, we’ll perform a validation on the same backupsets that RMAN reported in the previous example for the USERS tablespace:
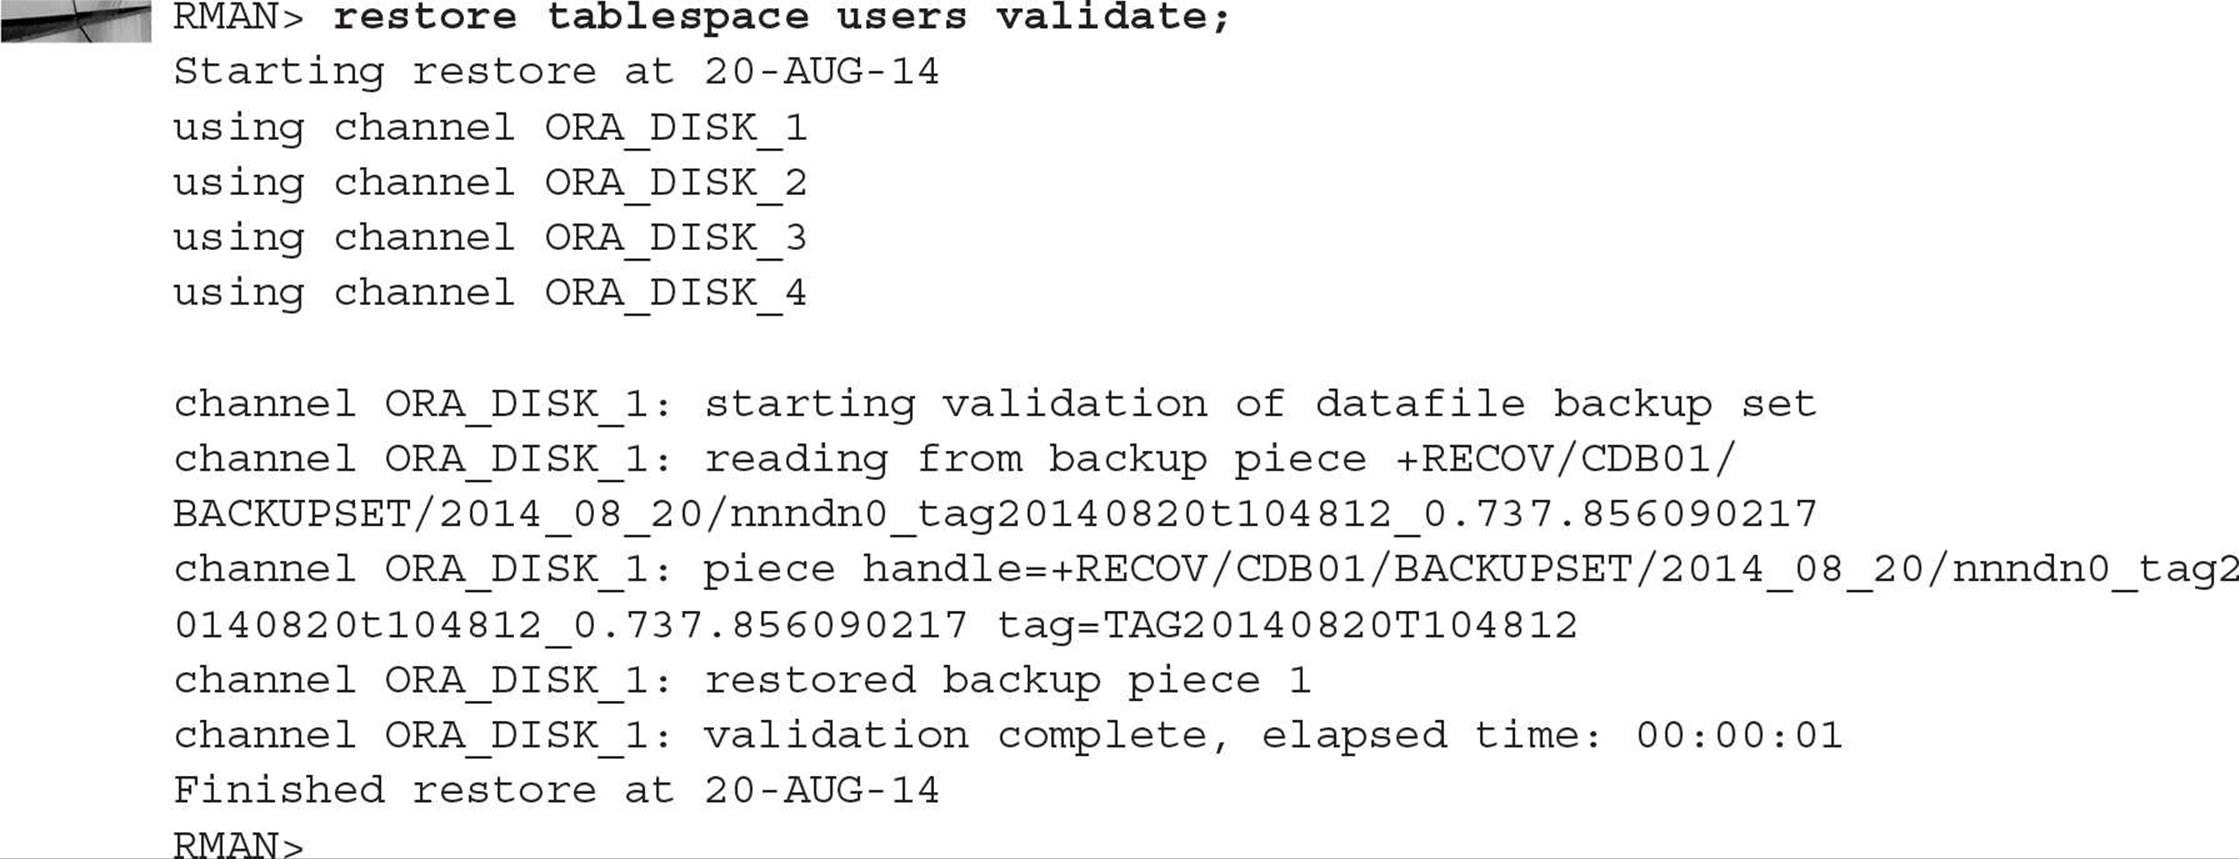
All blocks of the backupsets were read to ensure that they are usable for a restore operation for the USERS tablespace.
Point-in-Time Recovery
RMAN can be used to implement point-in-time recovery, or restoring and recovering a database up to a timestamp or SCN before the point at which a database failure occurred. As you found out in Chapter 13, a point-in-time recovery (PITR) may be useful for recovering from a user error where a table was dropped yesterday but the error was not detected until today. Using PITR, we can recover the database to a point in time right before the table was dropped.
Using PITR has the disadvantage of losing all other changes to the database from the point at which the database was restored; this disadvantage needs to be weighed against the consequences of the dropped table. If both options are undesirable, then another method such as Flashback Table, Flashback Database, or TSPITR should be considered as an alternative for recovering from these types of user errors. If you are using Oracle Database 12c, you can also restore and recover a table using RMAN, as covered earlier in this chapter.
Data Recovery Advisor
The Data Recovery Advisor (DRA), enhanced in Oracle Database 12c, can both proactively and reactively analyze failures. In both scenarios, it will not automatically fix problems it finds but instead provide one or more possible fixes and give you the option and the commands to perform the fix. As of Oracle Database 12c release 1 (12.1.0.2) only non-CDBs and single-instance CDBs are supported (non-RAC environments).
In previous releases of Oracle RMAN, you could perform proactive checks of the database’s datafiles with the VALIDATE command. In a CDB environment the VALIDATE command has been enhanced to analyze individual PDBs or the entire CDB.
In this scenario I’ll show you how DRA works in a multitenant environment, which means it also works the same way for a pre-Oracle Database 12c database or a non-CDB. In the container database CDB01, the datafiles for the CCREPOS SYSTEM tablespace were lost. You might come to that conclusion after viewing the alert log or, more likely, after a user submits a help desk ticket saying they can’t get into the CCREPOS database. You suspect that there might be more failures, so you start RMAN and use the DRA commands LIST FAILURE, ADVISE FAILURE, and REPAIR FAILURE to fix one or more issues.
To view and repair any issues with the CDB containing the CCREPOS PDB, start RMAN from the root container and run the LIST FAILURE DETAIL command:
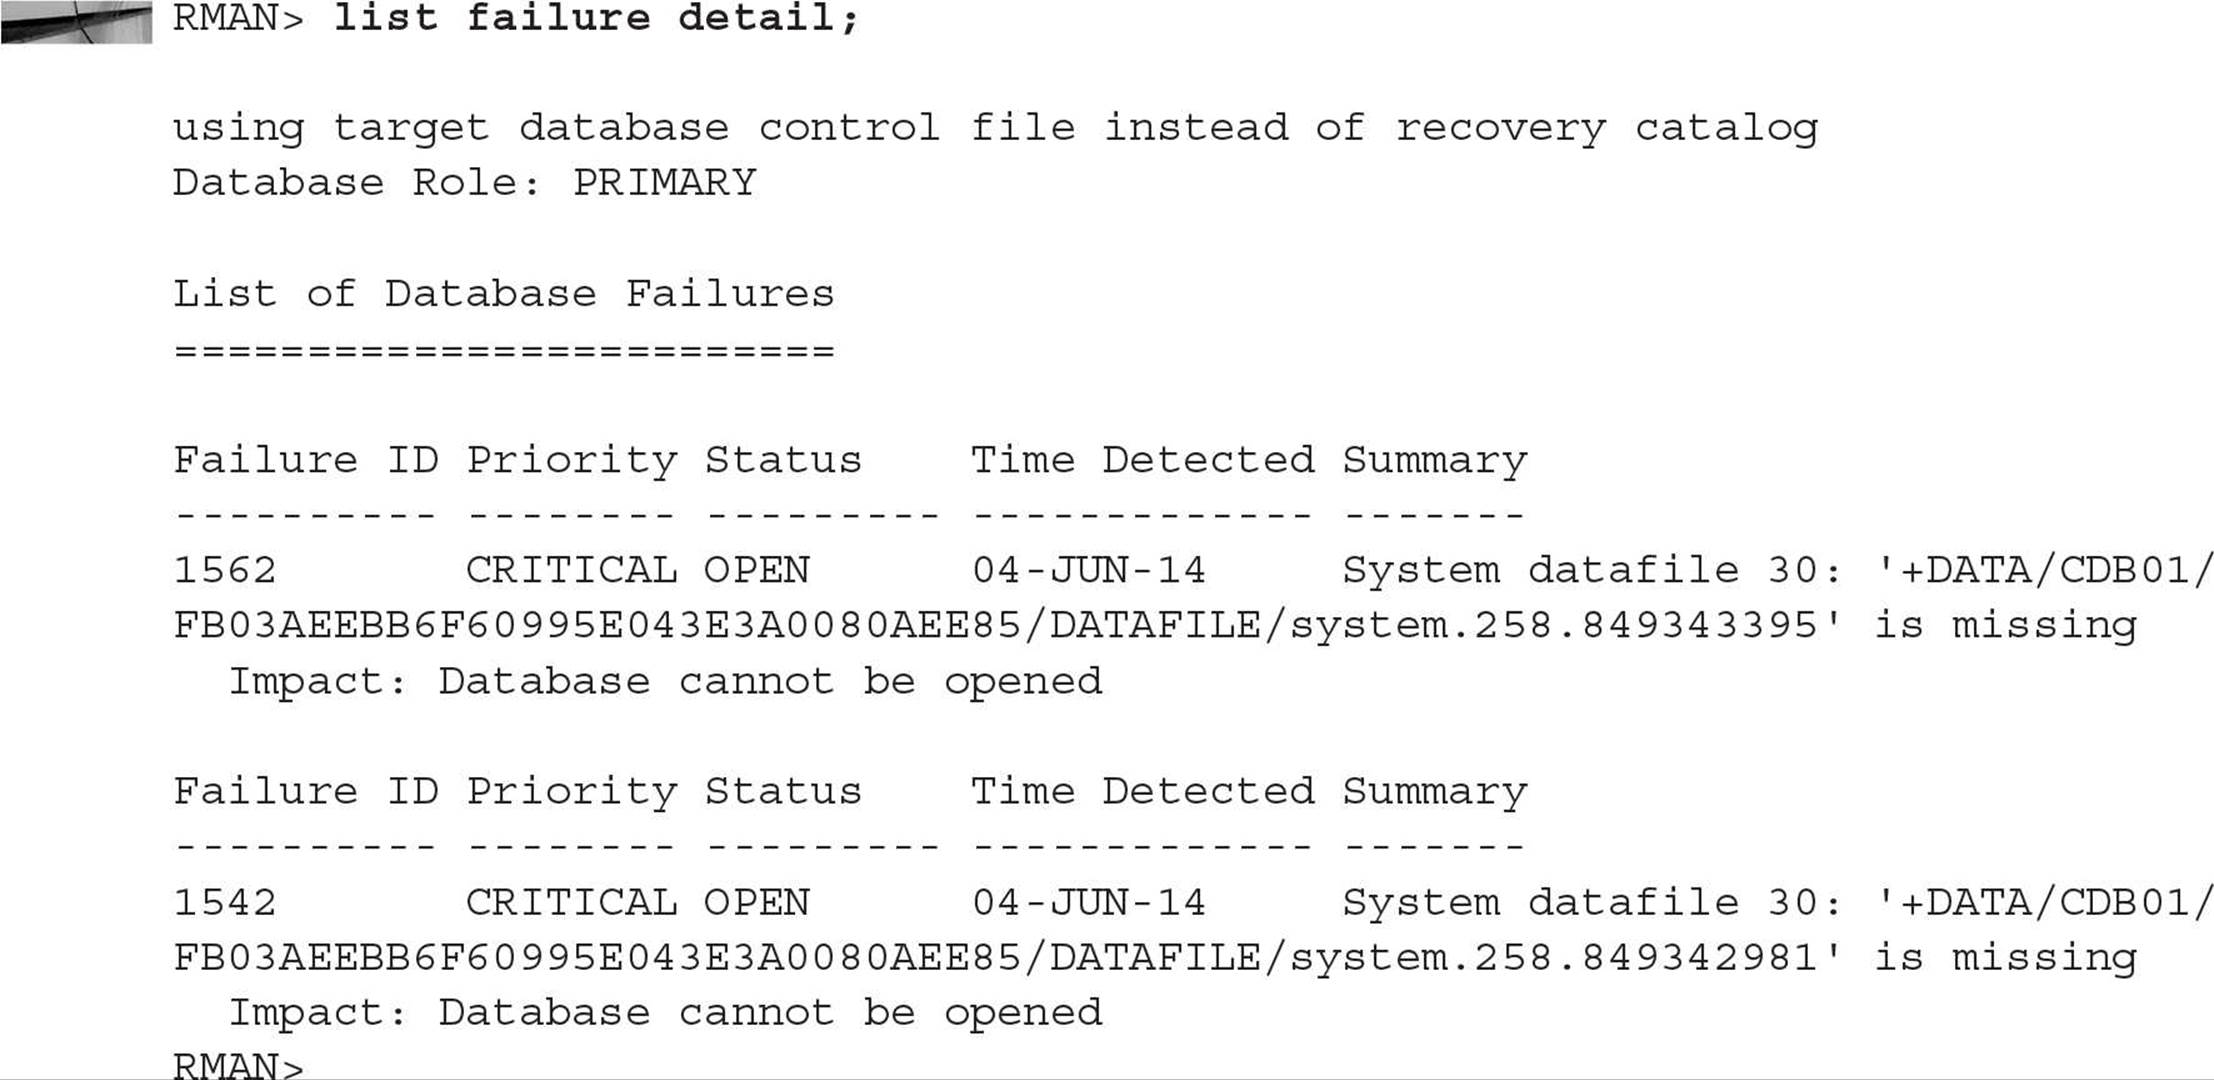
It looks like the SYSTEM datafile was lost once already (and recovered) earlier in the day! But the failure was not cleared from RMAN, so use CHANGE FAILURE to clear the earlier event:
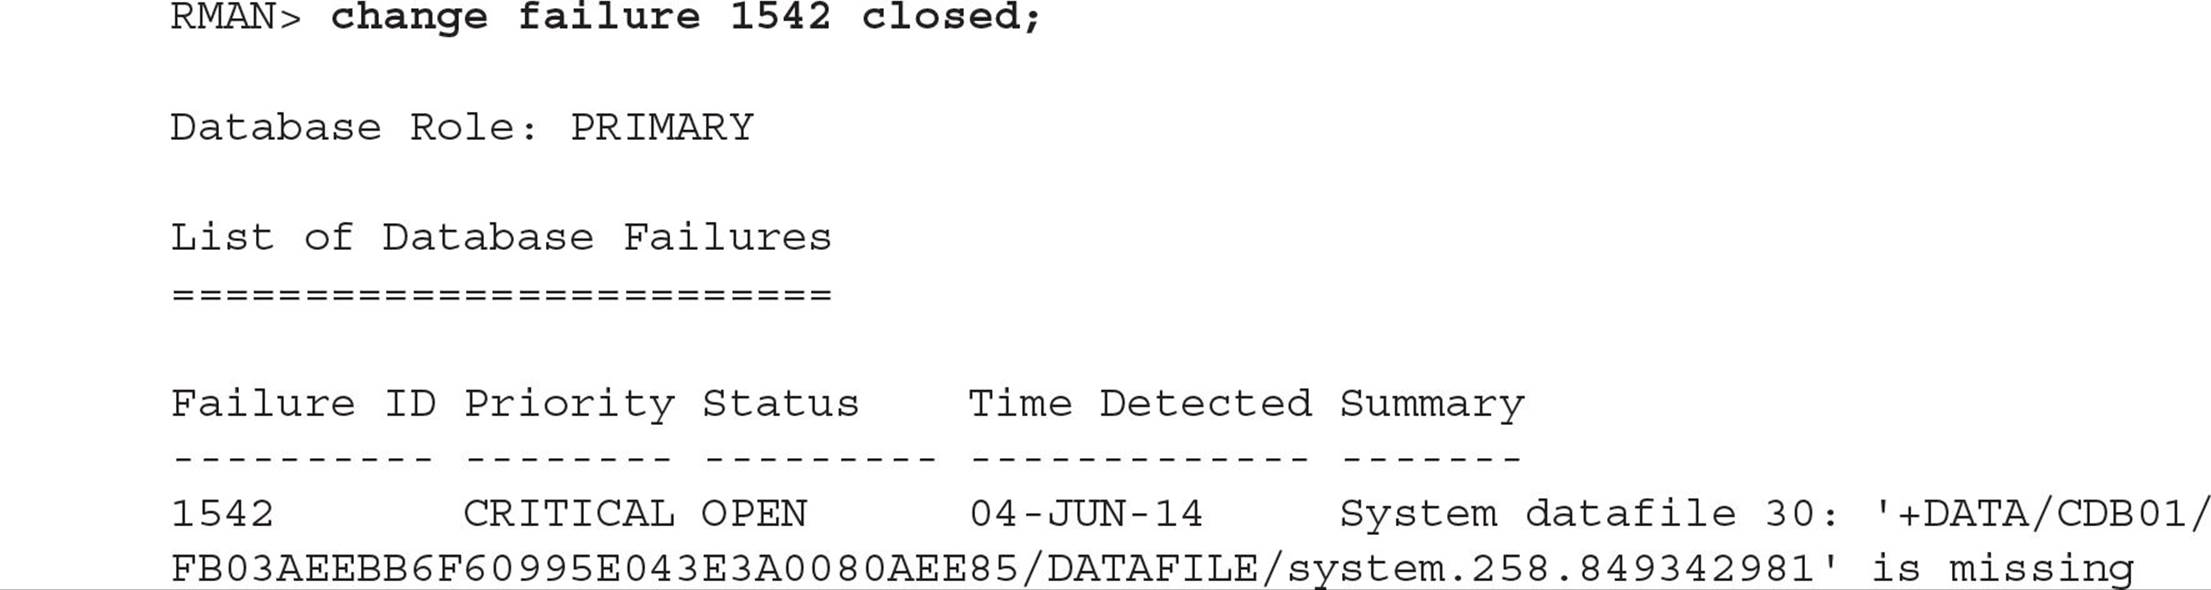

Next, let’s see what RMAN recommends to fix the problem:
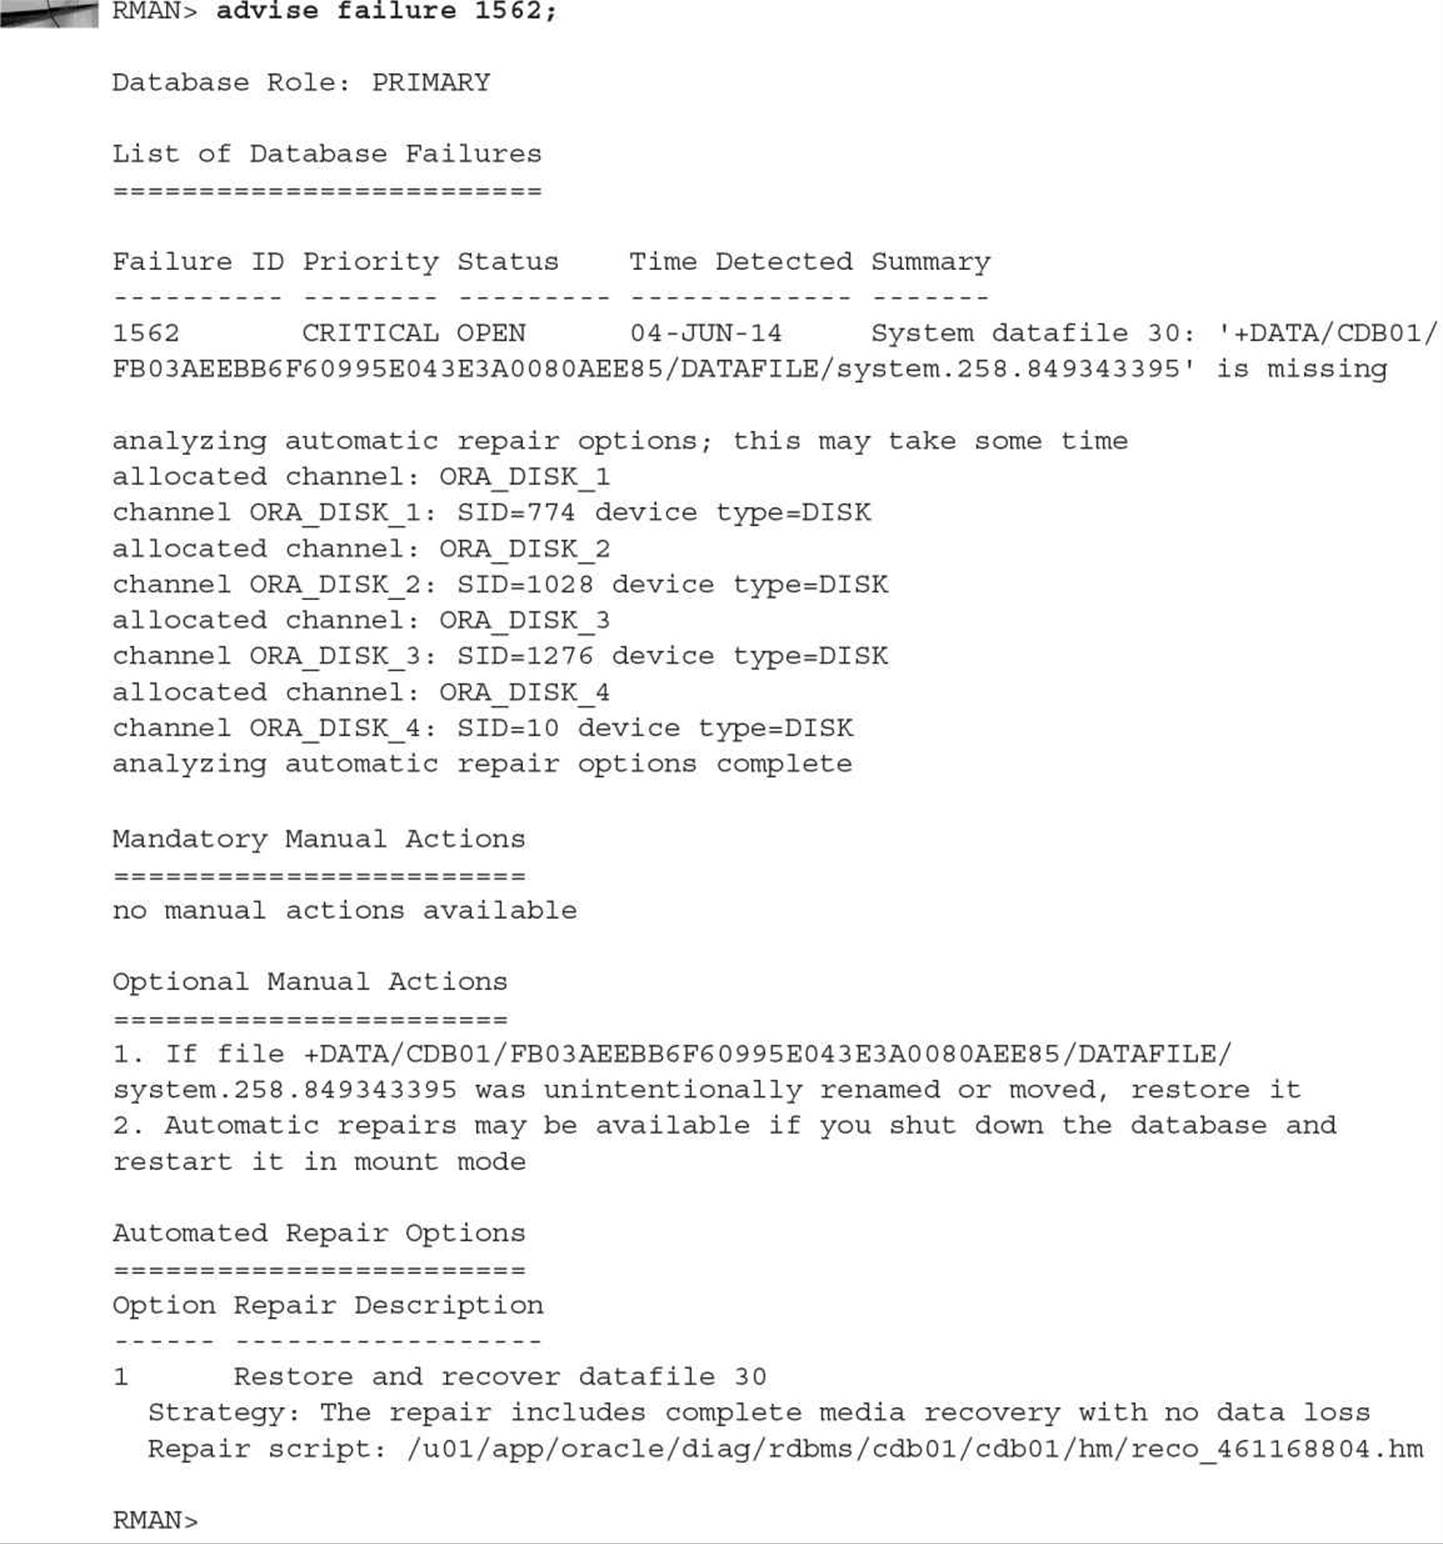
The repair script generated by RMAN is as follows:

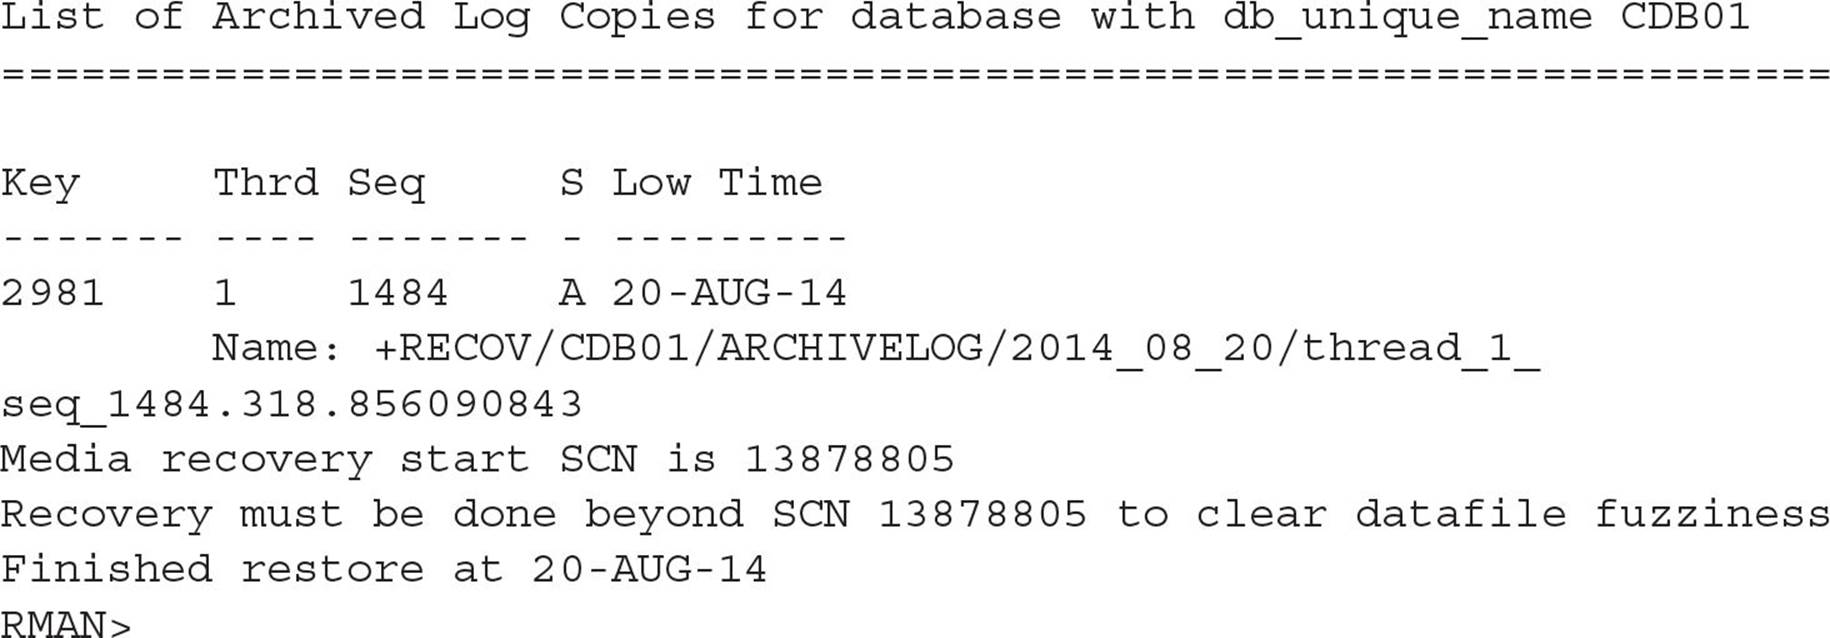
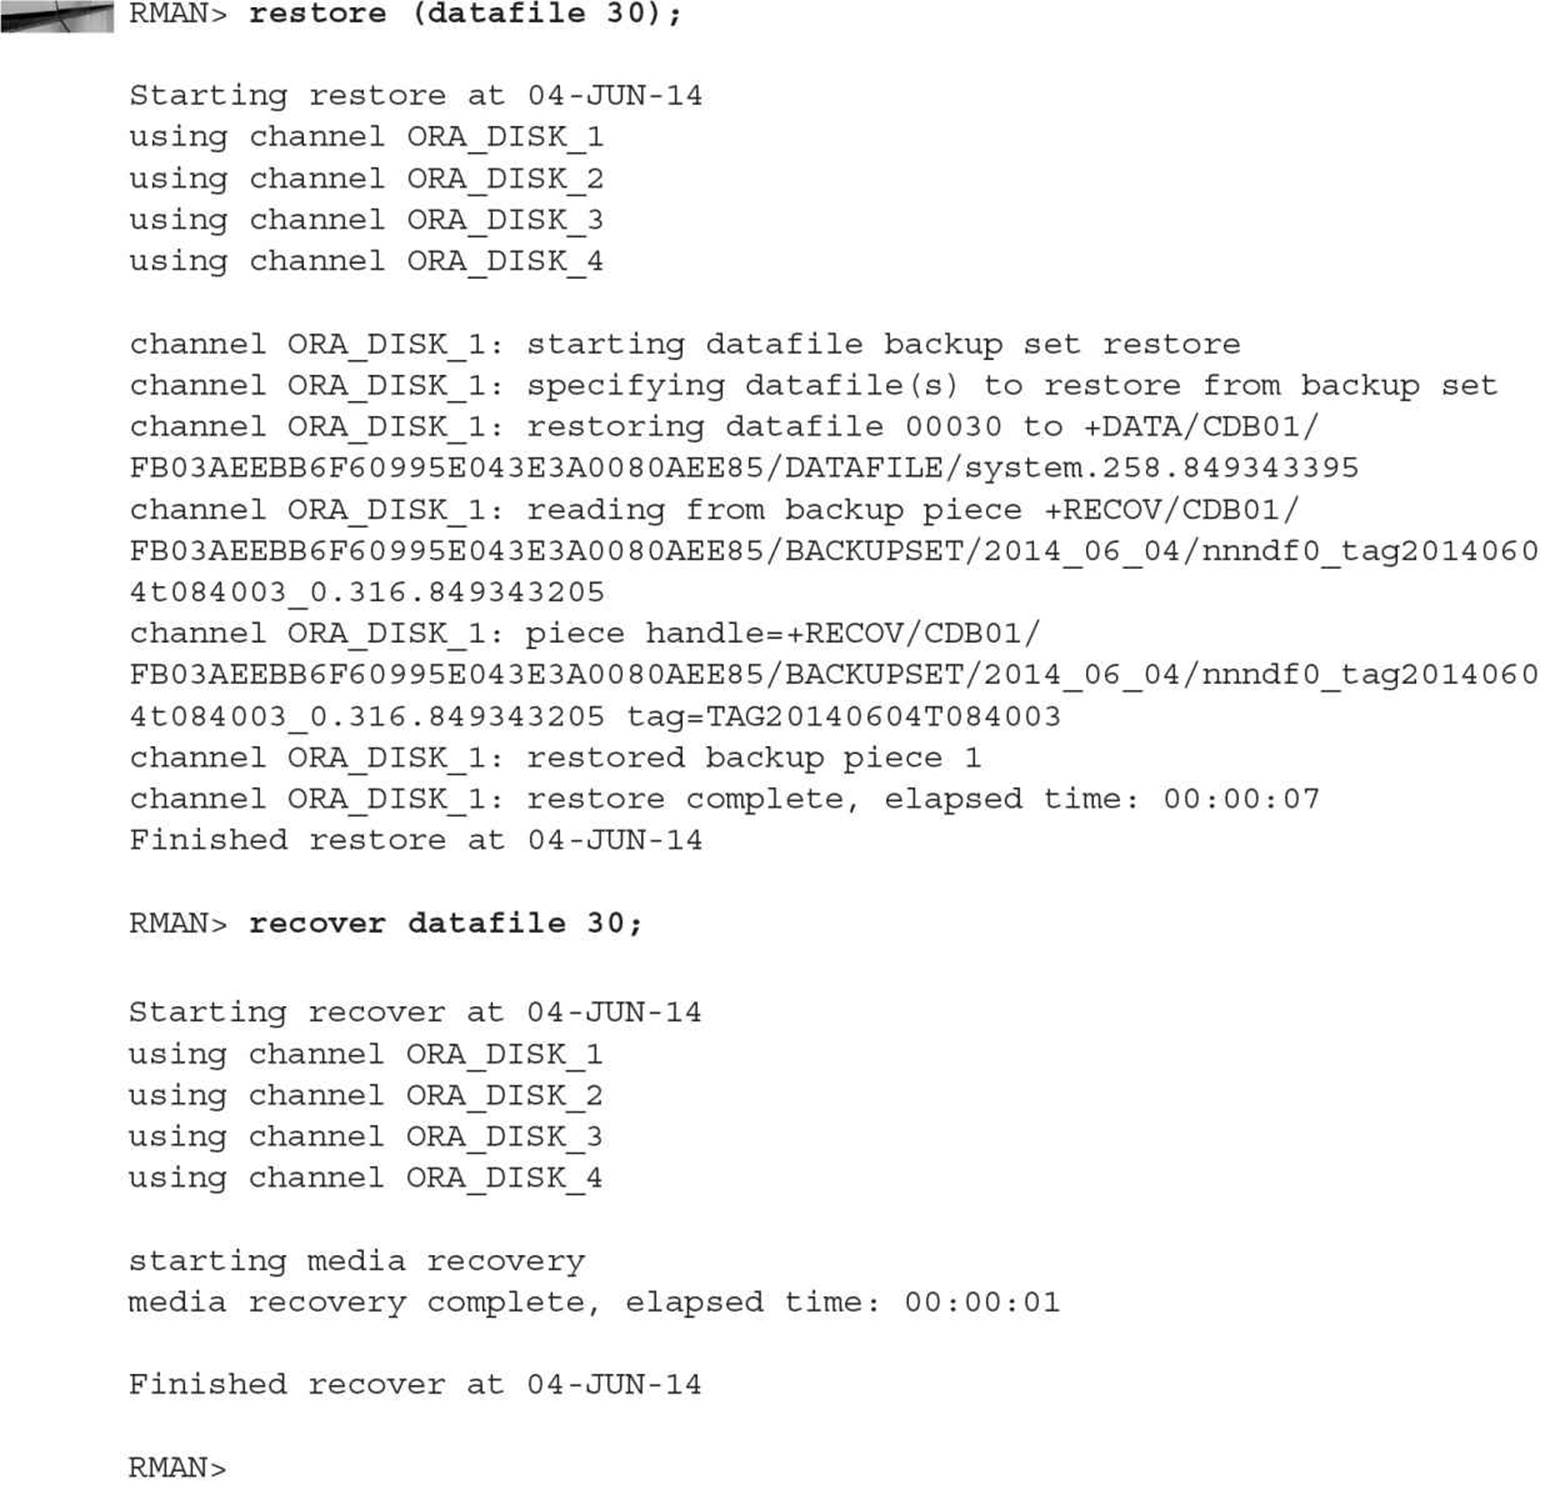
The script is generated to run as is in RMAN. Knowing that the CCREPOS PDB is closed, however, means that we can skip the first and last commands and just run the RESTORE and RECOVER commands:
Finally, open the PDB and see if all is well:

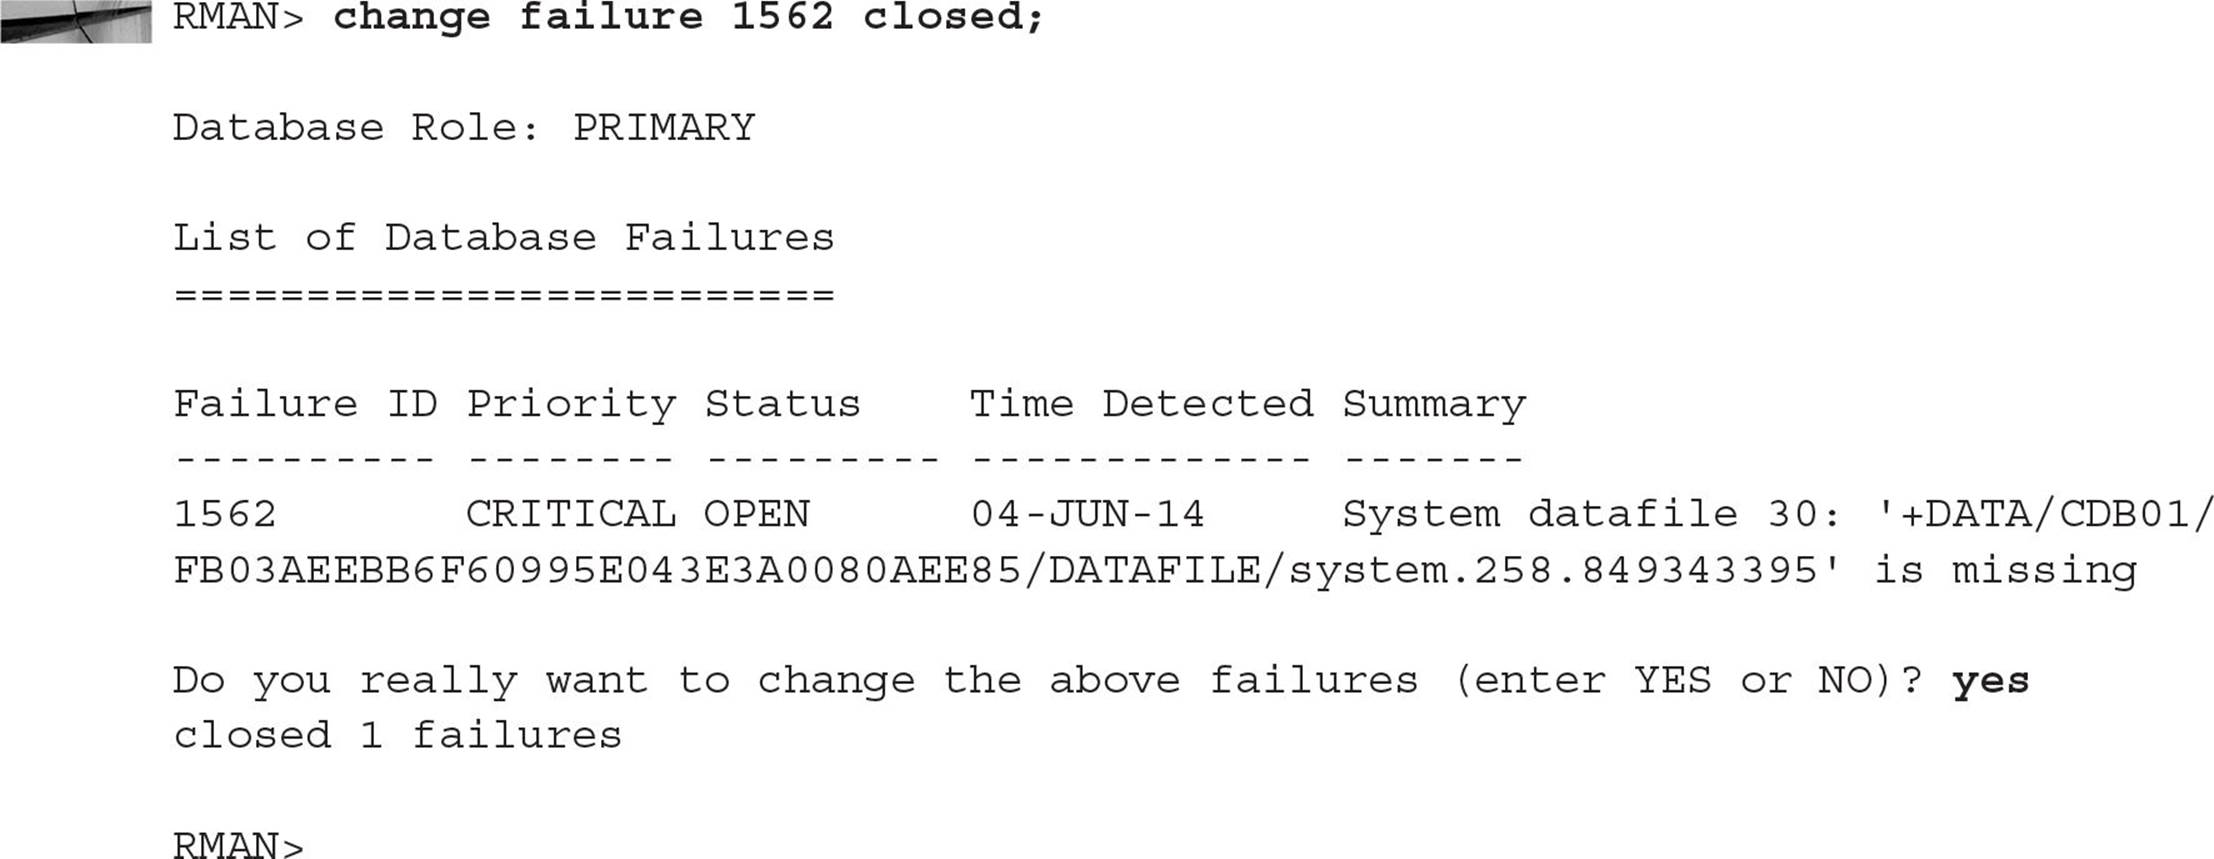
Since CCREPOS starts fine now, you can clear the failure in RMAN:
Miscellaneous Operations
The next few sections cover some of the other capabilities of RMAN, beyond the backup, restore, and recovery operations. I’ll show how to record the existence of other backups made outside of the database and perform some catalog maintenance. I’ll also give a couple more examples of the LIST and REPORT commands.
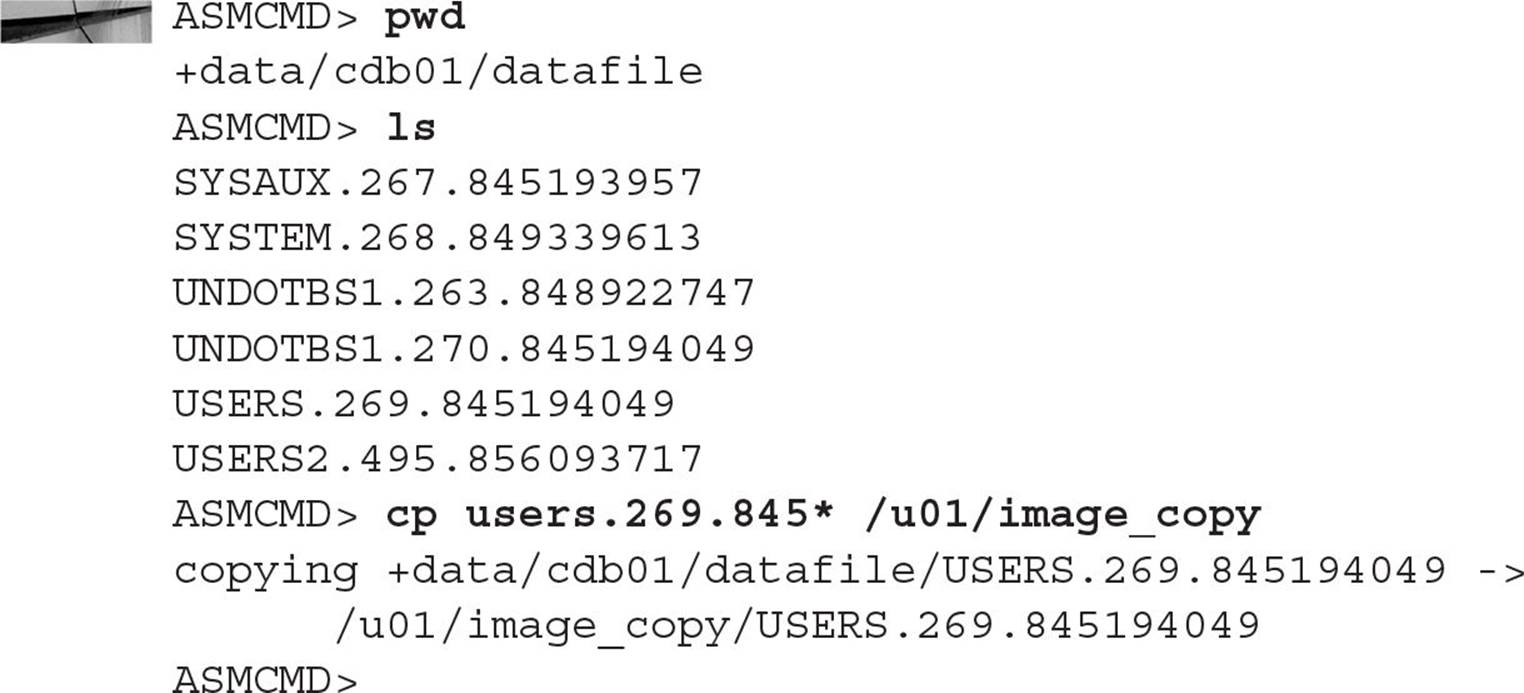
Cataloging Other Backups
On occasion, we want the recovery catalog to include backups made outside of RMAN, such as image copies made with operating system commands or with the asmcmd command, as in this example:

CAUTION
Image copies created with operating system commands must be performed either while the database is shut down or by using the ALTER TABLESPACE … BEGIN/END BACKUP commands.
Recording this image copy of the USERS tablespace is easy in RMAN using the CATALOG command:
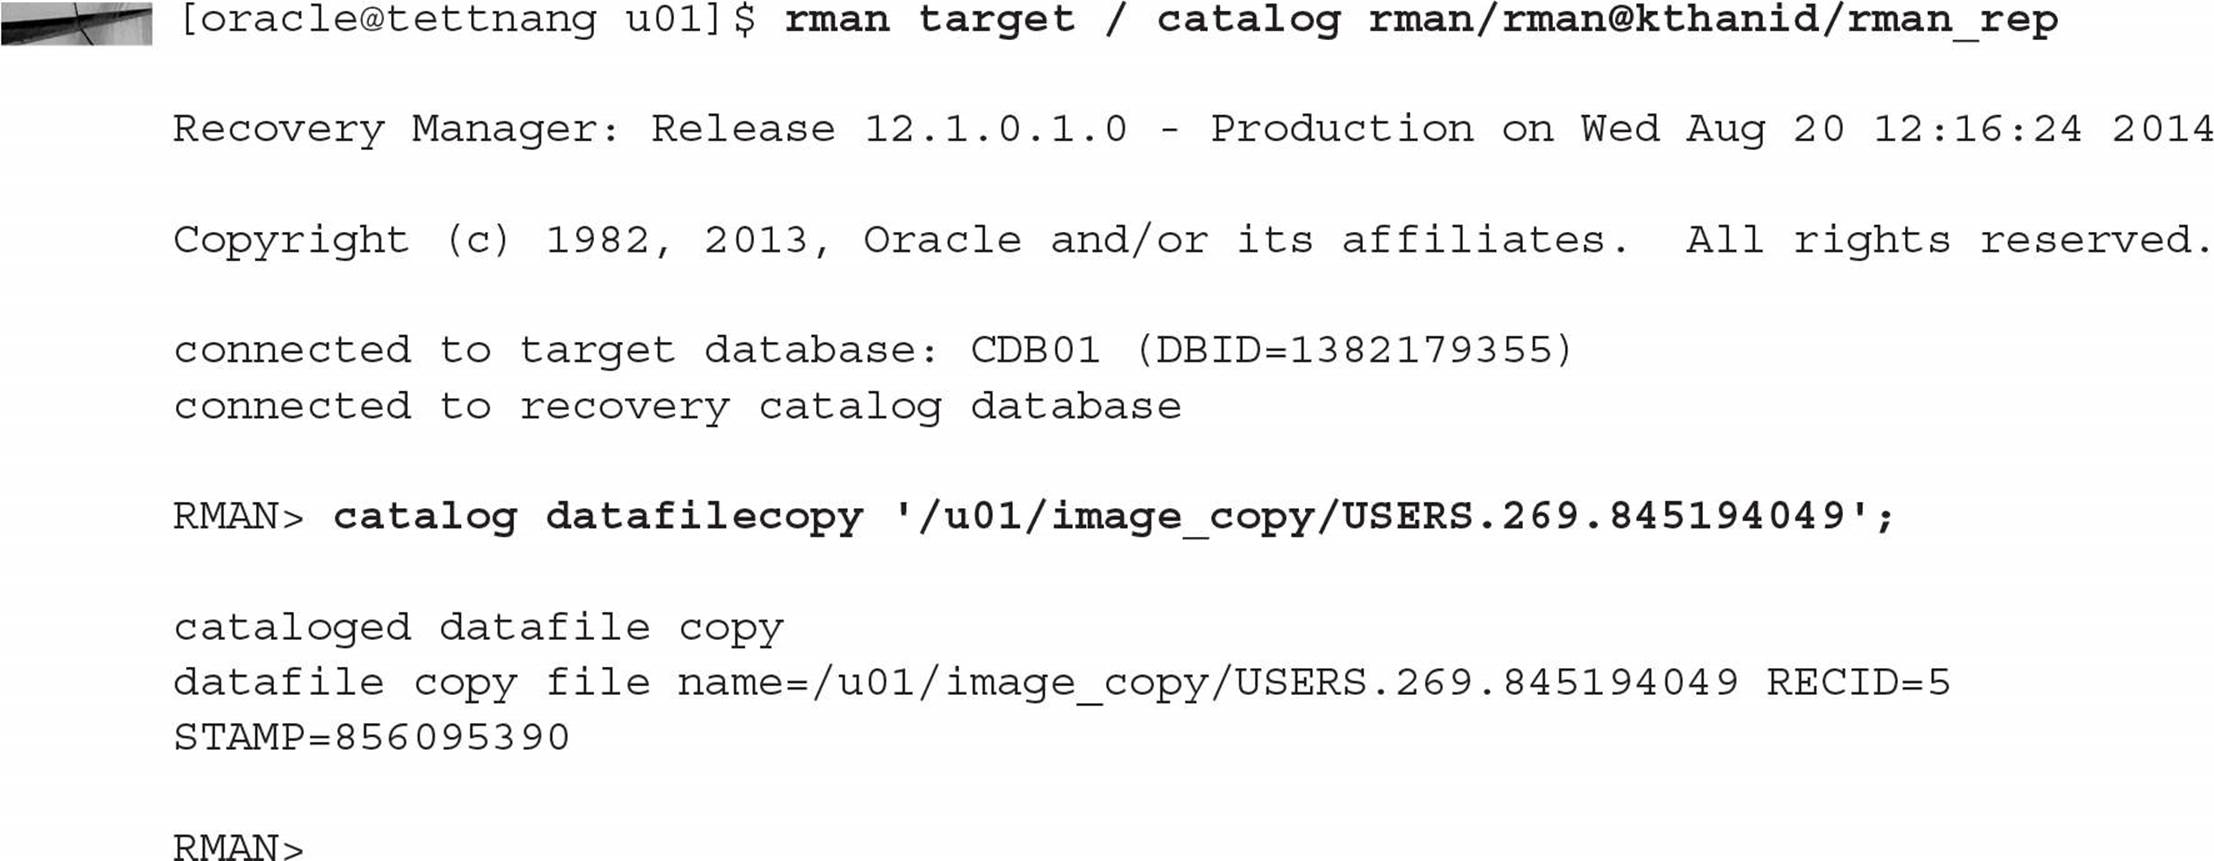
Now that the image copy is recorded in the RMAN repository, it may be considered for use in restore and recovery operations for the USERS tablespace.
Catalog Maintenance
Earlier in this chapter, we discussed the use of the BACKUP VALIDATE command to ensure that all the files that could be used in a backup operation were available, readable, and not corrupted. In that example, we found out that we had a mismatch between what the catalog reported and the archived redo logs on disk; some old archived redo logs were inadvertently removed from disk during a cleanup operation. You can use the CROSSCHECK command to update the recovery catalog with what archived redo log files are in the fast recovery area and which ones are missing:
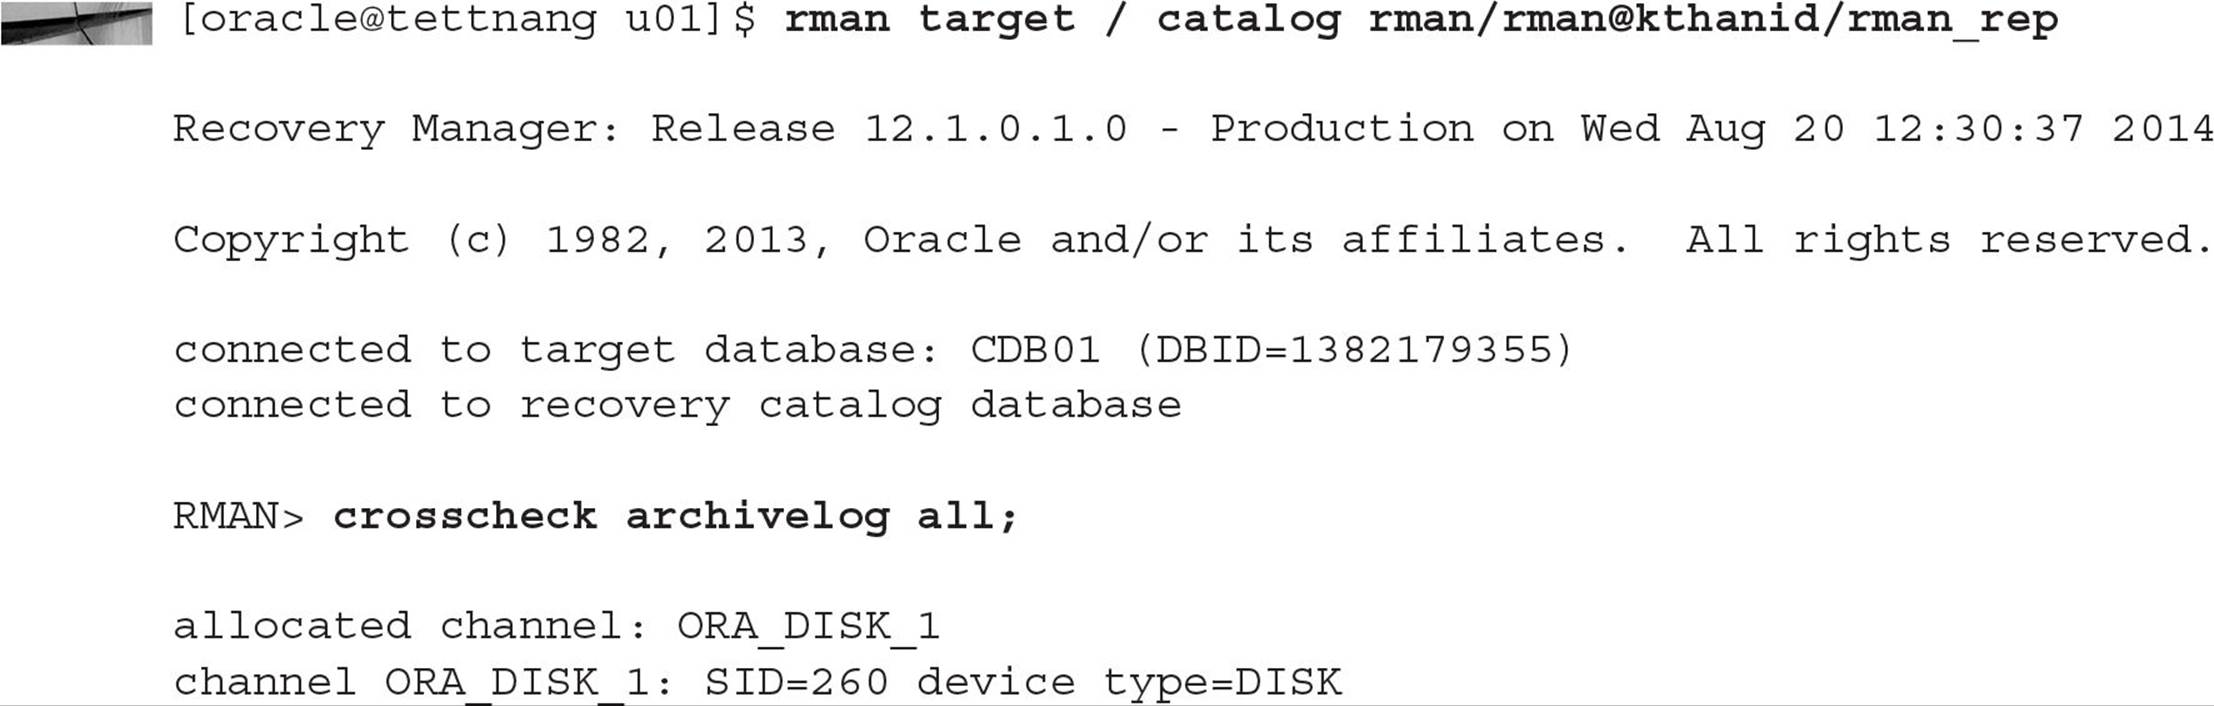
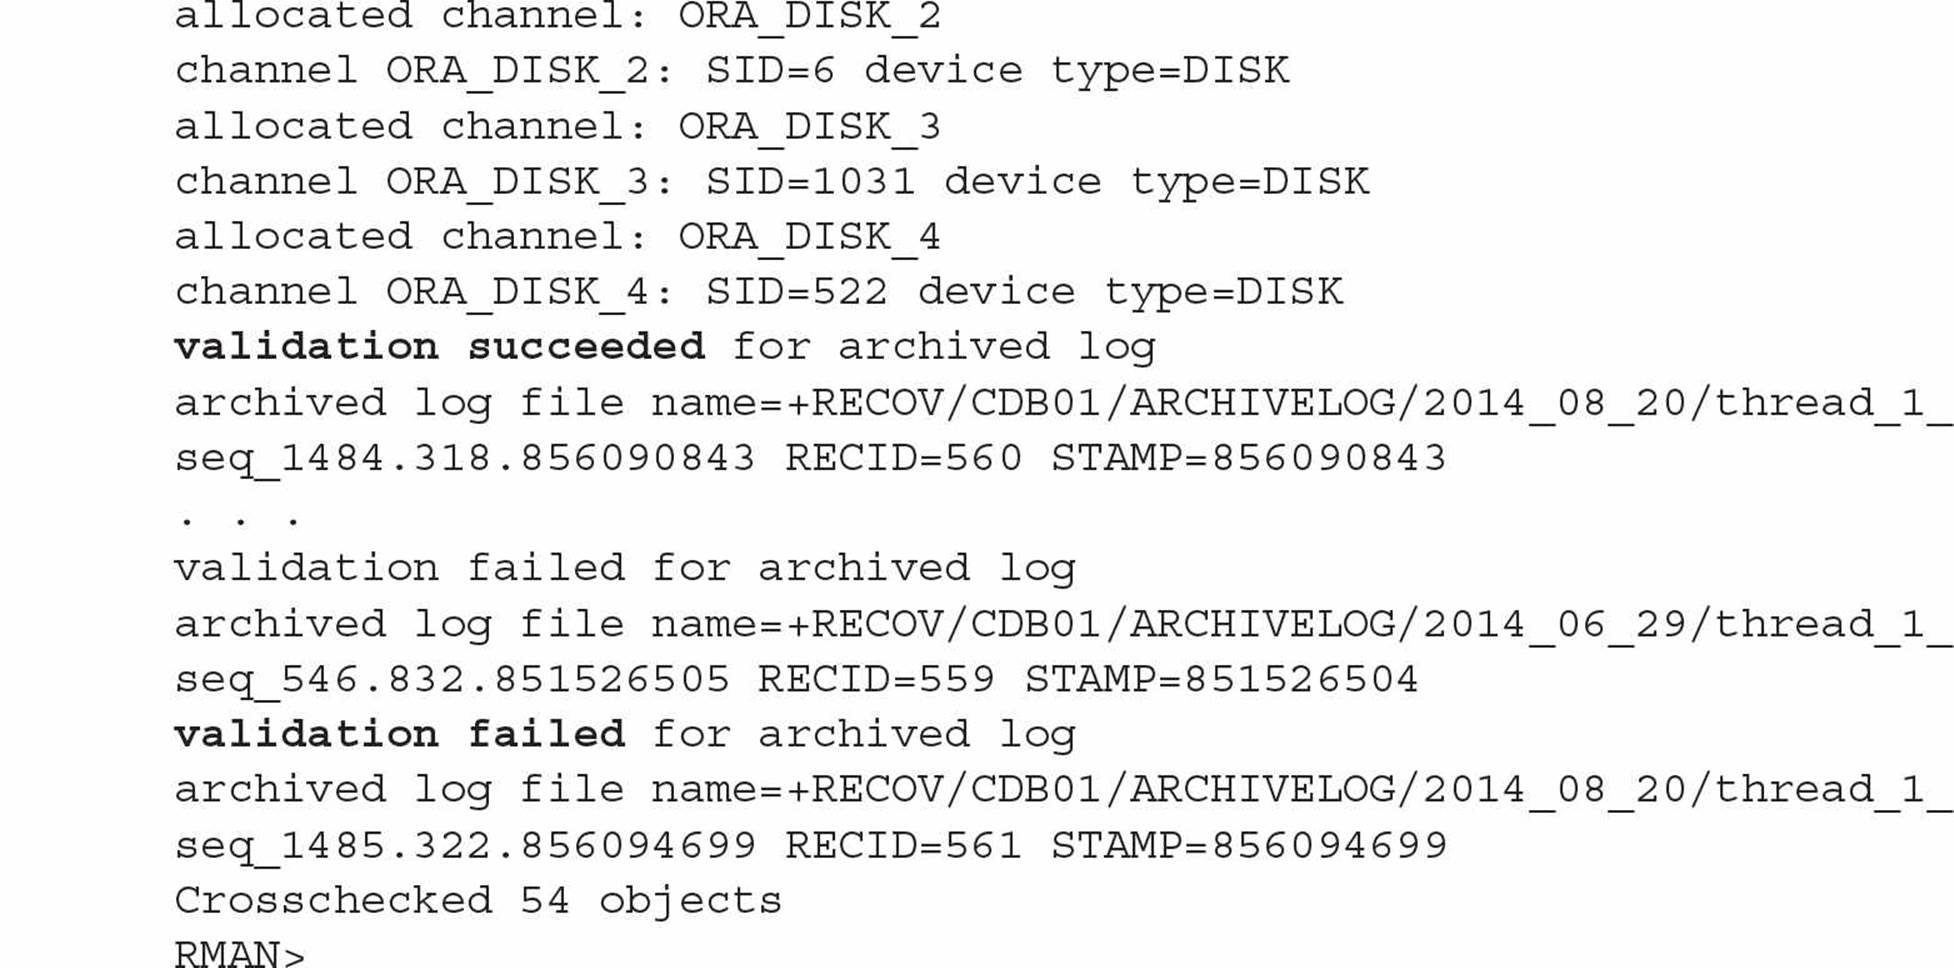
The missing archived redo logs are now marked as EXPIRED in the catalog, and they won’t be considered when validating backups or for performing restore or recovery operations.
All other datafiles that RMAN could consider for a backup operation, including archived redo logs, are available and readable.
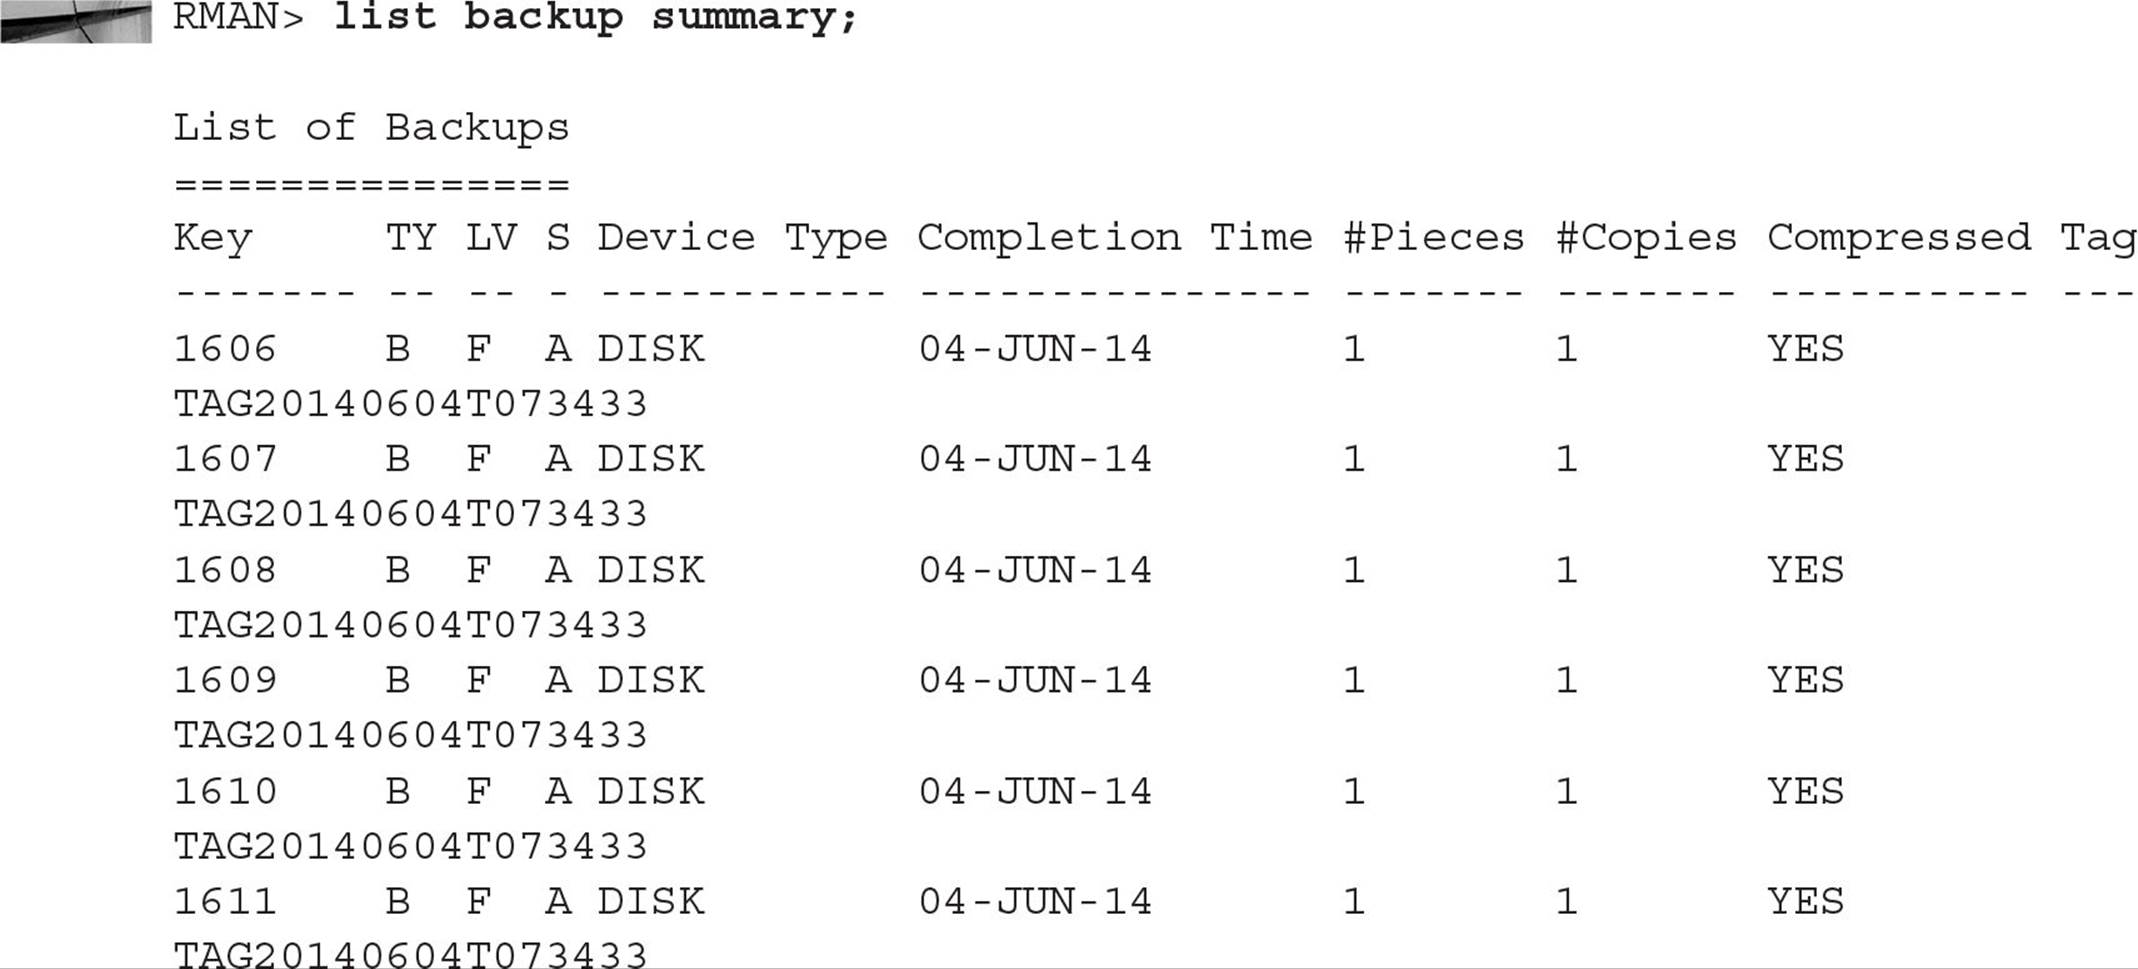
REPORT and LIST
All throughout this chapter, I’ve provided a number of examples of how to extract information from the recovery catalog, whether it resides in the target database control file or in a catalog database repository. We’ve used both the LIST and REPORT commands. The primary difference between these commands is in their complexity: The LIST command displays information about backupsets and image copies in the repository and lists the contents of scripts stored in the repository catalog:

In contrast, the REPORT command performs a more detailed analysis of the information in the recovery catalog; as in one of our previous examples, we used REPORT to identify which database files needed backups to comply with our retention policy. In the following example, we find out what the datafiles looked like back on August 19, 2014:
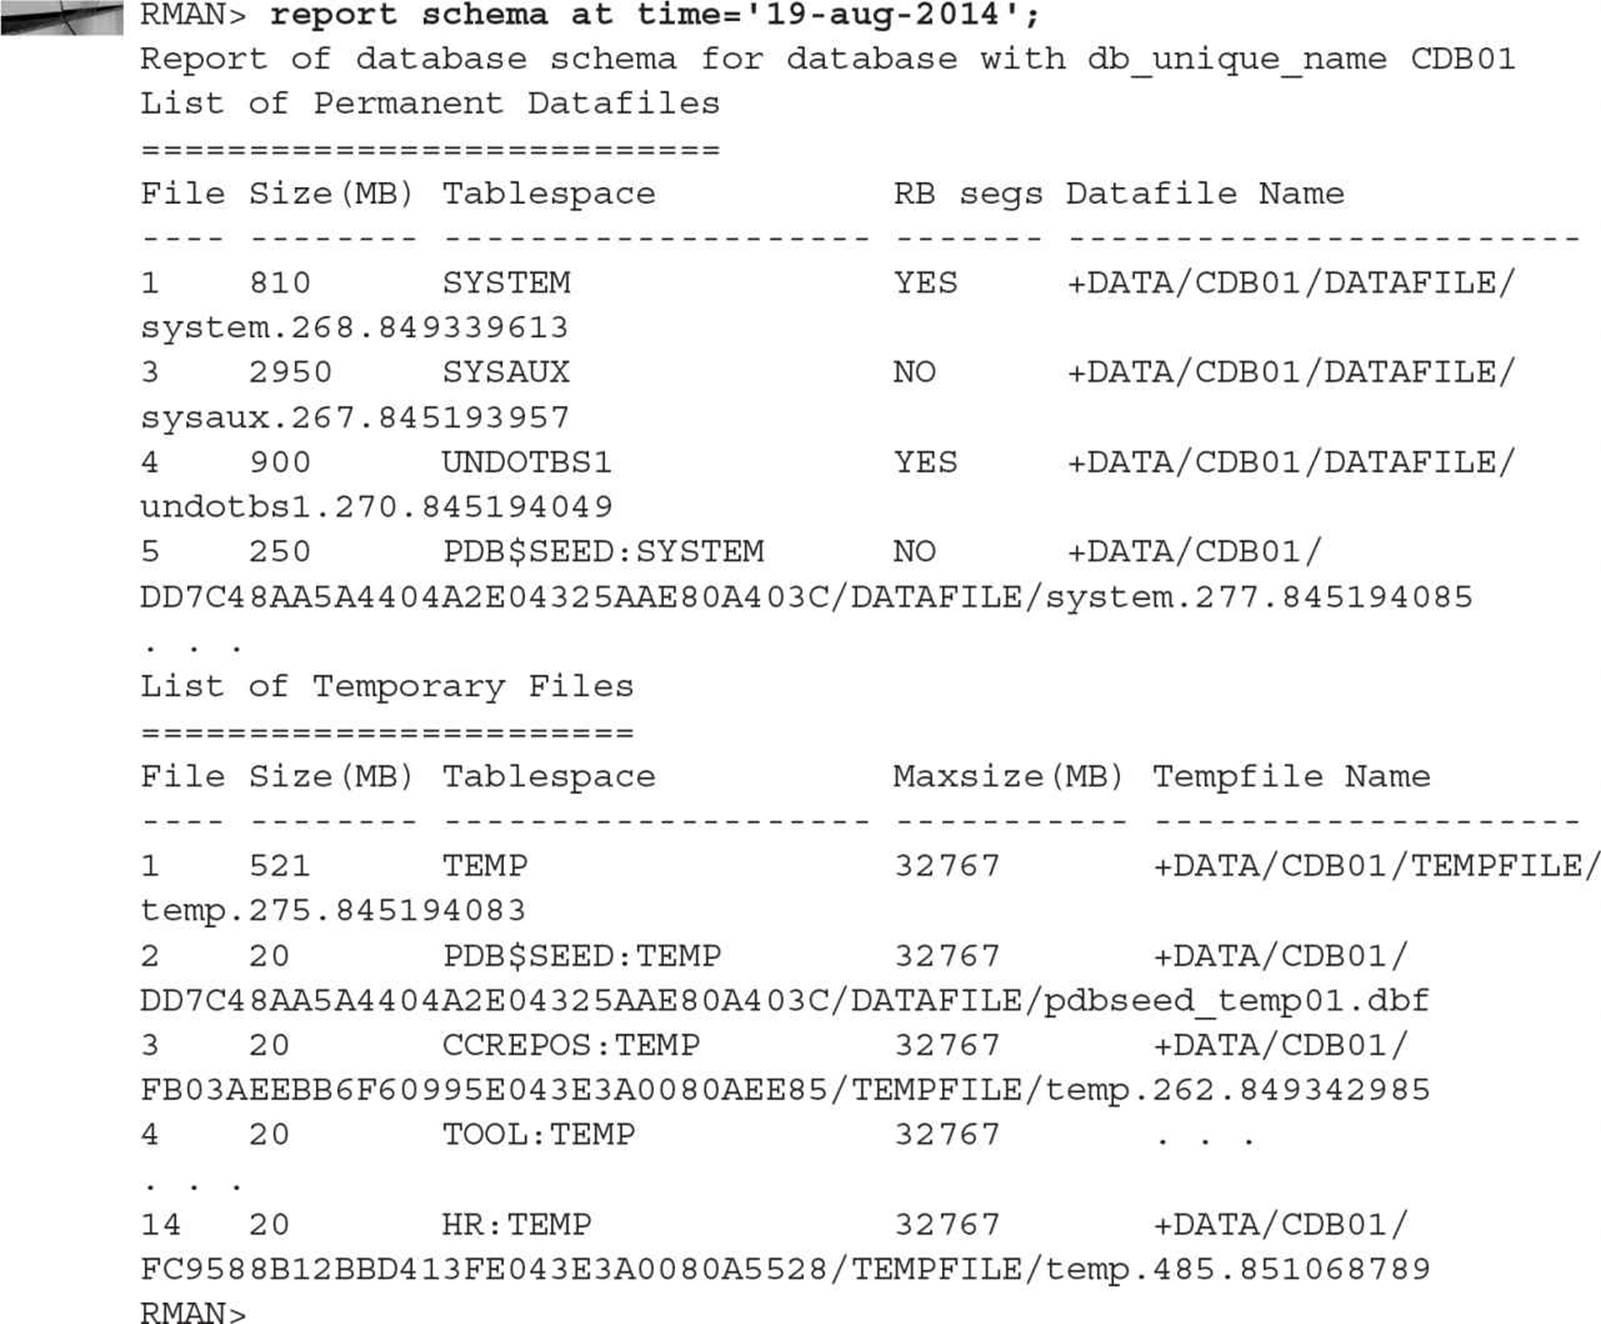
At some point between 8/19/2014 and today, we created the tablespace INET_STAR, as indicated by its omission from this report.
Summary
If you have not been using RMAN extensively since the release of Oracle Database 11g, you should be using it almost exclusively in Oracle Database 12c. RMAN can manage all aspects of physical backup and recovery for your departmental database or for hundreds of databases, including OLTP and data warehouse databases throughout an enterprise.
The features included with RMAN keep pace with the new features of the database. Backing up an entire container database or a pluggable database in Oracle 12c is as easy as backing up a non-CDB database in Oracle 11g. Other new features of RMAN, such as network support of compressed duplication of a database in parallel over a network to an auxiliary instance, means you may not need any intermediate RMAN backups on disk to support the duplication process.
Finally, having a recovery catalog makes it easy to recover an entire database even when you lose all datafiles and control files. If your environment has more than one production database, then maintaining a recovery catalog is worthwhile.


All materials on the site are licensed Creative Commons Attribution-Sharealike 3.0 Unported CC BY-SA 3.0 & GNU Free Documentation License (GFDL)
If you are the copyright holder of any material contained on our site and intend to remove it, please contact our site administrator for approval.
© 2016-2026 All site design rights belong to S.Y.A.