Oracle Database 12c DBA Handbook (2015)
PART
III
High Availability
CHAPTER
15
Oracle Data Guard
Oracle Data Guard provides a solution for high availability, enhanced performance, and automated failover. You can use Oracle Data Guard to create and maintain multiple standby databases for a primary database. The standby databases can be started in read-only mode to support reporting users and then returned to standby mode. Changes to the primary database can be automatically relayed from the primary database to the standby databases with a guarantee of no data lost in the process. The standby database servers can be physically separate from the primary server.
In this chapter, you will get an overview on how to administer an Oracle Data Guard environment, along with sample configuration files for a Data Guard environment.
Data Guard Architecture
In a Data Guard implementation, a database running in ARCHIVELOG mode is designated as the primary database for an application. One or more standby databases, accessible via Oracle Net, provide for failover capabilities. Data Guard automatically transmits redo information to the standby databases, where it is applied. As a result, the standby database is transactionally consistent. Depending on how you configure the redo apply process, the standby databases may be in sync with the primary database or may lag behind it. Figure 15-1 shows a standard Data Guard implementation.
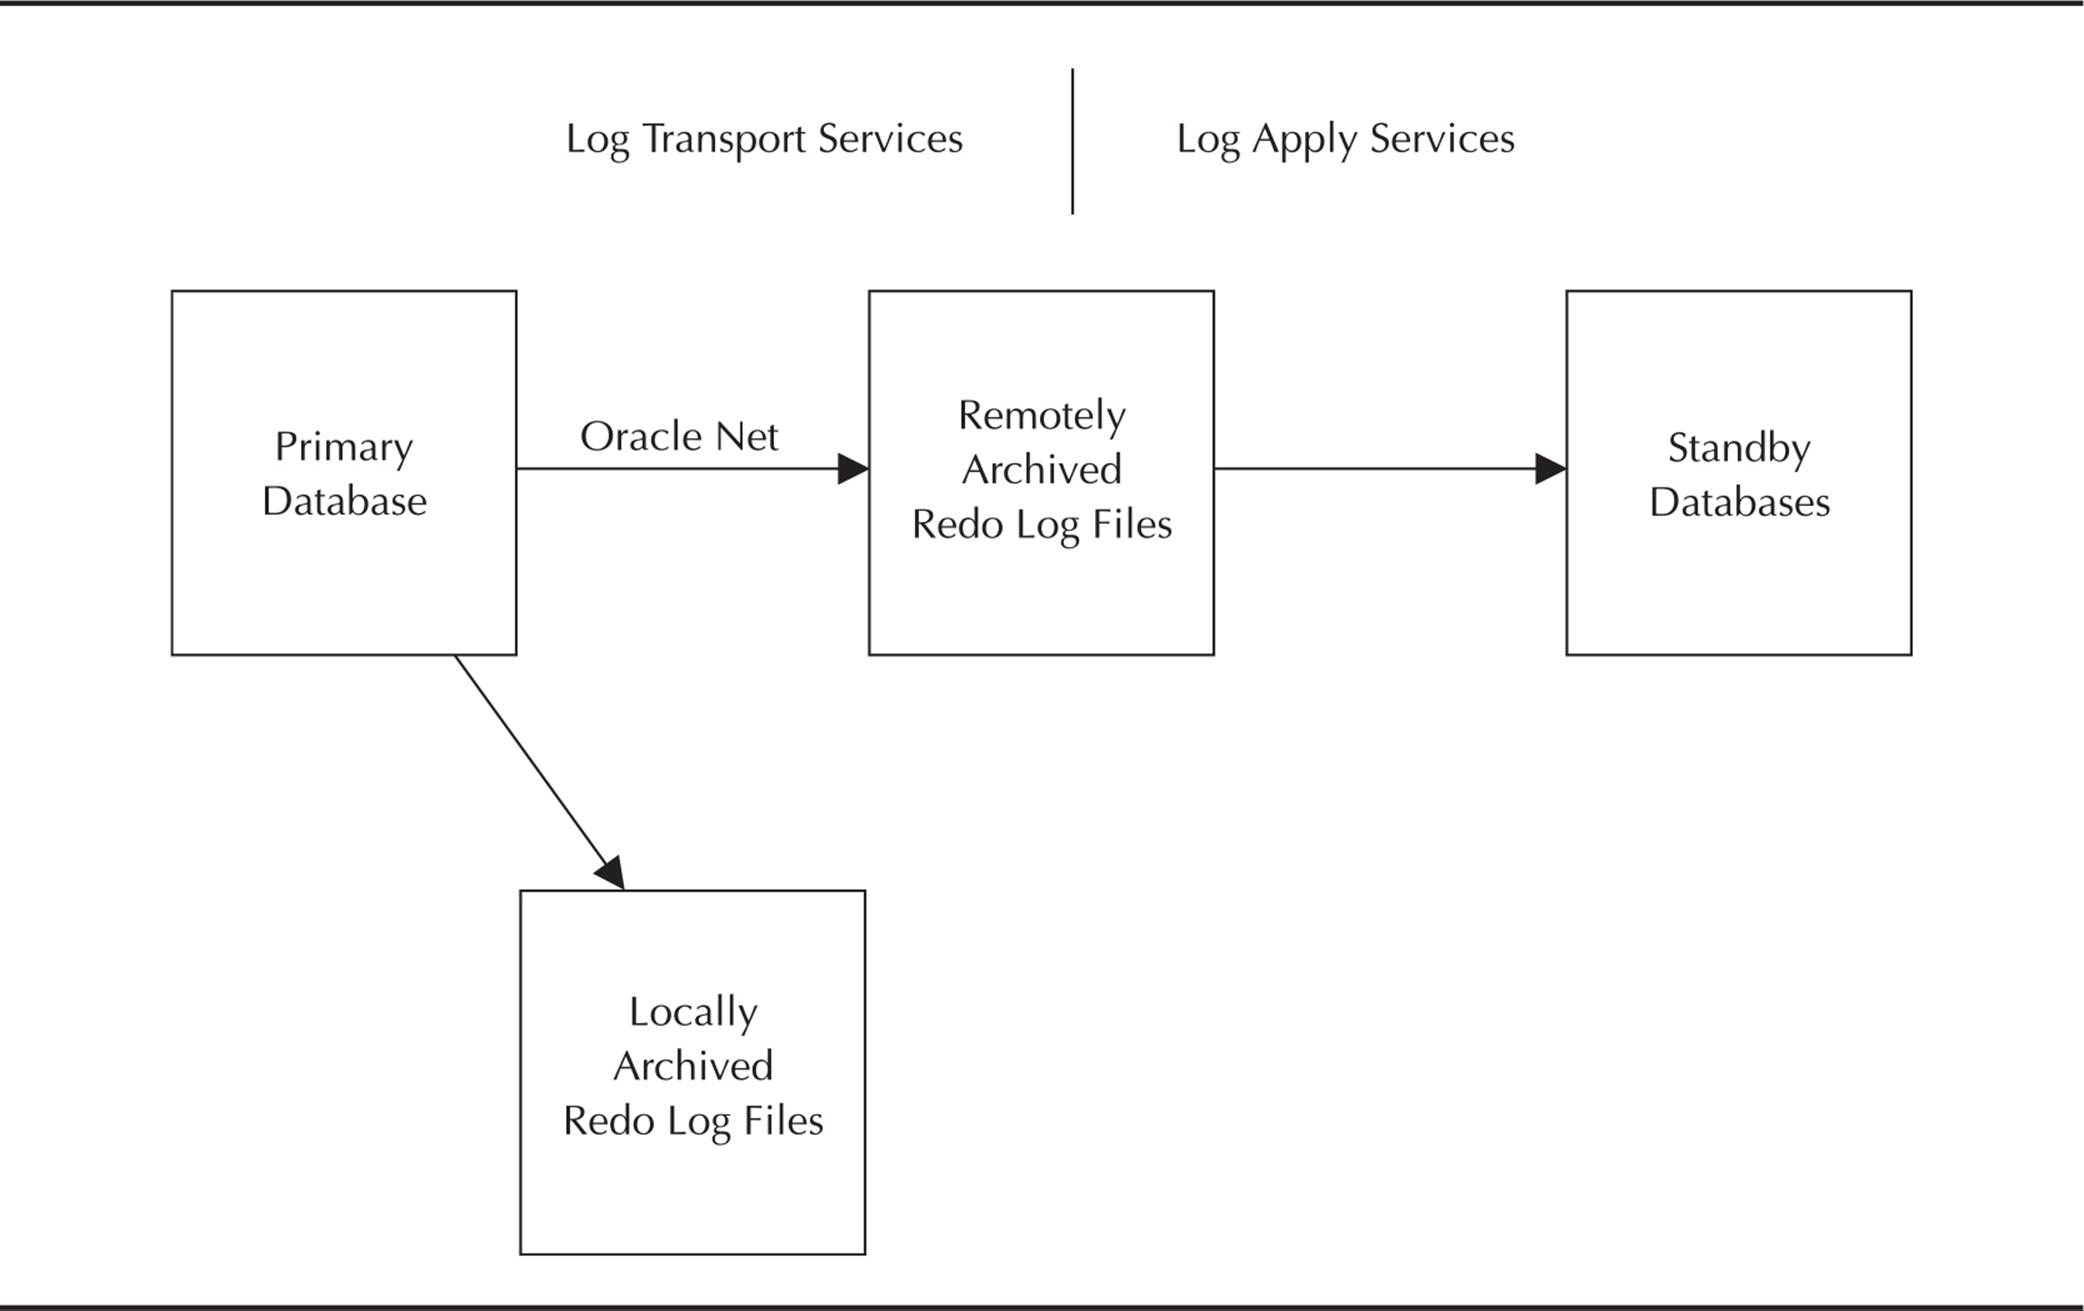
FIGURE 15-1. Simple Data Guard configuration
The redo log data is transferred to the standby databases via Log Transport Services, as defined via your initialization parameter settings. Log Apply Services apply the redo information to the standby databases. A third set of services, Global Data Services, simplify the process of making standby databases serve as the primary database.

NOTE
The primary database can be a single instance or a multi-instance Real Application Clusters implementation.
Physical vs. Logical Standby Databases
Two types of standby databases are supported: physical standbys and logical standbys. A physical standby database has the same structures as the primary database. A logical standby database may have different internal structures (such as additional indexes used for reporting or a different tablespace layout). You synchronize a logical standby database with the primary by transforming the redo data into SQL statements that are executed against the standby database.
Physical and logical standby databases serve different purposes. A physical standby database is a block-for-block copy of the primary database, so it can be used for database backups in place of the primary database. During disaster recovery, the physical standby looks exactly like the primary database it replaces.
A logical standby database, because it supports additional database structures, can more easily be used to support specific reporting requirements that would otherwise burden the primary database. Additionally, rolling upgrades of primary and standby databases can be performed with minimal downtime when logical standby databases are used. The type of standby to use depends on your needs; many environments start out using physical standby databases for disaster recovery and then add in additional logical standby databases to support specific reporting and business requirements.
NOTE
The operating system and platform architecture on the primary and standby locations do not need to be identical as of Oracle Database 11g. The directory structures for the primary and standby databases may differ, but you should minimize the differences to simplify administration and failover processes. If the standby is located on the same server as the primary, you must use a different directory structure for the two databases, and they cannot share an archive log directory. In addition, Oracle Data Guard is available only in Oracle Enterprise Edition. Also, not all cross-platform Data Guard replication is supported, even in Oracle Database 12c (12.1.0.2). See My Oracle Support note Data Guard Support for Heterogeneous Primary and Physical Standbys in Same Data Guard Configuration (ID 413484.1).
Data Protection Modes
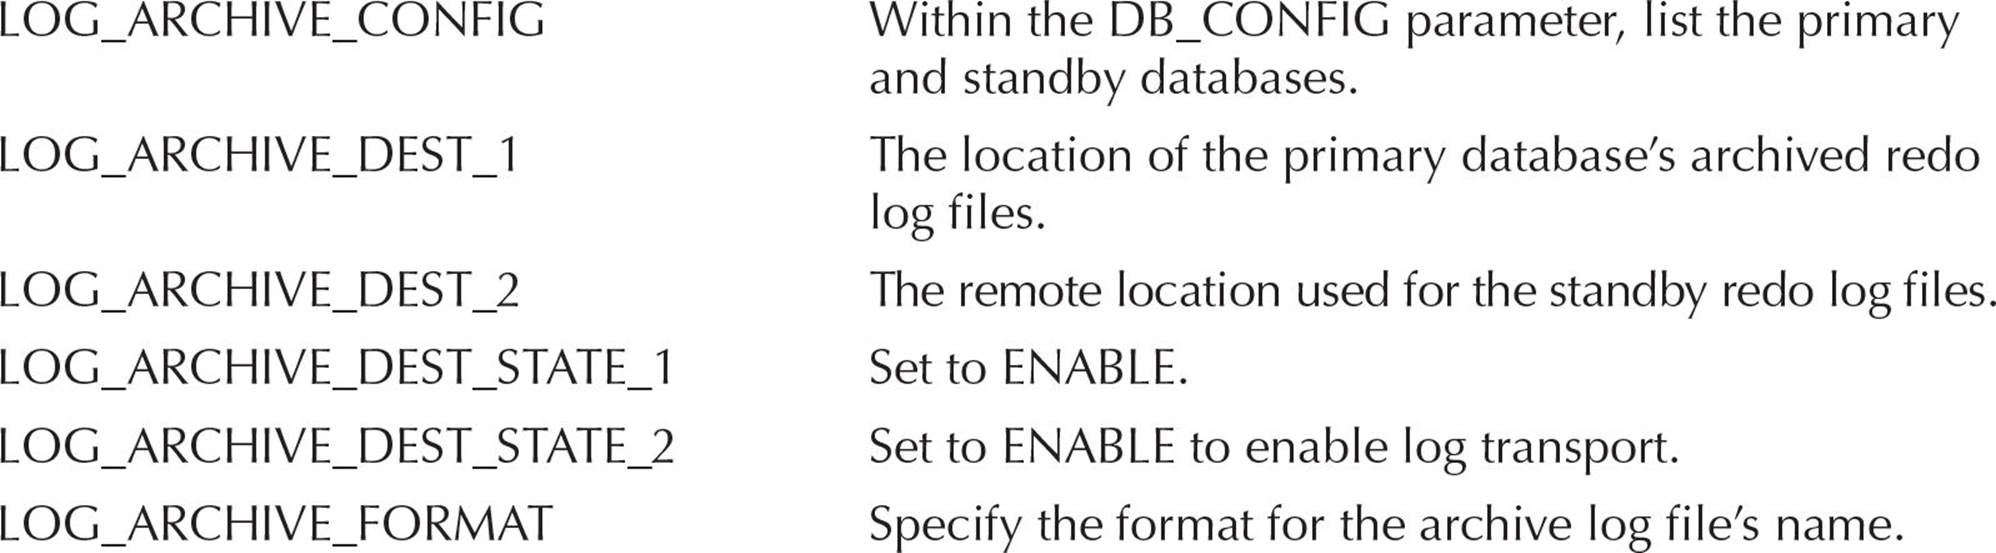
When you configure the primary and standby databases, you will need to determine the level of data loss that is acceptable to the business. In the primary database, you will define its archive log destination areas, at least one of which will refer to the remote site used by the standby database. The ASYNC, SYNC, ARCH, LGWR, NOAFFIRM, and AFFIRM attributes of the LOG_ARCHIVE_DEST_n parameter setting (see the upcoming Table 15-1) for the standby database will direct Oracle Data Guard to select among several modes of operation:
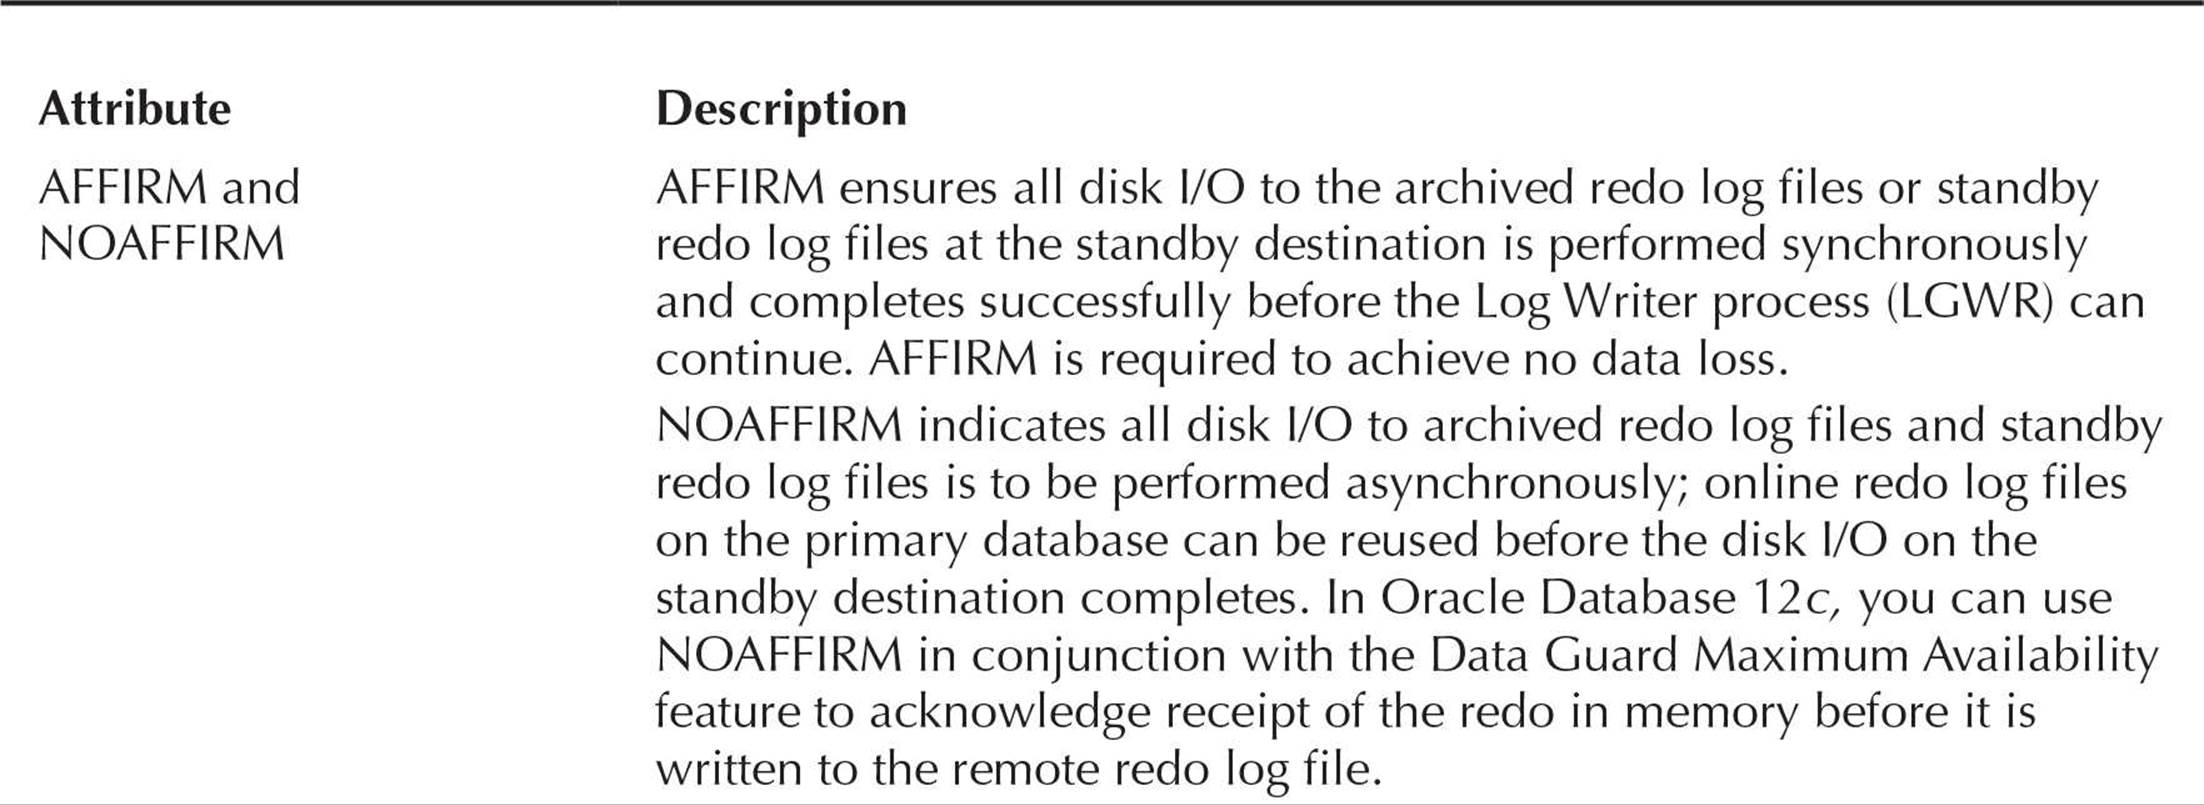

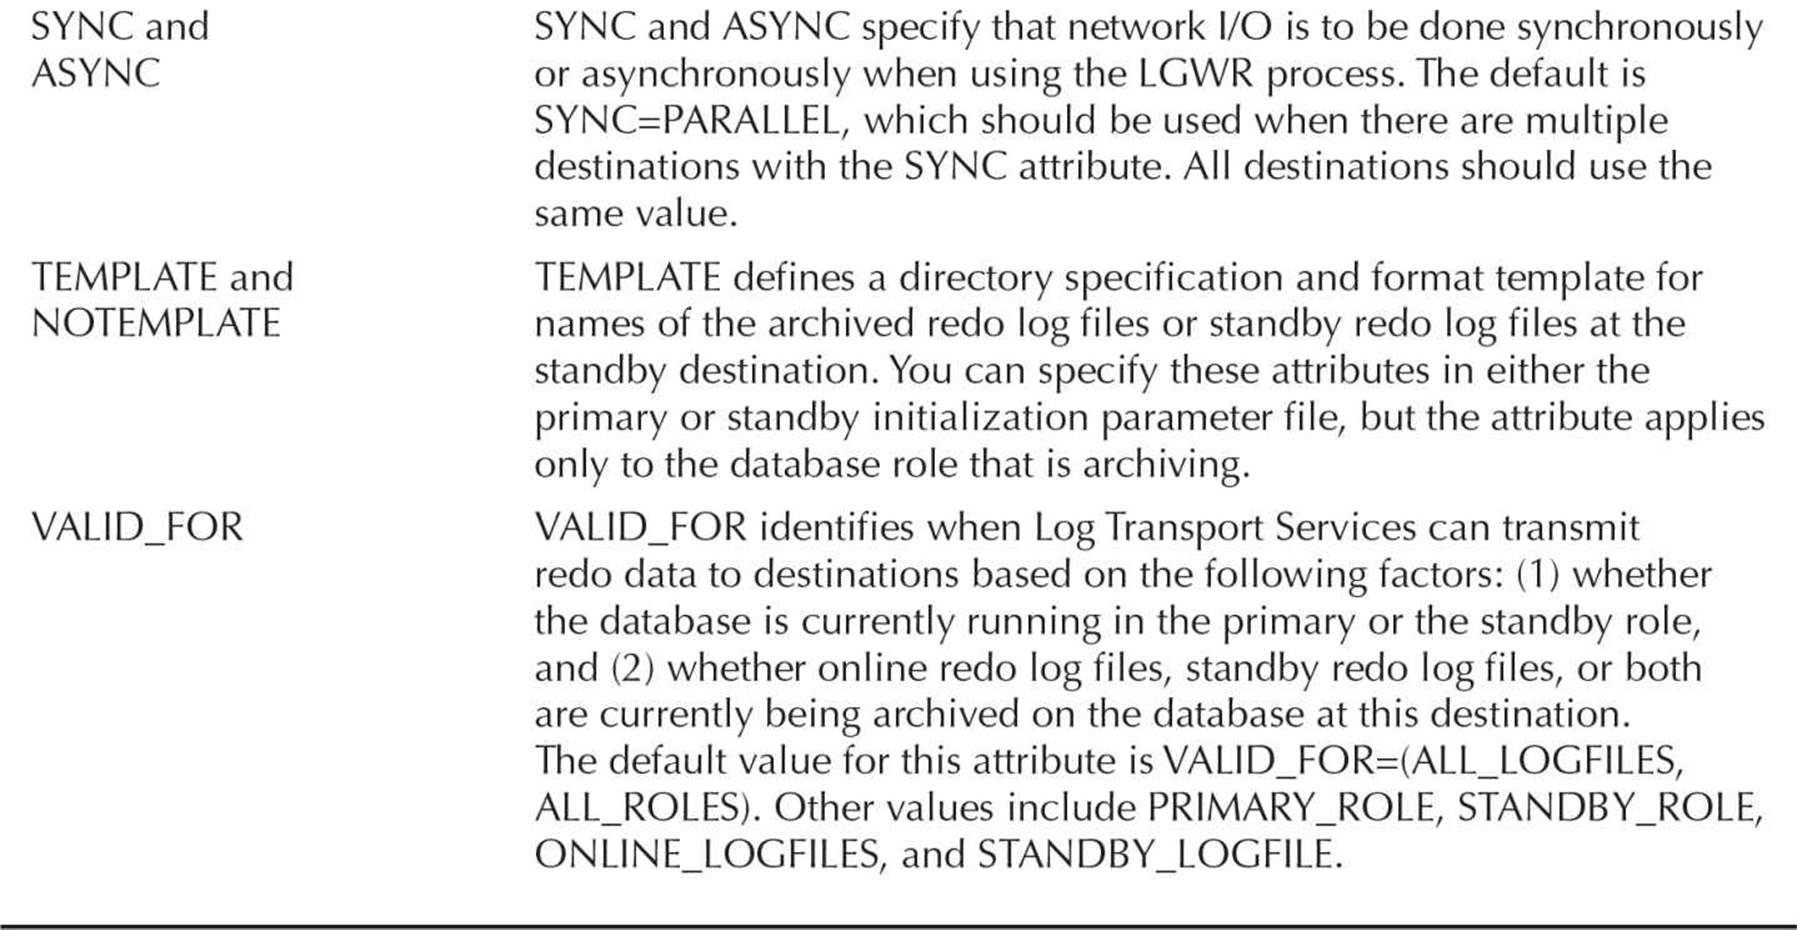
TABLE 15-1. LOG_ARCHIVE_DEST_n Parameter Attributes
![]() In maximum protection (or “no data loss”) mode, at least one standby location must be written to before a transaction commits in the primary database. The primary database shuts down if the standby database’s log location is unavailable.
In maximum protection (or “no data loss”) mode, at least one standby location must be written to before a transaction commits in the primary database. The primary database shuts down if the standby database’s log location is unavailable.
![]() In maximum availability mode, at least one standby location must be written to before a transaction commits in the primary database. If the standby location is not available, the primary database does not shut down. When the fault is corrected, the redo that has been generated since the fault is transported and applied to the standby databases.
In maximum availability mode, at least one standby location must be written to before a transaction commits in the primary database. If the standby location is not available, the primary database does not shut down. When the fault is corrected, the redo that has been generated since the fault is transported and applied to the standby databases.
![]() In maximum performance mode (the default), transactions can commit before their redo information is sent to the standby locations. Commits in the primary database occur as soon as writes to the local online redo logs complete. The writes to the standby locations are handled by the ARCn processes by default (up to 30 archiver processes in Oracle Database 12c).
In maximum performance mode (the default), transactions can commit before their redo information is sent to the standby locations. Commits in the primary database occur as soon as writes to the local online redo logs complete. The writes to the standby locations are handled by the ARCn processes by default (up to 30 archiver processes in Oracle Database 12c).
Once you have decided the type of standby and the data protection mode for your configuration, you can create your standby database.
LOG_ARCHIVE_DEST_n Parameter Attributes
As illustrated in the following sections, Oracle Data Guard configurations rely on a number of attributes within the LOG_ARCHIVE_DEST_n parameter. Table 15-1 summarizes the attributes available for this parameter. In almost all cases the attributes are paired; in some cases the second member of the pair simply serves to nullify the setting.
NOTE
LOG_ARCHIVE_DEST and LOG_ARCHIVE_DUPLEX_DEST are deprecated unless you do not have Oracle Database 12c Enterprise Edition, otherwise you can still use these parameters. With Enterprise Edition, use LOG_ARCHIVE_DEST_n instead.
Creating the Standby Database Configuration
You can use SQL*Plus, Oracle Enterprise Manager (OEM), or Data Guard-specific tools to configure and administer Data Guard configurations. The parameters you set will depend on the configuration you choose.
If the primary and standby databases are on the same server, you will need to set a value for the DB_UNIQUE_NAME parameter. Because the directory structures for the two databases will be different, you must either manually rename files or define values for the DB_FILE_NAME_CONVERT and LOG_FILE_NAME_CONVERT parameters in the standby database. You must set up unique service names for the primary and standby databases via the SERVICE_NAMES initialization parameter.
If the primary and standby databases are on separate servers, you can use the same directory structures for each, avoiding the need for the filename conversion parameters. If you use a different directory structure for the database files, you will need to define the values for the DB_FILE_NAME_CONVERT and LOG_FILE_NAME_CONVERT parameters in the standby database.
In physical standby databases, all the redo comes from the primary database. When physical standby databases are opened in read-only mode, no redo is generated. Oracle Data Guard does, however, use archived redo log files to support the replication of the data and SQL commands used to update the standby databases.
NOTE
For each standby database, you should create a standby redo log file to store redo data received from the primary database.
Preparing the Primary Database
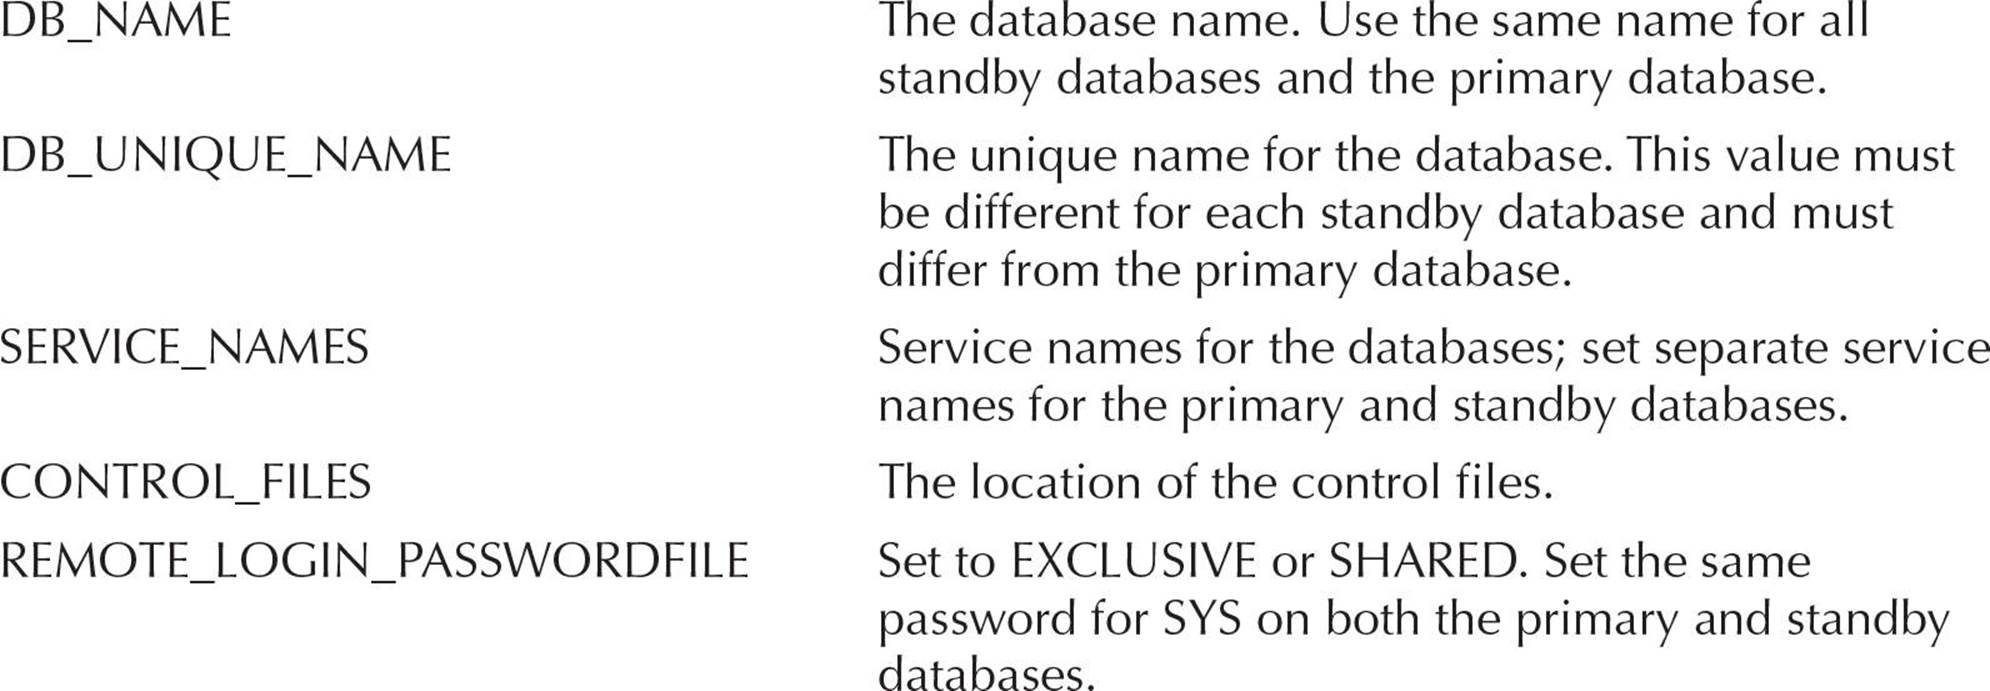
On the primary database, make sure you have set values for the following parameters, which impact the transfer of the redo log data. The first five parameters are standard for most databases; set REMOTE_LOGIN_PASSWORDFILE to EXCLUSIVE to support remote access by SYSDBA-privileged users.
The LOG_ARCHIVE-related parameters, listed next, will configure how the Log Transport Services work.
For this example, assume that the primary database has a DB_UNIQUE_NAME value of HEADQTR and the physical standby database has a DB_UNIQUE_NAME value of SALESOFC. The SERVICE_NAMES values can be the same as the DB_UNIQUE_NAME values, but this is not a requirement. In fact, the SERVICE_NAMES value may be unique to a single node in a RAC instance.
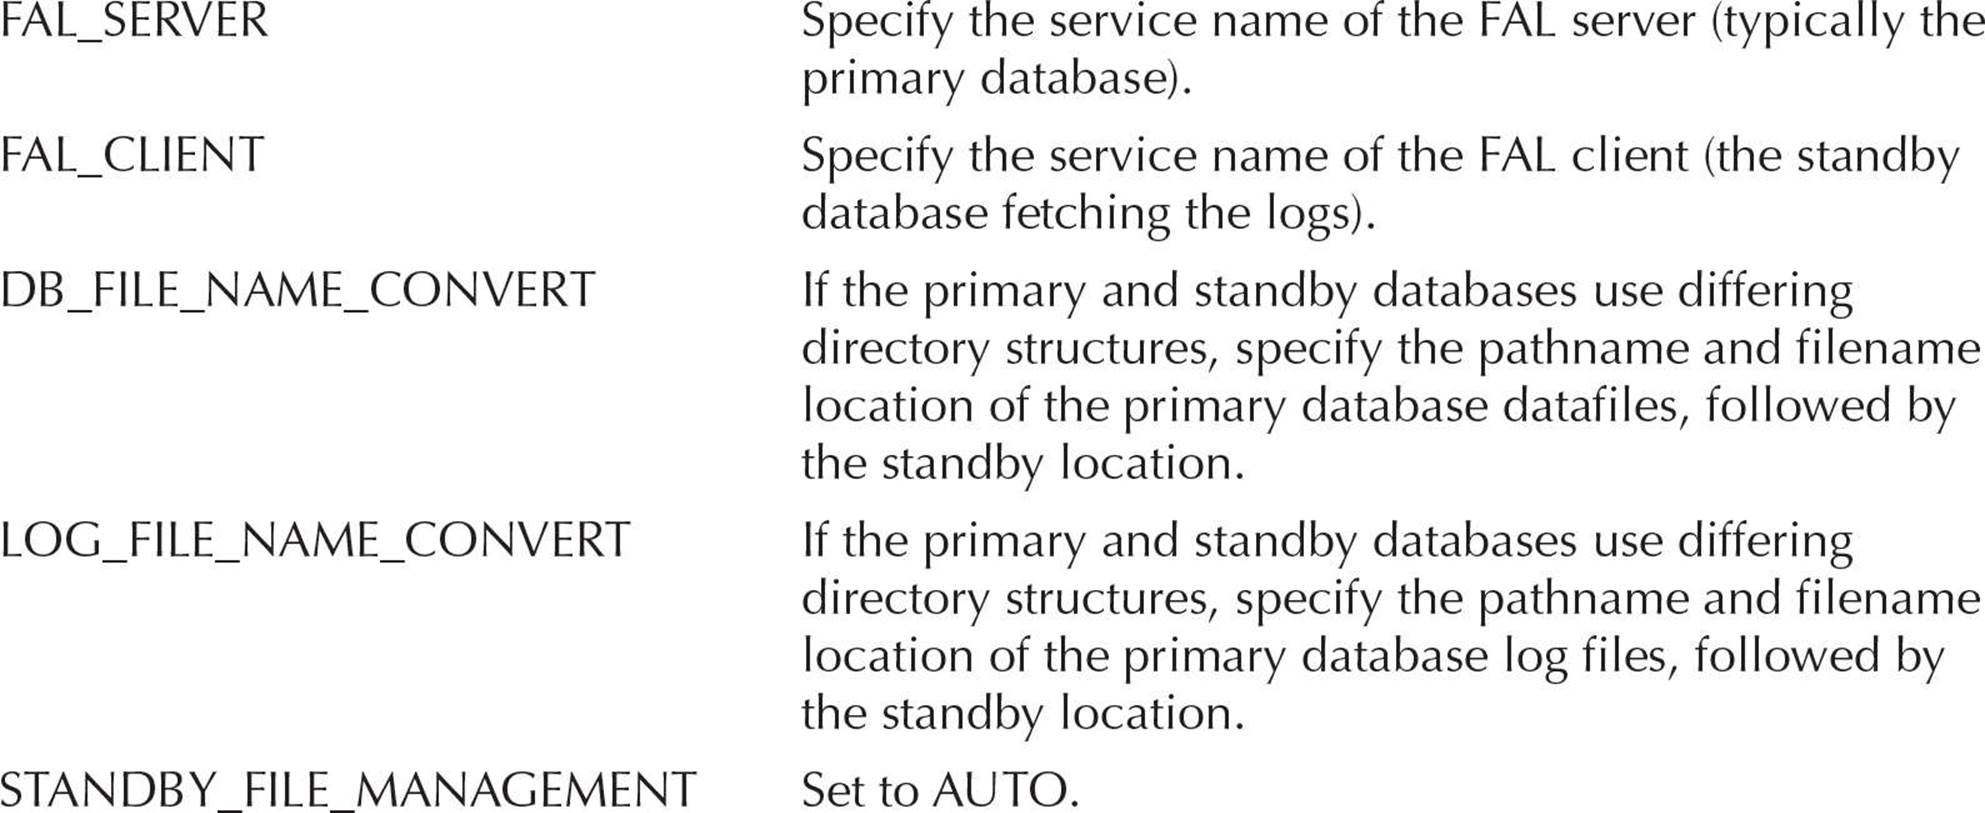
The LOG_ARCHIVE_CONFIG parameter setting may resemble the following:
![]()
There are two LOG_ARCHIVE_DEST_n entries—one for the local copy of the archived redo log files, and a second for the remote copy that will be shipped to the physical standby database:


The LOG_ARCHIVE_DEST_1 parameter specifies the location of the archived redo log files for the primary database (as specified via the DB_UNIQUE_NAME parameter). The LOG_ARCHIVE_DEST_2 parameter gives the service name of the physical standby database as its location. For each of these destinations, the corresponding LOG_ARCHIVE_DEST_STATE_n parameter should have a value of ENABLE.
The standby role-related parameters include the FAL (Fetch Archive Log) parameters used prior to Oracle Database 10g to resolve gaps in the range of archive logs copied to the standby databases:
TIP
FAL_SERVER and FAL_CLIENT should both be defined on each node so they are ready to switch back to their original roles after a role switch.
Sample settings for these parameters are shown in the following listing:

If the primary database is not already in ARCHIVELOG mode, enable archiving by issuing the ALTER DATABASE ARCHIVELOG command while the database is mounted but not open. In addition, enable forced logging in the primary database to ensure that all unlogged direct writes will be propagated to the standby database by using the ALTER DATABASE FORCE LOGGING command.
Once the log-related parameters have been set, you can begin the process of creating the standby database.
Step 1: Back Up the Primary Database’s Datafiles
First, perform a physical backup of the primary database. Oracle recommends using the RMAN utility to back up the database; you can use the DUPLICATE command within RMAN to automate the process of creating the standby database.
Step 2: Create a Control File for the Standby Database
In the primary database, issue the following command to generate a control file that will be used for the standby database:
![]()
Note that you specify the directory and filename where you want the control file to be created. Also, do not use the same directory and control file name as you use for the primary database.
Step 3: Create an Initialization Parameter File for the Standby Database
In the primary database, create a parameter file from the server parameter file:
![]()
Edit this initialization file to set the proper values for the standby database. Set the standby database’s values for DB_UNIQUE_NAME, SERVICE_NAMES, CONTROL_FILES, DB_FILE_NAME_CONVERT, LOG_FILE_NAME_CONVERT, LOG_ARCHIVE_DEST_n, INSTANCE_NAME, FAL_SERVER, and FAL_CLIENT. The filename conversions should be the same as in the primary database—you want to convert the filenames from the primary database to the standby database format when the redo information is applied:
In the standby environment, the LOG_ARCHIVE_DEST_1 parameter points to its local archive log destination, and LOG_ARCHIVE_DEST_2 points to the primary database’s service name. If the roles of the two databases are switched, the original primary database will be able to serve as the standby database. While the standby database is running in standby mode, the LOG_ARCHIVE_DEST_2 value will be ignored.
NOTE
Set the COMPATIBLE parameter to the same value for both the primary and standby databases. To take advantage of the new features in Oracle 12c, set the COMPATIBLE value to 12.1.0 or higher. Once COMPATIBLE is set to 12.1.0, you cannot reset it to a lower value.
Step 4: Copy the Database Files to the Standby Database Location
Copy the datafiles from Step 1, the control file from Step 2, and the standby initialization file from Step 3 to the standby database location. Put the files in the proper directories (as defined by the CONTROL_FILES, DB_FILE_NAME_CONVERT, and LOG_FILE_NAME_CONVERT parameters). Alternatively, use an RMAN backup of the primary database to create the standby database files.
Step 5: Configure the Standby Database Environment
At this point, the files are in place. You need to create the proper environment variables and services to allow an instance to access the files. For example, in a Windows environment you should use the oradim utility to create a new service, as shown in this example:
![]()
Next, create a password file for the standby database via the orapwd utility (see Chapter 2 for details on creating a new password file).
Next, create the Oracle Net parameters and services needed to access the standby database. In the standby environment, create an Oracle Net listener service for the standby database. In the standby server’s sqlnet.ora file, set the SQLNET.EXPIRE_TIME parameter to 1 to activate broken-connection detection after one minute. See Chapter 17 for further details on Oracle Net connections.
Next, create a service name entry for the standby database in the tnsnames.ora file and then distribute that update to both the standby and primary database servers.
If the primary database has an encryption wallet, copy the wallet to the standby database system and configure the standby database to use this wallet; the wallet must be re-copied from the primary to all standby databases whenever the master encryption key is updated.
Lastly, create a server parameter file via the CREATE SPFILE FROM PFILE command, passing the name and location of the standby parameter file as input to that command.
Step 6: Start the Standby Database
From within SQL*Plus, start the standby database in MOUNT mode, as shown in the following example:
![]()
NOTE
You can add new temporary files to the temporary tablespaces in the standby database. Adding temporary files will support sorting operations required for reporting activity within the standby database if the standby database is going to be used for read-only operations such as reporting.
Oracle recommends that you create the same number of online redo log files on each standby database; you could create fewer to speed up the migration process, but if there are not at least two, then the instance will not open.
Start the redo application process within the standby database via the following ALTER DATABASE command:

Step 7: Verify the Configuration
To test the configuration, go to the primary database and force a log switch to occur via the ALTER SYSTEM command, as shown here:
![]()
The primary database’s redo log data should then be copied to the standby location.
On the standby database, you can query the V$ARCHIVED_LOG view or use the ARCHIVE LOG LIST command to see which archived logs have been applied to the database. As new logs are received from the primary database and applied to the standby, new rows will be added to the listing in V$ARCHIVED_LOG.
Creating Logical Standby Databases
Logical standby databases follow many of the same steps used to create physical standby databases. Because they rely on the re-execution of SQL commands, logical standby databases have greater restrictions on their use. If any of your tables in the primary database use the following datatypes, they will be skipped during the redo application process:
![]() BFILE
BFILE
![]() ROWID, UROWID
ROWID, UROWID
![]() User-defined datatypes
User-defined datatypes
![]() Identity columns
Identity columns
![]() Objects with nested tables and REFs
Objects with nested tables and REFs
![]() Collections (varying arrays, nested tables)
Collections (varying arrays, nested tables)
![]() Spatial datatypes
Spatial datatypes
NOTE
Support for logical replication of XMLtype was added in Oracle Database 12c Release 1 (12.1.0.1). Oracle’s Extended Datatype Support (EDS) supports most datatypes that do not otherwise have native redo-based support.
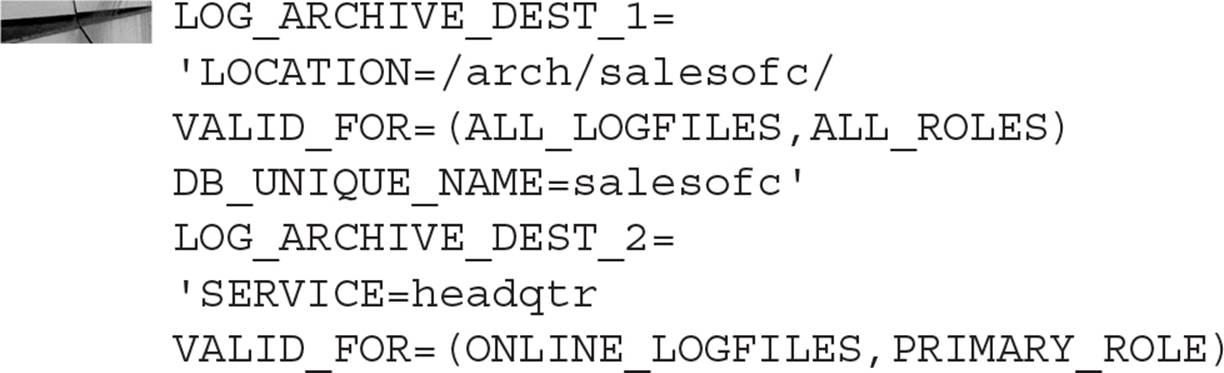
Additionally, tables that use table compression and the schemas that are installed with the Oracle software are skipped during redo application. The DBA_LOGSTDBY_UNSUPPORTED view lists the objects that are not supported for logical standby databases. The DBA_LOGSTDBY_SKIP view lists the schemas that will be skipped. Figure 15-2 shows the processing flow for the SQL apply architecture for a logical standby database.
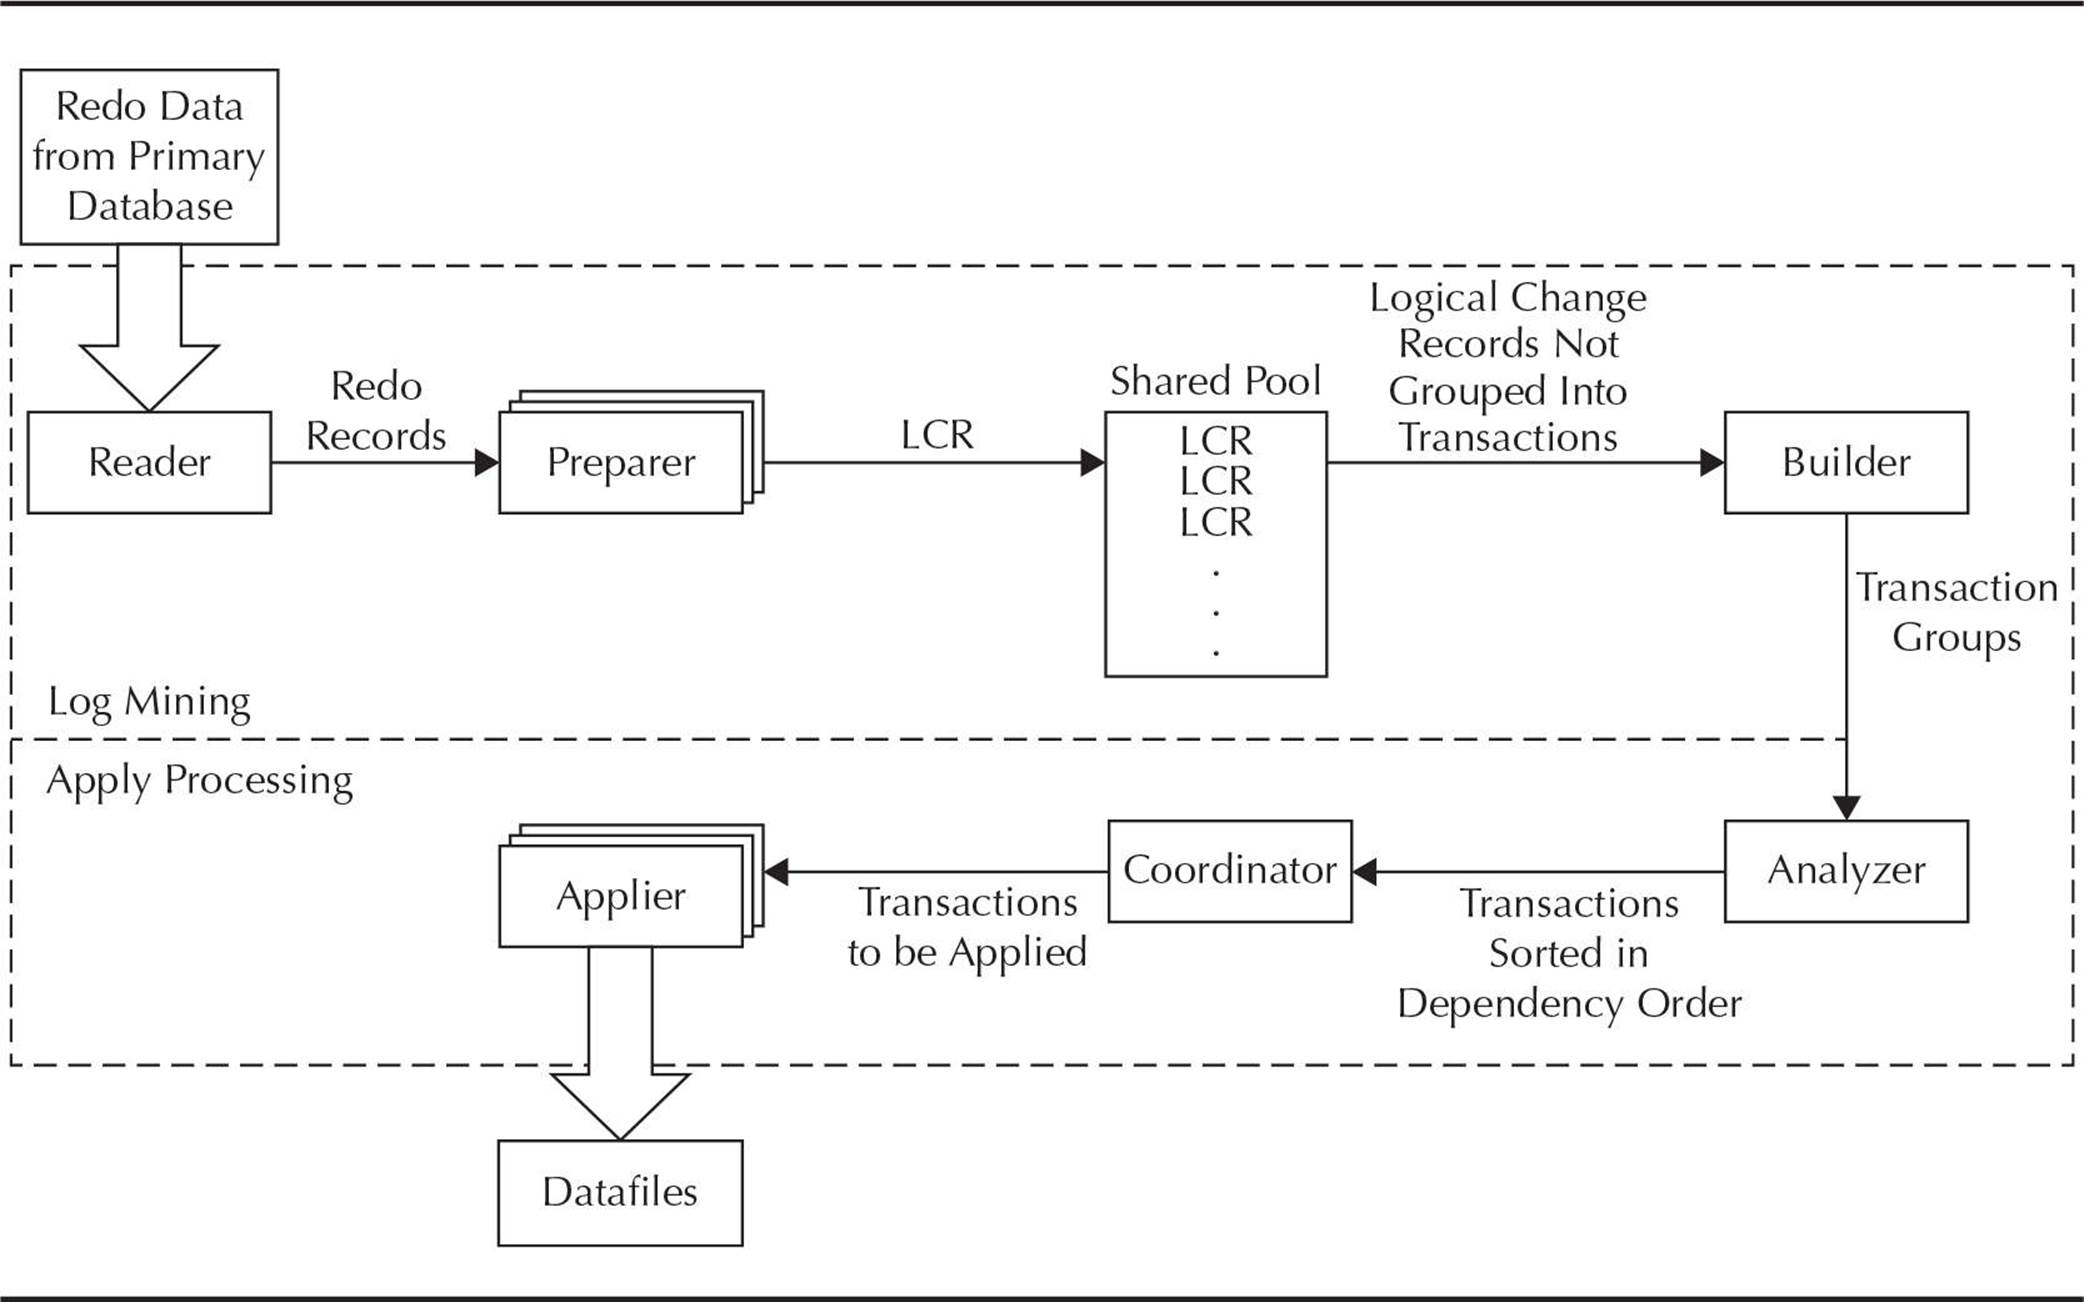
FIGURE 15-2. SQL apply process for logical standby databases
A logical standby database is not identical to the primary database. Each transaction that is executed in the logical standby database must be the logical equivalent of the transaction that was executed in the primary database. Therefore, you should make sure your tables have the proper constraints on them—primary keys, unique constraints, check constraints, and foreign keys—so the proper rows can be targeted for update in the logical standby database. You can query DBA_LOGSTDBY_NOT_UNIQUE to list tables that lack primary key or unique constraints in the primary database.
To create a logical standby database, follow the steps outlined in the remainder of this section.
Step 1: Create a Physical Standby Database
Following the steps in the prior section of this chapter, create a physical standby database. After you create and start up the physical standby, stop the redo apply process on the physical standby to avoid applying changes past the redo that contains the supplemental log information:
![]()
Step 2: Enable Supplemental Logging
Supplemental logging on the primary database generates additional information in the redo log. That information is then used during the redo application process in the standby database to make sure the correct rows are affected by the generated SQL. To add primary key and unique index information to the redo data, issue the following command in the primary database:
![]()
This procedure waits for all existing transactions to complete; if there are long-running transactions on the primary database, this process will not finish until those transactions commit or roll back.
Step 3: Transition the Physical Standby to a Logical Standby
The redo log files have the information necessary to convert your physical database to a logical database; run this command to continue redo log data application to the physical standby database until the moment you’re ready to convert to a logical standby:
![]()
Oracle automatically stores the name of your new logical standby database, new_db_name, in the SPFILE. Otherwise, this command generates a message reminding you to change the DB_NAME parameter in your initialization parameter file after shutting down the database.
Physical standby databases operate in read-only mode; logical standby databases are open for writes and generate their own redo data. In the initialization file for the logical standby database, specify destinations for the logical standby database’s redo data (LOG_ARCHIVE_DEST_1) and the incoming redo from the primary database (in this example, LOG_ARCHIVE_DEST_3 will be used to avoid conflicts with the earlier LOG_ARCHIVE_DEST_2 setting). You do not want a logical standby database to have the LOG_ARCHIVE_DEST_2 destination enabled and pointing back to the primary database.
Shut down and start up the database and change these parameters:

Step 4: Start the Logical Standby Database
Open the logical standby database using its new initialization parameter file or SPFILE as follows:
![]()
Because this is the first time the database is opened after being converted to a standby, the database’s global name is adjusted to match the new DB_NAME initialization parameter.
Step 5: Start the Redo Application Process
Within the logical standby database, you can now start the redo application process:
![]()
To see the logs that have been received and applied to the logical standby database, query the DBA_LOGSTDBY_LOG view. You can query the V$LOGSTDBY view to see the activity log of the logical standby redo application process. The logical standby database is now available for use.
Using Real-Time Apply
By default, redo data is not applied to a standby database until the standby redo log file is archived. When you use the real-time apply feature, redo data is applied to the standby database as it is received, reducing the time lag between the databases and potentially shortening the time required to fail over to the standby database.
To enable real-time apply in a physical standby database, execute the following command in the standby database:

For a logical standby database, the command to use is
![]()
The RECOVERY_MODE column of the V$ARCHIVE_DEST_STATUS view will have a value of MANAGED REAL TIME APPLY if real-time apply has been enabled.
As shown earlier in this chapter, you can enable the redo application on a physical standby database via the command:
![]()
The DISCONNECT keyword allows the command to run in the background after you disconnect from your Oracle session. When you start a foreground session and issue the same command without the DISCONNECT keyword, control is not returned to the command prompt until the recovery is cancelled by another session. To stop the redo application in a physical standby database, whether in a background session or a foreground session, use the following command:
![]()
For a logical standby database, the command to stop the Log Apply Services is
![]()
Managing Gaps in Archive Log Sequences
If the standby database has not received one or more archived logs generated by the primary database, it does not have a full record of the transactions in the primary database. Oracle Data Guard detects the gap in the archive log sequence automatically; it resolves the problem by copying the missing sequence of log files to the standby destination. In versions of Oracle Database prior to 10g, the FAL (Fetch Archive Log) client and server were used to resolve gaps from the primary database.
To determine if there is a gap in your physical standby database, query the V$ARCHIVE_GAP view. For each gap, that view will report the lowest and highest log sequence number of the set of logs missing from the standby database. If there is some reason why Oracle Data Guard has not been able to copy the logs, you can copy the files manually to your physical standby database environment and register them using the ALTER DATABASE REGISTER LOGFILE filename command; then you can start the redo apply process. After the logs have been applied, check the V$ARCHIVE_GAP view again to see if there is another gap to resolve.
Managing Roles: Switchovers and Failovers
Each database that participates in a Data Guard configuration has a role—it is either a primary database or a standby database. At some point, those roles may need to change. For example, if there is a hardware failure on the primary database’s server, you may fail over to the standby database. Depending on your configuration choices, there may be some loss of data during a failover.
A second type of role change is called a switchover. This occurs when the primary database switches roles with a standby database, and the standby becomes the new primary database. During a switchover, there should be no data lost. Switchovers and failovers require manual intervention by a database administrator.
Switchovers
Switchovers are planned role changes, usually to allow for maintenance activities to be performed on the primary database server. A standby database is chosen to act as the new primary database, the switchover occurs, and applications now write their data to the new primary database. At some later point in time you can switch the databases back to their original roles.
NOTE
You can perform switchovers with either a logical standby database or a physical standby database; the physical standby database is the preferred option.
What if you have defined multiple standby databases? When one of the physical standby databases becomes the new primary database, the other standby databases must be able to receive their redo log data from the new primary database. In that configuration, you must define the LOG_ARCHIVE_DEST_n parameters to allow those standby sites to receive data from the new primary database location.
NOTE
Verify that the database that will become the new primary database is running in ARCHIVELOG mode.
In the following sections, you will see the steps required to perform a switchover to a standby database. The standby database should be actively applying redo log data prior to the switchover, as this will minimize the time required to complete the switchover.
Switchovers to Physical Standby Databases
Switchovers are initiated on the primary database and completed on the standby database. In this section, you will see the steps for performing a switchover to a physical standby database. There is no data loss during a switchover.
Begin by verifying that the primary database is capable of performing a switchover. Query V$DATABASE for the value of the SWITCHOVER_STATUS column:
![]()
If the SWITCHOVER_STATUS column’s value is anything other than TO STANDBY, it is not possible to perform the switchover (usually due to a configuration or hardware issue). If the column’s value is SESSIONS ACTIVE, you should terminate active user sessions. Valid values for the SWITCHOVER_STATUS column are shown in Table 15-2.
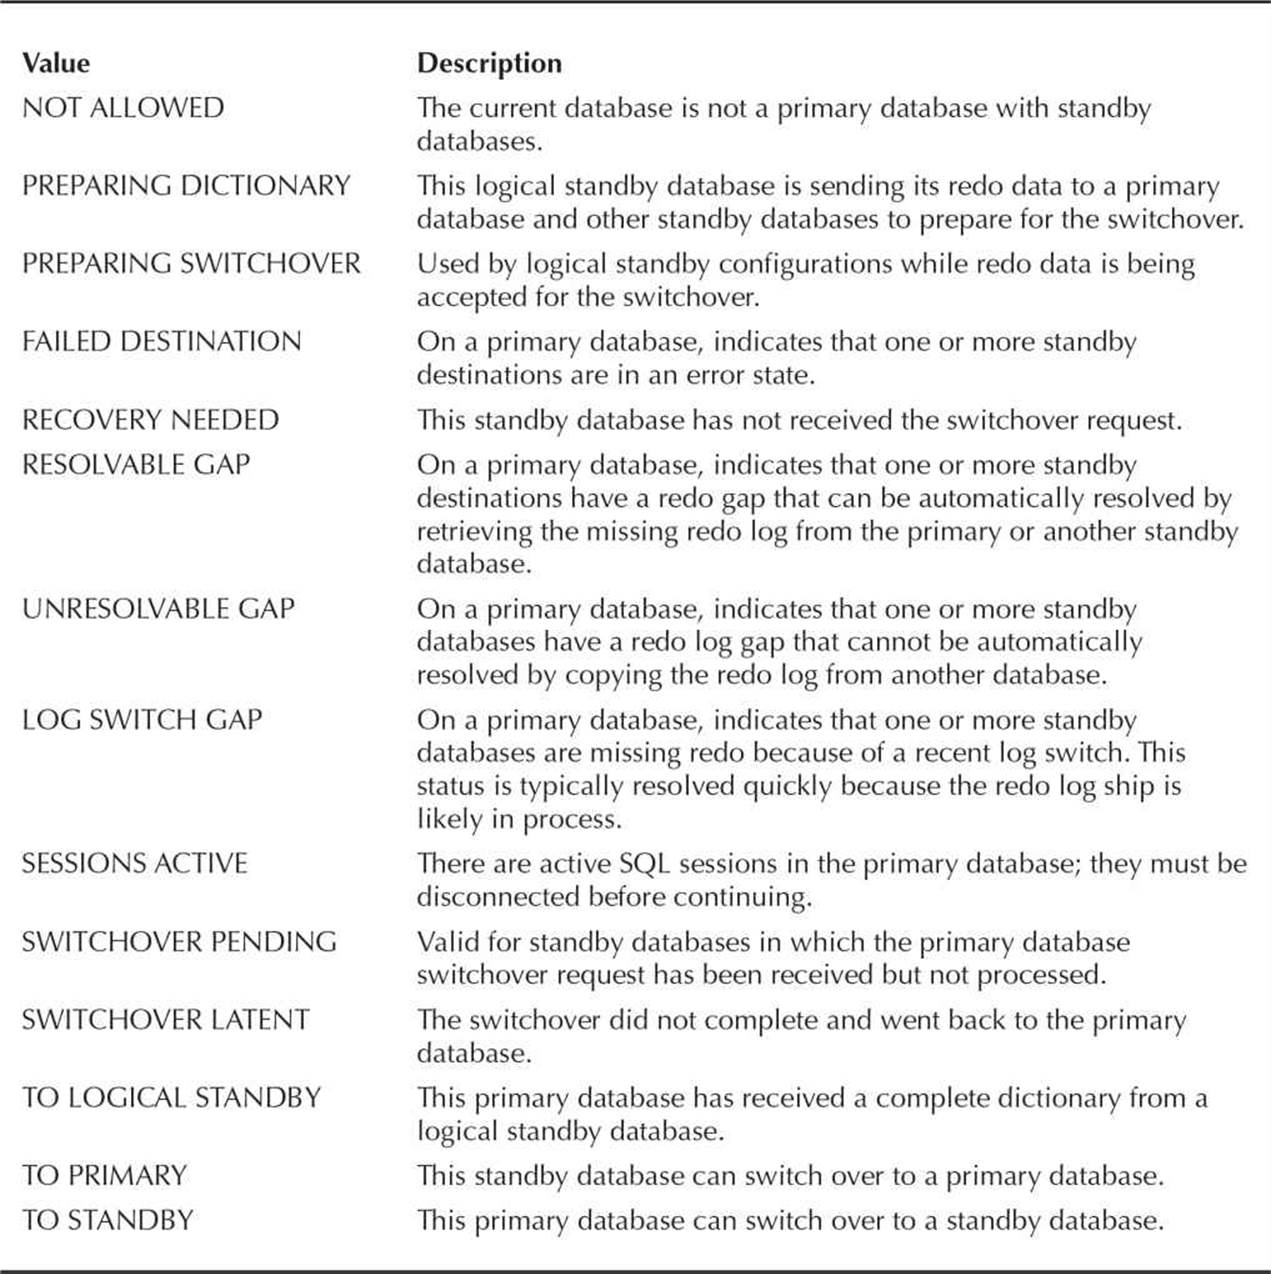
TABLE 15-2. SWITCHOVER_STATUS Values
From within the primary database, you can initiate its transition to the physical standby database role with the following command:
![]()
As part of executing this command, Oracle will back up the current primary database’s control file to a trace file. At this point, you should shut down the primary database and mount it:

The primary database is prepared for the switchover; you should now go to the physical standby database that will serve as the new primary database.
In the physical standby database, check the switchover status in the V$DATABASE view; its status should be TO PRIMARY (see Table 15-2). You can now switch the physical standby database to the primary via the following command:
![]()
If you add the WITH SESSION SHUTDOWN WAIT clause, the statement will not return to the SQL> prompt until the switchover is complete. Start up the database using the OPEN keyword:
![]()
The database has completed its transition to the primary database role. Next, start the redo apply services on the standby databases if they were not already running in the background:

Switchovers to Logical Standby Databases
Switchovers are initiated on the primary database and completed on the standby database. In this section, you will see the steps for performing a switchover to a logical standby database.
Begin by verifying that the primary database is capable of performing a switchover. Query V$DATABASE for the value of the SWITCHOVER_STATUS column:
![]()
For the switchover to complete, the status must be either TO STANDBY, TO LOGICAL STANDBY, or SESSIONS ACTIVE.
In the primary database, issue the following command to prepare the primary database for the switchover:
![]()
In the logical standby database, issue the following command:
![]()
At this point, the logical standby database will begin transmitting its redo data to the current primary database and to the other standby databases in the configuration. The redo data from the logical standby database is sent but is not applied at this point.
In the primary database, you must now verify that the dictionary data was received from the logical standby database. The SWITCHOVER_STATUS column value in V$DATABASE must read TO LOGICAL STANDBY in the primary database before you can continue to the next step. When that status value is shown in the primary database, switch the primary database to the logical standby role:
![]()
You do not need to shut down and restart the old primary database. You should now go back to the original logical standby database and verify its SWITCHOVER_STATUS value in V$DATABASE (it should be TO PRIMARY). You can then complete the switchover; in the original logical standby database, issue the following command:
![]()
The original logical standby database is now the primary database. In the new logical standby database (the old primary database), start the redo apply process:
![]()
The switchover is now complete.
Failovers
Failovers occur when the primary database can no longer be part of the primary database configuration. In the following section, you will see the steps required to fail over a physical standby database to the role of the primary database in a Data Guard configuration. In the subsequent section, you will see the steps required to fail over a logical standby database to the role of the primary database in a Data Guard configuration.
Failovers to Physical Standby Databases
In the standby database, you should first attempt to identify and resolve any gaps in the archived redo log files (see the section “Managing Gaps in Archive Log Sequences,” earlier in this chapter). You may need to manually copy and register log files for use by the standby database.
Within the standby database, you must then finish the recovery process. If you have configured the standby database to have standby redo log files, the command to execute is
![]()
If there are no standby redo log files, execute the following command:

Once the standby recovery operation has completed, you can perform the switchover using the following command:
![]()
Shut down and restart the new primary database to complete the transition. The old primary database is no longer a part of the Data Guard configuration. If you want to re-create the old primary database and use it as a standby database, you must create it as a standby database following the steps provided earlier in this chapter.
Failovers to Logical Standby Databases
In the standby database, you should first attempt to identify and resolve any gaps in the archived redo log files (see the section “Managing Gaps in Archive Log Sequences,” earlier in this chapter). You may need to manually copy and register log files for use by the standby database. Query the DBA_LOGSTDBY_LOG view for details on the logs remaining to be applied. If the redo apply process was not active on the logical standby database, start it by using the following command:
![]()
Next, enable the remote locations for the redo log files that the logical standby database generates. You may need to update the logical standby database’s settings of the LOG_ARCHIVE_DEST_STATE_n parameters so the other standby databases in the configuration will receive the redo generated from the original logical standby database. You can then activate the original logical standby database as the new primary database via the following command:
![]()
If there are other logical standby databases that are part of the Data Guard configuration, you may need to re-create them or use database links to add them to the new configuration. First, create a link in each of the databases that will act as a logical standby database to the new primary database. The ALTER SESSION DISABLE GUARD command allows you to bypass the Data Guard processes within your session. The database account used by the database link must have the SELECT_CATALOG_ROLE role:

You should verify the link by selecting from the DBA_LOGSTDBY_PARAMETERS view in the remote database (the new primary database).
In each logical standby database, you can now start the redo apply process based on the new primary database:
![]()
Administering the Databases
In the following sections, you will see the steps required to perform standard maintenance actions on the databases that are part of the Data Guard configuration, including startup and shutdown operations.
Startup and Shutdown of Physical Standby Databases
When you start up a physical standby database, you should start the redo apply process. First, mount the database:
![]()
Next, start the redo apply process:
![]()
Use the USING CURRENT LOGFILE clause in place of the DISCONNECT FROM SESSION clause to start real-time apply.
To shut down the standby database, you should first stop the Log Apply Services. Query the V$MANAGED_STANDBY view; if Log Apply Services are listed there, cancel them using the following command:
![]()
You can then shut down the database.
Opening Physical Standby Databases in Read-Only Mode
To make the physical standby database open for read operations, you should first cancel any log apply operations in the database:
![]()
Next, open the database:
![]()
Managing Datafiles in Data Guard Environments
As noted earlier in this chapter, you should set the STANDBY_FILE_MANAGEMENT initialization parameter to AUTO. Setting this parameter simplifies the administration of the Data Guard environment, because files added to the primary environment can be automatically propagated to the physical standby databases. When this parameter is set to AUTO, any new datafiles created in the primary database are automatically created in the standby databases; when the parameter is set to MANUAL, you must manually create the new datafiles in the standby databases.
When STANDBY_FILE_MANAGEMENT is set to MANUAL, follow these steps to add a datafile to a tablespace:
1. Add the new datafile in the primary database.
2. Alter the datafile’s tablespace so that it is offline.
3. Copy the datafile to the standby location.
4. Alter the datafile’s tablespace so that it is once again online.
To add a new tablespace using manual file management, follow the same steps: Create the tablespace, take the tablespace offline, copy its datafiles to the standby location, and then alter the tablespace so it is online. If you are using automatic file management, you only need to create the new tablespace in the primary database for it to be propagated to the standby databases.
To drop a tablespace, simply drop it in the primary database and force a log switch via the ALTER SYSTEM SWITCH LOGFILE command. You can then drop the file at the operating system level in the primary and standby environments.
Changes to the names of datafiles are not propagated, even if you are using automatic file management. To rename a datafile in a Data Guard configuration, take the tablespace offline and rename the datafile at the operating system level on the primary server. Use the ALTER TABLESPACE RENAME DATAFILE command on the primary database to point to the new location of the datafile. Bring the tablespace back online with the ALTER TABLESPACE tablespace_name ONLINE command. On the standby database, query the V$ARCHIVED_LOG view to verify all logs have been applied and then shut down the redo apply services:
![]()
Shut down the standby database and rename the file on the standby server. Next, use the STARTUP MOUNT command to mount the standby database. With the database mounted but not opened, use the ALTER DATABASE RENAME FILE command to point to the new file location on the standby server. Finally, restart the redo apply process:

Performing DDL on a Logical Standby Database
As illustrated earlier in this chapter, you can temporarily disable Data Guard within a logical standby database. When you need to perform DDL operations (such as the creation of new indexes to improve query performance), you will follow the same basic steps:
1. Stop the application of redo on the logical standby database.
2. Disable Data Guard.
3. Execute the DDL commands.
4. Enable Data Guard.
5. Restart the redo apply process.
For example, to create a new index, start by turning off the Data Guard features:
![]()
At this point, you can perform your DDL operations. When you are done, reenable the Data Guard features:

The logical standby database will then restart its redo apply process, while the index will be available to its query users.
Summary
Disasters happen. They can be physical disasters (data center fire, flood, and so forth) or logical disasters (dropped databases with no current backup). Even with a recent backup, a dropped database may take hours or days to restore and recover. Using Oracle Data Guard (and a suitable redo log file apply delay) you can be up and running in minutes instead of hours or days by having a standby database either in the same data center or on the other side of the world. While normal operations continue on the standby database, you can repair the original primary database and switch it back. A physical Data Guard destination matches the primary database bit for bit, including the physical layout of the tablespaces and datafiles.
If your standby needs are primarily as a read-only reporting database, then using a logical standby database fits the bill. The logical standby database need not have the same physical layout. In fact, the logical standby’s layout may differ significantly in its role as a reporting database: You may have additional temporary tablespaces, for example, to support long-running reports with many queries having ORDER BY and GROUP BY clauses that require a big temporary tablespace. Regardless of the type of standby you need, Oracle Database 12c has a configuration to maintain and enhance your recoverability, scalability, and availability.


All materials on the site are licensed Creative Commons Attribution-Sharealike 3.0 Unported CC BY-SA 3.0 & GNU Free Documentation License (GFDL)
If you are the copyright holder of any material contained on our site and intend to remove it, please contact our site administrator for approval.
© 2016-2026 All site design rights belong to S.Y.A.