Oracle Database 12c DBA Handbook (2015)
PART
I
Database Architecture
CHAPTER
2
Upgrading to Oracle Database 12c
If you have previously installed an earlier version of the Oracle database server, you can upgrade your database to Oracle Database 12c. Multiple upgrade paths are supported; the right choice for you will depend on factors such as your current Oracle software version and your database size. In this chapter, you will see descriptions of these methods along with guidelines for their use.
If you have not used a version of Oracle prior to Oracle Database 12c, you can skip this chapter for now. However, you will likely need to refer to it when you upgrade from Oracle Database 12c to a later version or when you migrate data from a different database into your database.
Prior to beginning the upgrade, you should read the Oracle Database 12c Installation Guide for your operating system. A successful installation is dependent on a properly configured environment, including operating system patch levels and system parameter settings. Plan to get the installation and upgrade right the first time rather than attempting to restart a partially successful installation. Configure the system to support both the installation of the Oracle software and the creation of a usable starter database.
This chapter assumes that your installation of the Oracle Database 12c software completed successfully and that you have an Oracle database that uses an earlier version of the Oracle software on the same server. Note that whether you are installing from scratch or upgrading a previous version of Oracle Database, there are distinct advantages to installing the Oracle Database 12c software and creating the database in separate steps. When installing from scratch, you have greater control over initialization parameters, database file locations, memory allocation, and so forth when you create the database in a separate step; when upgrading from a previous release, installing the software first provides you with the Oracle Pre-Upgrade Information Tool that you use against the existing database to alert you to any potential compatibility problems when you upgrade to Oracle Database 12c. To upgrade that database, you have four options:
![]() Use the Database Upgrade Assistant (DBUA) to guide and perform the upgrade in place. The old database will become an Oracle 12c database during this process. DBUA supports both Oracle Real Application Clusters (RAC) and Automatic Storage Management (ASM); you can launch DBUA as part of the installation process or as a standalone tool after installation. Oracle strongly recommends using DBUA for Oracle Database major releases or patch release upgrades.
Use the Database Upgrade Assistant (DBUA) to guide and perform the upgrade in place. The old database will become an Oracle 12c database during this process. DBUA supports both Oracle Real Application Clusters (RAC) and Automatic Storage Management (ASM); you can launch DBUA as part of the installation process or as a standalone tool after installation. Oracle strongly recommends using DBUA for Oracle Database major releases or patch release upgrades.
![]() Perform a manual upgrade of the database. The old database will become an Oracle 12c database during this process. While you have very precise control over every step of the process, this method is more susceptible to error if you miss a step or forget a prerequisite step.
Perform a manual upgrade of the database. The old database will become an Oracle 12c database during this process. While you have very precise control over every step of the process, this method is more susceptible to error if you miss a step or forget a prerequisite step.
![]() Use Oracle Data Pump to move data from an earlier version of Oracle to the Oracle 12c database. Two separate databases will be used: the old database as the source for the export and the new database as the target for the import. If you are upgrading from Oracle Database 11g, you will use Oracle Data Pump to move your data from the old database to the new database. Although Oracle Data Pump is the recommended migration method if available, the original import/export (imp and exp) are available to export from Oracle Database 10g and earlier and to import from an older release into Oracle Database 12c.
Use Oracle Data Pump to move data from an earlier version of Oracle to the Oracle 12c database. Two separate databases will be used: the old database as the source for the export and the new database as the target for the import. If you are upgrading from Oracle Database 11g, you will use Oracle Data Pump to move your data from the old database to the new database. Although Oracle Data Pump is the recommended migration method if available, the original import/export (imp and exp) are available to export from Oracle Database 10g and earlier and to import from an older release into Oracle Database 12c.
![]() Copy data from an earlier version of Oracle to an Oracle 12c database. Two separate databases will be used: the old database as the source for the copy and the new database as the target for the copy. This method is the most straightforward because your migration consists primarily of CREATE TABLE AS SELECT SQL statements referencing the old and new databases. However, unless your database has very few tables and you aren’t concerned with using existing SQL tuning sets, statistics, and so forth, Oracle does not recommend this method for production databases. One exception is if you’re migrating to Oracle Exadata, in which case this method enables you to leverage Exadata features such as Hybrid Columnar Compression (HCC) and partitioning, outweighing any disadvantages of using this method.
Copy data from an earlier version of Oracle to an Oracle 12c database. Two separate databases will be used: the old database as the source for the copy and the new database as the target for the copy. This method is the most straightforward because your migration consists primarily of CREATE TABLE AS SELECT SQL statements referencing the old and new databases. However, unless your database has very few tables and you aren’t concerned with using existing SQL tuning sets, statistics, and so forth, Oracle does not recommend this method for production databases. One exception is if you’re migrating to Oracle Exadata, in which case this method enables you to leverage Exadata features such as Hybrid Columnar Compression (HCC) and partitioning, outweighing any disadvantages of using this method.
Upgrading a database in place via either the Database Upgrade Assistant or the manual upgrade path is called a direct upgrade. Because a direct upgrade does not involve creating a second database for the one being upgraded, it may complete faster and require less disk space than an indirect upgrade.

NOTE
Direct upgrade of the database to version 12c is only supported if your present database is using one of these releases of Oracle: 10.2.0.5, 11.1.0.7, or 11.2.0.2 or later. If you are using any other release, you will first have to upgrade the database to one of those releases or you will need to use a different upgrade option.
Choosing an Upgrade Method
As described in the introduction, both direct upgrade and indirect upgrade paths are available. In this section, you will see a more detailed description of the options, followed by usage descriptions.
In general, the direct upgrade paths will perform the upgrade the fastest because they upgrade the database in place. The other methods involve copying data, either across a database link or via a Data Pump Export. For very large databases, the time required to completely re-create the database via the indirect methods may exclude them as viable options. One drawback to upgrading in place, however, is that none of the datafiles, tablespaces, or segments get reorganized and old objects that are now obsolete in Oracle Database 12c are still in the database.
The first direct method relies on the Database Upgrade Assistant (DBUA). DBUA is an interactive tool that guides you through the upgrade process. DBUA evaluates your present database configuration and recommends modifications that can be implemented during the upgrade process. After you accept the recommendations, DBUA performs the upgrade in the background while a progress panel is displayed. DBUA is very similar in approach to the Database Configuration Assistant (DBCA). As discussed in Chapter 1, DBCA is a graphical interface to the steps and parameters required to make the upgrade a success.
The second direct method is called a manual upgrade. Whereas DBUA runs scripts in the background, the manual upgrade path involves database administrators running the scripts themselves. The manual upgrade approach gives you a great deal of control, but it also adds to the level of risk in the upgrade because you must perform the steps in the proper order.
You can use Oracle Data Pump Export/Import (first available with Oracle Database 10g) as an indirect method for upgrading a database. In this method, you export the data from the old version of the database and then import it into a database that uses the new version of the Oracle software. This process may require disk space for multiple copies of the data in the source database, in the Export dump file, and in the target database. In exchange for these costs, this method gives you great flexibility in choosing which data will be migrated. You can select specific tablespaces, schemas, tables, and rows to be exported.
In the Data Pump method, the original database is not upgraded; its data is extracted and moved, and the database can then either be deleted or be run in parallel with the new database until testing of the new database has been completed. In the process of performing the export/import, you are selecting and reinserting each row of the database. If the database is very large, the import process may take a long time, impacting your ability to provide the upgraded database to your users in a timely fashion. This is mainly because of your network’s bandwidth limitations: if you have a 10-Gbps or faster network connection, then Data Pump can be run across the network in parallel for multiple schemas and even individual tables. See Chapter 12 for details on the Data Pump utilities.
In the data-copying method, you issue a series of CREATE TABLE AS SELECT … or INSERT INTO … SELECT commands that cross database links (see Chapter 16) to retrieve the source data. The tables are created in the Oracle 12c database based on queries of data from a separate source database. This method allows you to bring over data incrementally and to limit the rows and columns migrated. However, you will need to be careful that the copied data maintains all the necessary relationships among tables as well as any indexes or constraints. As with the Data Pump method, this method may require a significant amount of time for large databases.
NOTE
If you are changing the operating platform at the same time, you can use transportable tablespaces to move the data from the old database to the new database. For very large databases, this method may be faster than the other data-copying methods. See Chapter 17 for the details on transportable tablespaces.
Selecting the proper upgrade method requires you to evaluate the technical expertise of your team, the data that is to be migrated, and the allowable downtime for the database during the migration. In general, using DBUA will be the method of choice for very large databases, whereas using an indirect method may be more appropriate for smaller databases.
Before Upgrading
Prior to beginning the migration, you should back up the existing database and database software. If the migration fails for some reason and you are unable to revert the database or software to its earlier version, you will be able to restore your backup and re-create your database.
You should develop and test scripts that will allow you to evaluate the performance and functionality of the database following the upgrade. This evaluation may include the performance of specific database operations or the overall performance of the database under a significant user load.
Prior to executing the upgrade process on a production database, you should attempt the upgrade on a test database so that you can identify any missing components (such as operating system patches) and measure the time required for the upgrade.
Oracle Database 12c includes the Pre-Upgrade Information Tool called preupgrd.sql. This tool is included in the installation files in the directory $ORACLE_HOME/rdbms/admin. Copy this script to a location accessible by the old database, connect to the old database with SYSDBA privileges, and run this tool from a SQL*Plus session similar to the following:
![]()
This script produces a file called preupgrade.log containing the output from the script. Two other scripts are created by the pre-upgrade script: preupgrade_fixups.sql and postupgrade_fixups.sql. As the script names imply, they contain the commands to fix any issues with the existing database before the upgrade starts or to fix other issues that can only be fixed after the upgrade is completed. Any issues that cannot be fixed via the script are marked in the log file as *** USER ACTION REQUIRED ***.
The Pre-Upgrade Information Tool identifies invalid objects in the database. The list of invalid SYS or SYSTEM objects is stored in REGISTRY$SYS_INV_OBJS, and the list of non-SYS and non-SYSTEM objects is stored in REGISTRY$NONSYS_INV_OBJS. Typical invalid objects include corrupted indexes and triggers or other PL/SQL functions and procedures that will not compile due to missing objects or syntax problems.
Using the Database Upgrade Assistant
You can start the DBUA via the dbua command (in Unix environments) or by selecting Database Upgrade Assistant from the Oracle Configuration and Migration Tools menu option (in Windows environments). If you are using a Unix environment, you will need to enable an X Window display prior to starting DBUA.
When started, DBUA will display a Welcome screen. At the next screen, select the database you want to upgrade from the list of available databases. You can upgrade only one database at a time.
After you make your selection, the upgrade process begins. DBUA will perform pre-upgrade checks (such as for obsolete initialization parameters or files that are too small) using the preupgrd.sql script described earlier in this chapter. DBUA also includes the option to recompile invalid PL/SQL objects following the upgrade. To speed up the recompilation process, you can specify a degree of parallelism to run the recompiles in parallel. If you do not recompile these objects after the upgrade, the first user of these objects will be forced to wait while Oracle performs a run-time recompilation.
DBUA will then prompt you to back up the database as part of the upgrade process. If you have already backed up the database prior to starting DBUA, you may elect to skip this step. If you choose to have DBUA back up the database, it will use RMAN to create a backup in the location you specify. DBUA will also create a batch file in that directory to automate the restoration of those files to their earlier locations.
The next step is to choose whether to enable Oracle Enterprise Manager (OEM) to manage the database. If you enable the Oracle Management Agent, the upgraded database will automatically be available via OEM. If you are already using a centralized database and resource manager tool such as Oracle Enterprise Manager Cloud Control 12c, you can register the new database with Cloud Control at this time.
You will then be asked to finalize the security configuration for the upgraded database. As with the database-creation process, you can specify passwords for each privileged account or you can set a single password to apply to all the OEM user accounts.
Finally, you will be prompted for details on the flash recovery area location (see Chapter 14), the archive log setting, and the network configuration. A final summary screen displays your choices for the upgrade, and the upgrade starts when you accept them. After the upgrade has completed, DBUA will display the Checking Upgrade Results screen, showing the steps performed, the related log files, and the status. The section of the screen titled Password Management allows you to manage the passwords and the locked/unlocked status of accounts in the upgraded database.
If you are not satisfied with the upgrade results, you can choose the Restore option. If you used DBUA to perform the backup, the restoration will be performed automatically; otherwise, you will need to perform the restoration manually.
When you exit DBUA after successfully upgrading the database, DBUA removes the old database’s entry in the network listener configuration file, inserts an entry for the upgraded database, and reloads the file.
Performing a Manual Direct Upgrade
In a manual upgrade, you must perform the steps that DBUA performs. The result will be a direct upgrade of the database in which you are responsible for (and control) each step in the upgrade process.
You should use the Pre-Upgrade Information Tool to analyze the database prior to its upgrade. As mentioned earlier in this chapter, this tool is provided in a SQL script that is installed with the Oracle Database 12c software; you will need to run it against the database to be upgraded. You should run that file in the database to be upgraded as a SYSDBA-privileged user. The results will show potential problems that should be addressed prior to the upgrade.
If there are no issues to resolve prior to the upgrade, you should shut down the database and perform an offline backup before continuing with the upgrade process. This ensures that if you have any serious problems with the database upgrade, you can always get back to the state of your old database as of when you started the upgrade process. The automated version of the database upgrade process includes an option to back up the current database using RMAN.
Once you have a backup that you can restore if needed, you are ready to proceed with the upgrade process. The process is detailed and script-based, so you should consult with the Oracle installation and upgrade documentation for your environment and version. The steps are as follows:
1. Copy configuration files (init.ora, spfile.ora, password file) from their old location to the new Oracle software home directory. By default, the configuration files are found in the /dbs subdirectory on Unix platforms and the \database directory on Windows platforms.
2. Remove obsolete and deprecated initialization parameter from the configuration files identified in the Pre-Upgrade Information Tool. Update any initialization parameters to at least the minimum values specified in the Pre-Upgrade Information Tool report. Use full pathnames in the parameter files.
3. If you are upgrading a cluster database, set the CLUSTER_DATABASE initialization parameter to FALSE. After the upgrade, you must set this initialization parameter back to TRUE.
4. Shut down the instance.
5. If you are using Windows, stop the service associated with the instance and delete the Oracle service at the command prompt using this command:

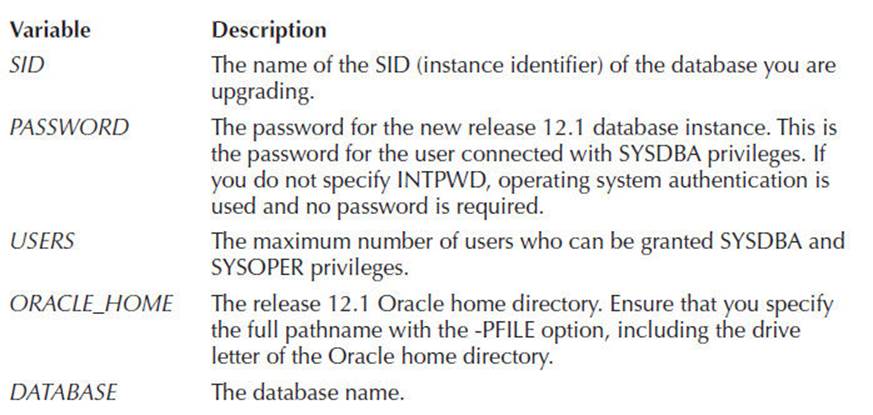
Next, create the new Oracle Database 12c service using the ORADIM command, as shown here. The variables for this command are shown in the following table.

6. If your operating system is Unix or Linux, make sure the environment variables ORACLE_HOME and PATH point to the new release 12.1 directories, ORACLE_SID is set to the existing database’s SID, and the file /etc/oratab points to the new Oracle Database 12c home directory. In addition, any server or client-side scripts that set ORACLE_HOME must be changed to point to the new Oracle software home directory.
7. Log into the system as the owner of the Oracle Database 12c software.
8. Change your directory to the $ORACLE_HOME/rdbms/admin subdirectory under the Oracle software home directory.
9. Connect to SQL*Plus as a user with SYSDBA privileges.
10. Issue the STARTUP UPGRADE command.
11. Use the SPOOL command to log the results of the following steps.
12. Run the Perl script catctl.pl in the 12c environment, specifying the SQL script catupgrd.sql as one of the arguments. The catctl.pl script also allows for a parallel upgrade process, to reduce upgrade time. This script automatically determines which upgrade scripts must be run, runs them, and then shuts down the database.
![]()
13. The database is shut down after running the Perl script. Next, restart the database as follows. The upgrade is complete.
![]()
Run the post-upgrade tool, utlu121s.sql, to see if there are any upgrade issues. After fixing the issues, run this script again to make sure they are fixed.
14. Gather fixed object statistics to minimize object recompilation time:
![]()
15. Run utlrp.sql to compile any PL/SQL or Java procedures that still need recompilation:
![]()
16. Verify that all objects and classes are valid:
![]()
NOTE
After the upgrade, you should never start your Oracle 12c database with the software from an earlier release.
Using Data Pump Export and Import
Export and Import provide you with an indirect method for the upgrade. You can create an Oracle 11g database alongside your existing database and use Data Pump Export and Import to move data from the old database to the new database. When the movement of the data is complete, you will need to point your applications to connect to the new database instead of the old database. You will also need to update any configuration files, version-specific scripts, and the networking configuration files (tnsnames.ora and listener.ora) to point to the new database.
The advantage to using the Export/Import method is that the existing database is unaffected throughout the upgrade process; however, to ensure that relational integrity remains intact and no new transactions are left behind in the old database, you can run the old database in restricted mode for the duration of the export and upgrade.
Export and Import Versions to Use
When you create an Export dump file via the Export utility, that file can be imported into all later releases of Oracle. When you create a Data Pump Export dump file, you can only import it into the same or later versions of Data Pump Export. Export dump files are not backward compatible, so if you ever need to revert to an earlier version of Oracle, you will need to carefully select the version of Export and Import used.
Note that when you are exporting in order to downgrade your database release, you should use the older version of the Export utility to minimize compatibility problems. You may still encounter compatibility problems if the newer version of the database uses new features (such as new datatypes) that the old version will not support.
Performing the Upgrade
Export the data from the source database using Data Pump Export (recommended) or Export/Import (Oracle Database 10g). Since a direct upgrade to Oracle Database 12c must be from a database running Oracle Database 10g or later, Data Pump Export will be available in that release and all interim releases. Perform a consistent export or perform the export when the database is not available for updates during and after the export.
Install the Oracle Database 12c software and create the target database. In the target database, pre-create the users and tablespaces needed to store the source data. If the source and target databases will coexist on the server, you need to be careful not to overwrite datafiles from one database with datafiles from the other. The Data Pump Import utility will attempt to execute the CREATE TABLESPACE commands found in the Data Pump Export dump file, and those commands will include the datafile names from the source database. By default, those commands will fail if the files already exist (although this can be overridden via Import’s REUSE_DATAFILES=Y parameter). Pre-create the tablespaces with the proper datafile names to avoid this problem.
NOTE
You can export specific tablespaces, users, tables, and rows.
Once the database has been prepared, use Data Pump Import to load the data from the Export dump file into the target database. Review the log file for information about objects that did not import successfully. See Chapter 11for detailed instructions on how to use Data Pump Export and Import.
Using the Data-Copying Method
The data-copying method requires that the source database and target database coexist. This method is most appropriate when the tables to be migrated are fairly small and few in number. As with the Data Pump Export/Import method, you must guard against transactions occurring in the source database during and after the extraction of the data. In this method, the data is extracted via queries across database links.
Create the target database using the Oracle Database 12c software-only installation and then pre-create the tablespaces, users, and tables to be populated with data from the source database. Create database links (see Chapter 16) in the target database that access accounts in the source database. Use commands such as INSERT INTO … SELECT to move data from the source database to the target.
The data-copying method allows you to bring over just the rows and columns you need; your queries limit the data migrated. You will need to be careful with the relationships between the tables in the source database so that you can re-create them properly in the target database. If you have a long application outage available for performing the upgrade and you need to modify the data structures during the migration, the data-copying method may be appropriate for your needs. Note that this method requires that the data be stored in multiple places at once, thus impacting your storage needs.
To improve the performance of this method, you may consider the following options:
![]() Disable all indexes and constraints until all the data has been loaded.
Disable all indexes and constraints until all the data has been loaded.
![]() Run multiple data-copying jobs in parallel.
Run multiple data-copying jobs in parallel.
![]() Use parallel query and DML to enhance the performance of individual queries and inserts.
Use parallel query and DML to enhance the performance of individual queries and inserts.
![]() Use the APPEND hint to enhance the performance of inserts (direct-path insert).
Use the APPEND hint to enhance the performance of inserts (direct-path insert).
![]() Collect statistics on the tables before re-creating the indexes. Oracle will automatically collect statistics on the indexes as they are being rebuilt.
Collect statistics on the tables before re-creating the indexes. Oracle will automatically collect statistics on the indexes as they are being rebuilt.
As of Oracle 10g, you can use cross-platform transportable tablespaces. When transporting tablespaces, you export and import only the metadata for the tablespace, while the datafiles are physically moved to the new platform. For very large databases, the time required to move the datafiles may be significantly shorter than the time required to reinsert the rows. See Chapter 17 for details on the use of transportable tablespaces; see Chapter 8 for additional advice on performance tuning.
After Upgrading
Following the upgrade, you should double-check the configuration and parameter files related to the database, particularly if the instance name changed in the migration process. These files include
![]() The tnsnames.ora file
The tnsnames.ora file
![]() The listener.ora file
The listener.ora file
![]() Programs that may have hard-coded instance names in them
Programs that may have hard-coded instance names in them
NOTE
You will need to manually reload the modified listener.ora file if you are not using DBUA to perform the upgrade.
You should review your database initialization parameters to make sure deprecated and obsolete parameters have been removed; these should have been identified during the migration process when you ran the Pre-Upgrade Information Tool preupgrd.sql. Be sure to recompile any programs you have written that rely on the database software libraries.
Once the upgrade has completed, perform the functional and performance tests identified before the upgrade began. If there are issues with the database functionality, attempt to identify any parameter settings or missing objects that may be impacting the test results. If the problem cannot be resolved, you may need to revert to the prior release. If you performed a full backup before starting the upgrade, you should be able to easily revert to the old release with minimal downtime.
Summary
Upgrading a database from Oracle Database 11g to 12c is easy and you can accomplish the upgrade with one of several methods depending on your storage available and database size. If your options are few, the Database Upgrade Assistant (DBUA) will use a GUI interface to step you through all of the options that would otherwise require several complex OS commands.
Using Data Pump Export and Import has the advantage of being a logical migration: it gives you the option to change your physical database layout that may have been sub-optimal in the original database.
The data-copying method is the simplest method but is only appropriate if your database is small and there are few database objects. Both the old and new databases must be up and running at the same time; in addition, you must create INSERT statements to copy table data from the old database to the new database. After all table data is copied you create the appropriate indexes, create users, and grant permissions on the new tables.

All materials on the site are licensed Creative Commons Attribution-Sharealike 3.0 Unported CC BY-SA 3.0 & GNU Free Documentation License (GFDL)
If you are the copyright holder of any material contained on our site and intend to remove it, please contact our site administrator for approval.
© 2016-2026 All site design rights belong to S.Y.A.