Learning Pentaho CTools (2016)
Chapter 2. Acquiring Data with CDA
When we want to display data on a dashboard, we need to get this data from anywhere and display it in the easiest way possible, without having to write code to parse the results in a way that components can make use of these results. Using Pentaho, you have many ways to access data. If you are calling a report built with Pentaho plugins or client tools, you will be able to select one kind of data source, but if you want to use your own application and make use of Pentaho data, it would be possible for you to use XMLA, Kettle transformations as web services, and the Community Data Access (CDA) plugin.
The purpose of this book is to cover Community Tools, so this chapter is focused on the use of CDA. You will learn about the available data sources, how to create a new data source, how to pass some parameters to the query to get the right results, and then how to preview the results. You can write your own customized queries but if this is not enough, then you will learn how to manipulate the output that will be exposed to the dashboards or to the exports.
CDA also makes it possible to export the results of your queries to various standard types as a result, so this chapter will also explain how to make use of that endpoint. There is also a chance to combine data from different data sources to make a join or union, so this is also covered in this chapter.
This chapter focuses on teaching you how CDA works, so we will get deep and write some code. You may not even need to write it, however, you will get a better and deeper understanding of how CDA works by doing so. Don't be scared, because it's really simple to create CDA data sources without writing code or editing XML files manually.
This chapter covers the following topics:
· Available Pentaho data sources using CDA
· Defining a new data source
· Testing and displaying the results of a query
· Using parameters to get the expected results
· Available endpoints and how to export results
· Creating compound queries
· Making use of the cache to improve performance
· Sorting and pagination on server side
Introduction to CDA
CDA was one of the first CTools. Its main purpose is to provide data abstraction for multiple kinds of data sources wrapped as web services. It was first created to be used as an interface between the data connections and the Community DashboardFramework (CDF), but nowadays it can also be used in Report Designer to embed data in third-party applications.
CDA includes many different output types that we can configure, and also includes some configurable cache options to optimize performance, which you will have the chance to learn about. Another great feature in CDA that is somehow related to performance, is to sort and paginate on the server side.
The following diagram is an example of how CDA can be used to acquire data from. CDA is able to provide data to a CDF and/or CDE dashboards. However, an external application can get data directly from CDA using its endpoints. When requested for data, CDA will check whether the cache is enabled and whether there are results already cached. It will only query the final data sources when no values for that query (that includes the parameters used) have been cached, values in the cache have already expired, or the cache keys do not match:
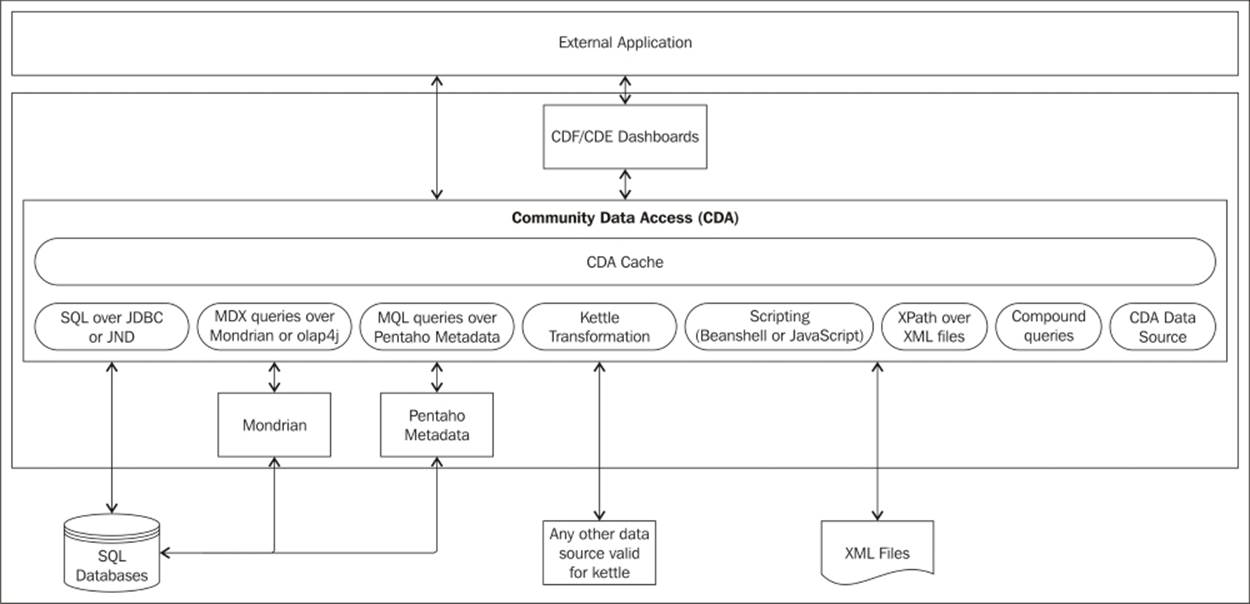
To enable the cache, we need to set some options when defining the CDA data source, but let's focus on the general functionality and leave these details to be explained later on in this chapter.
As we can see in the diagram, the available data sources for CDA are:
· SQL over JDBC or JNDI.
· MDX queries over Mondrian or olap4j.
· MQL queries over a Pentaho metadata connection.
· Kettle transformations.
· Scripting (only Beanshell and JavaScript are currently supported).
· XPath over XML files.
· Compound queries.
CDA files are a definition of the different sources to get data from. As you can have multiple data sources defined inside a single CDA file, you need to specify an identifier (ID). ID: the identifier of the connection. This child element is the unique identifier for that same CDA data source. Setting this child element would allow you to identify a particular query to be executed and get the data from it. It can also be seen as or called Data AccessID. It is mandatory and unique—the opposite of some other properties that are common to all data sources, which we will cover later in this chapter.
Creating a new CDA data source
There are multiple ways to create CDA data sources. One of the ways is to use CDE, where no code or XML is needed, and we will cover this later in the CDE chapter. There is another way, which is using the CDA editor, or just editing the file by hand using the Pentaho Text Editor plugin.
For now, I want you to understand the internals of CDA, so we need to start with the hardest way to create a CDA file—by creating/editing an XML file. The CDA files that are XML files will define the Pentaho repository and will have a .cda extension. This way, Pentaho will recognize the file extension and will provide the capability to preview the results or edit the file. The main structure of a CDA file is the following:
<?xml version="1.0" encoding="UTF-8"?>
<CDADescriptor>
<DataSources>
<!—- HERE LIVES EACH ONE OF <Connection>-->
</DataSources>
<!—- HERE LIVES EACH ONE OF <DataAccess> -->
</CDADescriptor>
As a .cda file is written using XML syntax, let's consider the concepts behind XML. XML files have elements and attributes.
The first line dictates that the file is written using the XML format type and the following lines will define all the connections and data access. We do it using the CDADescriptor element. Inside it, we will have a data source element with the definition of the data sources that can be used by different queries. It does not make sense to define the connections to the database when defining a query. Most of the time, queries that we want to execute share the same connections settings, so we can define the settings for the connections.
When defining the properties for each data access, we need to set some attributes like in the following example:
<Connection id="1" type="sql.jdbc">
...
</Connection>
Tip
Downloading the example code
You can download the example code files for this book from your account at http://www.packtpub.com. If you purchased this book elsewhere, you can visit http://www.packtpub.com/support and register to have the files e-mailed directly to you.
You can download the code files by following these steps:
· Log in or register to our website using your e-mail address and password.
· Hover the mouse pointer on the SUPPORT tab at the top.
· Click on Code Downloads & Errata.
· Enter the name of the book in the Search box.
· Select the book for which you're looking to download the code files.
· Choose from the drop-down menu where you purchased this book from.
· Click on Code Download.
You can also download the code files by clicking on the Code Files button on the book's webpage at the Packt Publishing website. This page can be accessed by entering the book's name in the Search box. Please note that you need to be logged in to your Packt account.
Once the file is downloaded, please make sure that you unzip or extract the folder using the latest version of:
· WinRAR / 7-Zip for Windows
· Zipeg / iZip / UnRarX for Mac
· 7-Zip / PeaZip for Linux
The code bundle for the book is also hosted on GitHub at https://github.com/PacktPublishing/Learning-Pentaho-CTools. We also have other code bundles from our rich catalog of books and videos available at https://github.com/PacktPublishing/. Check them out!
The following attributes are mandatory:
· ID: This is used to define a unique name that will later be used to identify the connections that the queries will be using.
· Type: This is used to define the type of connection, and this will set the elements that we need to have inside. When using CDE, this type will be set automatically when selecting the data source type to create.
After having all the connections defined, you will need to jump and start creating the data access. For each one of the queries, create an element like the following example:
<DataAccess id="1" connection="1" type="sql" access="private"
cache="true" cacheDuration="300">
...
</DataAccess>
The following attributes should be set:
· id: This is used to define the data access identifier that will be used in the components.
· connection: This is the identifier of the connection created previously. Different DataAccess id can share the same connection id.
· access: This defines whether the data access is visible. Here we can have one of two values: private or public. Private will say that the data access will not be visible, and public says the opposite. You may want to define that a data source is private when it is just to be used inside compound queries to create unions or joins between queries.
· cache: This defines whether the results of the query will be cached. Possible values are true and false. You should set it to true if you want your query to be cached. The default value is true.
· cacheDuration: This defines the cache duration in seconds. The query will be executed again after the specified seconds have passed. The query will be executed and the results cached again. This attribute will be ignored when the cache is set to false. The default value is 3600, the same as one hour expressed in seconds.
· type: We have the same goal when defining a connection and a Data Access, but they have different purposes, so we also need to specify the query type.
You can take a look at the following example to see how your .cda file should look after defining all the connections and Data Access. The example used is to define a query in a new type, and it uses the JSON syntax:
<?xml version="1.0" encoding="UTF-8"?>
<CDADescriptor>
<DataSources>
<Connection id="query" type="scripting.scripting">
<Initscript></Initscript>
<Language>beanshell</Language>
</Connection>
</DataSources>
<DataAccess access="public" connection="query"
id="query" type="jsonScriptable">
<Cache duration="3600" enabled="true"/>
<Columns/>
<Parameters/>
<Query>{
"resultset":[["row1", 0]],
"metadata":[
{"colIndex":0,"colType":"String","colName":"value"},
{"colIndex":1,"colType":"Integer","colName":"name2"}
]}
</Query>
</DataAccess>
</CDADescriptor>
Once you have the file uploaded/saved and available inside the Pentaho repository, you will get the ability to use a CDA editor/previewer.
Tip
There is an easy way to create CDA data sources
Like I already told before, there are easier ways to define a CDA data source. Later, you will see that you can also use CDE to create/edit data sources in a CDA file in a simpler way, using an intuitive Graphical User Interface (GUI). Don't get scared.
You should now be able to create a new CDA file. To do so, you should use your preferred code editor. Start by creating a new file in your file system with the name myFistQuery.cda and add the XML we just mentioned. Upload the file into the Pentaho repository and then open the file by clicking on Open in the right section of the Pentaho User Console. Select the Data Access identifier.
Available types of CDA data sources
The data sources covered in this book are the ones already pointed out previously, but we need to see them in detail. To create a new data source, you should also specify the attribute type that will be used to distinguish the method to be called on the server side to get the data and return the results. Depending on the data source that you are creating, you should also specify some properties that may be different depending on the kind of data source. Let's look at each one of the available options.
Each one of the following distinguished subsections will give you a brief overview and inform you about the properties that should be defined for the connections and also for the Data Access types. There are some common properties, such as the columns, that we will cover later in this chapter. For now, we will only focus on the different ones.
SQL databases
You can use this type of connection to get data from any source that uses Structured Query Language (SQL) and that can be reached using a JNDI connection or a JDBC driver. You can use one of these two kinds:
· sql.jdbc: To be utilized when using SQL over JDBC
· sql.jndi: To be utilized when using SQL over JNDI
When creating a connection of the sql.jdbc type, we should also specify the following properties:
· Driver: The Java class name to use (for example, org.postgresql.Driver)
· URL: The URL to connect to (for example, jdbc:postgresql://localhost:5432/database)
· User: The username to use
· Pass: The user's password
When defining the connection for a sql.jndi connection, you would need to set the following properties:
· jndi: The connection's name as defined in the context.xml file
Tip
JNDI autocomplete filed when using CDE
When setting this child element using CDE editor, a list of the JNDI connections available will be presented to you.
When specifying the Data Access properties, there is one that is mandatory:
· Query: Provides the SQL query to be executed
Mondrian cubes
When specifying the type for an MDX connection, we have the following available types:
· mondrian.jdbc: To be utilized when using MDX over JDBC
· mondrian.jndi: To be utilized when using MDX over JNDI
· olap4j.defaultolap4j: To be utilized when using MDX over olap4j
To set a connection of a mondrian.jdbc type, the following properties must be defined:
· Driver: The Java class name to use (for example, org.postgresql.Driver)
· URL: The URL to connect to (for example, jdbc:postgresql://localhost:5432/database)
· User: The username to use
· Pass: The user's password
· Catalog: The Mondrian schema to use
When creating a connection of the mondrian.jndi type, use the following properties:
· jndi: The jndi identifier
· Catalog: The Mondrian schema to use
And when creating a connection of the olap4j.defaultolap4j type, you should use:
· Driver: The Java class name to use (for example, mondrian.olap4j.MondrianOlap4jDriver)
· URL: The URL used to get call the driver class (for example, jdbc:mondrian:)
· JDBCUser: The username for the connection to the database (for example, pentaho_user)
· JDBCPassword: The password to verify authentication on the database (for example, password)
· JDBCDriver: The driver for the connection to the database (for example, org.hsqldb.jdbcDriver)
· JDBC: The URL to connect to the database (for example, jdbc:hsqldb:hsql://localhost:9001/Sampledata)
· Catalog: The path to the Mondrian schema (for example, mondrian:/SteelWheels)
To define the Data Access for a Mondrian data source, we should start discussing the difference between normalized and denormalized output. It's out of the scope of this book to explain data normalization/denormalization in detail, but it's important that you know the difference between them.
Normalized queries will have an output as expected, with the same number of columns as defined, but for denormalized queries—regardless of the number of selected measures—CDA will only display the name of the column and the value. Looking at the examples provided by the CDA samples, you would see the difference between them. With the normalized queries, we will get the result as provided in the query:
|
[Time].[(All)] |
[Time].[Years] |
[Measures].[Sales] |
[Measures].[Quantity] |
|
All Years |
2004 |
4750205.89 |
47151 |
|
All Years |
2005 |
1513074.46 |
14607 |
The denormalized queries will have a different output format, as referred to before, and will only have two columns representing the measures. All the selected measures in columns will be denormalized to appear as levels and value, where each level represents the measure name, followed by the value. Each one of the measures names will appear as a value of the column representing the level:
|
[Time].[(All)] |
[Time].[Years] |
[Measures].[MeasuresLevel] |
Measure |
|
All Years |
2004 |
Quantity |
47151 |
|
All Years |
2005 |
Quantity |
14607 |
|
All Years |
2005 |
Sales |
1513074.46 |
|
All Years |
2004 |
Sales |
4750205.89 |
Looking at both tables, it is easy to understand the big difference between them. This definition should be specified in the type attribute when creating the Data Access element. Depending on connection type and the output format, you should choose one of the following types: MDX, denormalizedMDX, olap4j, and denormalizedOlap4j.
So when defining the Data Access for an MDX data source inside a .cda file, you should also specify the following properties:
· Banded: This is only used and valid for normalized queries, and it also defines how the output is. If a classic mode is used, the result will be like we showed previously. When using a compact mode, only one column will be presented for each one of the dimensions used, corresponding to the lowest selected level.
· Query: This is the query to be executed.
Pentaho metadata
The Pentaho metadata data sources are used when acquiring data using a Pentaho Metadata Schema. When specifying a metadata query, we need to set the metadata.metadata type. This allows Pentaho metadata to be accessed from a dashboard through an MQL query. To do this, and when defining the connection, we should provide the following properties:
· DomainId: The domain used when creating the metadata schema
· XmiFile: The path and name of the file of the metadata schema
When creating the Data Access, we also need to specify:
· Query: A valid metadata query to be used to get data to the dashboard
Kettle transformations
This kind of data source, kettle transformations, allows you to get data from a kettle transformation. Besides the fact that it delivers powerful Extract, Transform, and Load (ETL) capabilities, it allows us to have many input sources. It provides a GUI with zero coding required, and the great ability to connect, combine, and transform data from multiple sources, making it easier when we have to deal with a hybrid data ecosystem. It also makes it possible to use predictive analytics.
Whatever you do with kettle, you will then be able to get data from a particular step in the transformation. Some time ago, it was only possible to call a transformation, but now we have the ability to run jobs from inside a transformation, which makes it even more powerful. Let's suppose you need some information from MongoDB. Well, you will be able to acquire data from MongoDB using a kettle transformation that will be called from the dashboard.
Also, let's suppose you want to apply some data mining algorithms using Weka or R. You can achieve your goals with kettle and get the results in your dashboard.
It's very simple to use—you just need to create a data source, and you should use an attribute type of kettle.TransFromFile. Also, when setting the connection, you will need to specify the following properties:
· KtrFile: This is used to specify the path and name of your transformation.
· Variables: This is used to specify the mapping between kettle parameters and the parameters used in the dashboard. You know how to use parameters in kettle transformations, you already know that you might specify parameters in your kettle transformations in a way you can run those kettle transformation with values that can be specified when executing them. The dashboard can also make use of parameters, which we will cover later in this chapter.
You should make use of the element "variables", to create a relationship between the parameters used inside the dashboard and the parameters you have defined inside your dashboard. To make use of this, you should specify as many variables as you need, the datarow-name, and the variable-name attributes.
If you look at the .cda samples, you will find a kettle.cda transformation that is defining parameters to be sent to the transformation. Let's look at the sample:
<Connection id="1" type="kettle.TransFromFile">
<KtrFile>sample-trans.ktr</KtrFile>
<variables datarow-name="myRadius"/>
<variables datarow-name="zipCode" variable-name="myDashZipCode"/>
</Connection>
The first variable defines a datarow-name, but it does not define a variable name, and that's because the parameter inside the transformation has the same name as the parameter defined to be used in the data source. The second one defines both datarow-name and variable-name, and that's because the names are not similar, so we need to create the map between them.
When defining the Data Access, we also need to define the kettle step name that we want to retrieve the data from. This is done using the query child element:
· Query: This defines the name of the step to get data from
Scripting data sources
Scriptable data sources are very useful when you start to build your dashboard, but you still do not have a query to start with. Sometimes, when working in a team, this may happen. If two teams start to work on the same project at the same time, with the same goal, the back-end team may not have the ability to provide a query to be used to start building the dashboards.
Let's suppose that we will have MDX queries. To have MDX queries, we need to have a Mondrian schema that works on top of a data warehouse. For this, it's necessary to build some ETL that will later be translated in a data warehouse. On top of what we are also building, we need a Mondrian schema to make MDX queries. All of this takes some time, so to start developing your dashboard, you have been provided with the ability to create some dummy data sources.
CDA started with one scriptable query, but has recently added a new one.
For both types of scripting when creating a scriptable data source, we need to create a similar connection. We need to specify the attribute type, that should have a value of scripting.scripting, but also the following child element:
· Language: For both kinds of scriptable queries, we should set the value beanshell or overJavaScript.
The definition of this data source should look something like this:
<Connection id="scriptable" type="scripting.scripting">
<Language>beanshell</Language>
</Connection>
When defining the Data Access, it's different, so for the first case, when setting the language to Beanshell, we should end up with something like the following:
<DataAccess id="overBeanshell" type="scriptable" connection="scriptable" access="public">
<Name>Sample query on SteelWheelsSales</Name>
<Query>
import org.pentaho.reporting.engine.classic.core.util.TypedTableModel;
String[] columnNames = new String[5];
columnNames[0] = "Region";
columnNames[1] = "Q1";
columnNames[2] = "Q2";
Class[] columnTypes = new Class[5];
columnTypes[0] = String.class;
columnTypes[1] = Integer.class;
columnTypes[2] = Integer.class;
TypedTableModel model = new TypedTableModel(columnNames, columnTypes);
model.addRow(new Object[]{ new String("East"), new Integer(10), new Integer(10) });
model.addRow(new Object[]{ new String("West"), new Integer(14), new Integer(34) });
return model;
</Query>
</DataAccess>
Scripting using JavaScript is a new type of data source that will simplify your life, but has the same drawbacks as when setting the language to overJavaScript:
<DataAccess id="overJavaScript" type="jsonScriptable" access="public" connection="scriptable" >
<Cache duration="3600" enabled="true"/>
<Columns/>
<Parameters/>
<Query>{
"resultset":[["row1", 0]],
"metadata":[
{"colIndex":0,"colType":"String","colName":"value"},
{"colIndex":1,"colType":"Integer","colName":"name2"}
]}
</Query>
</DataAccess>
Tip
Be careful using scripting data sources
You should be careful when using a scripting data source, and there are two reasons for this. The first one is that this type of query is very fast to execute, so you should always try to use a real data source, otherwise you will not know if your dashboard is having performance issues. There are some tricks that you can apply to the queries and to the dashboard to make them work faster, and we will cover them later.
The second reason is that you would always get the same result, because almost certainly you are not creating scriptable code that can deliver different results when changing parameters. Since you will get different results when you apply real queries, it's important that you keep looking at your dashboards using real data.
XPath over XML
Another type of data source is XPath over XML. This will allow you to grab specific nodes from a specified XML file. When defining the connection, the type should be xpath.xPath, and the mandatory property for the connection is:
· DataFile: The path and name of the XML file to extract data from. This will be something like the following:
· <Connection id="xpath" type="xpath.xPath">
· <DataFile>region.xml</DataFile>
</Connection>
When defining the Data Access, we also should specify the XPath string query in the query element:
<DataAccess access="public" connection="xpath" id="xpath" type="xPath">
<Query>/*/*[REGION=9]</Query>
</DataAccess>
Tip
More complex queries using XPath can also be done using a kettle transformation
The query specified in the last example would extract all the nodes where a region is equal to 9 from the file with the name region.xml. This example is very similar to what can be done using a kettle step. If you are trying to achieve some other results that are not achievable only using this data source, you can create a more complex kettle transformation and then call the transformations as you've already seen.
Compound queries
You can use compound queries to make a join or union of the results of two queries. There are two types of compound queries: join and union. For both of these types, we don't need to define a connection, because in reality we will be using the Data Access that is already defined. Since we are using another data source already created, and that which can only be created with the purpose to be used here, then as referred to earlier, they can be defined with an attribute access set to private. This way, they will not be seen in the previewer, but can be used inside the compound queries.
When creating a Data Access, we need to specify the attribute as being of the type joins or union, depending on the case. For the first case, when defining a join, we should define the following properties:
· JoinType: The join type will have the kind of join that you may know from the following SQL queries: Inner, Left Outer, Right Outer, and Full Outer
· Left: Here, we need to define two attributes: the id of the data source to be used and also the keys that should be used for the right side of the join
· Right: This is similar to the previous property but for the data source to be used on the left side of the join.
The other type, union, should include the following properties:
· Up: Identifies the query to be used on the top of the union
· Bottom: This identifies the query that will be placed on the bottom part of the union
Note that when defining the union, the number of columns should be the same.
You can use compound queries to make the join or union of the results of two queries, but you can also use a kettle transformation to get data from different data sources, do a lot of operations such as joining the results, and then returning the results to CDA so that they can be delivered to you in the format you have chosen. Kettle, or Pentaho Data Integration, as you prefer, is used for these operations.
You can find examples for all these types of data sources inside CDA plugin samples. You can access the samples using PUC and open them from the folder: /public/plugin-samples/CDA/cdafiles.
Common properties
There are some common properties that should or can be used when defining a Data Access. These properties are:
· Cache: The cache can also be defined as an attribute when defining a Data Access. When defining the cache as an element, we should also specify the two attributes, duration and enabled. The first attribute is used to define the time that the query will be cached since the last execution. The enabled attribute will be set to true or false depending on whether you want to enable it or disable it.
· Name: This is the friendly name of the data access being defined.
· Columns: This is an element that can create a different output by changing the name of a column or just by adding new ones using calculated columns. To change the name of columns, you would just need to specify the columns' idx, starting from 0, and the desired name, as shown in the following example:
· <Column idx="0">
· <Name> Region </Name>
· </Column>
· <Column idx="1">
· <Name> Quantity </Name>
· </Column>
· <Column idx="2">
· <Name> TotalPrice </Name>
</Column>
To create a calculated column, we need to specify the name of the new column and the formula to be used. The formulas should match the open formula specification. Please refer to http://wiki.pentaho.com/display/Reporting/Formula+Expressions to find out more information about this:
<CalculatedColumnidx="0">
<Name> Unit Price </Name>
<Formula>=[TotalPrice]/[Quantity]</Formula>
</CalculatedColumn >
· Query: Almost all Data Access makes use of this element. Refer to each one of the the data sources types referred earlier to get more information.
· Parameters: These are the parameters to be sent/used in the query. They is covered in the next subsection.
· Output: This element lets us define a different output than the one defined in the queries. Please refer to the Manipulating the output of a data source subsection.
Making use of parameters
We definitely do not want our queries to be static. If you can use a criterion in a query to restrict the set of records that the query returns, you also want that criterion to be changed dynamically without always having the same static value. This allows you to create a query that can be easily updated without needing to change the query itself.
Parameters on SQL queries
Having a parameter is like having a variable that can change over time. Each time the query runs, the parameter will be replaced by the value that the parameter is holding, returning data based on a criterion. The way to build a parameter is to use the following syntax: ${parameterName}. When setting a query to grab the customer for a particular country like:
select * from customers where country in ('USA');
You can change the static value by the parameter that you want to use:
select * from customers where country in (${country});
If the country is equal to USA, then the result from both queries is exactly the same. The advantage of using this parameter is that you would not need to change the query to grab the customers from another country. Just by changing the value of the parameter when running the query again, the results will also change with respect to the selected country. This is very useful when used inside dashboards, because dashboards are meant to be dynamic and respond to changes or interaction from the user.
When using parameters in CDA, you should also set a child element, Parameters. You should create your parameters like the following XML syntax:
<Parameters>
<Parameter default="USA" name="country" type="String"/>
</Parameters>
In one single query, you can define more than one parameter. So, inside the Parameters tag, you will have a Parameter element for each one of the parameters that you want to define. The attributes to define are the name of the parameter that should match to the one used in the query, the default value to be used when no other value is used, and the type of the parameter. For the type, you can use one of the following:
· String, Integer, Numeric, or Date: This depends on the type of value that you will use. Just to be clear, the Integer type can contain only whole numbers, such as 10 or 365. The Numeric type can contain decimal numbers such as 15.39.
· StringArray, IntegerArray, NumericArray, or DateArray: These are used when you have multiple values to be included in an IN condition.
As an example, your CDA file would look like the following:
<?xml version="1.0" encoding="UTF-8"?>
<CDADescriptor>
<DataSources>
<Connection id="sqlSample" type="sql.jndi">
<Jndi>SampleData</Jndi>
</Connection>
</DataSources>
<DataAccess access="public" connection="sqlSample" id="sqlSample" type="sql">
<Cache duration="3600" enabled="true"/>
<Columns/>
<Parameters>
<Parameter default="USA" name="country" type="StringArray"/>
</Parameters>
<Query>select * from customers where country in (${country})</Query>
</DataAccess>
</CDADescriptor>
When using SQL queries, CDA replaces the parameters as prepared statements. SQL queries passed to this method go to the database for precompilation if the JDBC driver supports it. If it does not, then precompilation occurs when you execute prepared queries. They are precompiled in the database and their access plan will be reused to execute further queries, which allows them to be executed much quicker than normal queries generated by a statement object. Another advantage of using them is that it will disable the ability to prevent SQL injection attacks.
Parameters in MDX queries
Parameterizing in MDX queries is much simpler than in SQL. It's not possible to perform SQL injection attacks, so CDA lets you have a parameter that is part of the query or the full query. You can use whatever tool you need/want and pass the query as a parameter to be executed by Mondrian. You might think that this would cause a security-related problem by passing a query that a user could not execute. When security in Mondrian is well implemented, even if you create a query to grab a part of data that you are not allowed to, you will not get the results back.
Using parameters in a Mondrian query is very similar, except for the fact that you can use the parameter anywhere in the query.
It's not the purpose of this book to teach you how MDX works or how to build MDX queries, so we will just stick with some sample queries. Creating the following query will show the sales by quantity for each one of the members of a particular level of a territory:
<?xml version="1.0" encoding="UTF-8"?>
<CDADescriptor>
<DataSources>
<Connection id="mk" type="mondrian.jndi">
<Catalog>mondrian:/SteelWheels</Catalog>
<Jndi>SampleData</Jndi>
</Connection>
</DataSources>
<DataAccess access="public" connection="mk" id="mk" type="mdx">
<BandedMode>compact</BandedMode>
<Cache duration="3600" enabled="true"/>
<Columns/>
<Parameters>
<Parameter name="markets" default="Territory" type="String"/>
</Parameters>
<Query>
SELECT
NON EMPTY {[Measures].[Quantity]} ON COLUMNS,
NON EMPTY {[Markets].[${markets}].Members} ON ROWS
FROM [SteelWheelsSales]
</Query>
</DataAccess>
</CDADescriptor>
You can see the query is defined with a parameter ${markets}. The parameter has a default value of Territory, so if no other value is set, the resulting query will show the quantities that were sold for each one of the territory's members. If a value of Country,State, Province, or City is set, then the quantities shown have numbers that correspond to each one of the levels of the selected level of the dimension territory.
As we referred to before, you can pass a parameter anywhere in the query, or just have the query as a parameter. Here is an example:
<DataAccess access="public" connection="mk" id="mk" type="mdx">
<BandedMode>compact</BandedMode>
<Parameters>
<Parameter name="myQuery" default="SELECT {[Measures].[Sales]} ON COLUMNS FROM [SteelWheelsSales]" type="String"/>
</Parameters>
<Query>
${myQuery}
</Query>
</DataAccess>
Parameters on kettle queries
When grabbing data from a kettle query, we don't need to define a query to be executed by kettle. Well, you may need to define one inside the transformation, but not in CDA. What you can do is pass the parameters to the kettle transformation. As we may have parameters in a dashboard that have a different parameter name in the kettle transformation, we will need to map them. Looking at the example provided by the CDA samples, we can see the variables that are used by the transformation inside the definition of the connection:
<?xml version="1.0" encoding="utf-8"?>
<CDADescriptor>
<DataSources>
<Connection id="1" type="kettle.TransformFile">
<KtrFile>sample-trans.ktr</KtrFile>
<variables datarow-name="myRadius"/>
<variables datarow-name="ZipCode" variable-name="myZip"/>
</Connection>
</DataSources>
<DataAccess id="1" connection="1" type="kettle" access="public" cache="true">
<Name>Sample query on SteelWheelsSales</Name>
<Query>Report Columns</Query>
<Parameters>
<Parameter name="myRadius" type="Integer" default="30"/>
<Parameter name="ZipCode" type="Integer" default="32771"/>
</Parameters>
</DataAccess>
</CDADescriptor>
myZip and myRadius are the names of the parameters defined inside the transformation, but we can see that the parameters ZipCode and myRadius are used inside CDA. That's the reason why the example sets a variable datarow-name=ZipCode and variable-name=myZip. These two, names and variable name need to be related to each other.
As the other parameter has the same name inside CDA and the kettle transformation, there is no need to establish the mapping—just set it so that CDA needs to pass the parameters to the transformation. You can also see that the CDA parameters are similar, as defined inside the definition of the Data Access.
Private parameters
Parameters can also be defined as private. When you define a parameter as private, the value is set on the server side, so even when you try to pass a parameter value from the client side, the value will be the value that is set by default. That's why the access can be set to private.
A use case of this is when you want to pass the username or tenant to a SQL query, and you want the username to be able to send a value that would compromise the real identity. So if you're setting the value of ${[security:principalName]}, on the server side, this parameter will be evaluated and replaced by the username of the user's login, no matter what value the user is sending from the client side to overwrite the default parameter value. For this, the parameter and SQL query should be set like the following:
<Parameters>
<Parameter default="${[security:principalName]}" name="username" type="String" access="private"/>
</Parameters>
<Query>SELECT * from Employee where id=${username}</Query>
Tip
Using session variables
You can also get values from a session variable to be used in CDA parameters' values using ${[session:sessionVariableName]}. Don't forget that to do this, you will need to have it defined on the server. You have multiple ways to set a session variable: using xActions, through Java code, using the Set session variables step available in the new BA Server Utils plugin for kettle, and through the Startup Rule Engine plugin for BA Server.
By default, a value is set as public; otherwise, you will need to specify that the parameter access level is private.
Editing and previewing
Once you have created a file and uploaded it to BA Server, the .cda extension will tell Pentaho how to handle this file. When clicking on a .cda file, in the context menu that becomes available on the right side of Pentaho User Console (PUC), you will be able to edit and open the previewer. When selecting edit, you will see a screen like the following:
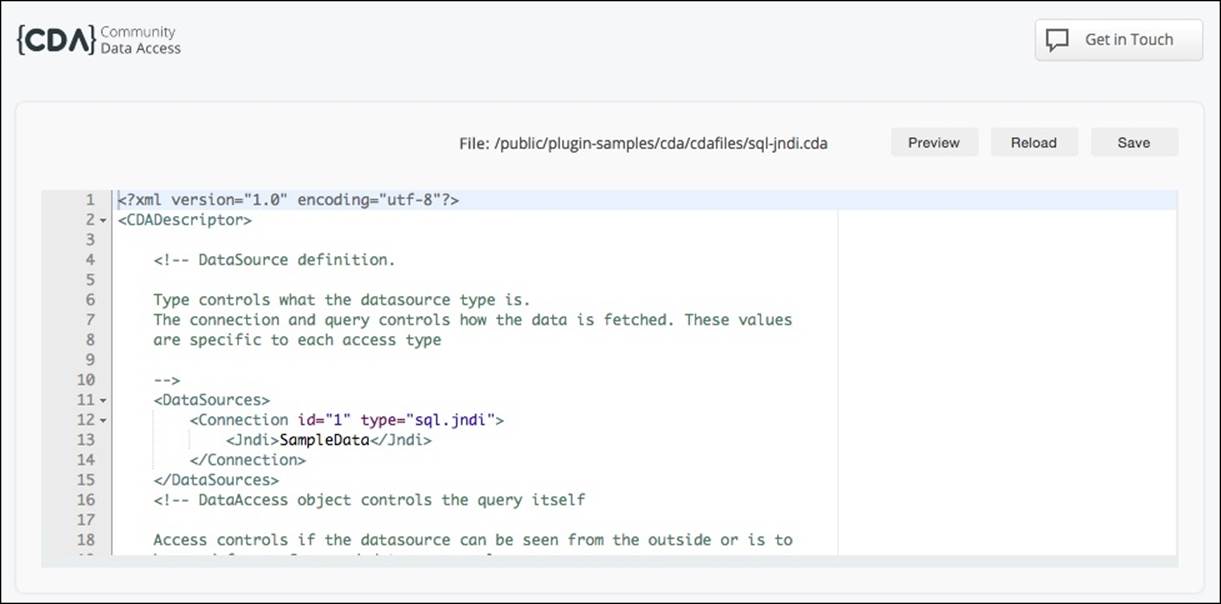
You can see the editor on the center of the page, and three buttons on the right-hand side, above the editor. We are able to change the XML file and use the buttons to trigger some actions. The available actions are:
· Save: To save the changes we can make in the editor
· Reload: To reload the content of the file
· Preview: This will open the previewer so that we can see the results of the execution of the data source
There are two ways to preview a query result when using CDA. The first one is using the CDA previewer, a GUI that will let you select the Data Access that you would like to execute. To open the previewer, you can select the .cda file in the PUC browser and click Select Edit or double-click on the file, click on the Preview button of the editor, or call the previewer in the browser:
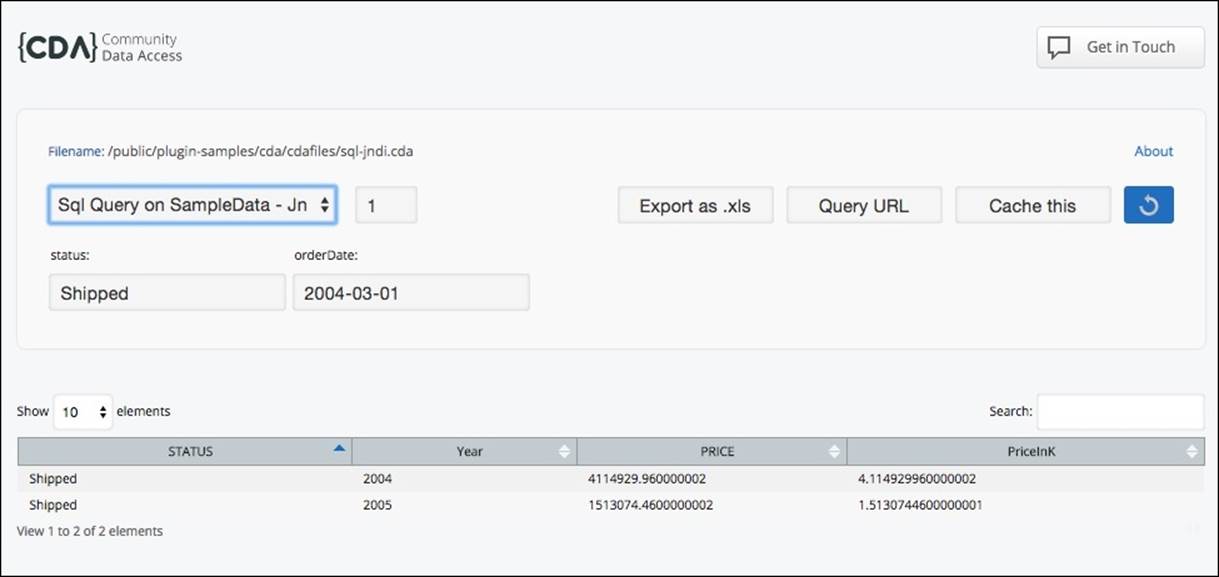
The first step to get results is to select the data access using the dropdown. Next, set the values of the parameters, if they exist, and then click the refresh button. On the bottom of the page, you will get the results of the execution of the query.
There are also three available buttons: from left to right, the first one gives you the ability to export the results to an .xls file. The second one presents a dialog window with the URL you can use to call the query using an HTTP request. The last one gives you the ability to schedule the execution of the report so that the results can be cached.
When clicking on the Cache this button, you get a dialog where you can choose the time interval to execute the query and cache the results.
Tip
Advanced options for cache scheduler
There is also an advanced option so that you can schedule it by using a Cron Expression. More information about Cron can be found at: https://en.wikipedia.org/wiki/Cron
There is another way to get and check the results which is not so user-friendly. This is by calling the endpoint in your browser to get the results from the execution of a query. The URL is provided to you when you click the Query URL button. You can also pass the parameters, and as a bonus, you can test the pagination on the server side and select the output type that you want to get results with. We will briefly cover this option later.
Manipulating the output of a data source
Manipulating the result of a data source is really simple. You can use the child element Output when setting the Data Access. Let's suppose we are performing a query that is returning 10 columns, but we only want to display the first two. If that's the case, then you should set the following child element in the Data Access definition:
<Output indexes="0,1" mode="include"/>
This child element tells CDA that it should use the first and second columns, identified by index 0 and 1. The mode will tell CDA that these are the columns to be included; otherwise, if you use exclude, you will get all the columns except the first two.
When accessing a query through a URL, another way to manipulate the output is to have a different output format. This can be achieved by calling the URL and adding a parameter outputType of one of the following formats: JSON, XML, CSV, XLS, or HTML.
For example, if you want to manipulate the output of the data source, you can use something like the following URL example can be used in your browser: http://localhost:8080/pentaho/plugin/cda/api/doQuery?path=/public/plugin-samples/cda/cdafiles/sql-jndi.cda&dataAccessId=1¶mstatus=Shipped¶morderDate=2004-03-01&outputType=csv
This request will download a .csv file and depending on the chosen format, it will be displayed in the browser or will just download a file (by default, if the file recognizes the format, the content will be rendered on the browser, otherwise the content will be download). The default format is JSON.
CDA cache
CDA is able to cache the queries that have been executed. Every query that runs will be cached or not cached, and by the time defined in the Cache property element when defining the Data Access. You can also set the interval of time to grab results from the cache, avoiding new requests to the server.
Managing the cache and the scheduler
In the PUC menu, click on Tools | Refresh | CDACache Manager, and you will have the ability to clean the CDA cache. When choosing this option, every single cache will be flushed.
It's also possible to manage what has been cached or is scheduled to be cached. By clicking on the PUC menu and going to Tools | CDA Cache Manager, it will open a new tab with the scheduled/cached queries manager. When opening the manager, you have the ability to choose between two modes by using the Scheduled Queries or Cached Queries buttons, respectively:
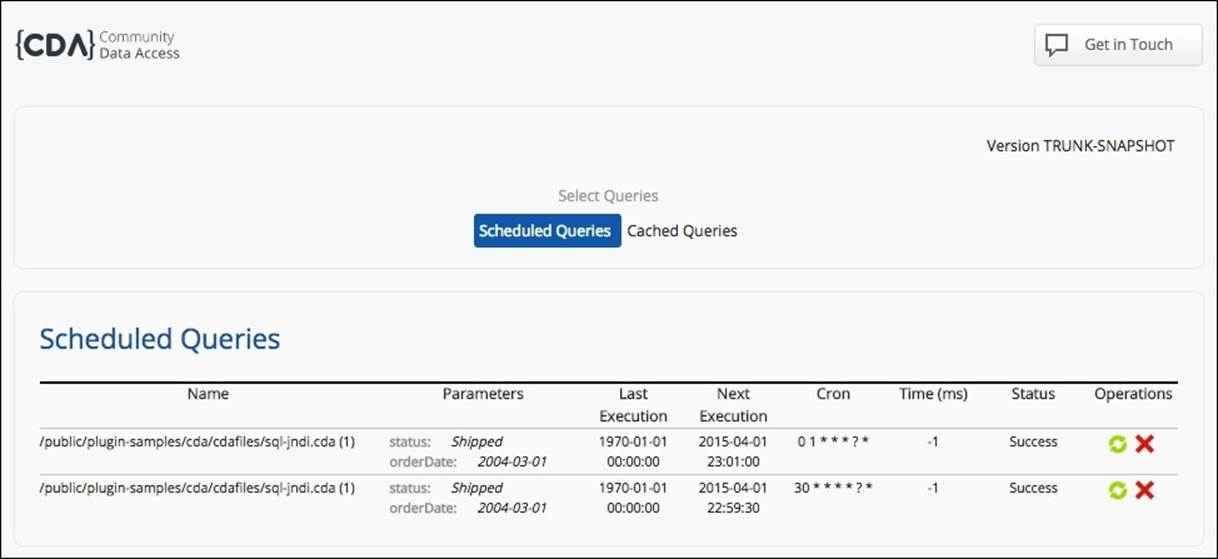
The previous image is an example of the Scheduled Queries manager, and it will display all the queries that have been cached. For each query, you have some information about the last execution, the next execution, the Cron expression, the status, and also two buttons, Execute or Remove, from the scheduler:
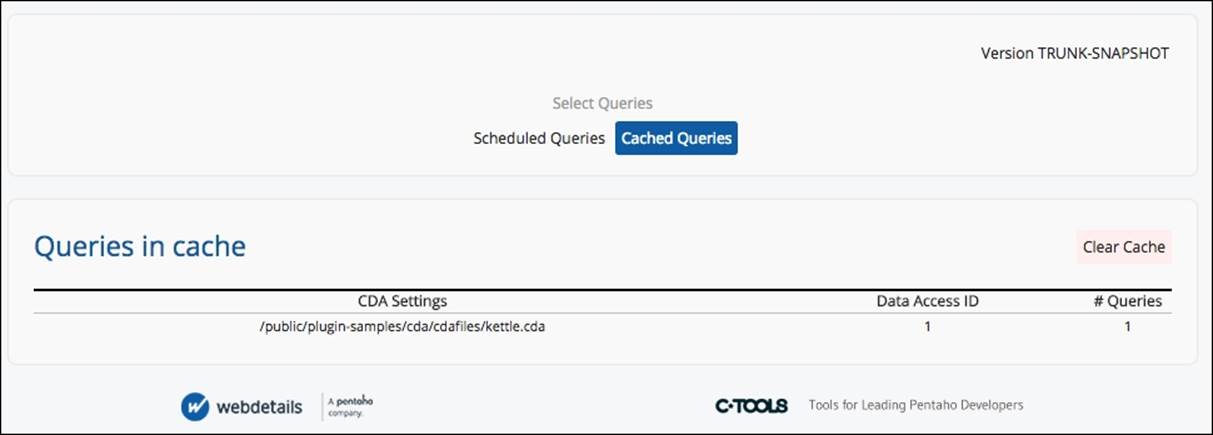
In the Cached Queries screen, you will see the queries that have been cached. When clicking on each row, you will get details about cached query, such as the executed query, the parameters used, the number of rows, how many hits, and also some actions buttons. The actions buttons are used to display the results below the query, and make it possible to remove a particular item from the cache. You also have a button that can empty the cache by removing all the items from the cache.
Cache keys
When using a Dynamic Schema Processor (DSP) to be used on Mondrian and MDX queries on top of CDA, we may face some problems with cached results. To optimize the cached results, CDA will use the query, the parameter values, and the role of the user as keys to manage/control the cached queries and the results. In a multi-tenant environment, it's important that the user or some other key can be set. More information about multi-tenancy is available at:https://help.pentaho.com/Documentation/6.0/0R0/070/Multi-Tenancy.
Configuring local cache keys
We can define cache keys in two different ways, The first way can be set when defining the data access, inside the Cache element, where we may also define the keys to use like the following:
<DataAccess>
<Cache enabled="true" duration="500">
<Key name="tenantId" value="${[session:org.pentaho.tenantId]}" default="/pentaho/tenant0"/>
</Cache>
</DataAccess>
This will make CDA add a key when managing the cache, and the cache will be segmented, also taking into account the tenantId value that will be acquired from the session variable org.pentaho.tenantId. The default value will be used if the used session variable is not defined at the time.
Some other valid examples provided by Webdetails are as follows:
<Key name="data-access-roles" value="${[system:data-access/settings.xml{data-access-roles}]}" default="data-access-roles"/>
<Key name="user-in-session" value="${[security:principalName]}" default="user-in-session"/>
<Key name="tenantId" value="${[session:org.pentaho.tenantId]}" default="default-tenant"/>
Configuring system-wide cache keys
The other way to define cache keys, configuring it to be used system-wide, has a drawback, all defined data accesses would need to define their cache keys. There is a way to make these keys system-wide. To do this, you need to edit the file cda.properties. You can find the file at pentaho-solutions/system/cda/.
At the end of the file, you have a commented example on how to set the keys, which is very simple. They keys are defined like the following:
pt.webdetails.cda.cache.extraCacheKeys.key=value
An example of how to use tenantId is as follows:
pt.webdetails.cda.cache.extraCacheKeys.tenantId=${[session:org.pentaho.tenantId]}
Save the file, restart BA Server, and CDA will start using the configured keys. These settings will be valid for all the queries.
Web API reference
One of the interesting things in knowing how to work with the API is that we can use CDA to get data into an external application. This is interesting if we're not using CDE or CDF to build the dashboard. Anyhow, a good reason for you to know about the API is so you can go further when using CTools.
You can make requests to CDA using Web API. The base URL to use is $BASE_URL/$WEBAPP/plugin/cda/api/, where $BASE_URL is the protocol, hostname, and port, and $WEBAPP is the web application name used on Apache Tomcat, and the default webapp is defined as pentaho.
For example, the following URL is referring the pentaho webapp: http://localhost:8080/pentaho/plugin/cda/api/doQuery?path=/public/plugin-samples/cda/cdafiles/mondrian-jndi.cda&dataAccessId=1¶mstatus=Shipped
Next we will cover the available endpoint. An endpoint, defines the particulars of a specific endpoint at which a given service is available.
getCdaList
The getCdaList endpoint will get a list of all the CDA files available inside the repository. There is no need to specify the parameters for this endpoint.
For example: http://localhost:8080/pentaho/plugin/cda/api/getCdaList
listQueries
The listQueries endpoint will list all the queries available in a CDA file. There is one mandatory parameter that needs to be used: path, to specify the path to the CDA file where we want to get the queries from. There is an optional parameter that we can specify, outputType, which defines a different output format for the results. The default value is json and the other option is xml.
Example of the call to list queries: http://localhost:8080/pentaho/plugin/cda/api/listQueries?path=/public/plugin-samples/cda/cdafiles/mondrian-jndi.cda
listParameters
The listParameter endpoint will list all the parameters that are defined in a particular query. There are two mandatory parameters that need to be used: path, to specify the path to the CDA file where the queries are defined, and dataAccessId, to specify the query we want to use. There is an optional parameter that we can specify, outputType, which defines a different output format for the results, where the default value is json and option is xml.
Example on how to list parameters: http://localhost:8080/pentaho/plugin/cda/api/listParameters?path=/public/plugin-samples/cda/cdafiles/mondrian-jndi.cda&dataAccessId=1
doQuery
This method makes a call to a query and returns the result. There are two mandatory parameters that need to be used: path and dataAccessId. The first one will inform the method which file should be used to get the connection and the query to be used. The second one informs which one of the data accesses that were defined in the CDA file are to be used. You should remember that in the last chapter, we needed to define connections, and that data access would point to a defined connection.
When using parameters, you should also specify the values of those parameters. To do this, it should be passed to the URL paramParameter, where Parameter corresponds to the name of the parameter.
There are other options that are optional, such as outputType, to specify a different output format for the results, where the default value is json and options are xml, csv, xls, or html.
If there is a need to have pagination, we can also define paginateQuery, which should have a Boolean value, and if we are setting a value of true, we should also specify pageStart to define which to start with and pageSize to define the numbers of rows we want to get.
Another parameter, bypassCache, can be used with a value of true if we need to bypass the cache and make CDA raise a new request to the database. To sort the query using a particular column or groups of columns, we should use sortBy and specify the list of columns.
Example on how to execute query: http://localhost:8080/pentaho/plugin/cda/api/doQuery?path=/public/plugin-samples/cda/cdafiles/mondrian-jndi.cda&dataAccessId=1¶mstatus=Shipped
Let's suppose you want to get data to your web application that is not built with CDE or CDF. You can do this by calling the same requests that CDF and CDE do. To get data, you need to specify which CDA to use and which data access identifier should be used. You can also specify the parameters to paste to the query, and then the URL will be as follows:
http://localhost:8080/pentaho/plugin/cda/api/doQuery?path=/public/plugin-samples/cda/cdafiles/mondrian-jndi.cda&dataAccessId=1¶mstatus=Shipped
This request is calling dataAccessId 1, which is available in the Mondrian-jndi.cda file located at: /public/plugin-samples/cda/cdafiles. It passes Shipped as the status parameter value. You will get the result in the json format as explained previously, and it willcontain the metadata, queryInfo, and the resultset. It will provide you with information on the columns' names and the type being returned, how many rows were returned, and also a multidimensional array that represents the results.
clearCache
The clearCache will clear the CDA cache. Example: http://localhost:8080/pentaho/plugin/cda/api/clearCache
previewQuery
This method will open the CDA previewer. Example: http://localhost:8080/pentaho/plugin/cda/api/previewQuery?path=/public/plugin-samples/cda/cdafiles/mondrian-jndi.cda
editFile
This method will open the CDA editor for a particular query. We should define a parameter with the path to the CDA file. The parameter is path. Example: http://localhost:8080/pentaho/plugin/cda/api/editFile?path=/public/plugin-samples/cda/cdafiles/mondrian-jndi.cda
manageCache
This method will open the cache manager, which we already covered previously in this chapter. Examples: http://localhost:8080/pentaho/plugin/cda/api/manageCache
Let's suppose you want to get data to your web application that is not built with CDE or CDF. You can do this by calling the same requests as CDF and CDE do. You can also specify the parameters to paste to the query, and then the URL will be as follows:
http://localhost:8080/pentaho/plugin/cda/api/doQuery?path=/public/plugin-samples/cda/cdafiles/mondrian-jndi.cda&dataAccessId=1¶mstatus=Shipped
Hands-on dashboards
Now it's time for you to create your data sources. In order to display the results from the queries, in the next chapter, you should create a CDA file with the following content:
<?xml version="1.0" encoding="utf-8"?>
<CDADescriptor>
<!—-Data source for the dashboard, a unique data source is used for all connections-->
<DataSources>
<Connection id="SampleData" type="mondrian.jndi">
<Jndi>SampleData</Jndi>
<Catalog>mondrian:/SteelWheels</Catalog>
<Cube>SteelWheelsSales</Cube>
</Connection>
</DataSources>
<!-—Data Access to get the territories values-->
<DataAccess id="territories" connection="SampleData" type="mdx" access="public">
<Name>territories</Name>
<BandedMode>compact</BandedMode>
<Query>
WITH
MEMBER [Measures].[UID] AS [Markets].CURRENTMEMBER.UNIQUENAME
SELECT
UNION([Markets].[All Markets], DESCENDANTS([Markets].[All Markets], [Markets].[Territory])) on ROWS,
{[Measures].[UID]} on COLUMNS
FROM [SteelWheelsSales]
</Query>
<Output indexes="1,0" mode="include"/>
</DataAccess>
<!-—Data Access to get the countries values-->
<DataAccess id="countries" connection="SampleData" type="mdx" access="public">
<Name>countries</Name>
<BandedMode>compact</BandedMode>
<Query>
WITH
MEMBER [Measures].[UID] AS [Markets].CURRENTMEMBER.UNIQUENAME
SELECT
UNION([Markets].[All Markets], DESCENDANTS(${marketQueryParam}, [Markets].[Country])) on ROWS,
{[Measures].[UID]} on COLUMNS
FROM [SteelWheelsSales]
</Query>
<!—-Parameters and default values to be used on the query. -->
<Parameters>
<Parameter name="marketQueryParam" type="String" default="[Markets].[All Markets]"/>
</Parameters>
<Output indexes="1,0" mode="include"/>
</DataAccess>
<!-—Data Access to get the top 50 customers -->
<DataAccess id="top50Customers" connection="SampleData" type="mdx" access="public">
<Name>top50Customers</Name>
<BandedMode>compact</BandedMode>
<Query>
WITH
SET CUSTOMERS AS TopCount([Customers].Children, 50.0, [Measures].[Sales])
SELECT
NON EMPTY {[Measures].[Sales]} ON COLUMNS,
NON EMPTY CUSTOMERS ON ROWS
FROM [SteelWheelsSales]
WHERE ${marketQueryParam}
</Query>
<!—-Parameters and default values to be used on the query.-->
<Parameters>
<Parameter name="marketQueryParam" type="String" default="[Markets].[All Markets]"/>
</Parameters>
</DataAccess>
</CDADescriptor>
We are creating a data source that points to the sample data source that is created during the Pentaho installation. We also have two MDX queries, the first one to get the territories and the unique name for each one, but filtering the undesired values. We are also changing the order of the columns from 0, 1 to 1, 0. The second one gets the customers that belong to a particular market. This query is created using a parameter for the markets, which has a default value to select all the customers available. When firing the query with a different value, we will get different results by filtering the customers based on the market they belong to.
This example will be used in some samples during the next chapter. Don't forget to preview the results and confirm that you are able to return the results for both queries.
Summary
Now you know how to create data sources that can bring data to your reports/dashboards. You should now understand how to create different types of queries by defining all the XML elements. There is an important part of the chapter on how to send parameters to the queries. One of the query types is a Kettle query, where you need to specify the mapping between the parameters that come from the dashboard and the variables defined inside the kettle transformation. If necessary, we can blend data, just by creating queries for different data sources that will later be combined using a join or union in a compound query.
We also covered how to preview the queries, how to edit a CDA file, and how to manage or clean segments of the CDA cache. You should now be able to schedule the queries so that they can be cached and give shorter response times to the users who are accessing the same query.
This chapter showed you how to create or edit a CDA file manually; however, you don't always need to do so.
Now that you know how to get data into the dashboard, we can start creating a dashboard, or at least getting to know the basic concepts of how to build a dashboard. In the next chapter, you will learn about CDF.
All materials on the site are licensed Creative Commons Attribution-Sharealike 3.0 Unported CC BY-SA 3.0 & GNU Free Documentation License (GFDL)
If you are the copyright holder of any material contained on our site and intend to remove it, please contact our site administrator for approval.
© 2016-2026 All site design rights belong to S.Y.A.