Mastering the Nikon COOLPIX A (2014)
Chapter 11. Creating HD Videos
The Nikon COOLPIX A has a level of video capability that few other compact cameras can claim. Many compact cameras are primarily still-image producers that happen to have video recording capabilities, but the new COOLPIX A was constructed with a video system that is nearly as capable as the still-image system.
Let’s examine how you can use the Nikon COOLPIX A for excellent video creation. We need to discuss a few somewhat technical video standards before we progress into making videos.
Understanding COOLPIX A Video Standard
The Nikon COOLPIX A is capable of producing H.264/MPEG-4 Advanced Video Coding (AVC) 4:2:0 8-bit compressed video. The H.264 output is stored in a MOV container (see the next main section, Containers and Their Formats). This Apple format allows pretty much any computer that can use Apple QuickTime to play your videos, which is basically all home computers. A video frame in this format ends up looking like a very compressed JPEG still image, which means it has plenty of quality for emergency commercial use and home use, and for display on websites like YouTube and Facebook. All video output is recorded to the memory card for later transfer to your computer. It is best to use at least a Class 6 SDHC/SDXC card to record the video. Slower cards may not be able to keep up with the video recording.
Containers and Their Formats
After you have recorded compressed video to your memory card, the recording must be placed in a specific container format, which will hold not only the video, but also the audio (sound) signal. The Nikon COOLPIX A records audio as stereo Advanced Audio Coding (AAC). This sound file is directly synchronized with the video signal and is bundled into the container.
If you regularly watch videos, container formats are well known to you, although you may not have realized you were using a container. The ending of the file name tells you which container you are using. For instance, I’m sure you’ve heard of WAV, AVI, MOV, and the various MPEG formats (e.g., MP4). Those are container formats that you can play on your computer, smartphone, or tablet.
Basic HD Video Information
Before you shoot your first movie, you’ll need to configure the camera for your favorite video frame size and rate. We’ll look at the actual configuration in a later section. For now, let’s briefly discuss some basics.
A video frame is much smaller, in terms of pixels, than a normal still-image frame. Although your COOLPIX A can create beautiful 16 MP still images, its best high-definition (HD) video image is just larger than 2 MP (2,073,600 pixels).
How can 2 MP be considered HD? Simply because it matches one of the HDTV broadcast resolutions. In the good old days of standard-definition television that we all grew up watching, there was even less resolution. Would you believe that the old TV you have stored in the garage displays only 345,600 pixels, or 0.3 MP?
I’ve been talking about the number of megapixels, but that’s not normally how HD devices are rated. Instead of the number of pixels, most HD information talks about the number of lines of resolution. There are several HD standards for lines of resolution. The most common standards are 720p, 1080i, and 1080p. The p and i after the numbers refer to progressive and interlaced. I’ll talk about what that means in the next section.
The COOLPIX A’s highest-quality Movie mode captures video at 1080p, which is a display-quality HDTV standard. At the time of this writing, most over-the-air broadcast-quality HD is 720p. I’m sure that will change now that TVs have gone digital. The 1080p designation simply means that your camera captures and displays HD images with 1,080 lines of vertical resolution. Each of those lines is 1,920 pixels wide, which allows the COOLPIX A to match the 16:9 aspect ratio of HDTV.
Progressive versus Interlaced
What’s the difference between progressive and interlaced (for example, 1080p versus 1080i)? Technically speaking, progressive video output displays the video frame starting with the top line and then draws the other lines until the entire frame is shown. The COOLPIX A displays 1,080 lines progressively from the top of the imaging sensor to the bottom (lines 1, 2, 3, 4 ... 1,080).
Interlaced video output displays every even line from top to bottom, then it goes back to the top and displays every odd line (lines 2, 4, 6, 8 ... 1,080; then 1, 3, 5, 7 ... 1,079).
Progressive output provides a higher-quality image with less flicker and a more cinematic look. I’m sure that’s why Nikon chose to make the COOLPIX A shoot progressive video. Now, let’s set up our cameras and make some movies!
Limitations of Capturing Videos in Movie Mode
Let’s briefly look at the limitations of the camera’s video capture capabilities. No multiuse device can have all the features of a dedicated device, and the COOLPIX A has some limits on how it captures video.
The COOLPIX A uses a CMOS sensor to record video. This type of sensor uses a rolling shutter and has three potential issues that we need to discuss: skew, wobble, and partial exposure.
Since video is captured at up to 30 frames per second (fps), the COOLPIX A has an electronic shutter in addition to the normal mechanical shutter.
Have you ever used your COOLPIX A in Continuous release mode when you are capturing up to four still images per second? The mechanical shutter enhanced by the artificial shutter sound (Setup Menu > Shutter sound) makes the cool chicka-chicka-chicka sound that causes passersby to look at you in awe.
You don’t hear that sound in Movie mode because your COOLPIX A does not use the mechanical shutter when you shoot movies. If it did the shutter would get worn out in only an hour or two of video capture. Remember, the camera captures video at a minimum of 24 fps. At that speed, an hour of video would require 86,400 frames. You would quickly exceed the lifetime capacity of the mechanical shutter.
Instead, the camera uses an electronic shutter and turns the sensor’s rows of pixels on and off while it scans from top to bottom as it records each video frame. This is called a rolling shutter. Not all parts of the image are recorded at exactly the same time. This can produce a skewed or wobbly video when you record rapidly moving subjects, like a race car or a flying bird, or if you are waving the camera back and forth while you record a video.
Rolling shutters are used in video cameras that have CMOS sensors, like the Nikon COOLPIX A. Here is a list of the effects that can occur in extreme circumstances with a rolling shutter:
• Skew: The image leans in one direction as the camera or subject moves. This is often seen at the edges of buildings and other static objects.
• Wobble: This effect is harder to describe. The whole image wobbles in a strange way. It looks like the top of the image is out of sync with the middle and bottom of the image. Since a video is a moving picture, the whole video can wobble back and forth in a very unnatural and dizzying way.
• Partial exposure: If another camera’s flash goes off during the video shoot, the burst of light may be present for only some of the rows of pixels in a particular frame. The top part of the frame may be brightly lit by the flash, while the bottom part appears dark. The partial exposure appears as a bright band in one or a few frames, depending on the duration of the bright light. Also, some older fluorescent lightbulbs have slow ballasts and can cause a video to have a series of moving bands as the light flickers. Our eyes can’t see it, but the fast video captures it well. If you are shooting images of an ambulance with its lights flashing, it can also cause banding. Anything that has intense bursts of light for short periods may cause partially exposed bands to appear in a video.
To understand skew and wobble better, let’s compare the COOLPIX A to a desktop scanner. It works in a similar way. If you place a paper document on a scanner and press the scan button, you’ll see a band of light under the glass travel from the top of the document to the bottom as it records one line at a time. At the end of the scan, there is a copy of the document in your computer’s memory that can be saved to the hard drive.
Imagine that you’re scanning a paper document on your desktop scanner, and halfway through the scan you move the paper a little. The top part of the scan would look normal, since it was already captured by the scanner’s sensor, but the bottom part of the scan would be at a different angle than the top part. You could say that it is skewed from the original angle. This is an example of the skew that can result with a rolling shutter.
Now, what if you grab the paper during a scan and rotate it back and forth all the way through the entire scan? The final scanned document would look like a series of zigzags, with some parts at one angle and other parts at different angles. This is an example of the wobble that can result with a rolling shutter.
The COOLPIX A records video in a similar manner, except it is much faster than a scanner. It records a frame of video in 1/24 second, or 24 fps, and can go as high as 30 fps. Since the Nikon COOLPIX A scans the image at this speed, there’s not usually a problem. Most movement is too slow to be zigzagged (wobbled) or angled (skewed).
Skew and wobble become especially evident when a person is walking and recording a video at the same time. These combined movements can be enough to cause wobble in the video. I call this the “jellywobble effect.” Like a bowl of Jell-O, your video looks like it is wobbling. What can you do to prevent it?
Avoiding the Jellywobble Effect
To avoid the jellywobble effect, you primarily have to be careful not to allow too much camera movement. It is best to use the COOLPIX A on a nice fluid-head video tripod or a stabilizing frame—or at least move the camera as little or as slowly as possible while you record a video.
This is one of the main differences between a dedicated video camera and a hybrid like the COOLPIX A. Dedicated video cameras use a CCD sensor, which has a global shutter instead of a rolling shutter. A global shutter does not scan the image one line at a time. It uses the whole sensor at once to grab the entire frame. There are some newer low-cost video cameras on the market that use a rolling shutter, but better video cameras use a global shutter.
This is probably the worst problem with COOLPIX A video. True videophiles will turn up their noses at a rolling shutter. They’ll buy a dedicated video camera with three separate CCD sensors—one for each RGB color—and a nice global shutter to avoid jellywobbles. And they’ll pay several thousand dollars for the privilege of owning that equipment.
You, however, realize that the COOLPIX A is primarily a very high-quality still camera with added video capabilities. You might be standing in a superstore parking lot one day when an alien spacecraft lands. You’ll get both still images and cool video from the same camera. So what if, in your excitement while running from the alien’s heat ray, you get a few jellywobbles in your video? One of the rules for getting great video is having a video camera with you. With the COOLPIX A, you have one at all times—with no extra effort. You do keep your camera with you just in case, right?
Settings Recommendation: Try to hold your camera still to greatly reduce any jellywobble effects. Use a tripod when you can. Anything that helps stabilize the camera will give you much higher-quality video.
Movie Live View Screens
(User’s Manual, Page 184)
Let’s start by examining each of the four screen overlays you can use while you take still images or shoot video in Movie recording mode. You can select one of the four screens from the Shooting Menu > Photo info setting.
In Movie recording mode you must select the screen overlay type before you start a video recording. The Menu button is disabled during video recordings.
Figure 11.1 shows your four choices for video screen overlays.
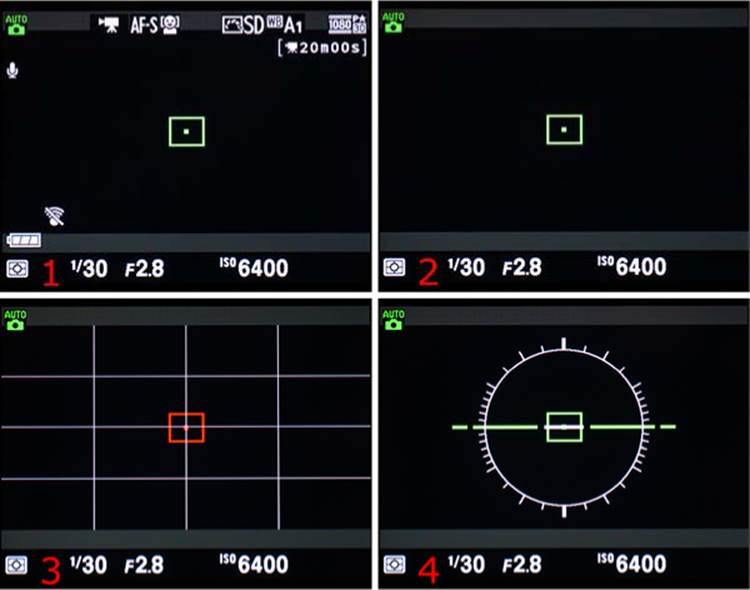
Figure 11.1: All four video screen overlays
Here are descriptions of the photo info video screen overlays by number:
1. Show info: This is the standard video screen, with full setting information displayed, which allows you to configure the camera before you start the video recording process.
2. Hide info: This is a sparse screen that is best used when you are not concerned about settings and are using Auto mode on the Mode dial. The camera will take care of things, and you can just enjoy the recording process without all the distracting settings on the screen. This is the best screen to use if you decide to send video out of the HDMI port to an external video recorder, such as an Atomos Ninja-2. The overlays will be included in the HDMI video output; therefore, it is best to have as few distractions in the video as possible. No screen overlays will appear in a normal video recorded to the memory card.
3. Framing grid: Use this screen overlay when you want to keep the camera lined up with the vertical or horizontal lines in your image. Framing grid is excellent for recording videos of architecture, for instance. It, too, has very sparse control listings, so it may be best used when you shoot in Auto mode on the Mode dial.
4. Virtual horizon: If you are shooting beautiful scenic landscapes and want to keep the camera level with the horizon, use the Virtual horizon setting. It is also rather sparse, so it is best used in Auto mode on the Mode dial.
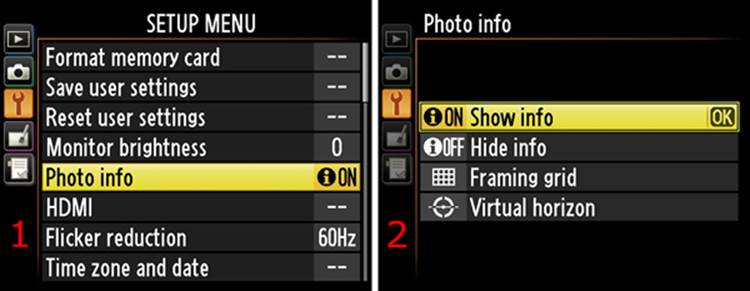
Figure 11.2: Selecting one of the four video overlay screens
Here are the steps to choose one of the Photo info screens:
1. Select Photo info from the Setup Menu and scroll to the right (figure 11.2, image 1).
2. Choose one of the four screen choices, as described in the preceding list. My camera is set to the default Show info screen, with its overlay of setting information symbols (figure 11.2, image 2).
3. Press the OK button when you’ve found the screen you like best.
Settings Recommendation: When you enter Movie recording mode, the camera hides most of the controls shown on the screen, leaving you with only basic exposure information and a Movie length countdown. You must adjust the controls before you start a video recording because the camera basically locks out any setting changes during a video session. For that reason, I strongly suggest using either Auto mode or Aperture-priority (A) mode on the Mode dial to record videos with the COOLPIX A. Examine the next section to understand what each of the items in the main Show info screen overlay mean.
Understanding the Movie Recording Controls
The Shooting Menu > Photo info > Show info screen (figure 11.3) is the default screen when you record a video. Let’s examine each of the controls in the overlay.
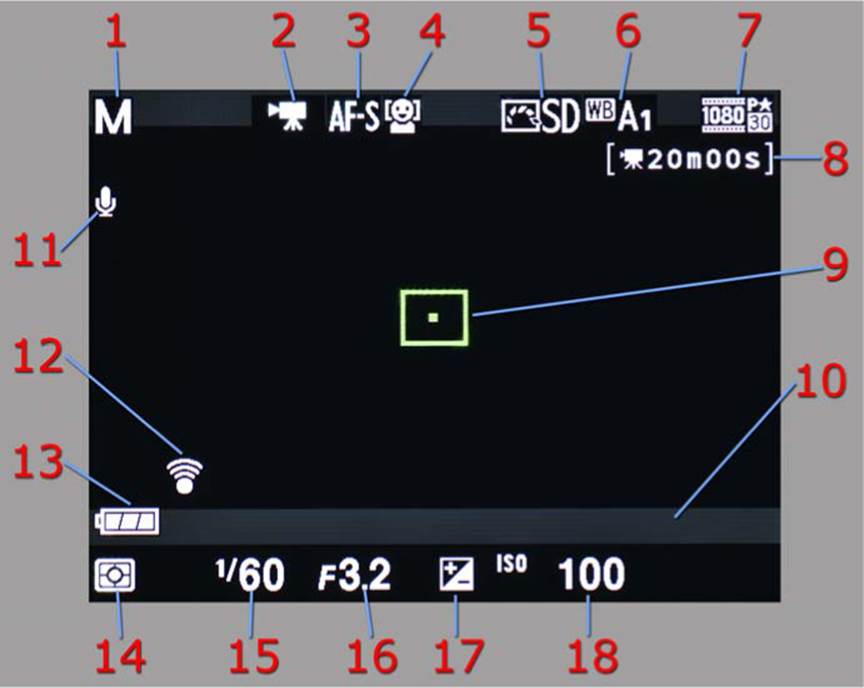
Figure 11.3: Default Show info screen for video recording
Here is a list of controls shown on the first screen, with explanations for adjusting them. Each number in figure 11.3 has a corresponding entry in the list that follows:
1. Exposure mode: You can select the Exposure mode by turning the Mode dial. One of the following selections will appear on the monitor: P, S, A, M, Scene, U1 or U2 (along with its selected Exposure mode), or Auto. You cannot change the Exposure mode while you are recording a movie. I strongly suggest that you use either Auto or Aperture-priority (A) mode when you record movies with the COOLPIX A.
2. Movie camera icon (Release mode): The movie camera icon reflects the fact that the camera is in Movie recording mode. You select this icon with Quick Menu > Release mode, which puts the camera into Movie recording mode.
3. Autofocus mode: Set this mode with Quick Menu > Autofocus mode. The available settings are Single-servo AF (AF-S) or Full-time-servo AF (AF-F). The camera is rather limited on focus options when you record videos in AF-S mode, which is basically useless unless you are shooting in one position and you or your subject never move. In addition, you cannot change the focus during video recording, even in manual focus (MF) mode with the focus ring on the front of the lens. When the camera is set to AF-F, however, it will attempt to remain focused on whatever is under the AF point (focus rectangle). You can press the Shutter-release button halfway in AF-F mode to initially focus on the subject and again while the video is recording, but make sure the focus square remains on the subject so AF-F can keep it in focus. You will notice during recording that autofocus is very slow and quiet to keep the noise down.
4. AF-area mode: Set this mode with Quick Menu > AF-area mode. The settings are Face-priority AF, Wide-area AF, Normal-area AF, and Subject-tracking AF (indicated with symbols).
5. Picture Control: You can control this setting with Quick Menu > Set Picture Control. Picture Controls add a certain look to the video, with more or less color saturation and contrast. There is even a black-and-white mode so you can shoot video in monochrome. The Picture Controls are SD, NL, VI, MC, PT, and LS. See the Shooting Menu chapter for more information on Picture Controls.
6. White balance: Set the White balance with Quick Menu > White balance. Select from eight White balance settings, including Auto. You must select Auto1 (A1) or Auto2 (A2) in Shooting Menu > White balance before you start recording. You may also select Incandescent, Fluorescent (there are seven types; you must set it in Shooting Menu > White balance), Direct sunlight, Flash, Cloudy, Shade, and Preset manual (PRE).
7. Frame size/frame rate: You control this setting with Shooting Menu > Movie settings > Frame size/frame rate. It displays the current frame size and frame rate in Movie recording mode, which, of course, must be set before you start the recording.
8. Time remaining: When you are recording a movie, this shows how much time is left before the camera automatically stops recording. All 1080p Frame size/frame rate modes that are recorded in High quality (18 Mbps) mode have a maximum recording time of 20 minutes. All 1080p Frame size/frame rate modes have a maximum recording time of 29 minutes and 59 seconds in Normal quality (10 Mbps) mode. All 720p Frame size/frame rate modes have a maximum recording time of 29 minutes and 59 seconds in High or Normal quality (10, 8, 6, or 5 Mbps) mode. When you remove the memory card from the camera and output video through the HDMI port to an external video recording device, there is no limit on the recording time. However, there are screen overlays included in the video stream, unlike with normal non-HDMI video.
9. AF point (focus rectangle): You can move the AF point around the screen with the Rotary multi selector to select the subject for autofocus. The focus rectangle will vary in size and color according to the selected AF-area mode (item 4 in this list) and whether the subject is in focus. You can move the AF point during video recording with the Rotary multi selector to change the focus to a different subject or area. You can press the OK button to cause the AF point to jump to the center of the screen. When the AF point is in the center of the screen, there will be a small dot in the center of the AF point, as shown in figure 11.3.
10. Video 16:9 frame lines: When you are shooting a video, you will see gray frame lines, such as the one indicated by number 10 in figure 11.3, on the top and bottom of the camera monitor. These represent the 16:9 ratio of an HD movie and an HDTV. If you allow any part of the subject to stray outside these gray lines, that part of the subject will not appear in the video.
11. Microphone status: This symbol means that the camera’s built-in stereo microphone is active and available to record, or is recording, sound. When the microphone is disabled there will be a line through the microphone symbol. You can enable or disable the microphone with Shooting Menu > Movie settings > Microphone.
12. Eye-Fi upload status: You can control Eye-Fi uploads with Setup Menu > Eye-Fi upload. If Eye-Fi uploads are enabled, the symbol will be as shown in figure 11.3; if uploads are disabled, the symbol will have a line through it. Images that you previously shot can upload to a wireless device or to file-sharing websites, through a Wi-Fi connection, even while you are shooting a video. The Eye-Fi app is initially configured to send only JPEG images. However, it will transfer RAW images and even video, if you choose to allow those file types in the Eye-Fi app. If you do, prepare yourself for very long upload times on the much larger RAW files and video.
13. Battery status: This icon shows the status of your camera battery. As the charge drops, notches will disappear on the battery symbol. If the battery symbol shows only one notch, it is time to replace the battery with a fresh one. A full battery charge will last for about 1 hour and 10 minutes of recording time. As a battery ages it may not hold as long of a charge, so keep plenty of batteries available when you are shooting video, or use an external power source (optional AC Adapter EH-5b with Power Connector EP-5C).
14. Metering mode: Movie live view mode uses Matrix metering only. Unlike still photography mode, Spot and Center-weighted metering is not available. This icon is merely a label informing you that Matrix metering is active.
15. Shutter speed: The shutter speed is limited to 1/30 to 1/8000 second while you are recording a video. Set the shutter speed with the Command dial before you start the video. You can change the shutter speed only in Manual (M) exposure mode. The camera controls it in Aperture-priority auto (A), Shutter-priority auto (S), and Programmed auto (P) modes. Change the exposure modes as described in item 1 of this list. Note: When you adjust the shutter speed manually, set it to approximately twice the fps recording rate the camera is using. Otherwise you may have odd-looking motion-blurred or jumpy video. For instance, if you have the camera set to 1080p at 30 fps, use a shutter speed of 1/60 second. In Auto mode the camera decides what shutter speed is best.
16. Aperture: You must set this value before you start recording a video. The aperture cannot be changed while the camera is recording a movie. Set the aperture by turning the Rotary multi selector in Manual mode (M); use the Command dial in Aperture-priority (A) or Flexible program (P*) modes. The camera controls this value in Shutter-priority auto (A) and Programmed auto (P) modes.
17. Exposure compensation: This symbol will appear only when +/- Exposure compensation has been dialed in to the camera. You can adjust this value with the +/- Exposure compensation button during a video recording when you use Programmed-auto (P), Shutter-priority (S), or Aperture-priority (A) exposure modes. You cannot adjust Exposure compensation in Manual (M) or Auto exposure modes.
18. ISO sensitivity: This is the ISO sensitivity value for the camera sensor. It is controlled by the camera in P, S, A, Auto, and Scene modes. You can control the ISO in Manual (M) exposure mode by setting it, from the Quick Menu, before you begin a recording. Strangely, you cannot set the ISO sensitivity value by holding down the ISO button and turning the Command dial. You must use the Quick Menu. You can manually adjust the ISO sensitivity from ISO 100 to 6400.
When you press the Shutter-release button to start a video recording, the screen removes several of the controls in the overlay along the top of the screen, as shown in figure 11.4.
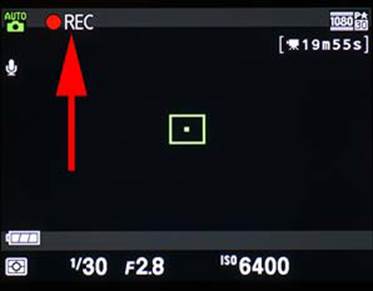
Figure 11.4: Screen overlay simplifies during recording
You can tell that this screen is displayed during video recording because of the REC symbol in the top-left corner, next to the red dot (red arrow). REC blinks the whole time you are making a recording.
Preparing to Make Movies
(User’s Manual, Page 38)
The Movie mode in the COOLPIX A is one of Nikon’s better compact-camera video recording systems. It has automatic focus, 1080p HD video recording, stereo AAC sound, recording segments up to 29 minutes and 59 seconds (depending on the frame size and rate), a maximum movie length of 4 GB, and excellent rolling shutter correction.
Let’s examine how to prepare for and record videos and then how to display them on various devices.
Camera Setup for Making Movies
The COOLPIX A is capable of creating movies at any time and with little thought; simply use the following settings and actions:
• Insert a fresh memory card and a fully charged battery
• Choose Movie recording from the Quick Menu Release modes
• Choose a Frame rate and size
• Select Autofocus mode AF-F (Full-time-servo AF)
• Set the Exposure mode to Auto
• Press the Movie-record button
Setting the camera this way makes it act like a standard video camera; you give little consideration to the camera settings and simply shoot the video.
However, you have purchased an advanced camera, and you may want to do more than just take automatic movies. The COOLPIX A can do it either way. Let’s discuss how to set up the camera for more professional movie creation. Before you make your first semi-pro movie, you’ll need to configure several things on your COOLPIX A:
Quick Menu Settings
• Choose Movie recording mode from the Quick Menu Release modes
• Select a White balance
• Set an ISO sensitivity (if you are using Manual exposure mode)
• Set the Autofocus mode (AF-F is best)
• Choose a Picture Control
• Add any Exposure compensation
Shooting Menu Settings
• Select a Frame rate and size
• Select the Movie quality
• Enable the stereo Microphone
• Set a Color space
Setup Menu Settings
• Set Photo info menu settings
• Enable or disable Eye-Fi upload
External Camera Control Settings
• Set the Shooting mode (P, S, A, M)
• Adjust the aperture or the initial shutter speed setting (depending on the Exposure mode)
• Press the Shutter-release button to start recording the movie.
After you have all the menu selections configured you are ready to start making videos.
Special Considerations for Movie Recording
We should briefly discuss a few of the previously mentioned functions before you shoot a video. Some of them will require you to make choices.
Choosing a White Balance
White balance (WB) sets the color tint of the video. It is very important to use a WB that matches the lighting conditions where you will be shooting the video. Auto WB works most of the time, but it can sometimes have problems with mixed lighting.
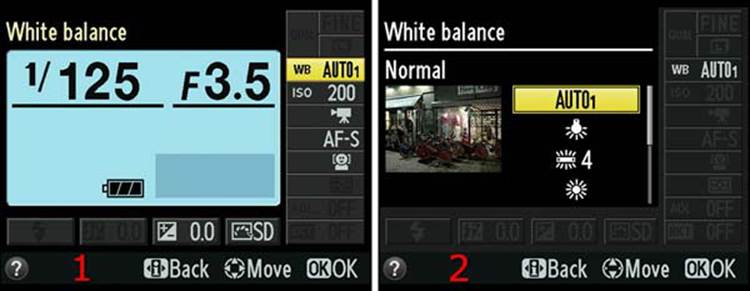
Figure 11.5: Choosing a White balance setting
You should be aware of the WB and experiment with it for your videos (figure 11.5). Maybe you should switch to Shade WB when you are in the shade, or Direct sunshine when you are in the sunlight. Your videos will have higher quality if you pay careful attention to the WB setting.
Doing a PRE Reading for White Balance in Live View
In addition to simply selecting one of the White balance values included with the camera, you can use PRE to do a reading on a white or gray card. Or you can simply select a white or gray area on your subject and use PRE to take a White balance reading on the fly.
Refer to the chapter titled White Balance to understand how to do an ambient-light PRE reading with your camera.
Settings Recommendation: I often use Auto White balance, unless I am in a tricky lighting situation, such as inside under fluorescent lighting with some outside light coming in the windows. In situations like that I try to match the camera to the most prevalent light source.
The camera does well outside in natural light, although at times I have seen a little blueness in the shade. In that case, I might use the Shade White balance. The critical thing is whether the color tint you see on the camera monitor looks like the real scene. If it doesn’t, try to make the camera match what you see.
Choosing an ISO Sensitivity
If you are shooting video in Manual (M) mode (only), you can select an ISO sensitivity (figure 11.6). The camera will choose the ISO sensitivity for you in A, S, P, and Scene modes.
Because the camera does well with controlling noise, you can use higher ISOs, such as ISO 400–1600. I have recorded excellent video at ISO 4000. However, you can expect some graininess at ISOs over 1600.
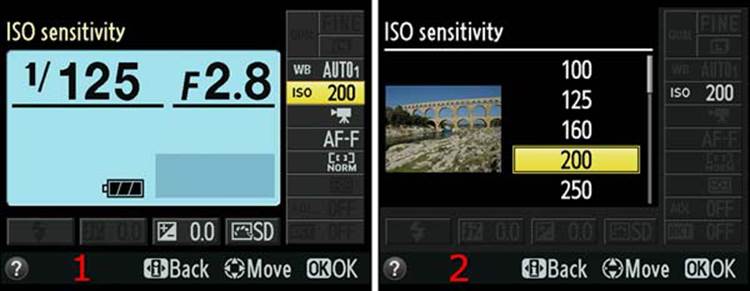
Figure 11.6: Selecting an ISO value
If you want to record superior videos, be sure to shoot in Manual (M) exposure mode. You have control of all the settings before you start the video. Unfortunately, the COOLPIX A will not allow you to adjust settings after the video recording has begun, so test your settings before you shoot in M mode. If this seems bothersome and you will use the video mode just for fun, simply select A, S, P, or Auto mode and the camera will make sure you get a good exposure by controlling the ISO sensitivity for you.
Settings Recommendation: I generally use Aperture-priority (A) mode when I shoot video because I want to control the aperture for an appropriate depth of field while allowing the camera to control the shutter speed and ISO sensitivity. However, if you are not overly concerned with doing more than getting good video, and since the camera will not allow you to make adjustments after the video recording has started, you may just want to use Auto exposure mode most of the time.
Selecting Movie Recording Mode
Of course, you will need to put the camera in Movie recording mode or it will take still pictures when you press the Shutter-release button. The Movie recording mode is under the Quick Menu Release mode setting, all the way down at the bottom of the list (figure 11.7).
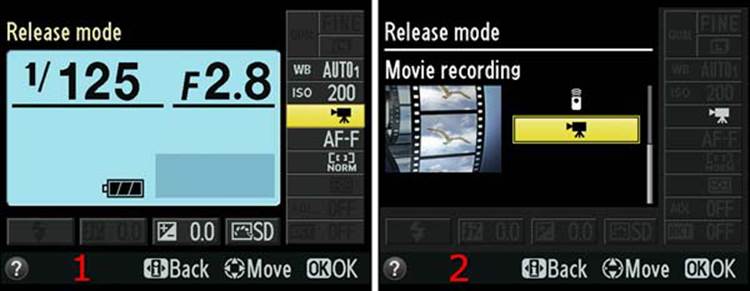
Figure 11.7: Selecting Movie recording mode from the Release mode menu
Settings Recommendation: I wish Nikon had given us a button to press that switches into video mode, instead of burying the Movie recording mode on the Release mode menu. After you have located this mode, I suggest adding it to My Menu for immediate access. Otherwise, unless you shoot videos often, you will be looking around on menus for how to start the video recording mode.
Selecting an Autofocus Mode
The Autofocus modes that are available in Movie live view are AF-S and AF-F (figure 11.8). AF-S is not a good choice because it requires you to focus before you start the movie, and it does not allow you to focus again until the movie is over. Don’t use AF-S mode when you record movies!
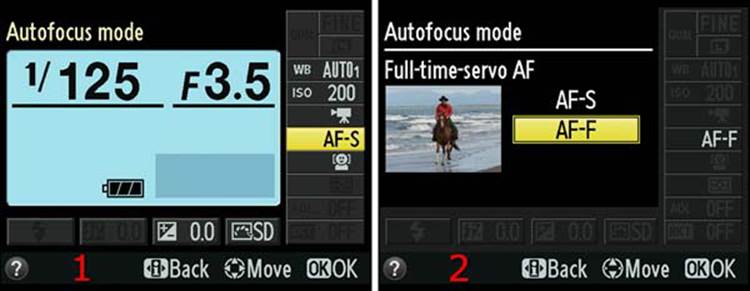
Figure 11.8: Choosing an Autofocus mode
AF-F is camera-controlled autofocus. You can initially move the focus square to any point on the monitor to focus on a specific area of your subject, then the camera will (hopefully) maintain focus on the subject—as long as you or the camera keep the AF point (focus rectangle) on the subject. Use the appropriate AF-area mode (next subsection) to help the camera stay with the subject.
Settings Recommendation: The camera has limited autofocus and no manual focus capabilities during video recording, even when it is set to Manual mode (M) and the focus switch on the side of the camera is set to MF. Please use Full-time-servo AF (AF-F mode) for video shooting with the COOLPIX A (figure 11.8).
The AF-area modes, discussed next, have a great deal of power over how well the autofocus system works. Consider them carefully!
Choosing an AF-Area Mode
The AF-area mode lets you choose where the camera will autofocus on your subject (see the Autofocus, AF-Area, and Release Modes chapter). The setting modifies the way autofocus decides what part of the subject is important for autofocus (figure 11.9).
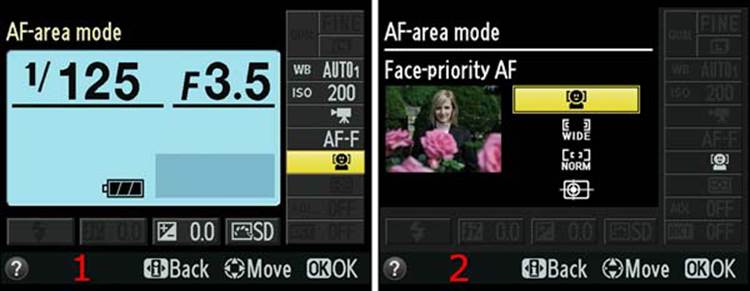
Figure 11.9: The four AF-area modes
The following list explains the four AF-area modes:
• Face-priority AF: The camera can track focus on the faces of several people at the same time. It is quite fun to watch as the green and yellow AF point squares find faces and stay with them as they move.
• Wide-area AF: For the landscape shooters among us who like to use Live view mode to shoot movies of beautiful scenic areas, this is the mode to use. The camera will display a big red (out of focus) or green (in focus) AF point square on the monitor. You can move this big AF point around until it rests exactly where you want the best focus to be. The camera will sense a wide area and determine the best focus, with priority on the area under the green square.
• Normal-area AF: This mode is primarily for shooters who need to get very accurate focus on a small area of the frame. This is a great mode to use with a macro lens because it gives you a much smaller AF point that you can move around the frame.
• Subject-tracking AF: In this mode you have to autofocus first with the Shutter-release button (AF-F mode does this automatically), then you start subject tracking by pressing the OK button once. To stop subject tracking, press it again.
Settings Recommendation: Why not leave the AF-area mode set to Face-priority AF if you take lots of videos of people? If you are using Movie live view for macro video recording, Normal-area AF gives you the smallest, most accurate area for detailed, up-close focusing. Landscape videographers should use Wide-area AF, and wildlife or sports photographers should use Subject-tracking AF.
Set Picture Control
The Set Picture Control selection allows you to choose one of the six Nikon Picture Controls (SD, NL, VI, MC, PT, LS)—or any of your carefully prepared Custom Picture Controls (C-1 to C-9)—to affect the final look of your video (figure 11.10).
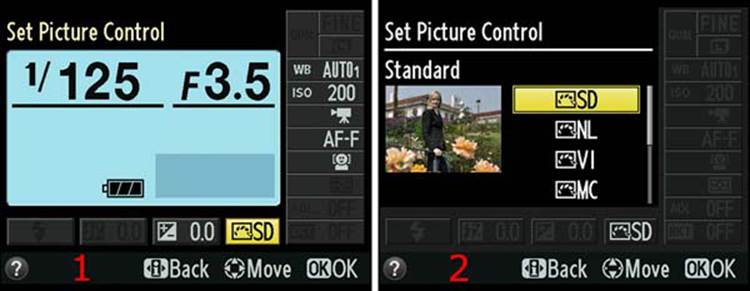
Figure 11.10: Choosing a Picture Control setting
Using different Picture Controls can give you powerful control over the look of your videos. Since videos are not still-image RAW files that can easily be adjusted to correct errors after the fact, it’s a good idea to carefully choose a Picture Control you are comfortable with and that matches the current situation.
For instance, let’s say you are shooting a video on an overcast, low-contrast day, and you want to add some snap to your movie. You can simply select the Vivid (VI) Picture Control, which will saturate the colors and darken the shadows.
Or you might be shooting on a very high-contrast, sunny day and want to tone down the contrast a bit. You can select the Neutral (NL) Picture Control, which will open up the shadows and extend the dynamic range of the sensor for a lower-contrast look.
Maybe you are shooting a video of a lovely, colorful autumn scene and want to maximize the color. Select the Landscape (LS) Picture Control, and your video will be optimized for beautiful scenery.
Fortunately, you can see the effect of each Picture Control in real time. Use the Movie live view screen to select a Picture Control and see how it looks by pointing the camera at the subject. When you have found a Picture Control that benefits the subject, use it for the video. You must set the Picture Control before you start recording the video.
Settings Recommendation: I like to shoot with the Neutral (NL) or Portrait (PT) Picture Control for most of my videos that include people because I like the skin colors better with those controls. However, when I am outdoors enjoying the beauty of nature, I often select the Landscape (LS) Picture Control, or if I am feeling a bit frisky in the autumn colors I might even use the Vivid (VI) Picture Control. The key is to use the Picture Controls enough to know what kind of results they produce so you are in control of your camera.
Exposure Compensation
The COOLPIX A gives you a measure of control over the exposure of the video recording. You can adjust Exposure compensation by holding down the +/-Exposure compensation button (figure 11.11, image 1) and turning the Command dial to add or subtract up to 2.0 EV steps of exposure. This will allow you to override the camera’s exposure value for as long as you have exposure compensation dialed in.
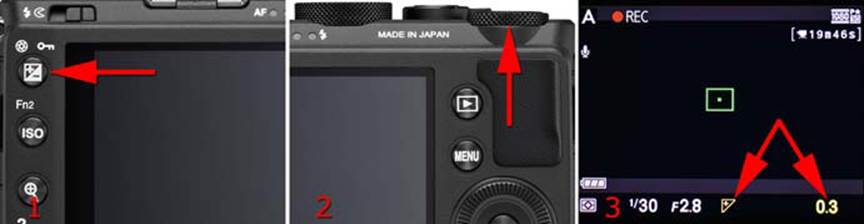
Figure 11.11: Using Exposure compensation for video recordings
The exposure compensation value can be changed even during a video recording, one of the few things the camera will let you adjust while a video is being recorded. However, there are some limitations. You can change Exposure compensation only if you are using A, S, or P exposure modes, but not M, Auto, or any of the Scene modes.
When you modify the exposure compensation value using the controls shown in figure 11.11, images 1 and 2, you will see the +/- Exposure compensation symbol appear on the monitor (image 3). The left arrow in image 3 shows the +/- symbol reflecting the fact that I am dialing in positive (+) exposure compensation. The right arrow in image 3 shows the actual value I have dialed in, which in this case is 0.3 EV. Notice that this is occurring during a video recording—you can see the REC (recording) symbol next to the red dot in the top-left corner of image 3.
Settings Recommendation: This capability is one of the reasons I tend to use Aperture-priority (A) mode when I record videos. I can simply add or subtract exposure with the +/- Exposure compensation button and Command dial.
If you use this feature, be sure to zero out the exposure compensation value when you are done recording. Otherwise all future videos and still pictures will use the exposure compensation value you dialed in. The camera does not automatically reset Exposure compensation, even when you make drastic mode changes, such as switching from Movie recording to still image modes.
Frame Size/Frame Rate and Quality
There are two Frame size settings available in Shooting Menu > Movie settings > Frame size/frame rate, and there are six Frame rates.
The Frame sizes are both HD standards at 1920 x 1080 (1080p) and 1280 x 720 (720p). The basic frames per second (fps) speeds are 30, 25, and 24 fps.
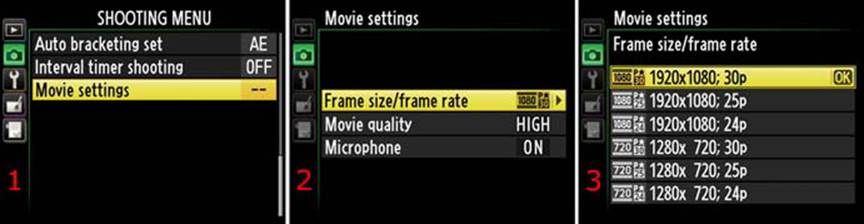
Figure 11.12: Frame size/frame rate
You must set the Frame size/frame rate before you start recording a video (figure 11.12). The Frame size/frame rate setting changes how large the movie will be when it’s stored on your memory card and computer hard drive. The maximum the camera will allow is 4 GB in any one movie segment.
The Movie quality setting affects the length of time you can record a video. High Movie quality (18 Mbps) is limited to 20 minutes, and Normal Movie quality (10 Mbps and below) is limited to 29 minutes, 59 seconds (see the next main section).
Video File Format
As mentioned previously, the container format used by the COOLPIX A for recording a video to the memory card is the popular Apple QuickTime MOV format. This format is handled by virtually all computer movie players. The video compression used inside the MOV file is H.264/MPEG-4 AVC (8-bit 4:2:0).
A computer should display any of the Movie quality modes. You can use a mini-HDMI (type c) to HDMI standard (type a) cable to play full HD videos on an HDTV. An HDMI cable is not included with the camera, but you can get one online and in many electronics stores. We’ll talk more about how to display video in a later section, which includes pictures of the cables.
Settings Recommendation: There are three considerations when you select a Movie quality setting: (1) how much storage capacity you have on your memory card; (2) what type of display device you will show the movies on; and (3) if you are a video fanatic.
If you are fanatical about video, you’ll only shoot at the fastest rates and highest quality. Or you may want to shoot a lot of family videos and hate storing the huge files that result from high Frame sizes and Frame rates. In that case, the Normal quality setting and lower resolutions may be sufficient.
If you can’t stand watching a non-HD video on YouTube, maybe you should stick to High quality. If standard YouTube videos are sufficient for your needs, nearly any quality setting on the COOLPIX A will look great on your computer.
This is a personal decision, and you’ll need to experiment with video modes to balance the quality and storage costs.
Why Different Frame Rates?
The NTSC encoding format, established in the 1940s, originally used two frame rates: 30 or 60 fps. In the 1960s a new German standard, PAL, was created; it uses 25 or 50 fps. Today, frame rates of 24, 25, 30, 50, and 60 are common in many cameras. These frame rates can also be expressed as hertz (Hz) on progressive scan monitors. The primary frame rate used in the movie industry is 24 fps.
We do not normally think of a video as a bunch of frames, but it is many still pictures joined together and moved past your eyes at a very fast rate. The human eye maintains an image at about 10 to 16 fps (1/10 to 1/16 second), so frame rates faster than that do not flicker for many people. However, some people’s eyes are more sensitive and can see flicker in slower frame rates. I am afraid to say much more about this issue because it can rapidly degrade into an almost religious discussion, with people having very strong opinions about their favorite frame rates.
I’ll just say that many people prefer 24 fps because that is normal for cinema movies. This rate is called a cinematic rate. Other people like the faster frame rate of 30 fps due to its lack of flicker. I suggest that you try the frame rates and see which you like best.
Movie Quality
The Movie quality setting has to do with the maximum bit rate—in megabits per second (Mbps)—the camera can stream to the memory card (figure 11.13).
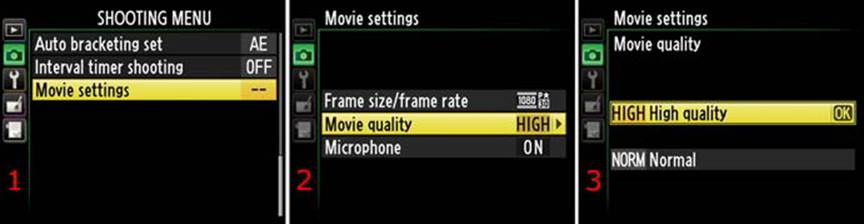
Figure 11.13: Movie quality (bit rate)
The bit rate is from 5 to 10 Mbps in Normal quality mode and 18 Mbps in High quality mode for the compressed video that is saved to the memory card. The higher the bit rate, the higher the video quality; it’s similar to how a 14-bit still image file can have finer color gradations than an 8- or 12-bit still image.
Table 11.1 shows the Mbps flow in High and Normal quality modes, along with the maximum movie length for the uncompressed video that is saved only to the memory card.
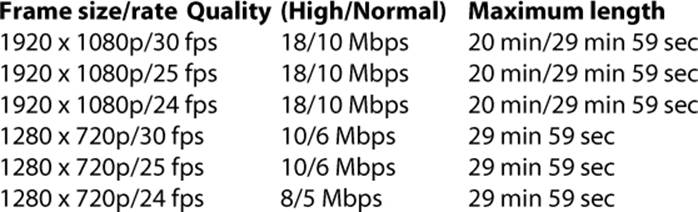
Table 11.1: Bit rates at Movie quality settings
Changing the bit rate is one way to control the amount of data the video contains. The higher the bit rate (18 Mbps versus 10, 6, 8, or 5 Mbps), the better the movie quality. There is one drawback: the higher the bit rate, the larger the movie. You will need to decide if size or quality is more important.
Settings Recommendation: Unless I am shooting a video for the Internet only (Facebook or YouTube) of a subject with no commercial value, I shoot with the Maximum frame rate, frame size, bit rate, and whatever maximums I can max out. If a video has the potential to make money or has an interesting subject that others will enjoy watching, I want the best quality I can wring out of those little 2 MP frames. However, that comes with a trade-off of much larger file sizes, so I buy increasingly larger hard drives each year or two. One thing about the COOLPIX A is it will certainly increase the stock prices of the hard drive and solidstate drive (SSD) manufacturers. The quality from this camera is amazing, and so are the file sizes!
Recording a Video with Your COOLPIX A
Now let’s look at the process of recording a video to your memory card. The following steps assume you’ve gone through the configuration process discussed in the first part of this chapter, which readies your camera to record video in the modes you prefer to use.
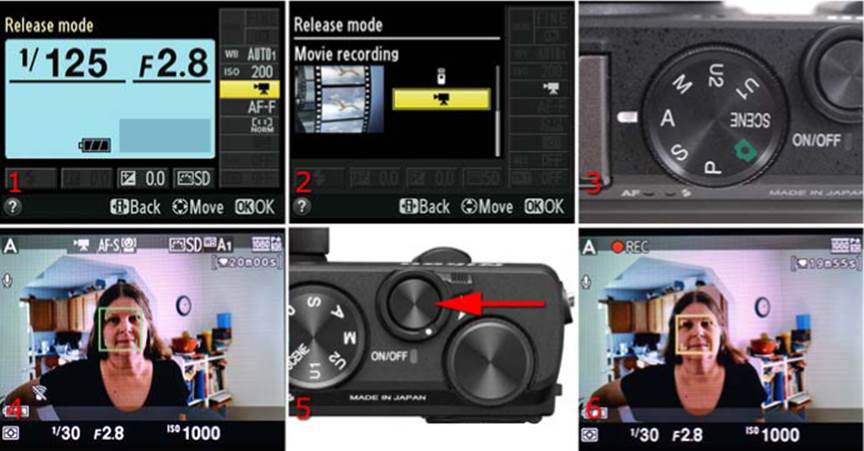
Figure 11.14: Recording a video
Use these steps to record a video, after having set up your camera based on the suggestions earlier in this chapter:
1. Open the Quick Menu with the i button and select Release mode, then press the OK button (figure 11.14, image 1).
2. Scroll all the way down to the bottom of the list of Release modes and select the Movie recording mode (figure 11.14, image 2).
3. Set the Mode dial to your chosen exposure mode. I chose A for Aperture-priority auto (figure 11.14, image 3).
4. Point your camera at the subject, move the AF point over the subject with the Rotary multi selector, and focus the camera by pressing the Shutterrelease button halfway. When the subject is in focus, the AF point will turn from red to green (figure 11.14, image 4).
5. Press the Shutter-release button all the way down to start the video recording (figure 11.14, image 5).
6. You will see a REC symbol next to a red dot blinking in the top-left corner of the monitor (figure 11.14, image 6). This blinking REC symbol and red dot inform you that a video is recording. The Time remaining will be counting down at the top-right corner of the monitor. See table 11.1for the maximum recording times.
Amazingly, that’s all there is to it for recording standard compressed video to the memory card. You have a powerful video camera built in to your still camera. It is available with a menu selection and a couple of controls.
Settings Recommendation: In most cases, unless you really want to control the camera manually, you can shoot your video in Auto mode and enjoy what you captured. The camera will make a good exposure in almost all circumstances. If you want a little more control over things like depth of field and exposure compensation, try using Aperture-priority (A) mode.
Displaying Movies
Now the fun begins! You have created a video on your memory card. What next? You can simply transfer the video to your computer and view it there, or you can upload it to Facebook or YouTube—they can both display the QuickTime MOV file format.
Let’s discuss how to enjoy your movies directly from the camera, either on the camera monitor or on an HDTV.
Displaying a Movie on the Camera Monitor
The way you view a movie on the COOLPIX A monitor is simplicity itself, just like video capture. Your videos are stored on the memory card. All you have to do is press the Playback button, choose a video with the Rotary multi selector, and press the OK button to play it.
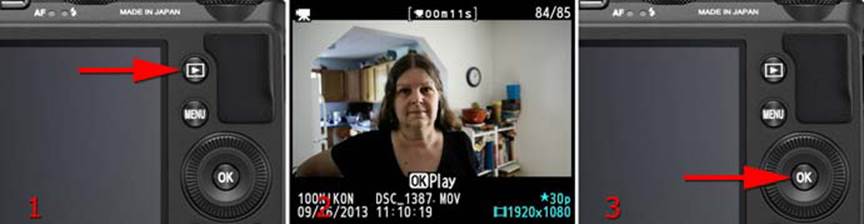
Figure 11.15: Playing a movie on the monitor
Use the following steps to play a movie on the monitor:
1. Press the Playback button to display images and videos on the monitor (figure 11.15, image 1).
2. Locate the video you want to play by scrolling through your images and videos with the Rotary multi selector.
3. When the video appears on the monitor, you’ll be able to identify it by three signs: a small movie camera icon in the top-left corner, a minutes and seconds counter at the top of the screen, and the words OK Play underneath the image. The picture you see on the monitor is the first frame of the video (figure 11.15, image 2).
4. Press the OK button to start playing the video (figure 11.15, image 3).
Settings Recommendation: The monitor on the COOLPIX A is big enough for several people to enjoy one of your videos. Don’t be afraid to show off a bit since your camera creates excellent high-resolution videos. Set it up on the kitchen table, put a jar next to it for tips, and start a video. You’ll find viewers!
Displaying a Movie on an HDTV
To display a video from your camera on an HDTV, you’ll need an HDMI cable with a mini-HDMI (type c) end to insert into your COOLPIX A, and the other end will have to match the HDMI port on your HDTV—usually HDMI standard (type a). We’ll talk more about the cable specifications in a moment, but first let’s discuss your camera’s HDMI output frequencies.
Before you attempt to connect your Nikon COOLPIX A to your HDTV, be sure the HDMI output is configured to match what your HDTV needs, or you won’t get a picture. Use the Setup Menu > HDMI > Output resolution setting to choose a specific Output resolution, or just select Auto so the camera and HDTV can figure it out for you. Here is a list of formats supported by your camera for video playback:
• Auto: Allows the camera to select the most appropriate format for display on the currently connected device
• 480p: 640 x 480 progressive format
• 576p: 720 x 576 progressive format
• 720p: 1280 x 720 progressive format
• 1080i: 1920 x 1080 interlaced format
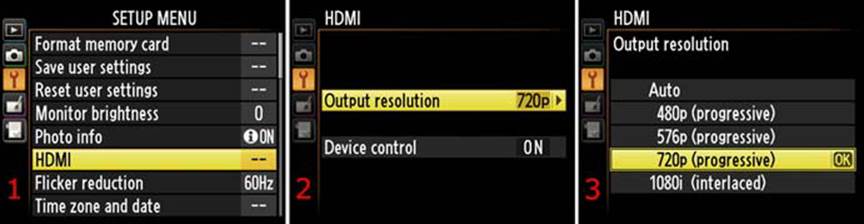
Figure 11.16: Selecting an HDMI Output resolution
Use the following steps to select an Output resolution:
1. Select HDMI from the Setup Menu and scroll to the right (figure 11.16, image 1).
2. Choose Output resolution from the menu and scroll to the right (figure 11.16, image 2).
3. Select one of the five output resolutions (figure 11.16, image 3). I chose 720p to interface with my computer’s screen capture card.
4. Press the OK button to lock in your Output resolution selection.
5. If your HDTV supports Device control (HDMI-CEC), enable it (figure 11.16, image 2, last menu item). Device control allows you to control the camera with your HDTV’s remote control. You can choose On or Off.
Settings Recommendation: In my experience, when the camera is set to Auto and is plugged in to an HDTV, the video flows immediately.
If your HDTV has more than one HDMI port, make sure you have the correct HDMI port selected. Often there is a control on the TV remote that lets you select a particular HDMI port. You probably won’t see anything from the camera until that port is active.
Figure 11.17 shows the ends of an HDMI cable. Unfortunately, you’ll have to purchase an HDMI cable since one is not included with your COOLPIX A. You’ll need to use a mini-HDMI (type c) to HDMI standard (type a) cable. And, of course, you’ll need to plug your HDMI cable in to the correct port on the COOLPIX A (figure 11.17, red arrow).
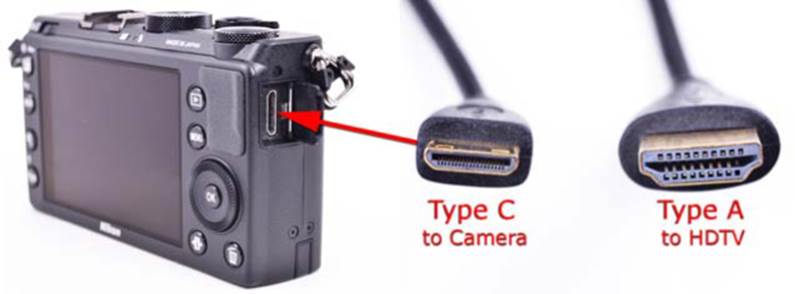
Figure 11.17: HDMI Type C port on the COOLPIX A, and HDMI connectors (Types C and A)
Use the following steps to display a video on your HDTV:
1. Turn your camera off. Why take a chance of blowing up your camera from a static spark?
2. Open the HDMI door on the side of your COOLPIX A and insert the mini-HDMI (type c) cable into the HDMI port (figure 11.17, red arrow).
3. Insert the HDMI standard (type a) cable into one of your HDTV’s HDMI ports. (Both video and sound are carried on this one cable.)
4. Your HDTV may have multiple HDMI ports, and you may have other devices connected, like a cable box or satellite receiver. When you plug the COOLPIX A’s HDMI cable in to your HDTV, be sure to select the HDMI input the camera is connected to, or you won’t see the camera’s video output. You may have to select that HDMI input from your TV remote or use another method. If in doubt, check your HDTV manual. (If your TV has only one HDMI port, please ignore this step.)
5. Turn on the camera, press the Playback button, and locate the video you want to show.
6. Press the OK button to play the video on your HDTV.
Settings Recommendation: Unless you are heavily into HDMI and understand the various formats, just leave the camera set to Auto. That allows the COOLPIX A to determine the proper format as soon as it’s plugged in to the display device and the HDMI input is selected. If Auto doesn’t work, try the other formats. One of them will work!
Author’s Conclusions
The video capability of the Nikon COOLPIX A is simply amazing. You will create some of the best videos of your life with this camera, primarily because it is so small you’ll always have it with you. When you are out shooting still images, why not grab some video too? Years from now actually hearing and seeing friends and family that are no longer with us will mean a lot.
Pictures are important, but so is video. Your camera does both, and they are available at a moment’s notice. Carry your camera with you and record your life. Hard drives are cheap compared to the memories you will lose if you don’t record them. Make good backups and give family videos to your family. Share the good qualities of your powerful camera with others, and the good will come back to you later.
By now you should have a much greater understanding of your camera. Be sure to review the Camera Control Reference in the Appendix to familiarize yourself with all the external camera controls and their functions.
Thank you!
I’d like to express my personal appreciation to you for buying this book and for sticking with me all the way to the end of it. I sincerely hope that is has been useful to you and that you’ll recommend my books to your Nikon-using friends.
Keep on capturing time ...
All materials on the site are licensed Creative Commons Attribution-Sharealike 3.0 Unported CC BY-SA 3.0 & GNU Free Documentation License (GFDL)
If you are the copyright holder of any material contained on our site and intend to remove it, please contact our site administrator for approval.
© 2016-2026 All site design rights belong to S.Y.A.