Mastering the Nikon COOLPIX A (2014)
Chapter 8. Autofocus, AF-Area, and Release Modes
Autofocus, AF-area, and Release modes are active settings that you’ll deal with each time you use your camera. Unlike adjusting the other menu settings from time to time, you’ll use autofocus, AF-area, and Release modes every time you make an image or movie.
To take pictures and make movies you need to be very familiar with these settings, so this is an important chapter for your mastery of the Nikon COOLPIX A. Grab your camera and let’s get started!
This chapter is divided into three main sections:
• Section 1: Autofocus Modes
• Section 2: AF-Area Modes
• Section 3: Release Modes
As you know, the Nikon COOLPIX A does not have a built-in viewfinder. You can purchase the relatively expensive Nikon DF-CP1 external viewfinder, which mounts in the camera’s accessory shoe, for those times when you don’t want to use Live view to frame the image. Otherwise you must use the Live view monitor to take pictures and shoot videos.
Live view is a feature that many old-timers love to hate. New photographers generally like to use it since they are accustomed to composing on the LCD screen of a point-and-shoot camera.
An old-timer who is accustomed to using only a viewfinder to compose images might find that some types of shooting are easier with Live view. I’ve been using SLR, DSLR, rangefinder, point-and-shoot, and compact cameras for more than 45 years. When Live view monitors first came out, my initial thought was “gimmick.” However, after shooting for several months with the COOLPIX A, the ease of use has changed my thinking. When I need extreme, up-close focusing accuracy, Live view can be superior to the Viewfinder.
And with Live view’s virtually 100 percent, through-the-lens view, you see what the camera sees, similar to when you are shooting with a DSLR. It is, by no means, as fast as shooting with a viewfinder; however, for contemplative photographers it can be a satisfying way to compose an image—sort of like a tiny, full-color view camera with no bellows or film holders to change. Live view is really just an old subject-framing idea updated to today’s digital standards. The ground glass in a view camera is equivalent to an LCD screen in a digital camera.
Let’s see how to best use the autofocus, AF-area, and Release modes with your new COOLPIX A.
Examining the Modes
Live view mode is a little different than a viewfinder when it comes to autofocus. In some ways it is simpler, and in other ways it is more complex. The Autofocus modes have only two settings, the AF-area modes have four, and the Release modes have six:
Autofocus modes
• Single-servo AF (AF-S)
• Full-time-servo AF (AF-F)
AF-area modes
• Face-priority AF
• Wide-area AF
• Normal-area AF
• Subject-tracking AF
Release modes
• Single frame (S)
• Continuous
• Self-timer
• Delayed remote (ML-L3)
• Quick-response (ML-L3)
• Movie recording
What’s the difference between these three mode types? The Autofocus modes are how the camera focuses, the AF-area modes are where it focuses, and the Release modes control how often (or how fast) a picture is taken.
In upcoming sections we will look into all these mode types and see how they work together to make the COOLPIX A’s autofocus and subject tracking system very effective.
You’ll be able to select whether the camera, in still image or video mode, grabs the focus and locks on a static subject or continuously seeks new focus if the subject is moving—and whether it shoots one still image at a time or many frames per second as it captures pictures.
First we’ll examine the Autofocus modes.
Section 1: Autofocus Modes
(User’s Manual, Page 75)
The COOLPIX A provides a type of autofocus called Focal plane contrast AF, which uses pixel-level contrast detection directly from the camera’s imaging sensor. A simple name for this is contrast-detect AF. It can use the entire surface of the imaging sensor to detect contrast between light and dark boundaries to provide autofocus. This is a relatively slow form of autofocus, but it is extremely accurate since it is done at the pixel level.
We covered how to adjust Live view’s Autofocus and AF-area modes in several previous chapters. However, let’s review how to choose an Autofocus mode. First we’ll examine the two Autofocus modes. Remember, the Autofocus modes tell the camera how to focus.
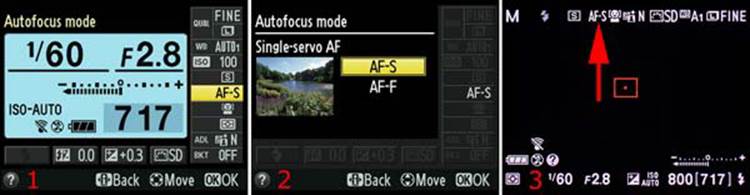
Figure 8.1: Choosing an Autofocus mode
Use the following steps to choose an Autofocus mode:
1. Open the Information display screen with the i button and select Autofocus mode from the Quick Menu on the right (figure 8.1, image 1).
2. Press the OK button, and you will see the Autofocus mode menu. Select your favorite Autofocus mode setting. Press the OK button again to lock in your choice. My camera is set to the Single-servo AF (AF-S) setting (figure 8.1, image 2).
3. Press the Shutter-release button halfway to return to the Live view display, and you will notice that the Autofocus mode selection you made is displayed on the Live view screen (figure 8.1, image 3). Make your pictures or videos.
Next I’ll describe the two selections under Autofocus mode. I photographed the screens with the lens cap on so you can clearly see them on a black background.
Single-Servo AF (AF-S)
The red arrow in figure 8.2 points to the Single-servo AF (AF-S) mode symbol on the Live view screen. You control the focus by pressing the Shutter-release button halfway in still image or video mode.
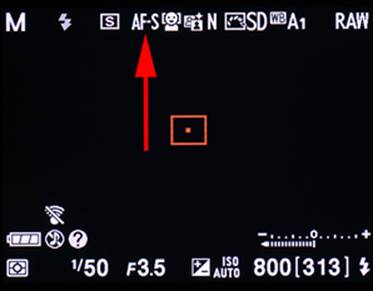
Figure 8.2: Single-servo AF (AF-S) mode
If the subject moves, you’ll need to release the Shutter-release button then reapply pressure to refocus. The focus locks when it is acquired, and it does not update unless you deliberately update it. You have to refocus if you or the subject moves.
A big red or green AF point square will appear in the middle of the camera display. The square will have a dot in it when it is in the middle of the screen. It will be red when the scene is not in focus and green when the scene is in focus. You can move the square around the screen to select the area of the subject on which the camera will focus.
If the subject doesn’t move or moves very slowly, use this AF mode. You can refocus at will.
Full-Time-Servo AF (AF-F)
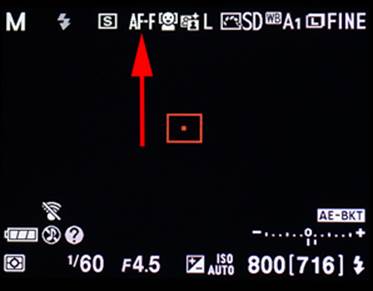
Figure 8.3: Full-time-servo AF (AF-F) mode
The red arrow in figure 8.3 points to the Full-time-servo AF (AF-F) mode symbol on the Live view screen. The red or green AF point square appears in the middle of the camera display, like in Single-servo AF mode. You can move it around to select a focus area. This mode constantly updates the autofocus so you can track the subject. It is tempered by the AF-area mode you have selected (next section). The focus doesn’t lock on the subject; rather, it updates continuously unless you press the Shutter-release button halfway to force a refocus. In other words, with AF-F mode the camera will maintain focus on the subject automatically. But if the focus is lost, you can refocus by pressing the Shutter-release button halfway.
In still image mode, you press the Shutter-release button fully when you are ready to take a picture. In Movie mode you press the Shutter-release button fully to start and stop the video recording.
Settings Recommendation: Unless I am going to do some very specialized macro shooting, I leave Autofocus mode set to AF-S, or Single-servo AF. I want to control exactly where the focus falls so I can control the depth of field. When you shoot a video with autofocus (not manual focus), AF-F mode can be convenient; however, it tends to lose focus sometimes, so you need to experiment with it to see how effective it is for your subjects.
Now, let’s examine the AF-area modes.
Section 2: AF-Area Modes
(User’s Manual, Page 76)
The AF-area mode lets you choose where the camera senses your subject. Autofocus works differently for each of the four AF-area modes. You can cause the camera to look for people’s faces, track a moving subject, widen out for landscapes, or pinpoint the focus on a small area of the frame.
Let’s see how to select an AF-area mode and then look at them in detail.
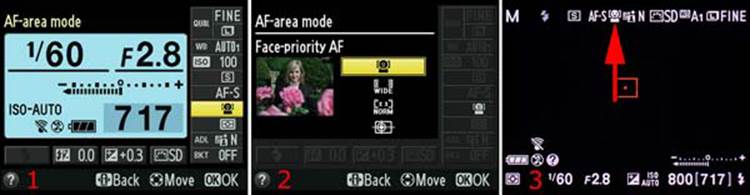
Figure 8.4: Choosing an AF-area mode
Use the following steps to change the AF-area mode:
1. Open the Information display screen with the i button and select AF-area mode from the Quick Menu on the right (figure 8.4, image 1).
2. Press the OK button, and you will see the AF-area mode menu. Select your favorite AF-area mode setting. Press the OK button again to lock in your choice. My camera is set to the Face-priority AF setting (figure 8.4, image 2).
3. Press the Shutter-release button halfway to return to the Live view display, and you will notice that the AF-area mode selection you made is displayed on the Live view screen (figure 8.4, image 3). Make your pictures or videos.
Face-Priority AF
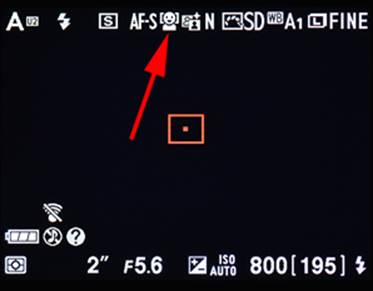
Figure 8.5: Face-priority AF
The red arrow in figure 8.5 points to the Face-priority AF symbol. When you are taking portraits in Live view mode or shooting movies with people in Movie mode, use Face-priority AF. The camera can track focus on the faces of several people at the same time. It is quite fun to watch as the little green and yellow AF point squares find faces and stay with them as they move—green squares are for focused faces and yellow squares are for people who are being tracked but are not in the best focus.
Nikon claims the COOLPIX A can detect up to 35 faces at the same time. That’s a lot of people! The Nikon website says, “When multiple faces are detected, the camera will focus on the subject recognized to be the closest. Alternatively, you can also choose a different subject with the Multi Selector.”
Wide-Area AF
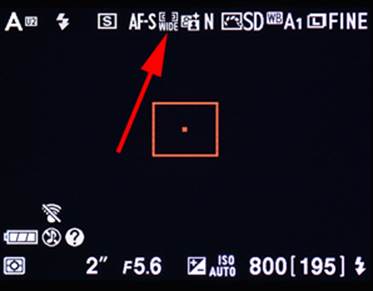
Figure 8.6: Wide-area AF
The red arrow in figure 8.6 points to the Wide-area AF symbol. For the landscape shooters among us who like to shoot still pictures or movies of beautiful scenic areas, this is your mode. The camera will display a big AF point rectangle on the monitor. You can move this large AF point around until it rests exactly where you want the best focus to be. The camera will sense a wide area and determine the best focus, with priority on the area under the AF rectangle.
Nikon says this AF-area mode is “Suitable for hand-held shooting such as landscape. AF area can be moved to the desired position within a frame.”
Normal-Area AF
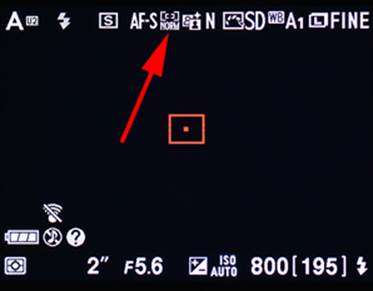
Figure 8.7: Normal-area AF
The red arrow in figure 8.7 points to the Normal-area AF symbol. This mode is primarily for shooters who need to get very accurate focus on a small area of the frame. If you are shooting a butterfly closeup and want to focus on one of the antennae, use Normal-area AF. This is a great mode to use with macro (closeup) shots because it gives you a much smaller AF point square that you can move around the frame.
Compare the square to the AF point in Wide-area AF mode, and you’ll see that it is about 25 percent of the size. You can pinpoint the exact area of the subject that you want to have the sharpest focus.
Nikon says this AF-area mode is “Suitable for tripod shooting with pin-point focus such as close up. AF area can be moved to the desired position within a frame.”
Subject-Tracking AF
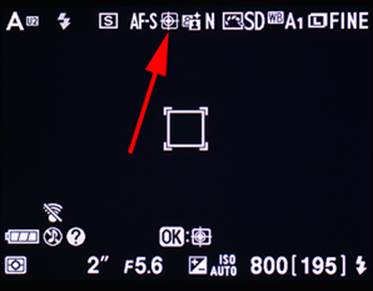
Figure 8.8: Subject-tracking AF
The red arrow in figure 8.8 points to the Subject-tracking AF symbol. When autofocus is locked—either with the Shutter-release button in AF-S mode or automatically in AF-F mode (discussed previously)—this mode lets you start subject tracking with the OK button. When the subject is selected (after you press the OK button) the camera locks focus on the subject and tracks it, regardless of whether the subject or the camera moves.
If you are making a movie of a black bear in the Great Smoky Mountains, move the focus point to the bear, focus, press the OK button, and the bear will stay in focus. It is amazing to watch the camera do this. Try it and see!
I strongly suggest that you use AF-F, or Full-time servo AF, with this mode. Full-time autofocus allows your camera to track the subject so you don’t have to worry about keeping it in focus yourself.
Nikon says this AF-area mode is “Suitable for a moving subject. After focusing is achieved with the OK button, AF area tracks the subject’s movement.”
Settings Recommendation: Why not leave the AF-area mode set to Face-priority AF if you photograph people a lot? If you are using Live view for macro shooting, Normal-area AF gives you the smallest, most accurate area for detailed, up-close focusing. Landscape shooters should use Wide-area AF, and wildlife or sports shooters should use Subject-tracking AF.
Now, let’s examine the Release modes.
Section 3: Release Modes
(User’s Manual, Page 63)
Release modes let you tell the camera how it should release the shutter for taking pictures and recording movies. The first five Release modes are concerned with taking still pictures. The sixth Release mode, Movie recording, will be examined here briefly and in greater detail in the upcoming chapter called Creating HD Movies.
Here is a list of the six modes:
• Single frame (S)
• Continuous
• Self-timer
• Delayed remote (ML-L3)
• Quick-response (ML-L3)
• Movie recording
In the good old film days the first two Release modes would have been called motor-drive settings since they are concerned with how fast the camera takes pictures.
First, we need to see how to select a Release mode.
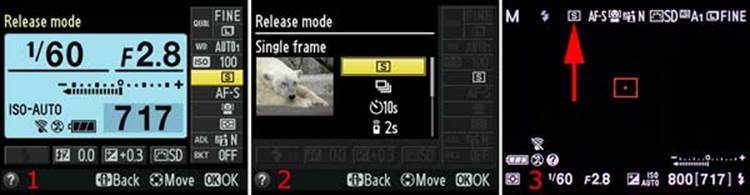
Figure 8.9: Choosing a Release mode
To select a Release mode, follow these steps:
1. Open the Information display screen with the i button and select Release mode from the Quick Menu on the right (figure 8.9, image 1).
2. Press the OK button, and you will see the Release mode menu. Select your favorite Release mode setting. Press the OK button again to lock in your choice. My camera is set to the Single frame Release mode setting (figure 8.9, image 2).
3. Press the Shutter-release button halfway to return to the Live view display, and you will notice that the Release mode selection you made is displayed on the Live view screen (figure 8.9, image 3). Make your pictures or videos.
Now, let’s examine the Live view screen and the actions of each Release mode.
Single Frame (S) Release Mode
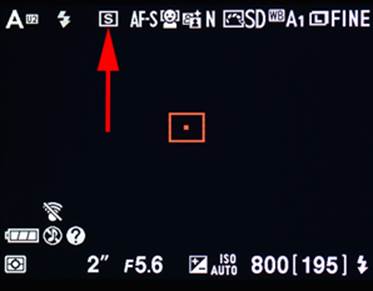
Figure 8.10: Single frame (S) Release mode
Single frame Release mode (figure 8.10) is the simplest Release mode; it takes a single picture each time you press the Shutter-release button fully. There is no speed here! This is for photographers who shoot a few frames at a time. Nature shooters often use this mode since they are more concerned with correct depth of field and excellent composition.
Continuous Release Mode
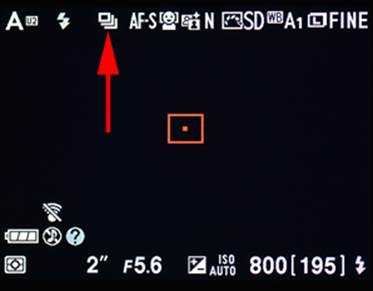
Figure 8.11: Continuous Release mode
Continuous Release mode (figure 8.11) allows you to take pictures in bursts at up to four frames per second (fps). Shooting at a fast frame rate (high fps) is based on the assumption that you are shooting with at least a 1/250 second shutter speed, have a fully charged battery, and there is available buffer space in your camera’s memory.
If these requirements are met, you can take several images in quick succession—up to 4 fps. The camera will buffer the images in internal memory while it writes them to the memory card. The number of images that can be held in the internal memory buffer varies according to whether you are shooting in RAW mode or JPEG mode and whether you are shooting a simple or complex subject (because of compression sizes). The camera will let you know how many more frames you can shoot before the internal memory buffer is full (figure 8.12).
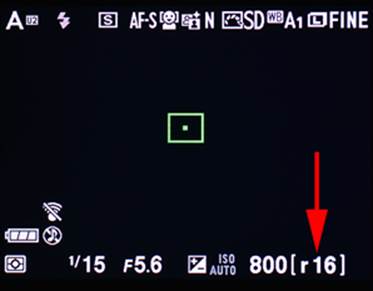
Figure 8.12: Remaining (r) images
You will see the letter r followed by a number, at the bottom right of the Live view screen, while you hold down the Shutter-release button. The number represents the approximate number of images the camera’s memory buffer will hold before the frame rate decreases. My camera—in JPEG fine mode—shows r16, which means the internal memory buffer will hold 16 more FINE JPEG images before it is full.
If you hold down the Shutter-release button and the internal memory buffer fills up, the camera will not stop taking pictures; it cannot maintain the 4 fps rate and will take another picture only when a picture in the buffer is written to the memory card.
In RAW mode, you can shoot only a few frames before the buffer is full (up to nine images). In JPEG mode, especially in the higher compression modes such as JPEG normal or JPEG basic, the camera can fire up to 26 frames before it runs out of buffer memory and slows the frame rate to catch up.
Self-Timer Release Mode
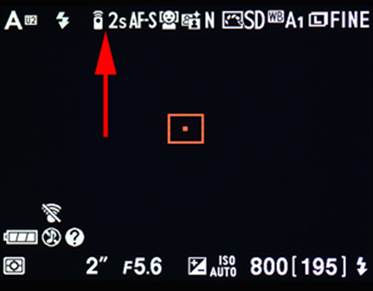
Figure 8.13: Self-timer Release mode
The Self-timer allows you to shoot pictures without touching the camera (figure 8.13). There is an adjustable countdown period before the Self-timer fires the shutter. The factory default time-out for the Self-timer is 10 seconds (10 s). You can use Setup Menu > Self-timer > Self-timer delayto set the time-out to 2, 5, 10, or 20 seconds.
You can also select the number of images that will be taken each time the self-timer completes a countdown cycle by configuring Setup Menu > Self-timer > Number of shots (from one to nine shots).
If you like to hear that little beep-beep-beep when the Self-timer is counting down the seconds before it fires the shutter, you can control it with Setup Menu > Beep.
Delayed Remote (ML-L3) Release Mode
Figure 8.14: Delayed remote (ML-L3) Release mode
Delayed remote (ML-L3) Release mode (figure 8.14) lets you fire the shutter remotely with an optional Nikon ML-L3 infrared remote control (figure 8.15).
Figure 8.15: Nikon ML-L3 infrared remote release unit
First, autofocus the camera by pressing the release button on the ML-L3 halfway. To take a picture, press the button all the way down. The camera will wait two seconds and fire the shutter.
Quick-Response (ML-L3) Release Mode
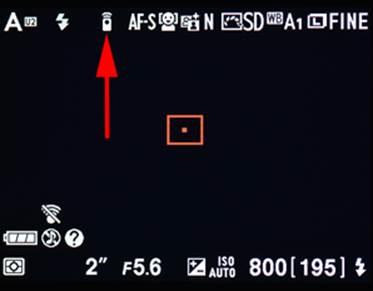
Figure 8.16: Quick-response ML-L3 Release mode
Quick-response (ML-L3) Release mode works in a similar manner to Delayed remote (ML-L3) Release mode (previous subsection), except there is no two-second delay before the shutter is fired (figure 8.16). You can fire the camera remotely, without cables or wires.
First, autofocus the camera by pressing the release button on the ML-L3 halfway. To take a picture, press the button all the way down. The camera will fire the shutter immediately.
Movie Recording Release Mode
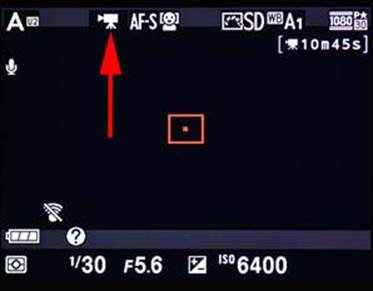
Figure 8.17: Movie recording Release mode
Movie recording Release mode is the only way to put the camera into video mode (figure 8.17). There are no external buttons on the COOLPIX A to shoot a video—other than starting and stopping the video with the Shutter-release button—after you select this mode.
This is a bit amateurish. Why give a camera the ability to create excellent 1080p video and then bury the settings that activate the Movie mode in a complex menu? Shouldn’t this setting be available by pressing a single button on the camera? It’s almost as though the video mode was an afterthought. That’s a shame because the camera makes excellent videos. I shot a sample 17-minute video, handheld, in a dark restaurant for your viewing pleasure:
http://www.youtube.com/watch?v=GFTAYmYGGGw
This video shows the capability of the COOLPIX A. Of course, YouTube compresses the video quite a bit to make it stream faster, so the original video is even nicer. However, you can get a sense of how well the camera performs, even in low ambient light conditions and with a high ISO value (about ISO 4000). The video was entirely handheld, even when the chef threw rice at my face! Be sure to watch for the cool onion volcano.
Settings Recommendation: It is a good idea to either memorize where this choice lives in the menus or place the setting in My Menu for immediate access. We will explore Movie recording mode in detail in the upcoming chapter titled Creating HD Videos.
Author’s Conclusions
I’ve followed the development of the Nikon autofocus systems since the late 1980s. My first camera with autofocus was the Nikon F4 professional SLR. Over the past several years I’ve experienced each new level of autofocus released by Nikon. It’s gotten better and better with each new generation!
Autofocus with the COOLPIX A is a real pleasure. It is snappy when the light is reasonable, and it even does a pretty good job in low light—with a little more seeking, of course.
The system can still seem complex, but if you spend some time with this chapter you should come away with a much greater understanding of the AF module. You’ll understand how you can adapt your camera to work best for your style of photography. Enjoy the excellent autofocus system of your COOLPIX A!
In the next chapter we will consider the camera’s three metering systems, all the exposure modes, and how to use the histogram for excellent exposures.