The DSLR Filmmaker’s Handbook: Real-World Production Techniques, Second Edition (2015)
Chapter 6. Lighting on Location
In its simplest role, light is necessary for exposing the image on your camera. But after this fundamental role, lighting becomes art. Even with natural available light, you can alter the look of lighting by choosing how your subject will interact technically with camera settings, what location you choose, and how you set up the shot. Using artificial light and a set provides a blank canvas to tell the story with light. Regardless of your lighting options available, you will be making many decisions about lighting while on location.
On your shoot, you may have only a couple of lighting people, or you may even be doing it all by yourself. On a large movie set entire teams of people are responsible for the lighting. At the end of the day, the same issues and decisions will come up on blockbuster movie sets as much as one-person shoots. How can the lights tell the story? Do you have the proper lights to technically be able to get the shot? What lights do you have? Where should you put them? What can you do with them?
Planning the Lights
You should plan the lighting during pre-production, if you can, so you can rent or purchase the appropriate gear. You must plan the lighting based on the blocking and the image composition; part of the composition of a frame is the lighting, and establishing the lighting composition is as important as framing the image. In fact, during pre-production, it is beneficial to sketch out the lighting setup so that you can gather the equipment and provide a blueprint for all crew members. Communication on set saves time, and saving time saves money. Anything you can do ahead of time to help you be better prepared will be better for you and the production.
The plan should include the types of lights, proposed angle and location, any grip equipment that is needed (because most likely on your set the grip/lighting assistants will be the same person or even you), camera and initial setup, major landmarks, initial starting point of actors, cardinal direction or GPS location, sun position, or any existing lighting you are planning to use graphed with details about the type of light and the shots/scene numbers or desired time of day you’re trying to capture. There is a lot to keep track of, and not all of these will be applicable on all productions. Rather this gives you a guideline for many things you should be aware of ahead of time.
Grip Equipment
Grip equipment is any equipment that helps hold or support the camera and lights on a set. This covers tripods, C-stands, flags, dollies, and any other equipment used to support cameras or lights but does not include the camera or lighting equipment. Anything that is attached to a light is the responsibility of the lighting department. Anything that is not attached to the light but still affects the lighting is usually in the purview of the grip, but practically speaking, many grips will be involved with adjusting lights and light attachments.
You should create a new lighting blueprint for any major lighting changes or setups. You can give these blueprints to all pivotal crewmembers and include them with the storyboard for on-set reference. The blueprint is likely to change, but it gives you a starting point for lighting ideas on the set. It is important to carefully plan any intricate lighting setup or tricky situation.
Timing: When to Set Lights
On set, the lighting will be at least partially set up according to the plans, but most of the lighting work will take place after you’ve done the blocking. If you are prelighting, start with the background and then light forward, saving the last lighting decisions for the details in the actors’ faces or for tweaking. At this point, ask yourself, “What will the major light sources be, and where is the source light?”
After the rehearsal, lighting tweaking will take place and will cease prior to the first shot. During the rehearsal, the blocking and the camera movements are connected to how the lighting will need to fall over the entire scene. This is the time to also look past the first shot and examine the coverage, the series of shots or setups that are planned to be shot, on that location and that day. Lighting can be a bit like chess, and thinking ahead to the next shots will save time and headaches down the line.
The lighting often has to be reset or tweaked with each setup or shot, as well as every time the camera moves or the blocking changes. Often with a small crew or even on a full-scale set, some people in the lighting department will be involved with moving light as the scene progresses or at the least holding or adjusting bounce cards to control light during the shot (Figure 6-1).

Figure 6-1: A white bounce card, bringing some fill light to the actor
Choosing Lights
DSLRs allow for extensive creativity and flexibility in lighting. Most types of bulbs and light will be effectively read by a DSLR. You can use professional light kits or a variety of lights picked up from your hardware store.
In this arena, what is often more important than the exact type of light is what you do with the light. Position, adjustment, and shape of the light are ultimately what matters with your lighting setups. As you choose your lights, take note of the different types of light that are either present on the set/location or available for you to position on the set (Figure 6-2).
All decisions must start with the quantity and brightness of the light. Simply put, what are the light requirements for proper exposure and desired depth of field? Even if you are using natural lighting, you may have to augment to get the exposure you want or the depth of field you need to get your shot in focus. Pay attention to how much light may have to be added or what exposure you may be dealing with if conditions aren’t ideal on the day of shooting (Figure 6-3).
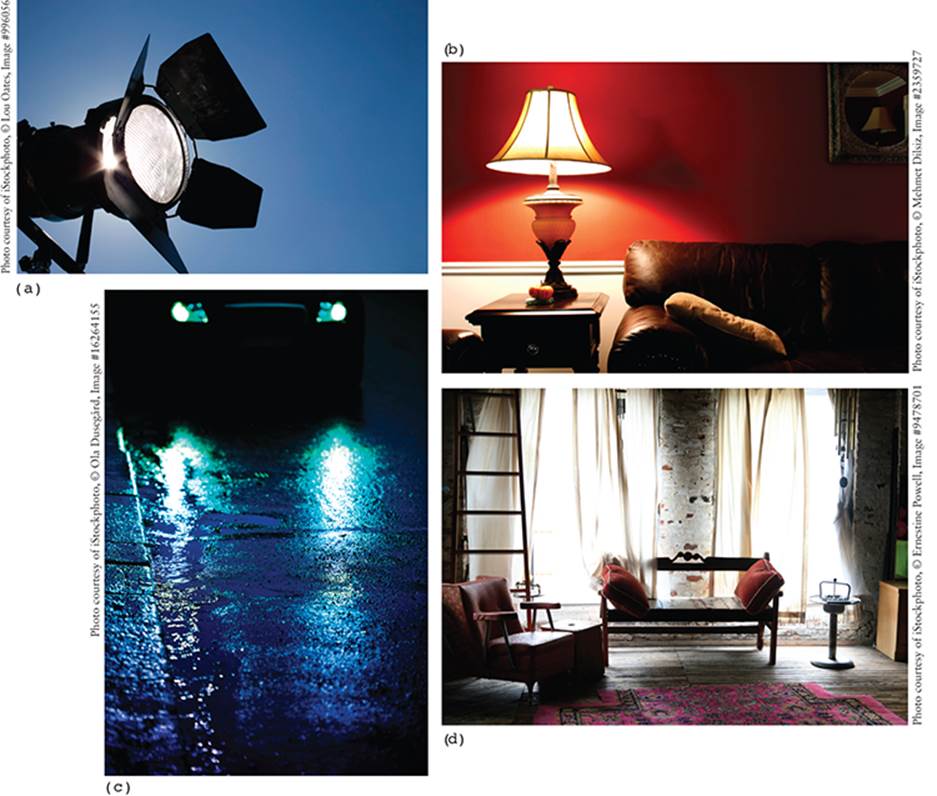
Figure 6-2: (a) A light setup on set. (b) A lamp (called a practical) can be used or added to help light the scene. (c) In a pinch, you can use the headlights of a car as ambient or direct lighting for your scene. (d) A great help is using windows and natural light to light your scene. You can use direct sunlight or use curtains as diffusion to soften the light.
Distribution and Shape
Different light sources distribute the light differently. Light may also take on a shape depending on the shape of the light source or if something gets in between the light source and the shot and adjusts the shape of the light. The light can be forced into patterns depending on what is placed in front of it.
Figure 6-4 shows that you can point your light at a simple broken mirror to create an interesting lighting pattern. If you have the time, you can glue pieces of broken glass onto foam core or wood and make a larger target to bounce light for any scenes that require a larger area to light.
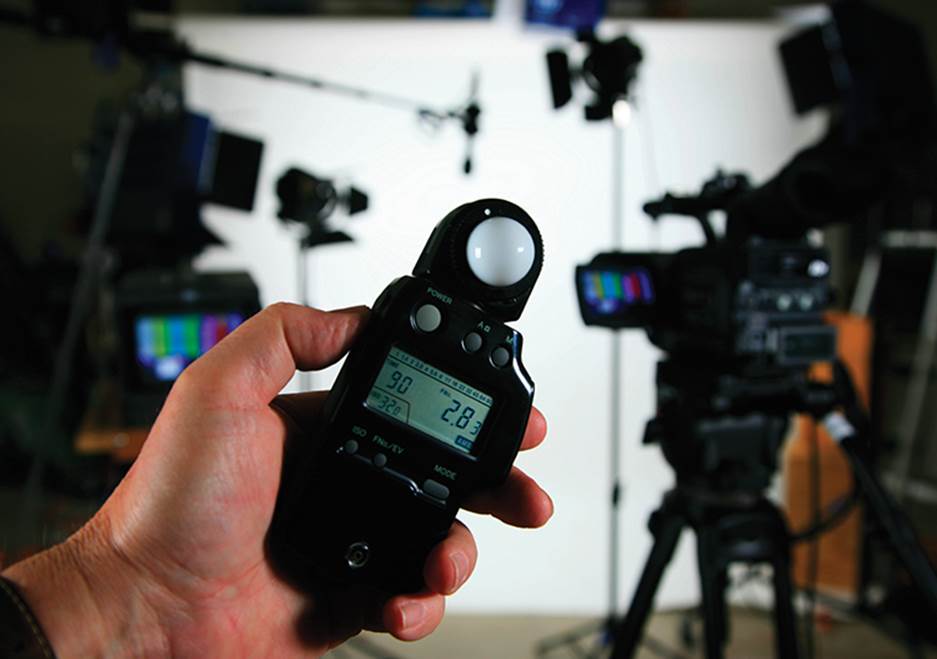
Photo courtesy of iStockphoto, © Michael Kurtz, Image #8239064
Figure 6-3: Metering the light on set
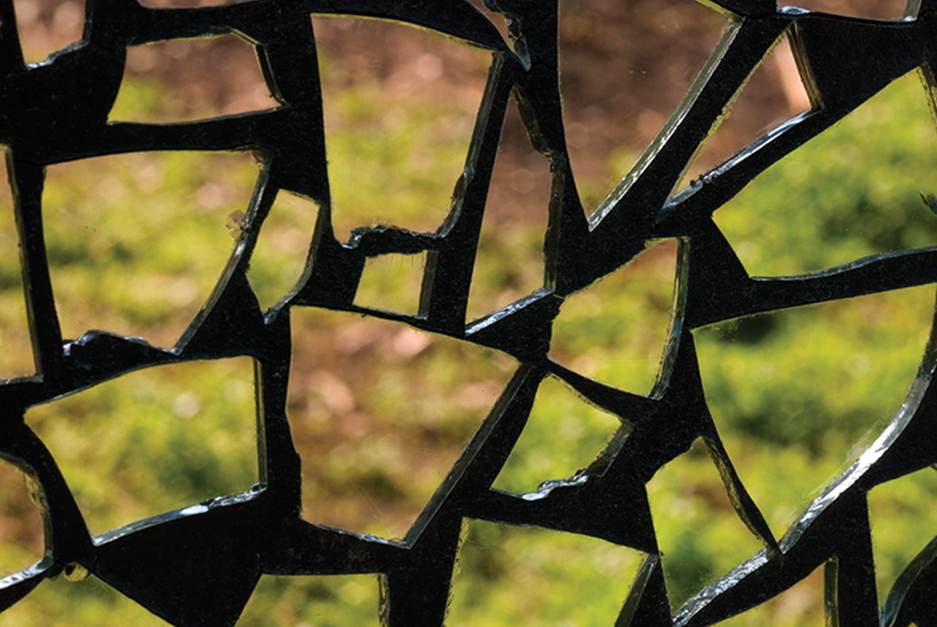
Photo courtesy of iStockphoto, © Rbirch1, Image #9588815
Figure 6-4: A broken mirror can create an interesting lighting pattern.
Color
Light is often not a pure white; it usually has color or a slight color cast that is measured in degrees of Kelvin temperature. The color of the light is not merely about setting proper white balance. The color of the light can influence the overall look of the piece in desirable ways, and you may want to pick the light based on its color, shoot at the magic hour to get golden hues, or adjust the light to manipulate the color of the light (Figure 6-5). The color is a result of the light temperature, gel on the lights, or filters on the lens or camera.
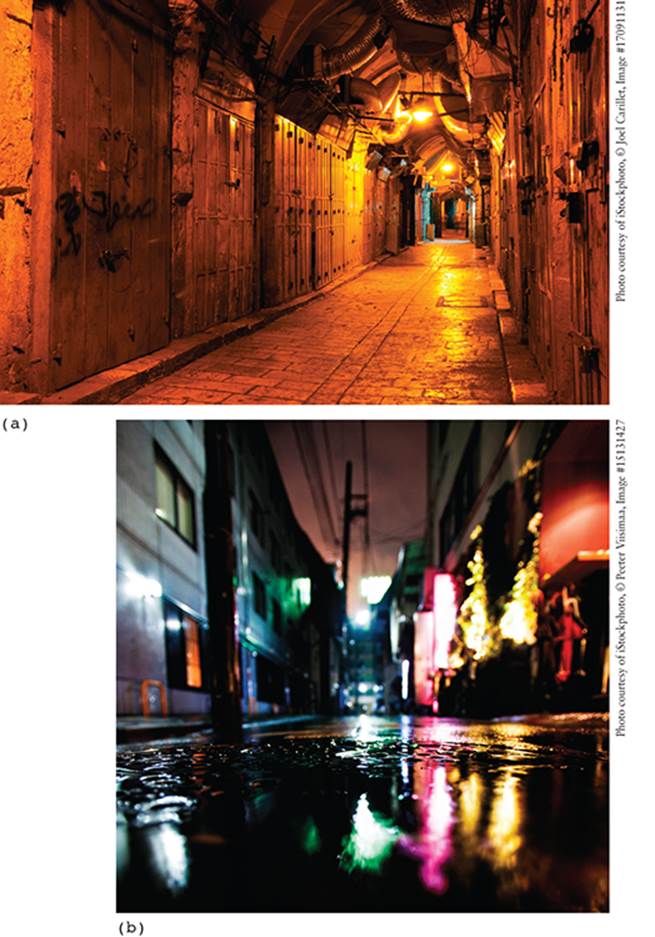
Figure 6-5: (a) A street scene with mostly one color light temperature and one type of light. (b) A street scene with a variety of colored lights and light temperatures.
As you pick the light, you will need to determine what light temperature and color fit your production. Often you can add visual interest by using a small bit of a contrasting color temperature light in the background or by playing with cool and warm tones in the shot. Usually proper white balance is desired; however, sometimes the color can be changed for effect by altering white balance, for example, by allowing fluorescents to go green in a shoot (Figure 6-6). Color can also be affected subtly by using filters or in controlled areas by gelling windows or individual lights.
Light temperature may change or the light may grow dimmer as the battery is drained, as the light heats up, or as the bulb gets older in the fixture itself. As you shoot, pay attention to any changes in brightness or color temperature that may be affected (Figure 6-7).
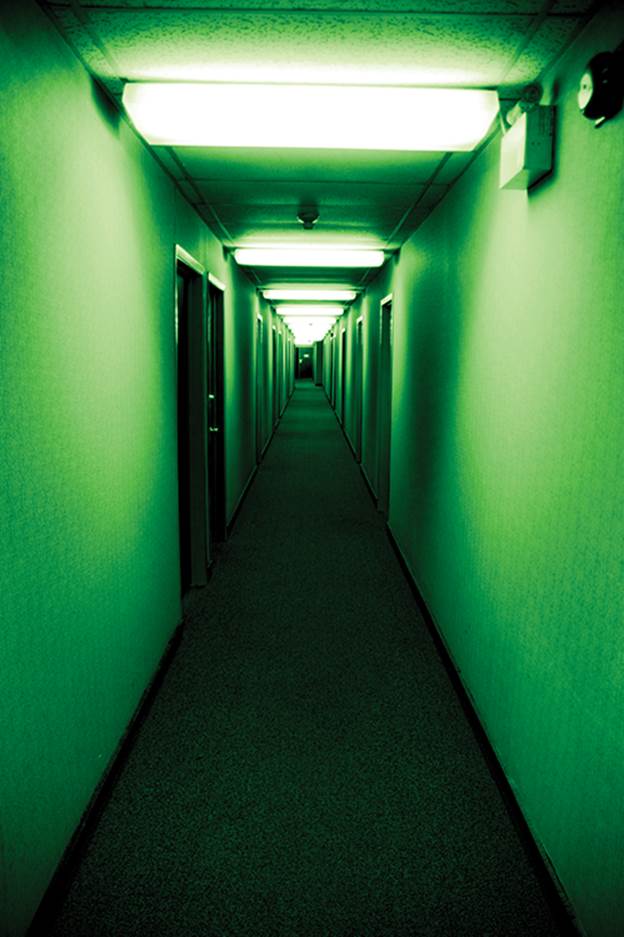
Figure 6-6: An incorrectly balanced hallway with fluorescent light produces a green tint on the scene.
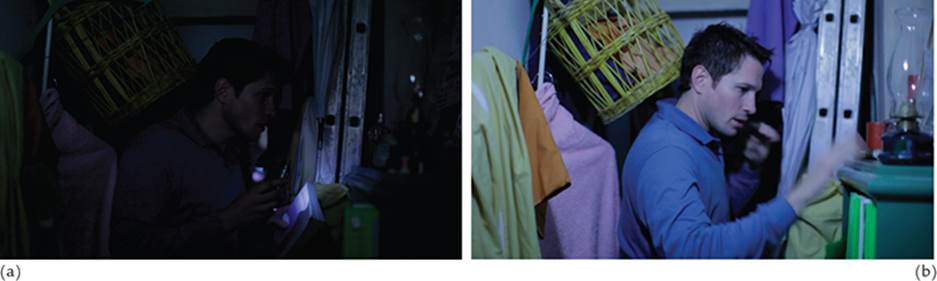
Figure 6-7: (a) Light at the beginning of a four-minute scene. (b) Light at the end of a four-minute scene in the same shot.
Principles for Setting Lighting
When you are starting the lighting process, it can be helpful to consult a few general philosophies on the lighting process to spark ideas.
Adding Depth and Dimension
Light separates the subject from the background. Light establishes space and dimension and shows that the scene is taking place in the real world. Lighting often helps shape the different dimensions of the subjects in the scene. By using light to define the foreground, middle ground, and background, the entire shot will have dimension throughout.
To visually distance the subject from the background, you can either backlight the subject with light that doesn’t hit the background, light the background and the subject separately, or use a background setting that contrasts with the visuals and color of the subject. By doing this you are allowing bokeh to separate the elements between the foreground and background. Depth and dimension are important regardless of where the focus is and can be altered if you want a different visual effect.
Lighting the Entire Scene
The lighting composition must work with the framing composition of any given shot. You must look at the lighting in the entire frame, from front to back. The world of film is a three-dimensional world, and understanding that will help you make sure that all aspects of your shot are considered.
In Figure 6-8, the addition of the light on the ground helps establish depth in the scene as opposed to a black wall behind the actress.
You can add visual interest to the lighting by increasing complexity or adding detail to what the eye can see. Having contrasting light temperatures in the same scene—in other words, light that changes from hard to soft, pops of color or color wash that adds to the story, a play of shadows and light, or other lighting detail—adds eye candy to the piece.
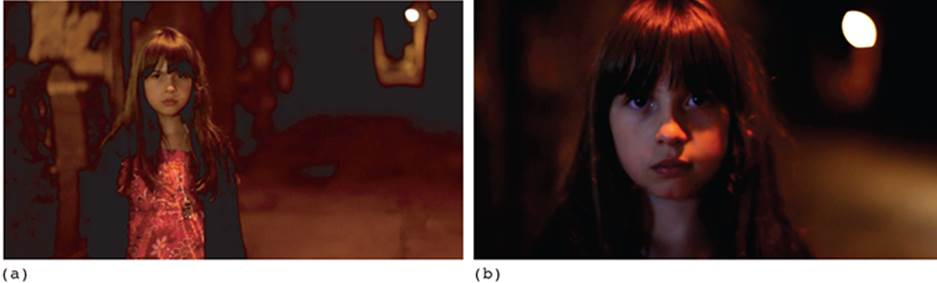
Figure 6-8: (a) Shot of actress with existing light with only a small bounce card lighting her face. (b) Shot of actress with a key light (with a different color temperature) and a kicker light hitting the ground over her left shoulder to add depth.
When looking at your location, think about what you want to light and what you want hidden. If you are shooting continuous shots that turn 360 degrees, you may need to mount many lights from above and hide the rest by using parts of the set dressing. You need to think about lighting the whole scene, which includes the entire room, when scouting a location, not just your talent.
Using Logic to Create a Natural Look
You see light every day, and you naturally respond to the light depending on its source. When you see light, you want to know its source; if the lighting source seems to come from nowhere, you feel something is amiss. As you plan the lighting, imagine where the light would actually be coming from in the scene. If there are windows, does the light you choose look like what light would be coming in through the windows naturally? You must find or create light sources in the scene to provide a logical lighting scheme for the entire set. You can then use other lights to augment them where needed. If your scene is outside, it pays to examine your lighting to see whether it incorporates sunlight or if you need to create entirely different lighting than what nature provides. You must determine whether what you set up with artificial lighting fits the light that the audience would expect to see in the scene based on light sources that are present (Figure 6-9).
Sometimes you may want to make the light source illogical or not based on what the audience expects. This mysterious light can add something to your scene visually. However, if you aren’t planning for a mysterious effect, it’s important to keep the lighting consistent with audience expectations. You can’t always rely on the lighting that is in place or even replicate exactly how the lighting would look because you may want to emphasize some objects or even tweak the lighting to make them look more interesting, but keeping an eye on the logic of lighting sources will make your piece more realistic.
If you are attempting a naturalistic light scenario, it is easy to just use natural and available light so that all of the light sources will be logical. But be careful with natural light because it changes. If you are relying on sunlight, remember that the light moves and changes color temperature over time. If you are shooting over the course of several hours, then you need to be aware that shots taken closer to the start will look very different from those taken at the end of the shoot. The light changes so subtly from shot to shot that you might not realize the difference until you look at your footage in post. This change of light over time is the opposite of what you want and might expect with using natural light.
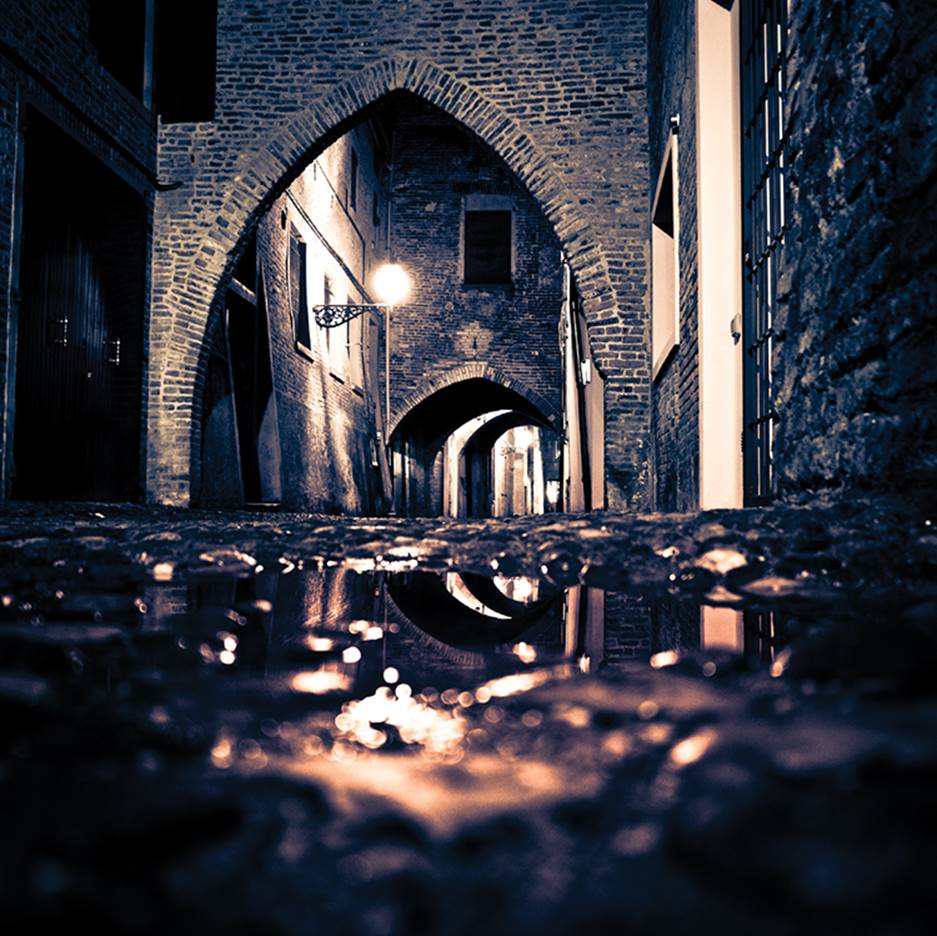
Photo courtesy of iStockphoto, © Giorgio Fochesato, Image #17011818
Figure 6-9: The natural light sources at this location are primarily the street lamps. Alternate light sources are the reflections in the water on the street, possibly the moon, and any lights in the windows or doors along the street.
It is better to have good lighting than to be a slave to the accuracy or realism of the existing lighting.
Reflecting Mood and Emotion
As you look at the light, think about how can you create emotion with the lighting and/or portray the mood of the scene. There isn’t just one way to show mood or emotion, and this can be a challenge for the lighting team. As you plan, ask yourself these questions: How does the light tell the story? What is the light supposed to show in this shot? What is the tone of the story? What world do the characters inhabit? What does the script say about the lighting? Does it match the mood or emotion of the scene? Ultimately, the right lighting is based on a feeling. Does the light feel right for the scene? That is the art of lighting. Sometimes it comes down to a feeling that you have or that you want to create. Just because it doesn’t make sense to others doesn’t always mean you shouldn’t try it. Experiment and try new things.
Setting Visual Priority and Focus
As your eye first looks at any scene, it searches for what to focus on. The light should lead the eye to a point or element that is supposed to be emphasized visually. Even if you’re setting a master shot, you should use the lighting to lead the eye through the shot. The eye will pick up the brightest areas first and then stray from there. You can plan what you would like the audience to look at initially by increasing the light levels on key points. If you change shots, the lighter areas will be tracked quickly, and if there are quick cuts, the audience may not have a lot of time to scan other parts of the shot. This means you must think about what to emphasize visually and plan for those elements in the lighting scheme.
As you figure out the mood of the piece, you are really deciding how it is going to accurately reflect your story. How you want the scene to look will determine where you place the lights or where you place your subjects in the location.
Types of Fill Light
By just changing the intensity of the fill light or the ratios of the various lights, you can completely change the look of your lighting (Figure 6-10). Achieving proper lighting often requires a decent amount of tweaking even after the lights have been set up. If you have a lighting setup and something feels off, before you run around changing everything, tweak the intensity of the lights and see how adjusting the ratio between your light sources might improve the scene.
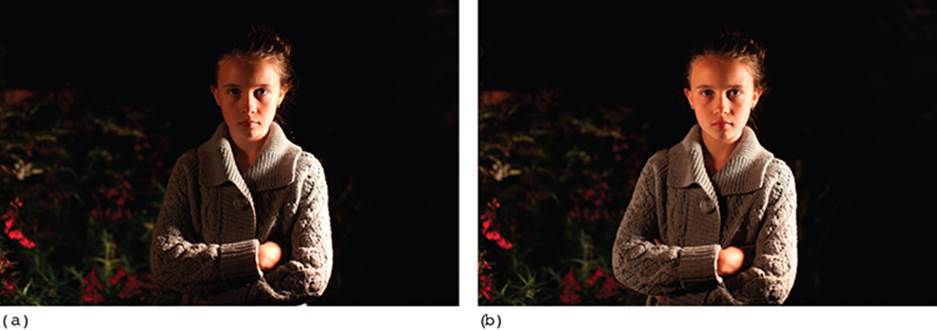
Photo courtesy of iStockphoto, © Nadya Lukic, Image #17013027
Figure 6-10: (a) A single key light on one side of the face with a backlight on the background. (b) A single key light with a fill light to balance out the contrast on the face.
High Key
High-key lighting is lighting that looks very bright over the entire scene. This style is notable for its scarcity of shadows in the overall frame. The simplest way to achieve high-key lighting is to use all soft, diffused light—and a lot of it. Usually, the foreground, middle ground, and background of the shot all have the same lighting. To achieve the high-key look you need to have light and brightness throughout the entire depth of your scene. High-key lighting is not achieved by simply changing the exposure of the shot or slightly overexposing (Figure 6-11). It is a properly exposed shot that is lit with the fill light intensity and brightness nearly matching the key light.
Natural light that is not at midday will often not allow for high-key or strong blacks.
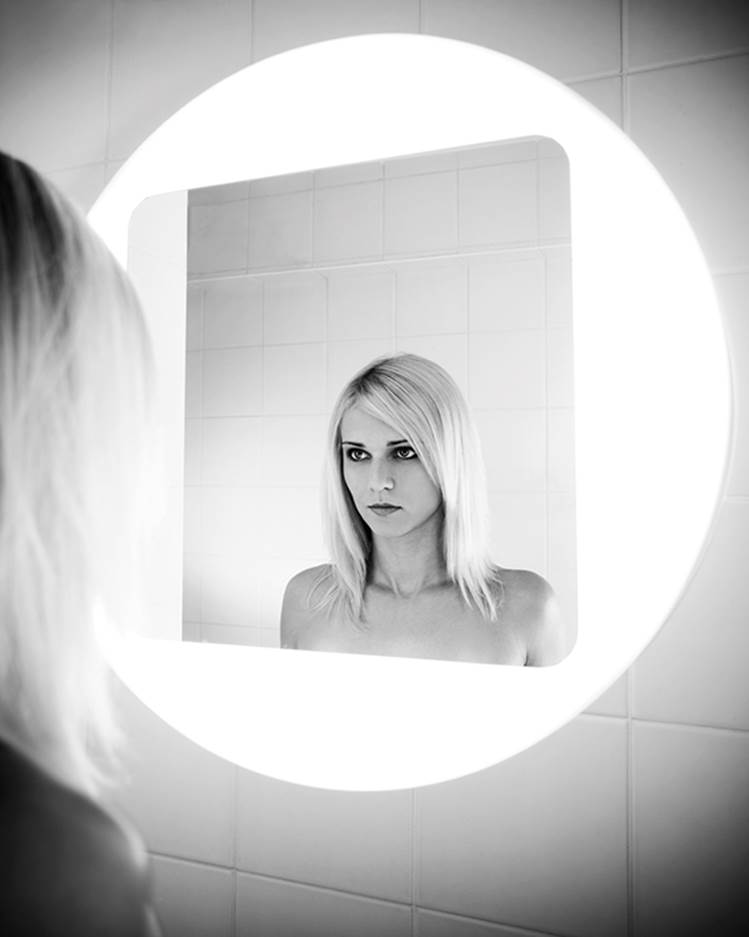
Figure 6-11: The lighting and exposure leave very little that might be underexposed in this scene.
Low Key
Low-key lighting is much moodier than high-key lighting and uses shadows to help create the look. Low-key lighting is predominantly shadows and darker areas, but the bright areas can pop, creating interplay of dark, black, and dim tones with hits of brightness (Figure 6-12). Low-key shots are not underexposed shots but shots that are lit to be low-key. Low-key lighting is achieved most often by using very little fill light or even turning the fill lights off completely. As stated previously, this is simply a changing of the ratios between your lighting sources. Your main light (your key light) can be bright, that is, have a higher ratio of light, and your fill or backlight can be almost nonexistent, that is, have a low ratio of light in comparison to your main key light. Low-key lighting will by its nature have a higher ratio between the light parts and dark parts of your frame.
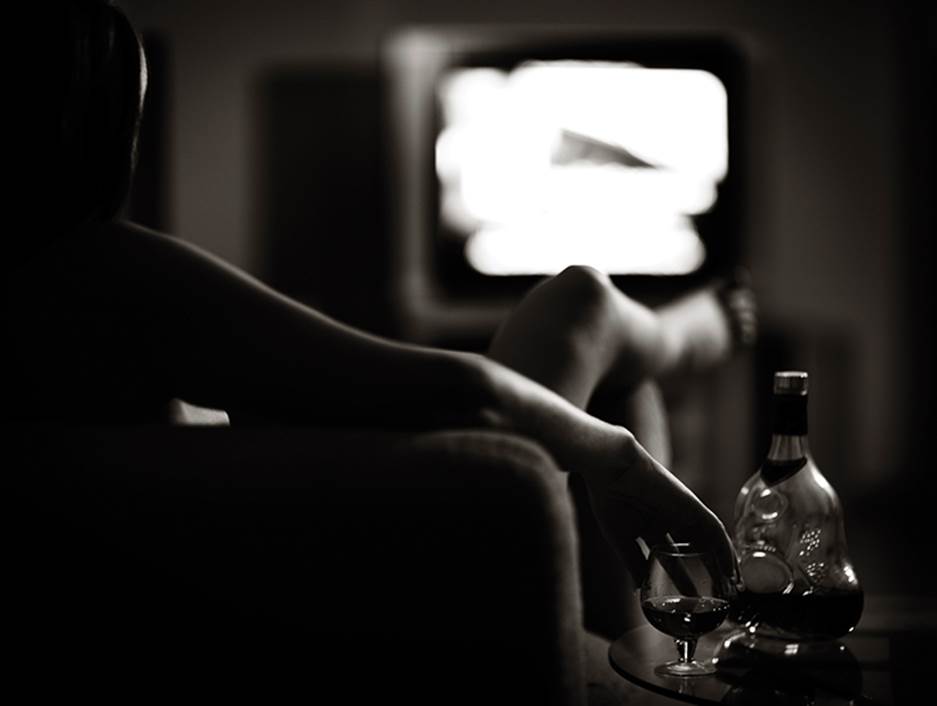
Photo courtesy of iStockphoto, © Igor Balasanov, Image ##5568507
Figure 6-12: Low-key lighting creates a high contrast from the light parts of the image to the dark (black) areas of the image.
Light Direction and Angle of Light
The next lighting decision that you have control over is direction. The physical direction, or the location the light is coming from, determines what part of the subject will have light hitting it. When using natural, available light, you may need to turn the subject or move camera positions to change the direction of light hitting your subject. You can’t change the direction of the sun, but you can change your camera position or move your actors around. You may not be able to change the entire lighting of a public square that you are shooting in, but you can pick the optimal time of day or shift your camera and actors around. You also can alter the sunlight that will light your subjects, or you can help redirect some sunlight to help augment your overall lighting. The direction the light comes from will change the look of your scene.
As you play with the angles, keep in mind even small changes that may occur in the scene. If you are using natural light, then your major source of light will usually be the sun. The sun will change angles as it passes overhead and will also be influenced by the time of year when you are shooting. If you can’t control the lighting and you need a certain light angle, you will have to pick a location suitable to the angle of light and the correct time so the location of your light source is where you need it to be.
The direction that the light is coming from will influence dramatically how the scene and subjects look. Flatness, dimensionality, shape, and detail of a subject are all determined in major part by the direction of the light as it hits the subject. This is most obvious when shooting close-ups and people because you can see the changes of light direction and how their face changes from one direction to another.
Generally, light direction on set is referred to in degrees related to the camera and/or simply as back, side, or front in relation to the subject.
Front light is light that is in front of a subject and hitting the subject mostly in the front (Figure 6-13). Front light will flatten a subject or an actor; it takes out most of the potential for shadows and decreases the dimensionality of the subject. Something lit with only front light will look very two-dimensional.
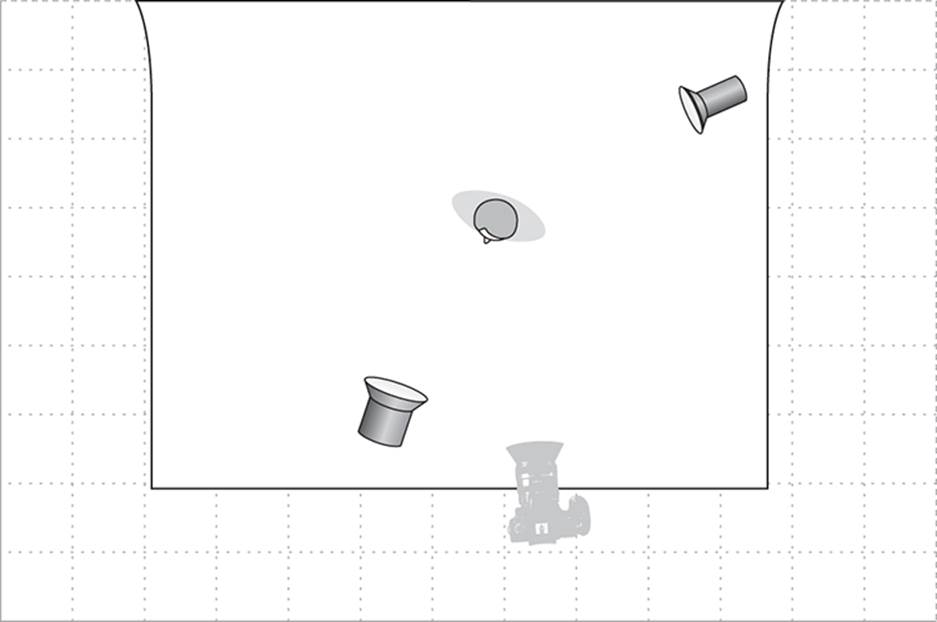
Figure 6-13: Diagram of lighting predominantly with a front light
To show the dimension of the subject or actor you must use back and side lights in addition to front lights. Dimension in a two-dimensional world is created by “shaping” your image with light. Backlight comes from behind a subject and will provide a general shape to the edges of a subject; it is best seen in exaggerated silhouettes or simply hair lights.
Side light emphasizes shape and most importantly the dimension of an object or subject. It creates shadows and contrast across the subject. Often more than one direction of light will be present in a shot or lighting scheme (Figure 6-14).
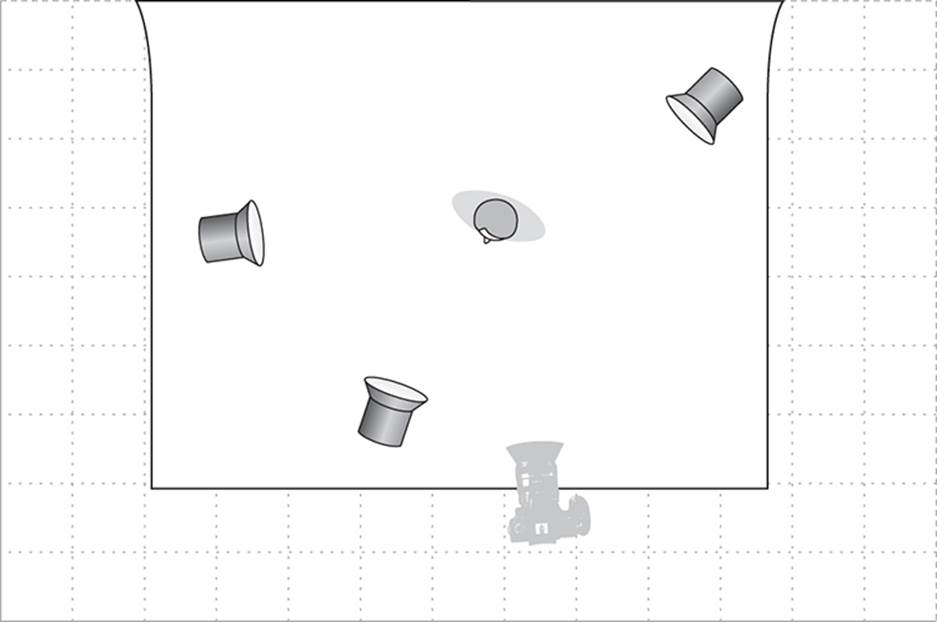
Figure 6-14: Diagram of lighting positions from the front, back, and side
Increasing the dimensionality and depth in the scene or even just in a close-up of an object is often a key role of lighting. Though the final image will be shown in a two-dimensional system, the visual depth of the scene is vital to give life to the image. The direction and position of the light will create the shape and texture in the scene and subjects. Showing depth is the opposite of flat lighting, but both types of lighting schemes may be useful for the different effects they provide.
“Lighting flat” is not the same as using camera settings to increase the flatness of the image, and the two techniques do not have the same impact on the image.
To increase depth, you can move the lights to the side and back. Try introducing front illumination later, and adjust the position, height, and angle of the lights until they hit the subject and create light and shadows on several sides or planes of the scene. Dimensional lighting is not achieved by direction alone but is also influenced by the angle and height of the light source.
Types of Lights by Position
No matter what brand or set of lights you choose, the individual lights will function in three major roles: key light, backlight, or fill light. The role of a light is based on its physical location oriented to the camera and the action. As you set up your lights or make adjustments, keep in mind how light is functioning or what its role or position is on set. The type of light is less important than the position or role it is playing.
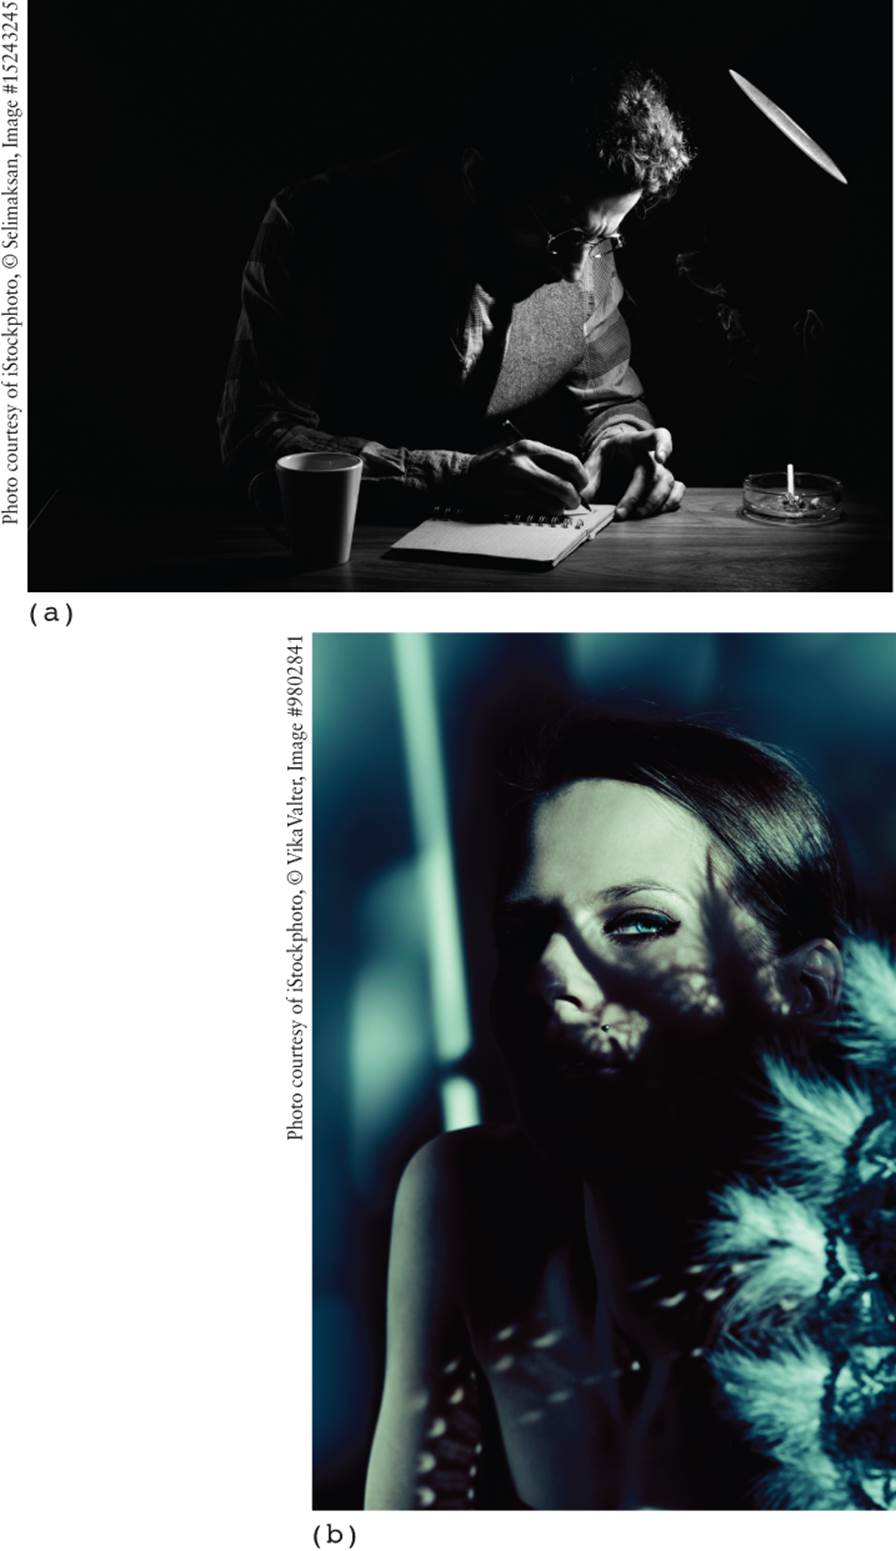
Figure 6-15: (a) The actor’s face being lit with a far-side key. (b) The actress is facing the key light, lit with a near-side key.
Key Light
The key light is usually the major light source for a shot, and it can be placed anywhere on the set. The position of the key light will be determined by a number of factors. The first thing you should do when you begin lighting is figure out where you want your key light to be. Determine where you want the light to be coming from in the scene and where you want the shadows to fall. Once you have decided that, you will have a good starting position for the key light.
A far-side key is a key light that lights the side of the face that is not pointed at the camera. A near-side key lights the side of the face that is pointed or angled to the camera. This description assumes that the actor is looking a bit right or a bit left of the camera and not centered looking directly at the camera. Usually actors are positioned at a slight angle to the camera. There is usually more modeling and interplay with contrast with far-key lighting; this is especially true for close-ups (Figure 6-15).
Backlight
A backlight is a light source placed behind the subjects or objects that you want to separate visually from the background (Figure 6-16). Backlights are not always used in every lighting setup but can be subtle or pronounced depending on the intensity of the light. If you want separation between the background and foreground objects, you can also choose to light the background instead of using a backlight as separation. This usually works the best when the background has a solid element such as an interesting wall or foliage.
The physical position of the backlight may change how it is referred to on set. Often terms such as backlight, hair light, or rim light will be used to describe a backlight but only the height of the light will be changed. The position in terms of height and at what angle the backlight is set will change the effect of the backlight.
· Hair lights are not directly overhead but are still very high. Hair lights are typically placed at a 45-degree angle or higher above the subject and opposite the key light. You will have the proper position when you see the hair suddenly pop into view with a glow about it (Figure 6-17).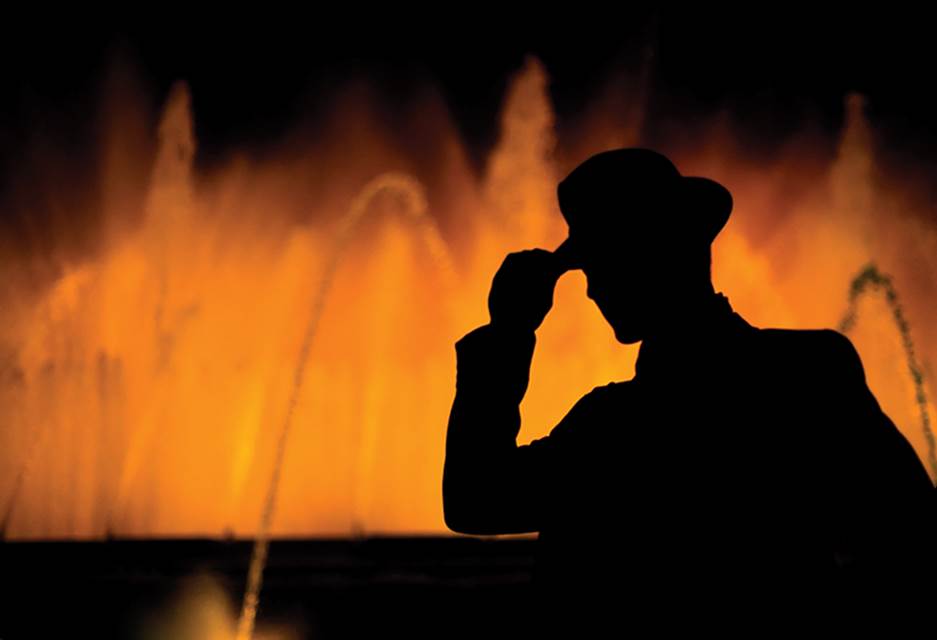
Photo courtesy of iStockphoto, © Elkor, Image #2242502
Figure 6-16: The backlight on the fountains can help create a mood or look with only the use of the backlight to silhouette the actor.
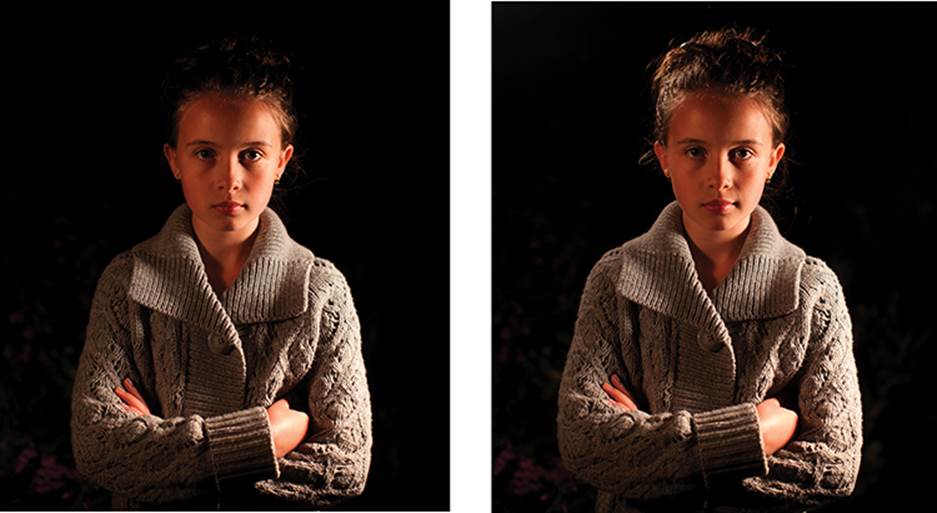
Figure 6-17: Actress without and with a hair light
· Side backlights that are placed on the side of an actor or object provide dramatic shadows and can be used alone or with combinations of lights for other effects.
· Rim lights are backlights that are very high and make what is in the foreground strongly separated from the background.
· A kicker is low backlight that is generally placed at a 45-degree angle in the back of the subject you are lighting. A kicker will usually be placed in tandem with a front key placed at a 45-degree angle in front of the subject you are shooting. The backlight kicker should create an edge around the chosen subject, giving dimension to the overall shot (Figure 6-18).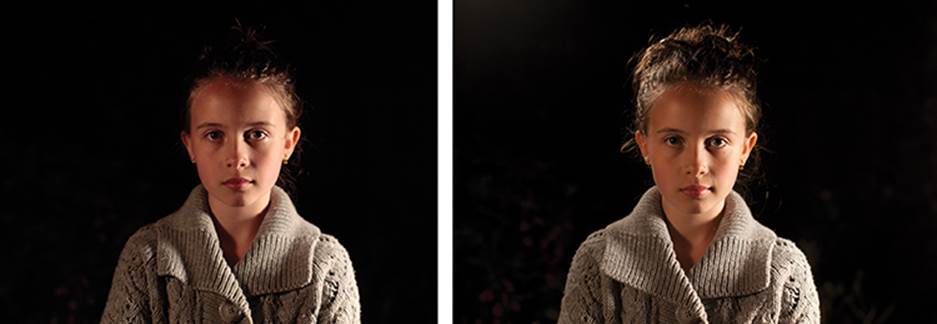
Figure 6-18: Actress without and with a kicker light
Fill Light
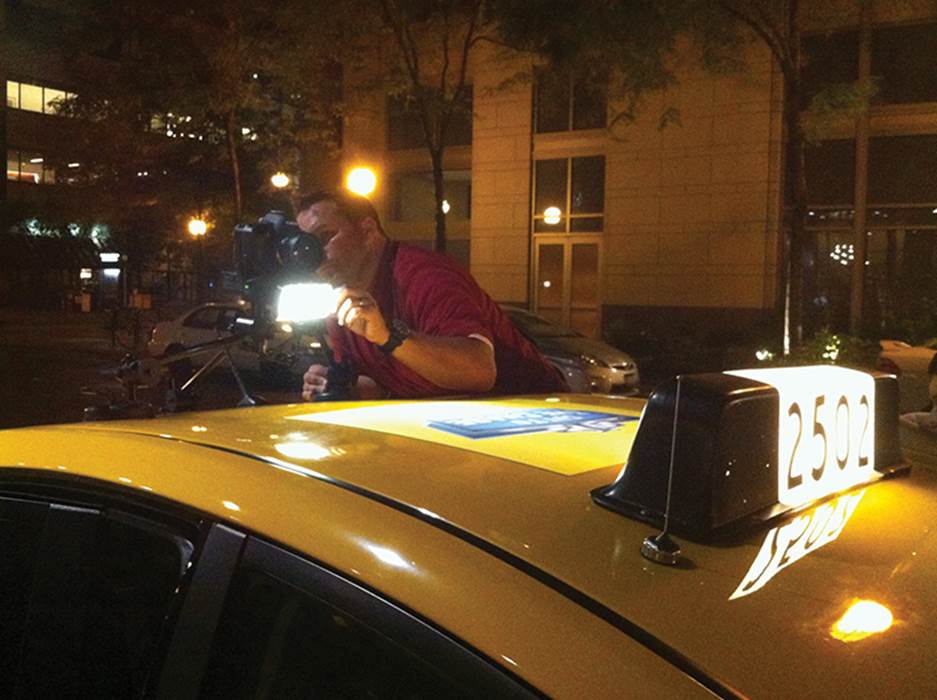
Figure 6-19: Canon 5D Mark III with a Torch LED Bolt light mounted to light the top of the taxicab
A fill light is usually positioned opposite the key light to help boost the light ratio between the key side of the face and the darker shadow side of the face opposite the key light. The main function of the fill light is to fill in shadows and unwanted dark areas on the far side of the key light. Fill lights are usually placed almost opposite the key light and to the side of the camera. Depending on the angles of your lighting setup you can sometimes use a light that is placed on the camera itself (Figure 6-19) as a potential fill light. The fill light will not be used in every shot you set up, especially if you need a very dramatic look with dark shadows as a predominant characteristic.
Eyes reflect light marvelously. Eye light refers to the light source that your actor’s eyes will be lit by in the scene. When you decide what kind of light to use as an eye light, think about the shape (Figure 6-20) that you will see reflected in your actor’s eye. Some shapes are more appealing than others; in some cases, strangely shaped eye lights can add an otherworldly effect to the actor. If you’re using a lot of fill in front, you may not see the effect of an eye light. You also need to ensure that the eye light is not so bright as to light the entire face, taking out shadows and eliminating desired contrast. For many still photographers, this is known as a catch light.
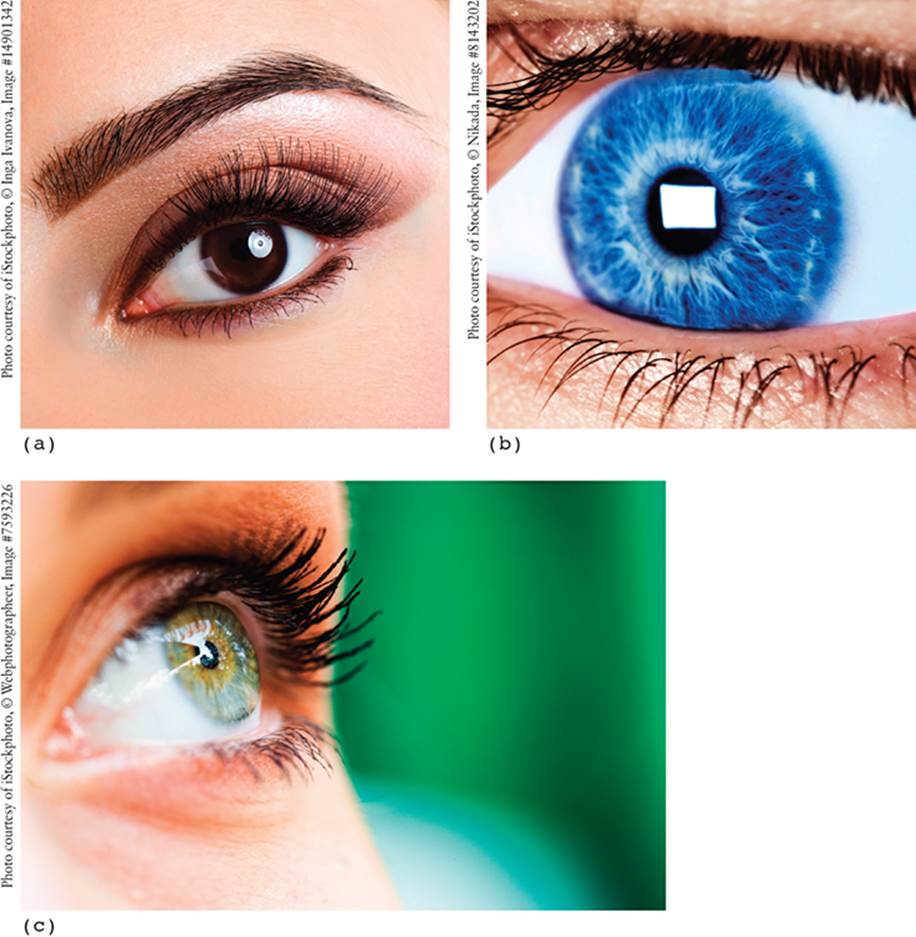
Figure 6-20: Reflection of lights in the eye: (a) circle light, (b) square light, (c) sky
Illuminating the Rest of the Set: The Traditional Three-Point Light Setup
A three-point light setup is a very simple way to light a set. It is a good start if you are just getting started with lighting or if you are setting up lighting for the first time. It is also a good starting point even if you are more experienced. Once you place your main three lights, you can work from there to add or change any lighting before you shoot.
There are a few ways to use a three-point light setup. Figure 6-21 shows the lights all equidistant from the subject and radiating in a circle, but remember that when you are setting up the lights on location, the lights will not always be equally spaced. Some of the lights may be farther from or nearer to the camera or subject.
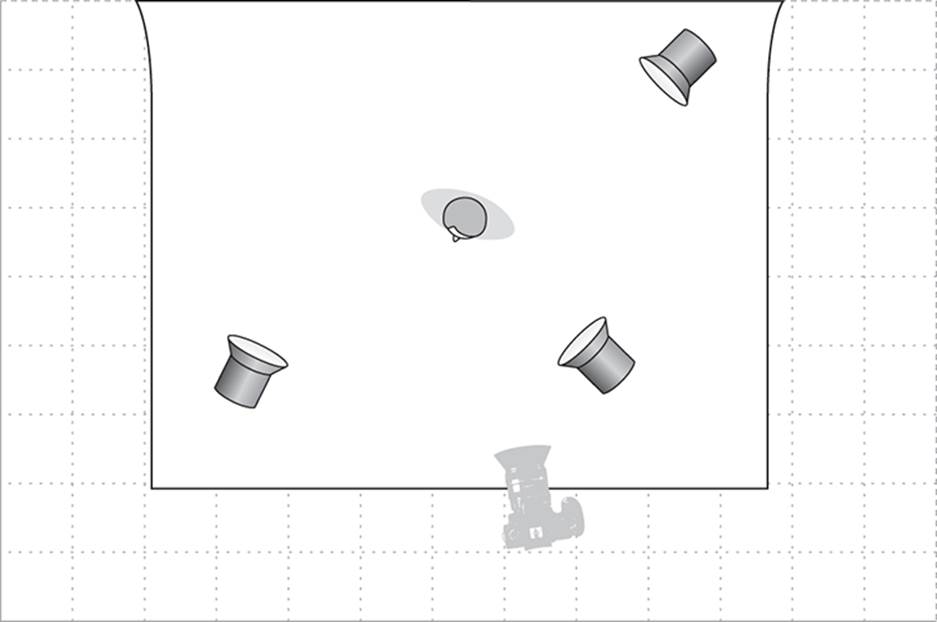
Figure 6-21: A three-light setup
The type of light also depends on the position of the subject or object in the scene. What will be a key light on one actor in the scene may be a backlight or a fill light on the other.
If you know the basic three-point lighting setup, you will be able to consistently light any shot. The three-point lighting setup uses, as you may have guessed, three lights. This setup will separate the subject from the background and will light the subject, thus providing dimension to the subject. Three-point lighting uses a key light, a fill light, and a backlight as the three light sources.
The key light will be the most intense light in the setup to begin. As you experiment with the setup, you can change the intensity to suit your look if you would like, but to start, put your most intense light in the key light position. Assuming you want soft lighting, you will want to use a light source that provides soft lighting or find a way to bounce or diffuse the light. The key light will be placed to the side of the shot (Figure 6-22).
The second light you will set up is the usually the fill light. The fill light will help fill in and/or minimize shadows and pockets of darkness on the far side of the actor from the key light. The degree of fill that you use is based on what is required by the scene and can be adjusted. You can adjust by moving the light backward or forward and/or diffusing the source light directly. This is the perfect light to have on a dimmer, or you can use a light that is dimmable. The fill is as a general rule a soft light; a soft fill can be used even if the rest of the lighting is hard. If you need just a bit of fill light, you can bounce the light to create fill (Figure 6-23). This small touch is especially useful when adding fill to close-ups of actors.
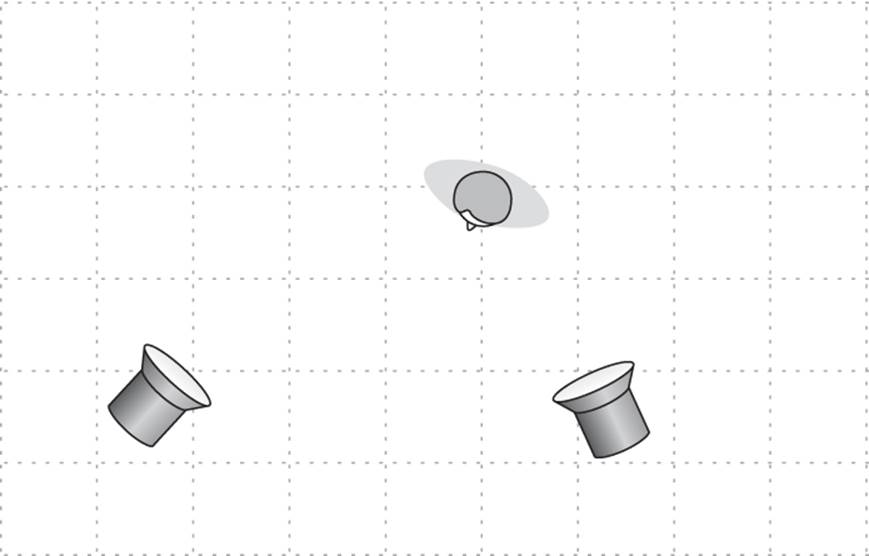
Figure 6-22: Key light position shown at roughly 45 degrees to the side of the actor
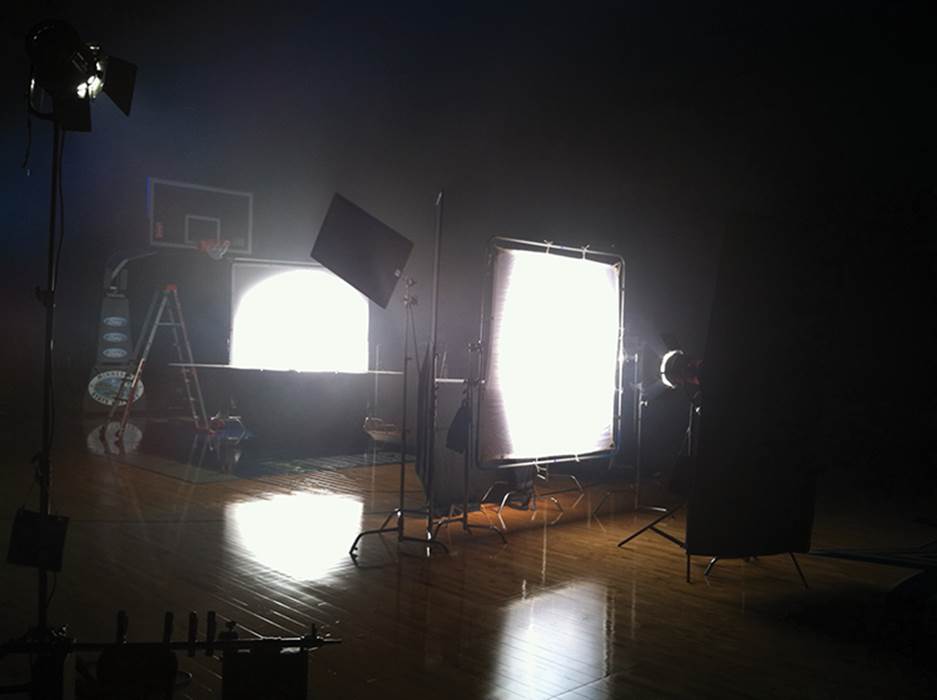
Photo courtesy of iStockphoto, © Olena Chernenko, Image #14812042
Figure 6-23: Fill light bounced to an actor
The last step is to add dimension to the scene with a backlight (Figure 6-24). This light will also sometimes be referred to as a kicker or rim lighting, as described earlier.
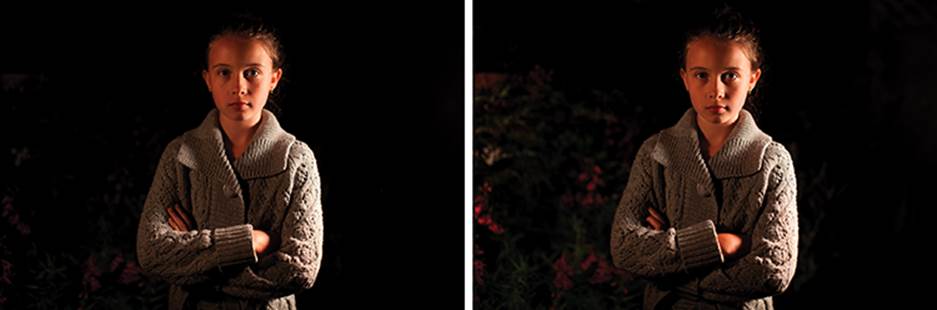
Figure 6-24: The same shot without backlight and with backlight. Notice the subtle light on the background to help separate the background from the actress.
Rembrandt Lighting
Rembrandt lighting is a usually a three-point lighting setup of a key light at 45 degrees, fill light, and backlight at 45 degrees from the subject you are shooting. You can tell immediately whether the lighting is set correctly because there will be a triangular bit of light, usually by the actor’s eye, on the side of the face with the most shadow. If you are trying to adjust contrast with this lighting setup, adjust the fill light. If you increase the fill, the contrast will be reduced. Equally, if you decrease the fill light, the contrast will increase. Some of the light for the Rembrandt lighting setup can be reflected light.
Light Sources and Ambient Light
You will need to take into account other lighting that may already be present on the set you are working with for your production. Even if no lighting is set up, there may be factors that prevent your set from being a completely blank slate. For example, if there is ambient light, you will need to determine where it is coming from. Usually light sources that are shown in the scene are accounted for. If the lights in the scene are turned on, they will provide light. This light may influence the lights you are setting up or may ideally work into your lighting scheme. If there are other sources of light that are logical to the script, such as if the scene is supposed to take place in bright sunlight, not only must the actors be lit for bright light, but the entire set should read visually as sunlight.
Lighting for Special Situations
As you move the lights into position, think of light as a physical force that you are directing, altering, and sometimes blocking. The shadows or dark areas created are just as important as the light areas created. Having contrast within your lighting scheme will be more interesting than having everything evenly lit. Remember that shadows are your friend in most lighting setups.
Shadows
The quality and characteristics of the shadows depend on the light. There is a difference in the shadows depending on the quality and intensity of your light. The hardness or softness of the light will change the effect of the shadows. However, other characteristics of the light affect the shadows as well. Where the light source is positioned or is in relation to the subject will influence the shadows’ length, definition, and overall contrast to the rest of the scene (Figure 6-25). The direction of the shadows is determined by the direction of the light. To change the direction of the shadows, change which direction the light is coming from. The size of the shadows will also be determined by the angle of the light to the subject; this includes the position of the sun. Keep in mind what the shadows are supposed to look like according to the time of day of the scene.
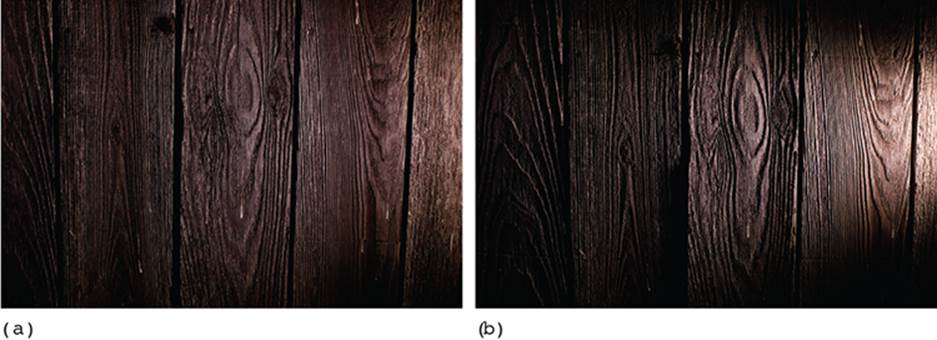
Figure 6-25: (a) Diffused lighting on a wooden fence. (b) Hard lighting on a wooden fence accentuating the grain and the contrast of the wood.
The contrast of the shadows is determined by the intensity of the light and its proximity to the subject. Shadows are not just present as shadowed reflections of objects but also are present when side lighting is used and light is contrasted with shadowed or dark areas in actors’ faces or across other planes. If you’re using natural sunlight, the shadows will change as the sun changes, so watch them as your shots progress through the day. Sometimes changing your angles can help counter changing shadows.
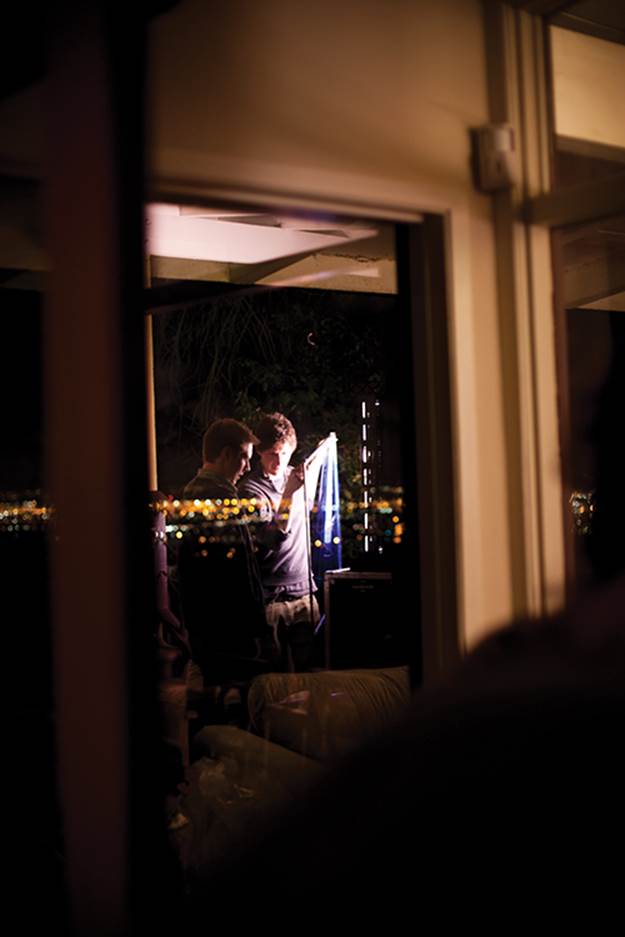
Light at Night
One of the great advantages of DSLRs is that in many circumstances it’s possible to shoot “night for night.” Due to the fact that many DSLRs have limited color-correction options, it is often best to shoot night shots at night and capture the scene in camera versus doing it in post. This ability to shoot in very low light is very freeing because in the past this wasn’t possible without extensive lighting setups to mimic low light or night settings. Also, available lighting from streetlights, car headlights, and lighted windows can provide sufficient lighting for many of the scenes you wish to capture (Figure 6-26).
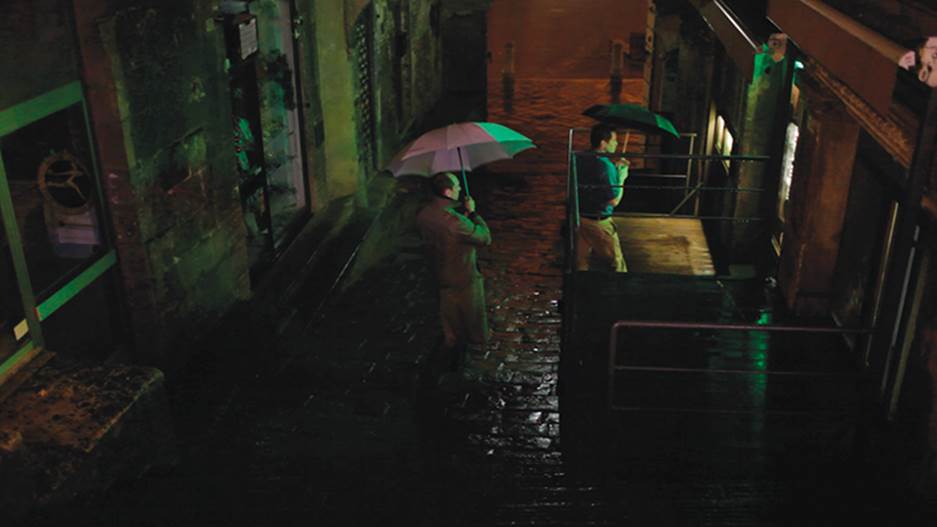
Figure 6-26: There is light coming from the café window as well as the square beyond the actors.
At night, creating depth and layering light often produces more pronounced contrast between areas of very dark and very light. Soft light will have a more moderated drop-off in darkness, and hard light will have a more distinct end point. These effects can be interesting to play with as you craft your scene. It is important to remember to not overlight your night scenes. This is especially important if you are lighting from above since the only illumination that people expect from above at night is from streetlights or the moon. Take into account what lights would be present in the scene as you plan your lighting scheme. Even at night, light sources need to feel logical and organic.
If you have a great moon, remember that it moves just like the sun. Moonlight often must be faked even if shooting at night because it may not be vivid enough for your scene or not present on the evening you are shooting. When creating moonlight, using a bit of cool blue will cue your audience that the light is supposed to be from the moon and not a daylight source.
Exposure for night shots must be very precise. Underexposed shots at night or shots with predominantly dark shadows will look very muddy and noisy. At the same time, even small specks of light will show up against a very dark background, so you can be more creative in what you use to light a scene. What looks like the small glow of a cell phone in real life can light the entire shot on camera. A good plan of action when lighting at night is to keep in mind that lighting should look like it has a logical point of origination in the scene. This is because often at night the only light source that is available in reality is the moon or lighting from streetlights or windows; however, in night shots, you will need to augment the lights. If the scene is supposed to have realistic lighting, augmenting at night requires a deft hand and paying attention to make sure that the lighting continues from scene to scene. This means that if moonlight is apparent in one shot, you likely will have to keep a visual nod to moonlight in other shots. If it is supposed to be hyper-realistic or not natural at all, then the lighting choices can be more creative in terms of direction, tone, and color.
Fire and Flames
If you have a fire or flame element in your scenes, there are a few things that are good to know. You never want to light the fire or flame directly. Let the flame itself be a light source. However, if that is the only light source in the scene, you will need to augment the lighting throughout the scene. A flame will rarely give off enough light to reach the walls or background of the scene. It is your job to match the lighting of the flame but get that light onto the set pieces, walls, or subjects in the frame so that you don’t just have black everywhere that is not near the flame.
At the same time, if you overlight the scene, all of the impact of the flame will be lost (Figure 6-27). Even with a flame as small as a candle, you are in danger of overlighting if you are adding lighting, so if there is a flame, keep in mind that its effect is created by the contrast between the darkness and the flame, not between the flame and the lower light.
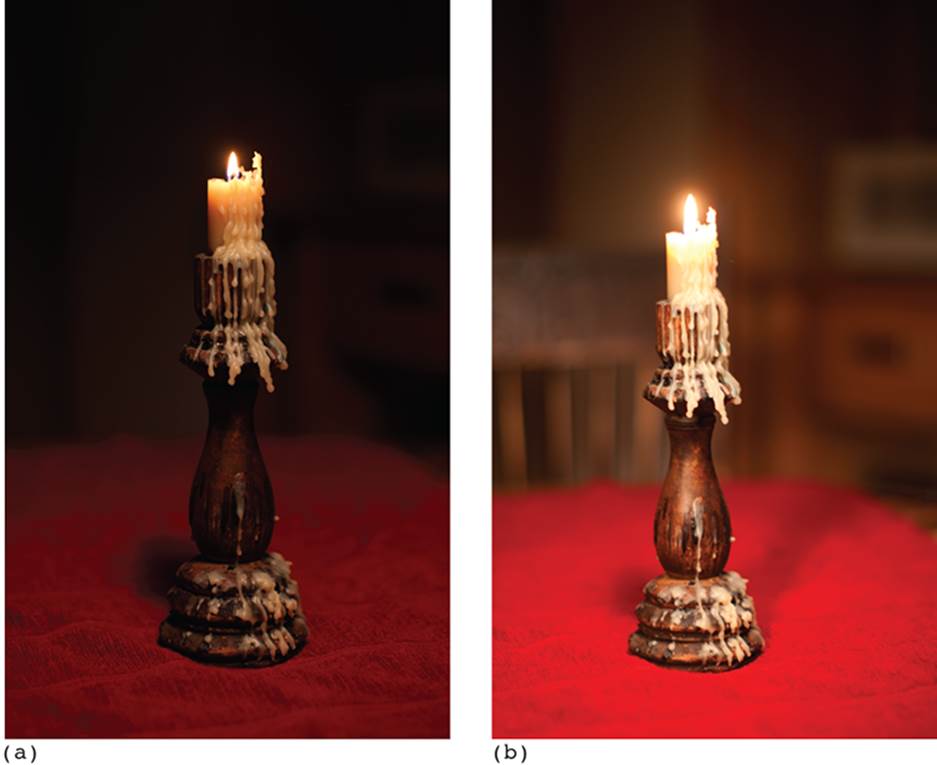
Figure 6-27: (a) Candle on a dinner table as the single source of lighting. (b) Candle on a dinner table with fill lighting, minimizing the effect of the candlelight on the scene.
Mirrors
When using a mirror, start by lighting low so that the wide shot is unobstructed and so that when you pull back there is some space for headroom. You obviously will not be able to shoot these shots head-on, so focus on the angle and tip of the mirror to get the proper lighting reflected inside the mirror (Figure 6-28). When lighting a mirror, angles are especially important; the light’s angle and height may have to be adjusted so that it lights the reflected image but does not appear in the shot. This is especially tricky if the camera moves from the reflected image to the real image in the same shot.

Photo courtesy of iStockphoto, © Marco Rosario Venturini Autieri, Image #2368692
Figure 6-28: Aim your light into a broken mirror.
There will be times when the angle of the mirror will produce glare or reflect the light back at the camera. Before worrying about trying to adjust the lighting, first try angling or tipping the mirror slightly to reduce the glare or reflection. This often is a simple and quick solution.
Glare
Glare and unwanted light reflection can screw up many shots. Often just slightly angling or tipping the offending mirror, reflective surface, or picture can take care of the problem. It can be handy to have furniture felt with adhesive backing or picture putty on hand to put under the edges of a mirror, picture, or reflective surface on the wall to prop objects and change the angle of reflection of their surface. Reflective objects can also be sprayed with dulling spray if necessary to eliminate reflection altogether. If the glare is from an immovable object, angling the camera or the lights can get rid of the glare, or you may have to block off your light source with a flag.
Close-up Lighting, Matching, and Cheating
Have a small emergency light and bounce card handy when shooting so that you can make small adjustments especially to focus points in the shot, such as the actors’ faces.
Your lighting will often have to be adjusted for any close-ups of people or objects. When lighting for a wider shot, the lighting may not provide subtle detail on the faces of the actors. This is fine for the wide shot but not always OK for a close-up. When moving in for a close-up, the actor’s face and any other small details will appear huge on-screen. Thus the same lighting setup likely will not give you the exact lighting you want on the close-up. This means that the lighting will need adjustment when there is a move, perhaps adding some eye lights, fill light, or shadow detail in the face or on the object. Thinking through all of the shots helps your actors stay with the scene and keeps momentum up by cutting down on the setup and change time between camera moves.
Just as the lighting is restructured, some of the objects or the set may need to be moved. This is one way to cheat or make a change that the audience won’t see in order to make the shots look consistent. Keep in mind what the audience would expect to see in the background or in the shot with the close-up. Some slight adjustments may also provide a more pleasing composition or detail.
The lighting changes you make for a close-up should look as if you still have the same light that was present in the wide or master shot. Any cheating or adjustments to light must be made with continuity in mind. Keep the angle, general lighting feel, and major source direction the same unless you are trying for a very off-kilter or disconcerting effect. Once you have established where the light is coming from in the scene, keep the major source direction in the rest of the shots, including the close-up.
Lighting for Green Screen or Chroma Key
When you are capturing a shot that will be used for a composite visual-effects shot and/or a background added in post, certain lighting decisions you make will help you achieve better results. If you are shooting a green screen, the most critical thing is to get consistent light across the entire green screen you are lighting. It is important that from edge to edge the lighting be even and soft. Any bright spots or shadows will adversely affect your ability to remove the green in post. Also note that ideally you need to place the green screen 8–10 feet or more behind your subject. If the green screen is too close, it will reflect the light you are putting on the screen itself back at your subject. This reflected light will have a green hue and cause issues when pulling your key in post.
In these shots, often you’ll shoot part of your set or the entire background with a green screen that will later be removed in post (Figure 6-29). Sometimes you’ll later add several shots into a single composite shot. The technical aspects of green screen and composite shot manipulation and creation in post are outside the realm of this book. However, you may be in a situation where part of your shot incorporates a green screen, and you will have to light the scene.
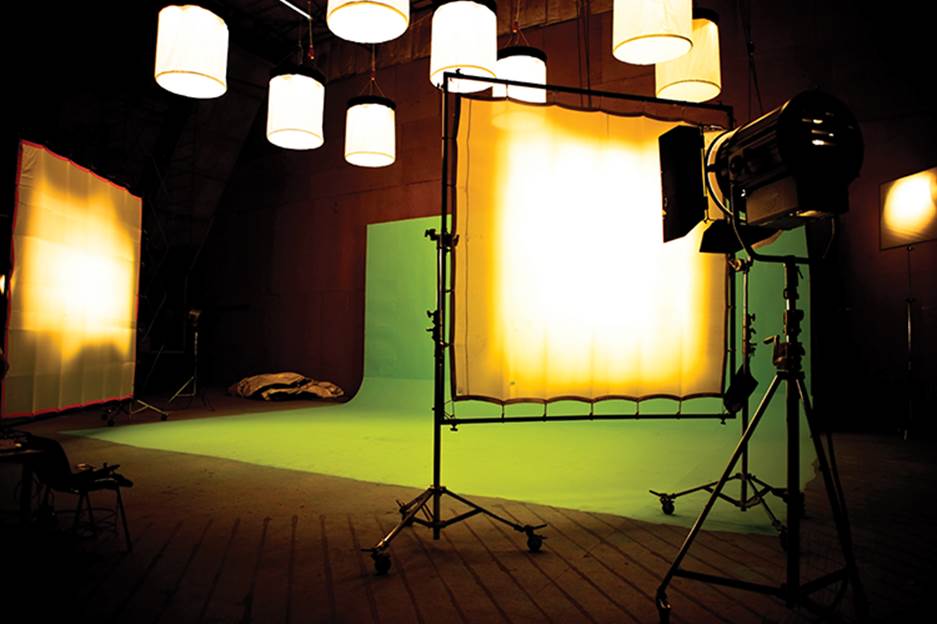
Photo courtesy of iStockphoto, © Anna Bryukhanova, Image #6846684
Figure 6-29: Green screen light on the set
The first step in setting up and planning your lighting for shots like this is to think about how the final shot is going to look. You need to make sure that the elements you are shooting that will be in the final shot are lit with the end result in mind. Color temperature is an obvious thing to check. Also, look for contrast in the areas you are lighting that will remain in the final product, and consider not just the contrast in the image but how the entire image will fit into the final shot. Each element you light and shoot must in the end look like the main lighting for the wide shot was used. If not, things will look out of place and not blend together properly.
You want the images to match as much as possible, so make sure that what you shoot will not be shot considerably darker or lighter than what will be added in post. For example, if you are going to be shooting actors in the foreground with a green screen that will be matted out in post, make sure that the actors’ lighting matches the lighting in mood, logic, and feel of what you want the shot to look like in the final permutation. As you are lighting, think through the image from all angles. If you are shooting two shots that are going to be composited, it is helpful to bring the footage from the first shoot to the set during the second location shoot. Looking at the footage you are trying to match is critical to having a good end product.
Butterfly Lighting
In butterfly lighting, the light is placed in front of the subject with the subject’s face toward the light. The light is then raised and adjusted until a butterfly-shaped shadow appears under the subject’s nose. For this to work, the subject’s nose must be directly facing the light.
The emotion conveyed by butterfly lighting can vary, depending on the overall lighting, especially the choice of harsh vs. soft.

Look for reflections in any objects that are going to remain in the final image. It is best to eliminate these reflections because they will not match the final image.
The green screen itself has lighting considerations. In post, it will be easier for the team to get a clean, crisp image to work with if the green screen is a uniform, consistently colored image. Essentially what you are trying to do is to keep the same color, tone, and brightness throughout the entire screen. The color of the green screen was designed based on a specific light color, and there are fluorescent lights available specifically designed to light green screens to keep them this color. The screen will be lit from the front with the goal of being uniform color on every area of the screen, from top to bottom and from side to side.
All of the lighting that you do in the foreground or in the area where you are using the image must stay off the green screen. Be especially careful of light spill and reflective color casts. It is helpful to keep some distance between the screen and the lighting. This means you may have to make adjustments to your set or location if you are using a green screen. Many flags, screens, and cards are used to block light from hitting the green screen or prevent the green screen from reflecting light back onto your subjects. Ask your post team how easy it will be to remove equipment from the shot in post. Often it is better to have visible cards and items in the shot if those items are blocking light than to have the light hit the screen. You need a lot of space to properly set up a green screen, and you need to have a plan or you likely won’t be happy with the results.
For a complete discussion of green-screen technique, see The Green Screen Handbook by Jeff Foster (Sybex, 2010).
Managing Light
When shooting with DSLRs, a new decision faces you that isn’t what lights should be added but rather the opposite: what lights should be dimmed, diffused, or blocked?
This is a new concept in the area of shooting video. In film, you add light to make it look natural and adjust exposure; with DSLRs, you often have to subtract to make sure the lighting looks natural and then adjust your exposure accordingly. Usually with film you light with high intensity, check ratios from there, and stop down; with DSLRs it is effective if you minimize or have low-intensity light and move up.
Three ways to limit light are diffusion, bouncing, and blocking the light.
Diffusion
Light, by its nature, generally radiates in straight parallel or nearly parallel lines. Changing the light rays from parallel lines to rays going in scattered directions is called diffusing the light. Diffusion is usually achieved by placing a translucent material in front of the light to interrupt the light waves (Figure 6-30). It can also be done on a grand scale by clouds on an overcast day. When people discuss hard-light vs. soft-light sources, they are referring to non-diffused light as hard light and diffused light as soft light.
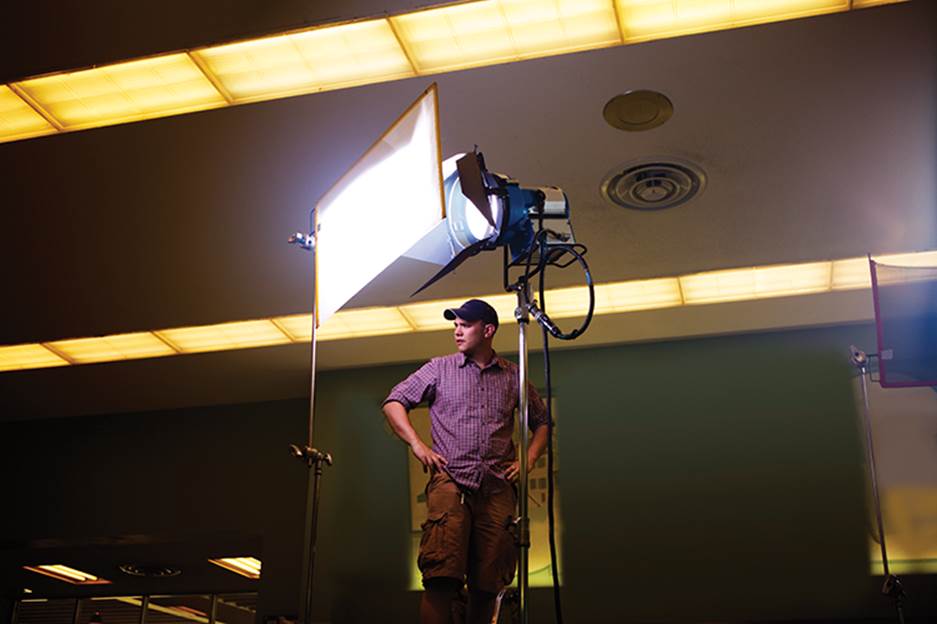
Photo courtesy of iStockphoto, © Nathan Jones, Image #9397110
Figure 6-30: A diffuser held by a C-stand in front of the light
Bouncing
Bounced light occurs when light from a light source is reflected or bounced off a light-colored object back at the scene you are shooting. In lighting, the light-colored object is usually a deliberately placed foam core board or card that is turned toward the subject or area where light is desired. The bounced light is less intense than the original light source and can be directed to the exact location by moving or angling the bounce card. Sometimes light bounces off objects on set that you don’t want light to be bounced from and in this case will have to be blocked so that it doesn’t pollute your scene.
When you bounce light, the material you are bouncing the light off will change the effect of the light (Figure 6-31). If you bounce off a non-reflective surface, you will get less bounce than if you bounce the light off a shiny material. The color of the bounce surface also matters, because if the surface is colored, a color cast may end up in the bounce, which can be pleasing, especially if you want a warmer or cooler tone to the light.
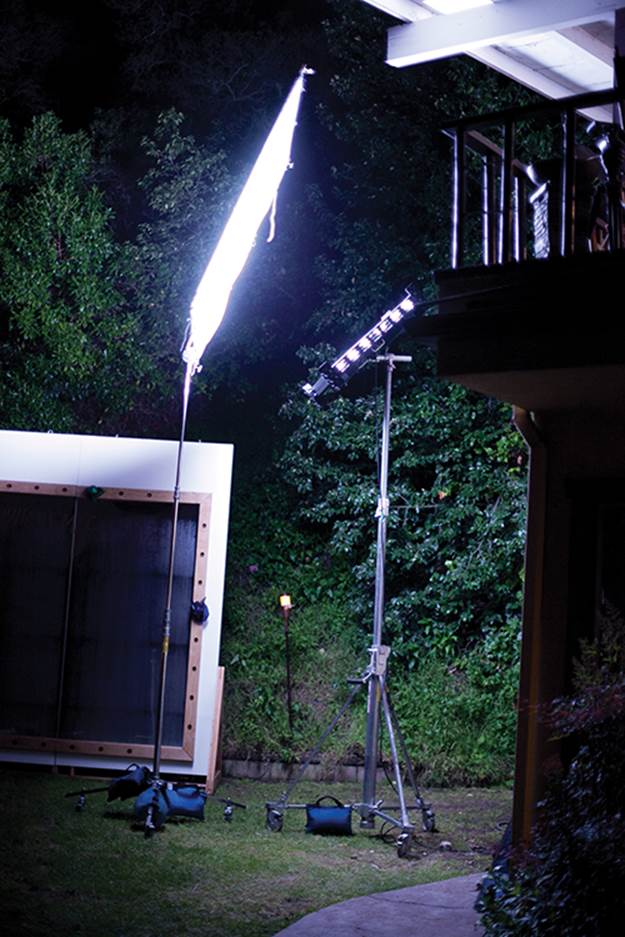
Figure 6-31: Aim your light into a bounce card to create a nice, soft, reflected light for your scene.
Blocking
Blocking part of the light has become common when shooting with DSLR cameras. Because of the extreme light sensitivity of the DSLR sensor, light spill is a common problem. It is very easy for background lights that are far in the distance to overpower a scene if the foreground is not heavily lit with bright lighting. Often on set you will be in the position of needing to block all or part of the light to make sure it doesn’t overpower your desired lighting setup. Blocking light can be tricky if you don’t have the ability to turn the light off completely or control the light. You can block any unwanted light with a flag, your actor’s positioning, or draping. Even when you try to control the light, some light may spill out and still influence your scene, so you have to be very diligent in watching for small amounts of light pollution in your scene. Even if you can correct or remove an unwanted light source in post, you will only be able to take out the light source, and the light spill will still affect your entire shot.
Regardless of how well you can control any unwanted light sources in your frame, paying attention to the blocking of this light is a way to influence your overall lighting scheme. It is useful to have walls of foam core or dark fabric available to block off large sections of your location. Smaller flags, fabric swatches, or similar items can be used to block off smaller individual lights or provide a barrier between the light and an actor’s face for a close-up shot. Blocking is an area where it pays to get creative.
Tools for Controlling Light
Whether you come from a motion picture, still, or video background, lighting and controlling the light sources are not new techniques. The same tools you are familiar with will serve you well. Lightboxes, barn doors, scrims, flags, silks, and reflectors are all still very much tools of the trade. The major new change in lighting is the idea of subtractive lighting. Don’t confuse this with flagging extra light or controlling the light; rather, it’s eliminating existing light from the scene.
Subtractive lighting techniques are employed many times with traditional lighting setup, and understanding how to take away light is just as important as knowing how to add it. For DSLR moviemaking, subtractive lighting techniques are especially useful. Available or natural light sometimes is all you need to alter your shoot in a negative fashion if you don’t control the amount or level of light. This is because many types of lighting are simply too intense for the sensitive DSLR sensor, so subtractive philosophies will help shape the lighting. Many times a subtractive and additive lighting scheme will be used where the available light is reduced or altered and some additional lighting like fill or eye lights is added to the scene.
Lightboxes/Softboxes
A softbox or lightbox can be attached directly to the lights and will take a hard light and turn it into a soft light. The most common thing that photographers are accustomed to using is a lightbox, which is a large box with black on three sides and a white translucent material on the front (Figure 6-32). It attaches to a light to diffuse and soften the effect of the lighting. A lightbox can change a relatively hard directed light source into a soft large light. Remember that the size of the lightbox will also affect the light. The larger the lightbox, the softer the light and the more the light will wrap around your subject. With a smaller lightbox you will still have soft light but it won’t wrap as far around the subject as a larger lightbox of the same diffusion.
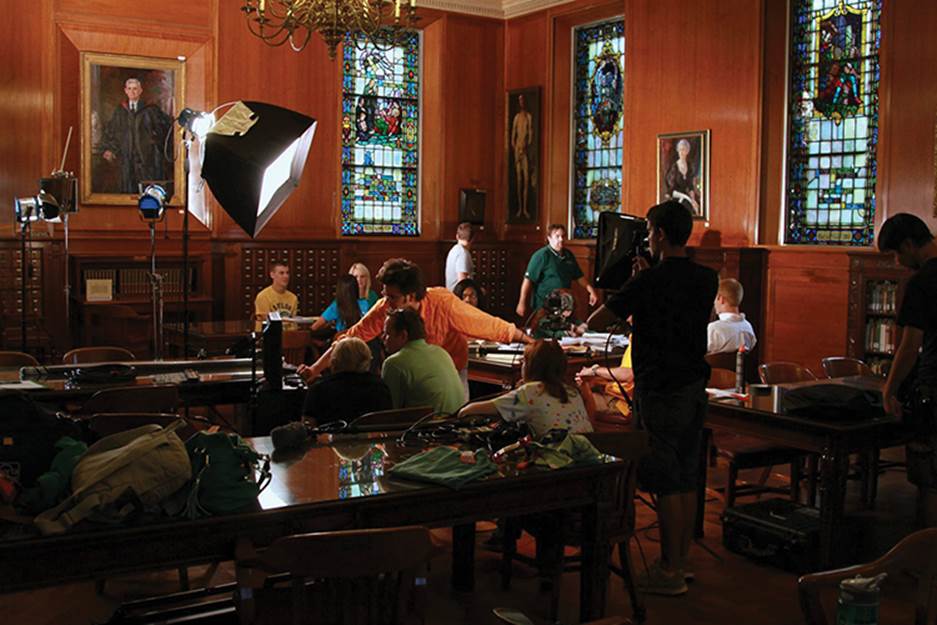
Figure 6-32: Standard softbox attachment on a light
Barn Doors and Related Attachments
Barn doors are black flaps or leaves that attach to the side of the light (Figure 6-33). You can adjust the angle of the barn doors to direct the light path or use it to block light off areas you don’t want to light. The barn doors can be adjusted to wide open or almost closed with just a small slash of light over the area of the scene you desire.
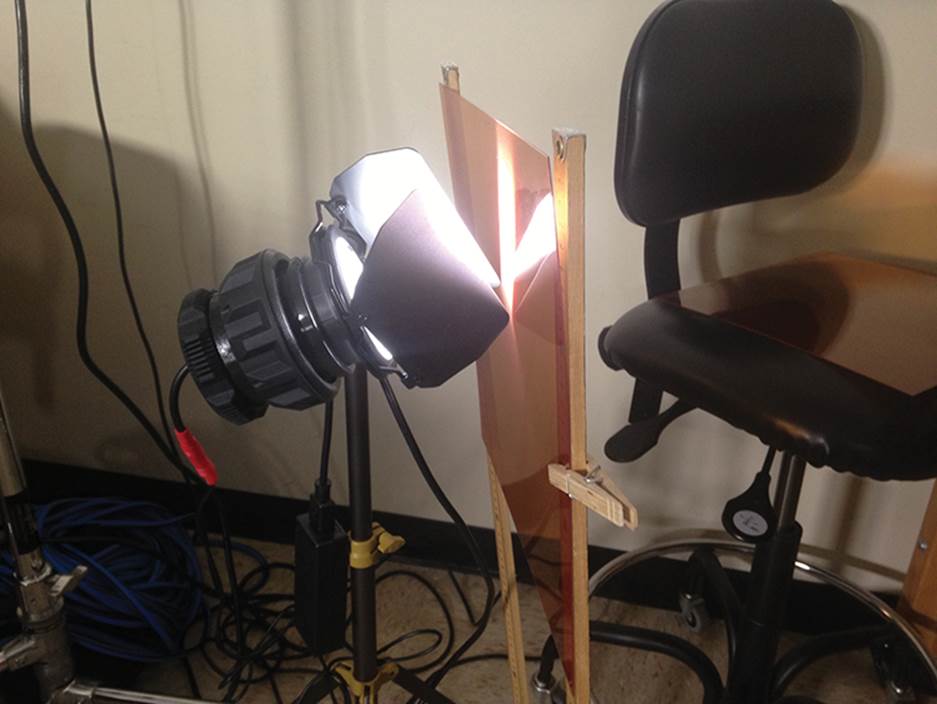
Figure 6-33: Standard set of barn doors on a light
A snoot also can be attached to the light to direct its beam. A snoot is a circular tube that attaches to the light to keep the beam in a highly defined circular pattern. A snoot acts as a focusing mechanism that directs the light instead of letting it spread out across the scene.
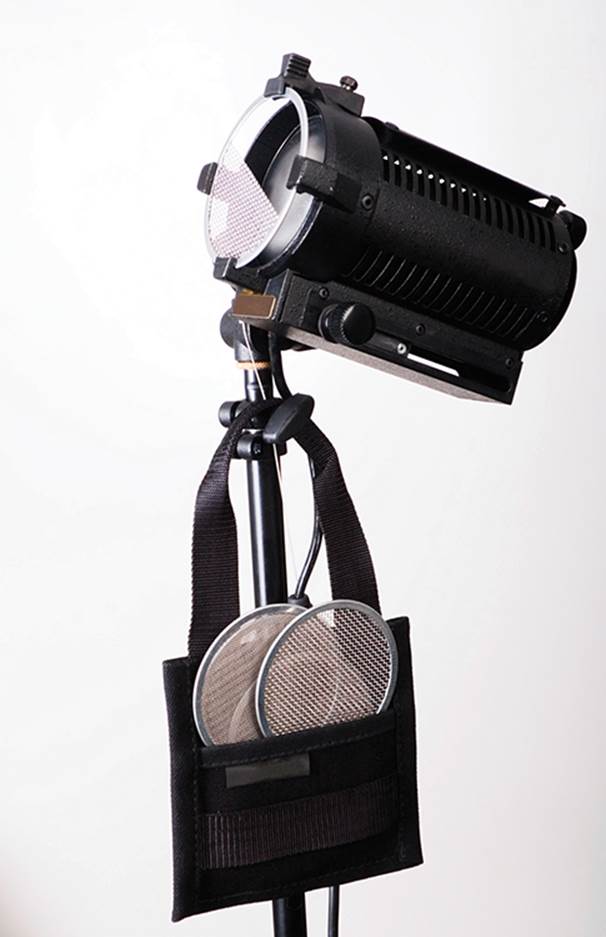
Photo courtesy of iStockphoto, © Petro Teslenko, Image #9505744
Figure 6-34: Notice the bag of scrims that can be inserted on the front of the light. Each scrim blocks more or less light than the others, allowing you to quickly remove or add a small amount of light without changing lights.
Shutters, which look like Venetian blinds, can be used on the light to limit the light or when completely closed block it. They can be useful if a light must be limited during the action, or they can be used to create an actual look for your scene. Imagine very harsh light blasted through shutters, giving you very dramatic shadow lines through your subject’s face.
Scrims
Scrims look like circular screens that come with different size meshes (Figure 6-34). They are attached to the light to cut the light’s intensity. The different mesh disks have varying size screen material that allows more or less light through the scrim. You start with a brighter source light than you need, and you use a scrim to knock down the light to a more appropriate level. This is not needed on newer LED lights because the lights themselves can be dimmed directly on the light fixture.
Flags
Flags are pieces of dark fabric or solid black heavy silk that are mounted on wire frames. They are usually rectangular in shape and are used to block light. Flags come in many different sizes and are made with an end that attaches to a stand or that can be clamped to various surfaces. There are times when an assistant can hold a flag to block light temporarily, but you have to be careful because any movement with the flag will show a change in light through your camera. These types of flags are not attached to the camera itself like French flags (which are placed on the camera or the light). Regular flags are not attached to the camera at all and are used for both blocking and directing light. Flags are placed to block unwanted light or to create a hard light path. If you are trying to get a hard cut or defined shadows, the flag will need to be moved farther from the light and closer to the area where the shot will be composed. The closer the flag is to the light, the softer the shadow edge will be. The farther the flag is from the light, the more defined the shadow edge will be.
Teasers are huge flags used to block light from larger areas or to avoid light spill, especially from bounced light.
Foam core makes a great large-scale flag, bounce card, or temporary bounce wall. It can be cut into many sizes or attached in multiple units to form substantial bounce cards or flags. Usually white and black can be easily procured; to maximize the benefit, try to get the foam core that is white on one side and black on the other. It can also be easily spray-painted if you want an inexpensive gold or silver reflector. Foam core is always useful but will definitely be an asset during natural light shoots where power isn’t handy.
Silks
Sometimes you should consider using silks to soften your light. Vertical light, like high sunlight, will often make the entire scene, including the landscape and scenery in the background, look flat or lifeless. In these situations, large silks combined with flags can save the shot and turn harsh or direct light into beautiful soft light. In these cases, the silk must be placed to keep the light from directly hitting the area where the shot is framed (Figure 6-35). Large silks are an effective way of shaping bright sunlight. However, it is often necessary (and especially so in extreme sunlight) to focus primarily on the area where the actors or subject is going to be and not worry about the light in the entire outdoor panorama.
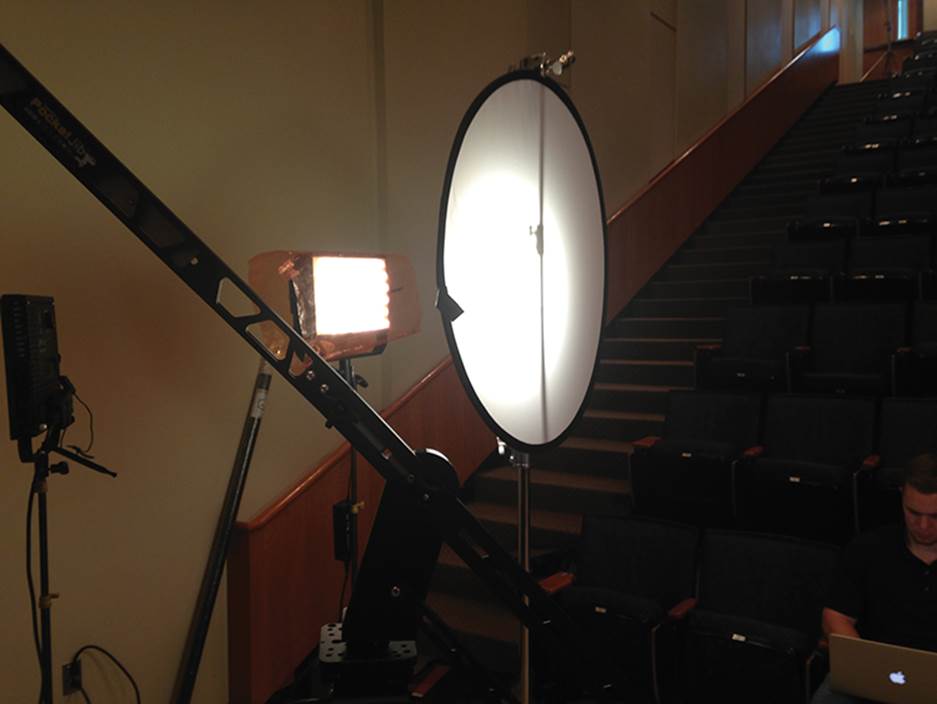
Figure 6-35: Silk placed in front of the light to diffuse the light
Anything that is blocking, reflecting, or adjusting the light will need to be firmly attached to a stand and/or something that prevents it from moving. If the item influencing the light is moving, it will look like the light itself is moving or waving in an unnatural way.
Silks are exactly what they sound like—pieces of silk fabric that are translucent but not transparent. They let some light through but manage to spread those harsh bright light waves a bit. Silks can be just the silk fabric you hang or find a way to attach or they can be the same as standard flags and be permanently mounted on rectangular grids to be used with a stand. There are silks that can be taken apart for transport. These larger silks can be mounted or held by assistants for a shot and/or be moved along with a moving shot. This size silk is often called a butterfly. Very large silks that are closer in size to sails are put together in pieces and with frames. These silks are mounted and used for areas where a large amount of diffusion is needed or for a moving scene. These silks are often calledoverheads and are mounted on larger stands or high roller stands. These silks will need to be weighed down and set up by a person who has knowledge in gripping because you are essentially setting up a large sail that can catch wind drafts.
Other types of material can be used on frames or put on stands to diffuse, block, or alter the light. Some of this is essentially a large tarp-like material called Griffolyn, but other fabric and material can be used to suit your needs. If you do not have the budget for professional grip and lighting alteration equipment, you can usually make your own with various cloth material, mirrors, Duvetyne, mesh, muslin, and sheets to rig up several options to use on set.
Reflectors and Bounce Cards
Reflectors are shiny surfaces that are used to reflect light. They can be boards, large rolls, cloth that can be stretched onto grids, pop-up disks, or even mirrors. The reflector is usually attached to a C-stand and placed so that the light hits it and is reflected to the appropriate area of your choosing. Most reflectors have a different surface on each side so you can use each one for more than one purpose. Often one surface will be a hard side that has a high-gloss finish that can reflect a hard beam of light a long distance. The other side is the soft side and is less shiny with a bit of texture. The light quality from the softer side is softer, less beam-like, and less intense.
If you have to cut down on sunlight or balance it, you will find it hard to get lights that can match the sunlight; it’s often difficult to even tell you added a light in direct sunlight. Reflecting light is usually the best choice when trying to add more light to a bright sunlight scene. If you are using the sun, remember that as the sun moves, your reflector position will also have to be adjusted.
When light hits anything that is reflective and not light absorbing, the light waves bounce back. You can take advantage of this property of light with reflectors and other bounce cards. A bounce card is simply a light surface that is placed so that the light can hit it and bounce to the desired place in the shot. Walls or other large surfaces can also provide bounce (just remember that sometimes this is unwanted bounce). Bounce can be done on a grand scale with a large piece of foam core or with a very small white card for close-up portrait-style shots. The bounced light will have a different feel than the direct light, so try it to see how you like your bounce light and what sort of bounce source works best.
Bounce happens any time the light hits a light surface, so the technique and materials for bouncing light are limitless. If you need light in an area, first try bouncing it in; this can quickly fix many shots and provide that extra bit of light the shot needs.
Nets
Nets have the same physical structure as flags, but instead of being an opaque black they are made from netted material. They are used to reduce the light intensity but not block the light altogether. Nets won’t cast a shadow when the light passes through them but just reduce and soften the light passing through. Nets can be used in layers, with the more layers used, the more light is reduced with each layer.
Patterned Light and Adding Texture Artificially
If you need to add patterns or texture to your lighting you can just place items in front of the light. Those can range from blinds, tree branches, or flags with shapes cut out of them.
Traditionally gobos or patterned nets are used, and these items can make your life a lot simpler on set. They attach to the light or in front of the light much like a scrim and then provide the pattern that is needed for your shot. They can also be custom manufactured for a particular pattern if you need one.
Light Quality
Light on set is often described as hard or soft (Figure 6-36). This is not determined by the direction, angle, or any other general light characteristics. Rather it is more a subjective quality assessment that varies with each person who views the light. The easiest way to understand the distinction is to simply look at the light. The quality of the light is based on the type and size of the light source and also how far away the light is from the subject.

Figure 6-36: (a) An exposed lightbulb is hard light. (b) Notice how just adding a lamp shade softens the light but also cuts down on the light farther from the source.
Hard light has high contrast and generally has little to no diffusion. One example of hard lighting is high midday light on a sunny day. Even though the atmosphere diffuses the sun, the sun can create hard shadows and a more pinpointed source at midday. Hard light is easily seen when an intense spotlight is beaming on your actor as the sole illumination. Hard light has more contrast, whereas soft light has less contrast. Hard light is often from one pointed direction with the light source coming from a smaller area. Lights that are generally hard are lights that are from very small source points and don’t have any diffusion between the bulb or light source and subject.
Soft light is low-contrast light that is either directly or indirectly illuminating the subject. An example of soft light is the light on a completely cloudy day. Soft light comes from light sources that are diffused or bounced. If you want soft light, you need to look for lights with easy diffusion abilities or use Kino Flo Blanket-Lites, egg carton diffusers, or diffusers placed separately in front of the lights (Figure 6-37). The light can also be bounced or the lights physically moved back to change the intensity and give the effect of more diffused light.
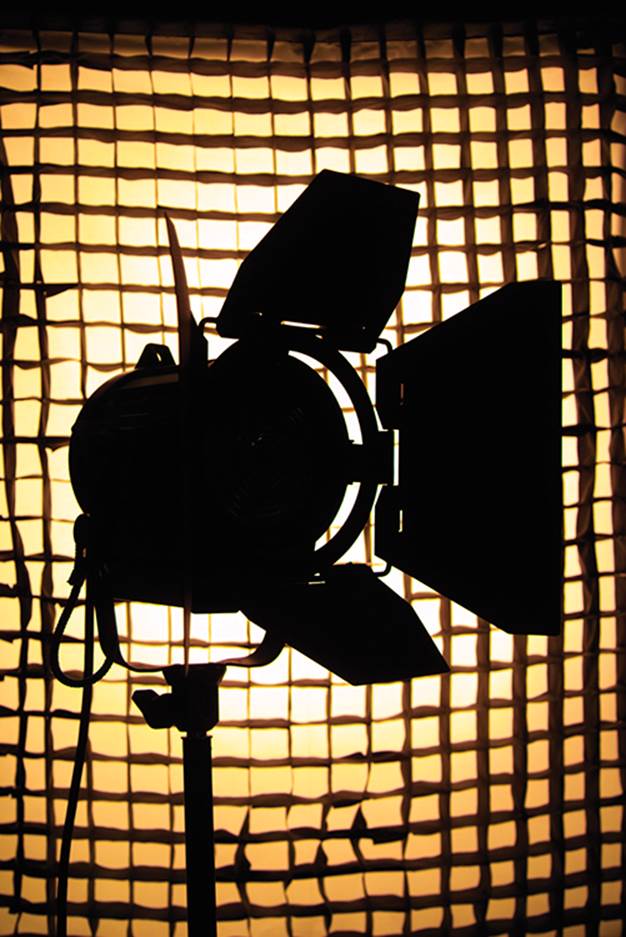
Photo courtesy of iStockphoto, © Peter Lora, Image #185141
Figure 6-37: An egg carton is used over a softbox to direct the light.
Light that is produced artificially can also be hard or soft. If you’re shooting with available natural light, you may be able to get both in the same location. For example, if you are shooting in a field midday when it’s sunny, the area in the field will be very hard light, but if you step under a tree, you can get soft light that is easily bounced (Figure 6-38).
Changing the Quality of the Light
If you have soft light but you need hard light, there is little you can do to change it to a hard light. Hard light can easily be made soft by adding diffusion to the light source (Figure 6-39). Soft light falls off more quickly than hard light, and once you have soft light, it can be difficult or impossible to control. Sometimes light can be so soft that it creates almost no contrast in the image. The choice is not between hard and soft lighting or between bad and good lighting but what works with your visual goals.
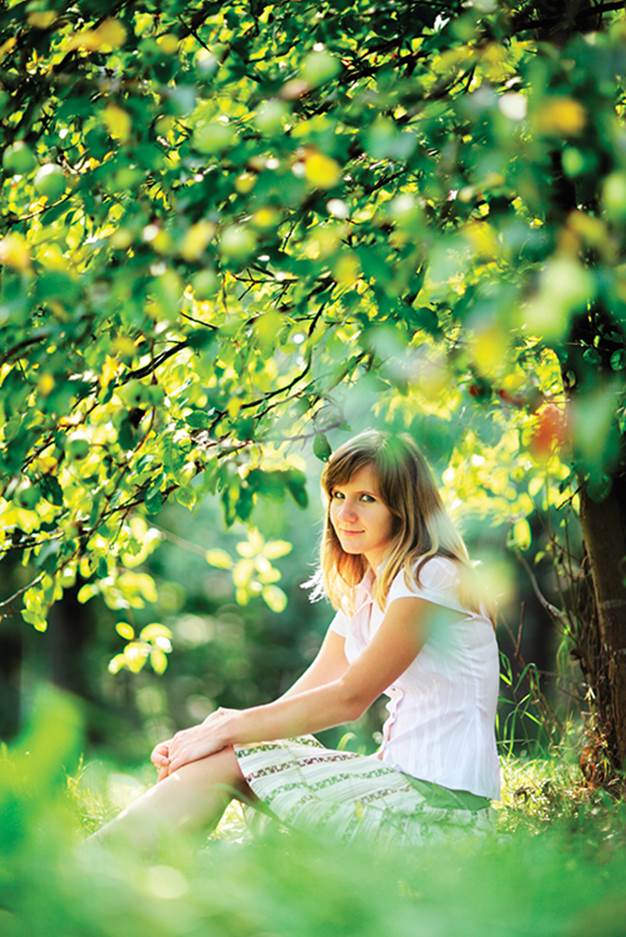
Photo courtesy of iStockphoto, © Ilya Bushuev, Image #13897014
Figure 6-38: Notice that the shade of the tree creates a nice, even, soft light over the actress.
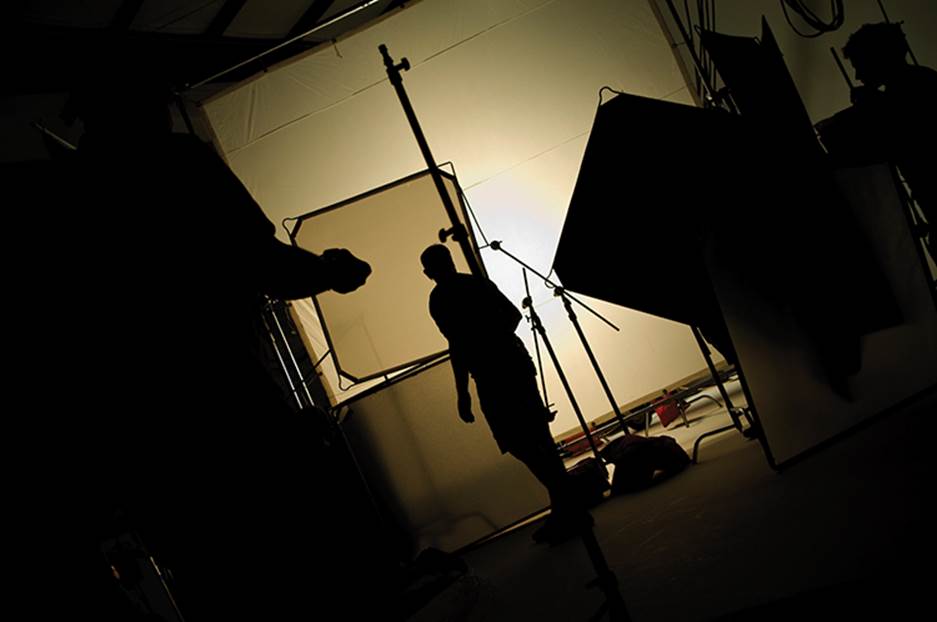
Photo courtesy of iStockphoto, © Fred Hall, Image #4403811
Figure 6-39: You can set a flag to keep the hard light off an actor or area of the set, or you could use a silk to diffuse the hard light.
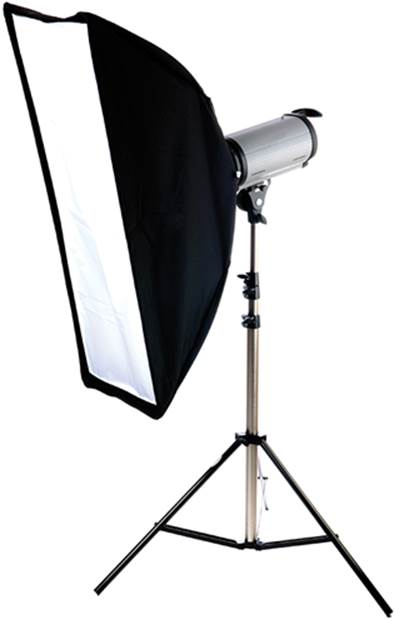
Photo courtesy of iStockphoto, © Angela Gyorfy, Image #11544848
Figure 6-40: A typical softbox light to help create a soft, even light source
If you are starting with a large light source, it can be a good idea to start with a harder light. You can add your diffusion or bounce of choice to create a soft lighting setup. Think about it like a hose—if you start with a lot of pressure you have options to turn it down later, but if you start with little to no pressure, it is hard if not impossible to increase the pressure down the line. You can also make the light softer with softboxes and similar light additions (Figure 6-40).
Adding softening blankets or diffusers to the light will help you create soft, even light (Figure 6-41). There are specific attachments made for this purpose if you are attaching them directly to a light. You should use the attachments designed for your lights because they have been made to be heat resistant and less flammable depending on the type of lighting fixture you are using.
You can also bounce the light with either small bounce cards or, if necessary, large bounce boards that are set up. If you need to diffuse the light on a large scale, you may need to set up walls made of sheets of a diffusion material such as muslin or specialized silks.
As the action occurs and motion happens in the shot, keep your eye on the lighting. Watch how the light quality and quantity change as the camera moves or the actor moves during the scene. What starts out as very soft side light may turn into bright front light by the end of the scene, or vice versa.

Photo courtesy of Carrie Vines Photography
Figure 6-41: The use of a diffusing ring to cut down the midday sun. We additionally used a blackout fabric on top of the diffusion ring to further cut down part of the light passing through to the actor and car.
Picking Exposure
Exposure directs the eye by choosing which element will be the brightest and which the darkest in the scene. Answer this question: “What part of the scene will you be exposing for?” The answer to this is almost always what the focal point will be in the scene.
Many scenes will have a few different options for exposure, all of which may have certain aspects of the shot in the proper exposure range. Proper exposure means that the scene is given adequate light but not excessive light to provide an image that has appropriate contrast and tonal range.
The scene’s contrast ratio is the proportion between the brightest parts of the light and the darkest, usually given in the number of f-stops between the darkest and lightest parts of the lighting. So, for example, if you light an actor’s face, you can have a 2:1 ratio between the lightest and darkest parts of his face, which means that there is a one f-stop change between those areas. The greater the number of f-stops between these points, the more dramatic the difference in your lighting and at the same time the higher the contrast ratio. If the contrast gets too high, you can actually start to lose detail and will end up not having a good range of tones. This is especially true in the darker areas of the frame; shadows will go to black quickly. If you have too high a ratio, you may need to add fill light in order to be able to expose for the midtones and shadows while keeping the highlights from blowing out. This is all a delicate balance that you, the artist, get to play with.
There are times, especially when shooting in an uncontrolled location, where the exposure choice you make to get your central subject properly exposed may leave part of the scene under- or overexposed. Again, because there is a limited correction range with DSLR footage, you should prioritize getting your actors or central action visual properly exposed. What you expose in the image and what you feel is the most visually pleasing exposure is up to you. Of course, when shooting in a very dark set with only one small light, your exposure choices will be limited if you want to keep lower ISOs and a shutter speed that is functional for video.
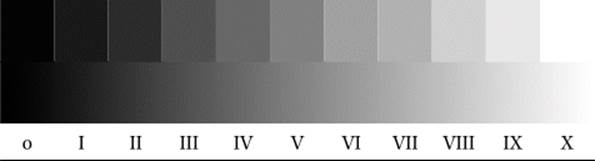
Figure 6-42: The zone system
The zone system can be a beneficial tool when making lighting decisions relating to exposure on the set. It can even help determine how intense the different lights in the scene are set or what other elements need a lighting adjustment. The zone system (Figure 6-42) in its simplest form breaks the grayscale from black to white into 11 zones. Each zone is twice as bright or twice as dark as the previous one.
In general, the eye looks at and focuses on any people and therefore skin in the image or lighter areas in the image. Skin falls mainly into zones IV, V, and VI. Zones VII, VIII, and IX are usually the lightest part of any given image.
The zone system helps determine what parts of the image should be in what zone. For example, if you are trying to determine whether you have adequate light to get proper exposure of your actors in a scene, put their skin tones in zone 5 and set the exposure for this zone. Now look at the rest of the image to see how it looks. You will want to see an image with a nice range of zones represented in the shadows and the highlights. If you don’t get the range you want or if exposing for the skin to be zone 5 makes other parts of the image improperly exposed, you will need to find a way to adjust your lighting.
The zone system can help in another way as well. When you set up the lighting, put your central visual focus on the zone you want it to be in. As you set the lights and test your shots, you can adjust the lighting to keep your exposure and make sure that the rest of the image has the proper light and dark areas to keep your exposure pleasing.
A quick way to test the zone system is to use a spot meter to test the f-stop of the element you are exposing for. Then you can expose to that point and check to make sure that any of the other parts of the image are in a range to get shadows and highlights in your shot the way you want them to look.
The zone system is not a fixed scale. The values are determined by how you decide to set the lighting in order to get the range you want or how you decide to expose based on into what zones you place visual elements of the shot. Any area can be placed into the zone of your choosing. For instance, if you choose an area that appears very bright on set to the naked eye but you determine that you will expose this to be in zone 6, then the rest of the image will be automatically shuffled into zones. This is because when you pick what zone 6 is and set exposure, the rest of the image will have its exposure and zone placement determined by this decision and settings. If after you do this you don’t like how the image looks, you can move elements to new zones by adding or subtracting the light on them or by moving the objects into a light area in the zone that you want them to be in.
When using the zone system, it can be hard to visualize because you are looking at the image in color. You may be able to visualize it more easily by looking at the image through a black-and-white monitor setting. Knowing the science of lighting is important. However, practically speaking, most of the time this is done by eye. Lighting is at its best an art. But you need to know and understand all of the technical knowledge as a baseline so you have the tools to use the art of lighting. You won’t be able to decide whether it’s the right lighting, whether it’s beautiful, or whether it’s perfect for your shot because there is no right or wrong. It is up to you to decide, shape, and experiment with to see what you like. Keep the ratios or zones or ISOs in mind as a philosophy and use the concepts to create well-balanced shots, but focus on the overall lighting scheme’s look to make your final decisions.
Lighting with Large Balloon Lights
An interesting solution to lighting a large area from above is to use giant balloons filled with helium that have lights mounted inside. These giant balloon lights produce wonderful soft, diffused light. They can also be a particularly large light source. The balloons float overhead tethered to the ground by guy wires. Clearly, they provide an overhead light source, but they also can be backed up from the subject to provide a slightly angled light source.
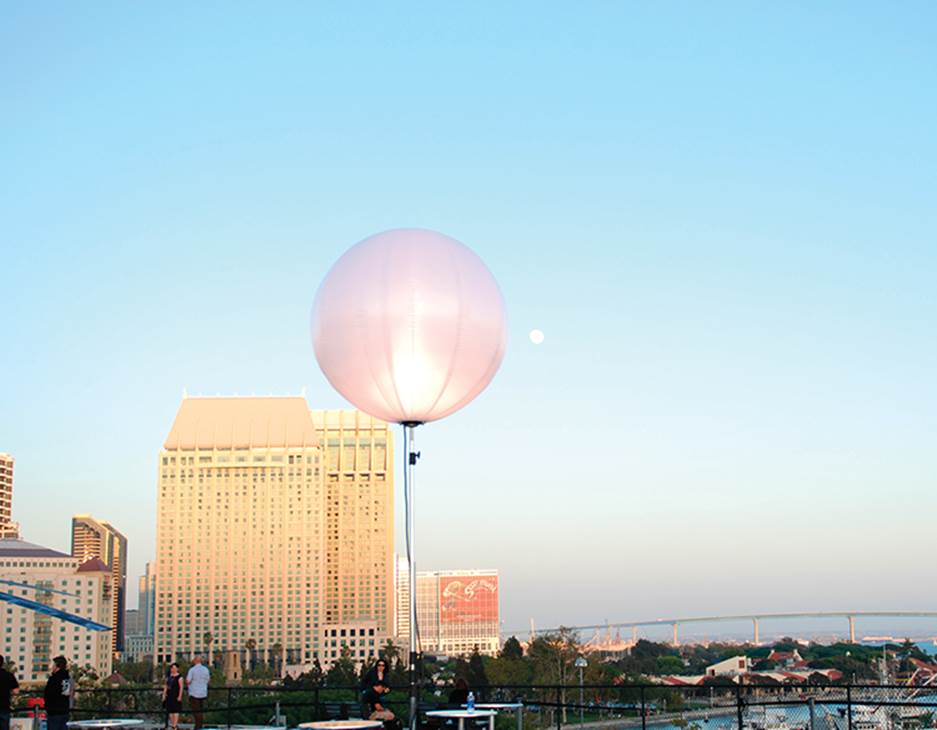
Balloon lights are great for locations where lights must be provided but can’t be hung, such as outdoor sets with no option of grid work or ceiling lights. They are easily hidden because they can simply be moved out of the frame at any time and can be used to add to a kinetic large-scale environment for additional light. They are very movable, and multiple balloons can be used to create a look. If putting lights on cranes is problematic or if you are in a location where you need large overhead light but have limited power, light balloons may be a good option. They do have some disadvantages; most prominently the wind can cause them to move erratically, and for obvious reasons they must not be used if there is danger of lightning.
All materials on the site are licensed Creative Commons Attribution-Sharealike 3.0 Unported CC BY-SA 3.0 & GNU Free Documentation License (GFDL)
If you are the copyright holder of any material contained on our site and intend to remove it, please contact our site administrator for approval.
© 2016-2026 All site design rights belong to S.Y.A.