Canon EOS 70D: The Guide to Understanding and Using Your Camera (2014)
Chapter 12. The Live View Shooting Menus

Live View Shoot1

Figure 12-1. Selecting the Live View Shoot1 tab
Live View Shooting
Live View is the name given to a camera’s ability to let you see, in real-time on the large, sharp LCD Monitor, just what the lens is passing to the image sensor. Normally, the reflex mirror that redirects the image from the lens up through the pentaprism to the viewfinder screen interrupts that image. For general photography, the conventional approach of composing a photograph and determining depth of field using the viewfinder works quite well. But when sharp focus is required, depth of field in a macro shot is critical, or you want to be able to control the camera from a connected computer, Live View is the way to go.
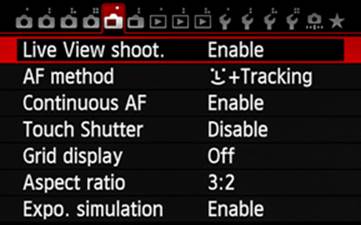
Figure 12-2. Selecting the Live View Shoot. option
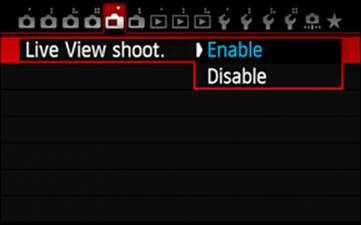
Figure 12-3. Enabling the Live View Shoot. feature
In Live View, the mirror is raised, which takes an element of protection away from the shutter. Do not point the camera at the sun while in Live View, as the highly focused sunlight can easily warp the curtains in the shutter, blinding it or worse.
A full-color LCD is one of the major power-consuming features of any camera, and Live View makes extensive and prolonged use of the LCD Monitor, so keep a close eye on the battery status indicator. In the Live View Shoot1 menu, shown in Figure 12-2, touch the Live View Shoot option, or select the option and then press the SET button. This option has only two states: Enable and Disable. If you wish to work in Live View, this option must be enabled.
AF Method
With Live View enabled, autofocus method selection is next. In the Live View Shoot1 menu, touch AF Method, or select the option and then press the SET button. Touch one of the four parameters, or select a parameter and then press the SET button.
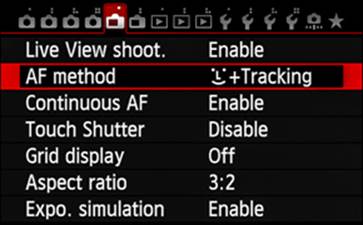
Figure 12-4. Selecting the Live View AF Method option
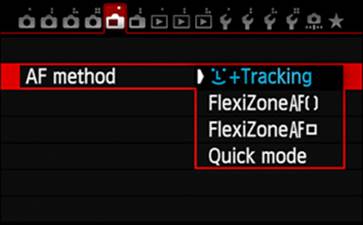
Figure 12-5. Choosing the AF Method setting
Using the camera’s image sensor, the Face Detection+Tracking choice allows you to quickly focus on a person’s face. Instead of a white rectangle, the AF point becomes a segmented square, with the segments being just the four corners of the square ( ![]() ). Now, as long as an eligible face is found in the frame, the camera will automatically recognize it and position the segmented square on it. Press the Shutter button halfway. If the border of the segmented square turns green, press the Shutter button completely to capture your image. If the border of that segmented square turns orange, focus could not be achieved; resolve that problem and try again. Even though there is a face in the frame, it may be too small, too large, too bright, or too dark to be recognized. If the head has been turned away from the camera, or if the head is tilted to the horizontal or diagonal plane, the camera may not be able to locate it. In this event, this AF setting will default to FlexiZone-Multi with automatic selection of the nearest object(s). Of course, it’s also possible that there may be more than one face in your composition, which will then cause the AF system to identify one of them with the white segmented square, but that square will have the left and right arrows (
). Now, as long as an eligible face is found in the frame, the camera will automatically recognize it and position the segmented square on it. Press the Shutter button halfway. If the border of the segmented square turns green, press the Shutter button completely to capture your image. If the border of that segmented square turns orange, focus could not be achieved; resolve that problem and try again. Even though there is a face in the frame, it may be too small, too large, too bright, or too dark to be recognized. If the head has been turned away from the camera, or if the head is tilted to the horizontal or diagonal plane, the camera may not be able to locate it. In this event, this AF setting will default to FlexiZone-Multi with automatic selection of the nearest object(s). Of course, it’s also possible that there may be more than one face in your composition, which will then cause the AF system to identify one of them with the white segmented square, but that square will have the left and right arrows ( ![]() ) that indicate you can use either the touch feature or the Multi-controller to select the particular face to use for focus. One more subtlety associated with Face Detection+Tracking: if you use the touch feature to select an object that the camera does not recognize as a face, the focus-area rectangle becomes a doubled segmented white square (
) that indicate you can use either the touch feature or the Multi-controller to select the particular face to use for focus. One more subtlety associated with Face Detection+Tracking: if you use the touch feature to select an object that the camera does not recognize as a face, the focus-area rectangle becomes a doubled segmented white square ( ![]() ) that can be repositioned by using either the touch feature or the Multi-controller.
) that can be repositioned by using either the touch feature or the Multi-controller.
In FlexiZone-Single AF, the image sensor is used for focusing. A white-bordered rectangle will appear in the center of the screen, and it will function as the AF point. You can use the touch feature or the Multi-controller to position that AF point rectangle where you want to focus; to return the AF point to the center of the screen, press the SET button. Now, when you press the Shutter button halfway, the camera attempts to focus. If it’s successful, the white border on the rectangle turns green; otherwise, it turns orange. With a green border on the AF point, press the Shutter button completely to capture the picture.
FlexiZone-Multi AF also uses the image sensor for focusing. This AF system allows you to select an area (or even the entire screen) for focusing, rather than a single point. As you press the Shutter button halfway, you will see one or more small green squares identifying the points at which the camera has found focus, based on objects that are closest to the camera. If no point can be adequately focused, the area’s enclosing border is colored orange.
The fourth option for AF Method is Quick Mode. This uses the camera’s dedicated AF sensor, not the image sensor, to implement One-Shot AF mode, operating the same way it does in standard viewfinder shooting. That also means that the focusing points are arranged in the typical flattened-diamond pattern, with 19 available focus points or five focus zones.
In reality, you can also set the lens’s focus mode switch to MF, magnify the image in Live View, and focus manually.
A word of caution: if you have enabled the Touch Shutter option on the Live View Shoot1 menu, using the touch feature to reposition the focusing square will also trigger the shutter, capturing an image.
Continuous AF
The Continuous AF option allows the camera to continuously follow focus as the subject or the camera moves, even if the camera is hanging idly from your shoulder. In Face Detection+Tracking, FlexiZone-Multi, and FlexiZone-Single, if you are attempting to photograph a moving object (an active child, a wide receiver headed for the end zone, etc.), this will ensure the lens is very close to in focus whenever you press the Shutter button for the image capture. With a static subject (a posed model, a wide-angle landscape, etc.), there is little need for this option.
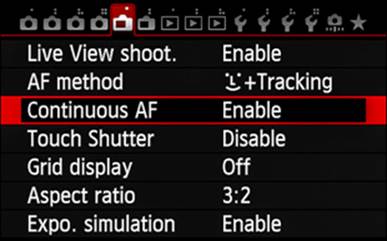
Figure 12-6. Selecting the Continuous AF option
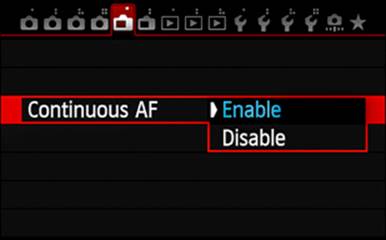
Figure 12-7. Selecting the Continuous AF setting
As the name implies, the camera is continuously moving the lens’s focusing mechanism, which does require a significant amount of battery power. Note that if you choose Quick Mode, Continuous AF is disabled.
Touch Shutter
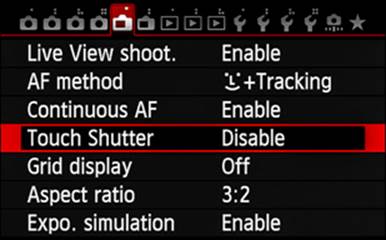
Figure 12-8. Selecting the Touch Shutter option
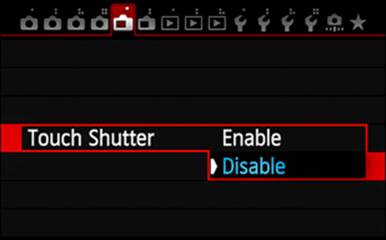
Figure 12-9. Selecting the Touch Shutter setting
While in Live View, the Touch Shutter option allows release of the shutter simply by touching the screen. This is nice if you’re not going to be using the LCD Monitor for any other purpose while in Live View, but otherwise, I really wonder about its value. As noted earlier, if you are trying to select a focus point by touching the LCD Monitor, you will also trigger the shutter. There is no means for effecting the press the Shutter button halfway process, so you get little preview of the focus status (you will see the green square indicating that focus has been achieved, but that lasts for a very small fraction of a second, and in Quick Mode there is no opportunity to react if focus was not achieved). The Live View screen displays an icon in the lower-left of the screen that you can use to quickly enable or disable the Touch Shutter feature; that setting is also reflected in this menu option.
Grid Display
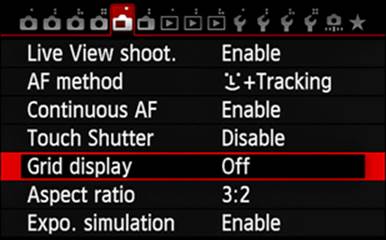
Figure 12-10. Selecting the Live View Grid Display option
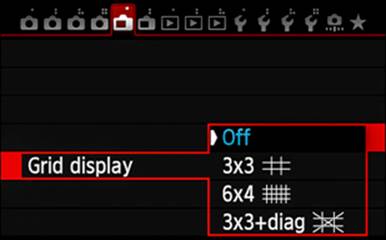
Figure 12-11. Selecting a Live View grid
Live View can superimpose a grid on the image displayed on the LCD Monitor. This grid is for composition purposes only, and does not appear in the image recorded on the memory card.
If desired, the grid can be in any of three configurations shown in Figure 12-11. The first, the 3x3 grid, is for those who try to follow the rule of thirds approach to composition. With this grid, it becomes quite easy to position your subject at one of the line intersections, satisfying the rule of thirds and, quite likely, improving your composition. The 6x4 grid is good for assisting in aligning with strong lines in the picture, and the 3x3+Diag grid is very useful for improving the compositional balance.
Aspect Ratio
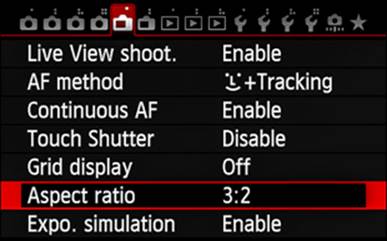
Figure 12-12. Selecting the Live View Aspect Ratio option
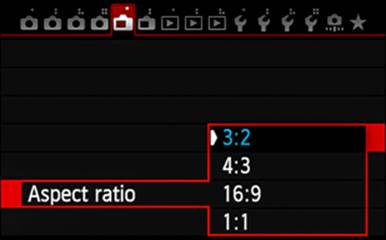
Figure 12-13. Selecting a Live View Aspect Ratio setting
Live View provides the opportunity for you to set an aspect ratio other than the standard 3:2 ratio. For an optimal fit on an older computer monitor or TV, try the 4:3 ratio, but for the newer, wide-screen computer monitors and TVs, use the 16:9 ratio. For those times when you want a perfectly square image, use the 1:1 ratio. When you choose an aspect ratio other than 3:2, a black mask is superimposed on the LCD Monitor’s display to identify the portion of the frame that will be recorded. When recording images as JPEGs, the resizing of the image is done in the camera and the stored image has the requested aspect ratio. For images recorded as RAW, the new aspect ratio data is recorded in the normal 3:2 ratio RAW file. The Canon Digital Photo Pro (DPP) software can be used to process the RAW files, including the encapsulated aspect ratio data.
The standard 3:2 ratio captures the largest image; all other ratios are essentially crops of the 3:2 image. Therefore, I don’t attempt to do this cropping in the camera. I shoot to record as much information as possible and then do my additional processing on my computer.
Expo. Simulation
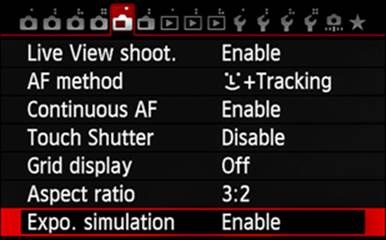
Figure 12-14. Selecting the Expo. Simulation option

Figure 12-15. Setting the Expo. Simulation value
In the Live View Shoot1 menu, shown in Figure 12-14, touch the Expo. Simulation line, or select Expo. Simulation and press the SET button. As shown in Figure 12-15, you will find three choices:
Enable: This lets the LCD Monitor simulate the brightness of the image to be captured, using the exposure settings you’ve made.
During: This allows the LCD Monitor to display the image at the brightness of the image to be captured, but only while the Depth-of-Field Preview button is depressed.
Disable: This allows the LCD Monitor to display the image at the standard settings.
Live View Shoot2

Figure 12-16. The Live View Shoot2 tab
Silent LV Shoot.
Mode 1 is the default with the Silent LV Shoot option selected in the Live View Shoot2 menu, as shown in Figure 12-17. Mode 1 offers quieter mechanical operation of the camera, even if you have selected a continuous drive mode. In fact, you should be able to shoot as many as seven frames per second in a high-speed continuous mode. In Mode 2, only a single exposure is captured, even if the drive mode has been set to one of the continuous options. The trick here is to depress the Shutter button, hold it for a second or two, and then release it. That technique can significantly reduce the shooting noise.
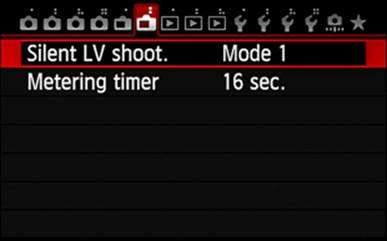
Figure 12-17. Selecting the Silent LV Shoot. option
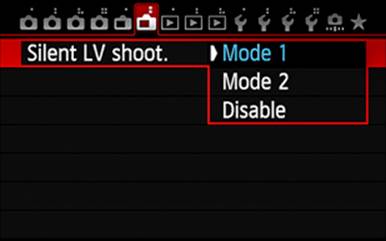
Figure 12-18. The available Silent LV Shoot. settings
Disable is used primarily when you attach a non-Canon flash to the hot shoe. The flash will not fire if either Mode 1 or Mode 2 has been set. If you use a Canon Speedlite, silent shooting is suspended, regardless of the settings here.
Metering Timer
Use the Live View Shoot2 menu’s Metering Timer option to specify the amount of time you want the exposure system’s metering to remain active after you press the Shutter button halfway (Figure 12-19). The 16 Sec. choice is generally adequate, but for work like studio shooting, you may find a longer time appropriate.
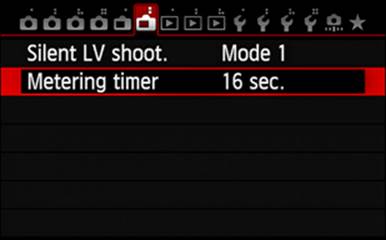
Figure 12-19. Selecting the Live View Metering Timer option
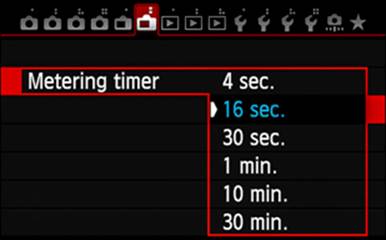
Figure 12-20. The list of available Metering Timer values
Use the touch feature to select and set a value, or use the Quick Control Dial or the Multi-controller to select a value, and then press the SET button.
All materials on the site are licensed Creative Commons Attribution-Sharealike 3.0 Unported CC BY-SA 3.0 & GNU Free Documentation License (GFDL)
If you are the copyright holder of any material contained on our site and intend to remove it, please contact our site administrator for approval.
© 2016-2026 All site design rights belong to S.Y.A.