Canon EOS 70D: The Guide to Understanding and Using Your Camera (2014)
Chapter 1. The Equipment

Checking Out the New Package
As of September 2013, the Canon EOS 70D camera became available on the American market in three different packages.
The Body-Only Package
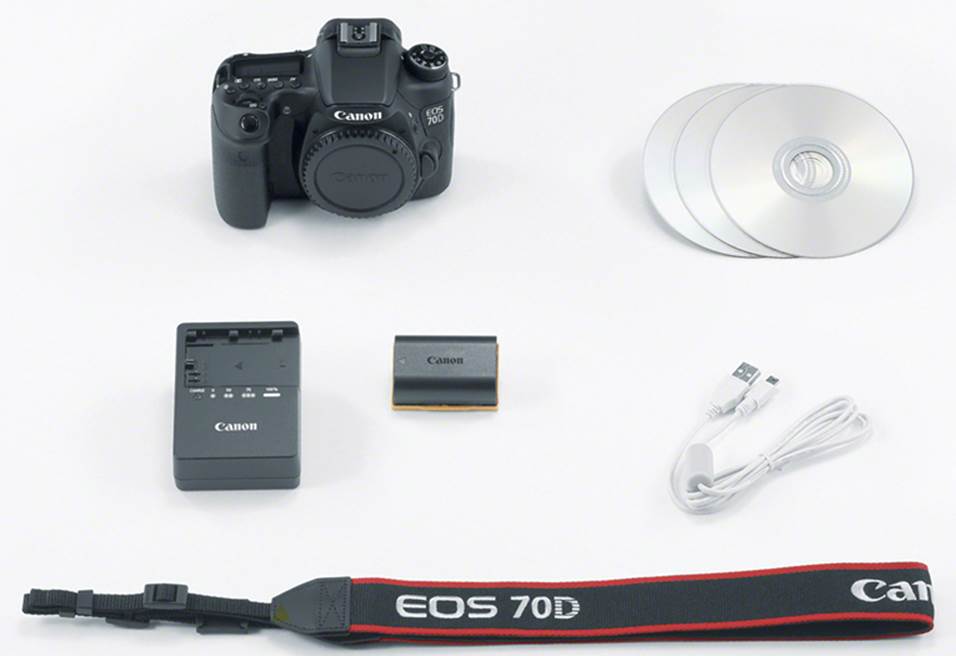
Figure 1-1. The contents of the Canon 8469B002 package
The first package, designated by Canon’s item code 8469B002, provides the EOS 70D body without a lens, plus:
• Eyecup Eb. This is the standard rubber eyecup designed to fit around the viewfinder’s viewing window. Removal (required only if you wish to install one of the dioptric adjustment lenses or to use the eyepiece cover) involves simply pressing the left and right sides of the eyecup, then lifting it straight up. (Though included as a separate piece in the body-only package, the eyecup Eb is not shown in Figure 1-1.)
• Eyepiece Cover. Many Canon camera owners are not aware that this piece exists. It’s a soft rubber rectangle that comes attached to the standard wide camera strap. Its purpose is to completely block ambient light from entering the viewfinder’s eyepiece. This is useful when you’re capturing an image without having your eye at the viewfinder (such as any kind of remote triggering, most long-exposure shots, and delayed exposures), because ambient light entering through the viewfinder can influence exposure metering, resulting in underexposed photos. To use this accessory, remove the viewfinder’s eyecup and slide the eyepiece cover (still attached to the camera strap) over the now-exposed viewfinder rails. Page 183 of the Instruction Manual describes and illustrates the process.
• Battery Pack LP-E6. This is the same lithium ion battery used in the EOS 5D Mark II, EOS 5D Mark III (but not the EOS 5D), EOS 60D, EOS 60Da, EOS 6D, and EOS 7D. That can be a real advantage if you’re using one of those models as a second camera because you’ll have access to that camera’s battery if needed for the EOS 70D, or vice-versa. The downside is that multiple-body compatibility makes this particular battery a very popular purchase, and it seems every shyster, using every imaginable means of deception and misrepresentation, has a “Genuine Canon LP-E6 battery” on the Internet market. Canon lists this battery for $100, so when you find it on the Internet for $14.95 plus $11.00 for shipping and handling, you should immediately leave that web page and seek your battery elsewhere. You can certainly find better deals online than the Canon list price, but you should expect to pay $60 or so for a real Canon battery that doesn’t pose any risks.
• Body Cap RF-3. This particular item is generally removed from a new camera, replaced with a lens, and relegated to some forgotten drawer or shoe box. The body cap’s role actually extends well beyond protecting the hole in the front of the camera during the sales process. Today’s DSLRs are complex electromechanical wonders that require protection from dust, moisture, shock, and temperature extremes. The body cap assists greatly in the case of dust protection, some in moisture protection, and even a bit in extreme-temperature protection. A DSLR’s greatest feature—the wide selection of sophisticated lenses that can be easily interchanged—is also its weakest point. Changing lenses provides a significant opportunity for particle intrusion. A particle inside your camera may simply be a nuisance, such as a speck of dust on the image sensor that creates a gray spot you have to remove from your photo during post-processing. It can also be as disastrous as a hard granule of sand, which can scratch internal components or totally bind some mechanical operations, rendering the camera useless until professional repair.
There will always be some degree of risk that we must accept in order to make lens changes. It’s still prudent to eliminate as many risk factors as possible. The amount of time that the camera’s internal parts are exposed should be reduced to an absolute minimum. For any period of time longer than a few seconds, using the body cap is highly recommended. You should certainly never stuff an open DSLR body into your camera bag. If there’s not a lens on the camera, there should be a body cap.
• Battery Charger LC-E6. Canon makes two versions of the battery charger for the LP-E6 battery. The LC-E6E has a four-foot-long power cord attached. The standard LC-E6, which is provided with the camera, has no power cord, and instead uses a swiveling male plug that folds into the body of the charger. It’s designed to plug directly into a wall outlet or power strip, with no associated power cord to trip over. I keep a four-foot single-ended extension cord on my desk that can provide temporary service to any of a number of devices, including this charger.
• Wide Strap EW-EOS70D. This red, black, and silver strap is embroidered with the readily recognized Canon logo and camera identifier. That has to be considered an asset: anyone who spends this kind of money on a camera is entitled to brag a bit. The neck strap is reasonably comfortable, with high-friction rubber on the underside to assist in holding it on your shoulder. Note, though, that the rubber doesn’t give any softness or elasticity to the strap. The strap seems quite capable of supporting the camera and lenses up to about 300mm in focal length. Of course, any lens is going to add weight to the camera body, so the ability of the body’s strap mounts must also be considered when you’re determining just how much weight the strap can hold. Some new lenses are quite heavy and actually provide strap mounts on the lens. You should use these mounts, but be sure to use a capable strap as well.
My greatest frustration with this strap is that it doesn’t provide any form of quick-disconnect couplers. When I shoot tripod-mounted macro images of wildflowers, the strap is often in the way, and frequently gets entangled in the greenery surrounding my subject. To address that problem, I’ve evaluated an UPstrap SLR-QR-V and an OP/TECH Pro Loop Strap 1501372. The UPstrap seems to have a far superior grip from the pad, which many users claim absolutely prevents the strap from slipping off your shoulder. This UPstrap can support 300 pounds (far in excess of any camera/lens combos I would ever expect to encounter) and claims to be comfortable up to about eight pounds. The OP/TECH has a shaped, wide pad that better distributes the suspended weight of the camera, lens, battery grip, flash, and whatever else you assemble as a luggable unit. At the moment, I’m using the OP/TECH strap. This particular OP/TECH strap appears to be the same one Canon provides to CPS (Canon Professional Services) members.
• USB Interface Cable IFC-130U. Be careful with this term. Personally, I feel its designation is correct, but I find that Canon uses the term primarily online and in printed promotional material. The Instruction Manual simply calls it the Interface Cable, and the camera port it plugs into is identified as the A/V OUT/DIGITAL terminal. The purpose of the cable is to connect the camera directly to a computer or to a PictBridge-compliant printer. This type of connection is useful for moving photos and movies from the camera to a computer without using an external memory card reader, as well as for copying firmware-update code to a memory card in the camera. However, except for a firmware update, I strongly recommend you always use an external card reader. That approach is safer, since you’re less likely to lose power during a transfer, and it significantly reduces the amount of battery charge required.
• EOS DIGITAL Solution Disk. This disk contains the Digital Photo Professional, EOS Utility, ImageBrowser EX, PhotoStitch, and Picture Style Editor software products. Before spending a significant amount of money on additional software, you might want to become familiar with these programs. You’ll gain a better understanding of which features you want in your editing software and utilities. Some folks never use any other software. However, it seems that most of us eventually bite the bullet and spend some real money for the extended capabilities available in Adobe’s Photoshop and Lightroom or, for Mac users, Apple’s Aperture photo-editing and photo-management software.
• EOS DIGITAL Software Instruction Manual Disk. The EOS DIGITAL Solution Disk provides some pretty comprehensive and sophisticated programs. To derive the maximum benefit from them, copy the instruction manuals on this disk to your computer for fast and easy access.
• Canon EOS 70D Basic Instruction Manual. Reading this manual may present one of the most challenging aspects of exploiting the camera’s extensive list of features. The manual, provided in both English and Spanish, is a 163-page, 4 1/8” × 5 7/8” booklet. If you’re over 40 years of age, you may need a magnifying glass.
• Canon EOS 70D Wi-Fi Function Basic Instruction Manual. This manual introduces the Wi-Fi features of the EOS 70D.
• Quick Reference Guide. The Quick Reference Guide is a small, eight-panel document. Though not nearly as comprehensive as the Instruction Manual, it is—as the name implies—small enough to always be with you, especially during your early experiences with the camera.
• Canon EOS 70D Camera Instruction Manual. This is a CD containing PDF versions of the full camera Instruction Manual, the full Wi-Fi Function Instruction Manual, and the Quick Reference Guide.
You should also be aware that these documents are available for download from the Canon website:
• EOS 70D (W) EOS 70D (N) Basic Instruction Manual (164 pages)
• EOS 70D (W) EOS 70D (N) Instruction Manual (468 pages)
• EOS 70D (W) EOS 70D (N) Quick Reference Guide (2 pages)
• EOS 70D (W) Wi-Fi Function Basic Instruction Manual (36 pages)
• EOS 70D (W) Wi-Fi Function Instruction Manual (174 pages)
The website always provides access to the very latest versions of these manuals, but when you print downloaded manuals, a very light gray diagonal watermark reading “COPY” appears on each page. The first three of these manuals are designed to cover both the Wi-Fi-enabled cameras (indicated by the “(W)” in the name) as well as the non-Wi-Fi-enabled cameras (indicated by the “(N)” in the name), which are intended for delivery in countries that have not approved the use of radio frequencies required by those features.
The Body and Lens Kits
The second package, designated by Canon’s item code 8469B009, contains all the components of the body-only package (8469B002) plus the Canon EF-S 18-55mm f/3.5-5.6 IS STM lens and its accompanying lens caps. The third package, designated by Canon’s item code 8469B016, contains all the components of the body-only package (8469B002) plus the Canon EF-S 18-135mm f/3.5-5.6 IS STM lens and its accompanying lens caps.
These lenses are from Canon’s relatively new line of very fast-focusing and very quiet lenses. They’re equipped with image stabilization (IS) to compensate for camera shake, and Canon’s Stepping Motor (STM) for improved focusing speed and quieter autofocusing. Both of these features are especially beneficial for those shooting video. They make either lens a very good general-purpose lens.
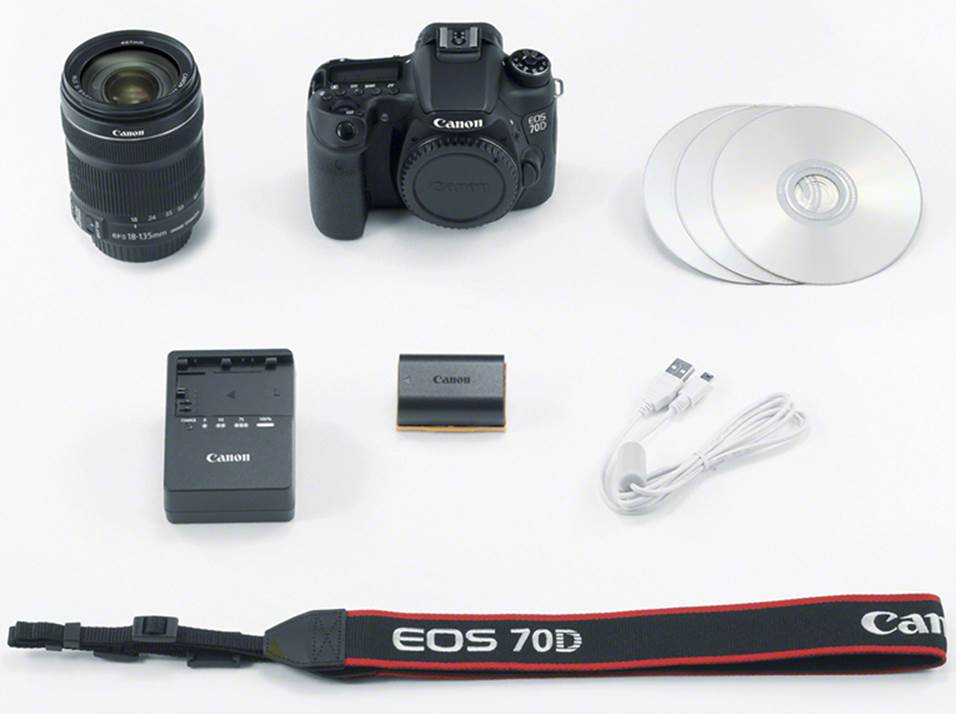
Figure 1-2. The contents of the Canon 8469B016 package
Along with the lens come:
• Lens Cap E-67 II or Lens Cap E-58 II. The sole purpose of a lens cap is to protect the front lens element. The integrity of the lens is compromised whenever that front element (the glass surface you see when you remove the cap) accumulates fingerprints, raindrops, mud spatters, or wind-blown detritus. Even worse, the lens can be rendered useless if that front element is cracked or broken. The lens cap can go a long way toward reducing or eliminating those kinds of problems—if it is in place on the front of the lens.
I have not seen these type-II lens caps before, but I assume they are a new version of the E-67 and E-58 lens caps. The latching mechanism has been significantly changed, making the release of the cap a much simpler task, especially with a lens hood mounted on the lens. The closure can be a bit disconcerting when some filters are used; the cap expects to reach fairly deep into the lens barrel to secure a firm grasp, but the female threads on some filters are so shallow that the lens cap does not seat as firmly, leaving a bit of a gap between the outer rim of the filter and the lens cap.
• Rear Lens Cap. While the front lens cap is extremely important, the rear lens cap is no less so. In addition to protecting the rearmost lens element, the rear lens cap covers the gold contacts and the lens-mounting lugs. The gold contacts are the means by which the camera and the lens communicate. This can be the lens telling the camera the current focal length, the Image Stabilizer switch settings, or the focus mode switch settings; or, it’s the camera instructing the lens to rotate the internal focusing mechanism or dictating the aperture to be used. Obviously, if the contacts are dirty or damaged, some part of that communication will be seriously compromised. The very sharp, precisely cut mounting lugs securely attach the lens to the camera body in a consistent position. The rear lens cap protects them from damage, as well.
What Else Do I Need?
Memory Cards
There was a time when digital cameras, including DSLRs, came with a memory card. The included card had a very limited capacity, but it was enough to let you check out the camera rather thoroughly.
Today, there is such a wide array of memory card types, and an even larger spread of specifications within memory card types, that most manufacturers leave the memory card selection to the photographer. The EOS 70D accepts the following SD (Secure Digital) memory cards: SD, SDHC, and SDXC.
Among memory cards, the major variables you need to consider are memory capacity and data-transfer rate. It’s becoming difficult to find new memory cards smaller than 4 gigabytes (GB), but there are some as large as 256 GB. The real consideration is how large a memory card you should buy. Most of us would like to have a memory card large enough to contain a day’s shooting, but there’s another option to think about. Some photographers believe it better to use four 4-GB memory cards rather than a single 16-GB memory card since a failure of the latter would result in losing all 16 GB of photos, but failure of the former would result in a maximum loss of only 4 GB of photos. Fortunately, the quality of today’s memory cards is high enough that it’s increasingly rare to suffer such a hardware failure.
You should select the capacity of your memory cards according to which image-quality settings you select, which file types you choose for saving photos, how many photos you typically shoot in a session, and how often you transfer your photos from the camera to a computer. On the EOS 70D, when you select the highest image-quality option, an image saved as a JPEG file will require about 6.6 megabytes (MB) of memory card space. That gives you the ability to store about 1,000 photos on an 8 GB memory card. If you save images as RAW files, each image will require 24 MB of memory card space, reducing the number of photos you can store on an 8 GB memory card to about 260. If you want to save each image as both a JPEG and a RAW file, saving an image as both file types will require about 30.6 (6.6 + 24) MB of memory card space, allowing you to store only 200 photos on that 8 GB memory card. Movies can consume huge quantities of space on a memory card. Shooting at the highest resolution in ALL-I mode requires 685 MB of memory card space per minute of recorded video. That rate allows 11 minutes of video to be recorded on an 8 GB memory card. This information should help you determine the storage capacity you need, regardless of how many memory cards you spread it over.
The other major consideration in choosing a memory card is its data-transfer rate. If you take but a single photo at a time, and your shots are spaced a minute apart, the slowest memory card you can find will serve you well. But if you take a number of photos in a very short time, use multiple-image bracketing, play with HDR photos, or simply use the high-speed continuous drive mode, you’ll find that you need some pretty fast data-transfer rates to get your images out of the camera’s internal systems and onto the memory card. This is especially true when shooting high-resolution movies. The camera’s internal systems are able to handle anything the camera was designed to do; the hitch is generally the low data-transfer rate of the photographer’s memory card. A note on data-transfer speeds: SD memory cards utilize some form of the numeric-X designation. Strangely enough, this data-transfer rate designation started with CDs. In their first manifestation, CD drives could read as fast as 150 kilobytes (KB) per second. Subsequent generations of CD drives, rather than stating an absolute data-transfer speed, simply provided an integer-multiple of that original CD data-transfer speed. Thus, an 8X CD drive was capable of 8 × 150 KB/s, or 1,200 KB/s. Exactly the same calculation is used in specifying memory card data-transfer rates.
SD Memory Cards
SD memory cards measure 32mm × 24mm × 2.1mm, which is quite small. They have evolved from the SD card to the SDHC card to the SDXC card. (Be aware that all three types are generally referred to simply as SD memory cards unless there is a need for a specific qualification.) As a result, nearly all SD cards are designed to work in cameras that support SDHC and SDXC cards, and all SDHC cards are designed to work in all cameras that support SDXC cards. However, any camera that supports only SD and SDHC cards will not be able to use an SDXC card. This same consideration applies to external memory card readers. Many older readers (including the ones built into the front panels of many personal computers) are not compatible with SDXC memory cards. If you load an SDXC card into an external reader and the computer doesn’t acknowledge its presence, the problem is most likely that the memory card reader is not new enough to recognize or support the SDXC memory card type. Be very careful: when some computers encounter an SD card they can’t recognize, they assume the card has been damaged and they suggest you re-format it, which would result in losing all the images you had on that SD card! I suggest that you always use the camera for formatting the memory cards instead of your computer.
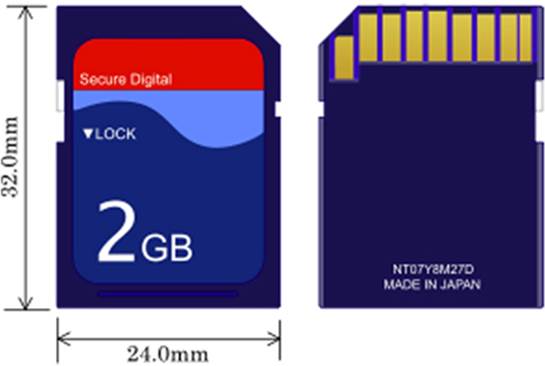
Figure 1-3. Front and back of a typical SD card
SD
• Secure Digital, also known as SDSC (for Secure Digital Standard Capacity)
• Maximum capacity: 2 GB
SDHC
• Secure Digital High Capacity
• Capacity range: 4 GB through 32 GB
SDXC
• Secure Digital eXtended Capacity
• Capacity range: 64 GB through 2 terabytes (TB), or 2,000 GB
Though the architecture allows a very high capacity, the largest SDXC card I found available at the time of this writing was 256 GB. As of October 2013, this card was priced at about $490.
Speed-Class Ratings
Inexpensive memory cards simply don’t operate as quickly as more expensive cards. This can become significant when recording high-quality video or a long burst of images: the amount of data simply overruns the card’s ability to accept and store it. This results in missed photos or video dropout.
Early in the life of SD architecture, data-transfer speeds were expressed in comparison to the original CD data-transfer speed of 150 KB/s. However, SD memory card manufacturers now also use a speed-class rating, which establishes a minimum rate at which data can be written to a memory card. Rates for reading data from a memory card are always equal to or higher than the writing rates.
The class number, encircled by the capital letter C, indicates the number of MB/s the memory card can write. Class 10 is currently the fastest class rating on the market. Table 1–1 shows the possible SD memory card speed ratings expressed as “X” values, data-transfer speeds, and speed-class ratings.
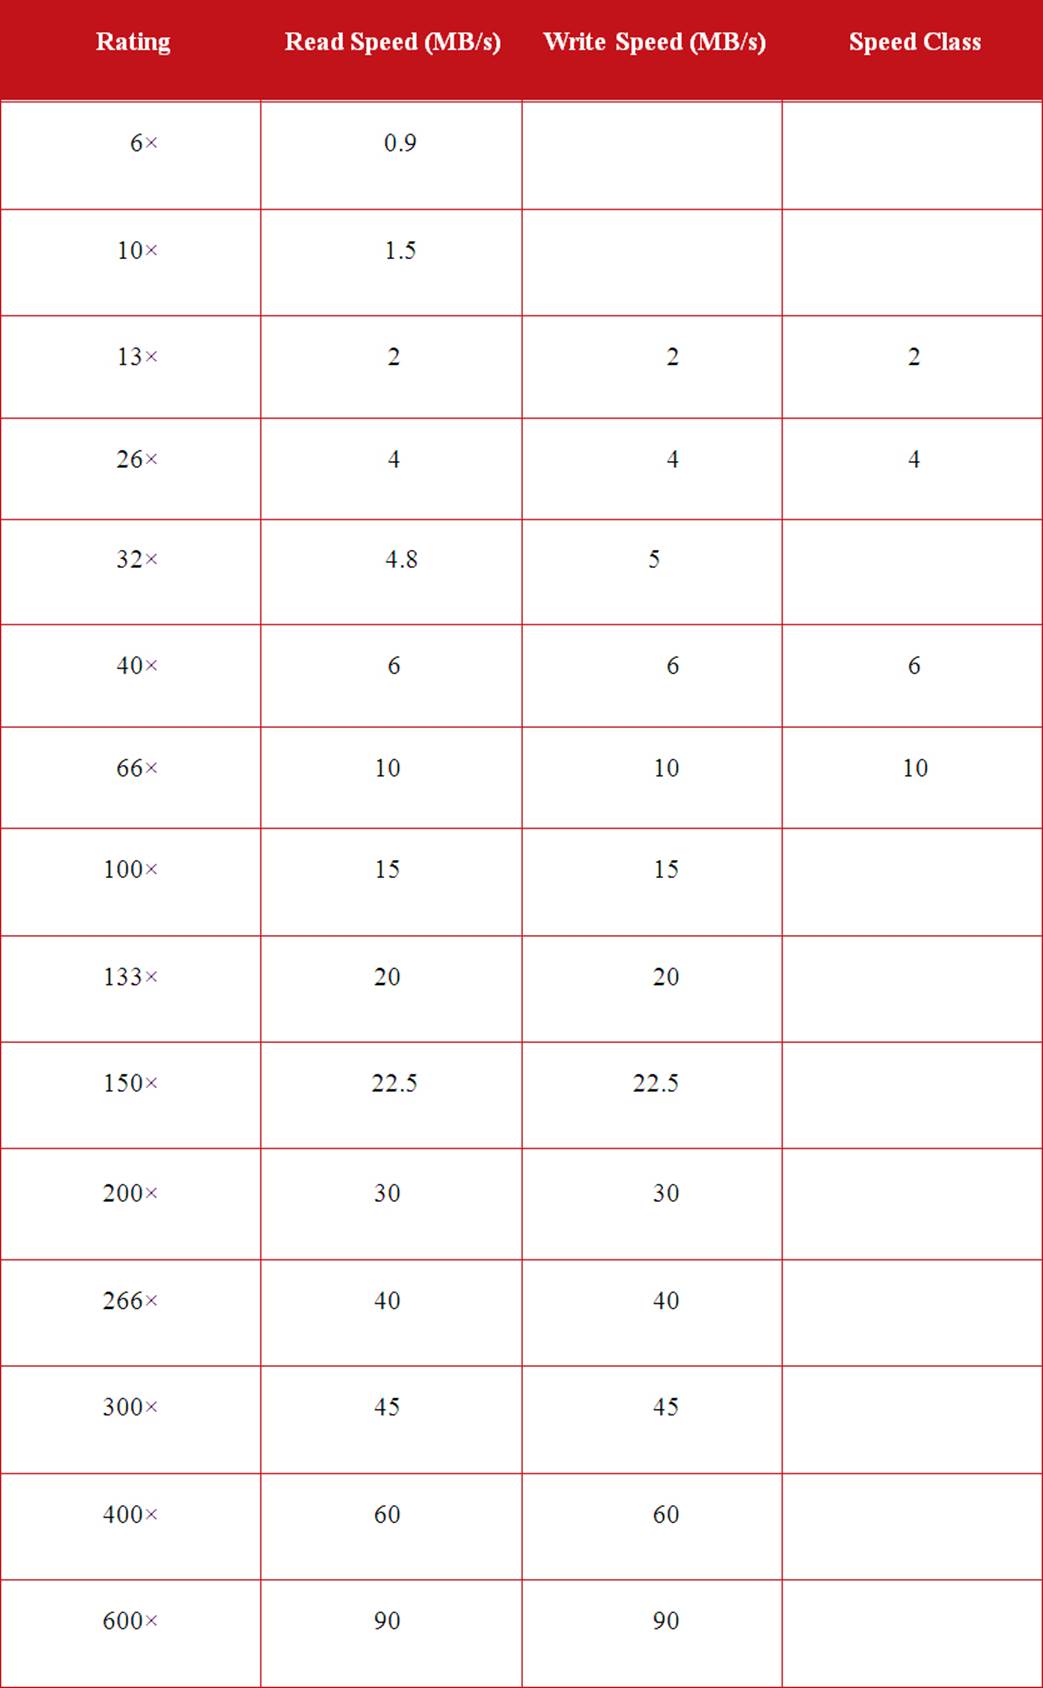
Table 1–1. SD memory card speed ratings
The speed-class rating is an indicator of minimum guaranteed data-transfer speed for writing. Therefore, you can find Class 10 memory cards (guaranteed minimum data-transfer speed of 10 MB/s) that provide the manufacturer’s “X” rating as well, resulting in Class 10 memory cards that display a rating of 133X, which indicates they’re capable of 20 MB/s. There are even Class 6 SDHC memory cards that claim 30 MB/s data transfer, but beware: that 30 MB/s figure applies only to the read speed; the write speed is actually Class 6 (6 MB/s). One manufacturer does produce what it calls an Extreme HD Video Class 10 SDHC memory card that claims a 30 MB/s speed for both read and write operations.
Newest on the market are SDXC UHS-I memory cards. The UHS initialism represents Ultra High Speed, and the label on the memory card will show a capital “U” with a small digit “1” inside the “U”. Not many cameras are capable of handling these new memory cards, but the EOS 70D is! This kind of performance comes at a price, but if you have a need and a camera that will be able to read and write at the UHS-I data-transfer rates, this type of card might be a good option for you. At the moment, SanDisk is selling an Extreme Pro SDXC UHS-I memory card capable of 90 MB/s write speed, which equates to 600X and yes, it’s still rated as a Class 10 memory card.
In my opinion, if you plan to purchase SD memory cards for this camera, you should consider using only SDXC memory cards of Class 10 or better. That way, as you become more familiar with the capabilities of the EOS 70D and start using these features in your still or video photography, you will never run into the problem of not having fast-enough memory cards.
Rob Galbraith has concluded and documented the results of his own memory card evaluation. You may want to check him out at: http://www.robgalbraith.com. Click on the “CF/SD/XQD” option in the menu to be redirected to the post about memory cards.
Optional Items
These items are not absolute requirements, but serious photographers—or any photographers who are serious about protecting their investment of money, time, or creative effort—should consider at least a filter capable of providing some protection for the front element of the lens, and a tripod to optimize those shots that require an exposure too long to be comfortably (and steadily) handheld.
Lens Filters
Many photographers shy away from using a clear filter just for the mundane purpose of protecting the lens. They see adding yet another glass surface as an opportunity to degrade the final image, and their position is technically quite valid. However, with the exception of fine-art photographers, most of us will never see the ever-so-subtle distortion one more piece of glass introduces (unless you buy really cheap filters!).
Filters for the purpose of protecting the lens, but not altering image characteristics, are often sold as UV protection filters, which can be a bit misleading: these filters absorb UV rays, but they do not protect against them. Be sure to get a filter sized for your lens (the EF-S 18-55mm f/3.5-5.6 IS STM lens requires a 58mm filter, and the EF-S 18-135mm f/3.5-5.6 IS STM lens requires a 67mm filter). The other filter characteristic you should be aware of is the depth of the mounting ring. Adding a filter, especially one with a deep mounting ring, can interfere with the light attempting to enter at the edge of the front of the lens. This will result in vignetting, which makes the corners of your photos become dark. A single thin-ring filter should not cause vignetting. If you need to apply a creative filter to the lens, you will generally want to remove the protective filter.
Lens Hoods
The EF-S 18-55mm f/3.5-5.6 IS STM lens uses an EW-63C Lens Hood, and the EF-S 18-55mm f/3.5-5.6 IS STM lens uses an EW-73B Lens Hood. Any lens hood serves at least two purposes: it helps reduce lens flare when the lens is pointed close to the sun, and it provides some degree of impact protection for the front lens element, especially when the lens cap has been removed.
Being Canon products, these lens hoods are quite durable, fit snugly, and do not intrude on the lens image to cause vignetting. If you need to replace this lens hood, there are many less-expensive options available, all claiming to be either a Canon product or for Canon lenses. However, these products are often badly designed, badly manufactured, or both.
Tripod
A thorough exploration of tripods could result in a book all by itself. There are so many variations in types, materials, weights, heights, heads, legs, feet, and other elements. The purpose of this section is to strongly encourage you to acquire and use a support of some kind. Most photographers will choose a tripod, and many will add other forms of support.
The EOS 70D body weighs 24 ounces, each LP-E6 battery weighs 3 ounces (the optional BG-E14 battery grip accepts two batteries), and the EFS 18-135mm f/3.5-5.6 IS STM kit lens weighs another 17 ounces (the EFS 18-55mm f/3.5-5.6 IS STM kit lens weighs just 7 ounces). By contrast, Canon’s very popular EF 70–200mm f/2.8L IS USM lens weighs in at 3 ¼ pounds. And if you’re into wild birds or animals, you may be using some very long—and very heavy—lenses. The weight of additional gear, such as a flash mounted in a bracket ot hot shoe, or a battery grip mounted on the bottom of the camera, is often overlooked. All of these items increase the weight and bulk that a tripod is expected to manage. Unfortunately, I’ve yet to find a tripod at Target or Best Buy that’s up to this task. Maneuvering the tripod head with that much weight resting on it can be challenging, but the real problem is that many of the leg-extension locks simply aren’t designed to provide that kind of support. The weight forces the weakest leg-set to slowly compress. It’s just a short period of time before the tripod is overbalanced by the camera’s weight and it topples. Whether aluminum, steel, carbon fiber, or another material, be sure your tripod will reliably support the load you will mount on it.
As a general rule, for handheld photographs of objects four or more feet away, you should use a shutter speed equal to or faster than the reciprocal of the focal length. That is, if the focal length is set at 25mm, use a shutter speed of 1/25 second or faster. For a moderate telephoto length of 200mm, you’ll need to use a shutter speed of 1/200 second or faster. When there is insufficient light for a good exposure at these shutter speeds, and you cannot or choose not to change the aperture, then a longer shutter speed must be used. Ensuring there is no camera movement during the exposure will require some kind of support—anything from a small beanbag to a very sophisticated and expensive tripod. Image Stabilization can certainly help, but when I have the time to consider the setup, I intentionally don’t put IS into the equation. That approach gives me a bit of insurance in case things quickly change.
At distances of four feet or more, the concern is managing camera motion in the up/down and left/right directions. At a closer distance, especially when using macro lenses, the depth of field can be so shallow that in/out motion must also be arrested. That’s even more reason for using some kind of support.
Electronic Flash
There are many instances, even outdoors in bright sunlight, in which being able to apply a bit more light can really make a difference in the final image. There is a small pop-up flash built into the EOS 70D, which has a guide number of 39 feet (12 meters) at ISO 100. Additionally, Canon makes a fairly wide range of external flash units that are designed to sit in the hot shoe atop the camera, and they, too, communicate with the camera regarding proper exposure, among other considerations.
At the other extreme is the relatively new Speedlite 600EX-RT, which has a guide number of 197 feet (60 meters) at ISO 100 with the flash unit zoomed to 200mm. This unit can also serve as a commander unit or as a remote unit.
All materials on the site are licensed Creative Commons Attribution-Sharealike 3.0 Unported CC BY-SA 3.0 & GNU Free Documentation License (GFDL)
If you are the copyright holder of any material contained on our site and intend to remove it, please contact our site administrator for approval.
© 2016-2026 All site design rights belong to S.Y.A.