Canon EOS 70D: The Guide to Understanding and Using Your Camera (2014)
Chapter 21. Movies and the EOS 70D

Concept
The idea of using a DSLR to record movies is still hotly debated; many committed still-image photographers are strongly opposed to cluttering up their cameras with a lot of features, menus, and buttons they simply don’t need or want.
Nonetheless, the DSLR has been adopted by many videographers because it offers a physically large image sensor, a higher pixel count, a vast array of lenses, and a comfortable physical unit to work with, typically at several thousand dollars less than commercially-available video cameras.
The EOS 70D does provide video recording as a feature, and has also introduced the industry-first dual-pixel autofocus system, optimized for video. Coupled with the new STM (stepping motor) lenses, this camera has become a premier video camera. As such, you may want to experiment with this feature; it can give you a whole new means of expressing yourself or documenting significant events.
Major Differences
Viewfinder: Simply not used in Movie mode. Instead, as with Live View mode, the LCD Monitor is used for composition and focus.
Shutter button vs Start/Stop button: Once the Live View/Movie rotary switch is rotated to Movie, the Start/Stop button in the center of the Live View/Movie rotary switch becomes active, and is used to start and stop actual video recording. If the Shutter button is pressed while the camera is recording a video, the video recording is interrupted for approximately one second while a still image is captured, then video recording resumes.
Flash: Though you may be able to open the flash or attach an external Speedlite, the flash will not fire while in Movie mode. An exception is for potential Speedlites that have a movie-illumination LED built into them, but those are designed for constant illumination.
Q button: This button still provides quick and easy access to many of the relevant variables, but the set of variables for video are quite different than those for still photos.
Menus: Again, video has its own set of variables. When in still-photo mode, the Shooting menus will include two menus for Live View. But, when the Live View/Movie rotary switch is set to Movie, the Live View menus are replaced with Movie menus.
Canon RC-6 Remote Control: For remote control of video recording, this may be the only device capable of actually starting a video recording; most remotes simply emulate pressing the Shutter button, which captures a still photo. Even with the RC-6 Remote Control, you will want to enable the RC-6’s two-second delay as well as set the camera’s DRIVE mode to either two-second self-timer or 10-second self-timer.
Wi-Fi: This camera feature must be disabled while video recording. After the recording is complete, Wi-Fi can be re-enabled to upload the movie to social media or other Wi-Fi-connected sites.
Touch-focus: During video recording, you cannot press the Shutter button halfway to achieve focus in a changed or new scene. The AF-ON button will initiate focus, but that can introduce a bit of camera shake unless the camera is stable. However, the EOS 70D has incorporated support for the touch feature, and the effort to have the LCD Monitor recognize the very light touch of a finger tip is significantly less than that required to press the AF-ON button. Further, with the touch feature, you can simply touch the portion of the image on which you want to focus.
Audio recording: The camera’s built-in stereo microphones do a commendable job of adding good sound to a video recording. For those with a bit more knowledge of audio recording, it’s possible to take control of sound levels and other elements of sound recording to further enhance the recording. That ability is especially attractive to videographers who opt to use a good-quality external stereo microphone, particularly in environments with wind or other intrusive background noises.
Image accuracy: When viewing your composition via the viewfinder, you’re seeing the real world, albeit a bit small. But when shooting video, the viewfinder is not used, and your composition is displayed on the larger LCD Monitor. However, as with Live View, image simulation is employed for Movie shooting. This technique allows many user-selectable features, such as picture style, white balance correction, and chromatic aberration correction, to be simulated on the LCD Monitor, better reflecting what the final recorded video will look like. However, the simulation, while a close approximation, will never be identical to the final video. Always review the playback of the recording.
Capturing
Camera Hardware Considerations
There are a very few camera hardware considerations that you need to be aware of, but they are critical to success. The first is memory card capacity. There can be some trade-offs in determining the best memory card capacity for your own style of video recording. If you tend to shoot long movies, a super-large memory card may be a good consideration. A large card would eliminate recording interruptions caused by the need to swap cards (it also helps maintain the chronological sequence of files). Though the camera will still record a series of 4 GB video segments, it will stop at the end of a 29 minute and 59 second recording, requiring you to press the Start/Stop button to resume recording. However, if you are recording ALL-I video segments of five minutes or less, then any card of 4 GB or larger will meet your needs.
The second consideration is memory card speed. To ensure that you do not encounter memory card constraints in any video-shooting situation, I suggest you use memory cards capable of writing 45 MB per second or better, class 10 rated, and preferably UHS-1 (ultra high speed) capable. Remember, most cards advertise their reading speed.
The third consideration is battery life. Given the intensive use of the LCD Monitor, consider the BG-E14 Battery Grip. Yes, it adds weight and bulk, but it also carries two batteries. A planned shoot may not need that kind of insurance, but shooting the news or even the kids’ birthdays simply doesn’t offer the opportunity to stop the action while you swap batteries.
The EOS 70D is a reasonably intelligent video camera, capable of recording for as long as 29 minutes and 59 seconds. Be careful: when running that long, the camera can get quite warm. Especially on very warm days, or in a warm studio, the camera may shut down to protect itself. (Remember, as sensor temperature goes up, so does the level of image noise.) If there is no temperature-related problem, and the camera stops after reaching the 29:59 time limit, you can immediately start again by pressing the Start/Stop button. SDHC memory cards use the FAT32 file allocation system, which has a 4 GB file size limit; SDXC memory cards use the exFAT memory allocation system, which imposes the same limits on file size. Considering the superior ALL-I compression system, which requires 685 MB per minute, a 32 GB card can provide about 44 minutes of recording, creating eight files in the process. Nonetheless, the camera will automatically create these new files as needed, without stopping video recording.
In summary, here’s a table of relevant recording options and their memory requirements:
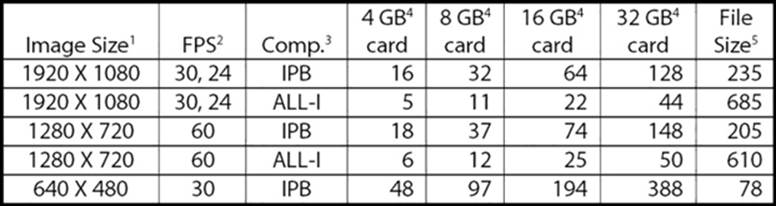
Table 21–1. Video recording parameters
Column-heading references:
1. This is the image size as derived from the selection made in the Movie Shoot2 menu’s Movie Rec. Size option. The 1920 × 1080 and the 1280 × 720 image sizes will display the video with 16:9 aspect ratio, and the 640 × 480 image size will display the video with a 4:3 aspect ratio.
2. FPS is the initialism for frames per second. In NTSC countries, such as the USA, the only rates supported are 60, 30, and 24. The higher the frame rate, the smoother the video action will appear. Note that the camera cannot support 60 fps in Full HD (1920 × 1080) recording mode. A frame rate of 24 fps is used when emulating a motion picture.
3. Comp. is an abbreviation for Compression Method, another selection made on the Movie Shoot2 menu’s Movie Rec. Size option. If your videos are to be immediately uploaded to a social media site, or will simply have little or no editing done on them, you will likely want to use the IPB compression method since it requires about one-third the amount of memory card and disk drive space, and requires only one-third as much time to upload. However, this compression method comes at a price: it is difficult to break open the compressed file to allow editing. ALL-I uses a different approach to compression, one that allows each frame to be independently compressed, greatly simplifying later editing.
4. These four columns show the amount of time, in minutes, available for recording on each of the four SD card sizes, depending on the selected image size, frame rate, and compression method.
5. The File Size column might be better titled File Recording Speed; it is a listing of the amount of data recorded per minute expressed in megabytes (MBs), depending on the selected image size, frame rate, and compression method.
Lens Choices
One of the advantages of using a DSLR for video is the vast array of wide-aperture lenses with their shallow depth of field, giving you the opportunity to focus the viewer’s attention on the subject of the video, all without totally eliminating the supporting elements in the scene. But there is a video-induced problem that goes along with that: shutter speeds tend to be in the 1/60 to 1/125 second range. When coupled with large apertures, this can result in serious overexposure. The solution to that kind of problem is a neutral density filter. In fact, you may want to acquire several filters of different densities. They will also help ensure that your ISO stays in a less noisy range.
There may be some exotic, special-purpose lenses that would find little or no application in video recording, but the great majority of Canon lenses (as well as third-party lenses) should work in video mode much as they do in still-photography mode. Remember that video seems to amplify any movement of the camera, so a tripod is even more advantageous when shooting video. As with still photography, the longer the focal length, the more important it is to use a tripod.
Shortly before the announcement of the EOS 70D, Canon introduced the STM (stepping motor) technology for lenses, and has now extended that line of lenses to include the EF-S 18-55, the EF-S 18-135, and the EF-S 55-250 lenses. Though I assumed the USM (Ultra Sonic motor) lenses were quiet, it seems that when used for video, the focus seeking of a USM lens creates sound that the camera’s microphone will pick up. However, this new stepping motor technology pretty well eliminates that problem. Plus, STM lenses tend to be quite fast, with minimal overshoot when focusing. When shopping for an STM lens, be sure to look for the “STM” on the front of the lens; Canon makes, for example, several EF-S 18-55 lenses.
Telling the Story
Video has introduced another dimension in storytelling. For example, science projects dealing with the life sciences are generally enhanced when accompanied by a video that can show changes over time that simply cannot be seen in a still photo. However, the dimensions of this recording can expand. Imagine starting with an acorn planted in a four-inch pot, then following its development from a seedling to a young tree, replanted along a city street as part of a community improvement project. This type of a project requires narrative planning, which isn’t the case with still photography.
Photojournalism
Typically, photojournalism is the process of capturing history as it unfolds. There is no story line, just the chronological capture of a sequence of events. For this kind of video work, you simply have to be prepared for anything, with an escape route for yourself being at the top of the list. In the world of still photography, the mantra is: “F/8, 1/60 second, and be there.” For today’s video journalist, an applicable alternative is: “fast-focusing, large aperture, wide-range zoom lens, and be there.” The DSLRs capable of recording video certainly aren’t the heavy, bulky cinematography units used in commercial video photography, but they seem to be able to provide high-quality images required for many applications. Ron Howard certainly makes effective use of them.
A unique area of photojournalism is investigative or documentary video recording, in which there is a clear objective established, appropriate equipment and individuals are brought together, and a sketch of a script is generated for the moderator/interviewer. This is typically a much more controlled recording, sometimes limited to studio environments. Those instances that involve on-the-scene developments in exposé-style documentaries will demand much more attention to what equipment to apply as well as the need to be flexible in order to accommodate the unexpected events that often occur in such situations.
Sharing
YouTube and other social media sites have become repositories of massive collections of movies. Indeed, they are certainly the most common vehicles for sharing movies for a variety of purposes. Though the Wi-Fi feature must be disabled during video recording, you can start the Wi-Fi feature after you’ve completed video recording and upload your movies from your EOS 70D directly to YouTube or other social media. If you plan to edit your collection of related video files and merge them into a single movie for distribution on a DVD, you will want to use something like Adobe’s Premier Elements to import and edit the camera’s MOV files. There are other programs available for this function, as well.
Do be careful and responsible for what you share: there is little, if any, benefit—long-term or otherwise—in intentionally embarrassing or exploiting other people. This is true of both video and still photography.
Viewing
Depending on how soon you wish to see the results and the quality of the presentation you intend to create, there are a number of ways you can approach the viewing of your videos.
The simplest, quickest means for viewing your videos is to simply press the Playback button while the recordings are still on the memory card. Though limited to the three-inch diagonal dimension of the LCD Monitor, you can still perform a rough evaluation of composition, exposure, and conformance to recording objectives. Pressing the SET button during playback will also give you access to the scissors icon, which you can use to trim frames from the front-end or the back-end of a file.
A more sophisticated approach involves connecting an HDMI cable between the camera and an HDTV. This approach gives you a much larger image to work with; presumably for displaying the rough files to a larger audience than can be handled with the LCD Monitor.
In my opinion, the optimal approach is uploading the files to your computer, editing and burning to a DVD, then playing back the refined video on a DVD player, preferably on a large-screen HDTV.
All materials on the site are licensed Creative Commons Attribution-Sharealike 3.0 Unported CC BY-SA 3.0 & GNU Free Documentation License (GFDL)
If you are the copyright holder of any material contained on our site and intend to remove it, please contact our site administrator for approval.
© 2016-2026 All site design rights belong to S.Y.A.