Canon EOS 70D: The Guide to Understanding and Using Your Camera (2014)
Chapter 5. Using the EOS 70D in the Basic Zone
In the very early years of the Twentieth Century, Kodak introduced their Brownie line of cameras. Their slogan was, “You push the button, we do the rest.” No worrying about settings for optimum ISO, aperture, shutter speed, focus, depth of field, white balance, etc.; simply compose the picture and press the shutter-release button. Millions of locations and occasions have been documented with these cameras.
Though the EOS 70D is a very capable camera, sometimes the simplicity of the old Brownie cameras is useful. The EOS 70D has many customizable options, and some features that are either new to the industry or part of a series of new features being introduced by Canon. However, the EOS 70D can also be used as a point-and-shoot camera, albeit with the advantage of using any of 100+ Canon lenses, or one of several relatively powerful electronic flashes. The Basic Zone function eliminates the need for most button pushing, dial rotating, and menu selections, and lets you focus on composition. Using the Mode Dial’s Basic Zone consists of pressing the Mode Dial Release button and rotating the Mode Dial to one of the Basic Zone options.
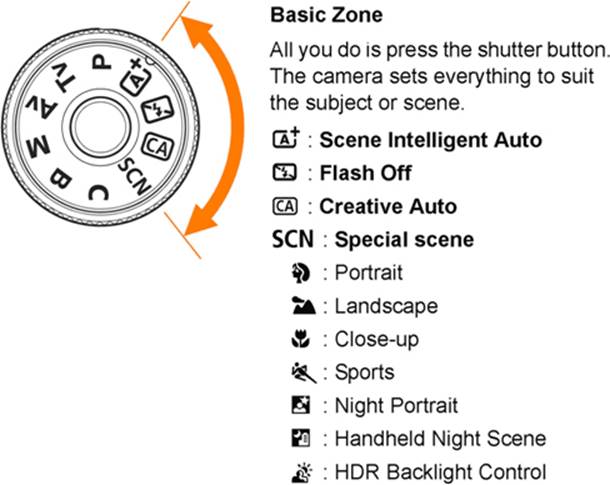
Figure 5-1. The Mode Dial’s Basic Zone options
This list can be a bit intimidating, but let’s spend a minute with each of the four major options and maybe some of the concern will go away.
Scene Intelligent Auto (![]() )
)
For Scene Intelligent Auto mode, Canon’s assertion that “all you do is press the shutter button” is rather accurate, as it is for the Flash Off mode. The remaining two Basic Zone modes do allow a minimum of customization.
Scene Intelligent Auto mode is a surprisingly good general-purpose selection, particularly if you frequently encounter conditions that simply don’t allow time to consider all the relevant exposure factors and then choose settings accordingly. With the camera in this mode, simply compose the picture in the viewfinder and press the shutter button.
In Scene Intelligent Auto mode, the EOS 70D will automatically focus the lens, select an ISO value, apply both an aperture setting and a shutter speed, open and trigger the flash if necessary, and use automatic White Balance.
When the camera is in Scene Intelligent Auto mode, all 19 autofocus points are used, and the closest object(s) are focused. The points that are focused will appear as black-bordered rectangles, except in low-light situations, when those points will be briefly (sub-second) displayed in red. When focus is achieved, the green focus confirmation light will be illuminated on the far right of the viewfinder’s status bar.
Scene Intelligent Auto mode will automatically open and fire the flash when the camera thinks it necessary, so you need to remember to close the flash when finished. Also, there may be times when you and the camera disagree about the need for flash. In those instances, you can use the Quick Control button to select the Flash Firing icon and choose the Flash Off icon, or you can simply rotate the Mode Dial to the Flash Off mode.
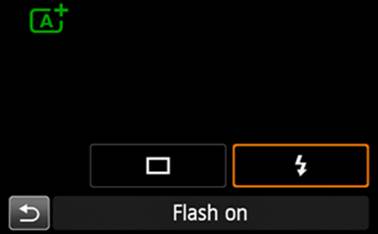
Figure 5-2. Selecting the Flash Firing icon
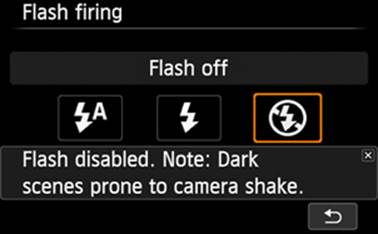
Figure 5-3. Choosing the Flash Off icon
The articulated LCD monitor, the touch feature, and Live View are all available when in Scene Intelligent Auto mode. You can also set the DRIVE mode, allowing you to shoot multiple exposures while simply holding down the Shutter button, or set a self-timer for a delayed shot.
Flash Off (![]() )
)
If you want to use the Scene Intelligent Auto mode, but you’re going to be in a museum, cathedral, or other location where flash is not permitted, you can simply rotate the Mode Dial to the Flash Off icon. The flash will not fire until the Mode Dial is set to another mode.
If the camera finds that the shutter speed will be so slow that camera shake is probable, it will cause the viewfinder-displayed shutter speed to blink. In that event, pay particular attention to your hand-held posture or, preferably, use a tripod. If you are using a zoom lens, walk closer to the subject so that you can use the wide-angle end of the zoom range. Just as the telephoto end of the zoom range magnifies the image, it also magnifies any camera shake.
Creative Auto (![]() )
)
Creative Auto mode performs all the automatic focusing, exposure setting, ISO selection, White Balance choice, and even the flash firing that is done in the Scene Intelligent Auto mode. It will also allow you to apply several ambience settings as well as give you a bit of control over background blur.
While in Creative Auto mode, press the Quick Control button to open the customized Quick Control screen. There are four distinct options on this screen, including the DRIVE mode icon and the Flash Firing icon that were discussed under the Scene Intelligent Auto section. You can see these four options in Figure 5-4: the number one red arrow identifies the Flash Firing icon; the number two red arrow identifies the DRIVE mode icon; the number three red arrow points out the background blur slider; and the number four red arrow points to the start of the Ambience menus.
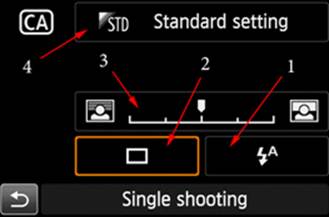
Figure 5-4. The Quick Control screen, when in Creative Auto mode
The background blur slider allows the selection of one of five settings. The default is mid-position of the slider. Moving the slider to the left will cause the background in subsequent image captures to be less sharp, eliminating competition for attention to the subject (especially advantageous with small subjects). Moving the slider to the right will increase the sharpness of the background for subsequent image captures, something that you might want to do when there is no central subject, and the entire image contributes to the photograph (especially true for scientific images and many broad-scene landscapes). Note that this setting does not affect any images already stored on a memory card. Also, be aware that this setting is ignored when the built-in flash is used.
The Ambience menu allows you to modify several of the default image appearance factors that were determined by the manufacturer (this is really the creative part of this Basic Zone mode). Again, the changes you make here apply only to images you capture after the changes are made. Since Live View allows you to see the image you will be capturing, you may want to use the Quick Control screen in Live View when you are attempting to determine which effect is appropriate for your particular image. The camera attempts to show you the result of your selections in real time, allowing you to make further adjustments if necessary. Live View makes it quite obvious that applying any of the Ambience effects results in a change from the default Standard setting.
As with many menus in the EOS 70D, you can use either the touch feature or the conventional dials-and-buttons technique for navigation through the options, or even a bit of both. But since this menu structure is not as intuitive as most and offers no on-screen hints or instructions, I’ll address each technique separately, though you can certainly blend them as appropriate.
Via the touch feature: To use the Ambience menu, press the Quick Control button to open the Creative Auto version of the Quick Control screen. Select the Standard Setting option at the top of the screen by touching it. In the Ambience-Based Shots screen, touch the desired ambience line, then confirm your selection by touching the u-turn icon in the lower-right corner of the screen, or by simply touching the selection again. There are nine ambience settings available, which is more than can be displayed on a single screen, so be sure to scroll through the entire list, which ends with Monochrome.
Once you have made your selection and returned to the Ambience menu, you will notice that there is now a new line under the selected ambience selection that shows three options. Touch this new line to transfer attention to those three options, then touch one of the options to establish the extent of the effect to be applied. You will be able to see a bit of text at the bottom of the screen, such as Effect: Low, Effect: Standard, or Effect: Strong. For Monochrome, the options are Effect: Blue, Effect: B/W, and Effect: Sepia. To choose a different Ambience setting, touch the top line (containing the name of the current Ambience setting) and you will be returned to the list of available settings.
Via the conventional technique: If you are more comfortable with the use of the camera dials and knobs for setting menu variables, you will need to press the Quick Control button to open the Creative Auto version of the Quick Control screen. You should now see Standard Setting at the top of a list of nine available ambience effects that can be individually applied to subsequent image captures. You can use either the Quick Control Dial or the Multi-controller to scroll through the list of effects, which ends with the Monochrome effect. Once you’ve selected the desired effect, press the SET button. That takes you back to the Creative Auto Quick Control screen where you will now see the name of your desired effect on the top line, and a new line below it that shows the three options for the extent of the effect to be applied. The Main Dial, the Quick Control Dial, and the Multi-controller can be used to select one of these extent options. After selecting a value for the chosen effect, you can press the Quick Control button or press the Shutter button halfway to set the effect’s new extent, which will be held until you set another effect or change this extent, or power the camera off; these settings are not retained across a power-off/power-on cycle.
Special Scene (![]() )
)
On entering the Special Scene mode and pressing the Quick Control button, you should find that the Quick Control screen looks quite similar to the screen seen in the Creative Auto mode, except the Background Blur area of the screen has been replaced with the Light/Scene area, and the CA icon in the upper-left corner has been replaced with one of several icons that represent the seven Special Scene modes supported by the EOS 70D.
In the Portrait Special Scene mode, the camera will use an exposure setting that tends to blur the background. It will also set the DRIVE mode to low-speed continuous shooting, giving you the opportunity to hold down the Shutter button and capture several images as your subject relaxes, slightly changing their pose or expression. You will want to be relatively close to your subject, allowing their torso or head to pretty much fill the frame. Attempt to keep as much distance between the subject and the background as possible to ensure that the background elements don’t compete with your subject for attention.
The Landscape Special Scene mode causes the camera to increase the range of focus (depth of field) as far as possible, and provides vivid blues and greens with additional sharpening of the captured images. Note that in this mode the camera disables the built-in flash, though an external Speedlite will fire.
Though a macro lens provides the best opportunity for capturing images of small objects, the Close-up Special Scene mode can help a great deal when such a lens is not in your camera case. In fact, even with a macro lens, this Special Scene mode can greatly simplify the process until you are prepared to master the subtleties of working with a macro lens.
The Canon series of macro lenses are all prime lenses, meaning that they are single focal-length lenses. However, there are a number of zoom lenses that are capable of a degree of macro work. Look on the lens barrel near the mounting flange for words such as “MACRO 0.39m/1.3ft” (text found on the Canon EF-S 18-135mm f/3.5-5.6 IS STM lens, which is one of the kit-lens options for the EOS 70D). The trick is to get as close as you can to your subject without getting nearer than that number posted on the side of the lens (1.3 feet in the case of the 18-135mm kit lens), and to zoom as far as possible to fill the frame with the desired composition.
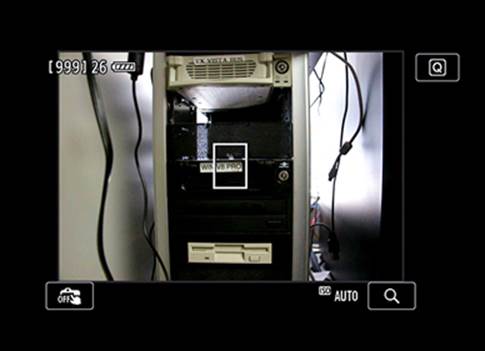
Figure 5-5. Zoomed to 18mm, at 17"
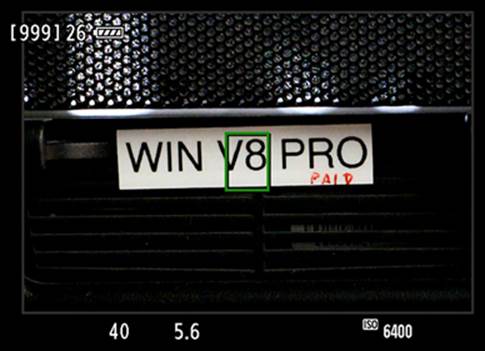
Figure 5-6. Zoomed to 135mm, at 17"
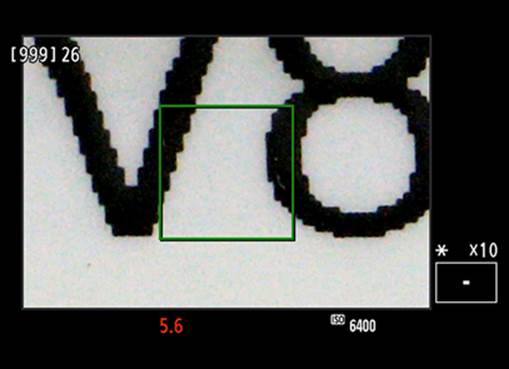
Figure 5-7. Focus-area enlarged 10x. Green box-border indicates image is focused.
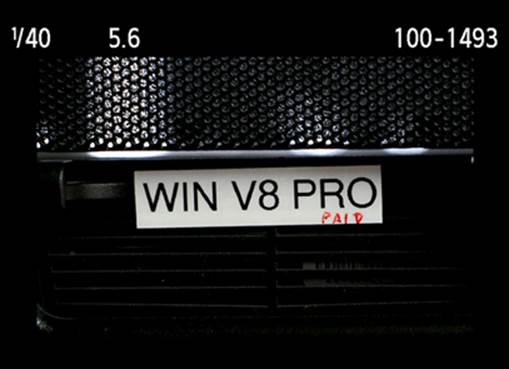
Figure 5-8. The captured image
Figures 5-5 through 5-8 were all shot with the EOS 70D and the 18-135mm kit lens. They were shot in SCN mode using Live View, with the Close-up Special Scene mode selected. The built-in flash has been disabled. The tripod-mounted camera is set so that there is a 17” distance between the subject (the white label in the figures) and the focal-plane mark on the side of the camera’s viewfinder. (The 18-135mm kit lens allows macro shooting at 1.3 feet [15.6”] and farther.) Since we want to magnify the displayed image, it is necessary to choose something other than Face Detection for the AF method; I’ve chosen the FlexiZone-Single AF method. Figure 5-5 is a screen capture of the Live View screen showing the image resulting from the placement of the camera 17” away from the subject, with the lens at 18mm; this allows an approximate placement of the point of focus, as indicated by the white-bordered rectangle in the center of the picture. In Figure 5-6, the camera has been zoomed to 135mm, and the Shutter button pressed halfway. The green border indicates that this image is in focus (if you were to accidentally get closer than the specified 15.6 inches, the camera would not be able to achieve focus). As shown in Figure 5-7, you can verify focus of the intended area (not really necessary when everything is in the same plane, perpendicular to the lens). Press the Magnify button three times to see a 10x enlargement of a portion of the focus area (the chosen area for enlargement can be repositioned by touching the arrows around the border of the screen, or with the Multi-controller). If the subject is too small for the camera’s auto-focus system to accurately focus, set the lens’s AF/MF switch to MF (manual focus), then rotate the lens’s focusing ring to allow you to set the focus you desire. Note that the focusing rectangle goes away in manual focus, but the ability to magnify the image is still active. With all variables set, press the Shutter button fully. The final captured image is shown in Figure 5-8.
The Sports Special Scene mode is especially effective when shooting moving objects. In this mode, the camera attempts to keep the shutter speed as short as possible, and offers a single focus point, dead-center in the viewfinder. Once you have established focus on a moving subject, the camera will maintain that focus as you track the motion of your subject. By default, the DRIVE mode is set to Continuous High-Speed, allowing you to track a subject and shoot at the rate of seven images per second.
The built-in flash will not fire, but an external Speedlite will fire.
The Night Portrait Special Scene mode is intended for capturing portraits against a lit background; it will have little effect when shooting against a dark background. Use a tripod and set the lens to the widest-angle setting that is practical, since this will include more background. If determined to be necessary, the camera will fire the built-in flash.
The Handheld Night Scene Special Scene mode addresses the problem of not being able to use a flash and not having a tripod. This mode compensates by triggering four exposures, then stacking those exposures into a single image. Obviously you want to ensure that the camera moves as little as possible while those four exposures are taken. Otherwise, the images will not properly stack, leaving some ghost imaging. If you have a close foreground subject—especially a person—set Flash On to ensure a good exposure of that subject; the flash fires only for the first of the four exposures.
The HDR Backlight Control Special Scene mode is designed to help expand the dynamic range of the final captured image. Generally, in a photo with strong bright and dark areas, you will find that some of the bright areas have no detail at all (blown-out) and the dark areas may have some detail that is totally lost in the shadows. Using this Special Scene mode, the camera will take three exposures (one properly exposed, one slightly overexposed, and one slightly underexposed), then merge them into a single image. The result is an image with greater detail in the bright and dark areas, and no loss of detail in the midrange. This provides a higher dynamic range (a broader tonal range) than a single exposure could offer. In the Creative Zone modes, the HDR Mode on the Shoot4 menu provides even more control over the shooting and processing of the three exposures.
Though some of the options available for the first four Special Scene modes in the Light/Scene listing (found in the Default Setting box in the middle of the screen) relate to scene conditions—sunset, shade, cloudy, etc.—they are all actually specialized applications for common variations in lighting conditions. There may be a few other unique exposure considerations for certain Scene modes, but they all share this need for some degree of light adjustment.
All materials on the site are licensed Creative Commons Attribution-Sharealike 3.0 Unported CC BY-SA 3.0 & GNU Free Documentation License (GFDL)
If you are the copyright holder of any material contained on our site and intend to remove it, please contact our site administrator for approval.
© 2016-2026 All site design rights belong to S.Y.A.