Canon EOS 70D: The Guide to Understanding and Using Your Camera (2014)
Chapter 6. Using the EOS 70D in the Creative Zone
The Creative Zone
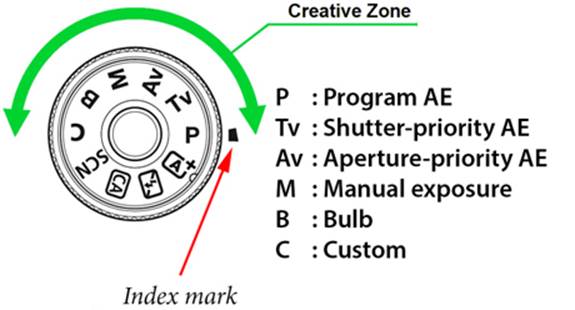
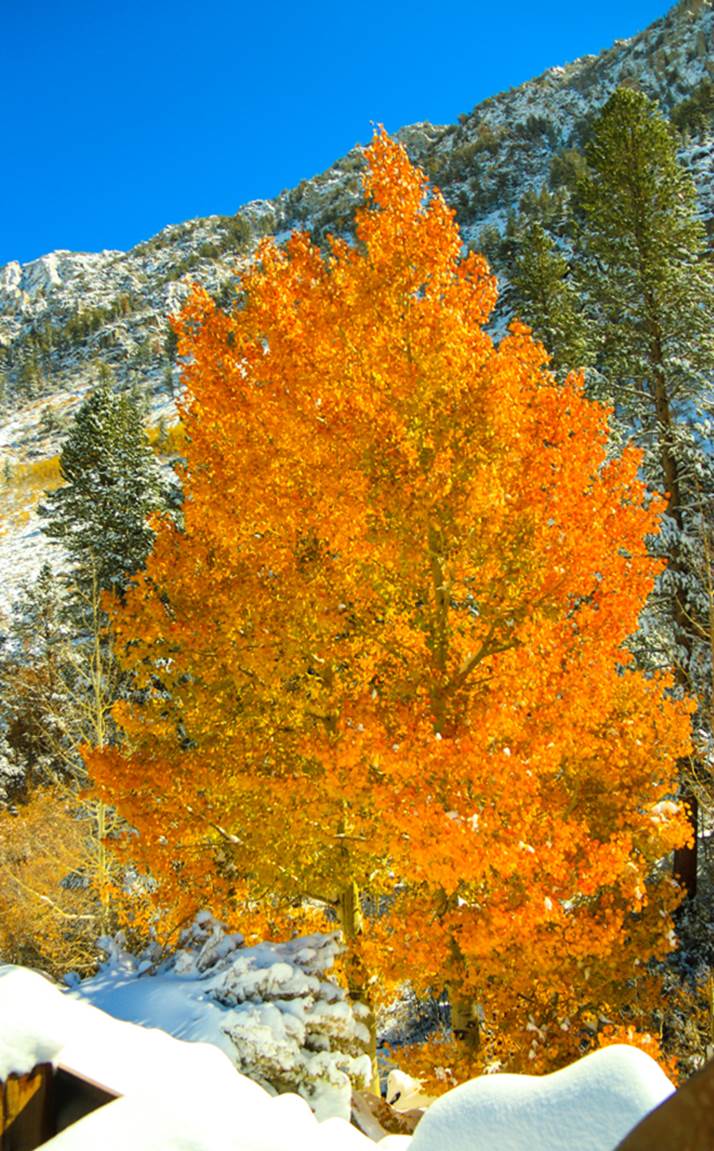
Figure 6-1. The Creative Zone range on the Mode Dial
The EOS 70D was designed for the Creative Zone. In the Creative Zone, as the name implies, you have complete control over the camera; you are able to override the factory-set defaults and establish specific values for individual images. Trying to anticipate the ways in which photographers would use the camera, Canon determined that photographers of static images (wildflower photographers, product-advertising photographers, still-life fine-art photographers, etc.) are not particularly concerned with shutter speed, but are generally very interested in being able to control depth of field. For this purpose, Canon created the Av (aperture value; better known as aperture priority) mode in the Creative Zone. However, for the photographers who work in sports photography or photojournalism, the ability to control shutter speed is essential, with aperture being a distant second consideration. For these users, the Creative Zone offers the Tv (Time value, or shutter-speed priority) mode. Though a minority, there are some photographers who do not want to worry about the camera’s choice of exposure values, and they use nothing but the Creative Zone’s Manual mode. For the intermediate photographer, possibly on the migration path from point-and-shoot to sophisticated DSLR, there is the Creative Zone’s Program mode.
Program
In Program AE (automatic exposure), the camera evaluates the scene’s brightness, then automatically sets the aperture and shutter speed. These two operations are the extent of the camera’s involvement in setting functions for an exposure; all other functions are available for your control. Actually, even these two can be minimally controlled: press the Shutter button halfway and release it, then rotate the Main Control to change the aperture. That allows the camera to change the shutter speed while maintaining the same exposure data. You may find that an image requires a shallow depth of field, and this Program Shift technique addresses that need. Of course, if your need was for a slower shutter speed to blur the flow of water in a rapids, this same Program Shift technique works there as well.
In many instances, functions beyond aperture and shutter-speed settings are not altered during a shoot, so having the camera manage the image-specific needs of shutter speed and aperture allows the photographer to concentrate on composition and lighting angles.
Time Value
Time value, or shutter-speed priority, gives the photographer control over the extent that objects in motion reflect that motion in the image. Therefore, shutter-speed priority is usually applied to assist in capturing events, rather than creating fine art. When you set a shutter speed, the camera will automatically set the aperture for a correct exposure. Use a tripod and either the self-timer or a remote shutter release to avoid camera shake. Otherwise, remember: the slowest shutter speed for hand-held photos is the reciprocal of the effective focal length of the lens (e.g., for a 100mm-400mm zoom, at 300mm will require a 1/300 second or faster).
Aperture Value
The Aperture Value (otherwise known as Av or aperture priority) setting on the Mode Dial seems to confuse some folks who are new to DSLRs. The Av setting prompts the camera process that starts with the user-selected aperture, then determines the other exposure values based on that aperture. The major advantage in using aperture priority is that you get to establish the depth of field for the resulting image. In some cases, such as landscapes, a large depth of field is desired (imagine the white-board fences around a field of blue grass and grazing racehorses, backed by the steeples on the stable). Sometimes, a very shallow depth of field is better suited for the scene (a just-emerged Monarch butterfly drying its wings while sitting on the lip of a rusty tin can in a garbage dump).
Today’s lenses all provide a range of apertures; some lenses are able to offer very large apertures, optimized for working with very low light levels. The shorter the lens’s focal length, the easier it is to provide a larger aperture. (In looking at the selection of Canon lenses, all lenses with apertures larger than f/2.0 are 85mm or shorter, with the great majority being 50mm or shorter. Most telephoto lenses of 400mm or longer are f/4.0 or smaller.) Another advantage of a large aperture is the ability to shorten the depth of field to the point that background objects are so de-focused that they appear as soft, rounded, patches of light. The actual roundness of that patch of light, or bokeh, can vary from the shape of a pentagon to almost perfectly round. A lens construction that provides seven or more diaphragm blades generally provides the more rounded bokeh, and curved blades assist in that effort.
One of the great advantages of the DSLR is that the diaphragm (the internal mechanism that changes shape in order to control the resulting aperture) remains wide open, allowing maximum light to pass through the lens until you press the shutter button all the way down. This additional light assists in composition, but will also present the shallowest depth of field in the viewfinder of the Live View screen. To see the depth of field that your chosen aperture will yield, press the Depth-of-Field Preview button on the front of the camera near the lens mount. If viewing through the viewfinder, you may find that the reduced amount of transmitted light darkens the image too much for useful evaluation. This is not a problem when working in Live View, since the Live View feature will amplify the transmitted light, closely approximating the final captured image and clearly revealing the increased depth of field.
Manual
I’ve heard that “real photographers shoot only in Manual mode.” Real or not, many photographers do shoot primarily (if not exclusively) in Manual mode. It certainly eliminates any constraints enforced by the camera, such as the camera automatically determining an aperture when you select a specific shutter speed while in Tv mode, or determining a shutter speed when you select a specific aperture while in Av mode. Along with the freedom to set whatever values you wish is the responsibility for understanding how each of those combinations affect your final captured image. An exposure-level mark, under the exposure-level indicator displayed in both the viewfinder and the LCD Panel, can be used to compare your new exposure setting to the camera-determined standard exposure, which is represented by the standard-exposure index centered above the exposure-level indicator.
Bulb
The EOS 70D’s shutter is a wondrously capable device that is able to capture light in increments as small as 1/8000 of a second up to as much as 30 seconds. For most of us, that range of shutter speeds is sufficient for the majority of our photos. But for some specialized photography unique to certain professions, or even in rare instance for the rest of us, it becomes necessary to use a longer shutter speed. Though you can simply press and hold the Shutter button for the necessary amount of time, you certainly want to have the camera mounted on a tripod. Even then, there is considerable vibration transmitted to the camera, so a remote shutter release capable of holding the shutter open is highly recommended.
Custom
This is certainly one of the modes available in the Creative Zone, but it has only factory-default functions. It’s actually a repository that holds all the settings you select for a particular style of shooting; once you determine what settings you need for, say, photographing birds on the wing, you can save all those settings in this repository and when needed, simply rotate the Mode Dial to the “C” position and all those settings will be made current in the camera. We will discuss this more thoroughly later in the book.
Capturing the Image—Composition and Focus
Composition
Of all the activities involved in taking a photograph, composition is by far the most subjective element and the greatest opportunity to create art. Even if your camera is mounted on a microscope so that you can record the otherwise invisible world, you still determine what to include in your photograph so it will communicate your ideas to your audience. The camera has a robust set of tools to optimize the result, but it can’t create the composition for you.
In composition, you need to be aware of conditions such as strong backlighting, the extremely broad dynamic range required for proper representation of critical components, objectionable features in the background that need to be de-emphasized, inadequate lighting for certain portions of the image, motion by the subject that needs to be emphasized or eliminated, and opportunities to exploit or enhance natural lighting.
Accommodating a variety of lighting conditions can usually be addressed by choosing the appropriate metering method. While Evaluative Metering works well in many cases, it may be wise to consider either Partial Metering or Spot Metering for subjects that are strongly backlit. Just remember that—unlike Evaluative Metering—neither Partial Metering nor Spot Metering considers the point of focus in its determination of exposure; both reference the exact center of the viewfinder. This can become a challenge in some instances, such as macro photography, when you want to use a focus point other than the central focus point to achieve the absolute sharpest image of a very small portion of the composition. That’s where the AE Lock justifies its existence. I use Evaluative Metering with One-Shot AF, set up my composition, and select the focus point I want to use. I press the Shutter button down halfway to achieve focus (the green dot appears at the right edge of the information bar in the viewfinder), move the lens to put the center of the viewfinder (actually, the spot-metering circle) on the subject, press the AE Lock button, reposition the camera to allow the selected focus point to fall on the subject, and press the Shutter button all the way down. Yes, that description seems a bit intimidating, but after you try it a half-dozen times, you’ll feel more confident about the process and it won’t seem so onerous.
Effectively capturing dynamic range in a photograph has been getting a fair amount of attention in recent years. If that’s the current challenge you face, consider using the HDR tool built into the EOS 70D. It’s not as powerful as some of the available software offerings, but it will faithfully tackle many jobs. Spend a bit of time with it so that you better understand its capabilities and limitations.
You can control interfering objects in the background by removing them or by reorienting your setup. When that’s not practical or it totally compromises the quality of the potential image, a physical backdrop can be set in place or a visual backdrop can be created by using remote flash to grossly overexpose the background and eliminate intrusive detail. However, the more common approach to this problem is simply to use a lens with a large aperture. This way, you can reduce the depth of field to a point where background colors are blended and shapes seem to flow, all without creating any stark, high-contrast portions of the image.
Insufficient or incorrect lighting is often a challenge. To a very limited degree, you can address this problem by manipulating one or more of the three exposure factors—ISO, aperture, and shutter speed. Truly taking control of it usually involves bringing more light to the situation. In fact, being able to supply several more light sources can greatly enhance your potential photograph. Some folks are fortunate enough to have access to banks of studio lights, but for the majority of us, it comes down to using electronic flash units. The EOS 70D has a built-in flash that can also serve as a flash commander for remote units. Canon sells a number of capable and sophisticated flash units that can help you master just about any lighting challenges you encounter.
Controlling the appearance of motion in a photograph is typically addressed by choice of shutter speed. A very short shutter speed tends to reduce or eliminate the appearance of motion, and a long shutter speed will blur the image, enhancing the appearance of motion. If you are practiced, you can select a point on the moving subject and pan by following the subject with your camera while keeping that point in the same position in the viewfinder. What the camera will record is a still subject with the world whirling by in the background. Otherwise, the secret to mastering the appearance of motion is in determining which shutter speed to use. Given a moving subject, you need to be able to estimate to some degree of accuracy the speed of the subject as viewed from a line perpendicular to the path of the subject. The subject’s speed is important because you want to determine just how far it will move while the shutter is open. I’ve always been fascinated with the pictures of a rifle bullet exiting a light bulb, water balloon, or grapefruit. It would seem that 1/4000 second should stop just about anything, but most rifles bigger than a .22 move the bullet at over 2,000 feet per second. So, at 1/4000 second, that bullet will travel one half of a foot, or six inches. Similarly, if you’re photographing a race car coming out of a curve at 120 miles per hour, remember it is going 633,600 feet per hour or 176 feet per second. If you divide the car’s speed in feet per second by the allowable motion (in feet) per second, you get an idea of the shutter speed you need. As an example, if you can accept the car moving two inches during the exposure, you get 176 divided by 1/6, or 1,056. That’s a shutter speed of 1/1000 second. Can your lens handle the resulting aperture requirement, or do you need to crank up the ISO to help things out?
When you spend a fair amount of time on kneepads (a concession to advancing years, in my case) capturing close-ups of the wonders of nature, you don’t always get the lighting you want. Though you can bring an electronic flash to the scene, you may want to first consider exploiting or enhancing the existing natural light. There are a number of screens and reflectors available in a variety of forms. For my macro photography, I like the collapsible 22-inch units that are mounted on a spring-steel hoop, which will coil into something approaching an 8-inch circle. These come with a reflective gold, silver, or white surface and generally also include a translucent surface that simply reduces light transmission. That’s very good when your subject is in strong sunlight. The gold is particularly good at warming up some flower colors, especially if used to reflect light up to the underside of the petals or leaves.
Focus
There are instances in which a photograph is intentionally blurred for some unique artistic expression. But for the majority of our photos, we want either tack-sharp focusing or just a wee bit of softening to eliminate some of the extraneous details. Because most, maybe all, cameras are designed to come as close to that tack-sharp criterion as possible, subtle softening is usually accomplished through soft-focus lens filters or, even more common in today’s world, with sophisticated post-processing software. Photographers who specialize in weddings or portraiture seem to be driving the growth of that part of the market. If you use Adobe Photoshop, you may want to look at opening a photo (particularly a photo of an elderly person) in Bridge, then passing the photo to Adobe’s RAW processor. Move the Clarity slider to the right to show every crease and imperfection, or move the slider to the left to defocus the image, effectively removing years from the subject’s appearance. And, certainly, Photoshop offers many more ways (through the Sharpen tools) to assist with this effort, as well.
If you can get a large enough image in the viewfinder to allow critical viewing of the portion of your subject that you want to focus on, then manual focusing is often the best and most accurate choice, but that’s available only when you have a still subject and the luxury of time. Having the camera on a good tripod and using Live View, with its 5x or 10x enlargement ability, certainly makes manual focusing easy to live with. But most photography, and especially action photography, simply does not allow for such an approach to focusing an image. The EOS 70D has a rather sophisticated automatic focusing system that is quite fast and offers enough options that the great majority of photographic situations, with a bit of input from you, can be handled quite capably by the camera.
The EOS 70D offers 19 unique focus points, as shown in Figure 6-2. What an improvement over the days of a single focus point fixed dead center in the viewfinder! Of course, if you’re standing perpendicular to a beautiful quilt hanging on a wall, one focus point is really all you need, and dead center is probably the best place for it. But, if the composition of a photograph is more complex, being able to move the focus point is a real advantage. Then to be able to select a portion of the viewfinder and have the focusing system select the focus points by finding the closest objects in that defined zone—well, that’s just short of magic. The autofocus system is also capable of tracking moving subjects. A lot has happened in photography since Alfred Eisenstaedt pointed his 35mm Leica at a subject, used the split-image rangefinder for focusing (often simply guessing at exposure factors), and still provided photographs that, even today, are considered outstanding.
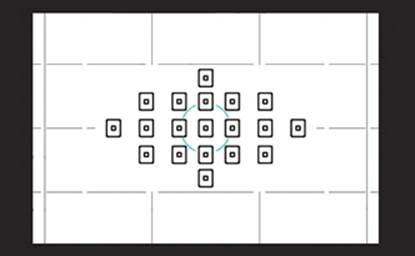
Figure 6-2. The EOS 70D’s 19 focus points and the spot-metering circle
Just how precisely can you position the point of focus? Well, the EOS 70D has 19 focus points available, arranged as shown in Figure 6-2. The area actually used for focusing is a bit larger than the individual small rectangles would indicate, so you get pretty good coverage. However, there are still some gaps, so be alert. This is a good case for not using AI Servo AF, but for using One-Shot AF with AF Area Selection set to Manual Selection: 1 Pt AF. In that setup, you will be able to see the red rectangle that identifies the focus point when the camera achieves focus, allowing you to ensure that the correct portion of your composition is being used for focusing.
How It Works
A little background on the technology Canon uses in the EOS 70D:
The AF sensor in earlier models had some AF points designed to recognize horizontal lines, while others recognized vertical lines, and one or a very few were cross-type AF points capable of detecting lines running in either direction. In the EOS 70D, all AF points are cross-type, greatly increasing the accuracy and speed of achieving focus.
In the EOS 70D, Canon has integrated part of the focusing system from the 5D Mark III, giving us the ability to select a portion of the full 19 points for focusing. By pressing the AF Area
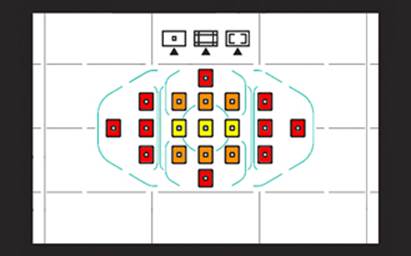
Figure 6-3. The Zone Areas in the 19-point focusing system
Selection button (in front, to the left of the Main Dial), you can select the Zone AF feature represented by the middle icon at the top of Figure 6-3. This breaks the 19-point AF system into a 5-zone system. Any one of these zones can be chosen. With a field chosen, you will see its outline briefly displayed in red when you depress the Shutter button halfway, along with which of its subset of focus points have actually achieved focus. Zone selection allows you to ignore other elements of the composition during focusing.
There is a four-point zone (shown in Figure 6-3 in red) on both the right and the left, another pair of four-point zones at top and bottom (shown in red and orange), and an overlapping 9-point central field indicated by the yellow and orange points (the orange points are shared between the central field and the respective top/bottom fields). Note that these colors are for the benefit of this graphic only, and are not shown in the viewfinder. The blue-green lines are intended to show the scope of the selected field.
Any of the 19 autofocus points will respond to an image formed by a lens with an f/5.6 or faster aperture. There is a central cross-type AF focus point that represents a high-precision autofocus point, and will work with lenses having an aperture of f/2.8 or faster; slower lenses will be able to utilize only standard-precision autofocus points. (Note that autofocus is performed before the shutter is tripped, so the lens diaphragm is still wide open. Focus will have been achieved by the time the lens stops down for the actual image capture.)
How Many Autofocus Points Do You Need?
Up until a few years ago, most of us were quite happy to point the dot in the center of the viewfinder toward a critical part of our subject and accept that such was the way autofocusing worked. When additional autofocus points on the viewfinder’s screen were introduced, we started moving the desired point to different parts of the composition for off-center focus. With stationary subjects, and when a greater degree of focusing accuracy is desired, this kind of manual autofocus point selection is ideal.
In AI Servo AF mode, we enter a whole different world of opportunities for refining autofocusing. This world is designed to accommodate moving subjects. With AI Servo AF mode and Automatic AF Point Selection, you select any one of the autofocus points for initial focus on the subject, and press the Shutter button halfway; as the subject moves, the camera selects surrounding autofocus points to track the subject and maintain focus, taking apparent motion of the subject caused by your attempts to pan the camera with the subject’s movement into consideration.
The more focus points available, the better. Consider the potential focusing options with the 61 focus points offered on the EOS 5D Mark III and the EOS-1Dx. Wow!
All materials on the site are licensed Creative Commons Attribution-Sharealike 3.0 Unported CC BY-SA 3.0 & GNU Free Documentation License (GFDL)
If you are the copyright holder of any material contained on our site and intend to remove it, please contact our site administrator for approval.
© 2016-2026 All site design rights belong to S.Y.A.