Canon EOS 70D: The Guide to Understanding and Using Your Camera (2014)
Chapter 7. Utilizing Some of the Camera's Advanced Features
Shooting with Live View
The Canon implementation of Live View is the most straightforward version of shooting with an LCD that I’ve come across. The whole justification for Live View is the ability to use that large, sharp screen for composing a photograph rather than using the comparatively tiny image in the viewfinder. A benefit of having Live View on the camera is the ability to connect the camera to a computer and use the Canon EOS Utility software to remotely control many of the camera’s functions.
To shoot in Live View mode, be sure the Live View/Movie shooting switch is set to Live View, then press the Start/Stop button.
Live View offers four options for autofocus:
• The first option is Face + Tracking, in which the camera focuses on a face and continues to track it if it moves. Absent a face, you can still touch the LCD Monitor at the position on which you want to focus (for those who wish to use the camera’s buttons and dials, you will need to press the Erase button or the SET button, which will cause the broken-border white box to appear in the center of the screen, then position that box by using the Multi-controller). Simply pressing the Shutter button, without a face in the composition, will select the brightest portion of the view for focusing. As you press the Shutter button halfway, you may see the point of focus identified as the borders of a series of adjacent boxes, the borders of two overlapping rectangles, or the broken outline of a single small box; if displayed in green, these indicators are telling you that the camera has achieved focus. If displayed in red, the camera cannot determine focus.
• The second option is FlexiZone-Multi. In Live View, the AF system works with two overlapping rectangles. The horizontal rectangle consists of an array of boxes three high and seven wide. The vertical rectangle is actually a box, consisting of boxes five high and five wide. Altogether, there are 31 unique boxes that FlexiZone-Multi can work with, in one of two modes. By pressing the Set button, you allow the Live View AF system to select the focus point anywhere within the 31 boxes, and probably within more than one box. If you press the Erase button, you change the mode to one in which the area described by the 31 boxes is subdivided into 9 slightly overlapping zones, with each zone sized to hold 9 boxes (be aware that the extreme outside box in the corner zones is not available for focusing). The Multi-controller or the touch feature can be used to select the zone to be used. Then, focusing will be limited to that zone.
• FlexiZone-Single is the third choice. With this AF option, you can use either the Multi-controller or the touch feature to select the specific point for focus. You should now be looking at the image created by the camera, with a white-bordered rectangle measuring approximately 1/2” by 3/8”, and a thin 3/8” black circle. To achieve optimal focus, press the Magnify button, and the image size increases 5x; press the Magnify button again, and the magnification goes to 10x (pressing the Magnify button a third time returns the magnification to 1x). Of course, any image capture will be at a magnification of 1x, regardless of what may be set for the LCD Monitor’s display.
• Finally, Quick Mode is the fourth option. Quick Mode focusing is dependent on the setting for AF Area Selection Mode. With 1 Pt AF, you can use the touch feature of the Multi-controller to select one of the 19 focus points; with Zone AF, you can select one of the five areas, from which the camera will select one or more focus points; in 19 Pt AF, the camera will choose one or more points anywhere within the area covered by the 19 focus points. Be aware that the Shutter button does not meet resistance at the halfway point while Live View is in Quick Mode AF; the image is captured with no opportunity to ensure a green outline on the focus target.
Pushing the INFO button will display additional data superimposed on the screen. Repeatedly pressing the INFO button will cycle the display through four information layouts, one of which provides no additional information, just the image, the white-bordered rectangle, and the thin black circle. If you are using any of the continuous shooting options while in Live View, the exposure determined for the first shot will be applied to subsequent shots in the series. The LCD Monitor uses a great deal of battery power, so watch the level of charge remaining a bit more closely than normal when in Live View. A fully charged battery is expected to provide power for approximately 200 photos when in Live View. If you’re using the BG-E14 battery grip, then you can double that figure.
Live View can be disabled. If that has occurred, open the Live View Shoot1 menu (the two Live View menu icons show a black rectangle—representing the LCD Monitor—that makes the Live View Shoot1 menu the fifth from the left in the row of menu icons) and enable the Live View Shooting option.
Since the LCD Monitor is busy displaying the current composition, the monitor’s screen is not available for the normal Quick Control button’s display or the normal INFO button’s display. However, when you press the INFO button several times, you will see that there is a circular path of five overlay displays available, with the original display showing nothing but the composed image and the focus points. The second display overlays on the first with a minimal amount of exposure data; the third display shows yet more shooting information; the fourth display adds a brightness histogram; the fifth display replaces the histogram with the electronic level. Pressing the Quick Control button while in Live View gives access to the AF method, drive mode, metering mode, image quality setting, White Balance, Picture Style, Auto Lighting Optimizer, and Creative Filters.
Figure 7-1 presents a good graphic I’ve adapted from the camera’s Instruction Manual. This graphic covers all the information that can be displayed (except for the electronic level) as a result of pressing the INFO button several times:
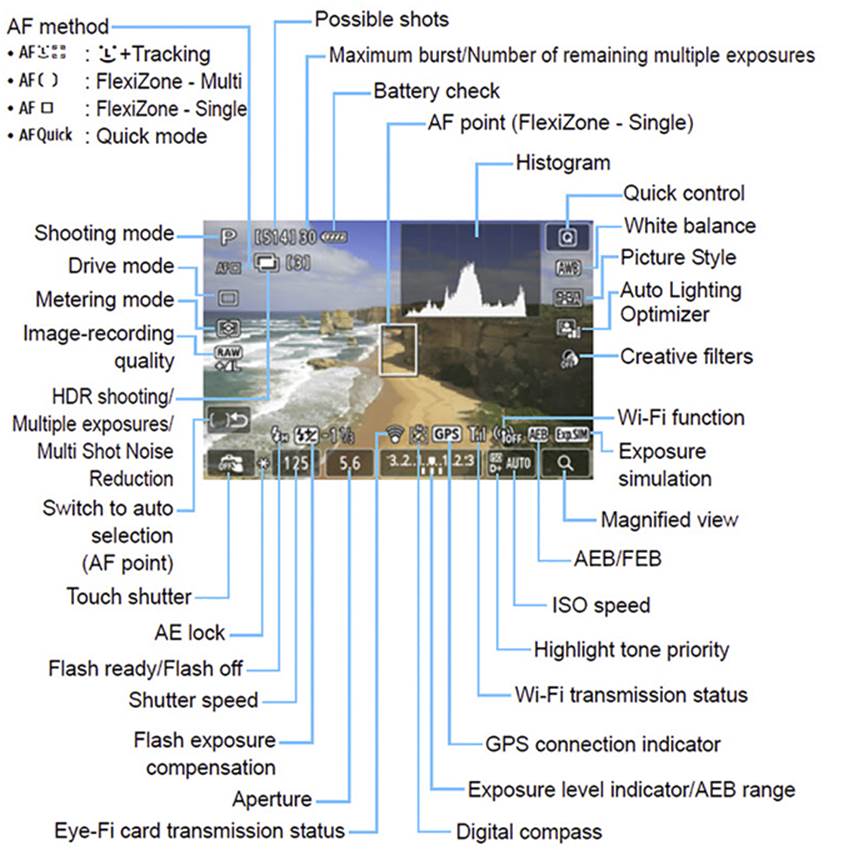
Figure 7-1. The aggregate of data that can be displayed in Live View INFO screens
Silent Shooting
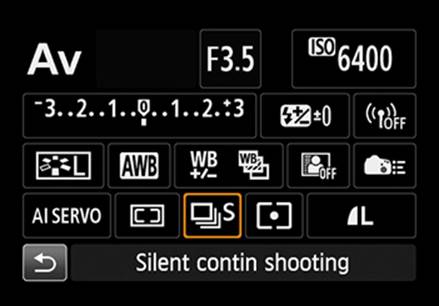
Figure 7-2. Selecting the Drive Mode icon on the Quick Control screen
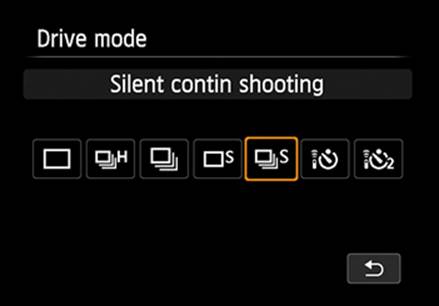
Figure 7-3. Choosing the Silent Continuous Shooting setting
During normal shooting, you can diminish the mechanical sounds of the camera during an exposure by choosing either Silent Single Shooting or Silent Continuous Shooting from the drive mode selections. Though Silent Continuous Shooting often slows things down a discernible amount, you will probably never be aware of any slowing while in Silent Single Shooting.
Silent LV Shooting
Silent LV shooting is a feature that is unique to Live View and is controlled by the Silent LV Shooting option in the Live View Shoot2 menu. As you might infer from the name of this option, its purpose is to reduce the amount of noise associated with mirror and shutter movement. There are three choices, one of which is the Disable option. The other two will diminish the camera’s mechanical sounds.
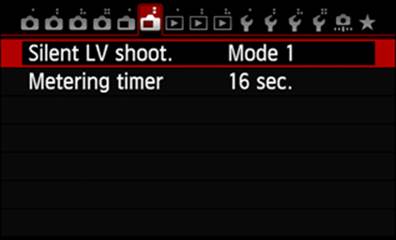
Figure 7-4. The Silent LV Shooting option
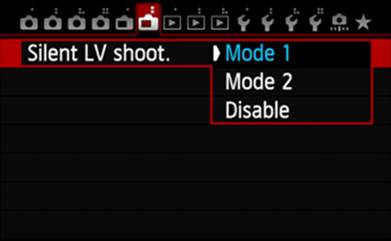
Figure 7-5. Selecting a Silent LV Shooting mode
Mode 1 allows you to use continuous shooting, and Mode 2 is for single-shot exposures. According to the Instruction Manual, maximum speed in Mode 1 will be about 7 frames per second, though the specifications for the camera cite a maximum rate of 3 fps. My own observation indicates the 3 fps figure is closer to correct. Silent LV Shooting and electronic flash are mutually exclusive; the Silent LV Shooting option must be set to Disable for non-Canon flash units to work, or for Canon Speedlites to fire when Drive is set to Silent Single Shooting. With DRIVE set to Silent Continuous Shooting, attempts to use a Canon flash (built-in or external) will result in the first frame being shot using the initial Silent Live View exposure data without flash, and remaining shots in that string will be shot with flash, but not in silent mode and at approximately one frame per second.
There is a Silent LV Shooting option available in the Movie Shoot1 menu as well. Setting the option in either menu will set the option in both menus. Though the option is included in the Movie Shoot1 menu, this option applies only to still photos, not to movies.
Continuous Shooting
Continuous shooting describes the act of pressing the Shutter button and holding it down. This allows the camera, within certain constraints, to continuously record images. Few of us were able to afford the luxury of continuous shooting in the days of film-based SLRs. Fortunately, 36 exposures was the greatest number of exposures most of us could even hope to shoot, so our risk was generally limited to a few dollars. With DSLRs, we are not limited by the dimensions of a film spool, but by the capacity and data-transfer speed of the memory cards we use. Other factors affecting continuous shooting performance include ISO speed, Picture Style choices, any Custom Functions, and the internal buffer size. Under optimal conditions, continuous shooting can capture as many as seven images per second.
If you have a need for a long burst of photographs (25 or more), you will want to set you camera to shoot JPEGs, not RAW, and certainly not RAW + JPEG. The maximum continuous shooting burst when recording both RAW and JPEG is seven exposures. In RAW only, the maximum continuous shooting burst you can record is 15 exposures, unless you are using a UHS-I SDHC memory card of 8 GB or greater, in which case you can expect to record up to 16 exposures. If you are recording Large Standard JPEG images to an 8 GB SD memory card, you should expect to be able to record as many as 103 exposures in a single burst, but if you are using a UHS-I memory card, that value goes up to 1920 exposures. With a shutter that’s been durability tested to 100,000 cycles, you should be able to use this extreme Large Fine JPEG continuous shooting burst example about 500 times before you need to consider having Canon replace the shutter assembly.
Look back to Figures 7-2 and 7-3 for the Quick Control screen and the Drive Mode screen that can be used to quickly set the desired continuous shooting option.
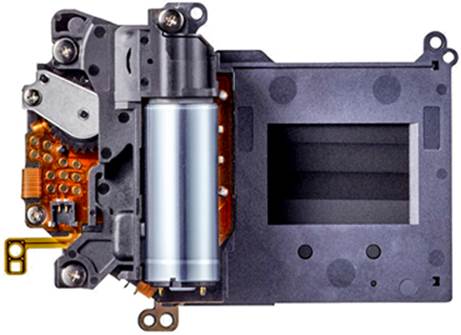
Figure 7-6. Canon shutter assembly for the EOS 70D
Long Exposures
Long exposures are those that require one second or more. Such image captures are especially prone to increased noise, particularly at higher ISO settings. The Shoot4 menu provides the Long Exposure Noise Reduction option, which can be set to OFF, AUTO, or ON. The AUTO option allows the camera to determine whether this special noise reduction technique is applied or not, while ON forces it to be active for every long exposure. The method used is based on the assumption that noise tends to come from the same image sensor pixels, whether light is falling on them or not. So, if a long-exposure image is recorded to the camera’s internal memory, and the sensor is then read again for the same long shutter speed but without light falling on it, the dark image can be subtracted from the first image, effectively removing any noise caused by long exposure. Noise from other sources is not reduced or eliminated by this technique. Be aware that using Long Exposure Noise Reduction results in the camera requiring twice the amount of time as normal. So, if you enable Long Exposure Noise Reduction and shoot an image requiring 27 seconds, the camera will use 27 seconds to capture the initial image, then another 27 seconds to capture the noise-only dark image. The camera will not be available to take another exposure during that time.
Be conscientious about reviewing any long-exposure image captures. In addition to noise, there are several quality-diminishing factors, especially color shifts, which seem to be cumulative during long exposures.
Delayed Exposures
Most photographers, at one time or another, have faced the need to set up a camera, trigger the shutter, then somehow get into the picture. Early efforts involved the photographer setting up the camera and joining the lineup in front of the camera with a rubber bulb in hand. That bulb was attached to a long piece of rubber tubing that operated a pneumatic piston on the camera, which tripped the shutter. With a bit more sophistication, and with focal-plane shutters, cameras started including self-timers, which could count down from a preset amount of time, then trip the shutter when the self-timer got to zero. Indeed, most of today’s DSLRs provide a digital version of this self-timer.
Being able to set up the camera and then enable a 10-second self-timer allows most photographers sufficient time to join the group for their group photos. Most of today’s cameras also support a much shorter timer value; the EOS 70D offers a two-second timer. That’s probably not enough time for you to run to the group before the shutter trips, but it’s just right for shooting many macro photos, as well as tripod-mounted long telephotos: set up the camera, trip the shutter, get out of the way for two seconds, and study your result on the Image Review screen. With the self-timer, the mirror is snapped up out of the way when you press the Shutter button, but the shutter is not opened until the timer runs to zero. That procedure eliminates any vibration introduced by the slap of the mirror being moved out of the way.
Depth of Field and Focus Stacking
Let’s discuss depth of field first.
When we focus on a point in our image composition, we expect to get an image of that point in the final photograph. The laws of physics dictate that as we move focus, we should expect the image of the previous focus point to become defocused, inappropriately enlarged, and blurred, appearing as a circle in the image. Interestingly, our eyes are a bit forgiving, and there is a certain range of displacement from that point in which we do not perceive the enlargement or blurring (we might see some, if the image is enlarged enough, which is why you should consider how an image might be processed in the future). The limit of the focus-range in which we cannot distinguish the blurring caused by changing the focus is described as being the range of acceptably sharp focus, and the circle at the threshold of acceptable sharpness is known as the circle of confusion.
What all that really says to a photographer is that there really is one distance at which a point will be sharp, and for points in front or behind it, there are points that are sufficiently sharp. There! That’s what depth of field is really all about: how much of an image will appear sharp, both in front of and behind the focused subject.
In photography, the greatest influence affecting depth of field is lens aperture. The smaller the aperture is (e.g., f/22), the deeper the depth of field will be. Conversely, the larger the aperture is (e.g., f/2.8), the shallower the depth of field will be. As the aperture goes to f/2.0 or f/1.4 or (gulp! If you can afford it) f/1.2, the depth of field becomes extremely shallow. With apertures below f/16 or maybe even f/11, the only change in focusing is depth of field. But with apertures above f/11 or f/16, while pursuing a greater depth of field, you may experience another phenomenon that seems to defeat the purpose: with small apertures, any lens will start to suffer from some degree of diffraction (a scattering of light waves). As the aperture becomes smaller, the diffraction increases. Remember, for most lenses, the sweet spot is around f/8 to f/11.
Understanding just what depth of field is and how to influence it should give you better control over the composition of your photos. Far too many photographers view their photographs as simple two-dimensional representations of what they saw as they composed the picture. In reality, that composition has a third dimension: the depth of field. Furthermore, increased depth of field is not always the desired objective. If you find a gorgeous rose begging to be photographed, but the background is a mash-up of a falling fence and rusty garbage cans, do you walk on by or consider what you can do to significantly shorten the depth of field? If you could focus on the rose, but visually convert the background into a collage of indistinguishable shapes and soft colors, would you reconsider the opportunity?
Given that you want to capture the rose (or whatever your subject is), your first reaction is to shorten the depth of field, which means making the aperture larger. That means more light will be allowed in, so the shutter speed will probably be shortened, or the ISO set lower. These values depend on just how much you change the aperture. You have two or three tools to help in that decision: the viewfinder, the LCD Monitor if you are using Live View, and the Depth-of-Field Preview button. The image in the viewfinder is pretty sharp, but it is also small, whereas the LCD Monitor is significantly larger. In Live View mode, you can also use the Magnify button to enlarge a portion of the displayed image, which gives you precise selection of the point that will control the focus.
After focusing the image by using either viewing method, press the Depth-of-Field Preview button to see what the final depth of field will be. This is necessary because the camera holds the lens aperture wide open during composition to give you as much light as possible for evaluating the image. The lens will stop down to the set aperture when the Shutter button is pressed, or when the Depth-of-Field Preview button is pressed. If you are using the viewfinder and have selected a very small aperture for the exposure, there may be insufficient light transmitted when the Depth-of-Field preview button is pressed to allow you to clearly see the details of the image. Sorry, but that’s a result of the laws of physics. However, by default, the Live View screen always tries to present a display that is as close to the final image brightness as possible, so it will be adequately bright, even for the smallest aperture the lens supports. It is possible to turn off this artificial illumination, or to limit it to be used only when the Depth-of-Field Preview button is pressed, by selecting the appropriate parameter for the Expo Simulation option in the Live View Shoot1 menu.
Focus Stacking
Focus stacking is not a feature of the EOS 70D, but is a technique that many EOS 70D users will use (or maybe should use). The entire intent in focus stacking is to increase the apparent depth of field of your image. This is a common pursuit in macro photography, but is relevant to other genres as well. The trick is to capture a series of images, starting at one end of your desired focusing range and incrementally changing the focus as you capture each successive image, working your way through the entire range. For a high-quality final product, it is essential that nothing else change—not the exposure, not the composition, and certainly not the focal length of the lens. Depending on the size of the subject and the distance to the subject, the number of focusing increments can vary from three or four to 20, 30, and possibly more. A tripod is strongly recommended for this kind of activity, and using Live View can certainly help with determining where to set the focus for the next image. If you happen to have a computer with you, or if you’re working in an interior facility close to your computer, consider using the Remote Shooting function in Canon’s EOS Utility. In fact, with the EOS 70D, you can accomplish this with the camera’s Wi-Fi capability. With Remote Shooting, you get a replication of the LCD Monitor on your computer screen, which significantly enhances your ability to establish sharp focus. It also lets you control several of the camera’s functions from your computer’s keyboard, the most significant of which (for focus stacking) is manual focus.
The next challenge is to identify the most sharply focused portion of each image and merge those pieces into a final photograph. There are some very good after-market software products that specialize in focus stacking, including the free CombineZM and the free-to-try-out Helicon Focus, which offer relatively simple user interfaces. Of course, you can also use Adobe Bridge and Photoshop, but those programs are intended for a much more comprehensive catalog of tasks, and are not nearly as simple to set up and use. Nonetheless, I’ll use Bridge and Photoshop to prepare an example.
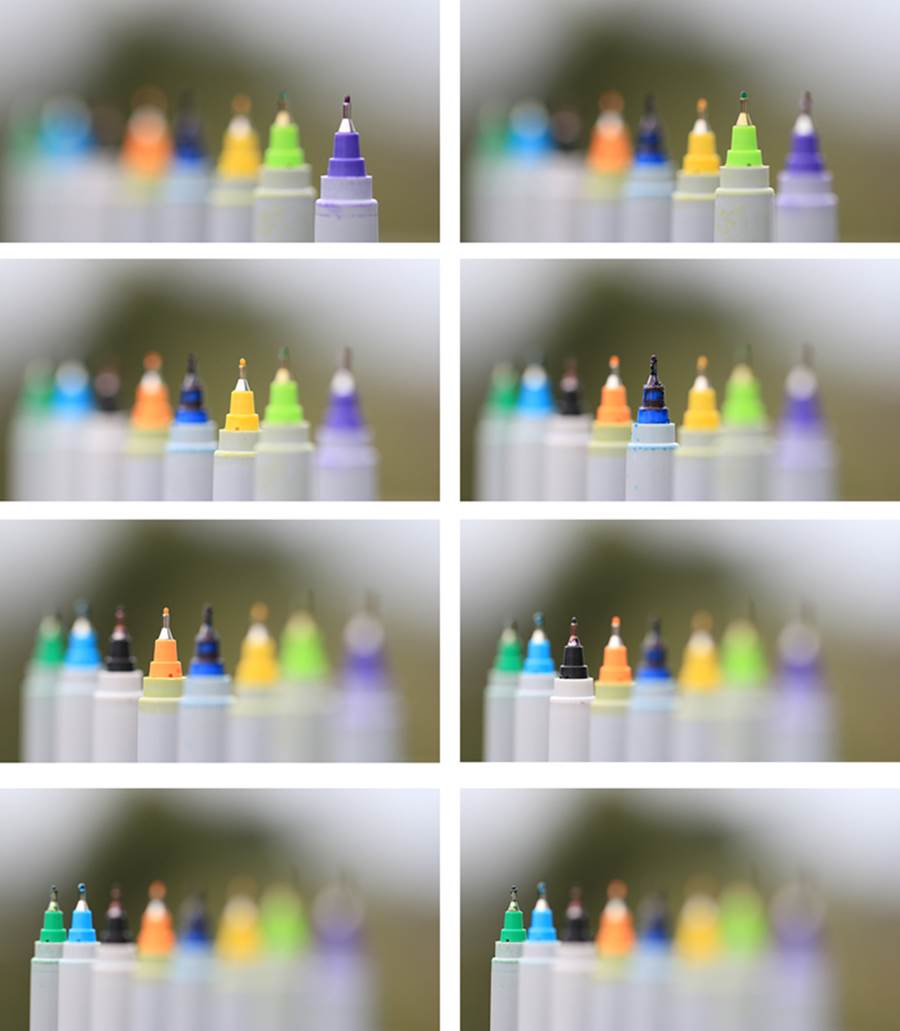
Figure 7-7. The individual images to be focus-stacked
In a Windows environment, the process starts in Bridge, where you first review all the images you have captured for this project. Then select Photoshop on the Tools menu. In the Photoshop drop-down command list, choose Load Files Into Photoshop Layers. Now, in the Photoshop Layers panel, select all of the layers (this can be done very simply by clicking the Select tab on the menu bar, then clicking on All Layers). On the Edit menu, select Auto-Align Layers. In the Auto-Align Layers dialog box, select the Auto option and click OK. On the Edit menu, select Auto-Blend Layers, and on the Auto-Blend Layers dialog box, ensure that Seamless Tones And Colors is checked. Then select Stack Images and click OK. Photoshop selects the sharpest portions of each layer, creating a mask for each image, with the result being a final image created from those individual masks, producing a relatively sharp image with each of the images contributing to a greatly increased depth of field. See Figure 7-9 for the layer stack of masks created for the image shown in Figure 7-8.
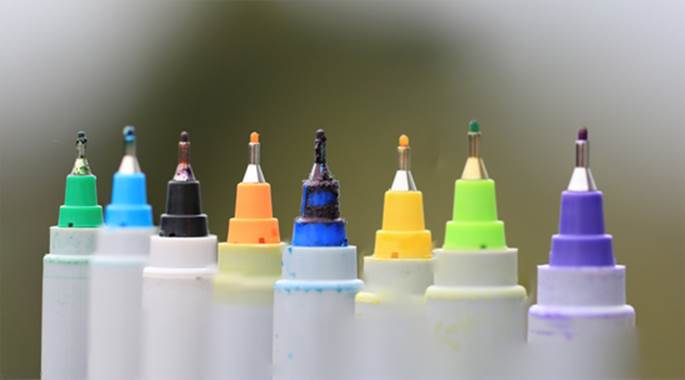
Figure 7-8. The result of focus stacking
Figure 7-7 shows the eight images captured for this exercise. Note that the pen nibs are approximately 3/4” apart, and that the EOS 70D’s focal-plane mark is 24 inches from the dark blue pen (the range of distances, from the purple pen to the dark green pen, is about 21” to 27”). The lens is a Canon EF 100mm f/2.8 L IS USM Macro. Using an aperture of f/2.8 (notice that there is no distracting detail in the background...), the depth of field is about 10/100” at the purple pen, 13/100” at the dark blue pen, and 17/100” at the dark green pen. With such shallow depth of field, it became necessary to focus on each pen nib in order to have it appear sharp in the final focus-stacked image. Looking at the purple pen in the top-left image in Figure 7-7, and comparing the barrel diameter with that of the purple pen shown in the bottom-right, you can see that as the focus diminishes, the scattering of light appears to increase the size of the image. Consider that as you prepare your setup and allow for cropping afterward. Indeed, if you look at the pseudo-images in Figure 7-9, you will see areas of transparency and edge overlap that came from the Auto-Align Layers operation, so the final focus-stacked image will generally need a bit of cropping to remove these artifacts.
If you look closely at Figure 7-8, you can see that some detail was lost in the barrels of these pens. Including images that focused on the barrels would have reduced or even eliminated that problem.
Figure 7-9 shows the masks created in Photoshop that select the sharpest portions of the individual images, resulting in a single composite image. Now let’s see if I can use this kind of result to justify the purchase of a small laptop to take into the field with me...
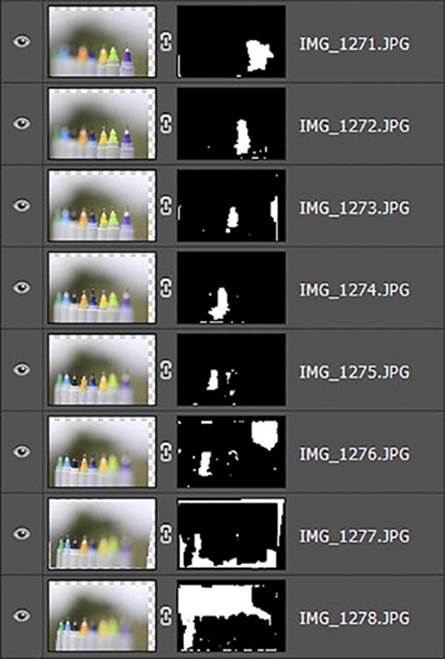
Figure 7-9. The Photoshop layer-stack of masks for a focus-stacking exercise
Wi-Fi
This is not a true acronym, but a trademarked term for any wireless local area network product that meets the IEEE 802.11 specifications certified by the Wi-Fi Alliance. Many photographers have some kind of Wi-Fi configuration in their office already, so expanding it to accommodate communication with the EOS 70D is not an additional expense. For that reason, I’ll focus on Wi-Fi communication between the EOS 70D and a wireless-router-connected computer.
The EOS 70D has the ability, limited though it may be in some configurations, to communicate via Wi-Fi with other Wi-Fi-capable Canon cameras, smartphones, Wi-Fi printers, computers (for file transfers and for remote control of the camera), Canon’s Image Gateway (for saving and sharing images), and with a DLNA (Digital Living Network Alliance)-capable image viewer.
The ability to transfer still images between cameras is limited to JPEG files. It is also limited to transfers between Wi-Fi-capable Canon cameras released in 2012 or later, and does not include camcorders with wireless capability. The ability to play back movies on the target camera is limited to file formats supported by the target camera.
Support for smartphones is provided by the dedicated app EOS Remote, which can be downloaded to the smartphone from the App Store or from Google Play, and is limited to those smartphones running iOS or Android. Canon recommends referring to the download site for information on the required versions of the respective operating systems (iOS or Android). The smartphone is capable of receiving and displaying JPEG and RAW images, but any images saved on the smartphone will be S2-size JPEG images.
The initial configuration for a wireless LAN connection can be a bit of a hassle, but it only needs to be set up once. This LAN connection enables the camera to communicate with several different devices.
Chapter 15 covers the details of menu navigation for Wi-Fi support, so I’ll touch on a bit of it here, but this is not the full story. Obviously, the first thing is to enable Wi-Fi, which is easily accomplished with the Set Up3 menu. Each time you wish to use WI-Fi, you will need to enable it in this menu. Likewise, each time you wish to terminate the Wi-Fi connection, you must disable it in this menu.
For each type of Wi-Fi connection, you’ll need to use the Set Up3 menu to select the Wi-Fi Function option in order to configure the camera’s Wi-Fi feature to recognize and communicate with the LAN-controlling router or access point. Save yourself a bit of time and frustration by gathering configuration data before you sit down with the camera.
Once you have the LAN connection configured, you’re ready to tackle image-transfer opportunities. In my case, I usually start the WFT Pairing software (a part of the EOS Utility software), which establishes the link between the camera and my computer. A small window will appear in which you must select the camera you wish to pair with the computer (for most of us, there is just one entry). If the pairing operation doesn’t start the EOS Utility software, then you will want to do that manually.
Once in EOS Utility, you can choose to batch download images from the camera’s memory card to your computer or remotely control your camera. Remote control allows you to make a wireless connection from your computer to your camera over a distance of several dozen feet. Some applications let you control HDR (high dynamic range); change ISO speed, aperture, or shutter speed (depending on what the Mode Dial was set to before you placed the camera in its remote site); change the White Balance setting; or set up interval shooting—the maximum number of images is determined by the size of the hard disk on which you’ve selected a Destination Folder. With 130 GB of disk space, you can capture about 5,000 images with interval shooting, which comes to almost one shot per second for an hour and 40 minutes. That’s generally more than enough to capture an opening blossom or a new monarch butterfly emerging from its chrysalis. My favorite application with remote control is Live View shooting, during which I can control focus and take an extended set of images without any hands touching the camera and introducing vibration. That’s especially nice for focus stacking or interval shooting when the subject may move.
The Wi-Fi data transfer speed is slower than the USB cable transfer speed, so you will see some delay, and probably some jerkiness in moving objects, in the Live View display on your computer screen.
In my own environment, I can reliably maintain a Wi-Fi connection up to 75 feet (I have not tested beyond that), and from that 75-foot distance, I can shut off the camera and have the Wi-Fi connection automatically restored when I next power on the camera.
All materials on the site are licensed Creative Commons Attribution-Sharealike 3.0 Unported CC BY-SA 3.0 & GNU Free Documentation License (GFDL)
If you are the copyright holder of any material contained on our site and intend to remove it, please contact our site administrator for approval.
© 2016-2026 All site design rights belong to S.Y.A.