Canon EOS 70D: The Guide to Understanding and Using Your Camera (2014)
Chapter 8. The Shoot1 Menu
Menus
The EOS 70D has many menus, with many different formats. That certainly provides you with significant opportunities to customize the camera to your needs and abilities. However, that also means that the user interface—which button does what within a menu—is not consistent, but adapted to the needs of each menu and its options. In many cases, the text on the menu’s screen will lead you through the sequence, but in other instances, there is little or no on-screen help. This section is catered to indicating the specific buttons and sequences required to effect a change on a menu in those situations.
The camera provides five unique groups of menus. Most menus contain multiple submenus, and each submenu contains as many as seven options. The presentation of menus and options has evolved over the last few years, and I believe the 70D’s arrangements are some of the best I’ve encountered. Referring to the graphic under the Shoot1 heading (Figure 8-1), you can see that there is an icon for each of the submenus in the five categories of menus. The currently active submenu will have its white icon displayed against its unique background color, and the inactive submenu icons will be all gray against a black background.
With the exception of the My Menu menu (represented by the star icon) and the Custom Function menu (just to the left of the My Menu menu), these icons represent submenus. Each of the submenus has one or more small white squares above and to the right of its icon. In this book, I’ll use the count of squares associated with a submenu to uniquely identify that submenu; e.g., the third Setup submenu (the wrench icon with three white squares in its upper-right corner) will be referred to as the Set Up3 menu. The colored frame for the selected option in a menu and the colored box representing the current submenu are shown in the same color as the menu background.
To scroll across the range of menu icons one submenu at a time, use the Main Dial or swipe your finger across the LCD Monitor. To scroll the list of options on a submenu, use the Quick Control Dial or the Multi-controller, or simply touch the specific line on the LCD Monitor. To select an option, press the SET button or touch the SET icon; if there is no SET icon, press the SET button.
Shoot1

Figure 8-1. The Menu display with the Shoot1 tab selected
Image Quality
Image quality, as used in the EOS 70D, is a bit of a misnomer. Though the term implies that it would include elements such as resolution, color saturation, contrast, and exposure, in fact—in the world of digital cameras—it relates only to recorded image resolution, including JPEG compression levels.
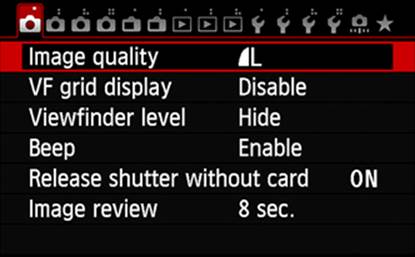
Figure 8-2. Selecting the Image Quality option
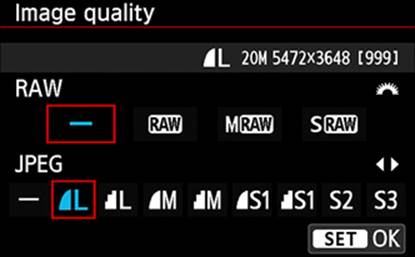
Figure 8-3. Setting image quality for JPEG
In the Instruction Manual, the introduction to this topic is “Setting the Image-Recording Quality.” Though this still seems to include more quality factors than resolution, it does correctly refer only to the recording of the image. That distinction is important, because the only resolution the camera can provide is a function of the image sensor size and the number of pixel units on the sensor. In the case of the EOS 70D, there are a total of 20.9 million pixels on the 22.5mm × 15mm image sensor. The effective resolution is 20.2 megapixels, and anything less than 20 megapixels in a recorded image is a result of setting the Image Quality option to a value other than Large JPEG or RAW.
The EOS 70D is capable of saving images to a memory card in either JPEG format or RAW format. In fact, it can save images in both formats if you wish.
For RAW recording, you can choose between RAW, Medium RAW (M-RAW), and Small RAW (S-RAW). The terms medium and small refer only to the file size. The dimensions of the image are not changed. The number of pixels per unit of length changes in order to achieve the smaller file size. In a RAW image, the recorded file will contain an image that is 5472 × 3648 pixels (243 pixels per mm), an M-RAW image will be 4104 × 2736 pixels (182 pixels per mm), and an S-RAW image 2736 × 1824 pixels (121 pixels per mm). The number of pixels available from the sensor does not change, but the percentage of those chosen for image processing varies: for RAW, all pixels are processed; for M-RAW, 55% of the pixels are processed (roughly two out of every three, in a single line); for S-RAW, only 25% of the available pixels are selected for processing (effectively, only one out of every two, in a single line).
Why in the world would you want to use a setting that essentially discards as much as three-fourths of your image data? If you’re shooting photos for fine art, you should never use anything less than the maximum offered by the camera. But if you’re working on a project in which all your photos will be made available only for viewing on the web, then the S-RAW setting will work just fine, and it will give you a file size that’s only one-fourth the size of a file for a RAW image. You can store four times as many S-RAW images as RAW images. Images stored as M-RAW are higher quality images than S-RAW. They work quite well if they’re being displayed on a digital photo frame, and require only half the storage space of RAW images.
Nonetheless, I tend to avoid M-RAW and S-RAW, and use only RAW when I shoot in the RAW format. Yes, it’s a bigger file and eats up the memory card faster, but I can always reduce the file size in Photoshop for a specific application and still have my full high-resolution original, a real advantage when someone sees one of the lower-resolution images and would like to have a large print. Besides, at the comparatively inexpensive prices for today’s memory cards and computer hard disks, space requirements are just not that much of a concern anymore.
If you choose to record your images to a memory card in JPEG format, the same principles hold true. There’s usually no good reason to select an image quality other than the very best. However, JPEG offers even more image-quality combinations. Bear in mind that JPEG alwaysperforms some degree of lossy compression, which means that there will be some degree of lost detail in every JPEG image. Still, it can be so insignificant that most people will never be aware of it. When I shoot JPEG images, I tend to use the very highest image quality offered, knowing I can always drop the final resolution for a specific need, and still retain a copy of the original high-res image for other work.
As JPEG images enjoy the benefits of in-camera processing based on all the controls that are set, many photographers will opt to save a captured picture as both a RAW image and a JPEG image. You use the sum of their requirements for storage space, but you have a JPEG image that you can immediately post to a website or show on a TV or computer monitor, and also have a RAW image for post-processing in an image editor, enabling you to apply image enhancements.
The following two tables present a summary of Image Quality values, along with the resulting image resolution (in pixels), recorded number of pixels, and file size (in megabytes).
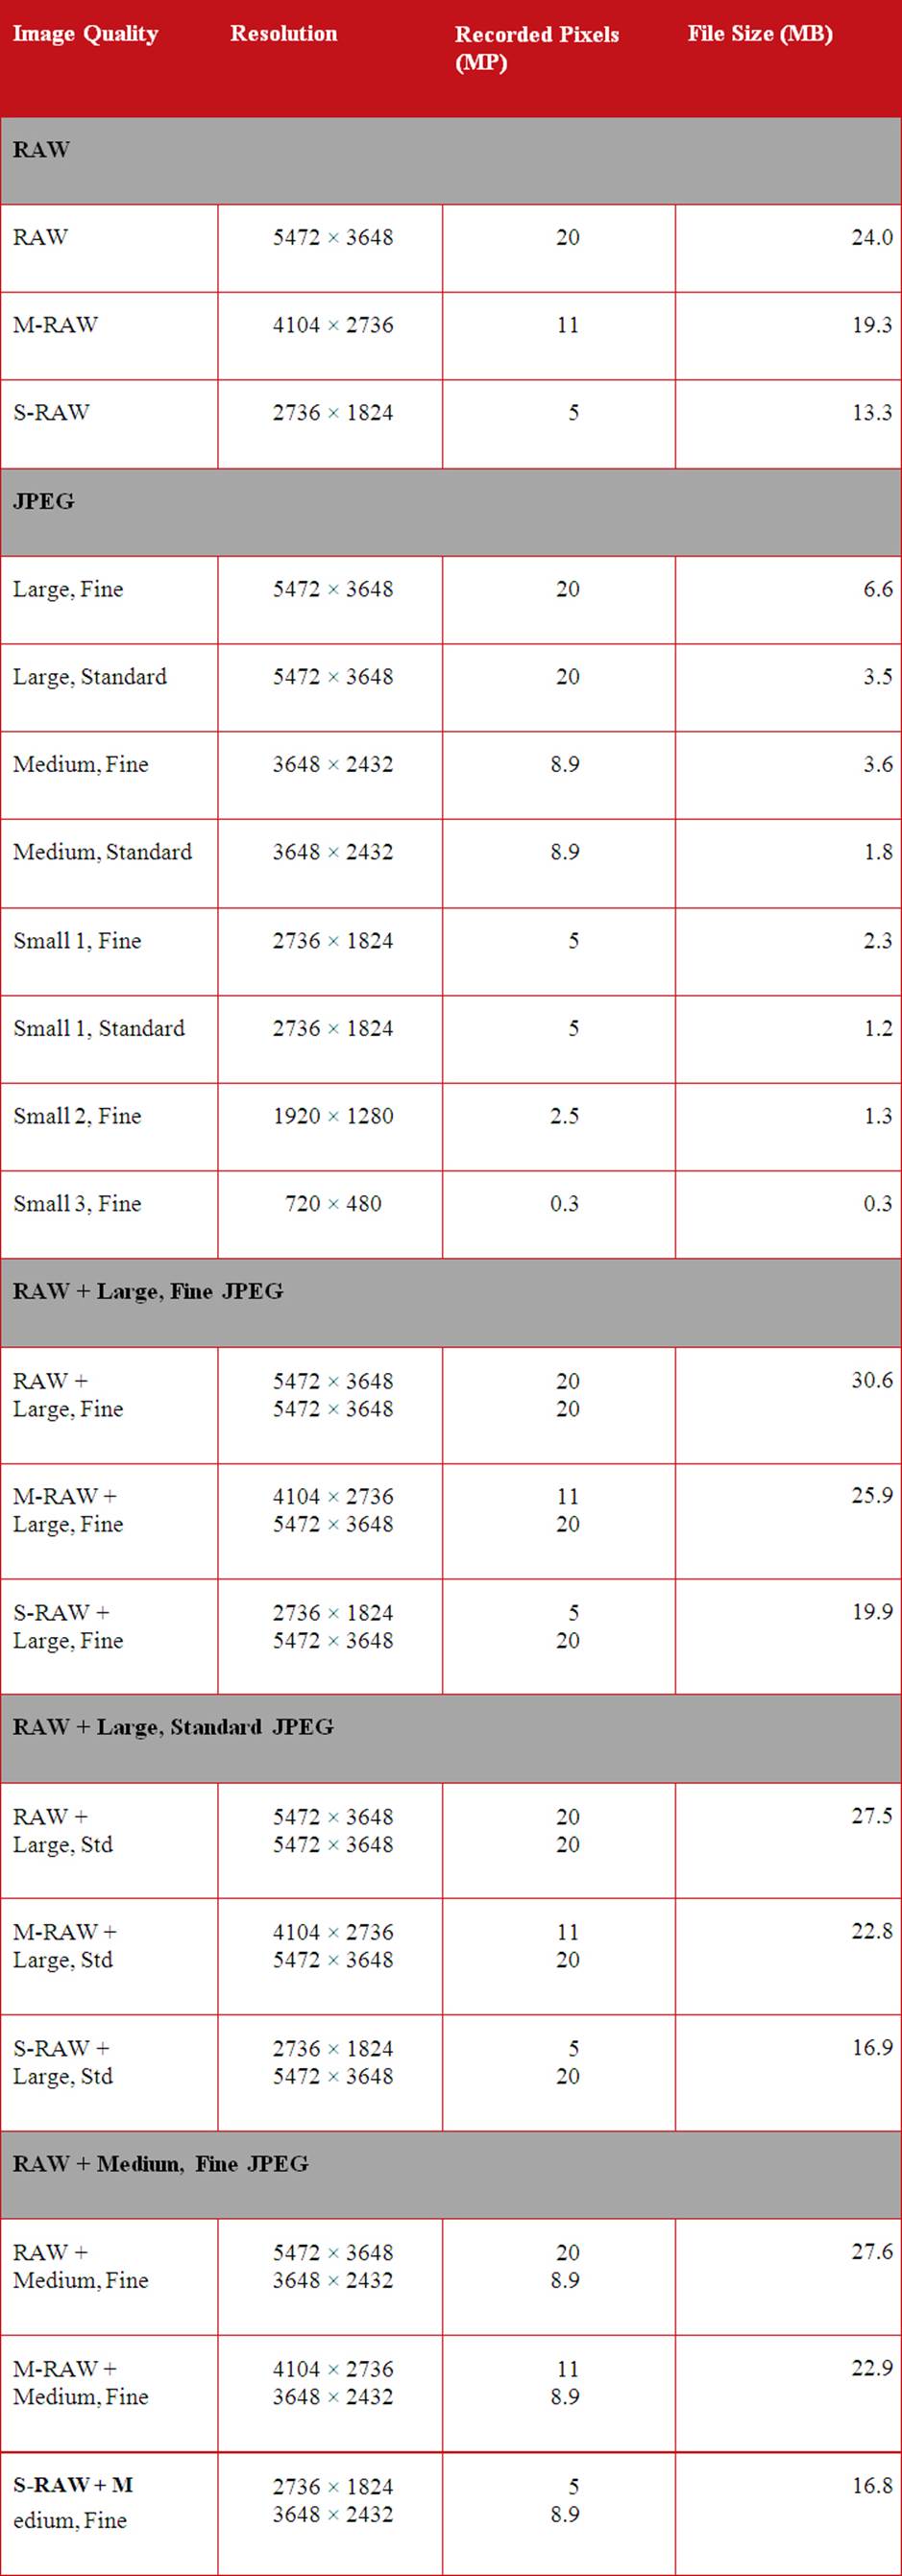
Table 8–1. Image Quality Values/Resolution
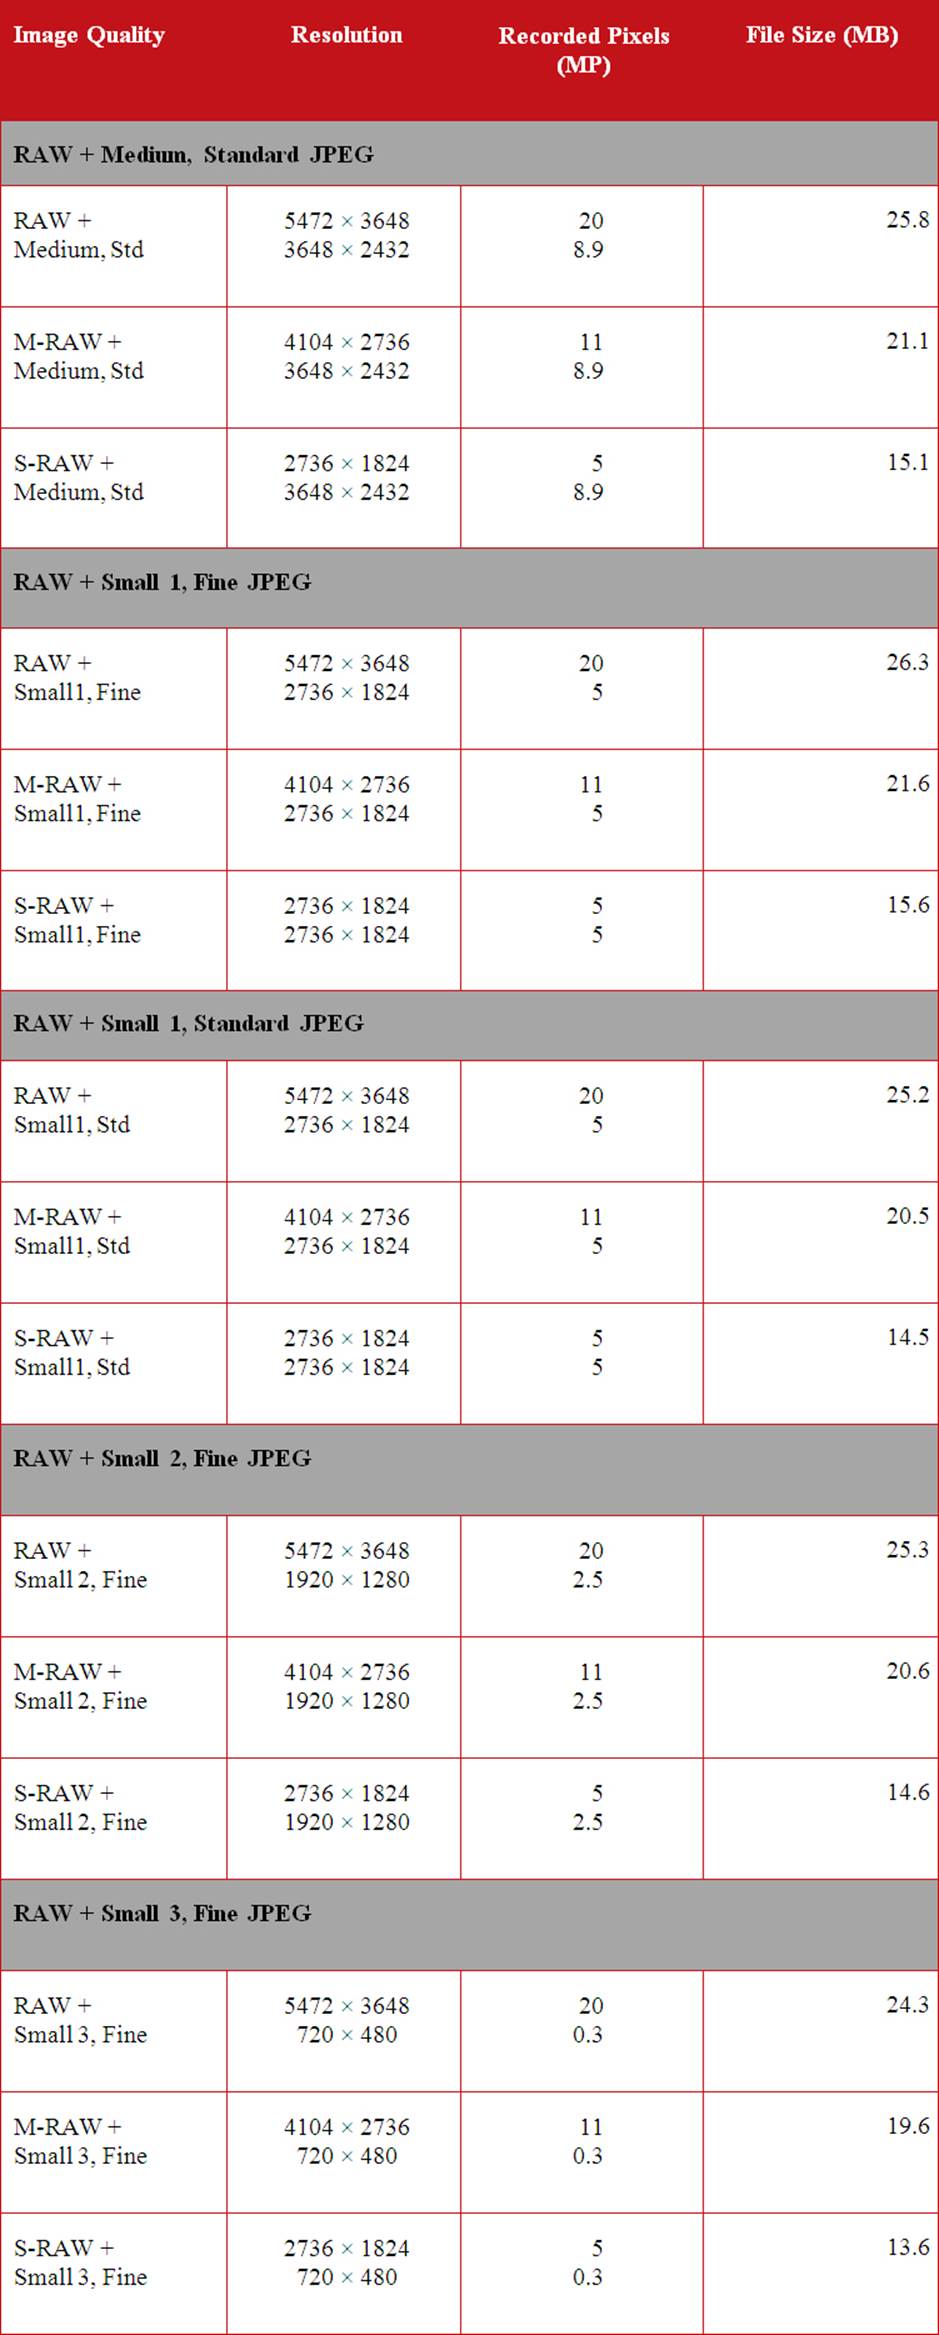
Table 8–2. Image Quality Values/Resolution
In the following table, the Possible Shots data and the Maximum Burst data are based on using an 8 GB SD memory card, except that the Maximum Burst data shown in parentheses reflects the values when an 8 GB SD UHS-I memory card is used.
RAW + JPEG data is available only for Large Fine JPEG combined with the three different RAW options.
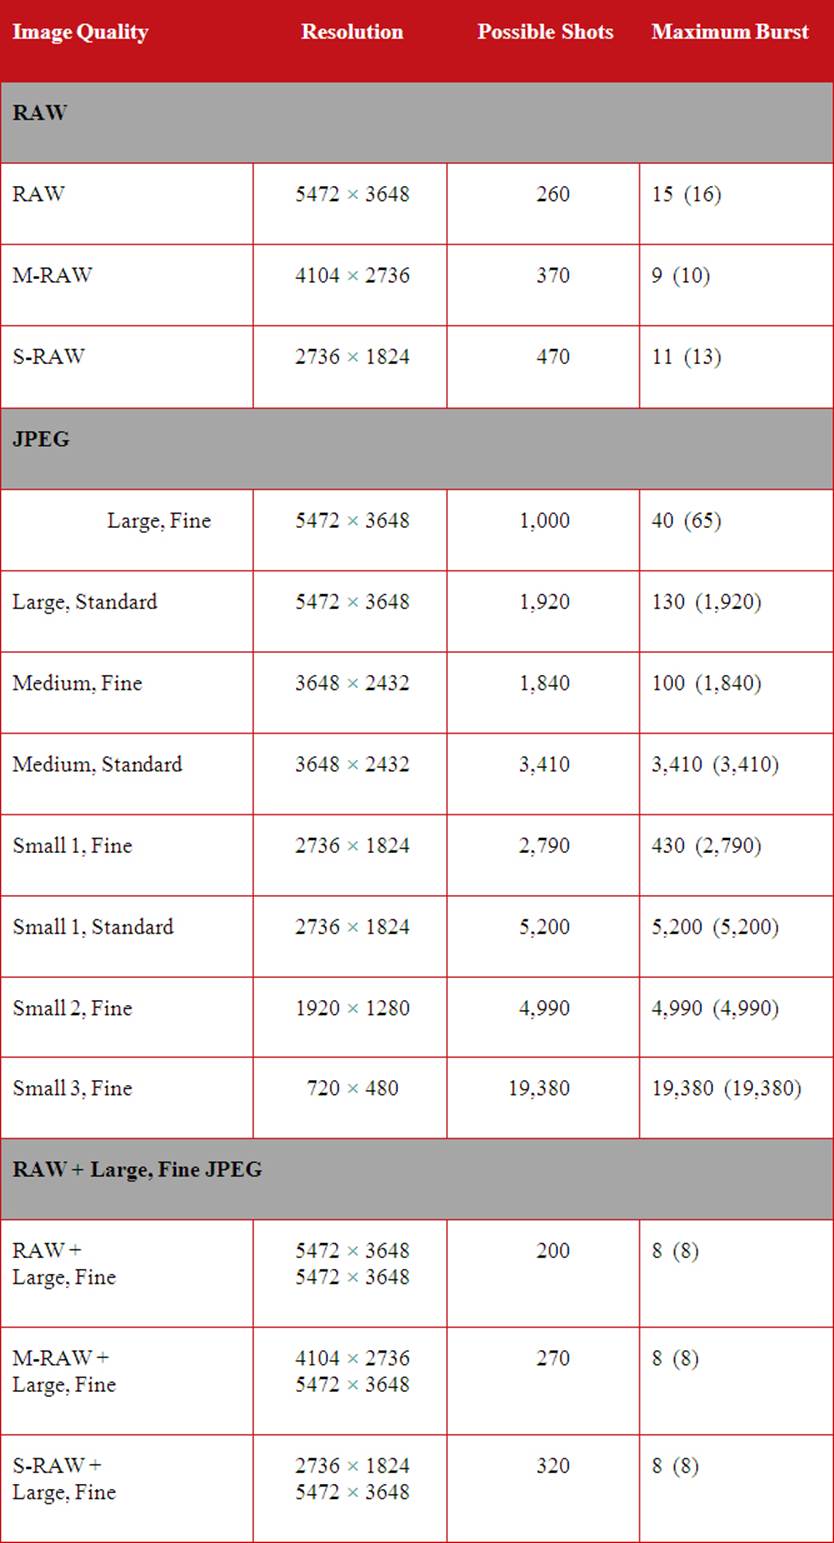
Table 8–3. Image Quality Values/Resolution
As for setting the Image Quality values, you need to determine just what you will be doing with the captured images. If you’re into fine art photography, wedding photography, or anything that demands that you spend a significant amount of time at the computer optimizing the final images, you’ll almost certainly be shooting in RAW (and not M-RAW or S-RAW). Shooting in RAW allows the camera to be a sophisticated machine serving the single, and simple, purpose of capturing the scene you have composed. A number of photographers will shoot in JPEG, either instead of or in addition to recording RAW images. When using a camera to record family history, JPEG is generally quite adequate. In fact, any option less than Large Fine will often satisfy the requirements of photographing a birthday party. Remember that the camera will apply all the image-enhancement options you’ve selected only when you’re shooting in JPEG.
In this chapter, the focus is on using various menus and submenus to configure the camera for specific tasks, but there are often alternate procedures using the Quick Control screen.
To set the Image Quality, start by pressing the MENU button. Then use the touch feature or the Main Dial to navigate to the Shoot1 menu. Use the touch feature or the Quick Control Dial to select the Image Quality option, and touch the SET icon or press the SET button.
In Figure 8-4: There’s a confirmation panel in the upper-left corner that shows that we are in the Image Quality configuration panel.
The top line of data displays the numerical characteristics for each of the chosen Image Quality parameters. The next line identifies the section of the panel used for configuring RAW options; at the far right of this line is an icon for the Main Dial to remind you which controller allows you to change the RAW parameters. You can directly select a value by touching its icon on the LCD Monitor.
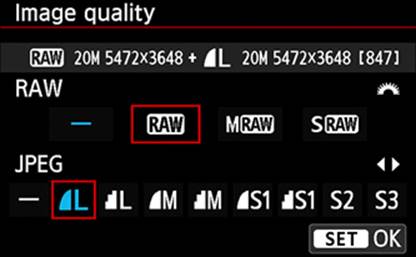
Figure 8-4. Setting both RAW and JPEG image qualities
The row of text under the RAW heading displays the four choices available for RAW. The leftmost is a hyphen, which means that no RAW images are to be recorded. In that case, there will be no numeric data displayed on the top line for the RAW image. Selecting any of the other three values will put its specific name (e.g., M-RAW) on that top line along with the relevant numeric data.
Similarly, on the JPEG row of text there is an icon representing the Multi-controller’s left/right keys at the right end of the line, indicating that the Multi-controller is used to scroll across the nine JPEG options available. (In the EOS 70D, the touch feature or the Quick Control Dial can be used, as well.) If a RAW option other than the hyphen is chosen, then the JPEG hyphen option can be selected, and no JPEG images will be recorded, nor will any JPEG-related data be displayed near the top of this panel. However, if the RAW option is set to the hyphen and the JPEG option is set to the hyphen, then the camera will default to Large Fine JPEG. Touch the SET icon or press the SET button to enable your selection and return to the Shoot1 menu.
VF Grid Display
The EOS 70D allows you to superimpose a grid onto the viewfinder to assist you in aligning horizons, vertical wall, etc. This option is enabled or disabled on the Shoot1 menu as needed. If you used a dial to make your selection, you must use the SET button to make your choice active.
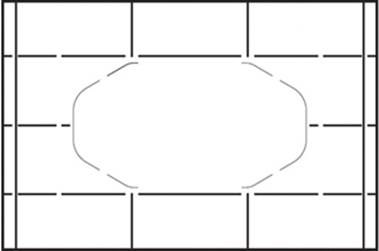
Figure 8-5. The Viewfinder grid
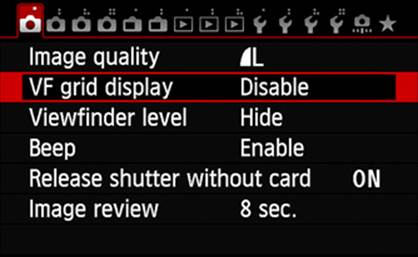
Figure 8-6. Selecting the VF Grid Display option

Figure 8-7. Choosing a VF Grid Display value
Viewfinder Level
The EOS 70D’s Viewfinder Level option allows you to monitor the camera’s horizontal level, in both landscape and portrait modes, while shooting hand-held. Select the Viewfinder Level option on the Shoot1 menu, then choose the Show setting. If you used a dial to make your selection, you must press the SET button to enable this choice. When this option is enabled, you will see a camera silhouette with a couple of radial lines that indicate the degree to which the camera is level.
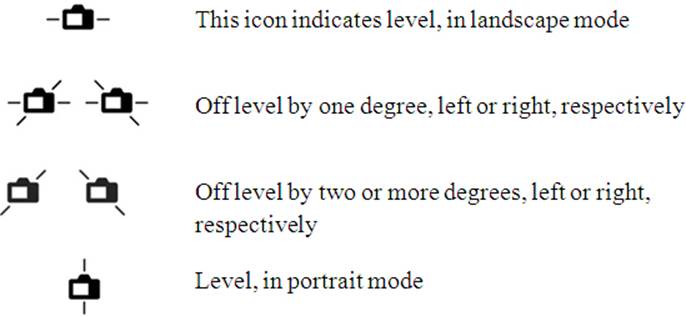
These icons are always black, and can be hard to discern on some images.
Figure 8-8. Selecting the Viewfinder Level option
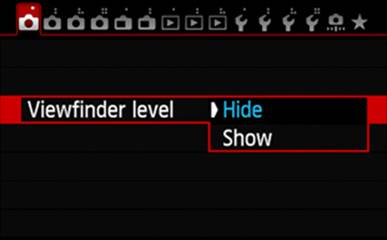
Figure 8-9. Choosing a Viewfinder Level value
Beep
While in the Shoot1 menu, use the touch feature, the Quick Control Dial, or the Multi-controller to select the Beep option. If using the Quick Control Dial or the Multi-controller, press the SET button. Again, use the touch feature, the Quick Control Dial, or the Multi-controller to choose the desired setting, and if you used a dial to make your selection, press the SET button. This will both record the selection and return you to the Shoot1 menu.
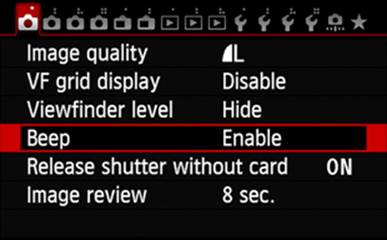
Figure 8-10. Selecting the Beep option
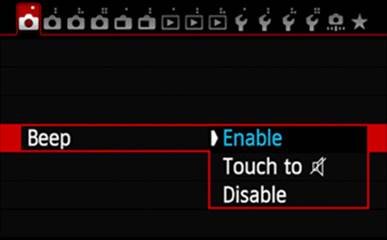
Figure 8-11. Choosing a Beep value
When enabled:
• In the Basic Zone’s Scene Intelligent Auto mode (![]() ), the beeper will sound when the autofocus system achieves focus. If the camera is focusing on a continually moving subject, the beeper will continue to beep softly.
), the beeper will sound when the autofocus system achieves focus. If the camera is focusing on a continually moving subject, the beeper will continue to beep softly.
• In Live View, the beeper will sound when the autofocus system achieves focus. With AI Servo AF mode, the beeper will not sound when the autofocus system achieves focus. However, with AI Focus AF mode, when functioning in Servo mode, the beeper will sound softly when the autofocus system achieves focus.
• The beeper sounds while the self-timer is active, with the beep-rate increasing during the last two seconds.
• The beeper will sound as a warning if, during manual cleaning of the sensor, the camera detects a low battery level.
• During registration of an AF point, a beep sounds to indicate a successful operation.
If you choose the ![]() value, you can suppress the ticking sound that is used to confirm that a touch operation has been accepted. Note that if you choose the Disable value, it will also suppress this touch-confirmation tick sound.
value, you can suppress the ticking sound that is used to confirm that a touch operation has been accepted. Note that if you choose the Disable value, it will also suppress this touch-confirmation tick sound.
When disabled:
• The beeper will not sound when the autofocus system achieves focus.
If the battery level becomes low while you are manually cleaning the sensor, the beeper will sound to warn you to stop cleaning since the mirror will drop back down when the battery level falls to zero. I cannot hear it, although my wife claims the pitch of the beeper is quite high.
Release Shutter Without Card
While in the Shoot1 submenu, use the touch feature, the Quick Control Dial, or the Multi-controller to select the Release Shutter Without Card option. If you used either the Quick Control Dial or the Multi-controller, press the SET button. Again, use the touch feature, the Quick Control Dial, or the Multi-controller to choose the desired value, and then press the SET button or touch the SET icon on the LCD Monitor, which will both record the selection and return you to the Shoot1 submenu.
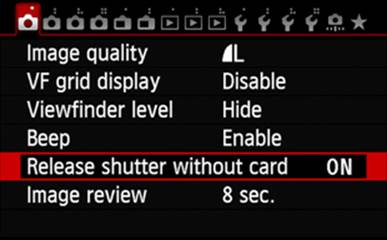
Figure 8-12. The Release Shutter Without Card option
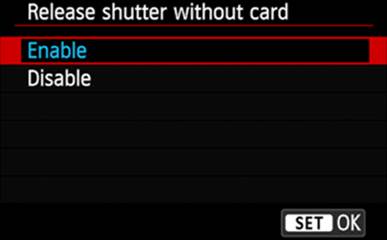
Figure 8-13. Choosing a Release Shutter Without Card value
This is another setting that has only Enable and Disable options. Enabling the setting allows a user to evaluate the numerous functions of the camera, including pressing the Shutter button halfway or even fully, without recording any images on a memory card. This is a common technique in a showroom so potential customers can put the camera through its paces while the memory card remains stowed in a secure drawer.
However, you intend to record photographic images, so I strongly recommend that you set this option to Disable to ensure that you never capture several once-in-a-lifetime images only to discover that there was no memory card in the camera. You cannot simply insert a memory card and have the buffered images in the camera’s internal memory written to it.
Image Review
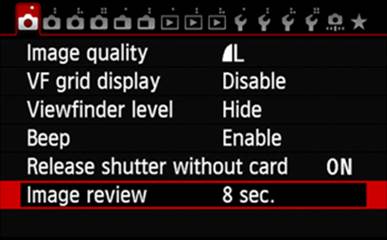
Figure 8-14. Selecting the Image Review option
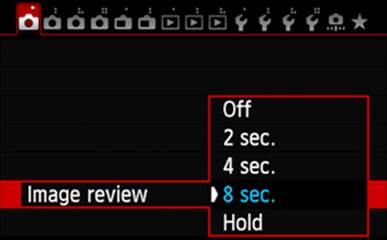
Figure 8-15. Choosing an Image Review value
Immediately after an exposure, the camera will briefly show the captured image, along with exposure details based on your selections from the INFO button options. You can choose two, four, or eight seconds for the display. To keep the image displayed, set to Hold. To not have the image displayed, set to Off. In the Shoot1 submenu, touch Image Review. The other option is to select Image Review, then press the SET button.
Touch the desired time, or select the desired time and press the SET button.
If you have set a long amount of time (or set Hold) for Image Review, but you see another photo opportunity developing, you need only press the Shutter button halfway to terminate the Image Review and proceed with acquiring this new photo.
All materials on the site are licensed Creative Commons Attribution-Sharealike 3.0 Unported CC BY-SA 3.0 & GNU Free Documentation License (GFDL)
If you are the copyright holder of any material contained on our site and intend to remove it, please contact our site administrator for approval.
© 2016-2026 All site design rights belong to S.Y.A.