Embedded Firmware Solutions: Development Best Practices for the Internet of Things (2015)
Chapter 5. Chrome book Firmware Internals
“The world as we have created it is a process of our thinking. It cannot be changed without changing our thinking.”
—Albert Einstein
About Chrome book and Chrome OS
When the first version of Chrome OS became available, many people were asking the same questions: Why? What can it be used for? How is it different from Android? Out of curiosity, many people downloaded it and played with an earlier version. People quickly discovered that it is a neat idea to build an application environment for connected devices that is bounded by a browser-like framework.
Chrome OS takes advantage of the numerous Google cloud-based applications. Why would an OS be designed to depend on the idea that everything would be stored and manipulated in the cloud? Yes, that is the idea. Today’s Chrome book and Chrome OS have the offline capabilities to allow users to write e-mails, view appointments, take notes, manipulate documents, edit photos, read offline web pages, and even play games offline without connection, but it is a machine and operating system built to work with Google’s cloud. Whatever you work on offline is synchronized with whatever is online, once you are connected. While there is a wide range of Chrome OS devices, the look and feel and experience is uniform across the whole product spectrum.
The reason why we include Chrome book and Chrome OS in this book is because of Google’s choice of coreboot as the vehicle to boot its OS. Chrome book may not be designed to be like a typical laptop that can boot multiple operating systems, and it does not have the capability to add and remove internal devices like a PC can, but it is designed to do one thing (if interfacing with cloud is considered as “one thing”) and do it well, and that is all that matters. This idea is what IoT devices are about, with a few dedicated functions, and to maximize its benefits and usability for those functions. Chrome book looks like a PC and smells like a PC, but it is deviating itself from the typical PC paradigm. And its choice of coreboot to simplify and secure the firmware stack not only makes sense, but also matches with Google’s open source philosophy from top to bottom.
As you read this chapter, you will also learn that Chrome devices are designed to be experimented with. Google has held classes to do just that—showing people how to change the internal firmware and software of a Chrome book. After reading this chapter (and the previous chapter about coreboot), as long as you always preserve a way to restore the original firmware and OS image, you should feel free to experiment with the firmware and OS stack.
Chrome OS Firmware Overview
Chrome OS uses coreboot for all its supported CPU architectures (currently, several different flavors of x86 and ARM devices). This allows for a consistent codebase and designed behaviors across all architectures. Google is committed to open source solutions, and coreboot contains the requisite features and capabilities for booting Chrome OS. coreboot, the firmware layer, provides maximum customization for the optimization of power, performance, and security, with a flexible and consistent firmware OS interface, via ACPI.
The internal operations of coreboot was discussed in the previous chapter, so in this chapter, we will highlight any differences and extensions that have been made to coreboot for Chrome OS devices. You should revisit the previous chapter for specific information about the internals of coreboot.
The Chrome OS firmware image is made up of several pieces: the coreboot hardware initialization code, the Google Depth charge payload, and support binaries and libraries required to boot Chrome OS. The image as a whole is called Chrome OS firmware and it should not to be confused with the embedded controller (EC) firmware or other firmware images within the flash device.
Chrome OS Security Philosophy
Google has designed Chrome OS from the ground up with users’ data security in mind. Chrome OS devices use the Google verified boot security library for the chain of trust, which starts in write-protected coreboot romstage.
Chrome OS Security Guiding Principles
The following are Chrome OS security guiding principles:
· The perfect is the enemy of the good. By realizing that there will never be a perfect solution, the developers of Chrome systems can always ship something good enough to protect the users.
· Deploy defenses in depth. There are a variety of defenses to prevent attacks at different levels, so that even if the attacker can penetrate one level, he can be stopped at other levels, making it difficult for the attacker to persist.
· Make devices secure by default. Security should not be optional, and it should not be a trade-off item competing with performance and ease-of-use. Since firmware, Chrome OS, and software are well-integrated by the developers, there can be a seamless security implementation from top to bottom by default, not as an afterthought.
· Don’t scapegoat the user. The design helps the user make decisions only about things they can comprehend, and ensures a fail-safe to make the choice go away when the user does not understand.
Further details are documented at http://www.chromium.org/chromium-os/chromiumos-design-docs/security-overview.
Power wash
To further protect user data, a system may be power washed, which securely wipes the user’s data on the device and returns the system to the default state. This may be performed at any time via the settings screen.
Chrome OS Boot Modes
Chrome OS supports three separate boot modes. The normal Verified Mode boots a Google-signed Chrome OS image. In case of image corruption or other device failure, Chrome OS has Recovery Mode to reinstall the signed image. The third boot mode is Developer Mode, which allows for advanced features and user-customized sources to be loaded.
Verified (Normal) Mode
Verified boot is the cornerstone for the Chrome OS security, which is implemented in concert with coreboot and the Depth charge payload. Google signs all the binary images that make up a Chrome OS device. This includes the coreboot firmware stages, the embedded controller firmware, and the kernel image. As the system boots, each binary image is cryptographically verified prior to running the image. To protect users, the firmware image enters Recovery Mode if any binary verification fails.
Recovery Mode
If something goes wrong in Chrome OS, the system will boot into Recovery Mode. Recovery Mode runs a protected version of coreboot and gives the user an opportunity to recover the system and return to Normal boot mode. Recovery Mode will only boot a Google-signed USB recovery image. Recovery Mode may be automatically initiated when a software or hardware issue occurs. It may also be initiated directly by the user, typically by pressing the Esc+Refresh+Power buttons.
To protect the system during Recovery Mode, the firmware runs the read-only protected version to defend against a problem with a system firmware update or in cases where the system may have been subject to some sort of attack. The read-only version of the firmware can’t be overwritten without physical access to the machine, and then only by removing the write-protect screw (which voids the device warranty).
Developer Mode
Developer Mode allows the user to run the Chrome OS system in an unverified mode. This allows more significant software modifications and system controls at the expense of some security. The user may use the root shell, install unsigned and unverified software, run customized images, or even boot a different operating system.
Developer Mode is, essentially, a built-in jailbreak mode that keeps Chrome OS hardware open and enables fair use for all who want to get a Chrome OS device, but are not quite sure whether they want to commit to Chrome OS over the lifetime of the device.
![]() Note Entering Developer Modeclears the private user data saved while the system is in Normal Mode. A warning screen is shown to the user on each boot, so they know that the device is not secure. Developer Mode may be entered by first entering Recovery Mode and then pressing Ctrl+D.
Note Entering Developer Modeclears the private user data saved while the system is in Normal Mode. A warning screen is shown to the user on each boot, so they know that the device is not secure. Developer Mode may be entered by first entering Recovery Mode and then pressing Ctrl+D.
Once in Developer Mode, the user may wish to boot something other than Chrome OS. This may be done by enabling the Legacy Mode flags. This loads the SeaBIOS payload instead of the Depth charge payload. SeaBIOS supports USB and normal hard drive INT19 (legacy) –style booting.
To enable legacy boot, the following flag must be set via the root shell.
crossystem dev_boot_legacy=1
![]() Note For more information, please check out the information at the following URL: http://www.chromium.org/chromium-os/chromiumos-design-docs/developer-mode.
Note For more information, please check out the information at the following URL: http://www.chromium.org/chromium-os/chromiumos-design-docs/developer-mode.
Chrome OS Coreboot
Chrome OS is developed on several CPU architectures. Currently, x86, ARM (including ARM64), and MIPS are supported; each architecture requires custom firmware.
x86
For the x86 architecture, the Chrome OS coreboot does not use the Intel FSP as described in the coreboot chapter. It has a smaller Intel firmware binary image, similar to the FSP, and the firmware binary image is specifically tailored to meet the performance and boot time requirements for Chrome OS. The Intel firmware binary image contains subsections of the Memory Reference Code (MRC) and System Agent code.
![]() Note As this book is written, Google has come down the path of using MRC binary in the firmware stack, and Intel FSP was made available later. There is an ongoing evaluation effort between Intel and Google to decide on the best solution for future projects. In other words, MRC and Intel FSP may converge in the near future.
Note As this book is written, Google has come down the path of using MRC binary in the firmware stack, and Intel FSP was made available later. There is an ongoing evaluation effort between Intel and Google to decide on the best solution for future projects. In other words, MRC and Intel FSP may converge in the near future.
ARM
x86 is well represented in the coreboot codebase. coreboot was originally designed around PCI standards first introduced in x86. Google has combined x86 and ARM support into a common codebase. ARM wasn’t discussed in the previous coreboot chapter, so we will give a brief overview here.
The number of ARM SOCs supported in coreboot at this time is still significantly behind the number of x86 processors and chipsets, but the number is steadily increasing. The first ARM SOC that started off ARM architecture support in coreboot was the Samsung Exynos 5250, which was added as an experimental proof of concept. Since then, several SOCs have been supported, including newer Exynos, Nvidia Tegra, and Qualcomm devices. Similar to x86, some of the systems require certain binary-only components—like a signed first-stage bootloader or a microcode—to fully function.
![]() Note Please check out coreboot differences at http://git.chromium.org/gitweb/?p=chromiumos/third_party/coreboot.git;a=summary.
Note Please check out coreboot differences at http://git.chromium.org/gitweb/?p=chromiumos/third_party/coreboot.git;a=summary.
Depth charge Payload
The Google Depth charge payload has a single, focused goal: to securely boot Chrome OS. It is designed to be simple, small, and easy to learn. Being simple and small, it has a quick load time, fast execution, a small attack surface, and is generally very efficient. Depth charge uses two libraries: vboot and libpayload.
Depth charge is loaded by coreboot just as any other coreboot payload. It resides in CBFS and is loaded immediately after coreboot has initialized the hardware. The code flow is fairly simple, as shown in Figure 5-1.
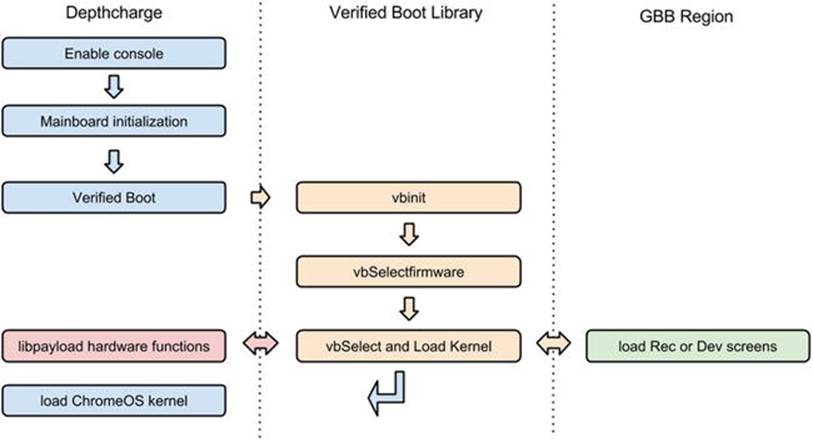
Figure 5-1. Verified boot flow with Depthcharge payload
Depth charge will only load Chrome OS and can’t boot any other operating system. Depth charge can chain load other payloads in Developer Mode, which may be used to load an additional payload, like SeaBIOS, which may load other operating systems.
libpayload
Depth charge is built upon lib payload. As mentioned in the “Payloads” section of Chapter 4, lib payload is a library of common payload functions and hardware drivers provided by coreboot. It is used by Depth charge and has the following lib payload features:
· A subset of libc and other utility functions
· malloc/free, printf, “string” functions, rand, *delay, etc.
· Tiny ncurses implementation for console and Developer Mode display
· Functions to read and parse the coreboot tables
· LZMA compression
· CBFS utility functions (see Chapter 4 for more information on CBFS)
· Device drivers
· PCI/PCIe: USB ver. 1, 2, 3—HID, mass storage, hubs; SD and eMMC; SATA (hard drive)
· CBMEM: Serial console and frame buffer console; CMOS; PC keyboard
Verified Boot
Verified boot is used within coreboot and Depth charge to ensure that only signed code is executed. It is based on security standards starting with a Root of Trust. The Root of Trust on Chrome OS devices is in read-only (RO) firmware protected by physical hardware write protection. The device reset vector (the first instructions executed) is in the RO area of flash (see Figure 5-2). Then, the RO firmware verifies a signed read-write (RW) firmware (VB_Firmware). (The RW firmware may be updated to fix issues in the field). The RW firmware verifies the Chrome OS kernel signature (VB_Kernel) prior to loading it.
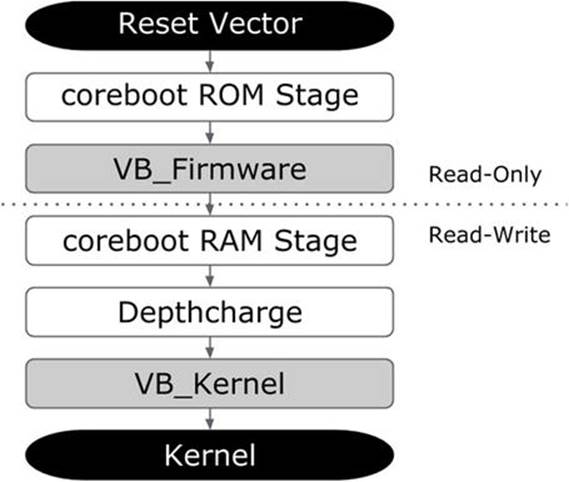
Figure 5-2. coreboot boot flow from reset to kernel
Verified Boot and Kernel Security
After the firmware has verified and loaded the kernel, the Root hash is passed to the kernel-on-kernel command line by Depthcharge. The kernel continues the Root of Trust–based security model and mounts the root filesystem as read-only (see Figure 5-3). The kernel security hashes each block in the image. The block hashes are bundled and structured in a tree, and subsequent read blocks are hashed and checked against the tree. The hash tree is stored in the page cache.
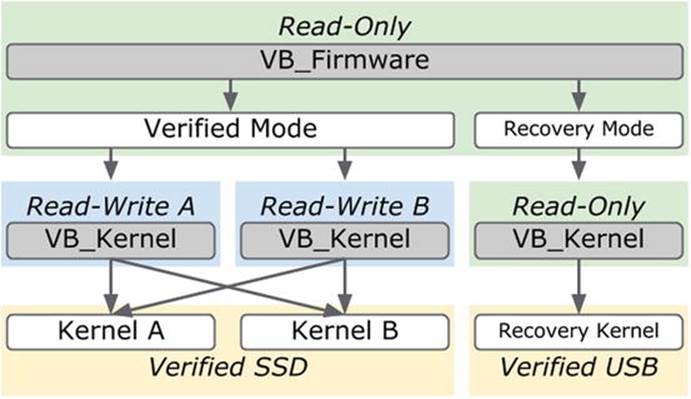
Figure 5-3. Verified boot and kernel security
![]() Note Reference implementation is available in the Chrome OS source code:http://git.chromium.org/gitweb/?p=chromiumos/platform/depthcharge.git;a=summary.
Note Reference implementation is available in the Chrome OS source code:http://git.chromium.org/gitweb/?p=chromiumos/platform/depthcharge.git;a=summary.
Chrome OS Firmware Boot Log
Traditionally, coreboot sends its boot console log messages to a serial port. The coreboot and Depth charge firmware boot log is saved to CBMEM on Chrome OS systems. This log is extremely helpful in debug and it contains useful information to the curious user.
In Chrome OS, the boot log is available in the system information at chrome://system and by then clicking on the Expand button under bios_log.
In Developer Mode, the boot log is easy to access in /sys/firmware/log:
# cat /sys/firmware/log
Boot Times Log
In addition, the firmware boot times are available under bios_times:
There are 23 entries total:
1:start of rom stage 50,048
2:before ram initialization 52,139 (2,091)
3:after ram initialization 73,927 (21,787)
4:end of romstage 74,426 (499)
5:start of verified boot 74,706 (280)
6:end of verified boot 329,652 (254,946)
8:start of copying ram stage 330,040 (387)
9:end of copying ram stage 346,012 (15,972)
10:start of ramstage 346,040 (28)
30:device enumeration 346,115 (74)
40:device configuration 400,461 (54,346)
50:device enable 404,182 (3,721)
60:device initialization 405,091 (908)
70:device setup done 459,755 (54,663)
75:cbmem post 459,770 (14)
80:write tables 467,590 (7,820)
90:load payload 468,743 (1,152)
99:selfboot jump 494,047 (25,304)
1000:depthcharge start 496,598 (2,551)
1002:RO vboot init 496,605 (7)
1020:vboot select&load kernel 498,680 (2,074)
1100:crossystem data 1,031,758 (533,077)
1101:start kernel 1,032,895 (1,136)
In Developer Mode, the boot log is easy to access in var/log/bios_times.txt:
# cat /var/log/bios_times.txt
Chrome OS Firmware Event Log
The coreboot boot log in CBMEM contains a lot of detailed information about the current boot, but it is lost when the system reboots and cannot be accessed when the system is in a nonbootable state. In order to debug issues across several reboots, all coreboot-based Chrome OS systems have a persistent log of system events.
The event log is based on SMBIOS Type 15 Event Log format, but uses a number of OEM events to provide additional information. The mosys application that is part of Chrome OS can be used to read and decode the log by running the mosys event log list as the root user in Chrome OS if the device is in Developer Mode, or by opening chrome://system and looking for the event log entry in Normal/Verified mode.
# mosys eventlog list
12 | 2013-01-15 10:47:43 | ACPI Wake | S5
13 | 2013-01-15 10:47:43 | EC Event | Lid Open
14 | 2013-01-15 10:47:43 | System boot | 142
15 | 2013-01-15 11:51:42 | ACPI Enter | S3
16 | 2013-01-15 21:05:37 | ACPI Wake | S3
17 | 2013-01-15 21:05:37 | Wake Source | GPIO | 11
18 | 2013-01-15 21:05:38 | Kernel Event | Oops
19 | 2013-01-15 21:05:38 | Kernel Event | Panic
20 | 2013-01-15 21:05:39 | System boot | 143
10:47 - Power on because lid was opened
11:51 - System is suspended
21:05 - Wake from suspend due to GPIO 11 (Touchpad)
21:05 - Kernel oops+panic on resume
Google SMI Linux Kernel Driver
The Google SMI kernel driver implements a kernel interface to talk to the firmware’s System Management Interrupt (SMI) handler. It allows kernel events to be stored in the firmware event log. The driver hooks into kernel notifier chains and records the following conditions to the log:
· panic
· thermal
· reboot
· die
Chrome OS Extensions to the Firmware Image
As discussed in previous sections, Google has added a number of features and capabilities that are beyond a standard coreboot firmware image. These extensions cohabitate within the firmware image along with coreboot, payloads, and vendor binaries. The extensions in the following subsections were added to help facilitate the many features in the flash image.
FMAP
FMAP is a simple specification for the layout of flash devices. It doesn’t make assumptions about the underlying technology. For example, it may be used by coreboot, Legacy BIOS, UEFI, and EC images. FMAP only defines regions in flash. Unlike the coreboot file system CBFS, FMAP defines fixed-size regions.
fmap structure:
struct fmap_header {
char fmap_signature[8]; /* "__FMAP__" */
uint8_t fmap_ver_major; /* Major version number of this structure */
uint8_t fmap_ver_minor; /* Minor version number of this structure */
uint64_t fmap_base; /* Physical address of the flash chip */
uint32_t fmap_size; /* Size of the flash chip in bytes */
char fmap_name[32]; /* Descriptive name of this flash device */
uint16_t fmap_nareas; /* Number of areas described by fmap_areas[] */
struct fmap_area_header {
uint32_t area_offset; /* Offset of this area in flash device */
uint32_t area_size; /* Size of this area in bytes */
char area_name[32]; /* Descriptive name of this area */
uint16_t area_flags; /* Flags for this area */
} fmap_areas[0];
} __packed;
#define FMAP_AREA_STATIC 0x0001 /* Area contents will not change */
#define FMAP_AREA_COMPRESSED 0x0002 /* Area holds potentially compressed data */
#define FMAP_AREA_RO 0x0004 /* Area is considered read-only */
A Chrome OS firmware FMAP example is shown in Table 5-1.
Table 5-1. FMAP Example
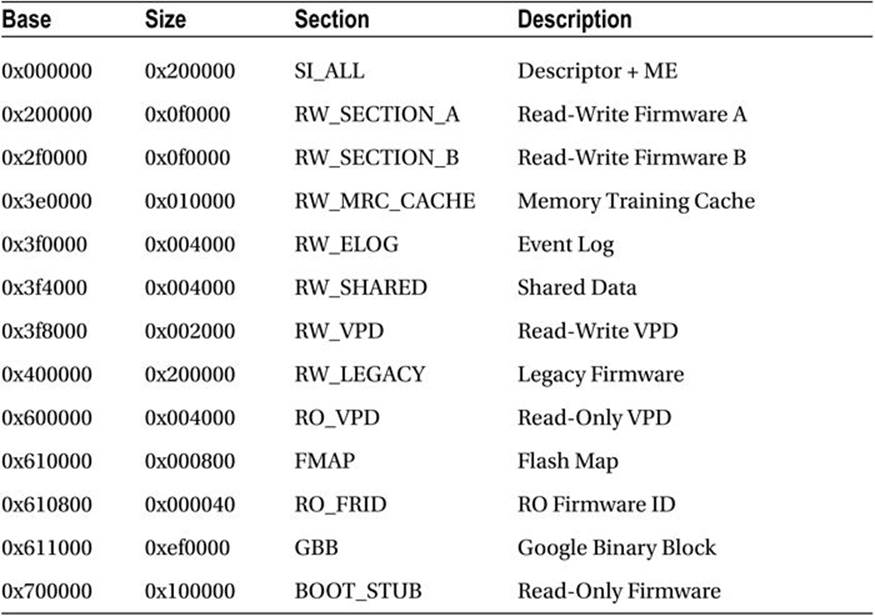
BOOT_STUB FMAP Section
The BOOT_STUB section contains the reset vector location at the end of the rom (for x86), as well as all the read-only firmware. This includes the coreboot rom stage and verified boot image used by the normal verified boot path. It also contains the complete RO firmware for Recovery Mode, which includes read-only versions of coreboot ram stage and Depth charge.
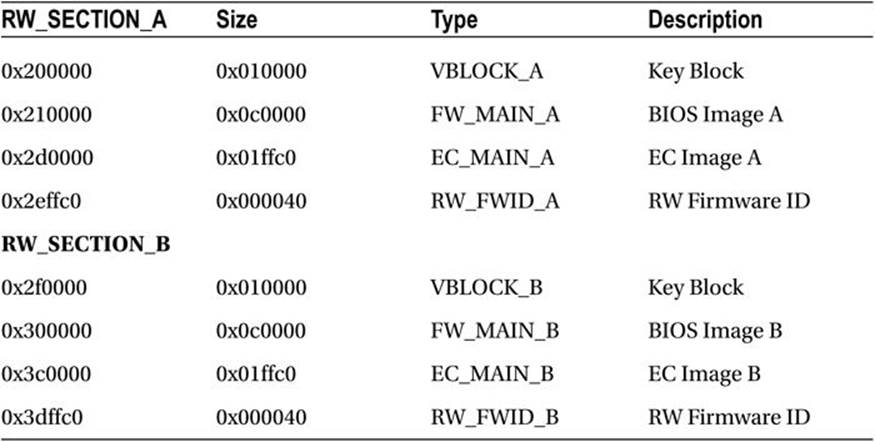
Chrome OS Firmware RW FMAP Sections
Chrome OS firmware contains two read-write sections. These are updated separately in case there is a problem with the update process. When a firmware update happens, only one of the sections is updated with a new image. Once the system has booted successfully with the new firmware, the old firmware in the other section is overwritten with the new firmware. If the firmware update fails, the system will automatically fall back to the old, known good firmware. A Chrome OS firmware FMAP RW Section example is shown in Table 5-2.
Table 5-2. FMAP Read-Write Section Example
The FMAPorganization is defined by the fmap.dts file located in the Depthcharge payload (see the following example).
An fmap.dts (RW_SECTION_A) Example
rw-a {
label = "rw-section-a";
reg = <0x00200000 0x000f0000>;
};
rw-a-vblock {
label = "vblock-a";
reg = <0x00200000 0x00010000>;
type = "keyblock boot,ecrwhash,ramstage,refcode";
keyblock = "firmware.keyblock";
signprivate = "firmware_data_key.vbprivk";
version = <1>;
kernelkey = "kernel_subkey.vbpubk";
preamble-flags = <0>;
};
rw-a-boot {
label = "fw-main-a";
reg = <0x00210000 0x000c0000>;
type = "blob boot,ecrwhash,ramstage,refcode";
};
rw-a-ec-boot {
label = "ec-main-a";
reg = <0x002d0000 0x0001ffc0>;
type = "blob ecbin";
};
rw-a-firmware-id {
label = "rw-fwid-a";
reg = <0x002effc0 0x00000040>;
read-only;
type = "blobstring fwid";
};
The FMAP reference implementation is available at http://flashmap.googlecode.com.
Google Binary Block (GBB)
The Google Binary Block (GBB) is a simple binary storage interface for Chrome OS devices. It is stored in a region in read-only firmware and located via the FMAP. It contains the following information:
· Hardware Identification (HWID)
· Firmware Root Key
· Recovery Key
· Bitmaps for firmware screens and translations of firmware messages
· A Flags setting to enable/disable Chrome OS–related features and boot configuration
GBB: HWID v3
The Hardware identifier is unique for each Chrome OS device model. It is generated by an algorithm that catalogs all HW and FW components, as well as the platform name, build phase, and the RO firmware version. It is generated for each board during the factory process. HWID is used to uniquely identify each platform hardware variant to ensure compatibility during recovery and updates.
GBB: Firmware Bitmaps
The firmware image screens for Recovery Mode help and Developer Mode warnings are included in the GBB area. These images have localized text overlays for the transition to and from Recovery and Developer modes. The user can switch between locales with arrow keys. The images are LZMA-compressed bitmaps to minimize space and they must be available for the RO firmware.
GBB: Firmware Keys
Public keys in GBB are used for verification of the binaries, which are signed by the Google private keys during the build process. The binary data is not encrypted; it is only hashed. The GBB contains the Root and Recovery Public Keys, which are RSA-8192 + SHA-512. Subsequent keys are smaller. Each signing key is versioned and the Verified boot will reject lower versions.
GBB: Boot Flags
The boot flags are flags that alter the Chrome OS boot path. They override the nonvolatile flags set with the crossystem tool. The flags are used to enable alternate booting for the factory process, but they can also be used by the end user to customize a boot after entering Developer Mode and disabling write protect. A list of the boot flags is located in Table 5-3.
Table 5-3. GBB Boot Flag Types
|
Flag Name |
Flag Value |
Description |
|
GBB_FLAG_DEV_SCREEN_SHORT_DELAY |
0x00000001 |
Reduce Developer screen delay to 2s |
|
GBB_FLAG_LOAD_OPTION_ROMS |
0x00000002 |
Load option ROMs from arbitrary PCI devices (obsolete) |
|
GBB_FLAG_ENABLE_ALTERNATE_OS |
0x00000004 |
Allow booting of non-Chrome OS kernel (obsolete) |
|
GBB_FLAG_FORCE_DEV_SWITCH_ON |
0x00000008 |
Force enable Developer Mode |
|
GBB_FLAG_FORCE_DEV_BOOT_USB |
0x00000010 |
Allow booting from USB in dev mode even if dev_boot_usb is 0 |
|
GBB_FLAG_DISABLE_FW_ROLLBACK_CHECK |
0x00000020 |
Disable firmware rollback protection |
|
GBB_FLAG_ENTER_TRIGGERS_TONORM |
0x00000040 |
Allow Enter key to trigger mode transition to Normal Mode on Developer Mode warning screen |
|
GBB_FLAG_FORCE_DEV_BOOT_LEGACY |
0x00000080 |
Allow Legacy Mode boot even if dev_boot_legacy is 0 |
|
GBB_FLAG_FAFT_KEY_OVERRIDE |
0x00000100 |
Allow use of alternate keys for firmware testing |
|
GBB_FLAG_DISABLE_EC_SOFTWARE_SYNC |
0x00000200 |
Disable EC read-write firmware update |
|
GBB_FLAG_DEFAULT_DEV_BOOT_LEGACY |
0x00000400 |
Boot legacy OS in Developer Mode by default |
|
GBB_FLAG_DISABLE_PD_SOFTWARE_SYNC |
0x00000800 |
Disable PD MCU read-write firmware update |
Vital Product Data (VPD)
There are two types of the Vital Product Data in the flash image. There is a region in read-only and read-write areas of flash and the two VPDs hold separate information, as follows.
· RO_VPD
· Serial Number
· Initial Locale
· Initial Time Zone
· Keyboard Layout
· Ethernet MAC address
· RW_VPD
· Activation Date
· Registration Codes
Firmware TPM Usage
TPM stands for Trusted Platform Module. It is a specialized chip on an endpoint device that stores RSA encryption keys specific to the host system for hardware authentication.
Chrome OS’s verified boot library uses the TPM for the following tasks:
· Preventing software and firmware version rollback
· Maintaining information to detect transitions between Normal and Developer Modes
· Protecting user data encryption keys
· Protecting certain user RSA keys (“hardware-backed” certificates)
· Providing tamper evidence for installation attributes
· Protecting state ful partition encryption keys
· Attesting TPM-protected keys
· Attesting device mode
The TPM is not directly available outside of Chrome OS for any purpose; that is, no remote software or system may have access to the TPM.
Chrome OS does not use the TPM for the following:
· Trusted boot: The TPM is not used as part of the Chrome OS verified boot solution.
· Hardware: Strength platform configuration reporting.
· Whole-disk encryption or similar: In particular, the TPM is not used to unwrap an encryption key during the boot process.
Chrome OS Firmware Update
The Chrome OS read-write area of the flash may be updated by the auto-update process. When required, Chrome OS downloads the firmware update as a self-contained firmware update package. All the binaries and scripts embedded into the shell archive, as well as the firmware images for the system flash and the EC flash. The flashrom utility is part of the package and is used to flash both the Chrome OS firmware image and the EC image.
As shown in the “FMAP” section of this chapter, the Chrome OS firmware has two read-write images. The update process begins with flashing one region, rebooting, verifying that the new image works, and then flashing the second region. This process should prevent the system from becoming unusable if there is an update issue. Figure 5-4 shows the process of the RW image update process.
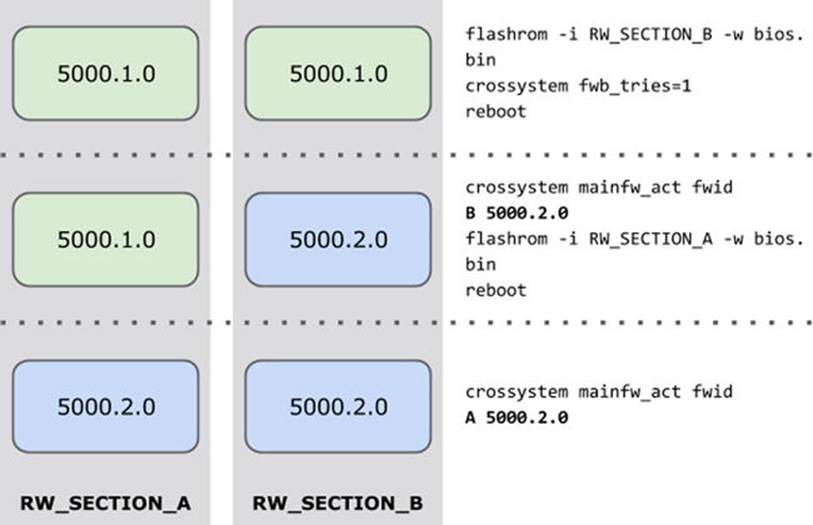
Figure 5-4. RW image update process
Chrome OS Utilities
Chrome OS uses several customized utilities behind the scenes. Users are able to access these utilities to make system modifications in Developer Mode:
· flashrom
· gbb_utility
· mosys
· crossystem
flashrom
flashrom is an open source flash chip programmer utility (flashrom.org). It supports many chipsets, flash devices, and programmers. The Chrome OS version has been customized for Chrome OS needs, which includes updates to FMAP regions.
FTDI (-p ft2232_spi:servo-v2)
Dediprog (-p dediprog)
Embedded Controllers (-p ec)
FMAP integration (-i region)
Usage: flashrom [-h|-R|-L|-p <programmername>[:<parameters>] [-c <chipname>]
[-E|(-r|-w|-v) <file>] [-l <layoutfile> [-i <imagename>]...] [-n] [-f]]
[-V[V[V]]] [-o <logfile>]
Read Chrome OS firmware image:
# flashrom -p host -r fw_backup.bin
flashrom v0.9.4 : 141a262 : Jan 08 2014 02:24:30 UTC on Linux 3.10.18 (x86_64), built with libpci 3.1.10, GCC 4.8.x-google 20130905 (prerelease), little endian
Mapping BYT IBASE at 0xfed08000, unaligned size 0x200.
Mapping BYT SBASE at 0xfed01000, unaligned size 0x200.
Reading flash... SUCCESS
Write Chrome OS firmware image:
# flashrom -p host -w image.bin
flashrom v0.9.4 : 141a262 : Jan 08 2014 02:24:30 UTC on Linux 3.10.18 (x86_64), built with libpci 3.1.10, GCC 4.8.x-google 20130905 (prerelease), little endian
Mapping BYT IBASE at 0xfed08000, unaligned size 0x200.
Mapping BYT SBASE at 0xfed01000, unaligned size 0x200.
Erasing and writing flash chip... Verifying flash... VERIFIED.
SUCCESS
gbb_utility
gbb_utility is the utility to manage the Google Binary Block (GBB) region of the firmware image.
![]() Note The internal write protect screw on the mainboard must be removed to write the GBB region.
Note The internal write protect screw on the mainboard must be removed to write the GBB region.
Usage: gbb_utility [-g|-s|-c] [OPTIONS] bios_file [output_file]
Read current BIOS from flash into bios.bin:
# flashrom -r bios.bin
Extract and display HWID from bios.bin:
# gbb_utility --get --hwid bios.bin
hardware_id: RAMBI TEST A-A 0120
Extract and display GBB flags from bios.bin:
# gbb_utility --get --flags bios.bin
flags: 0x00000000
Set GBB flags in bios.bin to 0x39 (factory default):
# gbb_utility --set --flags=0x39 bios.bin
- flags changed from 0x00000000 to 0x00000039: success
successfully saved new image to: bios.bin
Write updated bios.bin back to flash:
# flashrom -i GBB -w bios.bin
GBB Flags Utility Script: set_gbb_flags.sh
set_gbb_flags.sh is a script to automate the gbb_utility to change the flags. It can be used in place of the preceding GBB flags example.
Usage: set_gbb_flags.sh [option_flags] GBB_FLAGS_VALUE
crossystem
The crossystem tool is used to gather information about the Chrome OS device’s system flags, boot modes, VPD, GBB, NVRAM information, and binary versions.
Get vital system data:
# crossystem
arch = x86 # Platform architecture
clear_tpm_owner_request = 0 # Clear TPM owner on next boot
clear_tpm_owner_done = 0 # Clear TPM owner done
cros_debug = 1 # OS should allow debug features
dbg_reset = 0 # Debug reset mode request (writable)
ddr_type = unknown # Type of DDR RAM
debug_build = 1 # OS image built for debug features
dev_boot_usb = 0 # Enable developer mode boot from USB/SD (writable)
dev_boot_legacy = 0 # Enable developer mode boot Legacy OSes (writable)
dev_boot_signed_only = 0 # Enable developer mode boot only from official kernels (writable)
devsw_boot = 1 # Developer switch position at boot
devsw_cur = 1 # Developer switch current position
disable_dev_request = 0 # Disable virtual dev-mode on next boot
ecfw_act = RW # Active EC firmware
fmap_base = 0xffe10000 # Main firmware flashmap physical address
fwb_tries = 0 # Try firmware B count (writable)
fwid = Google_Rambi.5216.239.0 # Active firmware ID
fwupdate_tries = 0 # Times to try OS firmware update (writable, inside kern_nv)
hwid = RAMBI TEST A-A 0128 # Hardware ID
kern_nv = 0x00000000 # Non-volatile field for kernel use
kernkey_vfy = sig # Type of verification done on kernel key block
loc_idx = 0 # Localization index for firmware screens (writable)
mainfw_act = A # Active main firmware
mainfw_type = developer # Active main firmware type
nvram_cleared = 1 # Have NV settings been lost? Write 0 to clear
oprom_needed = 0 # Should we load the VGA Option ROM at boot?
platform_family = BayTrail # Platform family type
recovery_reason = 0 # Recovery mode reason for current boot
recovery_request = 0 # Recovery mode request (writable)
recovery_subcode = 0 # Recovery reason subcode (writable)
recoverysw_boot = 0 # Recovery switch position at boot
recoverysw_cur = (error) # Recovery switch current position
recoverysw_ec_boot = 0 # Recovery switch position at EC boot
ro_fwid = Google_Rambi.5216.239.0 # Read-only firmware ID
savedmem_base = 0x00f00000 # RAM debug data area physical address
savedmem_size = 1048576 # RAM debug data area size in bytes
sw_wpsw_boot = 0 # Firmware write protect software setting enabled at boot
tpm_fwver = 0x00010001 # Firmware version stored in TPM
tpm_kernver = 0x00010001 # Kernel version stored in TPM
tried_fwb = 0 # Tried firmware B before A this boot
vdat_flags = 0x00000c56 # Flags from VbSharedData
vdat_timers = LFS=185474800,273111920
LF=274161584,415809776
LK=1,2856282 # Timer values from VbSharedData
wpsw_boot = 1 # Firmware write protect hardware switch position at boot
wpsw_cur = 1 # Firmware write protect hardware switch current position
mosys
mosys is the firmware and hardware inspection utility. It is customized for each chipset, so the capabilities and information vary from system to system. Generally, the following commands are available with mosys:
ec EC information
eeprom EEPROM Information
gpio GPIO Information
memory Memory Information
nvram NVRAM information
platform Platform Information
smbios SMBIOS Information
eventlog Event Log
usage: mosys [options] [commands]
Get the SMBIOS BIOS information table:
# mosys smbios info bios
coreboot | Google_Rambi.5216.239.0 | 07/11/2014 | 8192 KB
Google Embedded Controller
Besides the Application processor firmware, coreboot, Google has developed open source embedded controller (EC) firmware.
The primary responsibilities of the EC are as follows:
· Application processor power sequencing
· Battery charging
· Thermal management
· Keyboard controller
· Buttons and switches
· Backlights, indicator LEDs
· Additional board-specific peripherals
![]() Note For more information about the Google EC, visit http://git.chromium.org/gitweb/?p=chromiumos/platform/ec.git;a=summary.
Note For more information about the Google EC, visit http://git.chromium.org/gitweb/?p=chromiumos/platform/ec.git;a=summary.
Like other areas of Chrome OS, the Chrome EC is designed for security. It has read-only and read-write regions. The read-write binary update is called Software Sync. The sync is handled by Depth charge and verified boot. The Chrome EC firmware has support for several different ARM SOCs, including Texas Instruments Stellar is Cortex-M4 and the ST Micro STM32 Cortex-M3.
Power Sequencing
Each application processor family has its own power sequencing requirements. The EC must manage and respond to all those requirements across the different system states, like boot, sleep, and idle. It also ensures that some peripherals are brought up and down as directed by system drivers; for example, USB and Wi-Fi devices.
Battery Charging
Most Chrome books use Smart Battery technology. This is a fairly simple system, where the battery asks for specific voltage and current, and the charger circuitry responds accordingly. The EC handles a few special cases:
· Trickle charge a fully discharged battery
· Custom charge requirements for high- or low-power conditions
· Keeping temperatures within safe operating ranges
![]() Note Reference materials are located at http://sbs-forum.org/specs/sbdat110.pdf.
Note Reference materials are located at http://sbs-forum.org/specs/sbdat110.pdf.
Thermal Management
The Chrome EC firmware supports several different thermal modes. It can act on independent thresholds and deliver host events via ACPI and the system PROCHOT signal. It also has configuration for fan speeds and can force the system power off, based on any sensor readings.
Keyboard Controller
For x86-based systems, the EC provides a “standard” 8042 AT-style interface. ARM-based systems use a binary format that merely sends the scan matrix up to the kernel. In either case, the keyboard scan matrix is defined in the board-specific firmware configuration.
Other Peripheral Controls
The Chrome EC also controls the following devices:
· LED behavior (battery charging, full, power on, etc.)
· Backlight
· Wi-Fi/USB power
· Light bar, accelerometer, dedicated hardware buttons
Chrome EC Software Sync
It is important that the AP firmware (coreboot) and the EC firmware remain compatible through upgrades. During every Normal Mode boot, the EC firmware is verified by the AP firmware and updated, if required. In Recovery Mode, the EC and AP firmware stay in read-only mode.
Software Sync Steps
The following are the software sync steps:
1. The EC boots its RO firmware and powers on the AP.
2. The AP boots its RO firmware.
3. The AP verifies its RW firmware and jumps to it.
4. The EC computes a hash of its RW firmware.
5. The AP RW firmware contains a copy of the EC’s RW firmware. The AP compares its hash with the EC’s hash.
If they differ, the AP gives the EC the correct RW firmware, which the EC writes to its flash.
The EC jumps to its RW firmware.
In Developer Mode, set the flag in the GBB to disable Software Sync:
# set_gbb_flags.sh 0x239
0x00000001 GBB_FLAG_DEV_SCREEN_SHORT_DELAY
0x00000008 GBB_FLAG_FORCE_DEV_SWITCH_ON
0x00000010 GBB_FLAG_FORCE_DEV_BOOT_USB
0x00000020 GBB_FLAG_DISABLE_FW_ROLLBACK_CHECK
0x00000200 GBB_FLAG_DISABLE_EC_SOFTWARE_SYNC
Summary
We are hoping that after reading this chapter, you have realized that the Chrome book and other Chrome devices are not only interesting and convenient to use, but are also devices that you can play with to experiment your new firmware and software ideas. This chapter has provided you enough information to start your journey, but do check out Google web sites to learn up-to-date and more detailed technical information.
By the way, this chapter’s text and graphics were written on a Chrome OS device in Google Docs.
![]() Note This chapter contains some modified materials from the Chromium OS wiki (http://www.chromium.org/chromium-os). This falls under the Creative Commons Attribution 2.5 license (http://creativecommons.org/licenses/by/2.5/).
Note This chapter contains some modified materials from the Chromium OS wiki (http://www.chromium.org/chromium-os). This falls under the Creative Commons Attribution 2.5 license (http://creativecommons.org/licenses/by/2.5/).
All materials on the site are licensed Creative Commons Attribution-Sharealike 3.0 Unported CC BY-SA 3.0 & GNU Free Documentation License (GFDL)
If you are the copyright holder of any material contained on our site and intend to remove it, please contact our site administrator for approval.
© 2016-2026 All site design rights belong to S.Y.A.