Creative flash photography : great lighting with small flashes: 40 flash workshops (2014)
Part II. The Fun Starts Here! 40 Lighting Workshops
Chapter 3. Workshops 1–13 Portrait and Fashion
Portraiture and photography of people in general are probably the most important applications for creative flash techniques. You can’t dictate the weather, and it is hard to capture a flattering look in the rain or when the sun is high in the sky. Continuous light is fine for this type of work in a studio, but a battery-powered flash—with its low weight, compact size, and high output—is the way to go on location. The workshops on the following pages start by describing a simple setup for shooting portraits for business professionals and then move on to more complex techniques, such as key shifting and Super-Sync/pseudo-HSS.
Workshop 1
Portraits for Business Professionals
▸ How to shoot portraits for business professionals using a simple setup with on-camera TTL flash
▸ How to trigger a non-TTL accent flash using the main TTL-flash
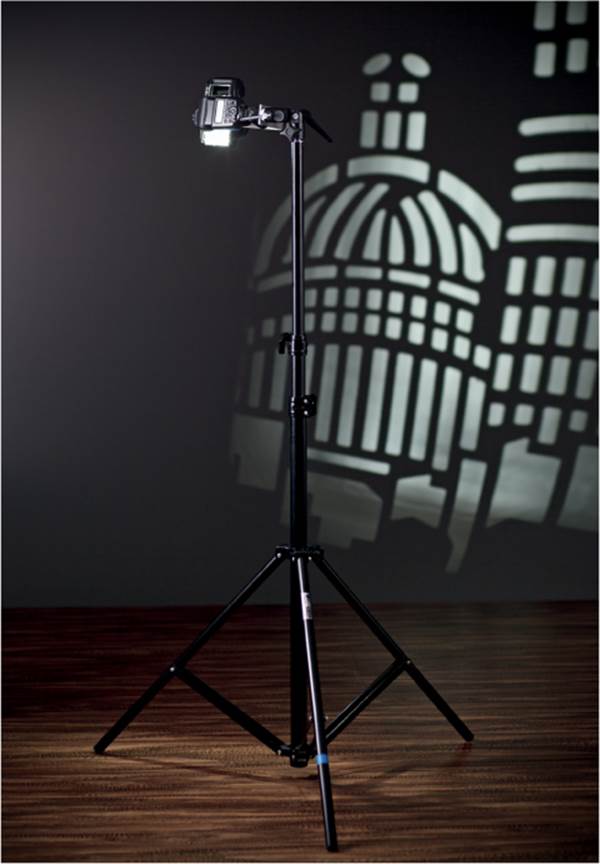
Sometimes business people ask me to shoot a photo for their website, résumé, or a job application. I prefer to carry as little gear as possible for jobs like this, and so I usually just take my backpack, a reflector, two flashes, and a lightweight tripod with me. This workshop introduces my setup.
Before we continue, I should point out that portraits always look better if they are shot with soft light. It’s easiest to produce soft light with large light sources, which are usually too unwieldy for the type of shoot described here. A collapsible 7-in-1 reflector is the best choice. It can be used to shape sunlight and flash, and to create a large and flattering light source. Another way to reduce the bulk of your kit is to use lightweight camera tripods instead of light stands, one of which also serve as an emergency tripod if you need it. My Velbon Ultra LUXi L is a great little tool that folds down really small, and it can be extended a long way without losing stability. Its quarter-inch thread is perfect for mounting a range of flashes and accessories. A Yongnuo RF-602 radio trigger and a Kaiser slave trigger (or an alternative model like the one mentioned on page 56) complete the kit.
The Setup
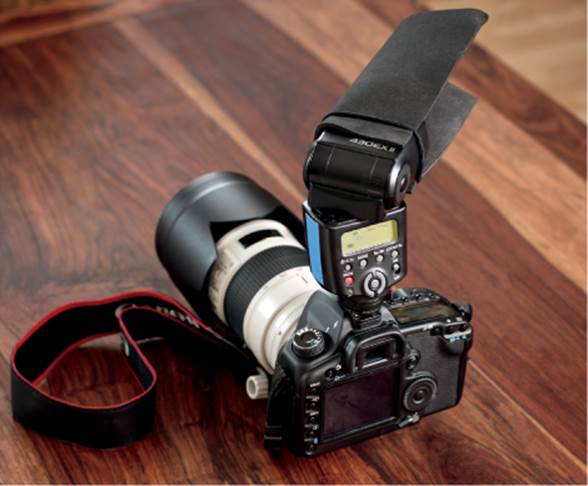
For this portrait, the main light was a Canon Speedlite 430EX II TTL flash mounted on-camera and rotated sideways toward a reflector that I placed on a chair. Diffuse light from a window opposite the reflector provided fill light; a second reflector or a white wall would do just as well. The model sat on a chair in front of a blue partition that was lit with a second background effect flash. The second flash can also be rotated for use as a sidelight or to light a subject’s hair. A cheap non-TTL flash is fine for this part of the setup.
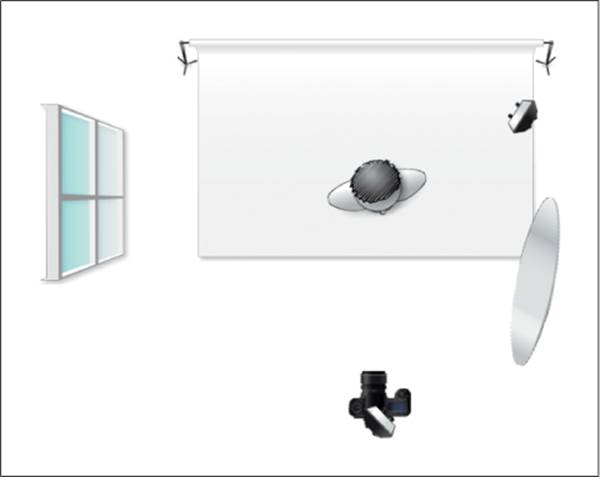
Schematic of the portrait setup. An on-camera TTL flash is bounced off a reflector, and a non-TTL accent flash illuminates the background.
This setup includes three cool technical tricks. The first involves firing the background flash. My Yongnuo YN-460 has its own built-in slave trigger and can be used without preflash, but it’s too far from the main flash to be triggered effectively. My solution is to use a trigger sandwich that consists of a slave trigger and a RF-602 radio trigger taped to the reflector along with a radio receiver attached to the accent flash.
The second trick is to suppress the preflash while using the on-camera TTL flash in TTL mode. A preflash would trigger the slave flash too early, so instead of switching to manual (M) mode, which would mean shooting without TTL functionality, the work-around is to use the Flash Exposure Lock feature (FE Lock), which decouples the preflash from the main flash and gives the slave (the accent flash) time to recharge. On Canon cameras, you can fire the preflash by pressing the * button near the thumb grip on the rear of the camera.
The third trick is to use a flag, to prevent flash light from reaching the subject directly. You can use a snoot, a honeycomb grid, or, if you want to go the cheap and simple route, a black foamie thing (invented by Neil van Niekerk). Without such a tool, it’s difficult to prevent hard flash light from hitting the subject. If the model can see any part of the front of the flash unit, it means the light will directly reach the subject.
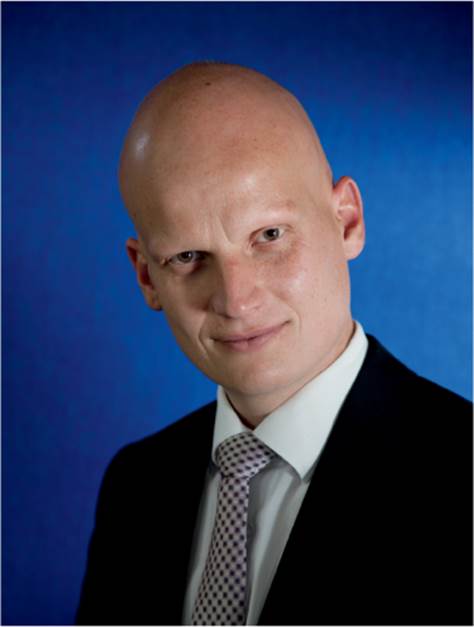
This shot was taken without a background flash and it isn’t quite right. The model needs to be separated more effectively from the background. The angle of the reflector isn’t right either, so the subject’s right eye is too dark and has no catch light.
Camera Settings and Shooting
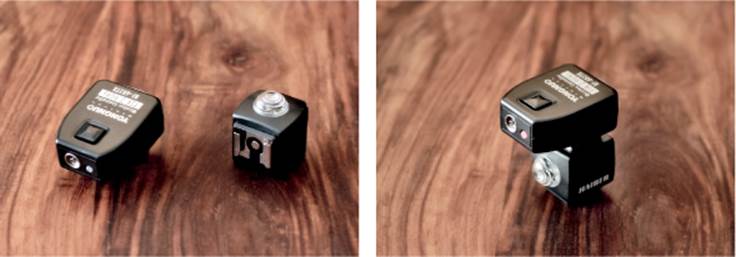
This trigger sandwich, made of a slave cell and a radio trigger, can reliably trigger non-TTL slave flash using a TTL main flash
For this shot I used a Canon 24–105mm standard zoom lens and a full-frame camera. The lens isn’t perfect for portraits, but it’s great for shooting upper-body shots in small spaces. The lens has a good built-in stabilizer, which allowed me to shoot handheld down to 1/20 second, although this worked only because the model kept perfectly still. It allowed me to use ISO 200 and include more of the ambient light as fill light.
Neil van Niekerk’s black foamie thing in action. It’s simply a mouse pad that was cut into shape and held by a rubber band, but it works well.
To set up this shot, position your flashes as shown in the diagram, switch your camera to manual (M) mode, and meter for the background. I usually use center-weighted metering. Adjust the exposure until about –1 EV, or slightly less, is metered for the ambient light. Now make a test shot without flash.
If the background looks right, add flash. Switch your flash to TTL mode and add FEC between 0 and +1/3 EV. These values vary from camera to camera and subject to subject—for example, setting +0.7 EV FEC works well when you shoot light skin with a Canon camera.
The TTL flash ensures that the main subject is correctly lit. This setup is relatively simple and is quick to master.
Post-Processing in Photoshop
The sample image is cropped, but otherwise it is only slightly processed. If necessary, you can increase or reduce the fill light using Photoshop’s Image > Adjustments > Shadows/Highlights tool. If you wish, you can also add a vignette and increase the contrast and vibrance. When you are done processing, sharpen the finished image for output.
The unprocessed shot
Tips, Tricks, and Notes
I have had plenty of practice with this setup, so by now it works well for me. The things to look out for the first few times you use it are as follows:
▸ Preflash issues: If you have problems triggering the accent flash, you can try using a normal slave trigger and suppressing the preflash instead of using FE Lock. Slave triggers are generally available in three categories:
• Cheap and not capable of suppressing preflash (Walimex and Kaiser are good value brands)
• Midrange with a dedicated preflash off switch (again, from Walimex or Kaiser)
• More expensive but with different modes, including multiple preflash; for example, a SUNPAK digital slave unit (DSU-01) can be used to trigger studio flash, even with a consumer-grade camera with built-in flash but without a hotshoe.
▸ Reflector: I used a 42-inch reflector that packs down to 16 inches. Don’t use a reflector with a diameter of less than 32 inches because the effect will not be as good. A white wall or a flip chart makes a good impromptu reflector; you can even use a white shirt.
▸ Black foamie thing (BFT): My BFT is made from a mouse pad with the fabric covering removed, and it’s trimmed to 6 x 7 in. I attach it to my flash with a hair tie. It may sound like a toy, but the effect is professional. I never leave home without it. If you find yourself without your BFT, you can always use a black card or black paper, or even your hand, or simply tip the flash head back as far as it will go.
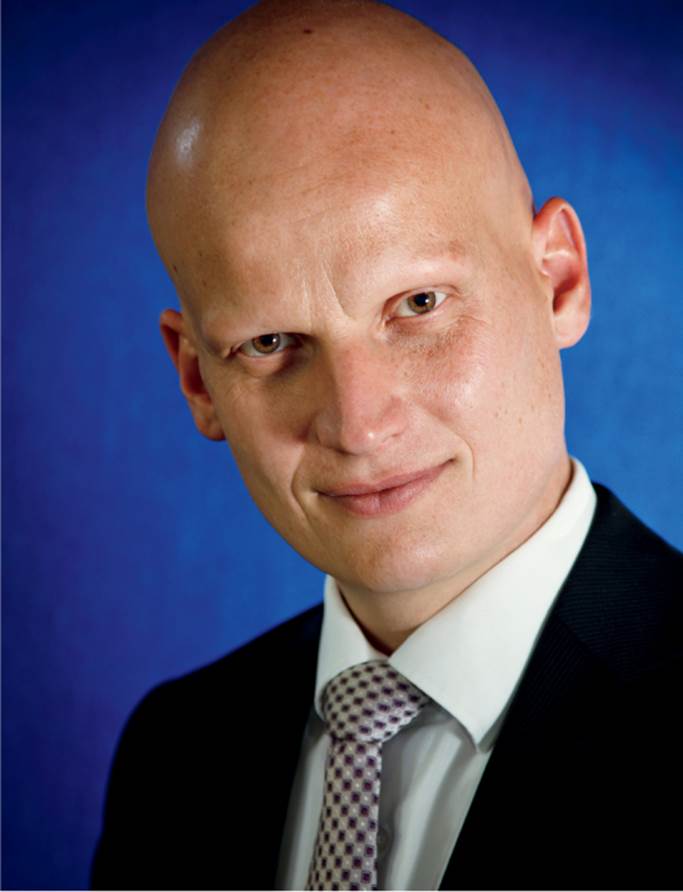
The final image after cropping and a little post-processing
Workshop 2
That Sunny Feeling
▸ Using off-camera TTL flash with a TTL flash cable
▸ How to use a softbox with flash
▸ All about dragging the shutter
If you need a classy-looking location on a dull day, try renting a room in a boutique hotel. Some hotels even allow you to shoot in the lobby if you don’t use too much equipment or take up too much space. The friendly management at The Pure in Frankfurt, Germany, allowed me to do just that, and you can check out the results on the next few pages. I created the sunny look of the photos entirely with flash and slight alterations to the white balance. This workshop shows that flash doesn’t have to look cold and hard.
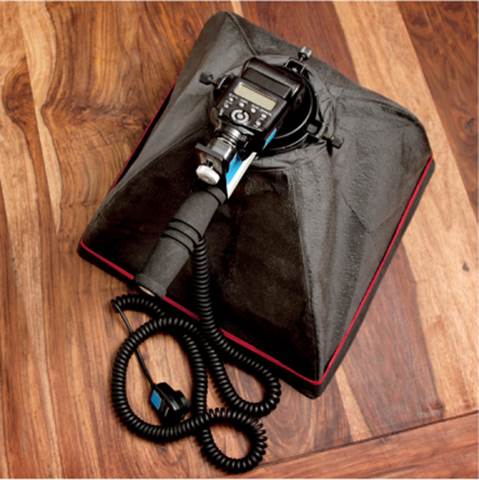
My flash2softbox that I used with a Canon Speedlite 430EX II TTL flash, a Yongnuo Canon-compatible TTL spiral cable, a flash2softbox adapter, and a 16 x 16 in softbox. The handle has a built-in quarter-inch thread that you can use to mount it on a tripod or light stand.
I wanted to use as little gear as possible so I could try a lot of setups without having to rebuild the scene every time. I used a small, dedicated softbox called the flash2softbox, which was developed to be used with Speedlights. (Note: This item is no longer available in the U.S., but I can recommend the Firefly Beauty Box FBO50 made by Aurora, which I also often use.)
I used a Canon Speedlite 430EX II TTL flash attached to the camera with a 33 ft spiral cable from Yongnuo. There is a quarter-inch thread built into the softbox handle so the softbox can be easily mounted on a tripod.
The Setup
Even in dreary weather, the subtle halogen lighting in the lobby of The Pure produces a pleasant atmosphere, and the frosted glass windows let in plenty of soft, diffuse light.
I wanted to utilize both types of light for these photos. I used the softbox mounted on a low stand to light the model from the right, and I made sure it remained above the line of her eyes. In shots like this you should always ensure that you get nice catch lights in the model’s eyes and that you avoid an unflattering nose shadow (for example, a shadow below the nose that reaches the lips).
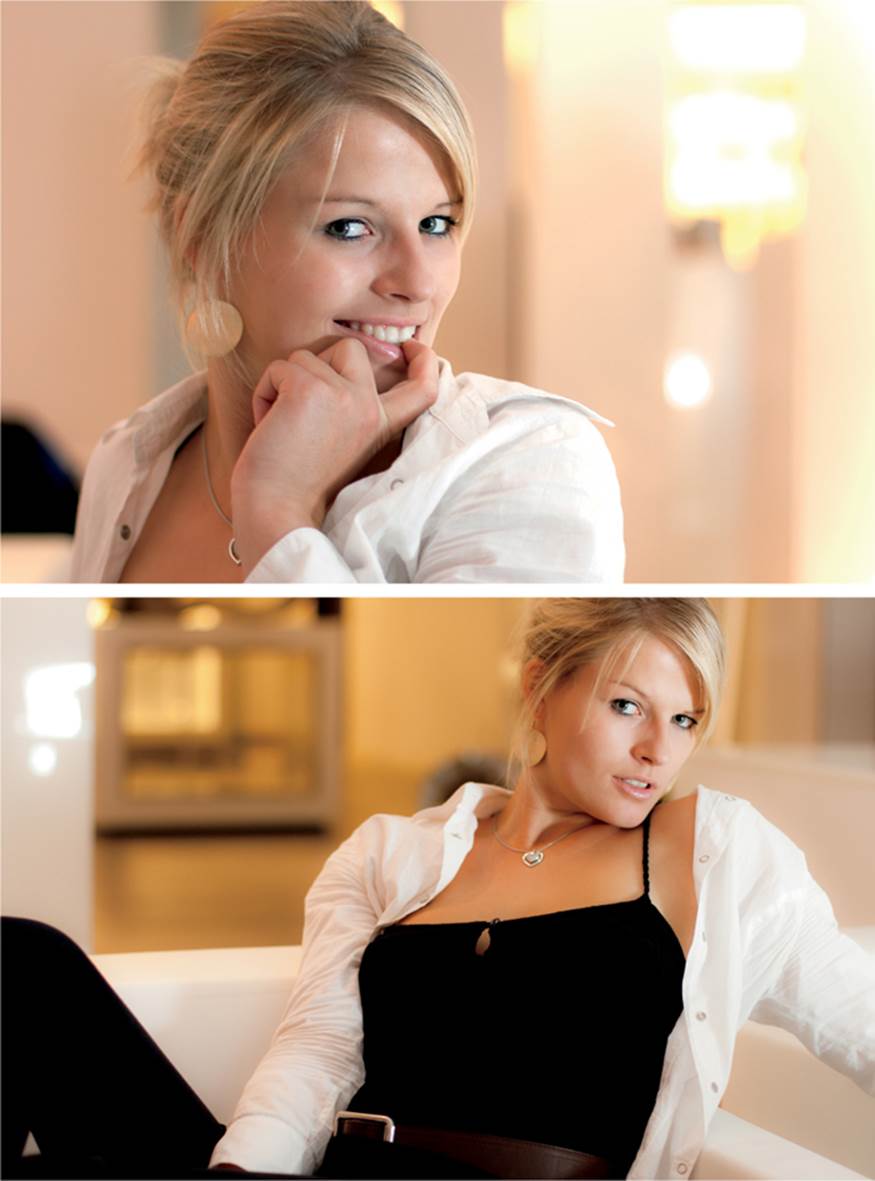
Shot in the lobby of The Pure, a hotel in Frankfurt, Germany, using a TTL flash-mounted softbox placed to the right of the subject (Model: Judith)
Canon EOS Rebel T1i (EOS 500D) | 50mm f/1.4 lens set to f/2 | M mode | 1/50 second | ISO 100 | RAW | white balance set to auto | TTL Canon Speedlite 430EX II flash connected to the camera with a 33 ft cable | spot metering with FE Lock
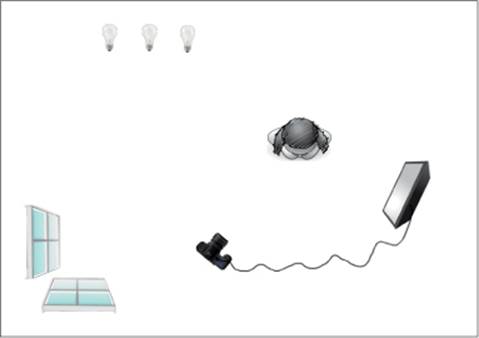
Schematic of the setup showing diffuse window light from the left, halogen light from behind, and a cable-bound softbox on the right
Camera Settings and Shooting
Use manual (M) mode and adjust your settings to correctly capture the ambient light. On this shoot I knew I could capture handheld images at 1/50 second, and from experience I know that my camera produces little or no noise at ISO 100. I realized that f/1.4 would be a little too wide, so I stopped down to f/2. In situations like this I set up my camera to capture as much ambient light as possible. In darker situations you can increase the ISO value and lengthen your exposure time. This process is known as “dragging the shutter.”

Begin by setting the camera up to capture the background correctly without flash before you add flash to illuminate the subject. Light skin usually requires between 0 and +1.3 EV FEC, although these values vary from camera to camera and among skin colors.
Using the camera in TTL auto mode would yield a different result: the camera would try to expose the subject correctly, but the background would be too dark.
When you have found the correct settings for the background, the TTL flash takes care of everything else and automatically sets the exposure for the main subject. Always make some test shots and fine-tune the flash exposure compensation (FEC) setting if necessary.
Exposure metering is important. I usually switch between spot and center-weighted metering, and I seldom use the other modes. For this shoot I used spot flash metering, which is called Flash Exposure Lock (FEL) by Canon and Flash Value Lock (FV Lock) by Nikon. This technique involves metering for a particular spot within the scene and saving the metered value in the camera’s memory before you finalize the composition. Pressing the * button on the rear panel of Canon DSLRs meters and saves flash exposure values.
If you know your camera well enough to find its controls while you look through the viewfinder, you can use the camera’s built-in light meter (usually indicated by a numeric scale at the bottom of the viewfinder frame) to help you find the right settings for the background. This saves time and test shots.
The flash2softbox system works with Yongnuo and other third-party flashes, although I had to build my own little bracket adapter to mount my Yongnuo flash/radio receiver combo
Tips, Tricks, and Notes
▸ I have been asked if I used a colored gel to take these photos. The simple answer is no. The camera’s automatic white balance circuitry produced the warm look without any interference from me. If necessary, I could have adjusted the white balance with a virtually lossless shift in a RAW converter. I don’t use automatic white balance very often. I usually set the white balance to daylight or flash to ensure consistent colors throughout a shoot. This approach also makes batch processing simpler.
▸ An umbrella is a more compact alternative to a softbox for a quick setup like this, but a diffusing umbrella produces unwanted light spill at its rear, and the light from a reflecting umbrella is more difficult to aim precisely. I like the light that reflecting umbrellas produce, but a drawback is that the stem can get in the way.
▸ You can use this setup with non-TTL flashes too, but you will have to make all the settings manually. Furthermore, to get my Yongnuo flash/radio receiver combo to work with the flash2softbox I had to make my own little aluminum bracket to hold it.
Workshop 3
Gobo Projections Using Flash
▸ Build your own gobo projector
▸ How to create projected backgrounds in the studio
Stores sometimes use gobos to project advertisements onto flat surfaces. A gobo projector works like a slide projector, but instead of projecting a photographic slide a gobo uses a pattern (much like a stencil) that is usually made of metal or etched glass to project a pattern. This gives the projection higher contrast, and the material is more heat resistant than a slide. Gobo projectors are usually much simpler than slide projectors because they don’t require complex mechanisms to change slides between shots. Gobo projectors usually use a halogen light source, but in this workshop we use flash to project interesting backgrounds in the studio.
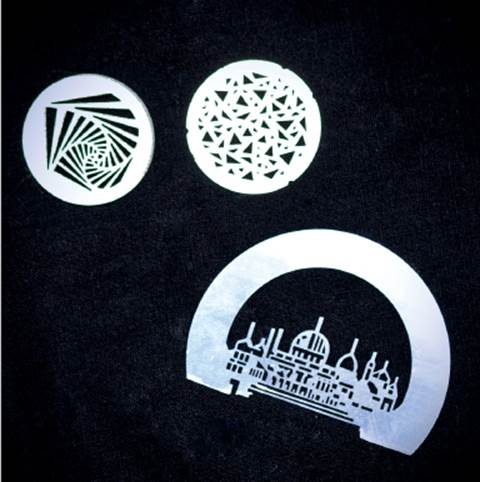
A selection of 27mm and 53.3mm metal gobos
Note that in the context of theater and event management, the term gobo is used to describe patterned slides, but in a photo studio it describes a shade that is placed in front of a flash to selectively block the light it produces. In both cases, the gobo is placed between the light source and the scene, which can be a projector lens or a photographic subject. I use the terms flag or shade to describe the latter tool.
The Setup
There are various ways you can use flash to project patterns. The simplest (and most expensive) approach is to equip a studio flash head with a custom gobo projector, such as from Walimex or Richter. You could also hack a gobo projector and replace the halogen light source with a speedlight, which is less expensive. Another simple and cheap method is to use an old analog single-lens reflex (SLR) camera body with a lens attached. As shown in the figure on the left, the gobo replaces the film in the modified SLR, and the flash is mounted where the back of the camera used to be, with a custom bracket that also serves as a tripod mount. You can cut the gobo to fit if it is too large, or you can mount it on aluminum foil or a piece of card stock if it is too small. I used wire cutters to remove the shutter from the SLR, and I used tape to fix the gobo in place.
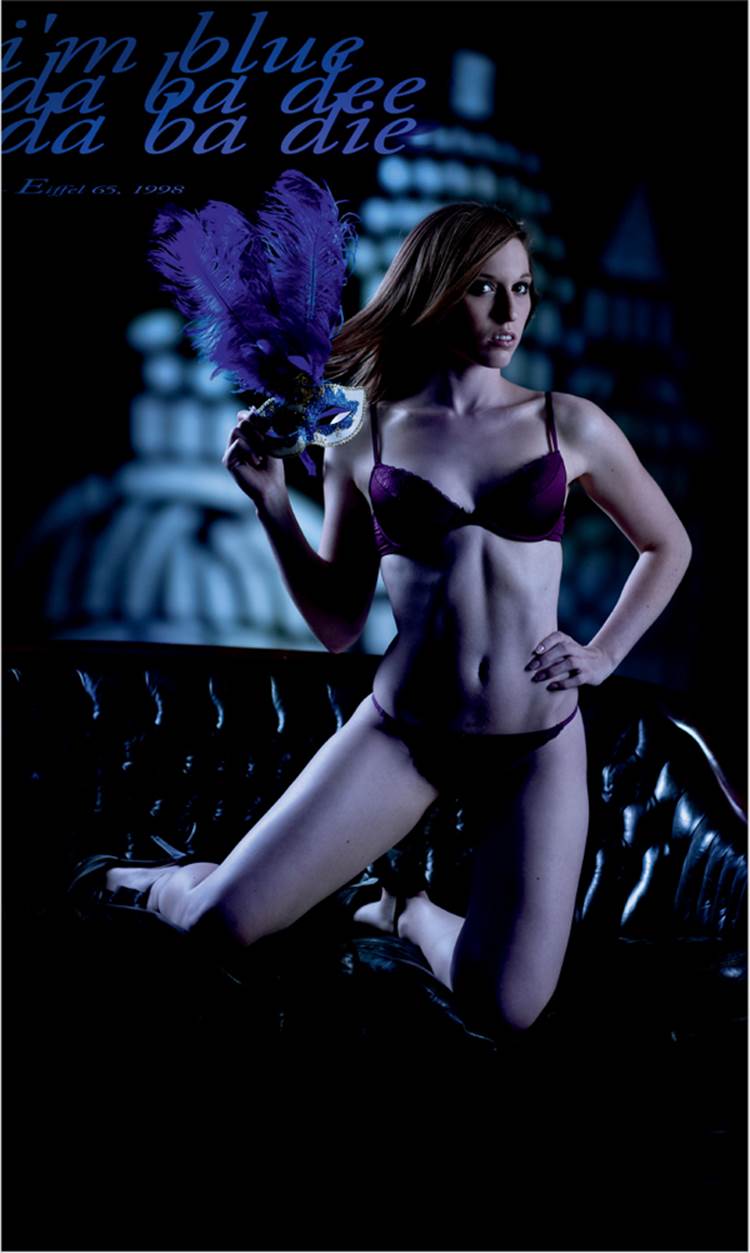
A gobo projector can be used to produce magical studio backgrounds (Model: Mauzz; studio courtesy of my co-photographer, Ray Sjoeberg)
Canon EOS 5D Mark II | EF 85mm f/1.8 set to f/2.5 | M mode | 1/100 second | ISO 100 | RAW | white balance set to flash
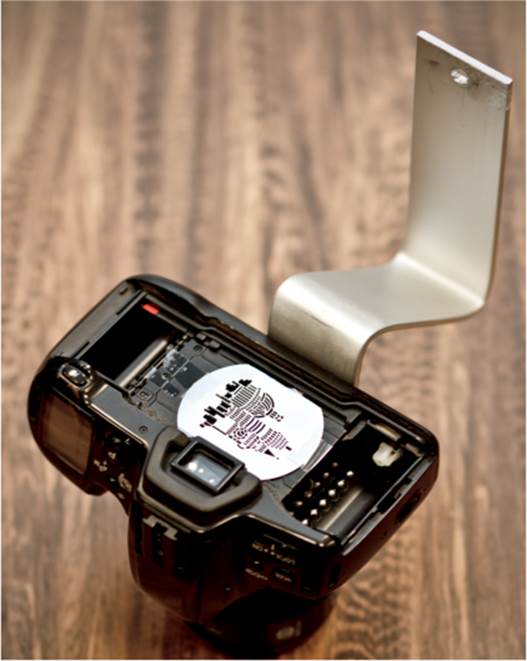
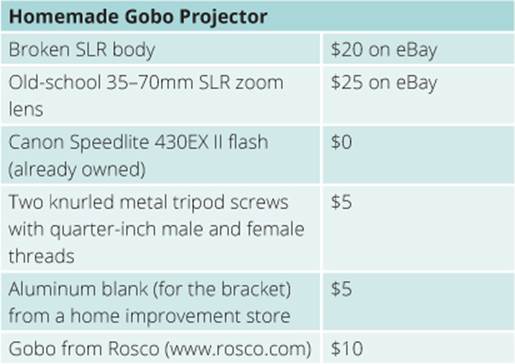
A homemade gobo projector. The flash and the radio trigger are mounted on the aluminum bracket, and the gobo (a skyline) replaces the film
You can mount the aluminum bracket in a vice while you bend it to shape and drill the mounting hole. I mounted my projector on a Manfrotto MA026 umbrella adapter so I can use it in portrait or landscape orientation. The parts I used are listed in the accompanying table.
Camera Settings and Shooting
Because this setup uses the light path of the SLR as a projector and the gobo is located on the film plane, the projected image is guaranteed to be sharp, and it can be zoomed and focused with the focus scale on the lens, just like when you take a photo. The aperture can be adjusted, too, although you will probably leave it at the widest setting.
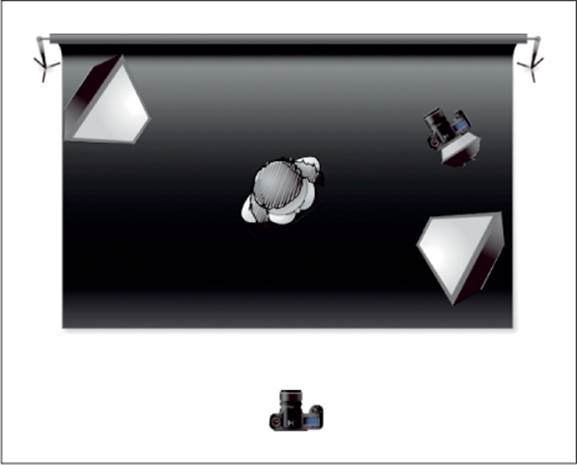
The complete setup in the studio. The gobo projector is aimed at the gray background, and two narrow softboxes produce a cross lighting setup to illuminate the model.
To optimize the light yield, set your flash to 1/2 or full output. Set the reflector to its wide-angle setting and position it as close to the gobo as possible. If you are using a gobo that is a slide or is made of plastic or an additional colored gel, make sure the flash won’t melt it. It’s best to mount gels between the gobo and the camera, or cover the projector lens with the gel. In this setup, the flash is connected to a RF-602 radio trigger, although a cable or slave cell should work just as well. If your flash unit has a modeling flash function, you can use it to assist zooming and focus. Modeling flash emits a series of weak flashes that appear as continuous light to the human eye. The Canon Speedlite 430EX II we used allows you to assign modeling flash to the Pilot/Test button.
Our gobo projector in action
This type of gobo projector is effective, but not very powerful, so you may need to dim the studio flashes a bit and increase the ISO. The accompanying illustrations show a possible setup and the results. Gobos come in a wide range of prices, so compare before you buy.
Post-Processing in Photoshop
I didn’t have to change much in the final image; I did only the usual straightening, cropping, color and contrast adjustments, and sharpening in Photoshop, but you could perform all these same steps in Elements, Lightroom, or Adobe Camera Raw.
Tips, Tricks, and Notes
If this workshop whets your appetite, do an Internet search for “DIY gobo projector” or “homemade gobo projector.” The Internet is a great source of inspiration for all sorts of homemade projects.
An example of an abstract gobo background pattern backgrounds (Model: Mauzz; studio courtesy of my co-photographer, Ray Sjoeberg)
Workshop 4
Wide-Aperture Look in Daylight
▸ How to outsmart physics and shoot wide open at 1/8000 second without an ND filter using standard studio flash
▸ Pseudo-HSS and second-curtain sync on location and in the studio
The limitations due to the sync speed make shooting with flash in bright sunshine a tricky operation. Remember that a conventional DSLR shutter is not completely open at any point during the exposure at speeds of faster than 1/200 second, and the exposure is made by a strip of light that moves across the surface of the sensor (see page 25). Using flash under such circumstances produces either a dark bar at the edge of the frame or a completely black photo. For this workshop, with standard flash usage, the frame would be completely dark at shutter speeds of 1/640 second and faster.
If your flash has a sufficiently long duration, the most elegant way to circumvent this problem is to use it as a kind of pseudo-continuous light source. The tricky part of this approach is ensuring that the flash is triggered before the shutter opens—a technical necessity that a conventionally triggered flash cannot fulfill. The standard work-around is to use high-speed sync (HSS), but with the drawback of loosing two stops. This workshop shows you another way to achieve a similar effect without the drawbacks using SuperSync/Pseudo HSS
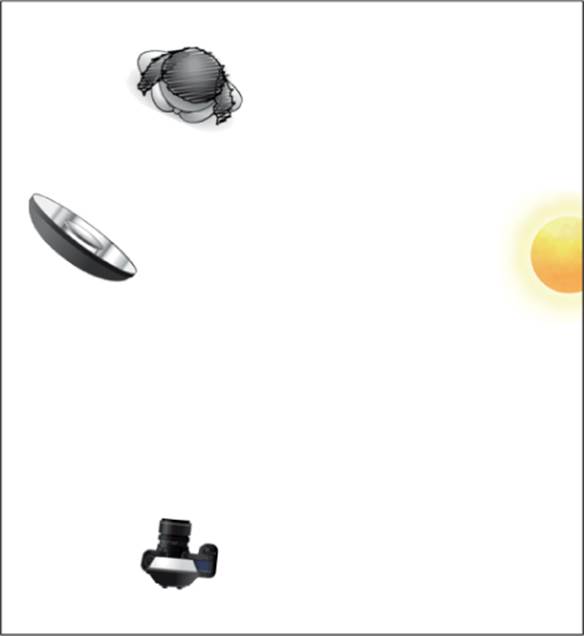
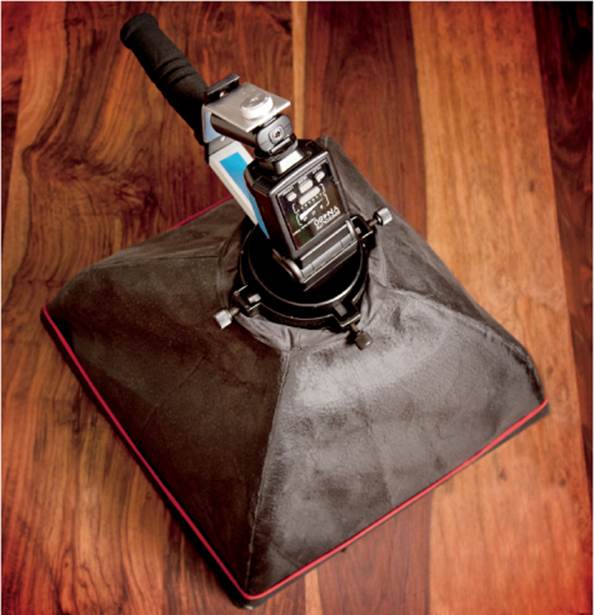
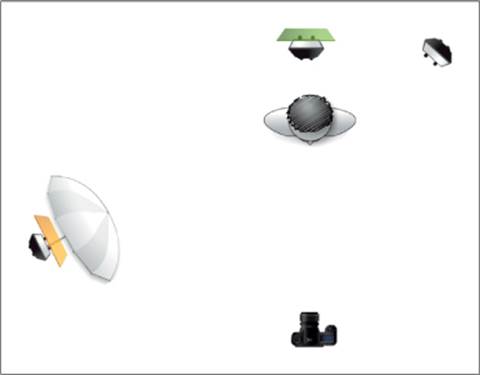
An HSS-capable flash is mounted on the camera. The slave trigger and radio transmitter sandwich is attached to the flash. It triggers a studio flash unit that is fitted with a beauty dish.
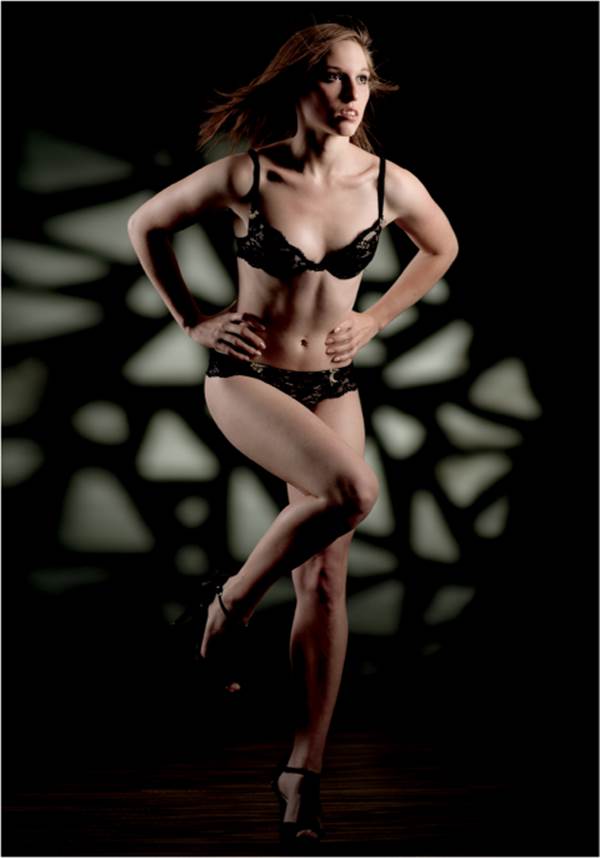
A photo that we captured during our SuperSync shoot (Model: Neleta)
Canon EOS 5D Mark II | 70–200mm f/2.8L IS II set to 200mm and f/4.0 | M mode | 1/500 second | ISO 160 | RAW
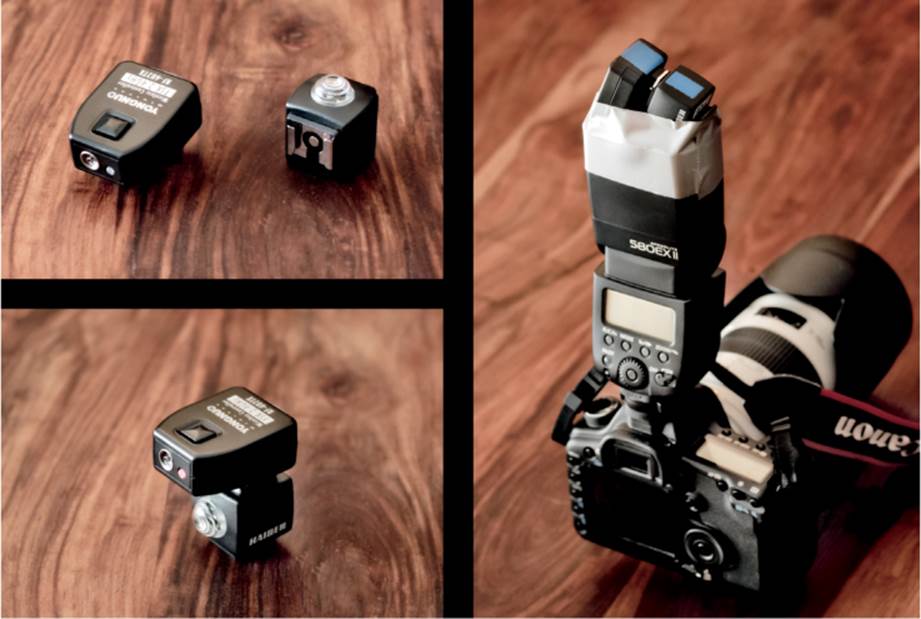
The slave trigger/radio transmitter sandwich. Attaching this combo to the flash with tape isn’t pretty, but it does the job and is easy to remove afterwards. The sandwich can also be attached in a clip-on diffusor.
The Setup
The following sections describe a relatively cheap, Canon-based way to use pseudo-HSS. The following steps can also be applied for setups that use flashes made by Nikon and other manufacturers:
▸ I used a Canon EOS 5D Mark II fitted with a Canon Speedlite 580EX II, although a cheaper HSS-capable flash, such as the Speedlite 270EX II, would work too. I set the flash to HSS mode and low output, and I pointed it upward. I also selected manual (M) mode to prevent it from emitting a preflash.
▸ I mounted the flash on a Sonia slave trigger cell I bought from colinsfoto on eBay (be sure to buy the green one), but there are other brands that are just as good. Instead of firing a second flash, I used the slave trigger to trigger a Yongnuo RF-602 radio transmitter. I fixed this little trigger sandwich to the front of my flash with tape.
▸ I used a relatively cheap 400 Ws Walimex studio flash/beauty dish combo powered by a Walimex Pro Power Station battery and triggered by a RF-602 radio receiver.
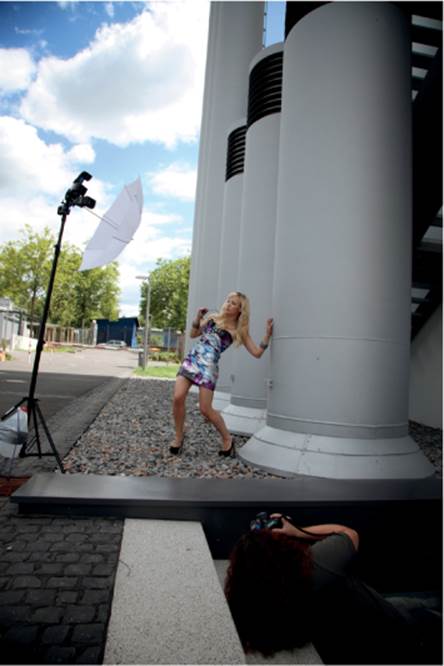
How the setup looks during the shoot (Model: Dominique, co-photographer: Niko/NN-Foto)
Camera Settings and Shooting
When everything is set up, the shoot itself is easy. You will usually set up a shot like this with the sun behind the model so it acts like a rim light that emphasizes her silhouette and the shine of her hair. Switch your camera to manual (M) mode, select ISO 50 or 100, and set the aperture and exposure time to capture the surroundings without flash (this will probably result in a slight underexposure).
The scenery is now well lit, but the model is underexposed by 1 or 2 stops. Make some test shots to check the flash output and distance, and use the histogram and look at the blinking warning areas to double check your settings. This mixture of underexposed surroundings and flash for the main subject creates a special look. If you push this effect so the color of the sky shifts from bright blue to dark blue, the effect will resemble the American night look that is popular in movies (see workshop 9).
Post-Processing in Photoshop
I used my standard white balance, color, and contrast settings during RAW import and added only a little beauty retouching in Photoshop before I applied the final round of sharpening.
Alternative Methods
An Internet search for “overpowering the sun” will yield all kinds of information about the latest trends in flash photography. There are various ways to counteract the effects of a slow focal plane shutter:
▸ The best-known approach is to use an ND filter to reduce the exposure time and shoot in bright sunlight with the aperture wide open (see workshop 6 and our sample EV calculations on page 266). However, very dark ND filters reduce the overall image quality and can cause autofocus to fail.
▸ Use a camera with a faster sync speed or one with a leaf or digital shutter. Compact cameras like the Canon PowerShot G10 have a built-in hot shoe and can be used to shoot with flash at speeds up to 1/4000 second. You can see a sample of this type of shot at my bloghttp://fotopraxis.net/2011/10/20/workshop-american-night/. I used the G10 for the shoot. (Note that the blog is in German but you will get the idea by looking at the photos.)
Begin by setting your exposure for the ambient light without flash. Here, the sun is behind the model, resulting in an underexposure that is canceled out by the flash. Both of these images are straight out of the camera.
▸ In this workshop, I used HSS mode on the flash to circumvent the limitations of the normal sync speed, and I used studio flash to create the lighting effect. You can, of course, use the on-camera flash to illuminate the subject in situations like this, but remember that using HSS reduces the light yield by at least 2 stops. Another popular technique for this type of situation is to use gang light. You use a whole gang of flashes (e.g., with PocketWizard triggers) to provide sufficient light in spite of the low yield in HSS mode. The downside of this approach is cost. For additional information and sample HSS exposure calculations, see the “Calculating Flash Exposure in HSS Mode” section on page 274.
Tips, Tricks, and Notes
▸ The SuperSync trick (aka pseudo-HSS) works well even with extremely short exposure times of as little as 1/8000 second. But keep in mind that the flash now works similar to a continuous light source. This results in a very low light output at very fast exposure times.
▸ The trigger technique we used in this workshop can also be useful in studio situations. For example, if you need second-curtain sync in the studio, you can simply mount a TTL flash on the camera, switch it to M mode, and use second-curtain sync to trigger a studio flash as described in this workshop. At close distances you can use the on-camera flash to directly trigger your studio flash without an additional radio trigger.
▸ I have had mixed success with optical slave triggers. Sometimes they work perfectly, and other times they cause problems. The great thing about slave triggers is they are cheap, so you can always purchase a bunch of models from different manufacturers and try them to see which works best.
▸ Instead of the Walimex studio flash that we used, a portable unit like the Hensel Porty is just as good. The most important feature is a relatively long flash duration, which requires a fairly high flash energy of 400 to 1,200 Ws.
▸ You can apply this technique with a second accessory flash instead of a studio flash—if it is powerful enough and is set to full output. My experiments often produced a thin black stripe within the frame that was caused by the insufficient output of an accessory flash coupled with very short exposure times.
▸ If you have problems with this technique, make sure the preflash and, if available, the red-eye reduction assist lamp in your trigger flash are switched off. You can also try other triggers or replace the radio trigger with a TTL flash cable. You will soon discover which part of the system is causing trouble.
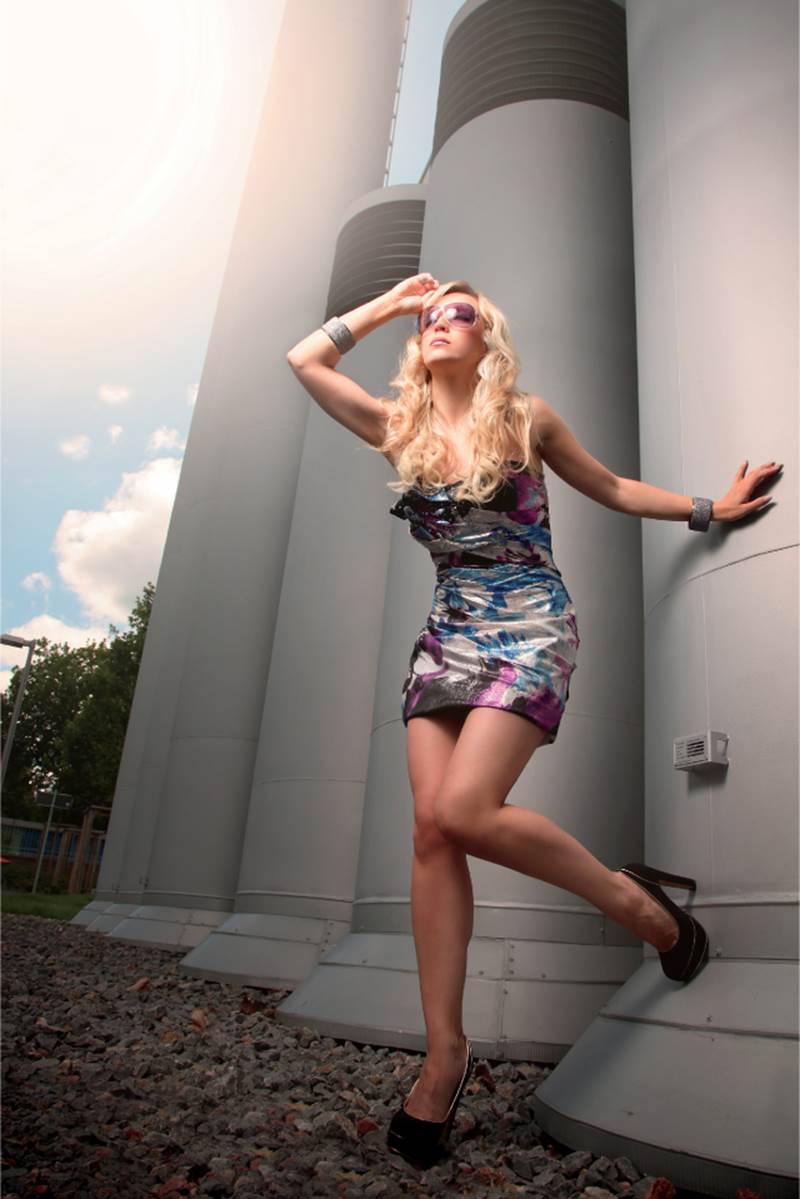
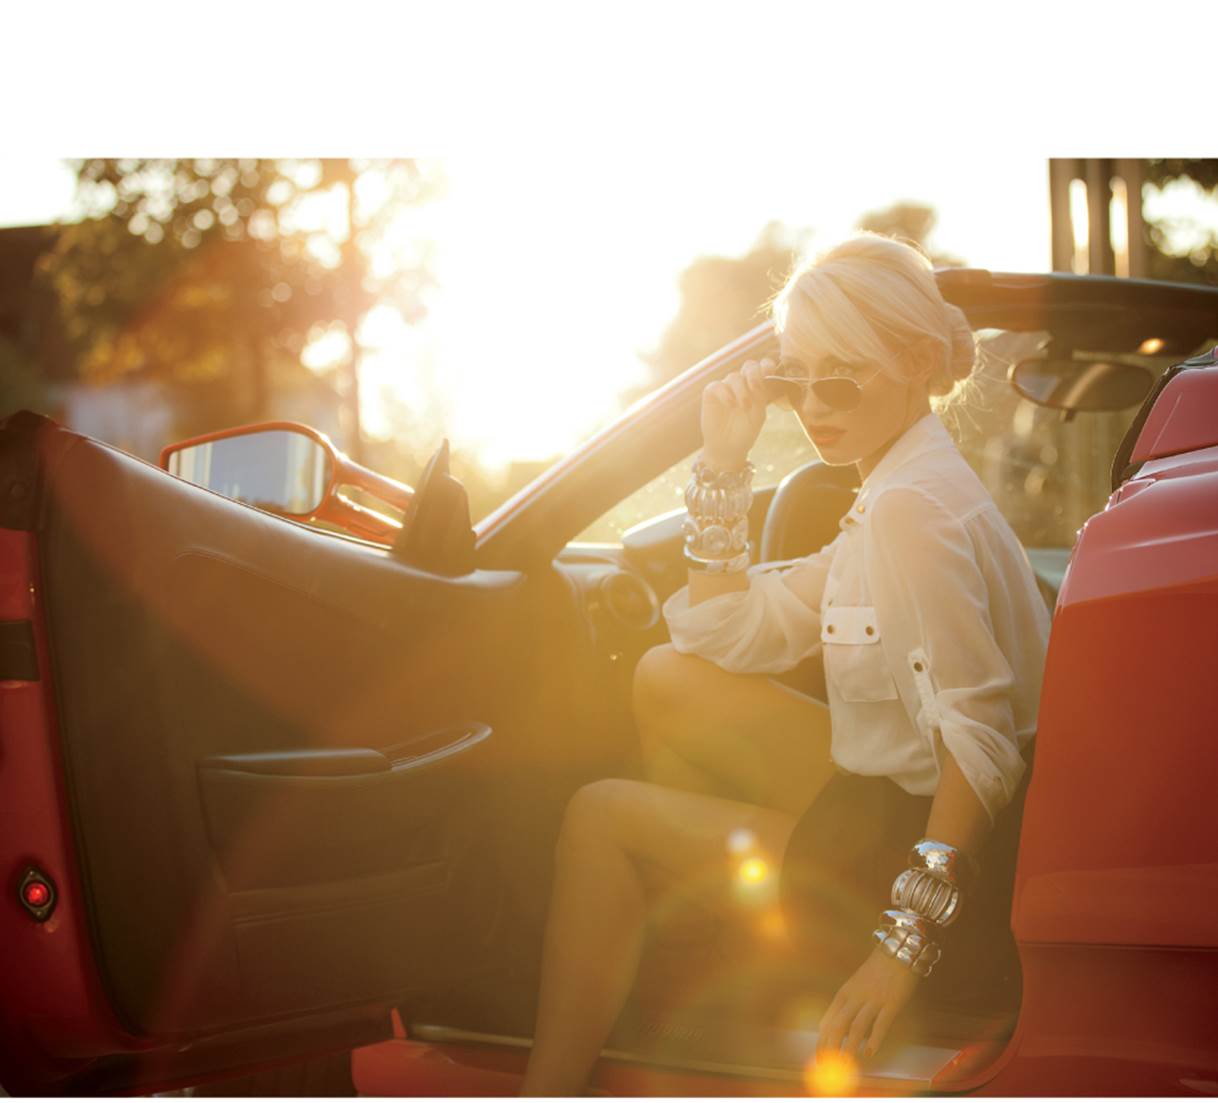
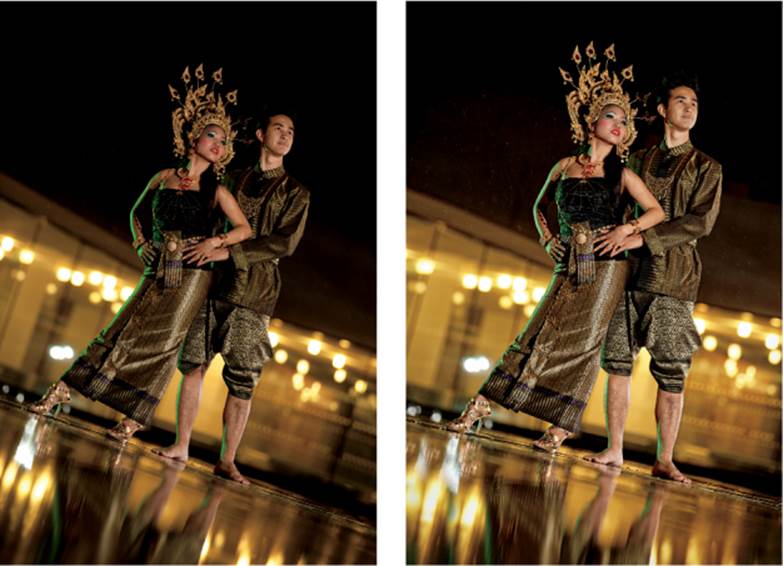
The photo on page 55 was also captured during our SuperSync shoot. The sun was already quite low, so it wasn’t as bright as earlier in the session. We took this shot at 1/500 second, which would have plunged the subject into almost complete darkness had we not used the SuperSync/pseudo-HSS trick.
Shooting with flash on a sunny afternoon with the aperture wide open is possible only with a clever trick or two (Model: Dominique)
Canon EOS 5D Mark II | 70–200mm set to 145mm and f/3.2 | M mode | 1/640 second | ISO 100 | RAW
Workshop 5
Duke, Nuke Them 1
▸ How to produce lots of light using multiple small flashes
▸ Using five flashes simultaneously
▸ Shooting with flash in the midday sun
Shooting in the midday sun is usually not a good idea. The light comes from directly above, which gives subjects dark, shaded eyes and produces short, ugly shadows. A low sun is much better for backlit shots, too. At midday you can shoot in the shade with flash, but even there the ambient light is often still very bright.
Flash usually limits the exposure times you can use and often restricts you to shutter speeds of 1/200 or 1/250 second (see workshop 4 for tips on how to work around this limitation). In such cases, you often can expose correctly for the ambient light only by using a small aperture or an ND filter, which itself requires a lot of flash power to sufficiently illuminate the subject. A single on-camera flash is seldom powerful enough, so if your budget doesn’t allow for a portable studio flash, multiple Speedlites are the way to go. The advantages and disadvantages of this approach are as follows:
Advantages:
▸ If you already own a number of flashes, acquiring a couple more non-TTL units won’t stretch your budget too far.
▸ They are easy to transport, are easily scalable, and don’t take up too much space when traveling.
▸ If you can afford additional TTL flashes, your setup will also be capable of HSS.
▸ Multiple flashes set to low output are faster than a single flash set to high output, making it easier to freeze high-speed action, such as water splashes.
Disadvantages:
▸ A setup with five flashes can produce up to 300 Ws of flash output. Battery-powered studio flash often has up to four times as much output, giving you the potential to further underexpose your subject’s surroundings and make the sky and the surroundings look more dramatic.
▸ Recycle times are longer than if you use a professional-grade portable flash solution.
▸ Speedlights are not designed for this type of use. Shooting long sequences can lead to overheating and flash failure, although they usually recover (eventually).
▸ The relatively low capacity of the batteries and thermal overheating protection make long sessions impossible.
▸ Costs can quickly increase if you want to use a complex setup that is capable of HSS.
However you look at it, I love using this kind of setup, not only because of the advantages, but just because it is cool!
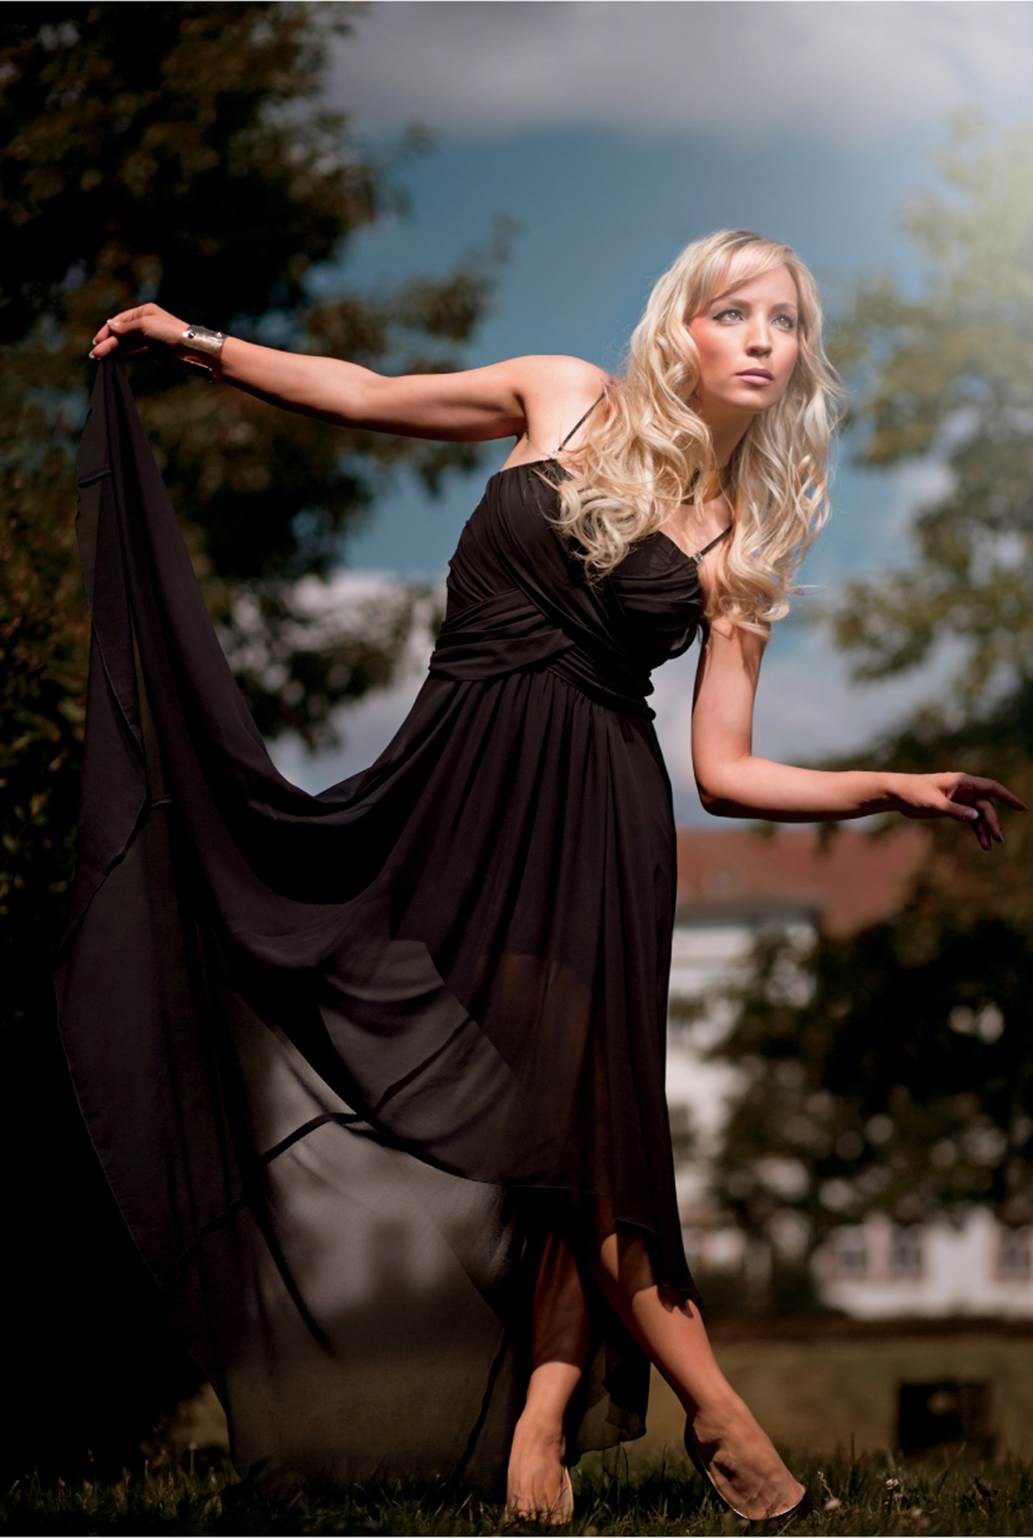
Flash portraits in the midday sun aren’t easy to shoot, but they are possible (Model: Solnyshko)
Canon EOS 5D Mark II | 24–105mm f/4 set to f/10 and 28mm | M mode | 1/125 second | ISO 100 | JPEG | white balance set to flash | five off-camera flashes fired simultaneously through a white umbrella
The Setup
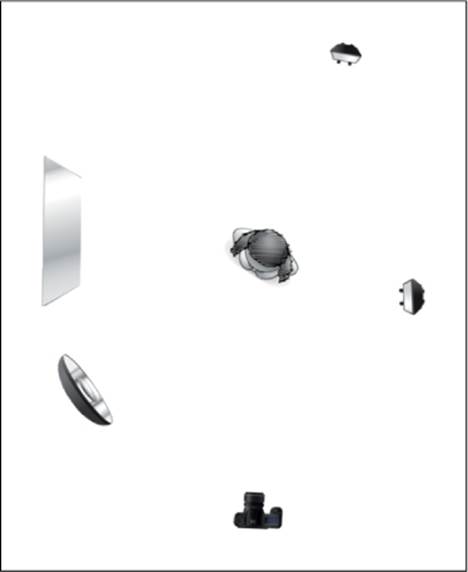
The accompanying photo shows the first prototype of the Duke Nukem setup with five non-TTL flashes from various manufacturers set up to fire through a white diffuser umbrella. The top three flashes are secured on a Lastolite TriFlash bracket, and the other two are affixed with homemade brackets that consist of a Walimex universal flash shoe, a Novoflex 19P ball head, and a Manfrotto Nano Clamp. To ensure that nothing came loose, I used a screw-thread locking adhesive from Loctite on the fastening screws. I then mounted the complete flash head on a conventional stand weighted with a one-gallon water jug. The umbrella swallows about 2 stops of light, but it softens the edges of the shadows and combines the five separate shadows from the flashes into one. It is possible to use this type of setup without an umbrella, but the individual shadows would be more visible in the images. All five flashes are fired in manual mode using RF-602 radio triggers. You can also fire just one flash with a radio control and the others with an optical signal, but this approach is not as reliable.
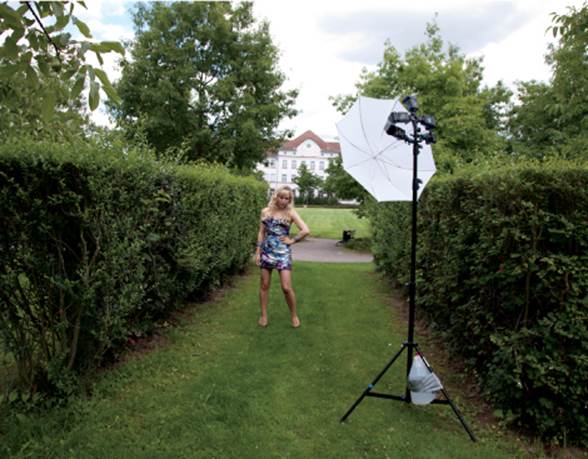
The model is positioned in the shade, but the midday sun is still very bright (co-photographer: Michele)

Duke Nukem version 1. Five flashes are fired simultaneously through a shoot-through umbrella.
Camera Settings and Shooting
The sequence of photos shows how we built up the scene to capture the final image. I began by shooting a couple test shots of the surroundings in auto mode to check out the most interesting details and angles of view. I then switched to manual mode and set the camera to expose correctly for the ambient light while taking the camera’s sync speed of about 1/160 second into account (sync speeds vary from camera to camera). After I found the settings that made the background and sky look right, I added the flash trigger to the setup. It is best to position an umbrella so its stem points directly toward the subject’s nose from above to prevent unflattering nose shadows. I then positioned the camera about 30 degrees to the light source so the light would look good even when the subject looked straight into the camera (which produces a loop lighting effect). In situations like this, you need to position the light as close to the subject as possible while providing enough light to illuminate the entire upper body. The flash output has to be set to maximum (or almost maximum) to be effective.
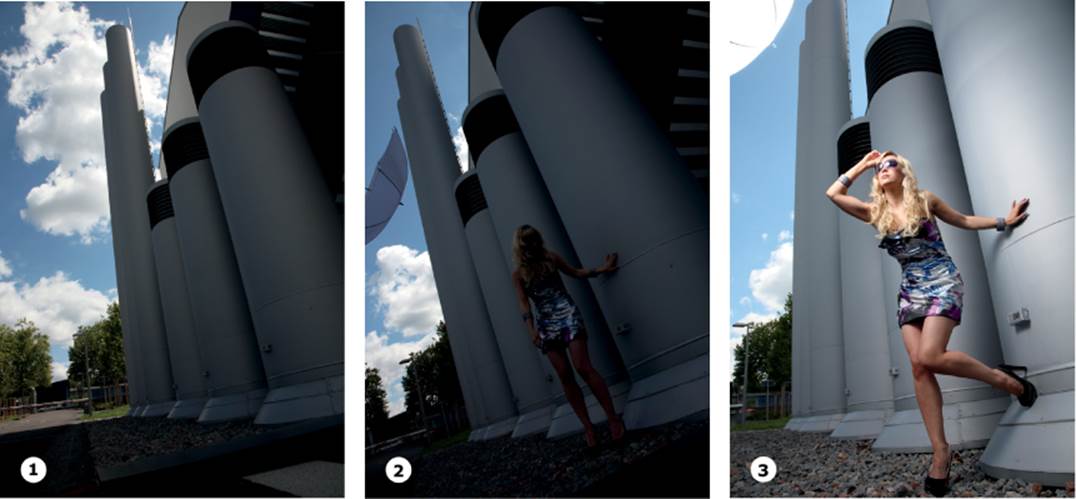
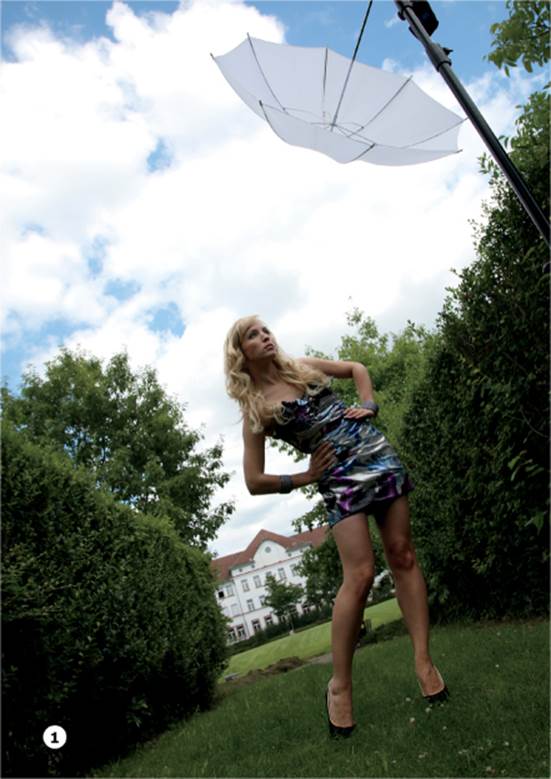
1 Checking the location for interesting details and angles;
2 setting the exposure for the surroundings in M mode without flash;
3 adding the Duke Nukem, made up of five flashes set to high (almost full) output. This is the original unprocessed photo.
Post-Processing in Photoshop
The processing steps I performed were relatively simple:
▸ Aligned, cropped, and repaired missing areas using the Clone Stamp
▸ Optimized the skin tones
▸ Warmed up the overall colors
▸ Increased saturation in the shadows and the subject’s dress with the Sponge tool
▸ Applied some subtle dodging and burning
▸ Sharpened the image

The Photoshop layer stack showing the processing steps I performed
Tips, Tricks, and Notes
This approach can be extended to encompass even more flashes. The FourSquare flash bracket (www.lightwaredirect.com) is a great piece of equipment that can be mounted at 45 degrees to a second unit so you can create a stable holder for eight flashes! These brackets are not inexpensive, but they are rock solid. Check out how to put them to use in Dave Black’s surfing shoot at www.tiny.cc/eu6wlw.
Using multiple flashes gets even more interesting if you use TTL units that have a built-in HSS mode. Multiple flash setups are often referred to as gang light, and a quick Internet search for that term in combination with the term strobist will show you some great examples of how to use it. You don’t have to use costly PocketWizard triggers for all the flashes in a multiple flash setup; you can just as easily trigger a single main flash with a TTL cable and trigger the others with simple optical slave cells.
Workshop 6
Duke, Nuke Them 2
▸ How to produce lots of light using small flashes
▸ Using five flashes simultaneously
▸ Shooting with a wide aperture in the midday sun with an ND filter
The previous workshop showed how to simultaneously use five flashes, but you may want less depth of field and more bokeh. The setup demands a small aperture that retains sharpness throughout the frame. Using an ND filter is one way to bring wider apertures and therefore less depth of field into play in a daytime shoot.
Neutral Density Filters
ND filters reduce the strength of the incident light and help make it possible to use wide apertures at speeds greater than the camera’s sync speed. ND filters are labeled as shown in the accompanying table
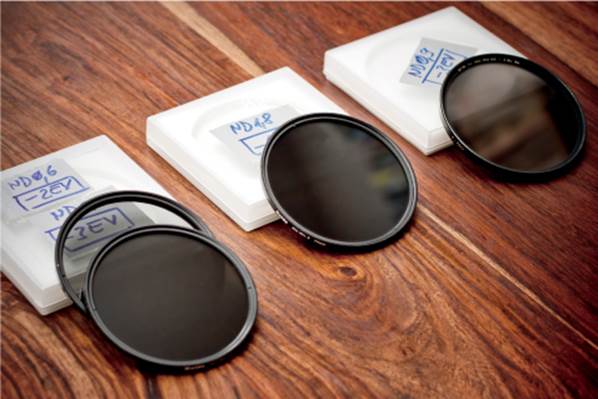
A selection of ND filters
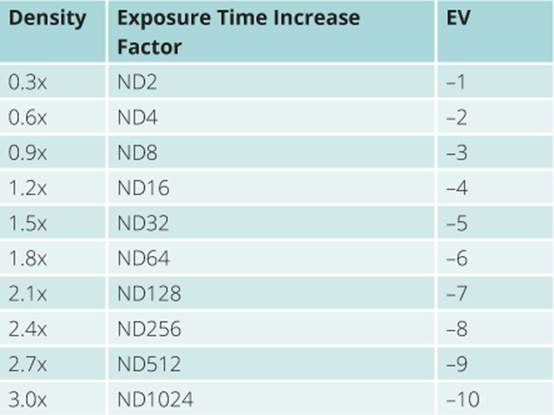
ND filter labeling convention
A flash-lit portrait with background bokeh captured in the midday sun—an ND filter made it possible (Model: Solnyshko)
Canon EOS 5D Mark II | EF 85mm f/1.8 set to f/2.5 with a 5 stop ND filter | M mode | 1/200 second | ISO 100 | RAW | white balance set to flash | five off-camera flashes fired simultaneously through a white shoot-through umbrella
The Setup
We set up the scene shown in the photo on page 65 so the interesting background was visible but blurred when it was captured with a moderately wide aperture.
Camera Settings and Shooting
For this shot I switched to a short telephoto EF 85mm f/1.8 lens set to f/2.5. I then had to work out which ND filter to use; the previous aperture setting was f/14, and the new one was f/2.5, which covers 5 stops (f/2.8, f/4, f/5.6, f/8, f/11, f/16), if you use the nearest full stops. This means that an ND32 filter was required (see the previous table). An ND64 filter would also work with a slightly wider aperture. I captured this shot in RAW format to make it easier to correct the exposure and adjust the slight color cast caused by the filter, without losing data.
Post-Processing in Photoshop
In addition to the steps described in the previous workshop, I also used a Hue/Saturation adjustment layer to correct the slight color cast that the ND filter produced.
Tips, Tricks, and Notes
Following are some tips to keep in mind when you use ND filters:
▸ ND filters are available from various manufacturers in a wide range of prices. I have found that the color shifts produced by ND filters correspond almost directly to price. If you want to produce authenticlooking results, purchase filters from a manufacturer with a good reputation, such as B+W or Hoya, even though they are more expensive.
▸ Be careful when you stack ND filters to achieve the correct strength. That’s what I did for this shot because I couldn’t find my ND32 filter. Image quality and color fidelity are reduced with each additional layer of glass. Not all ND filters can be stacked—the slim filters made by Hoya, for example, cannot.
▸ Like other filters, ND filters are available in various sizes. All of mine are 77mm. If I am using a smaller lens, I simply handhold the filter in front of it.
▸ Variable-strength ND filters are available. I have found that cheaper filters are detrimental to image quality, and high-end filters from companies like Singh-Ray are too expensive. It costs less to purchase a complete set of single-strength filters that are as good as, or even better than, the most expensive variable filters.
▸ Don’t use combinations of polarizer, ultraviolet (UV), and skylight filters. A high-quality sunshade for each of your lenses is a better investment. It also protects the front element of your lens and improves image quality.
An overview of our setup
1 This is how the scene looked when it was captured by a wide-angle lens without flash or an ND filter.

2 The same wide-angle shot was taken with flash, and the exposure was dialed down to suit the ambient light.
Canon EOS 5D Mark II | 24–105mm f/4 set to f/14 and 24mm | M mode | 1/160 second | ISO 100 | JPEG | white balance set to flash | five off-camera flashes fired through a white shoot-through umbrella
Workshop 7
Colored Gels Rock!
▸ Using filters to produce color accents
▸ How to mix colors
The “Spectra and Tricks with Color Filters” tutorial on page 72 explains how to use filters and alter white balance settings to change the color temperature or artificially color the background in your images. But filters can be used for more artistic purposes too. I have two sets of filters: the serious ones, such as CTO and green, for making selective color shifts (they are carefully sorted and labeled); and my fun filters, which include a random mix of bright colors including yellow, pink, green, purple, and all the others you can find in a LEE swatch book—the more colorful, the better. Any time a scene seems too dull, I can brighten it up with a color filter or two.
I don’t usually use color filters on my main lights, but they are great for side lights or background accent lights. Reflective surfaces like windows or puddles are perfect for amplifying the filter effects and creating multicolored reflections.
The Setup
For this shot, we used four off-camera YN-460 non-TTL, non-zoom flashes without additional light modifiers. The two background flashes were fitted with colored gels and arranged so one pointed straight into the camera and the other pointed at the window on the right. The light from these accent flashes was reflected and intensified by the ground and the window. We used the other two flashes as rim and main lights for the model. We used RF-602 radio receivers on all four flashes.
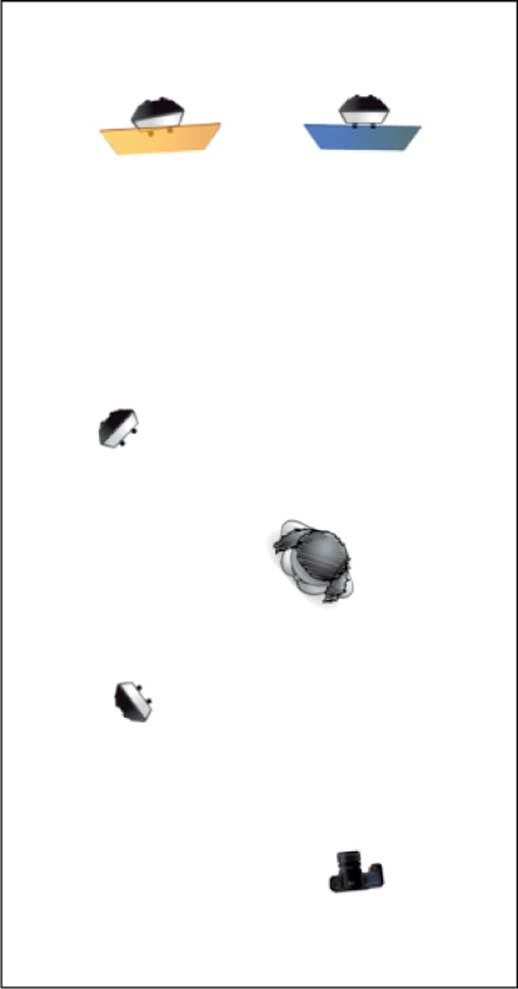
Four off-camera flashes without light modifiers, two of which are fitted with colored gels
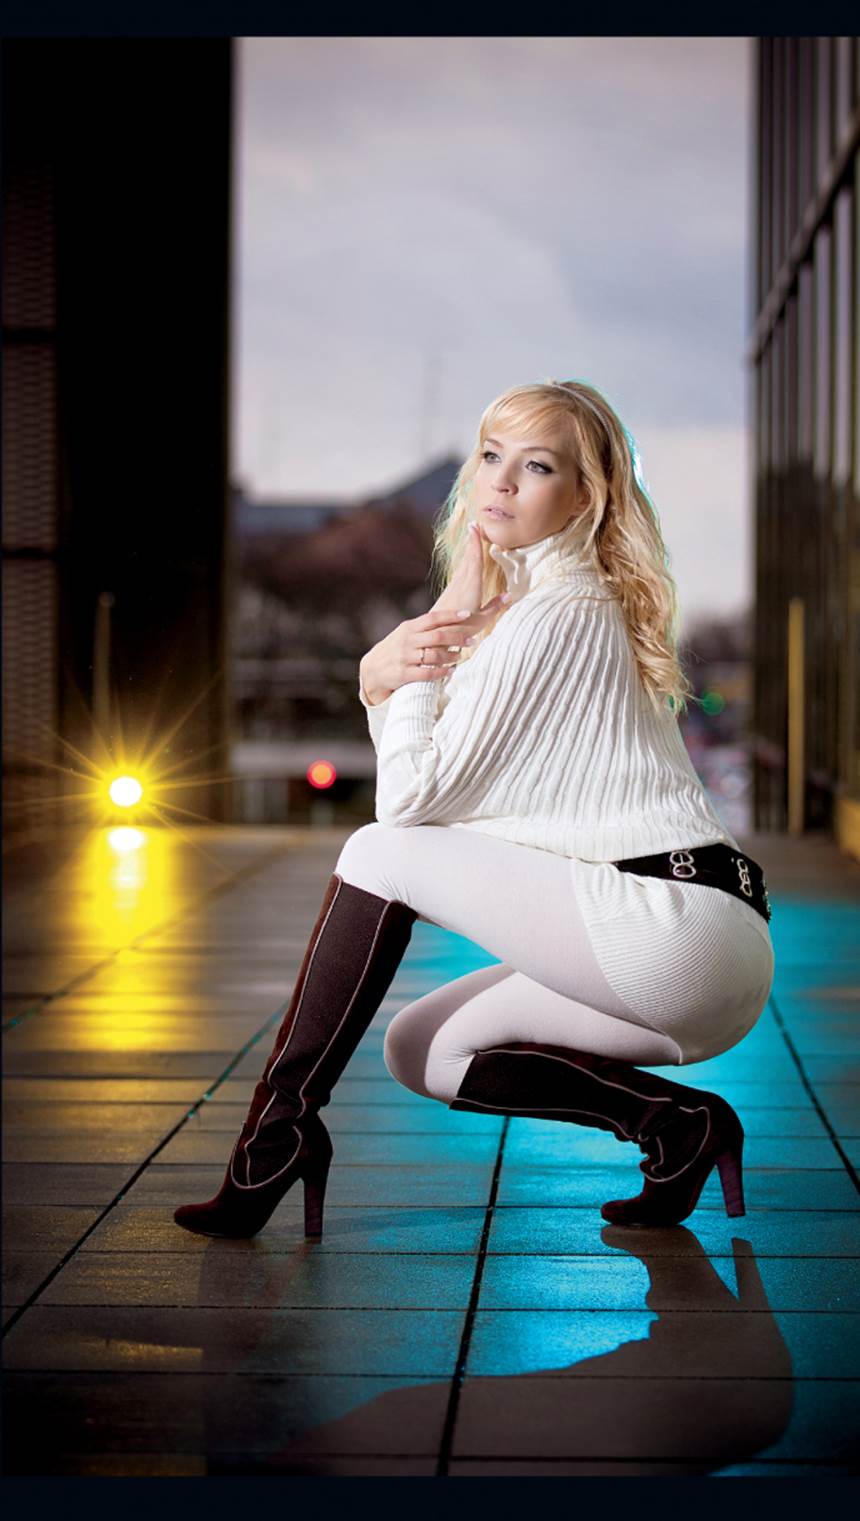
Accent flashes with color filters can add real sparkle to an otherwise ordinary image (Model: Solnyshko)
Canon EOS 5D Mark II | EF 70–200mm f/2.8 set to f/3.2 and 90mm | M mode | 1/160 second | ISO 100 | RAW | white balance set to flash | four off-camera flashes, two with colored gels, no light shapers
The turquoise and yellow filters we used are about 120 degrees apart on the color wheel (complementary colors are 180 degrees apart). In this case, the choice was random, but personally, I have found that colors separated by 120 degrees often work quite well together.
Camera Settings and Shooting
The ambient light was fairly dull, so our flashes were really effective right from the start. Here too, the best way to begin is using manual (M) mode to expose for the background and the detail in the sky without the flash trigger mounted. These settings will leave the subject underexposed, but that is where the flashes come in. Set up your main light first, followed by the rim light then the accent lights. Make some test shots starting at 1/8 output and work up slowly to the correct settings. Because they were farther away, the colored background flashes required quite a bit of power (recall the inverse square law from chapter 1). We will talk about how to affix the gels to the flashes in the tutorial on page 72.
Post-Processing in Photoshop
As usual, the initial post-processing steps involve straightening the image and selecting a slightly tighter crop, followed by adjustments to contrast and color, and finally some subtle beauty retouching to optimize the subject’s skin tones. You can always add a logo or some text like “Fashion” and then perform your final sharpening for output.
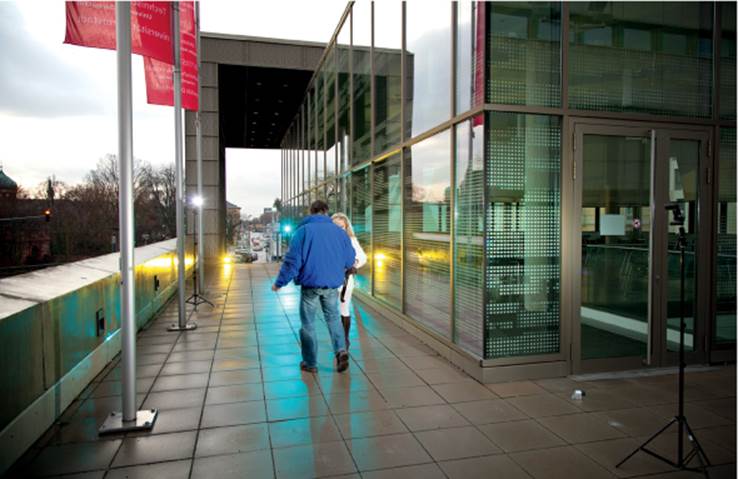
The location seen from the viewpoint of a passerby. This photo shows us setting up the main lights (Model: Solnyshko; co-photographer, Ray Sjoeberg)
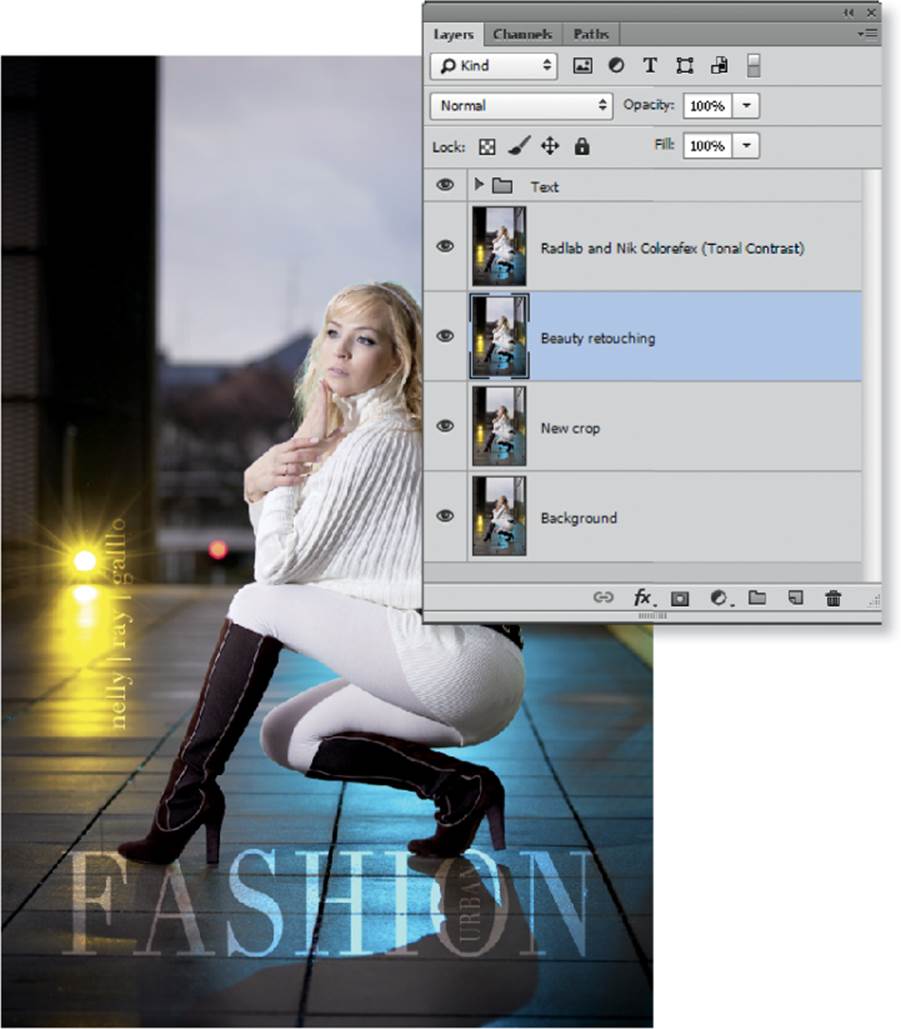
The finished, processed image and the corresponding layer stack
Tips, Tricks, and Notes
Mixing colors the way we did opens up a whole new world of possibilities. The other examples reproduced here show just two of the countless variations. The setup was similar, but we used different colored gels. We used a 50mm Lensbaby Composer with a Double Glass Optic for the shot on this page.

I admit this shot is a little over the top, but at least it isn’t boring! (Model: Solnyshko)
Canon EOS 5D Mark II | Lensbaby 50mm set to f/4 | M mode | 1/200 second | ISO 400 | RAW | white balance set to flash
In Depth:
Spectra and Tricks with Color Filters
Have you ever photographed in fluorescent light and found that, despite having made the appropriate white balance setting (in your camera or during RAW import), your photos don’t look natural? The human eye is especially sensitive when it comes to perceiving colors in skin tones and and in food, and it picks up on even the tiniest discrepancies. Fluorescent lamps come in many shapes and sizes with various color temperatures, and the spectra they produce often contain gaps (the spectra of LEDs have the same characteristics).
White Balance | Setting white balance using a white card, a SpyderCUBE, or some other tool sometimes works very well, but tools often fail in fluorescent light. The spectrum produced by fluorescent light is made up of a few isolated green and purple peaks, which is very different from the continuous spectrum provided by daylight.
A calibration chart like the DC Pro target can help to set things straight, but if you have to shoot under mixed light sources, automatic white balance (AWB) is often a good choice; it will usually select a setting that is close to the desired result. If you shoot in RAW format, you can adjust the white balance later, with no loss of image quality. You can see how altering the white balance reduces image quality by checking the adjustment against the exposure meter readout; the difference can be as much as ±1 EV. If possible, always use RAW format in tricky lighting. Successfully adjusting the white balance at the post-processing stage is virtually impossible for JPEG images.
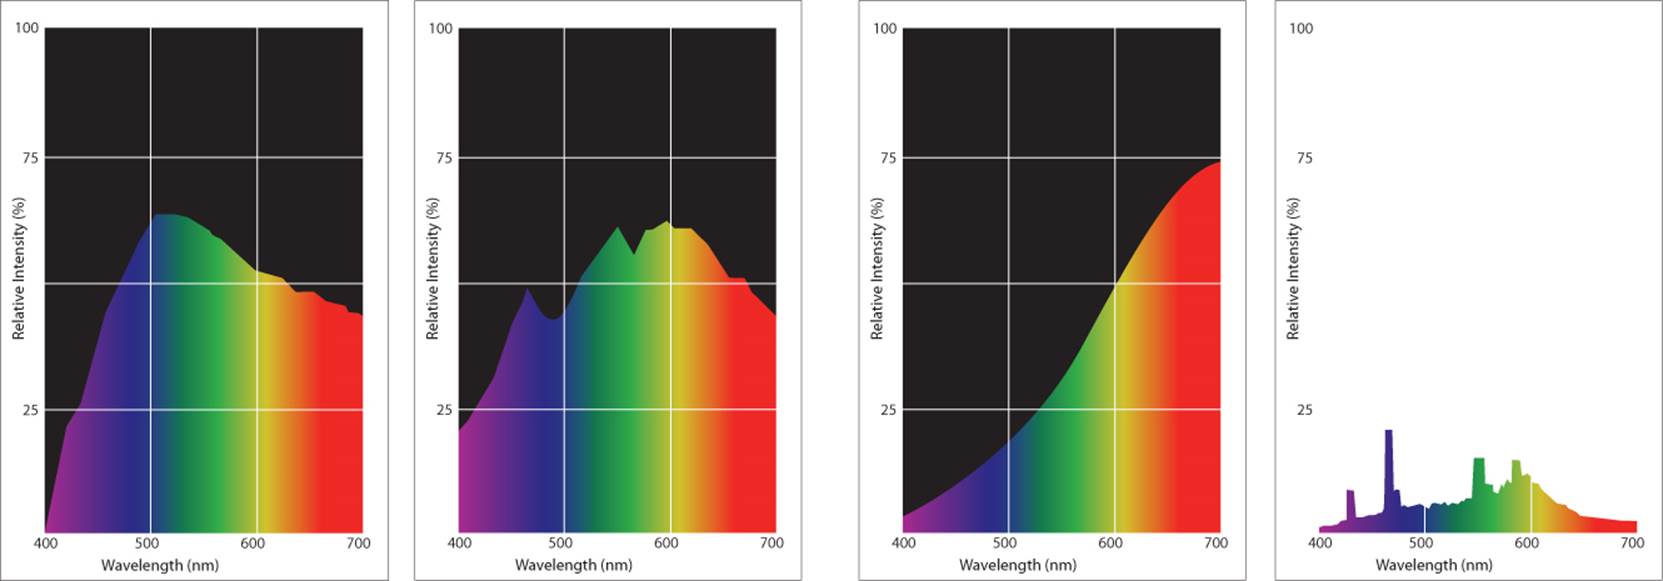
Left to right: These graphs show the relative intensities of the visible spectra produced by sunlight, xenon flash, a conventional light bulb, and fluorescent (neon) light. The graphs are based on data found at www.tiny.cc/p18wlw.
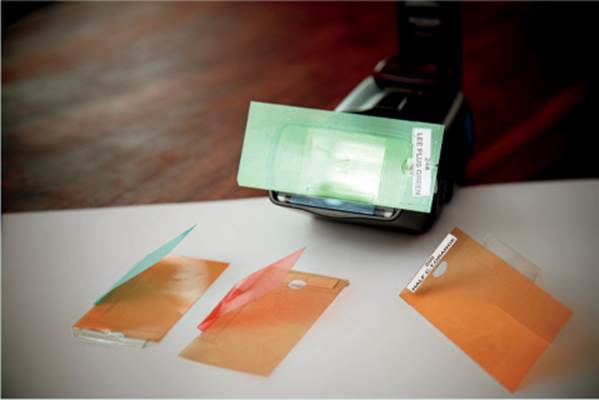
Gel Filters | Although they are now made of plastic, color filters used to be made of gelatin, which is where the word gel comes from. Gels are indispensable for flash photography and are most commonly used to help match the temperatures of ambient and artificial light. I keep my effects filters unsorted in one wallet, and I keep specific white balance filters, such as my LEE 204 CTO and my LEE 244 Plus Green, carefully labeled in a separate wallet.
Orange filters are perfect for mixing flash with tungsten or halogen light. These filters are called 1/4, 1/2, 3/4, or 1/1 (full) color temperature orange (CTO). Color temperature straw (CTS) filters are yellow and create a sunny effect. The accompanying table lists the most commonly used filters and the differences they make to daylight, which is 6500 K.
Fluorescent (neon) light is trickier to deal with. Some photographers recommend that you use a LEE 244 Plus Green (or similar) filter on your flash and set your white balance to fluorescent. This approach can work, but shooting in fluorescent light is always frustrating and should be avoided if possible.
The simplest way to affix colored gels to your flash is to use homemade plastic tabs cut from spare gels that you can insert into the diffuser slot on the flash head. The filters stay put, and you don’t need to use tape or Velcro.
Instead of using a filter to alter the color of the background light, you can work the other way around and use a filter to alter the color of the main flash and shift the colors for the subject and the background later in the camera or on a computer. This saves you from having to use a background flash and can produce a better overall effect. There are two ways to approach this kind of lighting.
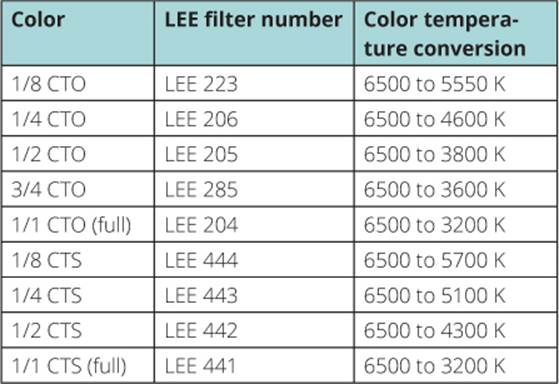
The values assigned to a selection of commonly used LEE filters
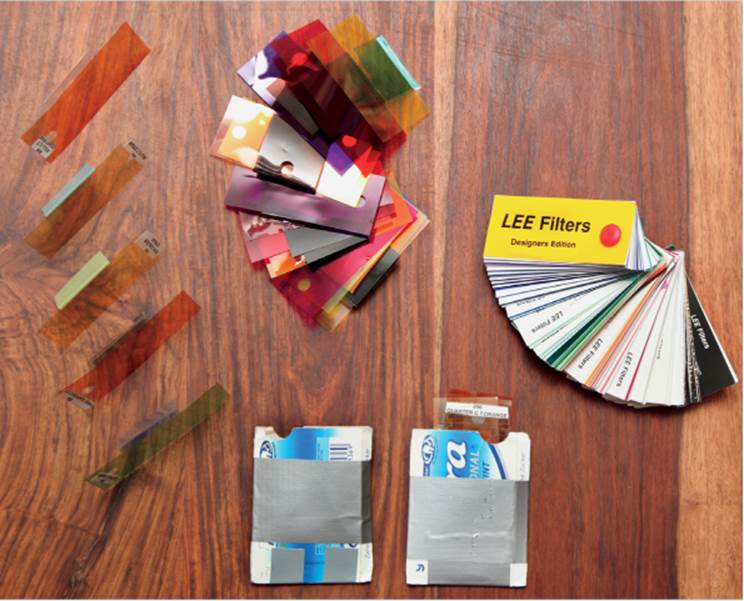
A LEE Filters swatch book contains everything a strobist’s heart desires. Empty gum packages are great for storing filters when they are not in use.
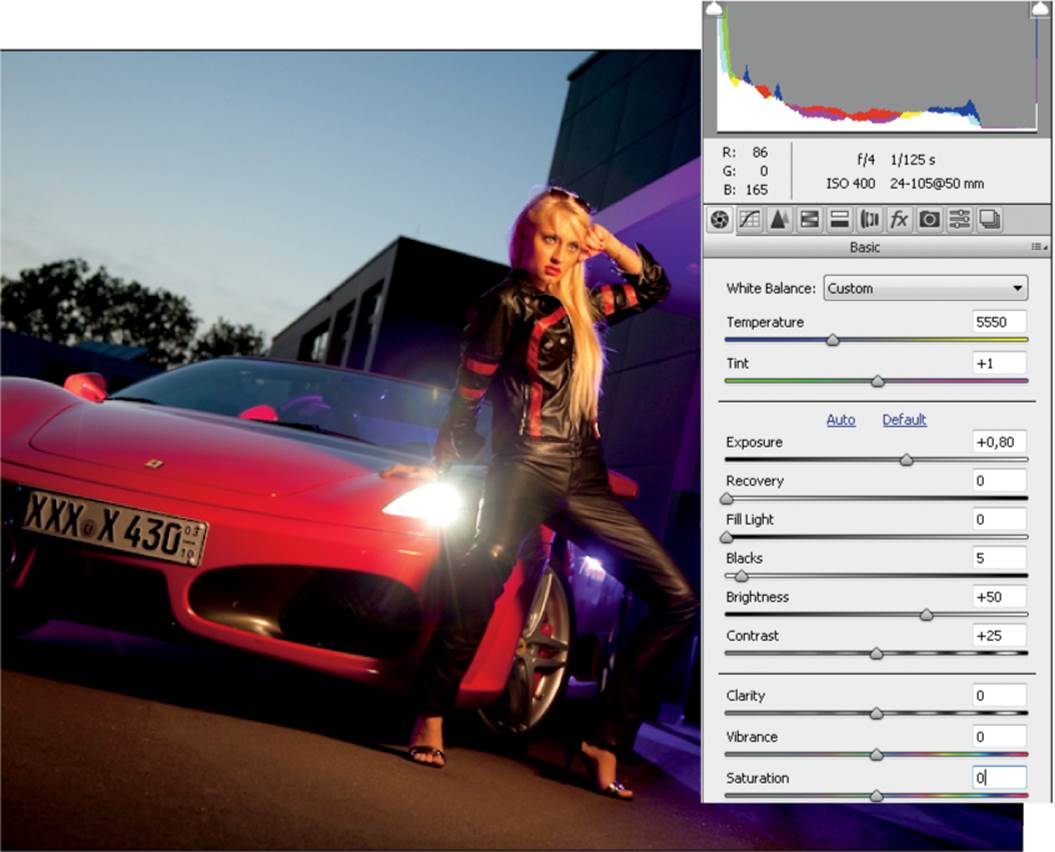
A full CTO filter on the flash along with a flash or daylight white balance setting produce orange skin tones and a normal-looking background
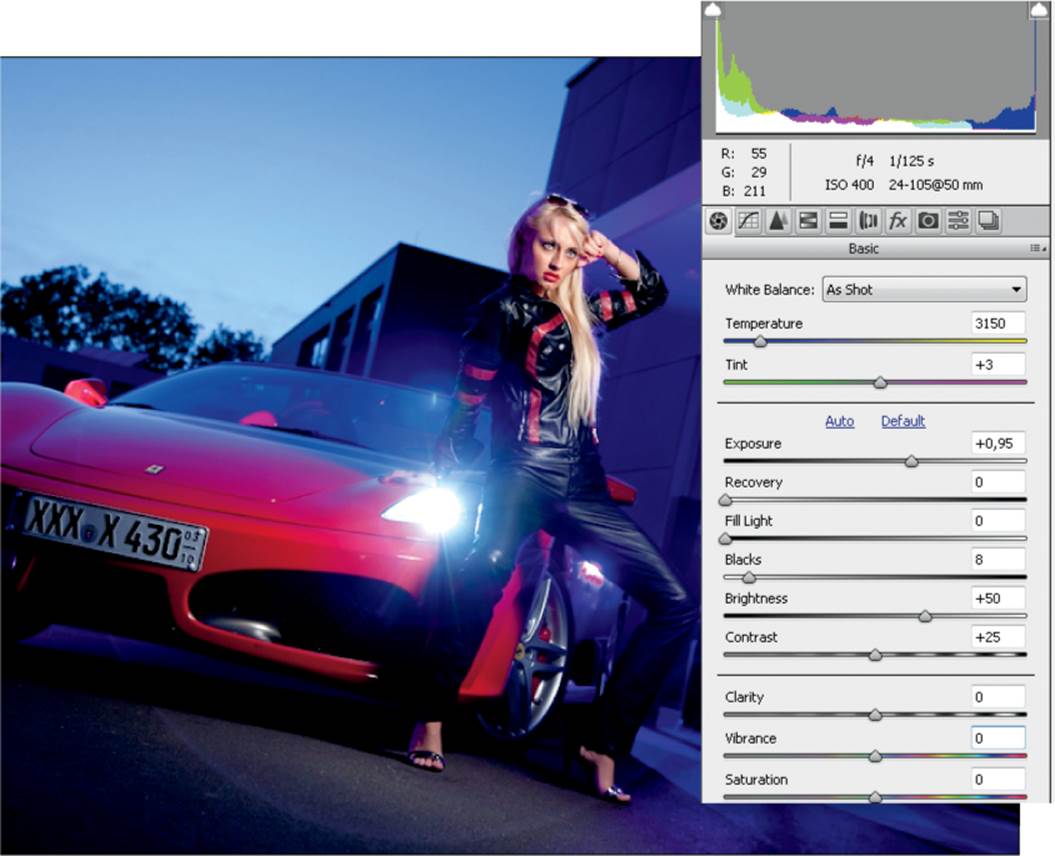
A full CTO LEE 204 gel on the flash and a tungsten in-camera white balance setting produce natural-looking skin tones and an artificially colored blue background. For this shot we fired an additional flash with a purple gel from the right.
Color Shift Based on a Known Color Temperature | If you use a full CTO filter, you know in advance that your flash will produce light with the same color temperature as a traditional light bulb, and you can set your white balance to tungsten.
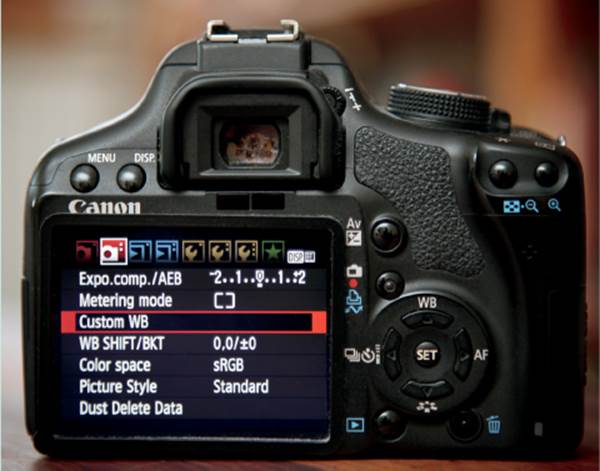
Color Shift Based on an Unknown Color Temperature| If you aren’t sure of the color temperature shift produced by your filter, you have to calibrate your camera accordingly. To do this, hold the filter in front of the lens, shoot a test image of a white or gray surface, and set your white balance manually using the reading you just made. This is called Custom WB (Canon) or PRE (Preset manual; Nikon).
You can use the same approach and a blue filter to turn the background red. You can also attach a filter to your flash and shoot a flash-lit photo of a white or gray surface to find the appropriate white balance setting. The process is explained in detail in Gary Fong’s YouTube video atwww.tiny.cc/128wlw. A complete list of LEE filters and the effects they produce, as well as a downloadable version of the LEE Swatchball filter comparison program, can be found at www.leefilters.com/lighting/colour-list.html.
When you use it with color filters and flash, your camera’s manual white balance setting opens up a new world of creative possibilities.
When you use it with color filters and flash, your camera’s manual white balance setting opens up a new world of creative possibilities
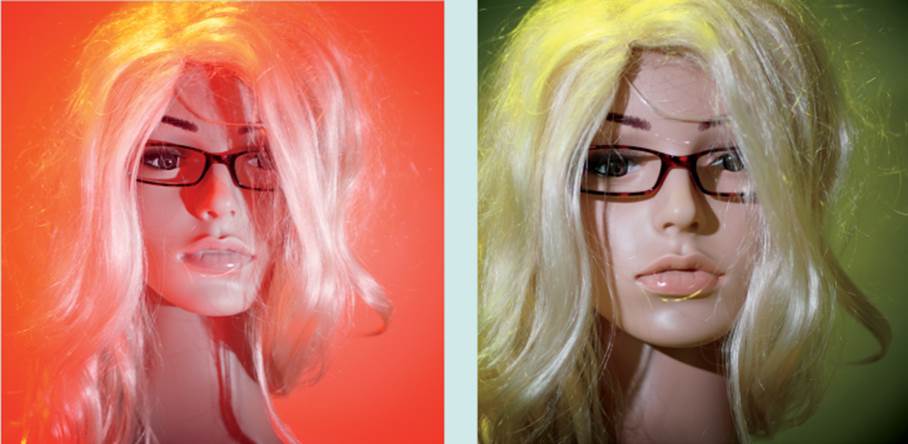
Evelyn, my most patient model, photographed in front of a white background. Left: With CTO and blue filters mounted one above the other on the flash. Right: With orange and purple filters on the flash and manual white balance set as described in the text.
The result of using the color filter trick along with some subtle retouching and a color shift in Photoshop CS6 using Adjustment Layer and Color Lookup > Late Sunset (Model: LondonQueen)
Canon EOS 5D Mark II | EF 24–105mm f/4.0L set to 50mm and f/4 | M mode | 1/125 second | ISO 400 | RAW | off-camera flash with a CTO filter fired through a white shoot-through umbrella from the front, flash with a purple gel from the back (right side), white balance set to tungsten
Workshop 8
Creating a Fire Effect with an Orange Filter
▸ Using an orange filter to set the scene on fire
▸ How to create smoke effects
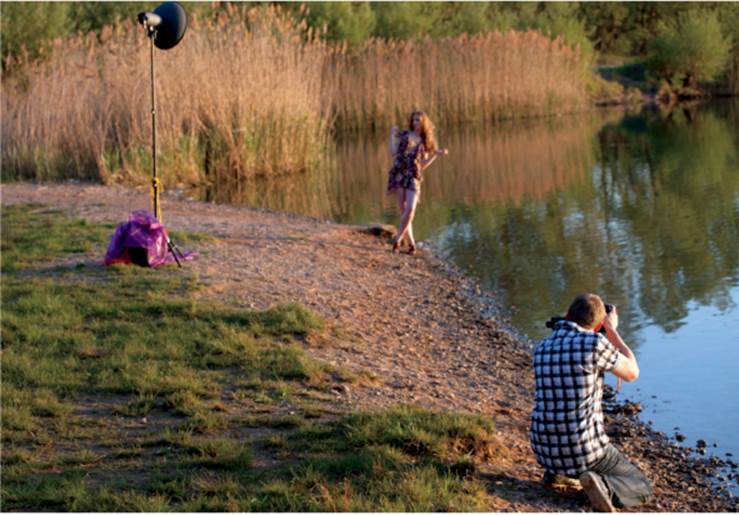
If you are shooting on location in the evening or at night, your flash won’t have to compete with the sun, but you run the risk of your backgrounds looking dark and uninteresting. In an urban environment you can simply use the bokeh of any background lights for a livelier background, but in a rural area you have to produce your own background lighting. We shot this workshop at a nearby lake where the reeds provided an interesting counterpoint to the subject. We used one flash on a stand to light the reeds and another fired through a white shoot-through umbrella to illuminate the model.
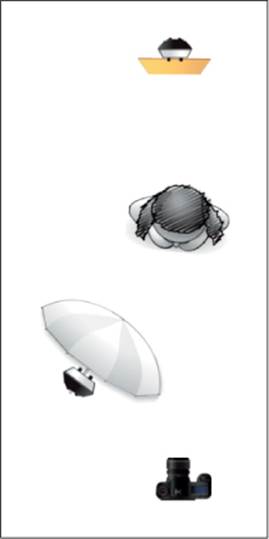
Schematic of our setup showing our main flash fired through a white umbrella and our background flash with its full CTO filter (without light modifiers) in the background
The Setup
We fitted the effect flash in the reeds with a full CTO gel to create a fire-like effect. See the “Spectra and Tricks with Color Filters” tutorial on page 72 for details on mounting and using gel filters. This effect flash shines toward the camera and is partially obscured by the model. To enhance the fire effect, we set off a smoke tablet in front of the flash.
We lit the main subject with a second flash mounted on a stand behind a white shoot-through umbrella. We used two non-TTL YN-460 flashes triggered by RF-602 modules.
Camera Settings and Shooting
First I set up the camera to capture some background detail without flash. Because it was quite dark, I increased the ISO to 500, which allowed me to shoot handheld at 1/80 second at a focal length of about 100mm. I used f/4, rather than the maximum aperture of f/2.8, to ensure the model’s eyes were in perfect focus. Because I had already increased the ISO sensitivity, I starting testing the flashes at 1/8 output and fine-tuned them from there.
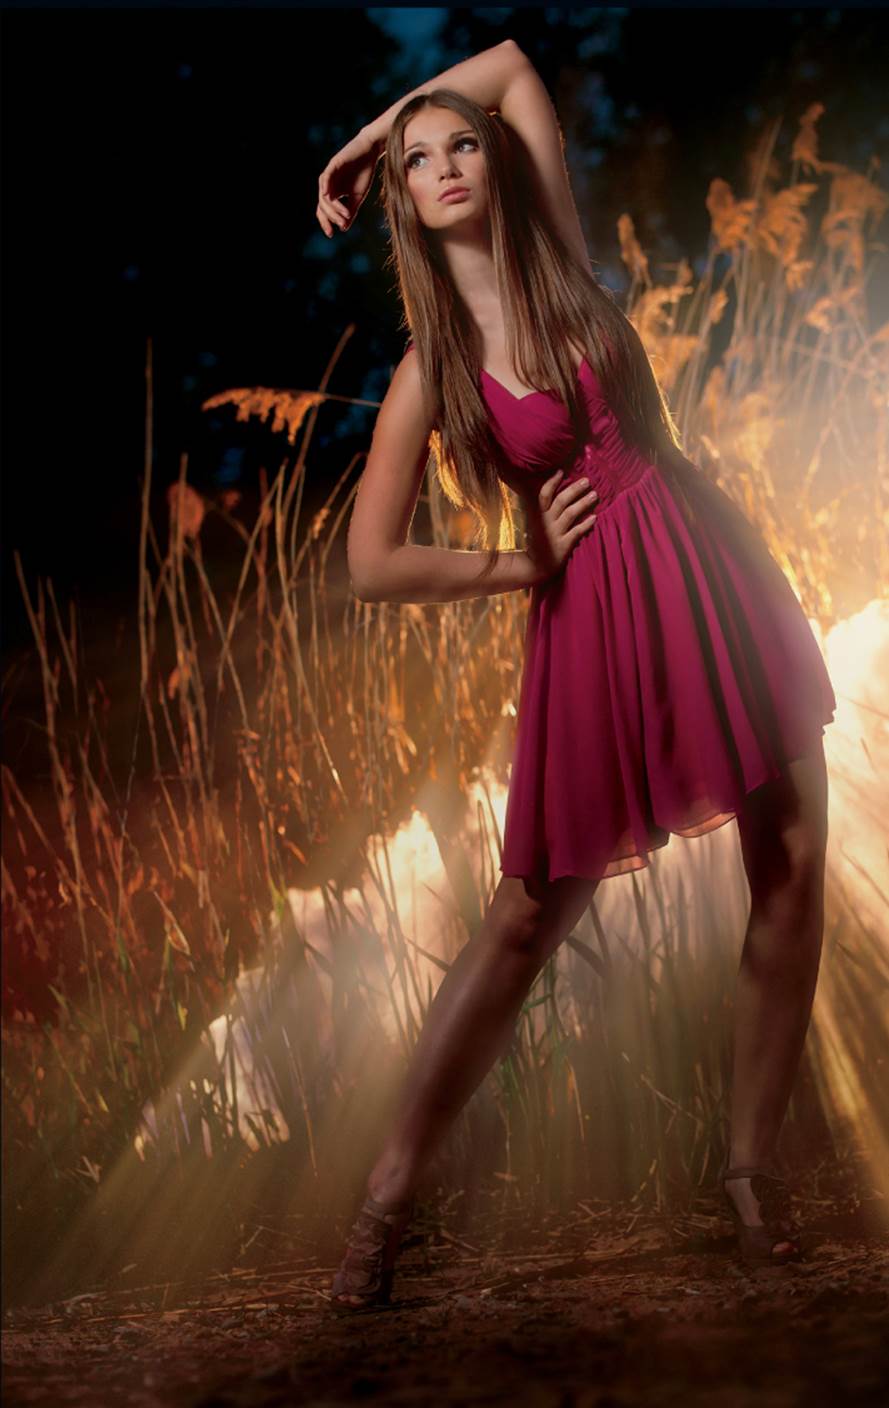
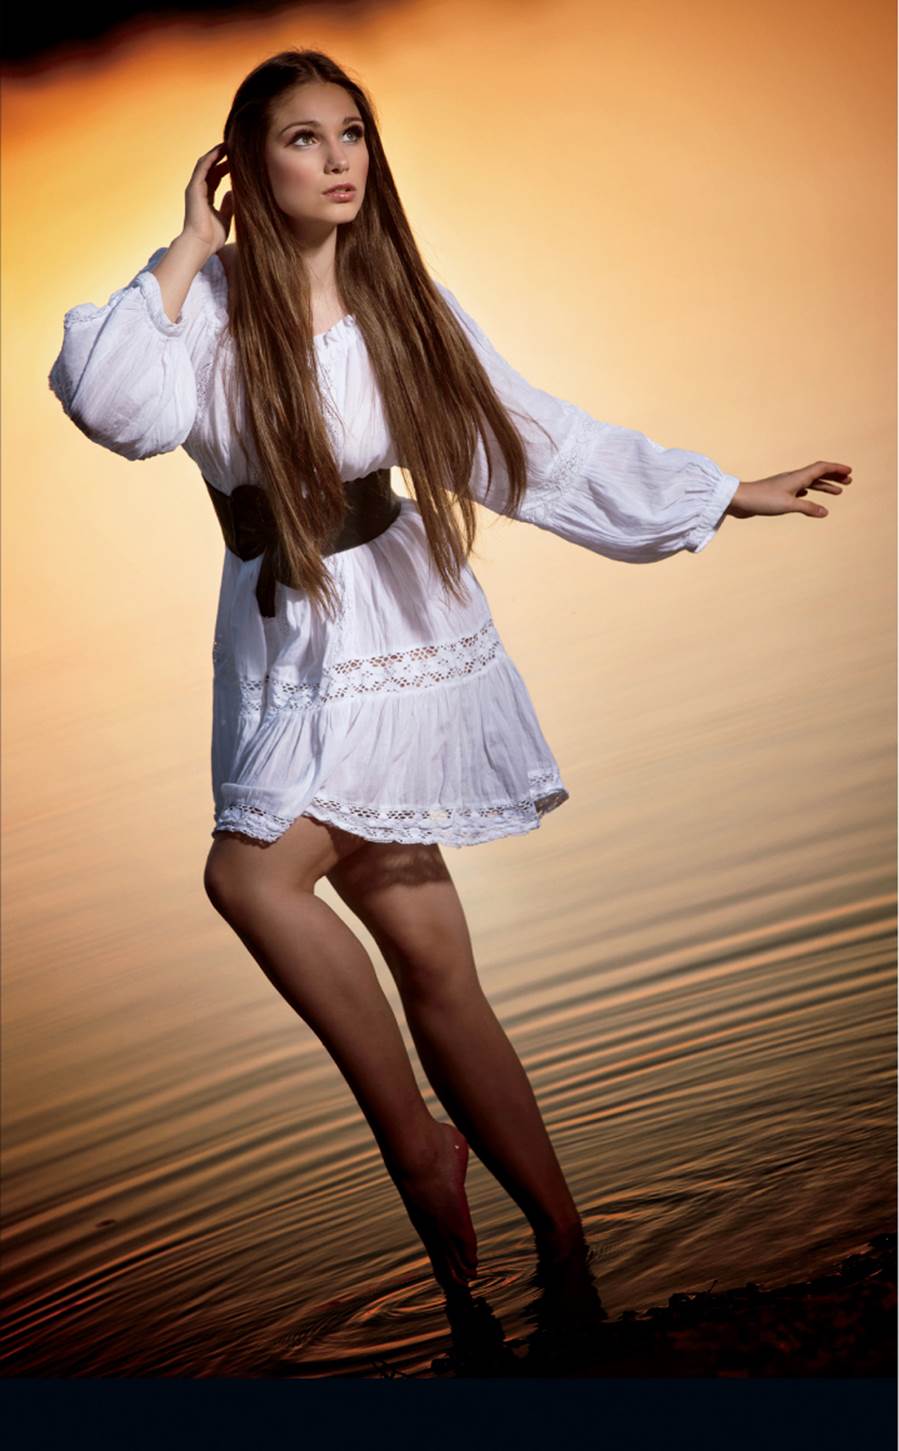
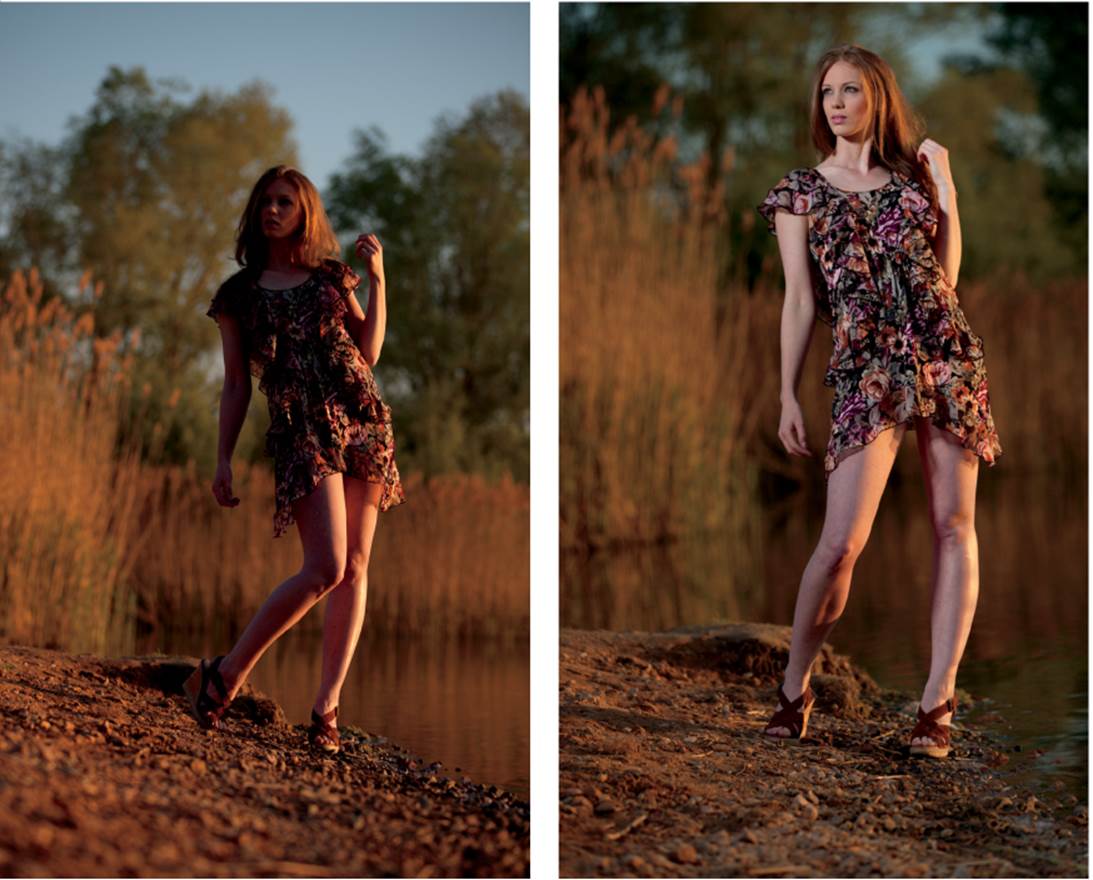
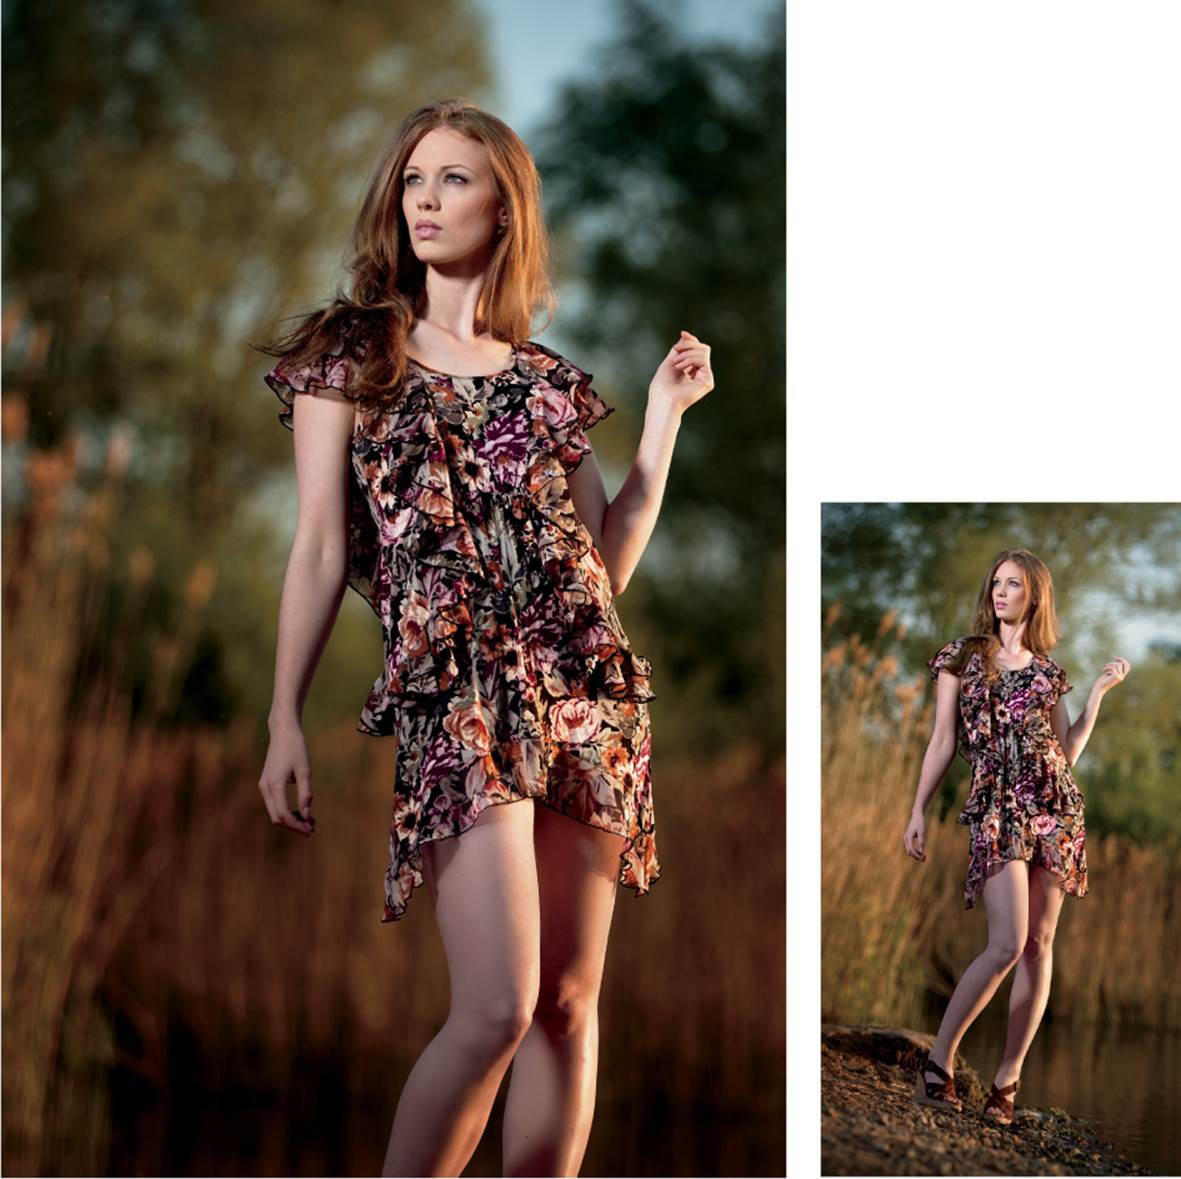
Using a flash with an orange filter is preferable to setting the reeds on fire! (Model: Neleta; co-photographer: Niko/NN-Foto)
Canon EOS 5D Mark II | 70–200mm f/2.8L IS II set to f/4 and 95mm | M mode | 1/80 second | ISO 500 | RAW | white balance set to flash | two off-camera flashes: one from behind with a full CTO filter, and the other from in front fired through a white shoot-through umbrella
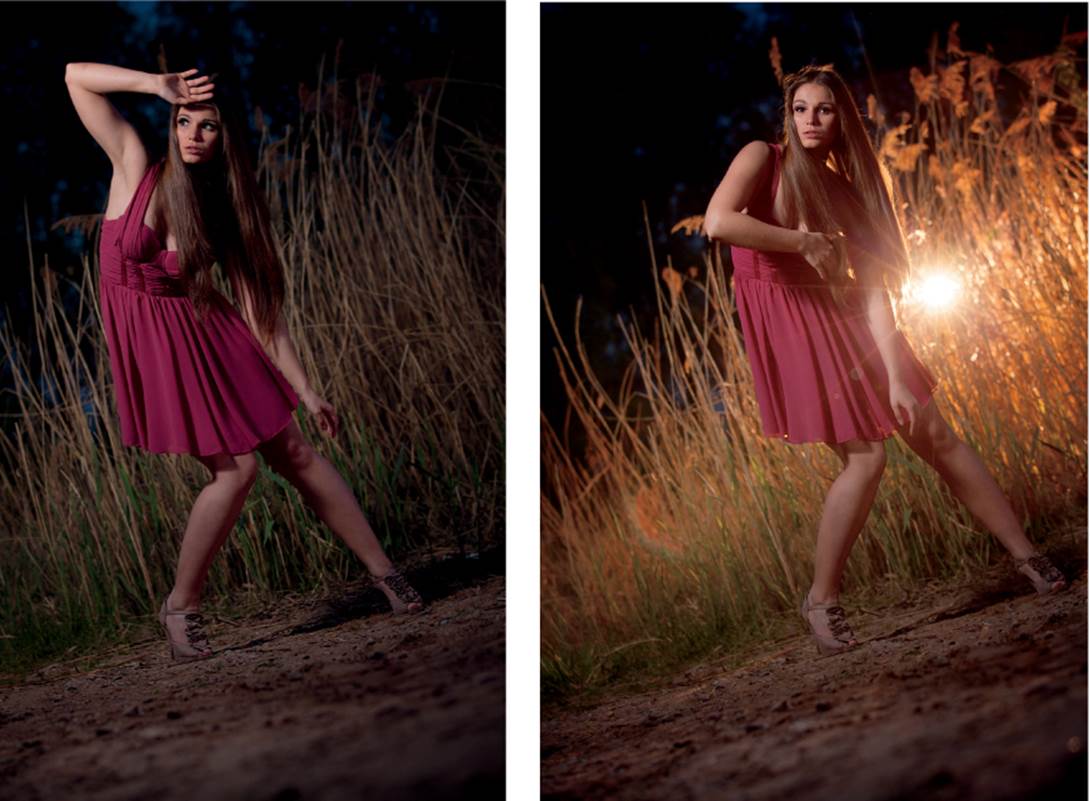
Two of our test shots: one without an effect flash, and one with an effect flash. The second image shows a nice starburst effect (we added the smoke effect later).
Post-Processing in Photoshop
In addition to my standard processing steps, I concentrated on emphasizing the flash light. I also added more smoke, a vignette, and a color adjustment. You can create realistic-looking light rays in Photoshop as follows:
▸ Create a duplicate layer (Ctrl+J) using the Lighter Color blending mode.
▸ Add Filter > Blur > Radial Blur with an Amount setting of 100 and Blur Method set to Zoom. Use your mouse to select the center of the effect.
The original image is shown on the bottom left on page 79, and the post-processed version, with its relatively complex layer stack, is shown on the bottom right. This may seem complicated, but even simple processing steps can produce a lot of layers. Always process an image carefully and build the look you want one step at a time.
Tips, Tricks, and Notes
The images on these pages include some with lens flare and some with starburst effects. You can deliberately produce them as follows:
▸ Lens flares occur when you shoot directly into the light. You can emphasize the effect by shooting without a sunshade, opening the aperture, and using a skylight or UV filter. To reduce the strength of the effect, make sure the light source is almost completely obscured by the subject.
▸ Starbursts occur when you shoot with a small aperture. The number of rays a starburst has depends on the number of aperture blades, and its strength depends on the internal construction of the lens. You can enhance the effect by stopping down or using a dedicated effect filter, like the Cokin starburst filter.
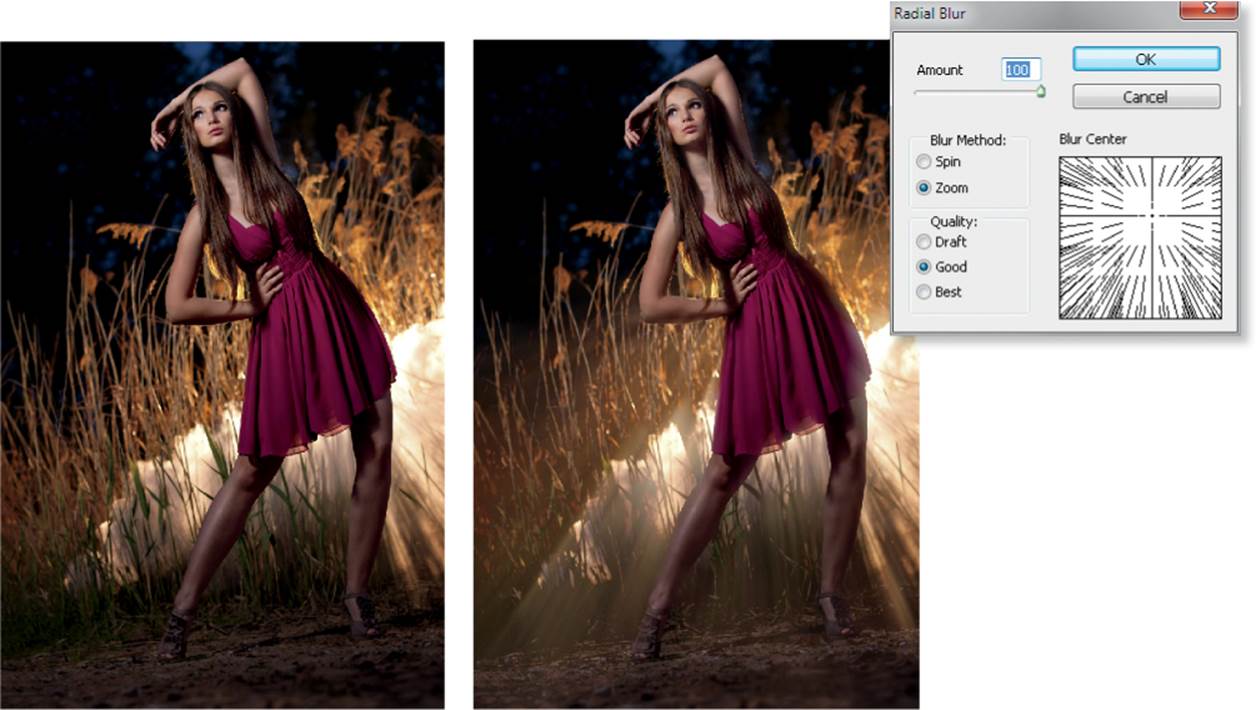
You can use the Radial Blur filter in Photoshop to emphasize light rays
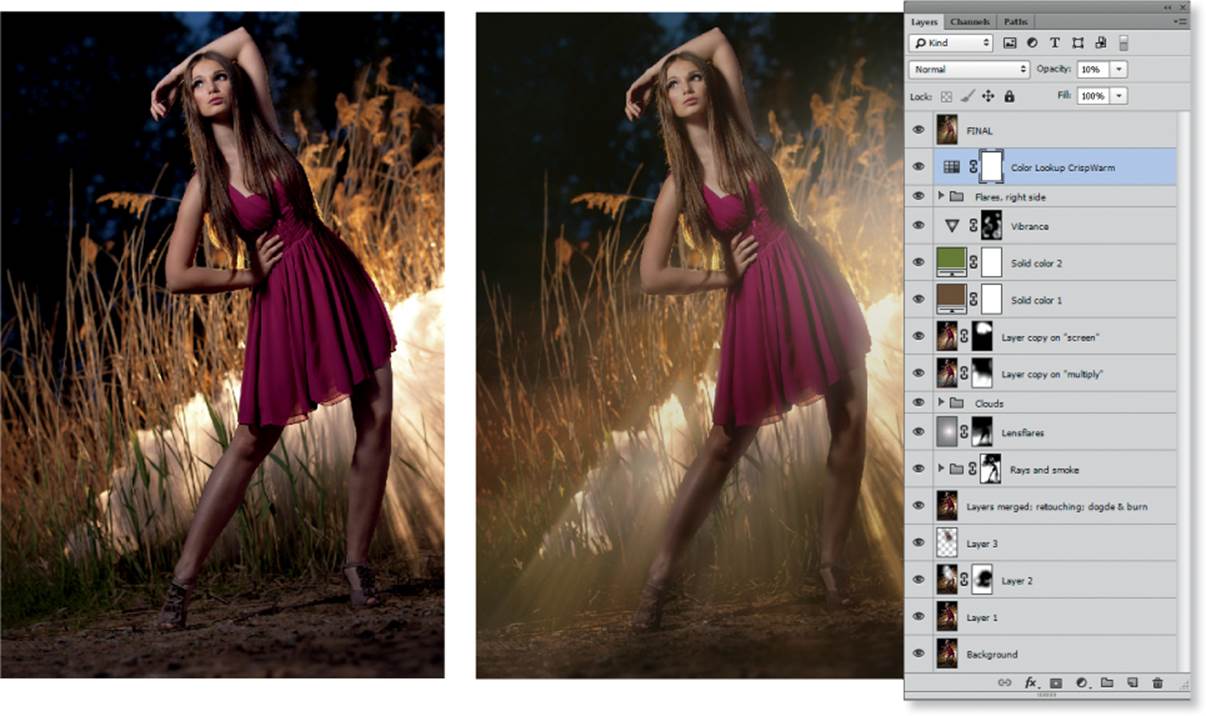
The image before and after processing. The increased emphasis on the light rays from behind is the most important factor in the look of the finished image.
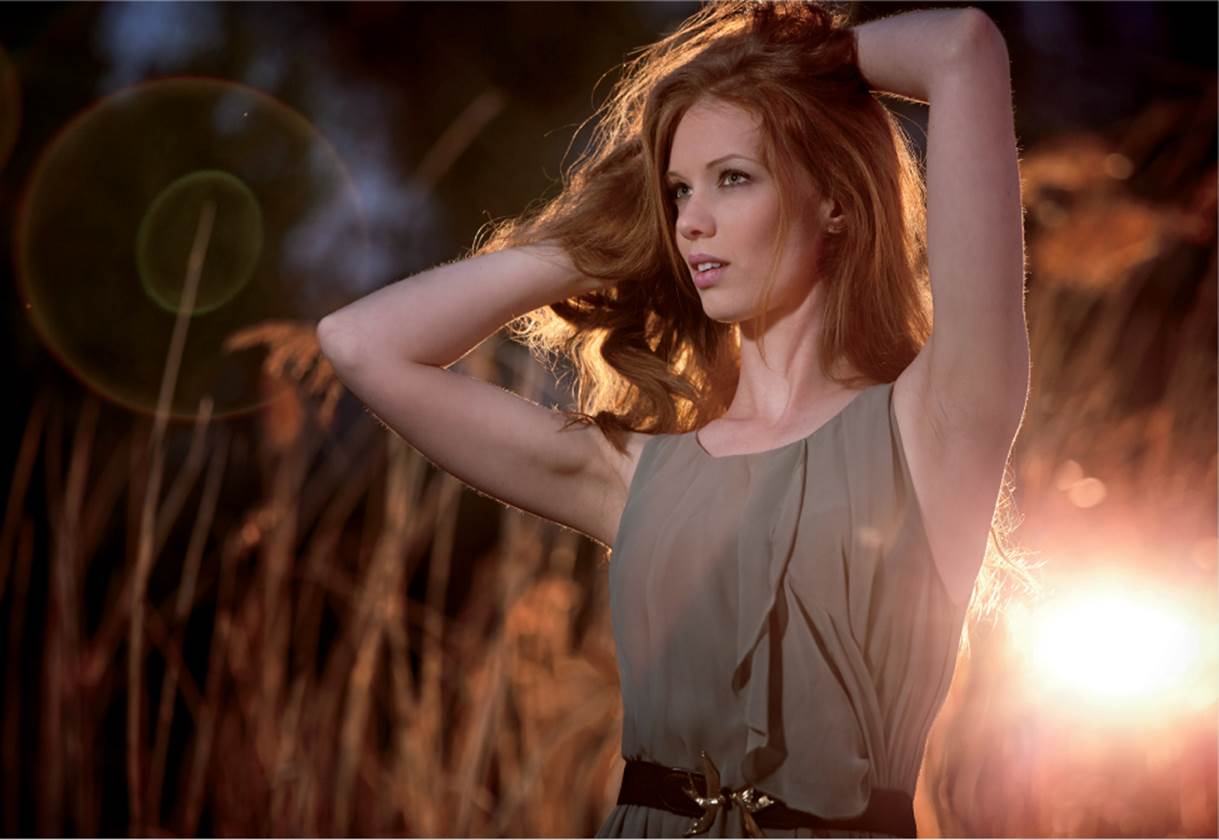
Another image from our fire shoot, this time with pronounced lens flare
Canon EOS 5D Mark II | EF 70–200mm f/2.8L IS II set to f/2.8 and 200mm | M mode | 1/80 second | ISO 200 | RAW | white balance set to flash | two off-camera flashes: one from behind with a full CTO filter, the other in front fired through a white umbrella (Model: Dominique)
In Depth:
Don’t Shake It Up
Flash can be used to freeze the movement of a subject, but if you include ambient light in your flash shots and don’t hold the camera completely still, you will see ghosting effects in your photos. The old rule of thumb that says 1/50 second is the slowest you can effectively shoot handheld is a useful point of reference, but today’s technology has fundamentally changed the way we shoot. The 1/50 rule was formulated for 35mm film cameras with a 24mm x 36mm frame and a standard 50mm lens. Using a longer lens required a new calculation to compensate for the increased risk of camera shake.
Therefore, it is generally accepted that you can take handheld images free of camera shake with an exposure time of 1/focal length for a full-frame camera.
If your camera has a smaller sensor, you need to include the crop factor in your calculations. For example, a 50mm full-frame lens behaves like an 80mm lens if it is on an APS-C camera with a crop factor of 1.6. The focal length remains the same, but the results are quite different.
For non-full-frame cameras, the modified formula says an exposure time of[(1/focal length)/crop factor] can generally be used to shoot handheld images with no camera shake.
This is closer to reality, but it’s not always true because of modern image stabilization systems. Image stabilization (IS) and vibration compensation (VC) systems allow us to shoot with much longer exposure times than before. Camera manufacturers claim improvements of between 2 and 4 EV, which equates to a factor of 4 to 16 when applied to exposure times.
In other words, the old formula can now be expressed as [(1/focal length)/crop factor] x a factor of 4 to 16 with image stabilization, or written as a formula:
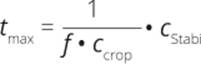
In this case, f = focal length, ccrop = crop factor (e.g., 1.6 for APS-C or DX), and cstabi = factor of 4–16 with active image stabilization. In real-world situations, you won’t have time to work this out precisely, so you will have to make a quick mental calculation that goes something like this: “I’m using a full-frame camera with a stabilized zoom set to 100mm. A conservative stabilizer factor of about 4 means I can reasonably expect to shoot without camera shake at 1/25 second.”
The same thought process should result in about 1/40 second for an APS-C or DX camera. Whichever numbers you come up with, always hold your camera as still as possible, press it tight to your eye, make sure you are standing firmly, and hold your breath while you press the shutter release. Burst shooting is also a useful tool for combating camera shake. Shooting three or four images in quick succession increases the probability of at least one frame being sharp.
Workshop 9
Key Shifting
▸ All about key shifting
▸ How to create a punchy lighting setup
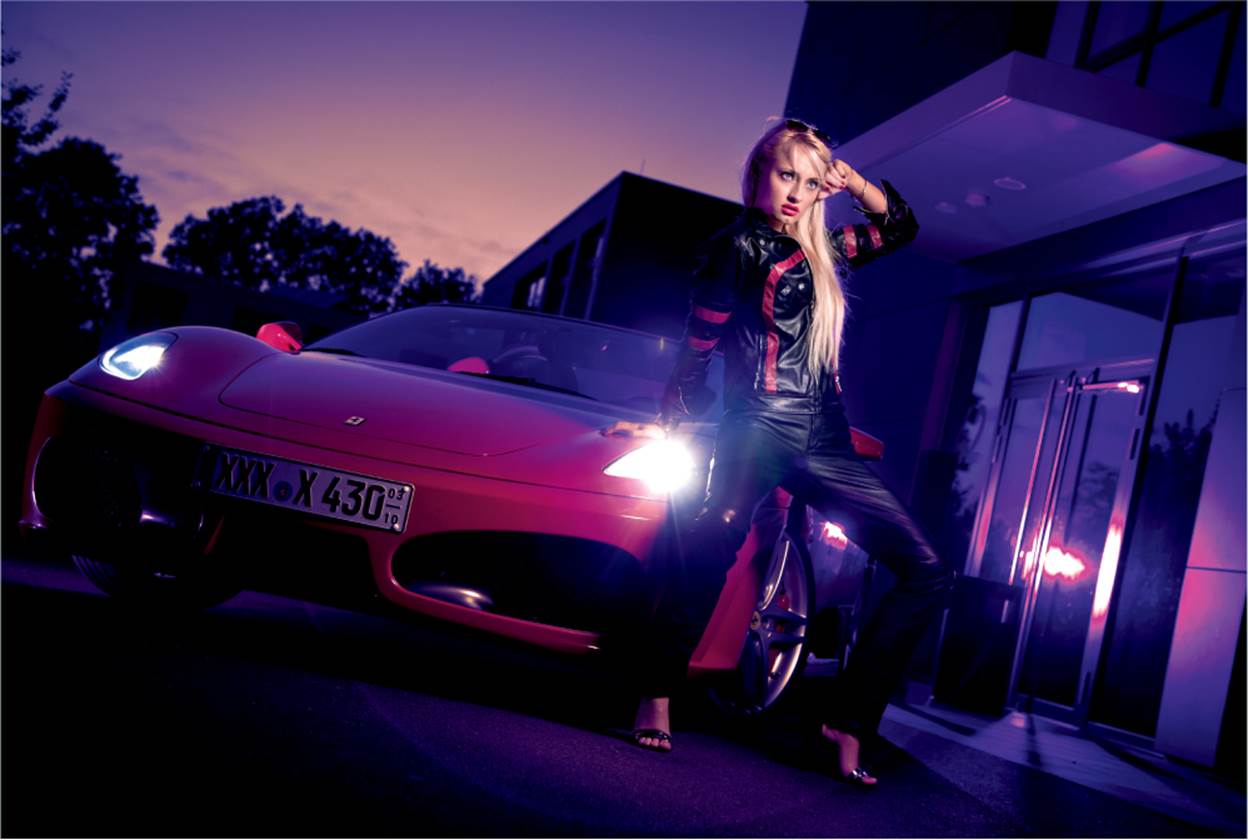
Usually photographers can shoot for free in public spaces. Although some parks in Frankfurt, Germany now charge a special-use fee of 50 euros (about $70), one of my favorite locations, the Bolongaro Park, in the Hoechst area of Frankfurt, still allows you to shoot for free if you request permission first. This wonderful place is full of sculptures and has a fountain, a giant outdoor chessboard, and two stone staircases, one of which you can see in the photos here. The whole place is perfect for fashion shoots. We used the key shifting flash technique to turn day into night, and the following sections explain how.
The Setup
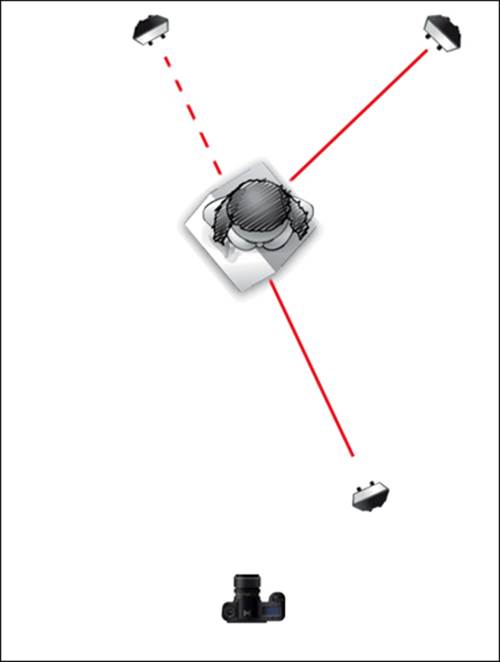
This was a relatively complex shoot. We used a battery-powered studio flash with a beauty dish as our main light, and we placed an additional flash (a speedlight) without modifiers at the top of the staircase to act as a rim/effect light that is visible in the final image. A third flash (also a speedlight) was located to the right of the railing to create the shadow you can see in the finished image. We set up a California Sunbounce reflector to the left of the stairs to provide some fill light. As you can see in the schematic, we placed the beauty dish a long way from the subject so it lit the scene adequately without appearing in the frame. The extra distance meant we had to dial the main light up to 1/4 output. Alternative setups for use with only accessory flashes are listed at the end of this workshop.
A battery-powered studio flash with a beauty dish at the left, two off-camera flashes at the right and from behind and above, and a large reflector opposite the second flash
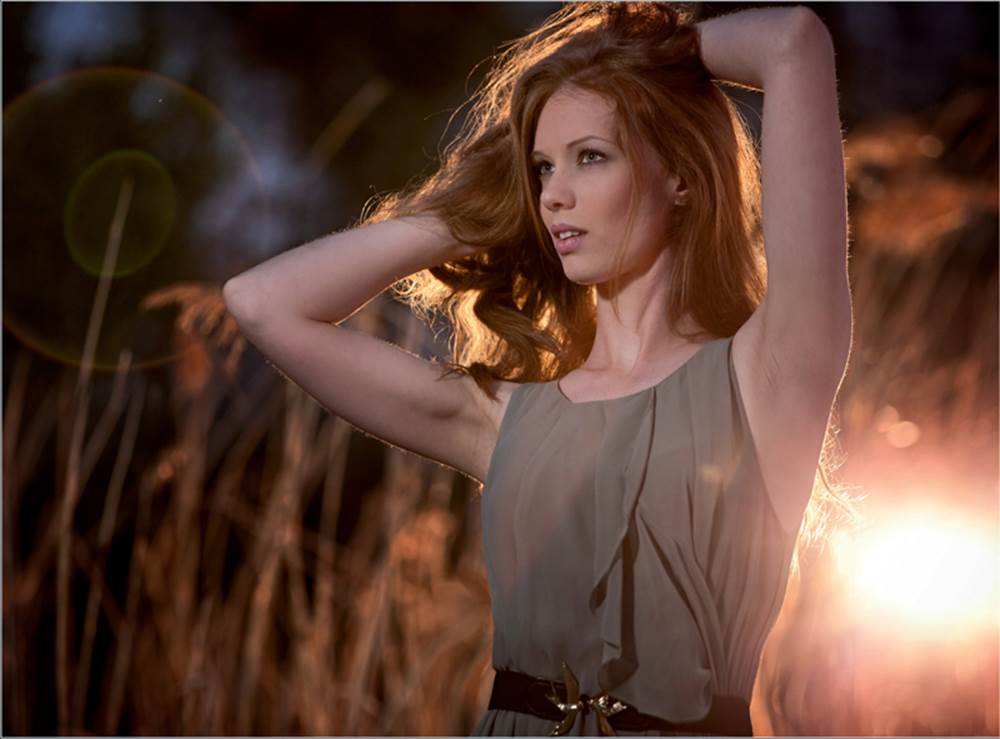
Instead of fighting it, use the available light to your advantage. Key shifting wouldn’t have made much sense for this scene, but the backlit flares make for a really punchy image. This is one of the few images in this book that was taken without flash. (Model: Diana)
Canon EOS 5D Mark II | EF 70–200mm f/2.8L IS II set to 70mm and f/3.2 | M mode | 1/320 second | ISO 100 | RAW | white balance set to auto | shot using the low sun as a backlight
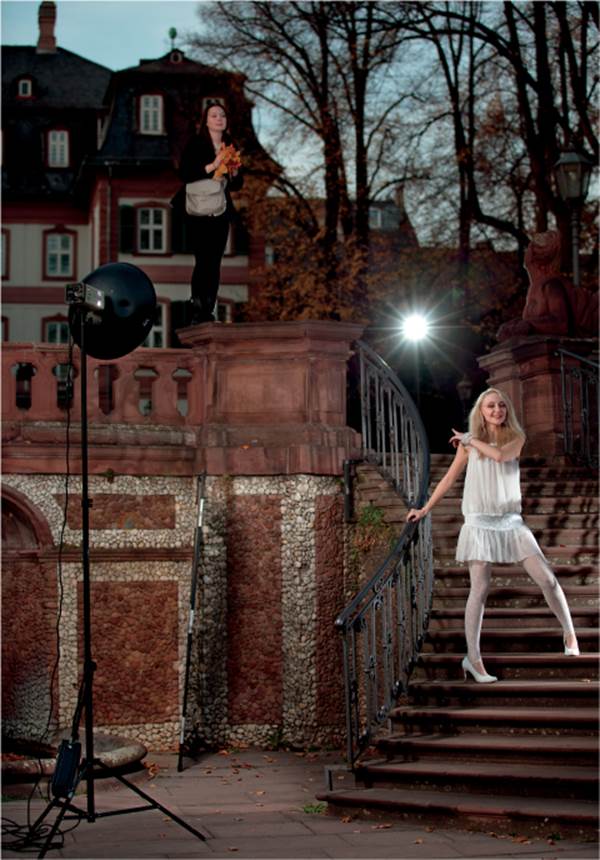
The setup showing our makeup artist (with leaves), the beauty dish, the large reflector on the left, and the effect light at the top of the stairs. The flash on the right that produced the shadow of the railing is not visible in this shot. (Model: Ann-Catrin)
Camera Settings and Shooting
What makes this scene particularly interesting are the camera settings and the use of key shifting (see the text box below). To demonstrate the effect, look at the two images on page 85. You can see the first shot taken in diffuse ambient light without flash. Technically speaking, the image is okay, but it isn’t very interesting. Adding flash wouldn’t help because the subject is correctly lit—additional light would only cause it to be overexposed.
If, as shown in the second example, we key shift the shot (i.e., we deliberately underexpose the surroundings by about 2 stops), we end up with a shot that appears to have been captured in the evening, and the flash provides effective accents. For shots like this you can check the amount of underexposure on the metering scale in your viewfinder. We started with our flashes set to 1/8 output and the main light to 1/4 output, and we worked up to the correct settings from there. In multiflash setups, it is usually best to add each flash separately in sequence.
Key Shifting, Dragging the Shutter, and American Night
Key shifting describes a technique that is often referred to as dragging the shutter, which alters the interplay of ambient light and flash light in a photo. This is typically—but not always—achieved by changing the exposure time, which alters the effect of ambient light but not flash light.
To drag the shutter, you typically increase the exposure time to allow more ambient light to reach the sensor. But you can also reduce the exposure time to allow less ambient light. The term key describes which part of the tonal scale makes up the majority of the image. Most of the tones in a low-key (i.e., darker) image are located toward the left side of the histogram, whereas a high-key image is bright and contains tones that are mostly located toward the right side of the histogram. By adjusting the exposure time to alter the relationship between the ambient light and the flash light, you alter the key—and therefore the look and feel of the image. Reducing the exposure time allows less ambient light to reach the sensor; increasing it has the opposite effect. In this workshop I reduced the exposure time to darken the surroundings and the sky to create a darker mood. This effect, with its deep blue sky, is also known as American night, named after a François Truffaut film called La nuit américaine that used this effect to excess. It is also sometimes called day for night.
Post-Processing in Photoshop
The flash light provided plenty of contrast, and the colors were nice and punchy straight out of the camera. The additional processing steps we applied were as follows:
▸ Straightened the horizon and cropped the image a little tighter
▸ Added a vignette with the P.O.S. Lens filter in the RadLab plug-in
▸ Performed a little standard beauty retouching and subtly applied the Liquify filter
▸ Slightly dodged and burned
▸ Retouched the model’s skin tone with the Dynamic Skin Softener filter in Nik Color Efex
▸ Slightly whitened the subject’s teeth
▸ Applied a second vignette
▸ Merged the layers and applied Smart Sharpening to the result (see the layer stack reproduced on the next page)
This is how the scene looked without flash, correctly exposed for the ambient light, but simply boring. Compare the histogram with the one below.
Canon EOS 5D Mark II | EF 70–200mm f/2.8L IS II set to 70mm and f/2.8 | M mode | 1/125 second | ISO 100 | RAW
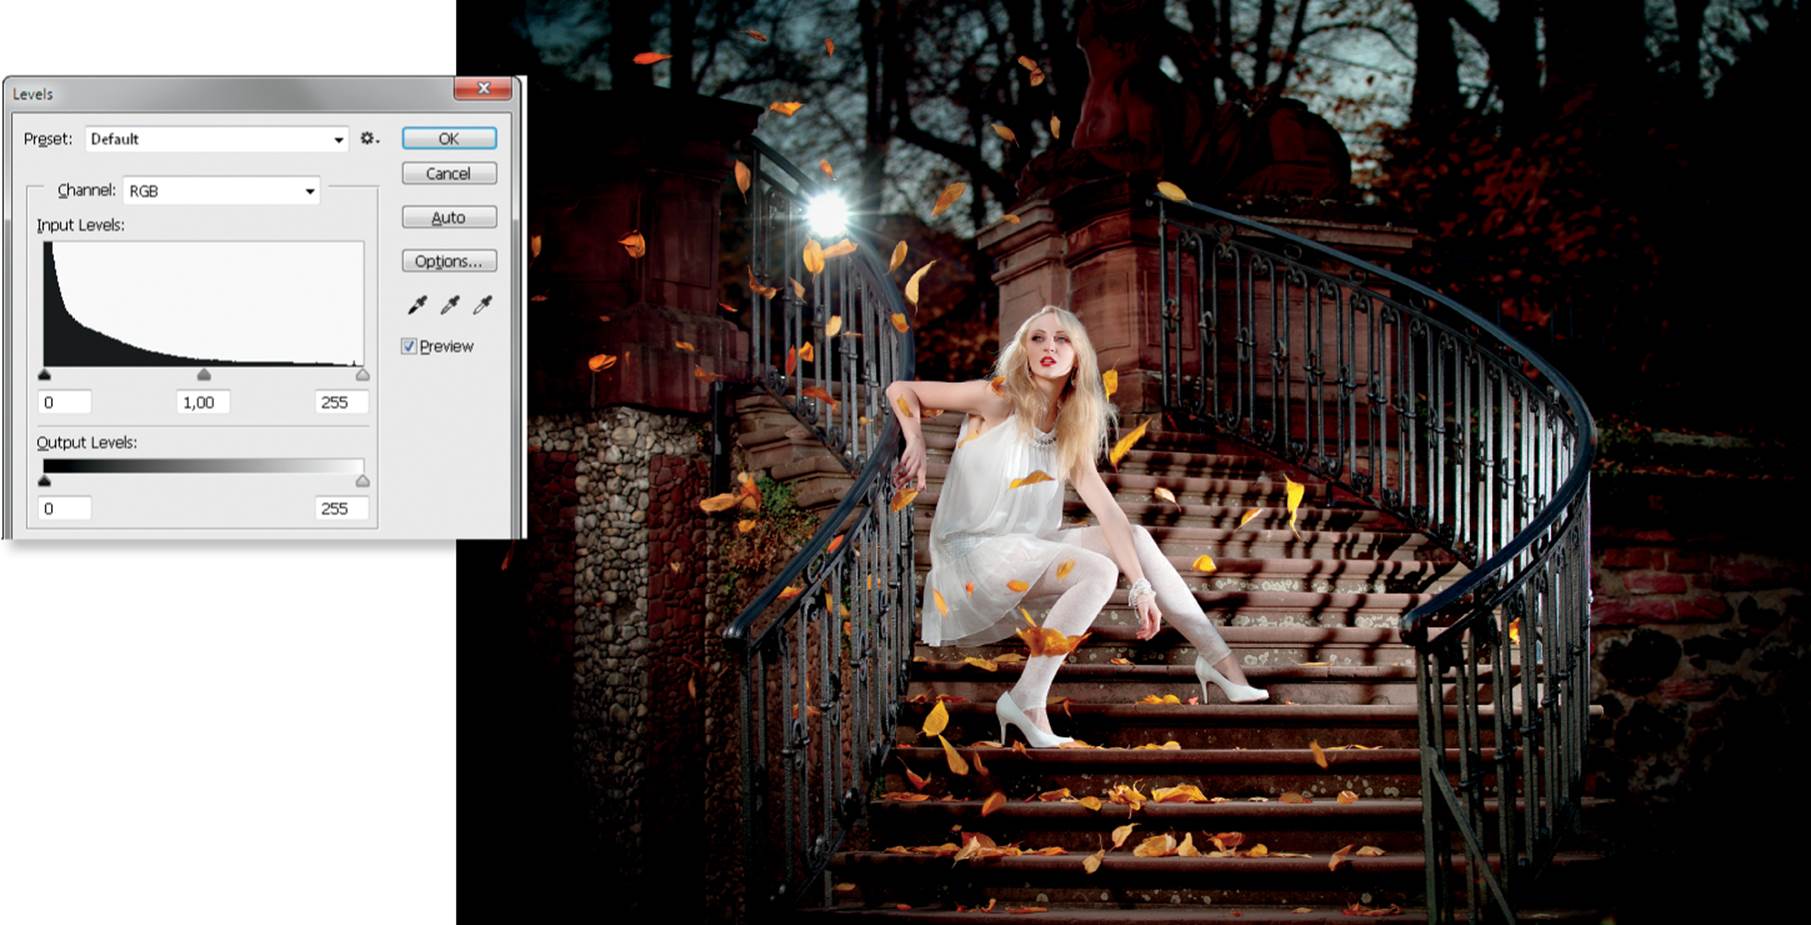
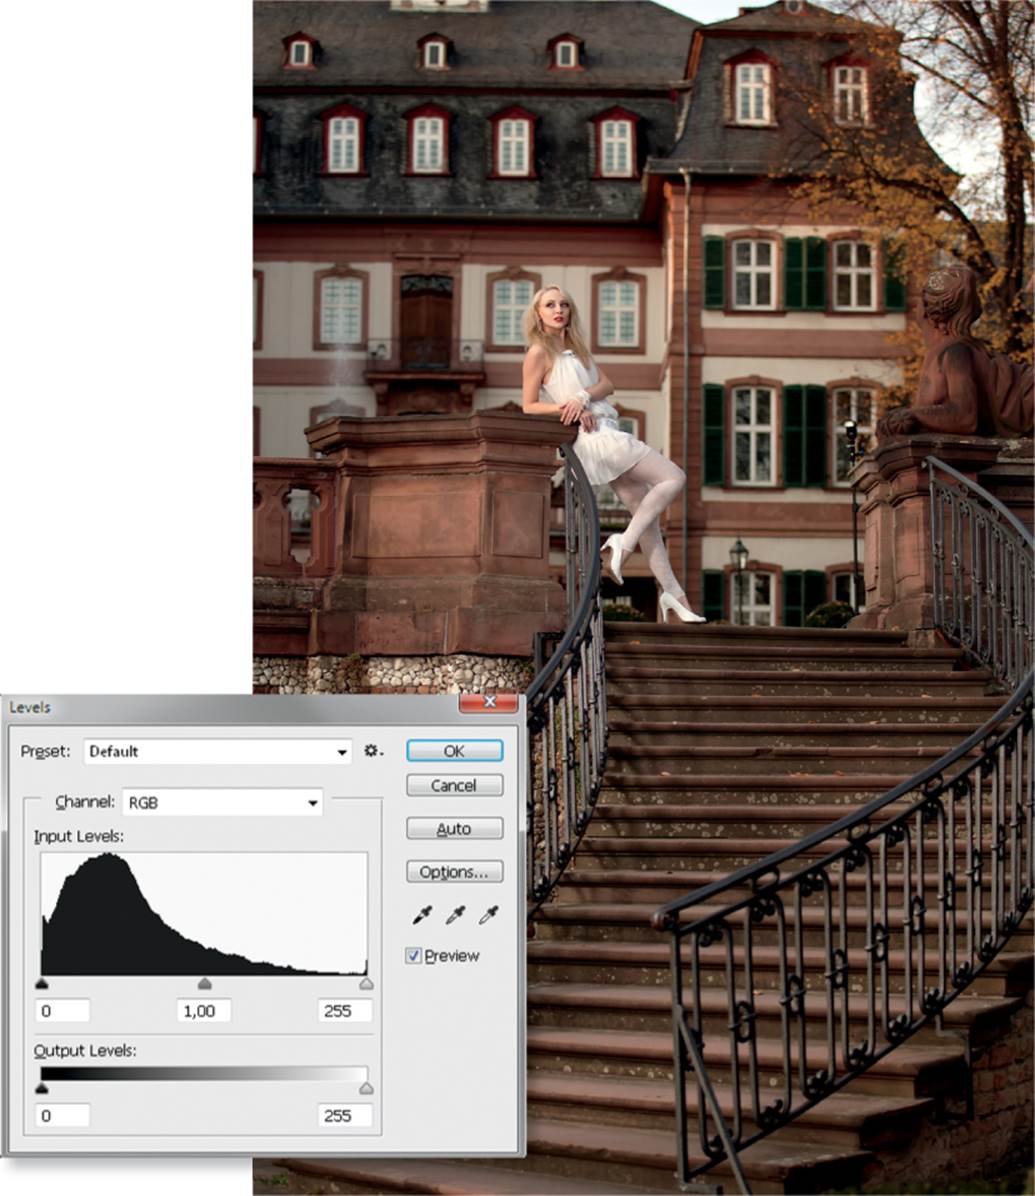
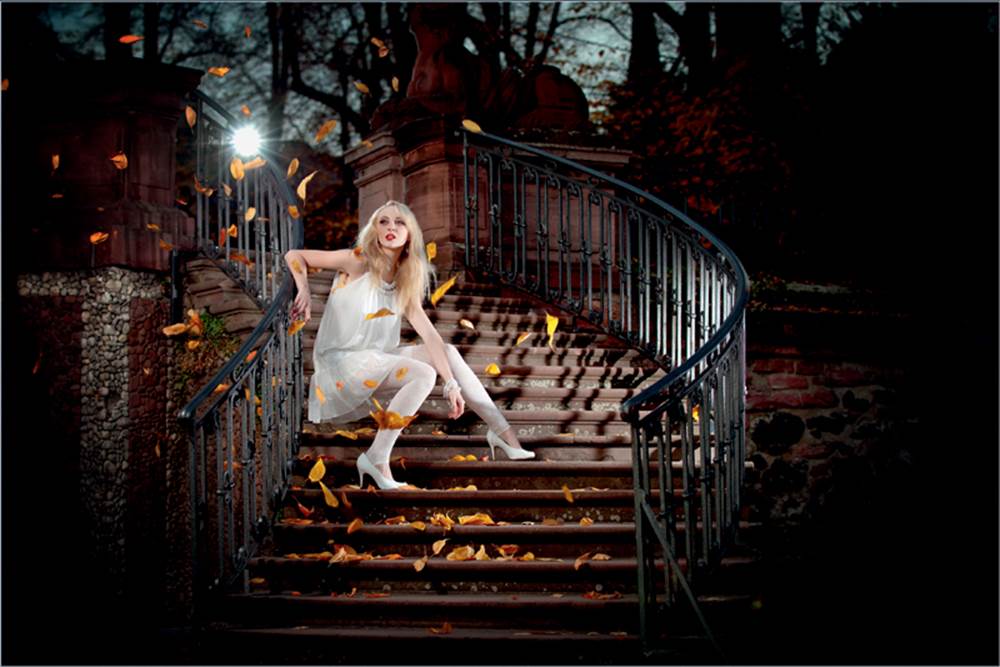
Underexposing the surroundings by 2 stops and adding flash produces an exciting, high-contrast image with a darker feel. The histogram shows the change to the distribution in tonal values (i.e., the change in key) with this approach—hence the name of the effect is key shifting.
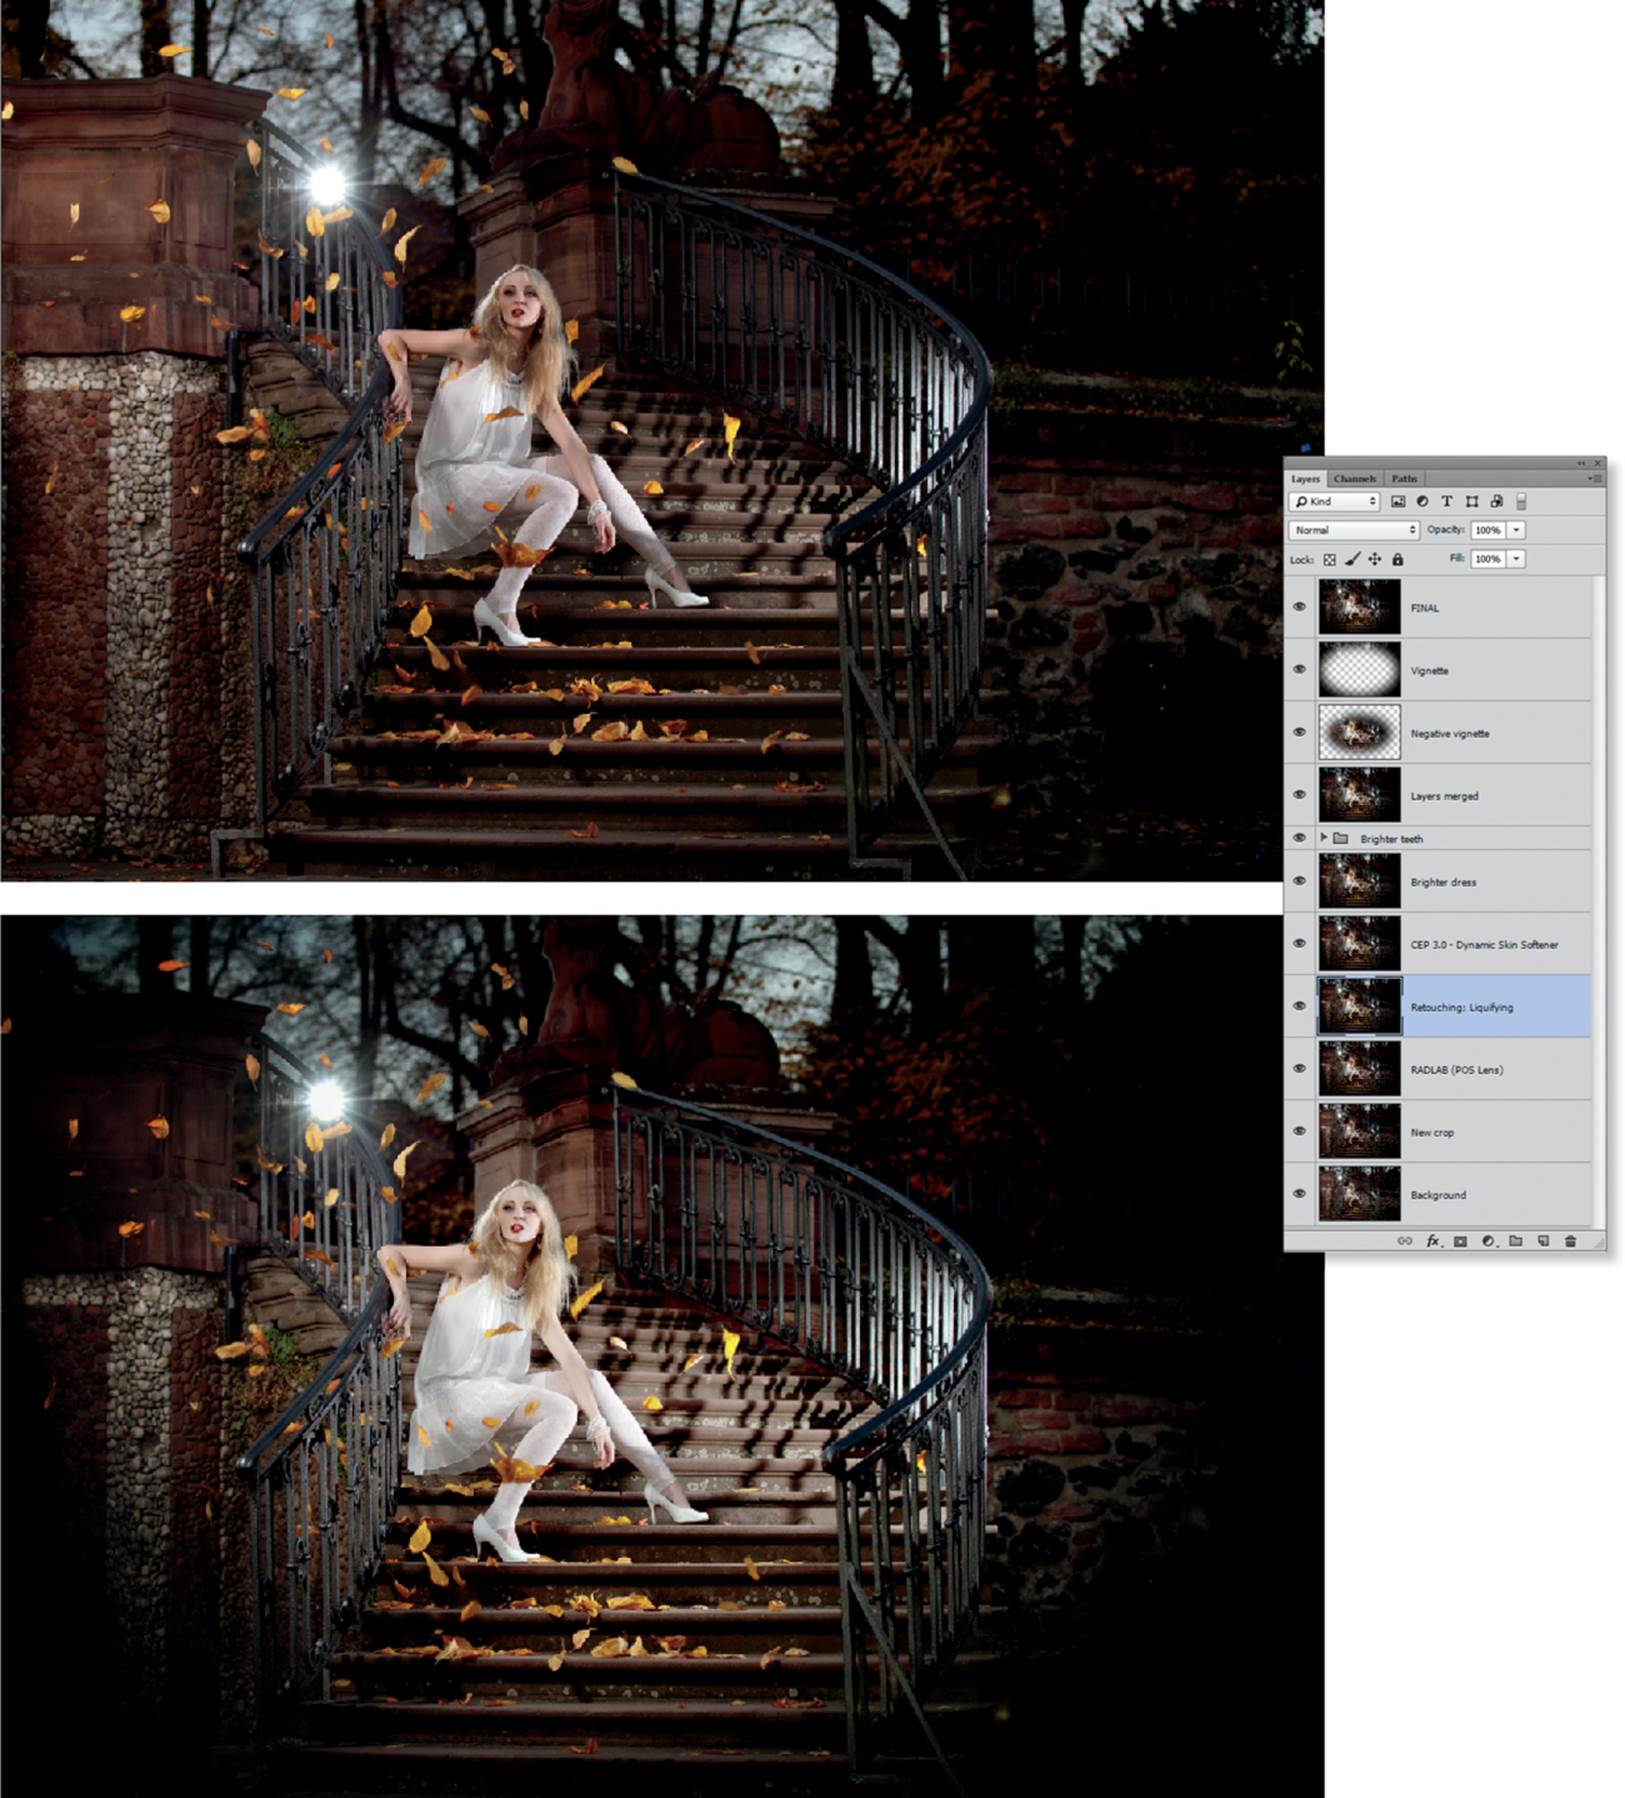
Before and after images and the corresponding Photoshop layer stack. The most obvious effect is produced by the vignette.
Tips, Tricks, and Notes
This is one of the few workshops in which we used a powerful battery-powered studio flash along with Speedlites. We could have set up this scene with just Speedlites if we had used the Duke Nukem (see workshop 5). The problem with using the Duke Nukem instead of a studio flash is that you can’t use it with a beauty dish. A white umbrella would have produced similar results, but if you rely on consistently reproducible results, a studio flash powered by rechargeable batteries is a better option. Such a flash unit can produce usable light even when the sun is high in the sky (see workshop 6).
If, however, you prefer to work with ambient light, you need to make the best of the conditions. If the sun is too bright, you can work without flash, use backlight, or work in the shade with a reflector. If diffuse daylight is still too bright to perform key shifting with Speedlites, try to find another location in different light while you wait for the blue hour.
This image was shot with three flashes and was key shifted; the ambient light was underexposed by about –2 EV (Model: Romashka; co-photographer: Ray Sjoeberg)
Canon EOS 5D Mark II | EF 70–200mm f/2.8L IS II set to 70mm and f/3.5 | M mode | 1/125 second | ISO 50 | RAW | white balance set to flash | three radio-triggered off-camera flashes
Workshop 10
Fashion Shoot in Hard Light
▸ Using flash without light modifiers
▸ Cross lighting with two flashes
▸ Working with hard-edged shadows
The leaves in this image may look like an artificial studio background, but they are real. We really did take a leather chair into the woods, and guess who had to carry it! It was worth the effort, and the leather and wood of the chair perfectly suited the autumn leaves and the model’s outfit. In contrast to our main prop, our lighting rig was easy to transport. It consisted of two small stands with umbrella swivels, two radio triggers, and two flashes. This setup does not require light modifiers, and you can decide later how soft you want the shadows to be.
We used two off-camera non-TTL flashes, one at the front right and the other at the back right. The effect is similar to that of a conventional cross lighting setup (represented by the dashed line), but the accent light is on the right instead of the left.
The Setup
We used two cheap Yongnuo YN-460 non-TTL flashes, which have internal reflectors fixed at a 35-degree angle of spread, and the modest output was perfectly adequate for a simple setup like this. The effect is similar to a cross lighting setup, but the lights are arranged on one side instead of opposite each other. This prevents the accent light stand from appearing within the frame, but the flash can still function as a rim light that accentuates the subject against the background, just as it would in a cross lighting setup. The main light is set up at about 30 degrees to the subject to prevent the shadow around her nose from being too obvious. Both flashes were located about 10 ft from the subject.
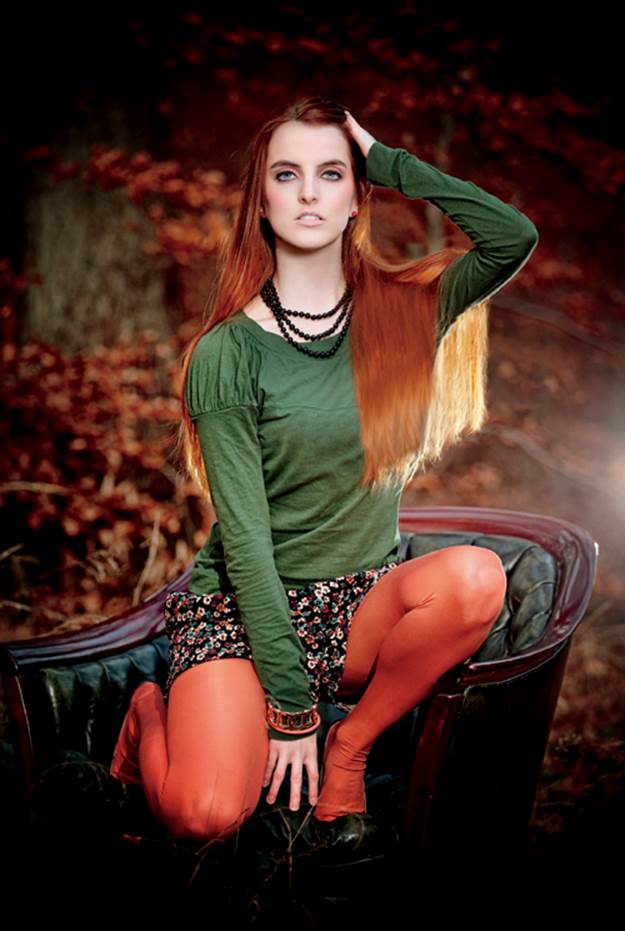
A fashion photo shot in the woods using two off-camera flashes and no light modifiers (Model: Lu)
Canon EOS 5D Mark II | EF 70–200mm f/2.8L IS II set to f/3.2 and 125mm | M mode | 1/200 second | ISO 160 | RAW | white balance set to flash | two off-camera flashes without light modifiers
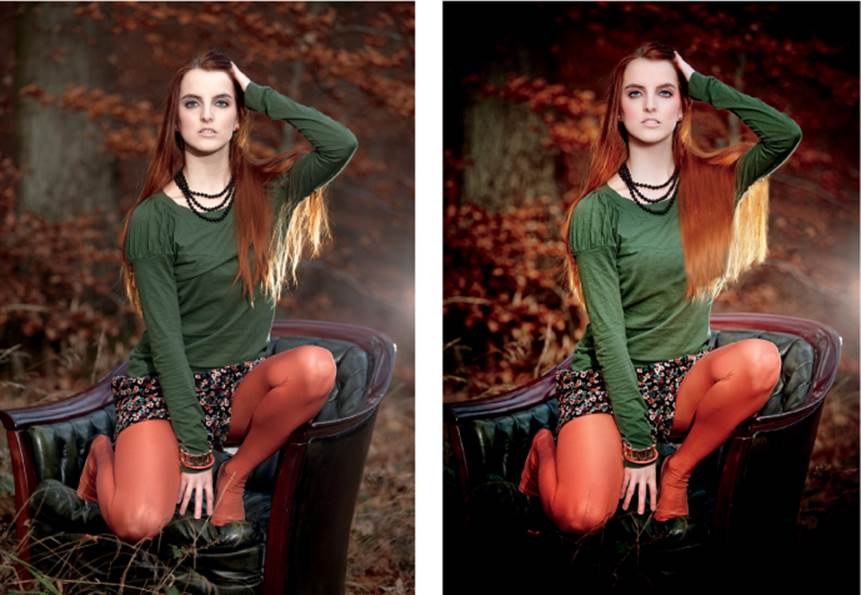
The original photo (left), and the post-processed version (right)
Camera Settings and Shooting
As usual, take a couple test shots without flash to get the right look for the background before you add the flashes. You can add the flashes in one step for this setup.
I began my test shots at 1/4 output and ISO 100. The histogram revealed a slight overall underexposure, so I just dialed in ISO 160 to correct this. Any other change—such as in aperture, shutter speed, flash output, or flash-to-subject distance—would have altered the look of the image too much.
I then set the white balance to flash and I stopped the lens down slightly to f/3.2 to keep everything nice and sharp.
Post-Processing in Photoshop
It took almost two hours to process this image, mainly because of the alterations we made to the model’s hair and the creases in her shirt. The before and after versions are shown above and the steps we used are as follows:
▸ Straightened and cropped the image
▸ Balanced the contrast and color with the Tonal Contrast filter in Nik Color Efex 4.0
▸ Retouched the model’s skin tones with the Dynamic Skin Softener filter in Nik Color Efex 4.0
▸ Slightly liquefied the image at the model’s waist and neck
▸ Made eye enhancements
▸ Softened the chin and nose shadows (see “Tips, Tricks, and Notes” in this workshop)
▸ Repaired the model’s hair and the creases in her shirt
▸ Added a vignette with the P.O.S. Lens filter in the RadLab plug-in
▸ Applied Smart Sharpening
In addition to my usual retouching steps, I also used the Patch tool to soften the shadows. Even though a white umbrella or a small softbox on the main light would have had the same effect, using hard light teaches you how to position and aim your lights—at least in my eyes, that influences the look of an image more than changing the light modifiers.
Tips, Tricks, and Notes
The Yongnuo YN-460 is so cheap it won’t cause any real heartache if it breaks. However, even if its flash capability is still going strong, its buttons are sure to fall apart. You can see a useful how-to guide that explains how to repair them and other rubber buttons at www.tiny.cc/uv6wlw.
The image for this workshop would not have been possible without Photoshop, and the alterations we made to the model’s hair play a significant role in the quality of the final result. You can capture natural-looking portraits without additional processing, but nowadays fashion and beauty shots made without digital help are rare. If you want to work in the fashion or beauty industries, I wholeheartedly recommend the retouching DVDs by Gry Garness and Natalia Taffarel, which offer high-end tips that will help any aspiring fashion photographer come to grips with the demands of the business.
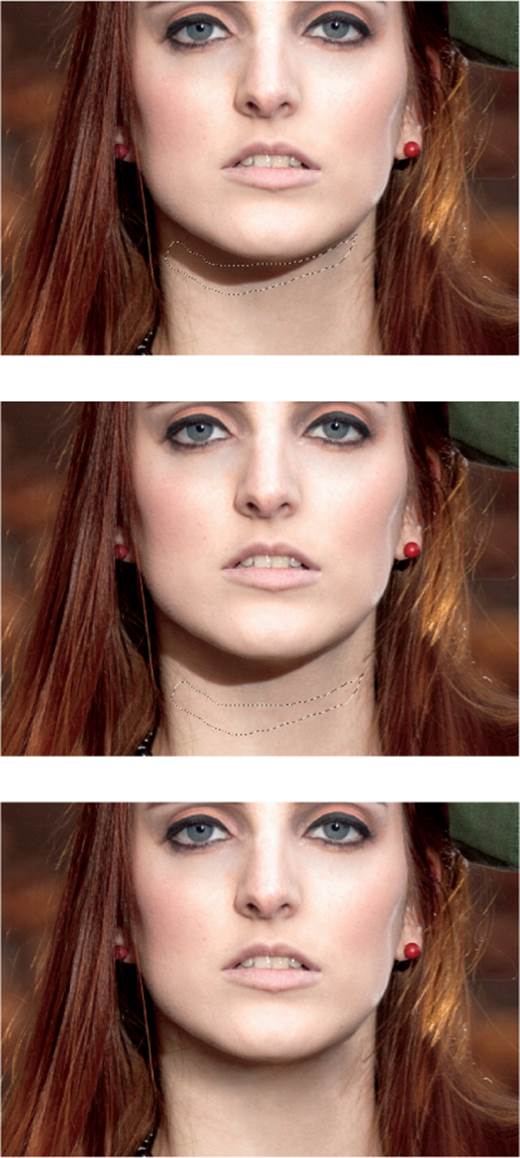
Three clicks is all it takes to soften shadows with Photoshop’s Patch tool
Workshop 11
Nighttime Bokeh
▸ How to capture wonderful background bokeh in urban settings
▸ Setting up your lights
Bokeh (those lovely out-of-focus areas in an image) is addictive, and lenses that produce beautiful bokeh are usually expensive! Bokeh can be captured in daylight (see the “Depth of Field and Bokeh” tutorial on page 98), but it really comes into its own at night when the circles of confusion produced by the lens form beautiful bokeh bubbles. I love shooting in the evening and at night when the light is at its most tantalizing. The downside of this time of day is it increases the risk of camera shake and image noise, and focusing at wide apertures is tricky. This workshop explains some ways to capture great nighttime shots. The image on the next page was captured in the rain at the famous Theater-platz in Darmstadt, Germany. The wet conditions didn’t make the shoot easy, but the water did produce some great reflections.
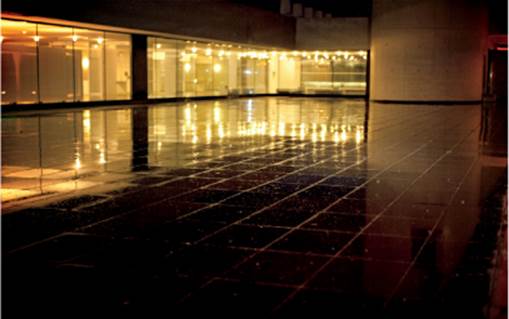
Our location in the rain, exposed with settings for the ambient light
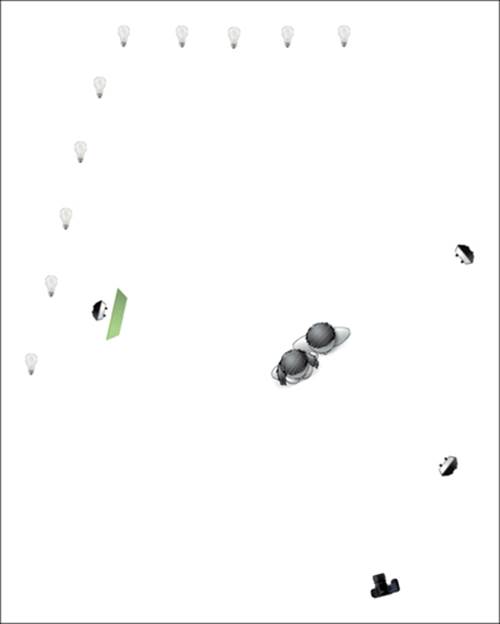
Schematic showing the artificial light from the theater, the main light at the front, the edge light at the back right, and a second edge light with a green filter at the left. No other light shapers were used.
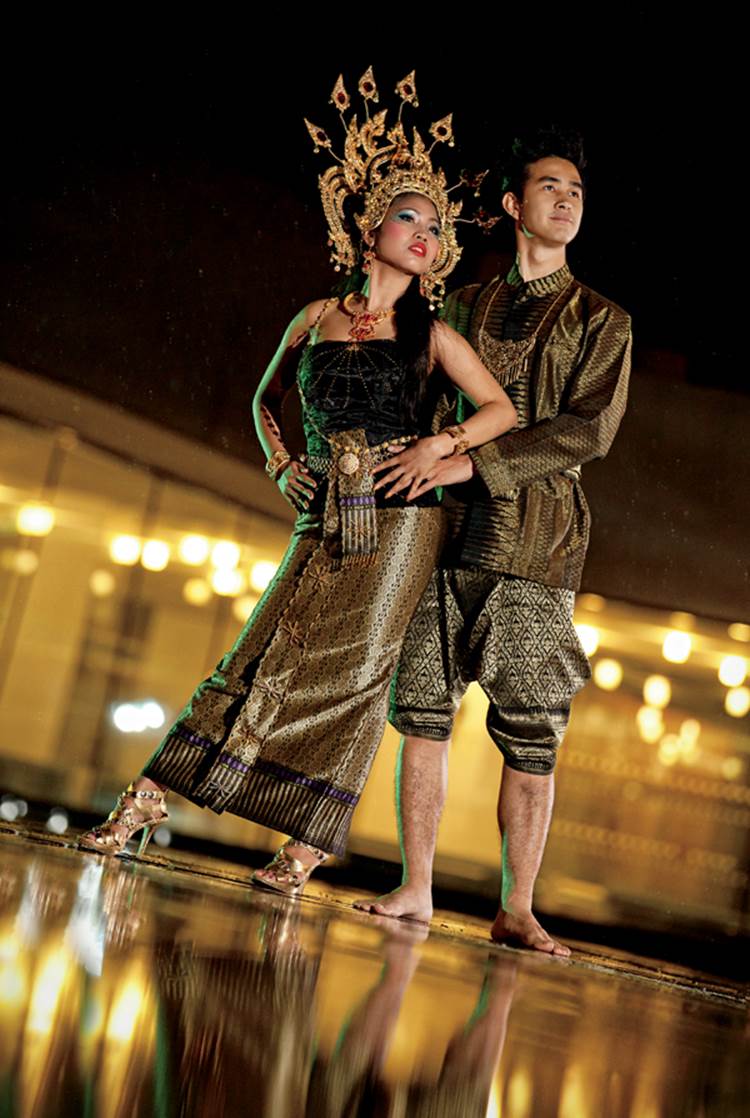
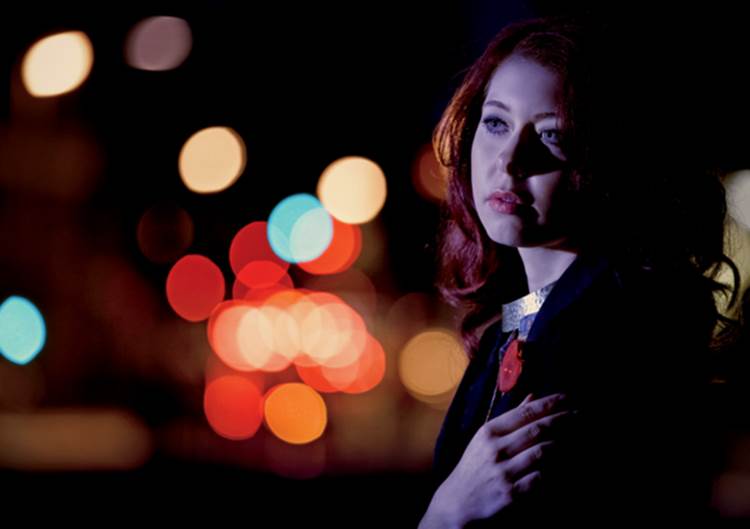
The Theaterplatz in Darmstadt, Germany, is a great location for a bokeh-laden nighttime fashion shoot (Models: Tiney and “Mr. M”; co-photographer: Ray Sjoeberg)
Canon EOS 5D Mark II | 70–200mm f/2.8 set to f/3.2 and 168mm | M mode | 1/50 second | ISO 640 | RAW | white balance set to flash | multiple non-TTL speedlights
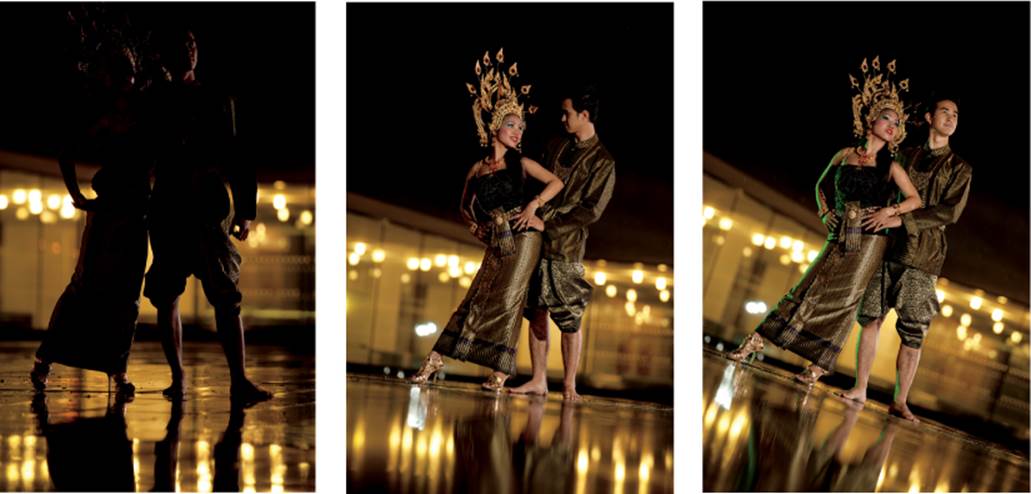
Left to right: Shots with no flash, the main light alone, and the complete lighting setup
The Setup
This is another relatively complex setup, but since we didn’t use light shapers, it went quickly. If you use flash without additional light-shaping tools, you can get away with using the smallest and lightest stands you can find. For this shoot we used Manfrotto 1052BACs, which would fall over easily if they were used with umbrellas or softboxes.
As usual, I added the flashes one by one, starting at 1/4 or 1/8 output, and then I fine-tuned their positions based on two or three test shots.
Camera Settings and Shooting
For my base exposure using only ambient light, I used ISO 640 and 1/50 second to capture the lights from the theater, although this was risky at a focal length of 170 mm. The lens I used has a great built-in stabilizer, but I would have ended up with fewer throwaway images if I had shot at ISO 1000 and 1/80 second. Stopping down slightly to f/3.2 provided adequate sharpness and retained great background bokeh.
How to Focus at Night
Due to the lack of contrast in the subject at dusk and after dark, autofocus cannot detect the edges of a subject and does not function properly. You can work around this issue by employing the following techniques:
▸ Illuminate the subject with a pocket flashlight, or hold a cell phone beside the subject’s face so the autofocus sensors can detect it. A flashing LED button pinned to the subject’s clothing also works.
▸ Use a fast lens (f/1.4 or f/1.8). Even if you stop down, a larger maximum aperture will make the focus more accurate.
▸ Use a dedicated laser focus aid, like the DeluxGear PinPoint. Take care to not point laser-based equipment at the subject’s eyes.
▸ Use the focus-assist lamp in a YN-622 transmitter.
▸ If you use a tripod, you can switch your camera to manual focus and use the live view monitor to focus on the subject’s face, with the help of an additional flashlight and a display loupe if necessary. This procedure may seem a bit awkward, but it really should deliver perfectly sharp results.
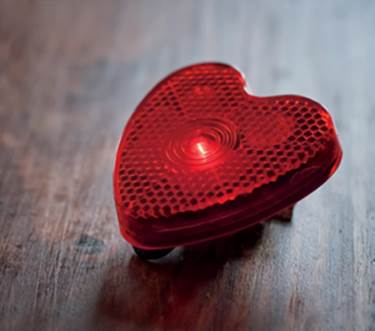
Small blinking LED buttons are cheap focusing aids and double as nice little gifts for models and other team members
Left to right: The original image, and the final image after post-processing in Photoshop
As the before and after images show, I didn’t have to make many adjustments to these images. Thanks to the full-frame camera, the noise remained in check at ISO 640. The steps I made were as follows:
▸ Straightened and cropped the image
▸ Slightly brightened the center of the frame and the faces
▸ Balanced the color and contrast, and did final sharpening
Schematic of my Diaz-style setup
Tips, Tricks, and Notes
If you decide to further investigate nighttime bokeh, sooner or later you will come across Dustin Diaz. Dustin’s Project 365 won him Flickr’s Best Photographer of the Year award in 2009. His photo stream (www.flickr.com/photos/polvero) includes plenty of nighttime shots with all kinds of bokeh. Note that many of Dustin’s shots are based on complex setups that are in a class of their own, and that he often uses a 200mm f/2 Nikkor lens that might be too expensive for many photographers.
The photo on page 101 shows my co-photographer, Alexander Kasper, reading the book Snow Crash. The main light was a flash with a 3/4 CTO filter fired through a white umbrella on the left. The edge light was behind Alex, and I added a third flash with a green filter and no light shaper to illuminate the ground behind him. All three flashes were non-TTL Yongnuo YN-460s with RF-602 radio triggers. In keeping with Dustin’s style, I added text on the image using the Trajan Pro font with wide spacing.
In Depth:
Depth of Field and Bokeh
By now you have probably noticed that I use a shallow depth of field as a design element in a lot of my photos. This section explains how to produce a shallow depth of field and the pitfalls to avoid.
Most cameras can produce only two-dimensional representations of the three-dimensional world, but there are ways to photographically emphasize the depth and details in a scene. Along with differences in brightness and contrast, varying the sharpness in an image is the most obvious way to differentiate important and less important elements. In photography, the Japanese word bokeh (which means blur or haze) is widely used to describe the quality of background blur. The fact that lens manufacturers cannot quantify the bokeh that lenses produce underscores that good bokeh is a matter of taste. Here is what we can say with certainty about bokeh:
▸ Good bokeh is usually a function of extensive blur. If the blur is not extreme enough,, it often seems accidental.
▸ The number of aperture blades and their shape determine the shape of the bokeh bubbles, and it impacts the roundness of the blurred points of light. It is generally accepted that circular and oval circles of confusion produce pleasing bokeh, and geometric patterns are not as good. In a DSLR, the shape of the camera’s mirror box can also cause clipping along the edges of the circles; this effect is also considered less aesthetically pleasing.
▸ The smoothness of bokeh plays a role in its perceived quality. The onion ring style of bokeh that some lenses produce is considered suboptimal. Bokeh perfectionists also look for circles of confusion with sharp edges and no halos.
Note that an image that doesn’t contain obvious circles of confusion can still have either high- or low-quality bokeh, but the circles make it more easy to recognize and categorize the bokeh. How can you create pleasing bokeh? As previously mentioned, the primary consideration is a shallow depth of field, which depends on the focal length of the lens (longer is better), the aperture (larger is better), the camera-to-subject distance (closer is better), and the distance to the background (farther is better). For technically minded readers, I recommend the article “Depth of Field and Bokeh” by Dr. H. Nasse at Zeiss, which you can download from http://tinyurl.com/md476kq.
Examples of bokeh. Clockwise from top left: Pentagonal, onion ring, clipped, and indistinct bokeh. All these bokeh styles are considered less than ideal.
An extensive bokeh effect is achieved by bright lights in the background combined with a long focal length, using a wide aperture, and focusing at a short distance (Model: Anne)
Canon EOS 5D Mark II | EF 70–200mm | f/2.8L IS II USM set to 200mm and f/3.2 | M Mode | 1/60 s | ISO 1000 | RAW | with RF-602 shoe mount flash used within an umbrella light stand positioned at top left
The size of your camera sensor plays an indirect role in creating bokeh. To produce images with conventional angles of view, the small sensors built into consumer-grade cameras are used with very short focal-length lenses. The result is images that are in sharp focus from the close foreground to the far background. You have to use macro mode to photograph subjects at extremely close distances and produce somewhat blurred backgrounds. Most lenses produce nicely rounded circles of confusion at maximum aperture, but more expensive lenses with specially shaped aperture blades produce smooth circles even at smaller apertures. Prime lenses generally produce smoother bokeh than zoom lenses, and lenses that are designed for extreme sharpness usually aren’t the best choice for producing great bokeh.
In Depth:
All About the Sync Speed
I took the photo on page 91 with a Canon EOS 5D Mark II set to 1/200 second, which is the shortest flash exposure time the camera is designed to use. Nikon (and a few other manufacturers) stretch this to 1/250 second, but 1/400 second is as fast as you will find in cameras with focal plane shutters.
You need to be careful even if you stick to the manufacturer’s quoted sync speed because radio triggers often increase the exposure time required for flash sync. Make some test shots with your camera to find out at what exposure time the ominous black stripe appears within the frame. Even with radio triggers I can expose accurately at up to 1/200 second, but faster speeds produce dark stripes in the images. Aside from the HSS and SuperSync/pseudo-HSS techniques we have already described, there are other ways to use short flash exposure times:
▸ At 1/320 second, half of an image taken with an EOS 5D Mark II will be correctly exposed, which might be sufficient if you crop the image tightly enough. If you know this in advance, you can frame the subject accordingly and simply crop out the dark areas during post-processing. In landscape format the dark stripes produced by my Canon cameras appear at the bottom of the frame. If you are shooting bright skies, it can help to turn the camera upside down when you shoot.
▸ If you include more daylight in your flash shots, the dark stripes will be less obtrusive (see David Ziser’s great explanation of this technique at http://vimeo.com/31405365).
▸ If all else fails, you can lighten any remaining dark stripes in Photoshop.
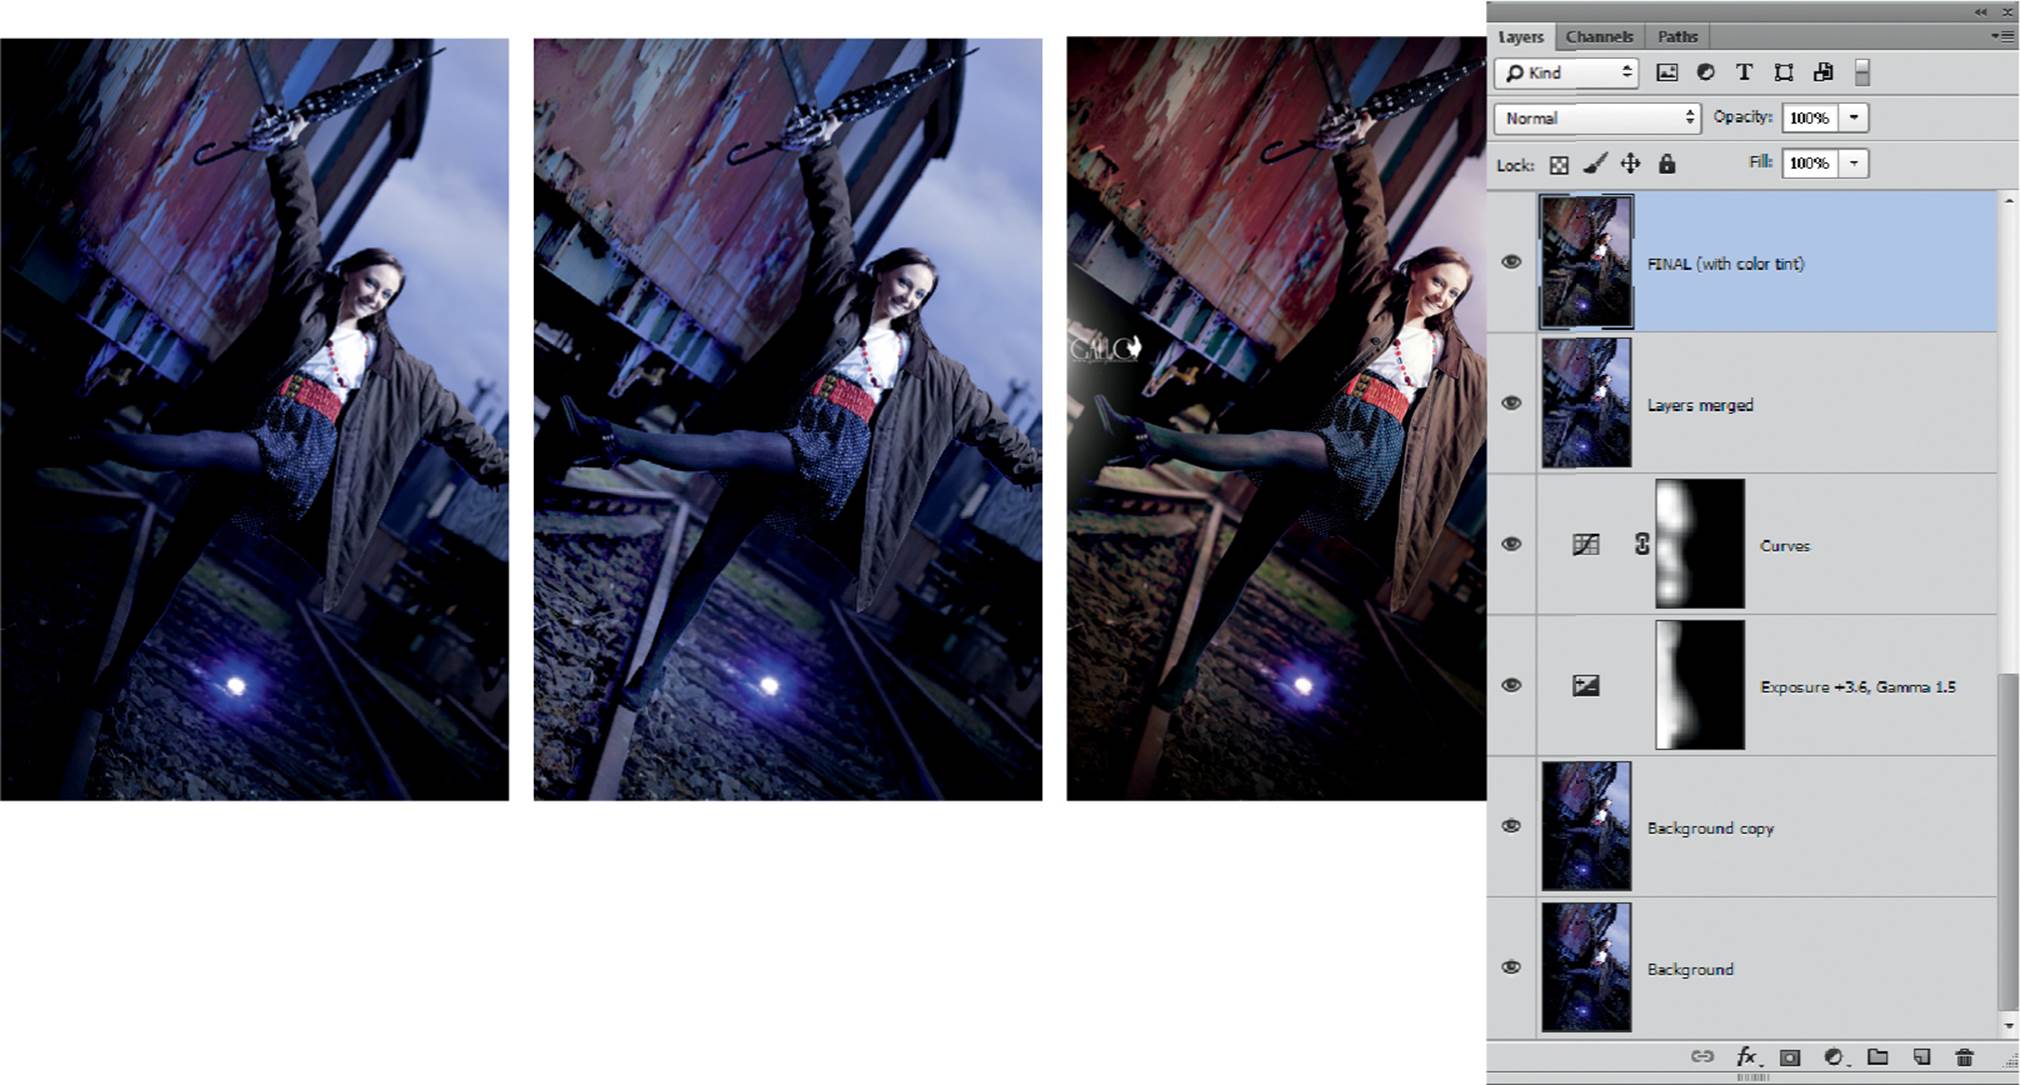
Shooting flash with a Canon EOS 5D Mark II at 1/250 second undercuts the camera’s intended sync speed, and the edge of the shutter appears as a dark strip across the frame. Such images can be rescued either by cropping or brightening the offending stripes. Left to right: The original image, the image after it was lightened, the image after color and contrast adjustments were made, and the corresponding layer stack.
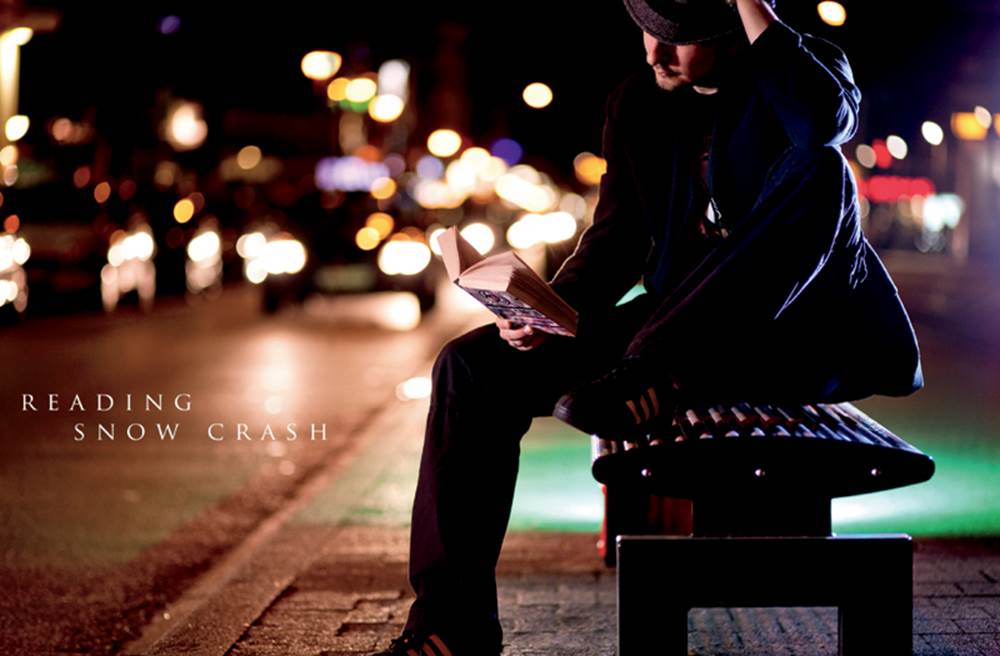
Reading Snow Crash: A Diaz-style night shot
Canon EOS 5D Mark II | 85mm f/1.8 set to f/1.8 | M mode | 1/60 second | ISO 400 | RAW | white balance set to auto | multiple off-camera, non-TTL flashes
Workshop 12
Dancer in a Flurry of Flash
▸ How to create stroboscopic effects without a dedicated stroboscopic mode
▸ Creating a complex setup with seven flashes, stroboscopic effects, and two sets of radio triggers
The idea for this project came from Joe McNally, who produced cool results using Nikon flashes in his “Repeating Flash” video (www.youtube.com/watch?v=g4fK3yvJLZM). Reproducing Joe’s setup could get expensive—I counted 10 Nikon SB-900 Speedlights. After mulling the idea over for a day or two and doing a couple experiments, I found that I could produce similar results using cheap non-TTL flashes. Actually, I only needed one flash with a built-in stroboscope mode—all the others were fired as conventional slaves.
I positioned two additional flashes that I mounted in umbrellas at each end of the stage to capture the start and finish positions; I triggered the first one with the main stroboscopic flash using a radio transmitter on the camera, and I triggered the final flash with a hand held radio transmitter at the end of the long exposure. It’s a complex scene, so after you’re done with initial preparations, plan on at least two hours of setup and testing time.
All the other workshops in this book use a maximum of five flashes, but for this shoot I used seven flashes, and even that was almost not enough. This might seem like flash overkill, but anyway, it was a lot of fun!
The Setup
The final image on the next page shows the dancer’s movements captured in a stroboscopic sequence of ghostlike images that start and finish with well-lit shots of her entire figure. To set up a shot like this, you need a darkened studio, you have to mount the camera on a tripod, and you need to set up your flashes to completely surround the model. We could have produced a similar effect by merging a series of individual images in Photoshop, but we took the purist route and captured the scene in a single long exposure. Here is how we did it:
1 The subject began by standing at the left and looking directly into umbrella 1 I released the shutter in bulb (B) mode with a cable release. This fired the radio release for the flash in umbrella 1on channel A and the stroboscopic Canon Speedlite 580EX II 4 (the only smart TTL flash in the whole setup). Flash 1 and flash 4 were mounted on RF-602 receivers, both set to channel A.
2 Following the initial shutter release, the subject danced along between flashes 2. and 6., which were set up to flash simultaneously with the 580EX II (see the “Camera Settings and Shooting” section later in this workshop).
3 The subject ended her movement in front of umbrella 7. and remained still in that position while I manually released the flash mounted in that umbrella with a second radio trigger set to channel B.
4 Finally, I let go of the cable release to close the shutter.
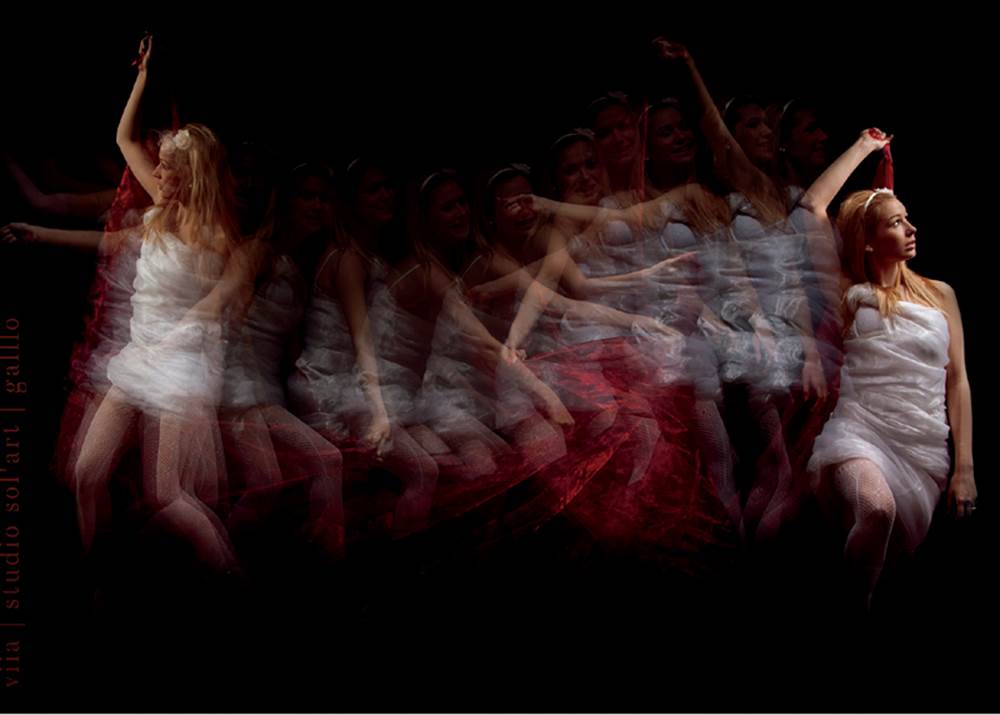
Dancer captured with five stroboscopic flashes (Model: Vanessa; co-photographer: Ray Sjoeberg; studio courtesy of Ray Sjoeberg)
Canon EOS 5D Mark II | EF 24–105mm f/4.0L set to f/6.3 and 35 mm | M mode | 4 seconds in bulb (B) mode with cable release | ISO 320 | RAW | white balance set to flash | two edge flashes in white umbrellas and five additional flashes set to function as stroboscopes
Camera Settings and Shooting
We set up our seven flashes and controlled them as follows:
1 YN-460, radio triggered on channel A using a RF-602 mounted on the camera. The flash was mounted in a white umbrella and set to 1/8 output.
2 YN-460 in S1 mode (i.e., as an optically triggered slave). This flash was set to 1/64 output and followed the stroboscopic flashes emitted by flash 4.
3 The same as flash 2.
4 Speedlite 580EX II, radio triggered on channel A by the transmitter mounted on the camera. This flash is set to stroboscopic (MULTI) mode (see the camera user’s manual to learn how) and 1/32 output. It flashes simultaneously with flash 1. The stroboscopic cycle lasts about four seconds at a frequency of 2–3 Hz.
5 The same as flash 2.
6 The same as flash 2.
7 YN-460, radio triggered using a RF-602 receiver on channel B. As soon as the model reached the end of her movement, I fired this flash manually with a second radio trigger in my hand. The flash was mounted in a white umbrella and was set to 1/8 output.
Flashes 2, 3, 5, and 6, were set as slaves (S1 mode) and were triggered optically by the stroboscopic flashes from the 580EX II. This was possible because of the low output setting and the clear line of sight between the master and the slave units. All five flashes were aimed at the slightly reflective floor, so the optical slave cells, which are located near their fronts, all pointed in the same direction.
Only flashes with a built-in stroboscopic mode—such as the Nikon SB-900 Speedlight, the Canon Speedlite 580EX II, or the Yongnuo YN-468—can be used as a master in a setup like this. Setting up stroboscopic mode involves selecting the number, frequency, and output of the flashes you want to fire. If the sequence doesn’t work properly, you most likely selected an output setting that is too high to recycle fast enough between flashes. Stroboscopic mode cannot usually be fired with a test button, so you have to trigger your test flashes with the camera’s shutter release or a radio trigger.
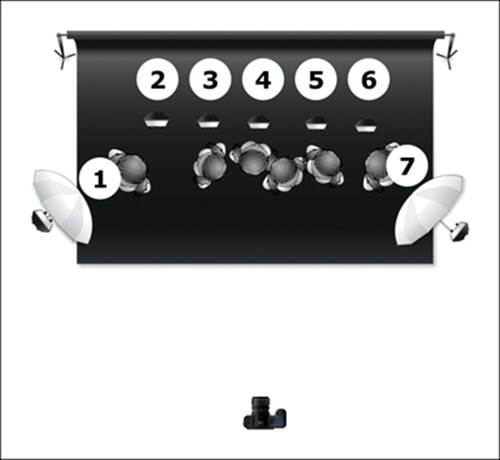
Schematic of our stroboscopic setup, showing the two flashes in white umbrellas that capture the dancer’s start and finish positions and the five stroboscope flashes in between that we set up without additional light shapers
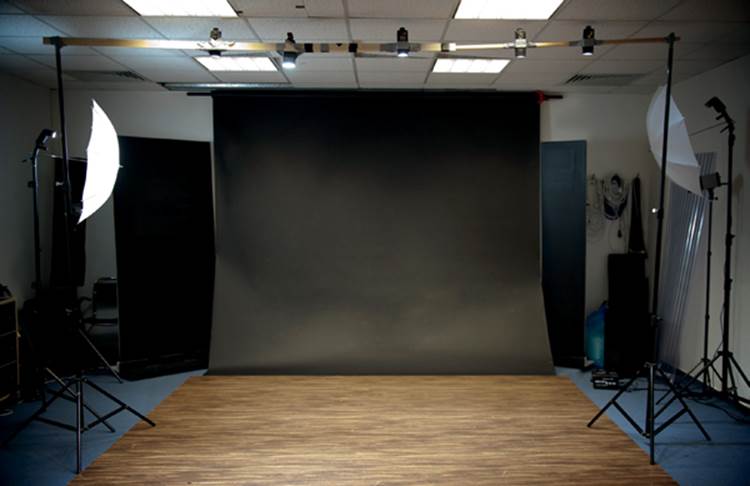
Our studio setup showing our start and finish flashes on their stands and our stroboscope flashes mounted on a beam between them. A larger space would better prevent unwanted reflections from the walls.
The two transmitter channels used in this setup can be set using the little DIP switches on the trigger. I referred to them as channels A and B, but the actual numbering may vary from model to model. The important thing is that you use two separate channels for the first flashes and for the last flash.
Post-Processing in Photoshop
The studio we used was small, which meant we had to deal with unwanted light spill and reflections from the walls. A large stage or a clearing in a forest at night would have been better. Most of the post-processing steps we performed were aimed at suppressing unwanted details in the studio background. Everything else was standard: crop, color and contrast adjustments, add text/logo, and sharpen.

The original image (top) and the processed version (bottom). A larger studio or a stage would have prevented the need for some of the post-processing.
Tips, Tricks, and Notes
For this setup I used the second most expensive Canon flash on the market. An alternative is to use a cheap non-stroboscopic flash set to its lowest output setting. You can fire it by manually pressing the pilot/test button as quickly as you can, and then fire optically triggered slave flashes with that hand held master. However, stroboscopic flashes are getting cheaper: the Yongnuo YN-568 is a good example of a bargain flash with a high-end feature set.
If, like Joe McNally, you have access to a lot of dedicated system flashes (his are Nikon CLS models), you can program them to automatically function as an intelligent master and slaves group. In our setup the terms master or slave meant just the simple non-intelligent optical triggering.
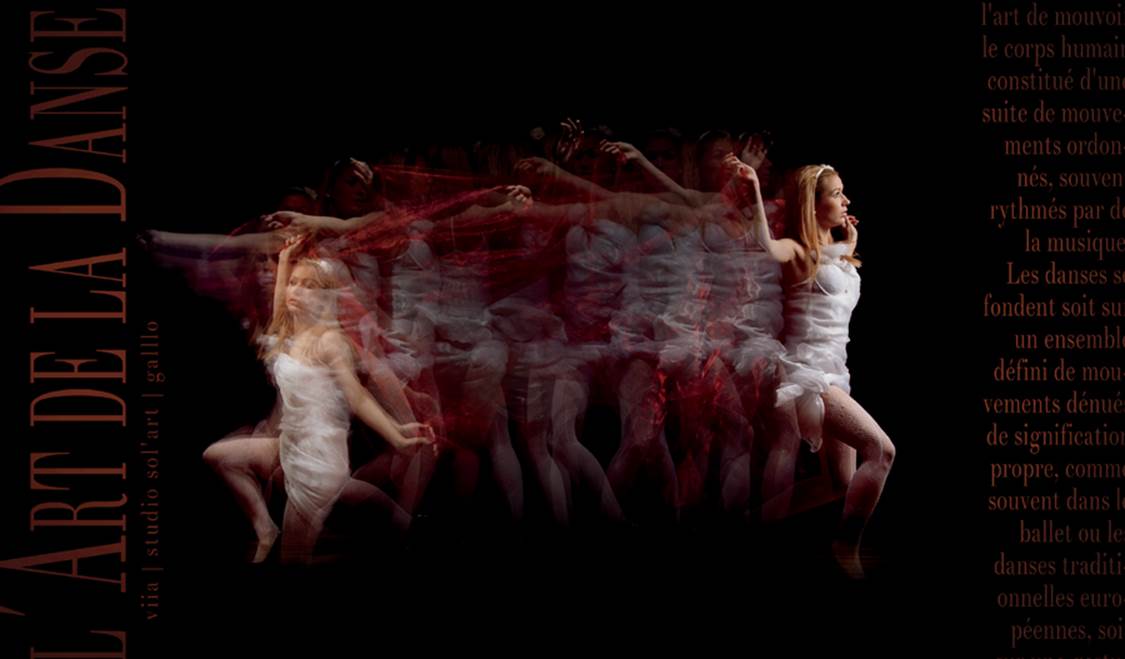
Another variation of the image that we captured during the shoot with the same parameters as those listed on page 103. This technique is perfect for capturing dance and sports scenes.
Workshop 13
Underwater Shoot
▸ How to make your gear waterproof on the cheap
▸ How to trigger flash under water
▸ Stay safe!
Heidi Klum showed us the way, so we decided to follow. Underwater fashion shots look really cool, but be warned: a shoot like this involves a lot of hard work and some frustration. The safety aspects of shooting underwater must not be ignored (see the textbox below), but I am lucky enough to know the owner of a heated outdoor pool, so I grabbed the opportunity. I was slightly nervous by the time we actually started shooting, but the guidelines outlined in this workshop made the effort a great success.
This workshop is intended to allow you the opportunity to experiment with this technique. For this project, we chose not to use our best camera in the event of a mishap, and the underwater housing we used was not high-end, nevertheless they served the purpose well. If you really want to get into shooting underwater, an investment in high-end equipment would be the next step.
Safety First!
If you follow some basic rules, shooting underwater can be safe and a lot of fun. Make sure at least one team member is certified in first aid, and have at least one person on dry land to make sure everyone is comfortable with the situation at all times. Ideally, the photographers should be qualified divers, even if they are only using snorkels.
If you need to use additional lights, anything that requires a power outlet is strictly off limits near a pool.
I have been told by a number of experts that using an electrically isolated battery-powered flash underwater is completely safe because the electrical current dissipates over the shortest possible distance between the poles of the flash (or the poles of the capacitor) and cannot be grounded through the water. This sounds plausible, but we decided not to try it. Instead, we used a triple safety mechanism to mount a flash head, a battery pack, and a 230-volt inverter, all positioned on a diving board, above the surface of the water.
Don’t blame me if your camera drowns when you attempt a shoot like this. Two of our radio receivers and one of our flashes died during this shoot, so don’t underestimate the risks—water can get inside everything!
The Setup
If you are still interested despite the warnings on this page, read on. You may consider not using flash, which would make things simpler, but you’ll be dependent on the position and angle of the sun. The walls of the pool will block a lot of available sunlight, so you can work only within a limited space where the light is at its brightest. Also, the camera’s built-in flash doesn’t really help, because it produces unattractive direct lighting. If you want your shot to look natural, the underwater light should come diagonally from above. If you are thinking about using a couple of those cheap construction site floodlights, forget it! It’s worth repeating that anything that requires a power outlet is strictly off limits near a pool. Construction lights wouldn’t produce enough illumination anyway (see appendix A for an example calculation for flash versus continuous light).
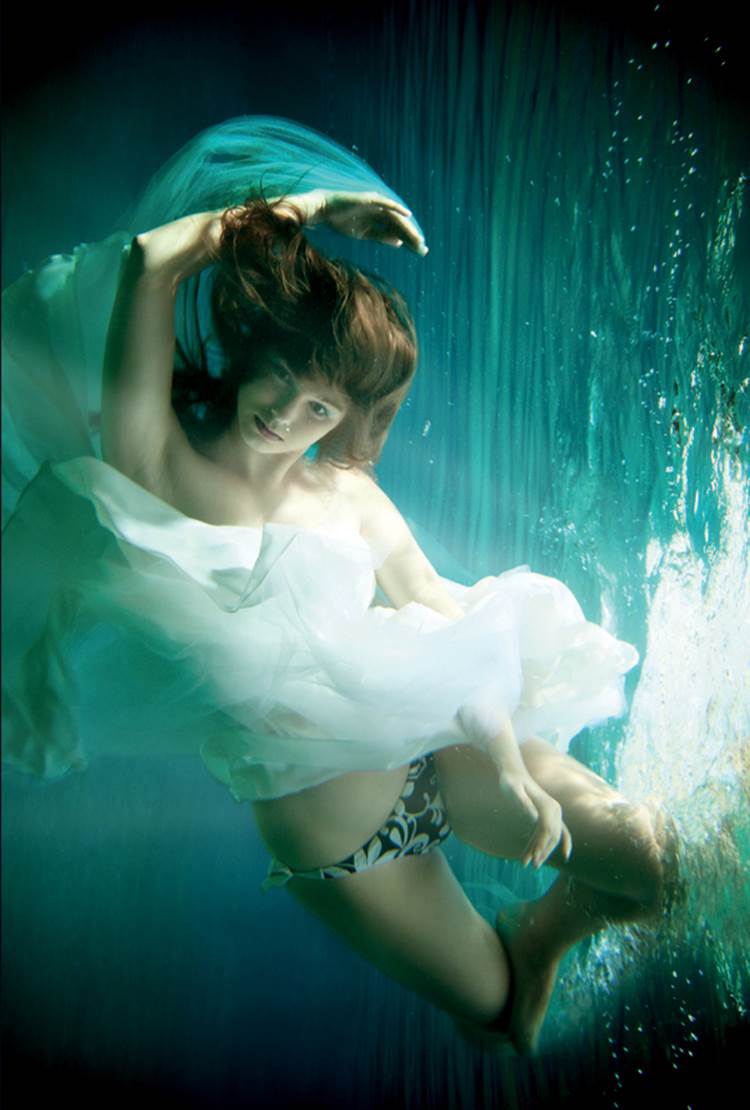
An image from our underwater shoot without any complex image processing; I simply rotated the image 90 degrees. The lighting and shooting parameters were the same as those described on page 114. (Model: Neleta; co-photographer: Niko/NN-Foto)
Using a radio trigger mounted on the camera to fire a flash above the surface of water doesn’t work either. Even a fairly powerful trigger, like my RF-602, has a range of only about 4 in underwater. Having said that, the setup shown in this workshop is based on that idea. We used an old Canon EOS Rebel T1i (EOS 500D) with a RF-602 radio trigger packed into a DiCAPac WP-S10 waterproof case 1. This case is cheap and works well, although it is impossible to use a cable with it because of leaks. There are more expensive and more reliable housings available, but this case served our purpose. It’s better to use a receiver module in a separate bag mounted close to the camera 2 with a 33 ft spiral flash cable connected to the battery-powered studio flash—in our case, a 400 Ws Walimex flash/battery combo with a parabolic reflector 3 and 4.
So far I haven’t talked about the weak spot in this system. It’s the point where the cable exits the bag containing the receiver. In our first attempt, we used multiple fish-carrying bags from a pet shop; we sealed the bags with tape and rubber bands. They remained watertight for a while, but after about an hour they began to leak. If you plan to spend a fair amount of time shooting underwater, get an electronics specialist to seal a radio trigger in a plastic housing with the cable fed through a watertight connection. If you are still experimenting, get a long roll of vacuum packaging foil and have your local butcher or grocer seal a long bag with one open end. You can then use the bag to house your trigger and your cable. Using this approach and a DiCAPac housing, we were able to set up an underwater flash kit for less than $120.
We affixed our battery-powered flash to the diving board using rope, tape, and cable ties, and we fitted it with a parabolic reflector and used it at 1/4 to 1/2 output. If you don’t have access to a studio flash, you can use the Duke Nukem solution described on page 60, although you will probably have to omit the umbrella to produce enough light.
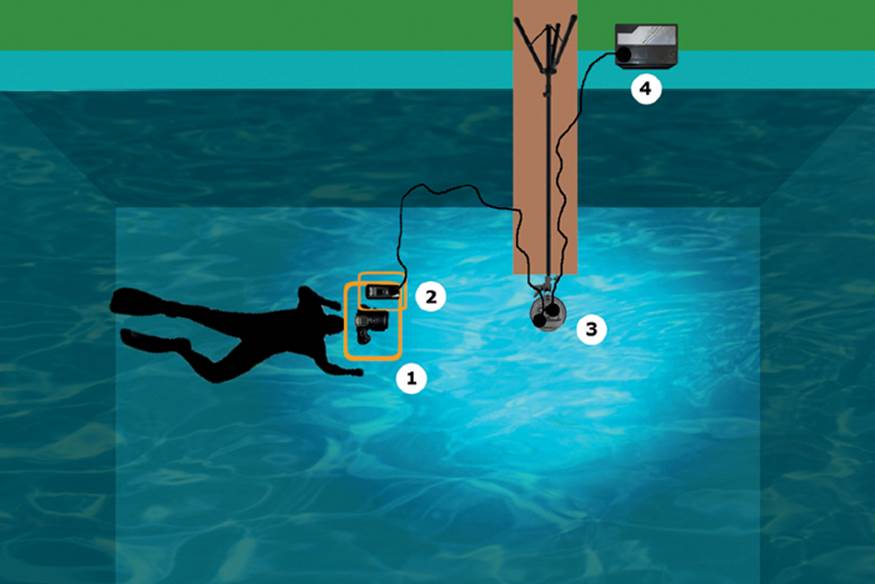
The setup for our underwater shoot
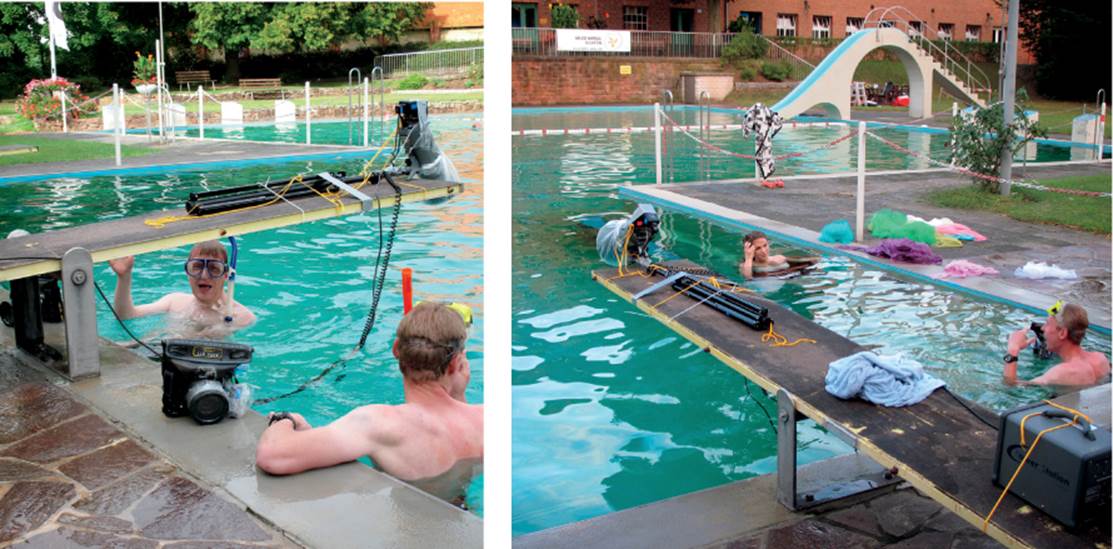
The photo crew at work
Camera Settings and Shooting
After we had everything set up, the shooting was fairly simple. It is surprisingly dark underwater if there is no direct sunlight, so we set our cameras to ISO 400. Fortunately, autofocus works quite well underwater, so we didn’t have to look through our masks, the water, and the camera housing to focus. We set the zoom lens to wide angle to ensure sufficient depth of field and to make sure we captured the model and her reflection in the surface of the water. Using a small aperture helps keep everything sharp, but it reduces the already minimal light that enters the lens. We ended up compromising with an aperture of f/7.1. Set the camera up the same way you would on dry land: use a reasonable ISO and shoot in manual mode to select a suitable aperture.
Make some test shots and check them when you get out of the water to see if the settings show the pool and the water at their best. If not, adjust the exposure and try again. After you finalize the exposure settings, add flash and let the model do her thing. Once again, use test shots to fine-tune the distance between the flash and the subject and to decide on the optimal flash output setting.
Post-Processing in Photoshop
Shooting in RAW format gives you the greatest leeway for adjusting your images at the processing stage. For this shoot, we performed the following steps:
▸ Imported our RAW files and increased the vibrance, slightly lightened the shadows, sharpened the files slightly, and increased the clarity
▸ Did some general cleanup in Photoshop, including deleting the pipe and the gaps between the tiles with the Clone Stamp tool
▸ Increased contrast, added a vignette, and adjusted the colors
▸ Merged our image with a stock image of the ocean for the background (Photograph from Fotolia), and added text and a logo
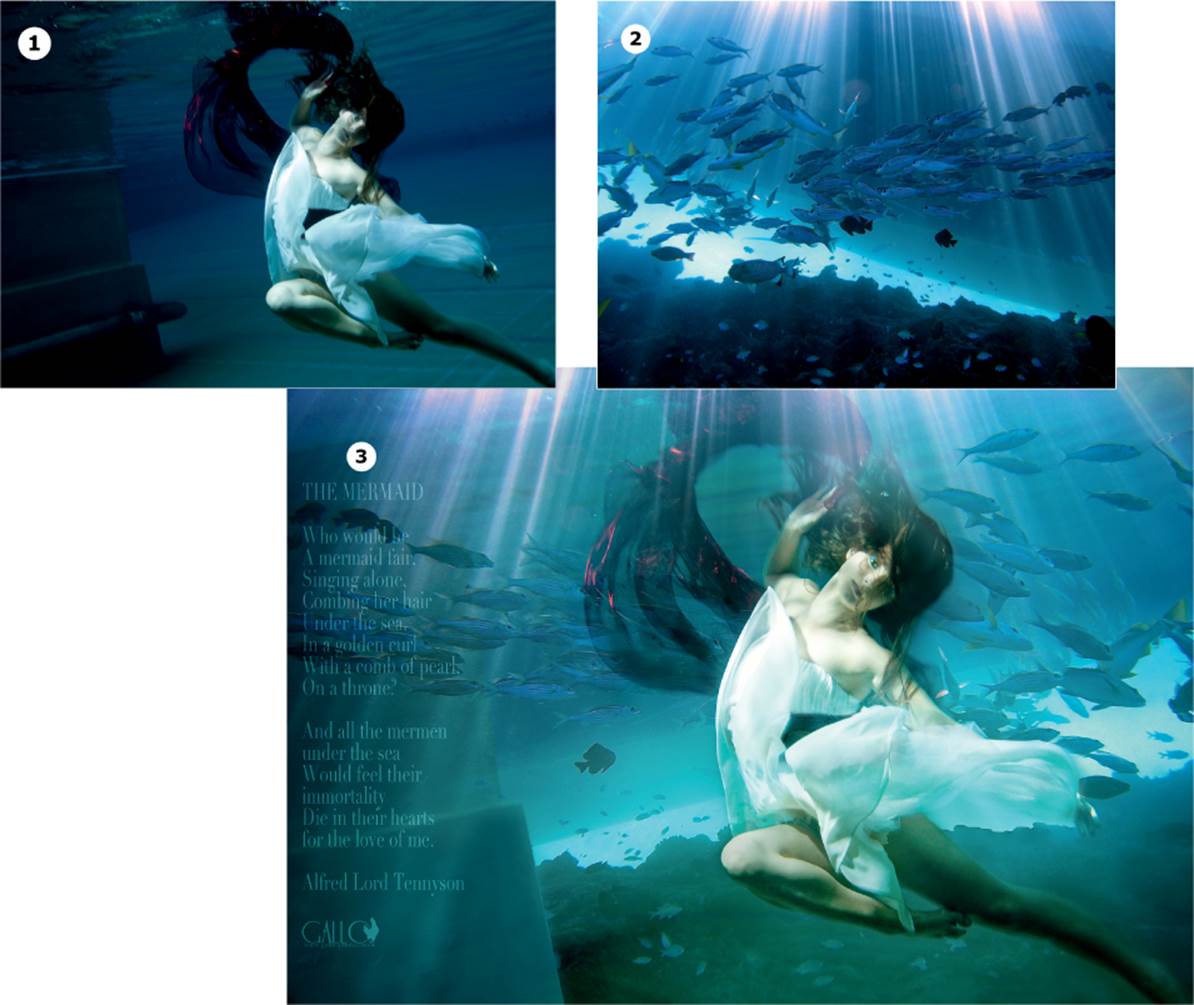
Our processing steps:
1 the original image
2 the background image (Photograph © AirMaria, Fotolia)
3 the result of two hours of work in Photoshop
Tips, Tricks, and Notes
▸ The DiPACac housing worked great, but the lens sleeve was too long. We pulled it back and fixed it in place with tape.
▸ The closer the model is to the surface of water and the deeper you are, the more you can use reflections from the surface in your photos.
▸ We couldn’t fire our battery-powered studio flash with a cable because we didn’t have the right adapter; our flash cable had hotshoes at both ends. Instead we attached a flash to the end of the cable above water, which we used to fire our main flash via its built-in optical trigger.
▸ Although the models were wearing long, heavy dresses, they still had to combat their own buoyancy. We solved this problem by having them dive deep and photographing them as they floated slowly upward. We weren’t able to compensate for our own buoyancy using just lead-weighted belts, so we held on to a pipe on the pool wall with our legs for 30–40 seconds while we shot.
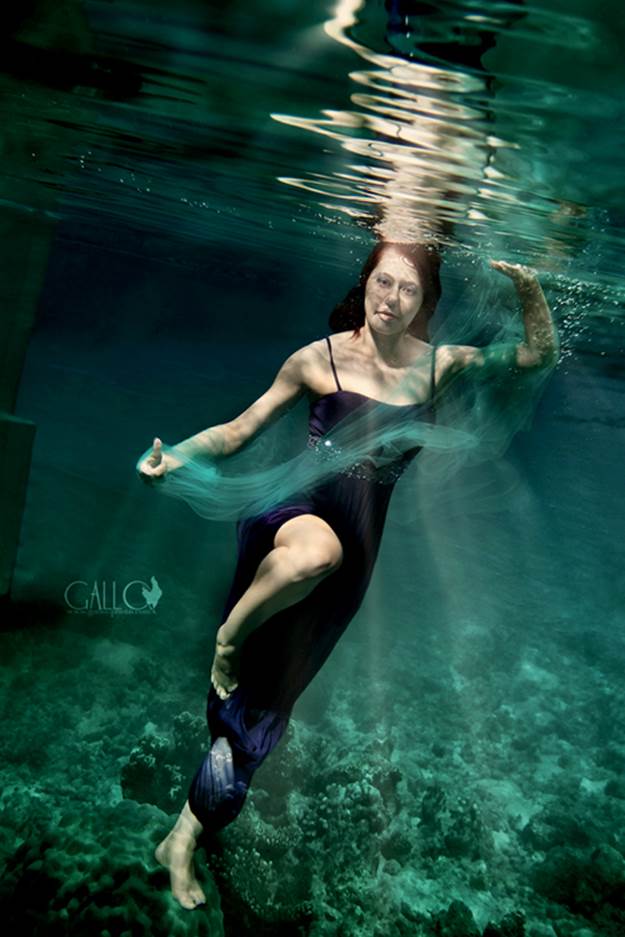
A finished image with an image of a sea floor added in Photoshop. The lighting and shooting parameters were the same as those listed on page 114. (Model: Anne; co-photographer: Niko/NN-Foto; background image © XL-Luftbild-fotograf, Fotolia)
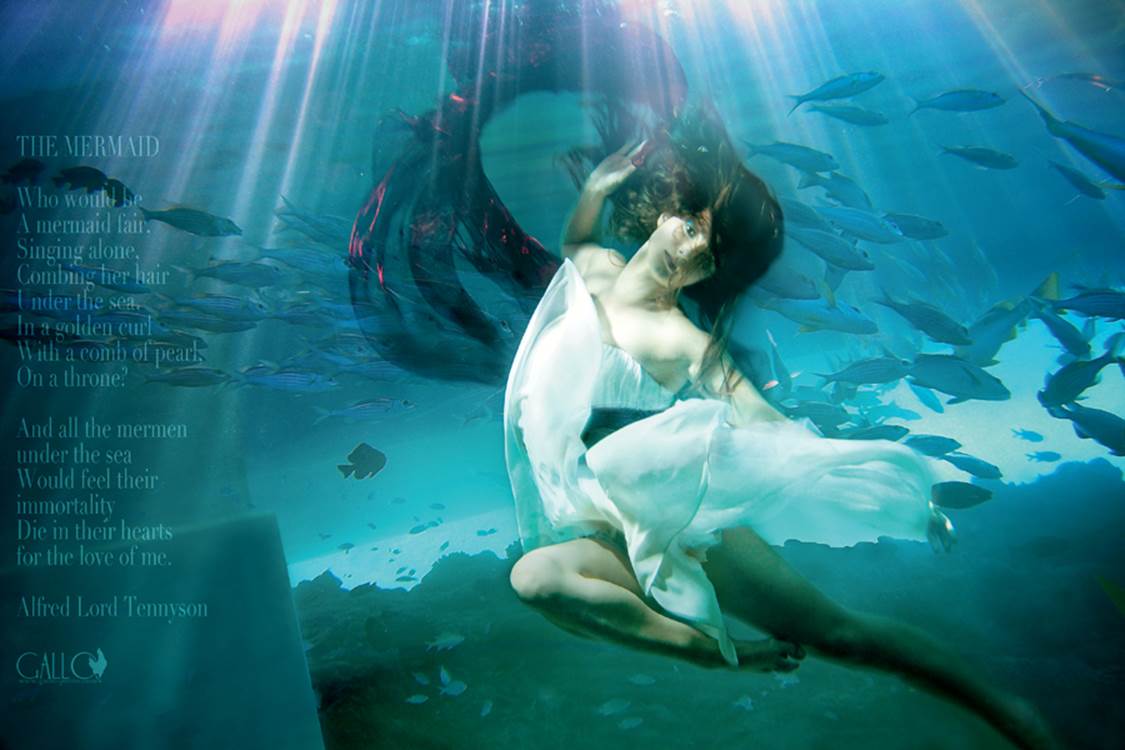
If you follow our tips and stick to some important safety rules, you can create effective flash photos, even underwater (Model: Neleta, makeup and styling: Layka; co-photographer: Niko/NN-Foto)
Canon EOS Rebel T1i (EOS 500D) | 24–105mm lens set to 24mm and f/7.1 | M mode | 1/160 second | ISO 400 | RAW | white balance set to flash | battery-powered studio flash
All materials on the site are licensed Creative Commons Attribution-Sharealike 3.0 Unported CC BY-SA 3.0 & GNU Free Documentation License (GFDL)
If you are the copyright holder of any material contained on our site and intend to remove it, please contact our site administrator for approval.
© 2016-2026 All site design rights belong to S.Y.A.