Creative flash photography : great lighting with small flashes: 40 flash workshops (2014)
Part II. The Fun Starts Here! 40 Lighting Workshops
Chapter 4. Workshops 14–17 Macro with Flash
Flash plays an important role in the world of macro photography. It allows you to shoot macro images that are free from camera shake and have plenty of depth of field. This chapter explains how to set up a powerful macro flash rig and uses the eye of an insect to explain focus stacking. The chapter also includes a section on dark field lighting.
Workshop 14
Using a Macro Rig
▸ Setting up a portable macro rig
▸ Set up and unleash your flash
Macro photography reveals tiny details that the human eye may not be able to see—the delicate pistils of a flower in bloom or the individual elements of an insect’s compound eye suddenly appear in wonderfully clear detail. Macro photos can be shot with closeup lenses, extension tubes, or reversing rings. These types of images are relatively easy to take on a limited budget.
In macro situations you will quickly find that daylight isn’t bright enough to capture a subject because small apertures are required to provide sufficient depth of field. That’s when flash comes into play. Shoe-mounted or built-in flash is poorly suited to this kind of work because the direct light is too harsh and doesn’t illuminate the area directly in front of the lens. Off-camera flash allows you to position the flash exactly where you need it.
The Setup
To build a macro rig, you need some kind of base plate. I use a Novoflex flash grip with an additional 19P ball head. This enables me to position the flash head at the front of the lens where I need it. The light from closerange flash can be softened with a dedicated flash diffuser or a simple paper cuff around the lens.
Macro Lenses | Conventional lenses can be used for macro photography if you add either closeup filters to the front of the lens or extension tubes between the camera and the lens. Specially designed macro lenses are also available at a range of prices. I used an extension tube to shoot the photo of a dandelion on page 120, and I used a reversing ring for all the other photos in this section. A reversing ring allows you to mount a lens backwards so you can shoot at close distances and high magnifications. Wide-angle lenses that are reversed can provide magnifications up to 7x, which is equivalent to high-end macro lenses such as the widely favored Canon MP-E 65mm f/2.8.
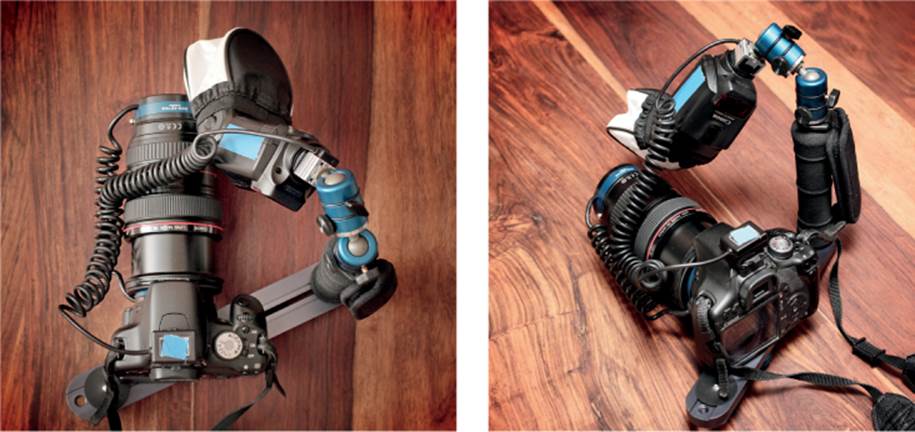
My simple but powerful macro rig, which includes an APS-C Canon EOS Rebel T1i (EOS 500D) and a Canon 24–105mm EF lens mounted on a Novoflex EOS-RETRO reversing ring. The camera is mounted on a Novoflex flash grip with two 19P ball heads and a Canon Speedlite 430EX II TTL flash that is connected with a Walimex spiral TTL flash cable.
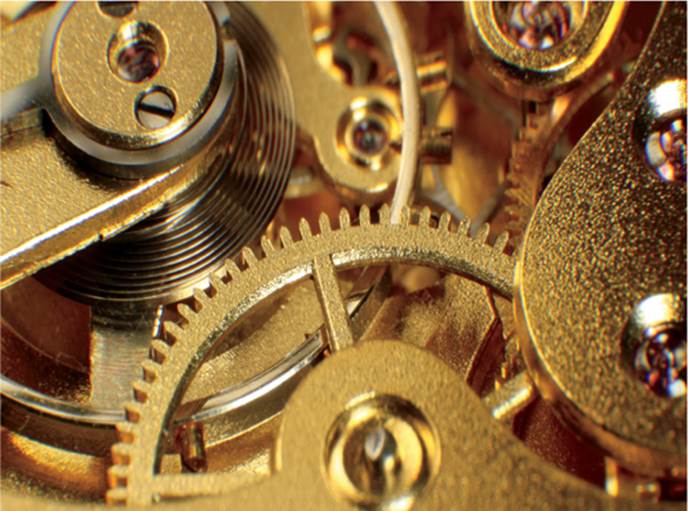
The movement of a pocket watch captured with the reversing ring described in the text and the lens set to the telephoto end of the zoom scale
Canon EOS Rebel T1i (EOS 500D) | EF 24–105mm set to 100mm and f/16 (mounted on a reversing ring) | M mode | 1/125 second | ISO 100 | RAW | white balance set to flash | TTL flash | –2/3 EV FEC
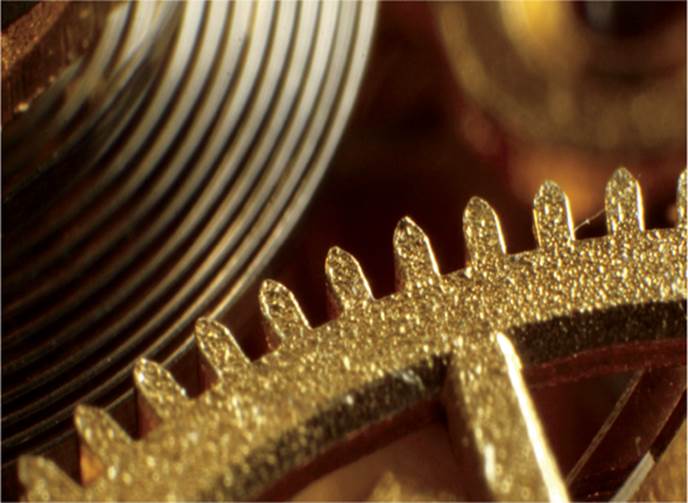
The same setup, but this time with the lens at a wide-angle setting
Canon EOS Rebel T1i (EOS 500D) | EF 24–105mm set to 24mm and f/16 (mounted on a reversing ring) | M mode | 1/125 second | ISO 200 | RAW | white balance set to Flash
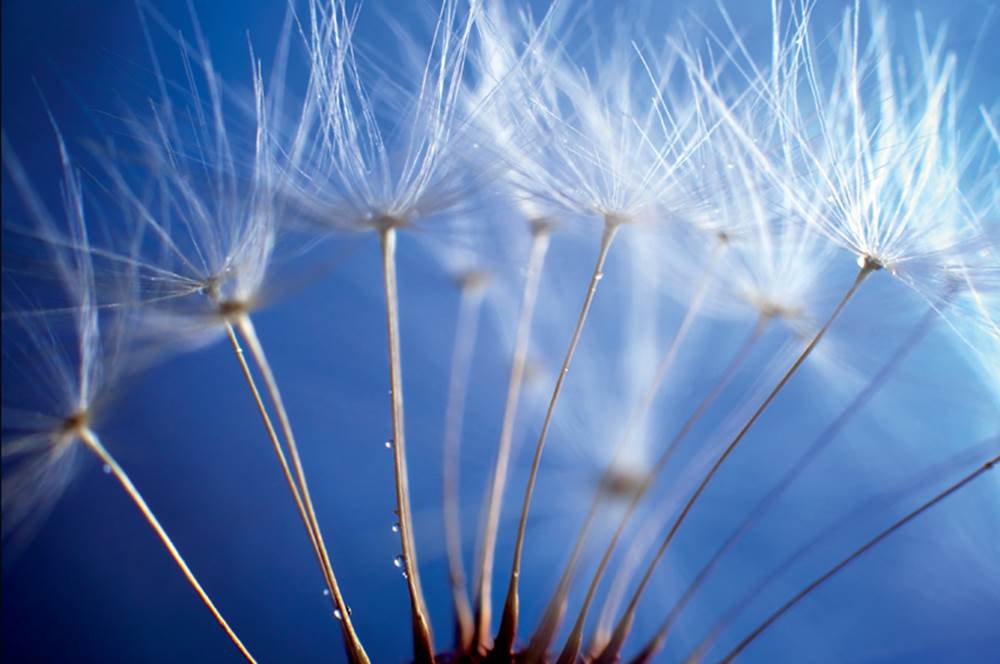
Macro shots are best captured with off-camera flash. This allows you to work without a tripod and still produce a sufficient depth of field
Canon EOS 500D | 50mm f/1.4 at f/10 with extension tube | M mode | 1/125s | ISO 100 | RAW | WB set to flash | Flash-setup: macro rig
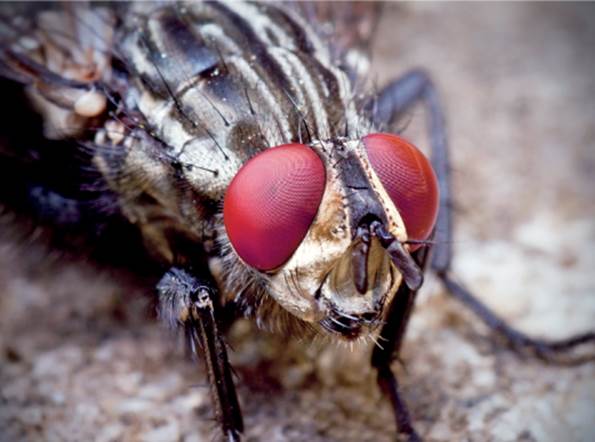
I captured this fly with my macro rig and a reverse-mounted 18–55mm standard kit zoom lens stopped down to f/18. For this shot I used a paper collar around the lens as a diffuser.
Canon EOS Rebel T1i (EOS 500D) | EF 18–55mm set to 33mm and f/18 (mounted on a reversing ring) | M mode | 1/125 second | ISO 100 | RAW | white balance set to Auto
Macro Flash | You can use TTL or non-TTL flash in macro situations, but, because TTL flash cables are manufacturer specific, you have to be careful when you choose how to connect your flash to the camera. I use a 2-meter Walimex spiral Canon E-TTL cable. For non-TTL flashes, you can use any compatible radio trigger. A TTL flash is a real boon for macro work, especially if you are shooting handheld, because small differences in the distance to the subject make a huge difference to the exposure settings (because of the inverse square law); a TTL flash compensates for the changes in distance automatically. Ideally you should switch your camera to FE Lock (Canon) or FV Lock (Nikon), which means a spot metering in combination with a storage of that metering (for recomposing afterwards). If you are shooting from a tripod, you will have much more control and can use non-TTL flash just as effectively.
Camera Settings and Shooting
After you have your rig set up, it is a good idea to take some test shots before you head off on your first insect safari. I usually stop down to around f/18, which means I have to dial up the flash output accordingly. If you increase the ISO to 200 or 400, you will reduce the recycle time of your flash. Such ISO levels present few image quality problems in today’s high-performance cameras (ISO 200 is the default ISO in many Nikon DSLRs).
Tips, Tricks, and Notes
▸ Extension tubes and reversing rings are available in passive and (more expensive) active versions. Passive gear provides a mechanical connection between the camera and the lens, but it doesn’t transmit any focus or aperture data between the two. This usually means you must work with the aperture either stopped all the way down or wide open (depending on the manufacturer of the lens). If you are willing to modify the mechanics of your lens (and most likely void the warranty), you can trick it into using a different-sized opening by setting the desired aperture, pressing the depth-of-field preview button, and removing the lens while you hold the button down. You can then mount the lens in the reverse position with the aperture set. If you are using an active reversing ring (they are available only from Novoflex and only for Canon), the aperture works automatically as usual.
▸ Reversing rings often have 58mm threads, so you may need an additional step-up or step-down ring for your particular lens.
▸ As usual, Flickr is a great resource for gear and shooting tips. To view a great macro portfolio by John Hallmen visit www.flickriver.com/photos/johnhallmen/popular-interesting, or see www.flickr.com/photos/johnhallmen/sets/72157604592459772 to check out his gear.
▸ Insect photography is a science in itself. If you want to capture great insect images, you need to know a lot about how they behave. Early mornings in late summer are perfect for photographing flies and dragonflies because the lower temperatures slow them down and make them easier to capture at rest. At these times you can even shoot with a tripod and flash without disturbing them.
In Depth:
Optimum versus Critical Aperture
Optimum aperture and critical aperture are terms that we encounter often. They describe the constant battle that photographers wage with the relationship between light and the equipment used to capture it. Put simply, the wider the aperture, the shallower the depth of field in an image. Conversely, the more you stop down, the greater the risk of reduced overall sharpness due to diffraction within the lens. The aperture that produces the best balance between depth of field and diffraction blur is known as the optimum aperture. Calculating the optimum aperture is no simple matter (start by searching Wikipedia for “depth of field”). Generally speaking, the optimum aperture is between f/16 and f/20 for full-frame and APS-C cameras, and it can be as low as f/5 or f/8 for compact cameras with small sensors. There are various online tools available for calculating optimum aperture.
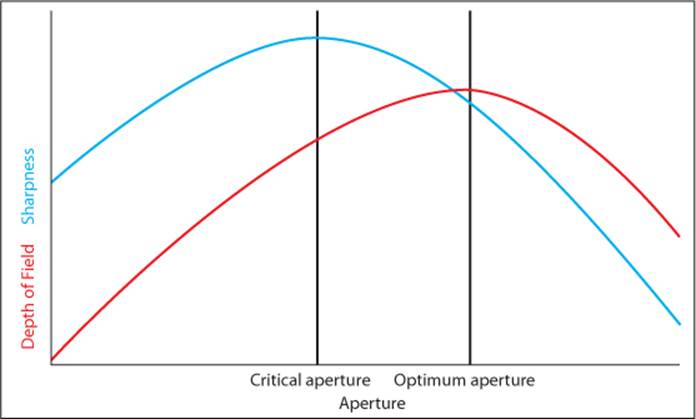
Optimum versus critical aperture

The critical aperture of the popular Canon EF 50mm f/1.8 II is f/5.6. This is the aperture at which the lens produces its sharpest results in absolute terms. (Illustrations courtesy of Dave Etchells, www.slrgear.com)
Even if the subject has little physical depth, two opposing values work together to help you capture the sharpest possible image: diffraction blur, which occurs at small apertures; and optical aberrations that are inherent in lens construction and are most prevalent at wide apertures. The relative aperture at which an optical system (i.e., the lens) delivers the best balance between aberration correction and contrast rendition is known as its critical aperture. An old rule of thumb says to set the aperture to f/8 in normal daylight. This may sound oversimplified, but a look at test charts (www.slrgear.com) supports the theory. Put simply, if the situation allows it and if the subject requires no special treatment with regard to depth of field, you can usually get good results at f/5.6 or f/8. Most full-frame and APS-C cameras produce their best overall resolution at these apertures.
Workshop 15
Extreme Macro Photography
▸ How to set up your gear to shoot extreme closeups
▸ Shooting focus stacking sequences
▸ Optimizing depth of field using focus-stacking techniques
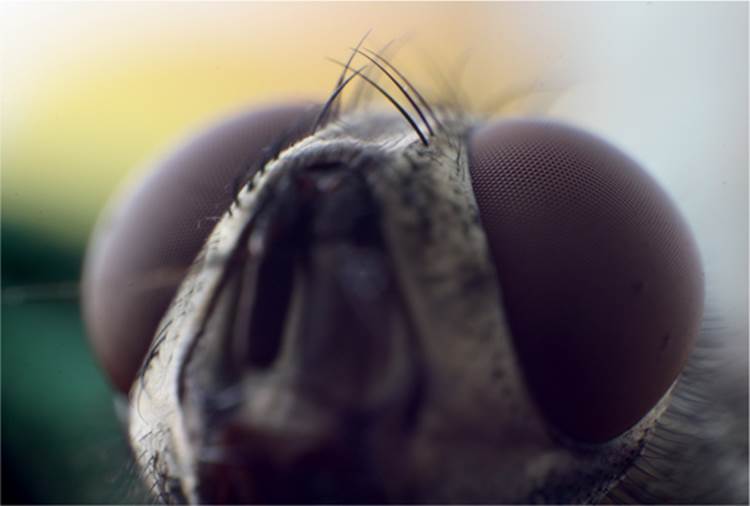
Extreme closeup photography requires unusual equipment. Normal extension tubes and closeup lenses no longer suffice if you wish to shoot at magnifications of 4x or more. You can use a macro lens with extension tubes or a highly specialized lens, such as the Canon MP-E 65mm f/2.8. Reversing rings can be used to convert just about any lens into an extreme macro lens. Photographing an insect’s compound eye is a particularly challenging photographic exercise, but the results are often fantastic. Check out the Flickr group dedicated to the subject atwww.flickr.com/groups/compoundeyes.
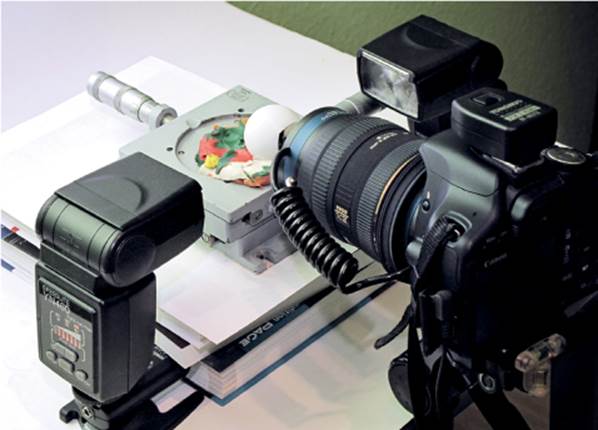
The setup for our compound eye shot, showing a micrometer vice and two off-camera flashes. A Ping-Pong ball served as a makeshift diffuser.
The Setup and Camera Settings
I used two non-TTL flashes set up on either side of the subject and mounted the fly on a piece of Plasticine that I placed on a micrometer vice. I cut open a Ping-Pong ball to use as a diffuser and fired my flashes with RF-602 radio triggers. The APS-C camera was mounted on a tripod with a reverse-mounted 10–20mm zoom lens set to 14mm. I used an active reversing ring from Novoflex that automatically transmits all aperture data to the camera. I used this setup to shoot a sequence of 33 images, each with the subject distance adjusted by 50 µm (micrometers). The single image at the top of page 126 shows how shallow the depth of field can be in such extreme macro situations. Stopping down the aperture would provide additional depth of field, but it would move further away from the critical aperture and thus reduce the overall sharpness. The most effective way to produce additional depth of field in macro images is to shoot a sequence of photos at various distances and merge them into a single image during postprocessing to reveal the enhanced depth of field.
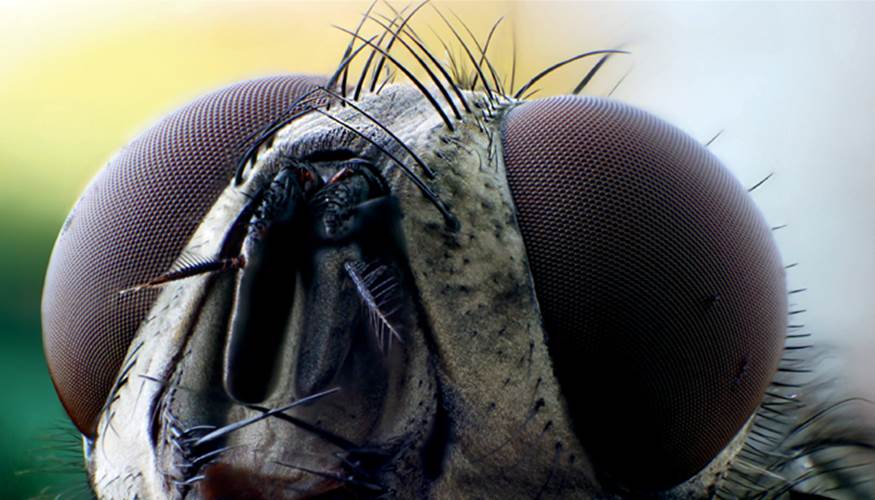
Each element of an insect’s compound eye is hexagonal. Fine details like these can be captured effectively only with flash and focus stacking techniques.
Canon EOS Rebel T1i (EOS 500D) | Sigma 10–20mm f/4–5.6 set to f/8 (Novoflex reversing ring and a 77–58mm step-down ring) | M mode | 1/125 second | ISO 100 | JPEG | white balance set to flash | two off-camera, non-TTL flashes | focus stacking from a sequence of 33 source images
One of the 33 source images showing how shallow the depth of field is
Introduction to Focus Stacking
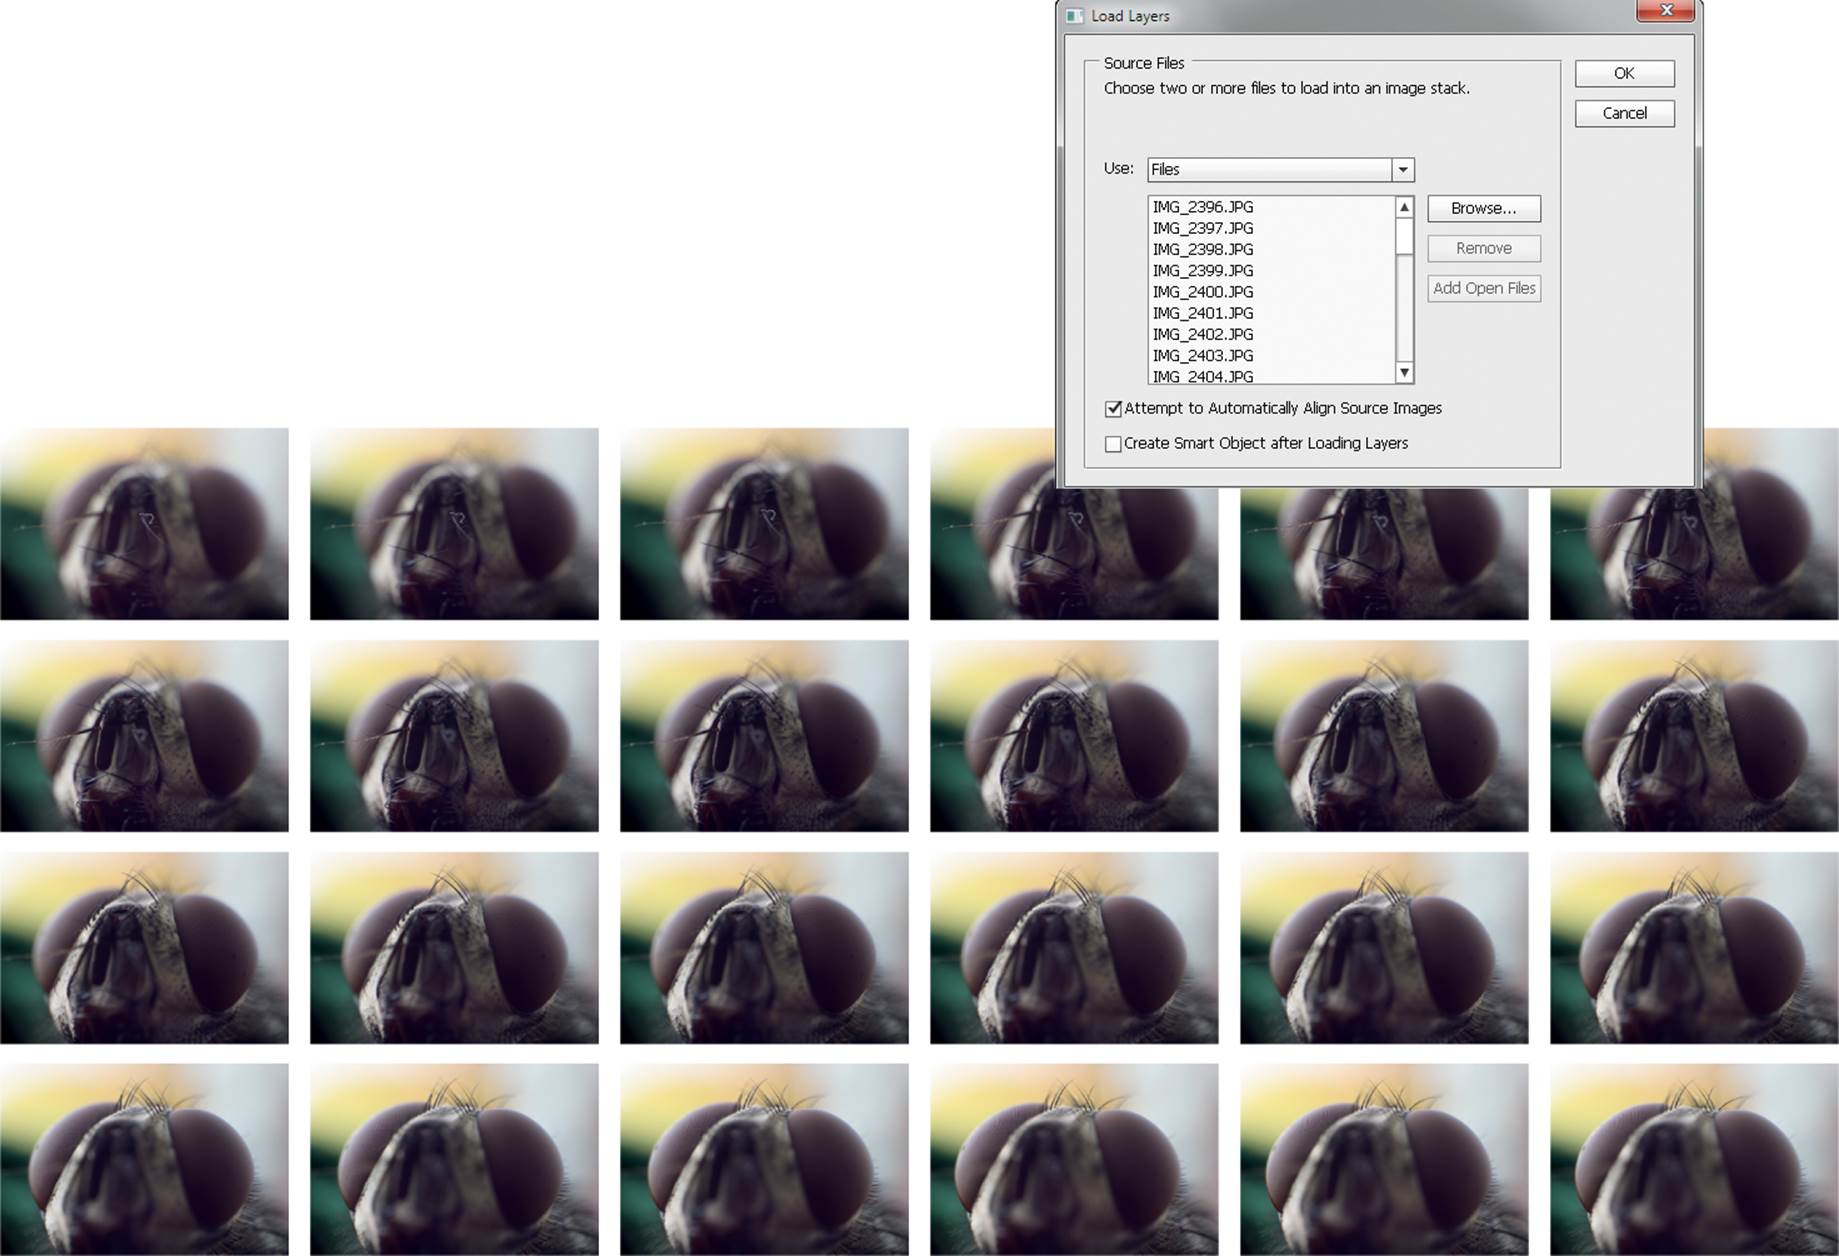
Our sequence of source images, each shot at a slightly different distance
There are various ways to shoot focus-stacking sequences. Simply altering the focus between shots can work, but this also slightly alters the magnification and therefore makes it more difficult to merge the images. It is preferable to use a setup that allows you to keep the focus constant and alter the distance between the subject and the lens. The best tool for this approach is a highprecision macro rail. The source images can then be merged in a dedicated stacking program, such as Helicon Focus, or with standard tools in Photoshop.
Focus Stacking in Photoshop
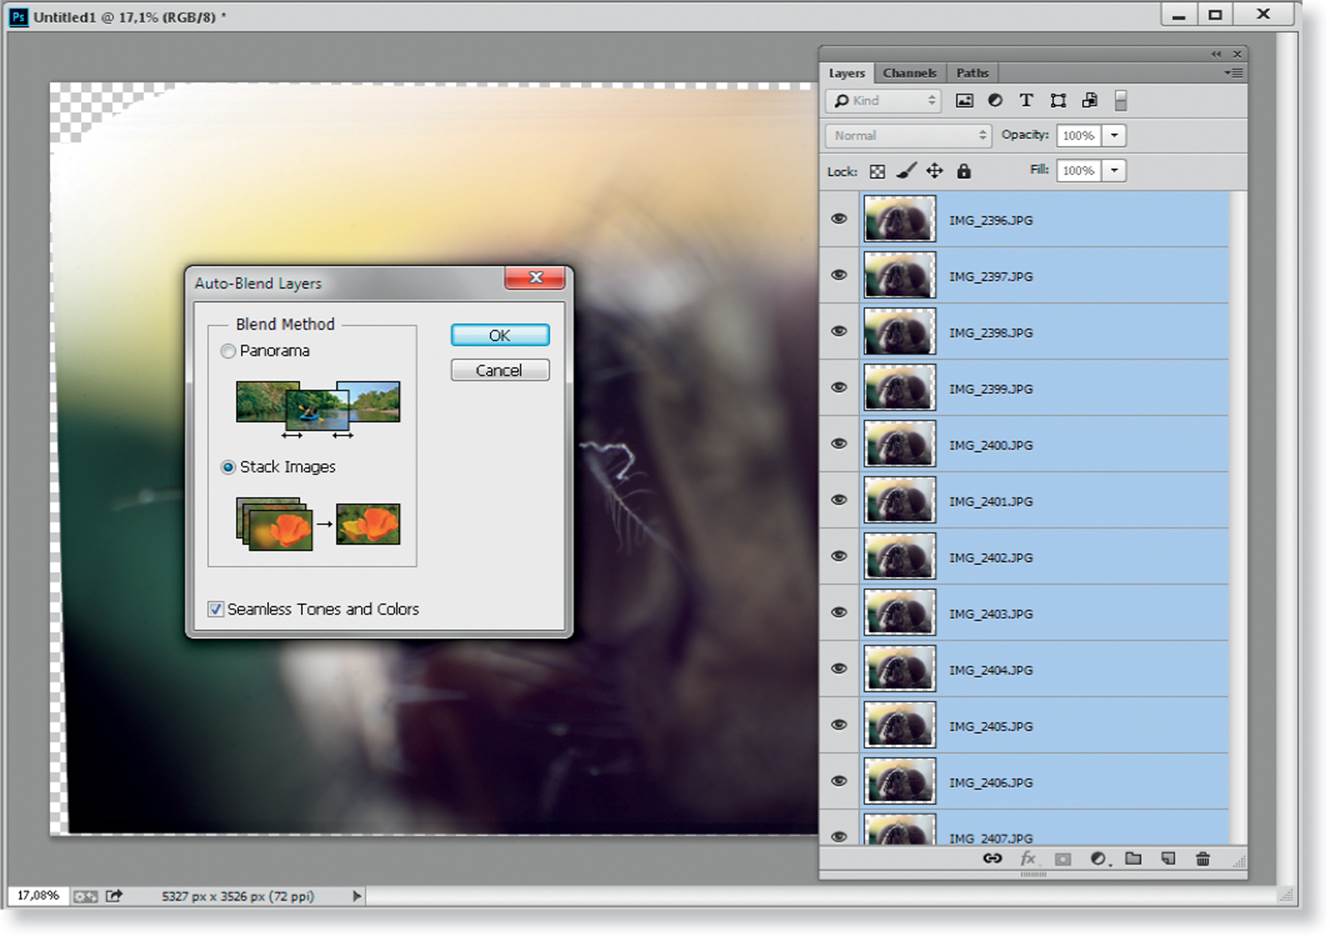
Load your source image into a new stack using the File > Scripts > Load Files into Stack command and check the Attempt to Automatically Align Source Images option. Now select all the layers in the resulting stack and navigate to the Edit > Auto-Blend Layers command and select the Seamless Tones and Colors option in the dialog that follows. Photoshop will then take a while to process the stack. When it is done, you can flatten the image to a single layer and fine-tune the result, using whatever contrast and color adjustments are necessary. After you remove any remaining halos or seams with the Clone Stamp tool, you can sharpen your enhanced depth-of-field image for output.
Workshop 16
Dewdrop Flowers
▸ Reproducing nature scenes in the studio
▸ Capturing extreme magnifications
▸ Optimizing depth of field using focus-stacking techniques
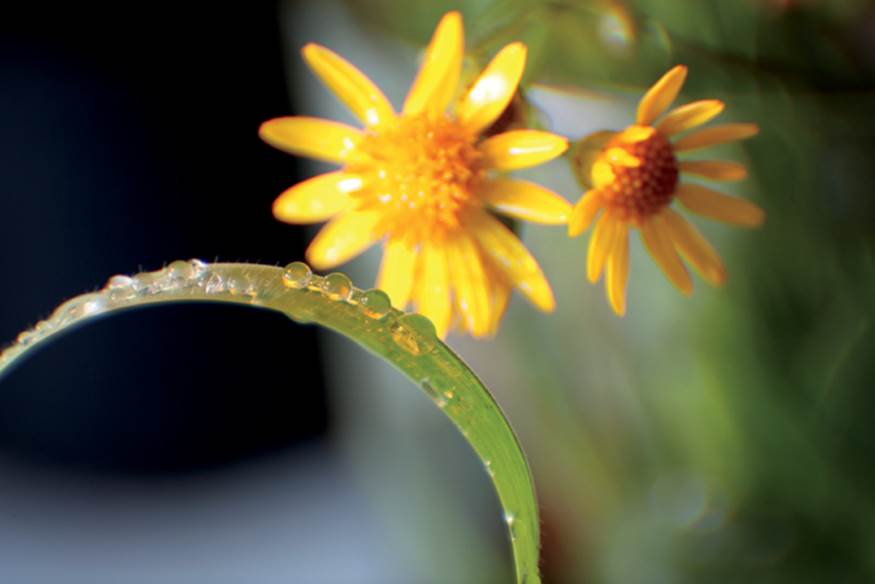
I like images in which colorful objects are magnified by dewdrops (that serve as tiny lenses), so I decided to produce the effect in my studio. I began by checking on Flickr to see what other photographers have done and found the photostream and tutorials of Brian Valentine (his alias is Lord V) at www.flickr.com/photos/lordv. Brian is obviously more of a nature fan than I am because he shoots outdoors, but he uses the same off-camera flash approach as described in this workshop.
Brian’s tutorial sounded easy, but my attempt took a lot longer than I anticipated. The first major hurdle was creating dewdrops on the blade of grass. An eyedropper didn’t work because the drops simply rolled off. I finally produced effective drops by filling a perfume atomizer with water and spraying it on the grass. After I created a row of drops, I removed excess water by carefully dabbing it with the corner of a paper towel.
The next thing I had to figure out was the optimum distance between the flowers and the drops. Very small flowers can be placed just an inch or so away. The other major challenge was photographing the drops because they were much smaller than I thought they would be—only about 1mm across. I couldn’t magnify the scene enough with my extension tubes, so I decided to reverse mount my 24–105mm f/4L on a Novoflex adapter. This setup gave me magnifications of 1–5x that I could vary with the zoom ring. All I needed now was a suitable light source.
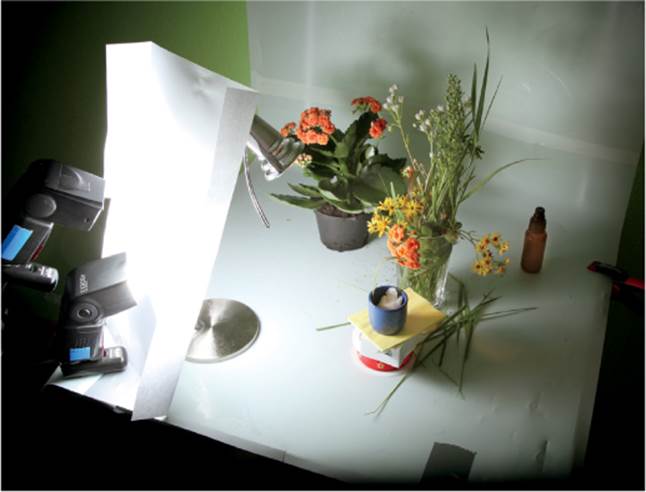
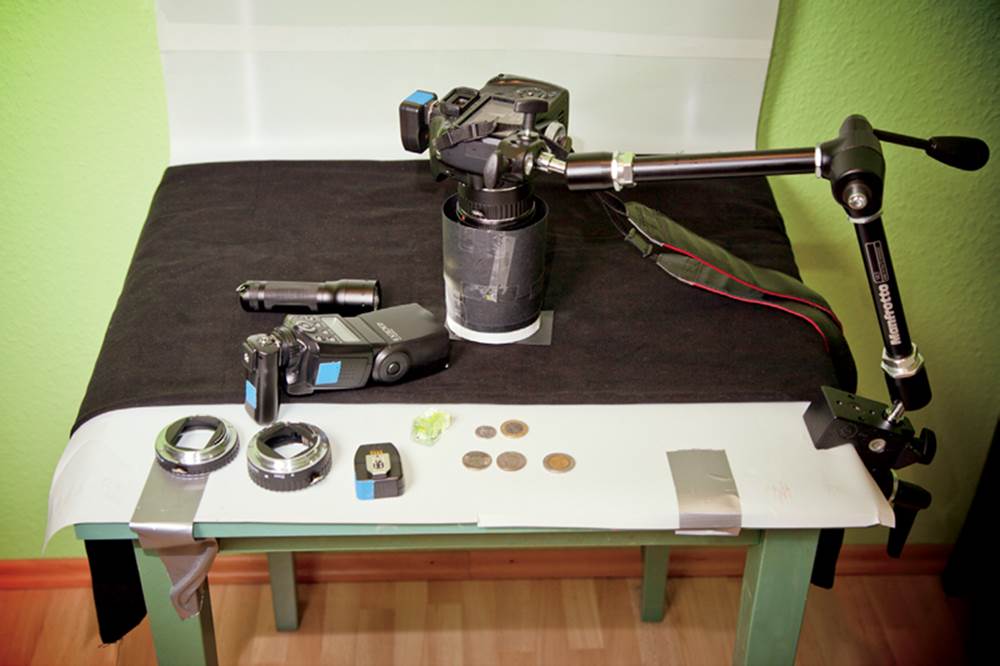
The setup for my dewdrop image, showing the two off-camera flashes fired through a white sheet of paper. The blade of grass with the water droplets was just a couple inches from the flowers, and I used a desk lamp as a focusing aid.
The Setup
As you can see in the photo at left, I used two off-camera flashes fired through a sheet of paper that acted as a diffuser. I set both flashes to 1/2 output with the intention of simulating a single full-output flash with a shorter recycle time. In spite of the relatively high output setting, I had to use ISO 320 and f/5.6, which is close to the critical aperture. Instead of using a smaller aperture, I compensated for the shallow depth of field by focus stacking the results.
The setup in detail
Camera Settings and Shooting
Although images like this can be shot handheld, slight variations among multiple images make it difficult to stack them accurately, so it’s better to use a macro rail. If you don’t have one, proceed as follows: Select your desired zoom setting and set the camera to manual focus. Move the camera gently back and forth until one of the dewdrop flowers is in focus, then release the shutter. Continue focusing on other dewdrops and capture multiple images. This technique will work only if you have a strong continuous light source to help you focus. I used a halogen desk lamp.
Post-Processing in Photoshop
Photoshop and Zerene Stacker failed to automatically stack my handheld source images. I ended up selecting the two images that had the most similar framing but were focused on different drops, and then Photoshop successfully stacked them. For the second series of images (with the red flowers), I selected three source images that I manually aligned and merged with layer masks.
Here are the steps I used:
▸ Automatic focus stacking (yellow flowers):
1 Select the source images that are aligned most similarly and load them as a stack using the File > Scripts > Load Files into Stack command. Check the Attempt to Automatically Align Source Images option. The selected images will load into an automatically aligned stack.
2 Select all the layers in the stack and navigate to the Edit > Auto-Blend Layers command.
3 Flatten the image by selecting the top layer and pressing Ctrl+E (Windows) or Command+E (Mac).
4 Perform any necessary repairs with the Clone Stamp and Patch tools.
▸ Manual focus stacking (red flowers):
1 Load your images into a stack as described for automatic focus stacking, but don’t check the Automatically Align Source Images option. Instead, align the images manually (Ctrl+A to select and Ctrl+T to transform). You can also distort a layer by keeping the Ctrl key pressed while you transform it. Reducing the opacity of the layer you are adjusting makes it easier to align it with the layer below.
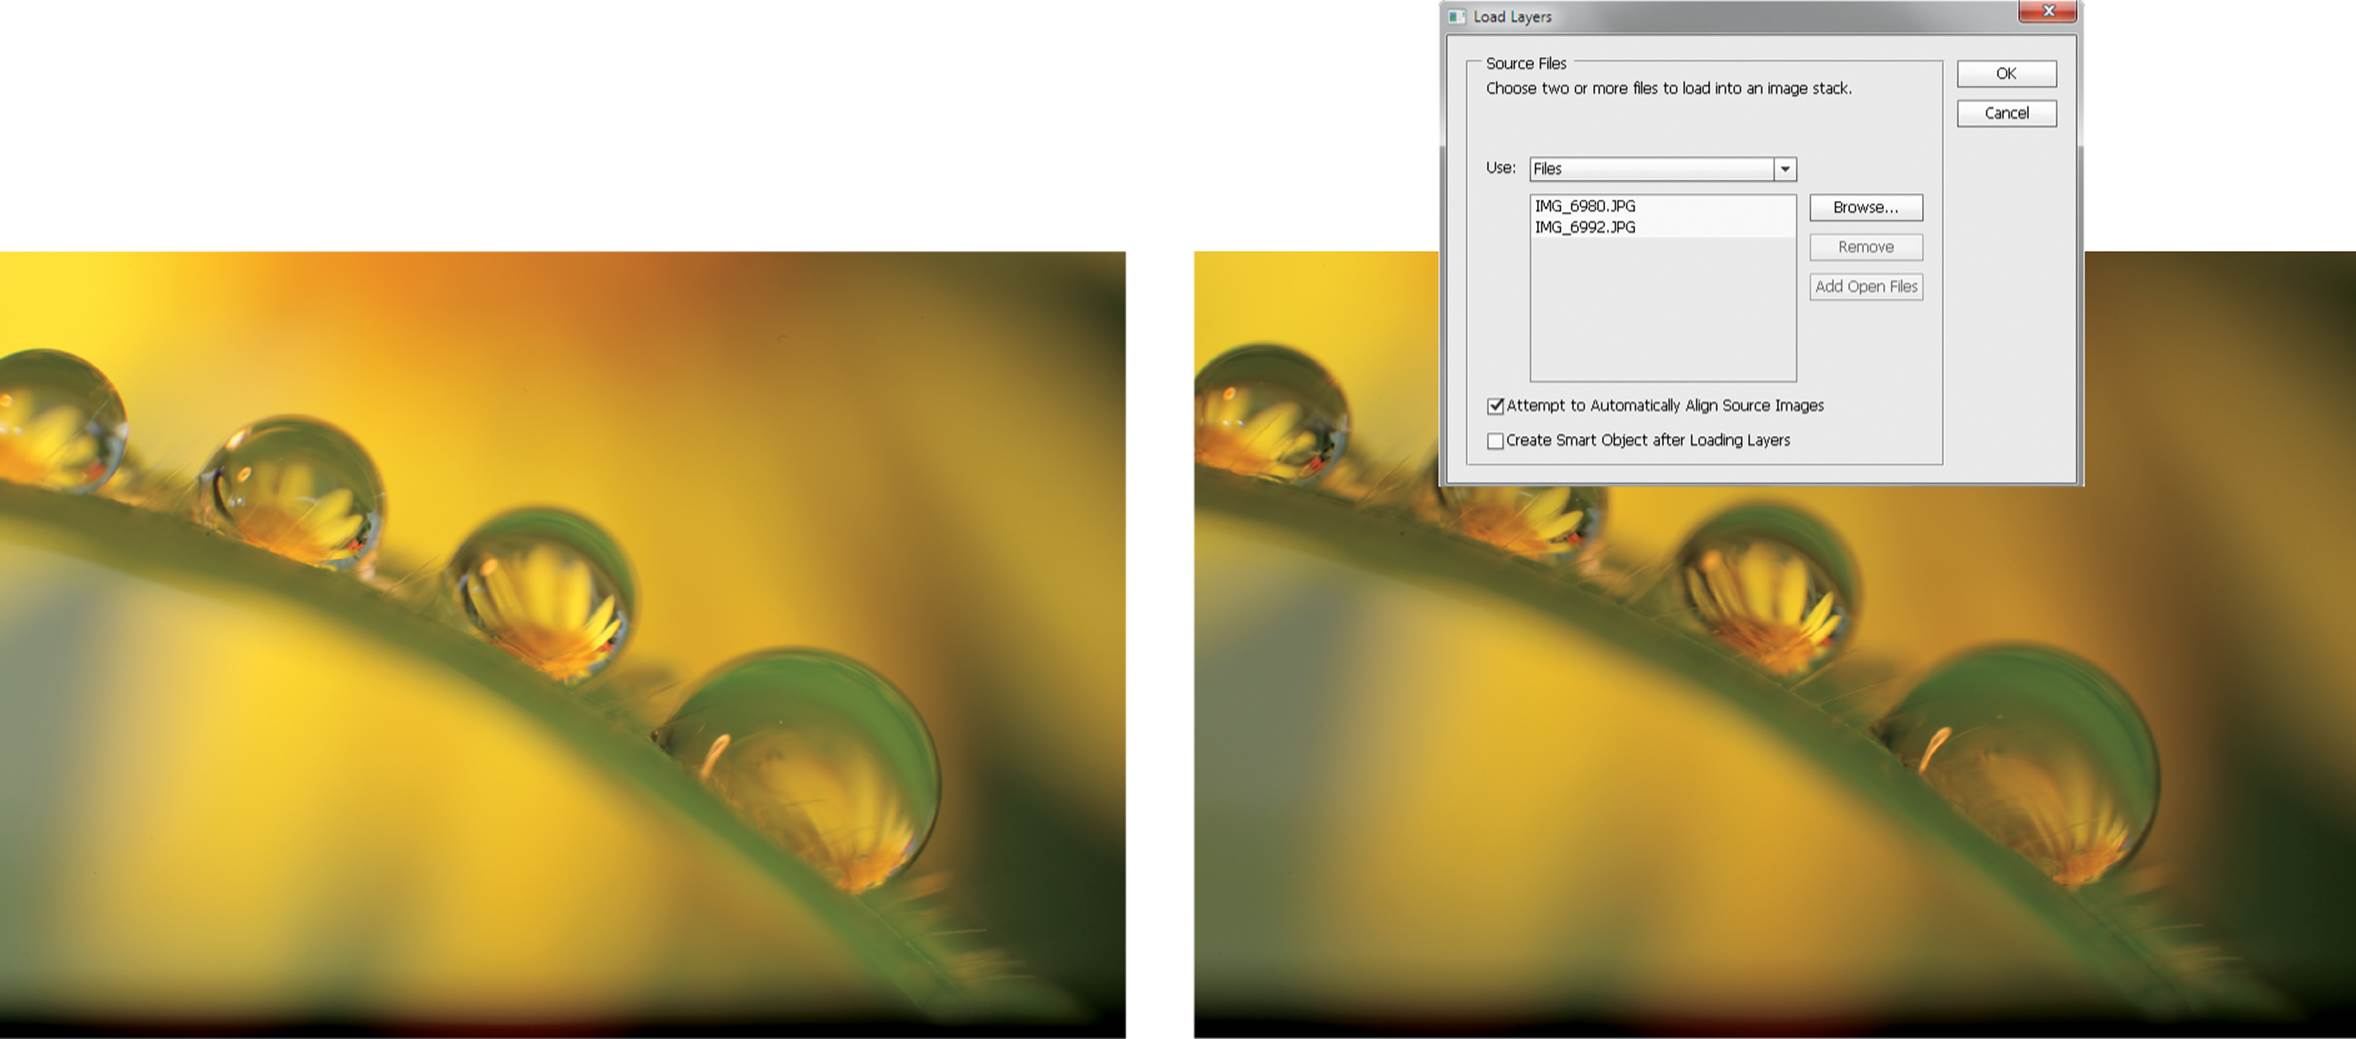
The two images I selected for automatic stacking
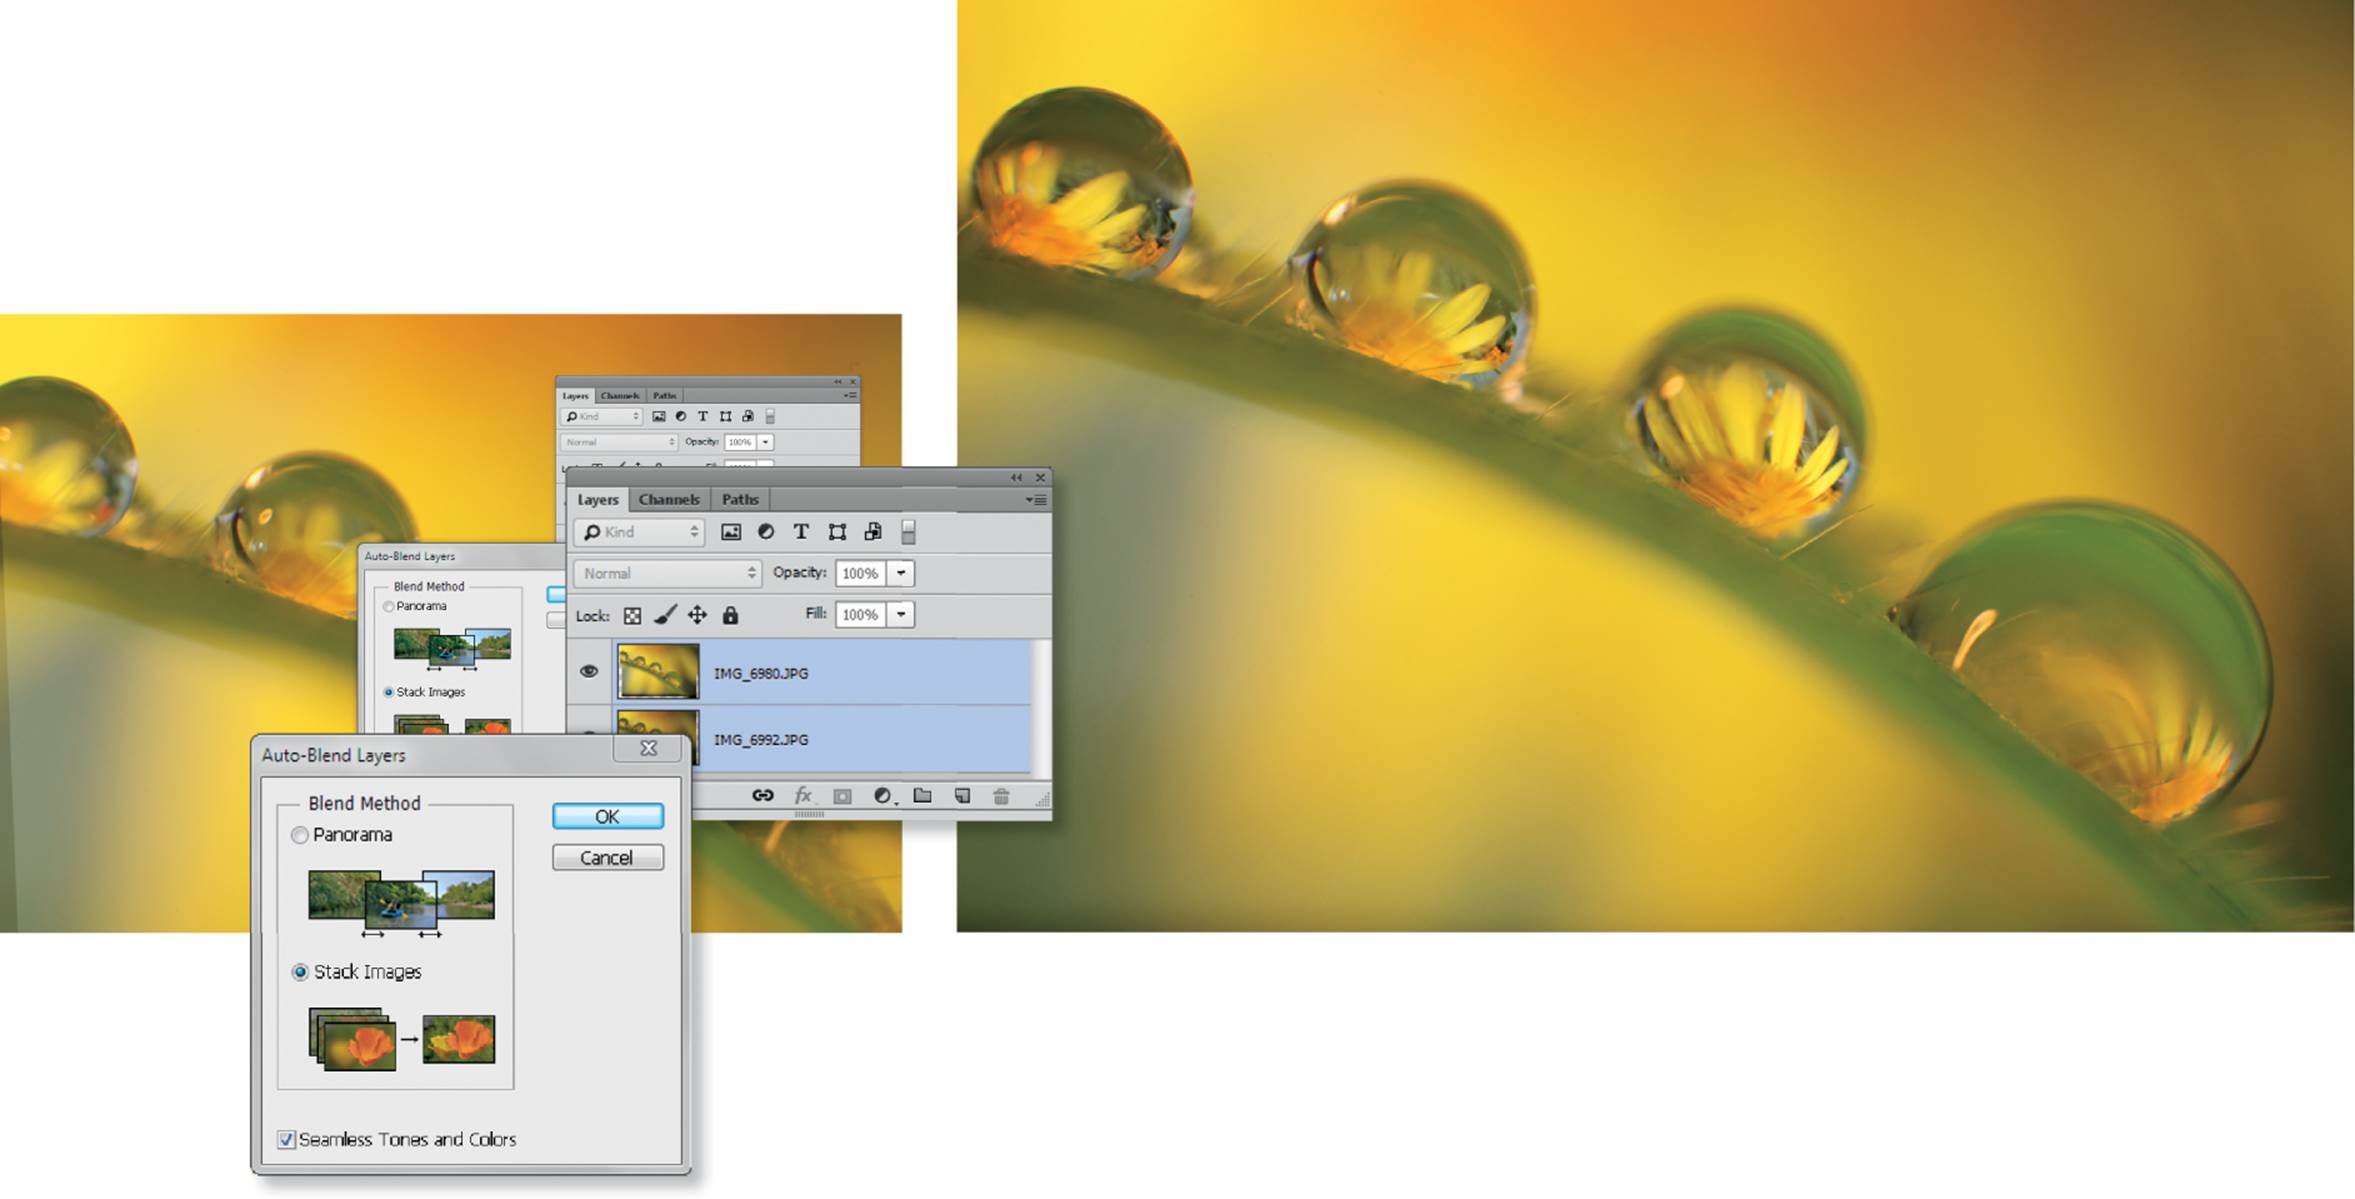
Automatic focus stacking using two source images. I fine-tuned the final image with the Clone Stamp tool and sharpened it a little to give it a final polish.
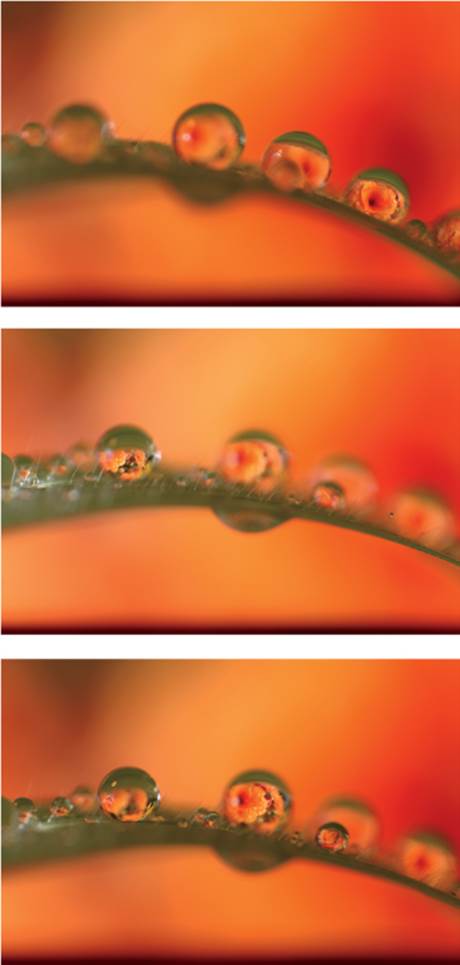
The three source images that I stacked manually
2 Add layer masks to each layer, invert them (Ctrl+I), and use a soft white brush to reveal the in-focus areas.
3 Flatten the merged image by selecting the top layer and pressing Ctrl+E (Windows) or Command+E (Mac).
4 Perform any necessary repairs with the Clone Stamp and Patch tools.
Tips, Tricks, and Notes
There are a number of stacking tools available. You will have to experiment to see which one handles your stack the best. In addition to Photoshop’s built-in stacking tools, you can also try these:
▸ Zerene Stacker: http://zerenesystems.com
▸ Helicon Focus: http://www.heliconsoft.com
▸ Enblend/Enfuse: http://enblend.sourceforge.net/
▸ CombineZM and CombineZP
See appendix C for more information on focus stacking and macro photography in general.
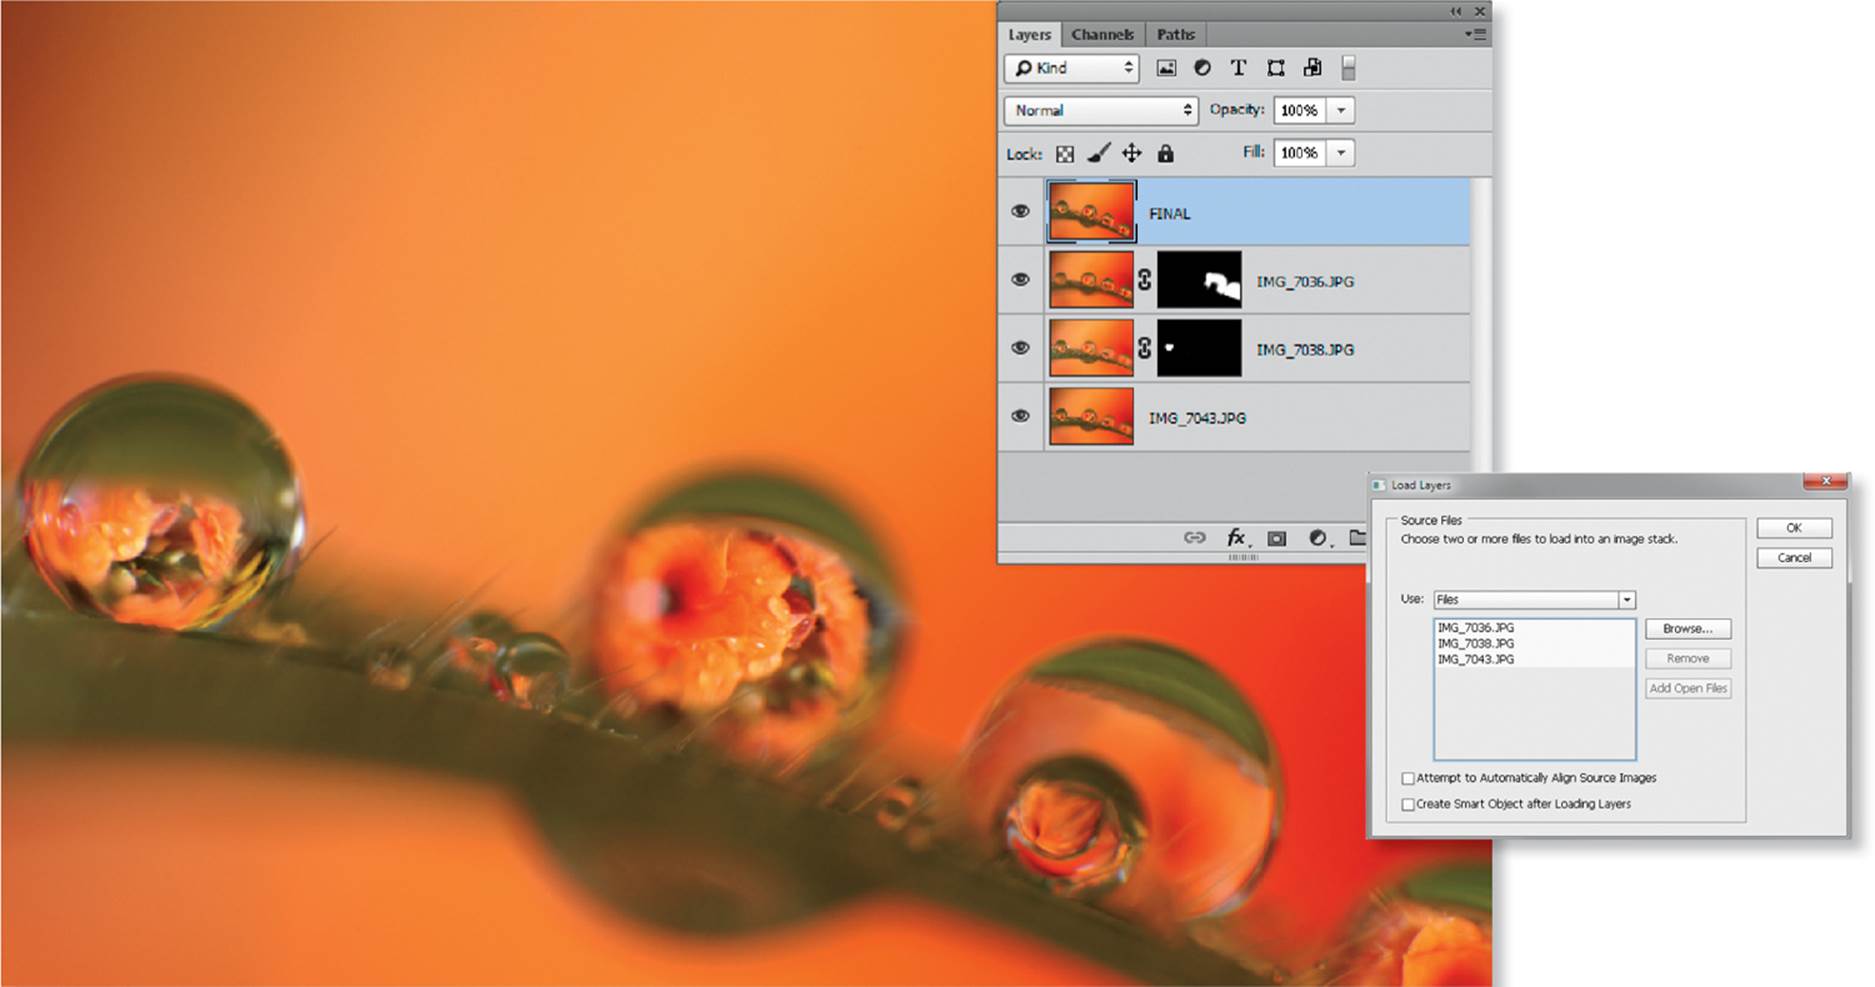
The aligned layers with their corresponding layers and masks
In Depth:
How to Use Mirror Lockup and Live View
Because telephoto and macro lenses greatly magnify the subject, even the smallest camera movements can lead to significant blur in your images. Such movements include the vibrations caused by a DSLR’s mirror swinging out of the light path during the exposure. The solution is mirror lockup. This feature is built into most DSLRs, and the setting can usually be found in the custom settings menu. When it’s enabled, mirror lockup causes the mirror to swing up when you press the shutter button, then you can wait for the vibrations to dissipate before you press the shutter button again to release the shutter. After the shutter is released, the mirror swings back into place. Mirror lockup is less useful if you take a long exposure because the time it takes the vibrations to dissipate is negligible compared to the total time the shutter is open. But for shorter exposure times, even the movements of the focus motor can cause camera shake. To get the maximum possible sharpness, always prefocus, wait a moment, then release the shutter.
In live view mode, the mirror is locked in the up position anyway, so using live view is another good way to reduce camera shake. Be aware that some cameras (such as the Nikon D700) swing the mirror down and up again when you release the shutter in live view mode. If you’re not sure if this occurs with your camera, listen carefully to the sounds the shutter makes—the clack of the mirror is much louder than the movement of the shutter.
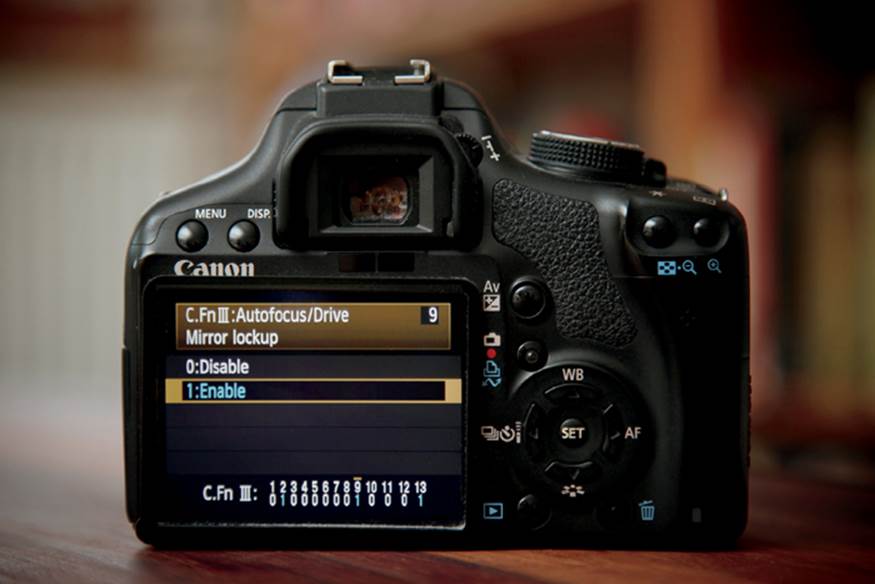
Using mirror lockup and live view are great ways to ensure maximum sharpness in telephoto and macro shots

Reflections of flowers in dewdrops are pretty, and they’re easy to photograph if you use the right technique
Canon EOS 5D Mark II | EF 24–105mm f/4 set to 24mm and f/5.6 (mounted on an active reversing ring) | M mode | 1/160 second | ISO 320 | JPEG | white balance set to flash | two off-camera flashes set up in parallel at 1/2 output
Workshop 17
Coins in a Dark Field
▸ Producing dark field lighting effects using flash
▸ Emphasizing the patterns in coins using a dark field lighting setup
▸ Exploiting the inverse square law to optimize your lighting
Dark field lighting involves setting up your lights so they graze the side of the subject. This technique is perfect for emphasizing engravings, embossed patterns, and other details on the surface of a subject. Real-world applications include photographing etched codes in industrial work, emphasizing the shape of a subject’s body in nude photography, and gazing light techniques (see Workshop 35). This workshop demonstrates a simple and effective way to use dark field lighting techniques to photograph coins.
The Setup
I used a Canon EOS Rebel T1i (EOS 500D) with an EF 50mm f/1.4 lens mounted on a 21mm extension tube taken from a three-piece set made by Kenko. I also used a Manfrotto Magic Arm, three non-TTL flashes with RF-602 triggers, and a homemade cardboard tube. A tripod will work instead of a Magic Arm if you prefer. I also used a bubble level to help keep the camera horizontal.
The generic YN-560 strobist flash has no built-in TTL functionality and must be controlled manually
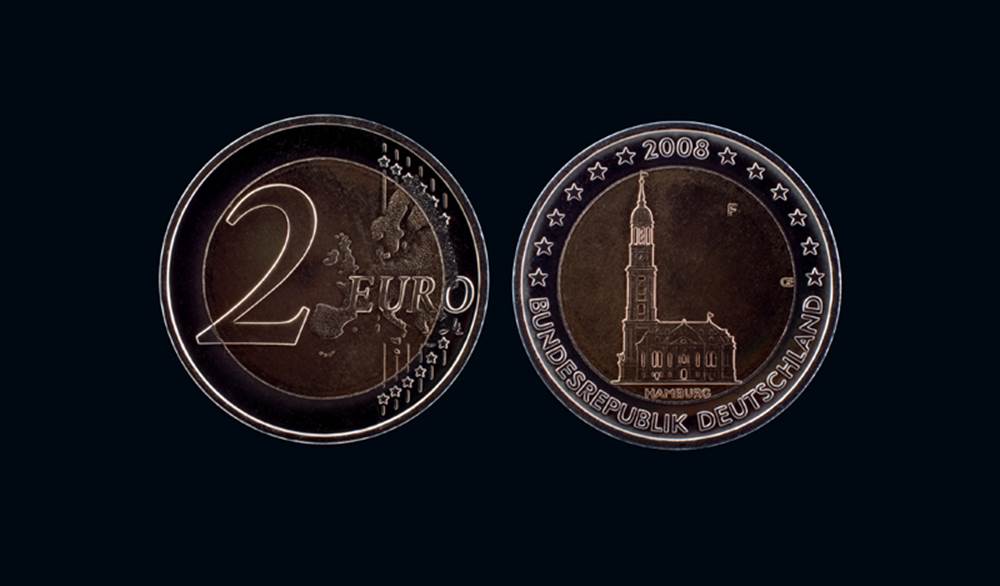
Dark field lighting is perfect for emphasizing the embossed patterns on a coin
Canon EOS Rebel T1i (EOS 500D) | EF 50 f/1.4 mounted on a 21mm extension tube | M mode | 1/125 second | ISO 100 | RAW | white balance set to flash | three off-camera flashes set up in a dark field
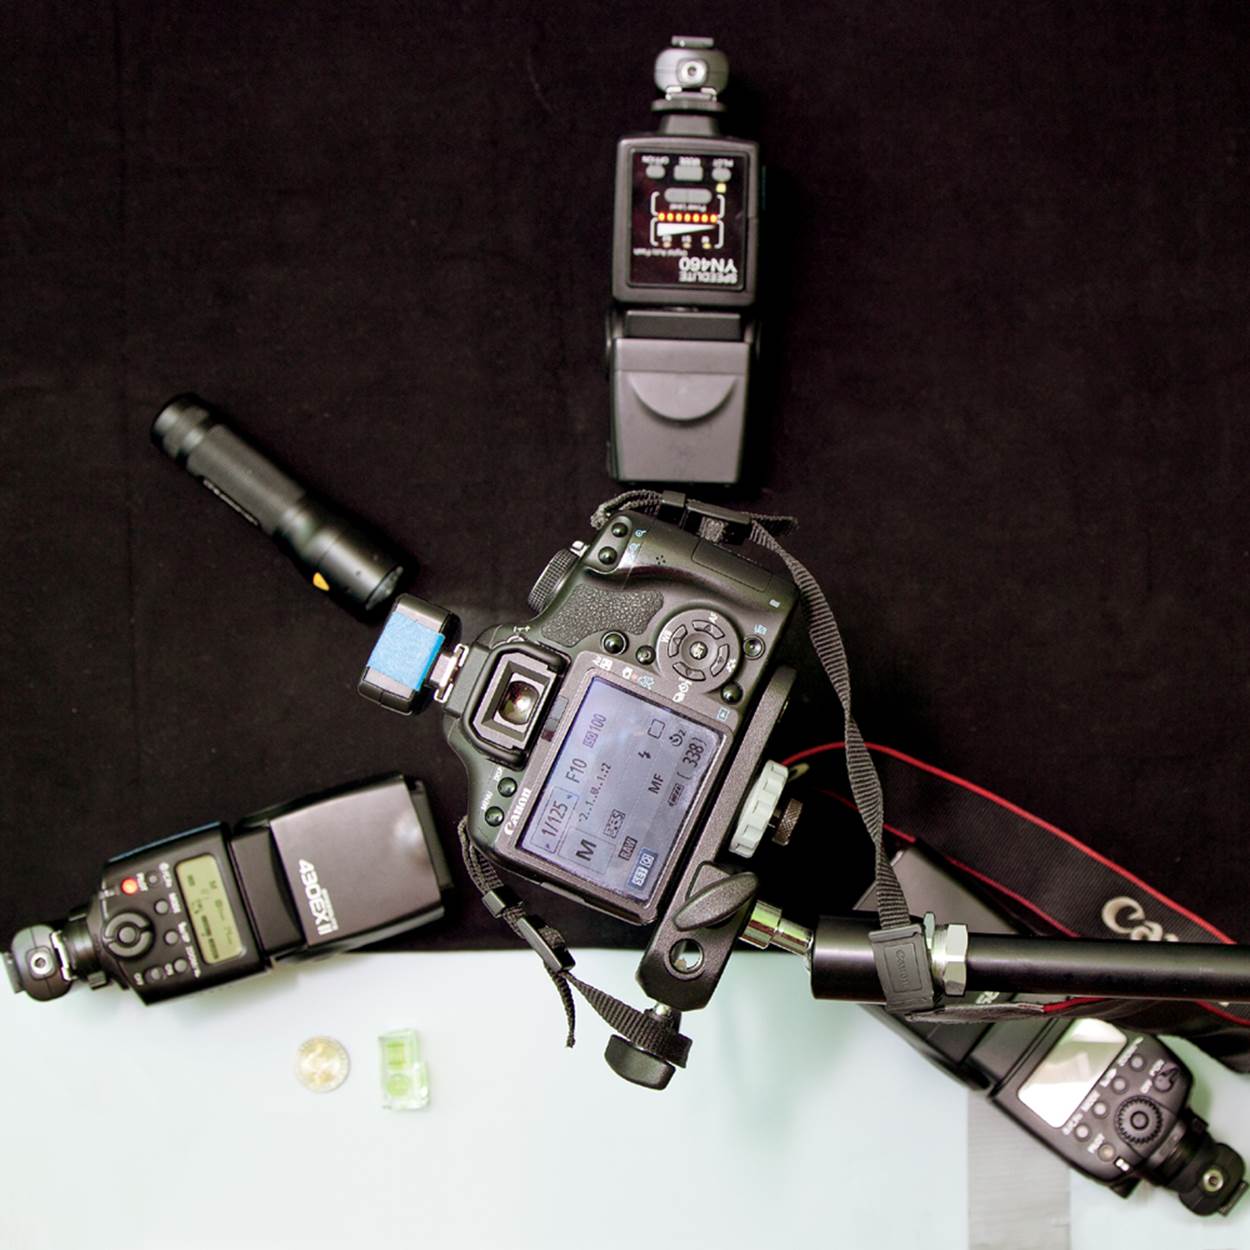
The final setup, which includes three flashes set up at a slight distance from the tube
The cardboard tube is the key to the whole setup. We stuck it together with tape. Aside from a half-inch piece of translucent paper attached to its bottom edge, it doesn’t allow light inside. We placed the tube over the coin and pointed the camera into the top of the tube. The flashes illuminated the coin through the translucent paper; the coin was therefore lit exclusively from the sides to reveal the patterns on its surface in sharp relief. In a dark field lighting setup, the surface of the subject looks dark and the details are emphasized.
Camera Settings and Shooting
Setting up this type of scene requires a little patience. I began by mounting the camera on the Magic Arm and fitting a bubble level to the flash shoe. I switched to manual focus, programmed auto (P) mode, and live view before I polished the coin and set the focus to the middle of the available range (this makes it easier to fine-tune the focus later). I then positioned the cardboard tube between the subject and the lens. To focus in live view mode, I zoomed the monitor image to 10x and shined a pocket flashlight on the subject from the side. In situations like this it is essential to adjust the focus, in addition to the alignment of the camera and the subject, every few shots as needed.
After everything was set up, I replaced the level with a flash trigger, set the camera to manual (M) mode, and switched out of live view mode. The RF-602 flash trigger doesn’t work with that camera in live view mode, but the monitor is dark in manual mode anyway, so it doesn’t matter. To ensure maximum sharpness, I used mirror lockup and a cable release to fire the shutter. Keep in mind that you have to press the shutter button twice when you use mirror lockup.
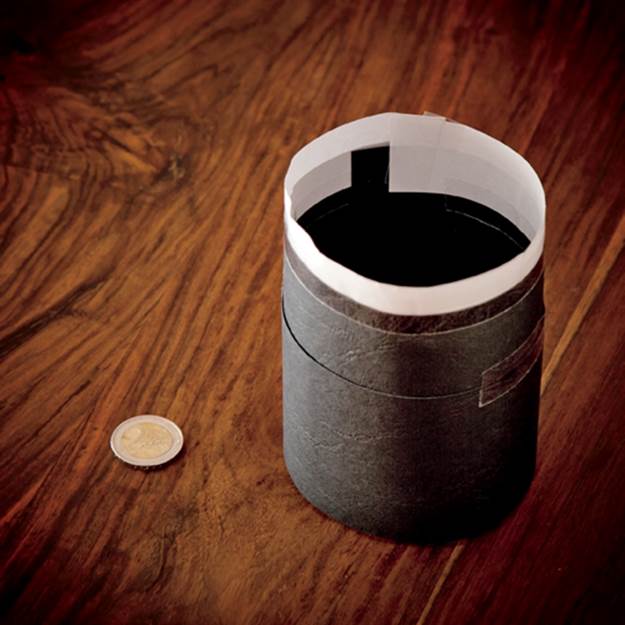
Our dark field lighting tube, constructed in five minutes from black cardstock and a strip of translucent copy paper
Because the translucent paper ring works as an internal reflector, this setup can be used with a single flash, although three flashes arranged in a symmetrical star pattern create a more balanced lighting. To avoid producing hot spots I set the flashes to their widest-angle setting and used their built-in flash diffusers. Place your flashes as far away from the subject as your flash output setting and exposure parameters allow. This ensures that the light produced by the flashes remains consistently bright across the entire surface of the subject. The calculation for this example is listed in appendix A.
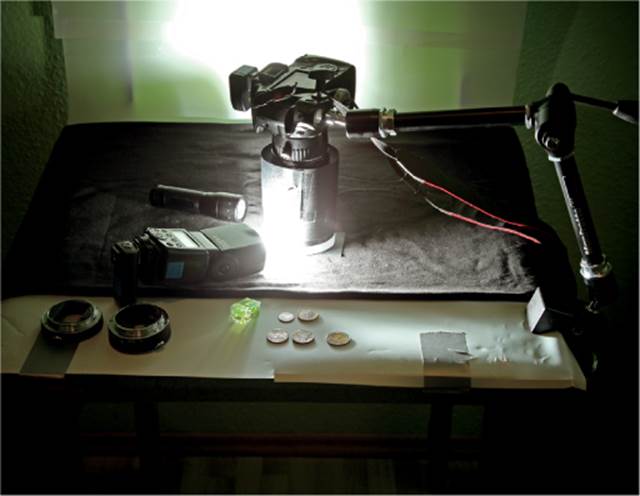
Our setup in action. You can create the dark field lighting effect and relatively balanced illumination with a single flash.
I used 1/2 output at a distance of about 60mm from the cardboard tube. This is a fairly extreme setup that allowed me to use an aperture of f/11, which is a good compromise between the critical and optimum settings (see www.slrgear.com for more details about this topic). Using the critical aperture wasn’t a good idea because the subject distance varied a little due to slight flexing in the Magic Arm. Using a smaller aperture ensured sharp images without the need to keep readjusting the focus.
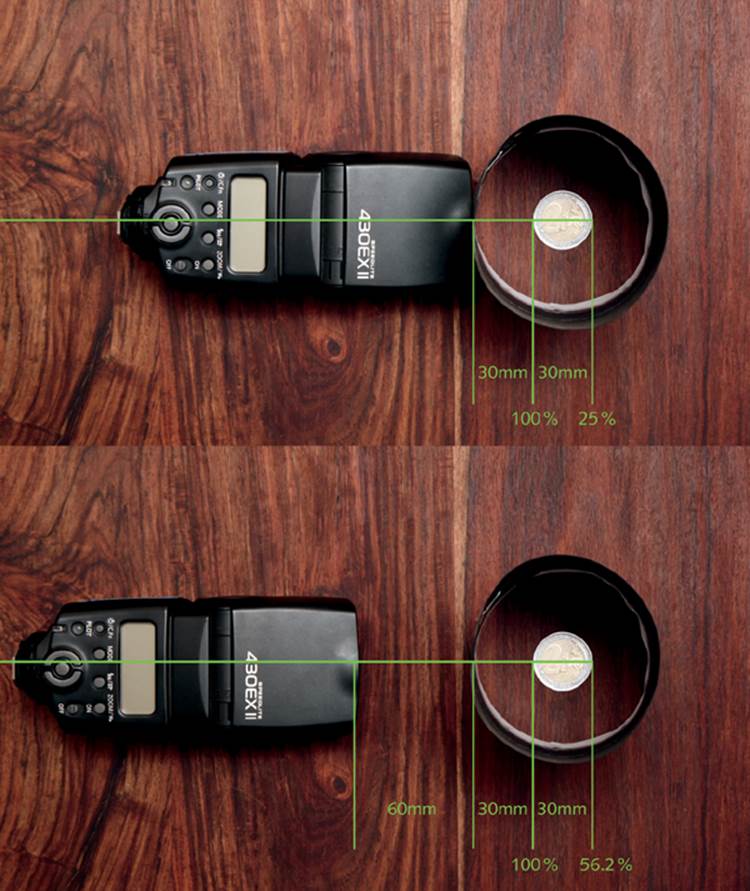
The inverse square law in practice. Increasing the distance between the flash and the subject means the intensity of the light from the flash decreases to just 56% of its initial value, instead of 25% at a closer distance (see also the sample calculation in appendix A).
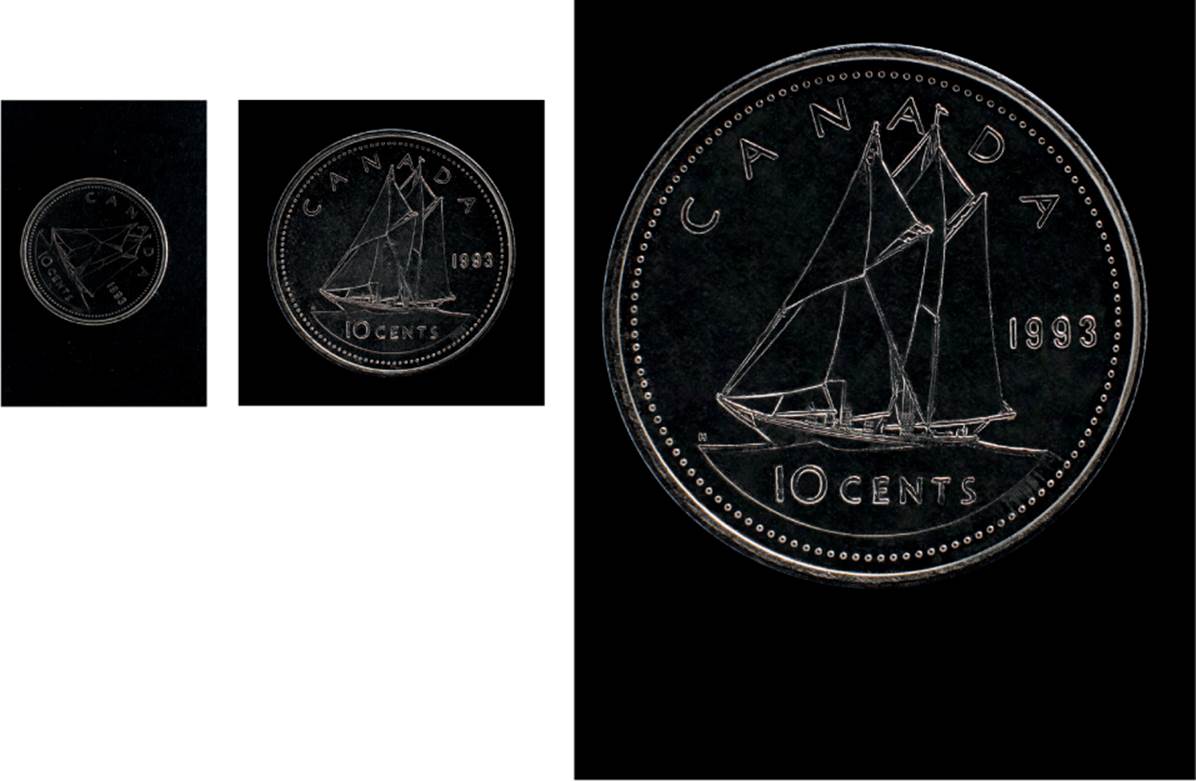
Left to right: The original image; a preliminary result; and the final image, which we straightened, cropped, and retouched before we increased the contrast. This image was captured with a single flash.
Post-Processing in Photoshop
I straightened the photo, selected the coins, and inserted a solid black background. I also removed the dust particles and increased the contrast using the Curves tool.
Tips, Tricks, and Notes
▸ Dark field illumination is a standard tool for performing visual inspections in industrial settings, although the setups in that context usually use LED or fluorescent ring lights rather than flash. Search the Internet for “industrial dark field inspection” to find out more. You can get flashes specifically made for dark field lighting, such as the Canon Macro Ring Lite MR-14EX.
▸ The Manfrotto Magic Arm I used for this setup is not cheap, but it is a worthwhile investment if you shoot a lot of tabletop setups. It is stable and centrally lockable, and you can use it to mount cameras, flashes, and reflectors. It is also available in a kit that includes the Camera Platform, Super Clamp, and Backlite Base.
▸ Dark field lighting is only one of many ways to effectively light coins. For a great example of how to photograph coins with a different lighting setup using a homemade light box, see www.flickr.com/photos/tomd77/3951747640/in/set-72157603959095587 and check outwww.flickr.com/photos/tomd77/sets/72157603959095587/with/3951747640 for a portfolio of the results.
All materials on the site are licensed Creative Commons Attribution-Sharealike 3.0 Unported CC BY-SA 3.0 & GNU Free Documentation License (GFDL)
If you are the copyright holder of any material contained on our site and intend to remove it, please contact our site administrator for approval.
© 2016-2026 All site design rights belong to S.Y.A.