Creative flash photography : great lighting with small flashes: 40 flash workshops (2014)
Part II. The Fun Starts Here! 40 Lighting Workshops
Chapter 5. Workshops 18–24 Still Life and Product Shots
Whether you are photographing items to sell on eBay or you are working on more sophisticated photos for a catalog or other project, flash is a great tool for displaying your subject in the right light. This section explains how to use bounce flash, how to set up a product shot stage, how to effectively photograph reflective subjects such as watches and jewelry, and how to use modeling flash to enhance your work with flash.
Workshop 18
Still Life with Bounce Flash
▸ How to bounce TTL flash
▸ Using a black foamie thing to soften direct light
▸ Long-distance bounce flash
Many photographers avoid using built-in flash because of the harsh and often unattractive results it produces. Portraits shot with direct flash usually look like mug shots, and product photos look cheap. Direct flash is not diffused and is directed along the camera’s optical axis, resulting in very short shadows. The small size of the light source also contributes to its hardness. The obvious solution is to enlarge the light source and alter its location—two adjustments that can be made by simply aiming your flash at a wall, which reflects the light and looks like daylight through a window.

The familiar unattractive look of a scene captured with direct flash
Canon EOS 5D Mark II | 50mm f/1.4 set to f/5.6 | M mode | 1/160 second | ISO 200 | RAW | white balance set to auto | straight on-camera TTL flash
Bouncing flash is a reliable technique that requires few (if any) additional settings and can be used at weddings and other events where you have little time to set up or make test shots. The potential stumbling blocks are stray light, the color temperature of the reflected light, and the effective range.
The Setup
The simplest way to prevent light from reaching the subject directly is to use a shade or flag, like a snoot or Neil van Niekerk’s wonderful black foamie thing (see page 43 for details). If you don’t shade your flash, some light may illuminate the scene directly. The schematic on page 146demonstrates the geometry of bounce flash, which more or less adheres to the rule angle of incidence = angle of reflection.

On-camera flash can be used to produce attractive side light if you learn how to direct it
Canon EOS 5D Mark II | 50mm f/1.4 set to f/5.6 | M mode | 1/160 second | ISO 200 | RAW | white balance set to auto | on-camera TTL flash, angled toward the wall on the left and shaded with a flag
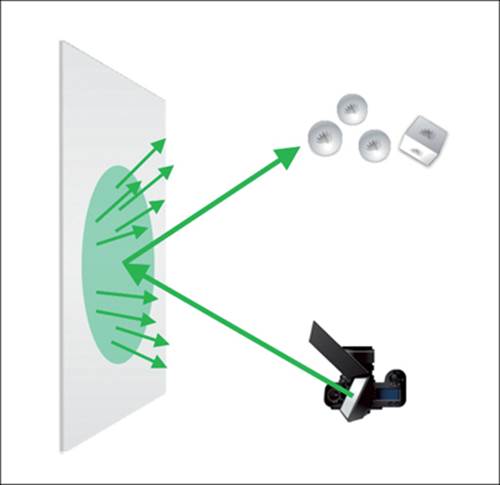
A wall used as a reflector bounces the flash light and acts as a large, diffuse source of light. A black foamie thing mounted on the flash prevents stray light from illuminating the subject directly.
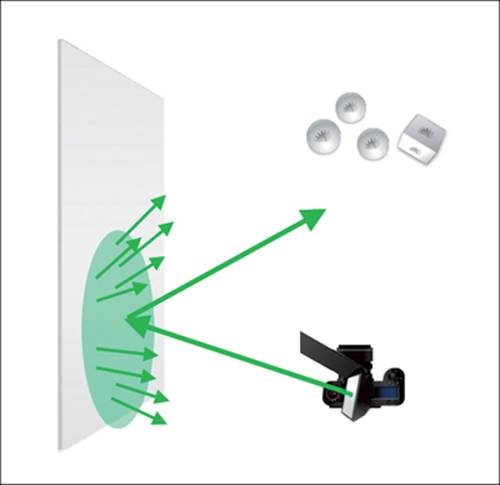
Changing the angle of your flash alters the angle at which the reflected light shines and affects the look of the image
Camera Settings and Shooting
After you set up the scene, attach the flash to your camera and mount a flag. You can leave your camera set to auto mode (i.e., set your flash to TTL mode) and simply shoot away. The downside of the auto approach is the camera decides how much ambient light is included in the scene.
In the example for this workshop, I wanted to completely suppress the ambient light. To do so, I switched to manual (M) mode and adjusted the exposure so a test shot (without flash) turned out almost completely dark. I used ISO 200 and 400 for my test shots so the flash would retain sufficient power to recycle quickly and illuminate the subject over a greater distance. I used automatic white balance to compensate for a potential color cast due to the ochre color of the wall. All I had to do for the flash was switch it on and select TTL mode. Always take some test shots and, if necessary, adjust the flash exposure compensation (FEC). If you require more light, try using +0.3 or +1.3 FEC. You can adjust the angle of the flash if you need to.
You can use cheaper non-TTL flash units in situations like this, but slight changes in the subject distance and flash angle make it difficult to produce consistent results. Because of the inverse square law, a slight difference in distance makes a surprisingly big difference to the effect of the flash, and you will spend most of your time fine-tuning the settings. Bounce flash works best in TTL mode; it produces satisfying results without the need to adjust settings. Using bounce techniques is the perfect way to produce great-looking flash images without additional equipment. In fact, I used bounce flash to shoot most of the photos of gear and setups in this book.
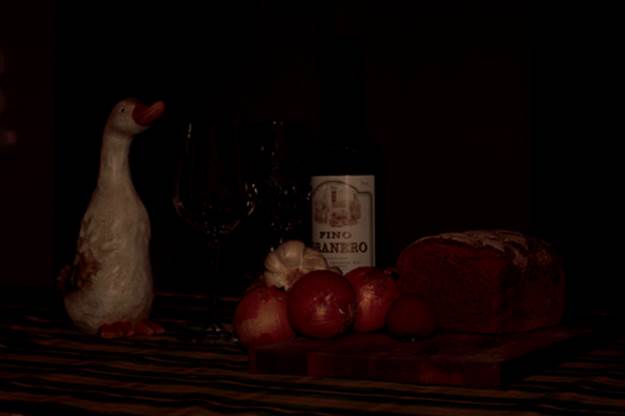
The initial test shot of the surroundings, shot without flash to confirm that the ambient light was suppressed
Canon EOS 5D Mark II | 50mm f/1.4 set to f/5.6 | M mode | 1/160 second | ISO 200 | RAW | white balance set to auto | no flash

The same shot with a swiveled TTL flash fitted with a black foamie thing
Using Bounce Flash over Long Distances
Bounce flash is usually best for short distances because walls usually have less than ideal reflective characteristics, and bouncing light significantly reduces the amount of light that reaches the subject. On the other hand, modern cameras produce perfectly good results at higher ISO settings. See our sample calculation on page 273 for how to use a high ISO value for long distance bouncing. For that example, I set everything up as previously described, but I selected an aperture that caused the TTL flash to automatically switch to full output so I could see how far the flash would reach.
You won’t usually have the time (or the inclination) to calculate each individual exposure. However, with a little practice you will learn to judge the distance of the subject in relation to the surface you’re using to bounce the light, and you can set an appropriate ISO value without much trouble.
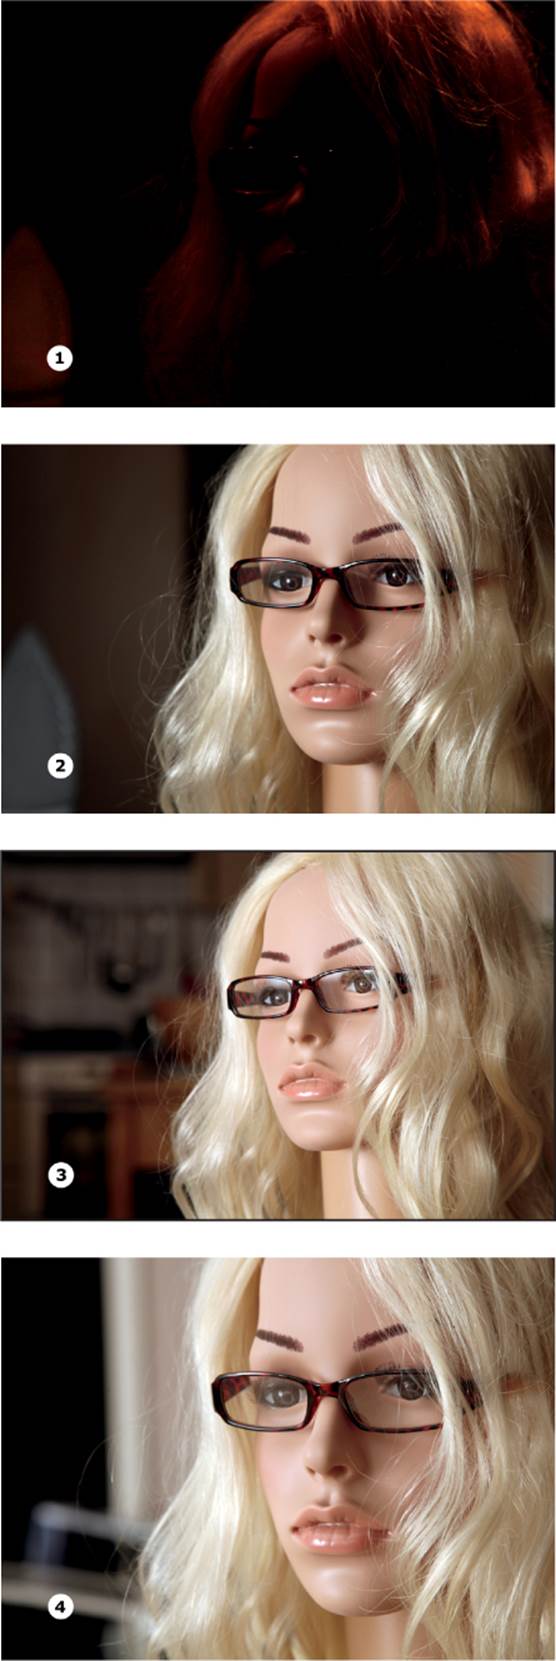
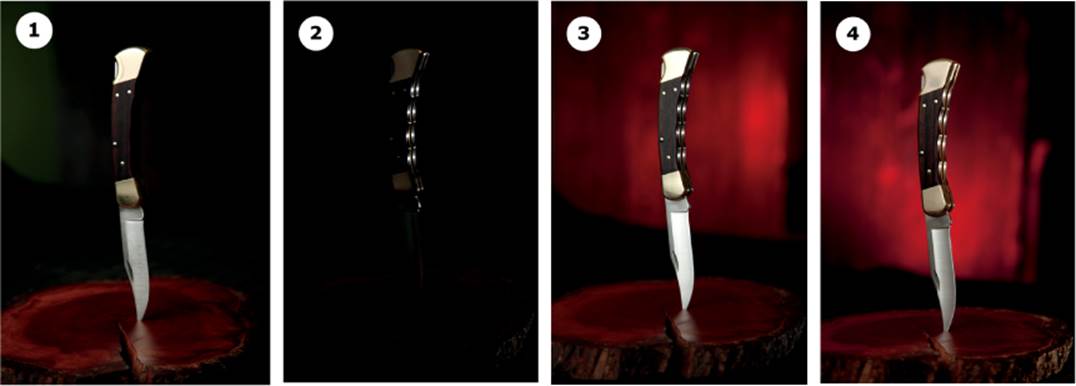
The results of using bounce flash over longer distances: 1. test shot at ISO 1600 to show the effect on ambient light; 2. shot from 1 meter at ISO 100; 3. shot from 2 meters at ISO 400; 4. shot from 4 meters at ISO 1600. The results are almost identical.
Canon EOS 5D Mark II | 24–105mm f/4L set to f/6.3 and 105mm | M mode | 1/125 second | ISO 100, 400, and 1600 | JPEG | white balance set to auto | TTL bounce flash
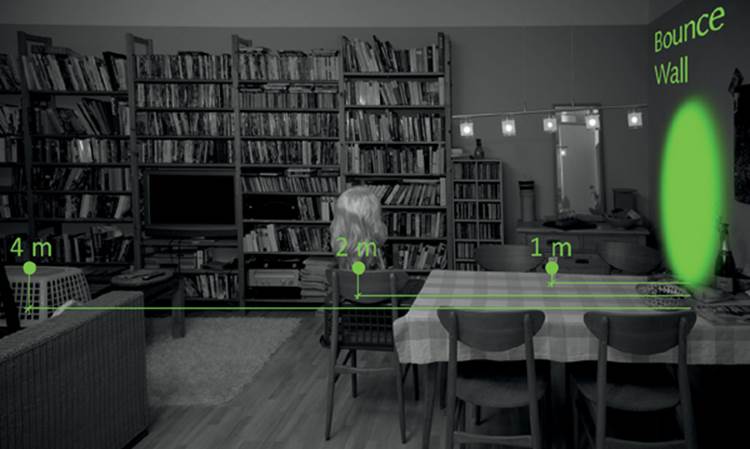
Bouncing light over longer distances. You will quickly learn to predict the effects of the inverse square law and choose an appropriate ISO value.
Tips, Tricks, and Notes
Thanks to TTL flash metering, the approach described in this workshop is reliable in most situations. If, however, you wish to take more control of the flash, you can always use FE Lock (Canon) or FV Lock (Nikon, the two terms mean the same, see page 49). Portraits are a good example of when spot flash metering comes into its own, as it allows you to meter precisely for the subject’s cheek.
In this example, I once again used a black foamie thing (BFT), invented by Niekerk. In his Tangents blog (neilvn.com/tangents), Neil van Niekerk describes not only how to build a BFT, he also provides a wealth of valuable flash and general photography tips. I use felt and foam BFTs a lot. Both types have pros and cons—the foam version (made from a mouse pad) is stickier and is less likely to fall off the flash, but the felt version is easier to shift and reshape. The experimental aspect is part of the fun. Perhaps you will come up with some other material that works just as well or better. The accompanying figure shows 6 x 7 in BFTs made of felt and foam, both fixed to flash units with hair ties.
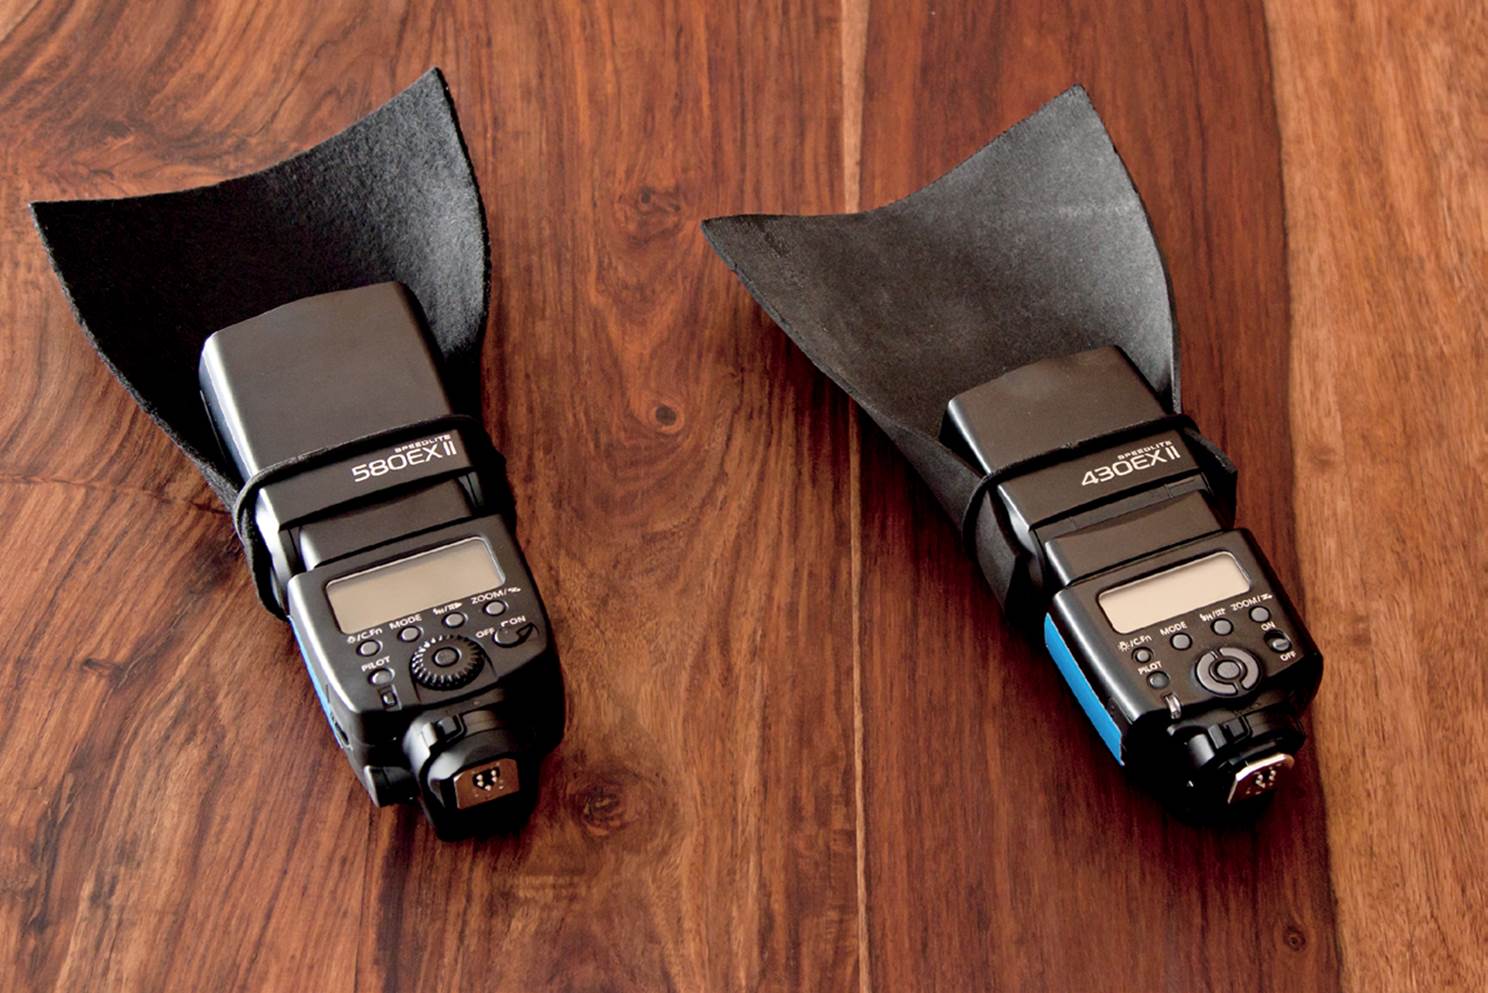
Black foamie things made of felt (left) and foam (right).
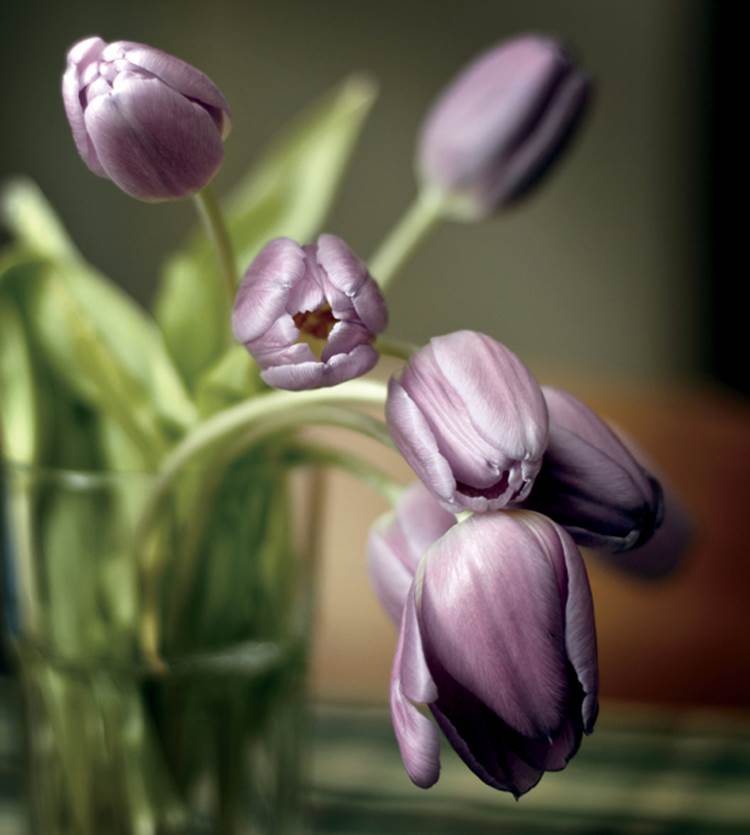
Another example that should get your bounce flash juices flowing. This photo was captured the same way as the one on page 145.
Workshop 19
Shooting for eBay
▸ Using a white shoot-through umbrella
▸ Setting up a rim (or kicker) light
▸ Creating an effective reflection
▸ Inserting artificial backgrounds
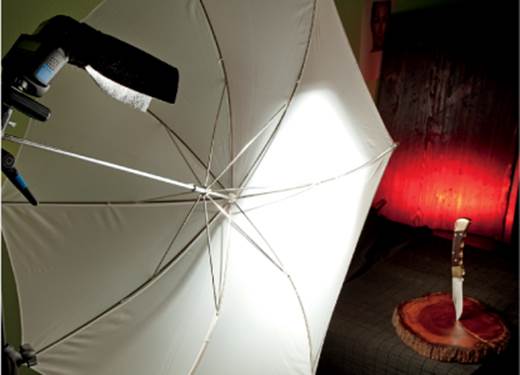
A light tent may be the first thing you think of when you consider what equipment you’ll need to photograph an item for eBay. However, a light tent that is large enough to accommodate anything but the smallest item can be quite expensive and gives you virtually no leeway in how to set the light. Using a white umbrella with the main light produces a more elegant look, and you can enhance it with a fill light or rim light. You can use a large sheet of paper to create a seamless background to shoot against, or you can use corrugated aluminum or ceramic tile as a stage.
A mirror or a sheet of Plexiglas is not as useful as you might think because it will produce reflections in both of its surfaces. Shiny plastic or sheet metal is much more effective. For this workshop I used a polished cake plate. It wasn’t large enough to serve as a complete stage and background, so I created an artificial background during the photo-editing process. Read on to see how.
The Setup
The simplest setup for product shots consists of a single diffused light set up at 30 to 45 degrees to the left and above the subject. For your first steps in product photography you can use a simple tripod as a stand, and a cheap white umbrella mounted with tape or a hose clamp shouldn’t cost much more than $10. You can fire your flash with a cable, a slave cell, or a cheap radio trigger, and a cardboard box or a piece of Styrofoam can act as a simple reflector.
In this example I enhanced the photo with a second accent flash positioned opposite the main light. This effect is called cross lighting; it is a popular setup for portrait shots. An accent light for the edge of the subject is known as a rim light, and one that illuminates the subject squarely from the side is known as a kicker (like the one I used here). To keep things simple, I set my accent flash to low output and used it with no additional modifiers.

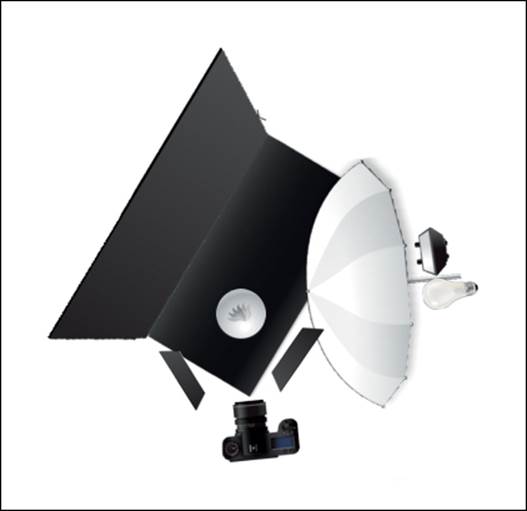
Schematic of our product shot setup, showing the kicker and the main light in a white shoot-through umbrella
A simple product shot is more interesting using side light and a reflective surface
Canon EOS 5D Mark II | 24–105mm f/4 set to f/16 and 75mm | M mode | 1/160 second | ISO 400 | RAW | white balance set to flash | two off-camera flashes, one fired through a white umbrella and one with no additional modifiers
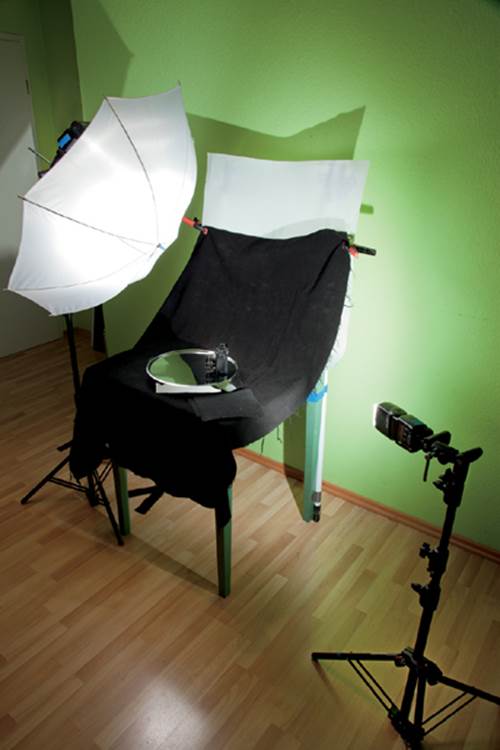
Our setup showing the polished cake plate we used as a stage
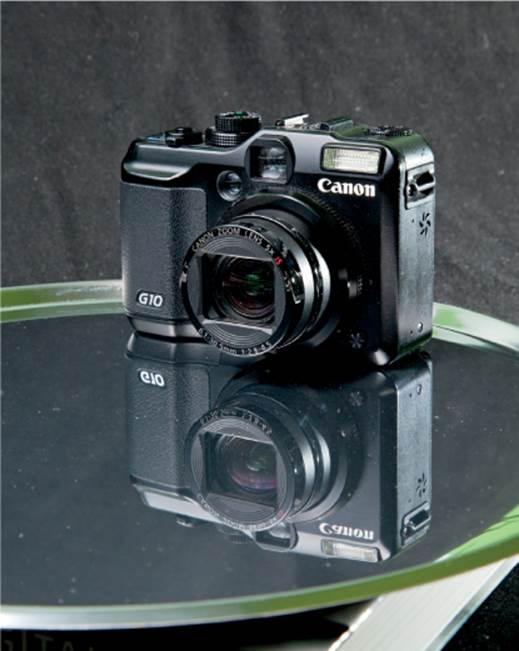
The original photo. The overall lighting and the reflection are fine, but the background and the stage still need work.
Camera Settings and Shooting
Product shots for eBay should make the item look good and inform potential buyers. It is important to shoot with a sufficient depth of field from a variety of angles, so full-frame focal lengths of 50–90mm are the best options.
For the shot shown here, I set my zoom to 75mm and the aperture to f/8. My test shots revealed slightly too little depth of field, so I switched to f/16 and increased the ISO from 100 to 400 (i.e., equivalent to f/8 > f/11 > f/16). These settings allowed me to set my flashes at 1/4 output, which reduced the recycle time and saved me from having to charge the batteries too often. Noise was not a problem with my full-frame camera, but these ISO values shouldn’t be a problem for cameras with APS-C sensors, either.
I placed the subject on a chrome-plated cake plate to create the desired reflection. The next step was to make the background and the other surroundings more attractive.
There are various ways to enhance the background in your product shots. You can use textured aluminum or a piece of granite as a stage, or you can use a simple paper as a seamless background. Any of these can be combined with a dark, distant background. Alternatively, you can extract your object from the image file and place it in an entirely synthetic background created in Photoshop.
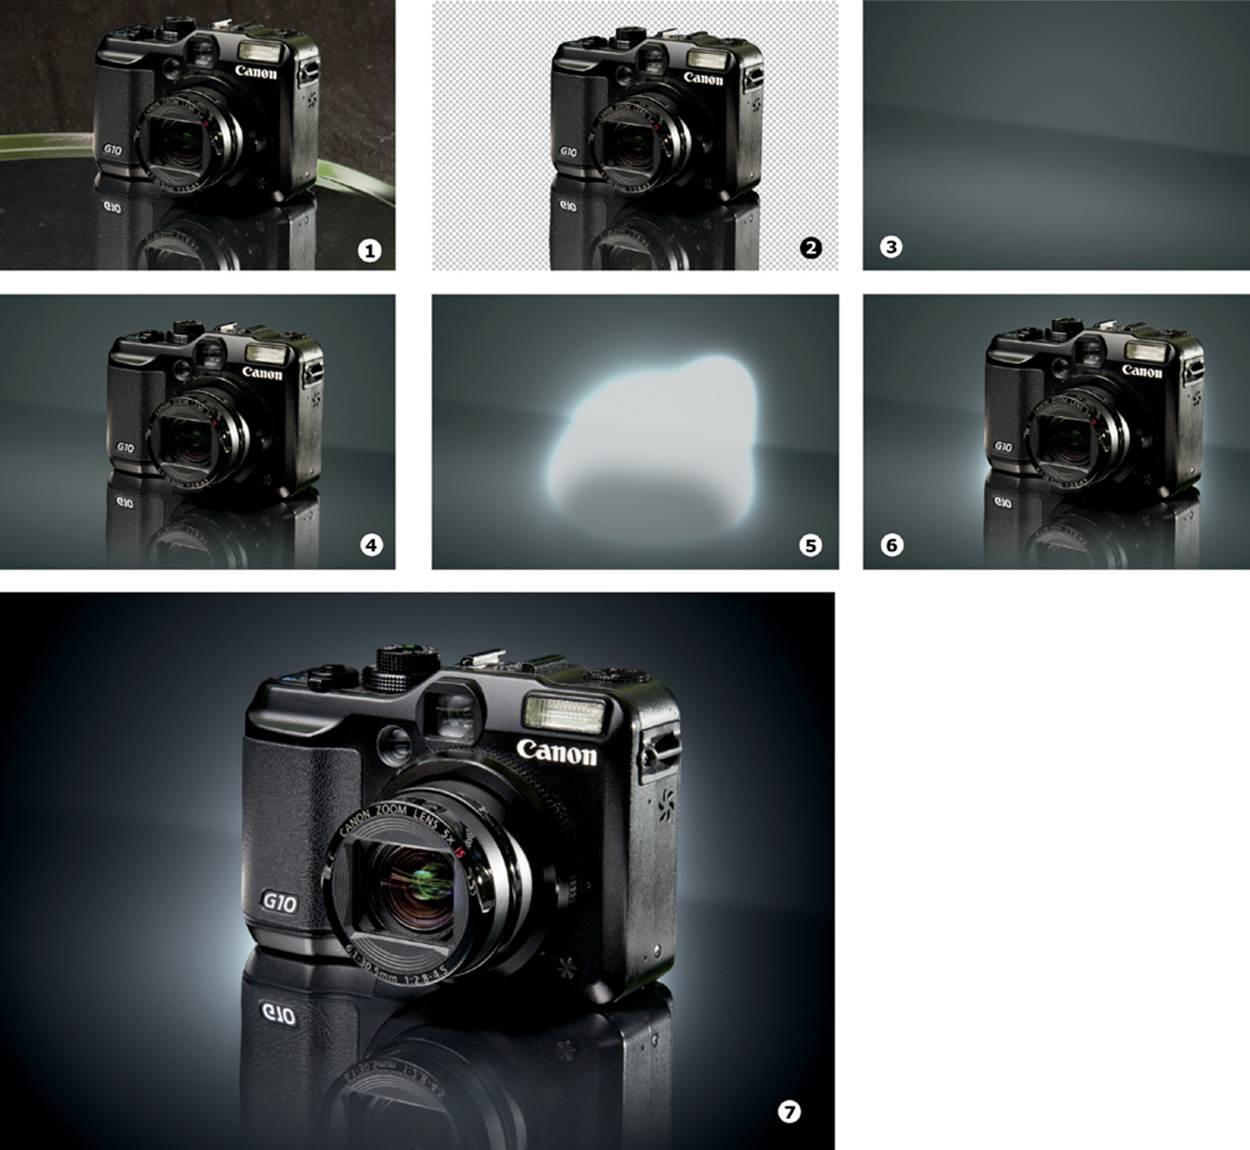
The image-editing steps:
1 The original image;
2 The selected object;
3 The background gradient;
4 The background with the object inserted;
5 The background gradient and spotlight without the subject;
6 The complete image;
7 The finished image after retouching and color adjustments
Post-Processing in Photoshop
If you are using Photoshop Elements, you can make effective selections using the Quick Selection tool and the Refine Edge dialog. In Photoshop, the Paths tool produces more accurate results. With a little practice, it should take only about 15 minutes to make a precise selection of an object like ours. For our example we used two separate gradients and an artificial spotlight to highlight the subject. We also retouched the remaining dust particles and adjusted the colors and contrast to give our image its final look. The illustrations on the previous page demonstrate the individual steps we took.
Tips, Tricks, and Notes
It is possible to create mirror effects in Photoshop, either using the standard tools or a plug-in such as Flood by Flaming Pear. If you want the results to look convincing, the camera’s optical axis must be in close proximity and parallel to the reflective surface, and it must be at a right angle to the surface of the subject—our example does not meet this criteria. You can also dismantle an artificial reflection and straighten the individual surfaces individually, but this involves a lot of effort that you can avoid if you take time to create a suitable mirror effect during the shoot.
As always, Flickr is a great source of tips and tricks. You can check the exchangeable image file format (EXIF) tags of individual photos, check out other people’s setups, and initiate a conversation using Flickr Mail. Some of the best groups are as follows:
▸ Creative Tabletop Photography: www.flickr.com/groups/creative_tabletop_photography/
▸ Product Shot: www.flickr.com/groups/994055@N23
▸ Product Photography: www.flickr.com/groups/product
▸ Product ART: www.flickriver.com/groups/461653@N24/pool/interesting
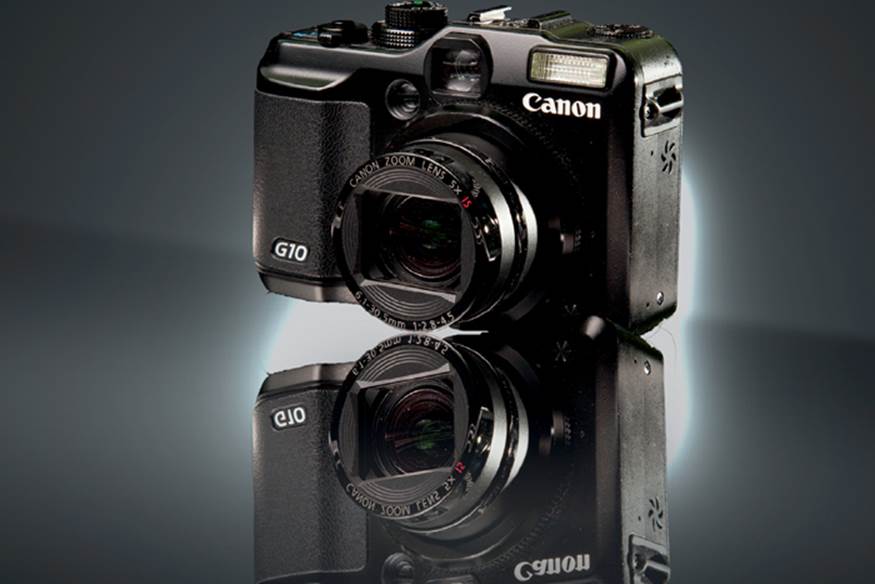
Synthetic mirror effects look authentic only if the camera’s optical axis is close to the reflective surface and runs at a right angle to the subject. This is not the case here. The subject was shot from too steep an angle.
In this example, the basic requirements are met and the mirror effect looks realistic. The original shot was captured using the parameters listed on page 150.
Workshop 20
Photos for Catalogs
▸ Setting up a classic three-light shot
▸ Fine-tuning the main light to emphasize subject detail
▸ Using manual white balance and a gel to produce warmer colors
This workshop builds on the simple setup demonstrated in the previous chapter and shows you how to light a more complex object using a classic three-light setup. The fine-tuning steps that follow explain how to enhance the light for the knife blade and give the image a warmer, more appealing look.
The Setup
It is always best to begin building a setup like this by mounting your camera on a tripod and positioning the subject in the viewfinder before you place any lights. For this shot I positioned the main light first, which was mounted behind a white diffuser. I used the rim light without modifiers to ensure that the shape of the knife grip was emphasized (see page 150 for explanations of the terms rim light and kicker). A wooden board illuminated by a flash with a red gel served as the background.
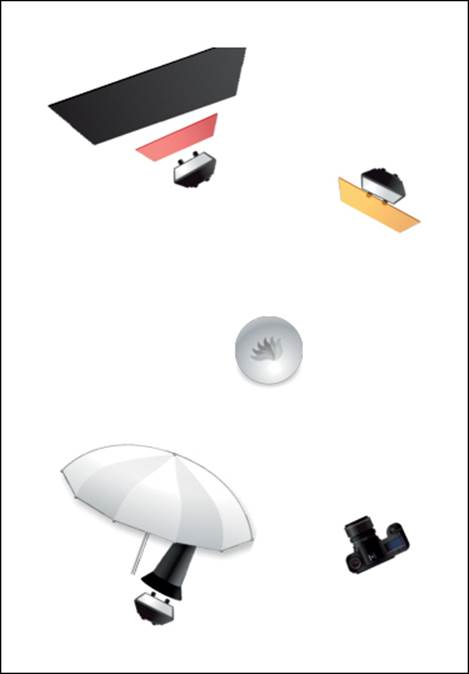
Schematic of the setup showing the main light (behind a diffuser and set to telephoto), the rim light (set to wide angle with a yellow filter), and the background light (with a red filter, also zoomed)
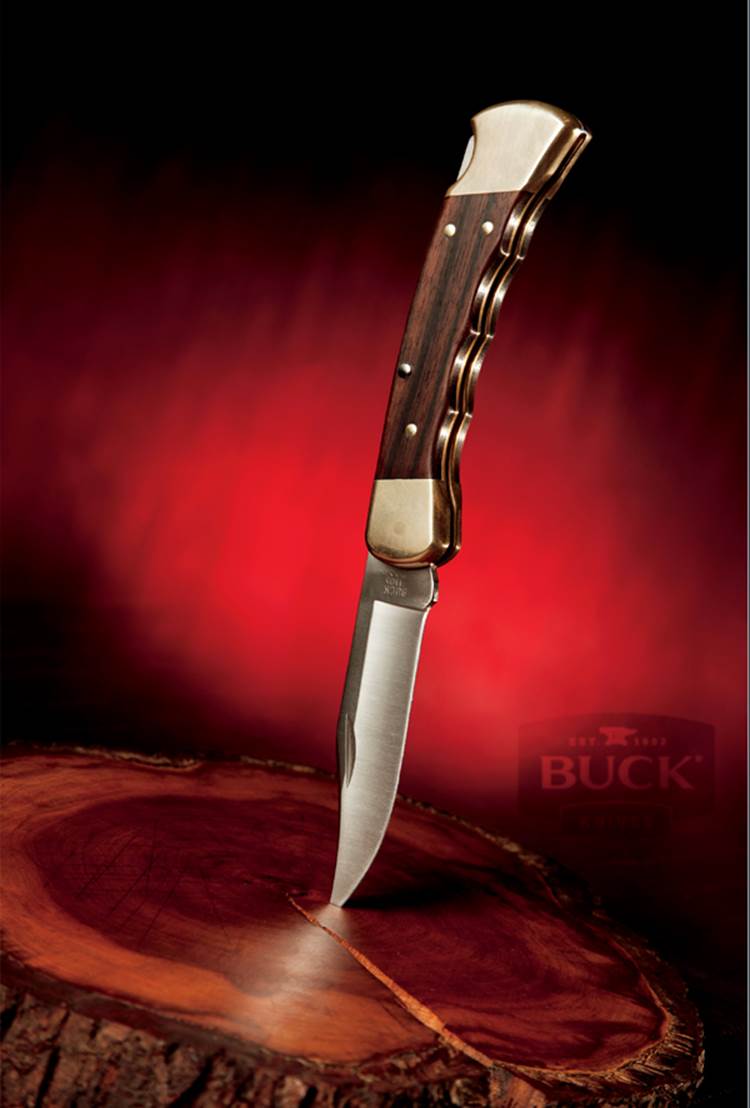
A typical catalog photo shot with a main light, a rim light, and a background spot
Canon EOS 5D Mark II | 24–105mm f/4 set to f/10 and 88mm | M mode | 1/160 second | ISO 200 | RAW | white balance set to shade | classic three-light flash setup
Camera Settings and Shooting
I used a medium zoom setting of 88mm on my full-frame camera to make the subject look natural. An aperture of f/10 ensured plenty of sharpness throughout the image, and an ISO setting of 200 allowed me to set my main light to 1/4 output, the rim light to 1/16, and the background spot to 1/8. After I set my lights up to produce an acceptable result, I began fine-tuning the setup:
▸ The ground edge of the knife blade wasn’t clear enough, so I added a BFT snoot to the flash, set the reflector to telephoto, and experimented with the position of the flash within the diffuser until the blade was nicely accentuated.
▸ I zoomed the background spot to 105mm to emphasize its effect.
▸ To give the wood and brass in the knife an appropriately warm, luxurious look, I set the white balance to shade. A yellow gel that covered half the rim light provided the final touch.
▸ Finally, I moved the camera to a slightly more dynamic angle and altered the position of the background spot to match.
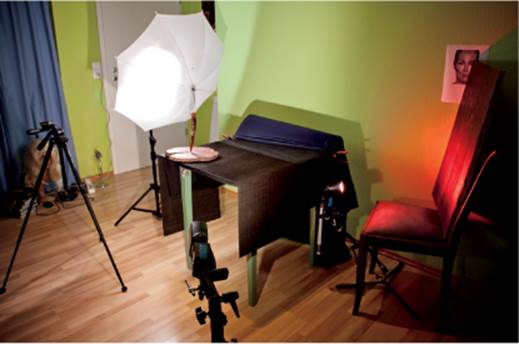
Our setup, which shows three flashes crammed into a relatively small space. But as always, only what the camera sees is important.
Fine-tuning the shot. The flash in the diffuser is fitted with a snoot, enabling us to position the light precisely and emphasize the ground edge of the knife blade.
The steps in the creation of our image: 1 the basic main light (the blade is not yet emphasized); 2 the rim light; 3 the basic main light, rim light, and background spot light, which improved the overall look; 4 the final setup with the repositioned main light, a yellow gel on the rim light, and a warmer white balance setting
Post-Processing in Photoshop
All I did in Photoshop was crop the image according to the golden ratio, intensify the background spot with a vignette, and adjust the color and contrast to taste. To finish, I retouched a couple of dust particles and sharpened the image for output.
Tips, Tricks, and Notes
For more workshops and tutorials about product photography, check out the following website: www.photigy.com.
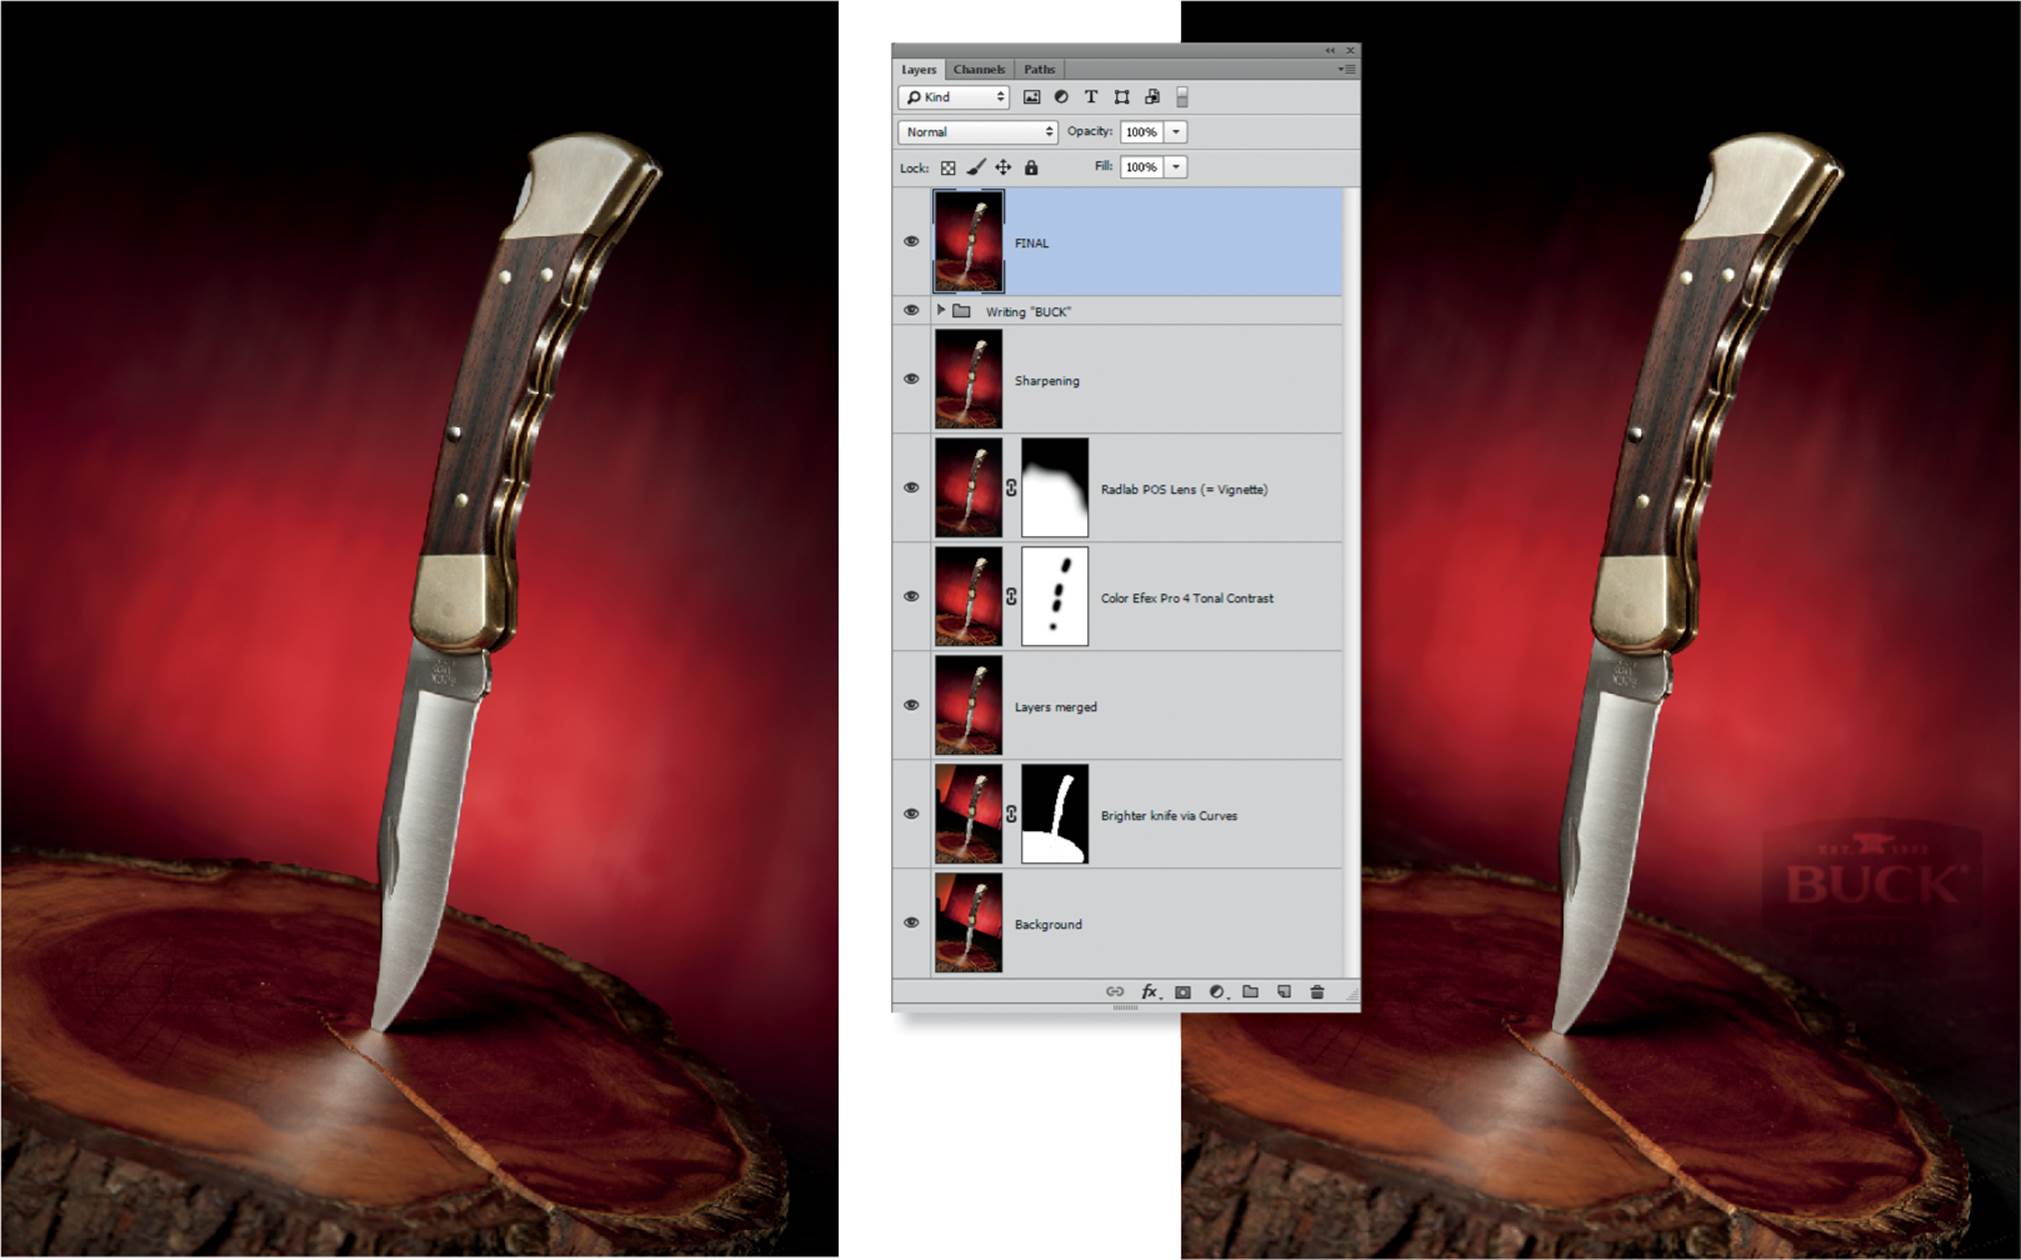
Left to right: The original image, the Photoshop layer stack, and the finished image
In-Depth:
Optimum Focus
With or without flash, it is often difficult to focus with a wide aperture. The most common way to ensure correct focus is focus and recompose, which involves focusing with the central AF point and locking focus before you adjust the camera to frame the subject. This is a useful approach, but it risks altering the subject distance relative to the camera’s optical axis.
It can be more useful to focus with a different AF point, although the central point is usually backed by a cross-type sensor that can focus on both vertical and horizontal edges. The best way to decide which AF point to use depends on the focal length of the lens. The longer the lens, the less detrimental it will be to change the viewing angle, and the less likely it is to affect the sharpness of the image.
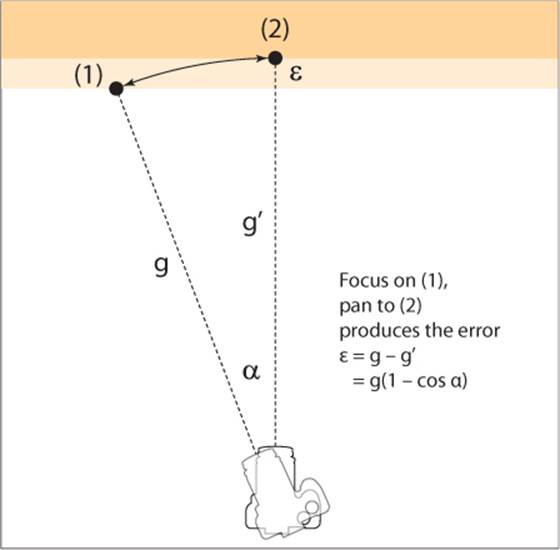
The focus and recompose approach leads to focus errors when used with a short lens. The closer the subject and the shorter the focal distance, the more pronounced the error will be.
Focusing manually through the viewfinder is often imprecise because of the small size of the viewfinder image. Live view with a zoomed monitor image is a more reliable approach. For stationary subjects, tethered shooting (i.e., projecting the camera’s monitor image onto a laptop screen with a USB connection) is a great solution. It’s best not to use automatic AF point selection because the camera will focus on whatever is closest. This approach is sure to fail quite often.
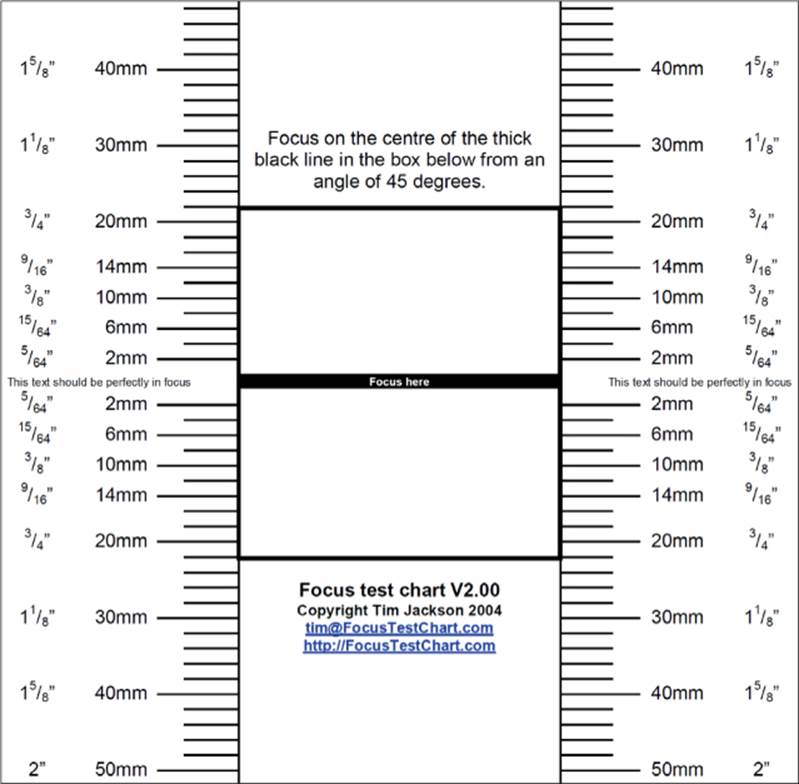
A quick test with a focus test chart will tell you if your lens is focusing correctly
If you think your lens is focusing incorrectly, you should test it. I use the free downloadable test chart at www.dphotojournal.com/focus-test-chart.pdf. If a test reveals continued errors, you should send your camera and lens to the manufacturer for calibration. Some high-end cameras have a built-in calibration chart in which you can enter appropriate error correction factors for individual lenses, although I have not found this approach to be perfectly accurate.
Portraits shot at maximum aperture are a special challenge. If you focus on the subject’s eye, you will usually end up with a usable image, although autofocus often focuses on the subject’s eyelashes. One way to work around this issue is to switch to continuous shooting mode. If you then take a series of shots while moving back and forth very slightly, at least one of the images is sure to be in correct focus.
Remember that even the most expensive lens will produce softer-looking results at the maximum aperture, and it will provide optimum sharpness when it is slightly stopped down. It is extremely difficult to focus accurately with a very shallow depth of field, and the results can be frustrating.
With practice you will get to know your lenses better, and you will be able to estimate which apertures will produce the best results at a variety of distances, and which apertures are too risky.
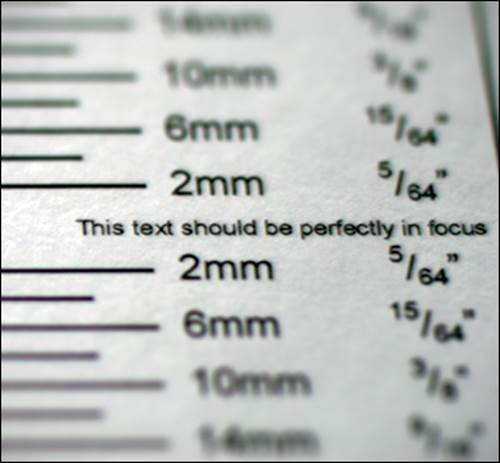
This test chart shows that the lens is working correctly

The focus in this shot is perfect. Be careful—using wide apertures can be addictive!
Workshop 21
Photographing Reflective Objects
▸ Setting up an improvised modeling light
▸ How to photograph reflective surfaces
▸ Using a collage to create a mood shot
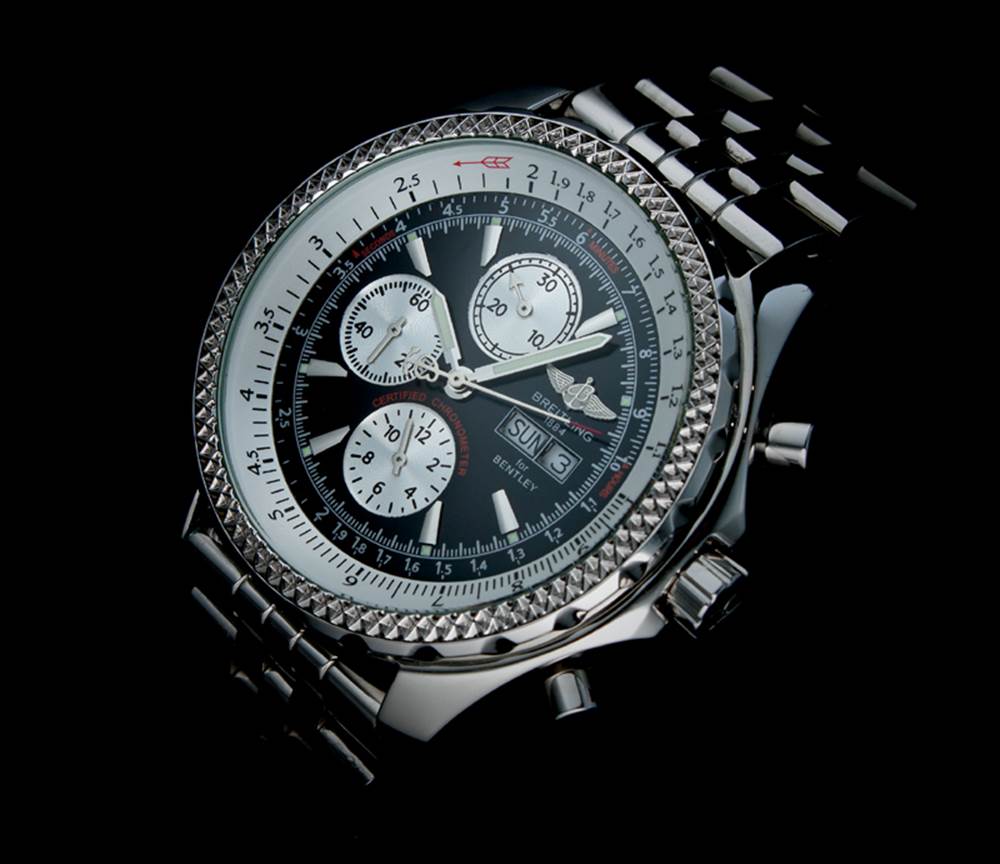
Now that we have taken a look at the practical aspects of product photography, this section demonstrates how to produce a mood shot. Mood shots are often used in advertising and are usually less practical than conventional product shots; they communicate with less tangible information and more atmosphere. Watches and jewelry present a challenge because the reflections they produce are difficult to control. Most photographers who do this type of work use studio flash with modeling lights and high-end macro or tilt/shift lenses. This chapter shows you how to produce similar results with simpler equipment. A modeling light is an important component of the setup. It allows you to keep an eye on the reflections in the subject while you adjust your settings.
The Setup
We placed the watch on a piece of black velvet and used black card to produce dark accents in the metal case. Then we mounted the camera on a tripod and used a 50mm lens with a polarizer filter mounted on a macro extension tube. Although it cannot combat reflections produced by metal, the filter helps reduce unwanted highlights in glass and other shiny surfaces.
Camera Settings and Shooting
Closeup focusing is easiest in live view mode with the camera monitor zoomed in. Some DSLRs do not display a usable live view image on the monitor in manual (M) mode, so you have to use an automatic mode to focus and then switch back to manual (M) mode to make the exposure. My Yongnuo RF-602 radio trigger doesn’t work in live view mode with this camera anyway.
Schematic of our watch shot showing the off-camera flash in a diffuser and the clip-on spot we used as a modeling light. Two small shades produced dark accents in the metal.
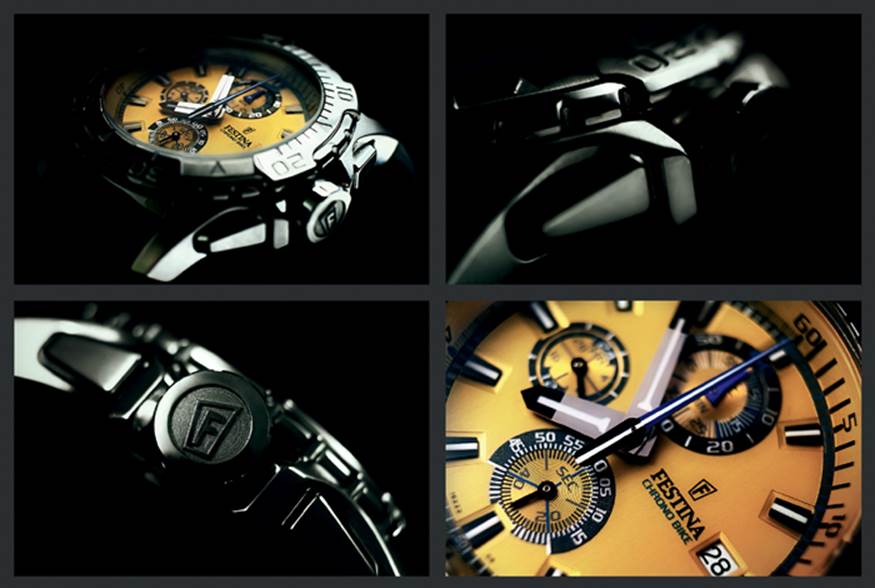
Detail photos that communicate a strong feeling are popular in advertising
Canon EOS Rebel T1i (EOS 500D) | EF 50mm f/1.4 set to f/7, with an extension tube and a polarizer filter | M mode | 1/125 second | ISO 100 | JPEG | white balance set to auto | camera tripod mounted, focused manually in live view | off-camera flash fired through a white shoot-through umbrella
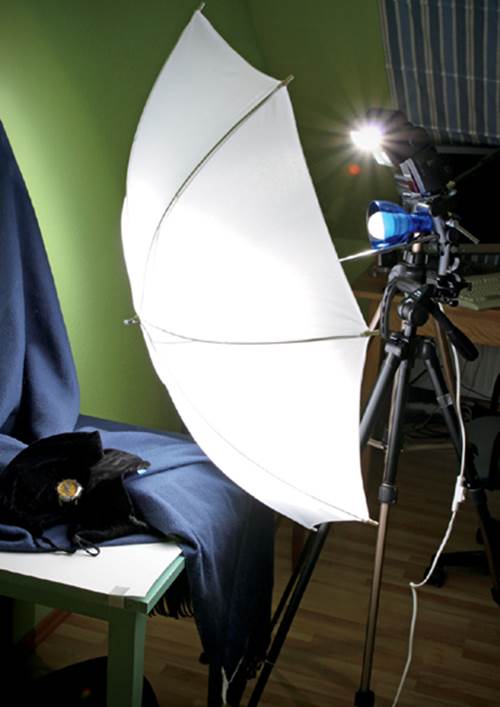
The setup for our watch shot
Post-Processing in Photoshop
To create the desired effect, shots like this have to be perfect. In this case I used the Clone Stamp tool to retouch visible scratches and dust particles, and I added some blur to each of the metal surfaces. I then created a collage from a selection of the detail shots. The processing steps were as follows:
▸ Crop following the golden ratio
▸ Retouch scratches and dust particles
▸ Unify and soften the metal surfaces
▸ Create a collage
▸ Tone and manipulate the image with the RadLab Photoshop plug-in (Oh, Snap at 75%, Prettyizer at 100%, Super Fun Happy at 61%, Warm It Up, Kris at 88%)
▸ Sharpen for output
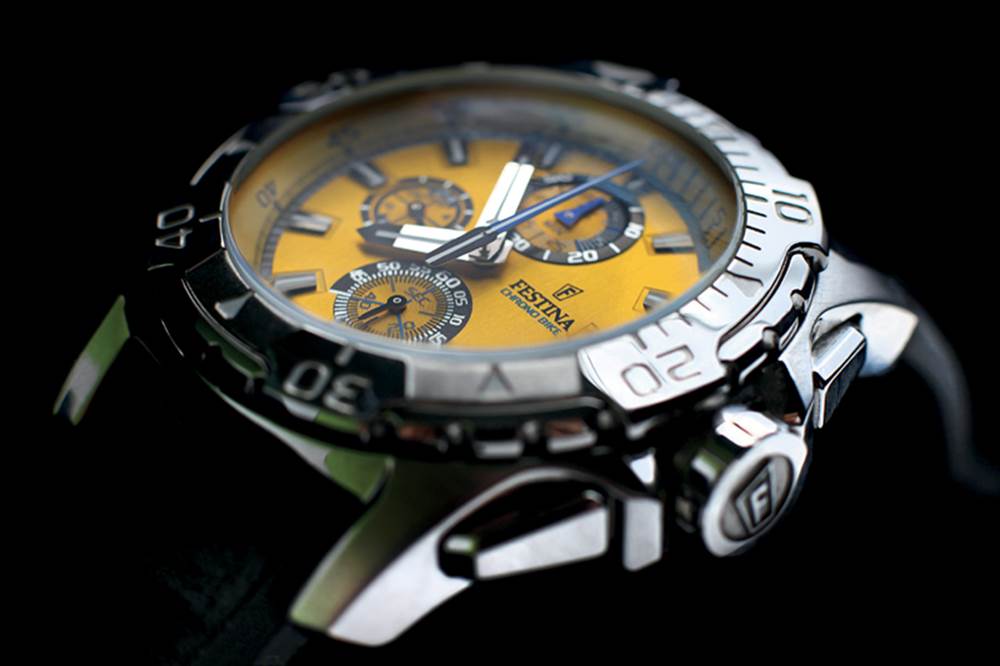
One of the unprocessed detail shots
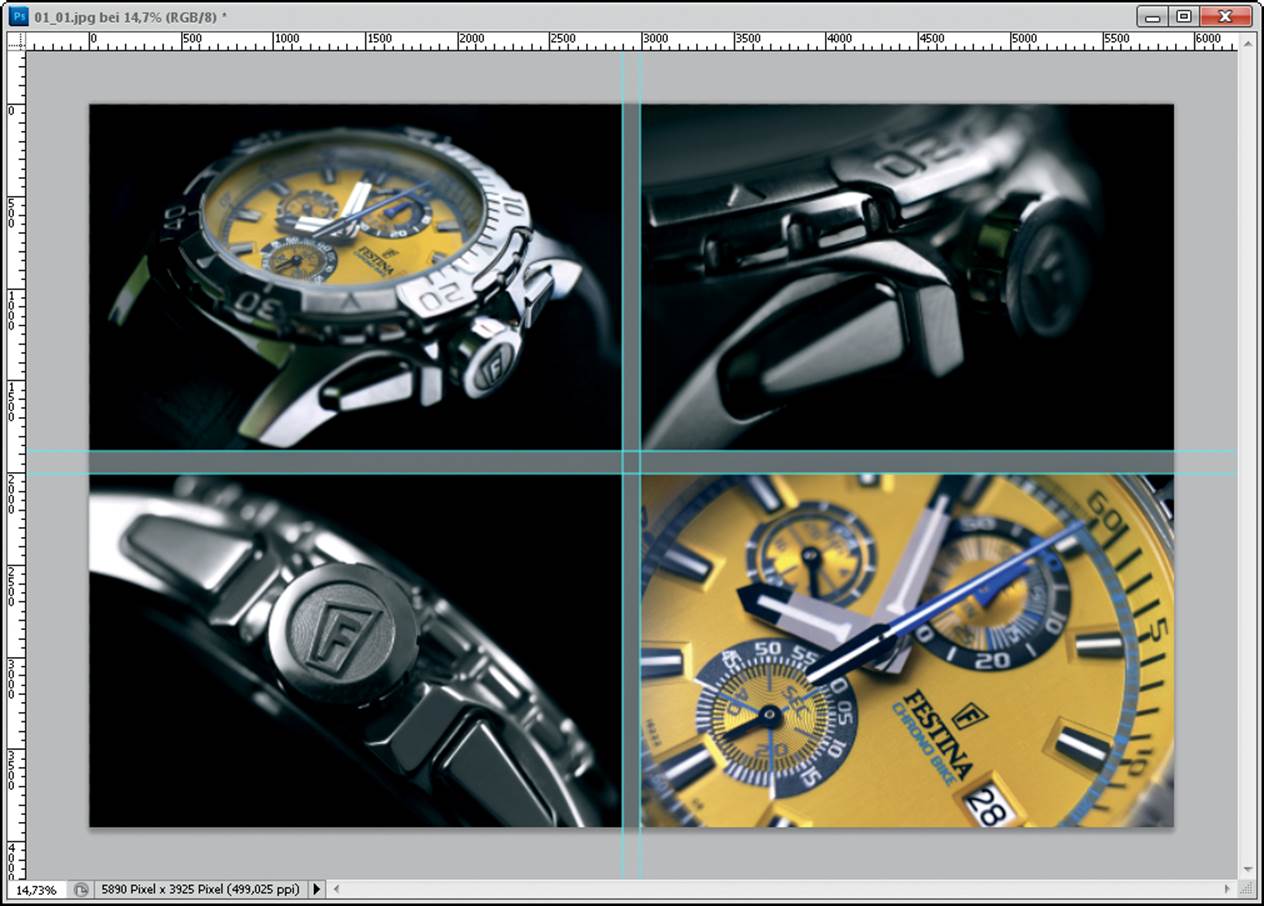
The collage before final processing
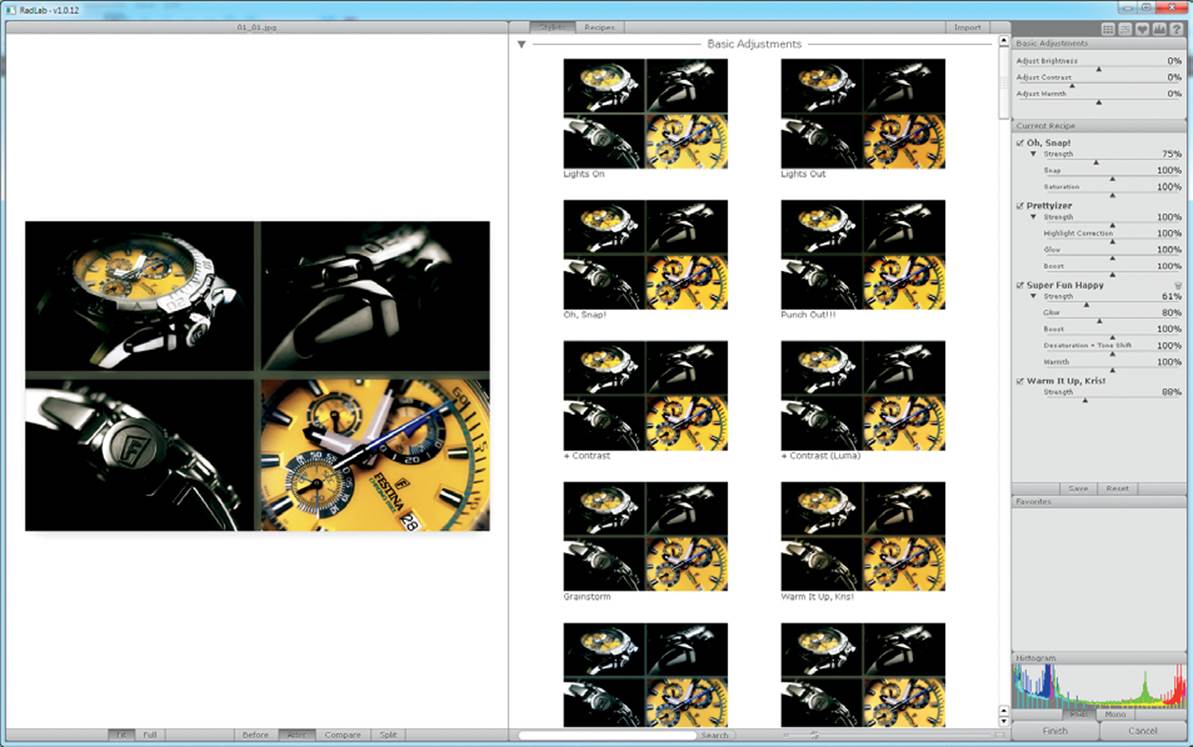
Work in progress in Photoshop showing the RadLab plug-in we used to give the images their final polish
Tips, Tricks, and Notes
Ming Thein is a specialist when it comes to capturing images of highly reflective watches and jewelry. Check out his setup and results on his Flickr photostream at www.flickr.com/photos/mingthein/843974766/in/photostream. I have used a similar setup to produce some really satisfying images.

A setup using Ming Thein’s triangular milky Plexiglas setup
An image captured using the triangular setup after RAW conversion and before processing
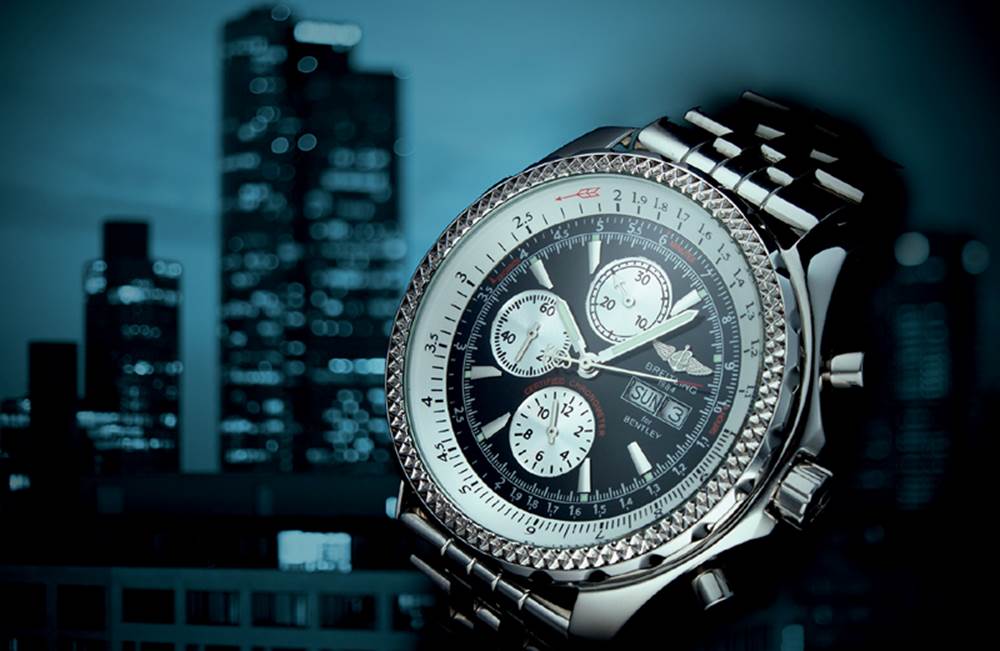
A finished, color-adjusted image shot with Ming Thein’s setup and inserted into a new background
Canon EOS Rebel T1i (EOS 500D) | EF 18–55mm f/3.5–5.6 IS set to 53mm and f/14 | M mode | 1/125 second | ISO 100 | RAW | white balance set to auto | three off-camera flashes and three milky Plexiglas diffusers
Workshop 22
Perfume Bottle in Translucent Backlight
▸ Building a backlit setup
▸ Setting a background spot
▸ Using a tilt lens to produce an advertising-style shot
Perfume bottles are attractive objects and are perfect for testing new lighting setups. In this workshop I used a blue bottle and matching blue Aqua Pearls (water absorbing beads) as a background. Backlight is the obvious technique to make the bottle and the pearls really shine (see the “Backlit Fruit” workshop 30 for a similar setup). In this case, a second flash brightened the background, and I used a tilt lens to adjust the plane of focus. The finished image had a rather monotone feel, so I added a color gradient in Photoshop to pep it up.
The Setup
The basic setup was simple and took only about five minutes to build. I placed a sheet of translucent Plexiglas on two large books and placed a glass dish with the pearls and the bottle on it. I used a flash to light the dish from below. I decided to shoot at an angle, so I used a second flash to brighten the background, which would otherwise have been too dark. After I took a couple of test shots, I decided to cover the main flash with a sheet of white paper to soften the light. For this shot I used an 80mm Lensbaby Edge 80 lens mounted in a Lensbaby Composer, which allowed me to tilt the optical axis. This tilt lens uses the Scheimpflug principle to alter the plane of focus and create all kinds of interesting effects. In this shot I used it to provide a very shallow anti-Scheimpflug field of focus.
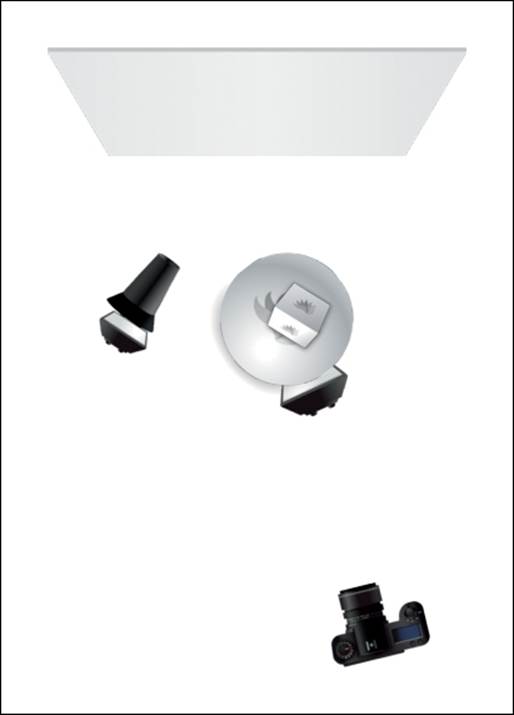
Schematic of the setup showing the main flash from below and the additional background flash
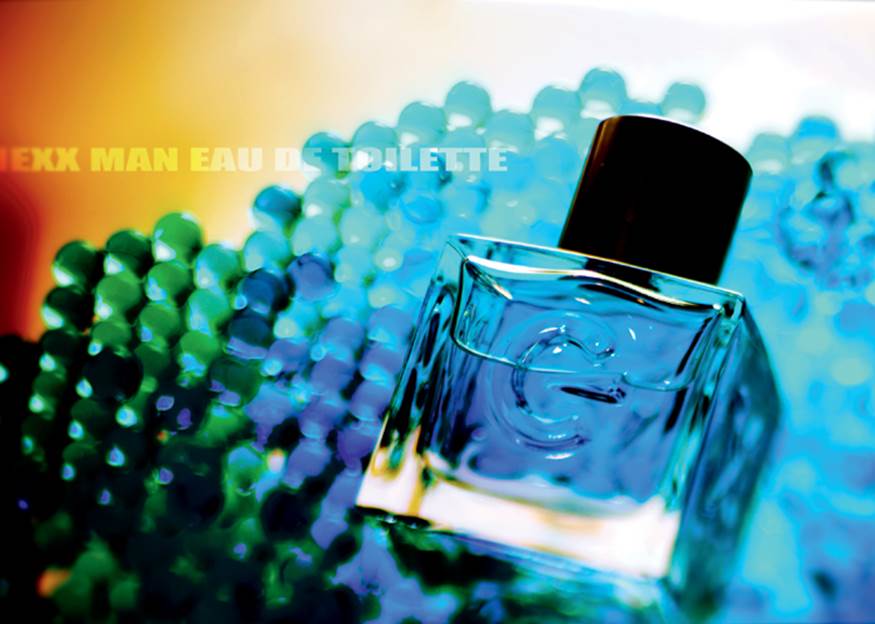
Perfume bottles make stylish photographic subjects. Here a bottle is captured in backlight with a tilt lens.
Canon EOS 5D Mark II | Lensbaby Edge 80mm (mounted in a Lensbaby Composer) set to f/2.8 and tilted to create an anti-Scheimpflug effect | M mode | 1/125 second | ISO 50 | RAW | white balance set to auto | two non-TTL, off-camera flashes fired with RF-602 radio triggers
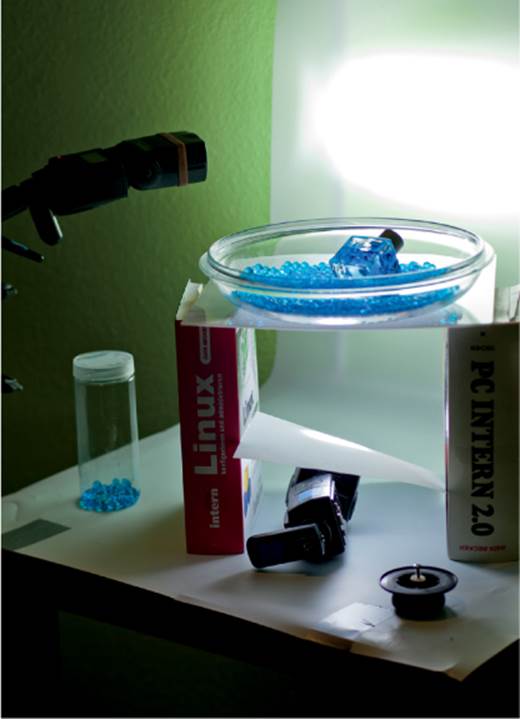
An overview of our setup. The second flash illuminates the background and is zoomed to 105mm.
Camera Settings and Shooting
The Lensbaby requires the aperture and focus to be set manually. I prefer to do this with a display loupe and a live view image that is 10x zoomed in. To frame and focus in live view, you need to use one of the camera’s automatic exposure modes. Remember to turn live view off when you switch back to manual (M) mode. If I failed to turn live view off, my RF-602 radio trigger wouldn’t work with that camera (note: this bug is fixed in the Canon 5D Mark III).
I began with 1/16 output for the backlight flash and ended up covering it with a sheet of paper and using ISO 50 before I was happy with the result.
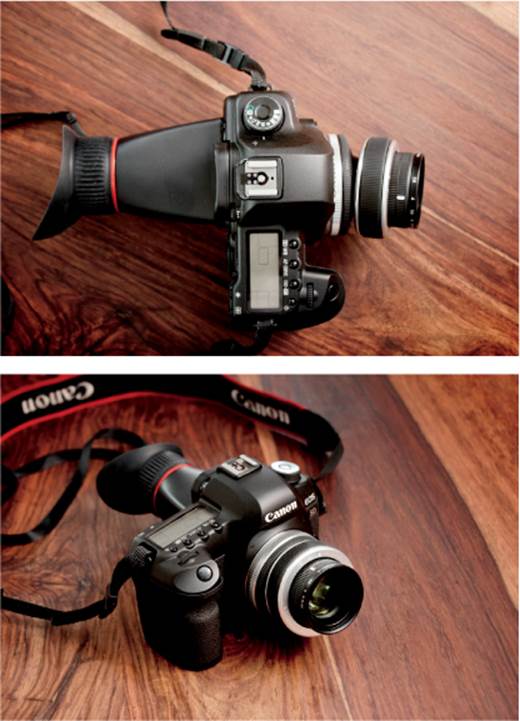
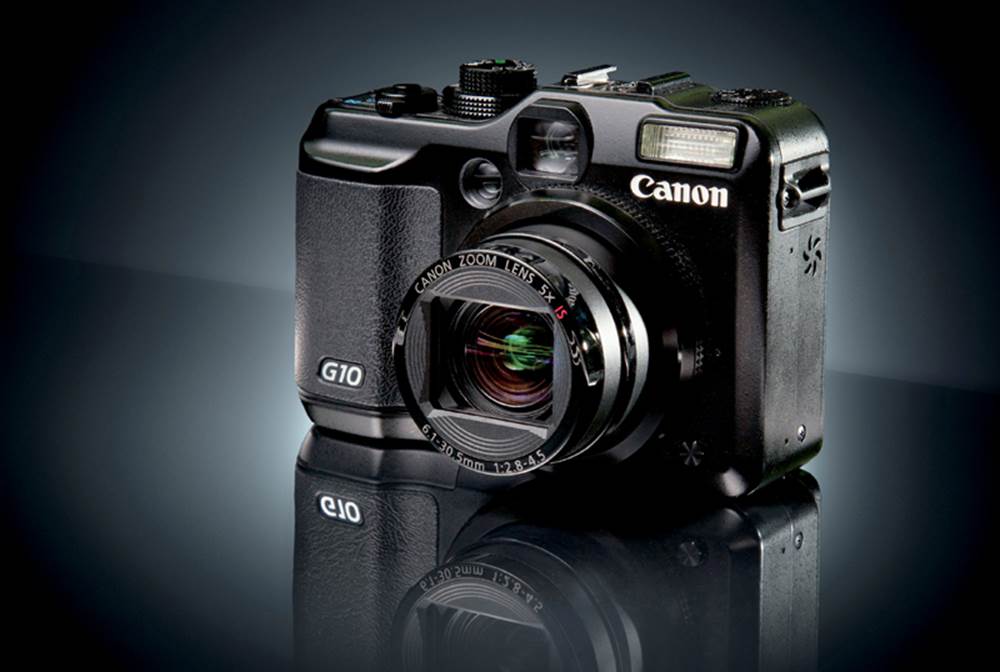
The camera, showing the Lensbaby Composer and Edge 80 lens, and the LCD magnifier
Post-Processing in Photoshop
You can see that the unprocessed image needs to be cropped, and the colors have a cast and look dull. To rectify these issues, I took the following steps in Photoshop:
▸ Crop to the golden ratio using the Crop tool
▸ Make an adjustment with Auto Levels
▸ Add a warm color gradient from the left side in Color Burn blend mode
▸ Add text to make the image look like an advertisement
▸ Sharpen the image for output
Tips, Tricks, and Notes
I could have created a similar color gradient using a gel on the flash, but it probably would not have been as accurate. You have to consider which effects are best created in the setup and which are easier to achieve in post-processing. Because they are virtually impossible to manipulate without looking artificial, the focus and the direction and quality of the light have to be set up correctly during the shoot.
If a Lensbaby is not in your budget, you can experiment with a technique called freelensing. You loosely hold a prime lens in the lens mount of your camera and then tilt it, but be careful! I damaged the mirror in one of my cameras this way.
These two Flickr groups provide further insights about the anti-Scheimpflug techniques mentioned in this workshop:
▸ Lensbaby Edge 80 Optic: www.flickriver.com/groups/1964552@N23/pool/interesting
▸ Freelensing: www.flickriver.com/groups/freelensing/pool/interesting
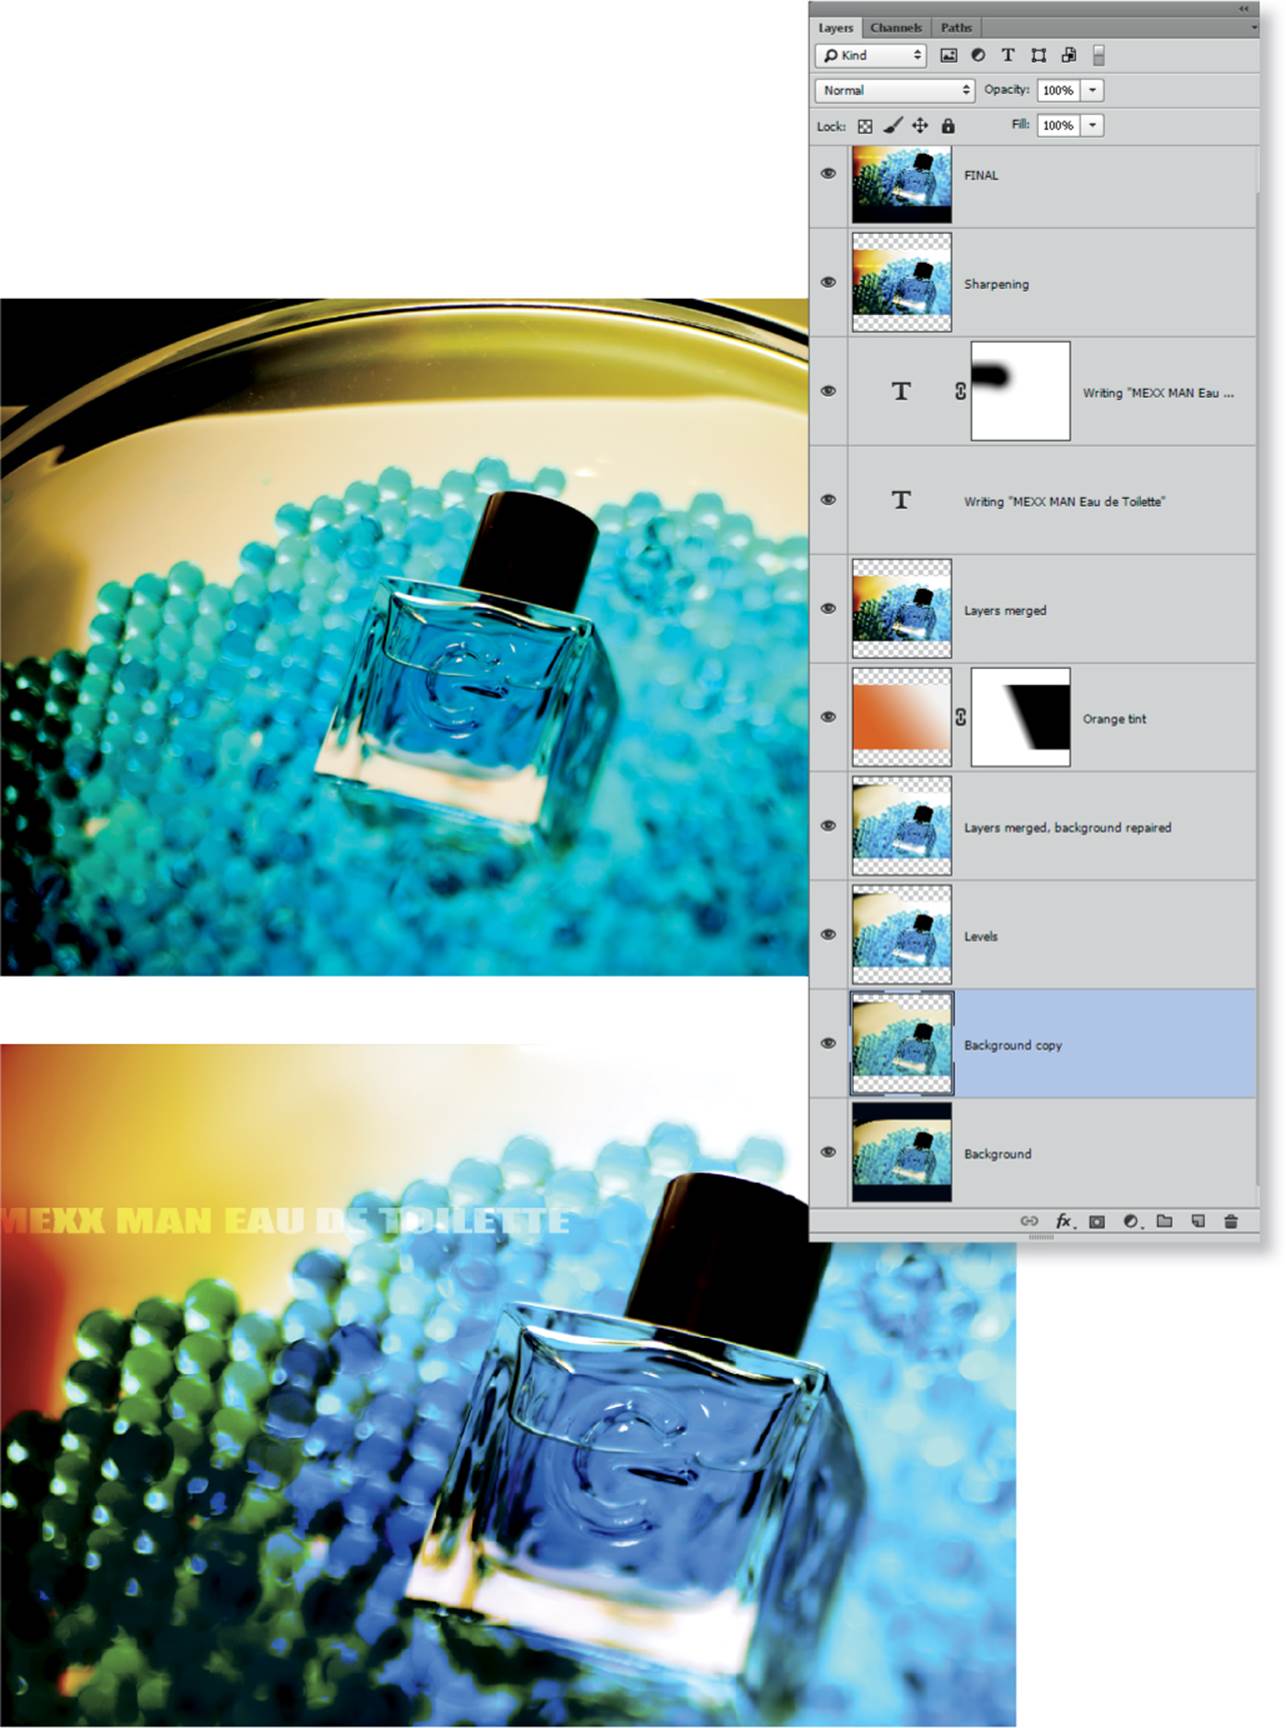
The layer stack showing the additional color gradient
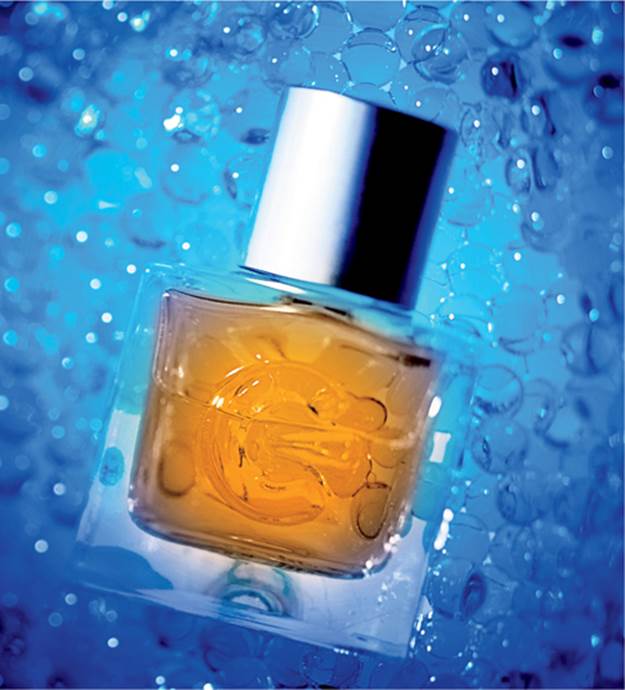
Another version of the same shot captured with the same setup, but the perfume bottle was recolored in Photoshop
Workshop 23
Acoustic Guitar
▸ Looking for an interesting perspective
▸ Creating a bidirectional double-kicker setup with homemade mini softboxes
Subtle focus effects for an image of a musical instrument are fine if you plan to use the image for a CD cover or a similar purpose. The closer you get to the subject, the more extreme the effect will be. In this workshop we focused on the head of the guitar, and the extreme vanishing point perspective accentuated the shallow focus. I used a Canon EOS Rebel T1i (EOS 500D) APS-C camera with an EF 50mm f/1.4 lens. I shot in manual (M) mode at 1/125 second, which gave me plenty of leeway regarding the camera’s flash sync speed of 1/200 second. The light came from four inexpensive Yongnuo YN-460 flashes fired with CTR-301 radio triggers, which are no longer manufactured and have been replaced by the more powerful and more reliable RF-602.
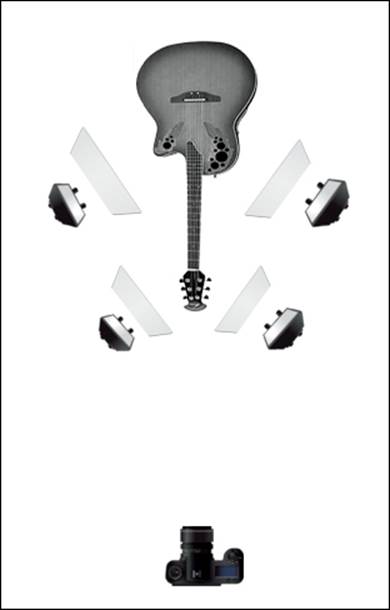
Schematic showing the four non-TTL flashes set up in two pairs. Each flash is fired through a folded sheet of copier paper.
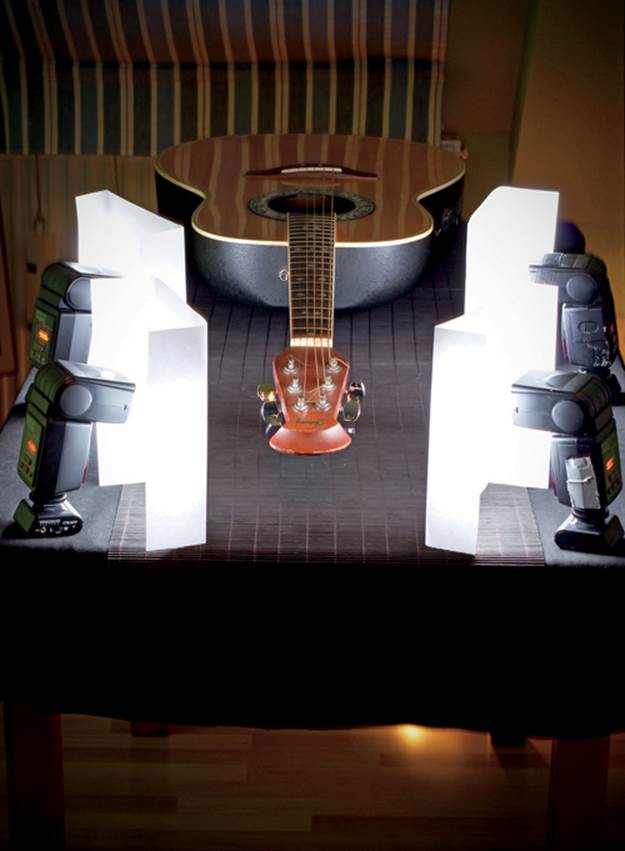
The actual set-up: Four non-TTL, shoe mount flashes; two on each side of the guitar. The flashes sit on their radio receivers, and white paper is used to soften the light.
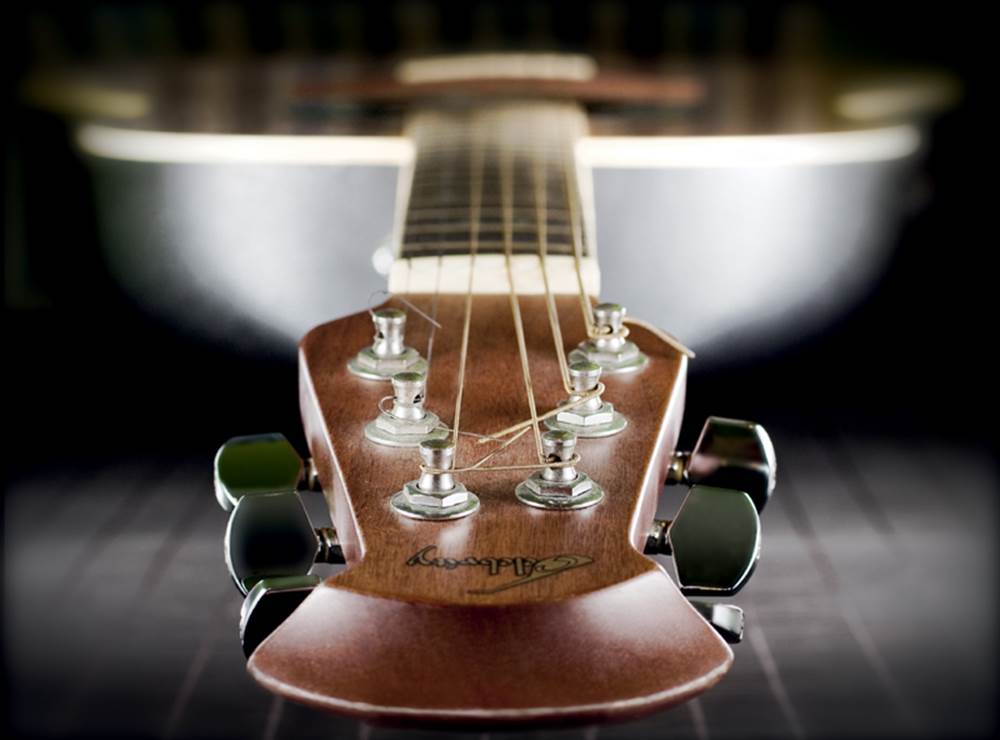
Mood shot of a guitar lit with a double-kicker lighting setup
Canon EOS Rebel T1i (EOS 500D) | 50mm f/1.4 set to f/6.3 | M mode | 1/125 second | ISO 100 | RAW | white balance set to auto | four off-camera, non-TTL flashes fired with Yongnuo radio triggers
The Setup
We placed the guitar flat on a table surrounded by two pairs of flashes set up in a double-kicker formation. Folded sheets of copier paper were used as diffusers to soften the light.

The original image. The lighting and focus are okay, but some retouching is required.
Camera Settings and Shooting
An aperture of f/6.3 might seem small for such a shallow focus effect, but the proximity of the camera to the subject made it possible. If we had selected a wider aperture, the guitar’s neck and body would have been unrecognizable. As usual, I made my initial test shots without flash to make sure the surroundings were adequately lit. I began testing my flashes at 1/4 output and fine-tuned them from there. I captured the shot handheld, so I had to straighten it during post-processing.
Post-Processing in Photoshop
These are the steps I performed:
▸ Straighten, crop, and add the background pixels that were missing at the edges of the frame
▸ Subtly broaden the guitar body
▸ Retouch the green support below the guitar head as well as the scratches and dust particles
▸ Slightly desaturate the image and increase the contrast
▸ Adjust the color
▸ Sharpen the image for output
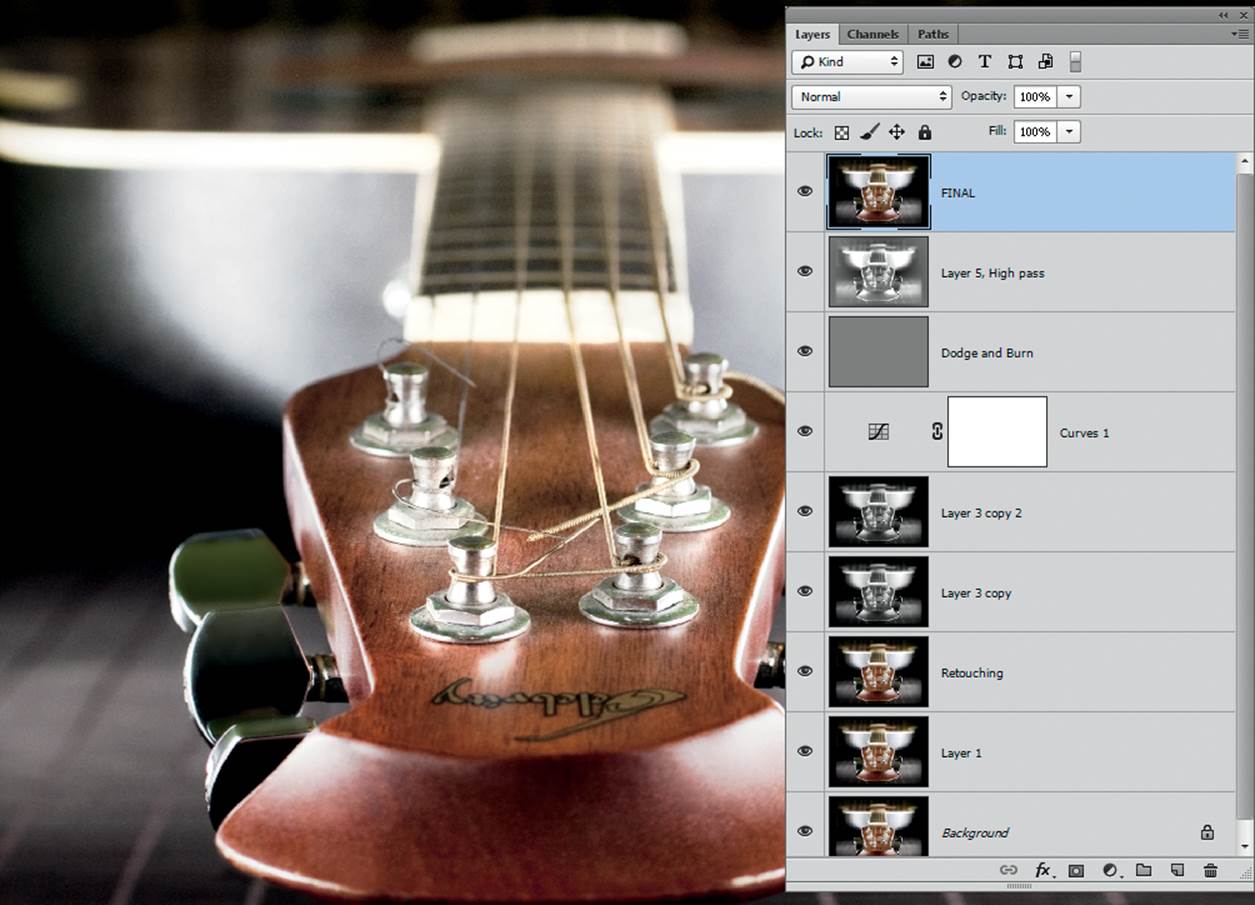
The layer stack is relatively simple. The retouching layer is the only one that required a significant amount of time and effort.
In-Depth:
The Pros and Cons of Using TTL Flash
The next workshop demonstrates how to use modeling light in conjunction with manual flash output settings. This raises the question of when it is preferable to use TTL mode and when to stick with manual. TTL mode is preferable in some situations:
▸ TTL is essential when you have to work quickly, such as at a wedding or other fast-paced event when there is no time to make complex settings or take test shots.
▸ TTL is extremely useful in handheld situations when the subject distance is constantly changing. Manual flash has to be readjusted every time the subject distance changes.
▸ For the same reason, TTL flash is also perfect for moving subjects—for example, when you are using a handheld softbox or are shooting models on a runway. Manual flash settings under these conditions would take too long.
In most other situations I prefer to set up my flashes manually. This approach is more deliberate, and you get exactly the amount of light you want. You can, of course, use FEC to compensate for any changes, but this increases the risk of TTL metering discrepancies in subsequent shots. And if you take time to make a compensation setting, you might just as well set up your flash manually.

TTL mode is the best option for moving subjects. This shot was captured with a Canon Speedlite 430EX II mounted in a softbox and fired with a 33 ft spiral TTL flash cable (the same setup as in workshop 2).
Canon EOS Rebel T1i (EOS 500D) | EF 50mm f/1.4 set to f/1.8 | M mode | 1/50 second | ISO 200 | RAW | spot metering with FE Lock and AI Servo AF
Workshop 24
Studio-Like Modeling Light
▸ How to make a flash work like a modeling light
▸ Lighting a simple tabletop scene using modeling flash
Aside from their lower output, one of the main disadvantages of using portable flash instead of studio flash is the lack of a modeling light. A modeling light is a continuous light source that helps you visualize the shadows, highlights, and reflections the flash will produce before it fires. Nowadays, higher-end flash units by Canon and Nikon have built-in modeling flash, which fires a series of weak flashes to emulate a conventional modeling light (see workshop 35). Canon’s modeling flash is activated by pressing the depth-of-field preview button on the camera body.
This is fine if the flash is mounted on the camera, but if you want to use this function with an off-camera flash and regulate the flash output manually, you have to take a slightly different approach.
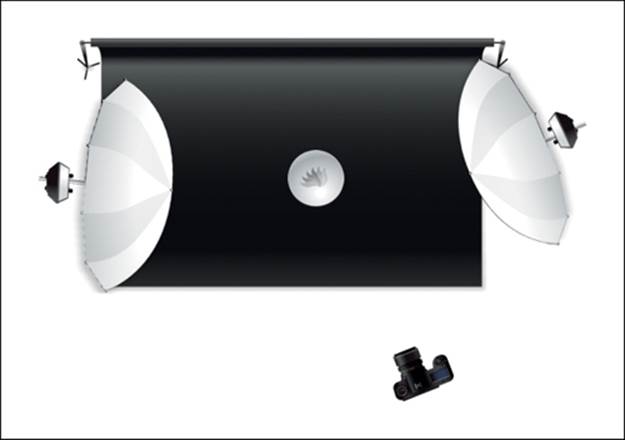
Schematic of our tabletop scene with two off-camera Canon flashes mounted in umbrella diffusers
The Setup
My trusty RF-602 radio triggers were not smart enough for this setup, so we had to use a Canon ST-E2 infrared transmitter (or Yongnuo’s cheaper version with the same name) to transmit data to the flashes. Both units were mounted on umbrella swivels in white shoot-through umbrellas.
Camera Settings and Shooting
I set my Canon Speedlite 430EX II to channel 4 and M mode (by pressing the Mode button for four seconds). I manually set the flash output to 1/8 and fine-tuned the setting after I took a couple test shots. Then I set up my Canon Speedlite 580EX II the same way and fine-tuned the output setting. Finally I mounted my Yongnuo ST-E2 transmitter on the camera and set it to channel 4. This setup allowed me to fire the modeling flash by pressing the depth-of-field preview button on the camera. The intensity of the modeling flash depends on the flash output setting you select.
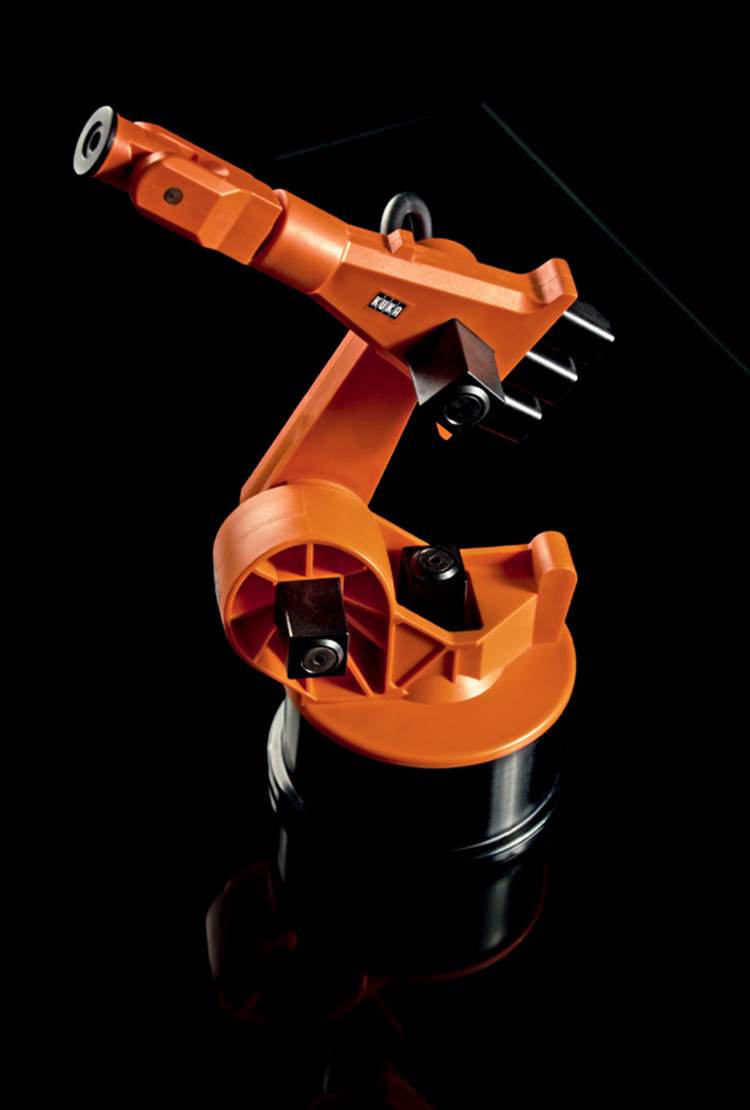
Tabletop scene of a model robot lit with two off-camera flashes set up with modeling flash
Canon EOS Rebel T1i (EOS 500D) | Tamron 18–270mm f/3.5–6.3 lens set to 50mm and f/9 | M mode | 1/200 second | ISO 100 | RAW | white balance set to flash | two off-camera flashes, triggered with a Yongnuo ST-E2
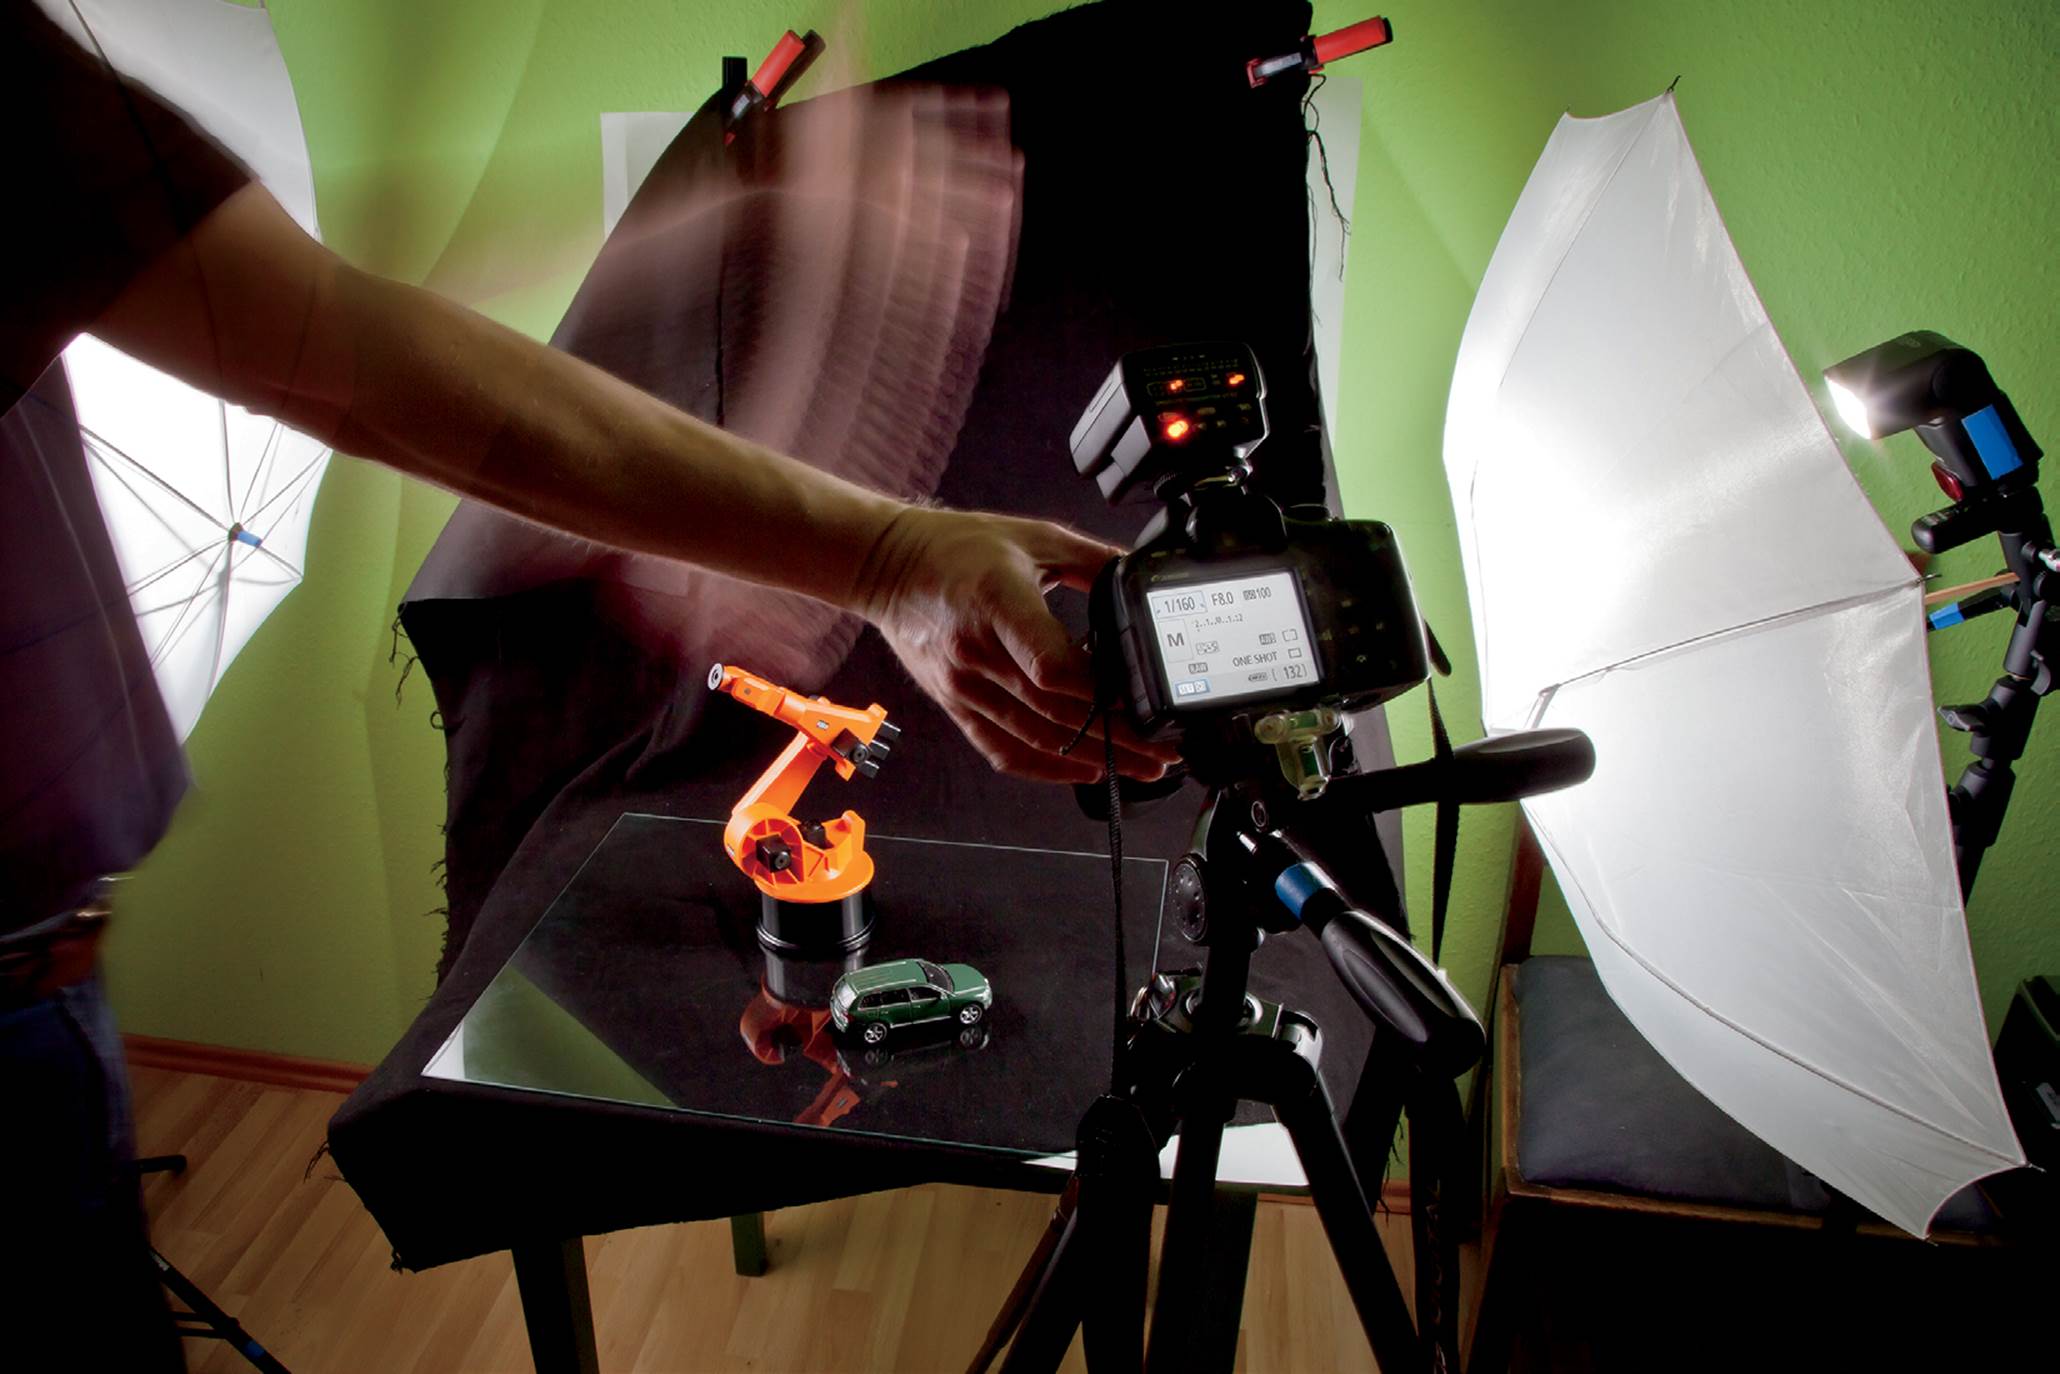
Our tabletop scene, showing the two Canon off-camera flashes mounted in umbrella diffusers fired with a Yongnuo ST-E2. The movement of the photographer’s hand demonstrates the stroboscopic effect of the modeling flash.
Post-Processing in Photoshop
Even though this workshop is about modeling light, the post-processing steps still play an important role in producing the finished image. The steps we performed were as follows:
▸ General cleanup, including removing dust particles and scratches
▸ Adjust, lengthen, and enhance the background and the reflection
▸ General enhancement with the RadLab plug-in from Totally Rad
▸ Sharpen the image for output
Tips, Tricks, and Notes
Actually, the shot of the setup at the top left was far more difficult to capture than the featured image in this workshop. Because I wanted to capture the strobelike effect of the modeling flash, I had to use a second tripod-mounted camera in bulb (B) mode and a cable release. I also needed three hands: one to wave in front of the lens (for the stroboscopic effect demonstration), one to release the shutter on the second camera, and one to press the depth-of-field preview button on the main camera! The room was completely dark, and the modeling flash lasted about 1 second.
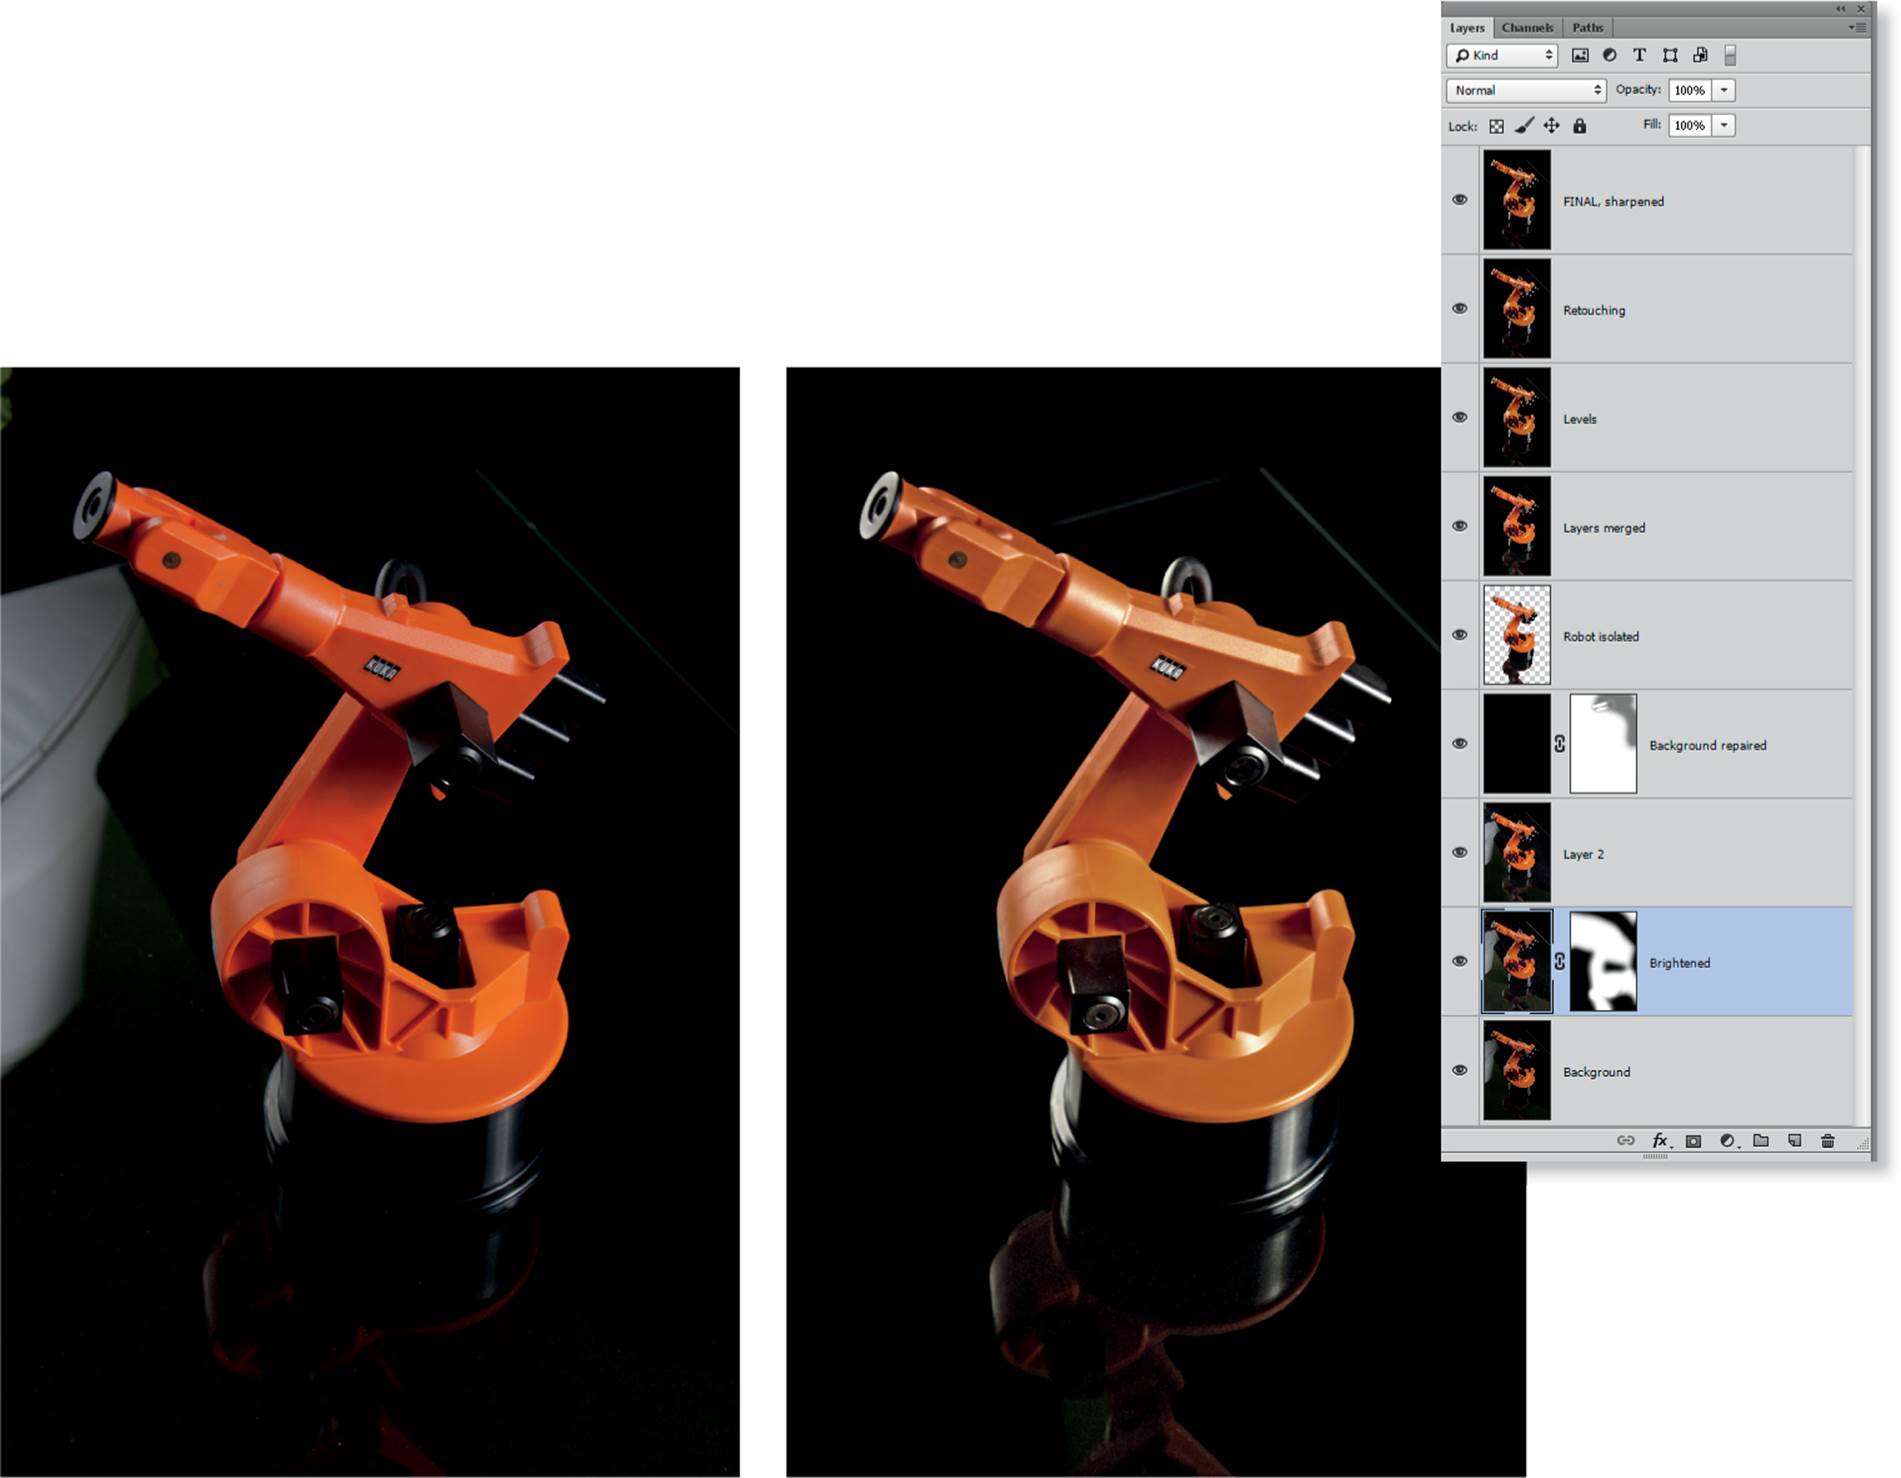
Before and after shots of the toy robot along with the corresponding layer stack

All materials on the site are licensed Creative Commons Attribution-Sharealike 3.0 Unported CC BY-SA 3.0 & GNU Free Documentation License (GFDL)
If you are the copyright holder of any material contained on our site and intend to remove it, please contact our site administrator for approval.
© 2016-2026 All site design rights belong to S.Y.A.