Creative flash photography : great lighting with small flashes: 40 flash workshops (2014)
Part II. The Fun Starts Here! 40 Lighting Workshops
Chapter 6. Workshops 25–35 Food Photos: The Most Important Ingredient is Light!
Food photography isn’t easy. If you are lucky, you will have a north-facing window that provides plenty of daylight—otherwise you will have to use flash. The workshops in this section show how to produce elegant-looking food shots with minimal equipment.
Workshop 25
Basic Flash Setup for Food Photos
▸ How to capture attractive food shots in low light—at home and out and about
▸ Bouncing on-camera and built-in flash
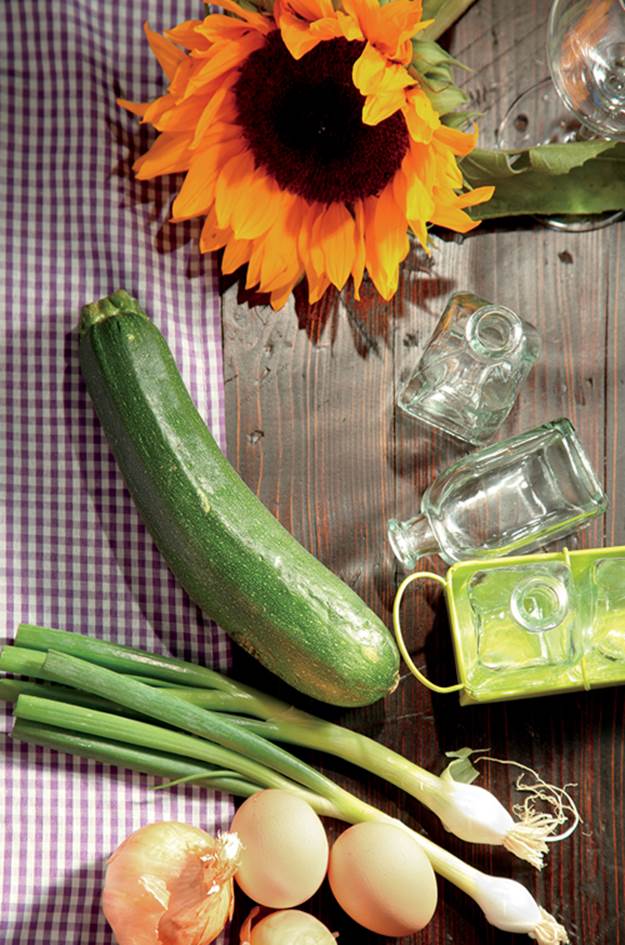
Everybody loves good food, and the numbers of amateur chefs and food bloggers are increasing daily. What’s better than a delicious-looking photo to whet people’s appetites? They’re easy to take in the right conditions. For great-looking food shots all you need is daylight as a side or main light, a reflector, slight overexposure, and a wide aperture! But if you have a day job and have to cook and photograph in the evening, things are a little trickier. Although continuous light is a possible solution, HTI lamps that emulate daylight are expensive, and normal energy-saving bulbs make food look decidedly unappetizing. The visible spectrum provided by studio flash is perfect for the job, but it is also expensive and can be difficult to set up. What’s wrong with using the gear you already have? A system flash, or even the popup flash built into your camera, will do. This might sound risky, but it works very well if you know how to do it. This workshop shows you how to use a single flash, a mouse pad, and a couple sheets of Styrofoam (or even a white wall) to build an effective food photo setup that will provide the look of soft daylight.
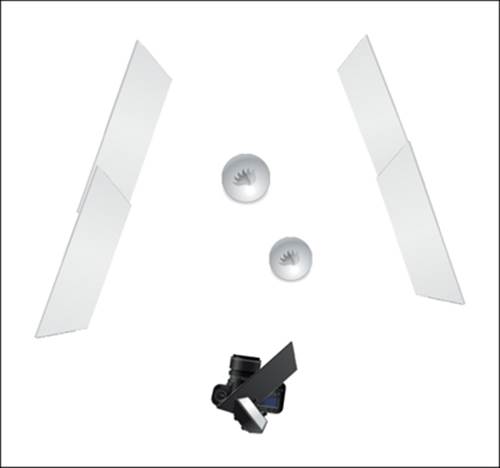
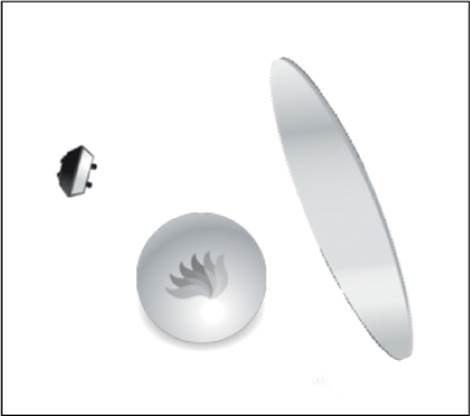
Schematic for our basic food setup, showing the bounced on-camera flash
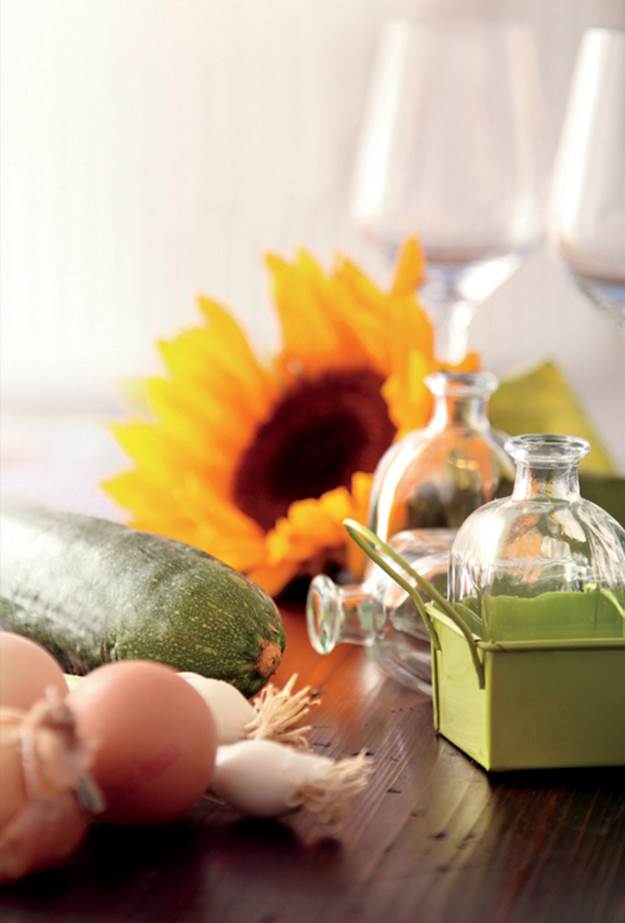
Is it possible to take attractive food shots in soft sidelight with on-camera flash if you play off the cushions (see workshop 1)
Canon EOS Rebel T1i (EOS 500D) | EF 50mm f/1.4 set to f/1.6 | M mode | 1/100 second | ISO 100 | RAW | white balance set to flash | on-camera Canon Speedlite 430EX II TTL flash | FEC set to +1.33 EV
On-Camera TTL Flash: Camera Settings and Shooting
For this type of shot, you need to suppress the ambient light as much as possible because it will usually have the wrong color temperature and will come from the wrong direction. I set the camera to manual (M) mode, chose my parameters to eliminate the ambient light, and I checked my settings in a couple test shots. I then mounted the flash and switched it to TTL. A test photo was adequately exposed, but the look and feel of the lighting was terrible—harsh frontal light filled the frame. For my next attempt I dialed in +1.33 EV FEC to give the shot a more open and inviting look.
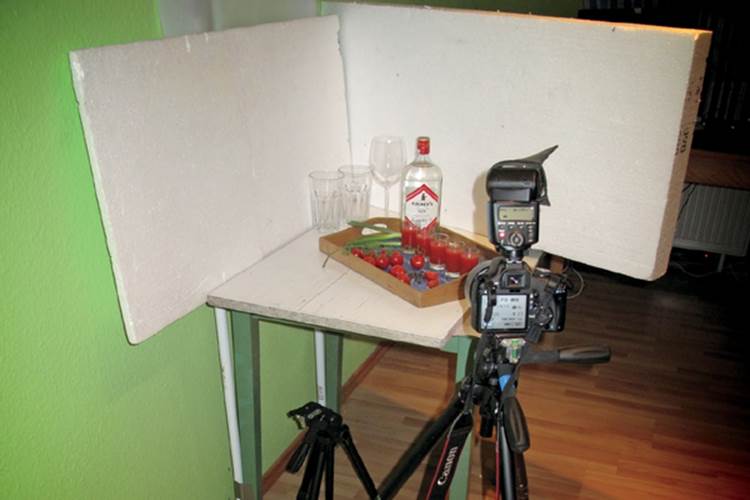
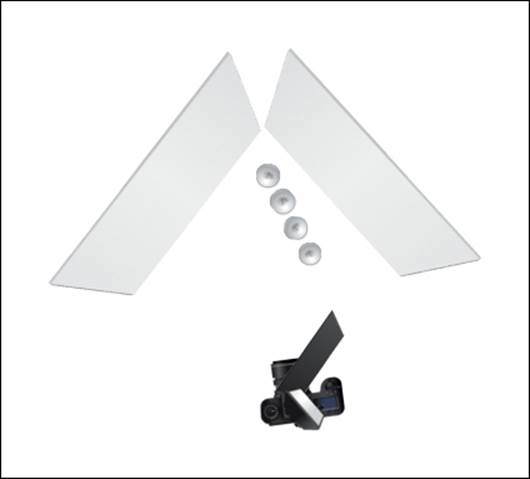
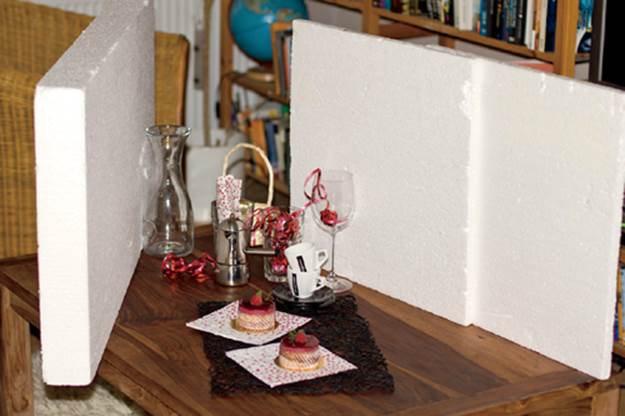
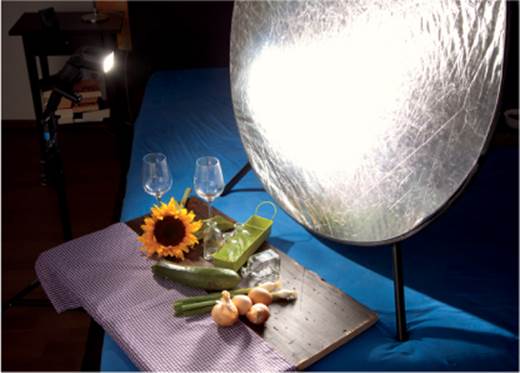
Our setup, showing two Styrofoam reflectors and a black foamie thing attached to the on-camera flash
The Setup
The spectrum that an on-camera or popup flash produces is identical to that of expensive studio flash units. It is very similar to daylight, which makes it perfect for food shots. Of course, accessory flash has a lower output than studio gear, but that doesn’t matter at the close distances involved in this workshop. In its basic form, on-camera flash is not particularly well suited to food photography due to the small size of the light source and its orientation along the camera’s optical axis, which produces short, hard shadows. The obvious solution is to modify the light from the flash to make it seem like it comes from a larger, softer source. The easiest way to accomplish this is to bounce light off a large reflector and use a black foamie thing (see page 43) to prevent stray light from directly illuminating the subject. For this shot I used two sheets of Styrofoam: one acted as the main reflector, and the other produced a fill accent from the other side. If you are shooting in a room with white walls, you can use them to produce the same bounce effect.
For these shots I used a Canon EOS Rebel T1i (EOS 500D) and a Canon Speedlite 430EX II flash. For the next shots, I even used the camera’s built-in flash.
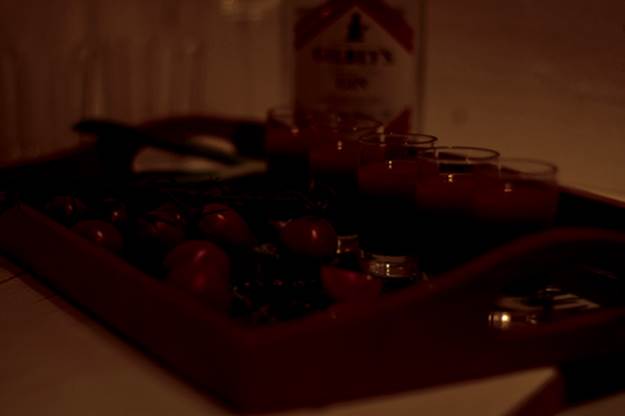
Test shot with manual exposure settings and without flash as a test to make sure the ambient light is suppressed
Canon EOS Rebel T1i (EOS 500D) | EF 50mm f/1.4 set to f/1.6 | M mode | 1/100 second | ISO 100 | RAW | white balance set to flash | no flash
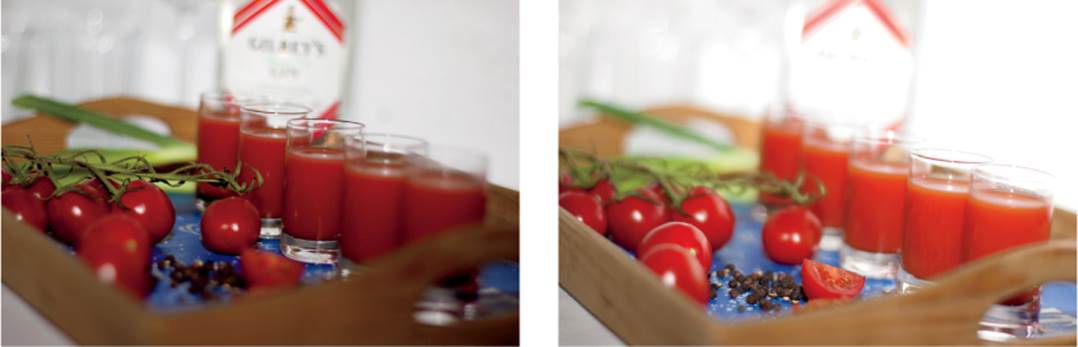
Left: With TTL flash and without bouncing, the exposure and the direction of the light are wrong. Right: The same shot with +1.33 EV FEC. This version looks better, but the direction of the light and the hard, short shadows it produces are still not right.
Canon EOS Rebel T1i (EOS 500D) | EF 50mm f/1.4 set to f/1.6 | M mode | 1/100 second | ISO 100 | RAW | white balance set to flash | on-camera Canon Speedlite 430EX II in TTL mode | 0 EV FEC (left) and +1.33 EV FEC (right)

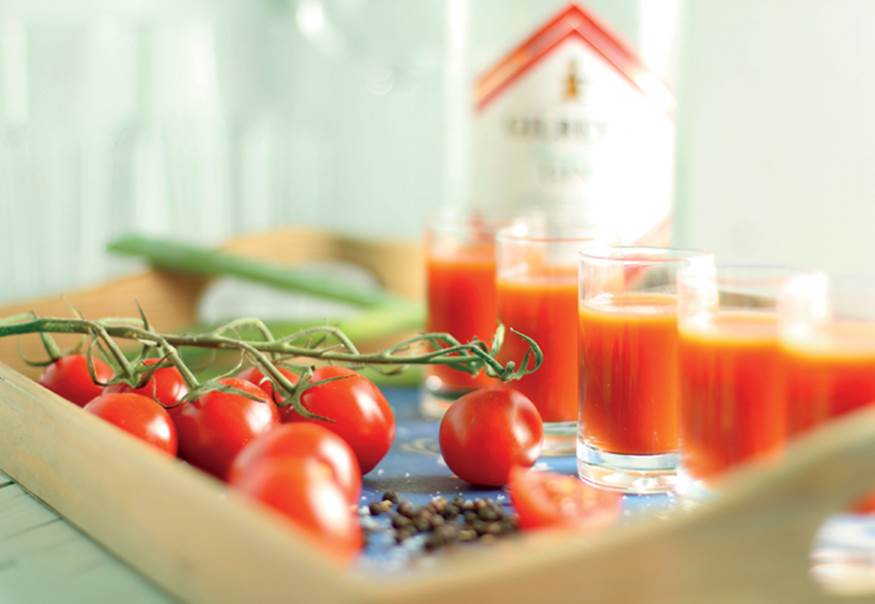
In this final version, the flash was bounced off a Styrofoam sheet placed to the right of the subject, and any direct flash was blocked by a black foamie thing that was mounted on the flash. The result is a scene that is lit exclusively by soft, lateral light.
Canon EOS Rebel T1i (EOS 500D) | EF 50mm f/1.4 set to f/1.6 | M mode | 1/100 second | ISO 100 | RAW | white balance set to flash | on-camera Canon Speedlite 430EX II with a black foamie thing | Styrofoam reflector | FEC set to +1.33 EV
The shot was starting to look better, but the direction of the light was not how I wanted it. To fix it I rotated the flash toward the Styrofoam reflector and blocked any remaining direct light with a black foamie thing. This simple step transformed the flash into a much larger and softer light source. The light now came from the side and made the tomato juice in the glasses really shine.
The amount of flash exposure compensation required to get this kind of shot varies from flash to flash and from scene to scene, so you will have to experiment to find your own solution. Values between +0.3 and +1.33 usually do the trick.
Popup Flash: Camera Settings and Shooting
You can use the same bounce trick with popup flash, but because you cannot rotate a popup flash, you need to direct the light a different way. I used a black foamie thing covered in reflective tape and transformed it into a silver foamie thing. You can usually attach a black foamie thing to a flash unit with a hair tie, but you have to hold it for a popup flash. With a little practice you will find that a silver foamie thing made from a mouse pad is easy to hold and manipulate.
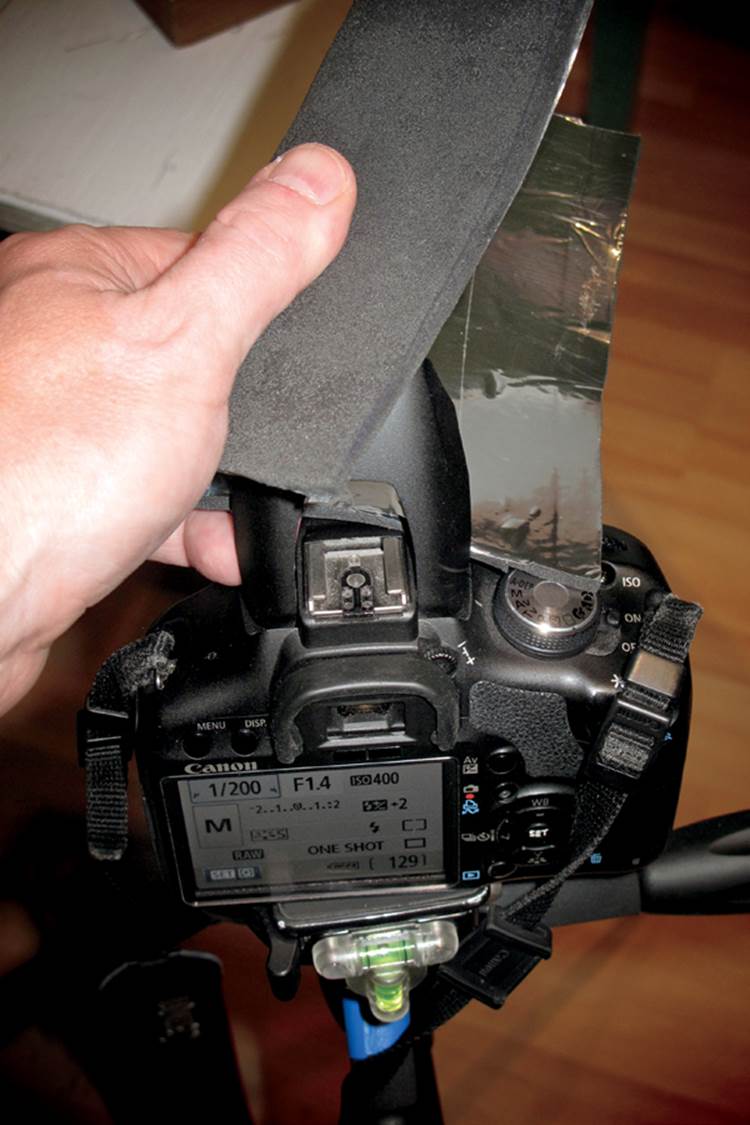
A popup flash cannot be rotated, so I handheld a black foamie thing covered with reflective tape to direct the light
The setup for our popup flash shots. You can see the glasses and glittery red ribbon we used to produce the background bokeh.
Schematic of the popup flash setup showing the black foamie thing covered with reflective tape (it is now a silver foamie thing)
Photos like these can even be captured with popup flash if you know how to manipulate it
Canon EOS Rebel T1i (EOS 500D) | EF 50mm f/1.4 set to f/2.2 | M mode | 1/200 second | ISO 100 | RAW | white balance set to flash | popup flash and a silver foamie thing | +1.33 EV FEC

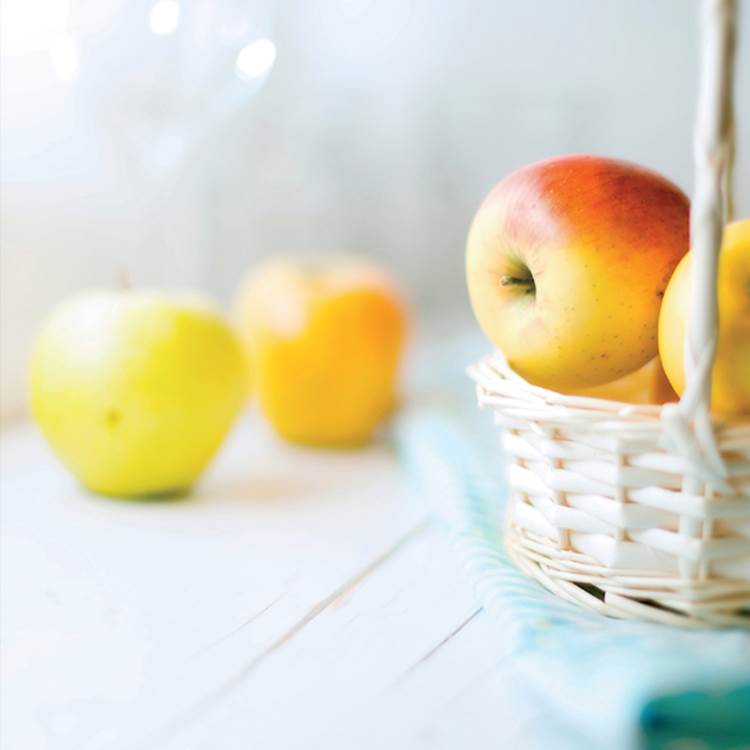
The setup for a photo of some apples, again with bounced flash. The glasses in the background produced the bokeh.
The rest of the setup was like the previous one of the tomato juice glasses. Once again, we used one sheet of Styrofoam as a reflector (a wall could work just as well) and a second sheet of Styrofoam opposite the first one to brighten the shadows. For this shot I added some glasses and I used a wide aperture to create the background bokeh.
Tips, Tricks, and Notes
The on-camera TTL bounce flash technique is quick to use and easy to perfect for shooting food photos in restaurants, but bouncing popup flash can be tricky and it requires practice. Popup flash is less powerful, so you might have to use flash exposure compensation or increase the ISO setting to get satisfactory results. If your budget allows it, a TTL flash with a swivel head from your camera manufacturer is the best option, and of course, you can also use this type of flash off-camera (see the next workshops for examples).
A silver flag is necessary only if you use it with popup flash. Shading a flash that rotates is more easily accomplished with the unmodified black foamie thing.
I think it is impossible to tell that this photo was captured with an on-camera flash and just a few simple accessories
Canon EOS 5D Mark II | EF 50mm f/1.4 set to f/1.4 | M mode | 1/125 second | ISO 100 | RAW | white balance set to flash | on-camera Canon Speedlite 580EX II set to TTL mode | +1.66 EV FEC | shot with a black foamie thing to block direct flash light
Workshop 26
A Simple Off-Camera Flash Setup
▸ Improvised reflectors and diffusers
▸ How to create attractive effects with a single backlight
▸ How to shoot quickly and discreetly with flash even in restaurants
Food prepared by a professional chef in a good restaurant tastes great, looks appetizing, and serves as a great photographic subject. If you have a window table during the day, photographing your food is relatively simple, but capturing it effectively in evening light is virtually impossible. Restaurant lights provide neither the spectrum nor the direction and softness you need to capture usable images.
You have a lot more options if you use flash. If you are sitting in the open, ask for permission before you use flash, but if you are sitting in a booth or in a corner of your own, you can usually go ahead and shoot. With a little practice you will learn to shoot quickly and unobtrusively so you don’t annoy other guests. Generally speaking, low-end restaurants don’t mind photographers, but high-end establishments prefer that people do not take pictures. At the same time, if you want a high-quality photo, you need a high-quality subject, so it might be worth asking.
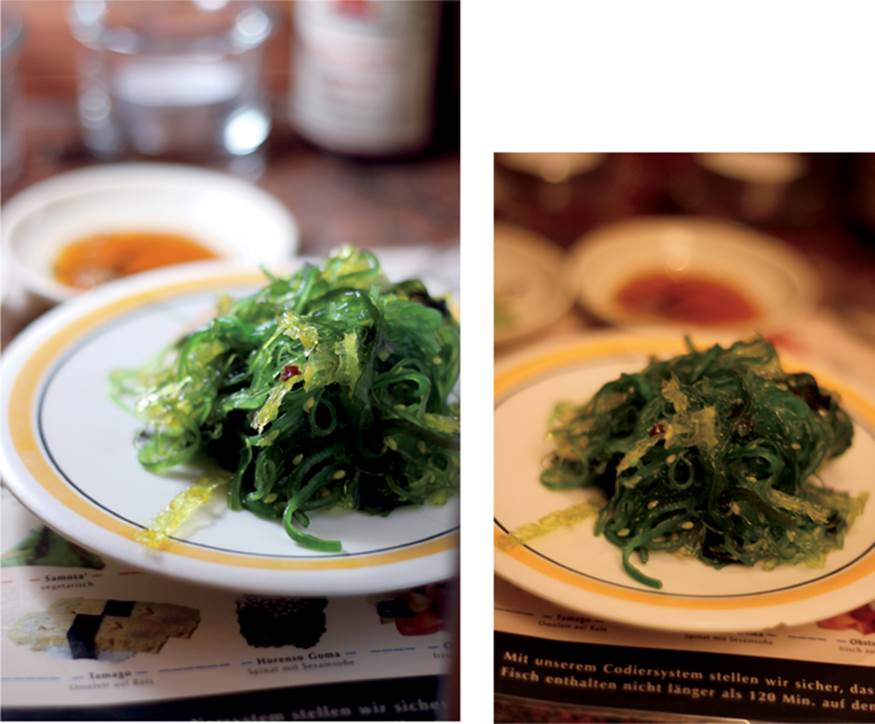
Flash versus artificial light—in this case there is no contest! These two photos were captured with the same camera, but the one on the left was shot with the camera on M mode and with flash, while the one on the right was shot with the camera’s auto exposure mode and without flash. Neither image was postprocessed.
Flash can help you capture great food shots in restaurants
Canon EOS Rebel T1i (EOS 500D) | EF 50mm f/1.8 set to f/2 | M mode | 1/100 second | ISO 100 | JPEG | white balance set to flash | one off-camera, non-TTL YN-460 flash, fired remotely with a RF-602 trigger
Another unprocessed restaurant shot. The focus and lighting are fine, but the background is dark and uninteresting. Photoshop can provide the solution.
The previous workshop showed you how to use lateral light to improve the quality of food photos. As your skills improve, you will want to add light from behind. Direct or angled backlight positioned opposite an accent or fill light guarantees attractive results, but it is impossible to set up this kind of shot with on-camera flash. The solution is an off-camera flash fired through a diffuser, ideally with an additional reflector opposite the flash. This might sound complex, but it is actually quite simple.
The Setup
Our setup consisted of a single YN-460 non-TTL flash placed diagonally behind the subject, a RF-602 radio trigger, and two sheets of copier paper; one used as a reflector and the other as a diffuser. We simply folded the paper to make it stand up, and we placed one sheet in front of the flash and the other opposite the flash in front of the subject. If paper is not available, you can probably find a light-colored advertising flyer to use instead. You can either mount your flash on the radio trigger or lay it on its side.
Camera Settings and Shooting
In a setup like this it is preferable to almost completely suppress the ambient light and allow the flash to dominate the scene. In manual (M) mode, select a wide aperture to create some background bokeh, choose ISO 100 for low noise, and set the exposure time to about 1/125 second. The short exposure time will suppress the ambient light in an artificially lit evening scene without overstepping the camera’s flash sync speed. As usual, the first step is to take a test shot without flash to check the ambient light level.
When you are satisfied with the settings, you can set up your flash and the paper reflectors. The close proximity of the subject and the wide aperture allows you to use a low output setting. Start at 1/32 and increase the output slightly if your test shots call for it (remember that one full increment doubles or halves the amount of light). Adjust the flash distance and angle to optimize the look of your shot. After some practice you will be able to set up and capture a shot like this in two or three minutes.

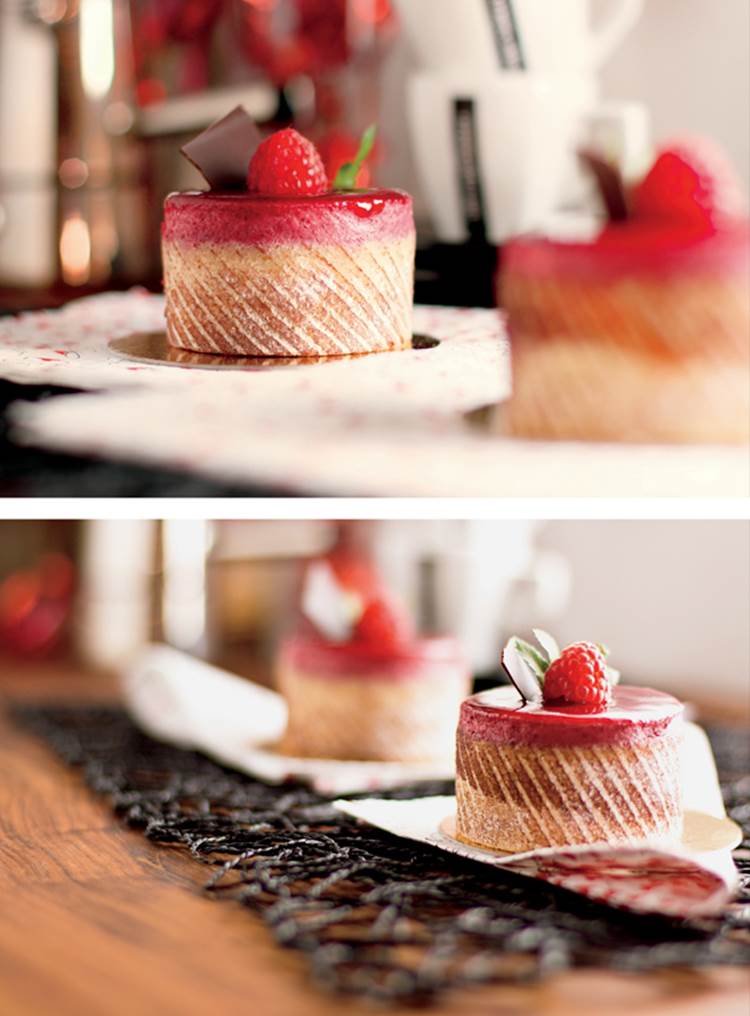
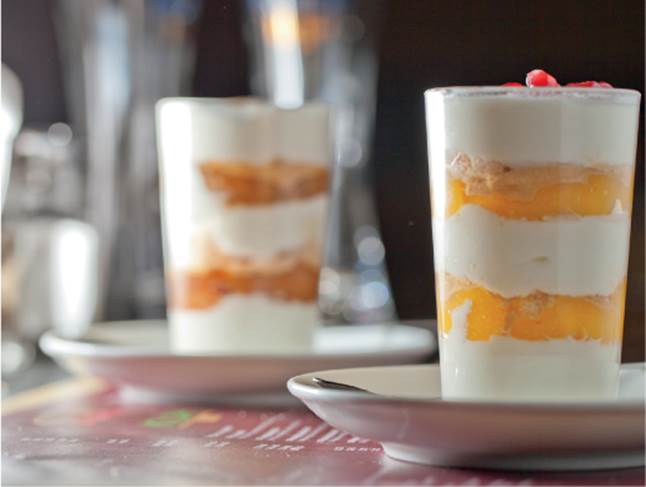
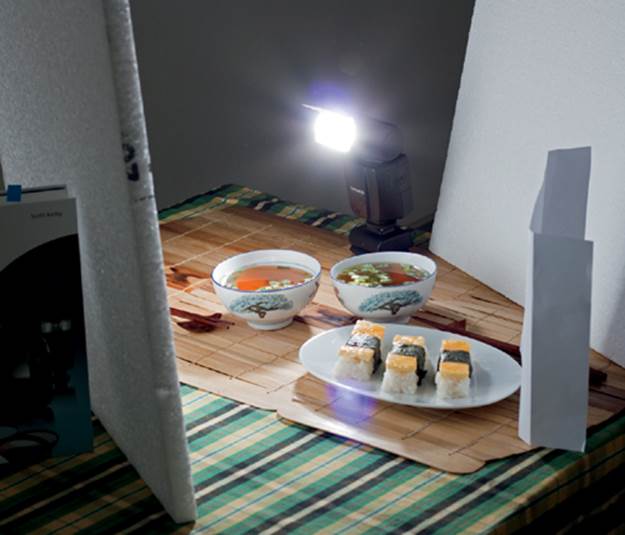
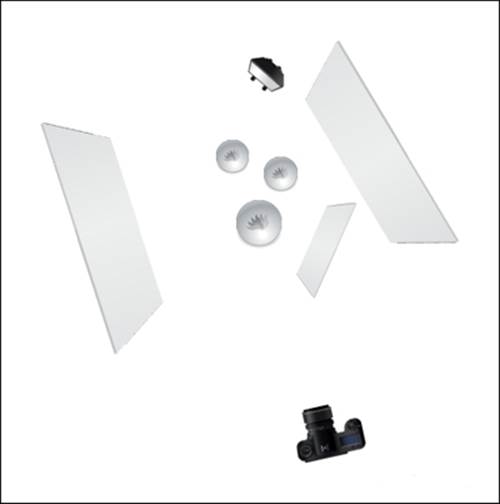
This same setup was used for both our sushi and dessert shots. The schematic shows our off-camera backlight flash with a paper diffuser and a second sheet of paper used as a reflector
After you have found the right settings, shots like this will usually require very little processing. However, our sample photo had a dark and rather dull background. If you have access to Photoshop or Photoshop Elements, it is easy to insert a completely new background. For optimum results, in this case, use Hard Light blend mode, mask the subject, and adjust the intensity of the background colors with the Opacity setting.
In our example we also used the Clone Stamp tool to remove a couple of messy details. We increased the contrast and virbrance, and we added a warm-toned filter with low opacity.

Using Photoshop to create a more interesting background. The screenshot shows the mask and the settings we used (Hard Light blend mode and 87% Opacity).
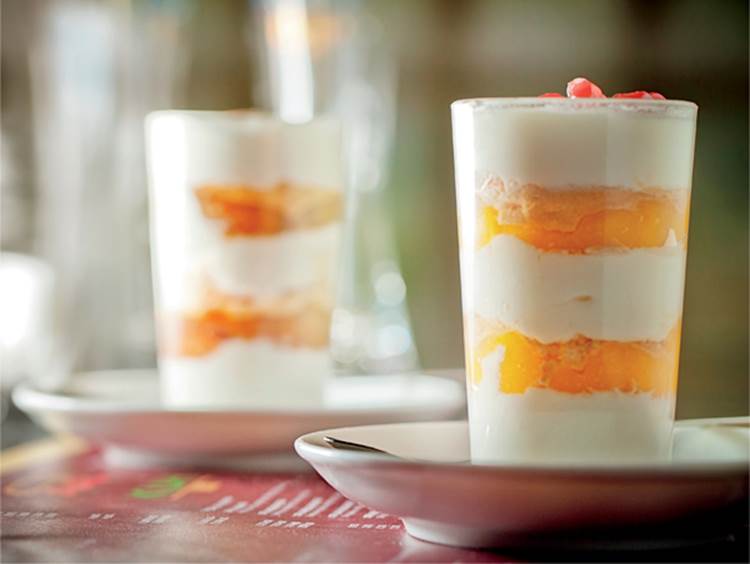
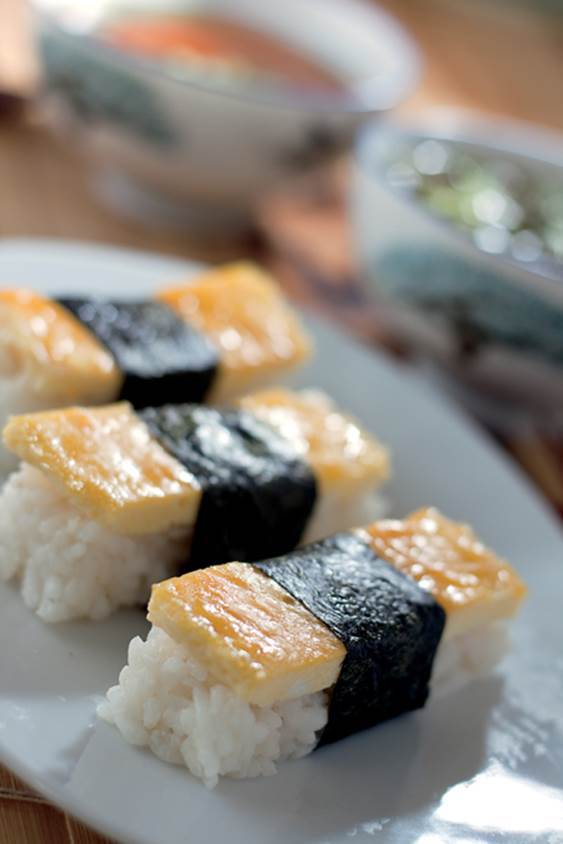
The final result is a delicious-looking photo that was shot in two minutes at a restaurant with a simple setup
Canon EOS 5D Mark II | EF 100mm f/2.8L macro set to f/4.5 | M mode | 1/125 second | ISO 100 | RAW | white balance set to flash | off-camera, non-TTL flash fired with a RF-602 radio trigger
Tips, Tricks, and Notes
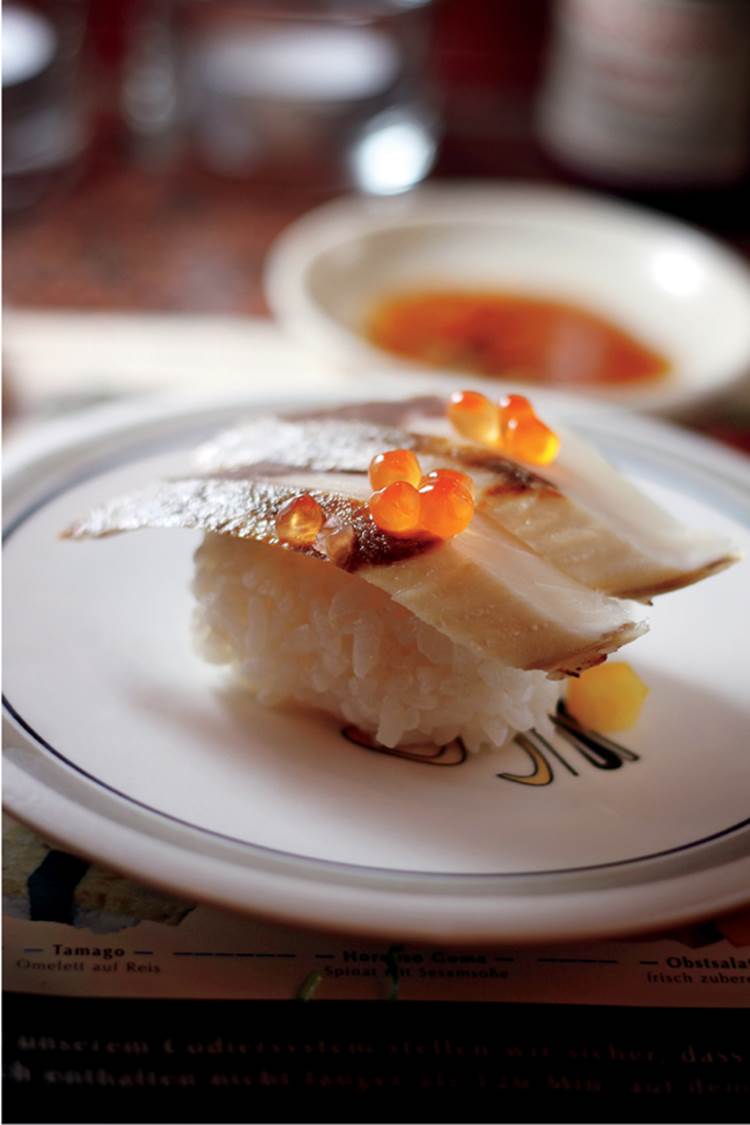
The background in food photos is important, even if it is completely blurred in the final image. Drinking glasses, glittery giftwrap, and other objects in the background provide interesting and attractive bokeh bubbles—the farther away from the subject, the larger the circles of confusion. Food photos usually look best when the background is blurred, so a long lens, a close subject distance, a wide aperture, and a distant background are ideal. Professional food photographers such as David Loftus use medium-format cameras, but an APS-C or DX camera coupled with a full-frame 50mm f/1.8 standard lens can produce great food shots, too. If you dare to get really close to the subject, the background will automatically blur.
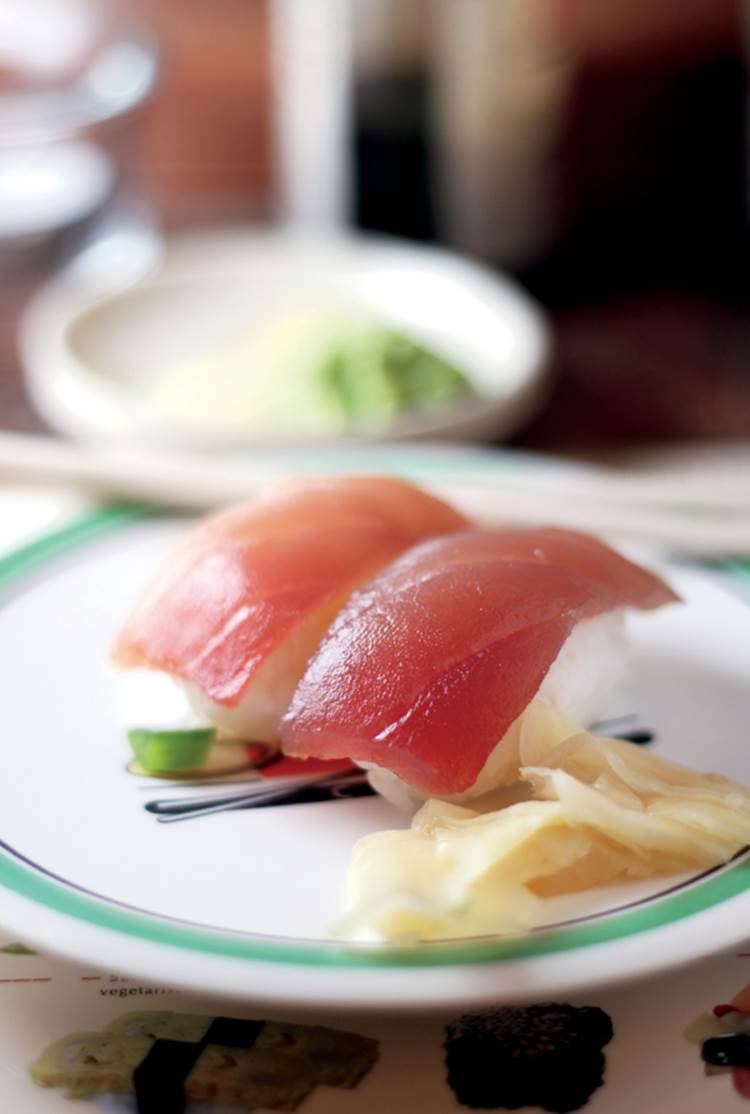
Another sushi shot to inspire you
Canon EOS Rebel T1i (EOS 500D) | EF 50mm f/1.8 set to f/2 | M mode | 1/100 second | ISO 100 | JPEG | white balance set to flash | radio-triggered off-camera, non-TTL flash
Workshop 27
A Complex Flash Setup for Food
▸ How to build a backlit setup
▸ Using Translum sheeting instead of a softbox
▸ Doing a contract job for a restaurant
A local restaurant owner asked me to shoot some photos for his website, so I began looking for a simple but reliable setup that I could use to capture a variety of dishes. My search took me to a setup created by Thomas Ruhl (1 www.tiny.cc/un7wlw) that uses a Translum diffuser backdrop and a reflective silver umbrella. I used the same basic elements in a less expensive and more portable form.
The Setup
I used flash fired through Translum sheeting for my main light and backlight. I mounted the sheeting on two telescopic painting poles, which are available from any hardware store, and I attached the poles to a table with tape. The Translum sheeting is easy to roll up, and you can adjust the flash position and angle. Both of the YN-460 flashes (with RF-602 radio triggers) were mounted on light stands with Manfrotto MA026 umbrella adapters, and the second light was pointed into a reflector umbrella. I used my trusty Canon EOS Rebel T1i (EOS 500D) with a Tamron 18–270mm zoom. During the shoot I stood on a ladder and shot down toward the subject.

Our setup, showing two flashes and the stage we made from a restaurant table and a roll of Translum sheeting mounted on the painting poles
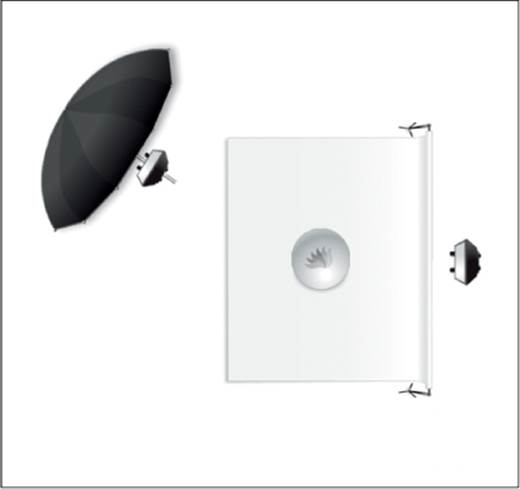
Schematic of our setup, showing the main flash fired through the Translum sheeting and the reflector umbrella at the front left. The camera was positioned directly above the the scene and is not shown here.
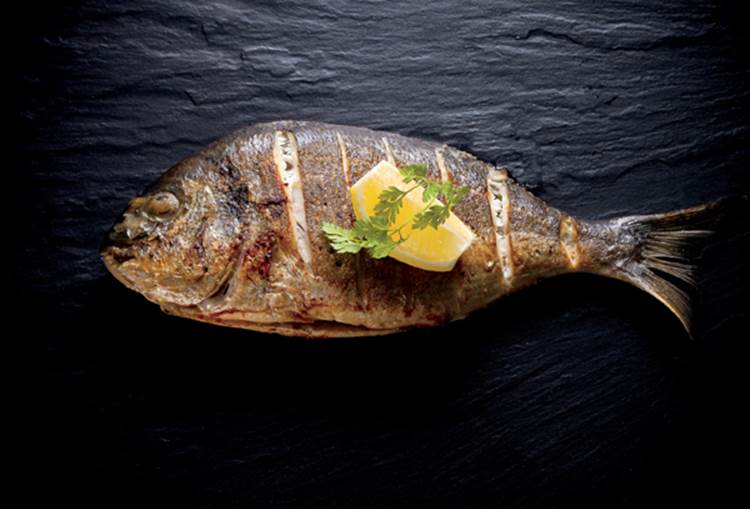
A quick and easy food photo. The setup included a roll of Translum sheeting and a reflector umbrella.
Canon EOS Rebel T1i (EOS 500D) | Tamron 18–270mm f/4– 5.6 set to f/8 and 46mm | M mode | 1/125 second | ISO 100 | RAW | white balance set to flash
Camera Settings and Shooting
This is another setup in which we want only flash light and no ambient light. In this case, the color temperature of the ambient light and its angle of incidence were undesirable. Shooting at f/8, 1/125 second, and ISO 100 should produce sharp, low-noise images with little influence from the ambient light. As always, make some test shots without flash to check the lighting balance before you add the backlight and reflected flash. The Translum sheeting reduces the flash output by 1–2 EV, and the medium aperture means you have to dial up the flash to compensate. In this setup, the umbrella light should be less prominent than the diffused light, so 1/4 output is a good place to start, and then you can adjust the setting as necessary.
This setup is simple and gives you the flexibility to shoot a variety of subjects. The camera position directly above the subject makes it unnecessary to adjust the lighting for each shot, as would be required when using a conventional viewpoint diagonally above the table. The question of aperture and depth of field is precluded by the unusual viewpoint and the relatively small aperture, and even our midrange lens produced perfectly sharp images with the chosen aperture.
Post-Processing in Photoshop
If the lighting setup is done properly, there will be little need for post-processing. For this photo I straightened and cropped the image before I removed a couple of excess water droplets and checked for unwanted artifacts. To finish up, I added a subtle vignette and sharpened the final image.
Tips, Tricks, and Notes
The 18–270mm Tamron lens we used for this shot has one of the largest zoom ranges available. It is a lot of fun to use, but it doesn’t produce the high-end sharpness we normally like to see throughout its entire range. If you know which focal lengths you are likely to use during a shoot, you can check in advance which apertures produce the best results. SLRgear (www.slrgear.com) lists the critical apertures for a wide range of popular lenses. I used focal lengths between 55mm and 70mm for this session, and f/8 provided the best compromise.
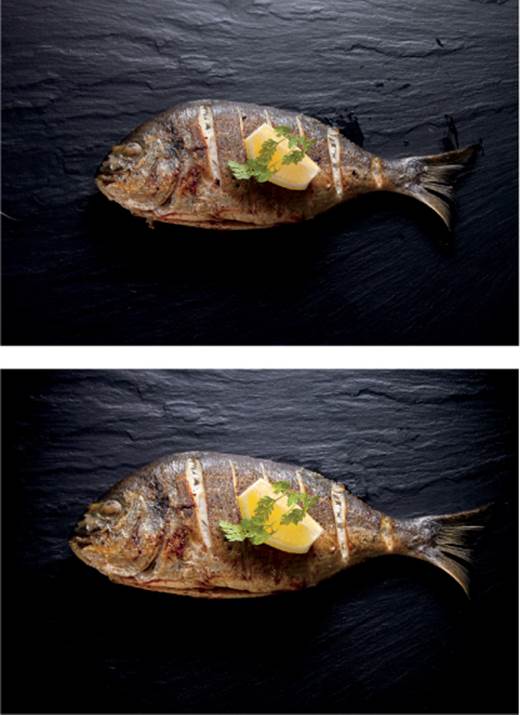
The original, unprocessed image (top); the same image with some subtle tweaking (bottom)
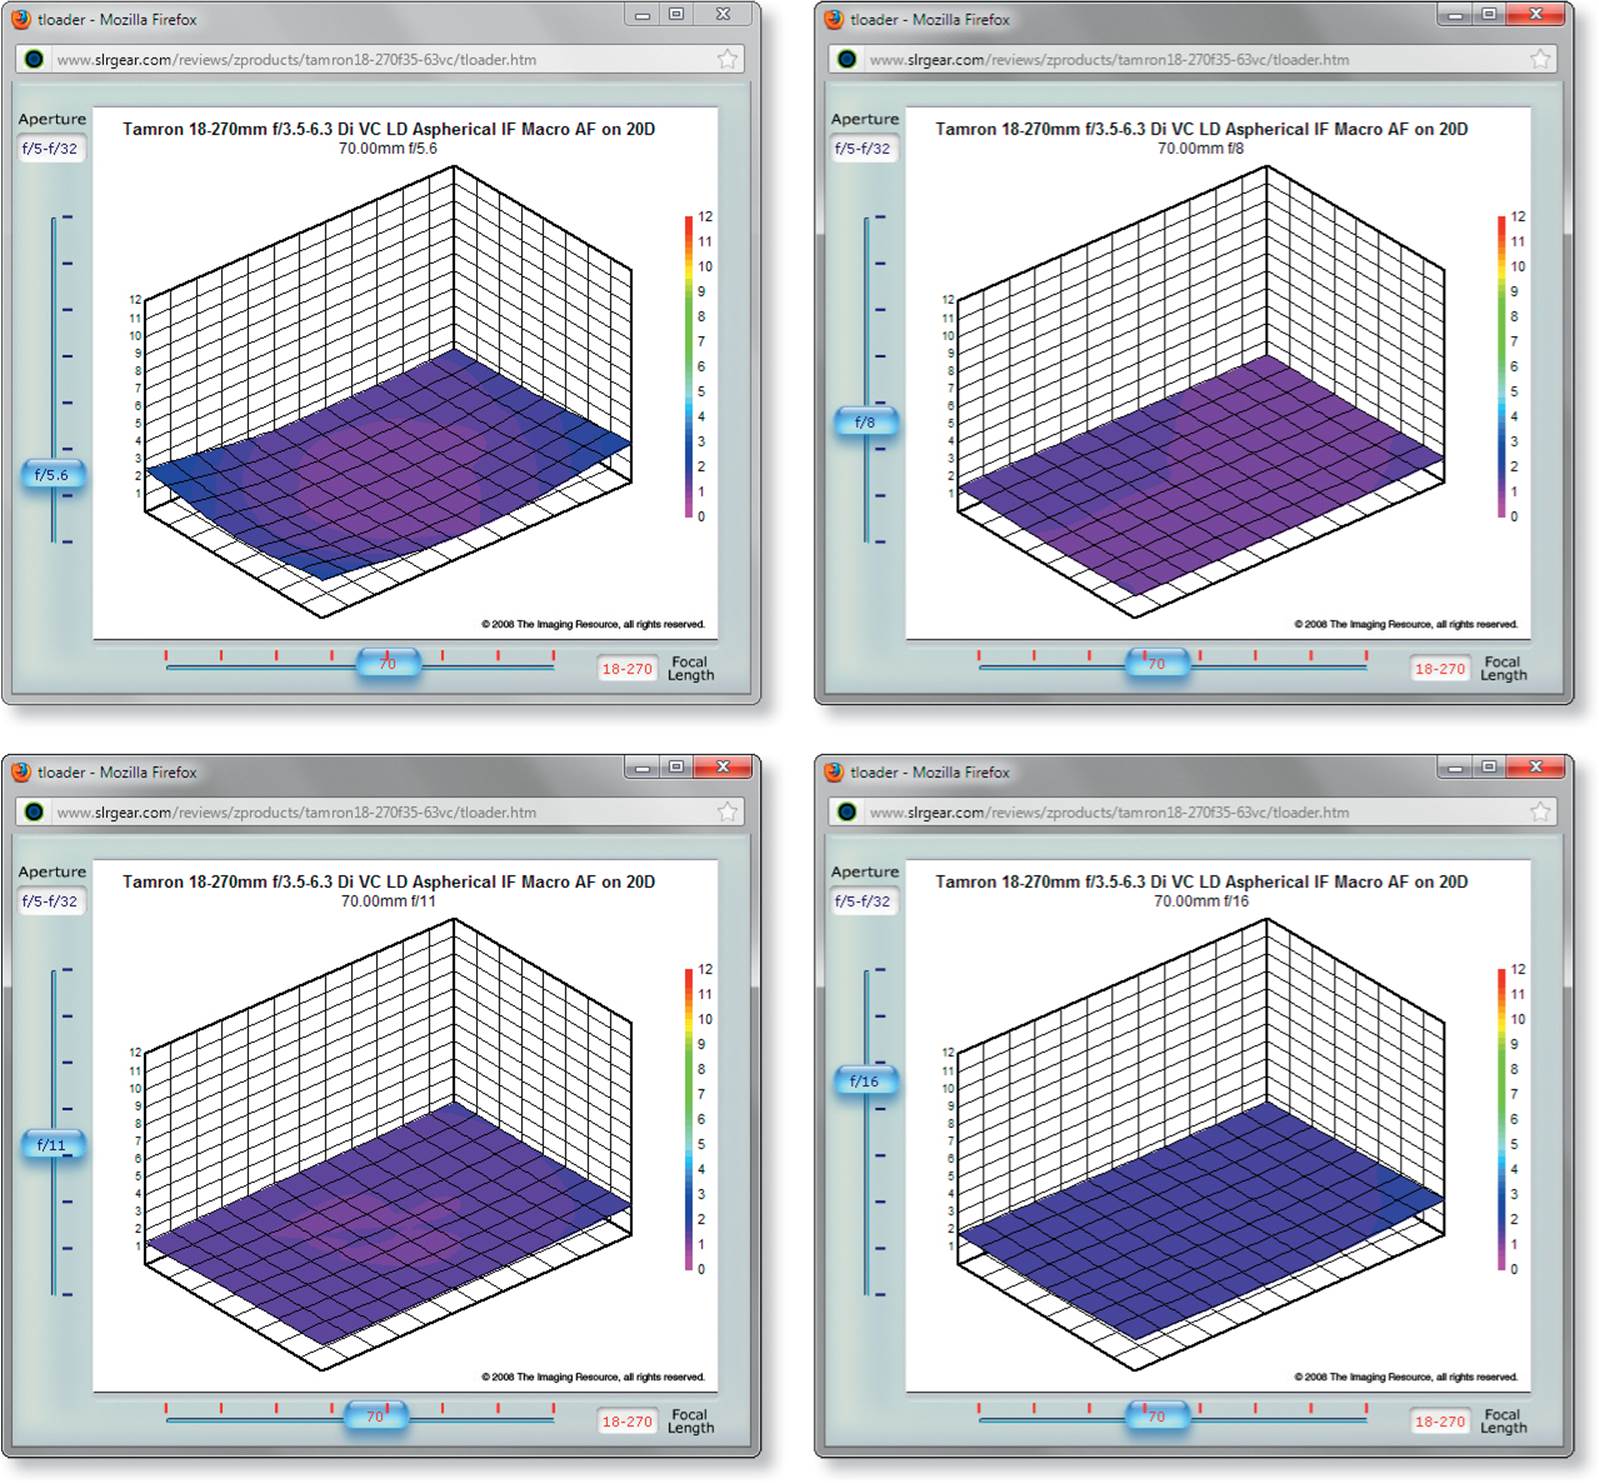
Graphs of the resolution produced by our Tamron lens at f/5.6, f/8, f/11, and f/16. Bright pink is better, dark blue is worse. (Illustrations courtesy of Dave Etchells, www.slrgear.com)
An aperture of f/11 would also provide the necessary depth of field in a situation like this, but stopping down any further would result in diminished image quality due to diffraction within the lens.
Thomas Ruhl (mentioned earlier) uses BD Trans-lum foil from Manfrotto, which is availale in Europe. An alternative that may be found in the U.S. is Savage Translum sheeting. We used a similar product from an architectural shop. Check around the stores in your neighborhood to see what alternatives you can find.
The background in our photo is an imitation slate tile from a hardware store. It was cheaper and easier to clean than the real thing, and I think it actually looks even better!
The photos on the overleaf came from the same shoot and present more examples of how you can use this simple but versatile setup. The basic shooting parameters were the same as those we used for the image on page 197.

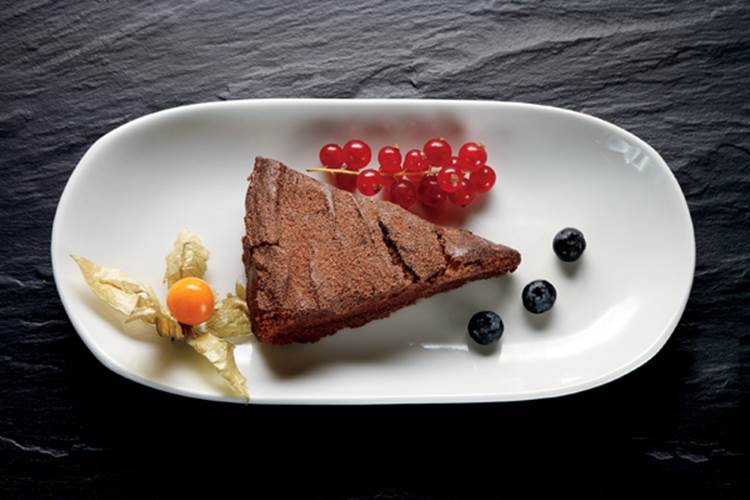
Two more shots made with our restaurant lighting setup
Workshop 28
Lighting Like Cannelle & Vanille
▸ How to build a backlit setup
▸ Using Translum sheeting instead of a softbox
▸ Doing a contract job for a restaurant
Lots of great food photographers display their work on Flickr. Two of my favorites are Cannelle & Vanille (Aran Goyoaga) and IngwerVanille (Svetlana Karner). Along with their great styling, they use light in clever ways to make their subjects look good enough to eat. Aran and Svetlana use mostly diffuse daylight, so I decided to take up the challenge of producing a similar mood with flash. My goal was to keep things as simple as possible to increase the chances of capturing great photos before the cream topping collapses or the sauce separates. The result is a simple setup that uses a single flash and the corner of a room. The “Tips, Tricks, and Notes” section at the end of this workshop gives you some ideas about how to further refine the setup.
The Setup
Aran and Svetlana use diffuse daylight coming from the front or the side, as backlight, or diagonally from above, depending on the dish. Both photographers use reflectors across from the main light to illuminate any unwanted shadows. Their main light is a north-facing window covered with a large diffuser, such as a bedsheet. I could use a large softbox positioned near the subject to reproduce this type of light, but there is an easier way.
The walls in most rooms are just as large as a window or a bedsheet. If they are painted white they can produce a similar effect when used with bounce flash. I have produced some of my best results by bouncing flash into a corner and using a reflector opposite the corner to lighten the shadows that are created by the main light. In this workshop I used the silver side of a 5-in-1 reflector mounted in a Manfrotto Nano Clamp that I attached to a tripod (tape would work just as well).
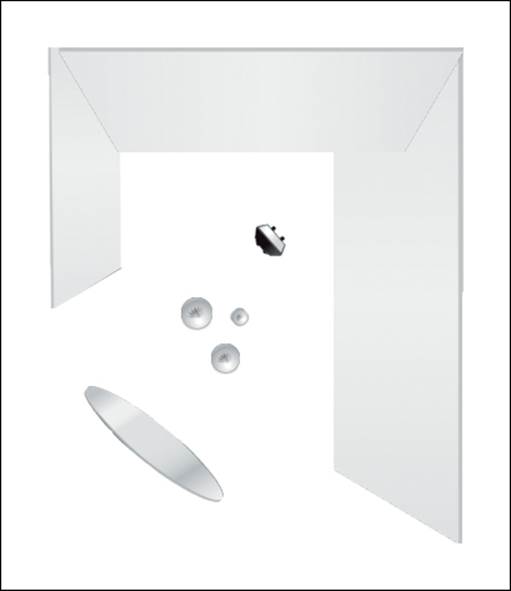
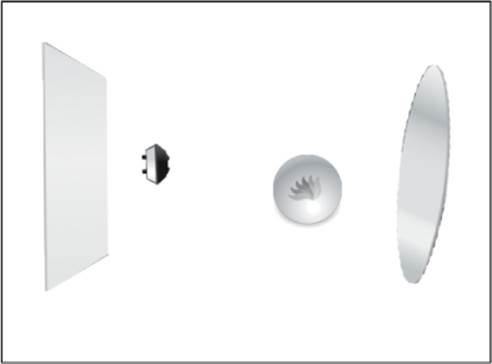
Schematic of the corner bounce setup
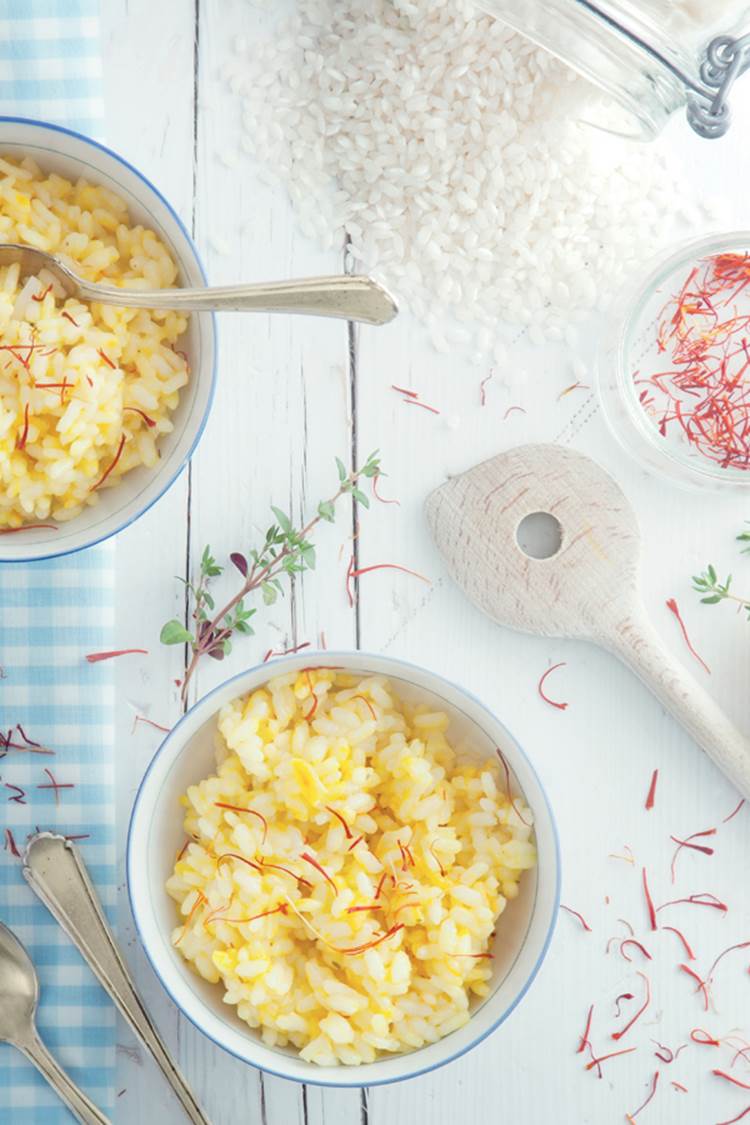
It doesn’t take magic to produce natural-looking light in a dark room with one flash and no modifiers—it’s a matter of using the right bouncing technique
Canon EOS 5D Mark II | EF 24–105mm f/4 set to f/9 and 96mm | M mode | 1/125 second | ISO 100 | RAW | white balance set to flash | one off-camera flash fired into the corner of the room
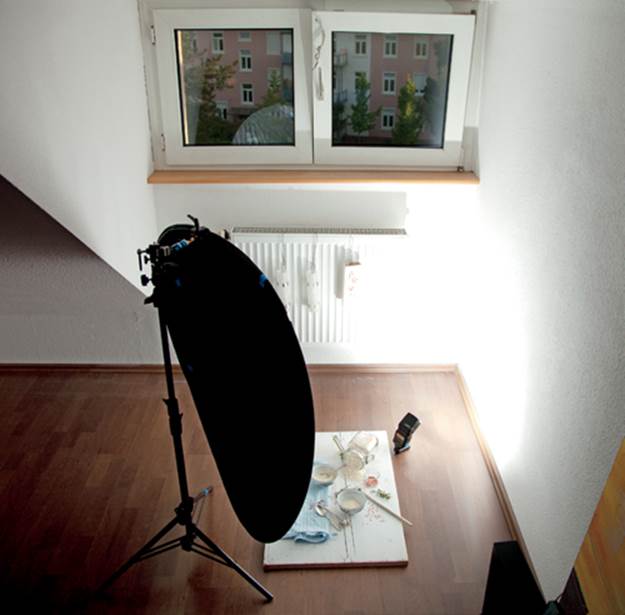
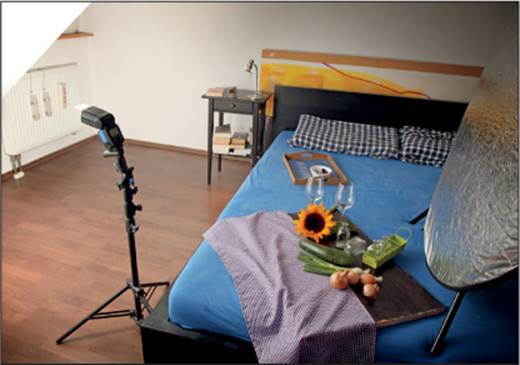
The flash fires into the corner, and the silver reflector lightens the shadow. Although the view outside looks dark, this shot was taken during the day; the ambient light was underexposed with a short shutter speed.
My setup was ready for shots captured from above. It is important to use at least a medium telephoto lens to prevent the scene from looking distorted. I set up my scene on the floor and stood on a chair to give me sufficient distance from the subject. I then shot with a full-frame camera and a zoom lens set to about 100mm. I made sure that I shot as perpendicular and accurately as possible with the subject in the center of the frame.
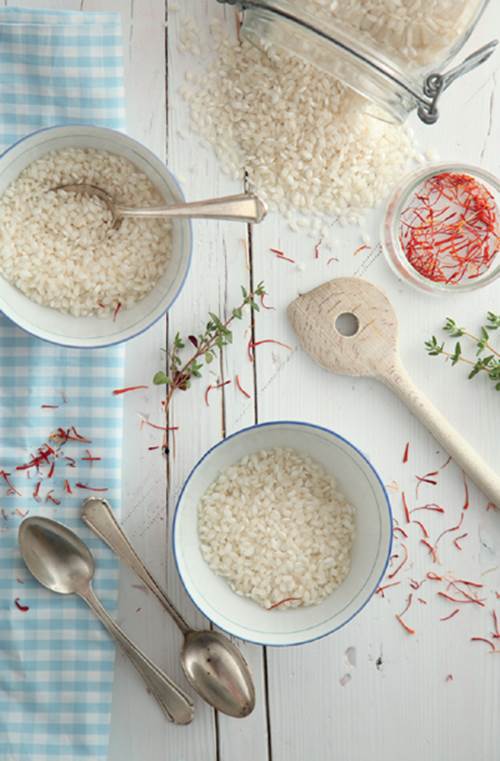
Always test and fine-tune your lighting setups with dummy dishes before you shoot the real thing. This is an original, unprocessed test shot.
Camera Settings and Shooting
This scene doesn’t have much depth, and I didn’t want a blurred background anyway, so I set the aperture to f/9, and I used ISO 100 to keep the noise levels low. I also used the built-in wide-angle diffuser and set my Canon Speedlite 430EX II to 1/2 output. To save battery power and reduce the recycle time, you could halve the output and double the ISO value. As usual, I made a test shot without flash to check the lighting balance, then I made some more test shots with flash, which I fired with a Yongnuo RF-602 radio trigger.
Always set up and fine-tune food shots with a dummy dish that looks similar to the real thing. For my test shots, I used two dishes of uncooked rice. After you are sure everything is set up correctly, add the real dish and then shoot quickly while the food still looks appetizing! This is the only way to effectively capture shots of foods such as ice cream, soufflés, whipped cream, and beer foam.
Post-Processing in Photoshop
I adjusted the exposure slightly in Adobe Camera Raw and then performed the following steps in Photoshop (they took about 15 minutes):
▸ Crop to the golden ratio using the Atrise Golden Section tool.
▸ Slightly reduce the blacks with the slider in the Levels dialog.
▸ Shift the color slightly to give the image a slightly cooler look (a technique often used by Cannelle & Vanille).
▸ Add a negative vignette on the light side by using a mask.
▸ Slightly lighten the shadows with the Shadows/Highlights tool and make subtle local color and brightness adjustments.
▸ Sharpen the image for output.
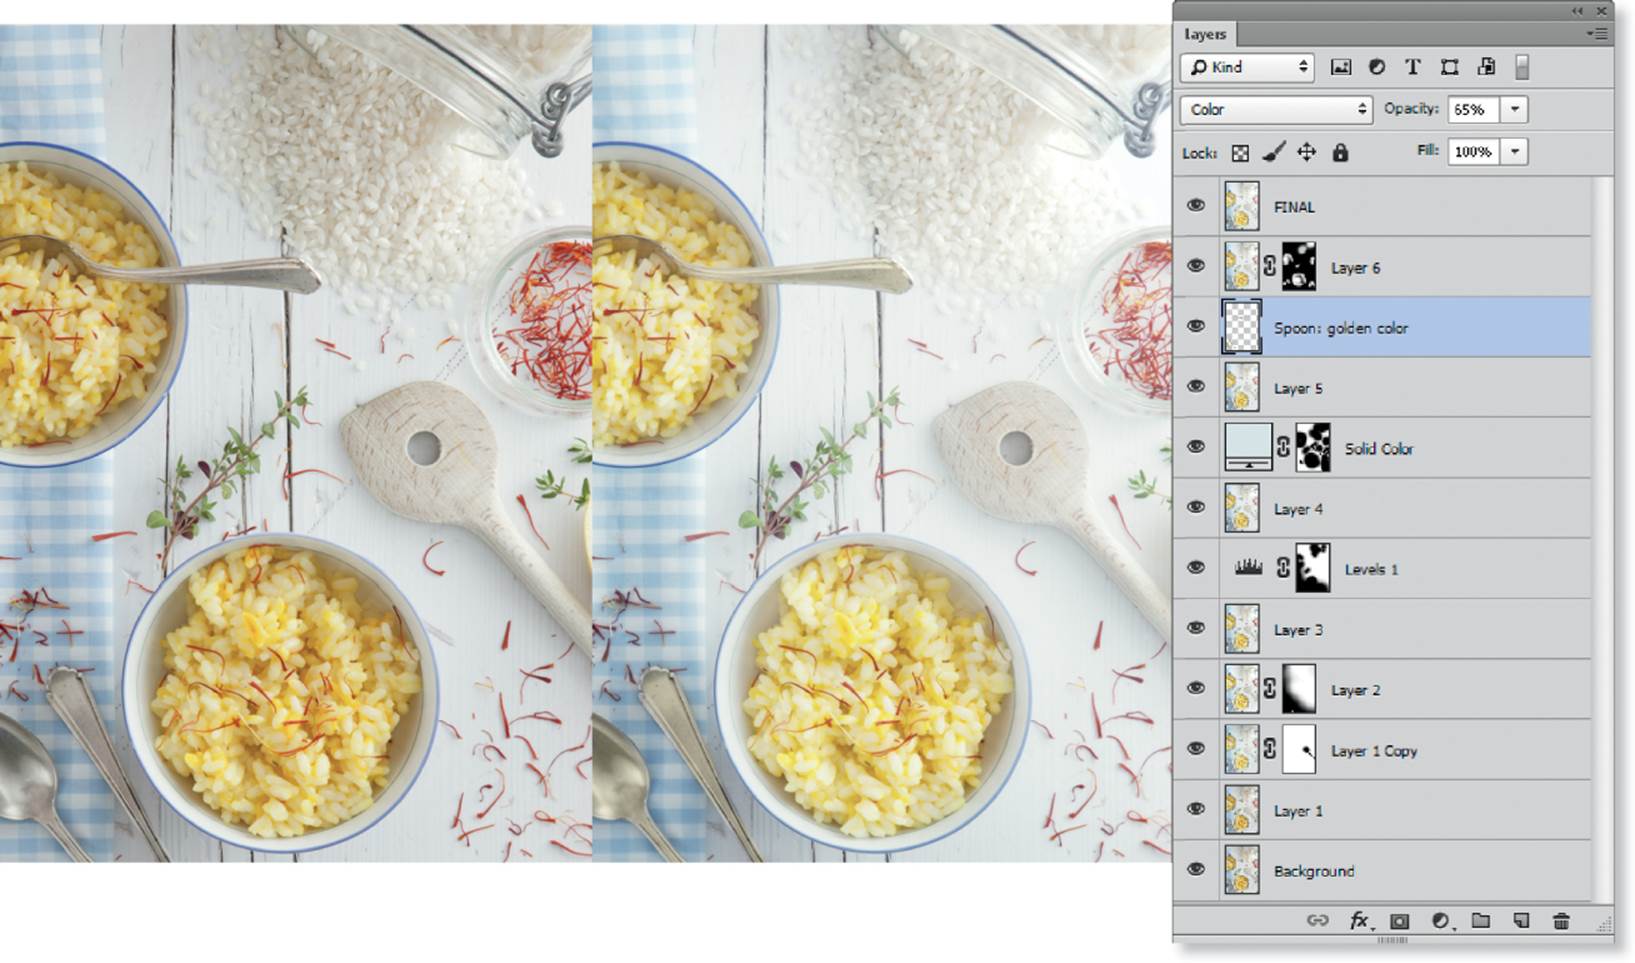
The original image (left); and the processed version (right). These are subtle alterations, but they give the image a cleaner, more airy look.
Tips, Tricks, and Notes
Here are a few tricks for dealing with diffusers, reflectors, and bounce flash:
▸ North-facing window: A popular way to produce soft, balanced light is to hang a white bed sheet in front of a window. You can even fire the flash through the window to produce the same effect at night. Use a high output setting or a high ISO value (or both) to reproduce the effect of a north-facing window. Your neighbors might wonder what’s going on, but it’s all for the sake of art!
▸ Bounce flash: Some photographers recommend tilting the flash head up and bouncing flash off the ceiling. Try it for yourself, and you will see that light from above is not as pleasing as light that comes from the side. If you look at everyday situations, you will realize that the most aesthetically pleasing light is near windows, under balconies, or in doorways. In these situations the light is shaded from above. Targeted, frontal light gives a scene structure and contours.
▸ Reflector holder: In the photo at the top of page 204 you can see that the reflector is held in a clamp on a light stand. Clamps and other adapters, goosenecks, and ball heads are just a few of the indispensable helpers that flash photographers collect for their work in the studio and on location. The photos on the next page show a selection of applications for these types of accessories. One of my favorite tools is the Manfrotto Magic Arm (see page 136). It is not cheap, but it is really versatile.
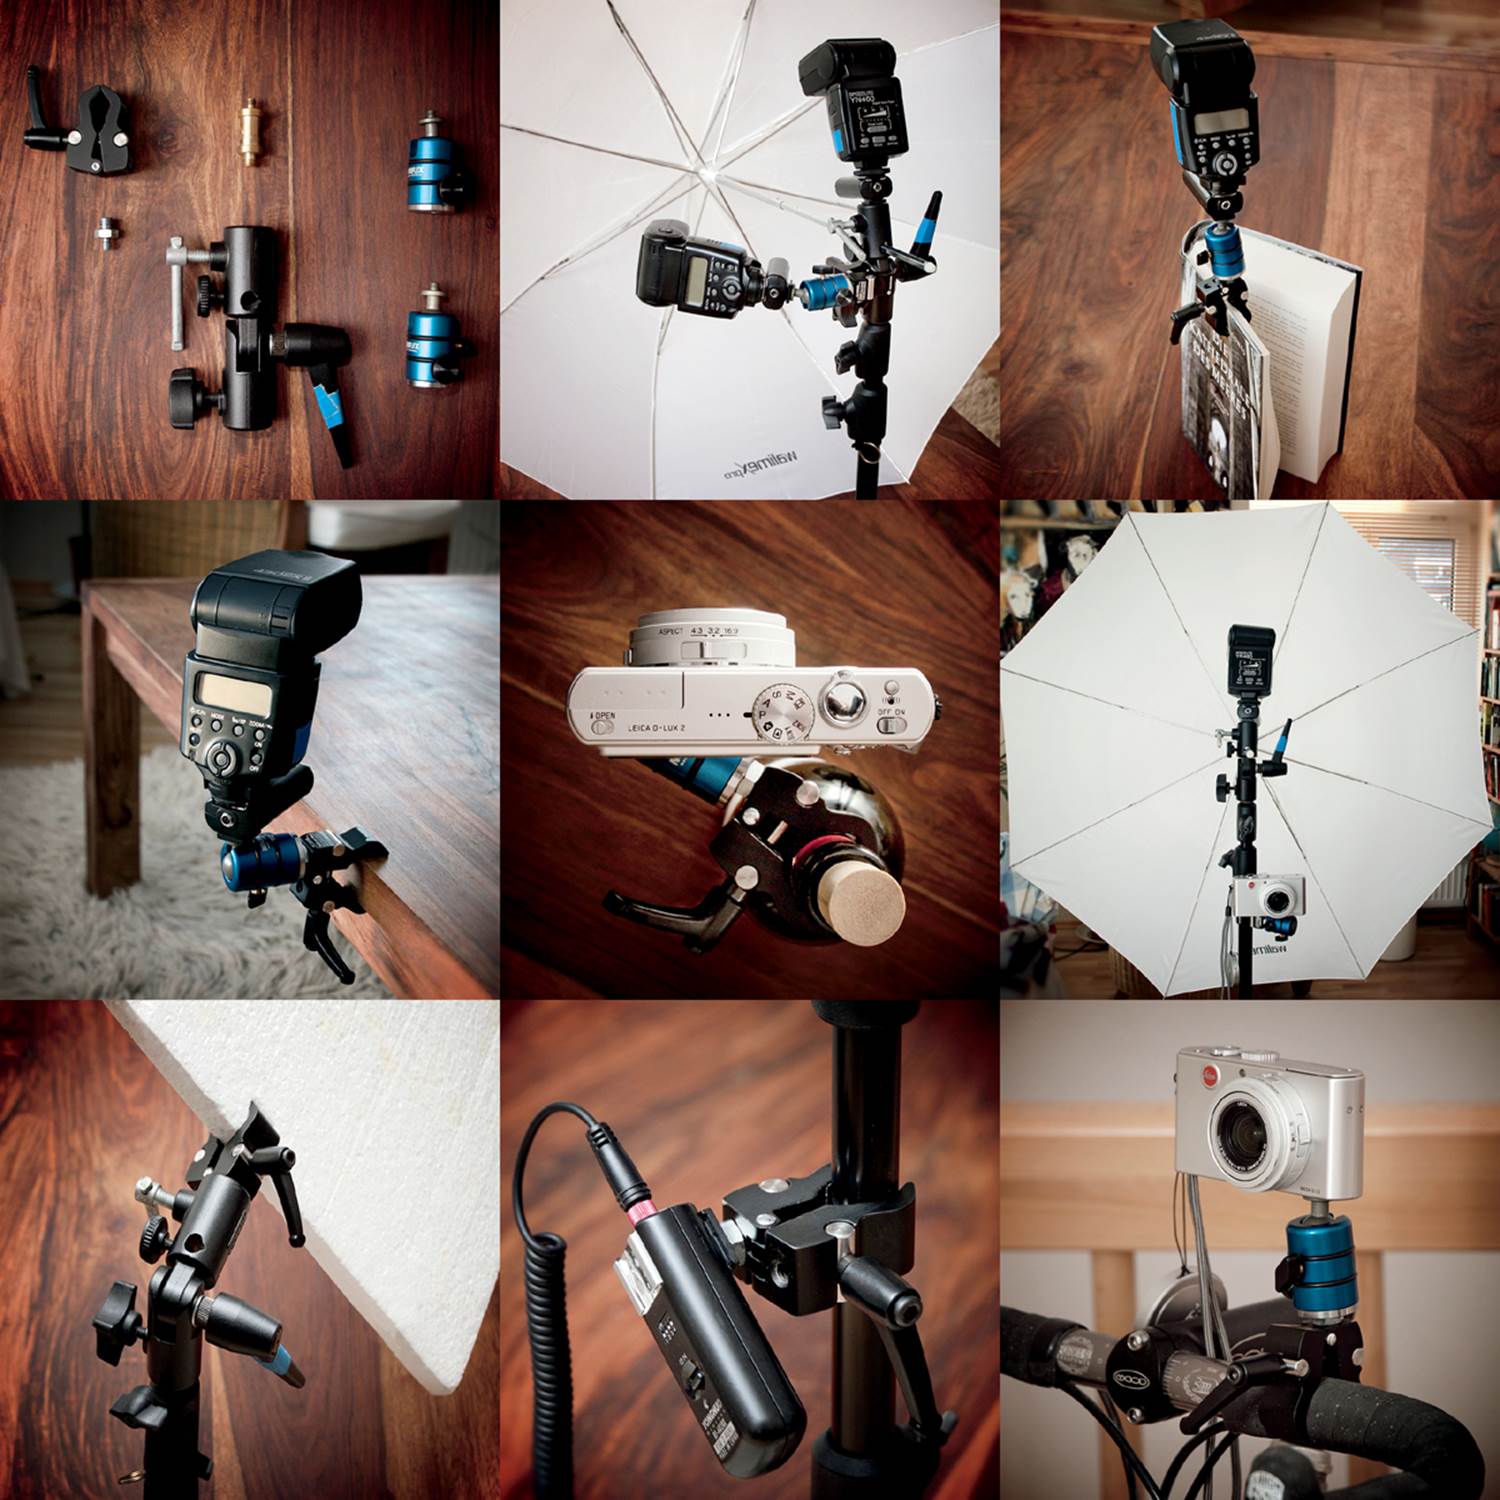
Versatile helpers in endless situations: Manfrotto 386BC Nano Clamp and MA026 Lite-Tite umbrella adapter, and Novoflex 19P ball head
Workshop 29
Simulating the Sun
▸ How to simulate sunlight using simple tools
▸ Modulating your artificial sun
The light used for food and tabletop shots is often very similar to daylight, and often it is modulated to give it a soft look. The simplest way to produce soft light is to shine it through a diffuser or bounce it off a reflector. If you deliberately let some light from the flash spill over to light the subject directly, it can help give the scene a sparkling, sunny look. The downside is that the contrast increases and is more difficult to control, which often results in overexposed highlights. In situations like this, shoot in RAW format if you can. It will give you the most leeway for adjusting proportions of the shadows and highlights later.
In this section I discuss three different setups to obtain various looks to the images.
Schematic showing the flash pointed at the sloped ceiling and the reflector opposite the light source
Setup I: Camera Settings and Shooting
For my first soft light shot I simply pointed my flash at a sloped white ceiling to bounce diagonal light from above. A reflector that I placed opposite the flash brightened the shadows.
You will have to experiment with the angle of the flash in relation to the camera’s optical axis until you find the right position. This setup is less appropriate for a camera viewpoint from above the subject (see workshop 28), although the side view adequately mimics light from a north-facing window. The lens I used is not known for its great bokeh, but nevertheless it produces a nice soft background at its long end when combined with a wide aperture and a close subject.
Simulating the light from a north-facing window
Warm, natural-looking light from a window on the left—or is it flash?
Canon EOS 5D Mark II | EF 24–105mm f/4 set to 105mm and f/4 | M mode | 1/125 second | ISO 250 | JPEG | white balance set to shadow | off-camera flash pointed at the wall to the left
A test shot without flash shows if the ambient light has been suppressed
I used the wide-angle diffuser, and I used the little plastic catchlight reflector on the flash to block some of the light from heading straight up. Bouncing flash and using a diffuser significantly reduces the amount of light that reaches the subject, so I increased the ISO to 250 and switched to the maximum aperture (in this case, a less than impressive f/4). I made a test shot at 1/125 second to check the level of ambient light.
I then added the RF-602 transmitter and set the flash output to 1/4. This value can be adjusted as necessary. I set the white balance to shadow so the camera would produce a warmer tone to enhance the sunny look of the image.
Schematic showing the flash aimed past the subject at the reflector, which brightens the scene and keeps the contrast manageable. Some of the light from the flash illuminates the subject directly.
Our hard sunlight setup
Setup II: Camera Settings and Shooting
The second setup uses a similar technique to produce a very different effect with much harder light that looks like afternoon sunshine. For this shot I aimed the flash to fire past the subject onto a silver reflector. This approach meant that some of the hard light from the flash illuminated the scene directly, and the reflector helped keep the overall contrast to a manageable level. This setup allowed me to use ISO 100, and once again I set the white balance to shadow to give the image a warmer, sunnier look.
Direct afternoon sunlight—or is it flash? Another shot using Setup 2.
Canon EOS 5D Mark II | EF 24–105mm f/4 set to 97mm and f/6.3 | M mode | 1/125 second | ISO 100 | RAW | white balance set to shadow | off-camera flash from the left fired past the subject at a reflector on the right
Setup III: Camera Settings and Shooting
This variation uses a small amount of direct light to give the subject a little extra sparkle. Once again, the reflectors provide the basic lighting and reduce the overall contrast. Less diffuse light would overwhelm the camera, just like the midday sun, and increase the risk of swamped shadows or burned-out highlights.
I used a non-TTL YN-460 flash with a radio trigger aimed past the subject at a Styrofoam reflector. Once again, some of the light from the flash lit the subject directly and provided the glittery highlights in the surface of the soup. I positioned a second reflector to the right to brighten the shadows, and I used a folded sheet of copier paper to brighten the foreground.
Post-Processing in Photoshop
In the first two shots the warm white balance provided the right look, and the camera’s auto setting was spot-on in the third shot, so all I had to do was crop the images, slightly increase the vibrance, and sharpen the photos for output.
Tips, Tricks, and Notes
If you want to dive deeper into the wonderful world of food photography, check out the sources listed at Fotopraxis (http://fotopraxis.net/workshops-2/food-food-food-iii/). Flickr food portfolios are a great source of inspiration. You can look at the EXIF data for tips and information, and you can check out other people’s setups. Flickr Mail is also a great tool for asking questions and sharing tips.
Our partial direct light setup
Schematic that shows the flash illuminating the subject both directly and indirectly. Two reflectors are positioned opposite the main reflector.
Sparkling light produced with a single off-camera flash creates a tantalizing food image
Canon EOS Rebel T1i (EOS 500D) | EF 50mm f/1.8 II set to f/5.6 | M mode | 1/125 second | ISO 100 | RAW | white balance set to flash | off-camera flash from the right, aimed past the subject at a Styrofoam reflector (left) with two additional reflectors (right and front)
Workshop 30
Backlit Fruit
▸ Setting up a transparent, backlit scene
▸ How to disperse flash
The transparent, backlit look is popular in advertising and is often used to photograph fruit and other foods. This technique looks great and is easy to set up. You might consider using a light table for shots like this, but flash provides light with better color temperature, spectrum, and output characteristics. All you need is some kind of stage for the subject and a diffuser to disperse the light produced by the flash.
The Setup
The stage is made from a sheet of milky acrylic set atop two piles of books. I placed the fruit in a glass cookware lid with the handle removed. For this shot I used a Canon Speedlite 430EX II flash (in manual mode), but any non-TTL model would work the same. I used RF-602 transmitter and receiver units to fire the flash.
Camera Settings and Shooting
I began with a 1/4 flash output setting, but it was too bright at f/8. I halved the output twice and eventually stopped the aperture down even further when I discovered the flash was still too bright. I ended up using f/13, although according to SLRgear (www.slrgear.com) f/8 is the optimum aperture for this lens when it is set to 40mm. If you are more patient than me, you can stick to the optimum aperture and adjust your flash output accordingly. The close proximity of the flash to the acrylic sheet increased the risk of producing a hot spot, so I set the flash reflector to its widest-angle setting and moved it to the side to increase the distance and help alleviate the problem. You can easily suppress the ambient light in a situation like this by selecting ISO 100, 1/125 second, and an aperture between f/8 and f/13 combined with a flash output setting of 1/32 or less. The blinkies that are displayed on the camera monitor when part of the image is overexposed are a great tool for checking your settings. In this situation, adjust your camera and flash settings so that everything white blinks and everything else doesn’t.
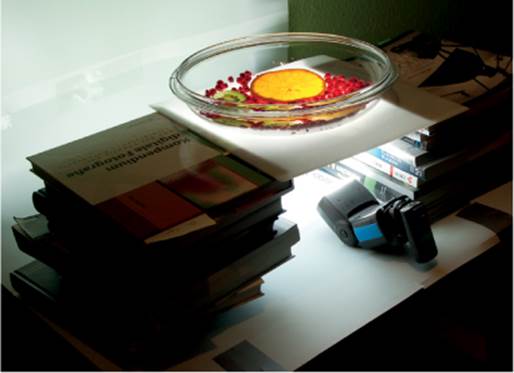
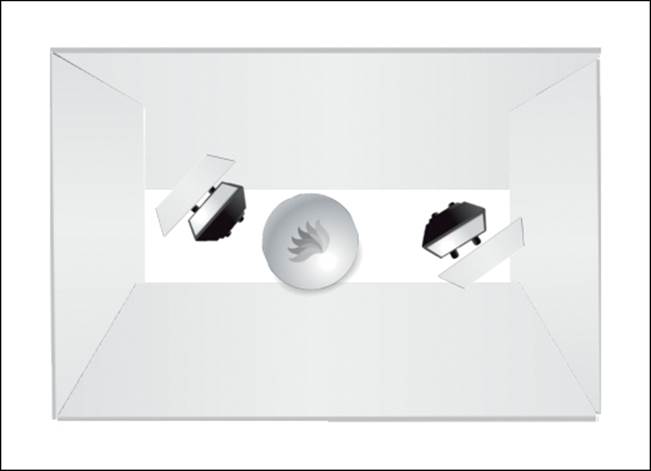
The simple setup for this photograph consisted of two piles of books, a sheet of plastic, a glass cookware lid, and a flash aimed upward from below
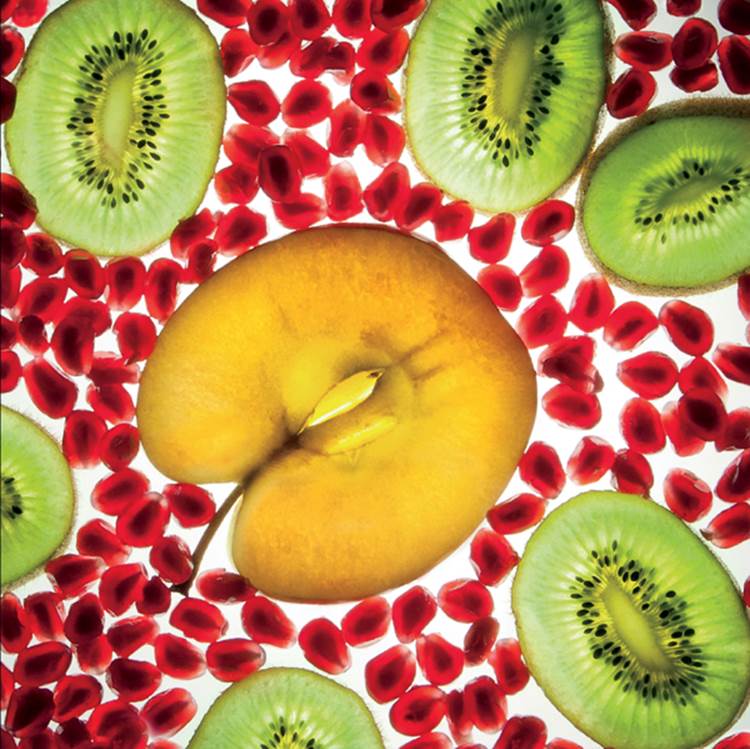
This setup is simple to build and is guaranteed to produce colorful, eye-catching images
Canon EOS Rebel T1i (EOS 500D) | EF 24–105mm f/4.0 set to f/13 and 40mm | M mode | 1/125 second | ISO 100 | RAW | white balance set to flash | lit from below with an off-camera, non-TTL flash
Post-Processing in Photoshop
If you get the exposure right, you won’t have to adjust much during post-processing. For this fruit shot I restricted myself to the following steps:
▸ Cropped to square
▸ Slightly retouched unwanted artifacts
▸ Applied a Curves adjustment (slight lowering in the center of the curve) to the overexposed areas using a mask (invert the mask and paint the areas you need to adjust with a soft white brush)
▸ Repaired the parts of the apple that were too bright with a mirrored selection
▸ Selectively sharpened with the Smart Sharpening tool
▸ Used a mask to apply a dark green filter to the kiwifruit
Tips, Tricks, and Notes
I mentioned using a light table for this kind of shot, but they usually contain neon tubes with gaps in their spectrum, which makes them less useful in food shots. The human eye is very sensitive to variations in color temperature, especially when it comes to photos of food and skin tones. Before you invest a in a light table, try using your computer monitor as a light source, but note that you will have to use much longer exposure times than the ones I used. A tripod is essential.
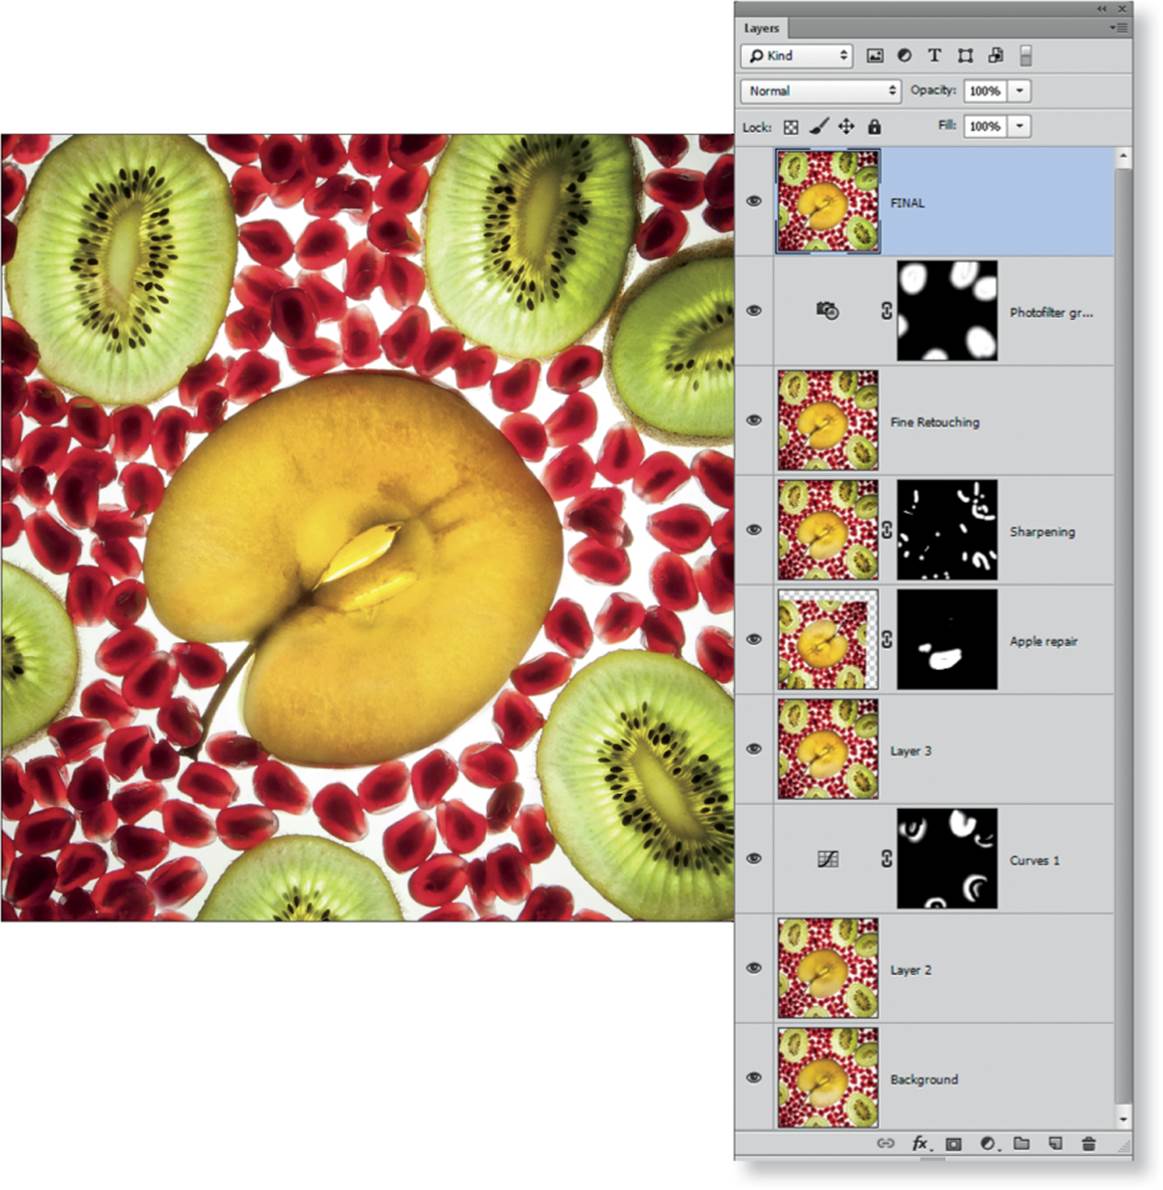
A Photoshop screenshot showing the layers and masks we used to process the image
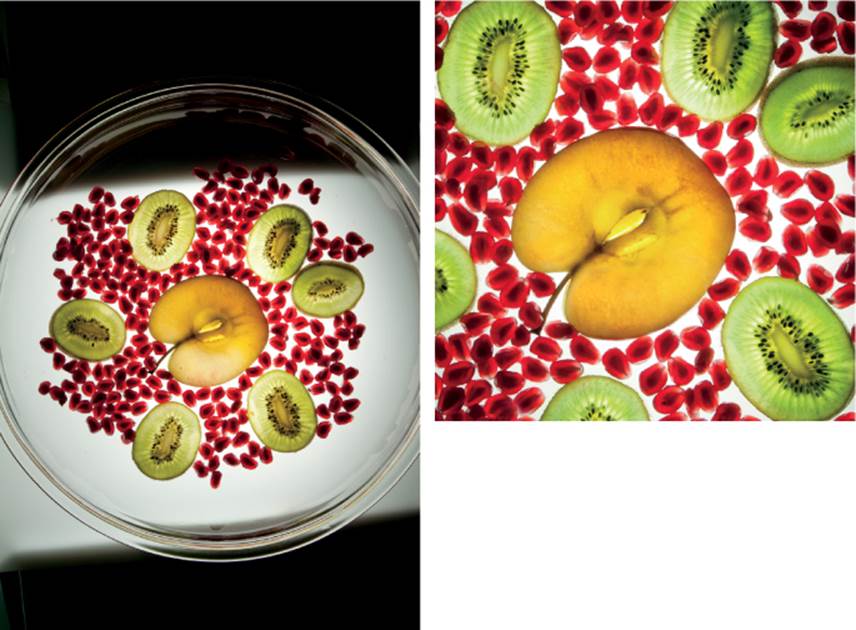
The original image (left), and the cropped and retouched version (right)
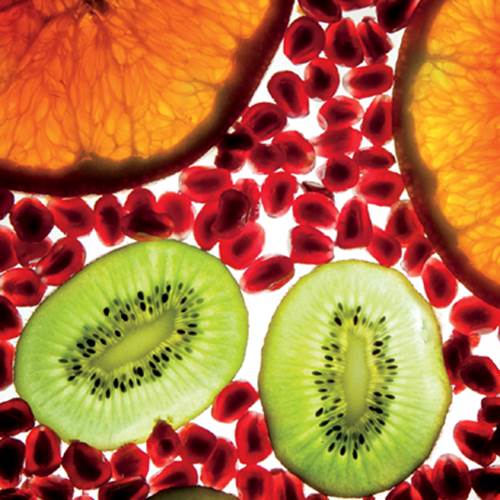
Another shot from our fruit session captured with the same parameters as before
The Mystery of the Blinking Canon Flash Display
If you use the Canon wide-angle diffuser, like I did for this shot, you will become familiar with the blinking Canon display. It blinks when the flash senses that some aspect of the settings is incorrect, but it is often difficult to figure out what is wrong. Some of the things that can cause the display to blink are as follows:
▸ The flash is waiting for user input or a confirmation.
▸ The reflector is tilted 10 degrees down from its neutral position (this is easy to overlook).
▸ A custom function has been assigned or altered.
▸ The reflector is tilted or swiveled, or the wide-angle diffuser is in use or not completely retracted.
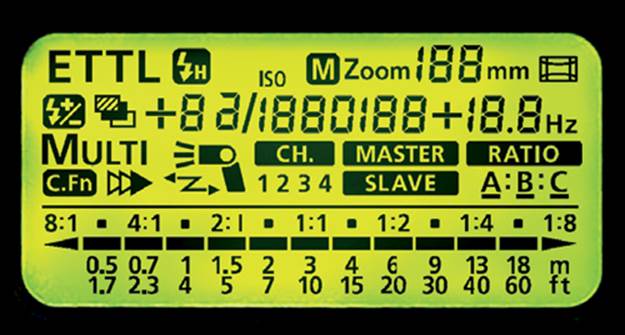
Sometimes the display on a Canon flash seems to blink for no apparent reason
Workshop 31
Glowing Pasta
▸ Another simple but effective light stage effect
▸ How to produce a fiery look
The Setup
The previous workshop used a sheet of plastic as a stage for illuminating the subject from below. This section describes an even simpler way to produce an uplight effect using a slatted wooden shelf.
To set up the shot, I placed the pasta (in this case, large penne noodles) on the boards and put the flash on the shelf below, pointing upward.
Camera Settings and Shooting
I decided to work without ambient light. To do this, I selected an exposure time of 1/125 second, ISO 100 to keep the image noise down, and f/7.1 to provide sufficient depth of field. Due to its proximity to the subject and the lack of additional light modifiers, I was able to set the flash output to a relatively low 1/16 for my initial test shot.
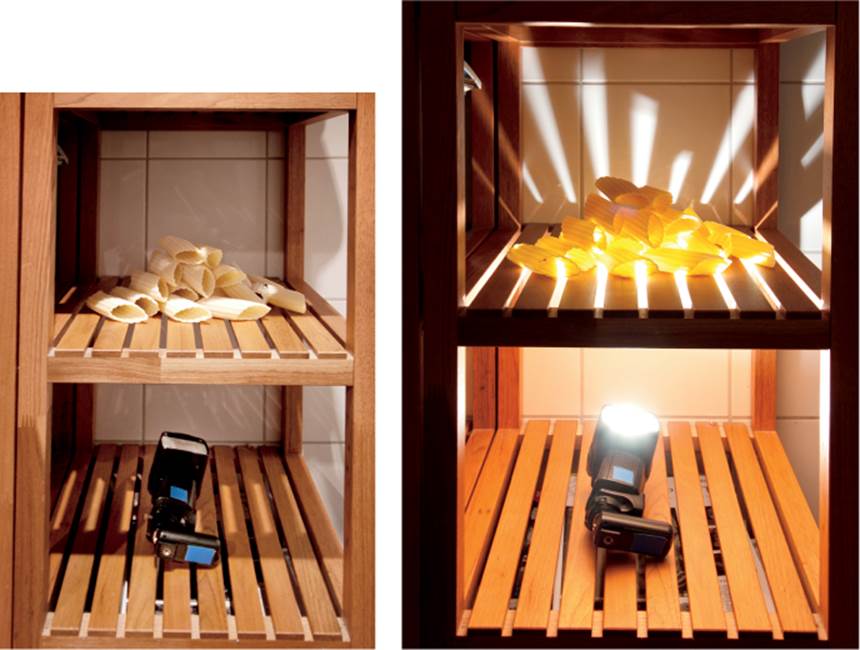
Our glowing pasta setup, with and without flash, using the settings detailed in this workshop. We created the warm look later at the RAW conversion stage.
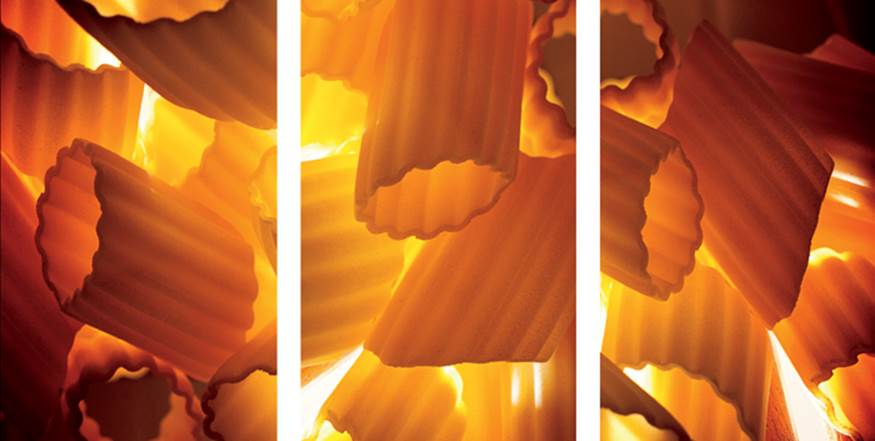
A simple but effective light stage effect shot on a wood shelf without flash modifiers
Canon EOS Rebel T1i (EOS 500D) | EF 50mm f/1.4 set to f/7.1 | M mode | 1/125 second | ISO 100 | RAW | white balance set to flash | off-camera, non-TTL flash
Post-Processing in Photoshop
We processed this shot to increase contrast and give the pasta a glowing look. During RAW conversion I set the color temperature a little warmer and increased the Blacks and Contrast values before I cropped my images in Photoshop.
Tips, Tricks, and Notes
And how did I get the idea to place gigantic penne pasta in our bathroom shelf? I can explain that!
In my circle of friends, we invented this little game: Everyone brings along an object or two to photograph. The objects are handed out at random, and everyone has to come up with a cool lighting setup for their object. I received a pair of freezer bag clips, a box of chocolates (see workshop 36), and the pasta. This is a fun way to drive creativity. Try it with your friends or at your next photo club meeting!

A couple of subtle adjustments during RAW conversion helped to add a glowing look to the pasta
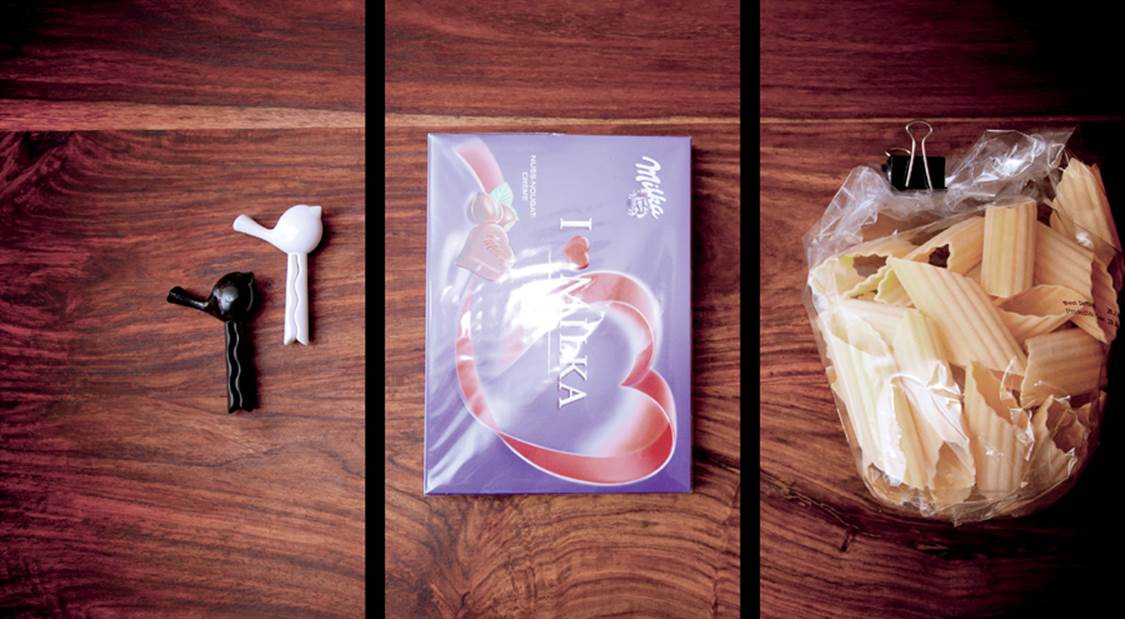
In a surprise subject contest, we took these photos of freezer bag clips, a box of chocolates, and a bag of pasta. The only rule of the game is that the resulting images have to look good.
Workshop 32
Campari in a Bathtub
▸ How to produce soft surrounding light
▸ Using a bathtub as a light tent
▸ Using Photoshop to create colors that pop
If you want to create a setup that bathes the subject in light, where better to work than in a bathtub? I wanted to photograph some Campari bottles and give them a gaudy, pop art look. I used a bathtub and two flashes to completely bathe the scene in light.
The Setup
A white bathtub is the best location for this kind of setup, but you could also improvise with a bed sheet in a large cardboard box. I used Plasticene to keep the bottles in position and lit them from the sides using two non-TTL YN-460 flashes aimed at the sides of the tub and softened with paper diffusers. I used RF-602 radio triggers and my Canon EOS Rebel T1i (EOS 500D) fitted with an EF 85mm f/1.8 lens.
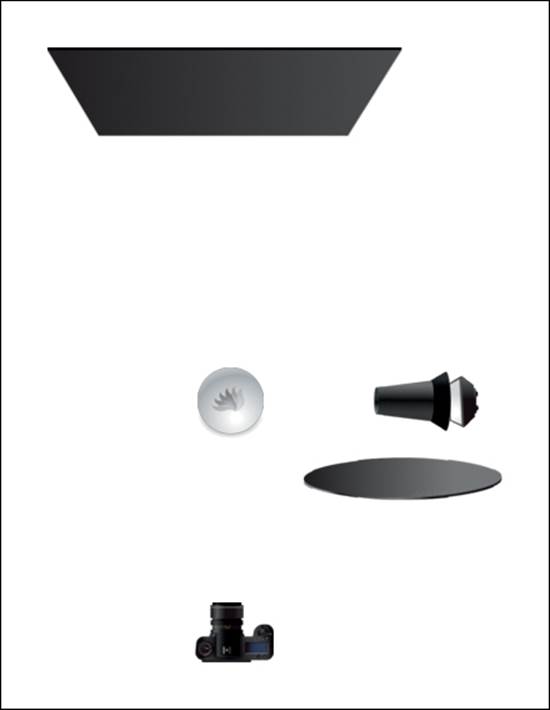
Schematic showing our bathtub setup with two flashes that flood the scene with light
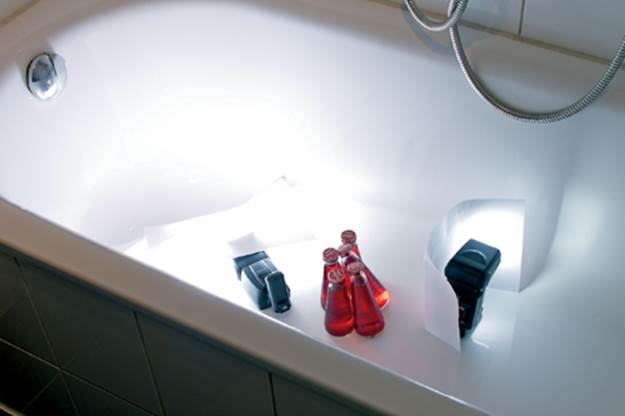
Two flashes with paper diffusers are aimed at the sides of the bathtub
A pop-art food photo captured in the bathtub at home
Canon EOS Rebel T1i (EOS 500D) | EF 85mm f/1.8 set to f/3.5 | M mode | 1/125 second | ISO 100 | RAW | white balance set to flash | two off-camera, non-TTL flashes fired with RF-602 radio triggers
Camera Settings and Shooting
The flash has to provide the bulk of the light in a shot like this, so you need to suppress the ambient light as much as possible. Select ISO 100 and f/3.5 for indoor lighting conditions. An exposure time of 1/125 second is normally sufficient to cut out most of the ambient light without undercutting the camera’s sync speed (which is often around 1/200 second). Do not go to the limit, because the RF transmission also takes some time—1/125 or 1/160 second is a good choice. And then always make a test shot without flash to make sure your settings exclude enough ambient light.
At such a short distance and with two flashes, 1/16 output for each flash should be enough. As always, you can adjust your settings after you make some test shots.
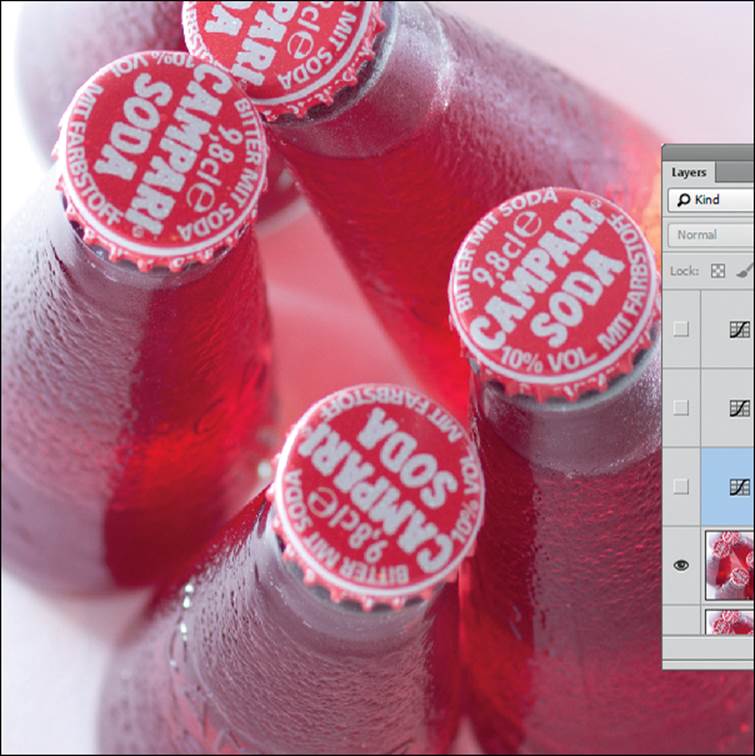
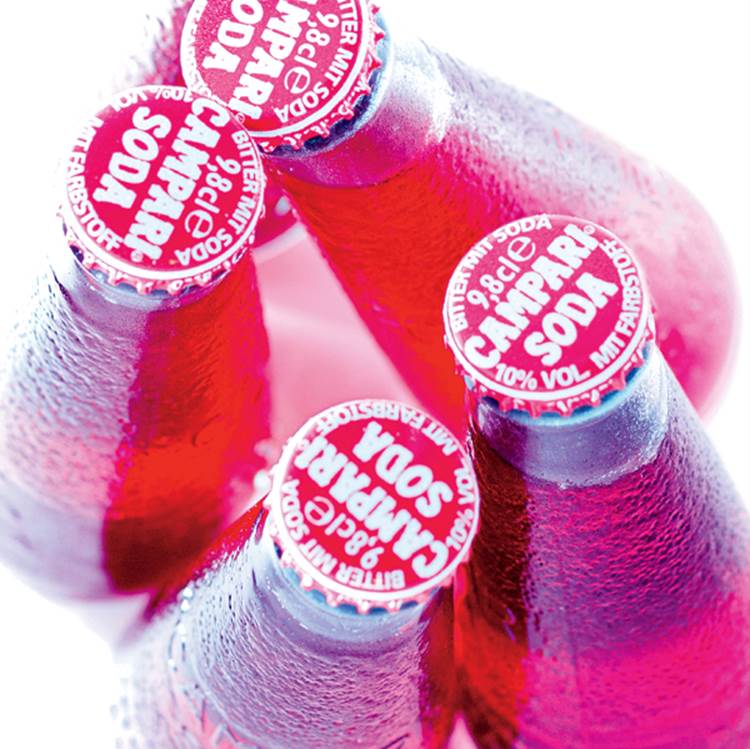
The original image
Post-Processing in Photoshop
Technically speaking, our original image was fine and had a great surround lighting effect. The bottoms of the bottles disappeared into the blur of the background, and the Campari itself had a nice glow. However, the image still required some processing.
We used three Curves adjustment layers: one to lighten the entire image and remove any traces of gray from the whites; one to reduce the red component slightly and enhance the blue tones; and one to emphasize the blue tones in the shadows.
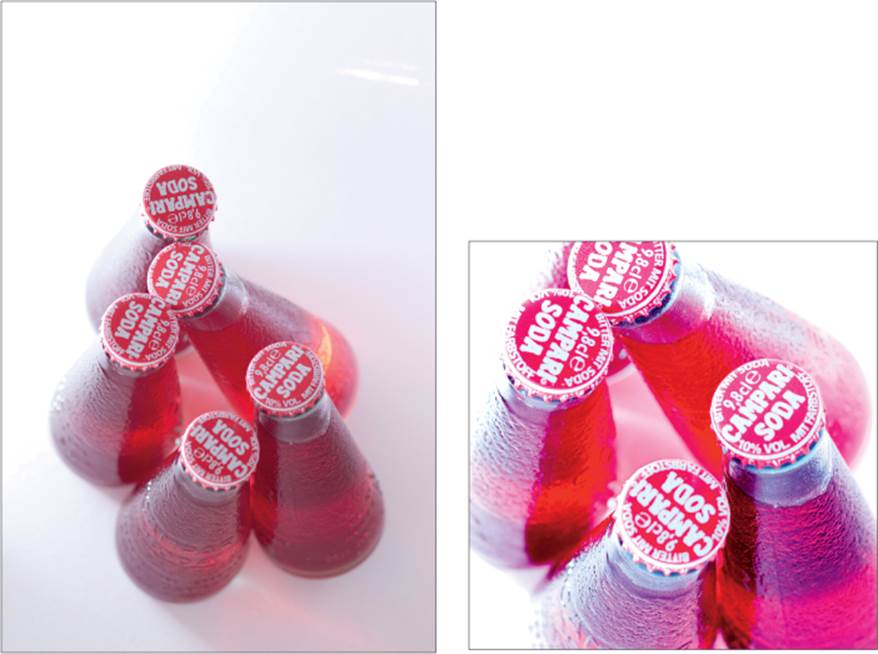
The original image is okay but a little dull. Post-processing gives it the necessary punch.
Tips, Tricks, and Notes
▸ Exposure times: You might wonder why I often select 1/125 second as my exposure time. My experience shows that this value often produces satisfactory results on location and in the studio. Longer exposure times increase the risk of too much ambient light, camera shake, and ghosting around flash-lit subjects. On the other hand, shorter exposure times often interfere with the camera’s sync speed. Give yourself some leeway if you fire your flashes with radio triggers because they add a delay to the timing.
▸ Photographing trademarks: Care is required when you photograph a trademark because infringement is punishable by law. In an educational photography book like this one, there is no danger of the trademark owner thinking I am abusing their rights. However, if I were to use the Campari photo in a calendar that is sold commercially, I could end up in trouble. If you have any doubt, seek legal advice before you use an image commercially.
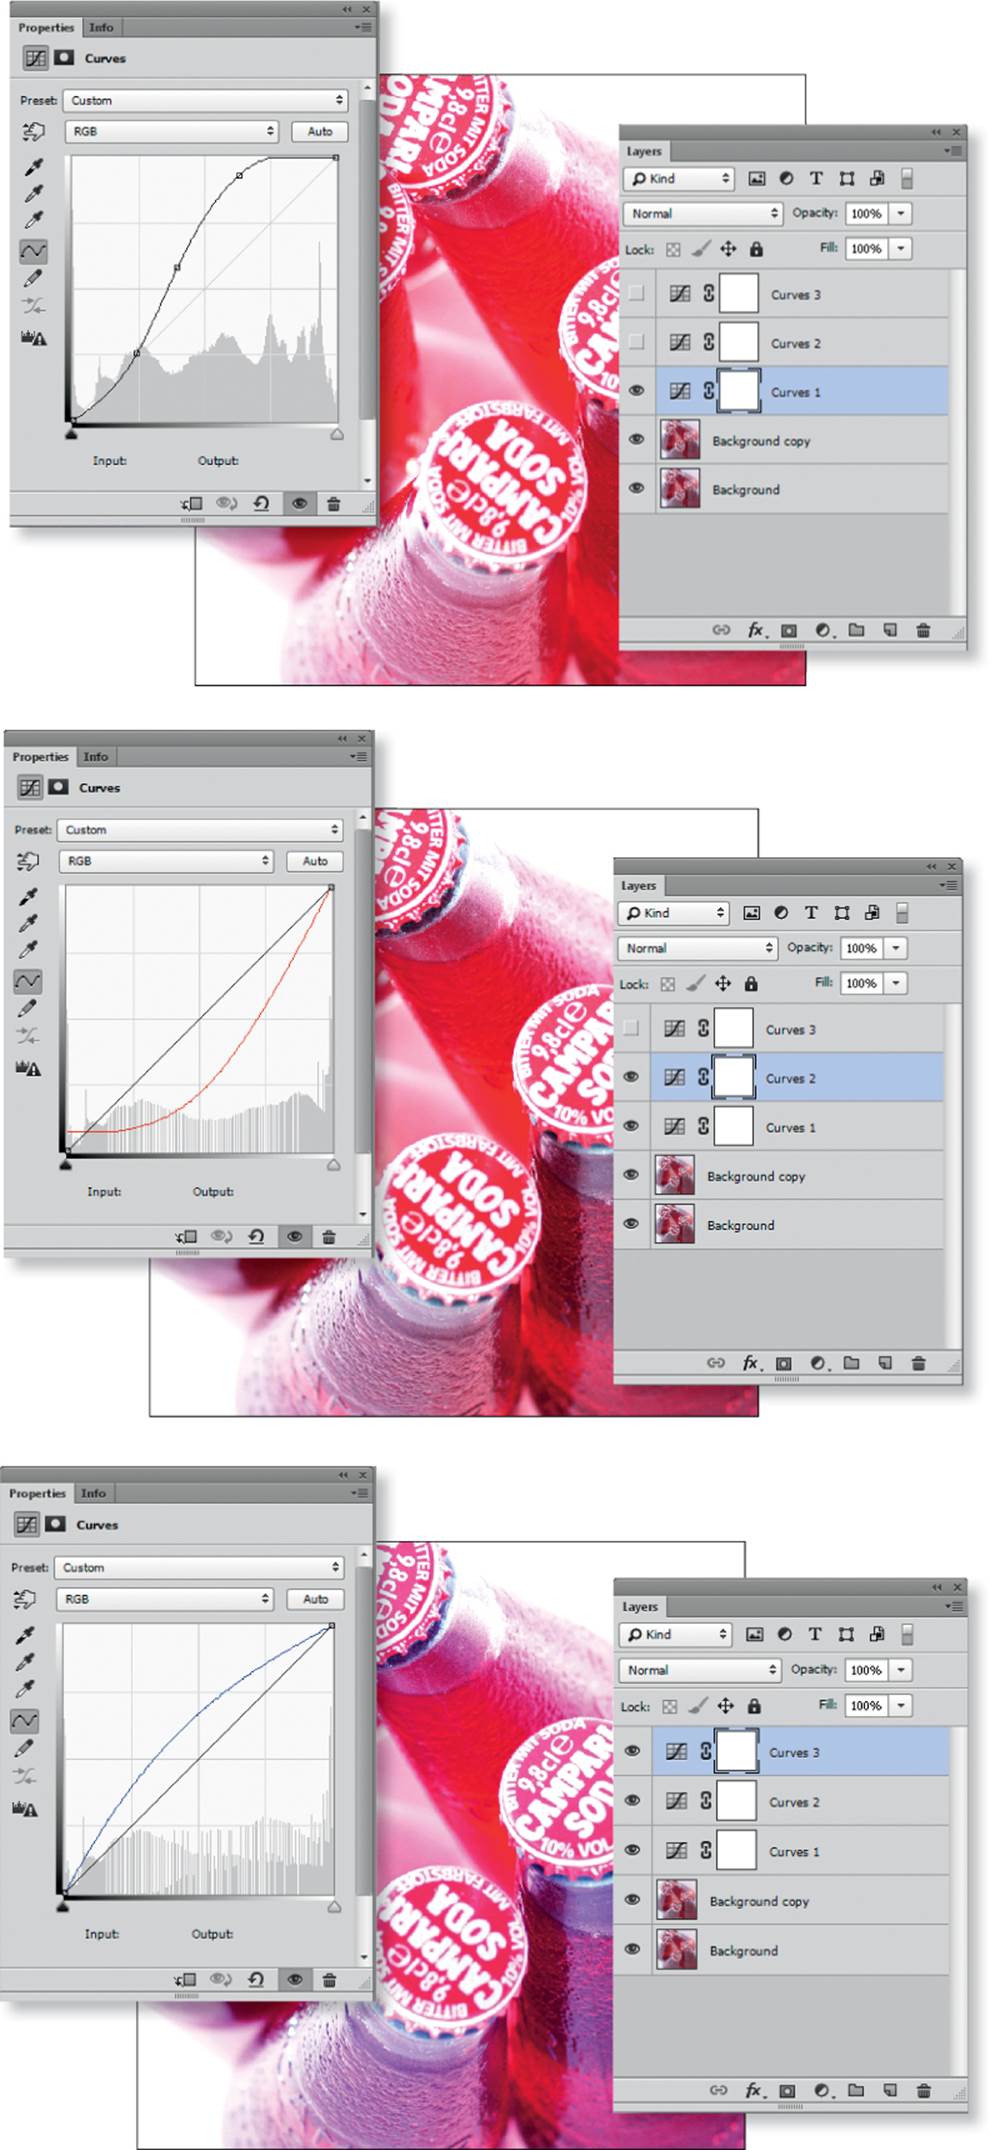
The three Curves adjustments we made and the effects they had on our image: the combined RGB values (top); the red channel (center); and the blue channel (bottom)
Workshop 33
Using Smoke to Depict Aroma
▸ How to photograph smoke
▸ Inverting and coloring smoke shots in Photoshop
▸ Capturing additional details for a photomontage
A few months ago I saw an advertisement for Lipton tea that used some kind of cloud to symbolize the product’s aroma. The effect looked like colored smoke, and I began to think about how to reproduce the effect. Smoke is relatively simple to photograph and can easily be inverted and colorized in Photoshop, but the rest of the scene shown was more difficult to construct. My final image is a composite of three different shots: the smoke, the teabag, and some tea leaves. By the time I produced a result that looked something like the original, I had used a lot of tea bags.
The Setup
The best way to capture smoke in a photo is to place an incense stick in front of a dark, distant background and light it from the side using flash with a snoot. A shade (or flag) placed between the flash and the camera limits flares and stray light and improves the overall results.
The backlit setup for the tea bag and tea leaves included a flash in a portable softbox that I placed on its back (see workshop 2 for more details). In the first shot, I photographed the tea bag lying on the softbox. For the second shot, I cut the tea bag open and spread the contents on the surface of the softbox. I began making test shots with 1/4 flash output and fine-tuned my settings from there.
Schematic of our smoke capture setup. An off-camera flash fitted with a snoot is aimed at the column of smoke, and a flag prevents flares and stray light from reaching the lens. The dark background is positioned as far away from the subject as possible.
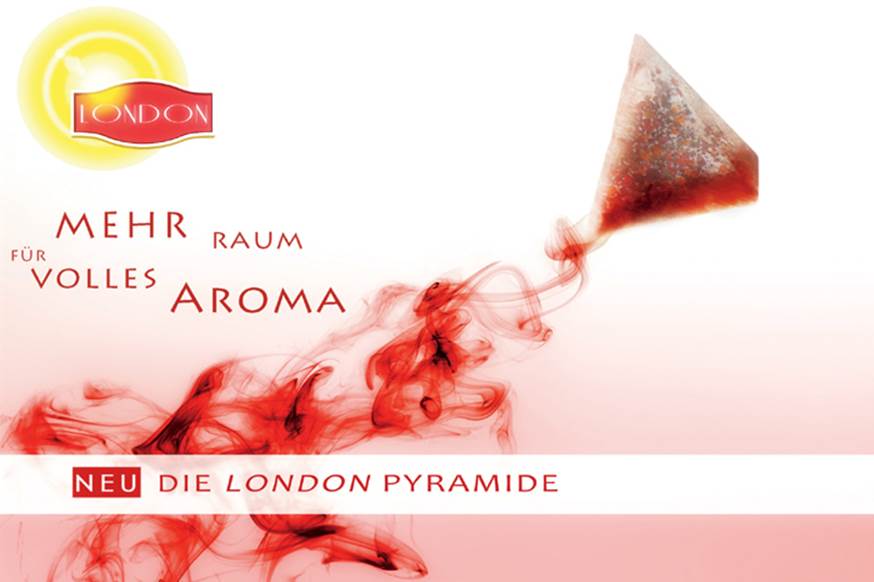
Aroma depicted using smoke, based on an idea from a Lipton tea advertisement. To produce the final effect I used two flash setups and a fair amount of post-processing in Photoshop.
Canon EOS 5D Mark II | EF 24–105mm f/4 set to f/5.6 and 45mm | M mode | 1/125 second | ISO 100 | RAW | white balance set to flash | one off-camera flash
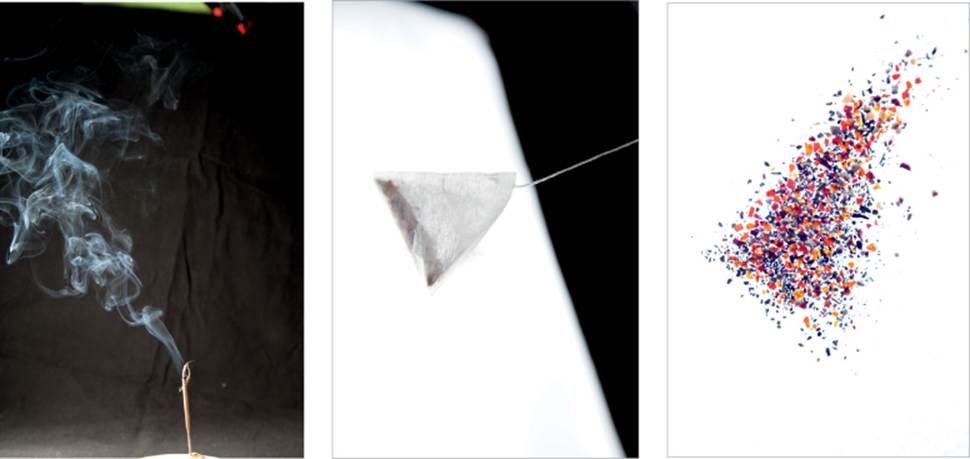
The three components of our tea advertisement: smoke, tea bag, and tea leaves
Camera Settings and Shooting for Smoke
To capture the smoke I used a tripod-mounted Canon EOS 5D Mark II with a 24–105mm zoom set to about 50mm and f/5.6 (a moderate depth of field was required). I set the camera to manual (M) mode and ISO 100 and switched to RAW format. Using a tripod allowed me to move the incense stick around to produce different patterns while I shot. As with most of the other setups in this book, I took an initial test shot without flash to see how much ambient light my settings would capture, and then I began making test flash exposures starting at 1/8 output.
I used the same setup for the shots of the tea bag and tea leaves, but I set the lens to its longest telephoto setting to fill the frame with the relatively small subjects. I shot at ISO 100 and 1/125 second with a non-TTL Yongnuo YN-460 flash mounted in a portable softbox, and I fired the flash with a RF-602 radio trigger.
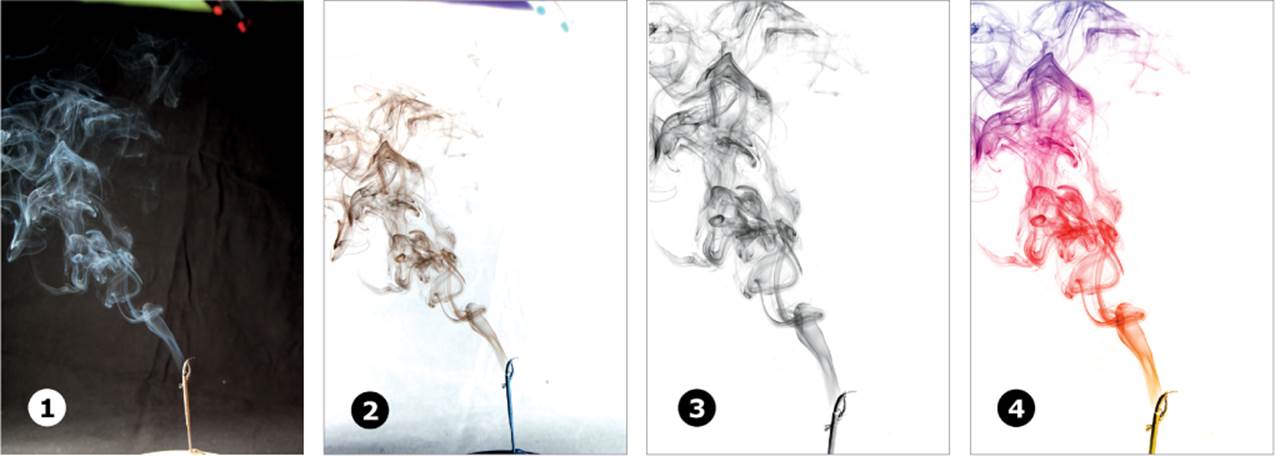
1 The original, unprocessed photo of the smoke; 2 the inverted version of the smoke image; 3 the desaturated, cleaned-up version of the inverted image; 4 the colorized version, processed with a color gradient
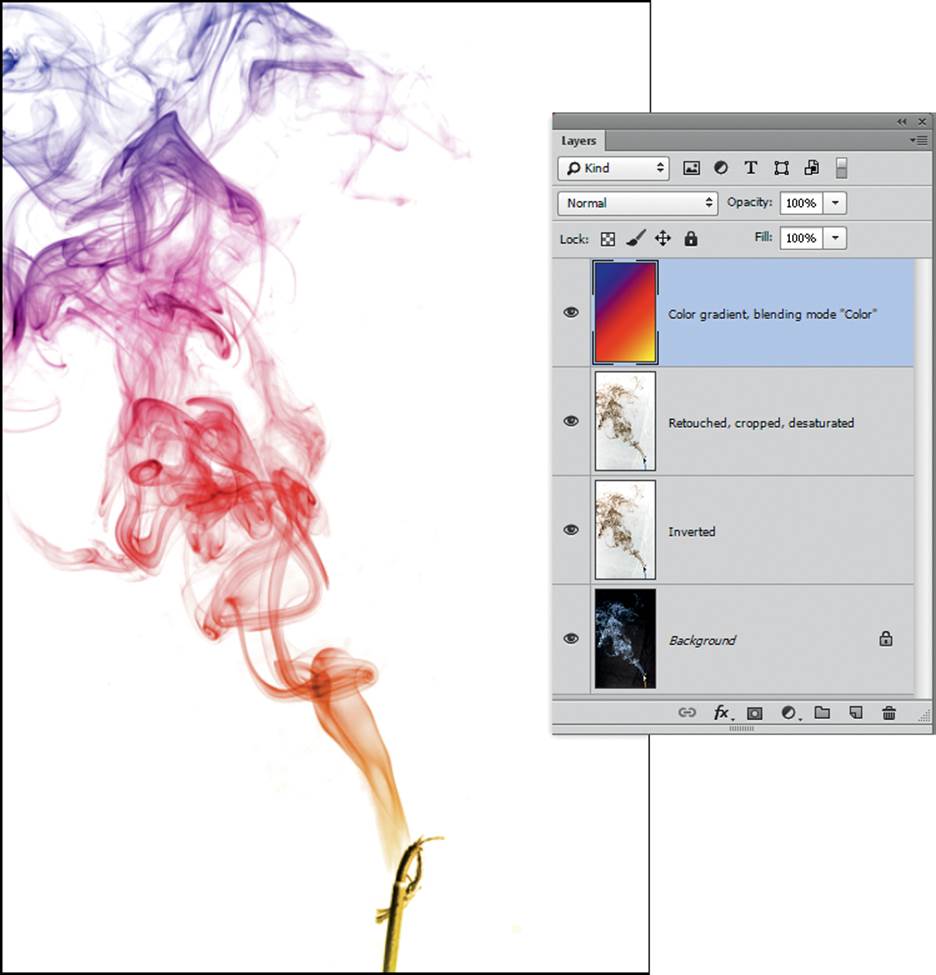
To colorize a smoke photo, create a new layer that contains your desired colors and merge it with the original image using the Color blend mode. In this example, I used a rainbow effect to better illustrate the process; I used red for the main photo.
Post-Processing in Photoshop
Even if you perfectly capture all three elements of a project like this, you still have to create an effective photomontage to get the final result. I isolated the tea bag and tea leaves with the Quick Selection and Refine Edge tools and used layer masks to produce the final effect. The precise masking technique and blend mode you use will vary depending on the effects you want to achieve.
Tips, Tricks, and Notes
▸ For this workshop and the next one, I used Photoshop a bit more extensively than for the other examples in this book. If you are interested in delving deeper into the subject of Photoshop montages and compositing, see the sources listed in appendix C.
▸ For the smoke image I used a rolled up Rogue Flash-Bender as a snoot. The FlashBender is a nice tool, but for this shot a rolled-up piece of black card would have done just as well. There are a lot of useful flash accessories on the market, including gel holders, diffuser socks, translucent plastic half spheres, and many more. Homemade solutions like the ones I often use save money and usually work better than commercial gear. The best example of such a tool is Niel van Niekerk’s black foamie thing (page 43), which is used throughout this book. This tool is just perfect and costs just a couple of dollars. Take my word for it—having spent money on a whole cupboard full of useless gimmicks, I wholeheartedly recommend that you better invest your money in good lenses instead!
Workshop 34
Flavored Gins à la David Hobby
▸ Building a light box
▸ How to use a light box with backlight
The founder of the strobist movement, David Hobby, provided the idea for this project with his Flavored Vodkas image. The image shows five tall shot glasses, each with a different flavoring, such as chocolate, cinnamon, or lemon. David kindly published the details of his deceptively simple setup, so I had to try it for myself. This setup is virtually identical to David’s, except I used gin instead of vodka (I prefer the taste and I happened to have some in the house). Water has a different refractive index than spirits and doesn’t produce the same effect.
The Setup
David’s setup consisted of a cardboard box with a hole cut in the top, which he then covered with translucent paper. This was the inlet for the light from the upper flash. Two more flashes were aimed at the background to keep it bright and white. The glasses themselves were placed on a sheet of white acrylic to create the reflection. David’s camera was mounted on a tripod with a built-in level to make sure it remained perfectly straight.
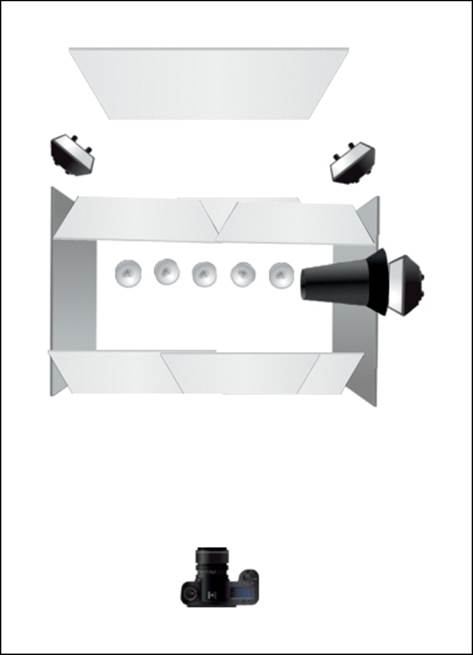
Schematic of the flavored gins shot. There are two flashes to light the background, a cardboard box, and a diffused flash with a snoot fired from above.
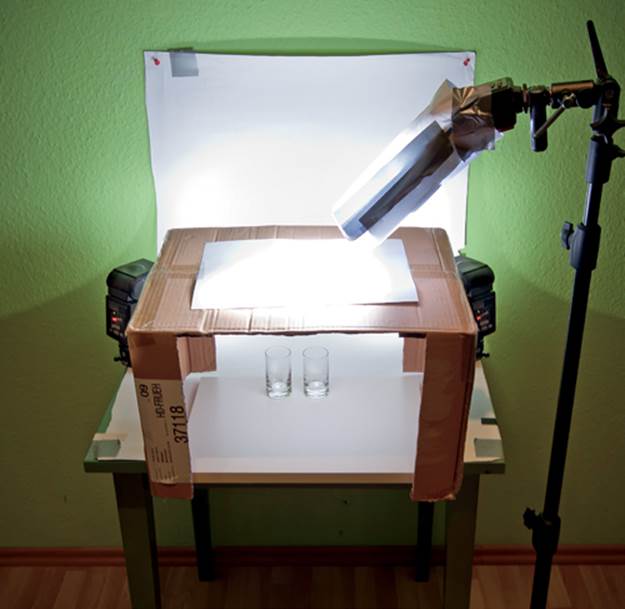
The setup with the almost-overexposed white background and the upper flash with its rolled-up paper snoot
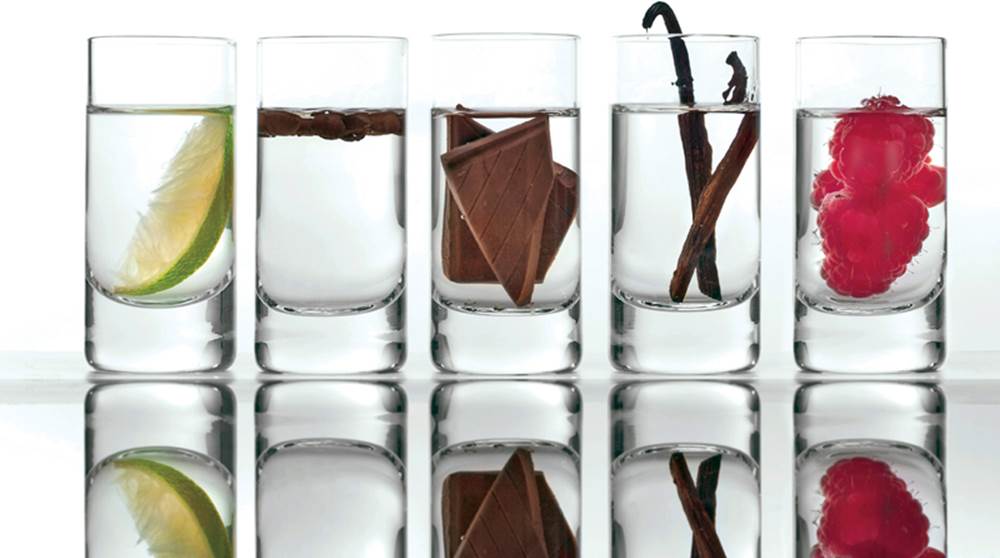
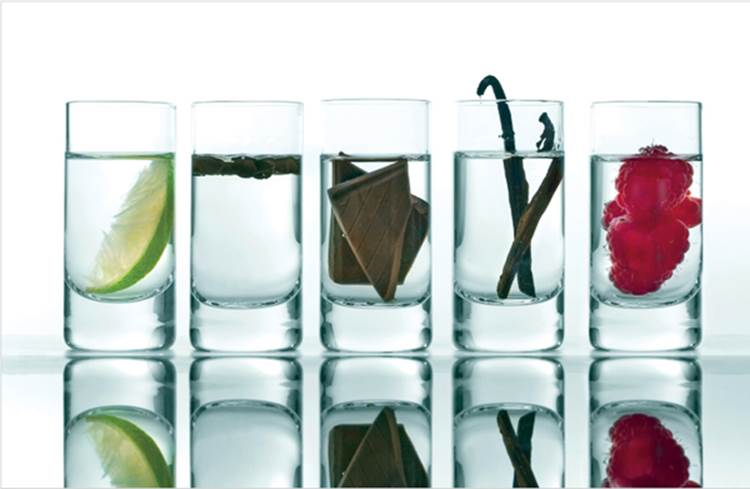
Delicious-looking flavored gins, captured at home with three flashes and a little improvisation
Canon EOS Rebel T1i (EOS 500D) | EF 50mm f/1.4 set to f/11 | M mode | 1/125 second | ISO 100 | RAW | white balance set to flash | three off-camera flashes
Camera Settings and Shooting
The settings I used provided the usual combination of suppressed ambient light and dominant flash. I used ISO 100 to keep the noise levels low, and I set my camera to 1/125 second and f/11. The narrow aperture slightly reduced the overall sharpness but ensured that the depth of field was sufficient throughout the frame. I fired the flashes (any non-TTL units will do) with RF-602 radio triggers. For this setup a test shot without flash should turn out almost completely dark. Add the background flashes first, arranged symmetrically with identical output settings, and adjust the output until the white of the background just begins to overexpose (keep an eye on the blinking highlights warning in your viewfinder), then add the upper flash. I began making test shots at 1/4 output and fine-tuned my settings until I found the right values.
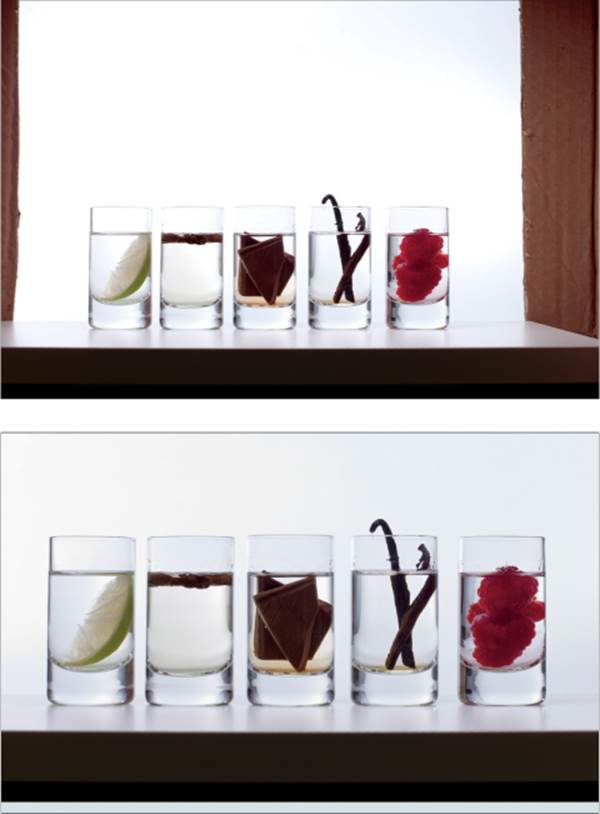
The somewhat sad-looking initial image (top) and the cropped and aligned version (bottom)
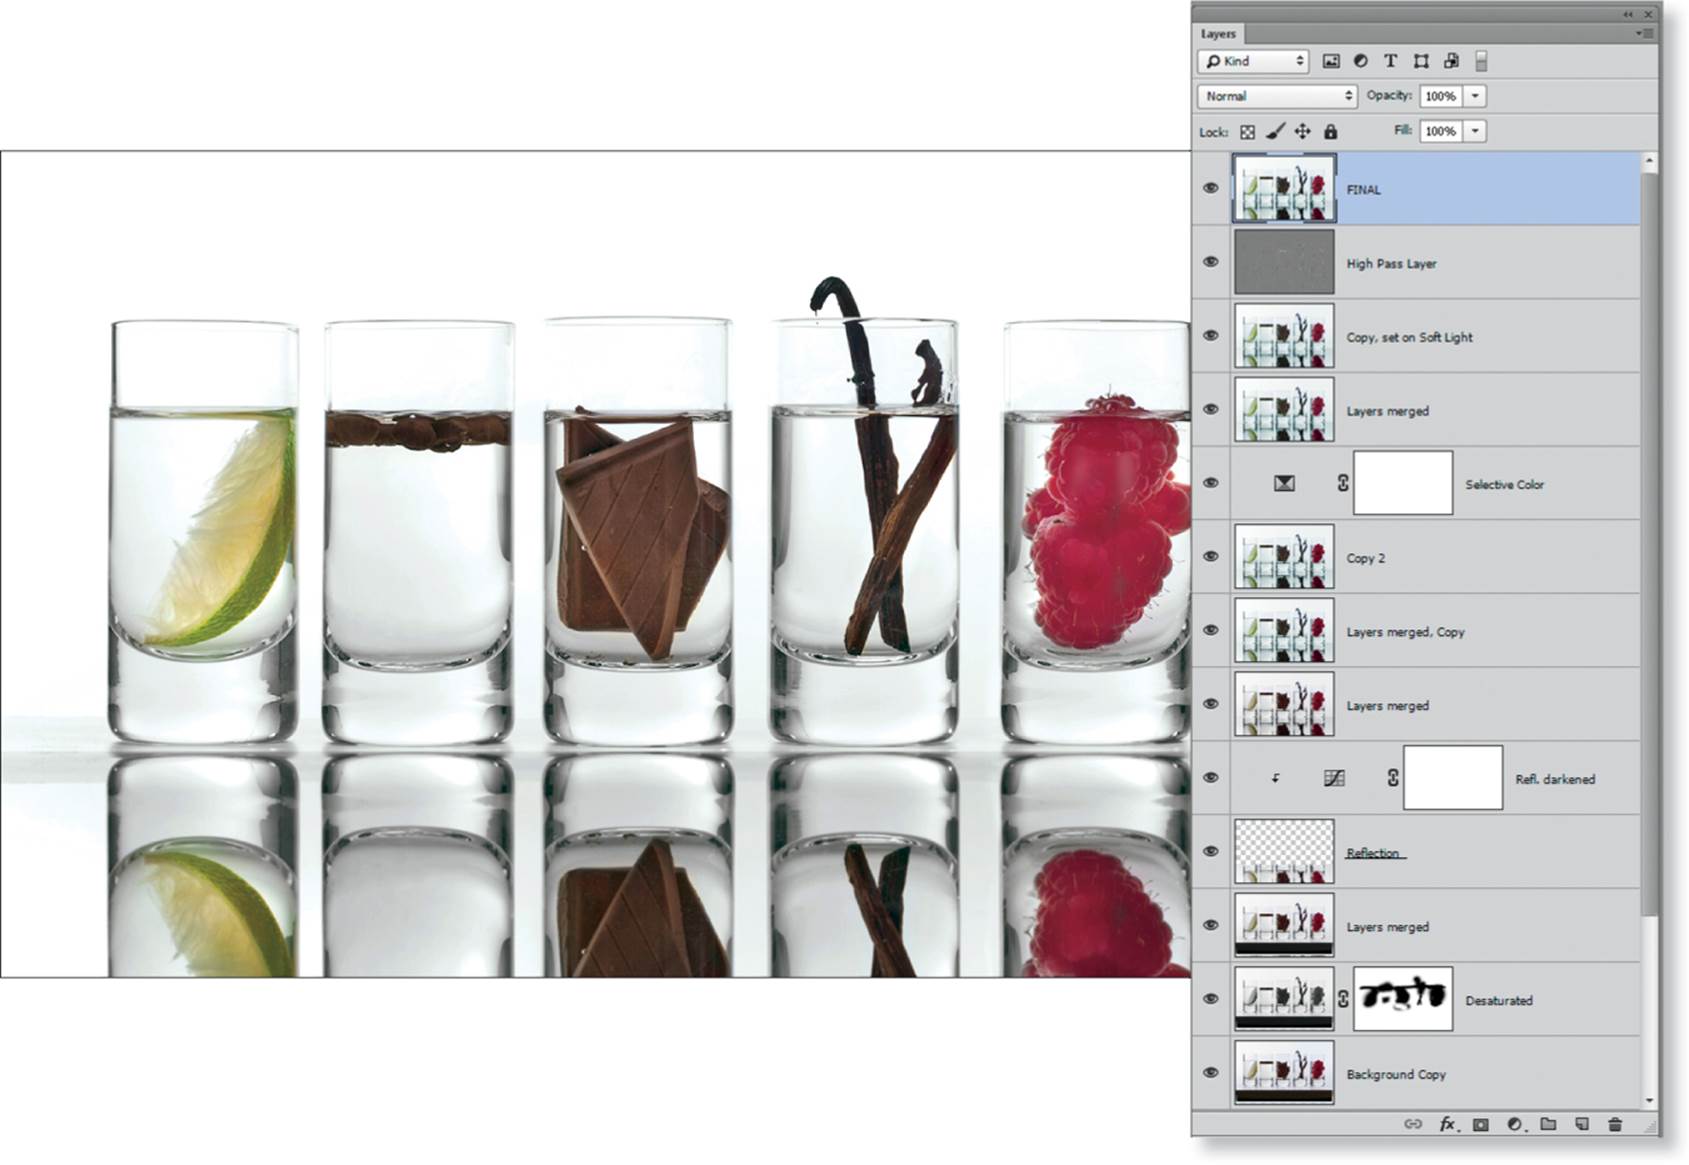
The Photoshop layer stack and the result of having applied the steps it contains. I straightened, cleaned up, and stretched the image, and then I optimized the colors and added an artificial reflection.
A cooler version of the same image. Here, I shifted the colors toward green to emphasize the glasses.
Post-Processing in Photoshop
This image required quite some processing work. The most important steps were as follows:
▸ Apply a new crop.
▸ Stretch the glasses.
▸ Desaturate the gin to eliminate particles of the other ingredients, which had begun to dissolve.
▸ Retouch unwanted reflections, artifacts, and dust particles, in some cases by cloning parts of other glasses.
▸ Replace the real reflection of the glasses with a more attractive artificial version.
▸ Dodge the ingredients, increase the vibrance, and apply final sharpening.
I could have prevented some of these steps if I had been more careful during the shoot, but as usual I had to decide if adjusting the setup was more efficient than retouching the image. For the shoot itself, it is essential to make sure the lighting is right and that everything is in focus because you can’t fix these things in postprocessing.
Tips, Tricks, and Notes
For this shot I set the white balance to flash. Sometimes, it makes more sense to set the white balance to auto, but if I was using flash without color filters, I would usually set the white balance to flash. This will ensure that all photos in a session have the same color temperature, and so it’s easy to correct them as a batch in Adobe Camera Raw or Lightroom.
Workshop 35
Chocolate
▸ Light painting with flash
▸ Using modeling light as a continuous light source
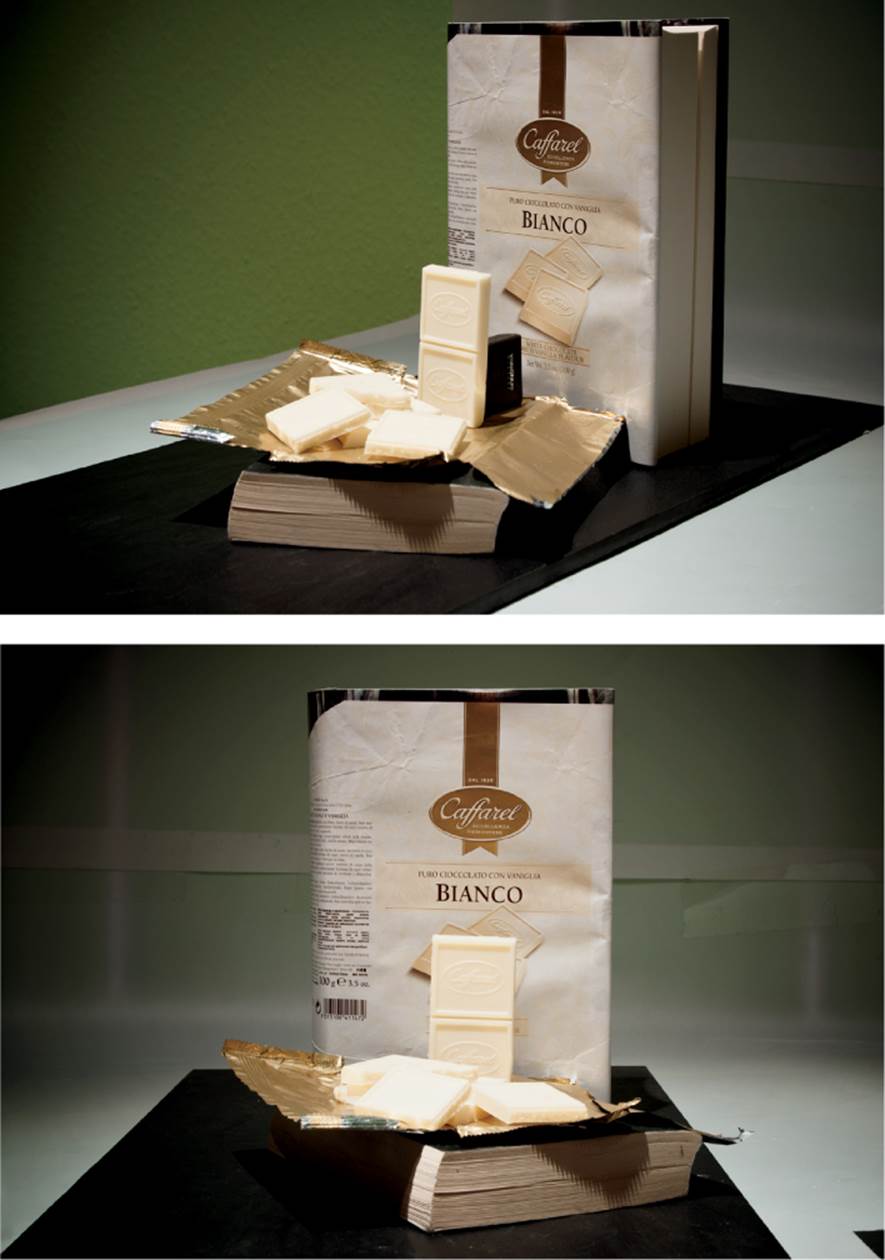
Chocolate isn’t easy to photograph. Without close attention, photos of chocolate often look like the flat, unappetizing image shown on the bottom-right of the following page. The challenge addressed by this workshop is to reproduce the warm, tempting look captured in the main image on the same page.
Producing these effects with conventional lighting is virtually impossible, mainly because the individual pieces of chocolate are positioned at various angles and each piece requires separate lighting to make them look right. I solved this problem with light painting techniques to illuminate various areas of the image in a customized way. For this type of shot the camera has to be mounted on a tripod and set to bulb (B) or self-timer mode, and the room must be dark during the entire long exposure.
The Setup
The usual tool of choice for light painting is a pocket flashlight. Unfortunately, they are usually fitted with incandescent or LED lamps, and their spectra are not suitable for food photography. Flash, on the other hand, provides the perfect light, but it normally lasts for only a short duration. The solution is selecting the modeling flash mode, which we assigned to the Pilot button on our Canon Speedlite 430EX II. The result is a perfect (albeit expensive!) flashlight that provides light with an even spectrum for about two seconds every time you press the button. To concentrate the light from the flash reflector, we cut the tube of a ballpoint pen to length and taped it onto the flash to form a kind of miniature snoot.
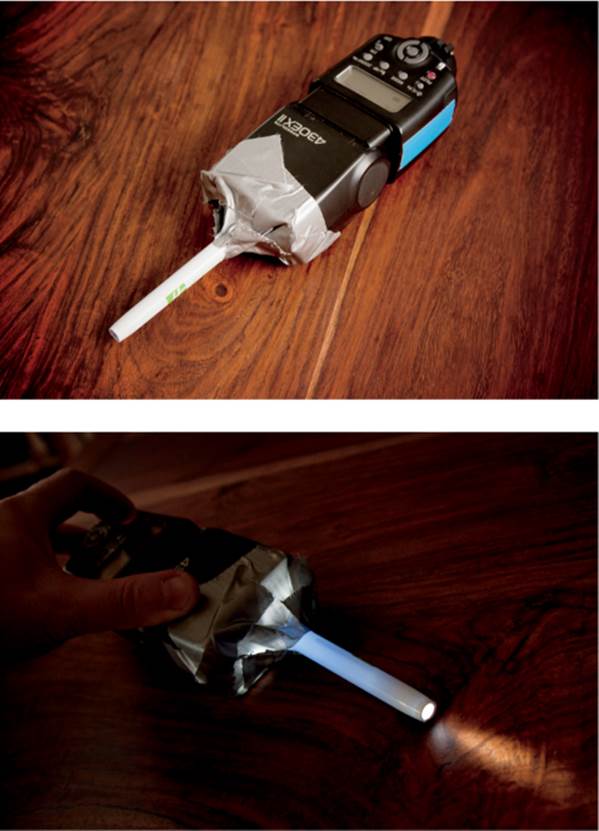
A Canon Speedlite 430EX II with a homemade miniature snoot. When the flash is set to modeling flash mode, it makes a perfect light brush.
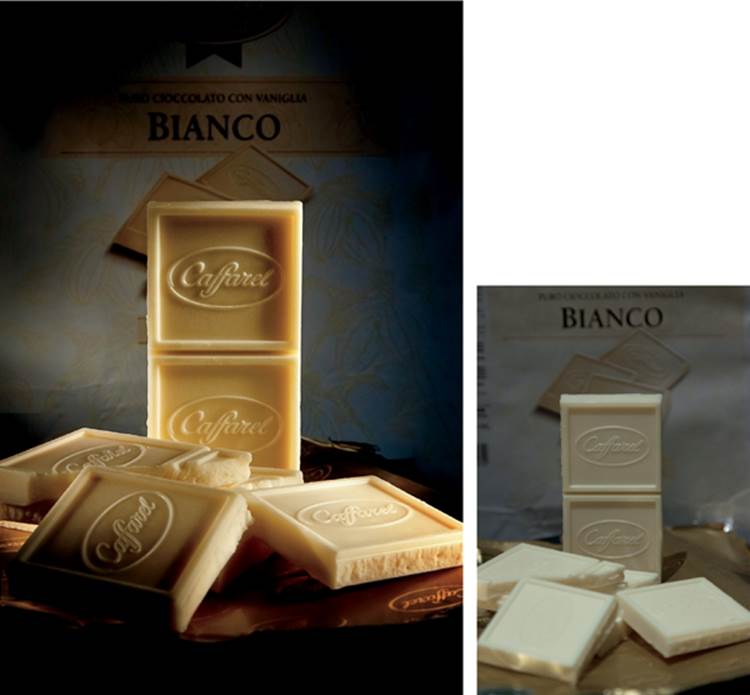
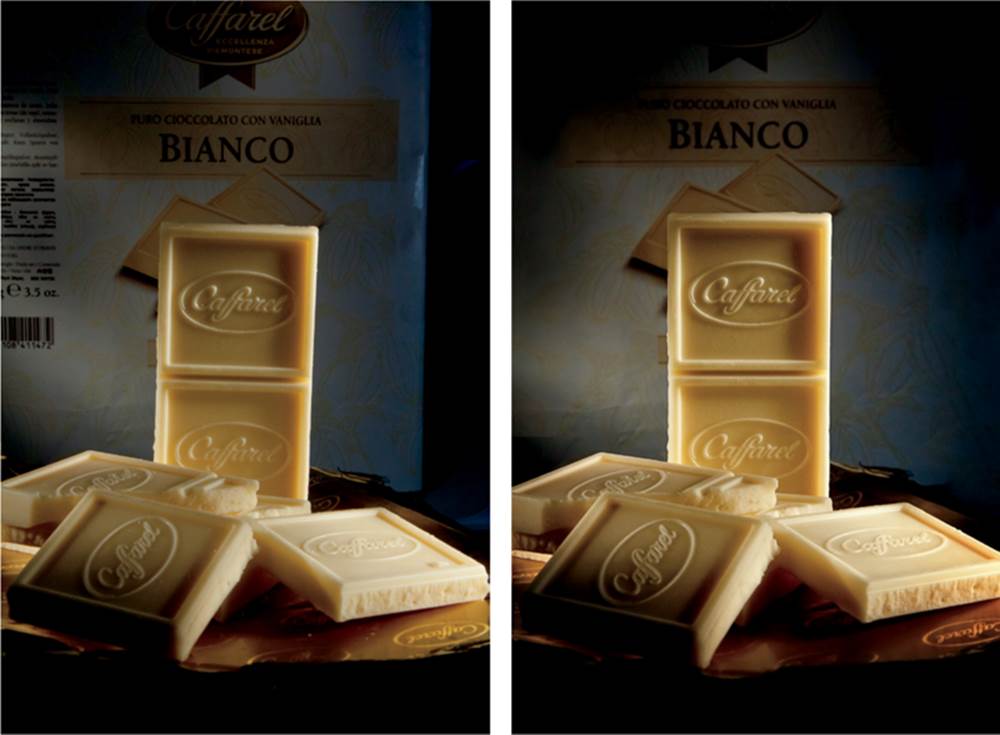
Which of these images was captured with warm and natural ambient light, and which with harsh flash? The image on the left was captured with flash, and the one on the right was taken using the room light.
Canon EOS Rebel T1i (EOS 500D) | EF 24– 105mm f/4 set to f/14 and 45mm | M mode | 30 seconds (self-timer) | ISO 400 | RAW | white balance set to flash | tripod | light painting during a long exposure with a modified flash unit
If your flash does not have a modeling flash mode, you can emulate this technique by setting your flash output to its lowest level and continually pressing the test flash button while you paint your subject. You can also use strobe or multi mode to achieve a similar effect (see workshop 12).
To make our chocolate scene look three-dimensional, I broke the bar into several pieces and carefully arranged them in front of a background made from the chocolate wrapper. I mounted my Canon EOS Rebel T1i (EOS 500D) on a tripod and released the shutter with the self-timer.
Camera Settings and Shooting
After the setup is ready, the rest of a shoot like this is routine. Switch the camera to live view and focus with the monitor magnified before you switch to manual (M) mode and set the self-timer to 30 seconds—bulb (B) mode and a cable release work just as well.
Darken the room, release the shutter, and paint with your light brush for the duration of the exposure. For such a small area of the subject, the angle and distance of the light source are critical, and you have to use very flat side light from close up to get the writing on the chocolate to look good.
The narrow aperture ensures that the entire subject stays sharp, even at the price of a little less overall image quality. In our photo I also had to increase the ISO setting to make sure I was done with the light painting within the 30-second exposure time.
The setup for our light-painted chocolate shot
ISO 400 is, in my opinion, the upper limit for the EOS Rebel T1i (EOS 500D)—higher values produce too much image noise. Other ways to increase the image quality are to expose for a longer duration (in B mode), use a full-frame camera, or set a wider aperture. However, using a larger aperture provides less depth of field (see the first two photos on page 237, which were shot at f/5.6). Another way to increase the depth of field is to use focus stacking techniques. For an example, see my Flickr photostream at http://www.flickr.com/photos/galllo/4905689780/.
The setup for our light-painted chocolate shot
Post-Processing in Photoshop
I used the Exposure, Blacks, and Vibrance sliders in Adobe Camera Raw to give the image a warmer, highercontrast look before I brought it into Photoshop so I could crop and straighten it and eliminate any unwanted artifacts. To finish up, I added a strong vignette and sharpened the image with the Smart Sharpen tool.
The original image (left) and the processed version (right)
Tips, Tricks, and Notes
It’s easy to check the quality of your images while you shoot, and there are some interesting parallels between industrial and artistic image processing techniques:
▸ Pseudotethered shooting: Nowadays tethered shooting software is often included with new cameras. It lets you view your camera monitor and adjust the shooting parameters in real time on a computer or laptop screen. Tethering is a great way to ensure high image quality, but it is complex to set up and gives you additional cables to trip over while you work. I have found it more effective to shoot four or five shots, check on the computer to see which settings I need to alter, and then return to the setup. These little checks take only two minutes but can be very helpful.
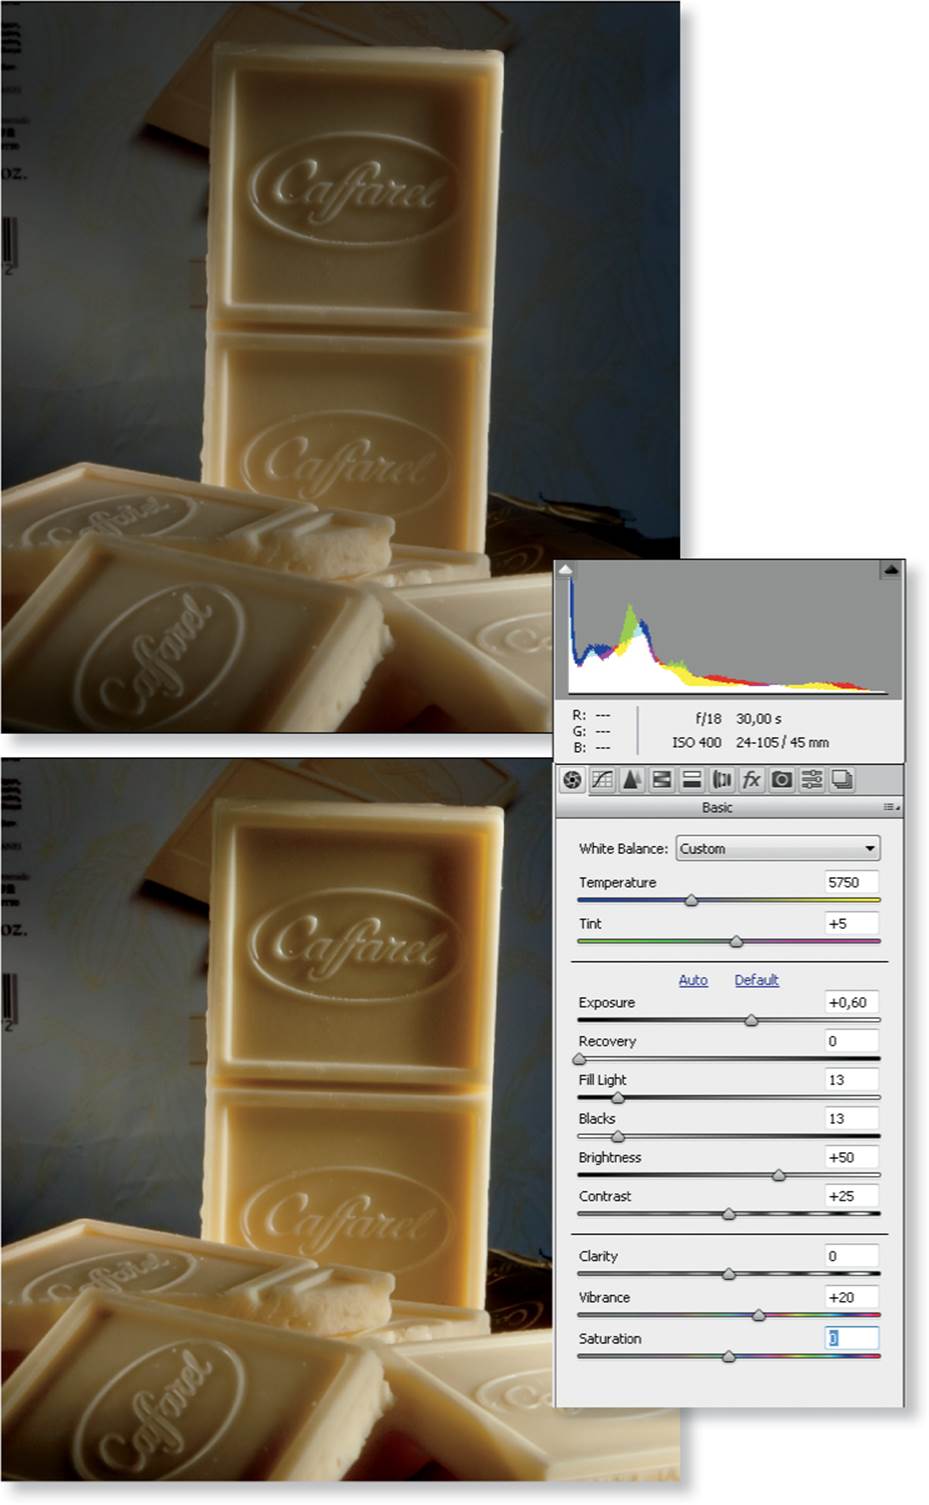
The settings I made in Adobe Camera Raw to increase the contrast and enhance the colors
▸ Industrial uses for grazing light: The flat, lateral light I used to emphasize the writing on the surface of the chocolate is often referred to as grazing light. It is used in industrial contexts to inspect embossing, scratches on a product’s surface, and etched codes (see workshop 17). Backlight used with a transparent background (see page 214) is another type of artistic lighting that is used in industry, and the ring light effects favored by Vogue magazine are also used in industrial applications when direct, shadow-free light is required. It’s always worth keeping an eye out for new lighting ideas, and appendix C lists a collection of useful sources to get you started.
To complete this workshop, here are some of the other unprocessed results I captured during the chocolate session. They are all slightly different and underscore the benefits of experimenting while you shoot.
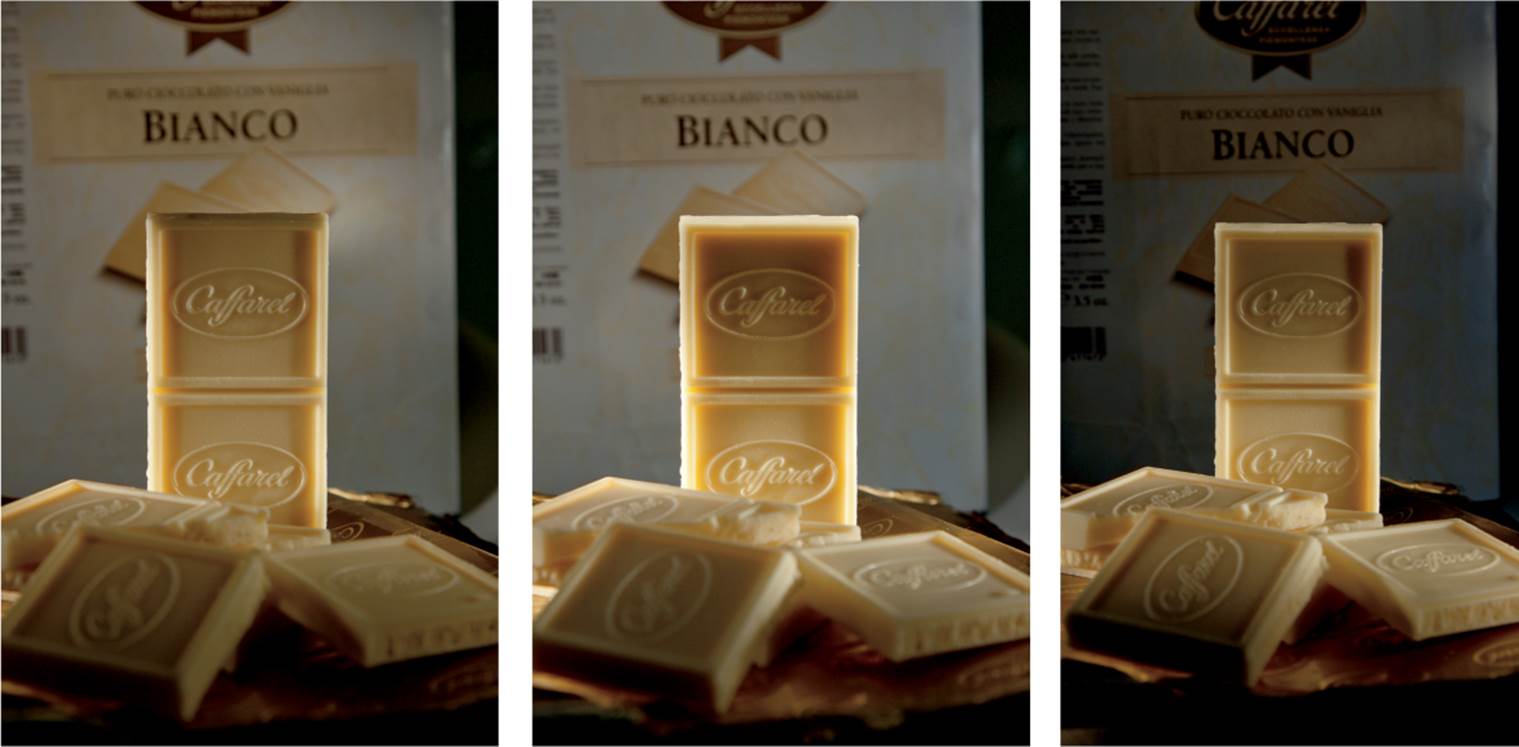
Unprocessed images from the same session, shot at f/5.6 (left and center) and f/8 (right)
In-Depth:
RAW vs. JPEG
You may have noticed that I usually shoot in RAW but sometimes in JPEG. Both formats have their advocates, and discussions about the topic sometimes sound like a religious debate! The main advantages and disadvantages of shooting in RAW format are as follows:
1 The white balance 1 can be adjusted losslessly after shooting.
2 The color space 3 of a RAW image can be altered losslessly.
3 RAW images have much more leeway when it comes to digital processing—for example, with the Exposure slider 2.
Generally speaking, you can apply more extreme processing to RAW images without running the risk of tonal clipping or banding effects. Always shoot RAW for important jobs and in tricky lighting conditions, such as in high contrast. You will have more options when it comes to processing or repairing your images later.
Arguments in favor of JPEG include the fact that they are about a fifth the size of their RAW counterparts and they are universally readable, making them ideal for sharing. RAW formats are manufacturer specific and, with the exception of Adobe’s DNG format, they are also proprietary.
If you always shoot RAW, you will quickly get used to the greater dynamic range it offers, which increases the risk of getting lazy when it comes to planning your exposure parameters. Shooting in JPEG requires discipline and that can help you produce better photos that require less processing.
The flash shoots described in this book involve a lot of test shots that take up space on your computer hard disk. Shooting JPEG reduces the size of your archive and accelerates the process of deleting unwanted test shots later. Last but not least, JPEG contrast and white balance settings allow you to create looks in the camera that can be difficult to create in a RAW converter. For example, Canon’s Fluorescent Light white balance setting is hard to duplicate perfectly in Adobe Camera Raw.
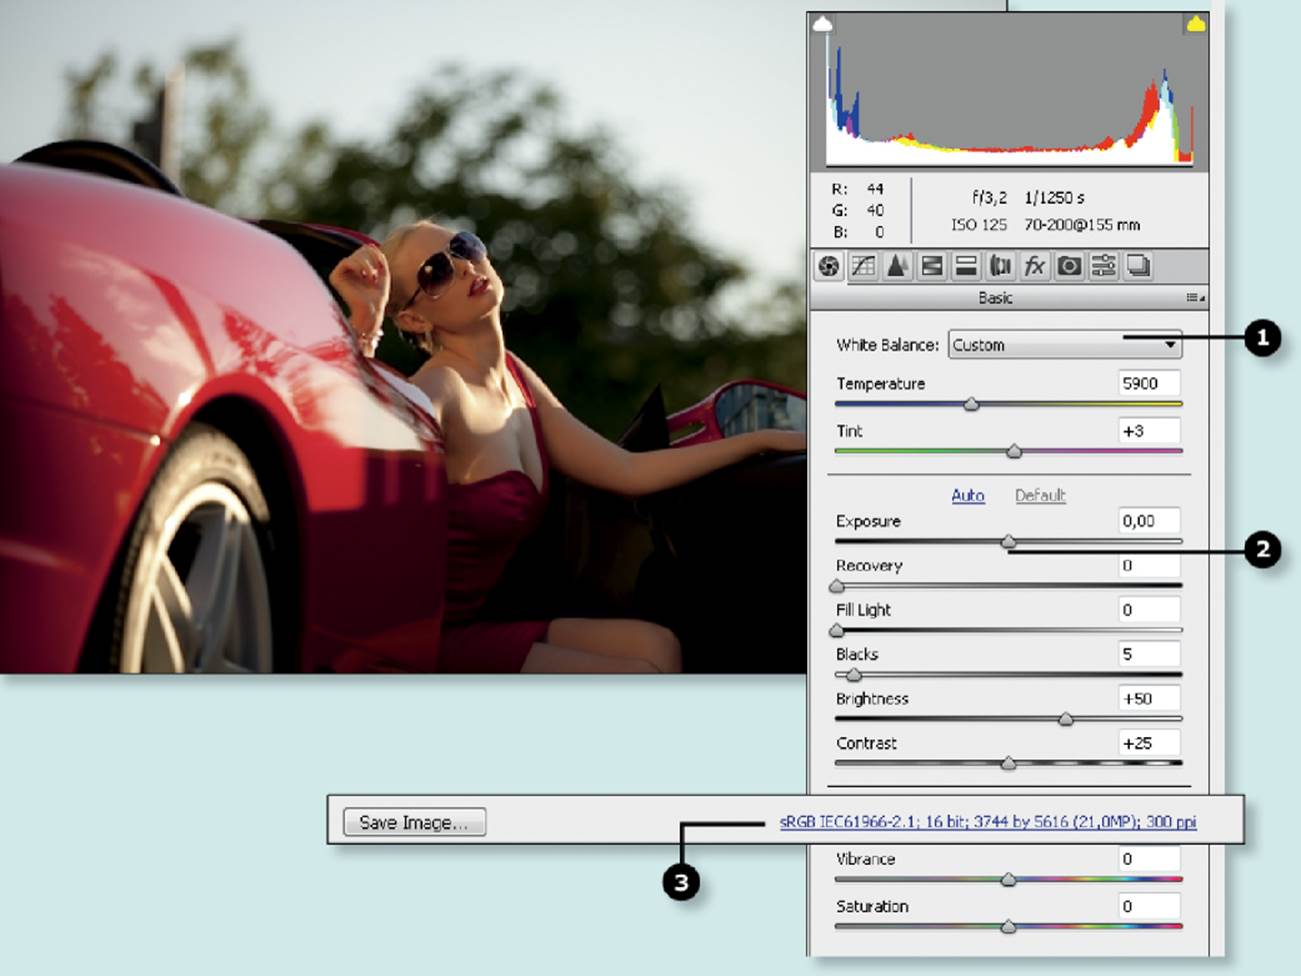
A screenshot taken from Adobe Camera Raw 7.0
All materials on the site are licensed Creative Commons Attribution-Sharealike 3.0 Unported CC BY-SA 3.0 & GNU Free Documentation License (GFDL)
If you are the copyright holder of any material contained on our site and intend to remove it, please contact our site administrator for approval.
© 2016-2026 All site design rights belong to S.Y.A.