Creative flash photography : great lighting with small flashes: 40 flash workshops (2014)
Part II. The Fun Starts Here! 40 Lighting Workshops
Chapter 7. Workshops 36–40 How to Make the Invisible Visible with High-Speed Flash
Flash guns are not only small, practical, clever, and battery powered, they are also fast! Their extremely short flash durations are perfect for freezing splashes or the movements of waves and other liquids. This chapter shows you how to capture perfect splash photos using simple gear and a little patience and skill, and it finishes up with how to use a cross-beam sensor.
Workshop 36
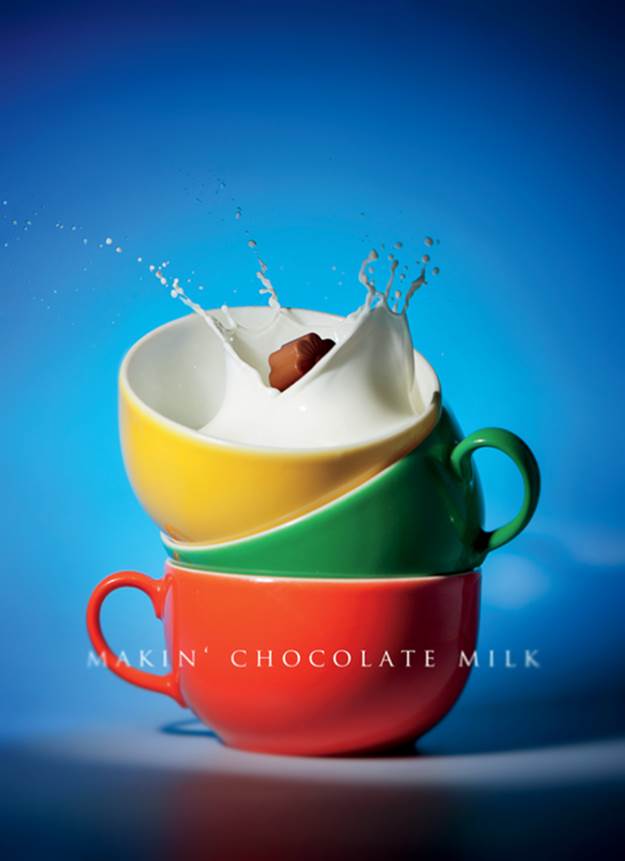
Milk and Chocolate Splash
▸ Shooting with ultrashort flash durations
▸ Using snoots, flags, and colored gels for splash shots
▸ Creating a perfect splash image from three exposures
Splatter and splash photos are popular, and you can find hundreds of coffee splashes on Flickr. More complex splash photos of olives, sugar cubes, ice cubes, and cookies falling into milk, cream, coffee, cola, or blue Curaçao are an integral part of the current advertising scene. Capturing splash photos is a lot of fun, but it involves some special gear and a fair amount of preparation. A 1cross-beam sensor, like the Jokie I use (see workshop 39), is ideal for ensuring picture-perfect results every time. With a little patience you can even capture splash photos without a cross-beam sensor, and you could also use bright sunlight to freeze the splash. Nevertheless, using a flash gun enables you to better direct the light, and the very short flash duration provided by low output settings is ideal for freezing action. Actually, a little system flash works even better than a studio flash for capturing splashes, because it is faster.
The final image is a composite of three exposures.
The Setup
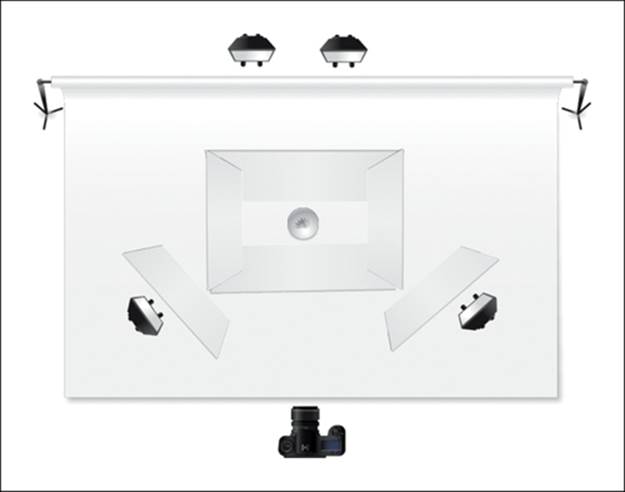
For the milk and chocolate splash, I used one flash with a blue gel to light the background and another flash with a snoot to capture the milk. I placed a flag made from a mouse pad in front of the filtered flash to prevent blue light from reaching the cup, and I used a book covered with white paper as a fill-in accent. I mounted the camera on a tripod and fired it with a cable release, and I fired the flashes at their second-to-lowest output setting with RF-602 radio triggers. To make cleaning up easier, I set up this scene in the bathroom. The basic setup consisted of two boards laid across the bathtub with a small infinity cove made of easy-to-clean Trans-Lum sheeting on top.
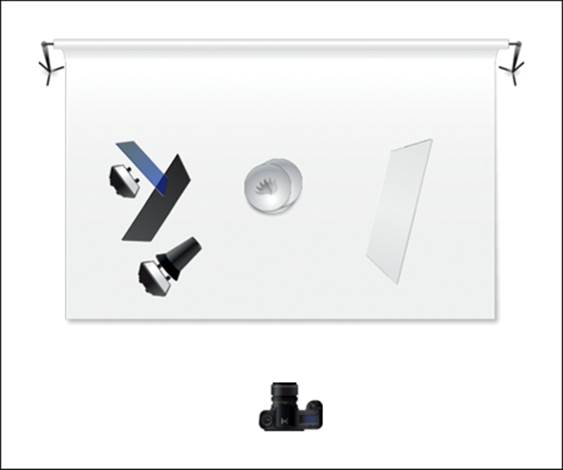
Schematic showing an infinity cove, two flashes (one with a blue gel and one with a snoot), and a flag
A splash like this works only if you are extremely patient or if you know a trick or two
Canon EOS 5D Mark II | 24–105mm set to 105mm and f/7.1 | M mode | 1/125 second | ISO 100 | RAW | manual prefocus (autofocus switched off)
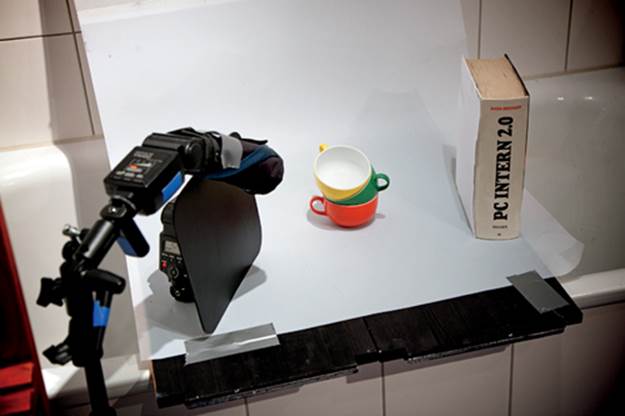
Our milk and chocolate splash setup
Camera and Flash Settings
We set the flash output to its second-lowest setting to keep the flash duration as short as possible. The hard light from the flash gives a splash like this a clear, three-dimensional look, so we didn’t use additional light modifiers or umbrellas. The black mouse pad flag prevented any of the blue-filtered light from coloring the milk. The background spot could be controlled with a snoot or honeycomb grid, but in this case, we just zoomed the flash to 105mm. The only additional tool we used was a Rogue FlashBender (RG040028) on the main flash for the milk, but a piece of rolled-up cardboard would have produced the same effect.
To protect the front lens element while shooting splashes, position your camera a long way from the subject or use a UV or skylight filter. For this shot I used my Canon EF 24–105mm f/4.0 zoom set to 105mm and f/7.1, which is slightly narrower than the critical aperture and provided us with sufficient depth of field throughout the frame (see the illustration below and information provided at www.slrgear.com).
I set the camera to manual (M) mode and 1/125 second to eliminate the ambient light. Even at such a low output setting, the close proximity of the flashes to the subject meant we could shoot at ISO 100.
The Shoot
For splash shots you have to prefocus to prevent the camera’s autofocus system from searching for the subject at the critical moment. Switch your lens to manual and set the focus manually using the zoomed-in live view display. Remember to check the focus periodically during the shoot because the gears in an autofocus lens make it easy to inadvertently alter the focus. Test and calibrate the setup before you start splashing.
For this setup, it is important to set the background flash so that it forms a nice centric background spot, and to set all parameters in such a way that the flashes can be used at a low flash output. This makes the flashes faster and the images sharper. As with other setups, a test shot with no flash should produce an almost completely dark image. When the basic setup is complete, you can position and set your flashes and attach the cable release to the camera. Now proceed as follows:
1 Hold the chocolate in your right hand and the cable release in your left hand.
2 Drop the chocolate and then release the shutter a split second later.
3 Check the results; if you didn’t quite catch the splash, try again.
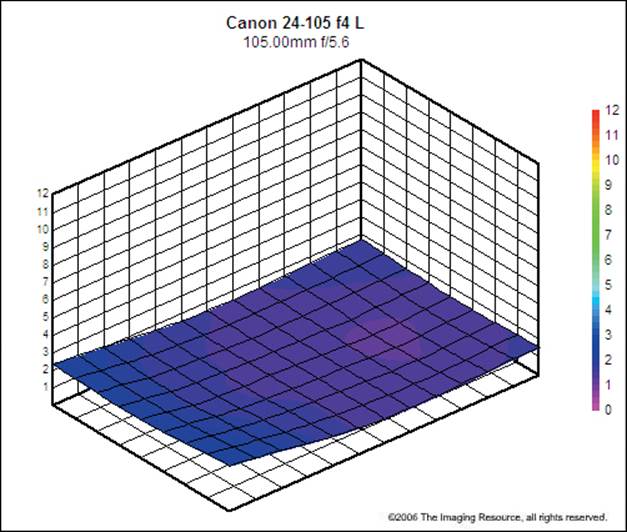
The critical (i.e., sharpest) aperture for the lens we used is f/5.6. The setting of f/7.1 that we selected for this shot gave us a little more depth of field and almost the same degree of absolute sharpness. (Illustration courtesy of SLRgear, www.slrgear.com)
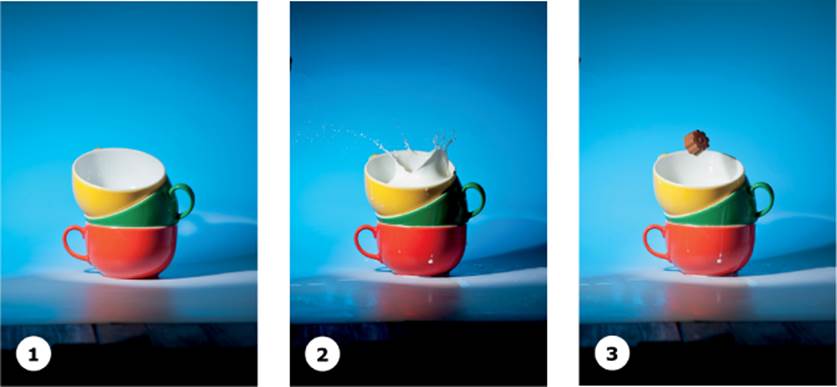
The three components of our splash shot:
1. Clean cups
2. The splash alone
3. The chocolate
Post-Processing in Photoshop
The nature of splashes means that everything is messed up after the first shot. Instead of cleaning up and rebuilding the scene between each attempt, it’s a lot easier to shoot a photo of the clean scene, without the splash, and then add the splash digitally—and this approach also works for the little piece of chocolate. In reality, for the splash to be high enough, the chocolate would have already fallen deep into the cup and the timing would have been impossible. I used Photoshop to select the chocolate and the splash, and I merged them with the photo of the clean cups. The simple setup meant we didn’t have to battle with implausible lighting or perspective effects. If you set up your shots carefully, and if you take your time in Photoshop when making the selections, you will end up with convincing results.
Tips, Tricks, and Notes
To capture splashes successfully, the focus has to be precise, you need a sufficient depth of field, and the flash duration has to be as short as possible. Short flashes are easiest to achieve with system flashes set to low output. If you need more flash power, use additional flashes rather than a higher output setting. The low output = short flash equation that system flash adheres to doesn’t always apply to studio flash units because they use multiple condensers that are fired in parallel or individually, depending on the output setting. This means the optimum flash duration is not always at the minimum output. If you are not sure if this applies to your flash, ask the manufacturer.
For crisp-looking splashes, use Photoshop to eliminate out-of-focus droplets of liquid.
If you want to capture a good splash every time, use a cross-beam sensor to fire your flash. (For details about this technique, see workshop 39.)
Check out the following Flickr groups for some great splash photo ideas and examples:
▸ Splish, Splash, Drips and Drops: www.flickr.com/groups/splish_splash_drips_n_drops
▸ Splash: www.flickr.com/groups/splash
▸ Cookie Splash: www.flickr.com/groups/cookiesplash
Click the Show EXIF bottom below a Flickr photo window to view the EXIF data for an image. If you want to know more, send the photographer a message in Flickr Mail. Most artists are friendly and helpful and happy to chat about their work.
Workshop 37
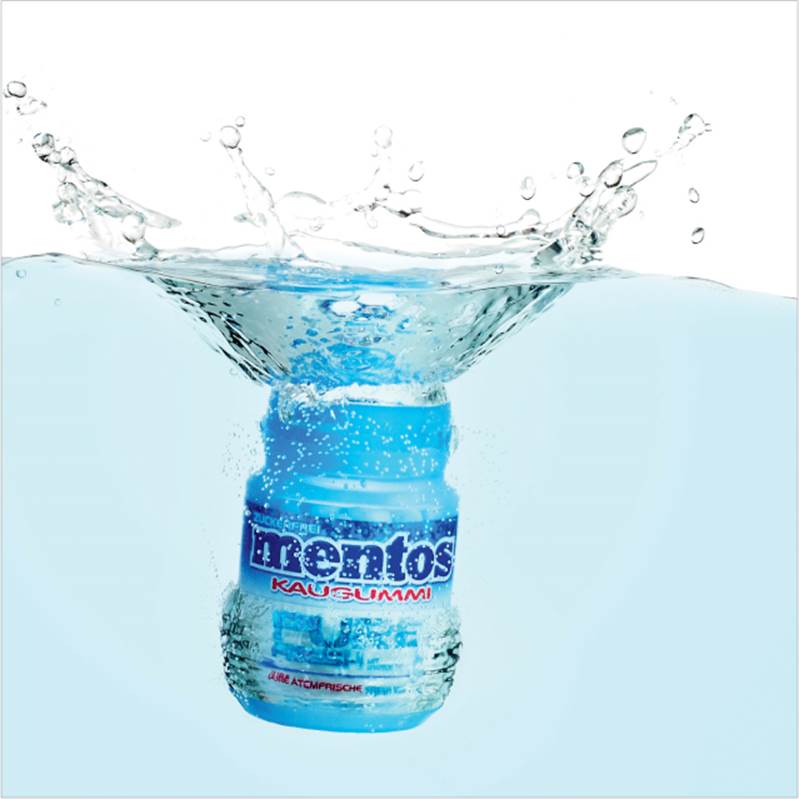
Shooting Splashes in an Aquarium
▸ Using Trans-Lum sheeting instead of a softbox
▸ How to light big splashes
The small size of the splash in the previous workshop made it tricky to capture, and we had to make several dozen attempts before we captured the result we were looking for. Larger splashes made with bigger objects are easier to capture. We used a cheap aquarium, but any large glass container will do. Instead of an expensive studio flash with a softbox, a sheet of Trans-Lum is all you need to produce an interesting and flattering lighting.
The Setup
The bathroom is the best place for a setup like this. The shot requires light both from behind to illuminate the liquid and from the front to illuminate the object that causes the splash. My immediate thought was to use a softbox for the rear light and two diffuser umbrellas for the front light. However, this would have taken too much space so I decided to use a simpler solution. I laid two boards across the bathtub with a gap between them and used a sheet of Trans-Lum taped to the wall as an infinity cove. I then placed the aquarium in the cove.
I used four flashes (a combination of Canon and Yongnuo) in manual mode and fired them with RF-602 radio triggers. Two of the flashes were positioned in the bathtub, pointed up to light the infinity cove from behind. The relatively large distance between the flashes and the subject, and the thickness of the Trans-Lum sheeting, meant we had to use a relatively high output setting. Once again, two flashes provide a shorter flash duration and faster recycle time than a single flash at a higher output. The other two flashes were positioned at the right and left corners of the aquarium along with diffusers made of copier paper. The camera was on a tripod, and the flash transmitter was mounted on the hot shoe. We fired the shutter with a cable release.
Schematic showing an aquarium placed on Trans-Lum foil with two flashes firing from below and two flashes placed at the corners.
To create a splash shot like this you need a bathroom, a small aquarium, a sheet of Trans-Lum, and system flashes
Canon EOS Rebel T1i (EOS 500D) | EF 50mm f/1.4 set to f/16 | M mode | 1/125 second | ISO 100 | RAW | manual prefocus based on the live view display (autofocus switched off)
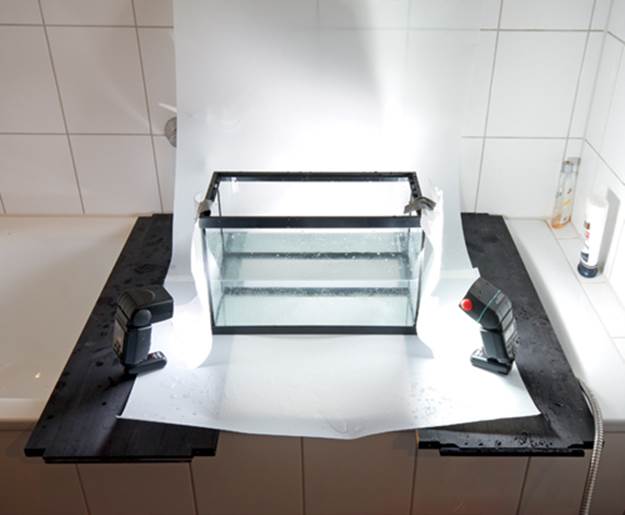
Our aquarium splash setup
Camera and Flash Settings
I used a 50mm prime lens at f/16 to capture the additional depth of field in this large splash. I don’t recommend using a smaller aperture because it will reduce the overall sharpness of the image (compare the measurements on www.slrgear.com). I prefocused with the zoomed-in live view display before I switched to manual (M) mode and used my favorite indoor shutter speed of 1/125 second. Using a full-frame prime lens on an APS-C camera gave me an effective focal length of 80mm and allowed a safe distance from the camera and the wet subject. Attach a UV or skylight filter to your lens as a safety precaution when you shoot liquids.
Make a test shot to be sure the ambient light is suppressed, then set your flash to 1/8 output. Remember that every full increment on the flash output scale halves (or doubles) the amount of light.
The Shoot
Check your setup and prefocus with the object in a fixed position (for example, hung in place with a piece of string) before you attempt to capture the splash. Drop the object from one hand and release the shutter with the other hand shortly afterwards. You will quickly get a feel for the timing, and then you’ll capture great splashes with almost every shot.
Post-Processing in Photoshop
Perfectionists will probably clean the walls of the aquarium after each exposure, but I took the easy way out and used Photoshop to remove unwanted droplets. I also increased the overall contrast, balanced the colors, and cropped the image before I did the final sharpening. I added a turquoise color to the water with a Photo Filter adjustment layer (I unchecked the Preserve Luminosity option).
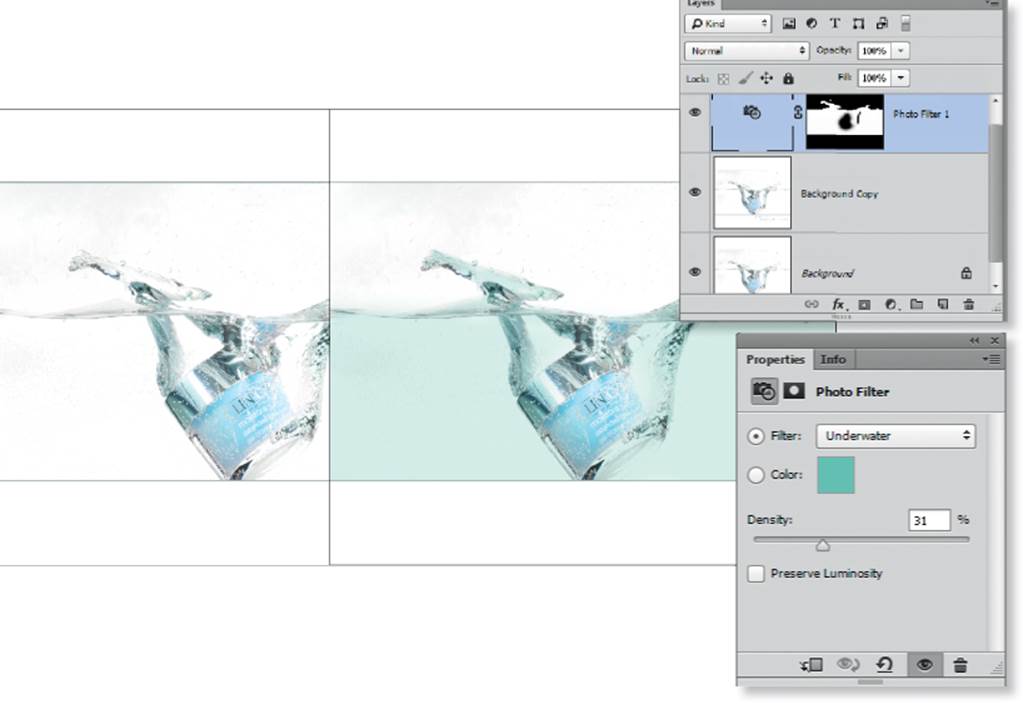
The photo before and after a Photo Filter adjustment layer. A mask restricts the new color to the water.
Tips, Tricks, and Notes
▸ Rolls of Trans-Lum sheeting are available from most well-stocked online photo dealers. Some art and architecture supply stores also carry small rolls or individual sheets.
▸ To see more inspirational splash shots, check out the sample photos and blog from Photigy (www.photigy.com).
▸ For more information about depth of field and diffraction blur, see en.wikipedia.org/wiki/Depth_of_field.
▸ Visit SLRgear (www.slrgear.com) to find test values for the critical aperture for your lenses.
This shot was taken with the same setup and camera settings as those used to capture the image on page 247
Workshop 38
Curaçao Wave
▸ Using Trans-Lum sheeting instead of a softbox
▸ An easy and reproducible way to capture waves
Capturing waves requires a slightly different approach than the one we used to capture splashes. The photo in this workshop gives the impression that it was captured when the liquid was poured into the glass, but it was actually the glass that was set in motion. This workshop demonstrates the simplest way to create this kind of effect and provides tips on how to set up your lights to effectively capture the movement.
The Setup
Creating a perfect wave requires some preparation, although you can find most of the bits and pieces you need at home. Once again I used two boards with a gap between them and my bathtub as a stage, and I taped a sheet of Trans-Lum to the wall as an infinity cove. To create the wave effect I used another board, the glass from a picture frame to create the reflection, and a champagne flute. I taped the glass to the board and attached the champagne flute to the glass with silicone fixative (clear tape would also work). To create a controlled wave, fill the glass, lift one end of the board three or four inches, and then drop it.
In this setup the light needs to come from behind. I initially placed two YN-460 flashes (fired with RF-602 radio triggers) behind the Trans-Lum sheet. They fell into the bathtub during my first attempt, so I let them lie in the bathtub and just pointed them up.
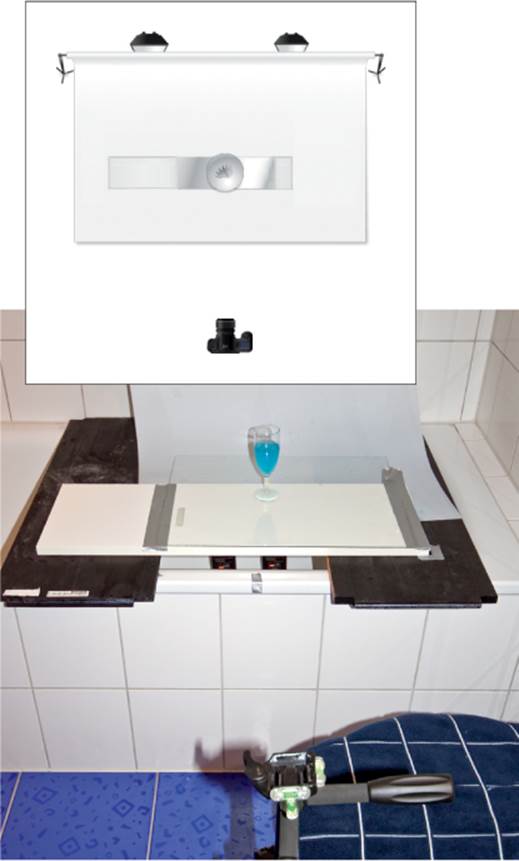
A schematic and a photo of the setup showing the Trans-Lum infinity cove, two flashes that light the background from below, and the champagne flute attached to a sheet of glass that was taped to a board

An effective wave shot requires careful preparation
Canon EOS Rebel T1i (EOS 500D) | EF 50mm f/1.4 set to f/10 | M mode | 1/125 second | ISO 100 | RAW | manual prefocus (autofocus off)
Camera and Flash Settings
I used a 50mm full-frame prime lens that gave me an effective focal length of 80mm on the APS-C camera and a safe distance between the camera and the subject. I prefocused manually with the live view display zoomed in, and I set the aperture to f/10 to give me sufficient depth of field. I began with the flashes set to 1/8 output and regulated them according to the results of my test shots. In this type of situation, always make sure the lighting is just right before you create the wave. The movement of a wave is slower than that of a splash, so you can use slightly longer flash durations. If you cannot generate enough light using two flashes, either add more flash units or increase your ISO setting.
The Shoot
When everything is set up, you can attach a cable release to your camera and create a wave by lifting the board and letting it drop. With a little practice, you will learn to time the drop and the shutter release to perfection, and you should be able to capture a great wave with every second or third attempt.
Post-Processing in Photoshop
You will need to crop most of your wave shots, and you will probably have to use the Clone Stamp tool (or a similar tool) to remove the tape or silicone you used to attach the champagne flute to the glass. Of course, you can also remove any other unwanted artifacts and adjust the colors, contrast, and sharpness to taste. Our before and after shots are shown below. Remember, the better the initial capture, the less post-processing will be needed.
Tips, Tricks, and Notes
▸ Although it looks like expensive liqueur, this shot was made with water and food coloring.
▸ The setup I used for this shot was inspired by Jamal Alayoubi (www.flickr.com/photos/jamalq8/3734558512). For an alternative method based on using a skateboard, see Vincent Riemersma’s setup (www.diyphotography.net/creating-the-splash).
▸ Check out AurumLight (http://blog.aurumlight.com/2011/04/20/milk-workshop-in-london) for another inspiring splash idea based on milk.
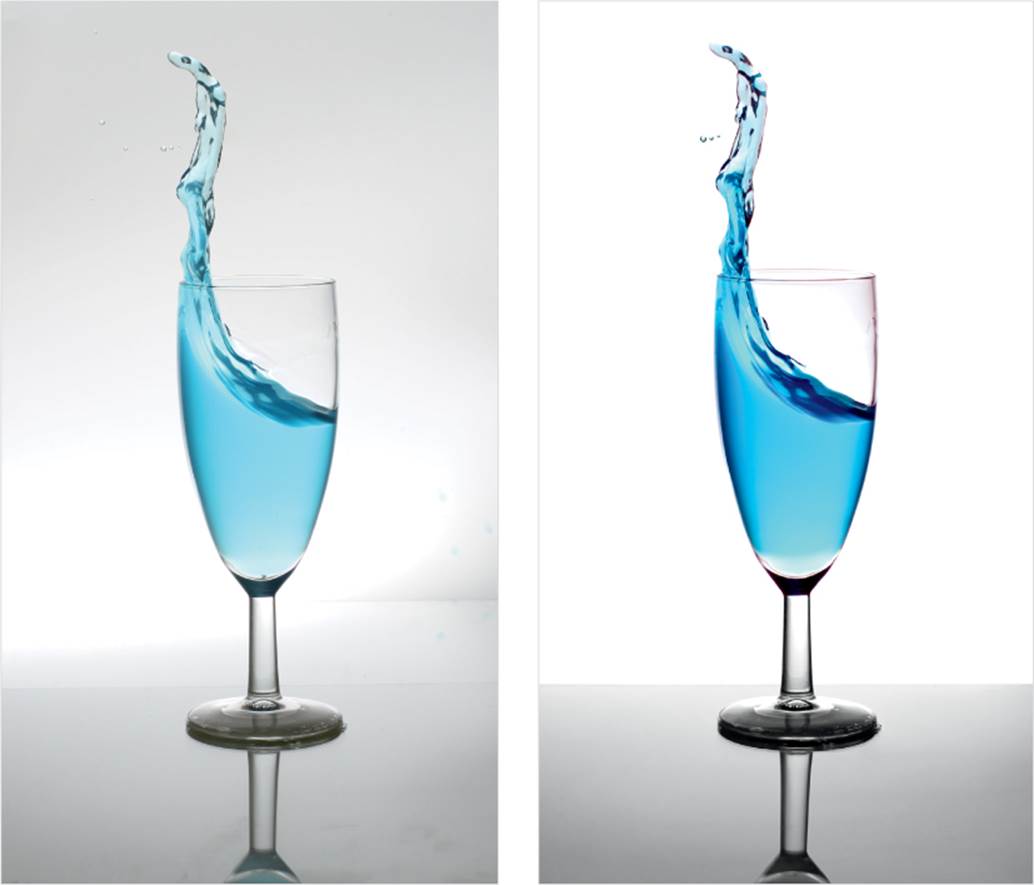
The original image (left) and the post-processed version (right)
Workshop 39
Kiwifruit Splash with a Cross-Beam Sensor
▸ How to set up a cheap and effective cross-beam sensor
▸ How to capture splashes of cream
If you were frustrated with the trial-and-error approach to shooting splashes in the previous two workshops, you can use a cross-beam sensor. After you set it up properly, you should be able to capture a great splash with every shot. But be warned: setting up the trigger is not trivial. For this workshop I used the Jokie model, which is available for about $215 from eltima electronic (www.eltima-electronic.de). This is a German company, but they ship overseas at reasonable prices. Another option is the StopShot by Cognisys; available in the U.S., but even without overseas shipping it is quite a bit more expensive.
Setting Up the Trigger
This setup uses a cross-beam sensor to release the shutter and capture a slice of kiwifruit as it falls into a cocktail glass filled with cream. The Jokie sensor has only one active component. The transmitter/receiver unit is the only part of the system that requires separate electrical power as it uses a simple cat’s eye reflector as counterpart. The unit is delivered with a battery holder and 20mm and 40mm reflectors. All components have quarter-inch threads, so they can be mounted on standard-size tripods and light stands.
In addition to batteries, a cross-beam sensor requires a connection cable. To trigger Canon cameras or flashes, the Jokie requires a male-to-male 2.5mm stereo cable. Cables for Canon and other cameras are available from Amazon or, in the case of the Jokie, from the manufacturer.
To set up the sensor, align the transmitter and the reflector until the warning lamp on the transmitter goes out, and then connect the cable to the camera. Now set up your flash and figure out the height from which you need to drop the object. We used two Yongnuo YN-460 flashes fitted with RF-602 radio triggers. For a shot like this, you can equip your flashes with snoots or grids, or simply bounce the light off a sheet of Styrofoam. Then measure the delay in the system by setting up a ruler next to your scene and dropping a suitable object (such as an eraser) through the trigger’s beam. For our setup we measured a height of about 42 cm, which is a 30 ms delay between the time the object is released and when the shutter fires. You can reduce the distance and delay by using mirror lockup. With our Canon EOS Rebel T1i (EOS 500D), this reduced the drop height to 35 cm. When you know these values, you can set up your scene accordingly and use a glass of water to prefocus and to test the system. The flash should be set to an output value close to its minimum to keep the flash duration short. You can then set your camera to f/8, 1/125 second, and ISO 100 and start dropping objects into liquids!
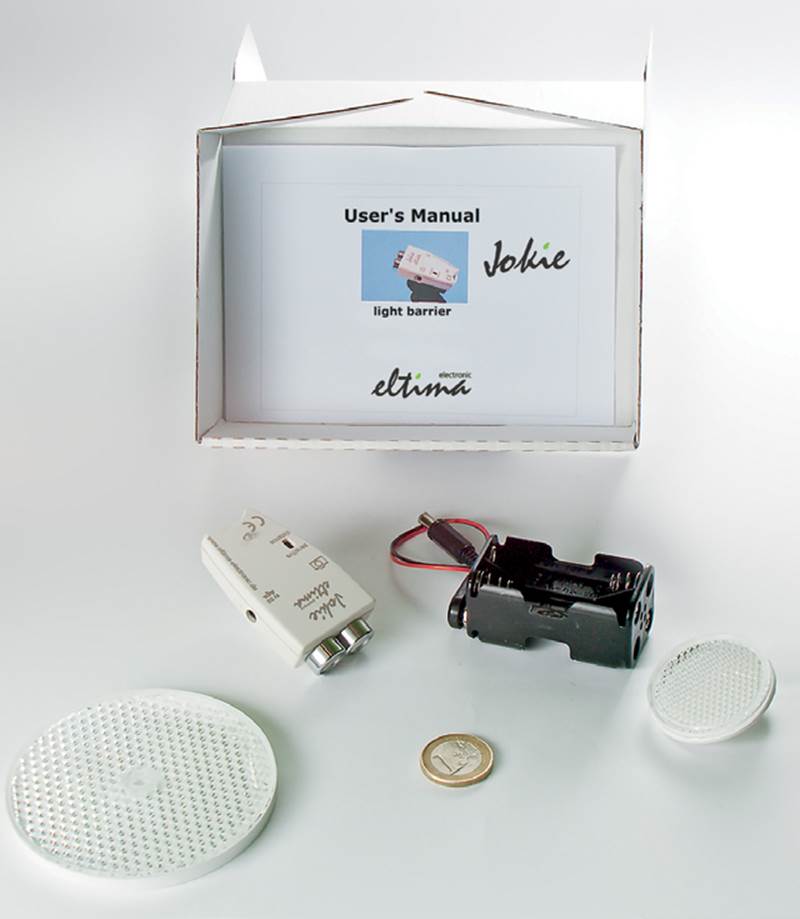
The IR trigger, showing the transmitter/receiver unit, the battery holder, and the two reflectors
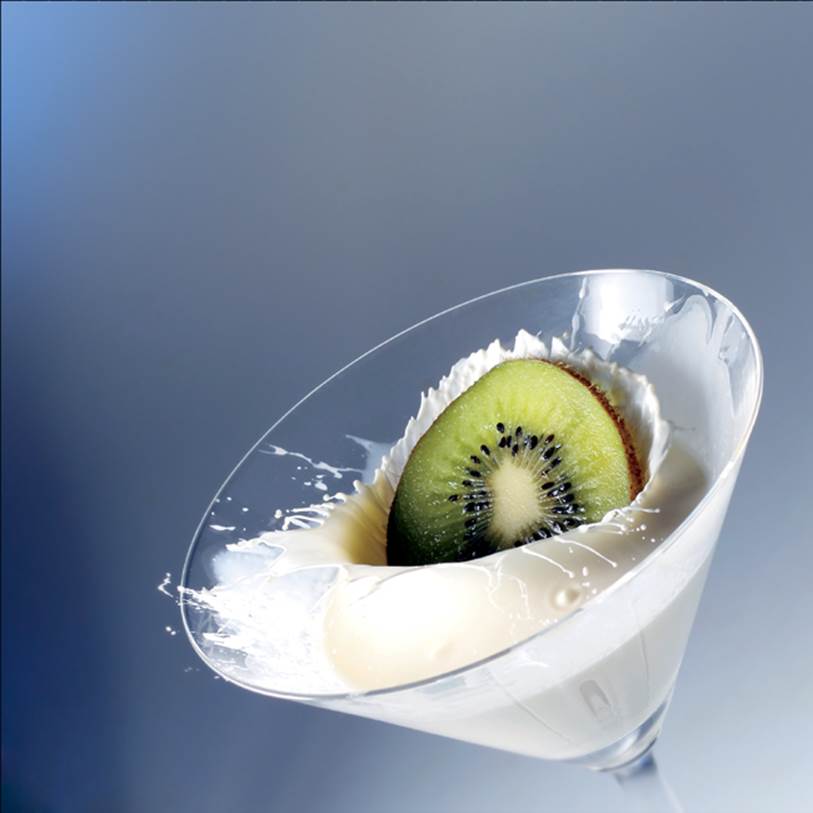
Our kiwifruit splash, captured using an cross-beam sensor
Canon EOS Rebel T1i (EOS 500D) | EF 50mm f/1.4 set to f/8 | M mode | 1/125 second | ISO 100 | RAW | manual prefocus (autofocus off)
For our setup the distance to the transmitter was about 70 cm, and we had to use the small reflector to get the system to work with such a small object. More expensive cross-beam sensors, such as the Cognisys StopShot, have a built-in delay circuit that you can use to precisely time your drops. The Jokie in the original version has no such feature, but it has a consistent delay of 0.13 milliseconds. If you are using a simple trigger like this and you need a longer delay, you either have to increase the drop distance or work without mirror lockup.
This setup is less useful with cameras that have longer shutter delay times (some Olympus cameras, for example, have a shutter delay of up to 300 ms). The best work-around is to darken the room, set the camera to bulb (B) mode, open the shutter, and then use the trigger to fire the flash instead of the camera. Cables are available to connect most triggers to a range of flash units. If necessary, you can trigger additional flashes as optical slaves.
Camera and Flash Settings
I used a 50mm full-frame prime lens that gave me an effective focal length of 80mm on that camera and a safe distance between the camera and the splash. I prefocused manually using the zoomed-in live view display, and I set the aperture to f/8 to give me a sufficient depth of field. I set the flashes to 1/8 output to begin, and I adjusted them based on my test shot results. In this type of situation, always make sure the lighting is just right before you create the splash. I used a blue gel on the background flash and a snoot made of rolled-up black card on the unit that illuminated the splash.
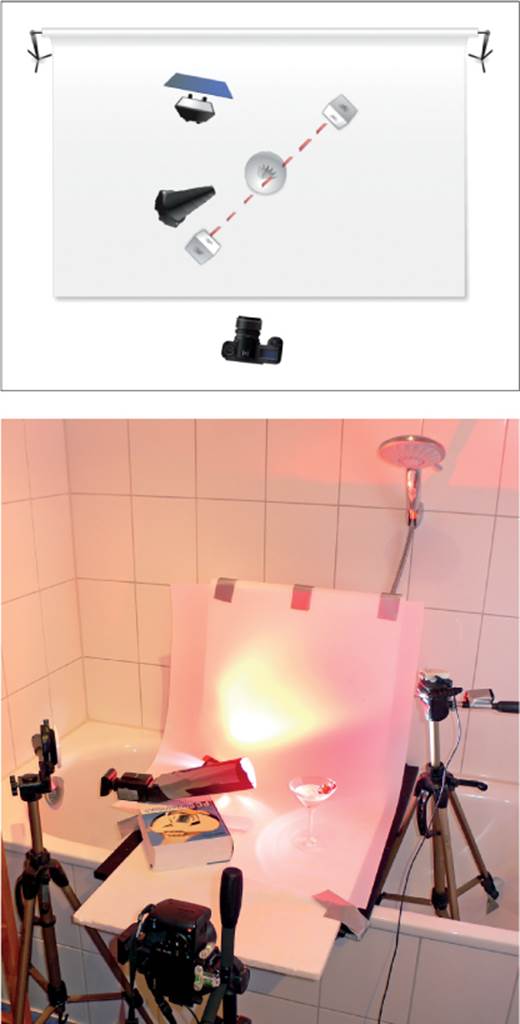
Schematic and photograph of our kiwifruit splash setup, showing a blue-filtered flash for the background and a snooted flash to light the glass
The Shoot
If you have prefocused correctly and your gear is set up properly, all you have to do is drop the object and wait for the camera to take the picture. However, as autofocus lenses tend to defocus easily you should also check the focus regularly.
Post-Processing in Photoshop
The results of this shoot already looked quite good straight out the camera, so all that I had to do was crop the images, adjust the contrast, and sharpen them for output.
Tips, Tricks, and Notes
▸ If you have trouble lining up the transmitter and the reflector over larger distances, move them closer toward each other until the lamp on the transmitter goes out and then slowly move them apart again. Adjust the alignment with each step so the lamp stays off.
▸ The two differently-sized reflectors provided with the Jokie are designed for use in different scenarios. The large one is better for greater distances, and the small one is better for small objects. My setups for the currants and kiwifruit worked only with the small reflector. If you are photographing birds or bats in flight, the large reflector is a better choice.
▸ The spin you apply to an object when you drop it affects the size, direction, and timing of the splash. With a little practice you will be able to control the splash with wrist action alone.
▸ Milk works for splashes, but it is thinner than cream and produces less impressive splashes. Olive oil and Jell-O are great for making splashes too.
▸ If you want to build your own cross-beam sensor, search the Internet for “DIY cross-beam sensor trigger photo.” A detailed construction plan by Brian Davies is available at DIYPhotography (www.diyphotography.net/high-speed-into-primer-better-trigger-and-cherry-drops).

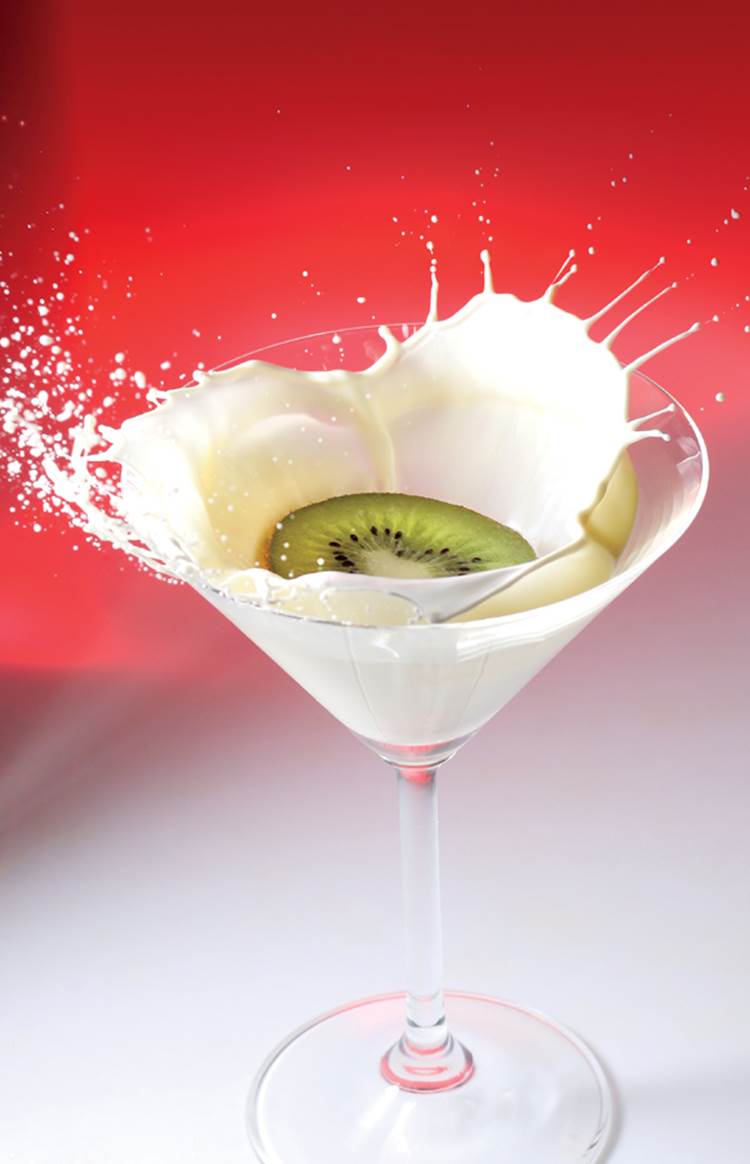
Two more cream splashes from the same shoot, captured using the parameters listed on page 255
Workshop 40
Dark Field Martini Splash
▸ Using a cross-beam sensor
▸ Capturing a splash using dark field lighting
Dark field lighting is perfect for capturing objects made of glass or other highly reflective materials. The technique uses light from the side that grazes the surface of the object and produces an aesthetically pleasing look. This workshop combines dark field lighting techniques with splashes.
The Setup
In this setup a large flag blocks the direct light from the flash and allows only diffuse, indirect light to reach the subject. This makes the glass look almost entirely black, with bright accents around the outline. To create the effect, bounce flash light off a reflector that is placed behind the glass, and insert a flag between the reflector and the subject. Additional reflectors on each side of the glass provide lateral accents.
For this shot I used two flashes set to 1/2 output and Styrofoam reflectors covered with paper to produce the reflections in the sides of the glass.
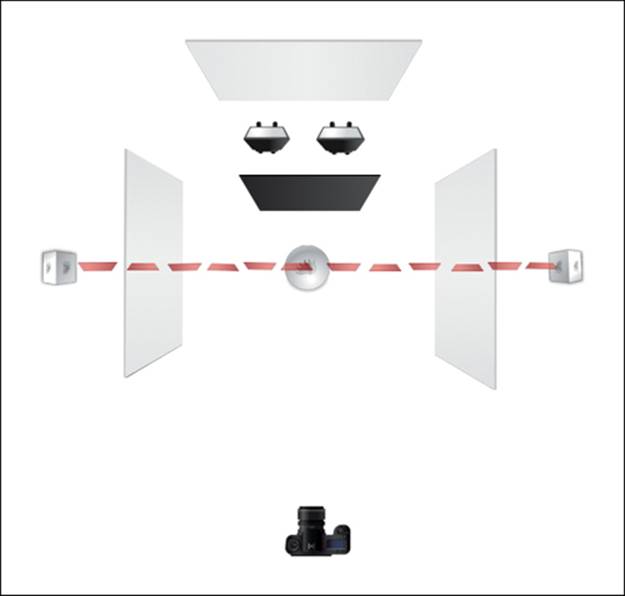
Schematic for our dark field martini splash shot, showing the cross-beam sensor and the large flag that produces the dark field lighting effect
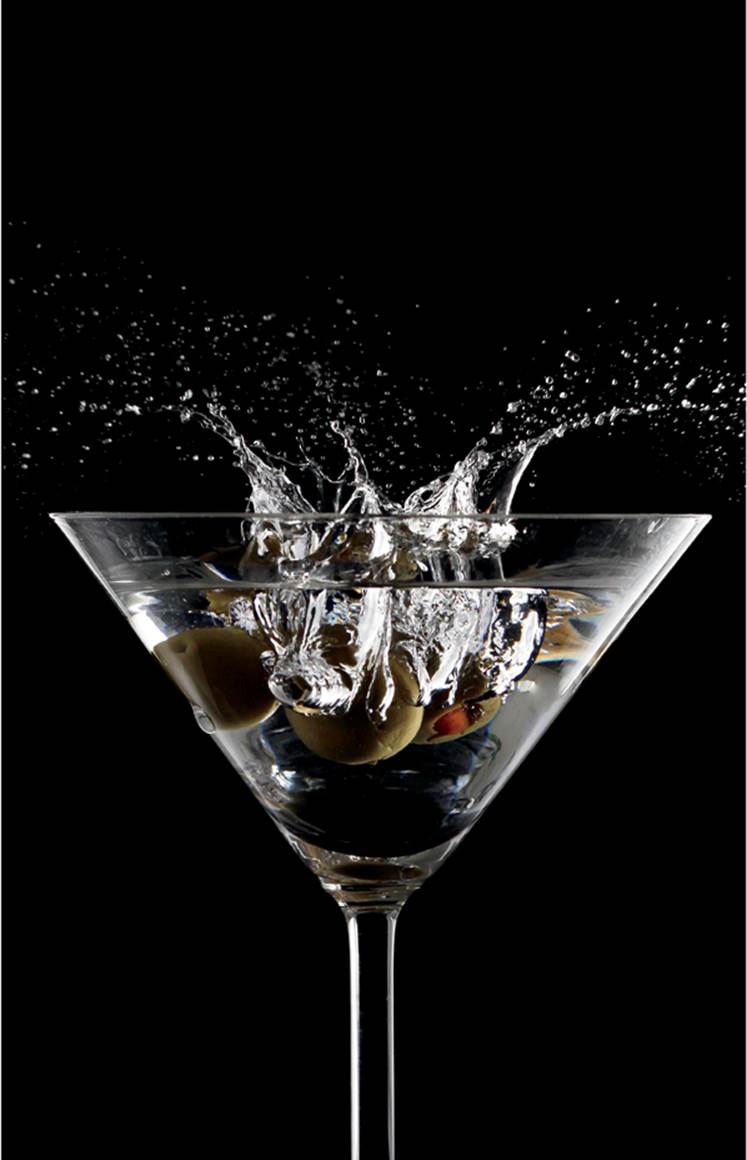
Dark field martini splash
Canon EOS Rebel T1i (EOS 500D) | EF 50mm f/1.4 set to f/8 | M mode | 1/125 second | ISO 200 | RAW | manual prefocus (autofocus off)
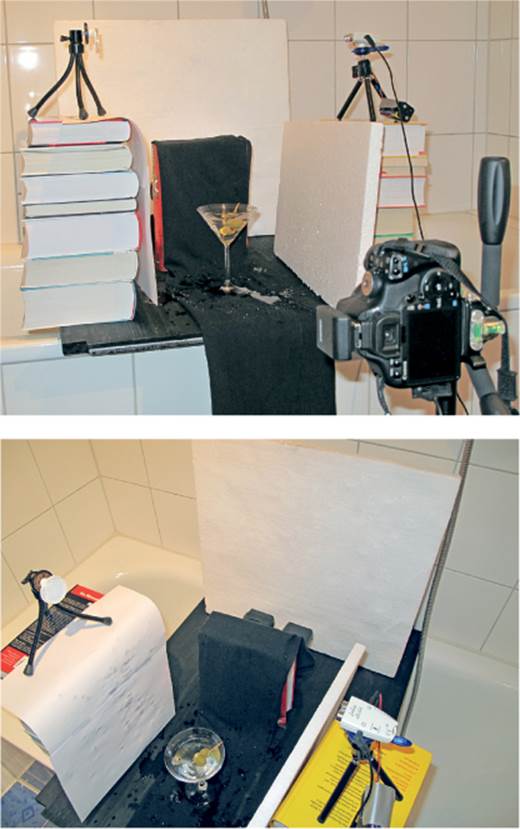
Our dark field splash setup from the camera’s point of view (top) and from above the scene (bottom)
Camera and Flash Settings
This type of indirect flash requires a high output setting if enough light is to reach the subject. As with many of the other setups described earlier, you can always add extra flashes to reduce the output, and thus the flash duration of each flash unit and produce sharper images. The other basic settings (including the Jokie cross-beam sensor) are described in the previous workshop.
The Shoot
If you have prefocused accurately and chose the right settings, all you have to do is let the object (in our case, an olive) fall into whatever container you are using. Autofocus lenses tend to defocus easily, so check the focus regularly with the zoomed-in live view display.
Post-Processing in Photoshop
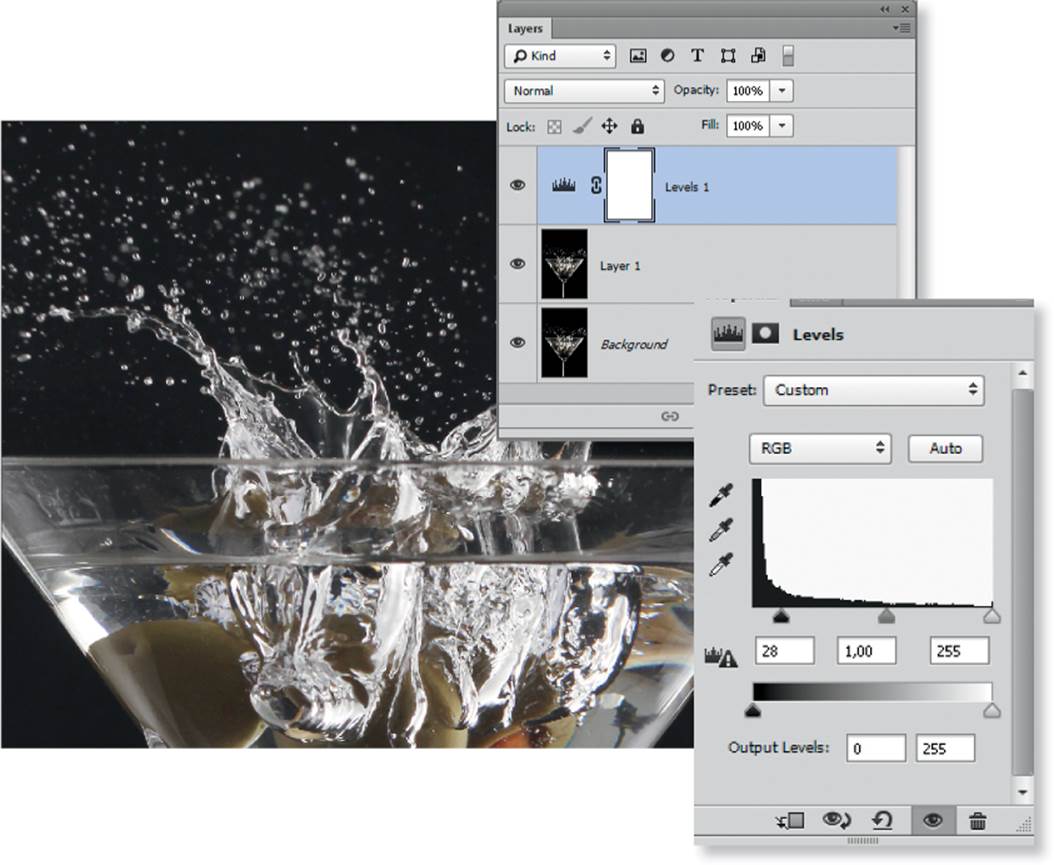
In addition to removing fingerprints and dust particles, pay attention to the blackness of the background. One of the simplest ways to ensure deep blacks is to shift the black point slider in the Photoshop Levels dialog toward the center of the histogram, or use the eyedropper to sample the areas that you want to be deep black. Shifting the black point ensures that the dark areas in the background are truly black
Tips, Tricks, and Notes
▸ Experts may notice that the viscosity and diffraction index of the martini in these shots is closer to that of water than a more expensive alcoholic beverage.
▸ Dark field lighting is often used in tabletop and product photography (workshops 17 and 35 are good examples). The appendices at the end of this book contain a wealth of useful tips as well as links to websites that provide more detail on these and a range of other photographic lighting scenarios, including retroreflection and coaxial lighting.

All materials on the site are licensed Creative Commons Attribution-Sharealike 3.0 Unported CC BY-SA 3.0 & GNU Free Documentation License (GFDL)
If you are the copyright holder of any material contained on our site and intend to remove it, please contact our site administrator for approval.
© 2016-2026 All site design rights belong to S.Y.A.