Creative flash photography : great lighting with small flashes: 40 flash workshops (2014)
Part III. Appendices

The following pages include detailed information about how to calculate flash exposures using exposure values and guide numbers, tips on how to create your own lighting diagrams, and a wealth of sources, links, and further reading. There is also a glossary to help you navigate your way through the strobist jungle.
Appendix A. How to Calculate Photographic Exposures
You might initially hate to calculate using exposure values, but you are sure to love it in the end. At first glance, calculating exposures with apertures, exposure values, and exposure times can seem complex and unnecessary, but after you discover how the basic parameters fit together you will have a lot of fun optimizing your images. Getting a perfect exposure is something a camera cannot do, regardless of how high-tech it is. The camera simply doesn’t know if it is mounted on a tripod, if the lens has a built-in stabilizer, if you prefer a long exposure time over a short one with low noise, or if you are using additional off-camera flash. Ultimately, the only skills you need to calculate exposures are simple addition, subtraction, and division.
Basics
Virtually all of today’s cameras have an exposure compensation function with values expressed in terms of exposure values (EVs). EVs are the cornerstone of photographic exposure calculation and represent the convergence of aperture, ISO, and shutter speed. Together, these settings determine the amount of light that reaches the sensor (and the amplitude of the output signal). Their relationship can be expressed mathematically using the following formula (which you can safely ignore if you are not interested in such things):
![]()
EV = 0 is defined as f/1.0 and an exposure time of 1 second.
When the first formula is rewritten to include the ISO value, the expression is as follows:
![]()
Fortunately, you will rarely need formulae like these because it is much easier to work with a rule of thumb that expresses the same concept in a simpler way:
Each full step in the aperture sequence, the exposure time sequence, the ISO values, or the flash output sequence means ±1 EV.
Aperture values are given by the sequence of numbers that result from calculating powers of the square root of 2 as follows: 1, 1.4, 2, 2.8, 4, 5.6, 8, 11, 16, 22, 32, and so forth. Each step along this scale represents double (or half) the area of the aperture opening and, therefore, the amount of light that can reach the sensor. Numerically, every second aperture value is double the previous one: 1, 2, 4, 8, and so forth; or 1.4, 2.8, 5.6, 11, and so forth.
Exposure times are expressed as fractions of a second, and they are doubled (or halved) with each increment: 1/1000, 1/500, 1/250, 1/125, 1/60, 1/30, 1/15, 1/8, 1/4, 1/2, 1, 2, 4, and so forth. Each increment allows twice (or half) as much light to reach the sensor.
ISO values are expressed numerically in a simple sequence that usually starts at 50 or 100 and doubles with each step: ISO 50, ISO 100, ISO 200, ISO 400, and so forth. Increasing the ISO value increases the output voltage of the sensor, and each step doubles (or halves) the sensitivity of the sensor.
Flash output values are expressed as fractions of a flash unit’s maximum (full) output (1, 1/2, 1/4, 1/8, 1/16, etc.). If the flash is the only source of light in the photo, each increment results in twice (or half) the amount of light that reaches the sensor.
That’s all there is to it! After you have memorized these simple concepts, it’s just a matter of practice. The following tables show randomly chosen combinations of values that result in the same overall exposure. Put simply, every time you alter one value by one or more full steps, you have to adjust another value in the opposite direction by the same number of increments to achieve the same exposure (table 1 shows exposure values calculated without flash, and table 2 includes flash in the calculation).
Flash-to-subject distance is also part of the calculation. Its effects are governed by the inverse square law as follows:
Halving the flash-to-subject distance quadruples the amount of flash that reaches the subject.
In other words, each halving or doubling of the subject-to-flash distance can be compensated for by not one, but two steps in one of the other sequences. If you want to stick with single steps in the aperture, time, or ISO sequence, you have to calculate with multiples of sqrt(2) = 1.4 in the sequence of distances.
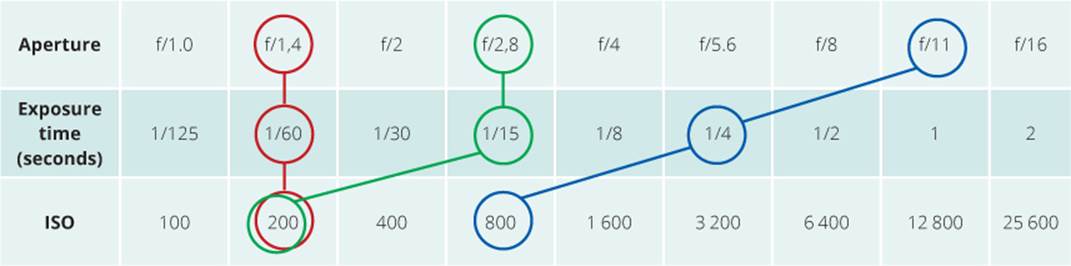
Table 1: Examples of combinations. Note that today’s cameras are usually calibrated with clicks that represent one-third of a full f-stop. If you increase a value by one click, you do not have to calculate, you just can decrease another value by one click. Even if your camera also gives you the option of using half-stop clicks, it is still better to use increments of 1/3 because flash output values are usually incremented in thirds.
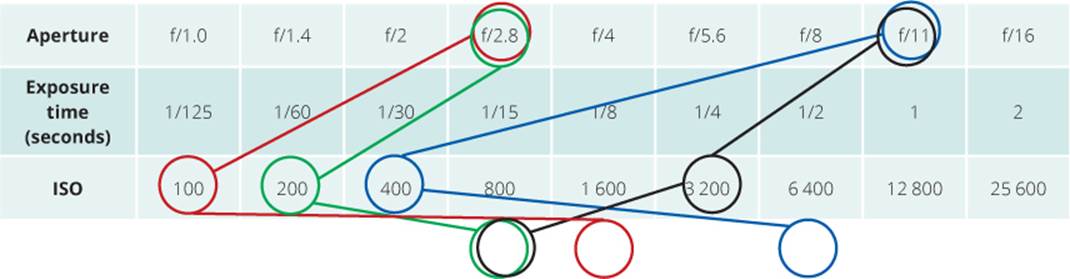
Table 2: Examples of combinations. Note that today’s Note: For exposures that are lit entirely with flash, the flash duration determines the exposure time. If the flash duration is the same as or longer than the camera’s flash sync speed, the exposure time is not relevant to the final exposure. The examples in this table are valid for a darkened room and a shutter speed of 1/125 second.
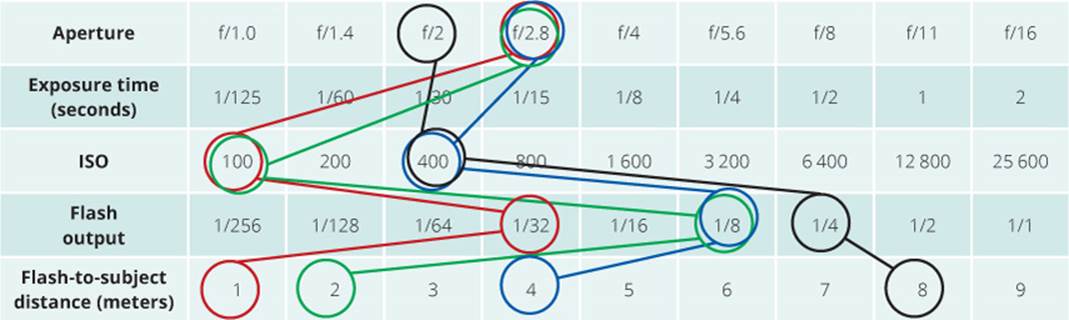
Table 3: This table also assumes that ambient light is low.
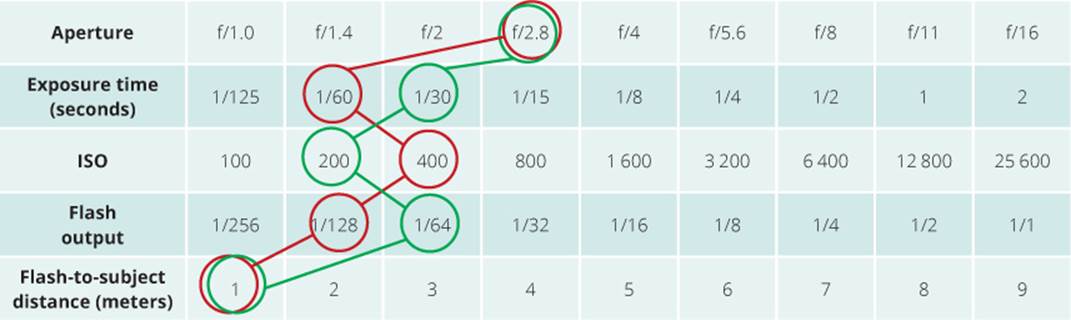
Table 4: To a certain extent, the effect of ambient light can be adjusted separately from the effect of flash light when you adjust the exposure time. The range of adjustments is determined by the camera’s flash sync speed.
If we put all this together and assume you are combining ambient light with flash, the whole thing gets slightly more complicated. In the example, I assumed that shooting at 1/60 second and ISO 400 includes a fair amount of ambient light in the resulting image and that the flash exposes the main subject correctly. Then, the sample settings indicated by the red and green outlines produce the same overall exposure (see table 4).
When you shoot on location, you will usually meter for the ambient light first and then add flash light to suit your needs. This approach allows you to alter the proportions of daylight and flash by adjusting only the exposure time (see the next section for examples).
The zoom setting of your flash reflector and the choice of light modifier you use also influence the exposure. These less precise factors cannot be expressed mathematically, but adding a light modifier, such as a shoot-through umbrella, reduces the amount of light that reaches the sensor by up to 2 EV.
The only other factor you need to consider when you work through the following examples is the longest exposure time at which you can shoot handheld without camera shake. A good rule of thumb is as follows: maximum exposure time ≤ 1 / focal length. If you have any doubt, then halve the maximum exposure time.
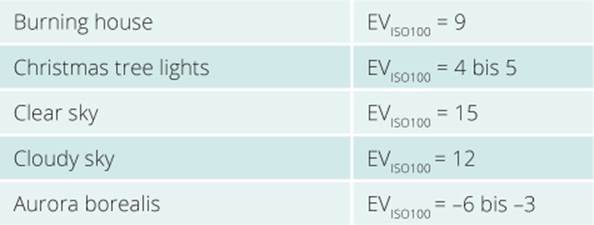
So far we have calculated with relative exposure values up and down the steps on a scale, but exposure values can also be expressed in absolute terms in relation to the physical concept of luminance. This means we can find the EV of certain situations without having to measure them (these examples are from the Wikipedia “Exposure Value” page):
Sample Calculations
Without Flash
Even if flash photography is your primary interest, the following nonflash examples are useful for thinking about exposure values, and they will teach you to effectively mix flash and ambient light when dragging the shutter.
Adjusting the ISO Value in Dim Light | Imagine you are shooting inside a church using a midrange zoom set to 30 mm. In P mode (ISO set to 100), the camera suggests an aperture of f/4 and an exposure time of 1/4 second. This shutter speed is obviously too long and would cause camera shake, but the lens is already set to its maximum aperture. The solution is to increase the ISO to 800, which gives you 3 additional stops (i.e., 1/4 → 1/8 → 1/15 → 1/30 second). The new shooting parameters are ISO 800, f/4, and 1/30 second, which you can shoot handheld. You can either set these values manually in M mode or you just change the ISO value. In Auto modes like Av or P, the camera then adjusts the other parameters automatically.
Dim Light with Stabilizer | The situation is the same as in the previous example, but this time you are using a lens with a built-in optical stabilizer; the camera has no way of knowing about the image stabilization. Once again, P mode suggests f/4 and 1/4 second at ISO 100. The stabilizer allows you to shoot up to 4 stops slower than normal, so you can safely adjust the ISO to 200 and still shoot low-noise images without camera shake.
Landscapes | This time you are shooting a broad landscape using a 10mm lens on an APS-C camera. In P mode and with auto ISO, the camera suggests f/8 and 1/1000 second. However, you wish to capture the maximum depth of field. You still have plenty of exposure time in reserve, so in Av or M mode you can switch to f/22, which gives you 3 stops less of light (8 → 11 → 16 → 22). The ISO remains at 100 (note that the minimum ISO for some Nikon cameras is 200), so you have to reduce the exposure time, from 1/1000 → 1/500 → 1/250 → 1/125 second, which is fine when you shoot handheld with a 10mm lens.
Landscape under a Bright, Clear Sky | In this situation the camera is set to auto and recommends ISO 100, f/8, and 1/500 second, but a test shot reveals that parts of the sky are burned out. The solution is to use Av mode and 1 or 2 stops of negative exposure compensation. The resulting settings are ISO 100, f/8, 1/500 second, and –2 EV compensation. This is equivalent to M mode settings of ISO 100, f/8, and 1/2000 second. These settings expose the sky correctly but underexpose the landscape—a discrepancy that is easy to fix in Photoshop if you shoot in RAW format.
Tripod-Mounted Landscape Shot with Neutral Density Filter | A neutral density (ND) filter helps keep exposure time long in bright sunlight and makes it possible to blur the movement of a waterfall captured in daylight. A 1000x ND filter provides 10 EV of additional leeway and extends the potential exposure time to 1,024 times its original value (1 → 2 → 4 → 8 → 16 → 32 → 64 → 128 → 256 → 512 → 1,024). For the human eye, such a filter looks just completely black and it also causes the camera’s exposure meter to fail. However, you can do test shots without the filter, and in the example, these shots show that ISO 100, f/11, and 1/30 second produce a well-exposed image.
Now, one solution is to mount the filter and set the camera to ISO 100, f/11, and 32 seconds. However, this means you have to wait 32 seconds to view each test shot. You can work faster if you make your test shots at ISO 800, f/11, and 4 seconds. After you know the basic exposure is correct, you can fine-tune the settings and make a couple of long exposures at ISO 100.
Product Shot in Daylight | This exercise involves photographing a piece of jewelry for an eBay auction in dull, diffuse daylight. The camera is fitted with a 50mm f/1.4 prime lens and is mounted on a tripod. The shutter is fired in mirror lockup mode using a cable release. The camera doesn’t know that it is mounted on a tripod; in Auto mode it turns on the popup flash to expose at ISO 400, f/4, and 1/60 second, which results in a horrible exposure.
If you switch to P mode with the flash off and use ISO 100, the camera recommends 1/8 second at f/1.4. This is okay, but it doesn’t provide enough depth of field. To shoot at the desired aperture of f/11 and ISO 100, you have to set the exposure time to 8 seconds (i.e., 6 stops slower to accommodate the narrow aperture). If a test shot reveals some slight overexposure, you would just switch to M mode and use ISO 100, f/11, and 4 seconds.
Portrait Backlit by the Sun | The idea is to capture a portrait in sunny backlight with a slightly overexposed background; the sun is peeking out from behind the subject. In this situation the camera’s automatic exposure control attempts to find a compromise for the background exposure and the foreground exposure, and it fails completely.
The solution is to spot meter the subject’s face. This should result in values of about 1/200 second and f/2.8 at ISO 100. To deliberately overexpose the background, alter the exposure time to 1/100 second and adjust the settings in M mode so you don’t have to repeat the procedure for every shot.
Bird in a Birdbath in Cloudy Daylight with Water Splashes | When this scenario is shot in auto mode with a telephoto zoom set to 250mm and a maximum aperture of f/6.3, the camera will select f/8 and 1/200 second, and it will turn the flash on and use ISO 400. In P mode with auto ISO and the flash turned off, the camera will select 1/400 second, f/7.1, and ISO 400. What would you do?
In such an extreme situation, use M mode and choose ISO 800, 1/1000 second, and f/6.3. You will trade a little extra image noise and a slight lack of sharpness due to the open aperture for successfully freezing the movement of the splashing water and the flapping of the bird’s wings.
Setting Exposure Using Known Values | In this exercise we look at a landscape under a cloudy sky. We want to expose the photo without the help of an exposure meter. Cloudy daylight generally has an EV of 12 at ISO 100. If you don’t already know the EVs of certain situations, you can look them up on the Wikipedia “Exposure Value” page. Recall from earlier in this appendix that 0 EV results from shooting at f/1.0 for 1 second at ISO 100.
Set your camera to ISO 100 (other values require you to recalculate using the formula shown at the beginning of this appendix). If you then select an aperture of f/8, you need to select an exposure time that equates to the difference of 6 stops between f/1.0 and f/8 (1 → 1.4 → 2 → 2.8 → 4 → 5.6 → 8). This accounts for half the difference between 0 EV and 12 EV (our target value). You can account for the other half by selecting an exposure time of 1/60 second (1 → 1/2 → 1/4 → 1/8 → 1/15 → 1/30 → 1/60). The final settings are, therefore, ISO 100, f/8, and 1/60 second.
Even if it seems complicated at first, this basic knowledge will help you quickly estimate the settings you need to correctly expose images in standard situations.
With Flash
Studio Workshop: The Instructor Has a Nikon, You Have a Canon | In this scenario, your portrait workshop instructor suggests that you use f/8 and 1/125 second to shoot in the lighting setup he has arranged, but your images are underexposed.
Nikon and Canon cameras don’t use the same metering parameters. The ISO range of some Nikon cameras begins at 200, which can cause discrepancies if someone else shoots with a Canon that meters starting at ISO 100. This is why your shots are 1 stop darker than those of the instructor. You can’t alter the flash settings because of the other workshop participants, and altering the exposure time doesn’t make any difference because of the short flash duration. Opening the aperture would reduce the depth of field, so the only solution is to double the ISO value to 200.
Team Shoot in a Studio with Preset Lighting | You are taking part in a group studio shoot. Your friend has set up the lighting to suit his 85mm f/1.8 lens, which he is using at f/2 with ISO 100 and 1/200 second. However, your zoom lens has a maximum aperture of f/2.8.
As in the previous example, you cannot alter the lighting, and changing the exposure time doesn’t influence the flash duration. Once again, the solution is to increase the ISO to 200.
Fashion Shoot with Bokeh and Multiple Lenses | On a fashion shoot that is lit with flash, you switch from your stabilized 70–200mm f/2.8 zoom to a 50mm f/1.4 lens. Your camera was previously set to 1/80 second at ISO 640, and you want to keep the same flash settings and continue using a wide aperture to produce pleasing bokeh. You begin shooting at f/2.8 and then switch to f/1.4. Later you swap your lens for a 50mm f/4.0 Lensbaby.
You can compensate for the first lens switch by setting the ISO to 160, and you can compensate for the second switch by increasing the ISO to 1280. The exposure time remains the same, and the combined effect of flash and ambient light remains constant.
Splash Photo | You are photographing an indoor splash scene with studio flash when you notice that your images aren’t as sharp as you would like them to be. You remember that system flashes can be faster than studio flashes, so you rebuild your setup using a speedlight at low output. But now, with your camera set to ISO 100, you are missing 2 EV of lighting power.
If you don’t have enough flash output, the first step is to increase the number of flash units. Twice as many flashes will increase the exposure by 1 EV. For this scenario you need to use four flash units instead of just one. Alternatively, you could use two flash units and double the ISO to 200.
Flash Bulb | You are using cheap, nonadjustable flash bulbs in a home studio. Your initial test shots at ISO 200 without light modifiers show that the scene is overexposed by 2 stops.
There are various ways to deal with this situation, all of which have advantages and disadvantages. Doubling the flash-to-subject distance will correct the overall lighting, but it provides harsher light. Closing down the aperture by 2 stops will correct the exposure, but it produces a greater depth of field. Using a diffuser will solve the problem, but it creates much softer light. Placing an ND4 filter on your lens will alter the exposure by –2 EV, but it diminishes the overall image quality. The best solution is to use Low ISO mode. For example, the ISO setting for a Canon EOS 5D Mark II can be reduced from 200 to 50. A compromise is to use ISO 100 and increase the flash-to-subject distance by a factor of 1.4.
Fighting Sunlight Using Guide Numbers | In this scenario you are shooting with flash in bright midday sunlight. The sun is behind the model, and you want to use your Canon Speedlite 580EX II flash as your main light (not as an accent light). Metering for the ambient light at ISO 200 gives you an aperture of f/16, which is typical and adheres to the sunny-16 rule. Is it possible to shoot with flash in this scenario using a 50mm standard lens? Can you estimate the exposure values based on the guide number of the speedlight used?
The answer is yes, even if you have to make compromises. If you set the flash zoom to 50mm to match the lens, the flash unit user’s manual says the appropriate guide number is 42 (in meters). The flash distance in meters at ISO 100 is given by the formula A = GN/B, which gives you A = 42/16 ≈ 2.6 m. Remember that this approach requires using the flash unit at full output with no modifier, because they reduce the amount of light that reaches the subject. These settings do not allow additional leeway for underexposing the surroundings—a technique that can be used with portable, high-power studio flash units (or porties, as they are called in Germany). You can, however, reduce the depth of field by using an ND filter to increase the aperture without affecting the overall exposure. In situations like this, rotating the flash 90 degrees may provide more even lighting for a standing model photographed in portrait format. If you need help working out the relationship between focal length and your flash unit’s angle of spread, check out the Wikipedia “Angle of View” page.
Evening and Nighttime City Streets with Flash and Lots of Bokeh (à la Dustin Diaz) | Your goal is to make portraits with bokeh in an urban evening scenario like the ones made by Dustin Diaz (www.flickriver.com/photos/polvero/popular-interesting/). You are using a 70–200mm f/2.8 IS (stabilized) lens at the maximum aperture and focal length. When you meter for the ambient light, the camera selects 1/200 second, f/2.8, and ISO 2500. Would other settings make more sense for the stabilized lens?
The camera doesn’t know the lens is stabilized, so it selected a very high ISO value. Armed with the knowledge that the image stabilization provides up to 4 stops of extra exposure, you can set the exposure time to 1/50 second (2 stops slower) without problems. This allows you to reduce the ISO to 640 and retain the wide aperture of f/2.8. If you are not sure if you can shoot at 1/50 second handheld, switch to 1/100 second and increase the ISO to 1280. If you are shooting in a situation like this with a nonstabilized lens, use a monopod and keep the shutter speed at 1/50 second. At this sensitivity level, the flash does not need to produce much light, because the camera is set so sensitive, and so 1/32 output should work for a bare flash. If you want to use light modifiers, then 1/8 output is a good starting point.
Diffuse Daylight with Flash | You are at an open-air fashion shoot on a cloudy afternoon. In auto mode, the camera’s spot meter chooses settings of 1/100 second, f/5.6, and ISO 200, which will expose the model correctly but produce uninspired images.
You can add flash to make the photos more interesting, but be warned: As the subject is already correctly exposed, you have to alter the camera settings to avoid overexposure. The solution is to underexpose the surroundings by about –2 EV, which results in settings of ISO 100, f/5.6, and 1/200 second. Then you can add an off-camera flash to light the subject without worrying about undercutting the camera’s sync speed. A single flash without modifiers should provide enough light (see also the “Fighting Sunlight Using Guide Numbers” example above).
Calculating Sync Speeds | Using a compact camera with a fast leaf shutter and with a dedicated hot shoe (such as the Canon PowerShot G10) allows you to use ultrashort exposure times to keep the surroundings underexposed and give the sky a more dramatic look. In this scenario, you are shooting at 1/400 second, f/4, and ISO 100 with two off-camera flashes set to full output (without modifiers) that are located in front of and behind the subject. Can you duplicate this scene with a DSLR that has a focal plane shutter?
This is possible but tricky. The standard flash sync speed for most DSLRs is 1/200 second, which overexposes the scene by 1 stop. However, closing the aperture by 1 stop or reducing the ISO to 50 would provide 1 EV too little flash output. Reducing the flash-to-subject distance by a factor of 1.4 would solve the output problem, but the subject would probably not be lit adequately. The most obvious (and probably the easiest) solution is to double the two flash units, and to fire all four units in parallel.
Bouncing Flash over Long Distances | Imagine you are shooting portraits during the blue hour. The location is great, but the ambient light is too weak. You have a flash with you, but no tripod and no radio trigger, so you have to mount the flash on the camera. The only potential reflector is a white wall about 10 meters away. Does it make sense to bounce the flash over the full 20 meters to the wall and back?
The camera is set to 1/50 second, f/2.8, and ISO 200. With the reflector set to its 105 mm zoom setting, the flash guide number is 58 (for ISO 100). You can bounce the flash over this relatively large distance if you increase the camera’s sensitivity without altering the exposure for the ambient scene—that is, 1/200 second, f/2.8, and ISO 800. At its telephoto setting, the flash range, A, is given by
![]()
where GN is the guide number (in meters), B is the aperture value, EF is the selected ISO value (800 in this case), and EL is the ISO base value (100 in this case).
This gives us: A = [(58 / 2.8) x 2.8] m = 58 m
Of course, a wall is not as effective as a mirror, but even accounting for a potential loss of 2 or 3 EV, this setup still allows you to bounce the flash over the full 20 meter distance.
In a situation like this, use a black foamie thing or a snoot to prevent direct light from hitting the subject, and use flash exposure compensation to balance the result. Depending on the camera you are using, you will probably need to set the exposure compensation to +1 or +2. Another approach is to set the flash to manual mode and full output—you will probably need it. Double check the bounce angle to make sure you get the most from the bounced flash.
Bouncing Flash at Various Distances | You are using on-camera TTL flash bounced off the walls to shoot at a wedding. The walls aren’t very close to the subject, but you can use the ISO setting to artificially increase the effect of the flash. Assume that you can produce a well-lit portrait shot using nearly full flash output, ISO 100, and a relatively narrow aperture of f/6.3. With a wall about 2 meters away from the subject, the bounced flash has to travel 4 meters. What can you do to keep shooting at the same aperture if you move to a distance of 4 or 8 meters from the wall?
The obvious solution is to increase the ISO, but remember that doubling the distance to the light source requires you to quadruple the ISO setting. In other words, at a distance of 4 meters from the wall, the light has to travel 8 meters, so you have to increase the ISO to 400. At a distance of 8 meters, you have to quadruple this value to ISO 1600.
In practice, you probably won’t have to use such a high ISO setting because the floor, ceiling, furniture, and other people in the room act as subsidiary reflectors. You could also open the aperture a little, but that will alter the depth of field and affect how the image looks. I chose f/6.3 for this example because my test shots showed that was the ideal value at full flash output. In practice, you can always increase your flash range by using a wider aperture.
Adjusting Background Brightness | You are shooting portraits at a distance of 2 meters in front of a white background using an on-camera ring flash. How can you underexpose the background by 2 stops?
The inverse square law says the strength of the light produced by a point source is inversely proportional to the square of the distance between the light source and the object being illuminated. If you know the flash-to-subject distance, you can use the inverse square law to figure out how to set your camera to underexpose the background by the desired number of stops. If the subject is correctly lit (i.e., 100% of the light from the flash reaches the subject) at a distance of 2 meters, the background will be underexposed by 2 stops (–2 EV) if the background is located 2 meters behind the model—in other words, only 25% of the light from the flash reaches the background.
Calculating Flash Exposure in HSS Mode | Assume you are using Neil van Niekerk’s gang light approach to shoot with flash in bright sunlight. Neil uses four speedlights in parallel and in HSS mode to circumvent the limitations of the flash sync speed, which allows him to use very short exposure times and wide apertures. The downside is that this approach requires multiple expensive HSS-capable system flashes and the same number of HSS-capable PocketWizard radio triggers. For his original gang light shot, Neil selected 1/8000 second, ISO 100, and f/2 in HSS mode (for more information, see Neil’s blog at http://neilvn.com/tangents/using-multiple-speedlights-with-high-speed-flash-sync/). Can you create the same look without using HSS and without so much expensive gear?
This is a hard but interesting problem to solve. Neil used a Canon EOS 5D Mark II and four Canon Speedlite 580EX II flashes set to HSS mode and, I assume, full output. The solution to the challenge lies in the use of a neutral density (ND) filter.
Calculation for the ambient light exposure:
When you expose for ambient light, the following pairs of parameters always give you the same overall exposure:
1/8000 at f/2
1/4000 at f/2.8
1/2000 at f/4
1/1000 at f/5.6
1/500 at f/8
1/250 at f/11
So obviously, the shortest exposure time you can use for a flash that is not set to HSS mode is 1/250 second. (To be more precise, 1/200 second is the flash sync speed for a Canon, but 1/250 second is easier to calculate with in this example.)
You also have to figure out how to use the same aperture as Neil to preserve the same shallow depth of field and the same overall look. You can achieve this by using an ND32 filter with a density of –5 EV. That will increase the exposure time by a factor of 32 (1 → 2 → 4 → 8 → 16 → 32). Adjusting the aperture by the same factor results in settings of 1/250 second and f/2.
Calculation for flash exposure:
You now have to verify if the flash setup still works with the new camera settings. So first, have a look at the influence of switching to HSS: Switching to HSS mode with an exposure time at the limit of non-HSS flash (i.e., approximately 1/250 second) reduces the flash output to 1/4 (i.e., –2 EV) because HSS mode uses an unconventional strobe-style flash. Furthermore, in HSS mode you have to calculate the exposure as you would for continuous light (as the flash now works as a continuous light source); in other words, you have to take the exposure time into account. So you lose 2 stops of exposure at 1/250 second, you loose 3 stops (–3 EV) at 1/500 second and 4 stops (–4 EV) at 1/1000 second. To compensate for this change with the aperture, you have to switch from f/11 → f/8 → f/5.6 → f/4 → f/2.8. This means the following sets of parameters produce identical exposures (both times, flash on maximum output):
- Normal flash, 1/250 second, f/11
- HSS flash, 1/1000 second, f/2.8
If you work back up the scale, you will end up at Neil’s original settings:
1/1000 at f/2.8
= 1/2000 at f/2.0
= 1/4000 at f/2.0 with two flashes
= 1/8000 at f/2.0 with four flashes
Note: Here we were lucky, as this was a spot landing. Remember, that you also can alter the flash power or the number of flashes used and, if needed, you can also alter the flash-to-subject distance or the flash reflector’s zoom setting. With these parameters, you could also easily adjust the settings to fit the Canon EOS 5D Mark II’s sync speed of 1/200 second (as we calculated with that little simplification of 1/250 second).
Freezing a Water Splash Using HSS Flash in Bright Sunlight | Recently, I saw some photos that were shot as part of an advertising campaign for the PocketWizard TTL and HSS-capable radio triggers. They showed a model splashing around in a lake, photographed into the bright afternoon sun at 1/4000 second. The photos look great (check them out at http://www.pocketwizard.com/inspirations/profiles/lammerhirt), and I wondered how I could create the same effect on a smaller budget without TTL-capable radio triggers.
The sample photo was captured with a Canon EOS 5D Mark II, an EF 24–70mm f/2.8L lens set to f/6.3 and 35mm, a shutter speed of 1/4000 second, ISO 200, and a bare Metz 60 CT4 flash zoomed to 35 degrees. The flash has a guide number of 60 meters at ISO 100 and 35 degrees (presumably at full output).
This flash unit’s extremely high guide number at such a wide-angle zoom setting puts it in a class of its own, but you can duplicate its power with multiple conventional flashes. The rest of this scenario assumes you have access to multiple Canon Speedlite 580EX II flashes and a TTL cable.
According to Canon, a single Speedlite 580EX II has a guide number of 36 meters at its 35-degree zoom setting. Adding one or two more units is equivalent to increasing the ISO to 200 or 300. The resulting calculation is as follows:

Here, GNold is the original guide number (in our example, 36 at ISO 100) and GNnew is the new guide number that results from using the new ISO value. This gives us new guide numbers of approximately 50 or 62 meters if we use two or three flashes. In other words, you can simulate the same effect using three Speedlite 580EX II units or two 580EX IIs and one 430EX II. In HSS mode, you can produce this effect as follows:
▸ Set all flashes to manual mode, HSS, full output, and 35 degrees.
▸ Configure one of your 580EX II units as the master and connect it to your camera with a TTL flash cable (the 430EX II can be configured only as a slave).
▸ Configure the other flash units as slaves and mount them on the same stand as the master. If necessary, use a small piece of aluminum foil to steer the master’s optical control signals toward the slaves’ receivers, which are located above the AF assist emitters on the fronts of the units.
I am not sure why the photographer used ISO 200. This was either an oversight or it was necessary to keep the exposure time short enough to freeze the splashes, which were illuminated by the sun, not the flash. Of course, the same calculation works perfectly for ISO 200.
Continuous Light versus Flash | This is an interesting but tricky exercise. A shot is set up so a Canon Speedlite 430EX II fires at 1/16 output with its zoom reflector set to 35 degrees. The camera is set to ISO 100 and f/16, and the subject distance is 0.5 meters. The flash is then replaced by a small 35-watt halogen lamp that also has a spread of 35 degrees. How long does the exposure have to be to create the same effect as the flash?
A quick Internet search reveals that the 430EX II has an output of 40 watt-seconds (Ws), and at 1/16 output, this equates to 2.5 watt-seconds. The halogen lamp is less efficient than that. A search for “luminous efficacy” on Wikipedia reveals that a xenon flash is usually about 7% efficient, and a halogen lamp is about 2.8% efficient. These values give us the following calculation:
35 W x exposure time = 2.5 Ws x (7% / 2.8%) exposure time ≈ 0.2 second
I tested this, and found that the two light sources deliver an almost identical exposure with the given shooting parameters. So our calculation seems to be right.
Inverse Square Law | In workshop 17 we used the inverse square law to figure out how to light the scene more evenly. The distance values are included in the workshop text, but we left out the precise calculation to keep the description simple.
Remember that the illuminance was initially reduced from 100% to 25%, then to 56%. The inverse square law states that the illuminance provided by a point source (EV) is inversely proportional to the square of the distance to the object it illuminates:
![]()
or
![]()
where EV is the illuminance in lux.
In our example, the distance from the flash to the left edge of the coin is 30mm and; the distance to the right edge of the coin is 60mm. I selected the constant k so that EV. left is 100 (i.e., 100%). This gives us k = 90,000. In absolute terms, the calculation for the light at the right edge of the coin is as follows:
![]()
The same formula applied to the lower image gives us the following:
![]()
Therefore, k = 810,000, which gives us the following:
![]()
This calculation shows that increasing the flash-to-subject distance results in a less severe lighting dropoff over the breadth of the subject. This is useful to remember when you are photographing groups of people. Moving the flash a little farther away reduces the difference between the light that illuminates the people in the front of the group and those at the back, but of course more flash output is needed. And be careful—don’t confuse illuminance (EV) with exposure value (EV)!
All materials on the site are licensed Creative Commons Attribution-Sharealike 3.0 Unported CC BY-SA 3.0 & GNU Free Documentation License (GFDL)
If you are the copyright holder of any material contained on our site and intend to remove it, please contact our site administrator for approval.
© 2016-2026 All site design rights belong to S.Y.A.