Mastering the Olympus OM-D E-M1 (2015)
Appendix: Button Tasks Reference
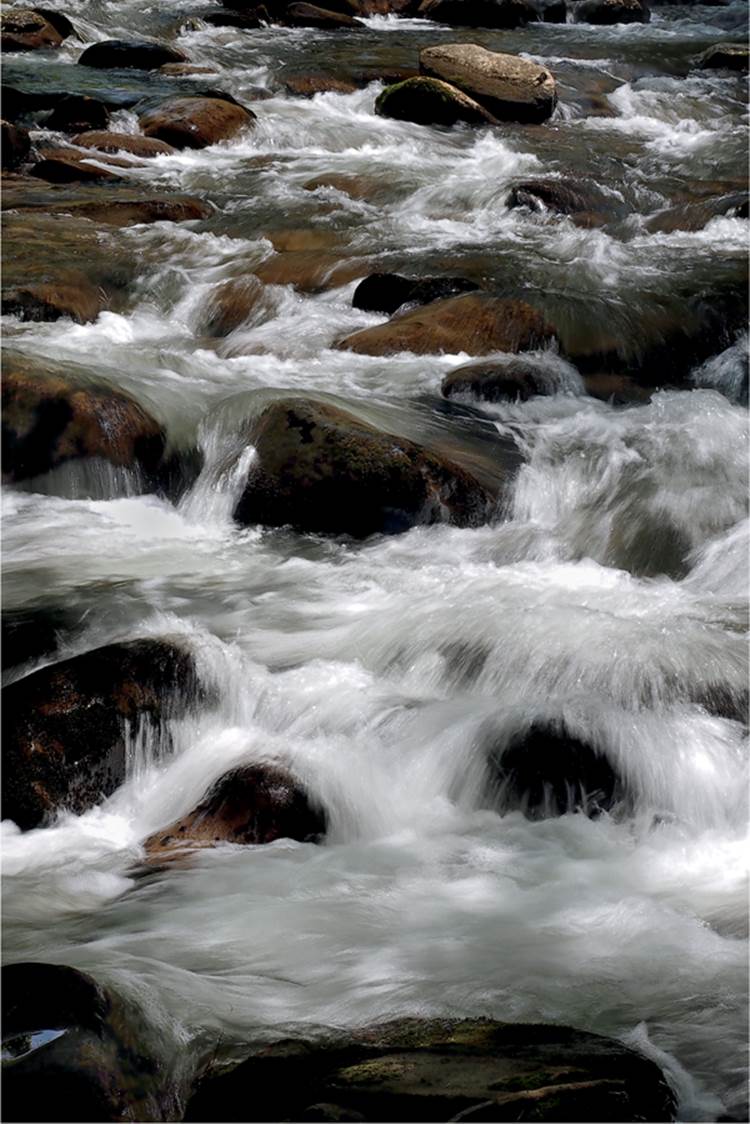
Image © Darrell Young
The Button tasks are a group of 28 tasks that you can assign to various buttons on the camera. Let’s examine each of the Button Functions. The tasks in this subsection are in alphabetical order for ease of reference.
This following Button Tasks List is a reference list of the 28 assignable Button tasks. Not all tasks can be assigned to all Button functions. In other words, each Button function may have a subset of the Button tasks assigned to it.
Following this list of assignable tasks you will find instructions for assigning these tasks to individual Button functions.
Button Tasks List
AEL/AFL
Press the button to assign AEL (autoexposure lock), AFL (autofocus lock), or Start AF (initiate autofocus) to a button. Which functionality is available is directly controlled by how you have the AEL/AFL settings (S-AF, C-AF, and MF) configured and selected in the AF/MF section of the Custom Menu (Custom Menu > A.AF/MF > AEL/AFL).
This task may be assigned to all assignable Button functions.
When you press the button that has been assigned to AEL/AFL, you should see a symbol appear in the location shown in figure 1 (red arrow). Pressing the button again turns off AEL/AFL and the symbol will disappear. Of course, if you have mode3 or mode4 selected under Custom Menu > A.AF/MF > AEL/AFL > C-AF, no symbol will display because that setting causes AF Start to activate, which requires no symbol.
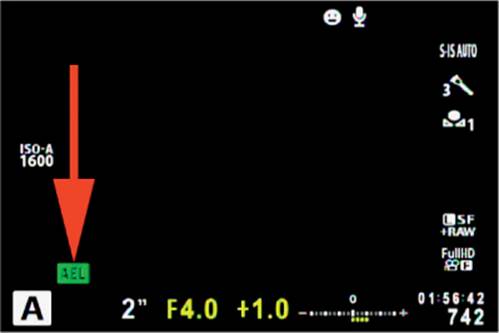
Figure 1: Using the AEL/AFL function
[•••] AF Area Select
Press the button to assign the AF Target or which AF point to use in the grid of 81 AF points with m4/3 lenses or 37 AF points with 4/3 lenses.
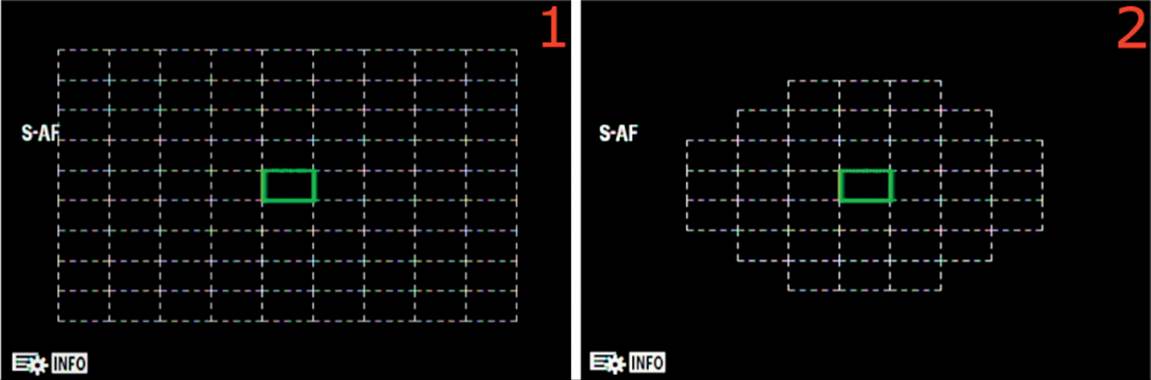
Figure 2: Using the AF Area Select function
Figure 2 shows one of the screens you will see when you press a button with factory-default [•••] AF Area Select assigned to it. If you are using an m4/3 lens you will see the screen shown in image 1, which has 81 AF points. If, instead, you are using a 4/3 lens with an Olympus MMF adapter, you will see the screen shown in image 2, which has 37 AF points. You can move the AF Area Pointer (green rectangle) around within the total number of AF points to select target areas on your subject for autofocus.
For the rest of this function description, we will use the 81-point m4/3 screen for sample screen images. Please keep in mind that if you normally use 4/3 lenses, the 37-point screen (figure 2, image 2) is what you will see with that lens type mounted.
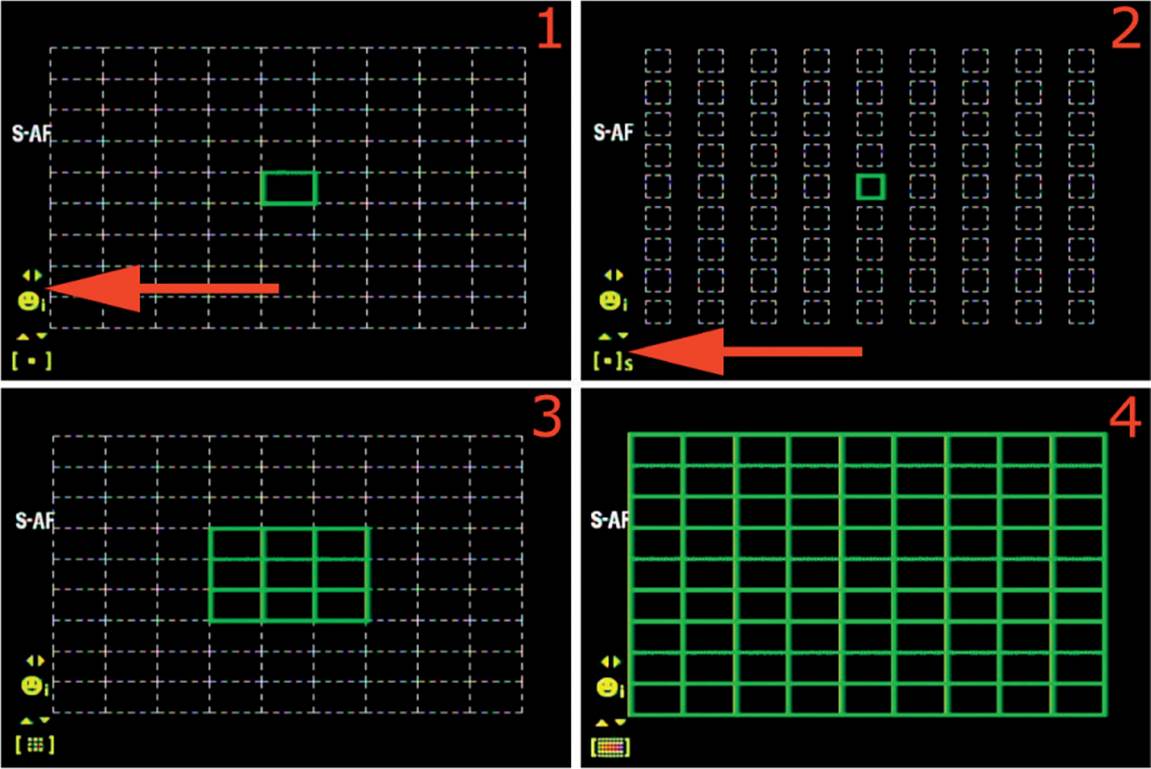
Figure 3: Selecting Face Priority and AF Target (press Info button to open controls)
Figure 3, image 1, shows a change to the [•••] AF Area Select screen when you press the Info button with the [•••] AF Area Select screen active. Notice in figure 3, image 1 that the red arrow is pointing to the small face symbol, with left (![]() ) and right (
) and right (![]() ) pointers just above it. By pressing left or right on the Arrow pad, you can adjust the Face Priority method, selecting one of the four modes we considered in the Face Priority subsection in chapter 6 (starting on page 291).
) pointers just above it. By pressing left or right on the Arrow pad, you can adjust the Face Priority method, selecting one of the four modes we considered in the Face Priority subsection in chapter 6 (starting on page 291).
Just below the Face Priority setting is the AF Target setting (figure 3, image 2, red arrow). Notice that the AF Target setting has a representation of an AF Target along with up (![]() ) and down (
) and down (![]() ) pointers. By pressing up or down on the Arrow pad, you will change the AF Target type from the default of Single Target, to Small Target, Group Target, or All Target.
) pointers. By pressing up or down on the Arrow pad, you will change the AF Target type from the default of Single Target, to Small Target, Group Target, or All Target.
Following is a description of each setting:
• Single Target (Figure 3, image 1): The Single Target function allows you to choose a single AF-point target that you can scroll around the screen with the Arrow pad, positioning the AF point where you would like on your subject. This is the default setting.
• Small Target (Figure 3, image 2): This setting is very similar to the Single target setting in that you can scroll the AF Area Pointer around the screen, positioning it where you would like it to be. The difference is in the size of the AF Area Pointer. Each AF point is significantly smaller than the normal green rectangle, which tends to make it more detail sensitive for smaller subjects. If you are doing macro photography and want to focus on a very small area of the subject, this is the best setting.
• Group Target (Figure 3, image 3): When this setting is selected, the camera uses an array of nine AF points in a small grid. The camera will decide which of the nine AF-point targets to use from within the grid, for best focus. You can move the entire nine-point group around the screen, just like with a single AF-point target. This grid arrangement allows you to use a much larger area to initially determine autofocus, by using nine AF points when Group Target mode is selected.
• All Targets (Figure 3, image 4): This setting allows the camera to decide which AF-point target to use for best autofocus. You have no choice as to which part of the subject(s) your camera will focus on.
Figure 4, image 1 (red arrow) shows the Face Priority adjustment, which appears when you press the Info button while the [•••] AF Area Select screen is active. By pressing left or right on the Arrow pad, as signified by the small ![]()
![]() pointers above the face symbol, you can select one of the Face Priority modes, or turn it off. See the subsection titled Face Priority on page 291.
pointers above the face symbol, you can select one of the Face Priority modes, or turn it off. See the subsection titled Face Priority on page 291.
The [•••] AF Area Select function may be assigned to any assignable button, except for Arrow pad right and Arrow pad down.
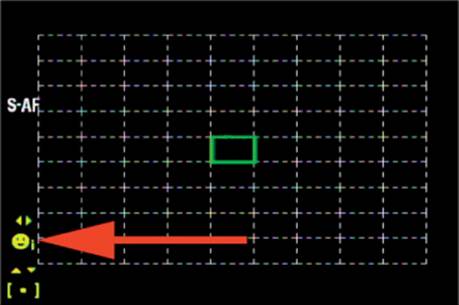
Figure 4: Setting the Face Priority mode
AF Stop
Press the L-Fn button on your camera’s lens to manually lock focus where the lens is currently focused (figure 5). You must hold the button down to maintain focus lock. This function is available only on lenses with an L-Fn button.
AF Stop is not available for assignment to any of the buttons on the camera’s body. It can be assigned to the L-Fn button only.
The red arrow in figure 5 shows the location of the L-Fn button on the M.Zuiko PRO 12–40mm f/2.8 ED Lens. It will probably be in a similar location on other lenses.
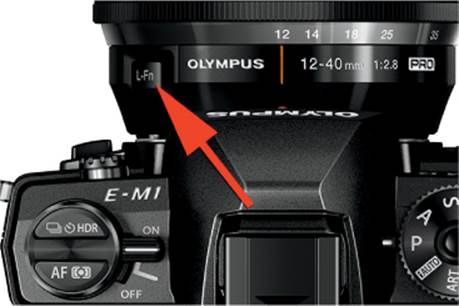
Figure 5: Using the L-Fn button
BKT

Figure 6: Bracketing (BKT) assignment and adjustment
Pressing the button toggles bracketing on and off, using the current BKT settings. You will see BKT appear in the top left of the viewfinder or monitor when bracketing is enabled (figure 6, image 1).
If you press and hold the assigned button for a moment, you will see the BKT menu appear. With the BKT menu you can modify the BKT settings (figure 6, image 2). Turning the Front Dial lets you modify the bracketing type listed at the top of the screen (e.g., AE BKT, WB BKT, ISO BKT). Turning the Rear Dial lets you control the settings along the bottom of the screen for each of the BKT methods.
Before you try to use bracketing, be sure that the BKT symbol is displayed at the top of the screen (figure 6, image 1). Once again, you press (not hold) the assigned button to toggle it on and off.
Let’s consider how to use each of the camera’s six bracketing systems.
AE BKT: Auto exposure bracketing allows you to shoot a number of bracketed images—from 2 to 7 in the bracket—while varying the exposure between each shot by 0.3, 0.7, or 1.0 EV steps. This allows you to capture a series of images with varying exposure values for either: selecting the best-exposed image from the series, or later combining the images into one high-dynamic-range (HDR) image.
As shown in figure 7, if you hold the assigned button and turn the Rear Dial, you can modify the number of frames in the bracket (i.e., 2F, 3F, 5F, 7F) and the amount of EV differential between each image in the bracket (i.e., 0.3 EV, 0.7 EV, 1.0 EV), as seen at the bottom of the screen (e.g., 2F 0.3EV, 2F 1.0EV).
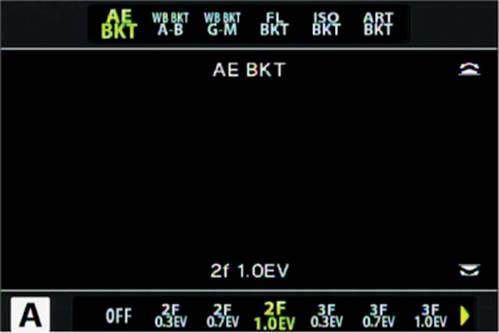
Figure 7: AE BKT—Autoexposure bracketing
On my camera 2F 1.0EV is selected, which means the camera will take 2 pictures (2F) with a one stop (1.0EV) difference between them.
WB BKT A-B: This method of white balance (WB) bracketing lets you shoot one image and have the camera bracket the WB of the image on the Amber-Blue (A-B) axis.
As shown in figure 8, if you hold the assigned button and turn the Rear Dial, you can select two, four, or six steps of color change for the A-B axis. The camera will then create one WB-modified copy of the original image for each bracket step (3F = 3 images total).
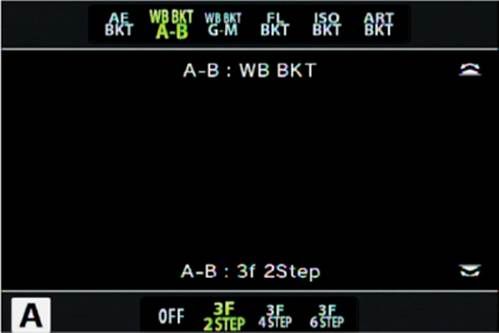
Figure 8: WB BKT A-B—White balance bracketing on the Amber-Blue axis
In other words, if you selected 3F 2 Step, as seen at the bottom of the screen in figure 8, the camera will create a normal image (A+0), a minus amber image (A-2), and a plus amber image (A+2).
The more steps selected (2 Step, 4 Step, or 6 Step), the wider the range of color change. You can combine this bracketing method with the WB BKT G-M method discussed next—by setting them both at the same time—and have both axes (A-B and G-M) of color shift bracketed simultaneously.
WB BKT G-M: This method of white balance (WB) bracketing lets you shoot one image and have the camera bracket the WB of the image on the Green-Magenta (G-M) axis.
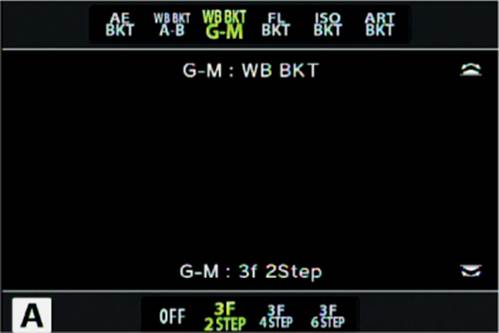
Figure 9: AE BKT—WB BKT G-M—White balance bracketing on the Green-Magenta axis
As shown in figure 9, if you hold the assigned button and turn the Rear Dial, you can select two, four, or six steps of color change for the G-M axis. The camera will then create one WB-modified copy of the original image for each single-axis bracket (3 images total).
In other words, if you selected 3F 2 Step, as seen at the bottom of the screen in figure 9, the camera will create a normal image (G+0), a minus green image (G-2), and a plus green image (G+2).
The more steps selected (2 Step, 4 Step, or 6 Step), the wider the range of color change. You can combine this bracketing method with the WB BKT A-B method discussed previously—by setting them both at the same time—and have both axes (A-B and G-M) of color shift bracketed simultaneously.
FL BKT: Flash bracketing causes the camera to vary the light output of the flash for three frames (3f) so that you can have the best exposure at the end of the bracket.
As shown in figure 10, if you hold the assigned button and turn the Rear Dial, you can select from 0.3EV, 0.7EV, or 1.0EV as the level of bracketing, which gives you as little as 1/3 stop between the images in the bracket and as much as 1.0 stop.
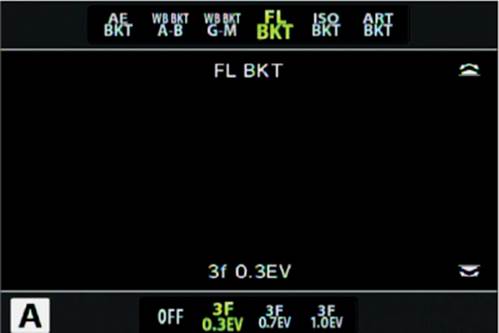
Figure 10: FL BKT—Flash bracketing
The bracketing order for the three frames is normal > underexposed > overexposed. The camera will take a normal exposure using the flash and then two more exposures with under- and overexposure governed by whether you select 0.3EV, 0.7EV, or 1.0EV.
My camera has 3F 0.3EV selected, which means it will take three (3F) pictures with 1/3 step (0.3EV) of exposure differential between each picture.
ISO BKT: ISO bracketing allows you to bracket three frames with a bracket level of 0.3EV, 0.7EV, or 1.0EV for two of the three pictures. The bracket order for the three frames is normal > underexposed > overexposed.
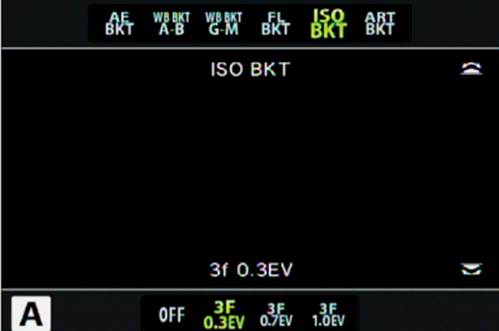
Figure 11: ISO BKT—ISO sensitivity bracketing
As shown in figure 11, if you hold the assigned button and turn the Rear Dial, you can select 3 frames with 0.3EV, 0.7EV, or 1.0EV exposure differential between them.
The camera will take a picture at the ISO sensitivity you have currently selected. You can then take two more pictures, one with an underexposed and another with an overexposed ISO sensitivity, per the EV value selected (0.3EV, 0.7EV, or 1.0EV).
My camera has 3F 0.3EV selected, which means it will take three (3F) pictures with 1/3 step (0.3EV) of exposure differential between each picture.
ART BKT: When using Art bracketing, the camera will make 12 copies of one picture with each of the Art filters applied (ART1–Art12).
If you hold the assigned button and turn the Rear Dial, you can set ART BKT to On (figure 12). You will then take only one normal picture and the camera will Art bracket that image by applying one of each of the 12 Art filters to a new copy of the image, leaving you with 13 pictures when it is done—one normal and 12 Art filtered copies.
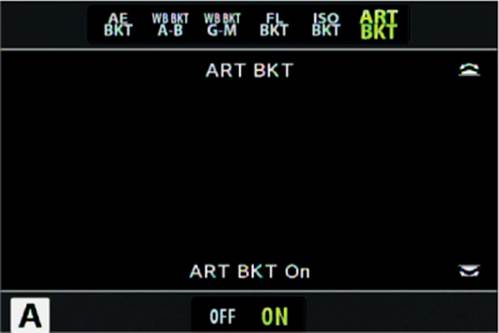
Figure 12: ART BKT—ART filter bracketing
The BKT function may be assigned to any assignable button, except for Arrow pad right and Arrow pad down.
Note: Please see the chapter Shooting Menu 2 under the heading Bracketing (page 202), for even deeper detail on each of these bracketing types. The E-M1 gives you multiple ways to approach image bracketing, both by assigning it to a button (this function), and also from Shooting Menu 2 (Shooting Menu 2 > Bracketing).
Digital Tele-converter
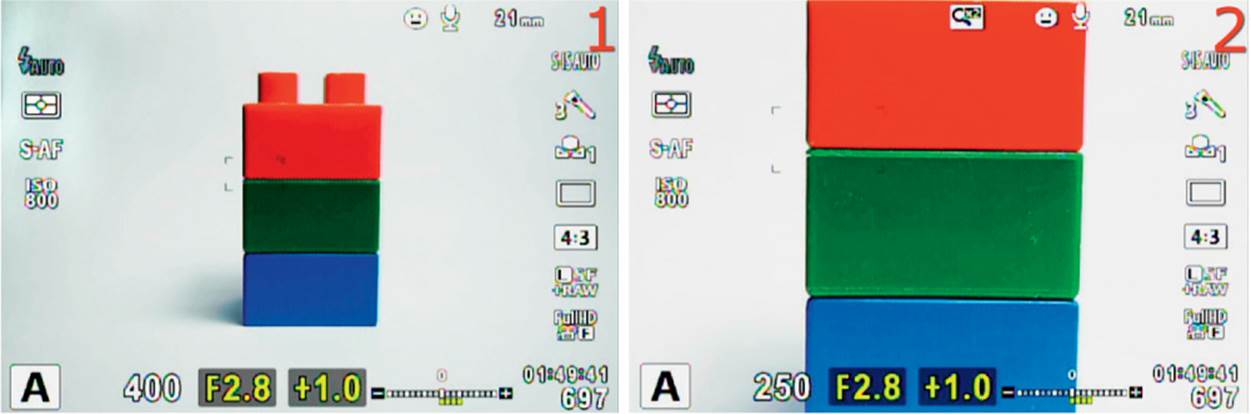
Figure 13: Using the Digital Tele-converter (2x fake zoom crop)
Pressing this button artificially enlarges the current subject in the camera’s viewfinder or monitor by two times (2x). Figure 13, image 1, shows the normal subject on the camera’s monitor, while image 2 shows it when the assigned button is pressed. You can toggle this effect on and off by repeatedly pressing the assigned button.
This is an in-camera digital enlargement, sort of like cropping the middle out of an image. It is not an optical zooming operation. When you take the picture, the camera acts like it has a much longer telephoto lens mounted.
However, this is an artificial enlargement of the subject and lowers image quality. This works the same as Shooting Menu 1 > Digital Tele-converter, except that it can be toggled on and off with the button. This function may be assigned to any assignable button, except for Arrow pad right and Arrow pad down.
Electronic Zoom
Press the button to enable the power zoom function for a lens having power zoom. After you press the button you can use the Arrow pad left and down keys to zoom in and out. This function is available only for the Arrow pad right and Arrow pad down buttons, and only when you have the main Arrow pad [![]()
![]()
![]()
![]() ] function set to Direct Function mode (Custom Menu > B. Button/Dial/Lever > Button Function > [
] function set to Direct Function mode (Custom Menu > B. Button/Dial/Lever > Button Function > [![]()
![]()
![]()
![]() ] Function).
] Function).
There are no extra camera screens that will show when you press the Arrow pad buttons. Instead, you will see the lens zoom in or out.
Exposure +/–
Press the button to toggle the camera’s exposure compensation system on or off. When using P, A, S, or M modes on the Mode Dial you will see exposure compensation controls appear above the shutter speed and aperture area of the cameras screens (figure 14, red arrows), when you enable Exposure +/–.
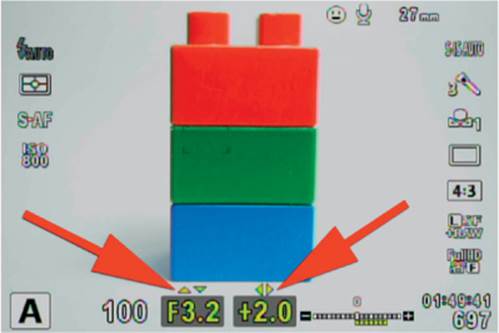
Figure 14: Using Exposure +/– (compensation)
You will make adjustments with the ![]()
![]()
![]()
![]() buttons on the Arrow pad, according to which exposure mode you are using. You can adjust exposure compensation in up to –5.0 to +5.0 EV steps.
buttons on the Arrow pad, according to which exposure mode you are using. You can adjust exposure compensation in up to –5.0 to +5.0 EV steps.
Here is a description of your choices:
Exposure compensation in various exposure modes:
• Program Mode (P and Ps): When the Mode Dial is set to Program (P) or Program shift (Ps) mode, the ![]()
![]() buttons control entry and exit from Ps mode, while the
buttons control entry and exit from Ps mode, while the ![]()
![]() buttons control exposure compensation (+/–5.0 EV).
buttons control exposure compensation (+/–5.0 EV).
• Aperture-Priority (A) Mode: When using Aperture-priority (A) mode, the ![]()
![]() buttons control the aperture directly, while the
buttons control the aperture directly, while the ![]()
![]() buttons control +/– exposure compensation by modifying the shutter speed (+/–5.0 EV).
buttons control +/– exposure compensation by modifying the shutter speed (+/–5.0 EV).
• Shutter-Priority (S) Mode: When using Shutter-priority (S) mode, the ![]()
![]() buttons control the shutter speed directly, while the
buttons control the shutter speed directly, while the ![]()
![]() buttons control +/– exposure compensation by modifying the aperture (+/–5.0 EV).
buttons control +/– exposure compensation by modifying the aperture (+/–5.0 EV).
• Manual (M) Mode: When using Manual (M) mode, the ![]()
![]() buttons control the shutter speed directly, while the
buttons control the shutter speed directly, while the ![]()
![]() buttons control the aperture directly (+/–5.0 EV). Exposure compensation will be handled by you, manually, while examining the small +/– exposure indicator to the right of the shutter speed aperture area.
buttons control the aperture directly (+/–5.0 EV). Exposure compensation will be handled by you, manually, while examining the small +/– exposure indicator to the right of the shutter speed aperture area.
Note: If you would prefer, you can use the front and rear dials to make the same adjustments otherwise made by the Arrow pad’s ![]()
![]()
![]()
![]() buttons, when using this function.
buttons, when using this function.
This function can be assigned to all assignable buttons.
Flash Mode
Press the button to open a flash mode (e.g., Flash Auto, Redeye, Fill in) selection screen (figure 14, image 1). This function is available only for the Arrow pad right and Arrow pad down buttons, and only when you have the main Arrow pad [![]()
![]()
![]()
![]() ] function set to Direct Function mode. When you press the Arrow pad key to which you have assigned this function (right or down buttons only), you can select a Flash mode.
] function set to Direct Function mode. When you press the Arrow pad key to which you have assigned this function (right or down buttons only), you can select a Flash mode.
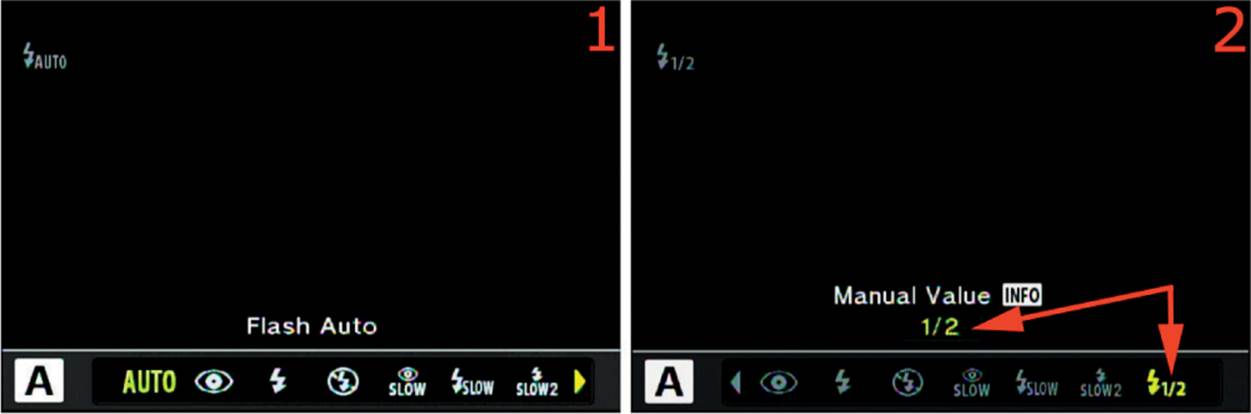
Figure 15: Using the flash modes
Figure 15, image 1, shows the screen you will see when you have assigned Flash Mode to one of the two available Arrow pad buttons and press the button. Along the bottom of the screen are eight available modes. You will use the left and right Arrow pad buttons to move the selection back and forth until you find the mode you want to use.
Figure 15, image 2, shows how to use Full (Manual Value). By selecting the last flash item on the right you will put the camera into manual flash mode. Once you have selected Full, you may press the Info button once and then turn the camera’s Rear Dial to select from a range of manual flash output values, as described in our upcoming list. Image 2 shows that my camera has a Manual Value of 1/2 (half) power selected (red arrows).
Here is a description of your Flash Mode choices, in camera order from left to right:
• Flash Auto: This setting lets the camera decide when to fire the external flash attached to the camera’s hot shoe.
• Redeye: This setting causes the flash to fire a short preflash and blink the bright red Focus assist light twice, just before the main flash burst fires. Hopefully, the two bright light sources shining in your subject’s eyes just before the flash fires will cause your subjects pupils to contract, thereby reducing any red-eye reflections.
• Fill in: The flash fires regardless of the current ambient light conditions. Use this mode to have complete control over the flash at all times. This mode causes the flash to be the main source of light for your pictures.
• Flash Off: This setting disables the camera’s flash signal so that a flash mounted in the camera’s hot shoe will not fire under any circumstances. It will also disable your camera’s ability to use flash RC Mode (Shooting Menu 2 > RC Mode) for remote control of external flash units.
• Red-Eye Slow: Selecting this function causes the camera to use both Redeye (redeye reduction) and Slow (1st curtain) sync at the same time. Refer to Redeye and Slow elsewhere in this list for how these two functions work and then mentally add them together.
• Slow (1st curtain): This setting causes the camera to fire the flash as soon as the camera’s first shutter curtain opens (beginning of the shutter speed cycle). In other words, if you have your camera set to a shutter speed of 1/125 sec, the flash will fire just as the camera starts timing the 1/125 second shutter open time. After the flash has fired, the camera uses ambient light for the rest of the 1/125 second shutter open time to balance out the exposure. This is perfect for shooting silhouetted subjects, or subjects where the background is important, because it will balance the flash with a bright background. However, be careful when you are shooting in this mode with low light levels. You may not be able to handhold the camera without subject ghosting due to slow shutter speeds. If low-light ghosting occurs—due to subject or camera movement—there will be both a sharp and blurred copy of your subject in the frame. The blurred (non-flashed) subject will appear as a trail in front of the sharp (flashed) subject.
• Slow2 (2nd curtain): This setting causes the camera to fire the flash after the first shutter curtain has opened, the shutter speed time has passed, and the second shutter curtain is about to close. In other words, if you have your camera set to a shutter speed of 1/30 sec, the camera will use ambient light for the 1/30 second shutter open time, and then the flash will fire as soon as 1/30 second shutter speed has passed. For a moving subject you will see a sharp subject (flashed) followed by a blurred subject (non-flashed). This allows you to shoot pictures of moving subjects with a blur behind it. Again, as with Slow (1st curtain), be very careful when shooting in low-light levels. Otherwise, camera shake may ruin the picture.
• Full: This mode sets the camera to manual mode for the flash output (Manual Value). You can control the amount of flash from Full power (1:1) or from a range of 1/1.3 to 1/64 power. For someone who wants to control the flash output very precisely, such as a studio photographer, this mode may be very useful.
Settings Recommendation: I was shooting a graduation ceremony with the E-M1, and had the flash set to Flash Auto accidentally. The room was dark so the camera decided to use the flash for each graduate picture. However, afterward, I tried to take a picture of the large sheet cake for the graduates to snack on. I could not get the flash to fire. Finally, I cranked the aperture down to a small value and the flash decided to fire. Only then did I realize I had the flash set to Auto mode. Therefore, if you want to fully control the flash during an important event, why not use Fill in or another mode instead. Then you can control when and where you want the flash to fire.
Slow and Slow2 mode can be used to balance the flash with ambient light for non-moving subjects. For moving subjects you will see a trail in front of the subject in Slow mode and a trail behind the subject in Slow2 mode. If you want to shoot a picture of a friend running by in front of you, the Slow2 mode will allow you to imply motion in an otherwise static picture. The blurred trail behind the subject makes it seem to be moving quickly.
I generally leave my camera set to flash Fill in mode, unless I am trying to achieve special effects with the other modes.
HDR
Press the button to enable the HDR mode for immediate use. Press the button again to disable HDR mode. The camera will use the settings you last used for HDR (e.g., HDR1, 3f 2.0EV, 5f 3.0EV). You can adjust the HDR settings in Shooting Menu 2 under the HDR function (Shooting Menu 2 > HDR).
When HDR mode is active, the HDR symbol will appear in the top left area of the screen (figure 16). This function may be assigned to any assignable button, except for Arrow pad right and Arrow pad down.
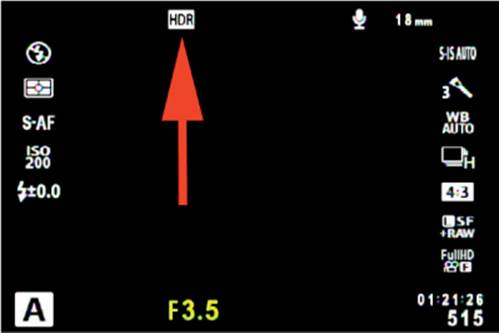
Figure 16: HDR on demand
[•••] Home
This function works in conjunction with the Custom Menu function called [•••] Set Home, found under the AF/MF settings (Custom Menu > A. AF/MF > AF/MF > [•••] Set Home).
You can store a single autofocus-point target (AF Target) position from the camera’s 81 AF-points (or 37 for Four Thirds lenses) in the [•••] Set Home memory location. Then, when you assign the [•••] Home function to one of the camera’s buttons, and press that button, the camera immediately moves the AF Area Pointer (green focus rectangle) to the AF Target position stored in [•••] Set Home (figure 17).
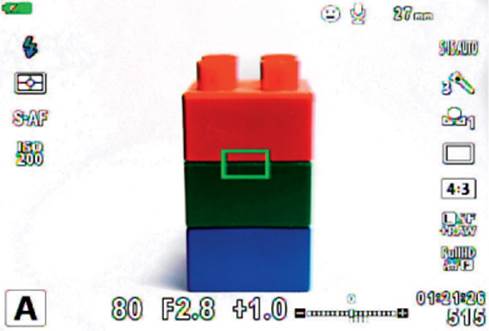
Figure 17: Jumping the AF Area Pointer to the Home position
In figure 17 my camera’s AF Target [•••] Home position was previously set to the center of the 81 AF points. I pressed the button and the AF Area Pointer (green focus rectangle) jumped from where it had been before to the home position in screen center. Once in home position, if the button is pressed again, the AF Area Pointer will return to its previous position—if it was moved away from its home position.
This function may be assigned to any assignable button, except for Arrow pad right and Arrow pad down.
ISO
Press the button to adjust the camera’s ISO sensitivity. You have a choice of ISO values that range from Low (ISO 50) to ISO 25600, and AUTO (ISO-A).
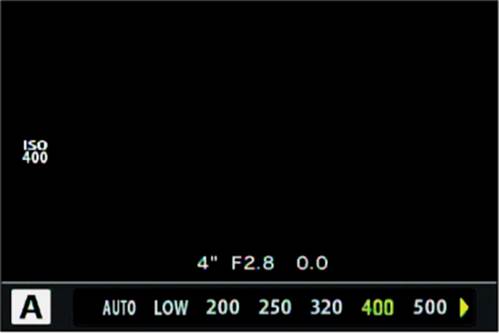
Figure 18: Choosing an ISO value
When you press the button, the screen shown in figure 18 will appear. Along the bottom of the screen is the range of ISO values you can select. Use the Arrow pad’s left and right buttons to scroll back and forth until you find the ISO value you want to use. If you select AUTO, the camera will decide which ISO value to use, according to the level of ambient light it detects. My camera is set to ISO 400.
This function may be assigned to all assignable buttons.
Keystone Comp.
When you press the button, the camera enables the Keystone comp. screen. Your tiny E-M1 then acts like a big view camera, with its tilts, swings, and excellent perspective control.
You use the function while viewing the subject on the monitor, not later in post-processing. Keystone comp. allows you to correct the odd leaning-backwards perspective distortion you see when you point a wide-angle lens upwards to capture a tall subject (vertical plane tilt). Additionally, you can use this function to correct perspective distortion on a horizontal plane (swing or shift). The results of this powerful function are easier to see than to describe, so let’s examine how it works.
In figure 18A you can see my battery and blocks in a normal straight-on configuration. Notice that there are two adjustable indicators on the screen (red arrows). The top red arrow points to the tilt control, which allows you to tilt the top or bottom of the image toward or away from you. Tilt correction is applied with the Rear Dial. The bottom red arrow points to the swing control, which allows you to swing the left or right side of the image toward or away from you. Swing correction is applied with the Front Dial.
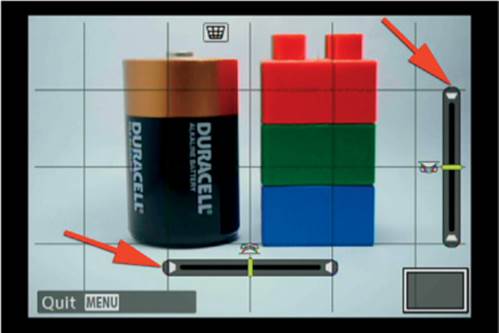
Figure 18A: Normal subject view with Keystone comp. function set to on
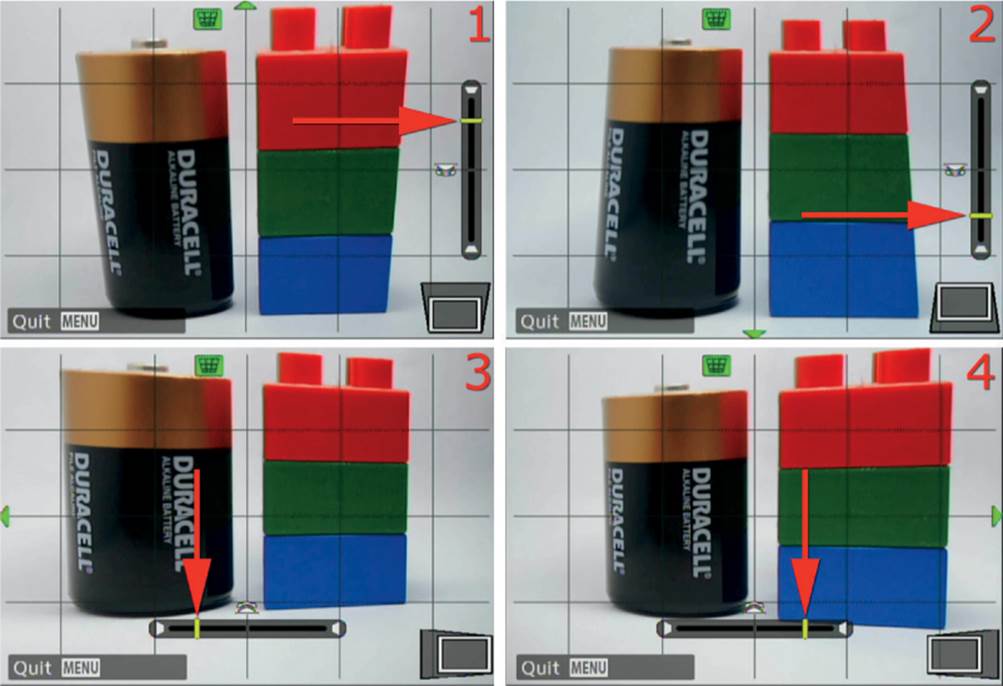
Figure 18B: Normal subject view with Keystone comp. function set to on
In figure 18B I used the tilt-swing features of the Keystone comp. function to make the subject swing left or right, or tilt from front to back, without moving the camera.
In image 1, the tilt indicator has been moved up toward the top of the scale, and the camera is tilting the top edge of the image toward you, while the bottom of the image stays the same.
In image 2, the tilt indicator has been moved down toward the bottom of the scale, and the camera is tilting the bottom edge of the image toward you, while the top of the image stays the same.
In image 3, the swing indicator has been moved to the left of the scale, and the camera is swinging the left side of the image toward you, while the right side of the image stays the same.
In image 4, the swing indicator has been moved to the right of the scale, and the camera is swinging the right side of the image toward you, while the left side of the image stays the same.
In figure 18C you can see a picture in which I used some vertical Keystone comp. correction to make the fire tower stand up straighter. I was standing below it with my wide-angle lens pointed upward.
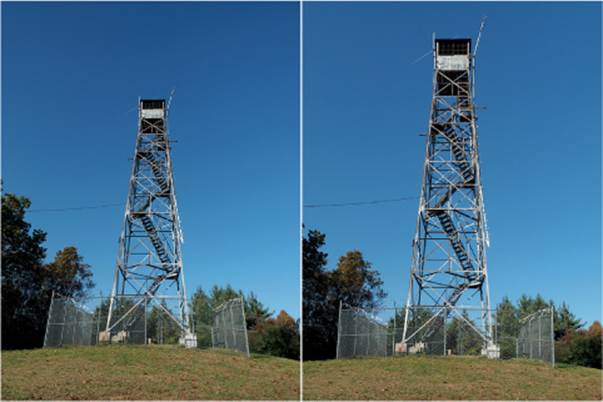
Figure 18C: Keystone comp. correction in action
In the first frame the tower seems to be leaning away from you at the top. That’s because the wide-angle lens is magnifying closer objects (the base of the tower) more than distant objects (the top of the tower).
In the second frame, notice how the camera has pulled the top of the image toward you, cutting off the edges of the frame to compensate, which tends to enlarge the subject a little. When you use this live function to make perspective corrections, you can see if the subject is cut off due to cropping, then you can make composition adjustments before you take the picture.
In the second frame, the fire tower is straighter, with a more normal perspective. I enjoyed using Keystone comp. much more than I expected. It corrects distortion without blurring the subject.
Note: When you have made your live Keystone comp. corrections, simply press the Menu button or touch the Shutter button to leave the Keystone comp. screen and take your pictures. Be sure to go back into the Keystone comp. task and set the correction indicators back to the center for horizontal and vertical correction, otherwise all future images will use Keystone correction until you turn the camera off and back on.
Also, when you are using Keystone comp. as a Button task, you cannot disable Keystone comp. with the function by that name in Shooting Menu 1.
Level Disp
Pressing the button turns on a small horizontal-only level display in the electronic viewfinder (EVF), replacing the –/+ exposure indicator scale.
The small leveling gauge is available only when you have the Built-in EVF style (Custom Menu > J. Built-In EVF > Built-in EVF Style) set to Style 1 or Style 2. It does not appear in Style 3 (see the subheading Built-In EVF Style on page 428, for more information on changing the EVF style of your camera).
You can use the Level Disp indicator to keep your camera level in a left-to-right direction, which is called roll (like with a car steering wheel). It does not work at all for forward or backward tilt (raising and lowering the front of the lens).
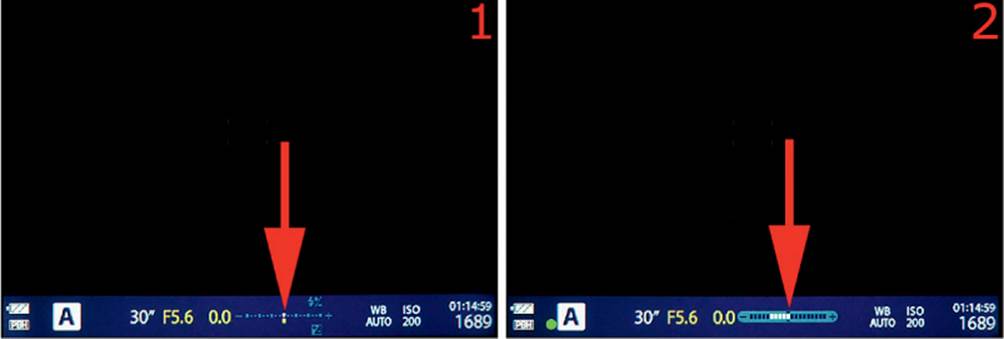
Figure 19: Using Level Disp
In figure 19, image 1, you can see the normal –/+ exposure indicator shown when the Built-in EVF Style is set to Style 1. When you press the assigned button, a small level indicator display replaces the –/+ exposure indicator display (figure 19, image 2).
From the reading on the Level Disp indicator in image 2, you can see that my camera was not level when the screen image was made. In fact, it was rotated a few degrees to the right.
Settings Recommendation: The new Level Disp indicator is useful for keeping the horizon level, if you don’t mind using one of the retro Built-in EVF Styles.
A much more robust level indicator—showing both roll and tilt—is available when your subject appears on the monitor, by pressing the Info button multiple times until the dual indicator appears.
Live Guide
Pressing the button will open the Live Guide menu (figure 20) with six Live Guides (from top to bottom): Change Color Saturation, Change Color Image, Change Brightness, Blur Background, Express Motions, and Shooting Tips.
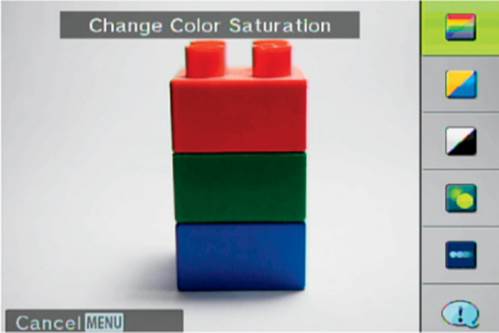
Figure 20: Using the Live Guides—opening screen
You can use these guides to change the appearance of your subject in various ways, before taking the picture; or, you may get Shooting Tips for various types of picture taking.
Let’s consider each of the six Live Guides. I used a black background in the screen graphics to make the selections on the screen stand out. Normally, you would see your subject on the camera’s monitor or in the viewfinder while you are making adjustments.
As seen in the next several graphics (e.g., figure 21, image 2), there is an adjustment slider available to make changes to the cameras settings. You will move the slider up or down. To move the slider use your finger on the camera’s touch screen, the Arrow pad’s up and down buttons, or turn the Rear Dial left and right:
Change Color Saturation: Change the color saturation on an image just before you make the picture.
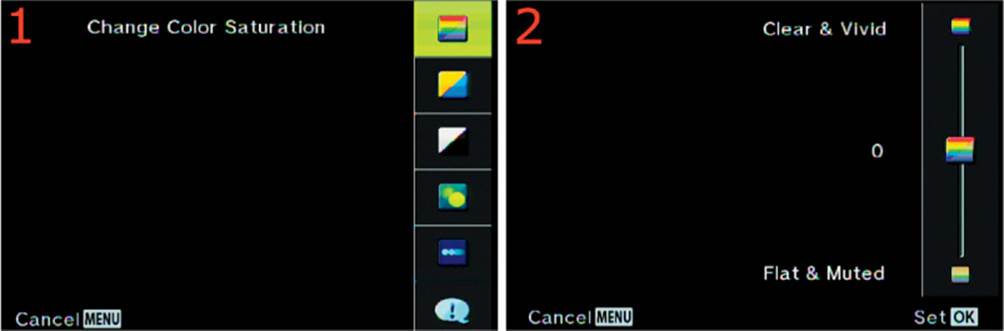
Figure 21: Change Color Saturation
Select the top menu choice, as seen in figure 21, image 1, and press the OK button. Using the screen seen in figure 21, image 2, move the slider up toward Clear & Vivid (more saturation) or down toward Flat & Muted (less saturation). Press the OK button to set the value and then immediately take your pictures. The camera will stay set to the color saturation level you chose until you press the Menu button or turn the camera off.
Change Color Image: Change the color temperature of an image just before you make the picture. You can make the color warmer (more red) or cooler (more blue).
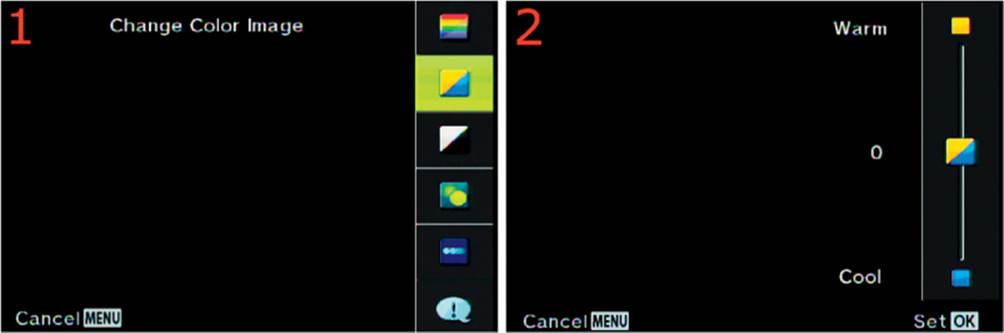
Figure 22: Change Color Image (color temperature)
Select the menu choice second from the top, as seen in figure 22, image 1, and press the OK button. Using the screen seen in figure 22, image 2, move the slider up toward Warm (reddish) or down toward Cool (bluish). Press the OK button to set the value and then immediately take your pictures. The camera will stay set to the color temperature you chose until you press the Menu button or turn the camera off. This is a fast way to modify the camera’s white balance visually.
Change Brightness: Change the brightness of an image in real time, just before you make the picture.
Select the menu choice third from the top, as seen in figure 23, image 1, and press the OK button. Using the screen seen in figure 23, image 2, move the slider up toward Bright or down toward Dark. Press the OK button to set the value and then immediately take your pictures. The camera will stay set to the brightness level you chose until you press the Menu button or turn the camera off.
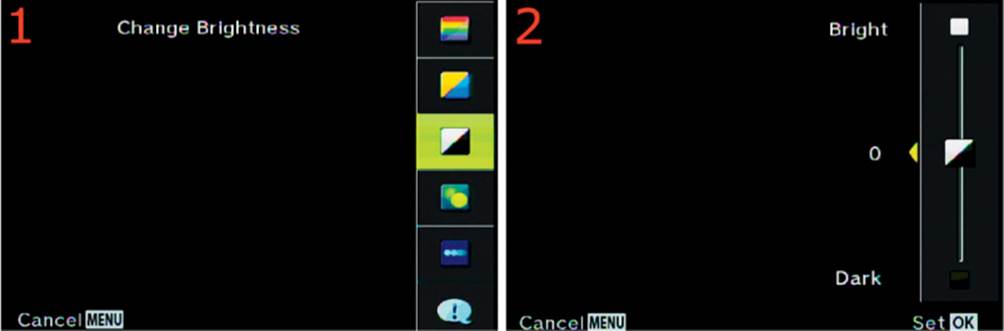
Figure 23: Change Brightness
Blur Background: Change the lens aperture by sliding the adjustment slider, while visually previewing depth of field (zone of sharp focus), just before you make the picture. A large aperture (Blur) will have less depth of field, blurring the background and foreground, while a small aperture (Sharp) will have more depth of field sharpening the background and foreground. The camera automatically adjusts shutter speed and ISO sensitivity to keep the exposure accurate while you are adjusting the aperture with the slider.
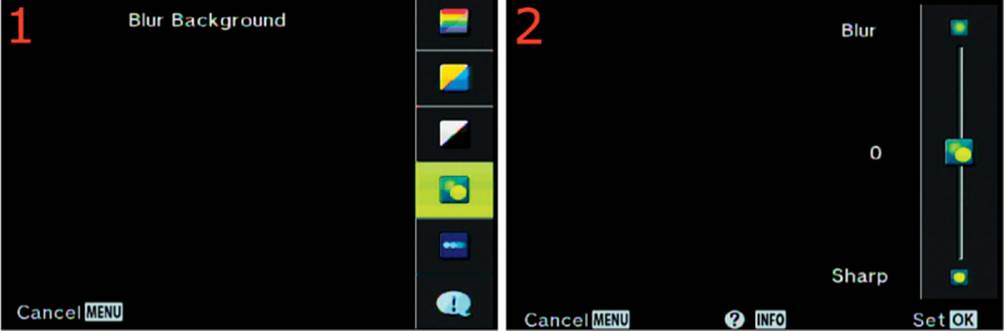
Figure 24: Change depth of field
Select the fourth menu choice from the top, as seen in figure 24, image 1, and press the OK button. Using the screen seen in figure 24, image 2, move the slider up toward Blur or down toward Sharp. Press the OK button to set the value and then immediately take your pictures. The camera will stay set to the visual depth of field value you chose until you press the Menu button or turn the camera off.
This function may be assigned to any assignable button, except for Arrow pad right and Arrow pad down.
Settings Recommendation: Blur Background is a useful method to change how much depth of field an image has, by adjusting it visually. This function may be used by macro shooters to adjust close up images with very shallow depth of field, or by a portrait shooter who wants to make sure there is enough depth of field to have a subject’s face fully in focus. By moving the slider, you will be able to see the depth of field changing on the camera’s monitor or in the viewfinder.
Consider this function to be a super-powered depth of field preview button. A new photographer can control the zone of sharpness in an image without fully understanding depth of field, because it is done visually. An experienced photographer can use this function for the luxury of fine-tuning depth of field in an accurate visual way.
To test the function, I took three pictures. One was a base test picture at the middle settings of 1/60 sec at f/8 and ISO 800. When I moved the slider all the way to the top (Blur), the camera selected 1/160 sec at f/2.8 and ISO 200, for very shallow depth of field (blurred background). When I moved the slider all the way to the bottom (Sharp), the camera selected 1/40 sec at f/16 and ISO 1600, for much deeper depth of field. It did not inform me of any of those settings, I got them from the resulting pictures (I’m a pedantically curious fellow). The camera adjusted shutter speed, aperture, and ISO so that depth of field could be fully controlled for blurred or sharp backgrounds (shallow or deep depth of field).
Express Motions: Control the camera’s shutter speed by moving the adjustment slider (figure 25, image 2). The camera will give you no indication of what shutter speed you are using. However, by moving the adjustment slider toward the Blurred Motion choice, you are progressively slowing down the shutter speed. By moving the slider toward Stop Motion, you are progressively making the shutter speed faster.
The camera automatically adjusts the aperture and ISO sensitivity to keep the exposure accurate while you are adjusting the aperture with the slider.
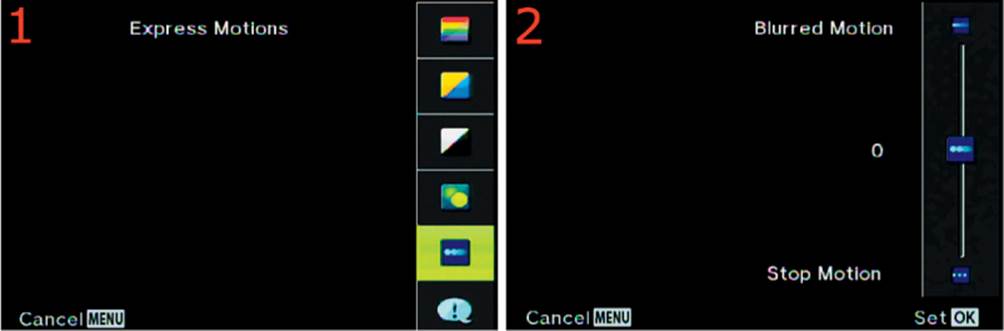
Figure 25: Control motion
Select the fifth menu choice from the top, as seen in figure 25, image 1, and press the OK button. Using the screen seen in figure 25, image 2, move the slider up toward Blurred Motion or down toward Stop Motion. Press the OK button to set the value and then immediately take your pictures. The camera will stay set to the shutter speed you chose until you press the Menu button or turn the camera off.
Settings Recommendation: By varying the shutter speed you will be able to express subject motion, allowing blur with Blurred Motion or stopping action with Stop Motion. It is less apparent visually how fast the shutter speed is since it is used only during the exposure, so the function effect of this function will not be seen as easily on the monitor or in the viewfinder until after the picture is taken.
However, if you are shooting something like a waterfall and want to have wispy blurred water you can move the adjustment slider toward Blurred Motion and take your picture, experimenting visually with the results. If you are shooting action, you can set the camera toward Stop Motion and visually see how much the slider needs to be moved toward Stop Motion, from the resulting pictures.
I took a series of test pictures to see what the camera would do in this mode. My base test picture was at 1/100 sec at f/8.0 and ISO 800. When I moved the slider fully toward Blurred Motion, the camera used 1/2 sec at f/22 and ISO LOW (ISO 50), thereby definitely allowing for blurred motion. In fact, the camera’s shutter speed was so slow that it needed to be on a tripod to keep from ruining the image from camera shake. Few people can handhold a camera at 1/2 sec! Therefore, when you are shooting for blurred motion and it is not a bright day outside, you probably should have your camera on a tripod. When I moved the slider all the way toward Stop Motion, the camera used: 1/1600 sec at f/2.8 and ISO 1600, definitely in the range to stop most motion in its tracks.
Shooting Tips: Obtain special instruction from the camera on various photographic subjects including: Child, Pet, Flower, and Cuisine Photography. You will also find screens for suggestions on framing an image and using camera accessories.
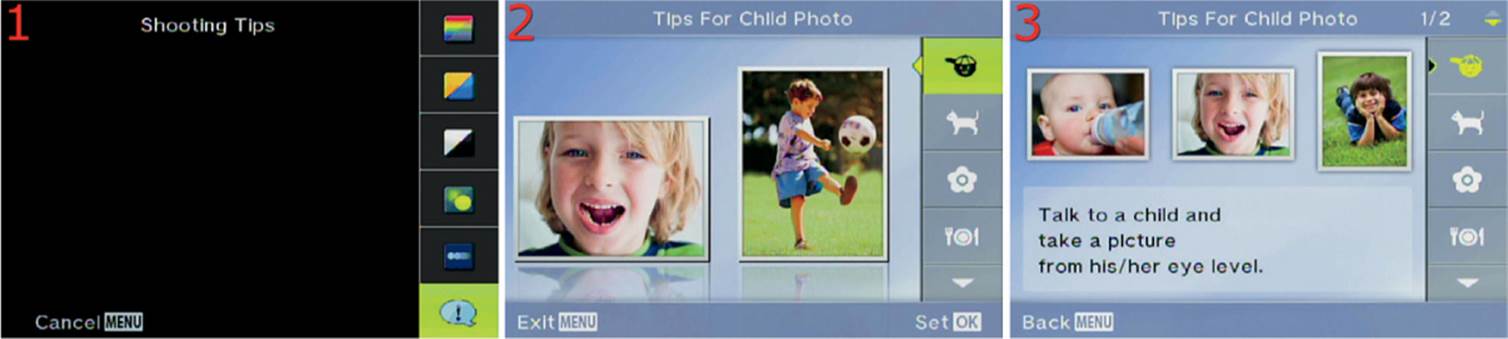
Figure 26: Shooting Tips—opening screen
Select the last menu choice on the Live Guide menu—the Shooting Tips selection—as seen in figure 26, image 1, and press the OK button to open the secondary screen.
In figure 26, image 2, you can see four of the six available Shooting Tips icons. You can see only four because each icon is a large button with a small picture that represents the type of tip the choice will provide. The other two menu choices are accessed by scrolling down with the Arrow pad. Scroll up and down to select the type of instruction you want to receive. Pay attention to the text at the top of the screen, which describes the type of tips (i.e., Tips For Child Photo). Press the OK button to enter the chosen Shooting Tips screen. Each screen is very simple and requires little instruction to use. In each of the six upcoming graphics (figures 27 to 32) you will see the individual screens for Shooting Tips. We will use figure 26 as our sample; however, all six of the Shooting Tips screens work the same way. Press the OK button to open the actual Shooting Tips screen.
Figure 26, image 3, shows one of the actual Shooting Tips screens. Each of the Shooting Tips screens will have more than one screen full of tips for that subject.
There are from two to four instructional screens, as shown by a number at the top right of the actual tips screens (1/2, 1/3, or 1/4). You may access each successive tips screen by scrolling down. If there are only two Shooting Tips screens in the series for that type of Shooting Tips, and you scroll down a third time, the next Shooting Tips type will appear. In fact, you could simply select the screen shown in figure 26, image 3, and keep scrolling down until you have read all available Shooting Tips for all types of photography.
Following are six graphics, which show the selection screen and the first screen of tips for that Shooting Tips type.
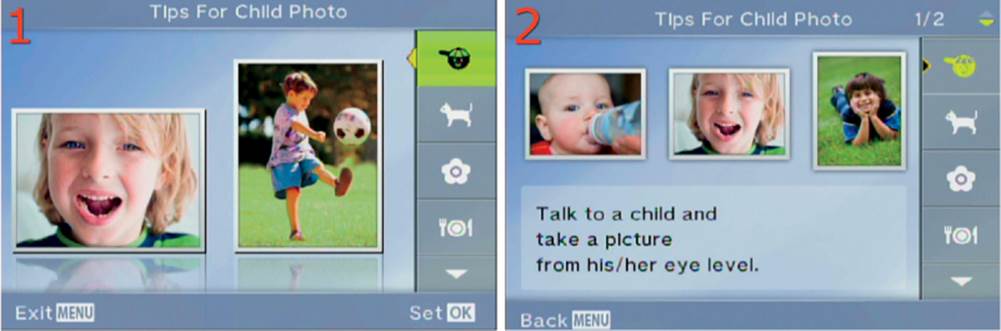
Figure 27: Tips for Child Photo (two information screens)
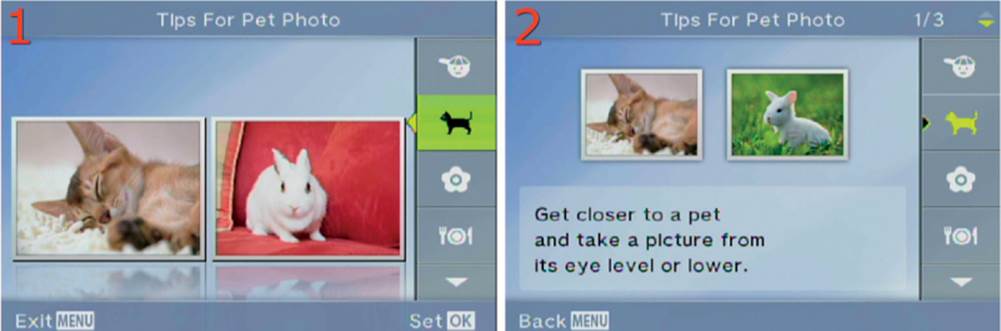
Figure 28: Tips for Pet Photo (three information screens)
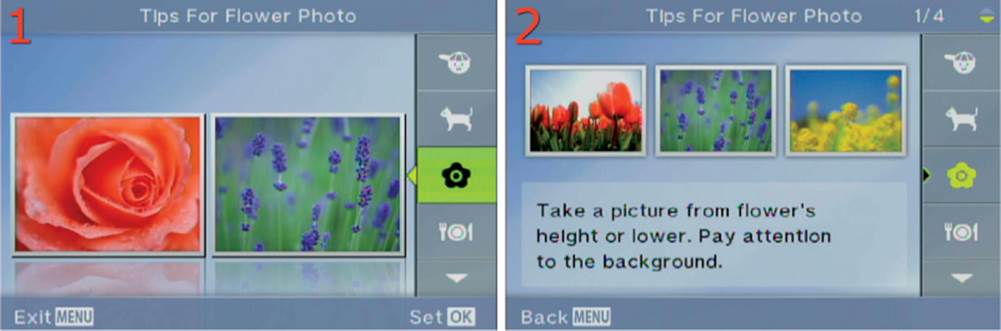
Figure 29: Tips for Flower Photo (four information screens)
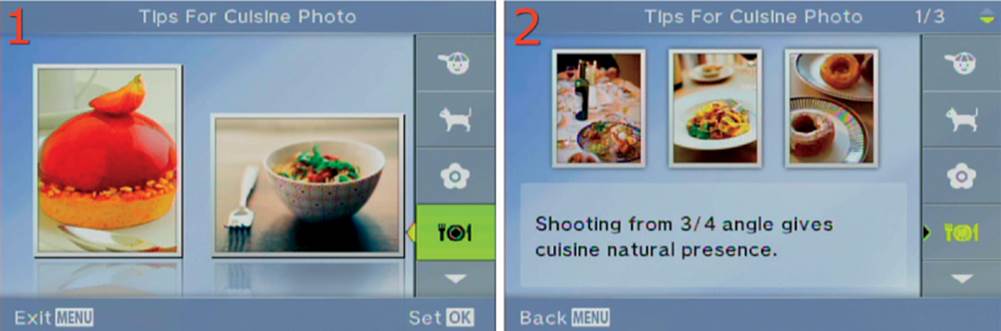
Figure 30: Tips for Cuisine Photo (three information screens)
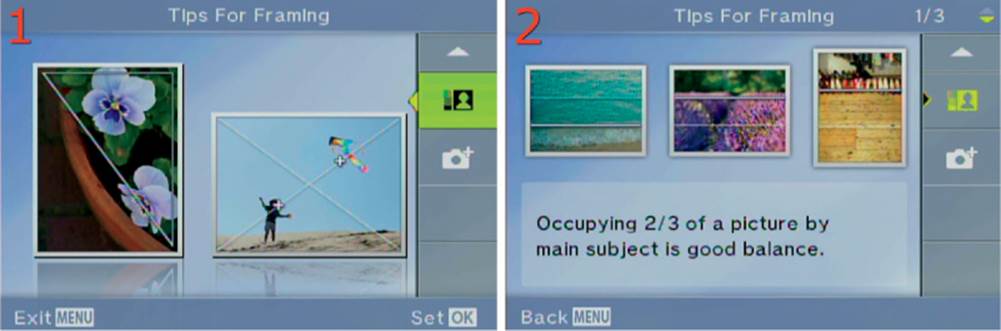
Figure 31: Tips for Framing (three information screens)
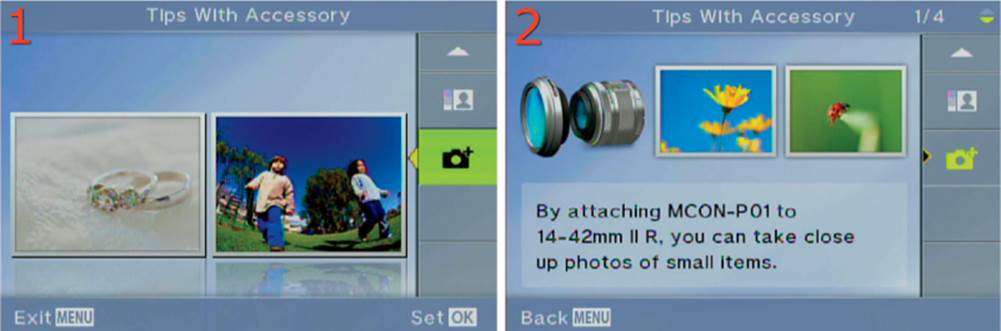
Figure 32: Tips for Camera Accessories (four information screens)
Settings Recommendation: These Shooting Tips are rather basic but do have good suggestions for the types of photography discussed. The number of actual tips are quite limited, thereby limiting the overall usefulness of this particular function.
Multiple Simultaneous Live Guide Settings: Beginning with firmware update 2.0, the camera allows you to select several of the Live Guide settings and use them at the same time on a single or multiple images.
Press the button assigned to the Live Guide task, and you will see the Live Guide selection screen. Use the method described in any of the Live Guide settings mentioned in this section to adjust the particular Live Guide value (e.g., Change Color Image, Blur Background). Afterward, you can use the screens shown in figure 32A to adjust and add another Live Guide value to the images you will take using Live Guide.
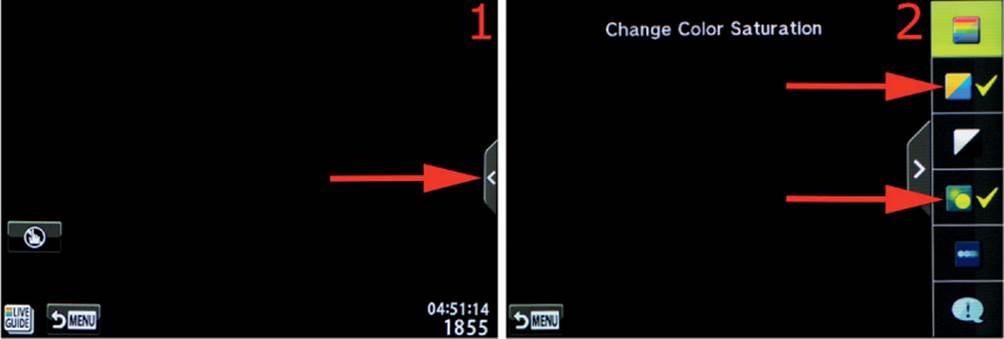
Figure 32A: Combining multiple simultaneous Live Guide settings
In figure 32A the camera has multiple Live Guide settings selected (figure 32A, image 2). In this case the Change Color Image (top arrow) and Blur Background (bottom arrow) settings are being combined in the image.
To select more than one Live Guide setting, you must configure the first setting, as previously described. Then you can touch the tab that sticks out on the right side of the screen, and the Live Guides will open again (figure 32A, image 1, red arrow).
The Live Guide setting you have already configured will have a yellow check mark to the right. Now configure any of the other Live Guide settings, and a yellow check mark will appear next to them as well. Touch the tab shown at the red arrow in screen 1 any time you want to see which Live Guide settings are currently in use. Take your pictures.
The camera will continue to use the Live Guide settings you have configured until you either press the Menu button to cancel the Live Guides or turn the camera off.
Note: Remember that you can cancel all current Live Guides by pressing the Menu button.
Magnify
Pressing the button opens a zoom frame, which is basically a less cluttered screen. Pressing it again immediately magnifies or zooms in on the image by ten times (10x). This lets you use autofocus or manual focus with great accuracy, while zoomed in.
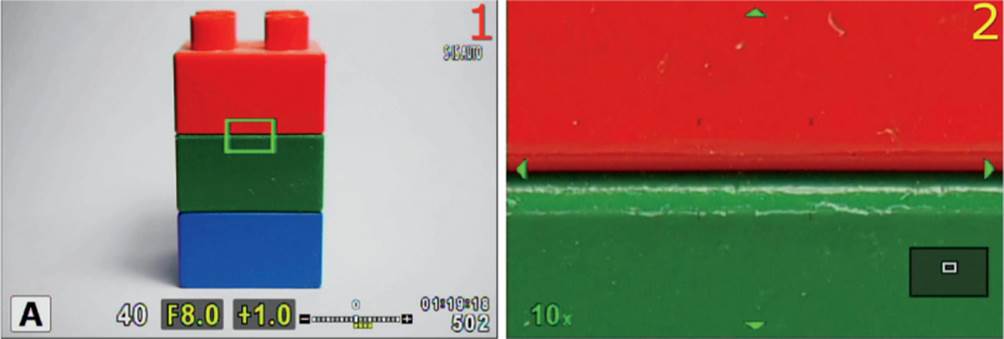
Figure 33: 10x zoom in at AF point on button press
While the zoom frame is active pressing the button toggles the zoom between 10x and normal subject view (figure 33). To get rid of the zoom frame, which tends to interfere with various other camera functions, simply press and hold the assigned button for a couple of seconds and the normal frame will appear. This function may be assigned to any assignable button, except for Arrow pad right and Arrow pad down.
Using MF Assist with Magnify: When the Magnify zoom frame is active and you have one or both of the subfunctions in Custom Menu > A. AF/MF > MF Assist (page 285) enabled, you can turn the focus ring on the lens manually and the camera will immediately use the features enabled under MF Assist. While using MF Assist you can use the Magnify and Peaking subfunctions to help you focus the camera.
The Magnify subfunction under MF assist works in a similar manner to the Magnify Button task that we are discussing in this section. The function is duplicated. However, where you would normally press the assigned button twice to magnify the image to 10x with the Magnify Button task, you can instead turn the lens focus ring when the image is not yet magnified and the zoom frame is active, which calls the extra MF assist functionality into play and allows you to use one or both of the MF Assist subfunctions (Magnify or Peaking).
In other words, the Magnify Button task allows you to zoom in to 10x for the best focusing, either by pressing the assigned button twice, or—if MF Assist is enabled—by turning the focus ring while the zoom frame is active and not already zoomed in. Enabling MF Assist adds focus peaking (Peaking), as well as an additional way to magnify the subject, to the Magnify Button task.
Settings Recommendation: I like the added functionality of having MF Assist enabled. I generally leave the Custom Menu > A. AF/MF > MF Assist > Peaking function constantly active because I like the accuracy that focus peaking gives me for manual focusing. Focus peaking easily replaces a split-prism focusing screen, which was used before the advent of autofocus.
MF
Press the button to toggle between the current autofocus setting and manual focus (MF). In other words, press the button once for MF and once again to return to the previous AF setting (e.g. S-AF, C-AF).
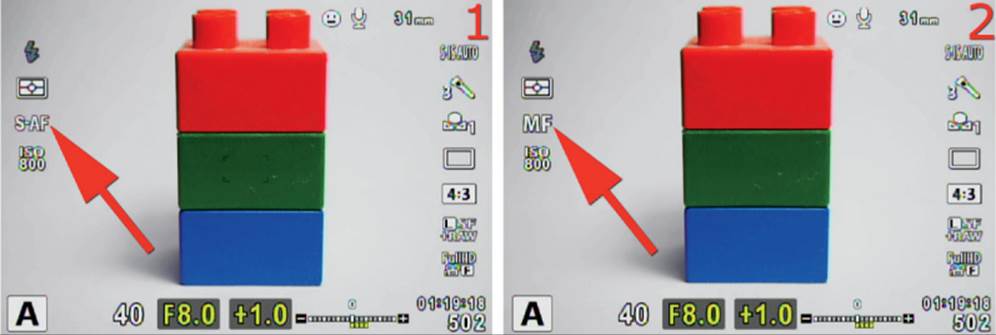
Figure 34: Toggling in and out of manual focus (MF) mode with a button press
At the point of the arrow in figure 34, image 1, you will see that the camera is set to S-AF mode. By pressing the button this function is assigned to, the camera immediately switched to MF mode, as seen in figure 34, image 2. This function may be assigned to any assignable button, except for Arrow pad right and Arrow pad down.
Settings Recommendation: If you frequently prefer to use manual focus and don’t want to take the time to switch from AF to MF within a camera menu, this is a good function to assign to your favorite button. You can use AF until you need MF, and then quickly switch to MF with a single button press, toggling back to AF by pressing the assigned button again.
Multi Function
The camera provides four separate controls built into an assigned button. It is aptly named Multi Function due to its ability to provide multiple functionalities under one button. Here is a list of the functions:
Multi Function Control List
• Highlight&Shadow Control: Provides a standard curve scale to adjust highlights and shadows
• Color Creator: Creatively changes the colors in your image with an easy-to-use color wheel
• Magnify: Zooms in on your subject by 10 times (10x) for very accurate autofocus or manual focus
• Image Aspect: Selects from five image aspect ratios to change the horizontal and vertical size of your image
To access the Multi Function features, press and hold the assigned button while rotating the Rear Dial.
You will then see the screen shown in figure 35. While still holding the button down, continue rotating the Rear Dial to move through the control selections. When the control you want to use is highlighted in green, release the button.
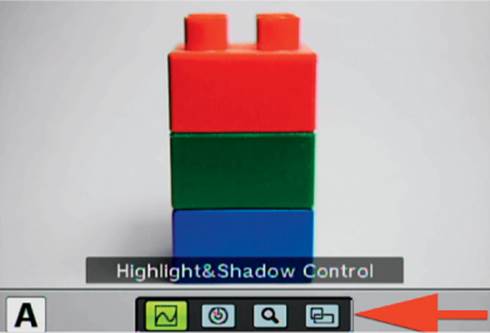
Figure 35: The four Multi Function controls (red arrow)
Now that a selection has been made, you can access it with a single press of the assigned button (do not turn the dial), as seen in figure 36, image 2. The only time you will need to press the button and turn the dial again is when you want to select a different one of the Multi Function controls. After a control is selected you simply have to press the button once to open that control.
Let’s consider how each of the four functions within the Multi Function control works.
Highlights&Shadow Control: Hold the assigned button and rotate the Rear Dial until Highlight&Shadow Control is selected in green (figure 36, image 1). Now, release the button. From this point, any time you press the assigned button (no dial turn), with the camera’s monitor or viewfinder active, the camera will present you with the Hi Light and Shadow adjustment screen, overlaying your subject on the screen.
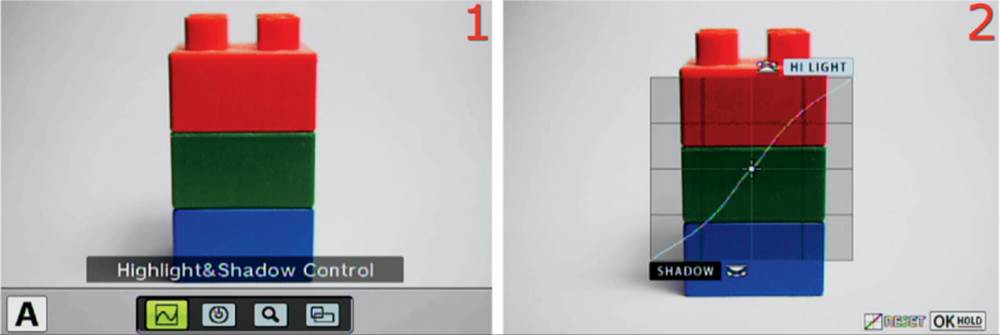
Figure 36: Adjusting the contrast ratio of the image (highlights to shadow)
Now, press the assigned button to open the Hi Light and Shadow adjustment screen (figure 36, image 2). Use this function to visually change the light to dark ratio (contrast) of the image using the Hi Light to Shadow curve scale (contrast ratio scale).
With your subject seen in the viewfinder or on the monitor, turn the camera’s Front dial, which adjusts the Hi Light (brightness) of the image. You can adjust Hi Light up to +/–7 steps. You will see the top part of the curve move in response.
Turn the camera’s Rear Dial to change the Shadow (darkness) of the image. You can adjust Shadow up to +/–7 steps. You will see the lower part of the curve respond.
A small icon will appear on the lower right side of the screen showing a small curve scale and the number of steps of adjustment (figure 37). This icon will stay on the screen until you reset the curve.
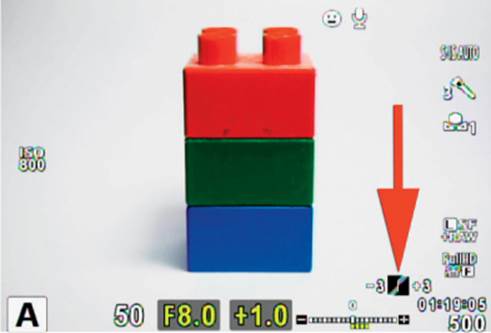
Figure 37: An active adjust to the contrast ratio is in effect
Since this is a visual process, you will be able to see how well the image looks on the monitor or in the viewfinder. After you make changes the camera remembers the highlights to shadow curve you have created until you reset the function. The values you have entered on the curve scale stay in effect, even if you turn the camera off and back on. Therefore, if you use this control to change the contrast ratio of the camera, please remember to set the curve back to a straight line, which zeros out your changes, setting the camera back to its default contrast values. Or, you can open the Hi Light and Shadow adjustment screen and hold down the OK button until the contrast ratio curve resets back to a straight line.
Color Creator: Press the button to open the Color Creator control, which allows you to change the color balance of your image in very creative ways. You can adjust both the hue and saturation with the Color Creator.
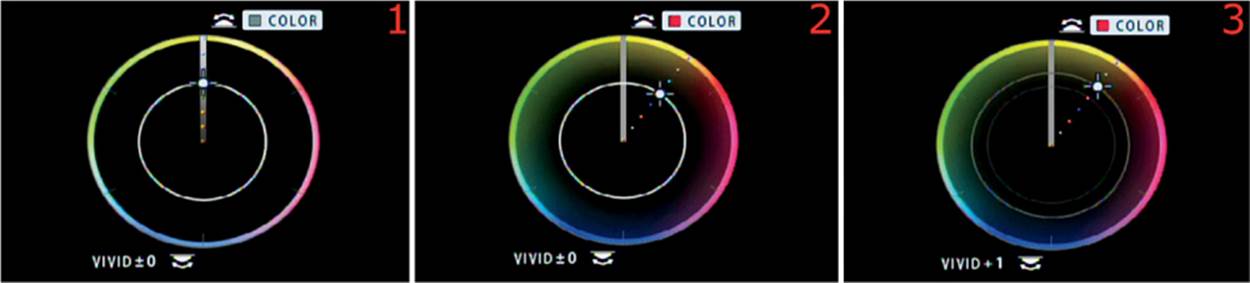
Figure 38: Adjusting the color balance with the Color Creator control
In figure 38 you will see the Color Creator control set to three different states. In image 1 the control is set to neutral, with no adjustments made. Also, notice that the Color Creator is composed of two circles, an outer one and an inner one. The outer circle represent hue, and the inner circle represents saturation.
In image 2 the hue has been changed. Notice how the little dot with crosshairs and the dotted line running from the center of the circle has moved, like a clock hand, to about the 1 o’clock position. The position of the dotted line shows that the currently selected hue is in the yellow zone and is close to the reddish border between yellow and red. The position of the dot on the inner circle has not changed from neutral, signifying that the saturation is still at neutral. You will control the position of the dotted line’s position on the outer circle with the camera’s Front Dial. There are 30 positions (hue changes) available around the outer circle as you turn the Front Dial, moving the dotted line a full 360 degrees around the circle.
In image 3, we see that the position of the dotted line has not changed; however, the bigger dot with cross hairs has moved toward the outer circle. This shows that the saturation has been increased. Moving the bigger dot toward the outer circle increases saturation, while moving it toward the center reduces saturation. There are 7 positions between the center of the circle and the outer circle, as represented with seven small dots on the dotted line. You will use the camera’s Rear Dial to move the dot with crosshairs toward or away from the center of the circle. As you move the bigger dot with crosshairs along the line of little dots, the saturation will change. When the dot with crosshairs is directly between the center of the circle and the outer circle, the saturation is at neutral.
You can see that the saturation is at neutral in both images 1 and 2 of figure 38. Now, let’s use the Color Wheel on an actual subject (figure 39).
Hold the assigned button and rotate the Rear Dial until Color Creator control is selected in green (figure 39, image 1). Now, release the button. From this point, any time you press the assigned button (no dial turn), with the camera’s monitor or viewfinder active, the camera will present you with the Color Creator control adjustment screen, overlaying your subject on the screen (figure 39, image 2).
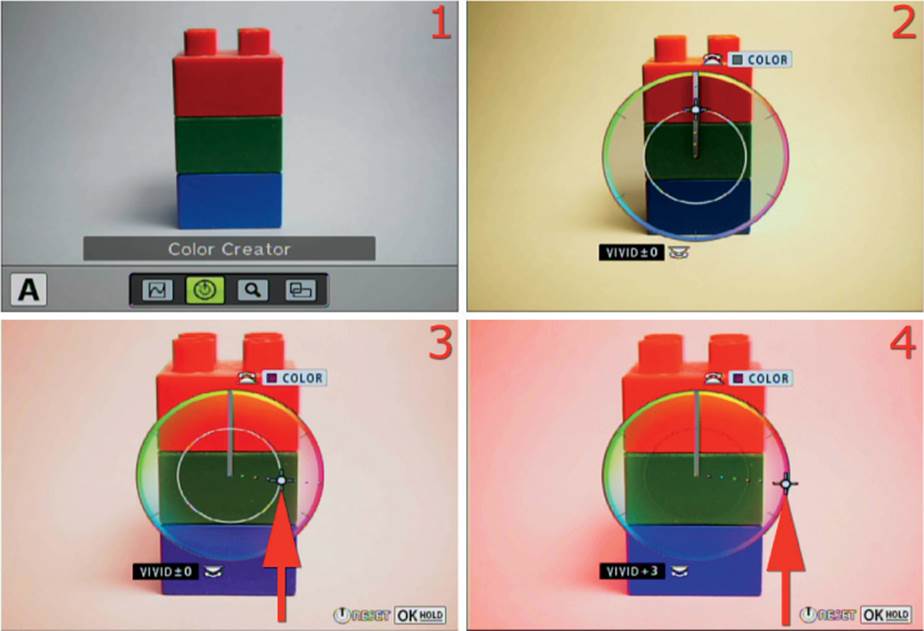
Figure 39: Adjusting the color balance with the Color Creator control
With the Color Creator at neutral, as seen in figure 39, image 2, turn the camera’s Front Dial and you will notice that the dotted line moves around the outer circle.
In image 3 the dotted line is pointing well into the red hue, at a little past the 3 o’clock position. See how the background of image 3 (red hue position) is much redder than the background of image 2 (neutral position)?
Now, by turning the camera’s Rear Dial so that the dot with crosshairs moves all the way out to the outer ring position (image 4), the red saturation of the image is greatly increased. If you were to turn the Rear Dial in the opposite direction, moving the dot with crosshairs toward the center, the saturation would decrease until you reached the center, at which point the image becomes monochrome.
Black-and-White Image: When you have the dot with crosshairs set to the center and the image set to monochrome, you can still affect the way the grayscale image renders the various colors into darker or lighter shades of gray, by turning the Front Dial (hue). This is better than using filters on the camera to adjust how a black-and-white image looks because it is all done visually.
Color Creator uses the Picture Mode: When I first started using the Color Creator, I was puzzled as to why the White Balance changed when I used the Color Creator. If you will notice, images 1 and 2 in figure 39 have distinctly different color temperatures.
When I selected the Color Creator in image 1, my camera was set to a direct white balance reading of the white background behind my Lego-block subject (under a small, warm fluorescent light). However, as soon as I selected the Color Creator and began to use it, I noticed that the white balance changed significantly. In figure 39, image 2 is much warmer than image 1. I didn’t like the much warmer background color for this book so I went to select my saved previous white balance and couldn’t. The camera was using WB Auto, and nothing I could come up with would make it change.
After several minutes of frustration, I found a sentence in small print in the E-M1 user’s manual (page 58) which said, “The settings are stored under picture mode.” Only then did I realize that, as soon as I selected the Color Creator, my camera stopped using the Natural Picture Mode I had selected previously and had switched, instead, to the Color Creator Picture Mode.
The point I want you to remember is this: if you are using Color Creator, the very act of selecting it sets the camera to WB Auto and switches away from whatever Picture Mode you were previously using to the Color Creator Picture Mode. Now, you should have no surprises when your white balance changes, even before you start using the Color Creator control to change it even more.
Indeed, the last settings you made with the Color Creator are saved inside the Color Creator Picture Mode so that you could select that mode again under Shooting Menu 1, and use those settings without switching to the Color Creator control.
Exiting Color Creator: When you are done with the Color Creator control and want to return to shooting with normal colors, you must have the Color Creator wheel displayed on the screen, then hold the OK button to reset the Color Creator back to normal color. Afterward, you can cancel Color Creator by pressing the Menu button.
Magnify: You can use this control to magnify your subject (zoom in) by ten times (10x) for very accurate autofocus or manual focus. This setting is exactly the same as the Magnify setting we considered previously in this list. The only difference is that you get to the Magnify control through the Multi Function setting instead of directly assigning Magnify to a button.
Hold the assigned button and rotate the Rear Dial until Magnify is selected in green (figure 40, image 1). Now, release the button. From this point, any time you press the assigned button (no dial turn) with the camera’s monitor or viewfinder active, the camera will present you with the Magnify screen, overlaying your subject on the screen (figure 40, image 2).
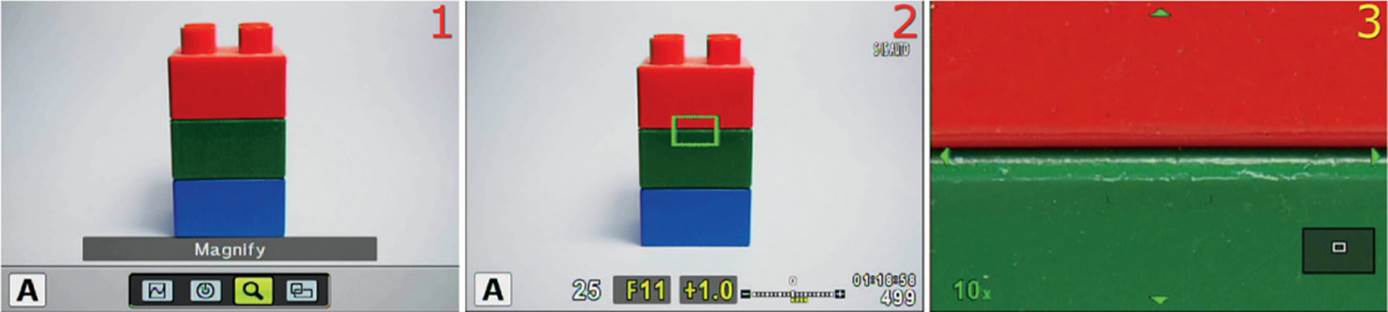
Figure 40: Using Magnify from the Multi Function Group
Press the assigned button and you will see the screen shown in figure 40, image 2 appear. To magnify the subject by 10x for accurate focusing, place the camera’s AF Area Pointer over the area you want to magnify and press the assigned button again. You will now see an extreme closeup of your subject, as shown in image 3. Pressing the button repeatedly will toggle the 10x magnification on and off.
Image Aspect: The camera has five different image aspect ratios, which change the relationship of the length of the image’s sides to each other. A regular Micro Four Thirds images uses a 4:3 aspect ratio. The camera also offers: 16:9, 3:2, 1:1, and 3:4.
Hold the assigned button and rotate the Rear Dial until Image Aspect is selected in green (figure 41, image 1). Now, release the button. From this point, any time you press the assigned button (no dial turn) with the camera’s monitor or viewfinder active, the camera will present you with the Image Aspect adjustment screen, with selections below your subject (figure 40, image 2).
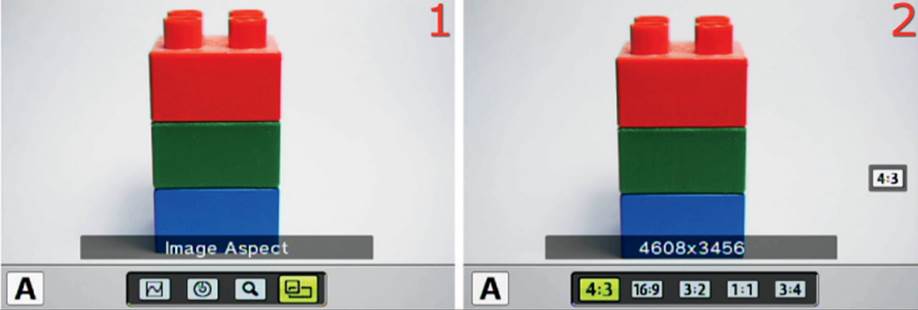
Figure 41: Changing the Image Aspect ratio of the image
Press the assigned button and you will see the screen shown in figure 41, image 2 appear. It offers you five separate Image Aspect ratios. Figure 41, image 2 (and Figure 42), shows all the Image Aspects you can choose from by turning the Rear Dial on the camera.
The 4:3 ratio is the normal shape for a Micro Four Thirds camera. The 16:9 ratio more closely fits displays on an HDTV, tablet, smart phone, or newer computer monitor. The 3:2 format matches the format most often seen from the 35mm world. The 1:1 ratio is square, like a Hasselblad medium format camera. The final format 3:4 is a vertical format in the same shape as a normal Micro Four Thirds image.
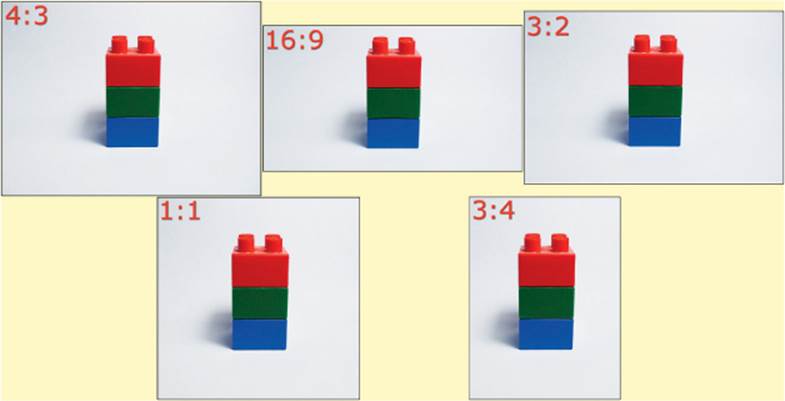
Figure 42: Various Image Aspect ratios for the E-M1
Settings Recommendation: I like to keep the unusually named Highlight&Shadow Control active on my camera because I enjoy fine-tuning the exposure. However, if you are more concerned with color balance, you may want to use Color Creator. You can also select the Magnify function for when you want to zoom in by 10x, or you may even want to change the image aspect ratio away from the standard Micro Four Thirds (4:3) to a different aspect ratio, such as 1:1 (square) or 3:2 (matching most 35mm cameras. There are four functions in this Multi Function group. You have access to all four of them with a button press and Rear Dial turn.
Myset1–Myset4
Press the button to load the previously saved camera configuration found in one of the four Myset memory locations (Myset1–Myset4). Each of the four Mysets must be individually assigned to a button. Therefore, you have Myset1 (My1) to Myset4 (My4) available for assignment.

Figure 43: Loading a Myset configuration to the camera’s active memory
Figure 43, image 1, is what was on my camera’s screen before I pressed the assigned button to load in a Myset value, and image 2 is after I pressed the assigned button. At the arrow in figure 43, image 2, you can see that I have loaded Myset1 (My1) into the camera’s active memory because the My1 symbol has appeared. From the orange-looking background in image 2 it is clear that the white balance stored in Myset1 (My1) is different from the white balance I was previously using to shoot the Lego blocks in image 1. Also, in image 2 the Live Histogram is enabled, where it wasn’t previously.
This function may be assigned to any assignable button, except for Arrow pad right and Arrow pad down.
[One-touch WB] (flower symbol)
This function is different from the WB setting considered previously in this list, which lets you choose from the camera’s preset WB values (e.g., Sunny, Shadow, Cloudy). Instead, by pressing the assigned button, you can do an immediate white balance reading from a white card or other white object by pointing the lens at it and taking a picture. No picture is actually recorded to the camera’s memory card, only a WB reading is taken. You can then save the newly determined white balance to one of four Capture WB memory locations (1–4) for recall later from the standard WB choices. You’ll find this saved Capture WB in the menu that opens when you press the OK button with your subject appearing on the monitor or in the viewfinder.
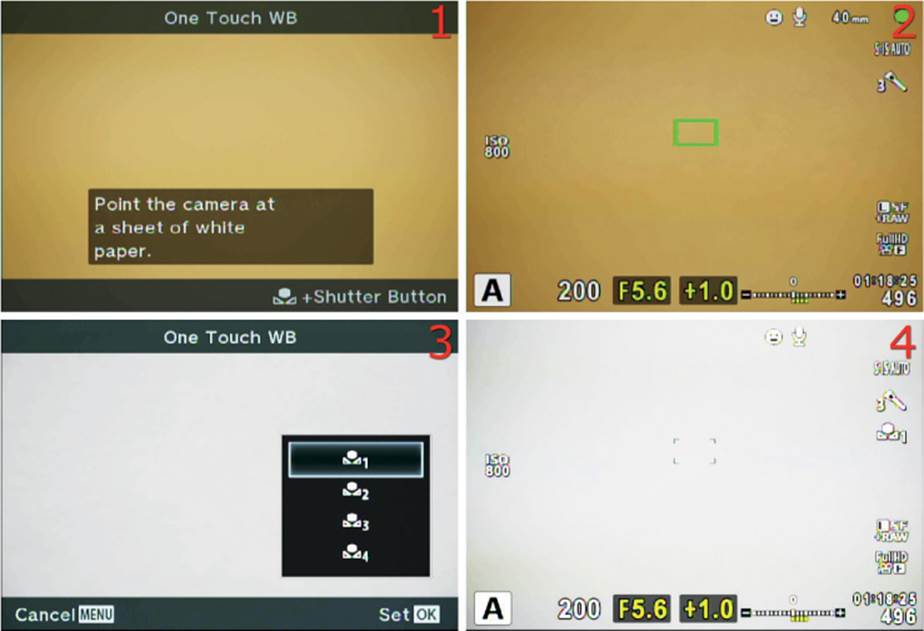
Figure 44: Doing a One Touch WB reading
In figure 44, image 1, the assigned button has been pressed and the camera is ready for making a white balance reading. From the orange color you can see that a white balance reading is truly needed. The white area is not white.
In image 2, the shutter button has been partially pressed and the camera is preparing to take the white balance reading.
Image 3 shows the screen that appears just after a WB reading has been taken. You must select one of the four locations to store the new WB value. You can also see from the white color, instead of orange, that the camera has set the white point correctly.
Image 4 shows the camera’s monitor after the new WB reading has been saved. The new WB value will remain in use by the camera until you change it to a different white balance.
This function may be assigned to any assignable button, except for Arrow pad right and Arrow pad down.
Peaking
Pressing the button toggles Peaking on and off. If you are using a focus mode such as S-AF+MF or MF, you could use the button to turn Peaking on and then use it for either fine tuning the AF or during manual focus for MF. Peaking is a white border that appears on your subject’s edges so that you can see when the image is in focus. When you turn the focus dial on your camera’s lens, you can see the area of sharp focus moving forward and backward as the peaking outline moves. If the edges of your subject are white, it is in focus.
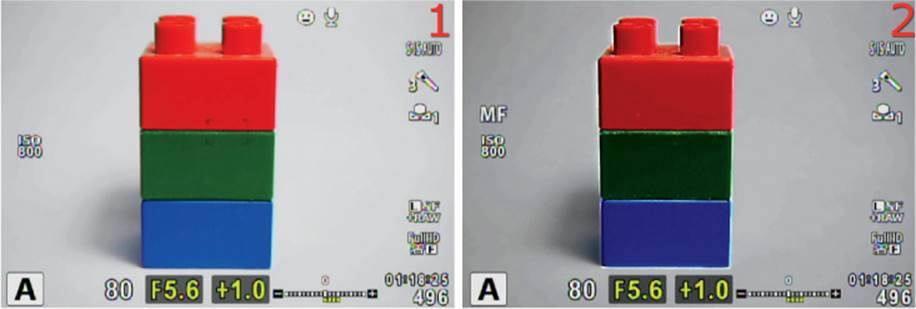
Figure 45: Using Focus Peaking for manual focus
Figure 45, image 1 shows the subject before the assigned button is pressed. Image 2 shows the subject after the assigned button is pressed. Do you see how the camera slightly darkens the background and puts a white border around the edges in the subject when it is in focus? The white in-focus edge enhancement will show on any edge the camera can find in the subject as it comes into focus. If the white border is not present the subject is not in best focus. Turn the focus dial on your camera’s lens until you see the border appear on the area you want to be in focus.
Although this is much easier to see than describe, Peaking is a very accurate way to manually focus your camera.
This function may be assigned to any assignable button, except for Arrow pad right and Arrow pad down.
Preview
Press the button to cause the camera to close the aperture (stop down) to the currently selected aperture value so that you can preview the depth of field that aperture provides. You will be able to see the zone of sharp focus displayed in the viewfinder or on the monitor.

Figure 46: Previewing depth of field
Notice in figure 46, image 1, that the focus is set just in front of the subject, not on it, which means the subject is not in focus and is blurry. In image 2, the assigned button is pressed and held, previewing depth of field. The small aperture of f/16 has enough depth of field to cover the subject with sharpness, even though the camera is not focused directly on the subject. See how the subject is sharp in image 2, even though the focus position has not moved at all. In other words, the smaller aperture has sufficient depth of field to cause the subject to be sharp, even though it is slightly out of focus.
You may also notice that the screen does not darken when you press the depth of field preview button, even though the smaller aperture lets in less light. This is one of the features of an electronic viewfinder (EVF) compared to an optical viewfinder (OVF). The EVF adjusts its brightness automatically so that you can continue viewing your subject normally, where on a camera with an OVF, the screen would darken appreciably, making it more difficult to see the actual depth of field.
This function may be assigned to any assignable button, except for Arrow pad right and Arrow pad down.
RAW
Press the button to toggle between JPEG and JPEG+RAW Record Modes, according to which JPEG mode is set currently in Shooting Menu 1 > [Record Mode] > Still Picture.
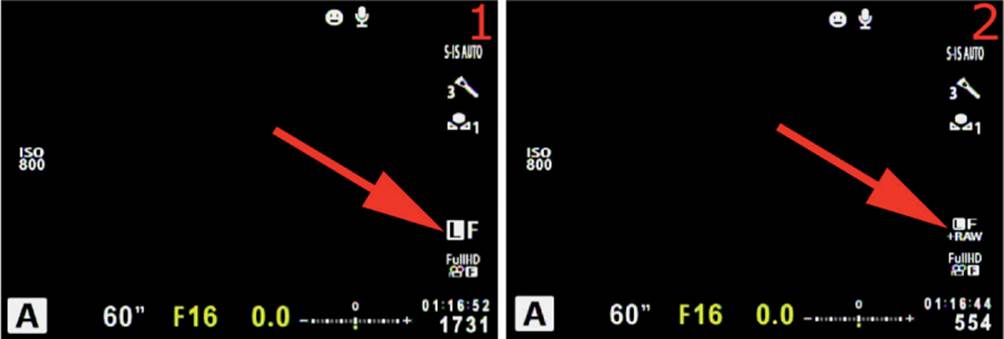
Figure 47: Quickly switching between RAW and JPEG+RAW modes
For instance, if Large Fine (LF) JPEG is set under Still Picture, the camera will toggle between LF and LF+RAW when you press the button (figure 47). This function may be assigned to any assignable button, except for Arrow pad right and Arrow pad down.
Rec
Press the button to record a video (Movie). This function is assignable to the Movie button only (figure 48).
You can assign one of the other button functions to the Movie button, if you prefer; however, that will prevent you from shooting videos with the camera since there will be no button available to start the video recording.
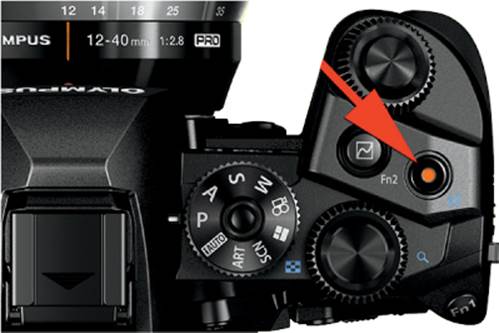
Figure 48: Rec can be assigned to the Movie button only
Setting Recommendation: If you don’t shoot video, then the Movie button is fair game to assign to other button functions. If you do shoot video, it may be best to leave Rec assigned to the Movie button since it cannot be assigned to any other button.
[Sequential shooting/Self timer]
When you press the Arrow pad key to which you have assigned this function (right or down Arrow pad buttons only), you can select a Sequential shooting or Self timer mode.
Press the assigned button on the Arrow pad (right or down) and then scroll left or right to select one of the modes from the menu at the bottom of the screen (figure 49).
This function uses the symbols for Sequential shooting and the Self timer. It can be assigned to the Arrow pad right or Arrow pad down button only, and only when you have the main Arrow pad’s [![]()
![]()
![]()
![]() ] Function (Custom Menu > B. Button/Dial/Lever > Button Function > [
] Function (Custom Menu > B. Button/Dial/Lever > Button Function > [![]()
![]()
![]()
![]() ] Function) set to Direct Function mode.
] Function) set to Direct Function mode.
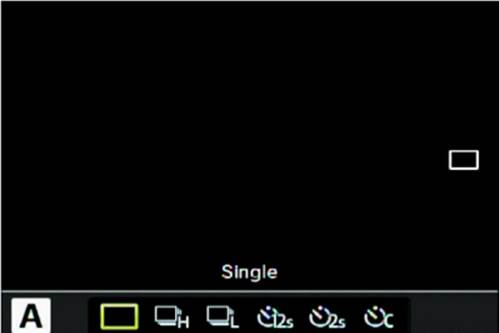
Figure 49: Select a Sequential/Self timer mode
Here is a list of the items available on the menu:
• Single (Single-frame shooting): The camera will take on picture for each press of the Shutter button.
• Sequential H: Pictures are taken at about 10 frames per second while the Shutter button is held down. The autofocus, exposure, and white balance are locked at the values determined in the first frame and do not update. This is a good mode to use for a subject moving left to right, or vise versa, relative to the photographer. It is not a good mode for a subject moving toward or away from you, into and out of dark and bright areas, or into and out of areas with different types of lighting.
• Sequential L: Pictures are taken at about 6.5 fps with firmware 2.0 or 9 fps with firmware 3.0 while the Shutter button is held down. The autofocus, exposure, and white balance all update normally, according to your camera’s settings.
• [Self-timer] 12 sec: Press the Shutter button halfway down to initiate autofocus and then press it all the way down to start the timer. The shutter will release after 12 seconds have expired. The Self-timer lamp (AF illuminator) will shine solidly until 10 seconds have passed. For the last couple of seconds it will blink. Then the picture is automatically taken.
• [Self-timer] 2 sec: Press the Shutter button halfway down to initiate autofocus and then press it all the way down to start the timer. The shutter will release after 2 seconds have expired. The Self-timer lamp (AF illuminator) will blink during the 2-second count-down. Then the picture is automatically taken.
• [Self-timer] C (Number of Pictures): The C in the label stands for Custom. See the upcoming Self-Timer Custom subheadings for more information.
Self-Timer Custom: This function allows you to choose the number of pictures you want to shoot, with a one-second delay between each picture.
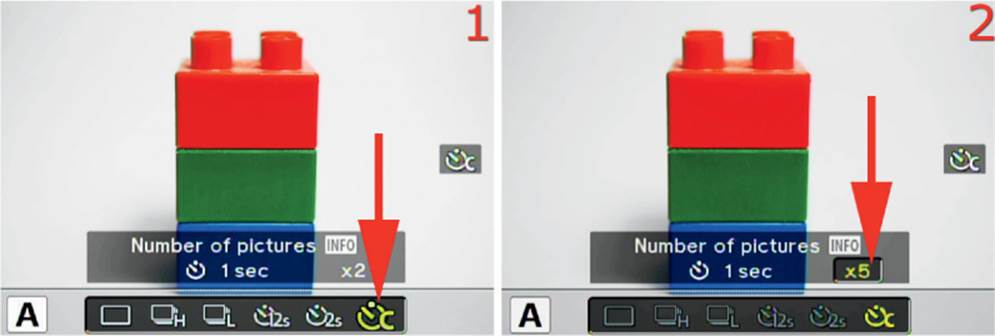
Figure 50: Choosing the number of frames to shoot with a 1 sec delay
Press the assigned button to open the Sequential shooting and Self-timer screen and then scroll left or right with the Arrow pad until [Self-timer] C is selected (figure 50, image 1).
Press the Info button and then turn either of the camera’s dials to adjust the Number of pictures value (e.g., x2). My camera is set to x5 (figure 50, image 2), which means that once I press the Shutter button all the way down, the camera will fire 5 frames with a one-second delay before each frame. This allows time for vibrations to die down and is a good substitute for an external shutter release wire. With this function you can do hands-off shooting of from 1 to 10 frames (x1 to x10).
Self-timer Custom and Bracketing: An undocumented feature of this camera is that you can use the Self-timer Custom function in conjunction with the camera’s bracketing (BKT) capability. If you will set the camera to Bracketing mode (see previous BKT sub-heading), and then set the custom Number of pictures to match the number of frames in the bracket, the camera will use both functions to fire the bracketed series. You can have a hands-off bracketing session with a one-second delay before each picture. This is a very powerful feature for those who bracket frequently!
Be sure to turn off Bracketing and the Self-timer when you are done shooting the self-timed bracket series.
Test Picture
Holding down the button while also pressing the Shutter button will take a test picture that will display on the camera’s monitor for you to examine closely. However the picture will not be written to the camera’s memory card.
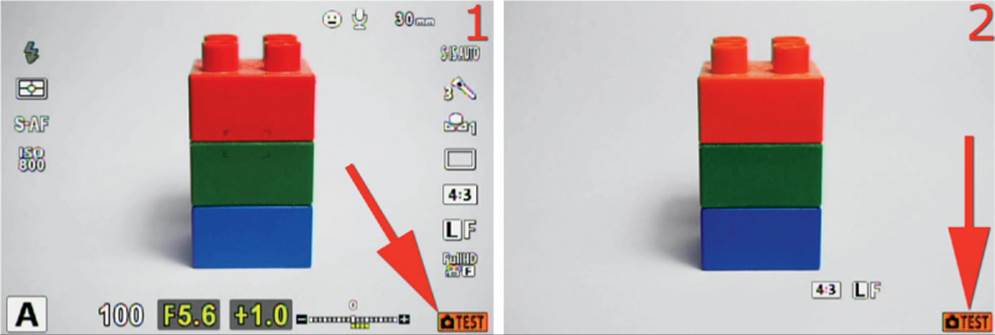
Figure 51: Making a temporary Test picture
When you hold down the assigned button, the word TEST will appear in an orange rectangle at the bottom right of the screen (figure 51, image 1).
When you continue to hold down the assigned button and simultaneously press the Shutter button, a picture will appear on the monitor, with the word TEST in an orange rectangle (figure 51, image 2).
This image will not be written to the memory card and it is, therefore, a temporary image you can use to see how the camera settings affect the subject of your picture. This function is especially useful for studio shooters.
This function may be assigned to any assignable button, except for Arrow pad right and Arrow pad down.
[Touch Panel] Lock
Press and hold the button for about two seconds to enable or disable (toggle) the touch panel capability for the camera’s rear monitor.
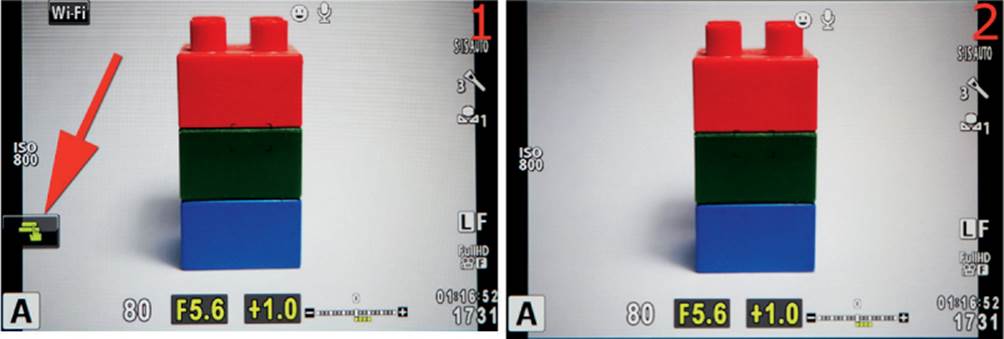
Figure 52: Locking the camera’s Touch Panel capability
The Touch Panel capability is enabled when the Touch Panel symbol is seen on the monitor (figure 52, image 1). Image 2 shows the monitor with Touch Panel disabled.
This function is available for the Arrow pad right and Arrow pad down buttons only, and only when you have the main Arrow pad [![]()
![]()
![]()
![]() ] Function (Custom Menu > B. Button/Dial/Lever > Button Function > [
] Function (Custom Menu > B. Button/Dial/Lever > Button Function > [![]()
![]()
![]()
![]() ] Function) set to Direct Function mode.
] Function) set to Direct Function mode.
[Underwater Zoom] (Framed Fish Symbols)
Press and hold the button for a couple of seconds to enter Underwater Zoom mode. Afterward, you can press the button to toggle between wide-angle and telephoto zoom positions while an underwater camera housing is attached, if you are using a lens with power zoom capability—such as the M.Zuiko ED 12–50mm f/3.5–6.3 EZ.
It is impossible to zoom a lens in and out in most underwater housings. Therefore, this mode has been provided to give you a way to zoom from wide to telephoto and back.
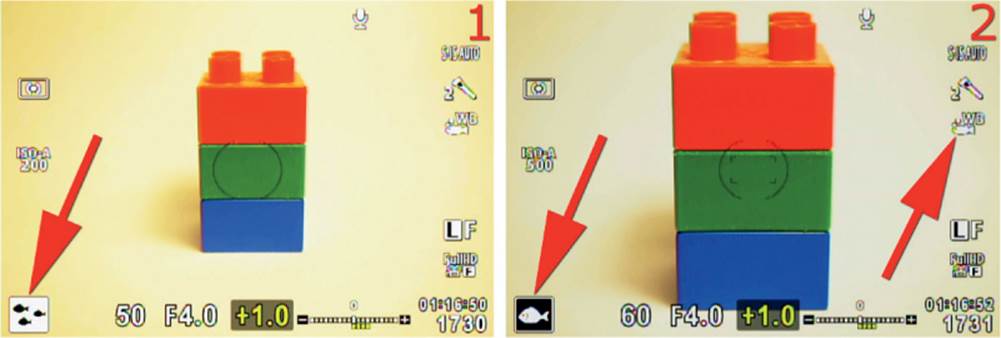
Figure 53: Using the E-M1 in an underwater housing, zooming in and out, plus WB values
When the camera enters this mode, you will see a small square symbol with three fish in the lower left corner of the screen (figure 53, image 1). As you can tell from the subject, the power-zoom lens is zoomed to wide-angle mode.
If you press the button again, the power-zoom lens will zoom to telephoto and the symbol in the lower left corner of the screen will change from three fish to one fish (figure 53, image 2).
Also, please note that the camera is using underwater white balance in this mode, which from the appearance of the image background is quite warm. That makes perfect sense because light underwater is quite blue looking and needs warming up. The symbol for underwater white balance is the letters WB above a tiny bubble-blowing fish (figure 53, image 2, arrow on right).
Note: If this option is selected, the small, accessory FL-LM2 flash unit will fire even when it is not raised. When using a lens with power zoom, the lens will automatically zoom to wide-angle or telephoto when the button is pressed. This function may be assigned to any assignable button, except for Arrow pad right and Arrow pad down.
WB
Press the button to assign the current white balance (WB) by choosing from a list of preset WB values (e.g., Sunny, Shadow, Cloudy), Capture WB values (1–4), or directly input a Kelvin color temperature (CWB).
Normally, you will choose white balance by pressing the OK button while viewing your subject and selecting WB from the menu on the right of the screen. However, with this function you may assign WB to a button you find more convenient.
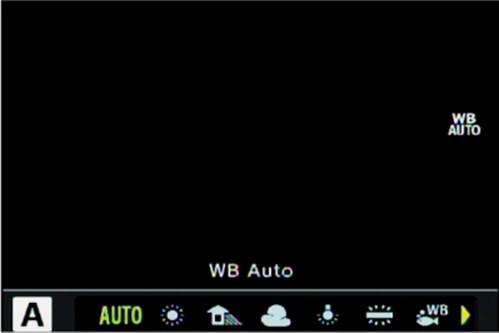
Figure 54: Choosing WB in an alternate way
Press the assigned button and you will see the WB screen with a menu of selections at the bottom. Scroll left or right until you find the WB type you want to use. It is selected when you have highlighted it in green. The name of the WB type will appear just above the menu of selections, where WB Auto is showing in figure 54. Here is a list of WB types:
• Auto: The camera chooses the correct WB.
• Sunny: Use this WB setting for bright sunny days when your subject is in direct sunlight.
• Shadow: Use this WB setting when the sun is out but your subject is in the shade. This WB tends to warm the image up a little (adds red) to counteract the blue normally found in shadow.
• Cloudy: On an overcast day the image can appear very cool and bluish. This setting warms the image by adding red, removing the cool appearance.
• Incandescent: Incandescent lights make your subject appear quite reddish orange when photographed. This WB setting cools down the subject by removing red from the image.
• Fluorescent: This type of lighting often will cause a sickly, yellowish-green color to tint your images (blue deficit). The camera counteracts this look by adding blue.
• Underwater: When taking pictures underwater the images are often too cool looking because of the prevalence of blue light wavelengths. The camera counteracts the bluish look by warming up the image (adding red).
• Flash: The camera sets the white balance for use with electronic flash units.
• Capture WB1 to Capture WB4: These four WB settings are user created. You will use a direct white balance reading by pointing your camera at a white card under the ambient light source and pressing the button assigned to One Touch WB. After a reading is made from the white card, the value can be stored in one of the four Capture WB memory locations for later recall. See the previous information in this list under the subheading [One-touch WB] (flower symbol).
• CWB: Use this setting to manually choose a Kelvin WB value from 2000K to 14000K. See the upcoming subheading CWB White Balance.
CWB White Balance: The CWB setting is used to input a WB value from a range of Kelvin color temperatures. It allows you to choose a particular white balance very accurately. This is quite useful when you are working in a studio and you know the exact Kelvin temperature of the lighting you are using.
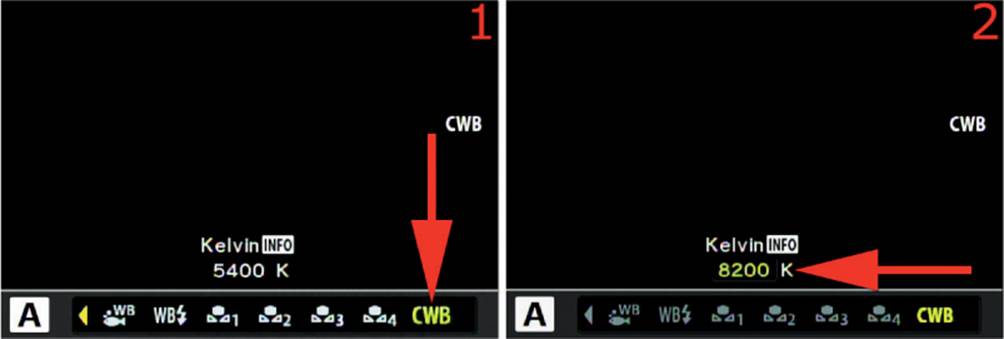
Figure 55: Directly choosing a WB value in Kelvin (2000K–14000K)
To use the manual Kelvin color temperature entry provided by the CWB setting, press the assigned button, and then scroll left or right with the Arrow pad until you highlight CWB in green (figure 55, image 1). As you can see under the words Kelvin (Info), the camera’s default CWB Kelvin temperature is 5400K.
Next, you must press the Info button to let the camera know you want to change the CWB value. Once you have pressed the Info button simply turn either of the camera’s dials until the Kelvin color temperature you want to use is dialed in. My camera has 8200K dialed in at the point of the arrow in figure 55, image 2. That is a very warm temperature and will make a red cast in the image.
Again, you can choose from 2000K (very cool and bluish) all the way up to 14000K (very warm and reddish). This function may be assigned to all assignable buttons.
All materials on the site are licensed Creative Commons Attribution-Sharealike 3.0 Unported CC BY-SA 3.0 & GNU Free Documentation License (GFDL)
If you are the copyright holder of any material contained on our site and intend to remove it, please contact our site administrator for approval.
© 2016-2026 All site design rights belong to S.Y.A.