Mastering the Olympus OM-D E-M1 (2015)
Chapter 7. Setup Menu

Image © Darrell Young
The Setup Menu is the final menu in the E-M1. It gives you control over some functions that do not directly influence how an image is made. These are basic utility functions that you’ll need primarily when you set up your camera.
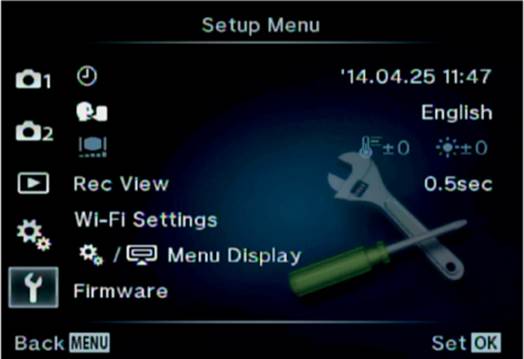
Figure 7.1: The Setup Menu for the E-M1
There are seven items on the Setup Menu:
• [Date and Time]: This option allows you to set the camera’s date, time (in 24-hour format), and date format (month, day, and year).
• [Language]: Select your language from a list of 35 languages.
• [Monitor Adjustments]: You can adjust the hue (color temperature) and brightness level of the camera monitor.
• Rec View: Choose how long an image is displayed on the camera monitor and in the electronic viewfinder immediately after you take a picture.
• Wi-Fi Settings: Connect your E-M1 to your smartphone or tablet and remotely control the camera, transfer pictures, and geotag your images. Olympus provides free apps for the iOS (iPhone and iPad) and Android platforms. These settings control how the Wi-Fi system works when it is enabled in the Playback Menu.
• Menu Display: Choose whether the Custom Menu and the Accessory Port Menu appear in the list of available menus.
• Firmware: This function displays the camera and lens firmware versions.
Now, let’s discover what each item in the Setup Menu does.
[Date and Time]
The [Date and Time] function allows you to set the date, time, and date format. These are, most likely, some of the first items you will adjust when you get your new camera. Let’s see how to adjust each item.
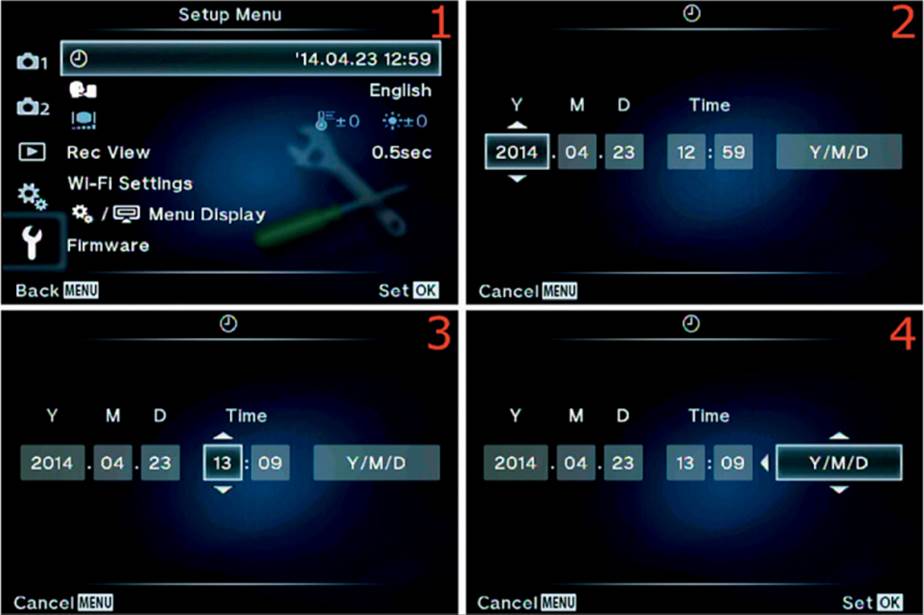
Figure 7.2: Setting the date, time, and date format
Use the following steps to adjust the date and time:
1. Select the clock symbol, which represents [Date and Time], from the Setup Menu and scroll to the right (figure 7.2, image 1).
2. The [Date and Time] screen has six up/down menus. We will use those menus to adjust the year (Y), month (M), and day (D). In figure 7.2, image 2, you can see that the year (Y) is selected. Press the up or down buttons on the Arrow pad to select from a range of years, starting at 2000and ending at 2099. I chose 2014. Next, scroll to the right until month (M) is highlighted and press the buttons on the Arrow pad to select a month (1–12). Finally, scroll to the right until day (D) is highlighted and press the buttons on the Arrow pad until the day you want is selected (1–31). The camera knows how many days are in each month and will offer only that number of days for the month, including leap years. My camera is set to April 23, 2014.
3. Now let’s set the time. Scroll to the right until the first up/down menu under Time is highlighted (figure 7.2, image 3). That is the hour field, with the minute field immediately to its right. Choose an hour, from 00–23. The camera uses a 24-hour clock, so 00 is midnight. Use the sidebar at the end of this section, titled 12- to 24-Hour Time Conversion Chart, to choose the correct hour conversion if you use a 12-hour day. Press the buttons on the Arrow pad until the hour you want is selected, then scroll to the minute field. You can choose from 00–59 in the minute field. Select the minute you want. My camera is set to 13:09 (1:09 p.m.).
4. Now, let’s set the date format. Scroll to the last up/down menu on the right, which is the date format selection (figure 7.2, image 4). You have three choices:
• Y/M/D: Year/Month/Day (2014/12/31)
• M/D/Y: Month/Day/Year (12/31/2014)
• D/M/Y: Day/Month/Year (31/12/2014)
Refer to the list of date formats and select the one you prefer to use. My camera is set to year, month, day (Y/M/D). Camera owners in the United States will probably use the second setting (M/D/Y).
5. Review each of the fields and make sure that all the values are correct. When you are happy with your settings, make sure the date format field is selected and press the OK button to save the settings. If any field other than date format is selected when you press the OK button, the camera will jump to the next field in the series.
Settings Recommendation: The factory default date format is Y/M/D, which I did not change on my camera before I photographed the camera screens. I changed my camera to M/D/Y because I live in the United States. Be sure to use the 12- to 24-Hour Time Conversion Chart to make sure you set the time correctly.
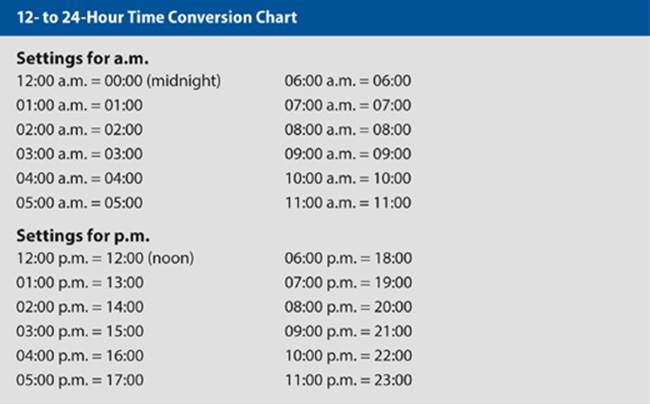
Note: There is no 24:00; 23:59 is followed by 00:00.
[Language]
The E-M1 is multilingual. It can use one of 34 languages for on-screen displays and error messages. Most likely your camera will come from the factory with the correct language already chosen for your area. However, if you prefer another language, simply scroll through the list and select your choice. Here’s how.
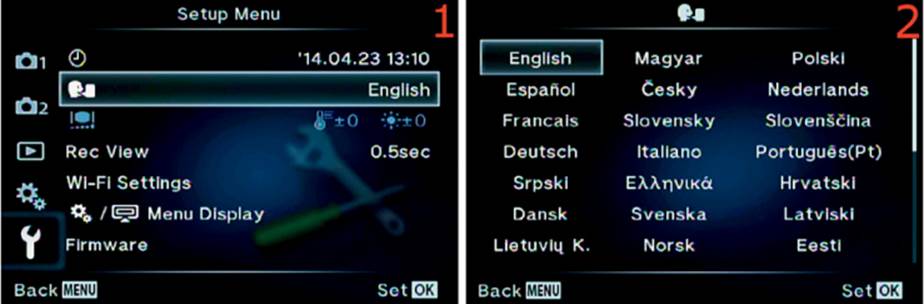
Figure 7.3: Choosing one of 34 languages for your camera
Use the following steps to select a language for your camera:
1. Choose the [Language] symbol from the Setup Menu. The symbol looks like a face with a speech bubble. Scroll to the right (figure 7.3, image 1).
2. As seen in figure 7.3, image 2, a screen will appear with a list of 34 languages (use the Arrow pad to scroll down and see all the languages). Highlight the language you want to use—if you are changing it from English—and press the OK button to Set the language.
Settings Recommendation: Most readers of this book will leave the camera set to the default of English, as I did in figure 7.3, image 2. If you are not a native English speaker, you may be more comfortable with a different language. You should be able to find your language by examining the list. The E-M1 has 10 or 15 more languages than most other cameras I’ve used.
[Monitor Adjustments]
The [Monitor Adjustments] setting lets you control two aspects of your camera monitor display: hue (color temperature) and brightness level. Each setting has an adjustment slider. You can also set the amount of monitor color saturation with two settings: Natural and Vivid. Let’s see how.
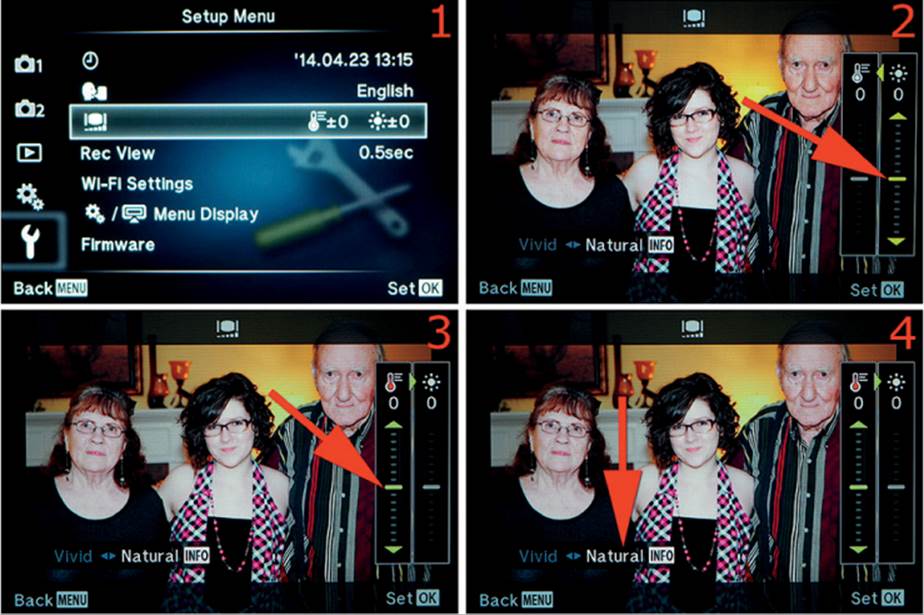
Figure 7.4: Changing the monitor hue, brightness, and color saturation
Use the following steps to change the monitor hue, brightness, and saturation. You can adjust one of the settings or all three:
1. Select the [Monitor Adjustments] symbol from the Setup Menu. It looks like a small screen with an adjustment slider beneath it (figure 7.4, image 1). Scroll to the right.
2. The next screen has two adjustable sliders. The brightness slider is on the right and has a sun symbol on top; it is automatically selected (figure 7.4, image 2). There are 14 steps of brightness change—seven steps (0 to +7) to increase brightness and seven steps (0 to –7) to decrease brightness. Choose a brightness level by scrolling up or down with the Arrow pad. The monitor will immediately reflect the brightness change. If you don’t want to change the hue setting, press the OK button, which Sets the brightness level. If you do want to change the hue, don’t press the OK button; instead, scroll to the left with the Arrow pad to select the hue slider.
3. The hue slider has a thermometer symbol at the top to indicate color temperature (figure 7.4, image 3). To adjust it, scroll up or down with the Arrow pad. There are 14 steps of hue change—seven steps (0 to +7) to cool down the image (add blue) and seven steps (0 to –7) to warm up the image (add red). The monitor will immediately reflect the change in hue. Press the OK button to Set all changes, or move on to the color saturation setting.
4. The camera has a special feature for those who want a more color-saturated monitor view. You can see the Vivid and Natural selections in figure 7.4, image 4, at the red arrow. If you select Vivid, the monitor will display a more saturated image than the actual scene. Natural reflects the scene as it actually appears. This setting affects only the camera monitor and does not change the saturation of the photograph, which is controlled by other settings such as the Picture Mode (e.g., Portrait, Muted, Natural, and Vivid). Choose a monitor saturation setting by pressing the Info button. You will see the selection change at the red arrow in figure 7.4, image 4. After you make your selection, press the OK button to Set your choices.
Note: The [Monitor Adjustments] settings affect only the monitor on the back of the camera. The electronic viewfinder (EVF) is not affected by the changes you make to the [Monitor Adjustments] setting.
Settings Recommendation: The brightness setting is useful when you want to manually control the brightness level of the monitor. The hue and saturation settings are rather subtle. Unless you want to make the camera monitor more closely match the appearance of a profiled computer monitor, the hue and saturation settings may not be useful to most people.
Rec View
The unusually named Rec View sets the amount of time an image is displayed on the camera monitor, or in the viewfinder, after you press the Shutter button.
Here’s how to adjust the Rec View time.
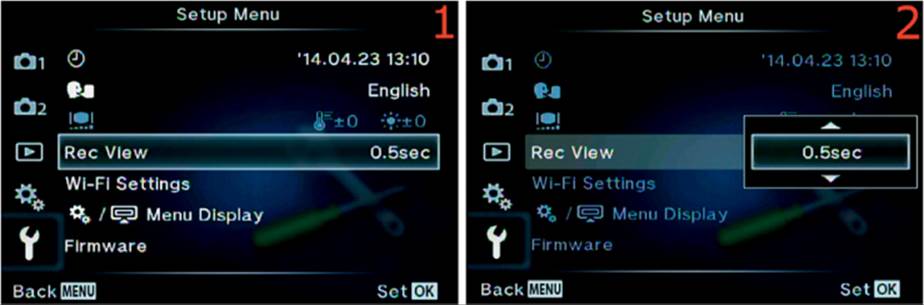
Figure 7.5: Setting a Rec View time for image display on the viewfinder or in the monitor
Use the following steps to choose how long your camera displays a picture after you take it:
1. Choose Rec View from the Setup Menu and scroll to the right (figure 7.5, image 1).
2. Use the up/down menu that appears to select a time from 0.3 to 20 seconds (0.3sec to 20sec), or choose Auto to let the camera decide. Press the OK button to Set the Rec View time. I chose one-half second (0.5sec) (figure 7.5, image 2).
3. After you take your pictures, the camera will display the image either in the viewfinder or on the monitor (mutually exclusive) for the Rec View display time you selected.
Settings Recommendation: If you have previously used a camera with an optical viewfinder (OVF), you may have to adjust your thinking when you use the E-M1 and its electronic viewfinder (EVF). With an OVF, it doesn’t matter how long an image appears on the monitor because the OVF is not used to view images after you take them.
With an EVF it can be surprising to see the picture you just took appear in the viewfinder because it briefly obscures your view of the subject, which seems to freeze in the viewfinder. Having used mostly Nikon cameras before getting my E-M1, I was totally unprepared for the viewfinder to display the image. On my Nikon cameras I had the image display on the camera monitor set to at least one minute so I could show off my cool images after I took them (or at least admire them myself).
When I set Rec View to more than a half second so I could see my picture on the monitor longer, I was shocked when my subject seemed to freeze in the viewfinder while the EVF displayed the new photo during the Rec View time period. It seemed to disconnect me from the subject. I quickly set the Rec View time back to 0.5 second, which seems about right. You will briefly see your picture and then you can take more. But what if you are shooting action shots and don’t want anything to obscure your viewfinder and cause you to lose tracking on your subject?
I eventually discovered that if you never fully release the Shutter button, and instead hold it halfway down while you shoot, the camera does not display the image in the viewfinder. When you release the Shutter button, the camera will display the last image you took until the Rec View time ends. Try it!
It’s a good idea to set the Rec View period to a short value and press the Playback button to see your image on the monitor, or in the viewfinder if the light is too bright to see the monitor.
Wi-Fi Settings
The Wi-Fi Settings function has several parts that allow you to access the images on your memory card and transfer them to your smartphone or tablet; I’ll call them smart devices. Olympus provides a free app called Olympus Image Share (OI.Share) for iOS (iPad, iPhone, iPod Touch) and Android devices.
The camera and app combo allows you transfer pictures to your smart device or to a friend’s device. If you want to allow only certain people to access your memory card, you can mark images with the Share Order system. We’ll talk more about Share Orders momentarily.
First, though, let’s examine how to configure the settings for Wi-Fi and the ways you can connect to your camera with a smart device.
Use the following steps to configure the Wi-Fi system. After you start Wi-Fi, you can touch the Wi-Fi icon on the camera monitor, or select Connection to Smart-phone from the Playback Menu, and the Wi-Fi system will function the way you want it to.
1. Select Wi-Fi Settings from the Setup Menu and scroll to the right (figure 7.6A). There are four menu items on the Wi-Fi Settings menu. The following steps and figures describe each one.
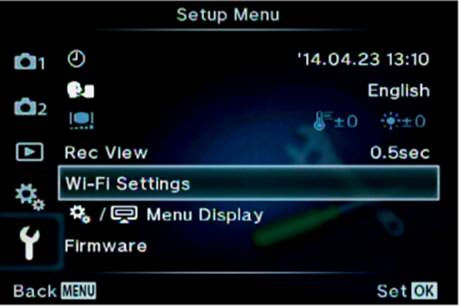
Figure 7.6A: Wi-Fi Settings configuration
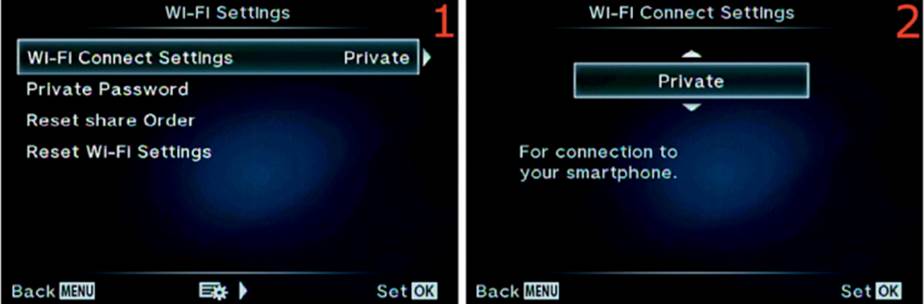
Figure 7.6B: Preparing the Wi-Fi connection type
2. Figure 7.6B continues where figure 7.6A leaves off. The first item on the Wi-Fi Settings menu is Wi-Fi Connect Settings. Choose it from the menu and scroll to the right (figure 7.6B, image 1).
3. You will now see an up/down menu with the following choices (figure 7.6B, image 2):
• Private: You will connect to the camera with your smart device by using the same camera-supplied password each time, as shown on the camera’s active Wi-Fi screen with the QR code. This password will not change unless you manually change it, as described in the next step.
• One-Time: You will connect to the camera with your smart device with a new camera-supplied password each time, as shown on the camera’s active Wi-Fi screen with the QR code.
• Select: This very convenient feature offers you the choice of Private or One-Time connection in a menu that pops up when you start the camera’s Wi-Fi.
• Off: Wi-Fi is disabled when you select Off.
Make your selection from the up/down menu, press the OK button, and your changes will be Set.

Figure 7.6C: Changing the Private Password for Wi-Fi sessions
4. You can change your camera’s current Wi-Fi Private Password. Select Private Password from the Wi-Fi Settings menu and scroll to the right (figure 7.6C, image 1).
5. The Private Password change screen will display the current Password. Press the Movie button on top of the camera (with red dot in the middle), and the camera will generate a new Password and display it (figure 7.6C, image 2, red arrow). Each time you press the Movie button a newPassword will appear.
6. When the Private Password has been changed, press the OK button to confirm the change.
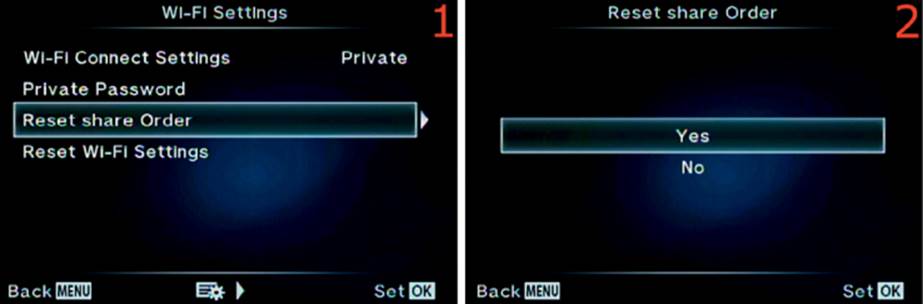
Figure 7.6D: Resetting a Share Order
7. The camera allows you to create a Share Order that lets you mark individual images as shareable. When you allow someone to connect to your camera with their smart device (they need to install the OI.Share app), you can prevent them from seeing anything except the marked images. For example, you could take images at a party, mark the ones you want to share, and have a friend connect to your camera and download the marked images. (See the chapter called Screen Displays for Camera Control, on page 86, under the subheading Share Order, for instructions to create a Share Order.) If you have marked images in a Share Order and no longer want people to access them, you can reset the Share Order by selecting Reset share Order from the Wi-Fi Settings menu and scrolling to the right (figure 7.6D, image 1).
8. You will now see a menu with Yes and No choices (figure 7.6D, image 2). Select Yes to reset the Share Order or No to cancel and leave the Share Order intact. Press the OK button to execute your choice.
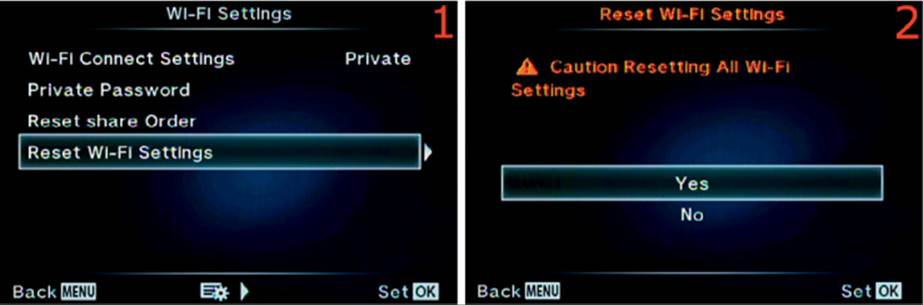
Figure 7.6E: Resetting the Wi-Fi system to factory defaults
9. To reset the Wi-Fi system to the factory defaults, select Reset Wi-Fi Settings and scroll to the right (figure 7.6E, image 1).
10. You will see a menu with Yes and No choices (figure 7.6E, image 2). You will also see a warning that says Caution Resetting All Wi-Fi Settings. Select Yes to reset the Wi-Fi system to the factory default, or select No to cancel and leave the current settings intact. Press the OK button to execute your choice.
Settings Recommendation: These Wi-Fi settings give you some flexibility in how your Wi-Fi system works. I leave my camera’s Wi-Fi Connect Settings set to Select so my camera will offer me a Private Wi-Fi session or a One-Time Wi-Fi session if I want to give images to someone. All they need is a smart device and the free Olympus Image Share app, and I can create a Share Order to wirelessly give them selected images from my camera. It’s the neatest thing I’ve seen since zoom lenses were invented.
Can You Connect Your Computer to Your E-M1?
You can start Wi-Fi on your camera and connect to your computer with its Wi-Fi connection tool. The connection name and password are provided on the E-M1’s active Wi-Fi screen (the one with the QR code). However, as of January 2015 Olympus has not provided software to support that connection for PC or Mac.
Being the curious type, I connected my iPad to my E-M1 and ran a network tool called Fing (free in the iOS and Android app stores) to find out that the IP address of my camera was 192.168.0.10. I connected my computer to the camera’s Wi-Fi access point and provided the password from the camera. The computer connected to the camera with no problems.
Nothing happened since there was only an active Wi-Fi connection and no Olympus-supported software to use the connection. I looked under the network section of File Explorer and found that nothing was listed. I was able to ping the camera’s IP address and received a reply, so a real connection existed.
I then tested three web browsers (Internet Explorer, Firefox, and Chrome) by typing 192.168.0.10 in the address bar, and I was able to connect to oishare/DCIM. Unfortunately, the browser did not display anything. I even tried connecting to http://192.168.0.10 using various URLs, such as http://192.168.0.10/oishare and http://192.168.0.10/oishare/DCIM, with no results. I marked some images for sharing via Wi-Fi with the camera’s Share Order system, but no images were displayed. For curiosity’s sake, I tried the same with https://and ftp://headers, but other than the initial browser connection to oishare/DCIM, nothing else was available.
Since browsers weren’t doing the job, I tried mapping a drive to \\192.168.0.10\oishare\DCIM (and various other UNC path combinations), but still no joy!
Note: While I was talking about this subject on the Facebook page for this book, one member reported that when he did the same things he was able to access his photos in his web browser. He was using Windows 8.1, and I am using Windows 7. Maybe I should upgrade. You can also access your images with an iOS or Android smart device by direct connection, as previously described.
The potential for Wi-Fi local area network (LAN) connectivity is there, but Olympus has not fully implemented it yet. They really should provide connectivity software for wireless computers. The Wi-Fi system in the camera works so well from a smart device, so it would be a shame not to control the camera from a studio computer too. This is a professional camera, after all.
By the way, I also found that the camera allows only one Wi-Fi connection at a time, so you cannot connect multiple devices to the camera simultaneously.
Note: In October 2014, the Olympus firmware update version 2.0 provided extra functionality for those who need to use the camera in a studio environment. Though it is not a Wi-Fi solution, Olympus released their Olympus Capture software, which allows you to use a USB cable to tether your E-M1 to your computer.
Running the Olympus Capture software on the computer lets you control the camera remotely with a live view of your subject on your computer screen. You have full control of the camera through the Olympus Capture software on your computer. Visit the following website for more information on Olympus Capture software:
http://www.getolympus.com/us/en/olympuscapture
Menu Display
The camera has two menus that are normally hidden. One of them should not be, for people who want to use their camera as more than a point-and-shoot. The two hidden menus are the Custom Menu, which contains nearly 100 configurable camera settings, and the Accessory Port Menu, which is a special menu for people who have Olympus PEN cameras and have used its Accessory Port with an Olympus Bluetooth Peanut storage and transmitter device.
Along with its excellent free app, Olympus Image Share, the E-M1 has full Wi-Fi capability. I can import images to smart devices and maybe even to a computer when Olympus provides PC and Mac software, as they have for iOS and Android.
In talking with senior technical support at Olympus, I found out that the Peanut device has relatively obsolete technology. In fact, due to rapid changes in wireless technology after its development, the Peanut device works with only a few older smartphones and no iOS devices. There is a list of Peanut-compatible smartphones at this website:
http://www.olympusamerica.com/files/oima_cckb/PENPAL_Smartphone_Compatibility_EN.pdf
Since the E-M1 has full Wi-Fi capability, including the potential for working with a wireless LAN, very few people will need to use the Accessory Port Menu. It supports only the Olympus Peanut’s Bluetooth PenPal system to send pictures to a few devices.
Instead of using a Peanut device, simply fire up the camera’s built-in Wi-Fi system and have people retrieve images over a Wi-Fi connection, which is faster, easier to use, and more stable than Bluetooth image transfers.
I decided not to include instructions for a device that is mostly obsolete. If you have a Peanut device and want to experiment with it on your E-M1, enable the Accessory Port Menu and refer to the user’s manual for your Peanut device. If you want to use Wi-Fi for image transfers, you can safely ignore the Accessory Port Menu and enable only the Custom Menu.
Now, let’s examine how to enable the extremely important Custom Menu and the Accessory Port Menu.
Use the following steps to enable the Custom Menu and Accessory Port Menu:
1. Choose the Menu Display setting from the Setup Menu and scroll to the right (figure 7.7A).

Figure 7.7A: Enabling the Custom Menu and the Accessory Port Menu
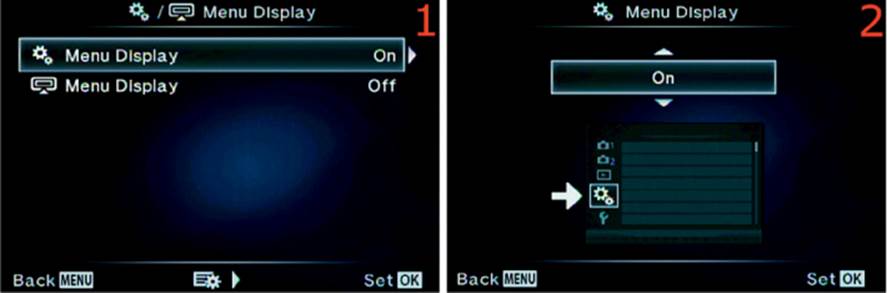
Figure 7.7B: Enabling the Custom Menu
2. Figure 7.7B takes up where figure 7.7A leaves off. The first option is the [Custom] Menu Display (figure 7.7B, image 1). Select the [Custom] option, which has small gears followed by Menu Display, and scroll to the right.
3. You will see an up/down menu that has two choices: On and Off. The gear icon for the Custom Menu (figure 7.7B, image 2, white arrow) will appear only if you select On. Press the OK button to enable the Custom Menu. If you select Off and press the OK button the Custom Menu will be disabled.
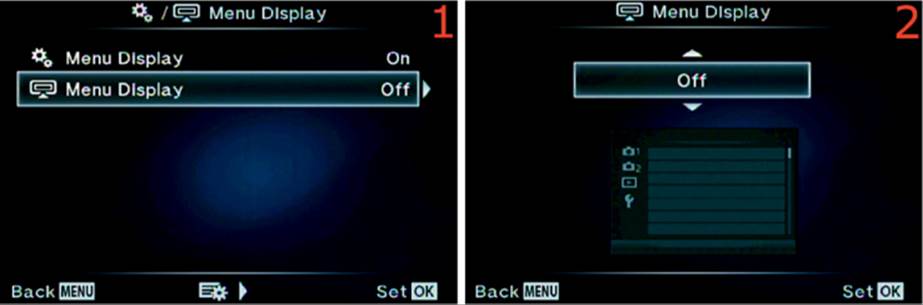
Figure 7.7C: Enabling the Accessory Port Menu
4. If you have an Olympus Peanut and want to use it with your E-M1, you can enable the Accessory Port Menu. Choose the second Menu Display option (figure 7.7C, image 1). The symbol for this option looks like a computer monitor. Scroll to the right.
5. Choose On or Off from the up/down menu (figure 7.7C, image 2)
6. After you make your selections, press the OK button to lock them in. Now you can see the menus you enabled when you press the Menu button.
Settings Recommendation: Most people can ignore the Accessory Port Menu selection and leave it Off (factory default). Most enthusiasts will use the Custom Menu often, so you should enable it and leave it active.
Firmware
The Firmware setting displays the current camera and lens firmware versions. You cannot do anything with this setting except see the version number and decide if you need to update the firmware in your camera or lens.
At the time of this writing, firmware version 1.3 had just been released and is installed on the camera. The lens on the camera I used for this book is an M.Zuiko PRO 12–40mm f/2.8 ED. Its current firmware version is 1.0.
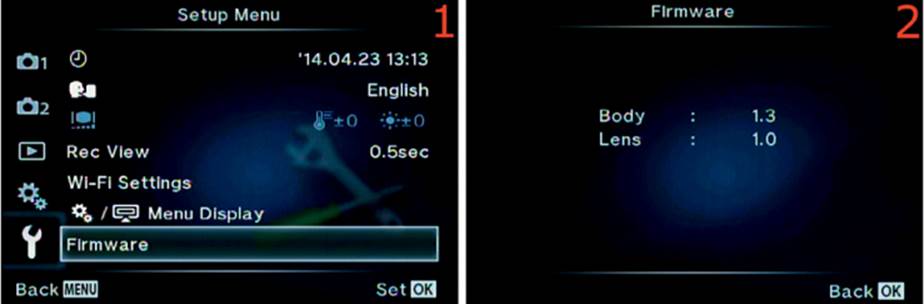
Figure 7.8: Viewing the firmware version
Use these steps to view the firmware version of your camera and mounted lens:
1. Select Firmware from the Setup Menu and scroll to the right (figure 7.8, image 1).
2. You will see two Firmware fields if you have a lens mounted on your camera. If no lens is mounted, you’ll see only one field. Body is the current firmware version for the camera body (version 1.3 in my E-M1). Lens is the current firmware for the lens mounted on my camera (version 1.0) (figure 7.8, image 2).
Settings Recommendation: You can update the firmware in your camera and lenses by using the Olympus Digital Camera Updater software, which you can download from the following website:
http://www.olympusamerica.com/cpg_section/cpg_downloads_updater.asp
Download the software to your computer and use the included USB cable to keep your camera and lens firmware up to date.
Author’s Conclusions
We’ve come a long way together, from taking a fresh camera out of the box with its myriad configuration abilities, to having a fully configured Olympus OM-D E-M1 ready to take on nearly any photographic task.
Thank you for sticking with me until the end of this technical book. I hope it has been useful to you and has helped you master your incredibly powerful and complex E-M1, one of the best mirrorless cameras on the market today.
Please write a short review of this book at the website of the retailer where you purchased it. Your good review can really help the book succeed.
I hope to stay in touch with you to answer questions and give you a place to report any major typos or logic errors you might find in this book. I created a special, non-public Facebook group called Master Your Olympus (MYO), at the following web address:
https://www.facebook.com/groups/MasterYourOlympus/
Please request membership at the Facebook site so we can discuss Olympus cameras, lenses, and photography as a community of enthusiasts who help one another.
Again, thank you for buying my book (and reviewing it, if you will). Until we meet again,
Keep on capturing time ...
All materials on the site are licensed Creative Commons Attribution-Sharealike 3.0 Unported CC BY-SA 3.0 & GNU Free Documentation License (GFDL)
If you are the copyright holder of any material contained on our site and intend to remove it, please contact our site administrator for approval.
© 2016-2026 All site design rights belong to S.Y.A.