OUYA Game Development by Example Beginner's Guide (2014)
Chapter 9. Blazing Your Own Development Trail
Now that you've learned all the fundamental basics of making games for OUYA, it's time to turn your gaze outward and create a plan that will help you keep learning beyond the content featured in this book. The previous chapter covered the last remaining basics for game development, including polishing mechanics and structure and submitting finished projects to the OUYA marketplace. This chapter will give you a springboard of resources that will teach you how to teach yourself as well as focus on some development methodologies and tricks of the trade used by both indie and professional developers alike.
This chapter will cover the following topics:
· Expanding your skills with advanced challenges
· Popular game development methodologies
· Basic design patterns for large code projects
· Getting started with version control
· Finding your own answers to questions online
The advanced challenges in the first section of this chapter will offer a starting point and hints on achieving their goals, but there will only be a few strict tutorials; instead, the challenges will serve as puzzles that can be figured out by applying everything you've learned in the previous chapters.
Expanding your skills with advanced challenges
While this book has covered every essential element of an OUYA game, it would be impossible to document all of the complexities and variations there are in each facet of game development. Between graphical effects, camera control, mechanical tweaking, and GUI polishing, there's always a way to make each distinct element of your game better. In this section are several challenges (and a few tutorials) that will challenge your development skills and inspire you to go beyond what you already know.
Working with shaders in depth
We've already done some basic work with shaders in Chapter 6, Saving Data to Create Longer Games, which are great tools that allow us to customize the finer aspects of a graphical object, such as how light hits it. However, we only touched upon the Diffuse andSpecular shaders, whereas there are many more complex shaders that can give your game an entirely different feel.
Try exploring the different categories of shaders that are already included in every Unity project. You'll find that there are various standard Diffuse and Specular shaders for each category, but they all offer different primary functionality.
The following table outlines the default Unity shader categories:
|
Shader category |
Description |
|
FX |
FX shaders focus on special effects such as lens flares, which is what the included Flare shader does. |
|
GUI |
GUI shaders manage on-screen elements that aren't part of your game world. The included Text Shader is necessary for all materials that you apply to in-game fonts. |
|
Mobile |
The shaders in the Mobile category are designed to run efficiently on weaker mobile technology and work around all of the technological differences between desktop and mobile development. |
|
Nature |
Nature shaders are meant to be applied to the outdoor components of your scene, including grass, trees, and terrain. You're likely to have many repeating nature assets in an outdoor game world, so Nature shaders are important for both appearance and efficiency. |
|
Particles |
Particle shaders can create several different effects when particles overlap, such as making them brighter or multiplying their color values. |
|
Reflective |
Reflective shaders sample the world around them and accurately reflect other objects in the world like a mirror. Reflective shaders are only available in the Pro version of the Unity engine. |
|
RenderFX |
RenderFX shaders are used to create effects that change how an object is rendered, such as turning a cube into a skybox. |
|
Self-Illumin |
Self-Illumin shaders are just what they sound like: objects that don't require a light present in the scene to be seen easily. |
|
Sprites |
Sprites shaders are used to display the game elements in 2D games that aren't affected by 3D lighting. |
|
Transparent |
Transparent shaders allow the user to see through an object to whatever is behind it. Opacity levels can be adjusted with a slider in the Inspector window. |
|
Unlit |
Unlit shaders don't respond to 3D lighting and have their own uniform shading. |
Time for action – creating a custom font with a text shader
You've already displayed text in your prototypes, but up until this point, we've been using the standard Arial font. However, you can display text in any Unity-compatible font using a Text Shader; the steps are as follows:
1. Create a new material and select Text Shader from the GUI list in the Shader drop-down menu.
A custom material with a Text Shader material attached to it has an area where you can input a texture in the Inspector window, as shown in the following screenshot:
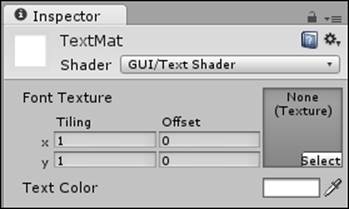
2. Add this texture to your asset list by importing a font file into your project and using the resulting font texture.
3. Next, link the Text Shader material to a GUI Text object and make sure that it is displayed properly on the screen.
If you've configured the material and shader properly, you should be able to change the color of the displayed text in real time by changing the Text Color property of the material you created.
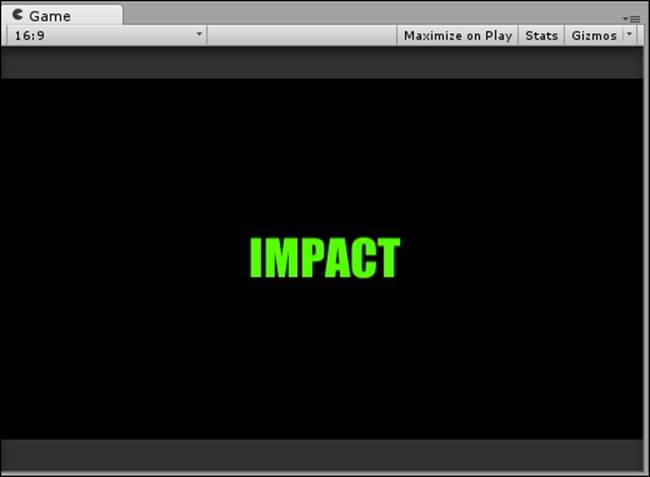
The following example shows a GUI Text object with a Text Shader material on it that features Microsoft's IMPACT font:
What just happened?
Text shaders let you customize the appearance of your on-screen text, just like how graphical shaders let you customize your mesh objects. Text shaders require a texture that can be acquired through importing any Unity-compatible font into your project.
You just followed this process to create your first custom font. Now that you know how to do it, you can choose fonts that mirror the tone of your game instead of using potentially dull default fonts.
Time for action – creating a fire effect with a particle shader
Basic Particle System objects in Unity don't look very distinct; by default, they emit white particles in an inverted cone shape that slowly travel upwards, as shown in the following screenshot:

Before you knew about shaders, it was impossible to change the color or graphical effects on any Particle System object. However, you now know how to create materials with custom shaders that can be applied to any game object, including Particle System objects:
1. Create a Particle shader with an Additive effect so that the particles look brighter when they overlap.
2. Use this in combination with the Particle System properties in the Inspector window to create a semi-realistic fire effect, as demonstrated in the following screenshot:
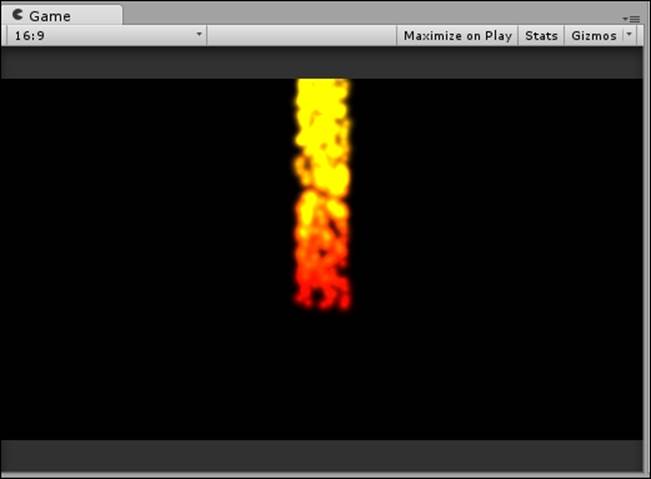
The torch effect in the preceding example makes use of the Emission, Shape, and Color over Lifetime properties of the Particle System objects. The more you enable, the more you can customize your effect to look just right.
What just happened?
You've had your first taste of the expansive Shuriken particle system that's integrated into Unity. Every optional component in a particle system's Inspector window features a simple user interface to customize different properties of your particles, so you can use Shuriken to create any kind of particle-based effect you want.
Particle shaders also offer different blending types, such as Multiply and Additive, which change the way they appear when they overlap. Blending types can be used in tandem with the custom particle settings to create any particle-based effect you can imagine.
Try experimenting with the different shaders available to you in the shader list. Note that advanced shader effects such as reflection and render textures can only be used with the Pro version of Unity, but there's still an immense library in the free version to get started with. For more tips and tutorials on customizing your graphics with shaders, a good place to start is Unity's ShaderLab documentation, which can be found at http://docs.unity3d.com/Documentation/Components/SL-Reference.html.
Advanced data saving
In Chapter 6, Saving Data to Create Longer Games, you learned how to store data and retrieve it by making the number of coins collected consistent between play sessions using Unity's PlayerPrefs functions. However, saving single numbers is just the tip of the iceberg when it comes to data management in larger projects.
Time for action – saving the player's position
In a game with massive levels, the player may need to quit in the middle of a session. They could get frustrated if their position resets to the initial start zone instead of picking up where they left off; nobody wants to play the same part of the game twice just because they had to stop the first time:
1. Implement a system that saves the player's current location whenever they exit the game and respawns them at their saved location whenever the game is started again.
You can achieve this in the same way that you saved the number of coins, but keep in mind that the position data is stored as Vector3 and PlayerPrefs doesn't have a SetVector3 function.
There isn't a single right way to go about saving data that's not natively supported by PlayerPrefs. Instead, it's all about how you want to implement the system and manipulate the data in a way that makes sense.
2. Try saving each individual axis value as a floating-point number or an integer (using SetFloat or SetInt, respectively), and then set the x, y, and z coordinates of the player one by one at the start of the game.
For minimum data usage, you could convert the entire Vector3 value into a single string value and then parse it on load using the string Split and Trim functions along with the C# Convert class.
Tip
Saving the position data is a good way to store progress in higher levels, but what about games that have several levels? It's simpler than you think. This is because the Application.LoadLevel function can take a string as a parameter to load a level; you can simply save the name of the current scene as a string and use it to load whichever level the player left on.
What just happened?
Being a skilled programmer sometimes comes down to knowing how to manipulate data to make it do what you want, even if it isn't explicitly designed for that purpose. In the previous section, you explored methods to manipulate simple datatypes to represent meaningful data and learned how to parse multiple values from one stored string.
To challenge yourself, try playing a game that features saving/loading functionality and try to figure out how you would save each property of that game. Think of the minimal amount of information needed to store your process and how that would be stored in numbers and letters.
Making a more polished GUI
The GUI is one of the most important elements of any game because it's always on the screen; user interfaces are much like windows through which we see the game world, so it's important to have a clean, unobtrusive window that tells our player what they need to know.
Time for action – creating a reusable GUI Skin
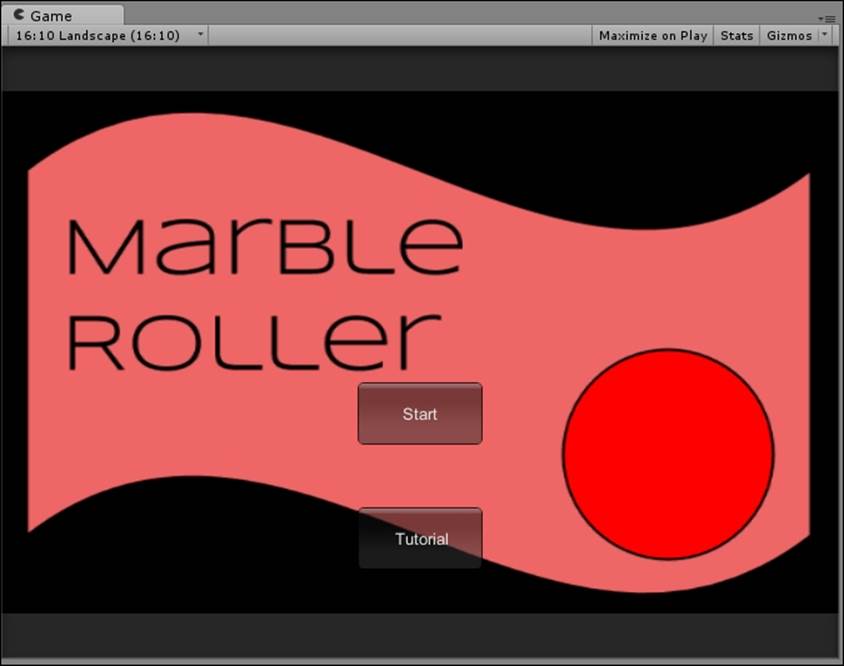
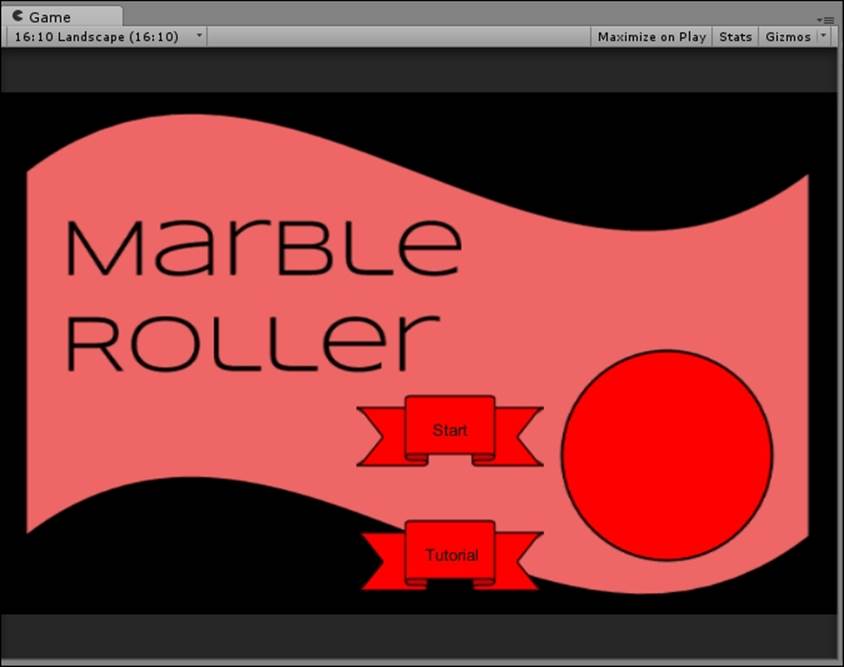
You used a standard GUI button earlier when you created a title screen with a Start and Tutorial button in Chapter 8, Polishing and Prepping Your Game for Deployment. However, you didn't change the default appearance of the buttons, so they appeared as standard transparent gray boxes, as shown in the following screenshot:
These boxes are clean and functional, but if we want them to match the unique theme of our game, we'll have to apply a GUI Skin. Just like every other reusable asset, a GUI Skin can be created and stored in your Project window and edited in the Inspectorwindow; the steps to do so are as follows:
1. Create a new GUI Skin and edit the various fonts and textures in the GUI Skin Inspector window until you've achieved a personalized look for your buttons.
2. When you want to apply a GUI Skin to your current buttons, create a variable of type GUISkin named marbleGameSkin in the script that manages your GUI and add the following lines to your OnGUI function:
3. void OnGUI()
4. {
5. GUI.skin = marbleGameSkin;
6. //GUI drawing code goes here
}
7. Customize and test the skin until everything looks as it should.
When you're finished, your GUI theme should feel flush with the rest of the game, just like the following screenshot:
What just happened?
You've just made Unity's GUI system your own by customizing your buttons to use your own texture. A GUI that matches the tone and aesthetic of your game will always help to satisfy and immerse your player, and you can reuse your custom elements by creating GUI Skin objects like the one you just made.
Time for action – making an automatically scaling GUI texture
The logo of our marble game may fill the screen in the Game window, but it may not be big enough to cover the entire view area when it's running on fullscreen on OUYA. Fortunately, there's an easy trick you can apply to make your fullscreen textures automatically scale to the size of your screen, and it doesn't even require any code:
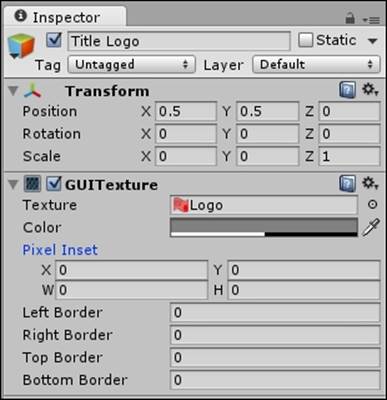
1. In order to have an autoscaling texture, you need to remove all the Pixel Inset values from the Inspector window of the logo's GUITexture. Set the X, Y, W, and H values of Pixel Inset to 0.
2. Your logo should now have no nonzero values besides the centered X and Y position values (at 0.5 each) and the Z scale (at 1). This is shown in the following screenshot:
3. With these settings, your logo will disappear from your Game window, but we can make it show up again by editing the X and Y scale values.
4. Change the X and Y scale values to 1.
Your logo should now perfectly fill the Game window, no matter how you size it. The edges of the logo should be touching all four borders of the window, just like the following screenshot:

What just happened?
Even though it's slightly counterintuitive, setting all of your logo's Pixel Inset values to 0 is the fastest way to center and scale any texture on screen. Keep in mind, however, that there are some downfalls to this method; if you edit the Border properties, the logo will tile itself to fill the screen. For instances when you need a border, try setting the width and height of your logo to Screen.width and Screen.height in a script, respectively.
Lighting your scenes perfectly
A simple scene doesn't take more than a few seconds to light, but if you want to set a mood in your game and create an added sense of realism using lighting, Unity features a few tools that can make your objects catch the light just right and cast high-definition shadows behind them.
Time for action – adding realism to your scene with lightmapping
Lightmapping in Unity is a quick and powerful process that can add detailed shadows and object lighting to make your game world appear even more real. To demonstrate this, we'll create a basic scene with primitive objects and preview it before and after lightmapping:
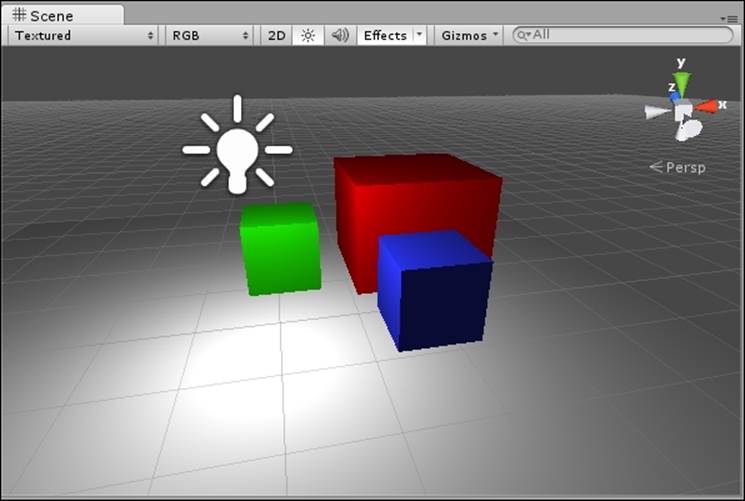
1. Create a new scene in Unity named lightmappingDemo.
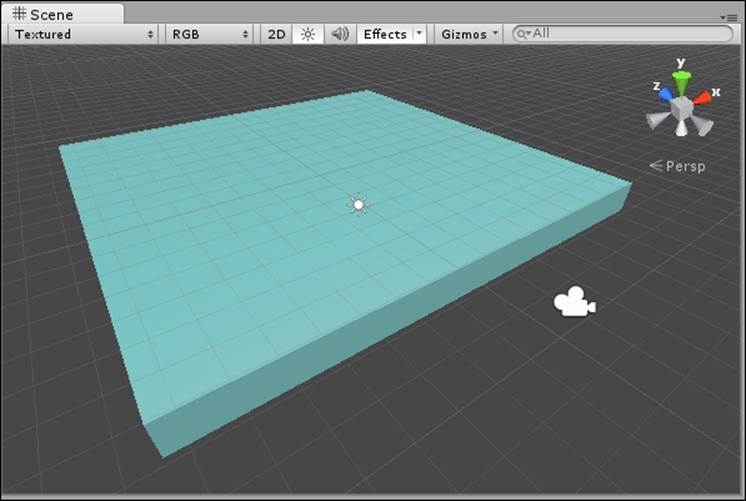
2. Create a plane positioned at 0, 0, 0 for our objects to sit on.
3. Create three cubes and position them next to each other on the plane.
4. Give each cube a different material color or size.
5. Create a point light and position it so that it lights the three cubes and the plane.
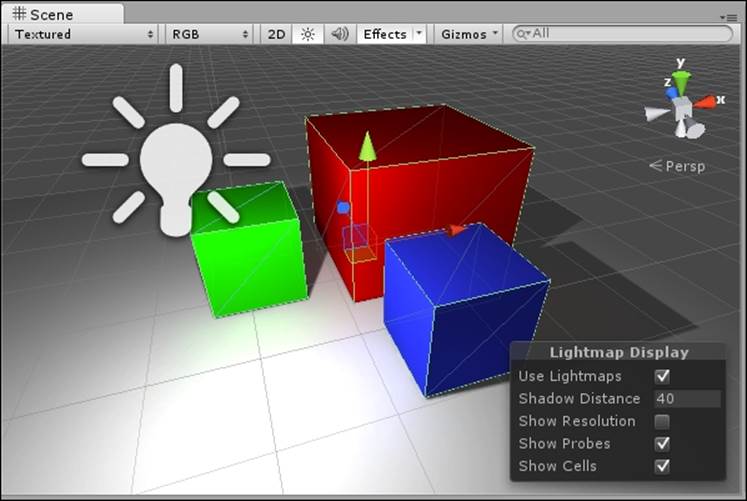
Your fully assembled scene should look something like the following screenshot:
As you can see, none of the cubes have cast shadows yet. Directional lights can project shadows across any kind of object automatically, but point lights require lightmapping to cast shadows.
6. Open the Window menu on the topmost toolbar of the Unity editor and select Lightmapping.
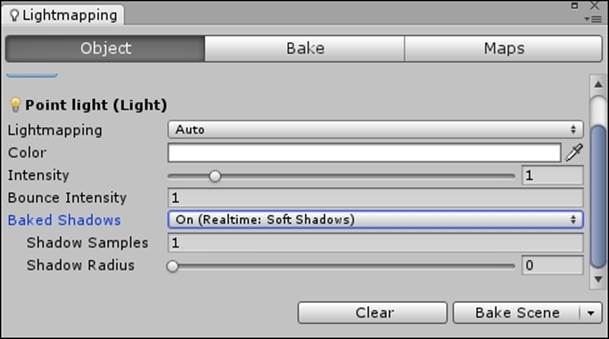
7. Click on your point light in the Hierarchy window to display its Lightmapping properties in the Lightmapping window.
8. Change the Baked Shadows property to On (Realtime: Soft Shadows).
The other properties of the light can remain at their default values for this example. Your point light settings should look like the following screenshot:
9. Keeping the Ctrl key pressed on Windows or command key pressed on Mac, click to select all three cubes in your scene's Hierarchy window while keeping your point light selected.
10. Once all of your objects are selected, mark the box next to Lightmap Static to include all of them in the lightmapping operation.
11. Click on the Bake Scene button and wait for the operation to complete.
Note
Baking is the process of analyzing a scene or object with a high level of detail and then saving the data so that it can be used without performing expensive detailed calculations in real time. Lightmaps aren't the only thing that can be baked; 3D artists can create the illusion of extreme detail by calculating lighting information onto their models and baking that lighting information onto a less detailed version of the model.
12. When the scene is lightmapped, change the Lightmapping setting to BakedOnly to see the effect of your bake.
Your baked scene will look like the following screenshot:
As you can see, each cube now casts its own shadow, and there is some slight coloration on the plane from the light that bounces off the cube. These effects can be modified using the light settings in the Lightmapping window, so play around with them until you find one that suits the mood of your scene.
What just happened?
You just added a lightmap to a scene by "baking" lighting detail onto all of your static objects. Adding a lightmap lets your point lights cast shadows, and it also enables you to create several advanced lighting effects, such as light pouring in through a window or bouncing off colored objects.
Have a go hero – experiment with Light Probes in Unity Pro
While lightmapping static objects is possible in any version of Unity, the Pro version enables you to simulate the effect of lightmapping on nonstatic objects, such as your character. This simulation is done using Light Probes.
If you have Unity Pro or have activated a free trial for it, open it up and try your hand at creating a scene filled with Light Probes. If you're looking for a starting point, explore the Unity documentation page on Light Probes athttp://docs.unity3d.com/Documentation/Manual/LightProbes.html.
Making your world feel real with Physics Materials
Physics Materials are like materials for your object's collider. Instead of affecting the appearance of the object, they affect the way things physically collide with it. For instance, a ball rolling on ice isn't going to behave in the same way as a ball rolling on rubber.
In this section, we'll demonstrate how to apply a Physics Material to an object and then provide a couple of challenges where you can attempt to make a physical/elemental prototype.
Time for action – applying an ice Physics Material
In this tutorial, we'll quickly set up a scene with a tilted platform that we'll attach an ice Physics Material to and see how it affects an object on top of it:
1. Create a new scene in Unity named physicsMaterialDemo.
2. Create a cube, position it at 0, 0, 0, and set its X and Z scale values to 5.
3. Add a directional light to your scene with the default orientation.
4. Create and apply a transparent blue specular material to give it an "icy" look.
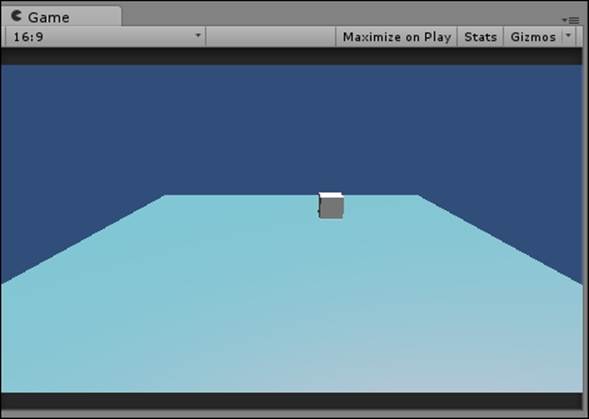
Your initial scene setup should look something like the following screenshot:
5. Change the X rotation of the platform to -20 so that it's tilted towards the camera.
6. Create a primitive cube and place it at the upper-most corner of the tilted platform.
7. Press Play to test the scene and watch the cube fall into place on the platform.
Note that the cube doesn't slide because we haven't applied a Physics Material yet; it simply stays put.
Next, we'll set up the ice material so that we can see how it affects the cube.
8. Open the Assets menu from the top toolbar of the Unity editor and select Physics Materials under the Import Package list.
9. Click on Import to add the Physics Materials files to a Standard Assets folder in your Project window.
10. Click on the cube you're using as a platform in the Hierarchy window to display it in the Inspector window.
11. Click-and-drag the Ice material from the Physics Materials folder inside Standard Assets and drop it in the Material field of your platform's Box Collider component.
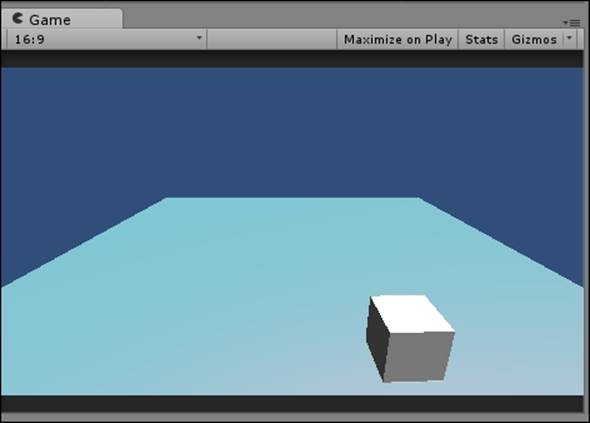
12. Press Play again to see the cube fall on the platform with an attached Physics Material.
In the following screenshot, observe how the lessened friction on the platform causes the cube to slide downwards towards the camera:
Tip
You don't always have to use the Physics Materials offered in the Standard Assets folder; you can also create your own by opening the Assets menu from the top toolbar of the Unity editor and selecting Physics Materials from the Create menu.
What just happened?
You've just taken your first step into giving the objects in your game world realistic physical properties. Adding Physics Materials is a great way to add some diversity to your game and can even help make core mechanics more fun with unexpected properties (sliding on ice, bouncing on a bouncy surface).
Have a go hero – playing with other Physics Materials
The best way to learn how to effectively use Physics Materials is to play with the ones included in Unity. Add each of the Physics Materials from the Standard Assets folder to your tilted platform and see how they affect your cube.
The following table provides a brief description of each of the five standard Physics Materials:
|
Physics Material |
Description |
|
Bouncy |
This material makes objects that hit it bounce back with a force relative to their impact. |
|
Ice |
This material drastically reduces friction on objects, causing them to lose grip and slide. |
|
Metal |
Metal is slick, but not as much as ice, and objects don't pick up speed on them quite as fast. |
|
Rubber |
Rubber surfaces provide the ultimate grip, reducing momentum and keeping the friction at a maximum. |
|
Wood |
The wood material's friction values are almost exactly halfway between ice and rubber, providing a happy middle ground for typical objects. |
Once you've played with all of the Physics Materials, try making your own and combining multiple materials to make an elemental obstacle course.
Have a go hero – making Physics Materials react realistically
Wouldn't it be cool if your ice didn't just cause objects to slide but actually melted and disappeared when exposed to fire? This type of functionality isn't built into Physics Materials, but you certainly know enough at this point to script some cool extra effects. Here are a few ideas to implement in your Physics Material demo:
· An ice object that destroys itself when it collides with a fire particle
· A fire particle system that gets bigger the more wood it touches
· A "boing" sound effect that plays whenever something hits a bouncy object
Make sure to experiment with colliders on the Particle System objects to implement any effects that involve fire or other particle-based objects.
Popular game development methodologies
Planning and organizing your project can be as much of an art as actually developing it. In this section, you'll learn a few different methodologies that you can follow to ensure that your game follows a logical development pattern suited for you or your team.
The Waterfall model
One of the most popular and oldest development patterns is the Waterfall model, dating back to 1970. The Waterfall model takes its name from its cascading stages of development, with each stage flowing into the next until the final stage is reached. These stages are outlined in a basic Waterfall model as follows:
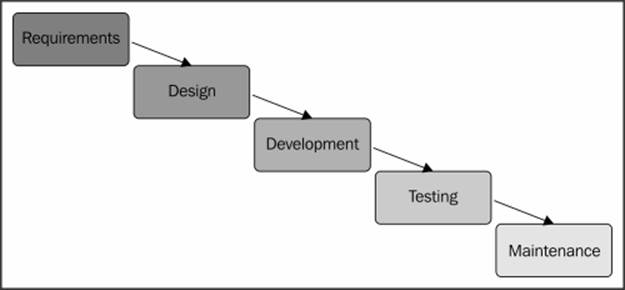
The Waterfall model has been lauded and criticized alike for its idealistic nature. Some developers argue that it's irresponsible to begin the next stage of a project before finishing the current one because a lot of early planning can be more advantageous than on-the-fly development. Others believe that every stage of a project is interconnected, and that they should all be developed simultaneously on an iterative basis so that they evolve together and form a cohesive whole.
The latter principle regarding iterative development is exactly what contributed to the inception of the next group of methodologies we'll cover: Agile development.
The Agile methodology
Agile is less of a singular methodology and more of a category of methodologies. Agile relies on short incremental cycles instead of a sequential path of development like Waterfall, and in order for Agile to work, the team must communicate efficiently and be open-minded to change. Agile is probably the most common methodology used by modern software developers and is considered to be a great standard for most projects.
Agile was defined in 2001 with a document called the Agile Manifesto, which outlined the principles behind the techniques and the necessity of a new system. The Agile Manifesto follows the following twelve principles:
· Valuable software should be delivered continuously
· Welcome changing requirements regardless of developmental stage
· Deliver working software in a minimal time frame
· Communication between business people and developers is a must
· Reliable team members are motivated and supported
· The best way to share information is face to face
· Working software is the primary measure of progress
· Teams should maintain an intended pace across development cycles
· Good long-term design makes short-term goals easier to achieve
· Simplicity is essential
· Self-organizing teams create better products
· Reflection leads to improvement
Tip
The preceding points are summaries of the twelve guiding principles of the Agile Manifesto. For the full text of the principles as well as the rest of the manifesto, check the page at http://www.agilemanifesto.org.
Most Agile methodologies involve a set time frame for iterations. For instance, a team could set their iteration length to a week or a month, work on a certain element of the project for that length of time, and then revisit it to reflect on what went well and what didn't.
Scrum, arguably the most popular development methodology, strongly promotes Agile development practices. Scrum also adds more definition to the development cycle, thereby creating a more rigid progression for teams so that they function as efficiently as possible. We'll look at the inner workings of a Scrum team next.
The Scrum methodology
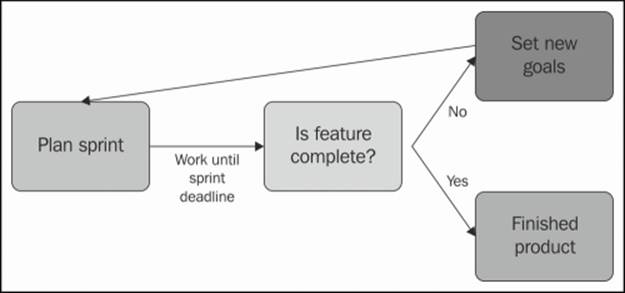
Scrum is an Agile development methodology that revolves around the idea of sprints or set increments of time during which the team will iterate on ideas and produce an updated version of their project. Scrum also relies heavily on team roles, which will be reviewed later.
Sprints in Scrum typically last around one to two weeks and require the product to be testable at the end of each sprint so that the next sprint can be planned. Based on the analysis performed after each sprint, a feature is either deemed complete and removed from the project backlog or added into the next sprint to be continued.
Note
A backlog is a list of potential features or capabilities that developers can integrate into their game. Backlog entries sometimes come in the form of user stories which present a feature or mechanic from the perspective of the player. For example, a user's story for a new control mechanism may sound something like, "As a user, I want to be able to rotate the camera with the right joystick so that I can easily see my surroundings."
The basic flow of a feature during Scrum development looks like this:
There are three defined roles in the Scrum model: the Product Owner, the Scrum Master, and the Development Team. In this section, we'll dissect each individual role to get a sense of where the responsibilities lie on any given Scrum project:
· The Product Owner: The Product Owner represents what your team is striving to create. They are responsible for prioritizing tasks and features, making sure the project stays in scope, and constantly ensuring the value of your final product. The Product Owner can be anyone on your team who has a confident vision of the project and its timeline, but Scrum practices suggest that the Product Owner is not the same as the Scrum Master; we'll look at the alternative duties of the Scrum Master next.
· The Scrum Master: The Scrum Master's sole purpose is to uphold the strict development pattern, that is, Scrum. This means organizing and/or conducting sprint meetings and making sure each week's goals are met. The Scrum Master also serves as a conduit between the project leads (including the Product Owner) and the Development Team, which we'll elaborate on next.
· The Development Team: The Development Team is the group of people responsible for actually creating the game or product. Each Development Team must integrate each sprint goal into a test-friendly environment at the end of a sprint so that the entire project team can make an iterative analysis and decide whether that element is complete or needs another sprint of iteration.
Basic design patterns for larger code projects
Even though our prototypes contain just a handful of scripts, your games will realistically contain many different scripts that will need to interact with each other. Unity's tag system is a great way to create cross-object communication quickly, but for a more reliable and organized approach, there are several design patterns that you can follow to keep your game functional and dynamic. In this section, we'll briefly touch upon the driving philosophies and functions behind three main design patterns and offer implementation ideas to try each of them out in your game.
The Singleton pattern
The Singleton pattern relies on an object with exactly one instance that can usually be accessed from anywhere. The Singleton implementation is equally easy, powerful, and dangerous, and is usually executed with a self-creating accessor function like the following one:
public static Singleton getInstance()
{
if(instance == null)
{
instance = CreateInstance();
}
return instance;
}
The preceding function returns an instance of a singleton that can be accessed without a reference to any object because of the static parameter (which is also what guarantees only one instance of the public static variable named instance).
You've already had some experience with certain singleton properties, even if you didn't realize it; Unity's tag system essentially makes any object potentially accessible from anywhere using the GameObject.FindGameObjectsWithTag function.
So, what's the problem with being able to conveniently access a script's properties from any other script? One or two singletons can improve the efficiency and readability of your code if every system needs to retrieve common data (such as player statistics), but excessive use of singletons can offer a confusing amount of available options during any given situation.
Using singletons to a large extent can also detract from the perceptible architecture of the game, which makes collaborating on your code base with other developers much slower. In summation, singletons are good to use with universal systems, but only use them when you need them; their ease of implementation can lead you into a code design pitfall that's very difficult to escape.
The Factory pattern
The main goal of the Factory pattern is to create several instances of complex objects while keeping the complicated instantiation code hidden from the programmer and avoiding senseless repetition. This can make your code easier to read and can also improve the usability of your code base to new programmers on your project.
Implementation complexity varies because of the myriad of different applications of the Factory pattern. However, a very basic example of a Factory implementation is shown in the following code snippet:
GameObject CreateComplexObject()
{
GameObject newObject = Instantiate(prefab);
newObject.AddComponent<BoxCollider>();
newObject.renderer.material.color = Color.red;
return newObject;
}
The CreateComplexObject function creates an instance of an existing prefab, adds a box collider to it, and colors it red. If we didn't use it, every place in the script where we wanted to instantiate a collision-ready red object would require all three lines to be written. However, because we encapsulated those three lines into a singular function that returns the premodified object, we can produce this result as many times as we want by calling CreateComplexObject in a single line.
The Command pattern
We don't often think about the technology behind the undo/redo commands, but the Command pattern is at the heart of sequential functionality. Implementing this pattern involves encapsulating a single user command or action into its own data type so that it can be stored and repeated at a later time. One such action data type for undoing and redoing a key entry might look like this:
class Command
{
public KeyCode pressedKey;
public void Undo()
{
//remove the character that matches pressedKey
}
public void Redo()
{
//add an additional character that matches pressedKey
}
}
A new instance of the Command class should be created every time the command is performed and stored in an ever-expanding list of commands so that the user can undo and redo any action and repeat the timeline of events in the same or reverse order. Note that commands shouldn't delete themselves if they are undone because the user may still want to redo them in the future.
Have a go hero – implement one of the preceding patterns
The preceding examples should have given you a good idea of the purpose and general functionality behind different code patterns, but none of the code samples are ready to be pasted into a game just yet; each one is missing a game function, and thus lacking a way to actualize the code.
Come up with a game mechanic that uses one of the three common patterns and implement it in a new or existing Unity project. You won't be able to create a fully fledged implementation of any pattern based on the code samples in this book alone; instead, examine the technical diagrams and descriptions for each pattern on www.oodesign.com before laying out the framework of your new classes and functions. The following are the websites you can refer to:
· The Singleton pattern: http://www.oodesign.com/singleton-pattern.html
· The Factory pattern: http://www.oodesign.com/factory-pattern.html
· The Command pattern: http://www.oodesign.com/command-pattern.html
Getting started with version control
Individual projects are easy to manage, but when multiple people are contributing code to the same project, things can get tricky fast. For instance, imagine keeping the project updated on everyone's computer and sending the project files to everyone every time someone makes a change; it would be inefficient to say the least.
To combat these problems, we can use version control, which is a tool that lets you host your code base on a universal repository and make changes that get pushed to everyone's copy of the project at the same time. Many different version control solutions exist, including Git, SVN, and Perforce; in this section, we'll show you how to set up a private Git repository using a website called BitBucket.
Version control is a complex subject, and we won't be able to cover every aspect of it in this chapter, but Atlassian, the creators of BitBucket, have a great collection of beginner tutorials on their website: https://www.atlassian.com/git/tutorial.
Time for action – creating a BitBucket repository
BitBucket is a free website that offers unlimited free private repositories for you and up to four other team members (five members in total). However, before you actually create your repository on the website, you need to create an account. The steps to do so are as follows:
1. Open a web browser and navigate to https://bitbucket.org.
2. Click on the button that reads Sign up for free and fill in the requested information to create your account.
3. Once you've finished creating your account and have logged in, press the Create button at the top of the browser window to create a new repository.
The Create a new repository screen asks for initial information about your project, both optional and required, as shown in the following screenshot:
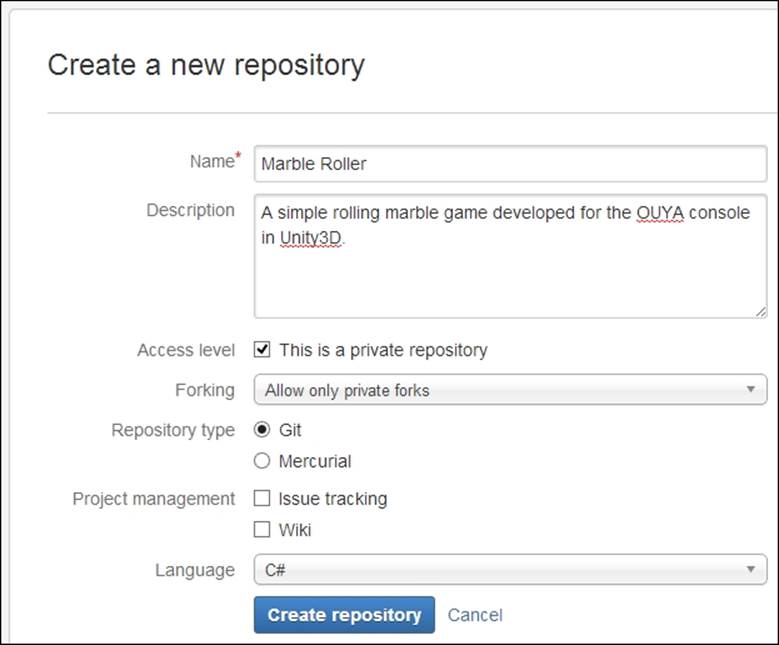
4. Give your repository a name. This is required for all new repositories.
5. If you already know what code you're going to add to the repository, add a simple description in the field labeled Description.
6. Keep the checkbox labeled This is a private repository selected. Open source projects are public and can be viewed by anyone, but at this point, you probably only want people you've explicitly invited accessing your code.
7. Ensure that your repository type is marked as Git and not Mercurial.
8. The two checkboxes next to Project management are optional, and they offer additional tools to manage a team. Check them if you expect to be working with multiple people on a relatively complex project.
9. Lastly, in the Language drop-down menu, select C#, as it's the programming language we've been using in Unity.
10. Click on the Create repository button. You'll then be taken to the splash screen for a new repository, which offers several steps and suggestions on getting started.
11. Click on the link to Set up Git and follow the included instructions to open the Git command line on your computer.
12. Use the following commands to create a new directory for your project files and mark the directory as the origin of your new Git repository:
13.mkdir ~/Projects/MarbleRoller
14.cd ~/Projects/MarbleRoller
15.git init
git remote add origin https://Username@bitbucket.org/Username/marble-roller.git
Let's examine the preceding code line by line and see exactly what it's doing.
The mkdir command creates a new directory with the path that you specify. If you don't use an absolute path beginning with the drive letter (C:) like in the preceding code example, it begins the path in the directory that the Git command line is currently in.
If you want to change Git's current directory, you can use the second command, cd, which stands for "change directory". In the preceding code sample, the cd command is used to navigate to the directory that the mkdir command created so that Git can explore the root of your project folder.
As soon as the Git command line is looking at your target directory, you can call git init, which tells Git to initialize a repository in that directory. The command directly following it, git remote add origin, links your initialized Git directory to your repository housed on BitBucket.
Tip
The URL of your Git repository is dependent on your repository name and your username, so the sample code doesn't accurately reflect the location of your new repository. To get the proper URL to use with git remote add origin, copy it from the information box next to the Get started tab on the new repository screen.
That's it! We'll take care of the other steps on the new repository screen next, but we'll do them on our own, so feel free to navigate back to the BitBucket home page where you can now find your new repository on the right-hand side of the window.
What just happened?
You just created an account on BitBucket and created your first repository, which will in turn give you advanced control over your code base and allow you to invite other users to your repository and contribute their own additions to the project.
Version control requires you to commit and push any intended changes to your version of the code so that it can be applied to everyone else's copy of the project. In the next tutorial, we'll show you how to add and update files in your repository using these two operations.
Time for action – preparing Unity for version control
Although Git handles text-heavy projects easily, it runs into some trouble when it comes down to binary files, which Unity uses by default to collect and save information about your project. There are, however, a few safety measures that can be put in place to ensure that your project doesn't encounter any errors or bugs when being managed with version control. We'll be demonstrating these measures using our marble game as a reference:
1. Open your RollingMarble project in the Unity editor.
2. Open the Edit menu on the toolbar at the top of the Unity editor window and select Editor within the Project Settings submenu.
The Editor Settings window will appear in your Inspector window and will look something like the following screenshot:
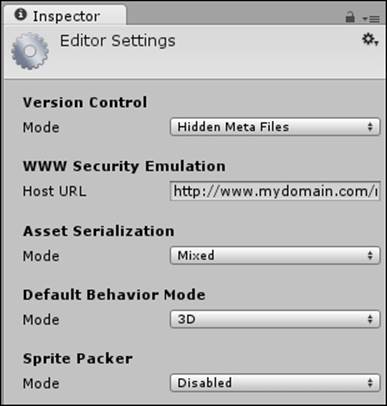
3. If you're using the Pro version of Unity, change your Asset Serialization setting to Force Text.
Tip
If you're using the free version of the Unity software, you'll be unable to edit your Asset Serialization setting. This doesn't mean you can't use version control with your Unity project, it just means that you may have to merge files that Git can't automatically merge. For information on manual merges, read the chapter on branching and merging in the Git documentation at http://git-scm.com/book/en/Git-Branching-Basic-Branching-and-Merging.
There's one other step to optimizing your Unity project for version control that can be done on any version of Unity: adding a .gitignore file. The .gitignore file includes names of directories and files that don't need to be shared on the repository, such as theLibrary folder that only stores local build data.
4. Create a new file in your preferred text editor and name it .gitignore. Ensure that your text editor doesn't automatically insert an additional extension, such as .txt.
5. Add the following lines to the .gitignore file:
6. .DS_Store
7. Library
8. Temp
9. *.csproj
10.*.pidb
11.*.unityproj
12.*.sln
*.userprefs
In addition to excluding the unnecessary library files, the preceding lines remove files that aren't required to open Unity projects and can create merge errors if left unattended.
13. Save your .gitignore file, close it, and move it to the root of your project's directory to be added with your other project files.
Tip
The root directory of your project is the directory that contains folders such as Assets, Library, obj, and ProjectSettings. It's important to place your .gitignore file in the root of your directory because that's the only place Git will look for it, and if it's in any other folder, the paths in the .gitignore file will not be ignored by your repository.
What just happened?
Version control is an invaluable tool to game developers, but that doesn't necessarily mean that every game engine is prepared for version control integration right out of the box.
Unity offers the ability to force text serialization to Pro users, which turns all of the data in your project into characters that Git can automatically merge together.
Users who don't use Unity Pro can still take measures to avoid Git headaches; however, the .gitignore files can be used to exclude unnecessary files from your repository while still keeping them present and functioning in their local directory on your own computer.
Time for action – making your first commit and push
Now that you're signed up for BitBucket, you've got an empty repository just waiting for some code. We'll use our marble game files to demonstrate how to upload a project; the steps to do so are as follows:
1. Click-and-drag the entire project directory from its original location to the directory you created for your repository.
2. Open the Git command line and use the cd command to navigate to your repository's directory.
As it's the first time we're uploading our project to the repository, we'll want to add every single file with Git. Fortunately, there's a command for that.
3. Enter the following command in your Git command line to add all the files:
git add --all
This will add changes to all the tracked and untracked files. In the case of projects being added to a repository for the first time, all files are considered to be untracked.
Tip
A tracked file means a file that has already been recognized by Git as part of the working repository, while an untracked file is a file that's been created since your last repository update. In an instance where you want to commit changes to existing code files but erase new temporary ones, you could add each desired change with the git add filename command and then discard the rest with the git checkout -- filename command.
Your files are now added to the stage to be committed, but until they're committed and pushed, you won't be able to view or access them on your repository—only in your local directory.
4. Enter the following command to commit all the added files:
git commit -m "Adding project to repository."
The -a flag following the commit command tells Git to commit all the added files, and the -m flag denotes a commit message. Every commit is required to have a commit message, so don't forget to type a meaningful summary of your changes so that team members can understand the details of the commit at a glance.
The final step, which is taken before your files are uploaded, is to push them to the repository with Git.
5. Enter the following command to push all the committed files:
git push origin
Using the push command updates the repository files with the newer versions that you committed, thereby finalizing the change and enabling other repository members to update their code by using the git pull command from the Git command line when they are in their own repository directory.
What just happened?
Even when you save files on your computer while working on your project, these changes won't be reflected on the repository until you add them using the Git command line. The add, commit, and push commands allow us to keep our project repository up to date, while the pull command allows us and our fellow team members to ensure they have the latest pushed code before they make changes of their own.
Finding your own answers to questions online
One of the great facts about game development is that if you have a problem, it's likely that someone else has run into the same problem before. A little searching on Google can go a long way, and so can these resources that are specifically tailored to make your development progress smoother and even offer new ideas.
Stack Overflow
Stack Overflow is one of the largest technical question and answer resources on the Internet, not just for Unity and OUYA development, but for all kinds of technical advice and software solutions. Stack Overflow's interface allows correct or smart answers to questions to be voted up and displayed as official answers, so you won't have to scour a results page for the correct solution; often, the answer is right next to the question.
Stack Overflow also rewards users who answer questions with points and medals, so you can use it as an educational resource until you earn enough clout to start educating other users yourself. Start asking and answering at http://stackoverflow.com.
OUYA Forums
Remember when we downloaded the OUYA input library from the OUYA Developer Forums in Chapter 4, Moving Your Player with Controller Input, because it provided a method of processing input that was easier and faster than the standard included input framework? That's just a single example of the myriad of ways in which the OUYA community helps itself grow. New topics are added to the OUYA forums every day, and communicating with your fellow developers is one of the fastest ways to grow. Share ideas, ask questions, and give answers; you have something in common with every OUYA developer, but everyone's experiences are different and can contain valuable lessons about the game industry and creative process in general. The OUYA Developer Forums can be found at http://forums.ouya.tv.
Unity Forums
Much like the OUYA Forums, the Unity Forums are a populous thinktank that can provide answers to any questions that have to do with the Unity engine and not things that necessarily apply to OUYA. All of your questions about GameObjects, tags, scripts, and lighting can be found at http://forum.unity3d.com.
Pop quiz – leaving the nest
Q1. Which of the following kinds of lights can cast shadows without a lightmap?
1. Area lights
2. Point lights
3. Directional lights
4. Spot lights
Q2. Which of the following design patterns can be used to create complex objects with simple functions?
1. The Singleton pattern
2. The Factory pattern
3. The Command pattern
Q3. Which of the following design patterns can be used to undo and redo a list of actions performed by the user?
1. The Singleton pattern
2. The Factory pattern
3. The Command pattern
Q4. What order should you execute the three basic Git commands in?
1. Commit, add, push
2. Add, commit, push
3. Commit, push, add
4. Push, commit, add
Q5. Which development methodology divides development into sequential stages?
1. Scrum
2. Agile
3. Waterfall
4. Git
Summary
In this chapter, you had the chance to attempt several tutorials that touched on advanced topics that you'll be working with a lot as you make complex games.
You also learned about development methodologies to manage a project from start to finish and how to use version control technologies, such as Git, with services, such as BitBucket, to create and collaborate on small team projects. You also learned how to seek answers for yourself and solve problems pragmatically.
You've reached the end of the book, and you now have the knowledge and resources you need to blaze your own trail without any more basic tutorials. Nobody can learn everything there is about game development, so the more you explore, share, and experiment, the better you'll become. Now go create OUYA games and be a part of the revolution!
All materials on the site are licensed Creative Commons Attribution-Sharealike 3.0 Unported CC BY-SA 3.0 & GNU Free Documentation License (GFDL)
If you are the copyright holder of any material contained on our site and intend to remove it, please contact our site administrator for approval.
© 2016-2026 All site design rights belong to S.Y.A.