OUYA Game Development by Example Beginner's Guide (2014)
Chapter 2. Installing Unity and the OUYA ODK
In the previous chapter, we briefly explained the Unity3D engine, which we'll be using to create games for the OUYA console. In this chapter, you'll link your OUYA to your computer and the Unity development environment, and create a simple workspace to make sure you can deploy and test your coded prototypes using the console.
In this chapter, we will cover the following topics:
· Installing the game engine
· Downloading and configuring additional packages
· Modifying the PATH variable
· Installing packages with the Android SDK
· Configuring the USB connection
Installing the game engine
The first thing we'll do is install the game engine itself. It's a good idea to install Unity first because you'll have to link every other package as and when you download it.
Time for action – setting up Unity
You'll be spending most of your time throughout the course of this book working in the Unity environment, so it's important to get it set up correctly and acclimate yourself with every element of the workspace layout. Perform the following steps to set up Unity:
1. To begin installing Unity, download the installer from http://unity3d.com/ by clicking on the Download tab.
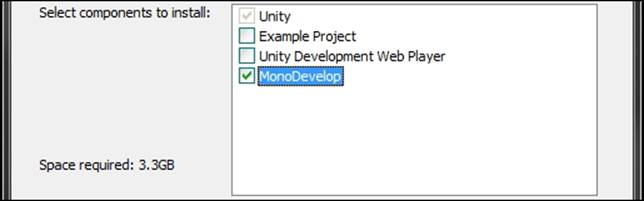
2. Once the download completes, run the installer. It may prompt you with some optional packages to install, including an example project, a web player, and a code editor called MonoDevelop.
The example project and web player aren't necessary as they apply to non-OUYA games, so you can leave them checked or un-check them depending on whether or not you want to explore games on other platforms. However, you'll want to leaveMonoDevelop checked, as shown in the following screenshot:
If you're using Windows and already use Visual Studio for coding projects, you can also configure Unity to use that as your primary editor in Unity's Preferences… menu. Open it from the Edit menu, select the External Tools tab, and select your installed version of Visual Studio from the drop-down list labeled External Script Editor.
Now that you've got Unity installed, let's take a look at the interface.
3. Start up Unity and click on New Project under the File menu to choose a place for your first project; for now, just use the default settings because you're only looking around.
Note
The first time you start Unity, it will prompt you to create a Unity account and choose between the free version of Unity and Unity Pro. Purchasing a Unity Pro license adds several additional features, but you won't need anything more than the free version when it comes to the material in this book.
Unity features several different preset layouts that you can play with to get your workspace exactly how you like it. In the examples in this book, we'll be using the 2 by 3 layout.
4. To change Unity's layout, open the Window menu from the top toolbar and open the Layouts submenu. Choose the 2 by 3 option and Unity should rearrange itself to look like the following screenshot:
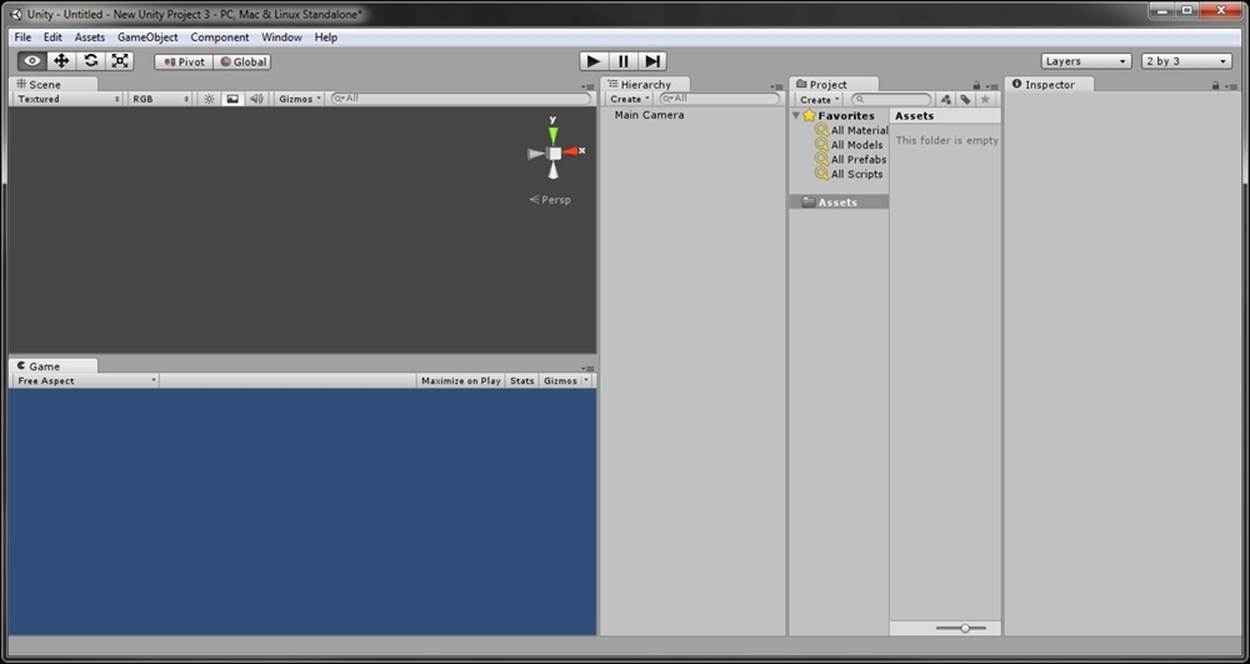
The two stacked windows on the left half of the application are the Game and Scene windows. The Game window will display your game through your main camera, as it will appear to the player. The Scene window is a 3D environment that you can move around and view from any angle, and will allow you to interact with the 3D objects in your game.
The three tabs on the right half of your layout are the Hierarchy, Project, and Inspector windows. The Hierarchy menu displays all Unity game objects present in the scene, the Project menu enables you to navigate your assets so that you can add them to the scene, and the Inspector menu lets you change individual properties of a single highlighted object in the Hierarchy or Project tab. Right now, you don't have any assets, but you have one game object in your Hierarchy menu: Main Camera. Each empty project will start with this default main camera so it has something to display on the screen, because every game needs at least one camera for the player to view the world through.
What just happened?
You've successfully installed Unity, but it doesn't come ready to develop for OUYA out of the box; next you'll need to link the engine to various packages and dependencies that OUYA uses to communicate with Unity.
Downloading and configuring additional packages
Right now, your Unity installation can only build and run games that are playable on your standalone PC/Mac client. Feel free to exit Unity for now—we'll come back to it when we've downloaded all of the required packages.
Time for action – downloading Java, the Android SDK, and the ODK
The first component we'll need is the Java Development Kit (JDK) and Java Runtime Engine (JRE) to handle the Java-side of the OUYA console. Because these are common packages, you may already have them installed on your computer; to check this, open a command line (Command Prompt in Windows or Terminal in Mac) and type the command javac -version. If a version number is displayed, skip over step one of this section and move on to downloading the Android ADT bundle. If you receive an error message that reads "command not found", continue with these steps to install the JDK and JRE.
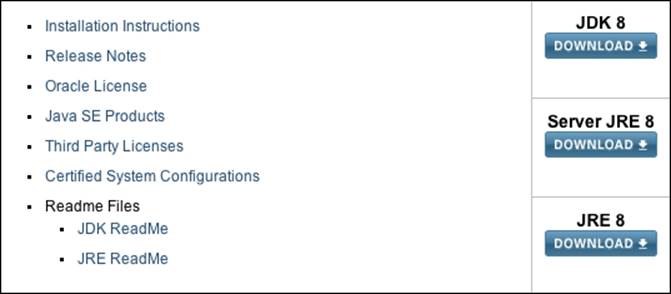
1. Download and install the JDK and JRE, both of which are available on the Oracle website at http://www.oracle.com/technetwork/java/javase/downloads/index.html.
The download links will be in the middle of the page, as shown in the following screenshot, with a Server JRE download button between them that you can ignore:
2. Once you've downloaded and run the installers, you'll need to download the Android SDK/ADT bundle, which can be found at http://developer.android.com/sdk/index.html.
When installing, you'll want to put everything into a folder called Development in your root directory so that if you're using Windows, the full path of the bundle will appear as C:\Development\adt-bundle-windows-x86_64. If you're using Mac OS, put it in your home directory so that it appears as ~/Development/adt-bundle-mac-x86_64. This is important because later, you'll need to change your computer's PATH variable to point to that location.
3. Create a new OUYA developer account by navigating to the developer portal at https://devs.ouya.tv/developers and clicking on Sign in to download the OUYA Development Kit. Click on Sign up on the following page and follow the instructions to create your OUYA developer account.
The Sign up button is directly below the login area on the Sign in page, as shown in the following screenshot:

4. Finally, download the OUYA Development Kit from the front page of the developer portal. When you unpack it, put it in your Development folder so that its path is Development\OUYA-ODK.
What just happened?
The Java packages you installed first are necessary for building a game on OUYA, even though you won't be programming in Java; we'll demonstrate the application of the JDK in a later tutorial.
You'll be developing with the API included in the Android SDK/ADT bundle. The OUYA OS is based on Android, which means that there are similarities between it and other devices that run some version of Android. The OUYA Development Kit, on the other hand, is for everything OUYA-specific in development, such as controller input or in-app purchasing. The packages you've downloaded so far are in your Development folder, which we will now add to your computer's PATH variable so that the command line recognizes it.
Modifying the PATH variable
Before you issue commands to OUYA from your command line or terminal, you'll need to make sure your system recognizes those commands. To do this, you'll be editing your PATH variable to include the location of the Android SDK you downloaded.
Note
The PATH variable is a string of directory locations, or paths, that your command line looks through when it's checking for commands. Any commands in directories that are included in your PATH variable can be run from any working directory instead of having to be run from the folder they're stored in.
Mac OS and Windows both have PATH variables, but they're edited differently; the upcoming tutorials will cover both the operations step by step.
Time for action – editing PATH on Mac OS
If you're using Mac OS, your PATH variable can read paths from your .bash_profile script. If you aren't familiar with it, you may not have one yet; so in that case, you'll need to create it by performing the following steps:
1. Start up the Terminal and enter cd ~/ to navigate to your home folder.
2. Type touch .bash_profile to create it.
3. Enter open -e .bash_profile to open it for editing.
Once you have your bash profile open, add the following lines to it:
export ANDROID_HOME="~/Development/adt-bundle-mac-x86_64"
export PATH=$PATH:$ANDROID_HOME/sdk/tools
export PATH=$PATH:$ANDROID_HOME/sdk/platform-tools
Tip
If you've changed your default shell from bash to a different shell, your profile may be named differently. For instance, if you're using zsh, you'll want to edit ~/zshrc instead of ~/.bash_profile. Check your shell's documentation for the exact name and location of the profile file.
Now that you've edited your PATH variable, you'll want to refresh it by typing the following command:
source ~/.bash_profile
To ensure the new directories were added to the PATH variable correctly, write the following line to display the PATH variable:
echo $PATH
After verifying that your PATH variable contains the directories that we added in this section, prepare for the next step by starting the Android SDK manager with the following command, and then close the Terminal:
android sdk
What just happened?
You've just edited your PATH variable permanently by adding a few directories to PATH in your profile file, which is loaded every time the computer starts up, so you'll never need to edit it again. Your profile is typically a hidden file starting with a period, and its specific name depends on whatever shell you're running (usually bash, by default).
Adding the Android package directories to your PATH variable enables you to send commands to the OUYA console using the Mac OS Terminal, which will be a useful tool when you get into development.
The next tutorial outlines how to make this change on a Windows computer. Feel free to skip over it and advance to the section titled Installing packages with the Android SDK if you don't have a Windows computer or don't wish to develop on it at this point in time.
Time for action – editing PATH on Windows
Perform the following steps to edit the PATH variable on Windows:
1. To edit the PATH variable on Windows, right-click on Computer and select Properties. In the left panel of the Properties window, select Advanced system settings and click on Environment Variables….
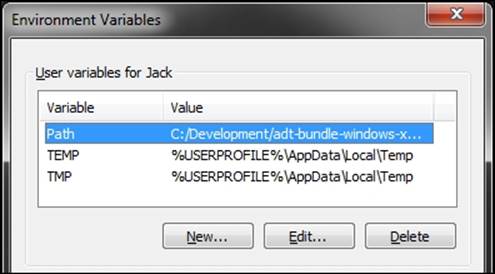
2. In the new window, in the topmost table labeled User variables, look for a variable called Path or PATH. If it exists, click on Edit… and add the following code to the end. If it doesn't exist, click on New… and create a variable called Path with the following code in it, but omit the preliminary semicolon:
3. C:/Development/adt-bundle-windows-x86-64/sdk/tools;
C:/Development/adt-bundle-windows-x86_64/sdk/platform-tools
4. Accept the changes and exit the Environment Variables window. To prepare for the next step, open the Android SDK manager by navigating to C:\Development\adt-bundle-windows-x86_64 and running SDK Manager.exe.
What just happened?
The PATH variable on your computer tells your command line where to look for executable commands. Now that you've added the path to the Android SDK to your PATH variable, you can send Android commands to OUYA through the Mac OS Terminal or the Windows Command Prompt.
After adding the proper paths to your PATH variable, you opened the Android SDK manager. Now you'll use this tool to download all of the SDK packages your projects will need.
Installing packages with the Android SDK
Now that you've opened the Android SDK Manager, you'll need to tell it which packages to download so that you have everything the OUYA needs to be recognized by your system. These packages include the main tools of the SDK, the API files for the latest version of Android supported by the OUYA, and the USB driver that your computer needs in order to recognize the OUYA as an Android device.
Time for action – installing Android packages
The SDK manager will give you a list of packages that you can check and install by performing the following steps:
1. Check the following packages:
· Android SDK Tools
· Android SDK Platform-tools
· Anroid 4.1.2 (API 16) platform (except Google APIs)
· Android Support Library (in the Extras folder)
· Google USB Driver (in the Extras folder)
· The following screenshot depicts these packages:
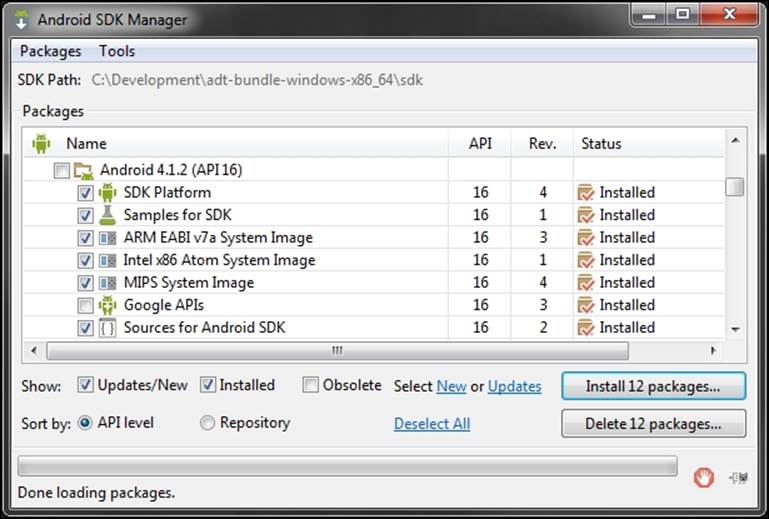
2. After checking all of the packages listed previously, click on Install 12 packages… (the total number may vary) and let the SDK manager run its course.
Tip
The future versions of the OUYA software may use a later version of the Android platform. For updated version numbers and instructions, refer to the documentation found at https://devs.ouya.tv/developers/docs/setup.
The packages include almost everything we need, but we need to manually configure the Android USB driver before it's ready to use, which is what we'll do next.
What just happened?
The Android SDK Manager is a wide repository of different packages that developers can install, update, and delete. We downloaded a version of Android that wasn't necessarily the most recent version; this is because each Android device is built with a specific supported version, and at the time of writing this, the OUYA supports Version 4.1.2.
As the OUYA software is updated, it's likely to change the supported version. While the installation instructions aren't likely to change much from this book, it is possible that the supported version number will change—updated information can always be found in the documentation on the OUYA developer portal.
Configuring the USB connection
Now is a good time to connect your OUYA to the computer and establish a connection between the two. Use a micro USB-to-USB cable to connect them together and press the power button on the top of the OUYA to turn it on.
You can verify that the device is connected by running the following three commands in succession:
android update adb
adb kill-server
adb devices
If the OUYA is powered on and connected, you should see it represented as a string of seemingly random characters in the device list. However, because the OUYA is a unique device, the driver information that you downloaded with the SDK manager may not have everything it needs to properly detect the OUYA when it's connected to your computer. To fix this, we'll have to manually insert an entry for OUYA into the driver file. Note that this step is only necessary if you're running a Windows operating system; if you're developing for OUYA on a Mac, this won't be an issue and your OUYA will connect without any additional configuration.
Time for action – configuring the USB driver on Windows
The file we need to edit on Windows operating systems is found at C:\Development\adt-bundle-windows-x86_64\sdk\extras\google\usb_driver\android_winusb.inf. Perform the following steps to edit the driver file:
1. Double-click on the file to open it in Notepad and find the section that begins with [Google.NTx86]. You'll see a list of devices already below this header; after the last device, add the highlighted text shown in the following screenshot:
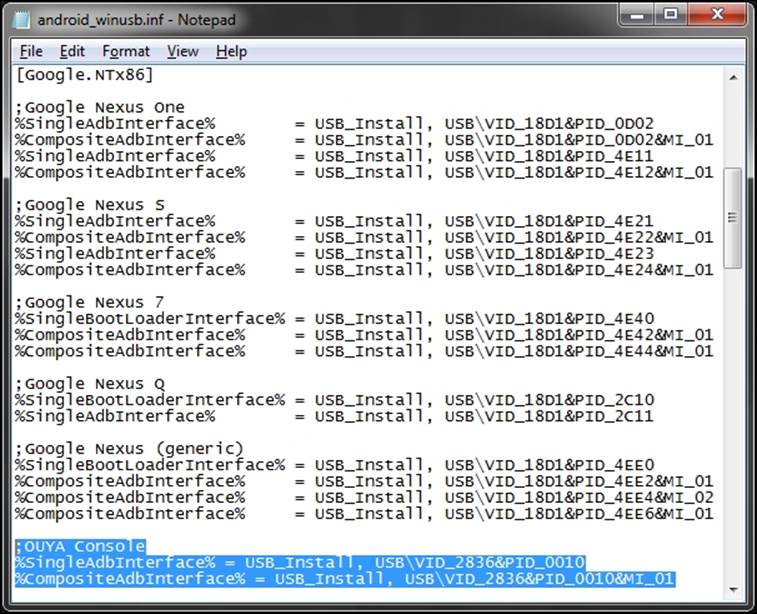
2. Add the same block of text in the same place under the similar section [Google.NTamd64], then save the document, and close Notepad.
Tip
The values that you entered shouldn't have a blank space after them, including any spaces or returns. Make sure that each line ends with the final character to avoid errors.
3. Next, open the Windows Command Prompt and run the following commands:
4. adb kill-server
5. echo 0x2836 >> "%USERPROFILE%\.android\adb_usb.ini"
adb start-server
6. Close the command prompt and right-click on Computer in your Start menu. Select Properties, and in the window that opens select Device Manager. Locate the OUYA Console on the list—most likely under Portable Devices—right-click on it and selectUpdate Driver Software…, as shown in the following screenshot:
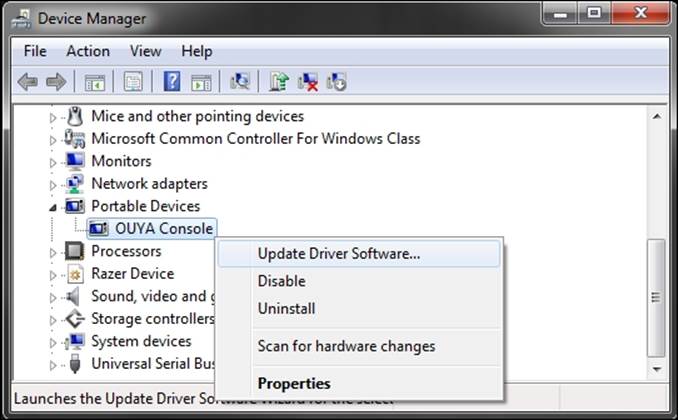
7. Choose Browse my computer for the driver software and then select Let me pick from a list of device drivers on my computer. Click on Show All Devices if available and then on Have Disk on the resulting screen. Navigate to the directory that contains your edited driver file, accept the driver, and exit. Your computer is now ready to recognize your console.
Tip
Your computer may warn you that the device driver isn't signed. In this case, you can go ahead and ignore it because the driver is safe. The fact that the driver is unsigned is the reason we had to manually point to its location, but other than that it won't have any impact on what you need to do.
What just happened?
You downloaded the USB driver for general Android devices, but the driver needed a little more tweaking before it was ready to communicate with the OUYA. To fix this, you added an OUYA entry to the driver, making it recognizable by your computer.
Having the correct drivers is important because you'll be sending code from your Unity development environment directly to the OUYA console to build and debug via USB, and without that additional entry in the driver file it would result in an error.
Time for action – exporting OUYA packages from Unity
The last thing you need before you can link everything you've downloaded to Unity is the Unity OUYA plugin. This can be downloaded directly from the developers at https://github.com/ouya/ouya-unity-plugin. Perform the following steps to install the plugin:
1. Click on the button on the page that says Download ZIP and put it in a location that's easy to find. When it has downloaded, unzip the archive and open Unity.
2. In the Unity window, navigate to File | Open Project…, browse the unzipped folder, and click on Open. On Mac OS, you may need to click on Open Other… to access the folder's location.
Depending on the latest versions of Unity and the plugin, you may be prompted to upgrade the project to work with the latest version of Unity. If it does, then accept the prompt; if you don't receive the prompt, it will work fine as it is.
After opening the plugin files as a project, two new drop-down lists will appear on the top toolbar of Unity: OUYA and NGUI.
3. Open the OUYA menu and click on Export Core Package, as shown in the following screenshot, to save the core package as a Unity package file that you can import into all of your projects:
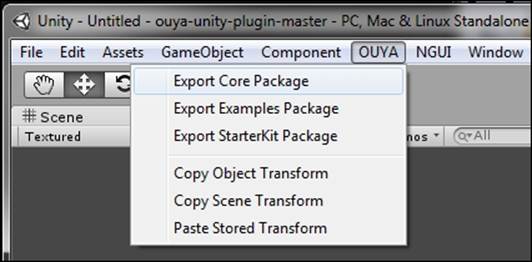
When exporting packages from Unity, the package files will always be found in the root directory of the project, which in this case is your ouya-unity-plugin-master directory.
4. Repeat this process for the other two packages until you have all three exported together. You only need the Core Package, but the others serve as a good reference for your own learning.
You'll import these exported packages into any project that you develop for the OUYA, so it's a good idea to keep them handy.
5. Save a copy of your exported packages to your Development folder in your root or home directory so that you can access them easily later.
It's also a good idea to copy the NGUI package from ouya-unity-plugin-master/Assets/NGUI to the same place, as it's helpful to a lot of Unity's features (particularly the user interface). However, you won't be required to use NGUI in any of the prototypes or games you develop in this book.
What just happened?
You just exported all of the required OUYA packages from the ODK project, which you'll now be able to import into any new project to set it up for deployment on the OUYA. If you ever lose these packages or want to update them to a new version of the OUYA SDK, simply re-export the packages from the ouya-unity-plugin-masters project again.
Time for action – importing packages into a new workspace
Now that you have all of the packages required for OUYA development, you can import them into the Unity workspace by performing the following steps:
1. Start a new project in Unity and double-click on the core package you exported to import it into your workspace. Unity will prompt you with a list of possible items to import; make sure they're all checked and click on Import. The OUYA menu will re-appear along the top toolbar as soon as the import completes.
2. Open the Window menu along that toolbar and click on Open OUYA Panel.
3. This window is where we'll finally link all of the packages we've downloaded so far to the engine. The panel also has a space to link an NDK, which we will download and link to last.
4. The Unity tab will automatically contain what it needs, so first click on the Java JDK tab and browse to the location of your JDK, as shown in the following screenshot:
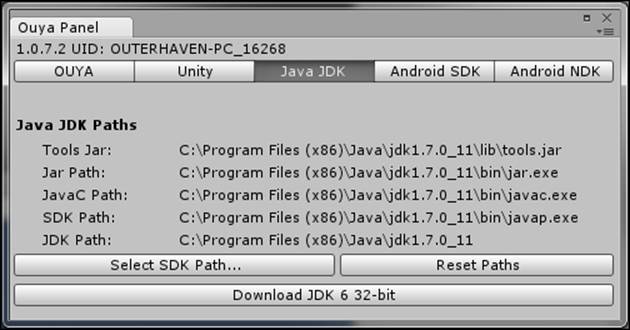
5. Next, click on the Android SDK tab and do the same. Note that it may not be as automatic as the Java process as the locations of files in the SDK tend to change; if that happens, locate the files at their new location and move them to the potential locations displayed in gray. As long as you downloaded all of the packages listed earlier in the chapter, you have the files; they just might not be in the place Unity expects them to be.
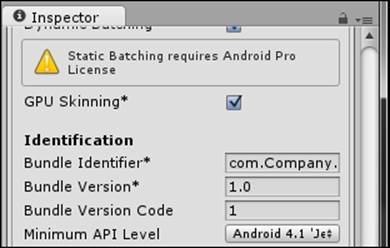
6. Also, check the minSDKVersion value that's at the top of the Android SDK tab. If it's not set to 16 (currently the supported SDK version for OUYA), you'll have to click on Edit, then move the mouse over Project Settings and click on Player. This will display your player settings in the Inspector window on the right-most pane of the Unity environment, where you can change the Minimum API Level to 16 (Android 4.1) under the Other Settings tab. Make sure you're viewing the Android tab at the top of theInspector window:
Once every path to the Android SDK is set, you just need to download and link to the Android NDK. The Android NDK tab has a link at the bottom to download the required package.
7. Download the proper version from the site it opens and store it in your development folder so that its path is Development/android-ndk-r8d. Link to this location in the OUYA panel window, as shown in the following screenshot, by browsing to that location and it should find the necessary files automatically.

What just happened?
The last step in setting up your development environment is linking your engine to the API that you'll be working in. The OUYA panel that you added to Unity using the OUYA Unity plugin serves as a sort of checklist organized into tabs, making sure you have every package necessary to build to the OUYA. The Java JDK is necessary for Unity and the Android SDK Manager to run. The Android SDK is the main package, as it includes code necessary for any project to run on Android.
The NDK that you downloaded and linked is a secondary Android package that isn't always necessary for Android projects but will be for OUYA projects. It enables the execution of low-level code that we won't need to deal with but is still necessary for "under-the-hood" operations. The following table lists various packages and their purpose:
|
Package names |
Purpose |
|
Java JDK |
It provides a framework for Unity and the Android SDK manager. |
|
Android SDK |
This is the bulk of the Android API that the OUYA uses (along with every other Android device). |
|
Ouya ODK |
This includes the OUYA-specific components of the API, including controller input and other game mechanics. |
|
Android NDK |
This is an optional Android package. Not all Android projects need it, but Unity uses it to deploy to the OUYA. |
Pop quiz – small parts of a whole
Q1. What should the minimum API level of your Unity Android project be to properly deploy to the OUYA?
1. API level 18 (Android 4.3)
2. API level 11 (Android 3.0)
3. API level 16 (Android 4.1)
4. API level 15 (Android 4.0.3)
Q2. What package needs to be imported in order to display the OUYA panel in the Unity workspace?
1. StarterKit Package
2. Core Package
3. Examples Package
4. NGUI Package
Summary
At long last, the linking is complete! Give yourself a pat on the back for getting through the dull part. Even though you haven't done any development yet, all of the packages that you downloaded, configured, and linked to Unity will allow you to deploy your code to run on your OUYA console natively at any time, which is an important step in creating software for an external device. Save the project as it is so that you have a linked project ready to go for the next chapter where you'll begin programming and testing.
All materials on the site are licensed Creative Commons Attribution-Sharealike 3.0 Unported CC BY-SA 3.0 & GNU Free Documentation License (GFDL)
If you are the copyright holder of any material contained on our site and intend to remove it, please contact our site administrator for approval.
© 2016-2026 All site design rights belong to S.Y.A.