OUYA Game Development by Example Beginner's Guide (2014)
Chapter 4. Moving Your Player with Controller Input
One of the most important features of a well-developed game is a system that allows the player to move their character in a way that feels natural and intuitive. In the previous chapter, you wrote your first scripts to make objects move and change color based on a key press. In this chapter, you'll use the key press logic from the previous chapter to create an input script that moves the player in the game world. There's not one single right answer for how to process input and movement in your game, but in this chapter, we'll work with several techniques that contribute to a quality-control scheme. These techniques will be integrated into a "rolling marble" game prototype, which will give you the opportunity to learn about win and loss states.
In this chapter, we will cover the following topics:
· Creating an interactive marble prototype
· Adding additional functionalities to our marble
· Completing our game
Creating an interactive marble prototype
Our prototype will feature a marble that the player can move with the OUYA controller, a platform for the marble to roll around on. The prototype will also contain several coins for the player to collect by rolling into them. Input for the marble will be one of the first things we create, but before we do that, we have to set up the scene in our Unity project.
Time for action – setting the scene
To begin with, we'll use the basic scene elements from Chapter 3, Diving into Development, to quickly create a stage to start developing our game on. Perform the following steps to set the scene:
1. Open a new project in Unity and name it RollingMarble.
2. Create a directional light to illuminate the scene and set its position to 0, 0, 0.
You may recall that the position of directional lights doesn't matter, but keeping things at the origin point of the scene makes it easy to find them when they've been highlighted.
Note
In two-dimensional coordinate systems, the value of 0 is sometimes used as a low-end boundary or the bottommost value. However, most 3D engines use 0 as the very center of the game world, instead of as an outlier. If you set an object's X, Y, and Z coordinates to 0, 0, and 0, its pivot point will be in the exact center of your scene.
3. After adding the light, add a cube from the Create menu in your Hierarchy menu. This cube can be used as the first platform for our marble to roll on.
We used a plane as a surface in our last project, but planes have no depth and are only visible from the front face. We'll be able to build a more solid level with cubes of different sizes.
4. Position the cube at the origin point by setting its three position values to 0.
The default cube is small and doesn't really look like a suitable platform to roll a marble on, so we'll alter its scale to make it more like a floor.
Take a look at the tools panel in the upper-left corner of the Unity editor. So far, we've only been using the Translate tool to reposition objects, but we can use the other three tools (Grab, Translate, Rotate, and Scale) to interact with our scene and the objects within it in different ways.
All of the object interaction tools are shown as icons in the Unity editor with inverse coloring on the currently selected tool, as shown in the following screenshot:
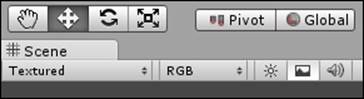
The four different tools, from left to right, are the Grab, Translate, Rotate, and Scale tools. The Grab tool affects your view of the entire scene, and the other three tools are all used for editing the properties of an object (which can also all be changed in theInspector menu). You can see the differences between them in the following table:
|
Tool name/symbol |
Purpose |
|
Grab tool Symbol: hand |
The Grab tool lets you grab your entire scene view and move it with the mouse as an alternative to navigating your scene with keyboard controls. This tool is good when you need to move your view very precisely. |
|
Translate tool Symbol: four opposite arrows |
The Translate tool, which we've used a little already, can be selected to move an object along the x, y, and z axes. |
|
Rotate tool Symbol: two curved arrows |
By selecting the Rotate tool, you can click-and-drag to rotate an object in any direction with a spherical rotating orb. Like the Translate tool, you can drag an individual axis or all three axes at once. |
|
Scale tool Symbol: four arrows with a square |
With the Scale tool, you can adjust the size of any object along an individual axis, or the universal size of the object by clicking-and-dragging from the middle; think of it as physically stretching the object. |
Tip
You can quickly switch between the four tools mentioned in the preceding table with the Q, W, E, and R keys. Each of them toggles the Grab, Translate, Rotate, and Scale tools, respectively.
5. Left-click on the Scale tool to activate it and then select your cube. Left-click and drag the x and z axes to make the cube into a broader platform.
You can also reduce the Y scale to 0.5, because we don't need the floor to be extremely thick.
6. Exact numbers aren't necessary in this case, but ensure that your platform still lies around the origin point of the scene (0, 0, 0) and that your X and Z scale values are around 10. Your Y value should be around 0.5.
If you want it to be exact, remember to round off the values in the Inspector menu. Your scaled starting platform should look something like what is shown in the following screenshot:
Now we'll create the marble that will roll around according to the player's input.
7. Create a new sphere from the Create menu in your Hierarchy menu and use the Translate tool to position it in the middle above the platform.
8. As we set the platform's position to 0 across all axes, we can zero out the sphere's X and Z coordinates to center the sphere on the platform and then drag the y axis until the sphere is slightly above the platform.
An exact elevation of the marble doesn't really matter, because once the marble is complete, Unity's built-in gravity will cause it to fall and hit the platform.
By this logic, you may be wondering why the platform that the marble falls on doesn't fall as well; after all, it's also loosely positioned in midair with no physical support to speak of. As it turns out, an object only responds to gravity if we tell it to by adding a rigidbody component to the object.
Note
Adding a rigidbody to an object tells Unity that we want it to be a dynamic, movable force in our game world, affected by any external force that is applied to it. These forces include gravity, collision from other objects, and wind.
9. Add a rigidbody component to your sphere by highlighting it and clicking on Add Component in the Inspector menu.
10. Select the Physics submenu from the drop-down list and click on Rigidbody.
The new component should now appear in the list of components attached to the object in the Inspector window.
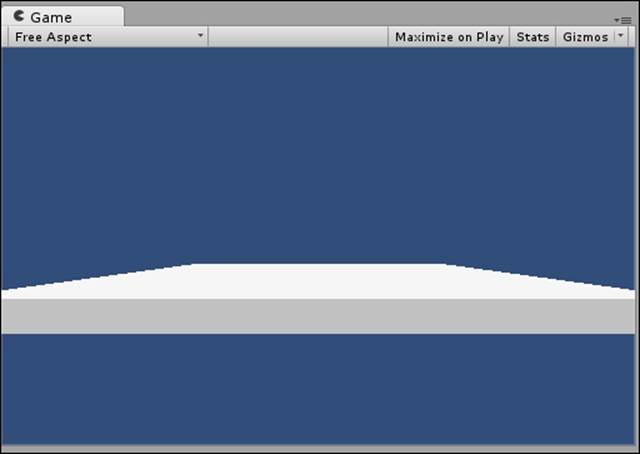
11. Press the play button and watch as the marble falls from its starting position until it lands on the platform.
The marble, with an attached rigidbody component, should look like what is shown in the following screenshot, in its resting position:

By adding a rigidbody component to the default sphere, we've turned a generic primitive into a unique object that's starting to suit our purpose for it. The more components you add to an object, the more dynamic and powerful it becomes. However, recreating an object with several components in another scene or in a different place within the same scene can be difficult and time consuming. For this, we have prefabs.
Note
A prefab (short for prefabrication) is like a blueprint for an object that you've created and/or modified. It stores all the components of a designated object and enables you to simply click-and-drag a new instance of that object onto your scene.
Let's create a prefab for our marble so that we can recreate it without having to make a sphere and then manually add the rigidbody component to it. It's worthwhile to create a separate folder for prefabs in your Assets directory, because you'll be using them a lot, and you're likely to have a lot of them when you start making bigger games.
Tip
Folders can be created in the Unity editor or in your operating system's file explorer; creating it once using either method makes it accessible from anywhere. Note that Unity won't recognize new folders added outside of the editor until you click on it once again to make it the active window.
Right-click on your new folder after creating it, mouse over the Create menu, select Prefab, and name the prefab Marble.
You should see your prefab in your Prefabs folder accompanied by a gray cube icon, as shown in the following screenshot:

This gray cube icon means that the prefab hasn't been linked to any object's components yet.
12. Left-click and drag the sphere from your Hierarchy menu and release it over the Marble prefab.
The gray cube icon will become a preview icon, indicating that you've successfully stored the object in its current state in the prefab, and the object name in the Hierarchy menu will also turn blue to indicate that it's a product of a prefab. In the future, you can also create new prefabs simply by clicking-and-dragging the object from the scene into your Prefabs folder in the Project window.
Tip
You can still make changes to individual objects that were created from prefabs. Small changes such as variable values will even keep it linked with the prefab. However, if you make a large fundamental change to the object, such as removing a component, Unity will warn you that the operation will break the prefab connection. An object that breaks the prefab connection will retain all the components that it inherited from the prefab, but it will no longer update with the prefab or any other sibling objects that maintain a link with it.
What just happened?
At this point, you're probably warming up to Unity and getting used to the necessities and good practices for every scene you make. You've also learned how to create prefabs, which can be used to store all the components of an object into a blueprint that can then be used to create that same object without reattaching each component individually. The newest component that we've touched upon is the rigidbody component, which enables any object that is attached to it to respond to external forces such as gravity and collision. We were able to see this in real time by positioning a marble object with a rigidbody component above a platform and watching it fall. Next, we'll start coding some input so that we can control how the marble rolls. Remember to save the progress you've made, if you haven't done so, before you move on.
Time for action – importing a Unity input script
The Unity API has values that we can read in a script to tell whether the buttons on a controller are being pressed down. If you were to just use the core OUYA package for Unity, you would have to program your own input manager to act based on those values, but for the purposes of getting the game up and running quickly, you can import an existing script into your game from the OUYA community.
There are several viable input systems that we could find on the Internet, but in this tutorial, we'll use the OuyaInput controller framework by Matthias Titze. Navigate to the GitHub page for the open source project athttps://github.com/rendermat/OuyaInputFramework and click on the Download ZIP button to download the files you'll need. When the zipped folder downloads, unzip it and open it to view the contents.
Now that you've acquired all of the necessary files for integrating input into your game, you can put the files into your Unity project by performing the following steps:
1. Move the InputManager.asset file from the downloaded folder to the ProjectSettings folder in your Unity project directory to replace the one that's included by default. This ensures that the axes' definitions are consistent with the input code.
2. Next, move the OuyaInput.cs script into your Plugins folder in the Assets directory. You won't have to write code in this script; it will just provide access to the input framework that we can access in our own scripts.
What just happened?
Installing the input library was as simple as downloading the files from the Web and dragging the OuyaInput.cs script into our Plugins folder. We also replaced the InputManager.asset file with a custom definition so that the input system would be able to access the correct controller mappings, but most plugins don't require you to edit files in the ProjectSettings directory.
Time for action – turning input into movement
We'll now use the input library you imported to capture data from the controller and translate it into movement that will be applied to our marble by performing the following steps:
1. Create a Scripts folder in your Assets directory to store all of your script files, if you haven't already done so, then right-click on it and create a new C# script.
2. Name the file MarbleInputManager and open it in your preferred code editor.
Recall the Start and Update functions from Chapter 3, Diving into Development, which will already be present in the code file; we'll be using Update for most of this chapter.
3. To link the code file with your marble, left-click and drag it onto the prefab you created or add it as a new script component using the Add Component button in the Inspector menu.
You can also drag it onto the actual marble on the screen, but this will only apply the script to that instance of the prefab; adding the script to the prefab itself will cause all the existing and future instances of that prefab to inherit the script.
4. Create two variables at the beginning of the script within the class definition: one called moveVector and one called speed. The moveVector variable will have a type of Vector3 and the speed variable will be of type float.
5. Declare your variables and initialize the speed variable with a value of 500, as shown in the following code:
6. Vector3 moveVector;
7. float speed;
8.
9. void Start ()
10.{
11. speed = 500.0f;
}
We'll use the speed variable to control how fast the marble responds to movement, and the moveVector variable will hold the direction that the marble should move in.
Note
Vector3 is a data type we haven't worked with yet, but it's relatively simple—while types such as float hold a single number, Vector3 variables hold three numbers for situations that demand more than one value, such as position (X, Y, and Z). Since we'll be applying the moveVector variable to the marble's position, it makes sense to store all three coordinate coefficients in a Vector3 variable, instead of declaring three different float variables for it. Other variable types exist for vectors that hold a different number of values; Vector2 holds two values and Vector4 holds four.
Now we'll add code to the Update function to capture input from the user. Eventually, we'll expand our code to capture input specifically from the OUYA controller. However, first, we'll want the code that can also be tested with the keyboard in-editor, because it takes much less time than deploying for OUYA every time you want to test a change.
12. Put the following code in your empty Update function:
13.void Update ()
14.{
15. moveVector.x = -Input.acceleration.y + Input.GetAxis("Horizontal");
16. moveVector.z = -Input.acceleration.x + Input.GetAxis("Vertical");
17.
18. rigidbody.AddForce(moveVector * speed * Time.deltaTime);
}
Even though the preceding code is only three lines long, a lot happens in it so let's take a minute to step through it.
The first two lines are value assignments, denoted by the equal sign. We are setting the x and z values of our movement vector. These values which will be the axes that the marble moves across (the marble won't be moving up, so we don't need to set the y value). The numbers we assign to these values are calculated with some simple addition. We start with the last-measured acceleration of the input to account for any speed that the marble may have already accumulated in a certain direction.
We also access Unity's Input class, which isn't something you wrote a script for—Input is code that is built into Unity, and you can access it from any script to get information stored within the game engine, such as input data.
You may have noticed that we made the acceleration values negative and that the axis letters don't match. The axes of the acceleration variable don't match the orientation of our global position axes, so we had to use values that would still appear to move the marble in the direction of the arrow key.
After the acceleration value, we add the numerical return value of a Unity function called GetAxis. This function processes positive or negative input along a predefined axis, so we don't have to write conditional statements for all four directions. The input parameter for the GetAxis function is merely a string value that matches the name of the input axis. Horizontal and Vertical are already mapped to the arrow keys, so we didn't have to define them.
Tip
Your options for capturing input with Unity's built-in input system aren't confined to any predefined values. By navigating to Edit | Project Settings | Input, you can view/edit all axes and input names, as well as add new ones. You'll notice that certain input axes have multiple entries, such as Horizontal and Vertical—this usually means that one entry is for capturing keyboard input and one is for capturing joystick input. If you still want to use them after they are overwritten by OUYA packages, just create new entries with the same values that they had before you imported them.
The last line of the Update function calls the AddForce function that all rigidbodies have and applies force on our marble along our directional vector at our speed. The last value in the multiplication, Time.deltaTime, is a Unity function common among many 3D game engines that ensures consistent movement. Since Update runs for every frame, our movement could be affected by lag and lost frames, but multiplying by deltaTime—a variable that keeps track of how much time has passed since the last frame—leaves the movement calculation unaffected by loss of frames.
What just happened?
Your game world moves by your command! We just scratched the surface of the capabilities of Unity's input system in this tutorial, but we covered the basics by capturing input along Unity's default vertical/horizontal axis definitions. Our code will expand when we're ready to capture OUYA-specific input, but for now, it's served its purpose by getting you used to the way input works. We housed our input code in the Update function, because we want it to update for every frame (virtually constantly) for accuracy and smoothness of animation.
You were also introduced to Time.deltaTime in this chapter. It is a very important variable to keep movement smooth. Multiplying a value by Time.deltaTime turns frame-by-frame movement into timed movement, so lag and loss of frames will never cause jumps or unexpected bugs.
Time for action – movement with the OUYA SDK
Now that you've got a good grasp on Unity input, let's program some OUYA-specific code so that we can see how it feels on the console. To do this, we'll need to import the OUYA input settings, which is part of the OUYA Core Package that we extracted in Chapter 2, Installing Unity and the OUYA ODK. Locate this package or refer to the chapter to re-extract it and import it into your current project by double-clicking on it or importing it as a custom package in the Assets menu along the top toolbar.
Tip
Take a moment to open your Input settings in the Project Settings submenu under Edit on the top toolbar. Expand the Axes list in the Inspector menu and observe how the defined inputs have changed since importing the OUYA SDK Core Package; now there are several more defined inputs for joysticks and separate input channels for up to four controllers at once.
Before we add in OUYA controls, we need to think about how we'll be testing the game. Once our Update function captures input from the OUYA controller, it won't necessarily accept keyboard controls to test in the editor anymore. Fortunately, there's a code flag wecan use to let the compiler identify which device the code is being run on, and we can write conditionals so the game can decide which code to run in which case. Perform the following steps to control movement with the OUYA SDK:
1. Add the following code in your Update function (the if statement at the beginning as well as the endif after the variable assignments):
2. void Update ()
3. {
4. #if UNITY_STANDALONE_WIN || UNITY_STANDALONE_OSX || UNITY_EDITOR
5. moveVector.x = -Input.acceleration.y + Input.GetAxis("Horizontal");
6. moveVector.z = -Input.acceleration.x + Input.GetAxis("Vertical);
7. #endif
8. rigidbody.AddForce(moveVector * speed * Time.deltaTime);
}
The #if and #endif flags serve as a conditional container for the code in between; it will only run if the if condition is met. In this case, it will only run if the game is being run on a standalone Unity client on Mac or Windows, or in the Unity editor. If you deployed this to the OUYA, nothing will be assigned to the moveVector variable. However, if you add an else flag, you can write code that will only execute if the game is run on the OUYA.
9. Add the following lines to your Update function:
10.void Update ()
11.{
12.#if UNITY_STANDALONE_WIN || UNITY_STANDALONE_OSX || UNITY_EDITOR
13. moveVector.x = -Input.acceleration.y + Input.GetAxis("Horizontal");
14. moveVector.z = -Input.acceleration.x + Input.GetAxis("Vertical);
15.#else
16. //OUYA-specific code goes here
17.#endif
18. rigidbody.AddForce(moveVector * speed * Time.deltaTime);
}
The #else flag is more general in that it doesn't require a specified condition; it just executes if the preceding if condition is not met. So, the code following #else will be executed when the game is run on OUYA or any other platform that isn't the Unity editor. This is where we'll put our OUYA controller code.
19. Add the following lines to your Update function to handle controller input:
20.void Update ()
21.{
22.#if UNITY_STANDALONE_WIN || UNITY_STANDALONE_OSX || UNITY_EDITOR
23. moveVector.x = -Input.acceleration.y + Input.GetAxis("Horizontal");
24. moveVector.z = -Input.acceleration.x + Input.GetAxis("Vertical);
25.#else
26. //OUYA-specific code goes here
27. moveVector.x = -Input.acceleration.y + OuyaInput.GetAxis(OuyaAxis.LX, OuyaPlayer.P01);
28. moveVector.z = -Input.acceleration.x + OuyaInput.GetAxis(OuyaAxis.LY, OuyaPlayer.P01);
29.#endif
30. rigidbody.AddForce(moveVector * speed * Time.deltaTime);
}
Tip
If you're creating a project with multiple platforms and want to explicitly specify an OUYA/Android project, extend the #else flag to read #else if UNITY_ANDROID. If you want to write code for the OUYA but ignore all other Android platforms, add a normal line of code directly after the #else flag that reads #if(!OuyaSDK.IsOUYA()) return;.
The lines we added for the OUYA look a little more complex than the normal input code, but it's basically doing the same thing; it's just getting the axis value for the multiplication from the OUYA controller instead of the arrow keys.
What just happened?
Your code is now more dynamic and can handle input from both the OUYA controller and the keyboard, depending on what you deploy the game to. If you want to test your controller code, review the instructions for OUYA configuration in Chapter 2, Installing Unity and the OUYA ODK, and then click on Build & Run in Unity's File menu.
Next, we'll write code to make the marble hop. This can be triggered by the face buttons on the right-hand side of the OUYA controller. We'll also keep writing conditional statements that let us test using a keyboard and PC, as it's a good practice to handle multiple conditions, and it will let us test on whatever is more convenient.
Adding additional functionality to our marble
Let's give the marble a jumping ability so that the player can leap over obstacles. This will be pretty simple, but button input works a little differently than axis input, as you'll see in this section.
Movement code works well in the Update function, because it updates very slightly for every frame based on the position of the arrow keys or joysticks. However, jumping isn't a gradual movement; it's an immediate command. So, if we were to send a jump command while a button was pressed down, several frames would pass in the time that it took us to press the button and release it, resulting in several jumps sent in quick succession. To remedy this, we'll tell Unity to only send the jump command if the jump button is pressed down and was not pressed down in the last frame. This is done with an input function called GetKeyDown/GetButtonDown. In the future, if you ever want to capture button status for every frame regardless of its earlier status, you will want to use the GetKey/GetButtonfunction.
Time for action – adding button features
Kindly perform the following steps to add button features to our marble:
1. Add one new line each to the OUYA and non-OUYA code for applying a jump force to the rigidbody of our marble. The Update function will now look as follows:
2. void Update ()
3. {
4. #if UNITY_STANDALONE_WIN || UNITY_STANDALONE_OSX || UNITY_EDITOR
5. moveVector.x = -Input.acceleration.y + Input.GetAxis("Horizontal");
6. moveVector.z = -Input.acceleration.x + Input.GetAxis("Vertical);
7.
8. if(Input.GetKeyDown(KeyCode.Space))
9. {
10. moveVector.y = 50.0f;
11. }
12. else
13. {
14. moveVector.y = 0.0f;
15. }
16.#else
17. //OUYA-specific code goes here
18. moveVector.x = -Input.acceleration.y +
19. OuyaInput.GetAxis(OuyaAxis.LX, OuyaPlayer.P01);
20. moveVector.z = -Input.acceleration.x + OuyaInput.GetAxis(OuyaAxis.LY, OuyaPlayer.P01);
21.
22. if(Input.GetButtonDown("Jump"))
23. moveVector.y = 50.0f;
24. else
25. moveVector.y = 0.0f;
26.#endif
27. rigidbody.AddForce(moveVector * speed * Time.deltaTime);
}
The non-OUYA code now checks to see whether the Space bar was just pressed. If it was, the code applies an upward jump force to our movement vector. The OUYA code checks Unity's input library for the Jump entry that is bound to the A button on the OUYA controller and was added when you imported the OUYA SDK.
Notice that we used an if/else conditional statement to reset the jump force to zero if the button wasn't just pressed, but it looks different than our other if/else in our code. This is because the if statement we used to check what device the code is being run on is a compiler directive that speaks directly with the said device, but the statement we used for jumping is a common format that only deals with the game and not with the device.
What just happened?
You've now dealt with the two different types of input: axis input and button input. You know how to handle both of them on the OUYA and on the in-game editor. It's always good to code for both instances so that you can test quickly in the Unity environment without having to deploy to the OUYA just so that it can recognize your code.
To finish the chapter off, we'll extend our level to make it more like a path, add a win zone at the end, and have Unity load a "win screen" level once the player reaches it. However, before we do this, we should add a little more functionality to our main camera.
Time for action – improving the camera
Right now, our camera always stays in the same place. This confines our game to a very small area. To extend this area a little bit, we'll use one simple line of code that will keep the camera trained on our marble constantly. Perform the following steps to expand the viewing area of the camera:
1. Create a new C# script called TrackingCamera in your Scripts folder and open it up.
2. Add the following variable to the script above the Start function:
3. public GameObject objectToTrack;
4.
5. void Start ()
6. {
7.
}
The public keyword before the GameObject variable type makes the variable accessible to the Unity editor and other scripts. We'll use this accessibility to our advantage and tell the script to track the marble right in the editor without any additional code.
8. Save the script and left-click and drag it onto the Main Camera object in your Hierarchy menu.
In the new script pane on the camera's list of components, a slot for your public variable will appear just below the name of the script.
9. Click-and-drag the marble object from your Hierarchy menu onto the variable slot.
The slot in the Inspector window will appear, and it will look like the following screenshot:
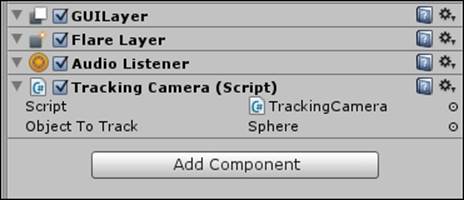
This relationship can also be established in code without having to use the Unity editor, which we'll do in later chapters, but this simple technique will be sufficient for now. All we have to do to complete the camera's functionality is add a single line to the tracking script's Update function.
10. Add the following line to the Update function:
11.void Update ()
12.{
13. transform.LookAt(objectToTrack.transform.position);
}
This Unity function will align the caller's rotation to look directly at a provided object. The camera won't change its position; it will only rotate, but even this will give us a larger amount of space to work with.
What just happened?
Sometimes, things are just easy. By writing two lines of code, you vastly expanded the viewing range of the main camera of the game with a built-in Unity function that makes it constantly look at a given object. It was even easy setting the object to track, by declaring the variable as public and dragging a valid object onto its slot in the Unity inspector.
Have a go hero – creating your own camera
The camera we just created will suit our needs for this chapter, but with the information you've learned over the last few chapters, you should be able to create a more robust camera that does even more. Here are some things to test out and try to implement in a new camera script:
· Make the camera move based on keyboard and controller input
· Implement manual rotation rather than automatic look-at rotation
· Enable the camera to zoom in and out (hint: use the z axis)
To implement manual rotation, you'll want to use the Input class that we've been using in combination with Unity's transform.Rotate function.
Completing our game
Every game needs an objective to reach or a goal to complete. Now that we've established a way for the player to move through the game world, we can add in a goal zone that triggers a victory state when the player touches it.
Time for action – adding a goal zone
Perform the following steps to add a goal zone and complete our game:
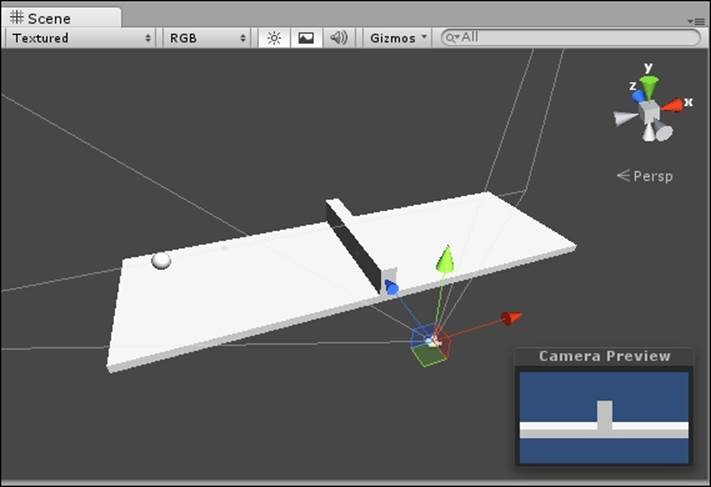
1. Extend your main platform by adding other platforms that create a straight path.
2. Reposition your marble to start on the leftmost platform so that it can be rolled to the rightmost one.
Exact positioning isn't necessary; just make sure your marble can roll from one platform to another.
3. Add in at least one small wall for your marble to jump over in order to reach the end.
Your finished product should look somewhat similar to the following screenshot:
Next, we'll create the goal object by performing the following steps:
4. Create a new cube with default scale and put it somewhere on the other side of the wall.
We will want to know when our marble hits the goal, so we'll write a code to access the collider property of this goal object.
5. Create a new C# script called GoalBox, attach it to your new cube, and open it for editing.
Just like the rigidbody component, the collider component also grants the parent object access to some specific functionality. One such function for the collider component is the OnCollisionEnter function, which can be extended by creating a definition for it in a script.
6. Add the OnCollisionEnter function to the GoalBox script with a collider parameter, as shown in the following code:
7. void Update()
8. {
9.
10.}
11.
12.void OnCollisionEnter(Collision obj)
13.{
14.
}
We'll eventually add code to this function that will take us to a win screen, but first, we need a win screen.
15. Save this scene as level1 and create a new scene in your Scenes folder called WinScreen.
We won't need to spend much time here; at this point, our win screen's only purpose is to notify us that we've reached the end. Add a new 3D text object that says You Win! and position it in the center of the camera's view, as shown in the following screenshot:
Now, all we need to do is add both scenes to the list of scenes in the build so that the application can recognize both scenes and switch from one to the other.
16. Navigate to File | Build Settings… and click on Add Current.
17. Save the win screen scene, open the scene in which your first level is, and add it with the Add Current button.
Now that both scenes are recognized by the build, we just need to add code that displays the win screen when the player reaches the goal.
18. Return to your OnCollisionEnter function and add the following code:
19.void OnCollisionEnter(Collider obj)
20.{
21. Application.LoadLevel("WinScreen");
}
22. Save changes to the script, double-check to make sure you've added it as a component to your goal cube, and press play.
Use the input commands you programmed to move the marble to the goal box, and as soon as you hit it, your win screen will be displayed. You've done it!
What just happened?
Give yourself a pat on the back; you made a small game, but you made a game nonetheless. Player input and win/loss states are fundamental to any game, and it is great to know about the Application.LoadLevel function to switch between multiple scenes or levels in a Unity game.
Pop quiz – coming full circle
Q1. Which of the following lines could be used to restart the game when the player presses the Space bar?
1. if(Input.GetKeyDown(KeyCode.Space)) Application.LoadLevel("SceneOne");
2. if(OuyaSDK.IsOUYA()) Application.LoadLevel("SceneOne");
3. if(Input.GetKeyDown(Input.Space)) Application.LoadLevel("SceneOne");
Q2. How can you add a component to an object in the scene without affecting the prefab that it's connected to?
1. Add the component to the prefab using the Inspector menu
2. Add the component to the object in the Hierarchy menu
3. Recreate the object using primitives
Summary
In this chapter, you created your first actual game. You programmed input code that the player can use to control their "character" (a marble, in this case) and added a goal zone that brings your player to the win screen as soon as they reach it. All of the code you've written so far has been pretty basic, but now that we've covered the fundamentals, we'll start delving into the more complex parts of what makes games fun and unique.
In the next chapter, you'll build your skills even further by turning simple game prototypes into advanced fun mechanics with the help of the OUYA controller's unique touch panel.
All materials on the site are licensed Creative Commons Attribution-Sharealike 3.0 Unported CC BY-SA 3.0 & GNU Free Documentation License (GFDL)
If you are the copyright holder of any material contained on our site and intend to remove it, please contact our site administrator for approval.
© 2016-2026 All site design rights belong to S.Y.A.