Samsung Galaxy S7 For Dummies (2016)
Part IV. Entertainment Applications
IN THIS PART …
Take pictures and video on your phone.
Peruse the games available on the Play Store and download the best ones to your phone.
Keep track of what you’ve downloaded.
Enjoy a single song, podcasts, or an entire album.
Know your licensing options.
Chapter 9. Sharing Pictures
IN THIS CHAPTER
Taking pictures and video with your phone
Organizing your pictures and video
Sharing pictures and video with friends and family
The Samsung Galaxy S7 should really be called a smartcamera with a phone. If you’re like many mobile phone users, you love that you can shoot photographs and video with your phone.
You probably carry your phone with you practically everywhere you go, so you never again have to miss a great photograph because you left your camera at home.
And don’t think that Samsung skimped on the camera on your Galaxy S7. Boasting 16 MP of muscle, this camera is complemented with lots of shooting options. Then, you can view your shots on that wicked Super AMOLED screen. Samsung also includes a Gallery app for organizing and sharing. Plus, the camera can shoot stills and video.
It’s truly amazing to consider the number of options that you have for your photographs and your videos. Samsung keeps on adding new options, filters, and ways to share these files. It would not be surprising if your phone now has more capabilities than your digital camera.
These capabilities actually cause a problem. There are so many options that it can be overwhelming. Research has shown that people fall into one of three categories: The first group tends to use the default settings. If they want to alter the image, they’d prefer to do it on their own PCs. The second group likes to explore some of the capabilities on the phone and will have some fun looking at the scenarios, but keep things within reason. The third group goes nuts with all the capabilities of the phone.
To accommodate everyone, this chapter starts with the basics. I cover how to use the camera on your phone, view your pictures, and share them online. This works for everybody.
I then focus on the most popular settings for the second group. There are some important capabilities.
For the third group, the best that can be done is to lead you in the right direction. As much as I would like to, it would be impossible to cover all the options and combinations. In my count, there are 2.43 billion possible combinations of filters, lighting, and modes. If you were to start now and take a picture every 10 seconds, you would not run out of combinations for over 700 years. This would not even include all the options for sharing these images.
Realistically, neither you nor your phone will last that long. To keep things in the realm of reality, I introduce only the most important and valuable options and go from there.
Say Cheese! Taking a Picture with Your Phone
Before you can take a picture, you have to open the Camera app. The traditional way is to simply access the Camera application from the Application list. Just tap the Camera icon to launch the app.
![]() Because the camera is so important, here are a few more ways to get to the Camera app. First, press the Home button twice. Boom. There it is.
Because the camera is so important, here are a few more ways to get to the Camera app. First, press the Home button twice. Boom. There it is.
Next, unless you have turned off the capability for security purposes, there is a camera icon on your lock screen. If you swipe the icon across the screen, the Camera app bypasses the security setting. You can snap away, but you can’t access the photo gallery or any other files.
 Here is a suggestion. If you see something suspicious, but are not ready to call 911, go ahead and start taking photos of what concerns you. If you need to, you can go back to the lock screen and slide the phone icon to the right to call 911, again without needing to unlock.
A closely related application on your phone is the Gallery, which is where your phone stores your images. The icons for these two apps are shown in the margin.
 With the Camera app open, you’re ready to take a picture within a second or two. The screen becomes your viewfinder. You see a screen like the one shown in Figure 9-1.
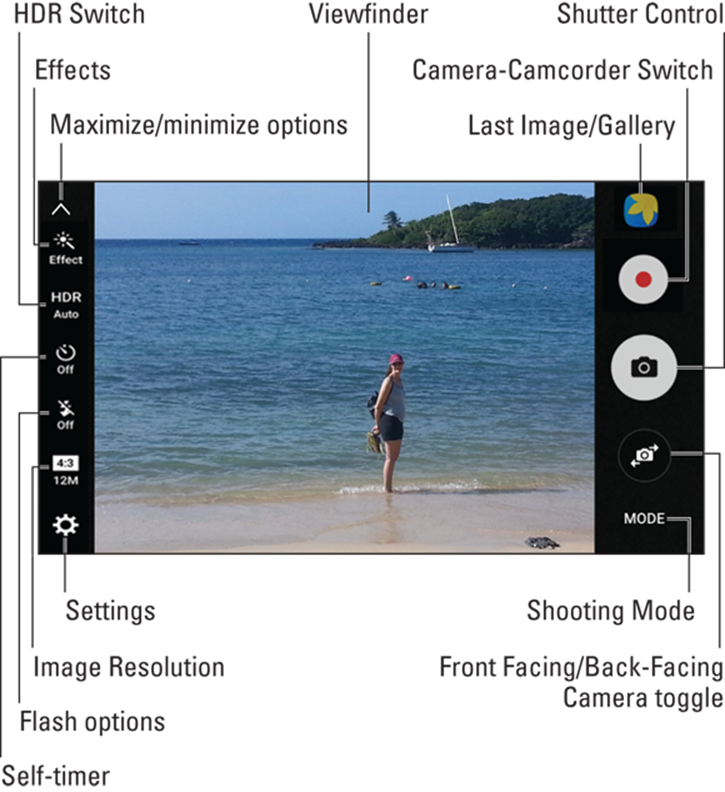
FIGURE 9-1: The screen is the viewfinder for the Camera app.
And how do you snap the picture? Just tap the big Camera icon on the right — the camera within the oval. The image in your viewfinder turns into a digital image.
A SUPER-FAST PRIMER ON SUPER AMOLED
All Samsung Galaxy S7 phones have a Super AMOLED screen. Allow me to take a moment to explain what makes this so good — and what makes you so smart for having bought the Samsung Galaxy S7.
To start, think about a typical LCD screen, like what your TV or PC might have. LCDs are great, but they work best indoors where it’s not too bright. LCDs need a backlight (fluorescent, most commonly), and the backlight draws a fair amount of power, although much less power than a CRT. When used on a phone, an LCD screen is the largest single user of battery life, using more power than the radios or the processor. Also, because of the backlight on an LCD screen, these screens display black as kinda washed-out, not a true black.
The next step has been to use light-emitting diodes (LEDs), which convert energy to light more efficiently. Monochrome LEDs have been used for decades. They are also used in the mongo-screens (jumbotrons) in sports arenas. Until recently, getting the colors right was a struggle. (Blue was a big problem.) That problem was solved by using organic materials (organic as in carbon-based, as opposed to being grown with no pesticides) for LEDs.
The first organic LEDs (OLEDs) looked good, drew less power, and offered really dark blacks, but still had two problems. Their imaging really stank in bright light, even worse than did LCD screens. Also, there was a problem with crosstalk — individual pixels would get confused, over time about whether they were on or off. You’d see green or red pixels remaining on-screen, even if the area was clearly supposed to be dark. It was very distracting.
The solution to the pixels’ confusion is called Active Matrix, which tells the pixels more frequently whether they are to be on or off. When you have Active Matrix technology, you have an Active Matrix Organic LED, or AMOLED. The image you get with this technology still stinks in bright light, but at least it’s some improvement.
Enter the Super AMOLED technology, made by Samsung. When compared with the first AMOLED screens, Super AMOLED screens are 20 percent brighter, use 20 percent less power, and cut sunlight reflection by 80 percent. This is really super!
This screen still uses a significant share of battery life, but less than with earlier technologies. With Super AMOLED, you even save more power if you use darker backgrounds where possible. A few picture-taking options are right there on the viewfinder. Going clockwise from the upper-right corner, the options include
· Gallery: Tap this icon to take you to see the pictures you have just taken. I discuss the Gallery in the section “Managing Your Photo Images,” later in this chapter.
· Camera/Video camera switch: This icon takes you from the camera to the video camera.
· Shutter control: This icon takes the picture.
· Rear facing camera to front-facing camera switch: This icon takes you from the 12 megapixel (MP) rear-facing camera to the not-too-shabby 5 MP front-facing camera. This is a good option for selfies as you can see what the shot will look like before you snap it.
· Mode: This icon gives you some fancy options that are not for the faint-of-heart. I cover these in the next section.
· Settings: Settings also gives some fancy options that are covered in the next section.
· Image Resolution: This lets you select the number of pixels for the image. The options are seen in Figure 9-2. I explore the pros and cons of the different settings in the later “Setting options on the viewfinder” section.
· Flash options: Even if you want to keep it simple, you will want to know how to control your flash. Sometimes you need a flash for your photo. Sometimes you need a flash for your photo, but it’s not allowed, as when you’re taking images of fish in an aquarium, newborns, or some animals. (Remember what happened to King Kong?) Regardless of the situation, your phone gives you control of the flash. Tap the Settings icon at the top of the viewfinder. You have the options of Off, On, or Auto Flash, which lets the light meter within the camera decide whether a flash is necessary. The options are seen in Figure 9-3.
· Self-timer: This lets you set a delay between the instant you tap the shutter and when the camera takes the picture. This is primarily for selfies to avoid having your hand in the way of the camera.
· HDR switch: Your phone can automatically compensate when the light sources add a blue or red tint. You do this by having the HDR in Auto mode. You can also remove this capability, but why?
· Effects: More fancy options for later in the “Effects options” section.
· Maximize/minimize options: Tap this arrow to make the options on the left go away.
· The viewfinder: The viewfinder shows what will be in the picture. Okay. This is obvious, but this is also how you control the magnification. From within the viewfinder, you can zoom in and out by pinching or stretching the screen.
· Stretch the screen to zoom in.
· Pinch the screen to zoom out.
The viewfinder tells you how much you have zoomed into the shot, as shown in Figure 9-4.
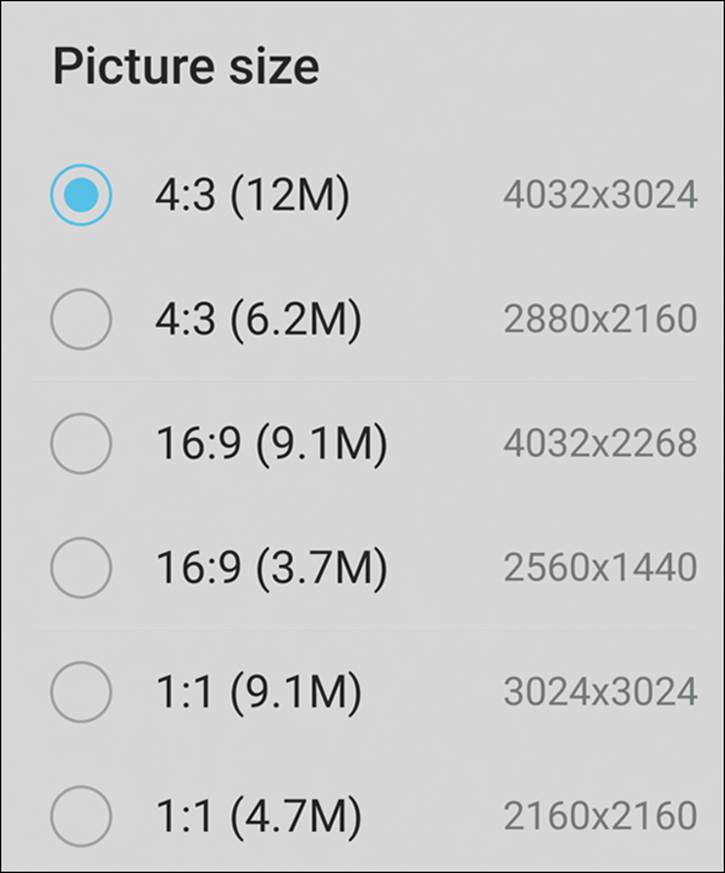
FIGURE 9-2: Resolution options.
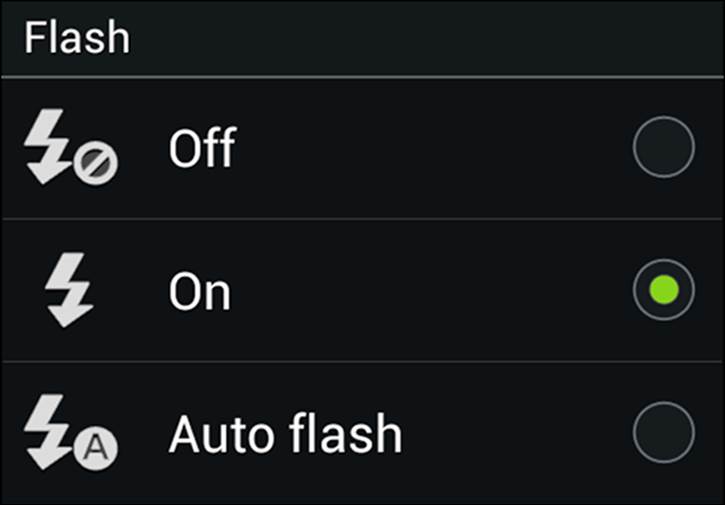
FIGURE 9-3: Flash options.
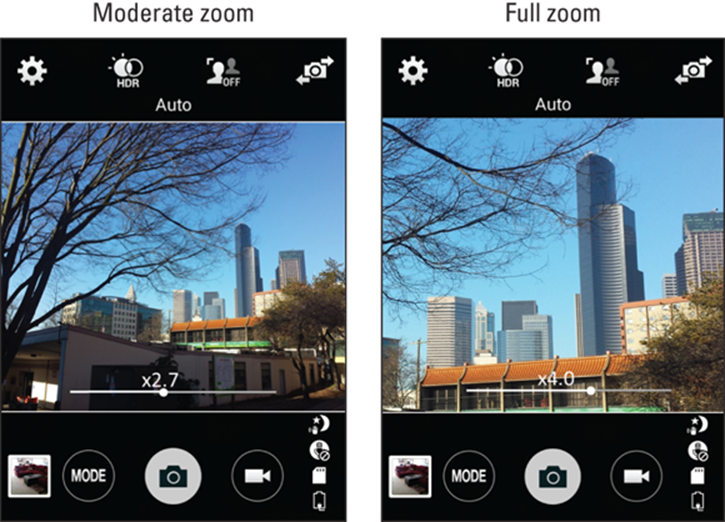
FIGURE 9-4: The Viewfinder when zooming.
You probably know that it’s not a good idea to touch the lens of a camera. At the same time, it’s practically impossible to avoid touching the lenses on your Galaxy S7. This can create a problem where there can be a buildup of oil and dirt on your high-resolution lens. You should clean the lens of your camera from time to time with a microfiber cloth to get the most out of your camera. Otherwise, your high-resolution images might look like you live in a perpetual fog bank.
FOR SKEPTICS ONLY
If you’ve ever used a cameraphone, you might be thinking, “Why make such a big deal about this camera’s phone? Cameraphones aren’t worth the megapixels they’re made of.” Granted, in the past, many cameraphones weren’t quite as good as a digital camera, but Samsung has addressed these issues with the Galaxy S7:
· Resolution: The resolution on most cameraphones was lower than what you typically get on a dedicated digital camera. The Galaxy S7, however, sports a 12 megapixel (MP) camera — and that’s good enough to produce an 8-x-10-inch print that’s indistinguishable from what you could produce with an analog camera, and 4 x 6-inch photos are plenty large for most uses.
· Low Light: Many cameraphones perform badly in low light conditions. The Galaxy S7 has an f/1.7 lens, which will impress the folks who know what that means. The implication is that the S7 works well in low light.
· AutoFocus: We amateurs like it when a camera will do the hard work of focusing. The technology in the S7 takes a big leap by having more pixels figuring out where to focus.
· Photo transfer: With most cameraphones, the photos are hard to move from the camera to a computer. With the Samsung Galaxy S7, however (remember: it uses the Android operating system), you can quickly and easily send an image, or a bunch of images, anywhere you want, easily and wirelessly.
· Screen resolution: In practice, many cameraphone users just end up showing their pictures to friends right on their phones. Many cameraphone screens, however, don’t have very good resolution, which means your images don’t look so hot when you want to show them off to your friends. The good news is that the Samsung Galaxy S7 has a bright, high-resolution screen. Photos look really good on the Super AMOLED screen.
· Organization: Most cameraphones don’t offer much in the way of organizational tools. Your images are all just there on your phone, without any structure. But the Samsung Galaxy S7 has the Gallery application that makes organizing your photos easier. It’s also set up to share these photos easily.
After you take a picture, you have a choice. The image is automatically stored in another application: the Gallery. This allows you to keep on snapping away and come back to the Gallery when you have time. I cover the Gallery application more in the upcoming section “Managing Your Photo Images.”
However, if you want to send that image right away, here’s what you do:
1. From the viewfinder screen, tap the Gallery icon.
The viewfinder shows the Gallery icon at the top-right corner of the viewfinder. When you tap it, it brings up the Gallery application, as shown in Figure 9-5.
This brings up the current image, along with the some other recent photos.
2. Tap the thumbnail of the image you want to share.
It also brings up some options, as seen in Figure 9-6. Right now, you’re interested in the Share option.
3. Tap the Share button.
This brings up the options you can use to forward the image; see Figure 9-7 (although your phone might not support all the options listed here and may have a few others not in this image).
· Dropbox: This is a cloud storage service. There are many other services that give you storage out on the Internet. There is a special folder specifically for your images.
· Messaging: This allows you to send it immediately to someone’s phone as a text message.
· Bluetooth: Send images to devices, such as a laptop or phone, linked with a Bluetooth connection.
· Photos: Picasa is a website owned by Google, created to help its subscribers organize and share photos. The main advantage for subscribers is that they can send links to friends or family for them to see a thumbnail of images, rather than sending a large number of high-resolution files. Read more on Picasa in the next section.
· Email: Send the image as an attachment with your primary email account.
· Facebook: You can take a picture and post it on your Facebook account with this option.
· Gmail: If your main email is with Gmail, this option and the Email option are the same.
· Google+: Google+ is a social networking site that is second in popularity only to Facebook. If you signed up for Google+ when you connected your phone, you can use this service to host images immediately.
· Wi-Fi Direct: Talk about slick! This option turns your phone into a Wi-Fi access point so that your Wi-Fi–enabled PC or another smartphone can establish a connection with you.

FIGURE 9-5: The Gallery app.
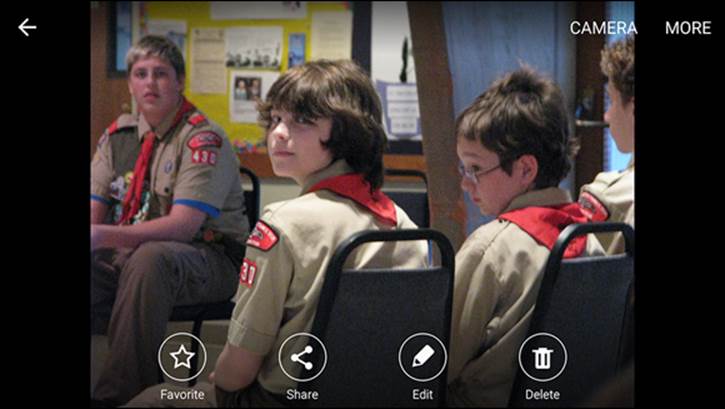
FIGURE 9-6: Gallery options for the current image.
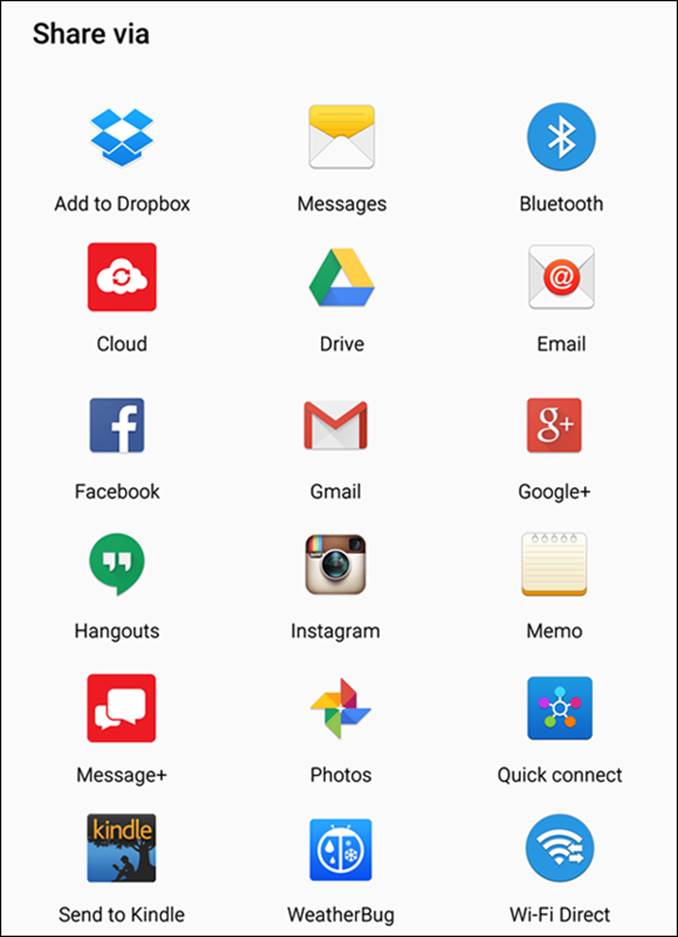
FIGURE 9-7: Sharing options for the current image.
The point is that there is an overabundance of options. If an app on your device works with images, this is the place you can upload that image. If one of these options doesn’t quite suit your need to share your pictures, perhaps you’re being too picky!
Getting a Little Fancier with Your Camera
Using the default Camera settings to snap pics is perfectly fine for those candid, casual, on-the-go shots — say, friends in your living room. However, your Samsung Galaxy S7 phone camera can support much more sophisticated shots. Your digital SLR camera has a bigger lens than your phone, but I can assure you that your phone has a much bigger brain than your camera. I suggest that even the users who want these default settings get familiar with the camera’s Mode settings. These are easy to access and will improve the image quality with minimal effort.
The Mode setting
The Mode setting is where you make some basic settings that describe the situation under which you will be taking your shot. The default is a single picture in Automatic mode. The Mode icon is a round button underneath the button for the shutter release.
Tapping on this icon brings up the options shown in Figure 9-8.
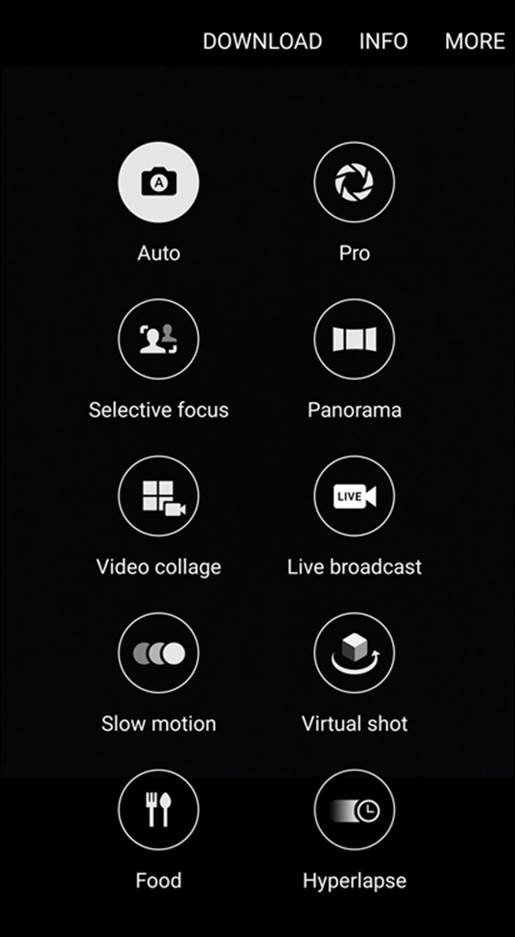
FIGURE 9-8: The Mode options pop-up on the camera viewfinder.
Tapping the Mode icon brings up a number of choices:
· Auto: Taking a single photo at a time is the default setting, which assumes average light. It’s a good place to start.
· Pro: This mode gets you to all kinds of camera settings that someone who knows what he or she is doing would want to control rather than let the camera make the choice. This includes setting the exposure, shutter speed, ISO sensitivity, white balance, focal length, and color tone. If you do not know what these mean, this is not the mode for you.
· Selective focus: This setting lets you get within 20 inches of an object, which is too close for the normal autofocus. On top of that, you can change the focus after taking the photo. (You read that right!)
· Panorama: This setting lets you take a wider shot than you can with a single shot. Press the Camera button while you rotate through your desired field of view. The application then digitally stitches the individual photos into a single wide angle shot.
· Video collage: This knits together a series of video images right on your phone.
· Live broadcast: Use this mode to upload images in real time to Facebook.
· Slow motion: This switches you to video mode to slow down really fast shots.
· Virtual shot: Put an image in the viewfinder and walk around it. The phone figures out where you are and creates a virtual tour. If this does not prove to you that your phone is a “smarticle,” nothing will.
· Food: This takes pictures that emphasize the colors in food to make your friends even more jealous.
· Hyperlapse: You can use this setting to create a time-lapse video. The video camera will adjust the speed of the shots based upon the movement of the phone.
If these are not enough for you, Samsung has some more options. At the top of Figure 9-8 is the option to download even more modes. A small sample is seen in Figure 9-9. The good news is that you only download the one you want.
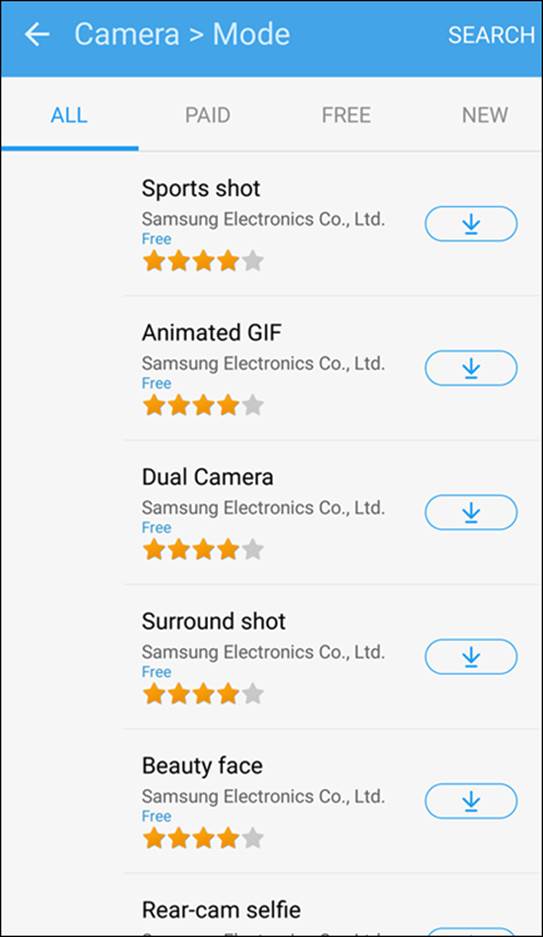
FIGURE 9-9: Mode Download options.
Choose the option that sounds right and snap away.
Settings options on the viewfinder
Tapping the Settings icon on the viewfinder brings up a number of choices, which are shown in Figure 9-10:
· Video size (rear): You have the option to get really carried away here. The lowest video option is VGA. This is the resolution of your old, analog television. That was perfectly adequate for us for many decades, but HD is the minimally acceptable resolution for thoroughly modern folks. However, your phone scoffs at this puny resolution, and can take it to four higher settings, as seen in Figure 9-11. The only reason to hesitate to use these higher settings is that, just as with still pictures, videos recorded in higher resolutions take more memory. It is good to know these resolutions are there. In addition to higher resolution, the FHD (60 fps) steps up quality by taking many more images per second. FHD normally uses between 24 and 30 frames per second. Using 60 frames per second removes any flicker at all. It also uses twice the amount of memory.
· Motion photo: This is a neat capability. Selecting this option records a short video clip before you take the still photo.
· Tracking AF: The Samsung Galaxy S7 can spot a person’s face and assumes that you want it to be the place where you focus if you toggle this option to the On position. Otherwise, if you don’t use this mode, the camera may assume that you want whatever is in the center of the viewfinder to be in focus.
· Video stabilization: If too much caffeine is causing your shots to blur, this capability is your answer.
· Grid lines: Some people like to have a 3 x 3 grid on the viewfinder to help frame the shot. If you are one of these people, toggle on this option.
· Location tags: The Samsung Galaxy S7 uses its GPS to tell the location of where you took the shot. If this is too intrusive, you can leave out this information on the image description.
· Shooting methods (rear): This option lets you turn voice control on. Your camera is listening to you. If you say, “Smile,” “Cheese,” “Capture,” or “Shoot,” the camera will snap a shot. This is simpler than using the self-timer. If you say “record video,” the video recorder will start recording. In either case, you can tell it to zoom by saying “zoom” — or not if you turn off this option.
· Review pictures: Some people want to see the shot right away. Others want to take a bunch of pictures and look at them at their leisure. If you want to see the image right away to see whether you need to take a second picture, turn on this toggle. It will jump you in to the Gallery app right away.
· Quick launch: You can launch the camera by pressing the Home button twice. If you would rather not, here is where you can disable that setting.
· Save as RAW file: This option turns off all the fancy photo-enhancing capabilities and just gives you whatever the cameras sees. This is for the folks who want to work with the images on some other PC.
· Storage location: If you have installed a microSD card in your phone, it will assume you want to use it to store images. If you have a microSD card installed but want to save photos in phone memory, here is where you make that selection.
· Volume keys function: This setting allows, or disables, the increase/decrease volume buttons on the side of the phone to control the shutter, the video recorder, or the zoom/pan capability when in camera or video mode.
· Shutter sound: It can be satisfying to hear the click when you take a picture. If you would rather not, turn that sound off here.
· Reset settings: If you mess something up, tap Reset settings, and it will take you back to the default settings.
· Help: If you mess something up but are too stubborn to reset the settings, the Help option will help you figure it all out.
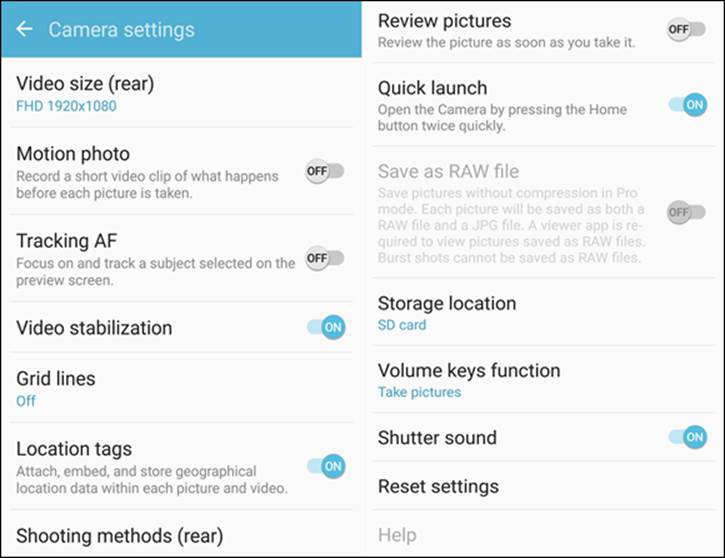
FIGURE 9-10: The Settings options.
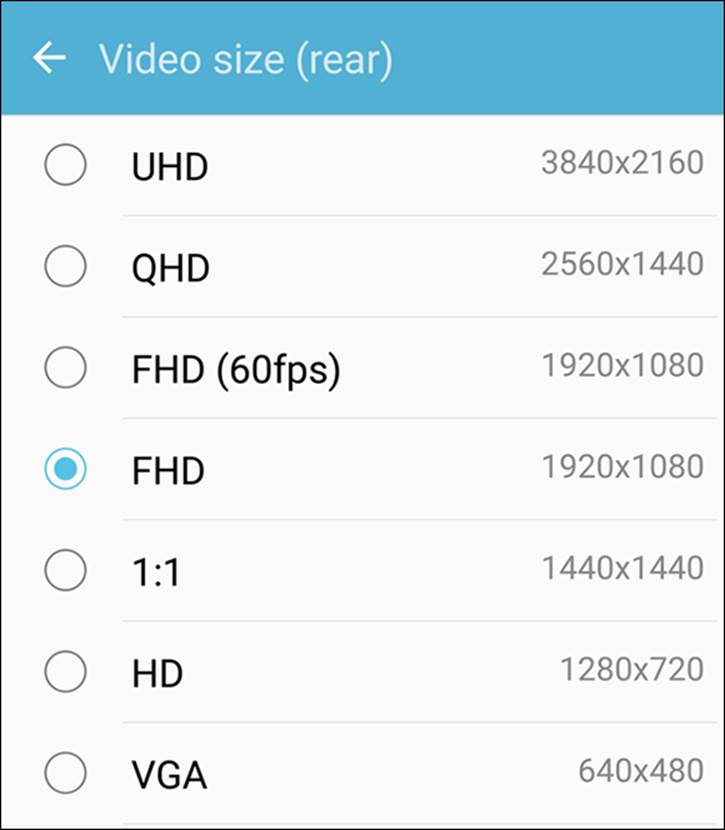
FIGURE 9-11: Your phone’s camcorder resolution options.
Effects options
A magic wand icon appears on the left side of the viewfinder. (Refer back to Figure 9-2 if you don’t believe me.) That’s not just for Harry Potter fans. Tapping that icon brings up a number of effects that you can apply to your image. If you tap the arrow, it brings up a long list of choices. Some examples are shown in Figure 9-12.
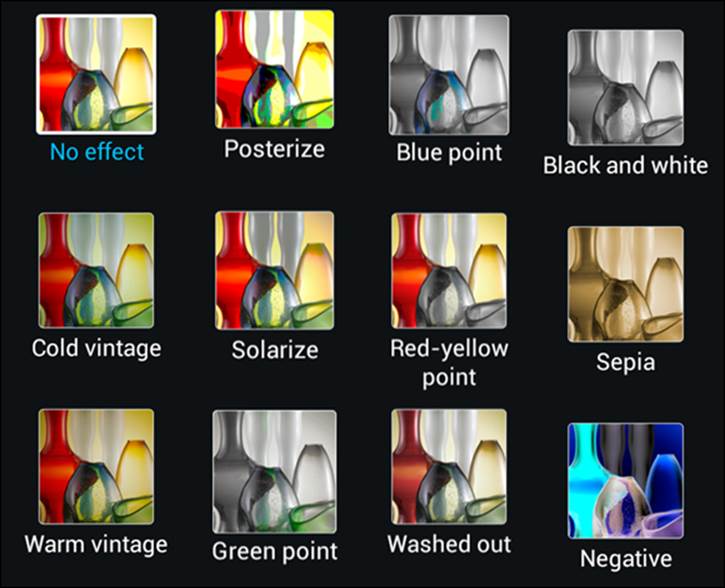
FIGURE 9-12: Some examples of Effects options.
Select the option that looks right and snap away.
The Digital Camcorder in Your Pocket
Your Samsung Galaxy S7 Camera application can also function as a digital camcorder.
Starting the camcorder
All you need to do to use your phone as a video recorder is to put your camera into Camcorder mode. From the camera viewfinder, you tap the icon that looks like the record button of a movie camera in the upper-right corner, and you switch from photographer to videographer.
 At this point, recording video automatically starts. You get the notification that says “Rec” in red and the timer from when it started.
The recording continues until you either tap the stop button, which is the circle with the dark square in the center on the right side of the viewfinder (see Figure 9-13), or the pause button, which is the button with the parallel slashes in the middle. If you press the stop button, the screen will revert back to the still camera.
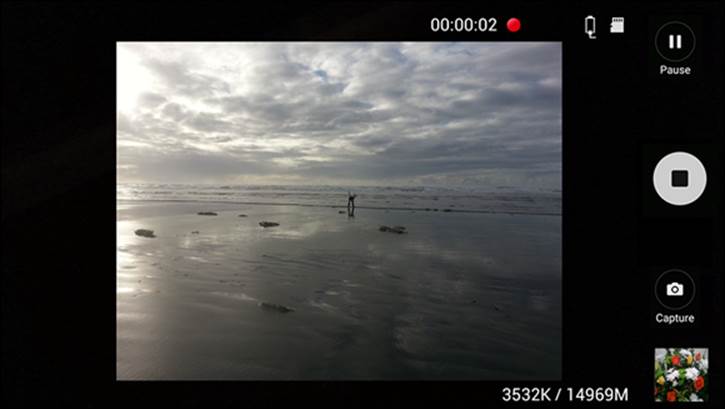
FIGURE 9-13: Your phone’s camcorder viewfinder.
If you press the pause button while in camcorder mode, the buttons to the right morph into the options seen in the small image below it. You can tap the upper button to switch back to the camera. Your other option is to tap the button with the red dot to begin recording again.
 Your phone is not only recording the video; it’s also recording the sound. Be careful what you say!
Taking and sharing videos with your camcorder
Just as you share photos you take with the camera, you can immediately share a video, play it, or delete it by tapping the video viewer. Also, the video is immediately saved on your camera. It’s stored in the Gallery app or is viewable from your Video Player app (see Chapter 12).
You can get fancy with some of the settings for your camcorder, but you won’t find nearly as many settings as you have for your camera (fortunately!). Two settings, Video Size and Image Stabilization, are available in Settings from the Menu button. In the Mode settings, you have Live Broadcast, Hyperlapse, slow motion, and video collage.
You cannot get to the Settings screen from the camcorder viewfinder. You must go back to camera mode. From there you tap the Settings icon to get to these options.
Use Image Stabilization unless you like the feeling of being seasick. It’s turned on by default.
Managing Your Photo Images
After you take some great pictures, you need to figure out what to do with them. Although you can send an image immediately to another site or via email, it will likely be the exception.
In most cases, it’s easier to keep on doing what you were doing and go back to the Gallery application when you have some time to take a look at the images and then decide what to do with them. Your choices include
· Store them on your phone within the Gallery app.
· Transfer them to your PC to your photo album application by sending them with email.
· Store them on an Internet site, like Picasa or Flickr.
· Print them from your PC.
· Email or text them to your friends and family.
· Any combination of the preceding choices.
Unlike many regular phones with a built-in camera, the Galaxy S7 makes it easy to access these choices. You need to determine the approach you want to take to keep your images when you want them to stick around. The rest of this chapter goes through your options.
Even though the Camera application and the Gallery application are closely related, they are two separate apps. Be sure that you keep straight which application you want to use.
The Gallery Home screen (refer to Figure 9-5) shows how the app first sorts the images on your phone into folders, depending upon when they originated.
All your photos from the Camera app are placed in files sorted by date. The application takes a shot at grouping them when a series of pictures or videos are taken about the same time.
Using Images on Your Phone
In addition to sharing photos from your camera, your Galaxy S7 phone allows you to use a Gallery photo as wallpaper or as a photo for a contact. And if the fancy shooting settings in the Camera application aren’t enough, you can wrangle minor edits — as in cropping or rotating — when you have an image in the Gallery application.
The first step is to find the image that you want in Gallery. If you want to do something to this image other than send it, tap the Edit button at the bottom of the screen (refer to Figure 9-6). Some of the options include
· Slideshow: This displays each of the images for a few seconds. You can not only set the speed for transition, but also add music and select among several image transitions.
· Crop: Cut away unnecessary or distracting parts of the image. The application creates a virtual box around what it considers to be the main object. You can move the box around the image, but you cannot resize it. You then can either save this cropped image or discard.
· Set As: Make this image your wallpaper or set it as the image for a contact.
· Print: This option allows you to print if you have set up a local printer to communicate with your phone either through Wi-Fi or Bluetooth.
· Rename: These options allow you to rotate the image right or left. This is useful if you turned the camera sideways to get more height in your shot and now want to turn the image to landscape (or vice versa).
· Details: See the information on the image — its metadata, which is fixed and cannot change.
Deleting Images on Your Phone
Not all the images on your phone are keepers. When you want to get rid of an image, press and hold the image you want to delete. In a second, a checkbox with the image selected will appear. Also, the links appear at the top to either Share or Delete. If you want to delete this image, tap Delete. The camera verifies that this is your intent. After you confirm, the image goes away.
If you want to delete more images, you can tap all the images you want to make go away. It is selected if it has a green checkmark on the image. Tap away, then hit delete. It will confirm with you once. Tap again and these images are gone forever.
 When I say that the photos you delete are gone forever, I do mean for-ev-er. Most of us have inadvertently deleted the only copy of an image from a PC or a digital camera. That’s not a pleasant feeling, so be careful.
All materials on the site are licensed Creative Commons Attribution-Sharealike 3.0 Unported CC BY-SA 3.0 & GNU Free Documentation License (GFDL)
If you are the copyright holder of any material contained on our site and intend to remove it, please contact our site administrator for approval.
© 2016-2026 All site design rights belong to S.Y.A.