Samsung Galaxy S7 For Dummies (2016)
Part IV. Entertainment Applications
Chapter 11. Mapping Out Where You Want to Be
IN THIS CHAPTER
Deciding what you want to use for navigation
Using what’s already on your phone
Using maps safely
Having a map on your phone is a very handy tool. At the most basic level, you can ask your phone to show you a map for where you plan to go. This is convenient, but only a small part of what you can do.
With the right applications, your Galaxy S7 phone can do the following:
· Automatically find your location on a map
· Give directions to where you want to go
· As you drive, using historical driving times
· As you drive, using real-time road conditions
· While you walk
· As you take public transportation
· Give turn-by-turn directions as you travel
· With two-dimensional representations of the road and intersections
· With three-dimensional representations of the roads, buildings, and intersections
· Tell others where you are
· Use the screen on your phone as a viewfinder to identify landmarks as you pan the area (augmented reality)
There are also some mapping applications for the Galaxy S7 for commercial users, such as MyBusVue from Zonar Systems or Live Truck Tracking from Real Green Systems, but I don’t cover them in this book.
GPS 101: First Things First
You can’t talk smartphone mapping without GPS in the background, which creates a few inherent challenges of which you need to be aware. First off (and obviously), there is a GPS receiver in your phone. That means the following:
· Gimme a sec. Like all GPS receivers, your location-detection system takes a little time to determine your location when you first turn on your phone.
· Outdoors is better. Many common places where you use your phone — primarily, within buildings — have poor GPS coverage.
· Nothing is perfect. Even with good GPS coverage, location and mapping aren’t perfected yet. Augmented reality, the option that identifies local landmarks on the screen, is even less perfect.
· You must be putting me on. Your GPS receiver must be turned on for it to work. Sure, turning it off saves battery life, but doing so precludes mapping applications from working.
· Keep it on the down-low. Sharing sensitive location information is of grave concern to privacy advocates. The fear is that a stalker or other villain can access your location information in your phone to track your movements. In practice, there are easier ways to accomplish this goal, but controlling who knows your location is still something you should consider, particularly when you have applications that share your location information.
 Good cellular coverage has nothing to do with GPS coverage. The GPS receiver in your phone is looking for satellites; cellular coverage is based upon antennas mounted on towers or tall buildings.
 Mapping apps are useful, but they also use more battery life and data than many other applications. Be aware of the impact on your data usage and battery life. Leaving mapping applications active is convenient, but it can also be a drain on your battery and your wallet if you don’t pay attention to your usage and have the wrong service plan.
Practically Speaking: Using Maps
The kind of mapping application that’s easiest to understand is one that presents a local map when you open the application. Depending on the model of your phone, you may have a mapping applications preloaded, such as Google Maps, TeleNav, or VZ Navigator. You can find them on your Home screen and in your Application list.
It’s not a large leap for a smartphone to offer directions from your GPS-derived location to somewhere you want to go in the local area. These are standard capabilities found in each of these applications.
This section describes Google Maps and Google Maps Navigation; these are both free and may come preinstalled on your phone. If not, you can download them from the Google Play Store. Other mapping applications that may come with your phone, such as Bing Maps or TeleNav, have similar capabilities, but the details will be a bit different. Or you may want to use other mapping applications. That’s all fine.
In addition to the general-purpose mapping applications that come on your phone, hundreds of available mapping applications can help you find a favorite store, navigate waterways, or find your car in a crowded parking lot. For example, Navigon and Waze offer solutions that base their navigation on real-time traffic conditions and give you turn-by-turn directions using three-dimensional images of the neighborhoods in which you are driving. For more, see the section, “Upgrading Your Navigation,” at the end of this chapter.
 As nice as mapping devices are, they’re too slow to tell you to stop looking at them and avoid an oncoming car. If you can’t control yourself in the car and need to watch the arrow on the map screen move, do yourself a favor and let someone else drive. If no one else is available to drive, be safe and don’t use the navigation service on your phone in the car.
![]() The most basic way to use a map is to bring up the Google Maps application. The icon for launching this app is shown here.
The most basic way to use a map is to bring up the Google Maps application. The icon for launching this app is shown here.
The first screen that you see when you tap the Google Maps icon is a street map with your location. Figure 11-1 shows an example of a map when the phone user is in the Seattle area.
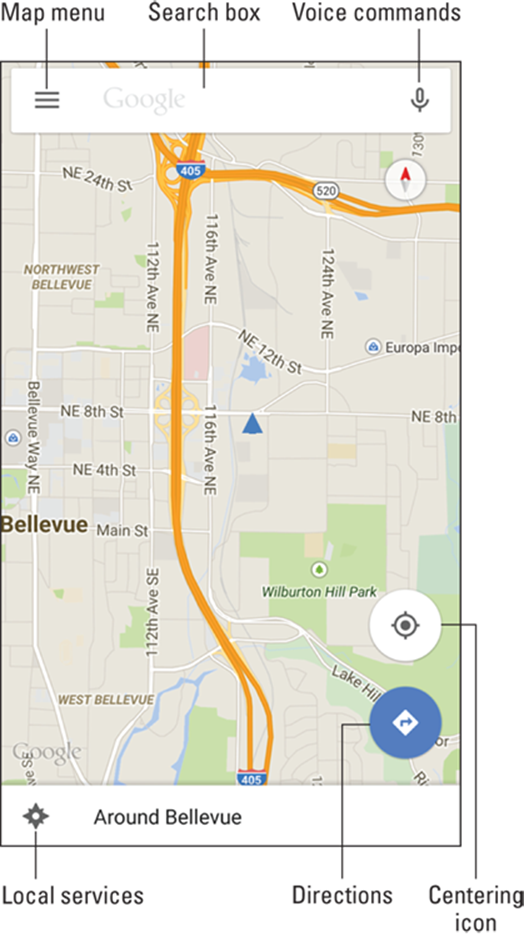
FIGURE 11-1: You start where you are.
The location of the user is a blue arrow head at the center of the map. The resolution of the map in the figure starts at about one square mile. You can see other parts of the map by placing a finger on the map and dragging away from the part of the map that you want to see. That brings new sections of the map onto the screen.
Turn the phone to change how the map is displayed. Depending on what you’re looking for, a different orientation might be easier.
Changing map scale
A resolution of one square mile will work, under some circumstances, to help you get oriented in an unfamiliar place. But sometimes it helps to zoom out to get a broader perspective or zoom in to find familiar landmarks, like a body of water or a major highway.
To get more real estate onto the screen, use the pinch motion I discuss in Chapter 2. This shrinks the size of the map and brings in more of the map around where you’re pinching. If you need more real estate on the screen, you can keep pinching until you get more and more map. After you have your bearings, you can return to the original resolution by double-tapping the screen.
On the other hand, a scale of one square mile may not be enough. To see more landmarks, use the stretch motion to zoom in. The stretch motion expands the boundaries of the place where you start the screen. Continue stretching and stretching until you get the detail that you want.Figure 11-2 shows a street map both zoomed in and zoomed out. The map on the left is zoomed in in Satellite view. The map on the right is zoomed out in Terrain view.
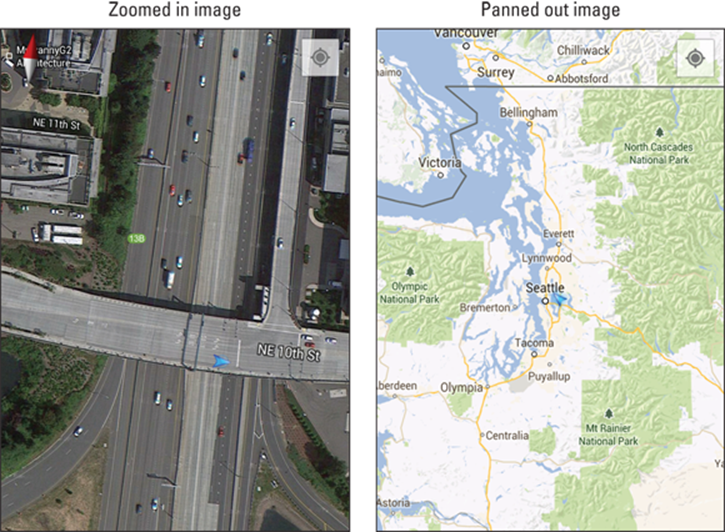
FIGURE 11-2: A street image zoomed in and zoomed out.
The app gives you the choice of Satellite view or Terrain view by tapping the menu button, the three parallel lines, on the top-left corner of the map. This brings up a pop-up menu similar to the one shown in Figure 11-3.
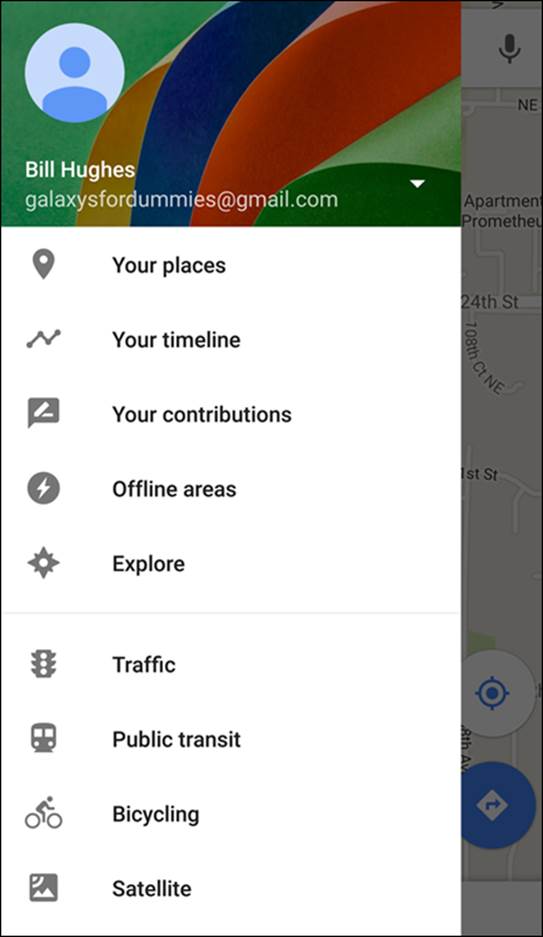
FIGURE 11-3: The Map menu pop-up.
Bring up the Satellite view by tapping Satellite. You get the Terrain view by tapping Terrain. You can also bring up other views that are useful to you, including transit routes and bicycling paths. I show you some of the other options in the next section in this chapter.
If you’re zooming in and can’t find where you are on the map, tap the dot-surrounded-by-a-circle icon (refer to Figure 11-1 for the centering icon). It moves the map so that you’re in the center.
Finding nearby services
Most searches for services fall into a relatively few categories. Your Maps application is set up to find what you’re most likely to seek. By tapping the Local Services icon at the bottom of the page (refer to Figure 11-1), you’re offered a quick way to find the services near you, such as restaurants, coffee shops, bars, hotels, attractions, ATMs, and gas stations, as shown in Figure 11-4.
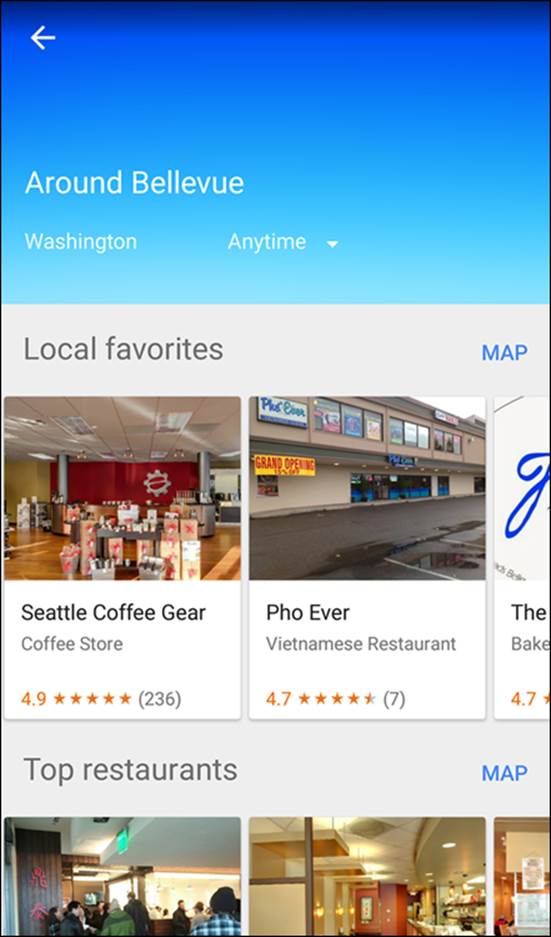
FIGURE 11-4: Tap to find a service on the map.
Not only that, it is aware of the time of day. There are different suggestions during breakfast time than in the evening. Just scroll down and tap one of the topical icons, and your phone performs a search of businesses in your immediate area. The results come back as a regular Google search with names, addresses, and distances from your location. An example is shown in Figure 11-5.
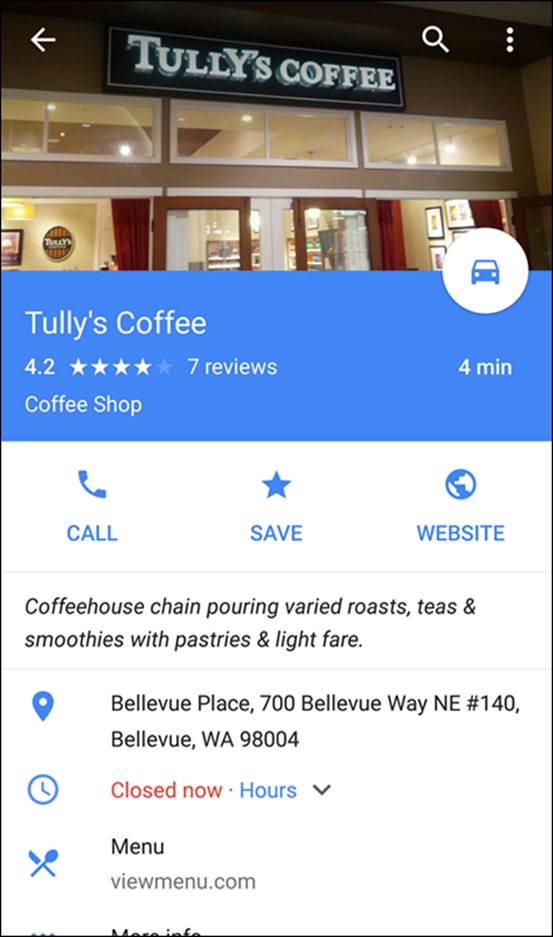
FIGURE 11-5: The results of a service selection.
In addition to the location and reviews, the search results include icons and other relevant information:
· Directions: Tap the car icon to get turn-by-turn directions from your location to this business.
 You might need to download Google Maps Navigation to your phone to get the turn-by-turn directions. This is a free app from the Play Store. For more on how to download applications, read Chapter 8.
· Call: Tap this to call the business.
· Save: Tap the star to set this place as one of your favorites.
· Website: Tap this to be taken to the website for this business.
· Map: Tap the Google location icon to see a map of where you are in relation to this business, but without directions.
· More options, which include
· Street View: See the location in Google Street View. As shown at the bottom of Figure 11-6, Street View shows a photo of the street address for the location you entered.
· Hours: If this establishment has shared its hours of operation, you can find them here.
· Menu: If this establishment has shared its menu, you can find it here.
· Reviews: This includes all kinds of information about what people have experienced this location.
· More: Run another Google search on this business to get additional information, such as reviews from other parts of the web.
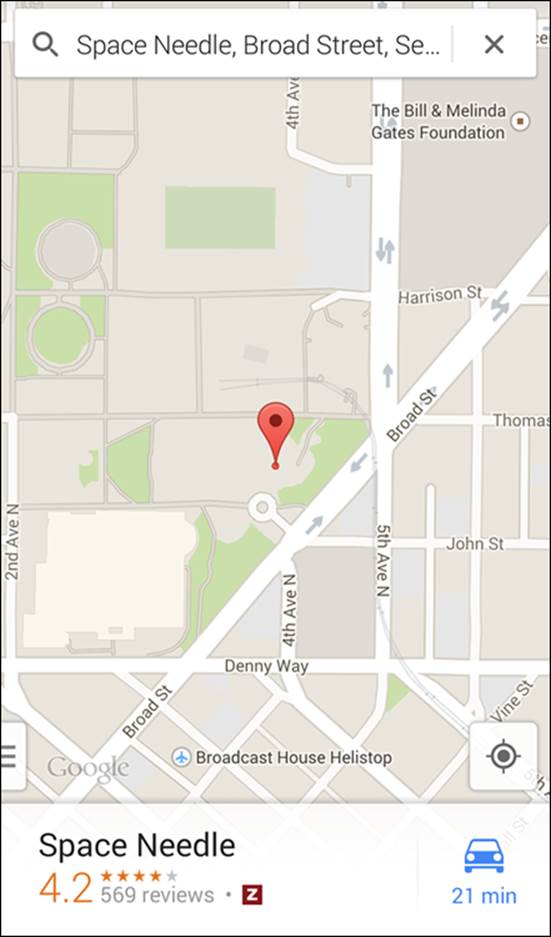
FIGURE 11-6: A street map search result.
Just how deeply you dive into using this information is up to you. In any case, having this kind of information when you’re visiting an unfamiliar location is handy.
Getting and Using Directions
You probably want to get directions from your map application. I know I do. You can get directions in a number of ways, including
· Tap the Search text box and enter the name or address of your location — for example, Seattle Space Needle or 742 Evergreen Terrace, Springfield, IL.
· Tap the Services icons (refer to Figure 11-2), tap the Attractions icon (refer to Figure 11-4), and select your location.
Any of these methods lead you to the map showing your location, as shown in Figure 11-6.
It might seem intuitive to expect that when you search for a specific attraction (such as the Seattle Space Needle), you get only the Seattle Space Needle. Such a result, however, is sometimes too simple. If a given search may have multiple results, such as for chain stores. Google Map gives you several choices, and you may need to choose your favorite. Typically, the app will give you the closest option.
To get directions, tap the Directions icon. This brings up the pop-up screen shown in Figure 11-7.
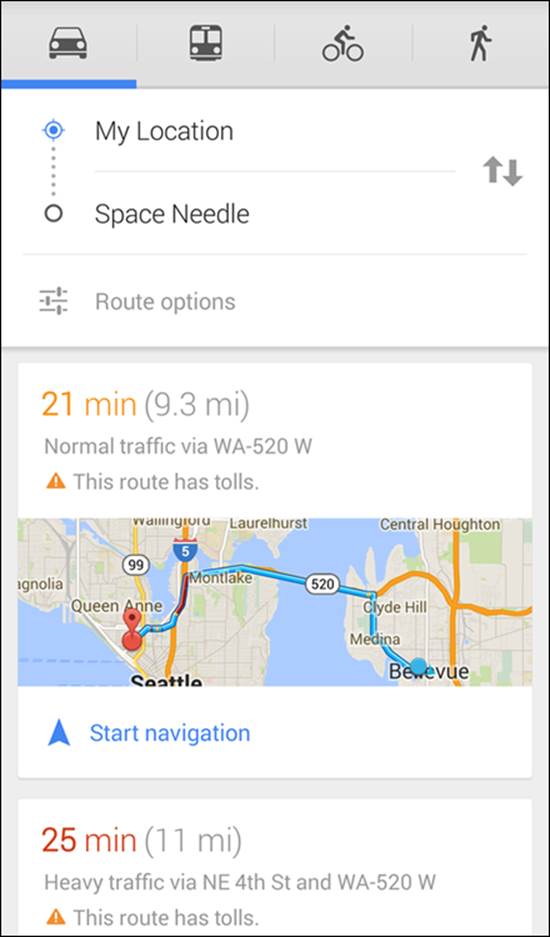
FIGURE 11-7: Your direction options, from original location to the target.
This gives you the options of
· Driving: Turn-by-turn directions as you drive from where you are to the destination.
· Public Transportation: This option tells you how to get to your destination by taking public transportation using published schedules.
· Cycling: This option is for the cyclists among us; it includes bike trails in addition to city streets.
· Walking Navigation: Turn-by-turn directions as you walk to your destination.
For each of these options, you can use the options at the bottom of the screen to
· Get Directions: Sequential directions, as shown in Figure 11-8, but without telling you when to turn.
· Navigate: Rather than show you a map, this option puts you in a navigation app that monitors where you are as you travel and tells you what to do next.
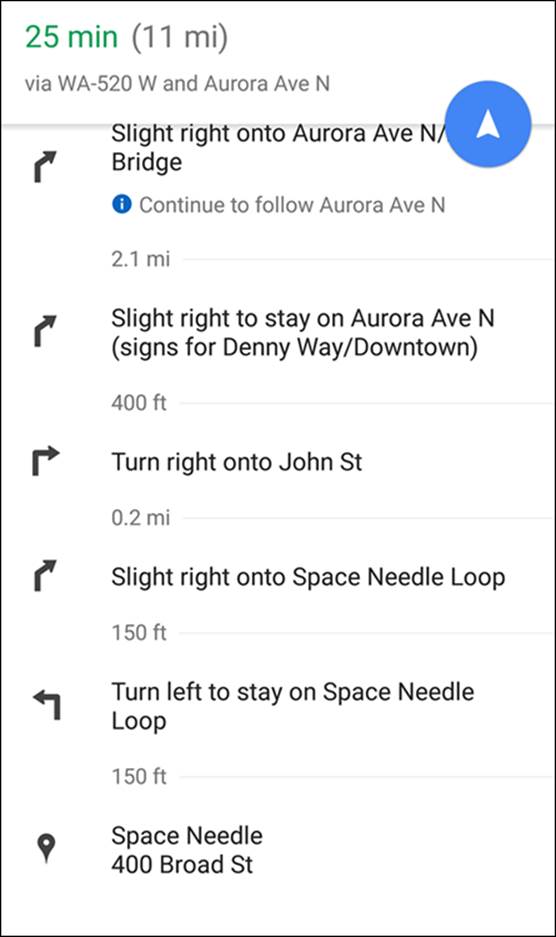
FIGURE 11-8: Step-by-step directions to the target.
Upgrading Your Navigation
As a rule, free navigation applications like Google Maps Navigation use historical averages to determine travel times. The applications that charge a modest monthly fee (between $5 and $10 monthly), like VZ Navigator, have real-time updates that avoid taking you on congested routes. They also tend to have 3D images that provide better context for landmarks. (See Figure 11-9.)
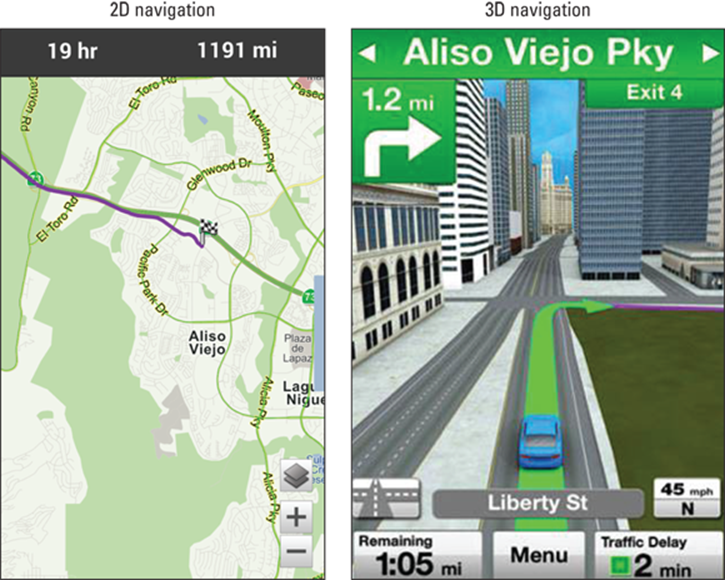
FIGURE 11-9: Comparing 2D navigation to 3D navigation.
As you can see in Figure 11-9, the 2D map is perfectly usable and accurate, but the 3D map gives you context and additional information about the buildings around you, which can give you an extra level of confidence. So if you frequently depend on your mapping app to get where you’re going, you may find it worth your while to spend money for a paid app.
Paying an extra $5 to $10 monthly feels like a lot for some of us. Keep in mind, however, that
· This amount is relatively modest compared to what you’re paying monthly for your service.
· The price of a dedicated GPS receiver, with almost exactly the same capabilities, is between $125 and $200. The monthly cost of the service is comparable to the one-time fee of the GPS receiver. Plus, you don’t have the hassle of lugging an additional device and its wiring.
Sometimes the app gives audio instructions. The Google App has a speaker icon that appears on the map that allows you to turn audio instructions on or off.
All materials on the site are licensed Creative Commons Attribution-Sharealike 3.0 Unported CC BY-SA 3.0 & GNU Free Documentation License (GFDL)
If you are the copyright holder of any material contained on our site and intend to remove it, please contact our site administrator for approval.
© 2016-2026 All site design rights belong to S.Y.A.