Samsung Galaxy S7 For Dummies (2016)
Part V. Productivity Applications
IN THIS PART …
Download your calendars to your phone and upload new events to your electronic calendar.
Use mobile Office applications from your phone or from the cloud.
Dictate an email or text and speak to Facebook.
Tell your phone to make a call.
Chapter 13. Using the Calendar
IN THIS CHAPTER
Setting up events
Downloading your calendars to your phone
Uploading events to your PC
You might fall in love with your Galaxy S7 phone so much that you want to ask it out on a date. And speaking of dates, let’s talk about your phone’s calendar. The Galaxy S7 phone calendar functions are powerful, and they can make your life easier. With just a few taps, you can bring all your electronic calendars together to keep your life synchronized.
In this chapter, I show you how to set up the calendar that comes with your phone, which might be all you need. The odds are, though, that you have calendars elsewhere, such as on your work computer. So I also show you how to combine all your calendars with your Galaxy S7 phone. After you read this chapter, you’ll have no excuse for missing a meeting. (Or, okay, a date.)
 Some calendars use the term appointments for events. They are the same idea. I use the term events.
Syncing Calendars
Most likely, you already have at least two electronic calendars scattered in different places: a calendar tied to your work computer and a personal calendar. Now you have a third one — the one on your Samsung phone that is synced to your Gmail account.
Bringing together all your electronic calendars to one place, though, is one of the best things about your phone — as long as you’re a faithful user of your electronic calendars, that is. To begin this process, you need to provide authorization to the respective places that your calendars are stored in the same way as you authorized access to your email accounts and contacts in Chapters 5 and 6. This authorization is necessary to respect your privacy.
![]() If your phone doesn’t have a Calendar icon on the Home screen, open the Calendar app from your App list. This same app works with the calendar that’s stored on your phone and any digital calendars that you add.
If your phone doesn’t have a Calendar icon on the Home screen, open the Calendar app from your App list. This same app works with the calendar that’s stored on your phone and any digital calendars that you add.
When you first open this app, you see a calendar in monthly format, as shown in Figure 13-1. I discuss other calendar views in the next section.
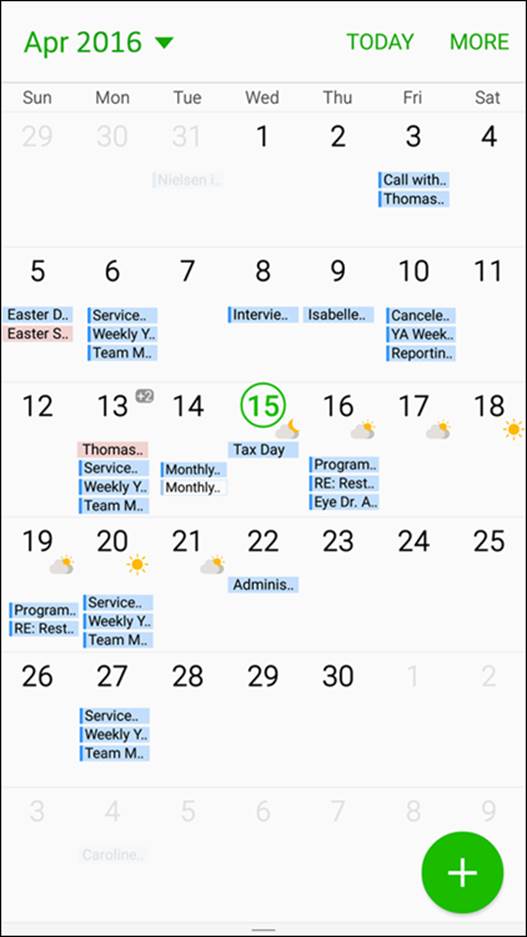
FIGURE 13-1: The monthly calendar display.
YOU MAY ALREADY BE A WINNER!
The calendar on your phone might already be populated with events from your work and personal calendars. Don’t be concerned — this is good news!
If you’ve already set up your phone to sync (combine) with your email and your calendar (see Chapter 5), your calendars are already synchronizing with your phone.
When you add an account to your phone, such as your personal or work email account, your Facebook account, or Dropbox, you’re asked whether you want to sync your calendar. The default setting for syncing is typically every hour.
Unless you get a warning message that alerts you to a communications problem, your phone now has the latest information on appointments and meeting requests. Your phone continues to sync automatically. It does all this syncing in the background; you may not even notice that changes are going on.
 You could encounter scheduling conflicts if others can create events for you on your digital calendar. Be aware of this possibility. It can be annoying (or worse) to think you have free time, offer it, and then find that someone else took it.
Setting Calendar Display Preferences
Before you get too far into playing around with your calendar, you’ll want to choose how you view it.
If you don’t have a lot of events, using the month calendar shown in Figure 13-1 is probably a fine option. On the other hand, if your day is jampacked with personal and professional events, the daily or weekly schedules might prove more practical. Switching views is easy. For example, just tap the Month link at the top of the calendar, which in this case displays Apr 2016, to bring up the options. These are shown in Figure 13-2.
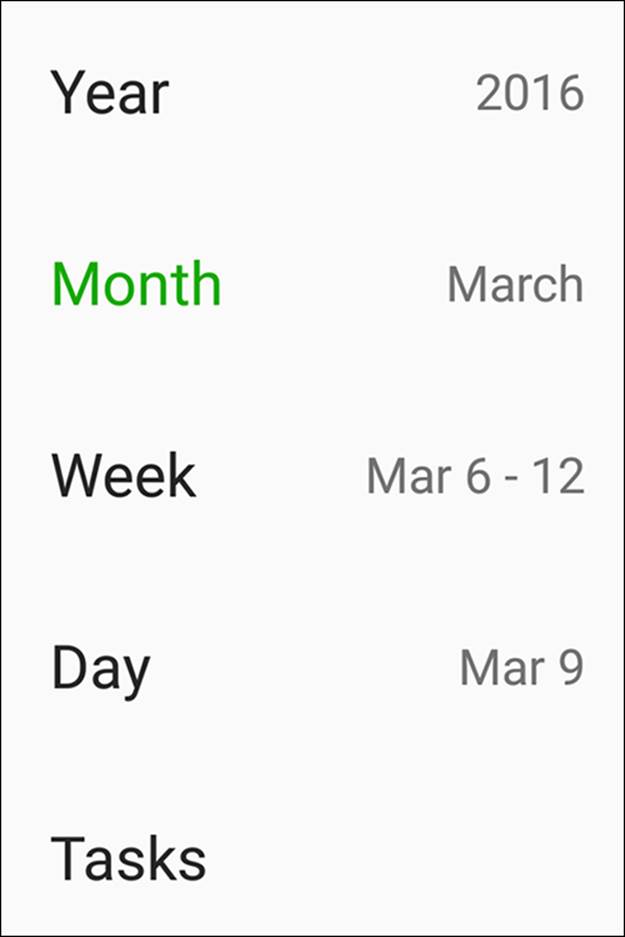
FIGURE 13-2: The Calendar Display Options pop-up menu.
If you tap Week, you see the weekly display, as shown in Figure 13-3.
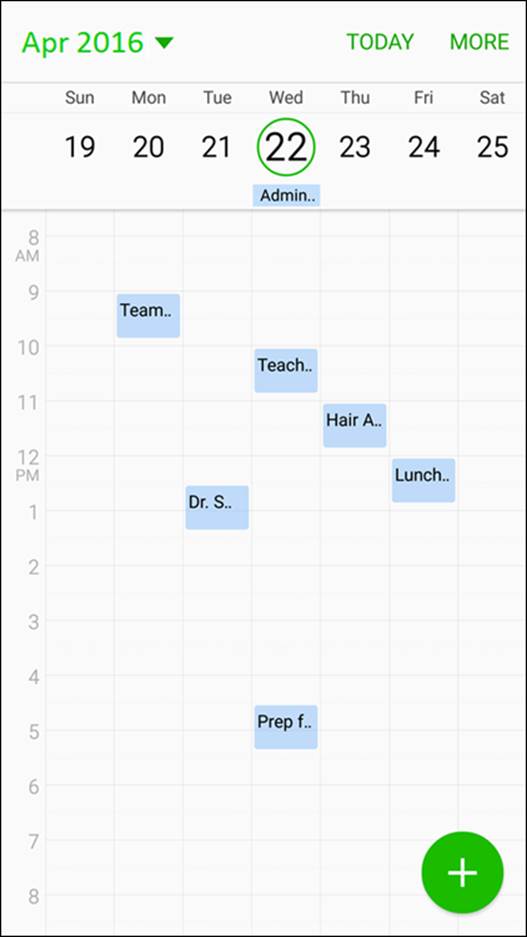
FIGURE 13-3: The weekly calendar display.
Or tap the Day button at the top of the calendar to show the daily display, as shown in Figure 13-4.
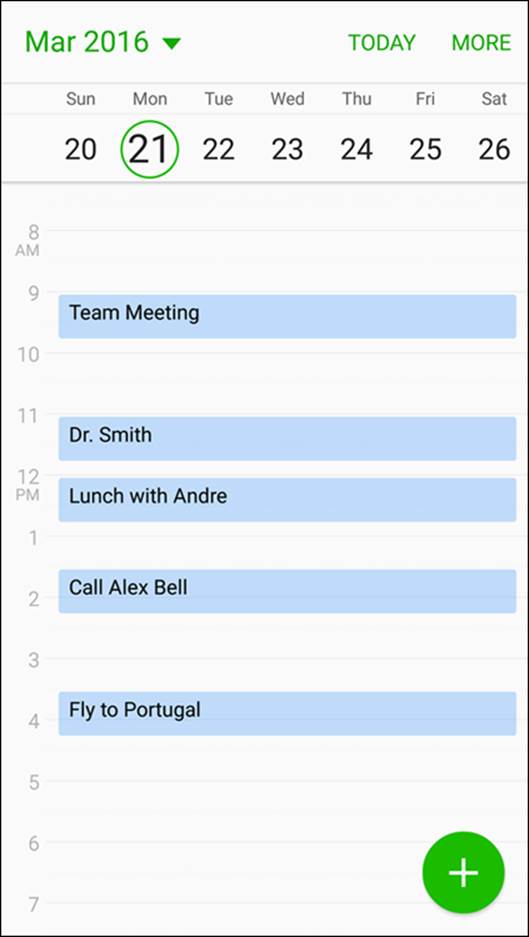
FIGURE 13-4: The daily calendar display.
To see what events you have upcoming, regardless of the day they’re on, you might prefer List view. Tap the List button at the top of the calendar to see a list of your activities.
The weekly and daily calendars show only a portion of the day. You can slide the screen to see the time slots earlier and later. You can also pinch and stretch to seem more or less of the time slots.
There is also an annual calendar, as seen in Figure 13-5. This is so busy that it does not allow you to see any appointments. It is primarily useful for setting dates out in the future.
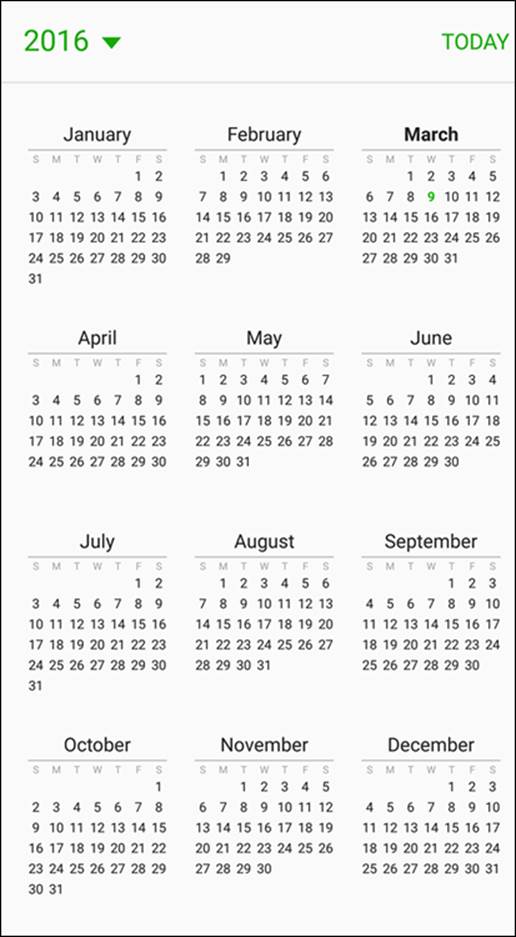
FIGURE 13-5: The annual calendar display.
Setting Other Display Options
In addition to the default display option, you can set other personal preferences for the calendar on your phone. To get to the settings for the calendar, tap the More link on the daily, weekly, or monthly calendars and tap Settings. Doing so brings up the screen shown in Figure 13-6.
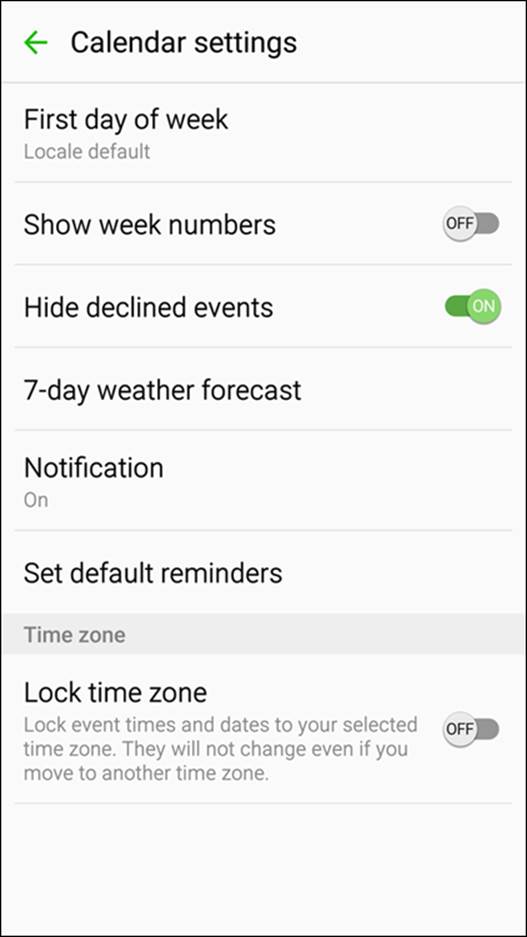
FIGURE 13-6: The Settings options for the calendar application.
You have the following options:
· First day of week: The standard in the United States is that a week is displayed from Sunday to Saturday. If you prefer the week to start on Saturday or Monday, you can change it here.
· Show week numbers: Some people prefer to see the week number on the weekly calendar. If you count yourself among those, check this option.
· Hide declined events: When some of us decline an event, we don’t care to hear about it again. Others may want to keep a reminder of the declined event in case the situation changes (or in case nothing better comes along). The default setting is to hide declined events; if you want to see them, deselect this box.
· 7-day weather forecast: If you look at the monthly calendar shown in Figure 13-1, you can see an image on some of the days representing the weather forecast. If you like seeing this, you can keep this information. If you feel it takes too much real estate on your screen, you can delete it.
· Notification: When an event is approaching, you can have the phone alert you with a pop-up, signal a notification on the status line, or do nothing. The default is to give you a notification, but you can change that option here.
· Set default reminders: It helps some of us to be reminded about an appointment a few minutes before we are to be somewhere. Others of us find this annoying. This setting lets you choose whether you get a reminder or not and how far in advance you will be reminded.
· Lock time zone: When you travel to a new time zone, your phone will take on the new time zone. Under most circumstances, this is a nice convenience. However, it may be confusing to some. If you prefer that the calendar remain in your home time zone, check this option.
Creating an Event on the Right Calendar
An important step in using a calendar when mobile is creating an event. It’s even more important to make sure that the event ends up on the right calendar. This section covers the steps to make this happen.
Creating, editing, and deleting an event
Here’s how to create an event — referred to as (well, yeah) an “event” — on your phone. Start from one of the calendar displays shown in Figures 13-1, 13-3, or 13-4. Tap the bright green circle with the plus (+) sign at the bottom right of the calendar. Doing so brings up the pop-up screen shown in Figure 13-7 (without the keyboard).
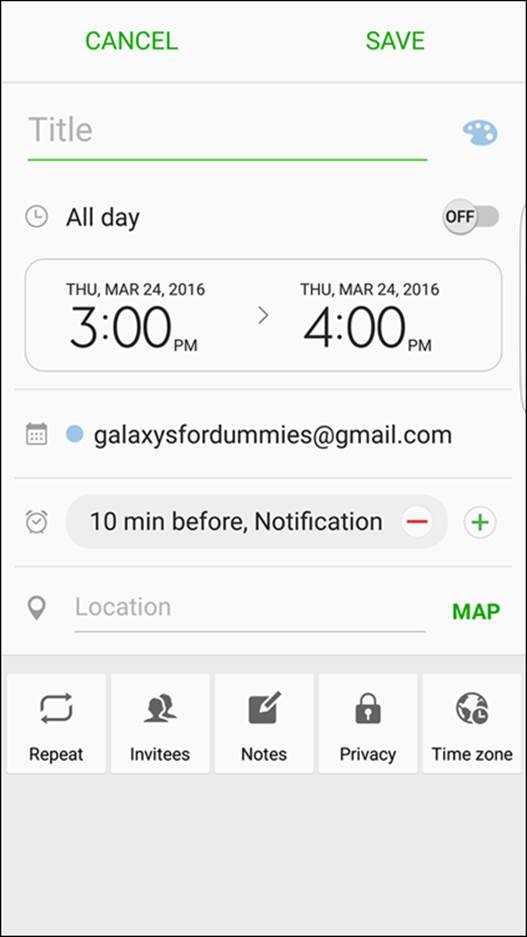
FIGURE 13-7: The Create Event screen.
The only required information to get things started is a memorable event name and the Start and End times.
You need the following information at hand when making an event:
· Calendar: Decide on which calendar you want to keep this event. Figure 13-7 shows that this event will be stored on the Gmail calendar. This is indicated by showing my Gmail account next to the blue dot in the middle of the screen. When you tap this selection, the phone presents you with the other calendars you’ve synced to your phone; you can store an event on any of them.
· Title: Call the event something descriptive so that you can remember what it is without having to open it up.
· Start and End: The two entry fields for the start and end times. Select the All Day toggle if the event is a full-day event.
· Notification: This field lets you set how soon before an event your phone will alert you that you have an upcoming event. This makes it less likely that you’ll be late to an appointment if you set this alert to accommodate your travel time.
· Location: This setting ties in to the Google Maps app, allowing you to enter an address or a landmark. You can also just enter text. If you want, you can enter more details on the meeting by adding:
· Repeat: This option is useful for recurring events, such as weekly meetings.
· Invitees: This allows you to have a group meeting by entering multiple contacts.
· Notes: Add information that you find useful about that meeting.
· Privacy: This is the same idea as the Show Me As option, but for non-Outlook-based calendars.
· Time zone: If you and everyone that is invited will be in the same time zone, you are set. If you happen to be in another time zone or some of the invitees are in other time zones, you can use this option to ensure that you are not setting a meeting off business hours, or worse, in the middle of the night.
After you fill in the obligatory (and any optional) fields and settings, tap the Save link at the top of the page. The event is stored in whichever calendar you selected when you sync.
After you save an event, you can edit or delete it:
· Edit: Open the event by tapping it from within one of the calendar views. This brings up the information as entered. Make your changes and tap Save. It’s changed when it syncs.
· Delete: To delete an event, start by tapping the entry on the screen. Tap the green Delete link at the top left. This brings up the pop-up as seen in Figure 13-8 to delete the event. Tap Delete. The event is gone.
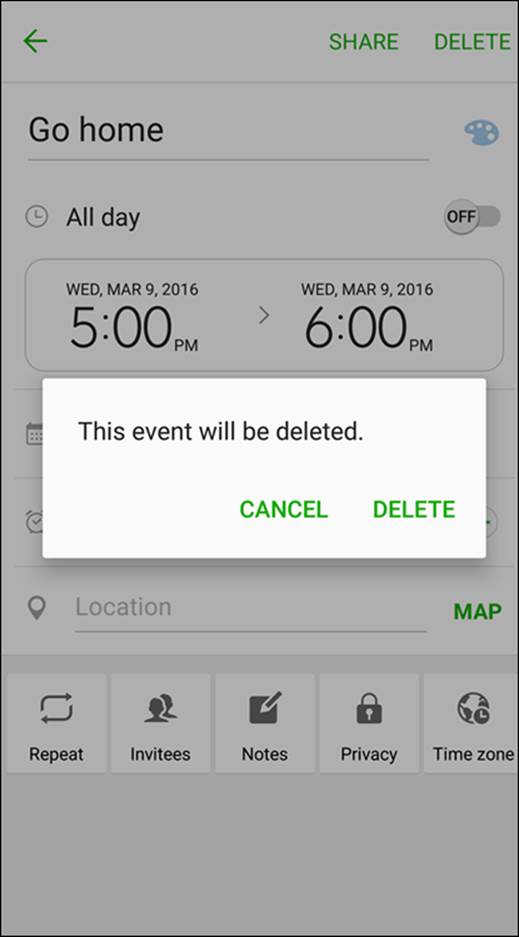
FIGURE 13-8: The Delete Event pop-up screen.
You can also create an event by tapping the calendar itself twice. Tapping it twice brings up a pop-up (refer to Figure 13-7) where you can enter the event details.
Keeping events separate and private
When you have multiple calendars stored in one place (in this case, your phone), you might get confused when you want to add a new event. It can be even more confusing when you need to add the real event on one calendar and a placeholder on another.
Suppose your boss is a jerk and to retain your sanity, you need to find a new job. You send your resume to the arch-rival firm, Plan B, which has offices across town. Plan B is interested and wants to interview you at 3 p.m. next Tuesday. All good news.
The problem is that your current boss demands that you track your every move on the company calendaring system. His draconian management style is to berate people if they’re not at their desks doing work when they’re not at a scheduled meeting. (By the way, I am not making up this scenario.)
You follow my drift. You don’t want Snidely Whiplash trudging through your calendar, sniffing out your plans to exit stage left, and making life more miserable if Plan B doesn’t work out. Instead, you want to put a reasonable-sounding placeholder on your work calendar, while putting the real event on your personal calendar. You can easily do this from your calendar on your Samsung Galaxy S7. When you’re making the event, you simply tell the phone where you want the event stored, making sure to keep each event exactly where it belongs.
The process begins with the Create Event screen. You bring this up by tapping the + sign in the green circle seen at the bottom-right corner of any of the calendars seen in Figures 13-1, 13-3, or 13-4. The information for the real event is shown on the left in Figure 13-9. The fake event is shown on the right. This is the one that is saved to your work email. The colored dot by the work address helps you be aware that this is a different calendar.

FIGURE 13-9: The Add an Event screen on your phone.
Now, when you look at your calendar on your phone, you see two events at the same time. (Check it out in Figure 13-10.) The Galaxy S7 doesn’t mind if you make two simultaneous events.
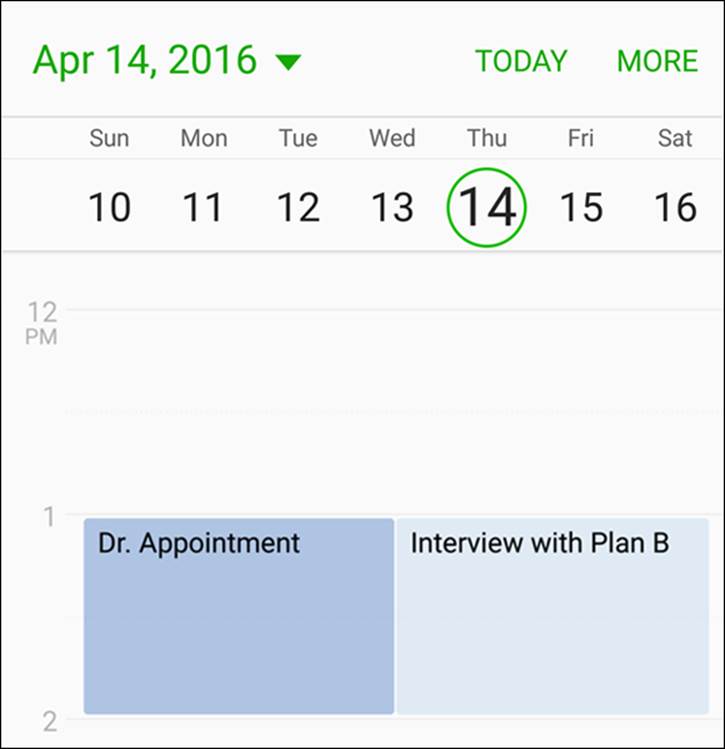
FIGURE 13-10: Two events on the same day on your phone calendar.
Under the circumstances, this is what you wanted to create. As long as your boss doesn’t see your phone, you’re safe — to try to find more fulfilling employment, that is.
All materials on the site are licensed Creative Commons Attribution-Sharealike 3.0 Unported CC BY-SA 3.0 & GNU Free Documentation License (GFDL)
If you are the copyright holder of any material contained on our site and intend to remove it, please contact our site administrator for approval.
© 2016-2026 All site design rights belong to S.Y.A.