Samsung Galaxy S7 For Dummies (2016)
Part I. Getting Started with the Samsung Galaxy S7
Chapter 2. Beginning at the Beginning
IN THIS CHAPTER
Turning on your phone
Charging the phone and managing battery life
Navigating your phone
Turning off your phone and using sleep mode
In this chapter, I fill you in on the basics of using your new Samsung Galaxy S7. You start by turning on your phone. (I told you I was covering the basics!) I guide you through charging your phone and getting the most out of your phone’s battery. Stick with me for a basic tour of your phone’s buttons and other features. Then I end by telling you how to turn off your phone or put it in “sleep” mode.
 Unless you’re new to mobile phones in general — and smartphones in particular — you might want to skip this chapter. If the term “smartphone” is foreign to you, you probably haven’t used one before, and reading this chapter won’t hurt. And, just so you know, asmartphone is just a mobile phone on which you can download and run applications that are better than what comes preloaded on a phone right out of the box.
First Things First: Turning On Your Phone
When you open the box of your new phone, the packaging will present you with your phone, wrapped in plastic, readily accessible. If you haven’t already, take the phone out of the box and remove any protective covering material on the screen. (There is no need to keep the plastic. It is not an effective screen protector!)
First things first. The Power button is on the right side of the phone. You can see where in Figure 2-1. Press the Power button for a second and see whether it vibrates and the screen lights up. Hopefully, your phone arrived with enough electrical charge that you won’t have to plug it into an outlet right away. You can enjoy your new phone for the first day without having to charge it.
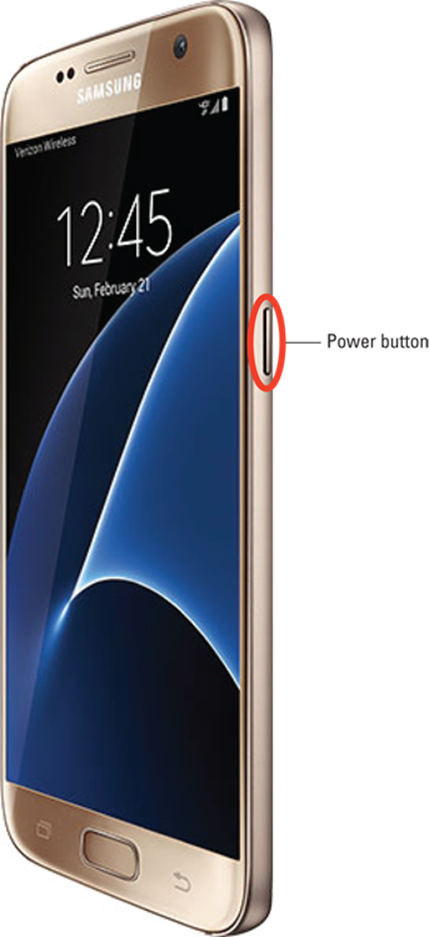
FIGURE 2-1: The Power button on the Galaxy S7.
The phones that you get at the stores of most cellular carriers usually come with the battery installed, partially charged, and registered with the network.
 If the screen does light up, don’t hold the Power button too long, or the phone might turn off.
If the phone screen doesn’t light up (rats!), you need to charge the battery. Here’s the rub: It’s important to fully charge the battery for 24 hours, or at least overnight, so that it will last as long as possible. That means that you have to wait to use your beautiful new phone. Sorry.
 THE NITTY-GRITTY OF HOW YOUR PHONE WORKS
As soon as you turn on your phone, several things happen. As the phone is powering up, it begins transmitting information to (and receiving information from) nearby cellular towers. The first information exchanged includes your phone’s electronic serial number. Every cellphone has its own unique serial number built into the hardware of the phone; the serial number in current-generation cellphones can’t be duplicated or used by any other phone.
This electronic serial number is also called an International Mobile Equipment Identity (IMEI) number. It is 14 or 15 digits long. Cellular equipment is fine with long numbers. We mere mortals have enough trouble remembering 10-digit numbers, even with the hack of having only a limited number of area codes. To help us out, you and I get to use the shorter number and the cellular equipment happily keeps track of the 10-digit and the 14/15-digit numbers and shows us only what we can handle.
It doesn’t matter to the phone or the cellular tower if you’re near your home when you turn on your phone — and that’s the joy of mobile phones. All cellular networks have agreements that allow you to use cellular networks in other parts of the country and, sometimes, around the world.
That said, a call outside your cellular provider’s own network may be expensive. Within the United States, many service plans allow you to pay the same rate if you use your phone anywhere in the United States to call anywhere in the United States. If you travel outside the United States, even to Canada, you might end up paying through the nose. Remember: Before you leave on a trip, check with your cellular carrier about your rates. Even if you travel internationally only a few times yearly, a different service plan may work better for you. Your cellular carrier can fill you in on your options.
Charging Your Phone and Managing Battery Life
Although you probably don’t have to plug your phone into an outlet right away, here’s a handy rule: The first time you do plug it in, allow it to charge overnight.
You’ll hear all kinds of “battery lore” left over from earlier battery technologies. For example, lithium-ion (Li-ion) batteries don’t have a “memory” (a bad thing for a battery) as nickel-cadmium (NiCad) batteries did. And the Samsung Galaxy S7 does use Li-ion batteries. That means that you don’t have to make sure that the battery fully discharges before you recharge it.
Your phone comes with a two-piece battery charger (cable and the transformer), as shown in Figure 2-2.
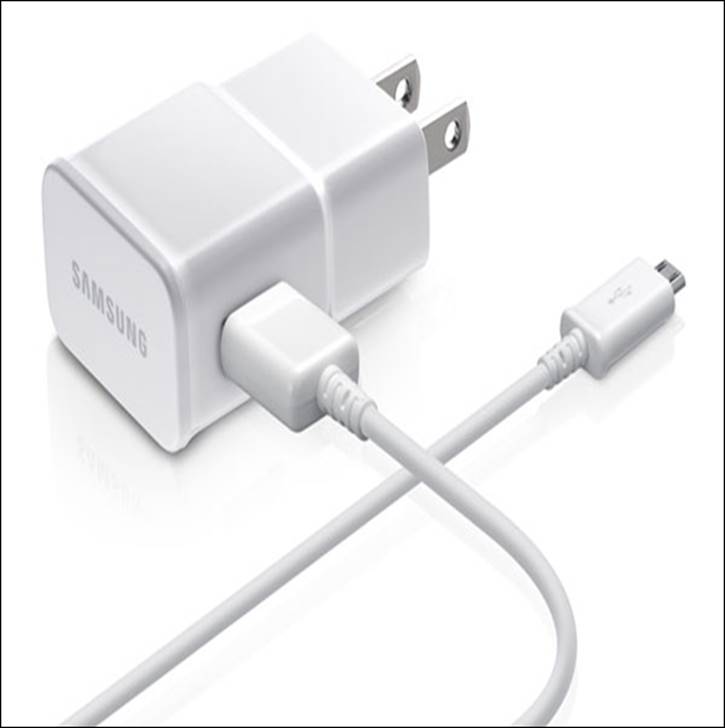
FIGURE 2-2: The transformer and USB cable for charging your phone.
The cable has two ends: one end that plugs into the phone, and the other that’s a standard USB connector. The phone end is a small connector called a micro-USB that is used on many Samsung devices and is the standard for charging cellphones and other small electronics — and for connecting them to computers.
To charge the phone, you have two choices:
· Plug the transformer into a wall socket and then plug the cable’s USB plug into the USB receptacle in the transformer.
· Plug the USB on the cable into a USB port on your PC.
Then you plug the small end of the cable into the phone. The port is on the bottom of the phone. You will see that the top is a little smaller than the bottom. It’s a trapezoid with rounded edges. Orient the plug with the hole in the phone and make sure that you push the little metal plug all the way in.
It doesn’t really matter in what order you plug in things. However, if you use the USB port on a PC, the PC needs to be powered on for the phone to charge.
Unplug the transformer when you aren’t charging your phone. A charger left plugged in will draw a small but continuous stream of power.
If your phone is off when you’re charging the battery, an image of a battery appears onscreen for a moment. The green portion of the battery indicates the amount of charge within the battery. You can get the image to reappear with a quick press of the Power button. This image tells you the status of the battery without your having to turn on the phone.
If your phone is on, you see a small battery icon at the top of the screen showing how much charge is in the phone’s battery. When the battery in the phone is fully charged, it vibrates to let you know that it’s done charging and that you should unplug the phone and charger.
It takes only a few hours to go from a dead battery to a fully charged battery. Other than the first time you charge the phone, you don’t need to wait for the battery to be fully charged. You can partially recharge and run if you want.
In addition to the transformer and USB cable that come with the phone, you have other optional charging tools:
· USB travel charger: If you already have a USB travel charger, you can leave the transformer at home. This accessory will run you about $15. You still need your cable, although any USB-to-micro-USB cable should work.
· Car charger: You can buy a charger with a USB port that plugs into the power socket/cigarette lighter in a car. This is convenient if you spend a lot of time in your car. The list price is $30, but you can get the real Samsung car charger for less at some online stores.
· Portable external charger: You can buy a portable external charger with a micro-USB port that you can use to recharge your phone without having to plug into the power socket or cigarette lighter in a car. You charge this gizmo before your travel and connect it only when the charge in your phone starts to get low. These usually involve re-chargeable batteries, but some of these products use photovoltaic cells to transform light into power. As long as there is a USB port (the female part of the USB), all you need is your cable. These chargers can cost from $30 to $100 on up. See some options in Figure 2-3.
· Wireless charger: This option is slick. You simply put your phone on a charging mat or in a cradle, and the phone battery will start charging! Your Galaxy S7 uses the widely adopted Qi standard (pronounced chee). This option saves you from having to plug and unplug your phone.
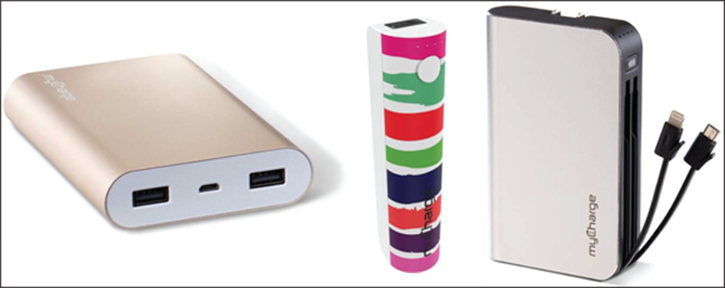
FIGURE 2-3: Some portable external charging options.
 Ideally, use Samsung chargers or chargers from reputable manufacturers or retailers. The power specifications for USB ports are standardized. Reputable manufactures comply with these standards, but less reputable manufacturers might not. Cheap USB chargers physically fit the USB end of the cable that goes to your phone. However, Li-ion batteries are sensitive to voltage. There are many, many creative options available outside the store where you bought your phone, but avoid the allure of low price.
Li-ion batteries do not like extreme heat. A warm room is one thing, but if you leave your phone on the dashboard all day in Phoenix during the summer, your battery will die an untimely and permanent death. When your battery dies, your phone dies because the Galaxy S7 does not have a user-replaceable battery. If your phone is with you, and you can stand the heat, your battery will be fine.
Be aware that the conditions that make for a good charge with a photocell also tend to make for high heat. It will do you little good to have a beautifully functioning charger and a dead phone.
INCREASING YOUR CHARGING KNOWLEDGE
There are so many charging options out there these days, it can be confusing. My simple advice is to use a micro-USB cable from a reliable supplier. This is completely valid. However, some well-meaning “friends” may try to lead you astray and try something else. Do not allow yourself to be fooled.
The following figure shows some of the options that are out in the market right now. The micro-USB is on the left. The ones to the right will not work with your phone. Buying these would be a waste of money. Trying any of these won’t fit in the receptacle on your phone.
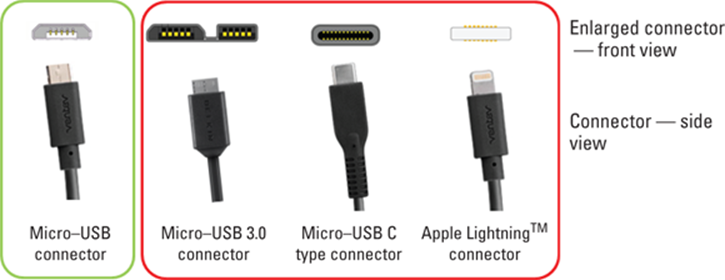
The first option is the micro-USB 3.0. The front view of the micro-USB 3.0 connector looks like the micro-USB connector front view with a rectangle welded on to the right. Frankly, it kinda looks silly, which is why it never really caught on. Samsung used it on the Galaxy S5, which is why you might see it in some stores.
The next connector type is the micro-USB C type. This connector type is just coming on the market and shows a lot of promise. For a number of reasons, Samsung chose not to use it on the S7. This connector can charge a device very quickly. It does this because this connector communicates with the device to ensure that the battery doesn’t get too hot. If the battery gets hot, the connector knows to slow down the amount of power and give the battery a chance to cool.
The third option is the Apple Lighting cable. This is unlike the others because the connectors are visible rather than being protected by a metal shroud. The best thing about it is that it costs more, as you can see in the figure that shows car charges from Ventev (one of those reputable suppliers I have told you about).

Images courtesy of Ventev
The same product has a $5 premium for the Apple connector. (Okay. The Apple cable has the smarts I mention for the Type C connector and prevents the Apple iPhone from overheating.)
Navigating the Galaxy S7
Galaxy S7 phone devices differ from many other mobile phones in design: They have significantly fewer hardware buttons (physical buttons on the phone). They rely much more heavily on software buttons that appear onscreen.
In this section, I guide you through your phone’s buttons.
The phone’s hardware buttons
Samsung has reduced the number of hardware buttons on the Galaxy S7. There are only four: the Power button, the Volume button, the Camera button, and the Home button. Before you get too far into using your phone, orient yourself to be sure that you’re looking at the correct side of the phone. When I refer to the left or right of the phone, I’m assuming a vertical orientation (meaning you’re not holding the phone sideways) and that you’re looking at the phone’s screen.
The Power button
The Power button (refer to Figure 2-1) is on right side of the phone, toward the top when you hold it in vertical orientation.
In addition to powering up the phone, pressing the Power button puts the device into sleep mode if you press it for a moment while the phone is On. Sleep mode shuts off the screen and suspends most running applications.
The phone automatically goes into sleep mode after about 30 seconds of inactivity to save power, but you might want to do this manually when you put away your phone. The Super AMOLED (Active-Matrix Organic Light-Emitting Diode) screen on your Samsung Galaxy S7 is cool, but it also uses a lot of power.
Don’t confuse sleep mode with powering off. Because the screen is the biggest user of power on your phone, having the screen go blank saves battery life. The phone is still alert to any incoming calls; when someone calls, the screen automatically lights up.
The Volume button(s)
Technically, there are two Volume buttons: one to increase the volume, and the other to lower it. Their locations are shown in Figure 2-4.
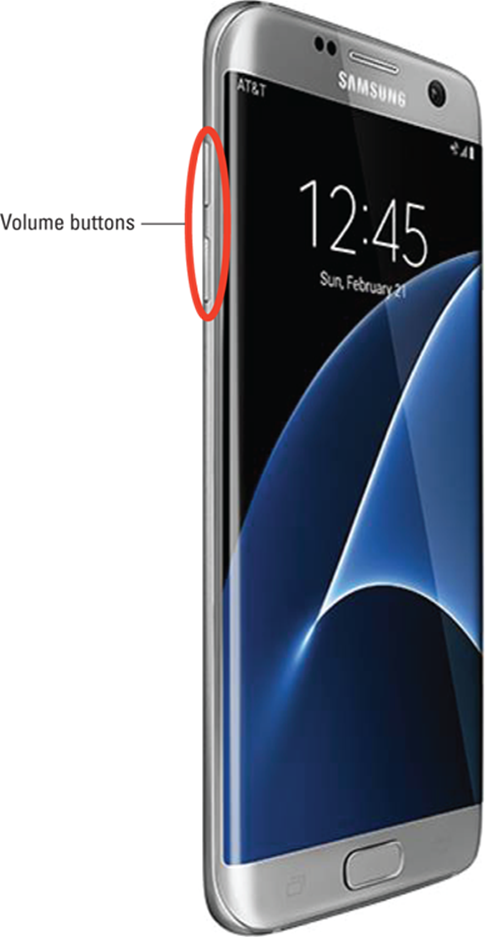
FIGURE 2-4: The Galaxy S7 Volume buttons on the left.
The Volume buttons control the volume of all the audio sources on the phone, including
· The phone ringer for when a call comes in (ringtone)
· The notifications that occur only when you’re not talking on the phone, such as the optional ping that lets you know you’ve received a text or email
· The phone headset when you’re talking on the phone
· The volume from the digital music and video player (media)
The volume controls are aware of the context; they can tell which volume you’re changing. For example, if you’re listening to music, adjusting volume raises or lowers the music volume, but leaves the ringer and phone-earpiece volumes unchanged.
The Volume buttons are complementary to software settings you can make within the applications. For example, you can open the music-player software and turn up the volume on the appropriate screen. Then you can use the hardware buttons to turn down the volume, and you’ll see the volume setting on the screen go down.
Another option is to go to a settings screen and set the volume levels for each scenario. Here’s how to do that:
1. From the Home screen, press either Volume button.
You can press it either up or down. Doing so brings up the screen shown in Figure 2-5.
If you press the volume up or down, the ring tone gets louder or softer. Hold off on this tweak for now and go to the next step.
2. From this screen, tap the arrow down in the upper-right corner.
Tapping it brings up the screen shown in Figure 2-6.
3. From the screen shown in Figure 2-6, set the volume at the desired setting.
You can adjust the volume of any setting by placing your finger on the dot on the slider image. The dot will get bigger; you can slide it to the left to lower this particular volume setting or to the right to raise it.

FIGURE 2-5: The ringer volume pop-up.
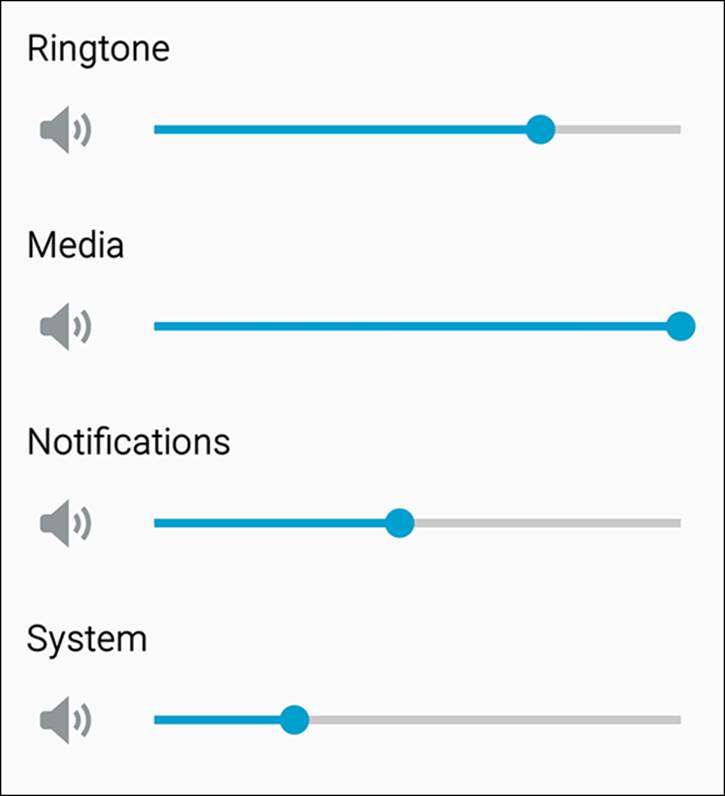
FIGURE 2-6: The All Volume Settings pop-up.
The Home button
The biggest button on the phone is the Home button (see Figure 2-7). It’s on the bottom of the front screen.
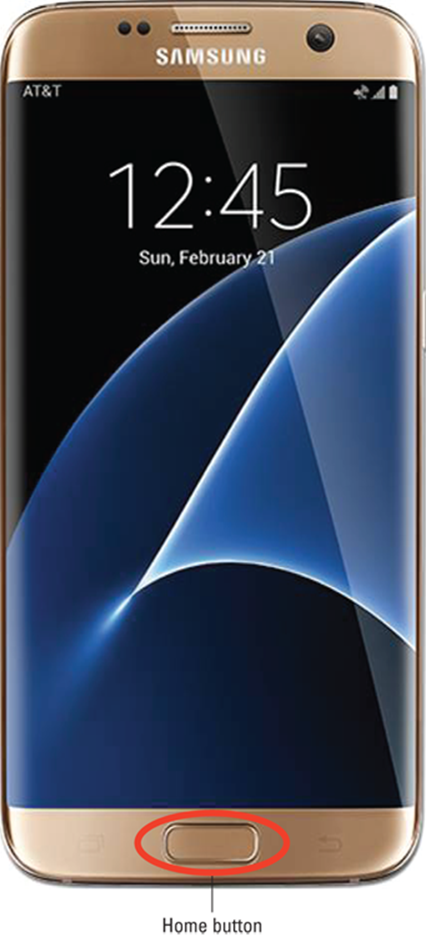
FIGURE 2-7: The Galaxy S7 Home button on the front.
The Home button brings you back to the Home screen from wherever you are in an application. If you’re working on applications and feel like you’re helplessly lost, don’t worry. Press the Home button, close your eyes, tap your heels together three times, and think to yourself, “There’s no place like home,” and you will be brought back to the Home screen.
 You don’t really need to do all that other stuff after pressing the Home button. Just pressing the Home button does the trick.
The touchscreen
To cram all the information that you need onto one screen, Samsung takes the modern approach to screen layout. You’ll want to become familiar with several finger-navigation motions used to work with your screen.
Before diving in, though, here’s a small list of terms you need to know:
· Icon: An icon is a little image. Tapping an icon launches an application or performs some function, such as making a telephone call.
· Button: A button on a touchscreen is meant to look like a three-dimensional button that you would push on, say, a telephone. Buttons are typically labeled to tell you what they do when you tap them. For example, you’ll see buttons labeled Save or Send.
· Hyperlink: Sometimes called a link for short, a hyperlink is text that performs some function when you tap it. Usually text is lifeless. If you tap a word and it does nothing, then it’s just text. If you tap a word and it launches a website or causes a screen to pop up, it’s a hyperlink.
· Thumbnail: A thumbnail is a small, low-resolution version of a larger, high-resolution picture stored somewhere else.
With this background, it’s time to discuss the motions you’ll be using on the touchscreen.
 You need to clean the touchscreen glass from time to time. The glass on your phone is Gorilla Glass (made by Corning) — the toughest stuff available to protect against breakage. Use a soft cloth or microfiber to get fingerprints off. You can even wipe the touchscreen on your clothes. However, never use a paper towel! Over time, glass is no match for the fibers in the humble paper towel.
Tap
Often, you just tap the screen to make things happen (as when you launch an app) or select options. Think of a tap as a single mouse click on a computer screen. A tap is simply a touch on the screen, much like using a touchscreen at a retail kiosk. Figure 2-8 shows what the tap motion should look like.
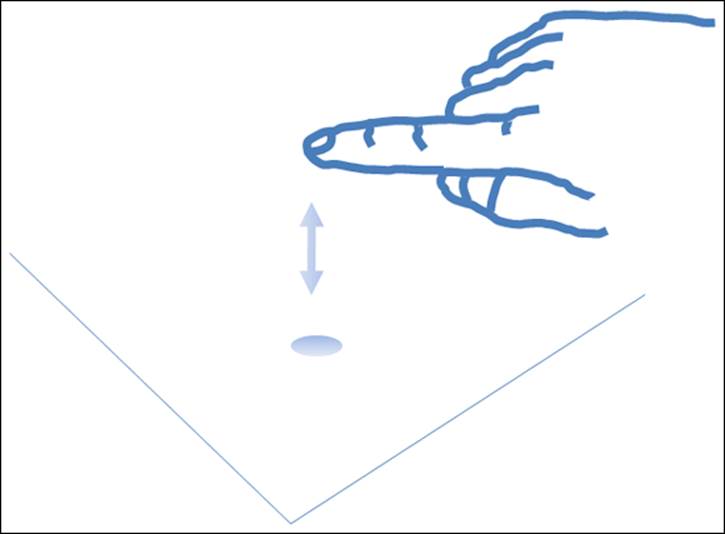
FIGURE 2-8: The tap motion.
One difference between a mouse click on a computer and a tap on a Galaxy S7 phone is that a single tap launches applications on the phone in the same way that a double-click of the mouse launches an application on a computer.
A tap is different from press and hold (see the next section). If you leave your finger on the screen for more than an instant, the phone thinks you want to do something other than launch an application.
Press and hold
Press and hold, as the name implies, involves putting your finger on an icon on the screen and leaving it there for more than a second. What happens when you leave your finger on an icon depends upon the situation.
For example, when you press and hold on an application on the Home screen (the screen that comes up after you turn on the phone), a garbage-can icon appears onscreen. This is to remove that icon from that screen. And when you press and hold an application icon from the list of applications, the phone assumes that you want to copy that application to your Home screen. Don’t worry if these distinctions might not make sense yet. The point is that you should be familiar with holding and pressing — and that it’s different from tapping.
You don’t need to tap or press and hold very hard for the phone to know that you want it to do something. Neither do you need to worry about breaking the glass, even by pressing on it very hard. If you hold the phone in one hand and tap with the other, you’ll be fine. I suppose you might break the glass on the phone if you put it on the floor and press up into a one-fingered handstand. I don’t recommend that, but if you do try it, please post the video on YouTube.
On average, a person calls 911 about once every year. Usually, you call 911 because of a stressful situation. Like every phone, the Samsung Galaxy S7 has a special stress sensor that causes it to lock up when you need it most. Okay, not really, but it seems that way. When you’re stressed, it’s easy to think that you’re tapping when you’re actually pressing and holding. Be aware of this tendency and remember to tap.
Moving around the screen or to the next screen
Additional finger motions help you move around the screens and to adjust the scaling for images that you want on the screen. Mastering these motions is important to getting the most from your phone.
The first step is navigating the screen to access what’s not visible onscreen. Think of this as navigating a regular computer screen, where you use a horizontal scroll bar to access information to the right or left of what’s visible on your monitor, or a vertical scroll bar to move you up and down on a screen.
The same concept works on your phone. To overcome the practical realities of screen size on a phone that will fit into your pocket, the Galaxy S7 phone uses a panorama screen layout, meaning that you keep scrolling left or right (or maybe up and down) to access different screens.
In a nutshell, although the full width of a screen is accessible, only the part bounded by the physical screen of the Galaxy S7 phone is visible on the display. Depending upon the circumstances, you have several ways to get to information not visible on the active screen. These actions include drag, flicks, pinch and stretch, and double taps. I cover all these gestures in the following sections.
Drag
The simplest finger motion on the phone is the drag. You place your finger on a point on the screen and then drag the image with your finger. Then you lift your finger. Figure 2-9 shows what the motion looks like.
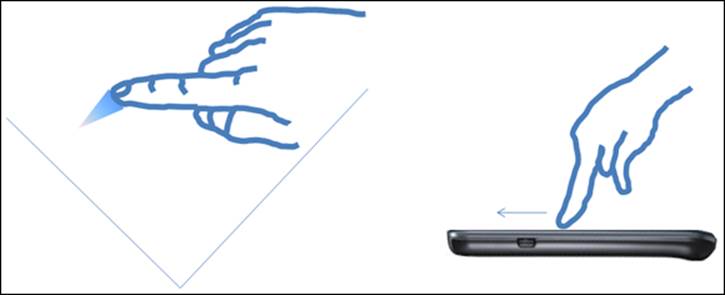
FIGURE 2-9: The drag motion for controlled movement.
Dragging allows you to move slowly around the panorama. This motion is like clicking a scroll bar and moving it slowly.
Flick
To move quickly around the panorama, you can flick the screen to move in the direction of your flick (see Figure 2-10).
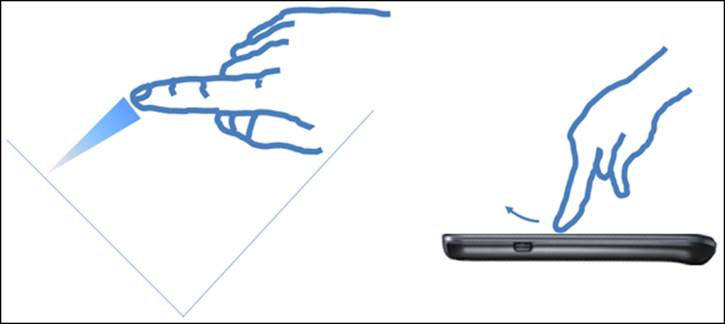
FIGURE 2-10: Use a flick motion for faster movement.
Better control of this motion comes with practice. In general, the faster the flick, the more the panorama moves. However, some screens (such as the extended Home screen) move only one screen to the right or left, no matter how fast you flick.
Pinch and stretch
Some screens allow you to change the scale of images you view on your screen. When this feature is active, the Zoom options change the magnification of the area on the screen. You can zoom out to see more features at a smaller size or zoom in to see more detail at a larger size.
To zoom out, you put two fingers (apart) on the screen and pull them together to pinch the image. Make sure you’re centered on the spot that you want to see in more detail. The pinch motion is shows in Figure 2-11.

FIGURE 2-11: Use the pinch motion to zoom out.
The opposite motion is to zoom in. This involves the stretch motion, as shown in Figure 2-12. You place two fingers (close together) and stretch them apart.
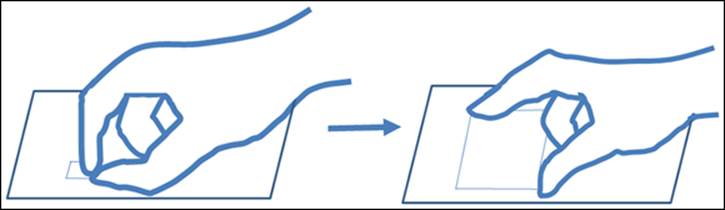
FIGURE 2-12: Use the stretch motion to zoom in.
Double tap
The double tap (shown in Figure 2-13) just means tapping the same button area on the screen twice in rapid succession. You use the double tap to jump between a zoomed-in and a zoomed-out image to get you back to the previous resolution. This option saves you frustration in getting back to a familiar perspective.
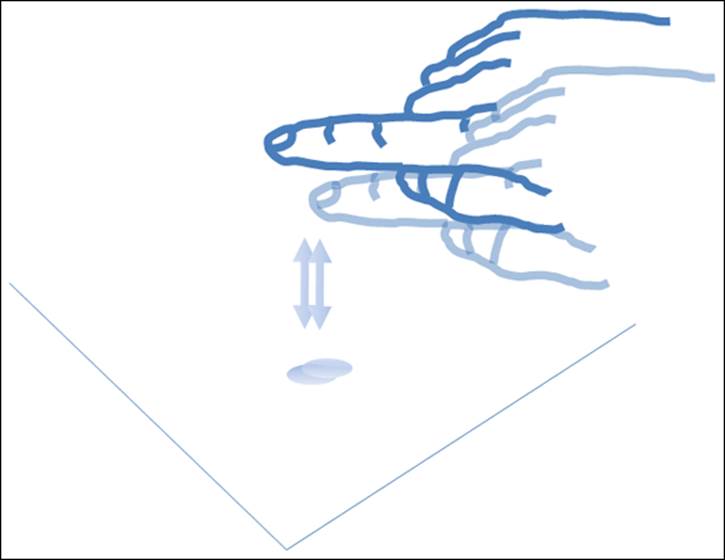
FIGURE 2-13: The double-tap motion.
 When you double tap, time the taps so that the phone doesn’t interpret them as two separate taps. With a little practice, you’ll master the timing of the second tap.
The extended Home screen
The Home screen is the first screen you see when the phone is done with setting up. Additional screens off to the right and left. make up the extended Home screen. They can be seen as a panorama in Figure 2-14.
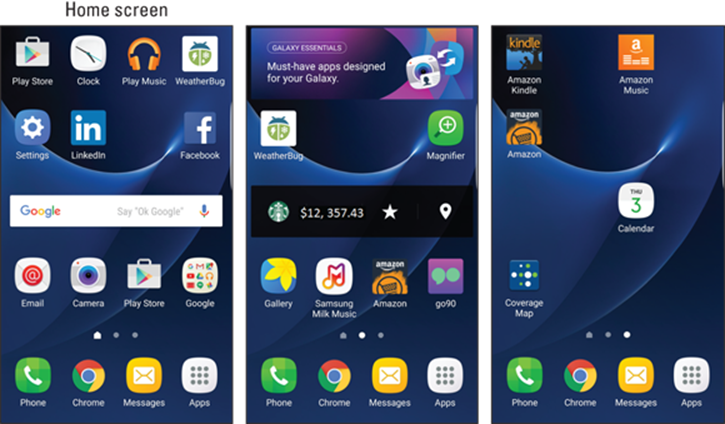
FIGURE 2-14: The Galaxy S7 phone panorama display of the extended Home screen.
At any given moment, you see only one screen at a time. You navigate among the screen by flicking to the right and left. Pressing the Home button will always bring you back to one of these screens. Right now, the left-most screen is designated as the Home screen.
The extended Home screen is where you can organize icons and other functions to best make the phone convenient for you. Out of the box, Samsung and your cellular carrier have worked together to create a starting point for you. Beyond that, though, you have lots of ways you can customize your Home screen for easy access to the things that are most important to you. Much of the book covers all the things that the phone can do, but a recurring theme is how to put your favorite capabilities on your Home screen, if you wish.
To start, check out the layout of the Home screen and how it relates to other areas of the phone. Knowing these areas is important for basic navigation.
Figure 2-15 shows a typical Home screen and highlights three important areas on the phone:
· The notification area: This part of the screen presents you with small icons that let you know if something important is up, like battery life.
· The primary shortcuts: These five icons remain stationary as you move across the Home screen. If you notice in Figure 2-15, these have been determined by Samsung and your cellular carrier to be the five most important applications on your phone and are on all the screens.
· The Function keys: These three keys control essential phone functions, regardless of what else is going on at the moment with the phone.
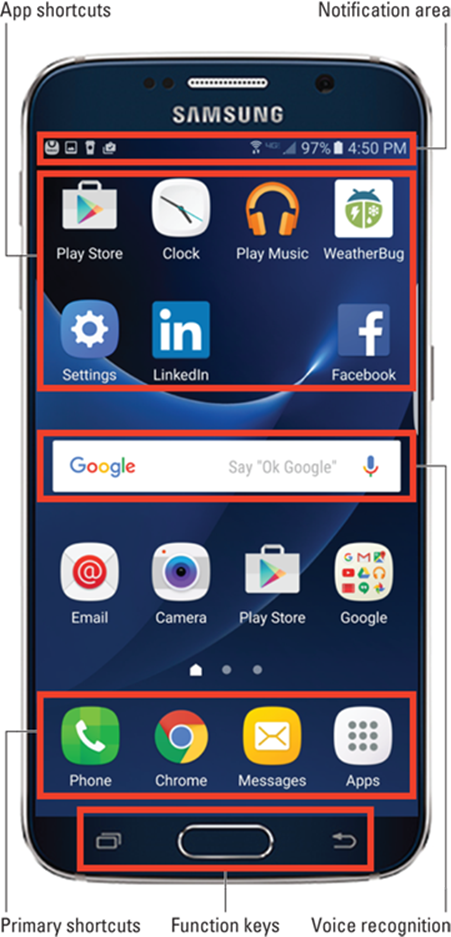
FIGURE 2-15: Important areas on the Galaxy S7 phone and Home screen.
There are a series of dots just above the primary shortcuts on the extended Home screen. You may also notice that one of the dots isn’t just a dot — it’s a little house. That is the “home” Home screen. The brightest dot indicates where you are among the screens. You can navigate among screens by dragging the screen to the left or right. This moves you one screen at a time. You can also jump multiple screens by tapping on the dot that corresponds to the screen number you want to see or by dragging the dots to the screen you want to see. The following sections give you more detail on each area.
Adding shortcuts to the Home screen
You have a lot of screen real estate where you can put icons of your favorite applications and widgets (refer to Figure 2-14). (Widgets are small apps that take care of simple functions, like displaying time or the status of your battery.) You can add shortcuts to the apps and to these widgets to your Home screen by following these steps:
1. From the extended Home screen page where there is some space for the icon of an app, tap the Apps icon on the primary shortcuts.
This brings up a directory of all the apps you currently have on the phone. The page shown in Figure 2-16 shows just one page. The number of apps and pages for their icons is practically unlimited. (I cover how to add new apps in Chapter 8.)
2. Press and hold the icon of the app you want to add.
The screen with the app icons fades, and the page with the space for the icon appears with the icon under your finger.
3. Move the icon to where you want it to be on the Home screen page and release.
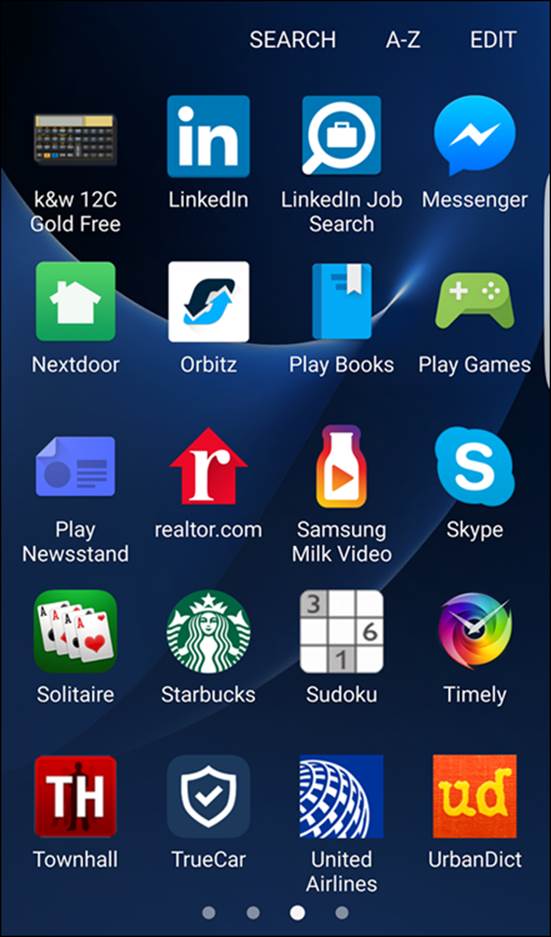
FIGURE 2-16: An Apps page.
Done.
Taking away or moving shortcuts
Say that you put the shortcut on the wrong spot. No problem. Press and hold the icon. The screen grays out except for your icon. It looks something like Figure 2-17, except the icon you pressed is in full color under your finger.
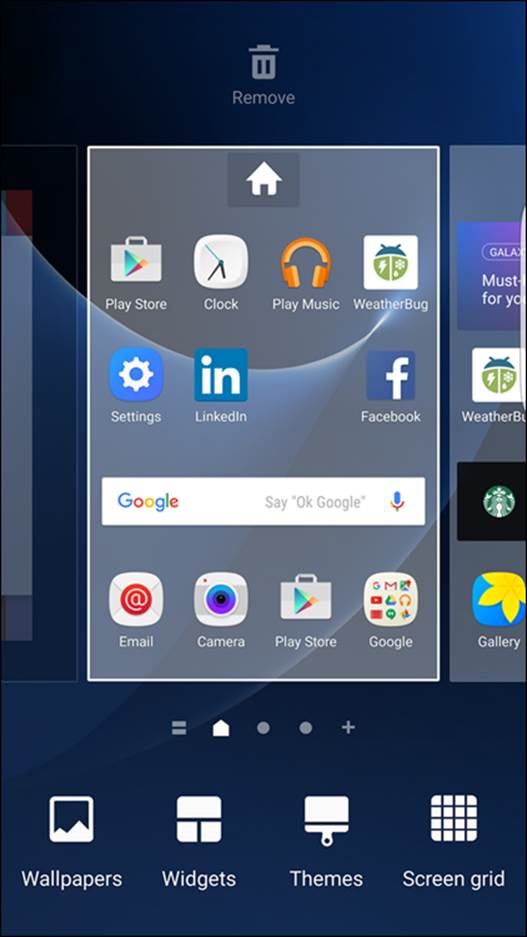
FIGURE 2-17: The extended Home screen in repositioning mode.
You then drag the icon to the place on the screen you want it to reside and release. Taking a shortcut off your Home screen is simple: Press and hold the icon on the screen. In a moment, you see the grayed out home page. Drag the doomed shortcut to the garbage can, and off it goes to its maker.
It’s gone, but if you made a mistake, you can get it back easily enough. To re-create it, simply go back to the App Menu key and follow the process again.
The notification area and screen
The notification area is located at the top of the phone (refer to Figure 2-15). Here, you see little status icons. Maybe you received a text or an email, or you’ll see an application needs some tending to.
Think of the notification area as a special email inbox where your carrier (or even the phone itself) can give you important information about what’s happening with your phone. These little icons at the top tell you the condition of the different radio systems on your phone: The number of bars shown gives you an indication of signal strength, and usually the phone will also tell you what kind of mobile data speed you’re getting – such as 3G or 4G.
You could take the time to learn the meanings of all the little icons that might come up, but that would take you a while. A more convenient option is to touch the notification area and pull it down, as shown in Figure 2-18.
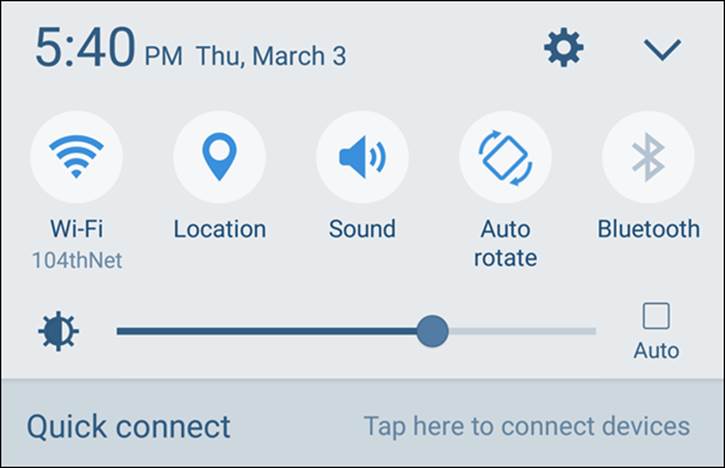
FIGURE 2-18: Notification area pull down.
The rest of the screen is written so that you can understand what’s going on and what, if anything, you’re expected to do — for example, if you see that you have connected to the Wi-Fi access point you intended.
When you’re finished reading the notifications, you slide your finger back up to the top. If this screen gets too full, you can clear it by tapping the Clear button. You can also clear notifications one at a time by touching each one and swiping it to the side.
If you want a shortcut to control some key phone capabilities, you can tap one of the five, dark-blue circles. For example, if you want to turn off Wi-Fi, you could just tap the Wi-Fi icon. This would save you from having to get in to Settings to do the same thing.
If you want to add more of these, simply tap the arrow down to see your Quick Settings options. These are seen in Figure 2-19, although you may have slightly different choices on your phone.
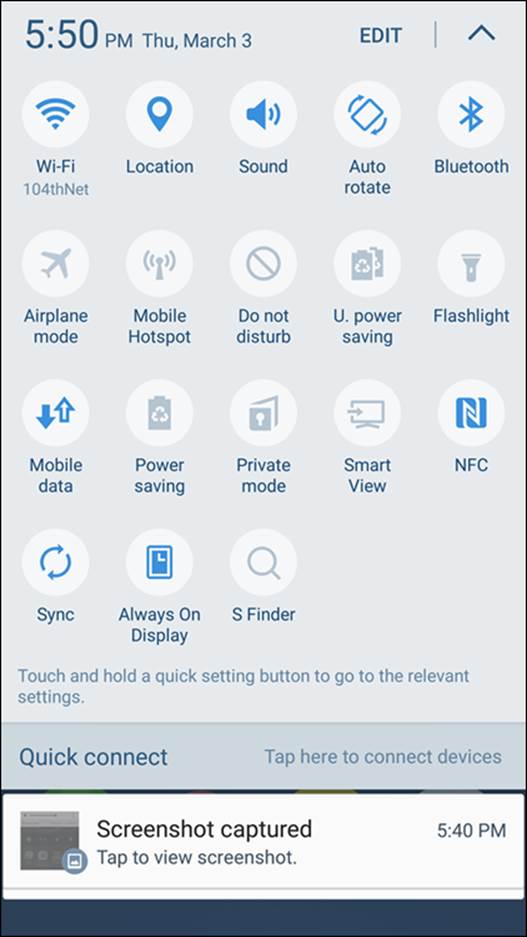
FIGURE 2-19: Notification area options.
For example, many people find the Flashlight capability to be handy. If it is not already there when you pull down the notifications screen, see whether it is among the options. If it is, press and hold on the flashlight icon. Then drag it to the top. The other icons scatter, and then you release it. You turn on the flashlight by tapping it. Try it and see.
The Device Function keys
At the bottom of the screen, below the rectangular screen display, are three important buttons: the Device Function keys. They’re always present for you to navigate your phone even though the backlight might switch off to hide their presence. Whatever else you’re doing on the phone, these buttons can take over. I talk about the Home button earlier in this chapter. The other buttons are equally cool.
Recent Apps button
The button to the left of the Home button is the Recent Apps button. Tapping the button brings up a list of the open apps. This is handy to navigate between running apps. Figure 2-20 shows a typical screen of recent apps.
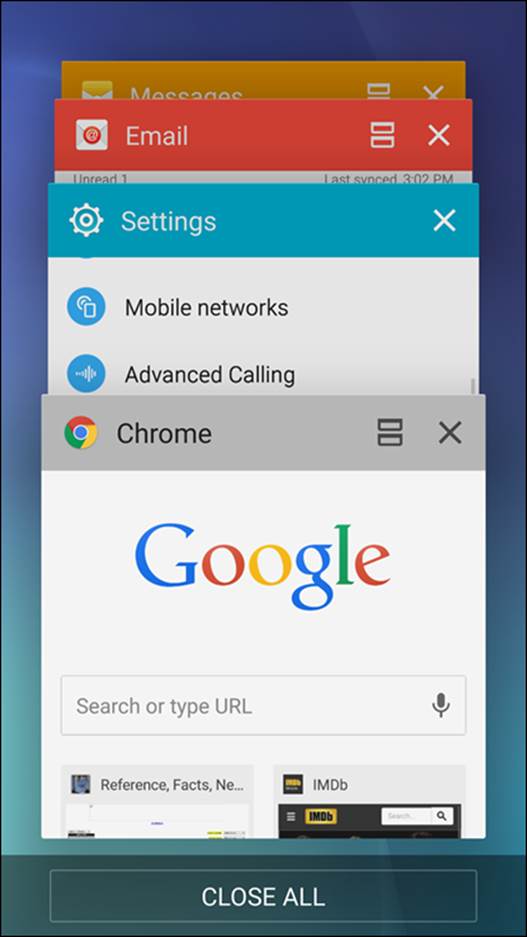
FIGURE 2-20: Recent Apps screen.
You can scroll among the open apps by flicking up or down. You can jump to one of these apps by tapping somewhere on the image. You can also shut down one of the apps by tapping the x on the upper-right corner. You can shut them all down by tapping the link at the bottom that says Close All.
The Device Function keys are cool because they light up when you’re touching them or the screen, but fade away the rest of the time.
The Back button
The Back button on your phone is similar to the Back button in a web browser: It takes you back one screen.
As you start navigating through the screens on your phone, tapping the Back button takes you back to the previous screen. If you keep tapping the Back button, you’ll eventually return to the Home screen.
The keyboard
The screen of the Galaxy S7 phone is important, but you’ll still probably spend more time on the keyboard entering data on the QWERTY keyboard.
Using the software keyboard
The software keyboard automatically pops up when the application detects a need for user text input. The keyboard, shown in Figure 2-21, appears at the bottom of the screen.
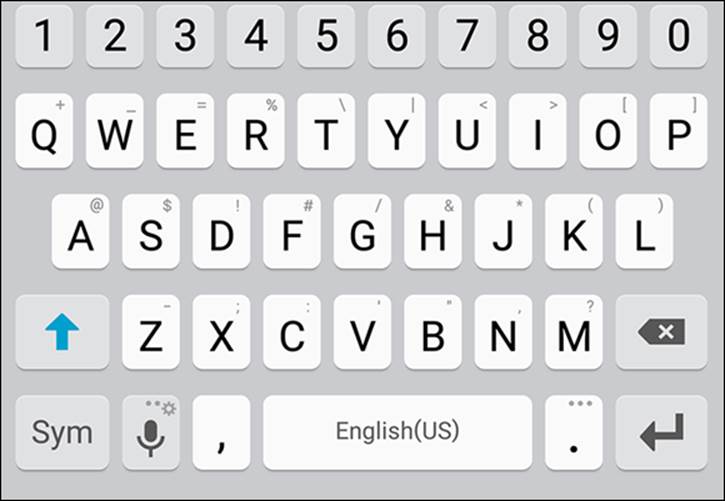
FIGURE 2-21: Use the software keyboard to enter data.
Using Swype
Some Galaxy S7 phones come with an enhanced data-entering capability called Swype. This option may have been preloaded on your phone. If not, you can download it from the Google Play Store. With a little practice, it can dramatically speed your ability to type fast on your phone.
Here’s how Swype works: Instead of tapping each discrete key on the keyboard, you leave your finger on the screen and swipe from key to key. The Swype application figures out the words you’re wanting to type, including inserting the spaces automatically.
If you like Swype, you can use it anytime you’re entering data. If you don’t care for it, you can just tap your letters. It’s all up to you!
Using voice recognition
The third option for a keyboard is … no keyboard at all! Galaxy S7 phones come with voice recognition as an option. It’s very easy and works surprisingly well. In most spots where you have an option to enter text, you see a small version of the microphone icon shown in Figure 2-22.

FIGURE 2-22: The voice recognition icon.
Just tap this icon and say what you would have typed. You see the phone thinking for a second, and then a screen tells you that it is listening. Go ahead and start talking. When you’re done, you can tap the Done button or just be quiet and wait. Within a few seconds, you’ll read what you just said!
The orientation of the phone
Earlier in this chapter where I discuss the Power button, I refer to the phone being in vertical orientation (so that the phone is tall and narrow). It can also be used in the landscape orientation (sideways, or so that the phone is short and wide). The phone senses in which direction you’re holding it and orients the screen to make it easier for you to view.
The phone makes its orientation known to the application, but not all applications are designed to change their inherent display. That nuance is left to the writers of the application. For example, your phone can play videos. However, the video player application that comes with your phone shows video in landscape mode only.
In addition, the phone can sense when you’re holding it to your ear. When it senses that it’s held in this position, it shuts off the screen. You need not be concerned that you’ll accidentally “chin-dial” a number in Botswana.
Going to Sleep Mode/Turning Off the Phone
You can leave your phone on every minute until you’re ready to upgrade to the newest Galaxy S7 phone in a few years, but that would use up your battery in no time. Instead, put your idle phone in sleep mode to save battery power. Note: Your phone goes into sleep mode automatically after 30 seconds of inactivity on the screen.
You can adjust the sleep time out for a longer duration, which I cover in Chapter 16. Or you can manually put the phone in sleep mode by pressing the Power button for just a moment.
Sometimes it’s best to simply shut down the phone if you aren’t going to use it for several days or more. To shut down the phone completely, simply press and hold the Power button for a few seconds. The following options appear:
· Power Off: Shut down the phone completely.
· Restart: The Android operating system is stable. Well, mostly stable. Sometimes you may want to reboot it because it starts acting quirky. Tap the restart option and see whether that solves the problem.
· Emergency Mode: This is an interesting option. Once you have agreed to some terms and conditions, your phone will go into hibernation, but it can come back to life quickly if you feel you need to dial 911. Before you can use this option, you need to agree to some of the limitations.
Good night!
All materials on the site are licensed Creative Commons Attribution-Sharealike 3.0 Unported CC BY-SA 3.0 & GNU Free Documentation License (GFDL)
If you are the copyright holder of any material contained on our site and intend to remove it, please contact our site administrator for approval.
© 2016-2026 All site design rights belong to S.Y.A.