Introduction to 3D Game Programming with DirectX 12 (Computer Science) (2016)
Appendix A
INTRODUCTION TO
WINDOWS PROGRAMMING
To use the Direct3D API (Application Programming Interface), it is necessary to create a Windows (Win32) application with a main window, upon which we will render our 3D scenes. This appendix serves as an introduction to writing Windows applications using the native Win32 API. Loosely, the Win32 API is a set of low-level functions and structures exposed to us in the C programming language that enables us to create Windows applications. For example, to define a window class, we fill out an instance of the Win32 API WNDCLASS structure; to create a window, we use the Win32 API CreateWindow function; to notify Windows to show a particular window, we use the Win32 API function ShowWindow.
Windows programming is a huge subject, and this appendix introduces only the amount necessary for us to use Direct3D. For readers interested in learning more about Windows programming with the Win32 API, the book Programming Windows by Charles Petzold, now in its fifth edition, is the standard text on the subject. Another invaluable resource when working with Microsoft technologies is the MSDN library, which is usually included with Microsoft’s Visual Studio but can also be read online at www.msdn.microsoft.com. In general, if you come upon a Win32 function or structure that you would like to know more about, go to MSDN and search for that function or structure for its full documentation. If we mention a Win32 function or structure in this appendix and do not elaborate on it, it is an implicit suggestion that the reader look the function up in MSDN.
Objectives:
1. To learn and understand the event driven programming model used in Windows programming.
2. To learn the minimal code necessary to create a Windows application that is necessary to use Direct3D.
|
|
To avoid confusion, we will use a capital ‘W’ to refer to Windows the OS and we will use a lower case ‘w’ to refer to a particular window running in Windows. |

A.1 OVERVIEW
As the name suggests, one of the primary themes of Windows programming is programming windows. Many of the components of a Windows application are windows, such as, the main application window, menus, toolbars, scroll bars, buttons, and other dialog controls. Therefore, a Windows application typically consists of several windows. These next subsections provide a concise overview of Windows programming concepts we should be familiar with before beginning a more complete discussion.
A.1.1 Resources
In Windows, several applications can run concurrently. Therefore, hardware resources such as CPU cycles, memory, and even the monitor screen must be shared amongst multiple applications. In order to prevent chaos from ensuing due to several applications accessing/modifying resources without any organization, Windows applications do not have direct access to hardware. One of the main jobs of Windows is to manage the presently instantiated applications and handle the distribution of resources amongst them. Thus, in order for our application to do something that might affect another running application, it must go through Windows. For example, to display a window you must call the Win32 API function ShowWindow; you cannot write to video memory directly.
A.1.2 Events, the Message Queue, Messages, and the Message Loop
A Windows application follows an event-driven programming model. Typically, a Windows application sits and waits1 for something to happen—an event. An event can be generated in a number of ways; some common examples are key presses, mouse clicks, and when a window is created, resized, moved, closed, minimized, maximized, or becomes visible.
1 We note that an application can perform idle processing; that is, perform a certain task when no events are occurring.
When an event occurs, Windows sends a message to the application the event occurred for, and adds the message to the application’s message queue, which is simply a priority queue that stores messages for an application. The application constantly checks the message queue for messages in a message loop and, when it receives one, it dispatches the message to the window procedure of the particular window the message is for. (Remember, an application can contain several windows within it.) Every window has with it an associated function called a window procedure.2 Window procedures are functions we implement which contain code that is to be executed in response to specific messages. For instance, we may want to destroy a window when the Escape key is pressed. In our window procedure we would write:
case WM_KEYDOWN:
if( wParam == VK_ESCAPE )
DestroyWindow(ghMainWnd);
return 0;
The messages a window does not handle should be forwarded to the default window procedure, which then handles the message. The Win32 API supplies the default window procedure, which is called DefWindowProc.
To summarize, the user or an application does something to generate an event. The OS finds the application the event was targeted towards, and it sends that application a message in response. The message is then added to the application’s message queue. The application is constantly checking its message queue for messages. When it receives a message, the application dispatches it to the window procedure of the window the message is targeted for. Finally, the window procedure executes instructions in response to the message.
Figure (A.1) summarizes the event driven programming model.
A.1.3 GUI
Most Windows programs present a GUI (Graphical User Interface) that users can work from. A typical Windows application has one main window, a menu, toolbar, and perhaps some other controls. Figure A.2 shows and identifies some common GUI elements. For Direct3D game programming, we do not need a fancy GUI. In fact, all we need is a main window, where the client area will be used to render our 3D worlds.
2 Every window has a window procedure, but several windows can share the same window procedure; therefore, we do not necessarily have to write a unique window procedure for each window. Two different windows would have different window procedures if we wanted them to respond to messages differently.
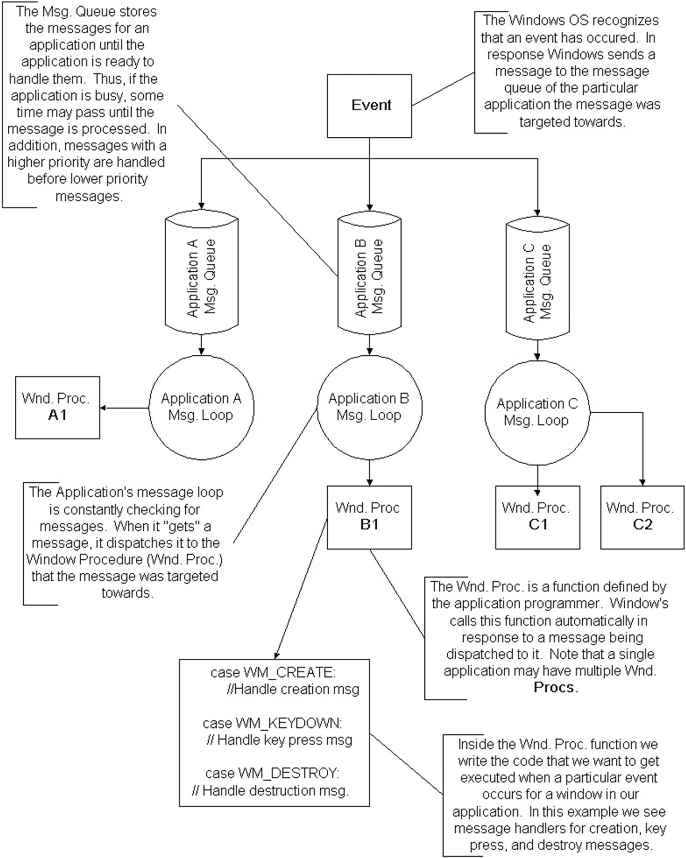
A.1. The event driven programming model.
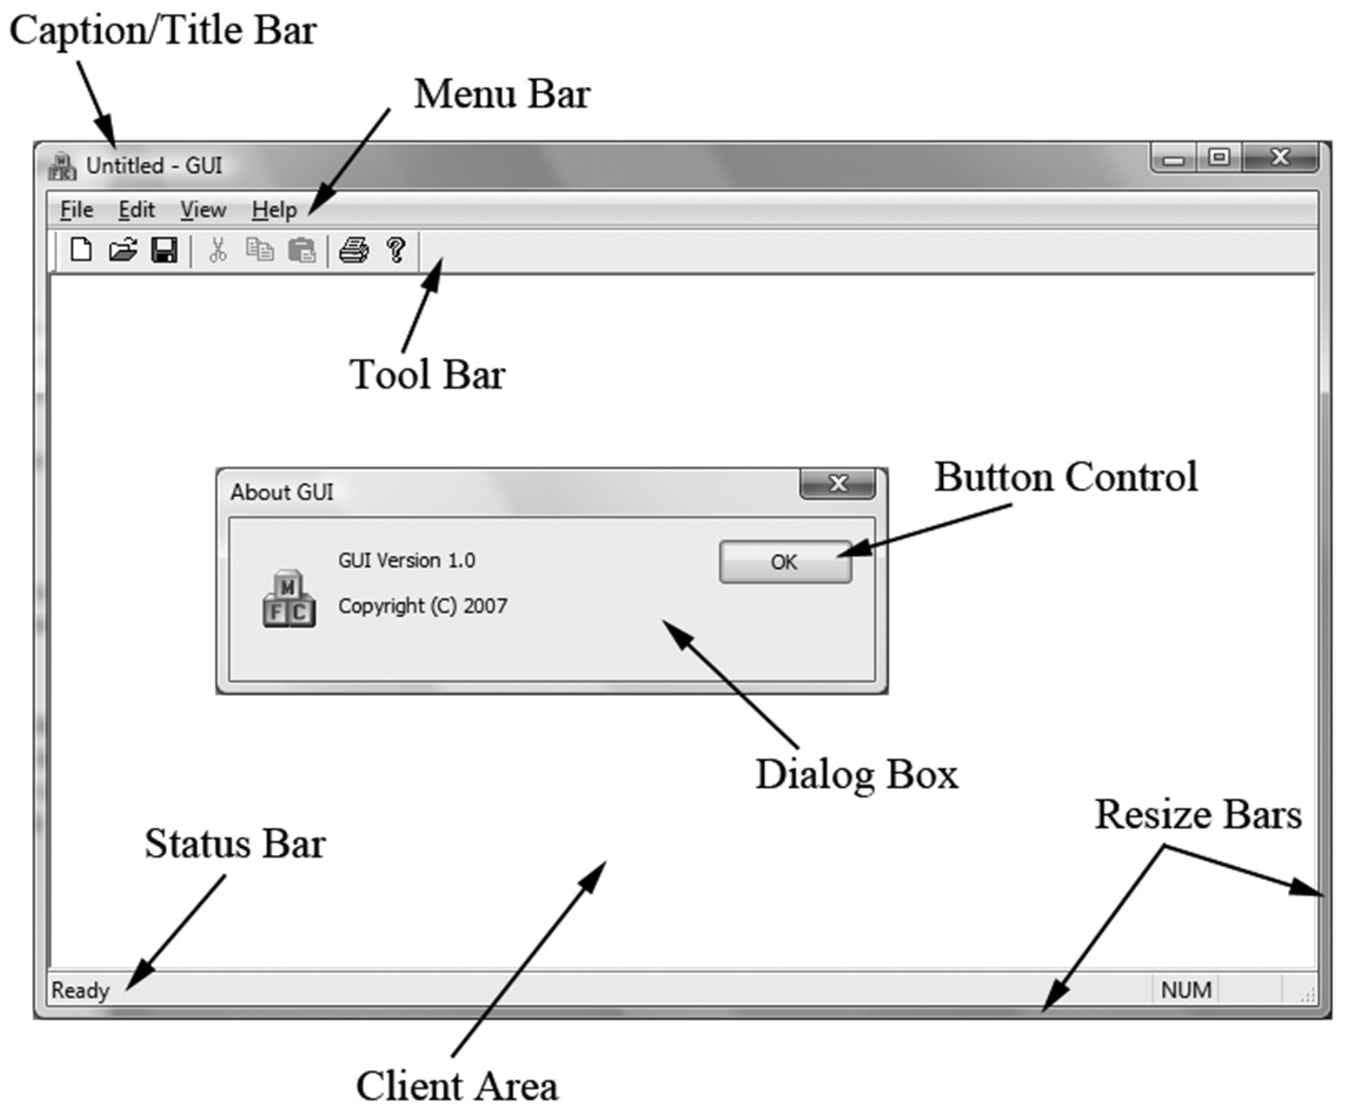
A.2. The A typical Windows application GUI. The client area is the entire large white rectangular space of the application. Typically, this area is where the user views most of the program output. When we program our Direct3D applications, we render our 3D scenes into the client area of a window.
A.1.4 Unicode
Essentially, Unicode (http://unicode.org/) uses 16-bit values to represent a character. This allows us to represent a larger character set to support international characters, and other symbols. For Unicode in C++, we use the wide-characters type wchar_t. In 32- and 64-bit Windows, a wchar_t is 16-bits. When using wide characters, we must prefix a string literal with a capital L; for example:
const wchar_t* wcstrPtr = L"Hello, World!";
The L tells the compiler to treat the string literal as a string of wide-characters (i.e., as wchar_t instead of char). The other important issue is that we need to use the wide-character versions of the string functions. For example, to get the length of a string we need to use wcslen instead of strlen; to copy a string we need to use wcscpy instead of strcpy; to compare two strings we need to use wcscmp instead of strcmp. The wide-character versions of these functions work with wchar_t pointers instead of char pointers. The C++ standard library also provides a wide-character version of its string class: std::wstring. The Windows header file WinNT.h also defines:
typedef wchar_t WCHAR; // wc, 16-bit UNICODE character
A.2 BASIC WINDOWS APPLICATION
Below is the code to a fully functional, yet simple, Windows program. Follow the code as best you can, and read the explanatory comments. The next section will explain the code a bit at a time. It is recommended that you create a project with your development tool, type the code in by hand, compile it and execute it as an exercise. Note that for Visual C++, you must create a “Win32 application project,” not a “Win32 console application project.”
//=====================================================================
// Win32Basic.cpp by Frank Luna (C) 2008 All Rights Reserved.
//
// Illustrates the minimal amount of the Win32 code needed for
// Direct3D programming.
//=====================================================================
// Include the windows header file; this has all the Win32 API
// structures, types, and function declarations we need to program
// Windows.
#include <windows.h>
// The main window handle; this is used to identify a
// created window.
HWND ghMainWnd = 0;
// Wraps the code necessary to initialize a Windows
// application. Function returns true if initialization
// was successful, otherwise it returns false.
bool InitWindowsApp(HINSTANCE instanceHandle, int show);
// Wraps the message loop code.
int Run();
// The window procedure handles events our window receives.
LRESULT CALLBACK
WndProc(HWND hWnd, UINT msg, WPARAM wParam, LPARAM lParam);
// Windows equivalant to main()
int WINAPI
WinMain(HINSTANCE hInstance, HINSTANCE hPrevInstance,
PSTR pCmdLine, int nShowCmd)
{
// First call our wrapper function (InitWindowsApp) to create
// and initialize the main application window, passing in the
// hInstance and nShowCmd values as arguments.
if(!InitWindowsApp(hInstance, nShowCmd))
return 0;
// Once our application has been created and initialized we
// enter the message loop. We stay in the message loop until
// a WM_QUIT mesage is received, indicating the application
// should be terminated.
return Run();
}
bool InitWindowsApp(HINSTANCE instanceHandle, int show)
{
// The first task to creating a window is to describe some of its
// characteristics by filling out a WNDCLASS structure.
WNDCLASS wc;
wc.style = CS_HREDRAW | CS_VREDRAW;
wc.lpfnWndProc = WndProc;
wc.cbClsExtra = 0;
wc.cbWndExtra = 0;
wc.hInstance = instanceHandle;
wc.hIcon = LoadIcon(0, IDI_APPLICATION);
wc.hCursor = LoadCursor(0, IDC_ARROW);
wc.hbrBackground = (HBRUSH)GetStockObject(WHITE_BRUSH);
wc.lpszMenuName = 0;
wc.lpszClassName = L"BasicWndClass";
// Next, we register this WNDCLASS instance with Windows so
// that we can create a window based on it.
if(!RegisterClass(&wc))
{
MessageBox(0, L"RegisterClass FAILED", 0, 0);
return false;
}
// With our WNDCLASS instance registered, we can create a
// window with the CreateWindow function. This function
// returns a handle to the window it creates (an HWND).
// If the creation failed, the handle will have the value
// of zero. A window handle is a way to refer to the window,
// which is internally managed by Windows. Many of the Win32 API
// functions that operate on windows require an HWND so that
// they know what window to act on.
ghMainWnd = CreateWindow(
L"BasicWndClass", // Registered WNDCLASS instance to use.
L"Win32Basic", // window title
WS_OVERLAPPEDWINDOW, // style flags
CW_USEDEFAULT, // x-coordinate
CW_USEDEFAULT, // y-coordinate
CW_USEDEFAULT, // width
CW_USEDEFAULT, // height
0, // parent window
0, // menu handle
instanceHandle, // app instance
0); // extra creation parameters
if(ghMainWnd == 0)
{
MessageBox(0, L"CreateWindow FAILED", 0, 0);
return false;
}
// Even though we just created a window, it is not initially
// shown. Therefore, the final step is to show and update the
// window we just created, which can be done with the following
// two function calls. Observe that we pass the handle to the
// window we want to show and update so that these functions know
// which window to show and update.
ShowWindow(ghMainWnd, show);
UpdateWindow(ghMainWnd);
return true;
}
int Run()
{
MSG msg = {0};
// Loop until we get a WM_QUIT message. The function
// GetMessage will only return 0 (false) when a WM_QUIT message
// is received, which effectively exits the loop. The function
// returns -1 if there is an error. Also, note that GetMessage
// puts the application thread to sleep until there is a
// message.
BOOL bRet = 1;
while( (bRet = GetMessage(&msg, 0, 0, 0)) != 0 )
{
if(bRet == -1)
{
MessageBox(0, L"GetMessage FAILED", L"Error", MB_OK);
break;
}
else
{
TranslateMessage(&msg);
DispatchMessage(&msg);
}
}
return (int)msg.wParam;
}
LRESULT CALLBACK
WndProc(HWND hWnd, UINT msg, WPARAM wParam, LPARAM lParam)
{
// Handle some specific messages. Note that if we handle a
// message, we should return 0.
switch( msg )
{
// In the case the left mouse button was pressed,
// then display a message box.
case WM_LBUTTONDOWN:
MessageBox(0, L"Hello, World", L"Hello", MB_OK);
return 0;
// In the case the escape key was pressed, then
// destroy the main application window.
case WM_KEYDOWN:
if( wParam == VK_ESCAPE )
DestroyWindow(ghMainWnd);
return 0;
// In the case of a destroy message, then send a
// quit message, which will terminate the message loop.
case WM_DESTROY:
PostQuitMessage(0);
return 0;
}
// Forward any other messages we did not handle above to the
// default window procedure. Note that our window procedure
// must return the return value of DefWindowProc.
return DefWindowProc(hWnd, msg, wParam, lParam);
}
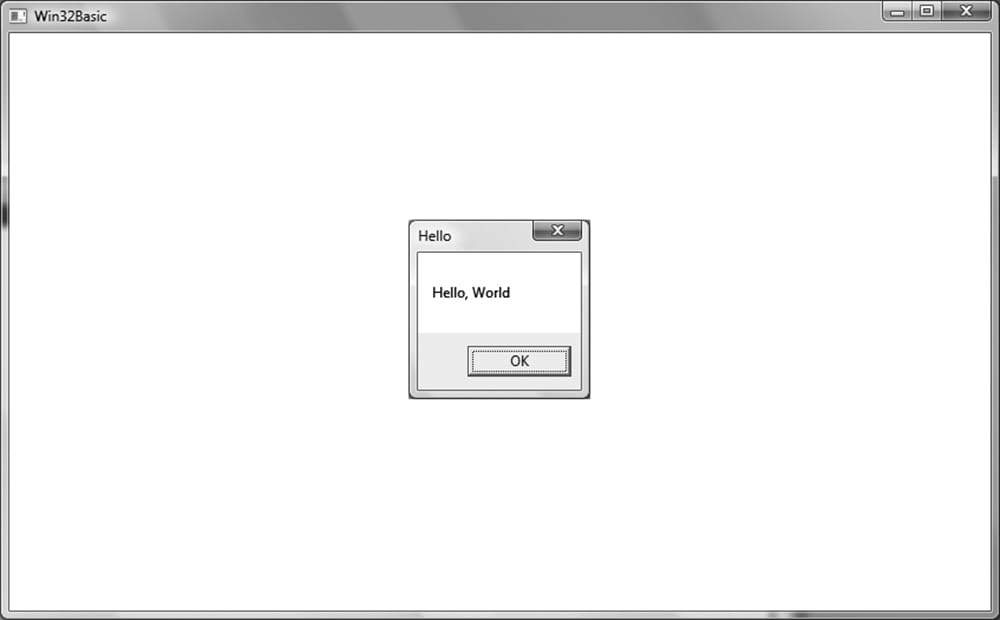
A.3. A screenshot of the above program. Note that the message box appears when you press the left mouse button in the window’s client area. Also try exiting the program by pressing the Escape key.
A.3 EXPLAINING THE BASIC WINDOWS APPLICATION
We will examine the code from top to bottom, stepping into any function that gets called along the way. Refer back to the code listing in the “Basic Windows Application” section throughout the following subsections.
A.3.1 Includes, Global Variables, and Prototypes
The first thing we do is include the windows.h header file. By including the windows.h file we obtain the structures, types, and function declarations needed for using the basic elements of the Win32 API.
#include <windows.h>
The second statement is an instantiation of a global variable of type HWND. This stands for “handle to a window” or “window handle.” In Windows programming, we often use handles to refer to objects maintained internally by Windows. In this sample, we will use an HWND to refer to our main application window maintained by Windows. We need to hold onto the handles of our windows because many calls to the API require that we pass in the handle of the window we want the API call to act on. For example, the call UpdateWindow takes one argument that is of type HWND that is used to specify the window to update. If we did not pass in a handle to it, the function would not know which window to update.
HWND ghMainWnd = 0;
The next three lines are function declarations. Briefly, InitWindowsApp creates and initializes our main application window; Run encapsulates the message loop for our application; and WndProc is our main window’s window procedure. We will examine these functions in more detail when we come to the point where they are called.
bool InitWindowsApp(HINSTANCE instanceHandle, int show);
int Run();
LRESULT CALLBACK
WndProc(HWND hWnd, UINT msg, WPARAM wParam, LPARAM lParam);
A.3.2 WinMain
WinMain is the Windows equivalent to the main function in normal C++ programming. WinMain is prototyped as follows:
int WINAPI
WinMain(HINSTANCE hInstance, HINSTANCE hPrevInstance,
PSTR pCmdLine, int nShowCmd)
1. hInstance: Handle to the current application instance. It serves as a way of identifying and referring to this application. Remember there may be several Windows applications running concurrently, so it is useful to be able to refer to each one.
2. hPrevInstance: Not used in Win32 programming and is zero.
3. pCmdLine: The command line argument string used to run the program.
4. nCmdShow: Specifies how the application should be displayed. Some common commands that show the window in its current size and position, maximized, and minimized, respectively, are SW_SHOW, SW_SHOWMAXIMIZED, and SW_SHOWMINIMIZED. See the MSDN library for a complete list of show commands.
If WinMain succeeds, it should return the wParam member of the WM_QUIT message. If the function exits without entering the message loop, it should return zero. The WINAPI identifier is defined as:
#define WINAPI __stdcall
This specifies the calling convention of the function, which means how the function arguments get placed on the stack.
A.3.3 WNDCLASS and Registration
Inside WinMain we call the function InitWindowsApp. As you can guess, this function does all the initialization of our program. Let us take a closer look at this function and its implementation. InitWindowsApp returns either true or false: true if the initialization was a success and false otherwise. In the WinMain definition, we pass as arguments a copy of our application instance and the show command variable into InitWindowsApp. Both are obtained from the WinMain parameter list.
if(!InitWindowsApp(hInstance, nShowCmd))
The first task at hand in initialization of a window is to describe some basic properties of the window by filling out a WNDCLASS (window class) structure. Its definition is:
typedef struct _WNDCLASS {
UINT style;
WNDPROC lpfnWndProc;
int cbClsExtra;
int cbWndExtra;
HANDLE hInstance;
HICON hIcon;
HCURSOR hCursor;
HBRUSH hbrBackground;
LPCTSTR lpszMenuName;
LPCTSTR lpszClassName;
} WNDCLASS;
1. style: Specifies the class style. In our example we use CS_HREDRAW combined with CS_VREDRAW. These two bit flags indicate that the window is to be repainted when either the horizontal or vertical window size is changed. For the complete list of the various styles with description, see the MSDN library.
wc.style = CS_HREDRAW | CS_VREDRAW;
2. lpfnWndProc: Pointer to the window procedure function to associate with this WNDCLASS instance. Windows that are created based on this WNDCLASS instance will use this window procedure. Thus, to create two windows with the same window procedure, you just create the two windows based on the same WNDCLASS instance. If you want to create two windows with different window procedures, you will need to fill out a different WNDCLASS instance for each of the two windows. The window procedure function is explained in section A.3.6.
wc.lpfnWndProc = WndProc;
3. cbClsExtra and cbWndExtra: These are extra memory slots you can use for your own purpose. Our program does not require any extra space and therefore sets both of these to zero.
wc.cbClsExtra = 0;
wc.cbWndExtra = 0;
4. hInstance: This field is a handle to the application instance. Recall the application instance handle is originally passed in through WinMain.
wc.hInstance = instanceHandle;
5. hIcon: Here you specify a handle to an icon to use for the windows created using this window class. You can use your own designed icon, but there are several built-in icons to choose from; see the MSDN library for details. The following uses the default application icon:
wc.hIcon = LoadIcon(0, IDI_APPLICATION);
6. hCursor: Similar to hIcon, here you specify a handle to a cursor to use when the cursor is over the window’s client area. Again, there are several built-in cursors; see the MSDN library for details. The following code uses the standard “arrow” cursor.
wc.hCursor = LoadCursor(0, IDC_ARROW);
7. hbrBackground: This field is used to specify a handle to brush which specifies the background color for the client area of the window. In our sample code, we call the Win32 function GetStockObject, which returns a handle to a prebuilt white colored brush; see the MSDN library for other types of built in brushes.
wc.hbrBackground = (HBRUSH)GetStockObject(WHITE_BRUSH);
8. lpszMenuName: Specifies the window’s menu. Since we have no menu in our application so, we set this to zero.
wc.lpszMenuName = 0;
9. lpszClassName: Specifies the name of the window class structure we are creating. This can be anything you want. In our application, we named it “BasicWndClass”. The name is simply used to identify the class structure so that we can reference it later by its name.
wc.lpszClassName = L"BasicWndClass";
Once we have filled out a WNDCLASS instance, we need to register it with Windows so that we can create windows based on it. This is done with the RegisterClass function which takes a pointer to a WNDCLASS structure. This function returns zero upon failure.
if(!RegisterClass(&wc))
{
MessageBox(0, L"RegisterClass FAILED", 0, 0);
return false;
}
A.3.4 Creating and Displaying the Window
After we have registered a WNDCLASS variable with Windows, we can create a window based on that class description. We can refer to a registered WNDCLASS instance via the class name we gave it (lpszClassName). The function we use to create a window is the CreateWindow function, which is declared as follows:
HWND CreateWindow(
LPCTSTR lpClassName,
LPCTSTR lpWindowName,
DWORD dwStyle,
int x,
int y,
int nWidth,
int nHeight,
HWND hWndParent,
HMENU hMenu,
HANDLE hInstance,
LPVOID lpParam
);
1. lpClassName: The name of the registered WNDCLASS structure that describes some of the properties of the window we want to create.
2. lpWindowName: The name we want to give our window; this is also the name that appears in the window’s caption bar.
3. dwStyle: Defines the style of the window. WS_OVERLAPPEDWINDOW is a combination of several flags: WS_OVERLAPPED, WS_CAPTION, WS_SYSMENU, WS_THICKFRAME, WS_MINIMIZEBOX, and WS_MAXIMIZEBOX. The names of these flags describe the characteristics of the window they produce. See the MSDN library for the complete list of styles.
4. x: The x position at the top left corner of the window relative to the screen. You can specify CW_USEDEFAULT for this parameter, and Windows will choose an appropriate default.
5. y: The y position at the top left corner of the window relative to the screen. You can specify CW_USEDEFAULT for this parameter, and Windows will choose an appropriate default.
6. nWidth: The width of the window in pixels. You can specify CW_USEDEFAULT for this parameter, and Windows will choose an appropriate default.
7. nHeight: The height of the window in pixels. You can specify CW_USEDEFAULT for this parameter, and Windows will choose an appropriate default.
A.4. Screen space.
8. hWndParent: Handle to a window that is to be the parent of this window. Our window has no relationship with any other windows, and therefore we set this value to zero.
9. hMenu: A handle to a menu. Our program does not use a menu, so we specify 0 for this field.
10.hInstance: Handle to the application the window will be associated with.
11.lpParam: A pointer to user-defined data that you want to be available to a WM_CREATE message handler. The WM_CREATE message is sent to a window when it is being created, but before CreateWindow returns. A window handles the WM_CREATE message if it wants to do something when it is created (e.g., initialization).
|
|
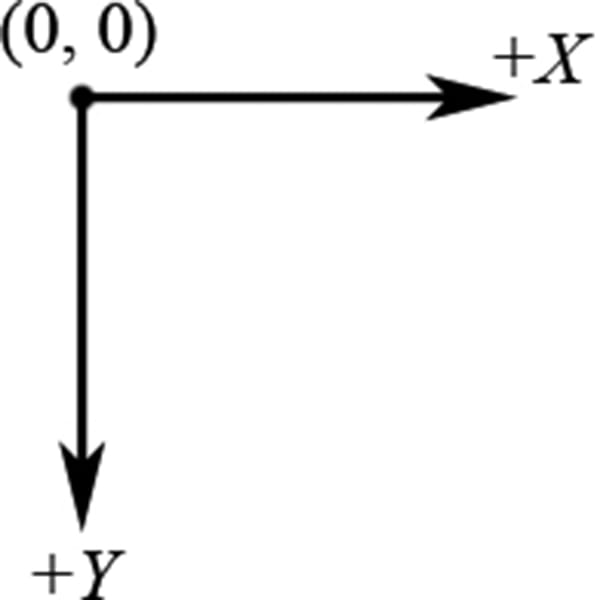
When we specify the (x, y) coordinates of the window’s position, they are relative to the upper-left corner of the screen. Also, the positive x-axis runs to the right as usual but the positive y-axis runs downward. Figure (A.4) shows this coordinate system, which is called screen coordinates, or screen space. |
CreateWindow returns a handle to the window it creates (an HWND). If the creation failed, the handle will have the value of zero (null handle). Remember that the handle is a way to refer to the window, which is managed by Windows. Many of the API calls require a HWND so that it knows what window to act on.
ghMainWnd = CreateWindow(L"BasicWndClass", L"Win32Basic",
WS_OVERLAPPEDWINDOW,
CW_USEDEFAULT, CW_USEDEFAULT,
CW_USEDEFAULT, CW_USEDEFAULT,
0, 0, instanceHandle, 0);
if(ghMainWnd == 0)
{
MessageBox(0, L"CreateWindow FAILED", 0, 0);
return false;
}
The last two function calls in the InitWindowsApp function have to do with displaying the window. First we call ShowWindow and pass in the handle of our newly created window so that Windows knows which window to show. We also pass in an integer value that defines how the window is to be initially shown (e.g., minimized, maximized, etc.). This value should be nShowCmd, which is a parameter of WinMain. After showing the window, we should refresh it. UpdateWindow does this; it takes one argument that is a handle to the window we wish to update.
ShowWindow(ghMainWnd, show);
UpdateWindow(ghMainWnd);
If we made it this far in InitWindowsApp, then the initialization is complete; we return true to indicate everything went successfully.
A.3.5 The Message Loop
Having successfully completed initialization we can begin the heart of the program—the message loop. In our Basic Windows Application, we have wrapped the message loop in a function called Run.
int Run()
{
MSG msg = {0};
BOOL bRet = 1;
while( (bRet = GetMessage(&msg, 0, 0, 0)) != 0 )
{
if(bRet == -1)
{
MessageBox(0, L"GetMessage FAILED", L"Error", MB_OK);
break;
}
else
{
TranslateMessage(&msg);
DispatchMessage(&msg);
}
}
return (int)msg.wParam;
}
The first thing done in Run is an instantiation of a variable called msg of type MSG, which is the structure that represents a Windows message. Its definition is as follows:
typedef struct tagMSG {
HWND hwnd;
UINT message;
WPARAM wParam;
LPARAM lParam;
DWORD time;
POINT pt;
} MSG;
1. hwnd: The handle to the window whose window procedure is to receive the message.
2. message: A predefined constant value identifying the message (e.g., WM_QUIT).
3. wParam: Extra information about the message. This is dependent upon the specific message.
4. lParam: Extra information about the message. This is dependent upon the specific message.
5. time: The time the message was posted.
6. pt: The (x, y) coordinates of the mouse cursor, in screen coordinates, when the message was posted.
Next, we enter the message loop. The GetMessage function retrieves a message from the message queue, and fills out the msg argument with the details of the message. The second, third, and fourth parameters of GetMessage may be set to zero, for our purposes. If an error occurs in GetMessage, then GetMessage returns -1. If a WM_QUIT message is received, then GetMessage returns 0, thereby terminating the message loop. If GetMessage returns any other value, then two more functions get called: TranslateMessage and DispatchMessage. TranslateMessage has Windows perform some keyboard translations; specifically, virtual key to character messages. DispatchMessage finally dispatches the message off to the appropriate window procedure.
If the application successfully exits via a WM_QUIT message, then the WinMain function should return the wParam of the WM_QUIT message (exit code).
A.3.6 The Window Procedure
We mentioned previously that the window procedure is where we write the code that we want to execute in response to a message our window receives. In the Basic Windows Application program, we name the window procedure WndProc and it is prototyped as:
LRESULT CALLBACK
WndProc(HWND hWnd, UINT msg, WPARAM wParam, LPARAM lParam);
This function returns a value of type LRESULT (defined as an integer), which indicates the success or failure of the function. The CALLBACK identifier specifies that the function is a callback function, which means that Windows will be calling this function outside of the code space of the program. As you can see from the Basic Windows Application source code, we never explicitly call the window procedure ourselves—Windows calls it for us when the window needs to process a message.
The window procedure has four parameters in its signature:
1. hWnd: The handle to the window receiving the message.
2. msg: A predefined value that identifies the particular message. For example, a quit message is defined as WM_QUIT. The prefix WM stands for “Window Message.” There are over a hundred predefined window messages; see the MSDN library for details.
3. wParam: Extra information about the message which is dependent upon the specific message.
4. lParam: Extra information about the message which is dependent upon the specific message.
Our window procedure handles three messages: WM_LBUTTONDOWN, WM_KEYDOWN, and WM_DESTROY messages. A WM_LBUTTONDOWN message is sent when the user clicks the left mouse button on the window’s client area. A WM_KEYDOWN message is sent to a window in focus when a key is pressed. A WM_DESTROY message is sent when a window is being destroyed.
Our code is quite simple; when we receive a WM_LBUTTONDOWN message we display a message box that prints out “Hello, World”:
case WM_LBUTTONDOWN:
MessageBox(0, L"Hello, World", L"Hello", MB_OK);
return 0;
When our window gets a WM_KEYDOWN message, we test if the Escape key was pressed, and if it was, we destroy the main application window using the DestroyWindow function. The wParam passed into the window procedure specifies the virtual key code of the specific key that was pressed. Think of virtual key codes as an identifier for a particular key. The Windows header files have a list of virtual key code constants we can use to then test for a particular key; for example to test if the escape key was pressed, we use the virtual key code constant VK_ESCAPE.
case WM_KEYDOWN:
if( wParam == VK_ESCAPE )
DestroyWindow(ghMainWnd);
return 0;
Remember, the wParam and lParam parameters are used to specify extra information about a particular message. For the WM_KEYDOWN message, the wParam specifies the virtual key code of the specific key that was pressed. The MSDN library will specify the information the wParam and lParam parameters carry for each Windows message.
When our window gets destroyed, we post a WM_QUIT message with the PostQuitMessage function (which terminates the message loop):
case WM_DESTROY:
PostQuitMessage(0);
return 0;
At the end of our window procedure, we call another function named DefWindowProc. This function is the default window procedure. In our Basic Windows Application program, we only handle three messages; we use the default behavior specified in DefWindowProc for all the other messages we receive but do not necessarily need to handle ourselves. For example, the Basic Windows Application program can be minimized, maximized, resized, and closed. This functionality is provided to us through the default window procedure, as we did not handle the messages to perform this functionality.
A.3.7 The MessageBox Function
There is one last API function we have not yet covered, and that is the MessageBox function. This function is a very handy way to provide the user with information and to get some quick input. The declaration to the MessageBox function looks like this:
int MessageBox(
HWND hWnd, // Handle of owner window, may specify null.
LPCTSTR lpText, // Text to put in the message box.
LPCTSTR lpCaption,// Text to put for the title of the message box.
UINT uType // Style of the message box.
);
The return value for the MessageBox function depends on the type of message box. See the MSDN library for a list of possible return values and styles; one possible style is a Yes/No message box; see Figure A.5.
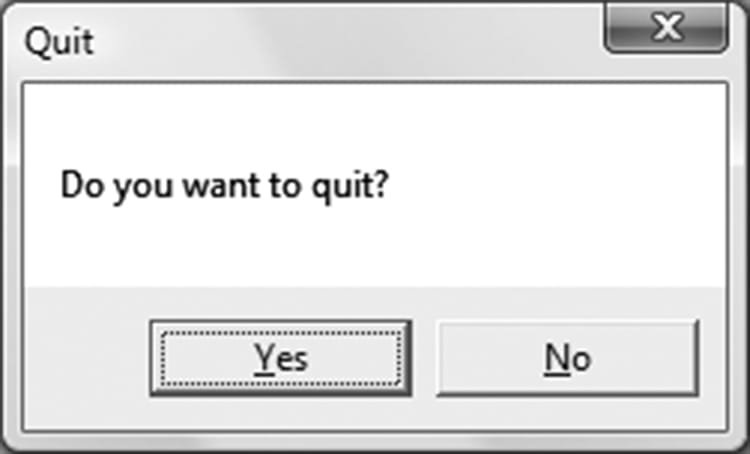
A.5. Yes/No message box.
A.4 A BETTER MESSAGE LOOP
Games are very different application than traditional Windows applications such as office type applications and web browsers. Typically, games do not sit around waiting for a message, but are constantly being updated. This presents a problem, because if there are no messages in the message queue, the function GetMessage puts the thread to sleep and waits for a message. For a game, we do not want this behavior; if there are no Windows messages to be processed, then we want to run our own game code. The fix is to use the PeekMessage function instead of GetMessage. The PeekFunction message returns immediately if there are no messages. Our new message loop is as follows:
int Run()
{
MSG msg = {0};
while(msg.message != WM_QUIT)
{
// If there are Window messages then process them.
if(PeekMessage( &msg, 0, 0, 0, PM_REMOVE ))
{
TranslateMessage( &msg );
DispatchMessage( &msg );
}
// Otherwise, do animation/game stuff.
else
{
}
}
return (int)msg.wParam;
}
After we instantiate msg, we enter into an endless loop. We first call the API function PeekMessage, which checks the message queue for a message. See MSDN for the parameter descriptions. If there is a message it returns true and we handle the message. If there are no messages, PeekMessage returns false and we execute our own specific game code.
A.5 SUMMARY
1. To use Direct3D we must create a Windows application that has a main window onto which we can render our 3D scenes. Furthermore, for games we create a special message loop that checks for messages. If there are messages, it processes them; otherwise, it executes our game logic.
2. Several Windows applications can be running concurrently, and therefore Windows must manage resource between them and direct messages to the applications for which they were intended. Messages are sent to an application’s message queue when an event (key press, mouse click, timer, etc.) has occurred for that application.
3. Every Windows application has a message queue in which messages an application receives are stored. The application’s message loop constantly checks the queue for messages and dispatches them off to their intended window procedure. Note that a single application can have several windows within it.
4. The window procedure is a special callback function we implement that Windows calls when a window in our application receives a message. In the window procedure, we write the code we want to be executed when a window in our application receives a particular message. Messages we do not specifically handle are forwarded to a default window procedure for default handling.
A.6 EXERCISES
1. Modify the program in §A.2 to use a different icon, cursor, and background color.
|
|
Hint: Look up the LoadIcon, LoadCursor, and GetStockObject functions in MSDN.) |

2. Modify the program in §A.2 by handling the WM_CLOSE message. This message is sent to a window or application indicating that the window or application should close. Use the message box function to ask the user if they really want to exit by displaying a Yes/No styled message box. If the user chooses “Yes,” then destroy the window; otherwise do not destroy the window. You could also use this technique to ask the user if they want to save their work before closing.
3. Modify the program in §A.2 by handling the WM_CREATE message. This message is sent to a window when it is being created, but before CreateWindow returns. Output a message, via the message box function, indicating that the window has been created.
4. Look up the Sleep function in MSDN and summarize, in your own words, what the function does.
5. Look up the messages WM_SIZE and WM_ACTIVATE in MSDN and summarize, in your own words, when the messages are sent.
All materials on the site are licensed Creative Commons Attribution-Sharealike 3.0 Unported CC BY-SA 3.0 & GNU Free Documentation License (GFDL)
If you are the copyright holder of any material contained on our site and intend to remove it, please contact our site administrator for approval.
© 2016-2026 All site design rights belong to S.Y.A.