Game Programming Algorithms and Techniques: A Platform-Agnostic Approach (2014)
Chapter 2. 2D Graphics
With the explosion of web, smartphone, and indie games, 2D has had a renaissance of sorts. Developers are drawn to 2D because the typical budget and team can be much smaller. Gamers are drawn toward 2D because of the purity and simplicity of the games.
Though the primary focus of this book is on 3D games, it would be a mistake not to cover the core concepts behind 2D graphics. It also should be noted that many of the topics covered in latter chapters, whether physics, sound, or UI programming, are equally applicable in both 2D and 3D games.
2D Rendering Foundations
To fully understand 2D rendering, it is important to understand the limitations of display devices when these techniques were first developed. Even though we now almost exclusively use LCD or plasma displays, many of the rendering concepts that were originally developed with older monitors in mind are still in use today.
CRT Monitor Basics
For many years, cathode ray tube (CRT) displays were the predominant display technology. A CRT features an array of picture elements known as pixels. For a color display, each pixel contains a red, green, and blue sub-pixel, which can then be combined to create specific colors. The resolution of the display determines the total number of pixels. For instance, a 300×200 display would have 200 total rows, or scan lines, and each scan line would have 300 pixels, for a grand total of 60,000 pixels. The (0,0) pixel usually refers to the top-left corner, though not all displays follow this format.
In a CRT, all of the drawing is done by an electron gun that fires a narrow stream of electrons. This gun starts drawing in the top-left corner of the screen and shifts its aim across horizontally to draw the first scan line (see Figure 2.1). It then repositions its aim so it can start all the way at the start of the subsequent scan line, repeating this process until all scan lines have been drawn.

Figure 2.1 Basic CRT drawing.
When the electron gun has finished drawing one frame, its aim will be positioned at the bottom-right corner of the CRT. The amount of time it takes for the electron gun to shift its aim from the bottom-right corner all the way back to the top-left corner is known as the vertical blank interval(VBLANK). This interval is a fraction of a second, though the precise timing depends on whether or not the CRT is for a television or computer, and additionally the region where the device is intended for use.
Early gaming hardware such as the Atari did not have enough memory to store the pixel data for the entire screen at once, which further complicated the rendering systems on that system. This topic is covered in greater detail in David Crane’s GDC talk that was referenced in Chapter 1, “Game Programming Overview.”
Color Buffers and Vertical Sync
Newer hardware featured more than enough memory to have a color buffer that could store the pixel data for the entire screen at once. But this did not mean that the game loop could ignore the CRT gun entirely. Suppose the electron gun is half way through drawing the screen. At this exact time, it just so happens that the game loop hits the “generate outputs” phase. So it starts writing the pixel information into the color buffer for the next frame, while the CRT is still drawing the last frame. The result of this is screen tearing, which is when the screen shows part of two different frames at once. An example of this is shown in Figure 2.2.
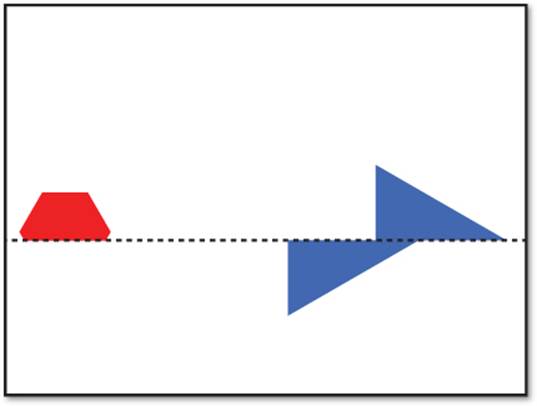
Figure 2.2 Screen tearing caused by updating video data while the CRT is drawing.
What’s worse is that the game loop might not actually finish writing all its image information for the next frame before it gets drawn on the screen. So not only will the second half of the screen be the wrong frame, it may even be missing graphical elements!
One solution to this problem is to synchronize it so the game loop renders only during the vertical blank interval. This will fix the split-image problem, but it limits the amount of time the game loop has to render to the color buffer to only that VBLANK period, which isn’t going to be enough time for a modern game.
It is instead possible to solve screen tearing with a rendering technique called double buffering. In double buffering, there are two color buffers. The game alternates between drawing to these two buffers. On one frame, the game loop might write to buffer A while the CRT displays buffer B. Then on the next frame, the CRT will display buffer A while the game loop writes to buffer B. As long as both the CRT and game loop aren’t accessing the same buffer at the same time, there is no risk of the CRT drawing an incomplete frame.
In order to fully prevent screen tearing, the buffer swap must happen during VBLANK. This is often listed as VSYNC in the graphics settings for games, though technically it’s a misnomer because VSYNC is the signal the monitor sends the system to let it know VBLANK has commenced. In any event, because the buffer swap is a relatively fast operation, the game has a much longer period of time to render the entire frame (though ideally this should be less than the amount of time it takes the CRT to draw a frame). So long as the buffer swap occurs during VBLANK, screen tearing will be entirely avoided.
Here’s what a game world render function might look like with double buffering:
function RenderWorld()
// Draw all objects in the game world
...
wait for VBLANK
swap color buffers
end
Some games do allow buffer swaps to occur as soon as rendering finishes, which means there may be some screen tearing. This is typically allowed when a user wants to run the game at a frame rate much higher than the screen refresh rate. If a particular monitor has a 60 Hz refresh rate, synchronizing the buffer swaps to VBLANK would cap the frame rate at 60 FPS. But players who are very conscientious of reducing their input lag (and have fast enough computers) may be able to achieve much higher frame rates if that cap is removed.
Even though CRT monitors are rarely used today, double buffering still will prevent screen tearing if buffer swaps are timed correctly on an LCD. Some games even use triple buffering, in which three color buffers are used instead of two. Triple buffering can help smooth out the frame rate if there is high volatility, but at the cost of increased input lag.
Sprites
A sprite is a 2D visual object within the game world that can be drawn using a single image on any given frame. Typically sprites are used to represent characters and other dynamic objects. For simple games, sprites might also be used for backgrounds, though there are more efficientapproaches, especially for static backgrounds. Most 2D games will have dozens if not hundreds of sprites, and for mobile games the sprites often make up the majority of the overall download size of the game. Because of this, it’s important to try to use sprites as efficiently as possible.
The first decision one has to make with sprites is the image format in which they will be stored. This will vary depending on the platform as well as memory constraints. A PNG file may take up less space, but hardware typically cannot natively draw PNGs, so they must be converted when loaded by the game. A TGA file can usually be drawn directly, but TGA file sizes are typically massive. On iOS devices, the preferred file format is PVR, because it is a compressed image format that can also be drawn natively by the hardware.
The process of loading an image file into memory can also vary greatly depending on the platform and framework. For frameworks such as SDL, XNA, and cocos2d, functionality for loading many file formats is built in. But if you are writing a 2D game from scratch, one relatively simple cross-platform library is stb_image.c (http://nothings.org/stb_image.c), which can load several file formats, including JPEG and PNG. Because it’s written in portable C code, it will work in C, C++, and Objective-C programs.
Drawing Sprites
Suppose you have a basic 2D scene with a background image and a character in the center. The simplest approach to drawing this scene would be to first draw the background image and then draw the character. This is much like how a painter would paint the scene on a canvas, and because of this, the approach is known as the painter’s algorithm. In the painter’s algorithm, all the sprites in a scene are sorted from back to front (see Figure 2.3). When it’s time to render the scene, the presorted scene can then be traversed in order so that it can be drawn appropriately.
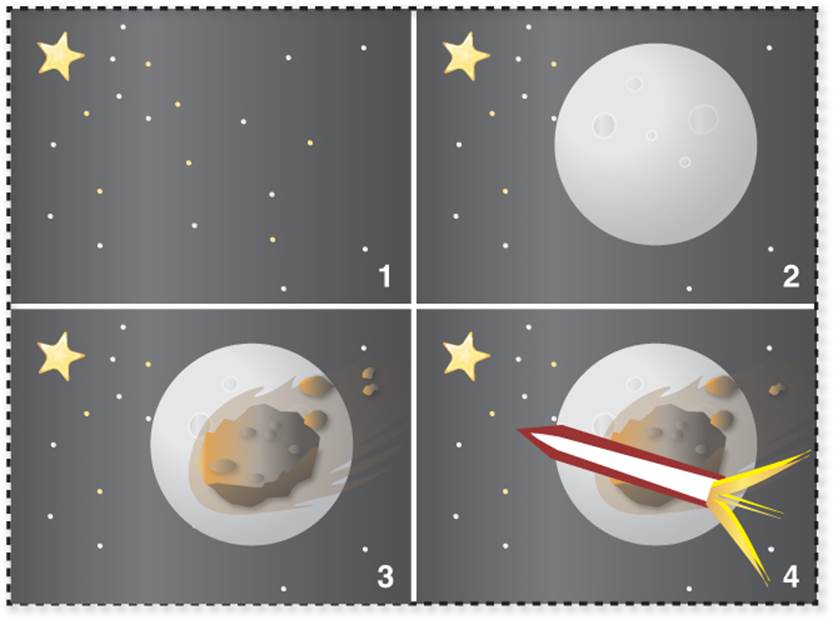
Figure 2.3 Painter’s algorithm applied to a 2D space scene.
This can be implemented without much issue in a 2D game. Each sprite object can have an integral draw order value, in addition to any other information such as image file data and the sprite’s x and y positions:
class Sprite
ImageFile image
int drawOrder
int x, y
function Draw()
// Draw the image at the correct (x,y)
...
end
end
Then, the game world’s list of drawable objects can be changed so it’s a sorted container that’s sorted based on the draw order. This way, during the rendering step, the sorted container can be linearly traversed to draw the sprites in the correct order.
SortedList spriteList
// When creating a new sprite...
Sprite newSprite = specify image and desired x/y
newSprite.drawOrder = set desired draw order value
// Add to sorted list based on draw order value
spriteList.Add(newSprite.drawOrder, newSprite)
// When it's time to draw...
foreach Sprite s in spriteList
s.Draw()
loop
As we will discuss in Chapter 4, “3D Graphics”, the painter’s algorithm can also be utilized in a 3D environment, though there are some distinct drawbacks that come out of this. But for 2D scenes, the painter’s algorithm generally works well.
Some 2D libraries, including cocos2d, allow a scene to be composed of any number of layers, each of which can have a specific draw order. Thus, a game might have a background layer, a character layer, and a UI layer (in that order, from back to front). Each layer can then contain any number of sprites. In our example, all the sprites in the background layer will automatically be placed behind all the sprites in the character layer, and both the background and character layers will show up behind the UI one. Within each individual layer, you can still specify the draw order for a particular sprite, except the draw order is only relative to other sprites in that same layer.
As for the x- and y-coordinates of the sprite, the location it references depends on the library. In some cases, it might be the top-left corner of the sprite relative to the top left of the screen, whereas others might refer to the center of the sprite relative to the bottom left. The choice is arbitrary and comes down to how a particular developer felt like implementing the functionality.
Animating Sprites
For most 2D games, animation is based on the principles of traditional flipbook animation: a series of static 2D images are played in rapid succession to create an illusion of motion (see Figure 2.4). For smooth animation, typically a minimum of 24 FPS is required, which is the traditional frame rate that is used in film. This means that for every one second of animation, you need 24 individual images. Some genres, such as 2D fighting games, may use 60 FPS animations, which increases the required number of images dramatically.
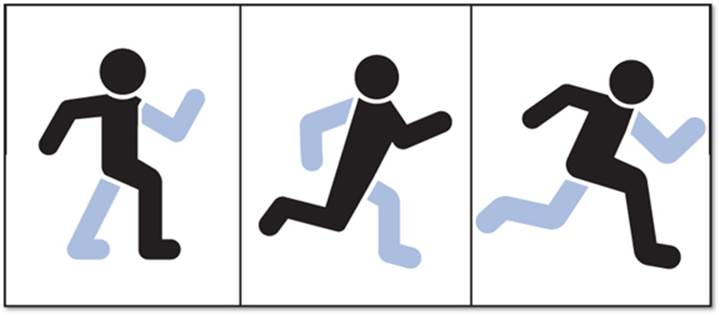
Figure 2.4 Animated run cycle.
A typical approach is to have an array of images that represents all the possible states of a particular character, regardless of the particular animation. For example, a character that has both a walk and run cycle, each ten frames in length, would have an array of 20 images in total. To keep things simple, these images would be stored sequentially, which would mean frames 0–9 would correspond to the walk cycle and frames 10–19 would correspond to the run cycle.
But this means we need some way to specify which frames correspond to which animations. A simple way to encapsulate this animation frame information is to create an AnimFrameData structure that specifies the start frame and number of frames for one particular animation:
struct AnimFrameData
// The index of the first frame of an animation
int startFrame
// The total number of frames for said animation
int numFrames
end
We would then have an AnimData struct that stores both the array of all the possible images, as well as the FrameData corresponding to each particular animation:
struct AnimData
// Array of images for all the animations
ImageFile images[]
// The frame data for all the different animations
AnimFrameData frameInfo[]
end
We then need an AnimatedSprite class that inherits from Sprite. Because it inherits from Sprite, it will already have position and draw order functionality, as well as the ability to draw a single ImageFile. However, because an AnimatedSprite is much more complicated than a single-image Sprite, several additional member variables are required.
AnimatedSprite must track the current animation number, the current frame in that animation, and the amount of game time the current frame has been displayed. You may notice that the animation FPS is also stored as a separate member variable. This allows the animation to dynamically speed up or slow down. For instance, as a character gains speed, it would be possible to have the run animation play more rapidly.
class AnimatedSprite inherits Sprite
// All of the animation data (includes ImageFiles and FrameData)
AnimData animData
// The particular animation that is active
int animNum
// The frame number of the active animation that's being displayed
int frameNum
// Amount of time the current frame has been displayed
float frameTime
// The FPS the animation is running at (24FPS by default).
float animFPS = 24.0f
function Initialize(AnimData myData, int startingAnimNum)
function UpdateAnim(float deltaTime)
function ChangeAnim(int num)
end
The Initialize function takes in a reference to the corresponding AnimData for this particular AnimatedSprite. By passing in a reference, an unlimited number of animated sprites can use the same image data, which will save large quantities of memory. Furthermore, the function requires passing in the first animation that will be played so that the remaining member variables can be initialized by the ChangeAnim function.
function AnimatedSprite.Initialize(AnimData myData, int startingAnimNum)
animData = myData
ChangeAnim(startingAnimNum)
end
The ChangeAnim function gets called when the AnimatedSprite swaps to a particular animation. It sets both the frame number and the amount of time in the frame to zero, and sets the active image to be the first frame in the animation. In both this function and in UpdateAnim, we use the image variable to represent the active image. That’s because the base class (Sprite) uses this variable to determine what it should draw on a particular frame.
function AnimatedSprite.ChangeAnim(int num)
animNum = num
// The active animation is now at frame 0 and 0.0f time
frameNum = 0
animTime = 0.0f
// Set active image, which is just the starting frame.
int imageNum = animData.frameInfo[animNum].startFrame
image = animData.images[imageNum]
end
The UpdateAnim function is where most of the heavy lifting of AnimatedSprite occurs. Much of its complexity stems from the fact that we can’t assume that the animation frame rate is slower than the game frame rate. For example, a game could be running at 30 FPS but we may want to play a 24 FPS animation at 2× speed (or 48 FPS). This means that UpdateAnim will quite often need to skip ahead multiple frames in the animation. To take this into account, once a particular frame has been displayed longer than the animation frame time, we need to calculate how many frames to jump ahead. This also means that when a looping animation wraps around, we can’t just reset it to frame 0. It might be that the animation is playing so quickly that we need to reset to frame 1 or 2.
function AnimatedSprite.UpdateAnim(float deltaTime)
// Update how long the current frame has been displayed
frameTime += deltaTime
// This check determines if it's time to change to the next frame.
if frameTime > (1 / animFPS)
// The number of frames to increment is the integral result of
// frameTime / (1 / animFPS), which is frameTime * animFPS
frameNum += frameTime * animFPS
// Check if we've advanced past the last frame, and must wrap.
if frameNum >= animData.frameInfo[animNum].numFrames
// The modulus (%) makes sure we wrap correctly.
// (Eg. If numFrames == 10 and frameNum == 11, frameNum would
// wrap to 11 % 10 = 1).
frameNum = frameNum % animData.frameInfo[animNum].numFrames
end
// Update the active image.
// (startFrame is relative to all the images, while frameNum is
// relative to the first frame of this particular animation).
int imageNum = animData.frameInfo[animNum].startFrame + frameNum
image = animData.images[imageNum]
// We use fmod (floating point modulus) for the same reason
// as the % above.
frameTime = fmod(frameTime, 1 / animFPS)
end
end
Although this implementation of AnimatedSprite will work for looping animations, it has no support for transitions between animations. If such functionality is required, it’s advisable to create an animation state machine. Chapter 9, “Artificial Intelligence,” discusses the state design pattern in the context of AI, but said state pattern could just as easily apply to an animation state machine.
Sprite Sheets
In order to line up animated sprites properly, it is preferable to have all the sprites for a particular character be the same size. In the past, many libraries also required that all image files had dimensions that were powers of two, in which case a 30×30 image would have to be padded to 32×32. Although most modern graphics libraries do allow non-power-of-two textures, power-of-two textures are still preferable due to a concept known as mipmapping (which is beyond the scope of this book).
You could certainly have each frame of an animated sprite be an individual image file (or texture). Although this is a simple system, it typically ends up wasting a great deal of memory. That’s because sprites usually aren’t rectangles, even though the image file must be. If the size of a particular frame’s image file is 100KB, but 15% of this space unused, that means 15KB is being wasted. This can add up quickly if there are a lot of frames of an animation; even just 100 total frames (~5 total seconds of animation) would waste almost 1.5MB!
A solution to this problem is to use a single image file that contains all the sprites, called a sprite sheet. In a sprite sheet, it is possible to pack in the sprites closely and overlap the unused space. This means that when the sprite sheet is opened, a bit of work is necessary to reconstruct the correct images in memory. But at least the file size can be significantly reduced, which will reduce the total installation size of the game. Figure 2.5 demonstrates saving space with a sprite sheet.
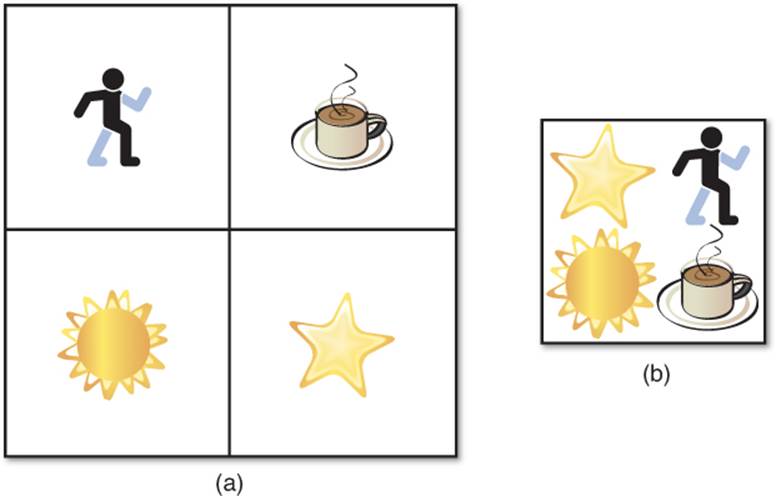
Figure 2.5 Individual sprites (a), and those sprites packed in a sprite sheet (b).
A popular tool for creating sprite sheets is TexturePacker (www.texturepacker.com), which is natively supported by many 2D libraries, including cocos2d. The Pro version of TexturePacker features some additional space-saving techniques, including rotating sprites to pack them together more tightly, and dithering, which can reduce the amount of color information a file needs to store.
Another advantage of using a sprite sheet is that most graphics processors must have a texture loaded into their own memory in order for it to be drawn. If you are switching between several individual texture files frequently when rendering a frame, this can result in a noticeable performance loss, especially if they are larger sprites. By having all of the sprites in one large texture, it is possible to eliminate this cost of switching.
Depending on how many sprites a game has, and the size of those sprites, it may not always be possible to fit all the sprites within one sprite sheet. Most hardware has a maximum texture size; for instance, current-generation iOS devices can’t have textures larger than 2048×2048. So if an iOS game has more sprites than can be fit into a 2048×2048 sprite sheet, it will need to have multiple sprite sheets.
Scrolling
In a relatively simple 2D game such as Pac-Man or Tetris, everything fits on one single screen. More complex 2D games, however, often have worlds that are larger than what can be displayed on a single screen. For these games, a common approach is to have the level scroll as the player moves across it. In this section, we cover progressively more complex types of scrolling.
Single-Axis Scrolling
In single-axis scrolling, the game scrolls only in the x or y direction. Infinite scroller games such as Jetpack Joyride, shown in Figure 2.6, often feature this type of scrolling. How this is implemented depends on how large the levels are. For games where all the background images can be loaded into memory at once, as we will assume in this section, the algorithms are not too complex.
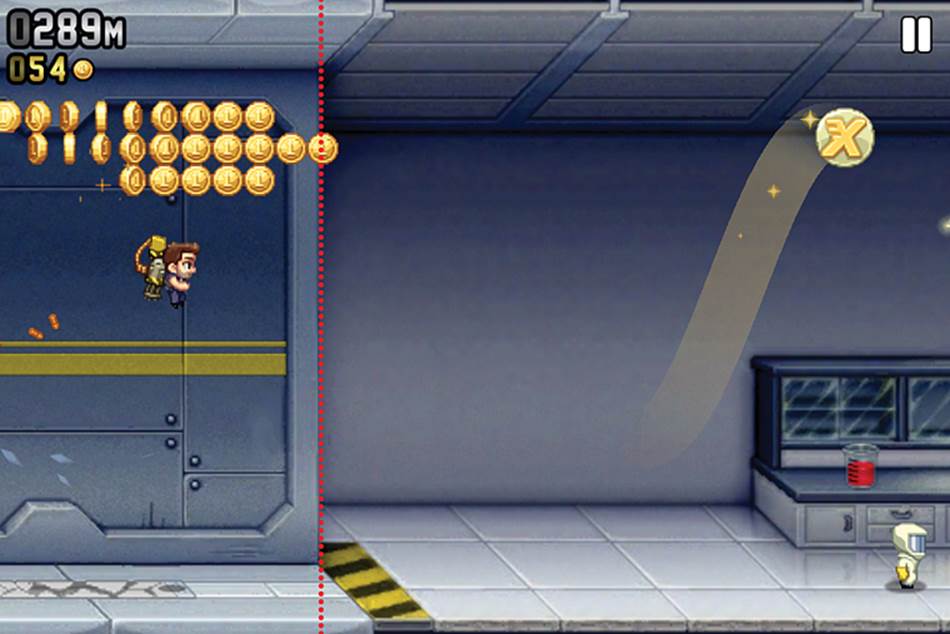
Figure 2.6 Single direction scrolling in Jetpack Joyride. The dotted line demonstrates a boundary.
The easiest approach is to split up the background of the level into screen-sized image segments. That’s because a level may be 20 or 30 screens-sized segments, which definitely would be larger than what would fit in a single texture. Each segment can then be positioned at the appropriate x- and y-coordinates in the world when loaded. Luckily, loading the segments at their correct positions in the world is a quick calculation if the background sprites are drawn relative to their top-left corner. As each background is loaded at the correct world position, it could be added to a linked list. For example, the setup code for horizontal scrolling would be as follows:
const int screenWidth = 960 // An iPhone 4/4S sideways is 960x640
// All the screen-sized image backgrounds
string backgrounds[] = { "bg1.png", "bg2.png", /*...*/}
// The total number of screen-sized images horizontally
int hCount = 0
foreach string s in backgrounds
Sprite bgSprite
bgSprite.image.Load(s)
// 1st screen would be x=0, 2nd x=960, 3rd x=1920, ...
bgSprite.x = hCount * screenWidth
bgSprite.y = 0
bgSpriteList.Add(bgSprite)
screenCount++
loop
Once the bgSpriteList has been populated, we then need to determine which backgrounds should be drawn and in what position. If the background segments are the size of the screen, no more than two background segments can be onscreen at once. We need a way to track what’s on screen and display the appropriate backgrounds.
One common approach is to have x- and y-coordinates for the camera also expressed as a position in the world. The camera starts out pointing at the center of the first background image. In horizontal scrolling, the camera’s x-position is set to the player’s x-position so long as the position does not scroll behind the first background or past the last background.
Although this could be done with if statements, as the complexity of the system increases these statements would become increasingly complex. A better solution is to use a clamp function, which takes a value and restricts it to be between a minimum and maximum value. In this case, we want the camera’s x-position to be equal to the player’s x-position, with a minimum valid value of half the screen width and a maximum valid value of the center of the final background.
Once we have the position of the camera, we can then determine which backgrounds are visible based on the camera. Finally, all the sprites, including the backgrounds, can be drawn with an offset based on this camera position.
// camera.x is player.x as long as its clamped within the valid range
camera.x = clamp(player.x, screenWidth / 2,
hCount * screenWidth – screenWidth / 2)
Iterator i = bgSpriteList.begin()
while i != bgSpriteList.end()
Sprite s = i.value()
// find the first bg image to draw
if (camera.x – s.x) < screenWidth
// Image 1: s.x = 0, camera.x = 480, screenWidth/2 = 480
// 0 – 480 + 480 = 0
draw s at (s.x – camera.x + screenWidth/2, 0)
// draw the bg image after this, since it might also be visible
i++
s = i.value()
draw s at (s.x – camera.x + screenWidth/2, 0)
break
end
i++
loop
This provided code implements scrolling where the camera and player can move forward and backward through the level, as in games such as Super Mario World. However, if we want to limit the scrolling so that the camera never goes backward, all we have to do is change the code so thatcamera.x is only changed when player.x is a greater value.
It’s also worth noting that in a framework that supports layers, such as cocos2d, it’s possible to simplify this code by changing the position of the background layer when it’s time to scroll. This is what’s employed for the sample iOS game outlined in Chapter 13, “Sample Game: Side-Scroller for iOS.” But for frameworks that don’t support such a feature, you’ll have to implement it in a manner similar to the preceding one.
Infinite Scrolling
Infinite scrolling is when the game continues to scroll until the player loses. Of course, there can never be an infinite number of background segments, so at some point the game will have to repeat images. In the case of Chapter 13’s infinite scroller, there actually are only two nebula images, which repeat indefinitely. However, most infinite scrollers will have a greater number of possibilities as well as random generation thrown in to add some variety. Typically the game may have a series of four or five background segments that must appear in order and then a clean break after which a different series of segments can be selected.
Parallax Scrolling
In parallax scrolling, the background is broken up into multiple layers at different depths. Each layer then scrolls at a different speed, which gives an illusion of depth. One example could be a game where there’s a cloud layer and a ground layer. If the cloud layer scrolls more slowly than the ground layer, it gives the impression that the clouds are further away than the ground.
This technique has been used in traditional animation for nearly a century, but the first game to popularize parallax scrolling was the 1982 arcade game Moon Patrol. On smartphone app stores, the majority of high-profile 2D games with scrolling utilize some form of parallax scrolling, whether it’s Jetpack Joyride or Angry Birds Space. Typically only three layers are necessary to create a believable parallax effect, as illustrated in Figure 2.7, but more layers add more depth to the effect.
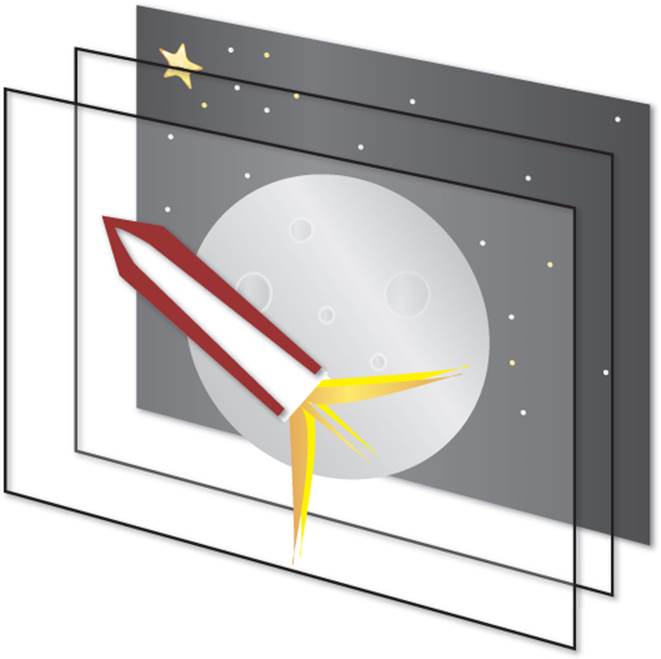
Figure 2.7 Space scene broken into three layers to facilitate parallax scrolling.
The single direction scrolling pseudocode could be updated to instead have multiple background sprite lists, one for each layer. To implement the parallax effect, when it’s time to calculate the offset of the sprite based on the camera, an additional factor must be applied. If a particular background layer is intended to move at a fifth of the speed of the closest layer, the offset calculation code would be as follows:
float speedFactor = 0.2f
draw s at (s.x – (camera.x – screenWidth/2) * speedFactor, 0)
For infinite scrollers, certain background layers may have less variety than others. The cloud layer may only have ten total segments that are repeated in perpetuity, whereas more readily apparent layers might have the aforementioned randomization. And, of course, frameworks that already support layers work perfectly with parallax scrolling as well.
For further detail on parallax scrolling, you should look at the sample 2D game implemented in Chapter 13. It implements infinite horizontal scrolling with multiple background layers in order to create the parallax effect.
Four-Way Scrolling
In four-way scrolling, the game world scrolls both horizontally and vertically, as in most 2D Mario games since Super Mario Bros. 2. Because it’s scrolling in both directions, up to four different background segments can be onscreen at any one time.
In order to update the horizontal scrolling code so it works in both directions, we will need to add code that checks whether or not the camera’s y-position needs to be updated. But first, we need to declare variables that tell us what the screen height is and how many vertical segments tall the level is:
const int screenHeight = 640 // Height of iPhone 4/4S horizontally
int vCount = 2
One issue that comes up with four-way scrolling is placement of the origin. Because most 2D frameworks have a coordinate system where the top left of the screen is (0,0), it simplifies things if the top left of the game world is also (0,0). So if our game supports two vertical segments, (0,0) would be one segment above the starting segment, as in Figure 2.8.
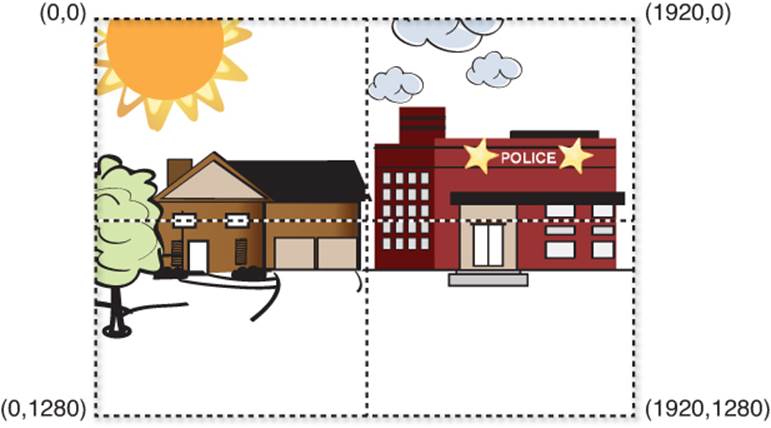
Figure 2.8 Scene broken up into four segments to support four-way scrolling.
Because we can also scroll vertically, we need to update the y-position of the camera, as well:
camera.y = clamp(player.y, screenHeight / 2,
vCount * screenHeight – screenHeight / 2)
Calculating the new location of the background sprite based on the camera also must take into account the y-position:
draw s at (s.x – camera.x + screenWidth/2,
s.y – camera.y – screenHeight / 2)
To determine which background segments need to be drawn, we can’t use the same approach as in horizontal scrolling. That’s because there isn’t just a single list of background sprites to iterate through. A basic approach might be to use a two-dimensional array to store the segments and determine both the row and column of the top-left segment on the screen. Once that segment is computed, it is trivial to get the other three visible segments.
// This assumes we have an 2D array [row][column] of all the segments
for int i = 0, i < vCount, i++
// Is this the correct row?
if (camera.y – segments[i][0].y) < screenHeight
for int j = 0, j < hCount, j++
// Is this the correct column?
if (camera.x – segments[i][j].x) < screenWidth
// This is the top left visible segment
end
loop
end
loop
Tile Maps
Suppose you are creating a 2D top-down action roleplaying game in the vein of The Legend of Zelda. There are massive outdoor areas and dungeons, so you need some way to draw these levels. A naïve approach might be to simply create a unique texture to represent every single scene. But this might duplicate a great deal of content because the same tree or rock might appear several times in one scene. And to make matters worse, those trees or rocks may show up in several different scenes, as well. This means using a unique texture for every scene may end up wasting a great deal of memory.
Tile maps solve this problem by partitioning the world into squares (or other polygons) of equal size. Each square then references the sprite that is at that location in the grid. The reference can often just be a numeric lookup into the tile set, or set of all the possible tiles. So if the tree is at index 0 in the tile set, every square that has a tree can be represented by the number 0. Figure 2.9 demonstrates a sample scene that uses tile maps.

Figure 2.9 Scene from the classic platformer Jazz Jackrabbit 2, which uses tile maps for its levels.
Even though squares are by far the most popular type of tile used in tile maps, this is not an absolute requirement. Some games choose to instead use hexagons, and others still might use parallelograms. It will solely depend on the type of view that is desired.
In any event, tile maps provide a great way to save memory and make life much easier for the artists and designers. And 2D games with procedurally generated content, such as Spelunky, would be difficult to implement without tile maps.
Simple Tile Maps
Certain frameworks, such as cocos2d, have built-in support for tile maps generated by the free program Tiled (www.mapeditor.org). It’s a great program, and I heartily recommend it if your framework of choice supports it. However, if Tiled is not supported by a particular framework, it still is possible to implement tile maps without major difficulty. This is especially true if each level fits on a single screen and scrolling isn’t required.
The first order of business is to determine the size of the tiles. This will vary depending on the device, but a popular size for many smartphone games is 32×32 pixels. This means that on a Retina iPhone with a resolution of 960×640, the screen would be able to fit 30×20 tiles.
Once the size of the tiles has been settled, the next step is to create the tile set that the game will use. All of the tiles should be placed into a single sprite sheet, if possible, for the gains outlined earlier. The code to render the tile map then needs some way to convert from the unique tile ID into the actual tile image. A simple convention is to have the tile in the top-left corner of the sprite sheet be tile 0, and then continue numbering across the row. The numbering for subsequent rows then continues at the number where the previous row left off.
Once we have a tile set, we can then create level data using these tiles. Although the level data could be a hardcoded 2D array of integers, it will work better if the level data is stored in an external file. The most basic file format would be a text file that lists the tile ID of each tile at each location on the screen. So a level that’s 5×5 tiles in size may look like this:
// Basic level file format
5,5
0,0,1,0,0
0,1,1,1,0
1,1,2,1,1
0,1,1,1,0
0,0,1,0,0
In this file format, the first line is ignored so the user can write a comment. The second line specifies the length and width of the level, and then the raw tile ID data is listed for each row and column. So the first row for this level has two tiles with ID 0, one with ID 1, and then two more with ID 1.
Levels would then be represented by the following class:
class Level
const int tileSize = 32
int width, height
int tiles[][]
function Draw()
end
The tiles array stores the tile IDs from the level file, and the width/height corresponds to those numbers in the level file. Loading the actual level file into the class is very language specific, but the file is so basic that parsing it should not prove to be difficult. Once the parsing is implemented, the next step is to implement the level’s draw function:
function Draw()
for int row = 0, row < height, row++
for int col = 0, col < width, col++
// Draw tiles[row][col] at (col*tileSize, row*tileSize)
loop
loop
end
Drawing the actual texture is also something that’s platform specific, but most 2D frameworks support drawing only a subset of a texture at a location. As long as the tile ID can be converted to the correct sub-image in the tile set, drawing it is relatively straightforward.
One important thing to note is that it may be possible to create several different tile sets that still use the same tile IDs. This is one easy way to implement seasonal or holiday-themed “skins” for a game. In the winter, it would be possible to change the tile set into something that’s covered in snow instead. It would be the same exact level, but it would look more festive.
Although this text-based tile map file format may work for simple levels, in a commercial game a more robust format would be preferable. Chapter 11, “Scripting Languages and Data Formats,” discusses other common file formats, some of which may be preferable formats for tile maps.
Isometric Tile Maps
The tile maps we’ve discussed to this point are displayed as a flat surface. This works well for a top-down or straight-on-the-side view, but if we want a view with a greater sense of depth, we need a different way to look at the scene. In an isometric view, the view is rotated slightly so that there is greater depth. Games such as Diablo and Fallout utilize isometric views, and a sample isometric view is shown in Figure 2.10.

Figure 2.10 Sample isometric scene.
Authoring tiles for an isometric view is a bit different from a standard view. Instead of squares, the tiles must either be diamonds or hexagons. It is also very common to have multiple layers of tiles when isometric tile maps are utilized, and higher layers may have structures constructed out of multiple adjacent tiles. To support multiple layers, we need to update our tile map format so data can be expressed for multiple layers. Furthermore, the drawing code will need to be updated so that layers are drawn in the appropriate order.
Summary
2D graphics have been around since the very inception of the video game industry, and this chapter discussed many of these core techniques. Although these techniques were developed with the limitations of CRT monitors in mind, most of them have carried over to modern games. Even today, we use double buffering in order to prevent screen tearing. And even though the resolutions of sprites have increased dramatically over the years, they are still the primary visual building block of any 2D games, whether animated or not. Finally, our discussion of scrolling and tile maps should have given you insight into how these slightly more complex systems might be implemented in a modern 2D game.
Review Questions
1. How does an electron gun draw the scene on a CRT? What is VBLANK?
2. What is screen tearing, and how can it be avoided?
3. What are the advantages of using double buffering instead of a single-color buffer?
4. What is the painter’s algorithm?
5. What advantage do sprite sheets have over individual sprites?
6. When should the camera’s position update in single-direction scrolling?
7. If all background segments can’t fit into memory at once in bidirectional scrolling, what data structure should you use to track the segments?
8. What is the difference between a tile map and tile set?
9. For animated sprites, why is it preferable to have the animation FPS as a member variable?
10. How does an isometric view differ from a top-down view?
Additional References
Cocos2d
The most popular 2D library used for iOS games is cocos2d, which is available at www.cocos2d-iphone.org.
Itterheim, Stephen. Learn Cocos2d 2: Game Development for iOS. New York: Apress, 2012. There are many books on cocos2d, but this is one of the stronger ones.
SDL
Simple DirectMedia Layer (SDL) is another library choice. This popular cross-platform 2D game library is written in C, but has been ported to many other languages. SDL is available at www.libsdl.org.
All materials on the site are licensed Creative Commons Attribution-Sharealike 3.0 Unported CC BY-SA 3.0 & GNU Free Documentation License (GFDL)
If you are the copyright holder of any material contained on our site and intend to remove it, please contact our site administrator for approval.
© 2016-2026 All site design rights belong to S.Y.A.