Games, Design and Play: A detailed approach to iterative game design (2016)
Part III: Practice
Chapter 11. Playtesting Your Game
The playtesting moment in the iterative cycle is where you find out the truth about your game’s design. It’s when the questions posed in the prototype are answered, often in ways that are unexpected. Just like there are many types of prototypes, there are many types of playtests, each based on getting your game closer to what you are hoping it will express.
If prototypes ask questions, then playtests provide the answers. Sometimes the team members ask and answer the question themselves. Sometimes playtesters from outside the team provide the answers. Sometimes playtests are super short, but other times they unfold over days, weeks, even months. It all depends on what questions are being asked through the prototype and what kinds of answers the team is seeking.
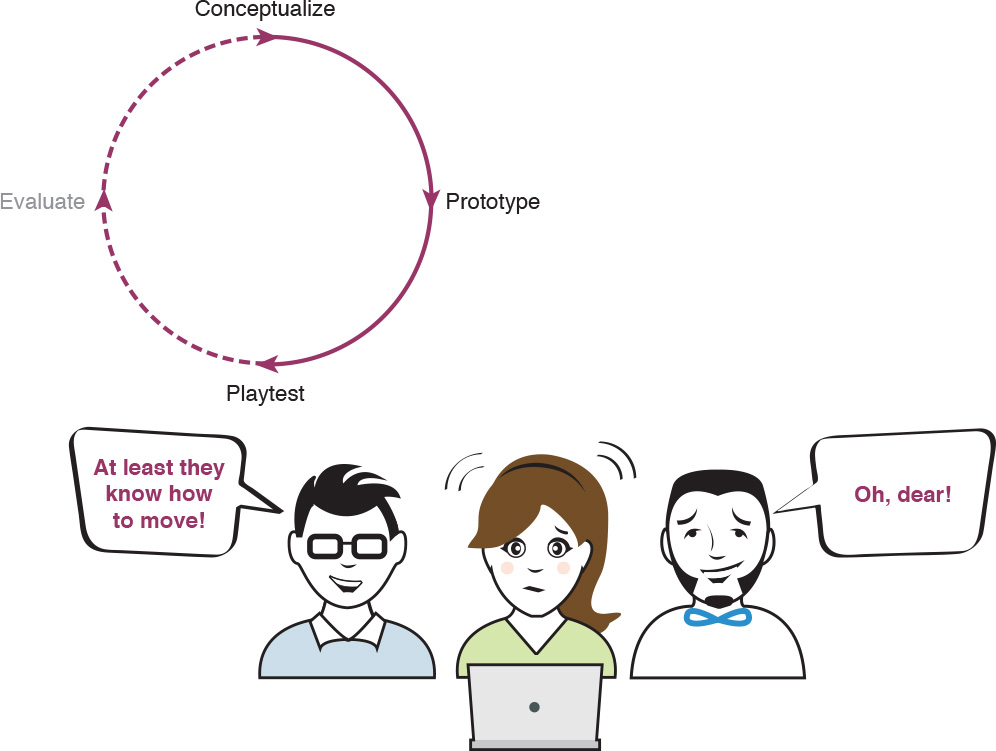
Figure 11.1 Playtesting is the third phase of the iterative cycle.
Playtesting lets us see what’s working and what’s not. Each time through the iterative cycle, different questions are posed by the prototype, and different answers are collected through playtesting. Early on, we’re seeing if our game will even run, if the components work together and the dynamics between them are in balance. Sometimes playtests let the team see whether the design values guiding the game’s design are embodied in the play experience. Later-stage playtests might focus on how easy or hard it is for players to understand how to play the game and gauge their progress, or they might test technical aspects of the game.
Often, particularly early in the iterative game design process, that answer isn’t always what’s expected. In fact, that’s why playtesting is such an important step. Playtesting can reveal cracks in the design that players can exploit to their own advantage, aspects that are unclear or easy to misinterpret, parts that are too easy or too difficult, and a wide array of emotions different from those hoped for. Games can generate many different kinds of emotions and responses from players—often more than the designers imagined and more than is the scope of this book. For more on this, we would recommend Katherine Isbister’s book How Games Move Us: Emotion by Design. It is a look into how games influence emotion, from the perspective of science and human psychology. It shows the depth of experiences games can evoke and how different games do this. Playtesting provides us with a method to witness and document these different responses—all answers to the questions our prototypes pose.
Six Kinds of Playtests
In the same way there are a lot of ways to prototype a game’s design, so there are a lot of different kinds of playtests to run for those prototypes. There are six kinds of playtests that we use in the game design process: internal tests, game developer tests, friend tests, target audience tests, new player tests, and experienced player tests.
Internal Playtests
The first kinds of playtests are internal playtests. In other words, playtest it yourself or with your team. Internal testing takes two forms: for quick loops and reviews with the team, and then as a way to make sure the prototype is ready for playtesting with people outside the team.
As a designer, anytime a question arises about the game’s design, a playtest should help find a suitable answer. Even with prototypes investigating aspects of the art, sound, code, or interface, there is still room for playtesting. Internal playtesting begins before we might even think of it as playtesting; every time code is tested during prototyping, that is an internal playtest.
Another form of internal testing happens with core and complete prototypes. Making sure the prototype functions well before asking others to spend time playtesting is important. This often catches bugs and basic gameplay problems without having to involve people outside the team. Just as important, internal playtests of playable prototypes provide the opportunity to review the game design as captured and investigated in that prototype.
With Ping!, our ping pong meets Pong game project, we did a lot of internal playtesting among the team (see Figure 11.2). Before we even got to our first coded prototype, when we were working on the paper prototype for Ping!, we were doing internal tests as we moved the paper elements around and making quick iterative loops as we went. This is one form of internal testing.
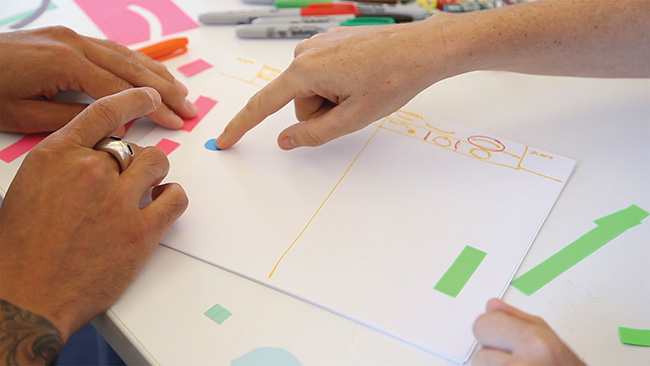
Figure 11.2 Internal playtesting of a paper prototype.
We also did a lot of this kind of playtesting with Ping!’s physical components—how to angle the projector and how projection looked on different materials, trying out the feel of different controllers and tweaking the code to get just the right kind of physics in the game. During our code prototypes and again in early playable prototypes, we created a series of custom controllers for the game to see which had the right combination of intuitiveness and the retro aesthetics we desired for the game. We first tested these separate from the game, taking turns manipulating the slides and knobs, and then again attached to a playable prototype.
Our internal playtesting continued with more detailed aspects of the playable prototype (see Figure 11.3). For instance, we tested and tweaked the speed of the paddles and the ball. Once we liked where we had those, we began to iterate around paddle abilities, like making it grow or shrink when you scored. As we played around and playtested, we finally ended up with an interesting option: one that actually made your paddle shrink or degrade when you hit the ball and grow when you scored against your opponent. This felt like something that could actually happen in the world of the game—the player starts with a nice big paddle, but it gets smaller (in effect, weaker) every time the player hits the ball. It added an interesting level of challenge to the gameplay. This idea later came into our first playable prototype in the form of interactions between materials. We used the different physical aspects of the ball to affect the paddle, and depending on the combination between the two, one or the other would shrink or grow.
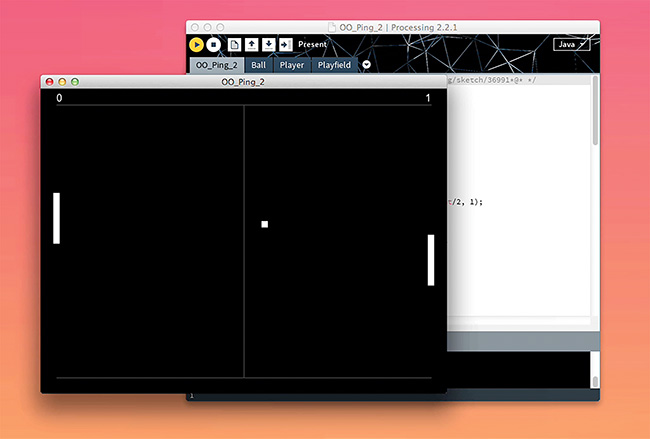
Figure 11.3 Playtesting an early playable prototype.
We did all of this playtesting in a day—often tweaking some variables and changing the code and playtesting right after. We sometimes call this “live coding”1—manipulating the game through the code and seeing right away how it changes the dynamics of play. One piece of advice about this kind of rapid iteration: don’t change too much at once. Instead, change only one thing at a time so you can get a better sense of how that change impacts the overall game. Sometimes the line between prototyping and playtesting can blur, as you can imagine from these examples. But the key with internal playtests is that the entire team takes time to play and share feedback on the game—even if it’s happening live and in the moment.
1 Live coding usually involves some kind of performance. It originated around computer music communities in the early 2000s. Our version is more oriented around rapidly prototyping and playtesting within the team to quickly home in on aspects of gameplay.
Game Developer Playtests
The next kind of playtest is with fellow game developers: people who understand the game design process. This type of playtest can happen at most any stage in the game design process, whether the prototype explores ideas or play. We think this is one of the best ways to get targeted feedback and to generate ideas around problems. Of course, game developers tend to be quite opinionated about games and can often give feedback about the version of the game they would make instead of the version there in front of them. Keeping in mind the design values for the game is really important when taking developer feedback on playtests, as they help the team stay aligned with its goals and to filter through the constructive feedback for the game’s design. You may even want to share your design values with your game developer testers so they know the principles guiding your design.
Game developers are great playtesters early on in the process because they have a trove of knowledge about games and can provide very detailed feedback. Maybe the team wants feedback on how one aspect of the game is coming together, in which case it is useful to bring in colleagues for a playable prototype. Or maybe the team wants feedback on how the visual design is working out, so running a playtest with some art director or graphic designer friends will benefit the game. Some coding challenges? Maybe a coder friend comes by to playtest a code prototype.
Early in the game design process for Ping!, we playtested an early playable prototype with our game designer friends Anthony and Naomi (see Figure 11.4). (In fact, Anthony loved the game so much, he joined the development team!) From this playtest we learned some important things about game feel and gameplay, and even more importantly, we learned of some new references and precedents for our game, including Bennett Foddy’s FLOP, a floppy version of Pong hidden in the PlayStation game Sportsfriends that we found really informative.
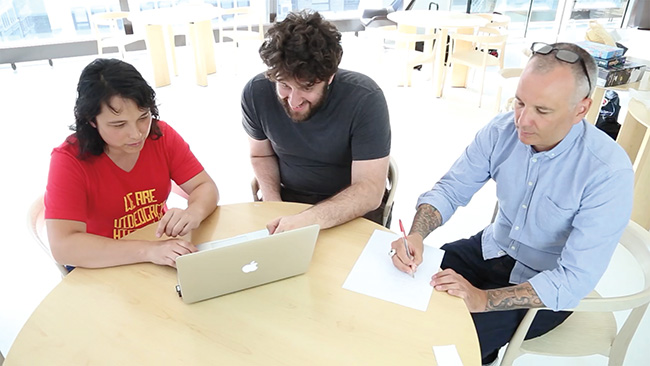
Figure 11.4 Playtesting with our game developer friends Anthony and Naomi.
Game developer playtests are great gut checks on the game and how well it is coming together to meet the agreed-upon design values. But be sure to take game developers’ feedback with a grain of...well, design values. Sometimes designers give feedback that is very solution oriented rather than simply reporting on their experience. They might suggest making certain changes to the game that pull it away from the kind of experience you are trying to generate. So do keep the design values in mind when considering feedback from other game designers.
Friend and Family Playtests
Another form of playtest is with friends and family—people with whom the team is comfortable sharing an in-progress game. Friend playtests can happen at most any stage. They are great for seeing how others respond to aspects of your game. But beware those friendly faces and kind words.... Your friends and family want you to succeed, so they likely will have only positive things to say about your game. With friend playtests, what people do or express is often more important than what they say, so pay close attention to what they are doing in the game, where they seem to be having the most fun, and where they seem to be having problems. And watch their facial expressions—these are often more honest and useful than what they will have to say.
With Local No. 12’s cardgame The Metagame (see Figure 11.5), we ran a fairly early playtest with a close friend’s family to see how people outside our game design communities responded to the game. We wanted the game to appeal to a wide range of players, so we thought a family gathering would make sense. We had people from 13 to 70 years old playing together, giving us a perfect range of ages for our pop culture-focused game. We were interested in seeing how people at the younger and older ends of the group reacted when they encountered things they didn’t know. By playing with the family of a close friend, we were able to have just the right distance from the players to assess the game’s content.
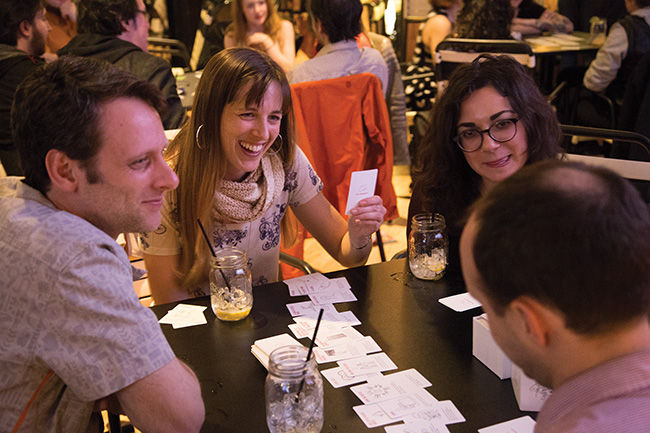
Figure 11.5 The Metagame.
Target Audience Playtests
Once the game’s design has progressed to core game and complete game prototypes, it’s time to bring in a wider range of playtesters. It can be helpful at this stage to find people who don’t know anything about the game or have limited familiarity with it, and most importantly, are in the target audience for the game. People who enjoy the type of play experience the game provides will help you see if the game’s design is creating the intended play experience.
Chris Hecker’s two-player Spy Party is a great example. Early in his design process, Chris began to seek out “early adopters” for the game. He would get a booth at game conventions, and he created a community website. This attracted players interested in the game, allowing Chris to develop a group of players with whom he could playtest his prototypes. Because the audience was eager to play the game, Chris was able to get lots of invaluable feedback on the game’s design from fairly early in the process, not so long after he had a first playable prototype. This also gave Chris an excellent gut check for design decisions—if his target audience playtesters enjoyed new features, art, and other aspects, then Chris knew he was heading in the right direction. And if they did not respond well, he was able to learn this early on and to work to find new solutions.
New Player Playtests
New player playtests are those that involve people new to the game. They are best for core game and complete game playtests to help see how new players will learn and enjoy the game. It is important to run between five and seven of these to try to see the full range of responses players will have. Less than five, and you might not get enough variation, and more than seven, and you are spending too much time on these tests. Keep in mind that a player is only a new player once, which means finding new people to playtest is an ongoing task.
Playtesting with new players will often shed light on the game that can be exploited in unexpected ways to a player’s advantage. As Kevin Cancienne was showing a prototype of his four-player game Dog Park (see Figure 11.6) at IndieCade, an independent game developer’s conference, one player found an exploit in the rules: that barking incessantly would always win in terms of accumulating fun points over any other activity. Kevin and his friend decided to try to stop the barking player from barking, making their dog characters go over and wrestle the barking dog to submission. They proceeded to run and chase each other all over the dog park. As they were doing this, Kevin had the sudden realization that what they were all doing in the game was exactly what dogs would actually do in real life—the game encourages the exact thing that Kevin was hoping for—giving people a chance to play like dogs. So instead of overcorrecting the exploit by completely removing barking from the game, he simply calibrated the number of points barking would give players. So barking is still a powerful strategy, but it can be overcome by the kinds of things dogs do to another dog whose behavior is annoying—chasing them, and wrestling them.
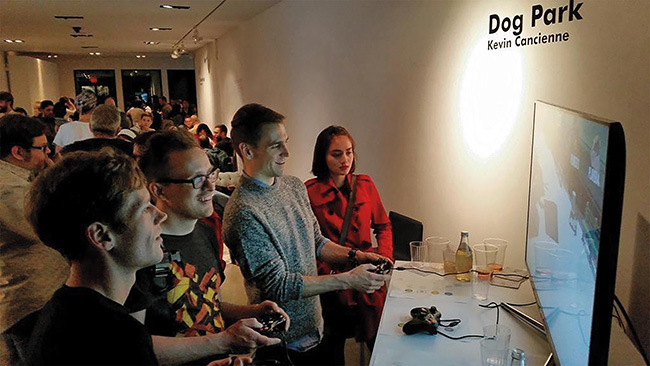
Figure 11.6 Dog Park being playtested. Photo by Daniel Latorre.
Experienced Player Playtests
Experienced player playtests are those where playtesters play a prototype over a longer period of time. Because of the nature of this sort of playtest, it is necessary to give experienced players some time—maybe a few days, maybe a week, maybe a few weeks. It will vary from game to game. Longer-term playtests like these are great for helping really see how the game design translates into play experiences. This kind of longer-term playtest can also show how changes in the game have impacted the experience since these playtesters will likely be around through various stages of the game’s development. Playtesting with experienced players can begin at the point there is a playable prototype, and to be effectively “experienced,” should continue through to complete game prototypes because these playtesters need to be able to give feedback on the whole experience. For longer-term playtests, it’s a good idea to set up regular emails (to prompt players to check in), website-based forms, or multiple in-person sessions if the game is multiplayer.
Chris Hecker’s work to develop a pool of target audience playtesters for Spy Party also allowed him to develop a group of experienced playtesters. This allowed him to focus on the core game and see what happened when players devoted time and energy to developing skills and strategy around the game. This sort of information is invaluable for games that emphasize player skill and goal-oriented play, but also for experiential games.
Matching Prototypes to Playtests
There are many different kinds of playtests—and playtesters—to use at every loop through the iterative cycle. Each one will provide different answers to the question that the prototype asks, based on their experiences, their relationship to you and the design team, and the kind of prototype they are testing. In fact, certain prototypes work best with certain playtesters.
Different prototypes lend themselves to different kinds of playtests (see Figure 11.7). This is because different kinds of playtests are better at evaluating different things:
![]() Paper prototypes are best suited for internal and game developer playtests.
Paper prototypes are best suited for internal and game developer playtests.
![]() The same goes for physical and code prototypes.
The same goes for physical and code prototypes.
![]() Art and playable prototypes might open up to also include friends and family.
Art and playable prototypes might open up to also include friends and family.
![]() Core game prototypes can open up a bit more to include target audience playtesters.
Core game prototypes can open up a bit more to include target audience playtesters.
![]() Complete game prototypes are the most open, involving all types of playtesters.
Complete game prototypes are the most open, involving all types of playtesters.
![]() Finally, experienced playtesters can be matched with almost any kind of prototype and might be playtesters from the beginning. How else will they become experienced?
Finally, experienced playtesters can be matched with almost any kind of prototype and might be playtesters from the beginning. How else will they become experienced?
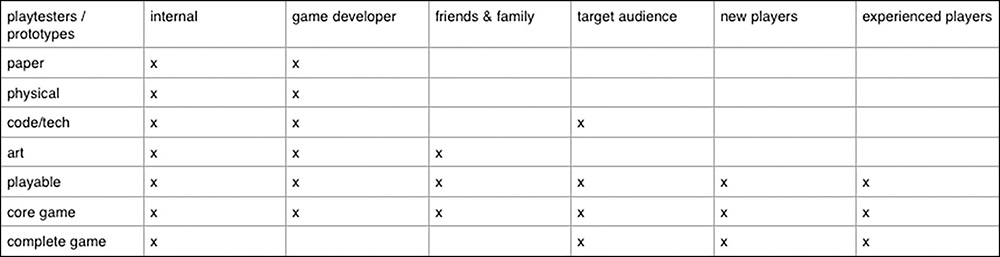
Figure 11.7 Matching prototypes to playtests.
Preparing for a Playtest
There is a lot more to running a playtest than just grabbing a couple of friends and letting them play the game (though that does work sometimes). Eric Zimmerman and his collaborator, the architect Nathalie Pozzi, talk about playtesting for their gallery games being both demanding and cruel.2 As Nathalie puts it, playtesting, particularly for early prototypes, is asking people to try out something its creators know is broken or incomplete. Eric describes early playtests like a dinner party where some of the food may be unappetizing or completely uncooked. Playtests ask a lot of everyone—most importantly the playtesters. To make the most of playtesting, make sure the prototype is ready and the team is prepared to capture the answers that come out of the playtest.
2 We interviewed Nathalie and Eric about their prototyping experience as part of our video series, Iterate: Design and Failure. http://www.designandfailure.com/nathalie-pozzi-and-eric-zimmerman/. 2015.
Picking a Time and Place
The basics of preparing for a playtest are picking a time and date, a location, and of course, playtesters. Setting a time and place that will accommodate playtesters but also provide the atmosphere conducive to evaluating the prototype isn’t trivial. For example, while a loud cafe or bar may seem ideal, it will quickly undermine the playtest if the game requires focus and undivided attention.
Planning the Playtest
Something that will help focus playtesters’ comments is a playtest plan—knowing how to introduce the game, what playtesters need to know to understand the current state of the game, and whatever info they need to know to play are all things to sort out ahead of time.
This means the team should meet before the playtest to identify what, exactly, everyone wants to learn from the playtest. A good place to start is revisiting the questions that led to creating the prototype in the first place. With Ping!, once we had our first playable prototype, we had a few questions we wanted to answer:
![]() How easy is it for players to manipulate the paddles?
How easy is it for players to manipulate the paddles?
![]() How long are they able to volley?
How long are they able to volley?
![]() Are certain materials and settings more fun than others?
Are certain materials and settings more fun than others?
These are the kinds of questions that we just couldn’t answer ourselves. We had been playing the prototypes all along and had lost the feel for how easy or difficult the game was. This is a common occurrence when developing a game. You need others to test it to keep the difficulty within reason and game interactions clear to new players.
Capturing Feedback
Just as important is having a plan for capturing the feedback. Will team members observe the players or even play along with them? Will sessions be videotaped for later review? Will screengrabs or video be captured if it is a screen-based prototype? Who will observe and take notes?
Much of what happens during playtests is nonverbal—a laugh, comments during gameplay, white knuckles during a particularly difficult challenge, bored glances at a cellphone. All these are important clues in the playtest and where videotaping can be quite helpful.
Running a Playtest
Once a prototype is ready to go, it’s time to playtest. This is often a pretty surprising, and sometimes a pretty traumatic, experience. But it’s also one that game designers become used to after a while. One of the most difficult things to do in a playtest is to sit back and pay attention to the playtest itself—and not try to intervene too much. It’s so hard to watch players fail to understand something in the game that seems obvious. In essence, it’s painful to watch them fail. This is exactly what we’re looking for—points in the game where things are unclear, too difficult, or just downright broken. To keep playtests smooth and focused, we’ve identified four things you should always do in a playtest: introduce, observe, listen, and discuss.
Introduce
First off, you should introduce playtesters to what they are about to experience. Tell them more about the state of the prototype. Make sure they understand where the project’s focus is right now. For example, if the art isn’t final or the win condition isn’t implemented, let playtesters know. This helps them understand better what they are playing and what they should comment upon.
Observe
The second is observe. When we observe the playtest, we’re looking for all kinds of things—body language, what players are actually doing onscreen, what they say when they are playing, how much they want to play, and in the case of our game, what players say to each other.
And here’s where we need to emphasize something. Observing doesn’t mean talking, helping, or coaching. Keep interactions with playtesters to a minimum. In fact, try not to interact at all when they are playing—even when they are struggling. This is easier said than done. It’s hard seeing playtesters fail because something in the game is unclear or play the game in a way that is totally unintended. Sometimes those surprises can be great to see—players helping strengthen the game’s design. And sometimes it is horrible, with the natural instinct being speaking up and intervening. Resist this impulse, as it defeats the purpose of playtesting. The goal of playtesting is watching to find just these kinds of failures and not to stop them from happening. So fight the impulse, keep quiet, and just write down what the playtesters are doing and what is and is not working.
Listen
The third thing to do is listen. This is different from observing. When we listen, we might be listening to our players talk aloud as they play. A good thing to do to understand what is going on in the player’s head is to ask them to actually say out loud what they are doing. A player can tell us why they are making certain choices, how the game is making them feel, or if there’s anything they are unsure about.
Discuss
The final thing to do during a playtest is to discuss. Make sure when scheduling the playtest to leave time to discuss the game with your playtesters. In the discussion, the kinds of questions to ask are not “yes/no,” or leading questions like “did the game feel fun?” Ask open questions like, “How did playing the game make you feel?” or use open prompts like, “Tell me how you figured out the game’s goal.” The goal here is looking for the playtester’s reactions to the game, not feeding them yours.
For certain playtests, in particular with target audience playtesters, have a discussion before or after the playtest about the playtesters’ own game preferences, who they are, and any other questions you might have to help you understand their point of view as they play your game.
So that’s it. Introduce, observe, listen, and discuss. Those are the four steps for running a playtest.
After a Playtest
There is so much going on during the playtesting process that it is easy to lose track of what you’ve done, why you did it, and what you should do next. Playtesting is the most critical part of the iterative game design process because it is the time when you gain deeper insight into the ideas explored during conceptualization and answers to the questions posed in your prototype. To help keep up with all this and to get the most out of each test, documentation is important. In the previous chapter we went over the why, what, and how of documentation of prototypes; now it’s time to focus on the who, when, where, and feedback of our playtests.
Who was playing? Make sure to record the playtesters’ names and a way to contact them in case additional questions come up. When and where are important to note because they provide pertinent information on the context within which the game was playtested. Feedback is the most essential thing to document. This is why we playtest in the first place: to see what playtesters do and think about the game. To make the most of playtesters’ time and efforts, pay careful attention to their experience.
We capture the most basic info like when we tested, who the playtesters were, which prototype we were testing, and who is taking the notes.
![]() Gameplay: This is where we collect notes relating to the play itself. Did the players enjoy themselves? Were they having problems? What worked? What didn’t?
Gameplay: This is where we collect notes relating to the play itself. Did the players enjoy themselves? Were they having problems? What worked? What didn’t?
![]() Visuals and audio: These are notes on the presentation layer of the game. Were there reactions to sound? To any of the visual elements of the game?
Visuals and audio: These are notes on the presentation layer of the game. Were there reactions to sound? To any of the visual elements of the game?
![]() Bugs: Were there any bugs that popped up during the playtest? Making careful note of what happened and what the playtester was doing that caused the bug is important for being able to go back and fix the bug.
Bugs: Were there any bugs that popped up during the playtest? Making careful note of what happened and what the playtester was doing that caused the bug is important for being able to go back and fix the bug.
![]() Comments: If playtesters say things that are revealing about their experience, try to write these down along with a note about what triggered the comment.
Comments: If playtesters say things that are revealing about their experience, try to write these down along with a note about what triggered the comment.
![]() Observations: Sometimes playtesters give feedback without saying a word—the furrow of a brow, a smile, or a laugh while they play. Playtesters also give feedback through their play. Watching what is happening onscreen, or if it is a nondigital game, what happens on the board or in their hand of cards, is also revealing.
Observations: Sometimes playtesters give feedback without saying a word—the furrow of a brow, a smile, or a laugh while they play. Playtesters also give feedback through their play. Watching what is happening onscreen, or if it is a nondigital game, what happens on the board or in their hand of cards, is also revealing.
![]() Ideas: Any ideas that come to mind during the test should be written down to avoid forgetting them. These are ideas about what to add, how to fix issues, and ways to enhance and improve. Catch them all.
Ideas: Any ideas that come to mind during the test should be written down to avoid forgetting them. These are ideas about what to add, how to fix issues, and ways to enhance and improve. Catch them all.
In addition to written notes, consider taking pictures and video of the playtest using screen capture software for recording the play sessions. The team can then go back and review these additional materials after the playtest session. But make sure to use notes to cross-reference with the video recordings to find relevant bits of footage rather than getting caught up re-watching hours of footage! We suggest adding exclamation points and noting the time or level so that these bits of footage can be easy to cue up and review.
As with all of this documentation, be sure to share it in a place where the team can access and review it. In the evaluate phase, any responses to the playtests will be added to the design document and reflected in schematics and task lists. (See Chapter 7, “Game Design Documentation,” for more details on this kind of documentation.)
The Difference Between Input and Feedback
Before moving on, it’s important to recognize some arguments that have been made against the iterative process. One of the stronger stances against iterative design comes from the critic and designer Mattie Brice.3 As Mattie points out, the player-centric iterative cycle can lead to the designer changing or smoothing out their original message to suit players. For gamemakers interested in creating challenging works, this can be problematic because it can water down the intended expression and experience of a game. Lana Polansky takes up a similar argument, noting that the player-centric approach can lead to gamemakers taking it easy on players.4 Further, by treating the player as central, gamemakers unintentionally have created a situation in which players often expect to be coddled and given what they want. Together, Brice and Polansky point out player-centered design has its problems and limits.
3 Mattie Brice, “Death of the Player,” Alternate Ending. www.mattiebrice.com/death-of-the-player, 2014.
4 Lana Polansky, “The Customer Is Often Wrong (Fuck the Player),” Sufficiently Human. http://sufficientlyhuman.com/archives/599, 2014.
There are also certain kinds of games for which playtesting is not really possible. Mattie draws an apt analogy in her essay, drawing a comparison to asking a romantic interest to give feedback on an early draft of a love letter. This would let the cat out of the bag, so to speak, before the letter writer has their thoughts fully formed.
Mattie and Lana’s thoughts on the role of playtesting bring up an important distinction between input and feedback. When game designers use the process to get player input on a game’s design, it is likely that the game will change to more fully suit player interests and tastes. This is different from getting feedback, which the game designer takes into account but doesn’t necessarily act upon. Jonathan Blow, the designer of Braid and The Witness, has an interesting relationship to iteration and playtesting. For Blow, videogames are an expressive medium through which he has particular things to say. He isn’t interested in getting ideas from his playtesters, yet he still playtests. Instead of looking for ways to better entertain his players, Blow playtests to make sure his games provide the play experience he intends. So playtesting becomes a tool for calibrating his expression rather than a method of giving players what they want.
The thing is, almost every creative medium has its own version of playtesting as feedback mechanism. For poets and writers, it is called workshops; for playwrights and screenplay writers, it is called table reads; for artists, it is called critiques. In these situations, the person creating the poem, play, or painting solicits feedback from their peers. This may come in the form of notes on where the work falls short of the intended goals, and it may come in the form of input, or suggestions, on how to change the work. Feedback points out the problems, while input suggests changes that may or may not be in line with the creator’s intentions. The point is, no matter what field of perspective an artist or designer brings to the creative process, there is almost always room for feedback, and at times, input, so long as the creator knows what to do with it.
Summary
Playtesting is where your team gets answers to the question that your prototype asks. It’s also where you are likely to see your playtesters struggle and your game fail to provide the play experience you want. This is exactly what you need to make your game better. Playtesting early with your team, fellow game designers and friends will help you see what’s working and what isn’t with your game. Later playtesting with your target audience, new players and experienced players will help you refine your game and turn it into something great. Remember to introduce, observe, listen, survey, and discuss with your playtesters and to record the results so that you can remember and discuss them with your team—which leads us to the next step in the iterative cycle: evaluate.
The six kinds of playtests include the following:
![]() Internal tests: Playtesting the game yourself or with your team. Internal testing takes two forms: for quick loops and reviews with the team, and then as a way to make sure the prototype is ready for playtesting with people outside the team.
Internal tests: Playtesting the game yourself or with your team. Internal testing takes two forms: for quick loops and reviews with the team, and then as a way to make sure the prototype is ready for playtesting with people outside the team.
![]() Game developer tests: Playtesting with fellow game developers: people who understand the game design process.
Game developer tests: Playtesting with fellow game developers: people who understand the game design process.
![]() Friend and family tests: Another form of playtest is with friends and family—people with whom the team is comfortable sharing an in-progress game.
Friend and family tests: Another form of playtest is with friends and family—people with whom the team is comfortable sharing an in-progress game.
![]() Target audience tests: Once the game’s design has progressed to core game and complete game prototypes, it’s time to bring in people who enjoy the type of play experience the game provides—in other words, the target audience.
Target audience tests: Once the game’s design has progressed to core game and complete game prototypes, it’s time to bring in people who enjoy the type of play experience the game provides—in other words, the target audience.
![]() New player tests: New player playtests are those that involve people new to the game. They are best for core game and complete game playtests to help see how new players will learn and enjoy the game.
New player tests: New player playtests are those that involve people new to the game. They are best for core game and complete game playtests to help see how new players will learn and enjoy the game.
![]() Experienced player tests: Experienced player playtests are those where playtesters play a prototype over a longer period of time.
Experienced player tests: Experienced player playtests are those where playtesters play a prototype over a longer period of time.
There is more to do than just decide what kind of playtest is needed for the current prototype. Planning is important in making the most of the playtest opportunity. There are a set of steps that help make a successful playtest:
1. Picking a time and place
2. Planning what is to be evaluated
3. Deciding how to document the playtest
Once the playtest begins, there are four key steps:
1. Introduce
2. Observe
3. Listen
4. Discuss
Depending on what is being playtested, there are a number of things to observe and document:
![]() Gameplay
Gameplay
![]() Visuals and audio
Visuals and audio
![]() Bugs
Bugs
![]() Player comments
Player comments
![]() Player behaviors
Player behaviors
![]() Tester observations
Tester observations
![]() Ideas generated during the playtest
Ideas generated during the playtest