Android Application Development: A Beginner's Tutorial (2015)
Chapter 12. Graphics and Custom Views
Thanks to Android’s extensive library, you have dozens of views and widgets at your disposal. If none of these meets your need, you can create a custom view and draw directly on it using the Android Graphics API.
This chapter discusses the use of some members of the Graphics API to draw on a canvas and create a custom view. A sample application called CanvasDemo is presented at the end of this chapter.
Overview
The Android Graphics API comprises the members of the android.graphics package. The Canvas class in this package plays a central role in 2D graphics. You can get an instance of Canvas from the system and you do not need to create one yourself. Once you have an instance of Canvas, you can call its various methods, such as drawColor, drawArc, drawRect, drawCircle, and drawText.
In addition to Canvas, Color and Paint are frequently used. A Color object represents a color code as an int. The Color class defines a number of color code fields and methods for creating and converting color ints. Color code fields defined in Color includes BLACK, CYAN,MAGENTA, YELLOW, WHITE, RED, GREEN and BLUE.
Take the drawColor method in Canvas as an example. This method accepts a color code as an argument.
public void drawColor(int color);
drawColor changes the color of the canvas with the specified color. To change the canvas color to magenta, you would write
canvas.drawColor(Color.MAGENTA);
A Paint is required when drawing a shape or text. A Paint determines the color and transparency of the shape or text drawn as well as the font family and style of the text.
To create a Paint, use one of the Paint class’s constructors:
public Paint()
public Paint(int flags)
public Paint(Paint anotherPaint)
If you use the second constructor, you can pass one or more fields defined in the Paint class. For example, the following code creates a Paint by passing the LINEAR_TEXT_FLAG and ANTI_ALIAS_FLAG fields.
Paint paint = new Paint(
Paint.LINEAR_TEXT_FLAG | Paint.ANTI_ALIAS_FLAG);
Hardware Acceleration
Modern smart phones and tablets come with a graphic processing unit (GPU), an electronic circuit that specializes in image creation and rendering. Starting with Android 3.0, the Android framework will utilize any GPU it can find on a device, resulting in improved performance throughhardware acceleration. Hardware acceleration is enabled by default for any application targeting Android API level 14 or above.
Unfortunately, currently not all drawing operations work when hardware acceleration is turned on. You can disable hardware acceleration by setting the android:hardwareAccelerated attribute to false in either the application or activity element in your android manifest file. For example, to turn off hardware acceleration for the whole application, use this:
<application android:hardwareAccelerated="false">
To disable hardware acceleration in an activity, use this:
<activity android:hardwareAccelerated="false" />
It is possible to use the android:hardwareAccelerated attribute in both application or activity levels. For example, the following indicates that all except one activity in the application should use hardware acceleration.
<application android:hardwareAccelerated="true">
<activity ... />
<activity android:hardwareAccelerated="false" />
</application>
Note
To try out the examples in this chapter, you must disable hardware acceleration.
Creating A Custom View
To create a custom view, extend the android.view.View class or one of its subclasses and override its onDraw method. Here is the signature of onDraw.
protected void onDraw (android.graphics.Canvas canvas)
The system calls the onDraw method and pass a Canvas. You can use the methods in Canvas to draw shapes and text. You can also create path and regions to draw more complex shapes.
The onDraw method may be called many times during the application lifecycle. As such, you should not perform expensive operations here, such as allocating objects. Objects that you need to use in onDraw should be created somewhere else.
For example, most drawing methods in Canvas require a Paint. Rather than creating a Paint in onDraw, you should create it at the class level and have it available for use in onDraw. This is illustrated in the following class.
public class MyCustomView extends View {
Paint paint;
{
paint = ... // create a Paint object here
}
@Override
protected void onDraw(Canvas canvas) {
// use paint here.
}
}
Drawing Basic Shapes
The Canvas class defines methods such as drawLine, drawCircle, and drawRect to draw shapes. For example, the following code shows how you can draw shapes in your onDraw method.
Paint paint = new Paint(Paint.FAKE_BOLD_TEXT_FLAG);
protected void onDraw(Canvas canvas) {
// change canvas background color.
canvas.drawColor(Color.parseColor("#bababa"));
// draw basic shapes
canvas.drawLine(5, 5, 200, 5, paint);
canvas.drawLine(5, 15, 200, 15, paint);
canvas.drawLine(5, 25, 200, 25, paint);
paint.setColor(Color.YELLOW);
canvas.drawCircle(50, 70, 35, paint);
paint.setColor(Color.GREEN);
canvas.drawRect(new Rect(100, 60, 150, 80), paint);
paint.setColor(Color.DKGRAY);
canvas.drawOval(new RectF(160, 60, 250, 80), paint);
...
}
Figure 12.1 shows the result.
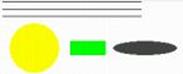
Figure 12.1: Basic shapes
Drawing Text
To draw text on a canvas, use the drawText method and a Paint. For example, the following code draws text using different colors.
// draw text
textPaint.setTextSize(22);
canvas.drawText("Welcome", 20, 100, textPaint);
textPaint.setColor(Color.MAGENTA);
textPaint.setTextSize(40);
canvas.drawText("Welcome", 20, 140, textPaint);
Figure 12.2 shows the drawn text.
![]()
Figure 12.2: Drawing text
Transparency
Android’s Graphics API supports transparency. You can set the transparency by assigning an alpha value to the Paint used in drawing. Consider the following code.
// transparency
textPaint.setColor(0xFF465574);
textPaint.setTextSize(60);
canvas.drawText("Android Rocks", 20, 340, textPaint);
// opaque circle
canvas.drawCircle(80, 300, 20, paint);
// semi-transparent circles
paint.setAlpha(110);
canvas.drawCircle(160, 300, 39, paint);
paint.setColor(Color.YELLOW);
paint.setAlpha(140);
canvas.drawCircle(240, 330, 30, paint);
paint.setColor(Color.MAGENTA);
paint.setAlpha(30);
canvas.drawCircle(288, 350, 30, paint);
paint.setColor(Color.CYAN);
paint.setAlpha(100);
canvas.drawCircle(380, 330, 50, paint);
Figure 12.3 shows some semi transparent circles..

Figure 12.3: Transparency
Shaders
A Shader is a span of colors. You create a Shader by defining two colors as in the following code.
// shader
Paint shaderPaint = new Paint();
Shader shader = new LinearGradient(0, 400, 300, 500, Color.RED,
Color.GREEN, Shader.TileMode.CLAMP);
shaderPaint.setShader(shader);
canvas.drawRect(0, 400, 200, 500, shaderPaint);
Figure 12.4 shows a linear gradient shader.
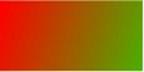
Figure 12.4: Using a linear gradient shader
Clipping
Clipping is the process of allocating an area on a canvas for drawing. The clipped area can be a rectangle, a circle, or any arbitrary shape you can imagine. Once you clip the canvas, any other drawing that would otherwise be rendered outside the area will be ignored.
Figure 12.5 shows a clip area in the shape of a star. After the canvas is clipped, drawn text will only be visible within the clipped area.
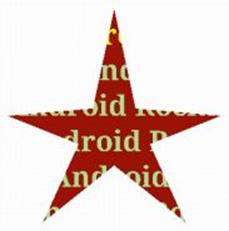
Figure 12.5: An example of clipping
The Canvas class provides the following methods for clipping: clipRect, clipPath, and clipRegion. The clipRect method uses a Rect as a clip area and clipPath uses a Path. For example, the clip area in Figure 12.5 was created using this code.
canvas.clipPath(starPath);
// starPath is a Path in the shape of a star, see next section
// on how to create it.
textPaint.setColor(Color.parseColor("yellow"));
canvas.drawText("Android", 350, 550, textPaint);
textPaint.setColor(Color.parseColor("#abde97"));
canvas.drawText("Android", 400, 600, textPaint);
canvas.drawText("Android Rocks", 300, 650, textPaint);
canvas.drawText("Android Rocks", 320, 700, textPaint);
canvas.drawText("Android Rocks", 360, 750, textPaint);
canvas.drawText("Android Rocks", 320, 800, textPaint);
You’ll learn more about clipping in the next sections.
Using Paths
A Path is a collection of any number of straight line segments, quadratic curves, and cubic curves. A Path can be used for clipping or to draw text on.
As an example, this method creates a star path. It takes a coordinate that is the location of its center.
private Path createStarPath(int x, int y) {
Path path = new Path();
path.moveTo(0 + x, 150 + y);
path.lineTo(120 + x, 140 + y);
path.lineTo(150 + x, 0 + y);
path.lineTo(180 + x, 140 + y);
path.lineTo(300 + x, 150 + y);
path.lineTo(200 + x, 190 + y);
path.lineTo(250 + x, 300 + y);
path.lineTo(150 + x, 220 + y);
path.lineTo(50 + x, 300 + y);
path.lineTo(100 + x, 190 + y);
path.lineTo(0 + x, 150 + y);
return path;
}
The following code shows how to draw text that curves along a Path.
public class CustomView extends View {
Path curvePath;
Paint textPaint = new Paint(Paint.LINEAR_TEXT_FLAG);
{
Typeface typeface = Typeface.create(Typeface.SERIF,
Typeface.BOLD);
textPaint.setTypeface(typeface);
curvePath = createCurvePath();
}
private Path createCurvePath() {
Path path = new Path();
path.addArc(new RectF(400, 40, 780, 300), -210, 230);
return path;
}
protected void onDraw(Canvas canvas) {
...
// draw text on path
textPaint.setColor(Color.rgb(155, 20, 10));
canvas.drawTextOnPath("Nice artistic touches",
curvePath, 10, 10, textPaint);
...
}
}
Figure 12.6 shows the drawn text.

Figure 12.6: Drawing text on a path
The CanvasDemo Application
The CanvasDemo application features a custom view and contains all the code snippets presented in this chapter. Figure 12.7 shows the main activity of the application.
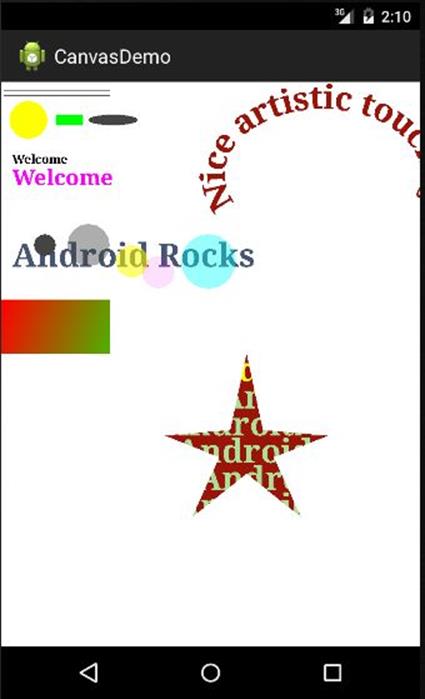
Figure 12.7: The CanvasDemo application
Listing 12.1 shows the AndroidManifest.xml file for this application. It only has one activity.
Listing 12.1: The AndroidManifest.xml file
<?xml version="1.0" encoding="utf-8"?>
<manifest xmlns:android="http://schemas.android.com/apk/res/android"
package="com.example.canvasdemo"
android:versionCode="1"
android:versionName="1.0" >
<uses-sdk
android:minSdkVersion="18"
android:targetSdkVersion="18" />
<application
android:hardwareAccelerated="false"
android:allowBackup="true"
android:icon="@drawable/ic_launcher"
android:label="@string/app_name"
android:theme="@style/AppTheme" >
<activity
android:name="com.example.canvasdemo.MainActivity"
android:label="@string/app_name" >
<intent-filter>
<action android:name="android.intent.action.MAIN"/>
<category
android:name="android.intent.category.LAUNCHER" />
</intent-filter>
</activity>
</application>
</manifest>
The main actor of the application is the CustomView class in Listing 12.2. It extends View and overrides its onDraw method.
Listing 12.2: The CustomView class
package com.example.canvasdemo;
import android.content.Context;
import android.graphics.Canvas;
import android.graphics.Color;
import android.graphics.LinearGradient;
import android.graphics.Paint;
import android.graphics.Path;
import android.graphics.Rect;
import android.graphics.RectF;
import android.graphics.Shader;
import android.graphics.Typeface;
import android.view.View;
public class CustomView extends View {
public CustomView(Context context) {
super(context);
}
Paint paint = new Paint(Paint.FAKE_BOLD_TEXT_FLAG);
Path starPath;
Path curvePath;
Paint textPaint = new Paint(Paint.LINEAR_TEXT_FLAG);
Paint shaderPaint = new Paint();
{
Typeface typeface = Typeface.create(
Typeface.SERIF, Typeface.BOLD);
textPaint.setTypeface(typeface);
Shader shader = new LinearGradient(0, 400, 300, 500,
Color.RED, Color.GREEN, Shader.TileMode.CLAMP);
shaderPaint.setShader(shader);
// create star path
starPath = createStarPath(300, 500);
curvePath = createCurvePath();
}
protected void onDraw(Canvas canvas) {
// draw basic shapes
canvas.drawLine(5, 5, 200, 5, paint);
canvas.drawLine(5, 15, 200, 15, paint);
canvas.drawLine(5, 25, 200, 25, paint);
paint.setColor(Color.YELLOW);
canvas.drawCircle(50, 70, 35, paint);
paint.setColor(Color.GREEN);
canvas.drawRect(new Rect(100, 60, 150, 80), paint);
paint.setColor(Color.DKGRAY);
canvas.drawOval(new RectF(160, 60, 250, 80), paint);
// draw text
textPaint.setTextSize(22);
canvas.drawText("Welcome", 20, 150, textPaint);
textPaint.setColor(Color.MAGENTA);
textPaint.setTextSize(40);
canvas.drawText("Welcome", 20, 190, textPaint);
// transparency
textPaint.setColor(0xFF465574);
textPaint.setTextSize(60);
canvas.drawText("Android Rocks", 20, 340, textPaint);
// opaque circle
canvas.drawCircle(80, 300, 20, paint);
// semi-transparent circle
paint.setAlpha(110);
canvas.drawCircle(160, 300, 39, paint);
paint.setColor(Color.YELLOW);
paint.setAlpha(140);
canvas.drawCircle(240, 330, 30, paint);
paint.setColor(Color.MAGENTA);
paint.setAlpha(30);
canvas.drawCircle(288, 350, 30, paint);
paint.setColor(Color.CYAN);
paint.setAlpha(100);
canvas.drawCircle(380, 330, 50, paint);
// draw text on path
textPaint.setColor(Color.rgb(155, 20, 10));
canvas.drawTextOnPath("Nice artistic touches",
curvePath, 10, 10, textPaint);
// shader
canvas.drawRect(0, 400, 200, 500, shaderPaint);
// create a star-shaped clip
canvas.drawPath(starPath, textPaint);
textPaint.setColor(Color.CYAN);
canvas.clipPath(starPath);
textPaint.setColor(Color.parseColor("yellow"));
canvas.drawText("Android", 350, 550, textPaint);
textPaint.setColor(Color.parseColor("#abde97"));
canvas.drawText("Android", 400, 600, textPaint);
canvas.drawText("Android Rocks", 300, 650, textPaint);
canvas.drawText("Android Rocks", 320, 700, textPaint);
canvas.drawText("Android Rocks", 360, 750, textPaint);
canvas.drawText("Android Rocks", 320, 800, textPaint);
}
private Path createStarPath(int x, int y) {
Path path = new Path();
path.moveTo(0 + x, 150 + y);
path.lineTo(120 + x, 140 + y);
path.lineTo(150 + x, 0 + y);
path.lineTo(180 + x, 140 + y);
path.lineTo(300 + x, 150 + y);
path.lineTo(200 + x, 190 + y);
path.lineTo(250 + x, 300 + y);
path.lineTo(150 + x, 220 + y);
path.lineTo(50 + x, 300 + y);
path.lineTo(100 + x, 190 + y);
path.lineTo(0 + x, 150 + y);
return path;
}
private Path createCurvePath() {
Path path = new Path();
path.addArc(new RectF(400, 40, 780, 300),
-210, 230);
return path;
}
}
The MainActivity class, given in Listing 12.3, instantiates the CustomView class and pass the instance to its setContentView method. This is unlike most applications in this book where you pass a layout resource identifier to another overload of setContentView.
Listing 12.3: The MainActivity class
package com.example.canvasdemo;
import android.app.Activity;
import android.os.Bundle;
public class MainActivity extends Activity {
@Override
protected void onCreate(Bundle savedInstanceState) {
super.onCreate(savedInstanceState);
CustomView customView = new CustomView(this);
setContentView(customView);
}
}
Summary
The Android SDK comes with a wide range of views that you can use in your applications. If none of these suits your need, you can create a custom view and draw on it. This chapter showed you how to create a custom view and draw multiple shapes on a canvas.
All materials on the site are licensed Creative Commons Attribution-Sharealike 3.0 Unported CC BY-SA 3.0 & GNU Free Documentation License (GFDL)
If you are the copyright holder of any material contained on our site and intend to remove it, please contact our site administrator for approval.
© 2016-2026 All site design rights belong to S.Y.A.