Android Application Development: A Beginner's Tutorial (2015)
Chapter 13. Fragments
A powerful feature added to Android 3.0 (API level 11), fragments are components that can be embedded into an activity. Unlike custom views, fragments have their own lifecycle and may or may not have a user interface.
This chapter explains what fragments are and shows how to use them.
The Fragment Lifecycle
You create a fragment by extending the android.app.Fragment class or one of its subclasses. A fragment may or may not have a user interface. A fragment with no user interface (UI) normally acts as a worker for the activity the fragment is embedded into. If a fragment has a UI, it may contain views arranged in a layout file that will be loaded after the fragment is created. In many aspects, writing a fragment is similar to writing an activity.
In order to create fragments effectively, you need to know the lifecycle of a fragment. Figure 13.1 shows the lifecycle of a fragment.
The lifecycle of a fragment is similar to that of an activity. For example, it has callback methods such as onCreate, onResume and onPause. On top of that, there are additional methods like onAttach, onActivityCreated and onDetach. onAttach is called after the fragment is associated with an activity and onActivityCreated gets called after the onCreate method of the activity that contains the fragment is completed. onDetach is invoked before a fragment is detached from an activity.
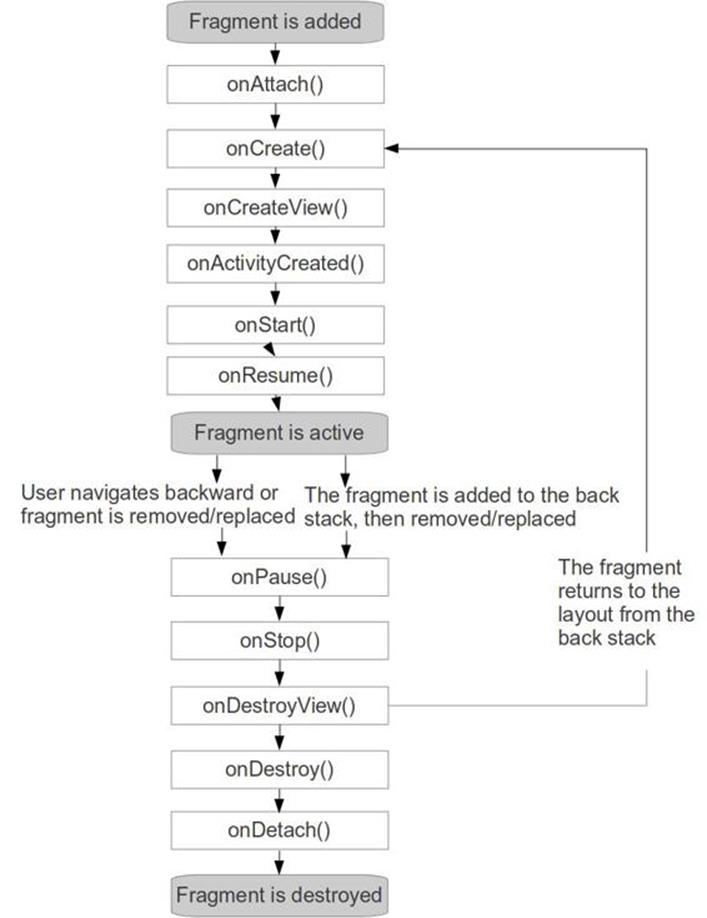
Figure 13.1: The fragment lifecycle
§ onAttach. Called right after the fragment is associated with its activity.
§ onCreate. Called to create the fragment the first time.
§ onCreateView. Called when it is time to create the layout for the fragment. It must return the fragment’s root view.
§ onActivityCreated. Called to tell the fragment that its activity’s onCreate method has completed.
§ onStart. Called when the fragment’s view is made visible to the user.
§ onResume. Called when the containing activity enters the Resumed state, which means the activity is running.
§ onPause. Called when the containing activity is being paused.
§ onStop. Called when the containing activity is stopped.
§ onDestroyView. Called to allow the fragment to release resources used for its view.
§ onDestroy. Called to allow the fragment to do final clean-up before it is destroyed.
§ onDetach. Called right after the fragment is detached from its activity.
There are some subtle differences between an activity and a fragment. In an activity, you normally set the view for the activity in its onCreate method using the setContentView method, e.g.
protected void onCreate(android.os.Bundle savedInstanceState) {
super(savedInstanceState);
setContentView(R.layout.activity_main);
...
}
In a fragment you normally create a view in its onCreateView method. Here is the signature of the onCreateView method.
public View onCreateView(android.view.LayoutInflater inflater,
android.view.ViewGroup container,
android.os.Bundle savedInstanceState);
Noticed there are three arguments that are passed to onCreateView? The first argument is a LayoutInflater that you use to inflate any view in the fragment. The second argument is the parent view the fragment should be attached to. The third argument, a Bundle, if not null contains information from the previously saved state.
In an activity, you can obtain a reference to a view by calling the findViewById method on the activity. In a fragment, you can find a view in the fragment by calling the findViewById on the parent view.
View root = inflater.inflate(R.layout.fragment_names,
container, false);
View aView = (View) root.findViewById(id);
Also note that a fragment should not know anything about its activity or other fragments. If you need to listen for an event that occurs in a fragment that affects the activity or other views or fragments, do not write a listener in the fragment class. Instead, trigger a new event in response to the fragment event and let the activity handle it.
You will learn more about creating a fragment in later sections in this chapter.
Fragment Management
To use a fragment in an activity, use the fragment element in a layout file just as you would a view. Specify the fragment class name in the android:name attribute and an identifier in the android:id attribute. Here is an example of a fragment element.
<fragment
android:name="com.example.MyFragment"
android:id="@+id/fragment1"
...
/>
Alternatively, You can manage fragments programmatically in your activity class using an android.app.FragmentManager. You can obtain the default instance of FragmentManager by calling the getFragmentManager method in your activity class. Then, call the beginTransactionmethod on the FragmentManager to obtain a FragmentTransaction.
FragmentManager fragmentManager = getFragmentManager();
FragmentTransaction fragmentTransaction =
fragmentManager.beginTransaction();
The android.app.FragmentTransaction class offers methods for adding, removing, and replacing fragments. Once you’re finished, call FragmentTransaction.commit() to commit your changes.
You can add a fragment to an activity using one of the add method overloads in the FragmentTransaction class. You have to specify to which view the fragment should be added to. Normally, you would add a fragment to a FrameLayout or some other type of layout. Here is one of theadd methods in FragmentTransaction.
public abstract FragmentTransaction add(int containerViewId,
Fragment fragment, String tag)
To use add, you would instantiate your fragment class and then specify the ID of the view to add to. If you pass a tag, you can later retrieve your fragment using the findFragmentByTag method on the FragmentManager.
If you are not using a tag, you can use this add method.
public abstract FragmentTransaction add(int containerViewId,
Fragment fragment)
To remove a fragment from an activity, call the remove method on the FragmentTransaction.
public abstract FragmentTransaction remove(Fragment fragment)
And to replace a fragment in a view with another fragment, use the replace method.
public abstract FragmentTransaction replace(int containerViewId,
Fragment fragment, String tag)
As a last step once you are finished managing your fragments, call commit on the FragmentTransaction.
public abstract int commit()
Using A Fragment
The FragmentDemo1 application is a sample application with an activity that uses two fragments. The first fragment lists some cities. Selecting a city causes the second fragment to show the picture of the selected city. Since proper design dictates that a fragment should not know anything about its surrounding, the first fragment rises an event upon receiving user selection. The activity handles this new event and causes the second fragment to change.
Figure 13.2 shows how FragmentDemo1 looks like.
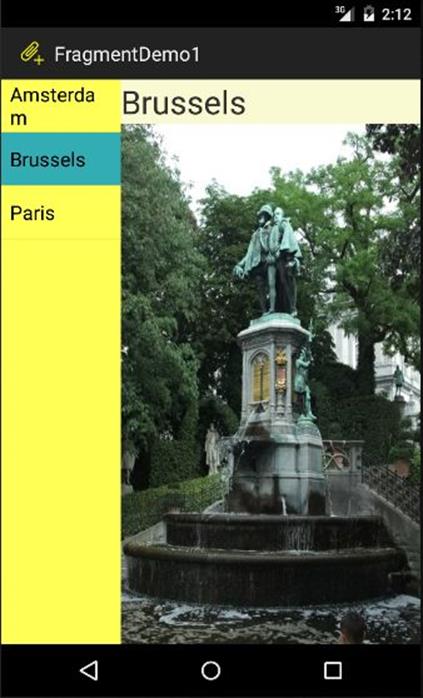
Figure 13.2: Using fragments
The manifest for the application is printed in Listing 13.1.
Listing 13.1: The AndroidManifest.xml file for FragmentDemo1
<?xml version="1.0" encoding="utf-8"?>
<manifest xmlns:android="http://schemas.android.com/apk/res/android"
package="com.example.fragmentdemo1"
android:versionCode="1"
android:versionName="1.0" >
<uses-sdk
android:minSdkVersion="18"
android:targetSdkVersion="18" />
<application
android:allowBackup="true"
android:icon="@drawable/ic_launcher"
android:label="@string/app_name"
android:theme="@style/AppTheme">
<activity
android:name="com.example.fragmentdemo1.MainActivity"
android:label="@string/app_name" >
<intent-filter>
<action android:name="android.intent.action.MAIN"/>
<category android:name="android.intent.category.LAUNCHER"/>
</intent-filter>
</activity>
</application>
</manifest>
Nothing extraordinary here. It simply declares an activity for the application.
You use a fragment as you would a view or a widget, by declaring it in an activity’s layout file or by programmatically adding one. For FragmentDemo1, two fragments are added to the layout of the application’s main activity. The layout file is shown in Listing 13.2.
Listing 13.2: The layout file for the main activity (activity_main.xml)
<LinearLayout
xmlns:android="http://schemas.android.com/apk/res/android"
android:orientation="horizontal"
android:layout_width="match_parent"
android:layout_height="match_parent">
<fragment
android:name="com.example.fragmentdemo1.NamesFragment"
android:id="@+id/namesFragment"
android:layout_weight="1"
android:layout_width="0dp"
android:layout_height="match_parent" />
<fragment
android:name="com.example.fragmentdemo1.DetailsFragment"
android:id="@+id/detailsFragment"
android:layout_weight="2.5"
android:layout_width="0dp"
android:layout_height="match_parent" />
</LinearLayout>
The layout for the main activity uses a horizontal LinearLayout that splits the screen into two panes. The ratio of the pane widths is 1:2.5, as defined by the layout_weight attributes of the fragment elements. Each pane is filled with a fragment. The first pane is represented by theNamesFragment class and the second pane by the DetailsFragment class.
The first fragment, NamesFragment, gets its layout from the fragment_names.xml file in Listing 13.3. This file is located in the res/layout folder.
Listing 13.3: The fragment_names.xml file
<ListView
xmlns:android="http://schemas.android.com/apk/res/android"
android:id="@+id/listView1"
android:layout_width="wrap_content"
android:layout_height="wrap_content"
android:background="#FFFF55"/>
The layout of NamesFragment is very simple. It contains a single view that is a ListView. The layout is loaded in the onCreateView method of the fragment class (See Listing 13.4).
Listing 13.4: The NamesFragment class
package com.example.fragmentdemo1;
import android.app.Activity;
import android.app.Fragment;
import android.os.Bundle;
import android.view.LayoutInflater;
import android.view.View;
import android.view.ViewGroup;
import android.widget.AdapterView;
import android.widget.ArrayAdapter;
import android.widget.ListView;
public class NamesFragment extends Fragment {
@Override
public View onCreateView(LayoutInflater inflater,
ViewGroup container, Bundle savedInstanceState) {
final String[] names = {"Amsterdam", "Brussels", "Paris"};
// use android.R.layout.simple_list_item_activated_1
// to have the selected item in a different color
ArrayAdapter<String> adapter = new ArrayAdapter<String>(
getActivity(),
android.R.layout.simple_list_item_activated_1,
names);
View view = inflater.inflate(R.layout.fragment_names,
container, false);
final ListView listView = (ListView) view.findViewById(
R.id.listView1);
listView.setChoiceMode(ListView.CHOICE_MODE_SINGLE);
listView.setOnItemClickListener(new
AdapterView.OnItemClickListener() {
@Override
public void onItemClick(AdapterView<?> parent,
final View view, int position, long id) {
if (callback != null) {
callback.onItemSelected(names[position]);
}
}
});
listView.setAdapter(adapter);
return view;
}
public interface Callback {
public void onItemSelected(String id);
}
private Callback callback;
@Override
public void onAttach(Activity activity) {
super.onAttach(activity);
if (activity instanceof Callback) {
callback = (Callback) activity;
}
}
@Override
public void onDetach() {
super.onDetach();
callback = null;
}
}
The NamesFragment class defines a Callback interface that its activity must implement to listen to the item selection event of its ListView. The activity can then use it to drive the second fragment. The onAttach method makes sure that the implementing class is an Activity.
The second fragment, DetailsFragment, has a layout file that is given in Listing 13.5. It contains a TextView and an ImageView. The TextView displays the name of the selected city and the ImageView shows the picture of the selected city.
Listing 13.5: The fragment_details.xml file
<LinearLayout
xmlns:android="http://schemas.android.com/apk/res/android"
android:orientation="vertical"
android:background="#FAFAD2"
android:layout_width="match_parent"
android:layout_height="match_parent">
<TextView
android:id="@+id/text1"
android:layout_width="wrap_content"
android:layout_height="wrap_content"
android:textSize="30sp"/>
<ImageView
android:id="@+id/imageView1"
android:layout_width="match_parent"
android:layout_height="match_parent"/>
</LinearLayout>
The DetailsFragment class in shown in Listing 13.6. It has a showDetails method that the containing activity can call to change the content of the TextView and ImageView.
Listing 13.6: The DetailsFragment class
package com.example.fragmentdemo1;
import android.app.Fragment;
import android.os.Bundle;
import android.view.LayoutInflater;
import android.view.View;
import android.view.ViewGroup;
import android.widget.ImageView;
import android.widget.ImageView.ScaleType;
import android.widget.TextView;
public class DetailsFragment extends Fragment {
@Override
public View onCreateView(LayoutInflater inflater,
ViewGroup container, Bundle savedInstanceState) {
return inflater.inflate(R.layout.fragment_details,
container, false);
}
public void showDetails(String name) {
TextView textView = (TextView)
getView().findViewById(R.id.text1);
textView.setText(name);
ImageView imageView = (ImageView) getView().findViewById(
R.id.imageView1);
imageView.setScaleType(ScaleType.FIT_XY); // stretch image
if (name.equals("Amsterdam")) {
imageView.setImageResource(R.drawable.amsterdam);
} else if (name.equals("Brussels")) {
imageView.setImageResource(R.drawable.brussels);
} else if (name.equals("Paris")) {
imageView.setImageResource(R.drawable.paris);
}
}
}
The activity class for FragmentDemo1 is presented in Listing 13.7.
Listing 13.7: The activity class for FragmentDemo1
package com.example.fragmentdemo1;
import android.app.Activity;
import android.os.Bundle;
public class MainActivity extends Activity
implements NamesFragment.Callback {
@Override
protected void onCreate(Bundle savedInstanceState) {
super.onCreate(savedInstanceState);
setContentView(R.layout.activity_main);
}
@Override
public void onItemSelected(String value) {
DetailsFragment details = (DetailsFragment)
getFragmentManager().findFragmentById(
R.id.detailsFragment);
details.showDetails(value);
}
}
The most important thing to note is that the activity class implements NamesFragment.Callback so that it can capture the item click event in the fragment. The onItemSelected method is an implementation for the Callback interface. It calls the showDetails method in the second fragment to change the text and picture of the selected city.
Extending ListFragment and Using FragmentManager
FragmentDemo1 showed how you could add a fragment to an activity using the fragment element in the activity’s layout file. In the second sample application, FragmentDemo2, you will learn how to add a fragment to an activity programmatically.
FragmentDemo2 is similar in functionality to its predecessor with a few differences. The first difference pertains to how the name and the picture of a selected city are updated. In FragmentDemo1, the containing activity calls the showDetails method in the second fragment, passing the city name. In FragmentDemo2, when a city is selected, the activity creates a new instance of DetailsFragment and uses it to replace the old instance.
The second difference is the fact that the first fragment extends ListFragment instead of Fragment. ListFragment is a subclass of Fragment and contains a ListView that fills its entire view. When subclassing ListFragment, you should override its onCreate method and call itssetListAdapter method. This is demonstrated in the NamesListFragment class in Listing 13.8.
Listing 13.8: The NamesListFragment class
package com.example.fragmentdemo2;
import android.app.Activity;
import android.app.ListFragment;
import android.os.Bundle;
import android.view.View;
import android.widget.AdapterView;
import android.widget.ArrayAdapter;
import android.widget.ListView;
/* we don't need fragment_names-xml anymore */
public class NamesListFragment extends ListFragment {
final String[] names = {"Amsterdam", "Brussels", "Paris"};
@Override
public void onCreate(Bundle savedInstanceState) {
super.onCreate(savedInstanceState);
ArrayAdapter<String> adapter = new ArrayAdapter<String>(
getActivity(),
android.R.layout.simple_list_item_activated_1,
names);
setListAdapter(adapter);
}
@Override
public void onViewCreated(View view,
Bundle savedInstanceState) {
// ListView can only be accessed here, not in onCreate()
super.onViewCreated(view, savedInstanceState);
ListView listView = getListView();
listView.setChoiceMode(ListView.CHOICE_MODE_SINGLE);
listView.setOnItemClickListener(new
AdapterView.OnItemClickListener() {
@Override
public void onItemClick(AdapterView<?> parent,
final View view, int position, long id) {
if (callback != null) {
callback.onItemSelected(names[position]);
}
}
});
}
public interface Callback {
public void onItemSelected(String id);
}
private Callback callback;
@Override
public void onAttach(Activity activity) {
super.onAttach(activity);
if (activity instanceof Callback) {
callback = (Callback) activity;
}
}
@Override
public void onDetach() {
super.onDetach();
callback = null;
}
}
Like the NamesFragment class in FragmentDemo1, the NamesListFragment class in FragmentDemo2 also defines a Callback interface that a containing activity must implement to listen to the ListView’s OnItemClick event.
The second fragment, DetailsFragment in Listing 13.9, expects its activity to pass two arguments, a name and an image ID. In its onCreate method, the fragment retrieves these arguments and store them in class level variables, name and imageId. The values of the variables are then used in its onCreateView method to populate its TextView and ImageView.
Listing 13.9: The DetailsFragment class
package com.example.fragmentdemo2;
import android.app.Fragment;
import android.os.Bundle;
import android.view.LayoutInflater;
import android.view.View;
import android.view.ViewGroup;
import android.widget.ImageView;
import android.widget.ImageView.ScaleType;
import android.widget.TextView;
public class DetailsFragment extends Fragment {
int imageId;
String name;
public DetailsFragment() {
}
@Override
public void onCreate(Bundle savedInstanceState) {
super.onCreate(savedInstanceState);
if (getArguments().containsKey("name")) {
name = getArguments().getString("name");
}
if (getArguments().containsKey("imageId")) {
imageId = getArguments().getInt("imageId");
}
}
@Override
public View onCreateView(LayoutInflater inflater,
ViewGroup container, Bundle savedInstanceState) {
View rootView = inflater.inflate(
R.layout.fragment_details, container, false);
TextView textView = (TextView)
rootView.findViewById(R.id.text1);
textView.setText(name);
ImageView imageView = (ImageView) rootView.findViewById(
R.id.imageView1);
imageView.setScaleType(ScaleType.FIT_XY); //stretch image
imageView.setImageResource(imageId);
return rootView;
}
}
Now that you have looked at the fragments, take a close look at the activity. The layout file is given in Listing 13.10. Instead of two fragment elements like in FragmentDemo1, the activity layout file in FragmentDemo2 has a fragment element and a FrameLayout. The latter acts as the container for the second fragment.
Listing 13.10: The activity_main.xml file
<LinearLayout
xmlns:android="http://schemas.android.com/apk/res/android"
android:orientation="horizontal"
android:layout_width="match_parent"
android:layout_height="match_parent">
<fragment
android:name="com.example.fragmentdemo2.NamesListFragment"
android:id="@+id/namesFragment"
android:layout_weight="1"
android:layout_width="0dp"
android:layout_height="match_parent"/>
<FrameLayout
android:id="@+id/details_container"
android:layout_width="0dp"
android:layout_height="match_parent"
android:layout_weight="2.5"/>
</LinearLayout>
The activity class for FragmentDemo2 is given in Listing 13.11. Like the activity class in FragmentDemo1, it also implements the Callback interface. However, its implementation of the onItemSelected method is different. First, it passes two arguments to the DetailsFragment. Second, every time onItemSelected is called, a new DetailsFragment instance is created and passed to the FrameLayout.
Listing 13.11: The MainActivity class
package com.example.fragmentdemo2;
import android.app.Activity;
import android.app.FragmentManager;
import android.app.FragmentTransaction;
import android.os.Bundle;
public class MainActivity extends Activity
implements NamesListFragment.Callback {
@Override
protected void onCreate(Bundle savedInstanceState) {
super.onCreate(savedInstanceState);
setContentView(R.layout.activity_main);
}
@Override
public void onItemSelected(String value) {
Bundle arguments = new Bundle();
arguments.putString("name", value);
if (value.equals("Amsterdam")) {
arguments.putInt("imageId", R.drawable.amsterdam);
} else if (value.equals("Brussels")) {
arguments.putInt("imageId", R.drawable.brussels);
} else if (value.equals("Paris")) {
arguments.putInt("imageId", R.drawable.paris);
}
DetailsFragment fragment = new DetailsFragment();
fragment.setArguments(arguments);
FragmentManager fragmentManager = getFragmentManager();
FragmentTransaction fragmentTransaction =
fragmentManager.beginTransaction();
fragmentTransaction.replace(
R.id.details_container, fragment);
fragmentTransaction.commit();
}
}
Figure 13.3 shows FragmentDemo2.
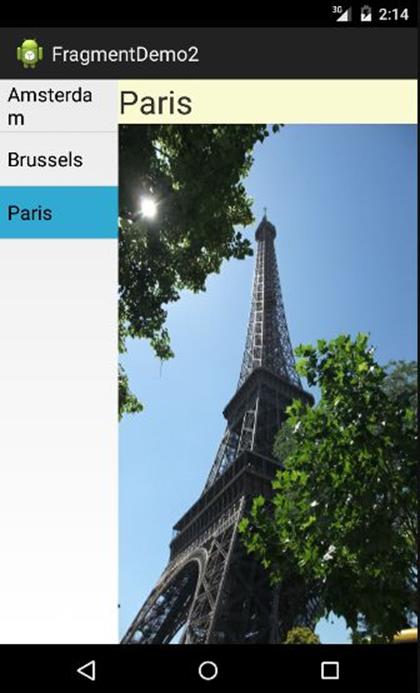
Figure 13.3: FragmentDemo2
Summary
Fragments are components that can be added to an activity. A fragment has its own lifecycle and has methods that get called when certain phases of its life occur. In this chapter you have learned to write your own fragments.
All materials on the site are licensed Creative Commons Attribution-Sharealike 3.0 Unported CC BY-SA 3.0 & GNU Free Documentation License (GFDL)
If you are the copyright holder of any material contained on our site and intend to remove it, please contact our site administrator for approval.
© 2016-2026 All site design rights belong to S.Y.A.