Android Application Development: A Beginner's Tutorial (2015)
Chapter 14. Multi-Pane Layouts
An Android tablet generally has a larger screen than that of a handset. In many cases, you might want to take advantage of the bigger screen in tablets to display more information by using a multi-pane layout.
This chapter discusses multi-pane layouts using fragments that you learned in Chapter 13, “Fragments.”
Overview
A tablet has a larger screen than a handset and you can display more information on a tablet than on a handset. If you are writing an application that needs to look good on both types of devices, a common strategy is to support two layouts. A single-pane layout can be used for handsets and a multi-pane layout for tablets.
Figure 14.1 shows a dual-pane version of an application and Figure 14.2 shows the same application in single-pane mode.
In a single layout, you would display an activity that often contains a single fragment, which in turn often contains a ListView. Selecting an item on the ListView would start another activity.
In a multi-pane layout, you would have an activity that is big enough for two panes. You would use the same fragment, but this time when an item is selected, it updates a second fragment instead of starting another activity.
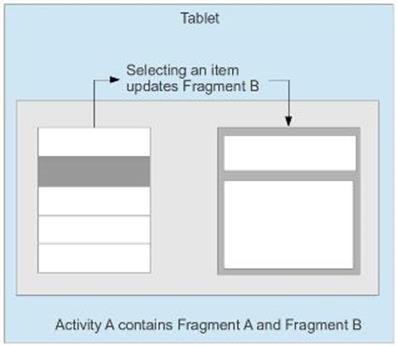
Figure 14.1: Dual-pane layout
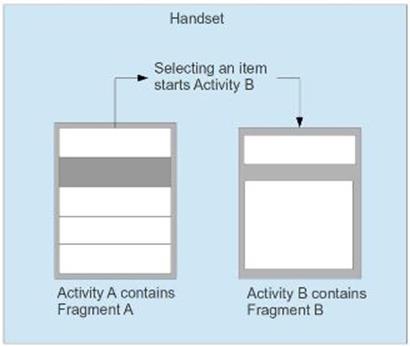
Figure 14.2: Single-pane layout
The question is, how do you tell the system to pick the right layout? Prior to Android 3.2 (API level 13) a screen may fall into one of these categories depending on its size:
§ small, for screens that are at least 426dp x 320dp
§ normal, for screens that are at least 470dp x 320dp
§ large, for screens that are at least 640dp x 480dp
§ xlarge, for screens that are at least 960dp x 720dp
Here, dp stands for density independent pixel. You can calculate the number of pixels (px) from the dp and the screen density (in dots per inch or dpi) by using this formula.
px = dp * (dpi / 160)
To support a screen category, you would place your layout files in the folder dedicated to that category, that is res/layout-small for small screens, res/layout for normal screens, res/layout-large for large screens, and res/layout-xlarge for xlarge screens. To support both normal and large screens, you would have layout files in both res/layout and res/layout-large directories.
The system is not without limitations, however. For example, a 7” tablet and a 10” tablet would both fall into the xlarge category, even though they provide different amounts of space. To allow for different layouts for 7” and 10” tablets, Android 3.2 changed the way it worked. Instead of the four screen sizes, Android 3.2 and later employ a new technique that measures the screen based on the amount of space in dp, rather than trying to make the layout fit the generalized size groups.
With the new system, it is easy to provide different layouts for tablets with a 600dp screen width (such as in a typical 7” tablet) and tablets with a 720dp screen width (such as in a typical 10” tablet). A typical handset, by the way, has a 320dp screen width.
Now, to support large screen devices for both pre-3.2 devices and later devices, you need to store layout files in both res/layout-large and res/layout-sw600dp directories. In other words, for each layout you end up with three files (assuming your layout file is called main.xml):
§ res/layout/main.xml for normal screens
§ res/layout-large/main.xml for devices running pre-3.2 Android having a large screen
§ res/layout-sw600dp/main.xml for devices running Android 3.2 or later having a large screen
In addition, if your application has a different screen for 10” tablets, you will also need a res/layout-sw720dp/main.xml file.
The main.xml files in the layout-large and layout-sw600dp directories are identical and having duplicates that both have to be changed if one of them was updated is certainly a maintenance nightmare.
To get around it, you can use references. With references, you only need two layout files, one for normal screens and one for large screens, both in the res/layout directory. Assuming the names of your layout files are main.xml and main_large.xml, to reference the latter, you need to have a refs.xml file in both res/values-large and res/values-sw600dp. The content of refs.xml would be as follows.
<resources>
<item name="main" type="layout">@layout/main_large</item>
</resources>
Figure 14.3 shows the content of the res directory.
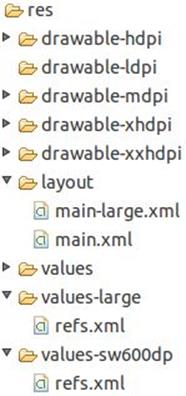
Figure 14.3: The structure of the res directory that supports layout references
This way, you still have two identical files, the refs.xml file in the values-large directory and the refs.xml file in the values-sw600dp directory. However, these are reference files that do not need to be updated if the layout changes.
A Multi-Pane Example
MultiPaneDemo is an application that supports small and large screens. For large screens it shows an activity that uses a multi-pane layout consisting of two fragments. For smaller screens, another activity will be shown that contains only one fragment.
The easiest way to create a multi-pane application is by using Android Studio. As usual, you would use the New Android Application wizard as described in Chapter 1, “Getting Started.” However, instead of creating a blank activity as in Chapter 1, you should select Master/Detail Flow, as shown in Figure 14.4.
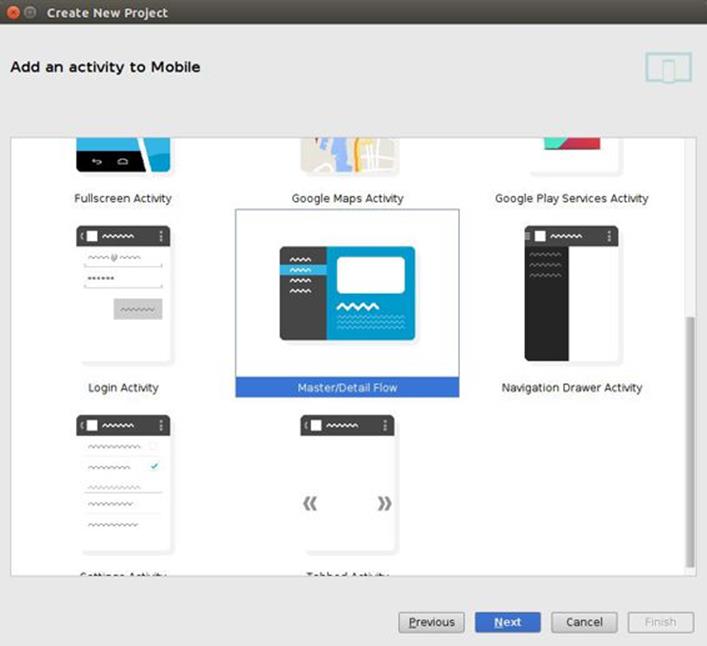
Figure 14.4: Selecting Master/Detail Flow activity
After you reach the window in Figure 14.4, click Next. In the window that appears next (See Figure 14.5), select the name for your item(s) and click Finish.
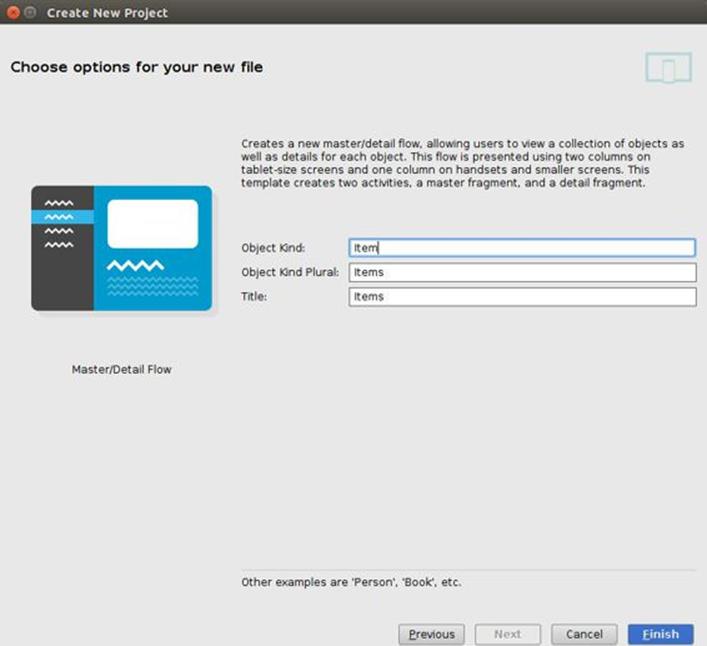
Figure 14.5: Choosing names for the items
Android Studio supports multi-pane/single-pane layouts by creating two versions of the layout file for the main activity. The single-pane version is stored in the res/layout directory and the multi-pane version in the res/layout-sw600dp directory. When the application is launched, the main activity automatically selects the correct layout file depending on the screen resolution.
Android Studio also creates a multi-pane application that supports Android 3.0 and later as well as pre-3.0 Android. If you don’t need to support older devices, however, you can remove the support classes. The advantage is you will have an apk file that is about 30KB lighter.
The AndroidManifest.xml file for the application is given in Listing 14.1.
Listing 14.1: The AndroidManifest.xml file
<?xml version="1.0" encoding="utf-8"?>
<manifest xmlns:android="http://schemas.android.com/apk/res/android"
package="com.example.multipanedemo"
android:versionCode="1"
android:versionName="1.0" >
<uses-sdk
android:minSdkVersion="18"
android:targetSdkVersion="18" />
<application
android:allowBackup="true"
android:icon="@drawable/ic_launcher"
android:label="@string/app_name"
android:theme="@style/AppTheme" >
<activity
android:name=".ItemListActivity"
android:label="@string/app_name" >
<intent-filter>
<action android:name="android.intent.action.MAIN" />
<category
android:name="android.intent.category.LAUNCHER" />
</intent-filter>
</activity>
<activity
android:name=".ItemDetailActivity"
android:label="@string/title_item_detail"
android:parentActivityName=".ItemListActivity" >
<meta-data
android:name="android.support.PARENT_ACTIVITY"
android:value=".ItemListActivity" />
</activity>
</application>
</manifest>
The application has two activities. The main activity is used in both single-pane and multi-pane environments. The second activity is used in the single-pane environment only.
The Layouts and Activities
As you can see in the manifest, the ItemListActivity class is the activity class that will be instantiated when the application is launched. This class is shown in Listing 14.2.
Listing 14.2: The ItemListActivity class
package com.example.multipanedemo;
import android.app.Activity;
import android.content.Intent;
import android.os.Bundle;
public class ItemListActivity extends Activity
implements ItemListFragment.Callbacks {
private boolean twoPane;
@Override
protected void onCreate(Bundle savedInstanceState) {
super.onCreate(savedInstanceState);
setContentView(R.layout.activity_item_list);
if (findViewById(R.id.item_detail_container) != null) {
twoPane = true;
// In two-pane mode, list items should be given the
// 'activated' state when touched.
((ItemListFragment) getFragmentManager()
.findFragmentById(R.id.item_list))
.setActivateOnItemClick(true);
}
}
/**
* Callback method from {@link ItemListFragment.Callbacks}
* indicating that the item with the given ID was selected.
*/
@Override
public void onItemSelected(String id) {
if (twoPane) {
Bundle arguments = new Bundle();
arguments.putString(ItemDetailFragment.ARG_ITEM_ID, id);
ItemDetailFragment fragment = new ItemDetailFragment();
fragment.setArguments(arguments);
getFragmentManager().beginTransaction()
.replace(R.id.item_detail_container, fragment)
.commit();
} else {
// In single-pane mode, simply start the detail activity
// for the selected item ID.
Intent detailIntent = new Intent(this, ItemDetailActivity.class);
detailIntent.putExtra(ItemDetailFragment.ARG_ITEM_ID, id);
startActivity(detailIntent);
}
}
}
The onCreate method in ItemListActivity loads the layout indicated by layout identifier R.layout.activity_item_list.
protected void onCreate(Bundle savedInstanceState) {
super.onCreate(savedInstanceState);
setContentView(R.layout.activity_item_list);
...
In devices with smaller screens, the res/layout/activity_item_list.xml will be loaded. In devices with larger screens, the system will try to locate the activity_item_list.xml file in either the res/layout-large or res/layout-sw600dp directory.
The multi-pane activity_item_list.xml file in res/layout/sw600dp is used in devices with a large screen. This layout file is presented in Listing 14.3.
Listing 14.3: The res/layout-sw600dp/activity_item_list.xml file (multi-pane)
<LinearLayout
xmlns:android="http://schemas.android.com/apk/res/android"
xmlns:tools="http://schemas.android.com/tools"
android:layout_width="match_parent"
android:layout_height="match_parent"
android:layout_marginLeft="16dp"
android:layout_marginRight="16dp"
android:baselineAligned="false"
android:divider="?android:attr/dividerHorizontal"
android:orientation="horizontal"
android:showDividers="middle"
tools:context=".ItemListActivity">
<!--
This layout is a two-pane layout for the Items
master/detail flow.
-->
<fragment android:id="@+id/item_list"
android:name="com.example.multipanedemo.ItemListFragment"
android:layout_width="0dp"
android:layout_height="match_parent"
android:layout_weight="1"
tools:layout="@android:layout/list_content" />
<FrameLayout android:id="@+id/item_detail_container"
android:layout_width="0dp"
android:layout_height="match_parent"
android:layout_weight="3" />
</LinearLayout>
The activity_item_list.xml layout file features a horizontal LinearLayout that splits the screen into two panes. The left pane consists of a fragment that contains a ListView. The right pane contains a FrameLayout to which instances of another fragment called ItemDetailFragment can be added. Listing 14.4 shows the layout for ItemDetailFragment.
Listing 14.4: The fragment_item_detail.xml file
<TextView xmlns:android="http://schemas.android.com/apk/res/android"
xmlns:tools="http://schemas.android.com/tools"
android:id="@+id/item_detail"
style="?android:attr/textAppearanceLarge"
android:layout_width="match_parent"
android:layout_height="match_parent"
android:padding="16dp"
android:textIsSelectable="true"
tools:context=".ItemDetailFragment" />
For smaller screens, two activities will be used. The main activity will load the activity_item_list.xml layout file in Listing 14.5. This layout contains the same fragment used by the left pane in the multi-pane layout.
Listing 14.5: The res/layout/activity_item_list.xml file (single-pane)
<fragment xmlns:android="http://schemas.android.com/apk/res/android"
xmlns:tools="http://schemas.android.com/tools"
android:id="@+id/item_list"
android:name="com.example.multipanedemo.ItemListFragment"
android:layout_width="match_parent"
android:layout_height="match_parent"
android:layout_marginLeft="16dp"
android:layout_marginRight="16dp"
tools:context=".ItemListActivity"
tools:layout="@android:layout/list_content" />
The Fragment Classes
The two fragment classes are given in Listing 14.6 and Listing 14.7, respectively.
Listing 14.6: The ItemListFragment class
package com.example.multipanedemo;
import android.app.Activity;
import android.os.Bundle;
import android.app.ListFragment;
import android.view.View;
import android.widget.ArrayAdapter;
import android.widget.ListView;
import com.example.multipanedemo.dummy.DummyContent;
public class ItemListFragment extends ListFragment {
private static final String STATE_ACTIVATED_POSITION = "activated_position";
/**
* The fragment's current callback object, which is notified of
* list item clicks.
*/
private Callbacks mCallbacks = sDummyCallbacks;
/**
* The current activated item position. Only used on tablets.
*/
private int mActivatedPosition = ListView.INVALID_POSITION;
/**
* A callback interface that all activities containing this
* fragment must implement. This mechanism allows
* activities to be notified of item selections.
*/
public interface Callbacks {
/**
* Callback for when an item has been selected.
*/
public void onItemSelected(String id);
}
/**
* A dummy implementation of the {@link Callbacks} interface
* that does nothing. Used only when this fragment is not
* attached to an activity.
*/
private static Callbacks sDummyCallbacks = new Callbacks() {
@Override
public void onItemSelected(String id) {
}
};
/**
* Mandatory empty constructor for the fragment manager to
* instantiate the fragment (e.g. upon screen orientation
* changes).
*/
public ItemListFragment() {
}
@Override
public void onCreate(Bundle savedInstanceState) {
super.onCreate(savedInstanceState);
// TODO: replace with a real list adapter.
setListAdapter(new ArrayAdapter<DummyContent.DummyItem>(
getActivity(),
android.R.layout.simple_list_item_activated_1,
android.R.id.text1,
DummyContent.ITEMS));
}
@Override
public void onViewCreated(View view, Bundle savedInstanceState) {
super.onViewCreated(view, savedInstanceState);
// Restore the previously serialized activated item
// position.
if (savedInstanceState != null
&& savedInstanceState.containsKey(
STATE_ACTIVATED_POSITION)) {
setActivatedPosition(savedInstanceState.getInt(
STATE_ACTIVATED_POSITION));
}
}
@Override
public void onAttach(Activity activity) {
super.onAttach(activity);
// Activities containing this fragment must implement its
// callbacks.
if (!(activity instanceof Callbacks)) {
throw new IllegalStateException(
"Activity must implement fragment's callbacks.");
}
mCallbacks = (Callbacks) activity;
}
@Override
public void onDetach() {
super.onDetach();
// Reset the active callbacks interface to the dummy
// implementation.
mCallbacks = sDummyCallbacks;
}
@Override
public void onListItemClick(ListView listView, View view, int
position, long id) {
super.onListItemClick(listView, view, position, id);
// Notify the active callbacks interface (the activity, if
// the fragment is attached to one) that an item has been
// selected.
mCallbacks.onItemSelected(DummyContent.ITEMS.get(
position).id);
}
@Override
public void onSaveInstanceState(Bundle outState) {
super.onSaveInstanceState(outState);
if (mActivatedPosition != ListView.INVALID_POSITION) {
// Serialize and persist the activated item position.
outState.putInt(STATE_ACTIVATED_POSITION,
mActivatedPosition);
}
}
/**
* Turns on activate-on-click mode. When this mode is on, list
* items will be
* given the 'activated' state when touched.
*/
public void setActivateOnItemClick(boolean activateOnItemClick) {
// When setting CHOICE_MODE_SINGLE, ListView will
// automatically
// give items the 'activated' state when touched.
getListView().setChoiceMode(activateOnItemClick
? ListView.CHOICE_MODE_SINGLE
: ListView.CHOICE_MODE_NONE);
}
private void setActivatedPosition(int position) {
if (position == ListView.INVALID_POSITION) {
getListView().setItemChecked(mActivatedPosition, false);
} else {
getListView().setItemChecked(position, true);
}
mActivatedPosition = position;
}
}
The ItemListFragment class extends ListFragment and gets the data for its ListView from a DummyContent class. It also provides a Callbacks interface that any activity using this fragment must implement to handle the ListItemClick event of the ListView. In the onAttach method, the fragment makes sure the activity class implements Callbacks and replaces the content of mCallbacks with the activity, in effect delegating the event handling to the activity.
Listing 14.7: The ItemDetailFragment class
package com.example.multipanedemo;
import android.os.Bundle;
import android.app.Fragment;
import android.view.LayoutInflater;
import android.view.View;
import android.view.ViewGroup;
import android.widget.TextView;
import com.example.multipanedemo.dummy.DummyContent;
/**
* A fragment representing a single Item detail screen.
* This fragment is either contained in a {@link ItemListActivity}
* in two-pane mode (on tablets) or a {@link ItemDetailActivity}
* on handsets.
*/
public class ItemDetailFragment extends Fragment {
/**
* The fragment argument representing the item ID that this
* fragment represents.
*/
public static final String ARG_ITEM_ID = "item_id";
/**
* The dummy content this fragment is presenting.
*/
private DummyContent.DummyItem mItem;
/**
* Mandatory empty constructor for the fragment manager to
* instantiate the fragment (e.g. upon screen orientation
* changes).
*/
public ItemDetailFragment() {
}
@Override
public void onCreate(Bundle savedInstanceState) {
super.onCreate(savedInstanceState);
if (getArguments().containsKey(ARG_ITEM_ID)) {
// Load the dummy content specified by the fragment
// arguments. In a real-world scenario, use a Loader
// to load content from a content provider.
mItem = DummyContent.ITEM_MAP.get(
getArguments().getString(ARG_ITEM_ID));
}
}
@Override
public View onCreateView(LayoutInflater inflater, ViewGroup
container, Bundle savedInstanceState) {
View rootView =
inflater.inflate(R.layout.fragment_item_detail,
container, false);
// Show the dummy content as text in a TextView.
if (mItem != null) {
((TextView) rootView.findViewById(R.id.item_detail))
.setText(mItem.content);
}
return rootView;
}
}
Running the Application
Figure 14.6 and Figure 14.7 show the MultipaneDemo1 application on a tablet and a handset, respectively.
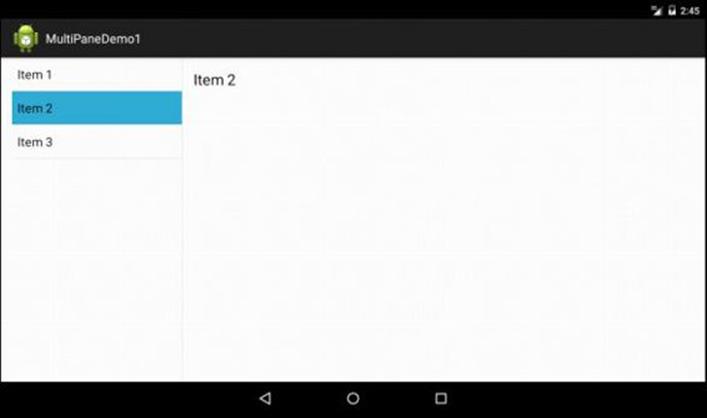
Figure 14.6: Multi-pane layout on a large screen
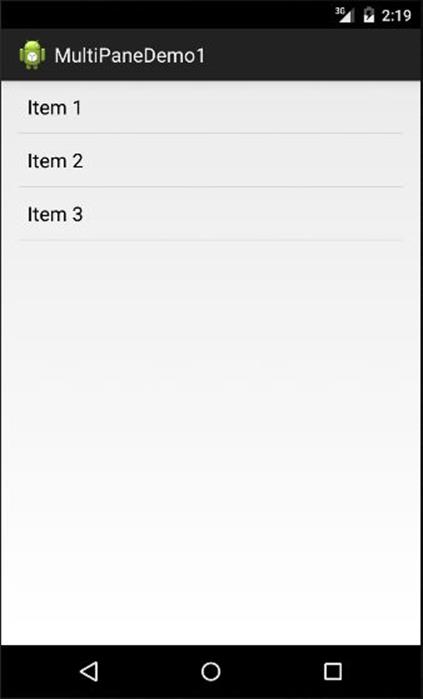
Figure 14.7: Single-pane layout on a small screen
Summary
To give your users the best experience, you may want to use different layouts for different screen sizes. In this chapter, you learned that a good strategy to achieve that is to use a multi-pane layout for tablets and a single-pane layout for handsets.
All materials on the site are licensed Creative Commons Attribution-Sharealike 3.0 Unported CC BY-SA 3.0 & GNU Free Documentation License (GFDL)
If you are the copyright holder of any material contained on our site and intend to remove it, please contact our site administrator for approval.
© 2016-2026 All site design rights belong to S.Y.A.