Android Application Development: A Beginner's Tutorial (2015)
Chapter 20. Making Videos
The easiest way to provide video-making capability in your application is to use a built-in intent to activate an existing activity. However, if you need more than what the default application can provide, you need to get your hands dirty and work with the API directly.
This chapter shows how to use both methods for making videos.
Using the Built-in Intent
If you choose to use the default Camera application for making video, you can activate the application with these three lines of code.
int requestCode = ...;
Intent intent = new Intent(MediaStore.ACTION_VIDEO_CAPTURE);
startActivityForResult(intent, requestCode);
Basically, you need to create an Intent object by passing MediaStore.ACTION_VIDEO_CAPTURE to its constructor and pass it to the startActivityForResult method in your activity class. You can choose any integer for the request code that you will pass as the second argument tostartActivityForResult. This method will pause the current activity and start Camera and make it ready to capture a video.
When you exit from Camera, either by canceling the operation or when you are done making a video, the system will resume your original activity (the activity where you called startActivityForResult) and call its onActivityResult method. If you are interested in saving or processing the captured video, you must override onActivityResult. Its signature is as follows.
protected void onActivityResult(int requestCode, int resultCode, android.content.Intent data)
The system calls onActivityResult by passing three arguments. The first argument, requestCode, is the request code passed when you called startActivityForResult. The request code is important if you are calling other activities from your activity, passing a different request code for each activity. Since you can only have one onActivityResult implementation in your activity, all calls to startActivityForResult will share the same onActivityResult, and you need to know which activity caused onActivityResult to be called by checking the value of the request code.
The second argument to onActivityResult is a result code. The value can be either Activity.RESULT_OK or Activity.RESULT_CANCELED or a user defined value. Activity.RESULT_OK indicates that the operation succeeded and Activity.RESULT_CANCELED indicates that the operation was canceled.
The third argument to onActivityResult contains data from Camera if the operation was successful.
In addition, you need the following uses-feature element in your manifest to indicate that your application needs to use the camera hardware of the device.
<uses-feature android:name="android.hardware.camera"
android:required="true" />
As an example, consider the VideoDemo application that has an activity with a button on its action bar. You can press this button to activate Camera for the purpose of making a video. The VideoDemo application is shown in Figure 20.1.
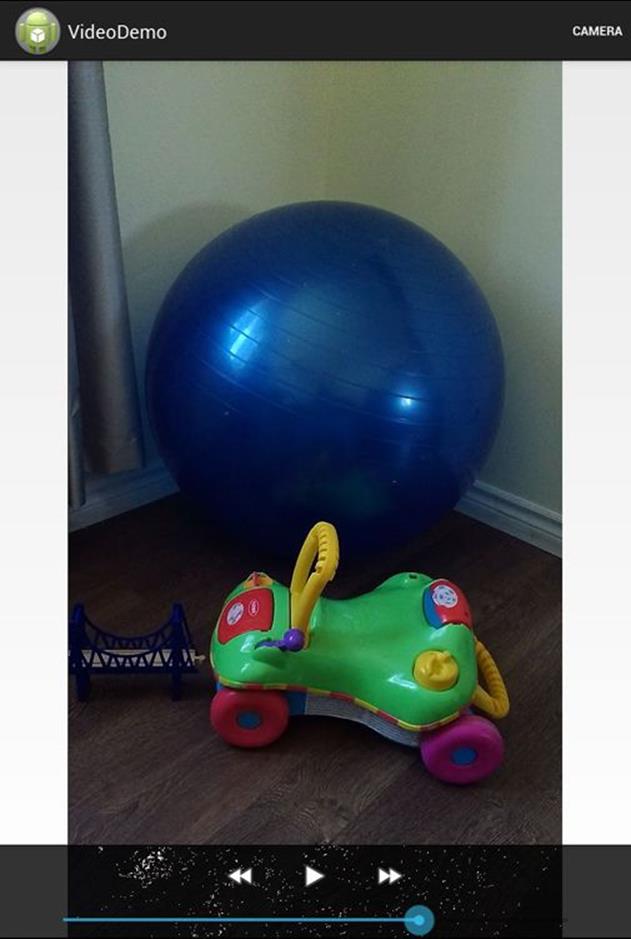
Figure 20.1: VideoDemo
The AndroidManifest.xml file in Listing 20.1 shows the activity used in the application as well as a use-feature element.
Listing 20.1: The AndroidManifest.xml file
<?xml version="1.0" encoding="utf-8"?>
<manifest xmlns:android="http://schemas.android.com/apk/res/android"
package="com.example.videodemo"
android:versionCode="1"
android:versionName="1.0" >
<uses-sdk
android:minSdkVersion="16"
android:targetSdkVersion="19" />
<uses-feature android:name="android.hardware.camera"
android:required="true" />
<application
android:allowBackup="true"
android:icon="@drawable/ic_launcher"
android:label="@string/app_name"
android:theme="@style/AppTheme" >
<activity
android:name="com.example.videodemo.MainActivity"
android:label="@string/app_name">
<intent-filter>
<action android:name="android.intent.action.MAIN" />
<category android:name="android.intent.category.LAUNCHER" />
</intent-filter>
</activity>
</application>
</manifest>
There is only one activity in the application, the MainActivity activity. The activity reads the menu file in Listing 20.2 to populate its action bar.
Listing 20.2: The menu file (menu_main.xml)
<menu xmlns:android="http://schemas.android.com/apk/res/android">
<item
android:id="@+id/action_camera"
android:orderInCategory="100"
android:showAsAction="always"
android:title="@string/action_camera"/>
</menu>
The activity also uses the layout file in Listing 20.3 to set its view. There is only a FrameLayout with a VideoView element that is used to display the video file.
Listing 20.3: The activity_main.xml file
<FrameLayout xmlns:android="http://schemas.android.com/apk/res/android"
android:layout_width="match_parent"
android:layout_height="match_parent" >
<VideoView
android:id="@+id/videoView"
android:layout_width="match_parent"
android:layout_height="match_parent"
android:layout_gravity="center">
</VideoView>
</FrameLayout>
Note that I use a FrameLayout to enclose the VideoView to center it. For some reason, a LinearLayout or a RelativeLayout will not center it.
Finally, the MainActivity class is presented in Listing 20.4. You should know by now that the onOptionsItemSelected method is called when the a menu item is pressed. In short, pressing the Camera button on the action bar calls the showCamera method. showCamera constructs a built-in Intent and passes it to startActivityForResult to activate the video making feature in Camera.
Listing 20.4: The MainActivity class
package com.example.videodemo;
import android.app.Activity;
import android.content.Intent;
import android.net.Uri;
import android.os.Bundle;
import android.provider.MediaStore;
import android.view.Menu;
import android.view.MenuItem;
import android.widget.MediaController;
import android.widget.Toast;
import android.widget.VideoView;
public class MainActivity extends Activity {
private static final int REQUEST_CODE = 200;
@Override
protected void onCreate(Bundle savedInstanceState) {
super.onCreate(savedInstanceState);
setContentView(R.layout.activity_main);
}
@Override
public boolean onCreateOptionsMenu(Menu menu) {
getMenuInflater().inflate(R.menu.menu_main, menu);
return true;
}
@Override
public boolean onOptionsItemSelected(MenuItem item) {
switch (item.getItemId()) {
case R.id.action_camera:
showCamera();
return true;
default:
return super.onContextItemSelected(item);
}
}
private void showCamera() {
// cannot set the video file
Intent intent = new Intent(
MediaStore.ACTION_VIDEO_CAPTURE);
// check if the device has a camera:
if (intent.resolveActivity(getPackageManager()) != null) {
startActivityForResult(intent, REQUEST_CODE);
} else {
Toast.makeText(this, "Opening camera failed",
Toast.LENGTH_LONG).show();
}
}
@Override
protected void onActivityResult(int requestCode,
int resultCode, Intent data) {
if (requestCode == REQUEST_CODE) {
if (resultCode == RESULT_OK) {
if (data != null) {
Uri uri = data.getData();
VideoView videoView = (VideoView)
findViewById(R.id.videoView);
videoView.setVideoURI(uri);
videoView.setMediaController(
new MediaController(this));
videoView.requestFocus();
}
} else if (resultCode == RESULT_CANCELED) {
Toast.makeText(this, "Action cancelled",
Toast.LENGTH_LONG).show();
} else {
Toast.makeText(this, "Error", Toast.LENGTH_LONG)
.show();
}
}
}
}
What is interesting is the implementation of the onActivityResult method, which gets called when the user leaves Camera. If the result code is RESULT_OK and data is not null, the method calls the getData method on data to get a Uri pointing to the location of the video. Next, it finds theVideoView widget and set its videoURI property and calls two other methods on the VideoView, setMediaController and requestFocus.
protected void onActivityResult(int requestCode,
int resultCode, Intent data) {
if (requestCode == REQUEST_CODE) {
if (resultCode == RESULT_OK) {
if (data != null) {
Uri uri = data.getData();
VideoView videoView = (VideoView)
findViewById(R.id.videoView);
videoView.setVideoURI(uri);
videoView.setMediaController(
new MediaController(this));
videoView.requestFocus();
}
...
Passing a MediaController decorates the VideoView with a media controller that can be used to play and stop the video. Calling requestFocus() on the VideoView sets focus on the widget.
MediaRecorder
If you choose to deal with the API directly rather than using the Camera to provide your application with video-making capability, you need to know the details of MediaRecorder.
The android.media.MediaRecorder class can be used to record audio and video. Figure 20.2 shows the various states a MediaRecord can be in.
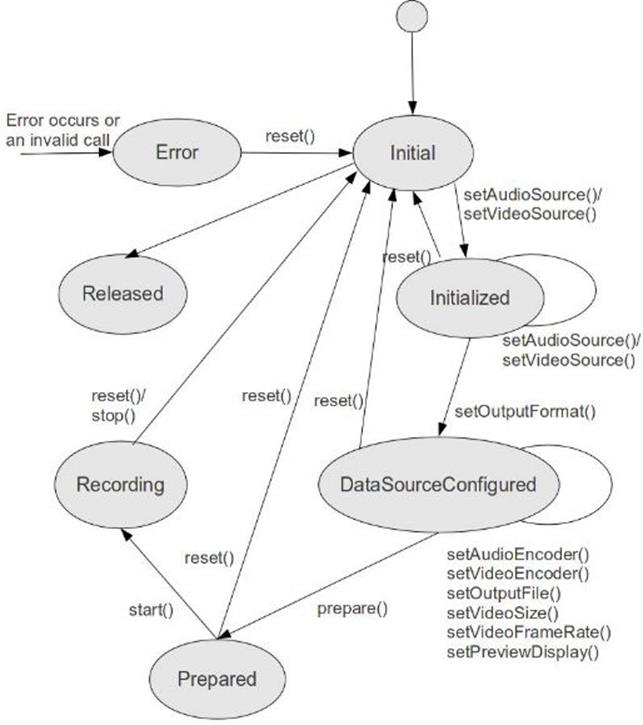
Figure 20.2: The MediaRecorder state diagram
To capture a video with a MediaRecorder, of course you need an instance of it. So, the first thing to do is to create a MediaRecorder.
MediaRecorder mediaRecorder = new MediaRecorder();
Then, as you can see in Figure 20.2, to record a video, you have to bring the MediaRecorder to the Initialized state, followed by the DataSourceConfigured and Prepared states by calling certain methods.
To transition a MediaRecorder to the Initialized state, call the setAudioSource and setVideoSource methods to set the audio and video sources. The valid value for setAudioSource is one of the fields defined in the MediaRecorder.AudioSource class, which are CAMCORDER,DEFAULT, MIC, REMOTE_SUBMIX, VOICE_CALL, VOICE_COMMUNICATION, VOICE_DOWNLINK, VOICE_RECOGNITION, and VOICE_UPLINK.
The valid value for setVideoSource is one of the fields in the MediaRecorder.VideoSource class, which are CAMERA and DEFAULT.
Once the MediaRecorder is in the Initialized state, call its setOutputFormat method, passing one of the file formats in the MediaRecorder.OutputFormat class. The following fields are defined: AAC_ADTS, AMR_NB, AMR_WB, DEFAULT, MPEG_4, RAW_AMR, andTHREE_GPP.
Successfully calling setOutputFormat brings the MediaRecorder to the DataSourceConfigured state. You just need to call prepare to prepare the MediaRecorder.
To start recording, call the start method. It will keep recording until stop is called or an error occurs. An error may occur if the MediaRecorder runs out of space to store video or if a specified maximum record time is exceeded.
Once you stop a MediaRecorder, it goes back to the initial state. You must take it through the previous three states again to record another video.
Also note that a MediaRecorder uses a lot of resources and it is prudent to release the resources by calling its release method if the MediaRecorder is not being used. For example, you should release the MediaRecorder when the activity is paused. Once a MediaRecorder is released, the same instance cannot be reused to record another video.
Using MediaRecorder
The VideoRecorder application demonstrates how to use the MediaRecorder to record a video. It has one activity that contains a button and a SurfaceView. The button is used to start and stop recording whereas the SurfaceView for displaying what the camera sees. SurfaceView was explained in detail in Chapter 19, “Taking Pictures.”
The layout file for the activity is shown in Listing 20.5 and the activity class in Listing 20.6.
Listing 20.5: The layout file (activity_main.xml)
<LinearLayout xmlns:android="http://schemas.android.com/apk/res/android"
android:orientation="vertical"
android:layout_width="fill_parent"
android:layout_height="fill_parent">
<Button
android:id="@+id/button1"
android:layout_width="wrap_content"
android:layout_height="wrap_content"
android:layout_marginLeft="33dp"
android:layout_marginTop="22dp"
android:onClick="startStopRecording"
android:text="@string/button_start" />
<SurfaceView
android:id="@+id/surfaceView"
android:layout_width="match_parent"
android:layout_height="match_parent" />
</LinearLayout>
Listing 20.6: The MainActivity class
package com.example.videorecorder;
import java.io.File;
import java.io.IOException;
import android.app.Activity;
import android.media.MediaRecorder;
import android.os.Bundle;
import android.os.Environment;
import android.view.SurfaceHolder;
import android.view.SurfaceView;
import android.view.View;
import android.widget.Button;
public class MainActivity extends Activity {
private MediaRecorder mediaRecorder;
private File outputDir;
private boolean recording = false;
@Override
public void onCreate(Bundle savedInstanceState) {
super.onCreate(savedInstanceState);
File moviesDir = Environment
.getExternalStoragePublicDirectory(
Environment.DIRECTORY_MOVIES);
outputDir = new File(moviesDir,
"VideoRecorder");
outputDir.mkdirs();
setContentView(R.layout.activity_main);
}
@Override
protected void onResume() {
super.onResume();
mediaRecorder = new MediaRecorder();
initAndConfigureMediaRecorder();
}
@Override
protected void onPause() {
super.onPause();
if (recording) {
try {
mediaRecorder.stop();
} catch (IllegalStateException e) {
}
}
releaseMediaRecorder();
Button button = (Button) findViewById(R.id.button1);
button.setText("Start");
recording = false;
}
private void releaseMediaRecorder() {
if (mediaRecorder != null) {
mediaRecorder.reset();
mediaRecorder.release();
mediaRecorder = null;
}
}
private void initAndConfigureMediaRecorder() {
mediaRecorder.setAudioSource(
MediaRecorder.AudioSource.CAMCORDER);
mediaRecorder
.setVideoSource(MediaRecorder.VideoSource.CAMERA);
mediaRecorder.setOutputFormat(
MediaRecorder.OutputFormat.MPEG_4);
mediaRecorder.setVideoFrameRate(10);// make it very low
mediaRecorder.setVideoEncoder(
MediaRecorder.VideoEncoder.MPEG_4_SP);
mediaRecorder.setAudioEncoder(
MediaRecorder.AudioEncoder.AMR_NB);
String outputFile = new File(outputDir,
System.currentTimeMillis() + ".mp4")
.getAbsolutePath();
mediaRecorder.setOutputFile(outputFile);
SurfaceView surfaceView = (SurfaceView)
findViewById(R.id.surfaceView);
SurfaceHolder surfaceHolder = surfaceView.getHolder();
mediaRecorder.setPreviewDisplay(surfaceHolder
.getSurface());
}
public void startStopRecording(View view) {
Button button = (Button) findViewById(R.id.button1);
if (recording) {
button.setText("Start");
try {
mediaRecorder.stop();
} catch (IllegalStateException e) {
}
releaseMediaRecorder();
} else {
button.setText("Stop");
if (mediaRecorder == null) {
mediaRecorder = new MediaRecorder();
initAndConfigureMediaRecorder();
}
// prepare MediaRecorder
try {
mediaRecorder.prepare();
} catch (IllegalStateException e) {
e.printStackTrace();
} catch (IOException e) {
e.printStackTrace();
}
mediaRecorder.start();
}
recording = !recording;
}
}
Let’s start with the onCreate method. It does an important job which is to create a directory for all videos captured under the default directory for movie files.
File moviesDir = Environment
.getExternalStoragePublicDirectory(
Environment.DIRECTORY_MOVIES);
outputDir = new File(moviesDir,
"VideoRecorder");
outputDir.mkdirs();
The other two important methods are onResume and onPause. In onResume you create a new instance of MediaRecorder and initialize and configure it by calling initAndConfigureMediaRecorder. Why a new instance every time? Because once used, a MediaRecorder cannot be reused.
In onPause, you stop the MediaRecorder if it is recording and call the releaseMediaRecorder method to release the MediaRecorder.
Now, let’s have a look at the initAndConfigureMediaRecorder and releaseMediaRecorder methods.
As the name implies, initAndConfigureMediaRecorder initializes and configures the MediaRecorder created by the onResume method. It calls various methods in MediaRecorder to transition it to the Initialized and DataSourceConfigured states. It also passes the Surface of theSurfaceView to display what the camera sees.
SurfaceView surfaceView = (SurfaceView)
findViewById(R.id.surfaceView);
SurfaceHolder surfaceHolder = surfaceView.getHolder();
mediaRecorder.setPreviewDisplay(surfaceHolder
.getSurface());
In this state, the MediaRecorder just waits until the user presses the Start button. When it happens, the startStopRecording method is called, which in turn calls the prepare and start methods on the MediaRecorder. It also changes the Start button to a Stop button.
When the user presses the Stop button, the MediaRecorder’s stop method is called and the MediaRecorder is released. The Stop button is changed back to a Start button, waiting for another turn.
Summary
Two methods are available if you want to equip your application with video-making capability. The first, the easy one, is by creating the default intent and passing it to startActivityForResult. The second method is to use MediaRecorder directly. This method is harder but brings with it the full features of the device camera.
This chapter showed how to use both methods to make video.
All materials on the site are licensed Creative Commons Attribution-Sharealike 3.0 Unported CC BY-SA 3.0 & GNU Free Documentation License (GFDL)
If you are the copyright holder of any material contained on our site and intend to remove it, please contact our site administrator for approval.
© 2016-2026 All site design rights belong to S.Y.A.